

Page 1

User Guide for Avaya Video Collaboration
Solution for IP Office
Version 8.3
For Avaya IP Office 8.1
March 2014
Page 2

© 2000-2014 Avaya Inc. All intellectual property rights in
this publication are owned by Avaya Inc. and are
protected by United States copyright laws, other
applicable copyright laws and international treaty
provisions. Avaya Inc. retains all rights not expressly
granted.
All product and company names herein may be
trademarks of their registered owners.
This publication is AVAYA Confidential & Proprietary.
Use pursuant to your signed agreement or Avaya policy.
No part of this publication may be reproduced in any
form whatsoever or used to make any derivative work
without prior written approval by Avaya Inc.
No representation of warranties for fitness for any
purpose other than what is specifically mentioned in this
guide is made either by Avaya Inc. or its agents.
Avaya Inc. reserves the right to revise this publication
and make changes without obligation to notify any
person of such revisions or changes. Avaya Inc may
make improvements or changes in the product(s) and/or
the program(s) described in this documentation at any
time.
If there is any software on removable media described in
this publication, it is furnished under a license agreement
included with the product as a separate document. If you
are unable to locate a copy, please contact Avaya Inc
and a copy will be provided to you.
Unless otherwise indicated, Avaya registered trademarks
are registered in the United States and other territories.
All registered trademarks recognized.
For further information contact Avaya or your local
distributor or reseller.
User Guide for Avaya Video Collaboration Solution for IP
Office Version 8.3, March 13, 2014
http://support.avaya.com
User Guide for Avaya Video Collaboration Solution for IP Office
Version 8.3
Notices | 2
Page 3

Table of Contents
Chapter 1: About the XT Series
About the Built-In MCU .....................................................................................................................................5
Chapter 2: Getting Started
Initial Workflow for XT Series Users .................................................................................................................7
Connecting a Computer to the XT Series .........................................................................................................8
Controlling the XT Series ..................................................................................................................................9
Accessing the XT Series Local Menu .................................................................................................10
About the XT Remote Control Unit .....................................................................................................11
Pairing an XT Remote Control Unit .......................................................................................... 13
Accessing XT Series Web Interface ...................................................................................................14
Configuring Basic Settings with the Quick Setup Wizard ...............................................................................15
Setting the System Name and Language ...........................................................................................16
Adjusting the Image Position ..............................................................................................................17
Configuring Basic Network Settings ...................................................................................................18
Configuring Basic Gatekeeper Settings ............................................................................................. 19
Tips for Participating in a Videoconference ....................................................................................................21
Chapter 3: Starting a New Call
Starting a Meeting ...........................................................................................................................................22
Finding, Changing or Deleting Contacts .........................................................................................................26
Chapter 4: Participating in Meetings
Joining a Meeting from the XT Series Calendar ............................................................................................ 30
Moving the PTZ Camera's Position ................................................................................................................31
Adjusting the Default Volume Settings ...........................................................................................................33
Connecting a Computer to the XT Series .......................................................................................................34
Sharing Computer Content .............................................................................................................................36
Changing Your Own Video Layout .................................................................................................................37
Blocking your own Audio and Video ...............................................................................................................39
User Guide for Avaya Video Collaboration Solution for IP Office
Version 8.3
Table of Contents | 3
Page 4

Blocking All Incoming Calls (DND) .................................................................................................................41
Chapter 5: Recording Meetings
Chapter 6: Moderating Meetings
Moderating a Videoconference .......................................................................................................................46
Changing the Video Layout for all Participants .............................................................................................. 49
Chapter 7: Configuring Advanced User Settings
Setting Call Answering Preferences ...............................................................................................................51
Activating the Screen Saver ...........................................................................................................................52
Setting Recording Preferences .......................................................................................................................53
Setting PIN Codes for the XT Series ..............................................................................................................54
Confirming Call Disconnections ......................................................................................................................55
Chapter 8: Troubleshooting the Avaya Scopia® XT Series
Viewing System Information for Customer Support ....................................................................................... 57
Resolving Monitor Display Problems ..............................................................................................................58
Resolving Problems Viewing Computer Content ........................................................................................... 60
Resolving XT Remote Control Unit Problems ................................................................................................61
Restoring Default User Settings .....................................................................................................................61
Resolving Video or Audio Disruptions ............................................................................................................62
Glossary of Terms for Scopia® Solution
User Guide for Avaya Video Collaboration Solution for IP Office
Version 8.3
Table of Contents | 4
Page 5

Chapter 1 | About the XT Series
The Avaya Scopia® XT Series incorporates state-of-the-art video technology for high definition (HD) conferencing.
You can locally host videoconferences with the built-in MCU. The XT Series seamlessly works with a wide variety of
endpoints, including H.323, SIP, Scopia® Desktop Clients, Scopia® Mobile devices, and ISDN endpoints (via
Scopia® 100 Gateway).
You can use the XT Series as an MCU only, or as an endpoint by connecting a monitor, camera, and microphone.
This section provides an overview of the general features and capabilities available in the XT Series:
•
The XT Series is a dedicated videoconferencing endpoint which can also host its own videoconferences with its
built-in MCU, without requiring an external MCU.
•
Excellent video quality, with resolutions of 720p, and up to 1080p at an unprecedented 60 frames per second
(fps), depending on the license.
•
Support for dual HD video streams, allowing PC presentations to be shared alongside video from the camera in
resolutions of up to 1080p at 60fps, depending on the license.
•
Seamlessly share data and presentations with third-party endpoints.
•
DVD-quality audio with up to 48 kHz sampling rate audio encoding capability. The sampling rate is a measure
of the accuracy of the audio when it is digitized. The XT Series endpoints are shipped with different
microphones depending on the model. You can add dedicated Microphone Pods or additional analog
microphones if required.
•
High quality video and audio even with limited bandwidth or poor network conditions, by using two compression
methods:
–
H.264 Scalable Video Coding Technology (SVC) in point-to-point calls. SVC extends the H.264 codec
standard to dramatically increase error resiliency and video quality without the need for higher bandwidth.
–
H.264 High Profile is a standard for compressing video by up to 25% over the H.264 Baseline Profile,
enabling high definition calls to be held over lower call speeds. It requires both sides of the transmission
(sending and receiving endpoints) to support this protocol.
–
NetSense is a proprietary Scopia® Solution technology which optimizes the video quality according to the
available bandwidth to minimize packet loss. As the available bandwidth of a connection varies depending
on data traffic, NetSense's sophisticated algorithm dynamically scans the video stream, and then reduces
or improves the video resolution to maximize quality with the available bandwidth.
•
Ability to record and playback videoconferences using a USB drive (may require license, depending on the
model).
•
For an even better experience, Scopia® Control enables you to remotely control the XT Series features using
the intuitive touch interface of an Apple® iPad® (may require license, depending on the model).
•
Secure point-to-point video calls and videoconferences, via encrypted connections or using TLS certificates.
You can have up to three remote encrypted participants in a videoconference.
Important:
Using encryption is subject to local regulation. In some countries it is restricted or limited for usage. For more
information, consult your local reseller.
User Guide for Avaya Video Collaboration Solution for IP Office
Version 8.3
About the XT Series | 5
Page 6
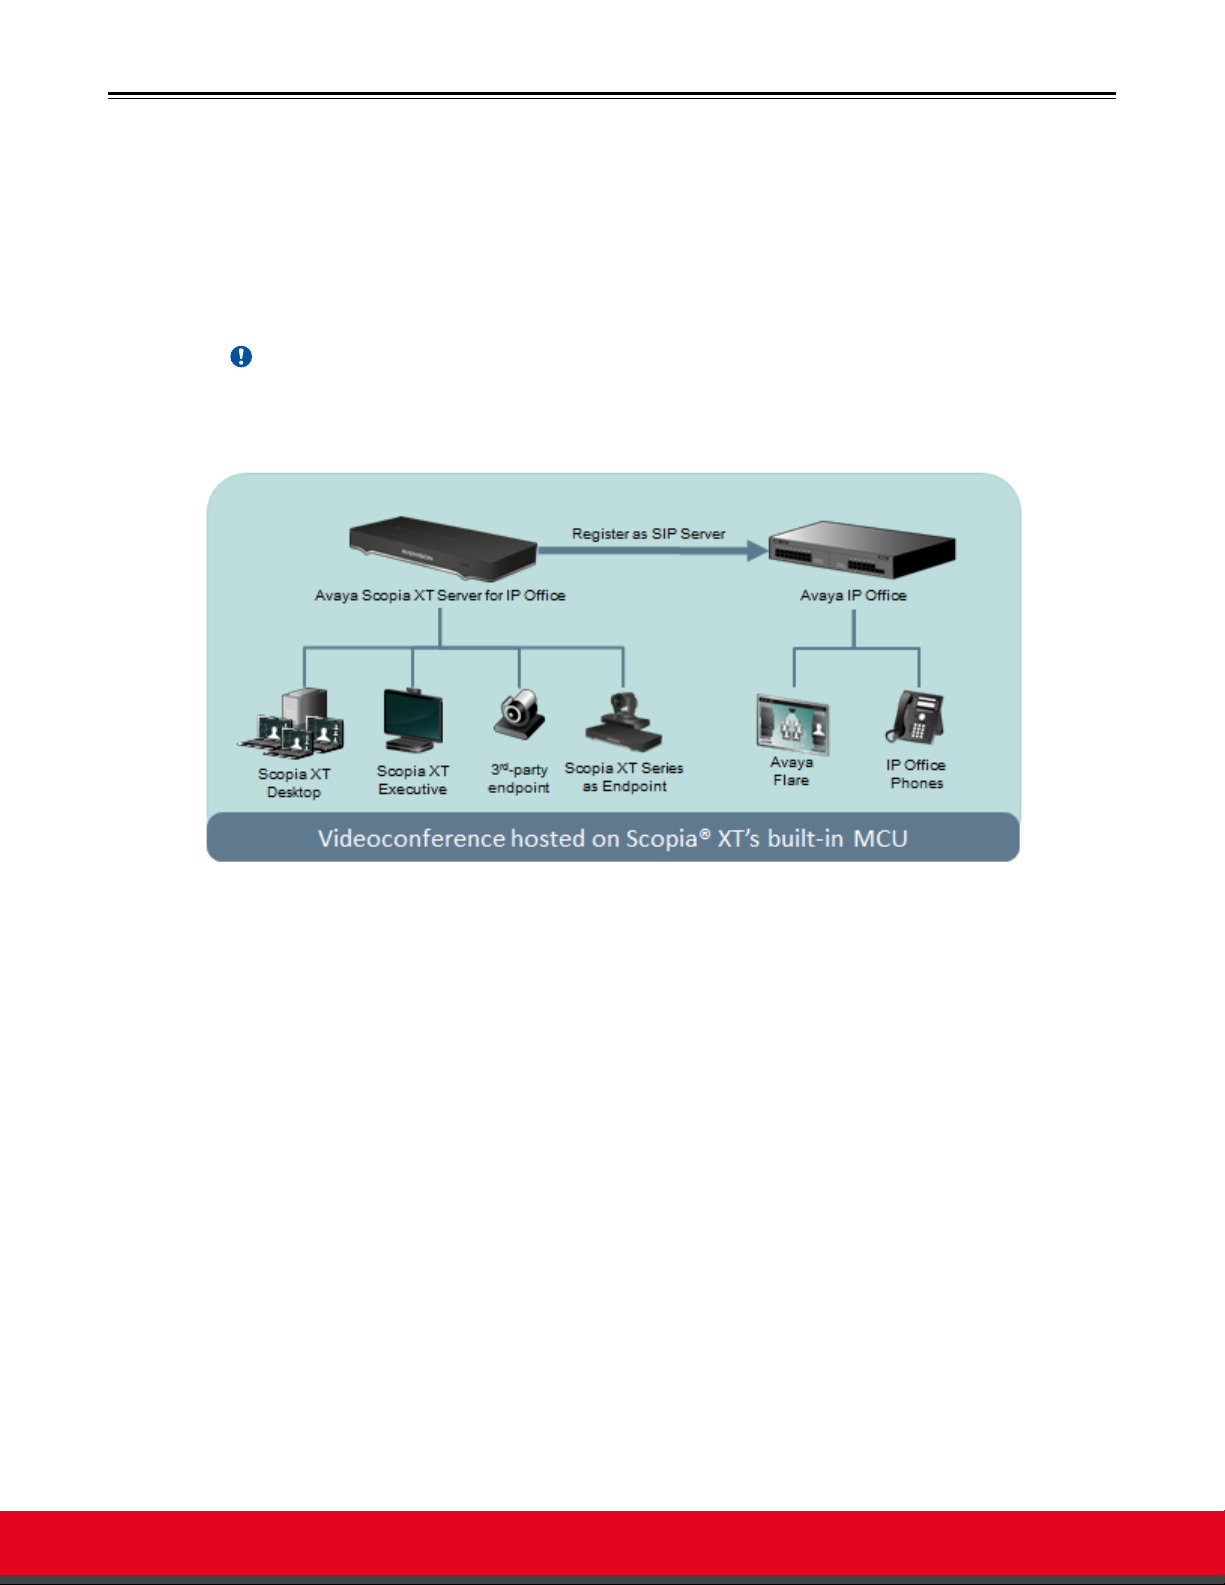
About the Built-In MCU
You can use your Avaya Scopia® XT Series to join a videoconference hosted on the built-in MCU.
An MCU, or Multipoint Control Unit, connects several endpoints to a single videoconference. It manages
the audio mixing and creates the video layouts, adjusting the output to suit each endpoint's capabilities.
Avaya IP Office connects to the XT Series as a SIP server, allowing it to host videoconferences and add
Avaya endpoints to videoconferences.
Important:
If you do not register to IP Office, you cannot host videoconferences on the built-in MCU.
Figure 1: Hosting a videoconference on the XT Series
Your XT Series can host videoconferences on its built-in MCU, with up to nine (one local, eight remote)
participants. If you do not register to IP Office, you cannot host videoconferences on the built-in MCU.
The embedded MCU can mix standard definition and HD endpoints in the same meeting, without one
impacting on the other. The built-in MCU also supports both wide-screen (16:9) and standard formats
(4:3), incorporating them seamlessly into the video layout.
While generating the video layout, the built-in MCU must shrink each participant's image to fit the layout.
So while the composite video layout remains in HD, each participant's image within the layout can reach
a maximum resolution of 448p.
When using the XT Series as an MCU only, not participating locally, we recommend blocking the audio
and video input from this XT Series during the meeting.
User Guide for Avaya Video Collaboration Solution for IP Office
Version 8.3
About the XT Series | 6
Page 7

Chapter 2 | Getting Started
To get started with video calls and videoconferences, activate the product and use the quick setup wizard to
configure the basic settings of the unit. We recommend following the workflow described in Initial Workflow for XT
Series Users on page 7.
Navigation
•
Initial Workflow for XT Series Users on page 7
•
Connecting a Computer to the XT Series on page 8
•
Controlling the XT Series on page 9
•
Configuring Basic Settings with the Quick Setup Wizard on page 15
•
Tips for Participating in a Videoconference on page 21
Initial Workflow for XT Series Users
About this task
To quickly get started with your XT Series, follow the steps in this workflow.
Before you begin
Your system administrator should install and activate your XT Series, which includes registering the
system to the IP Office Proxy/Registrar. For details, see the following documentation:
•
Quick Setup Guide for Avaya Scopia® XT Series: Explains the simplest configuration necessary for
the system to work properly.
•
Safety Instructions leaflet for Avaya Scopia® XT Series
•
Deployment Guide for Avaya Scopia® XT Series
Your system administrator may have customized certain features described in this guide to suit the
environment of your company.
Procedure
1.
Turn on the XT Codec Unit by pressing the
2. (Scopia® XT Executive only) Connect your computer to use the XT Series as your monitor,
as described in Connecting a Computer to the XT Series on page 8.
3. Configure the basic settings required to start using the XT Series, as described in Configuring
Basic Settings with the Quick Setup Wizard on page 15.
Power key on the XT Remote Control Unit.
You can use the XT Remote Control Unit or Scopia® Control as well as the web interface to
control the XT Series (see Controlling the XT Series on page 9).
User Guide for Avaya Video Collaboration Solution for IP Office
Version 8.3
Getting Started | 7
Page 8

4. Set up your phonebook to easily dial your contacts, as described in Finding, Changing or
Deleting Contacts on page 26.
5. You can now start video calls and meetings (see Starting a New Call on page 22).
6. If your endpoint has an embedded MCU (license required), you can also host
videoconferences, as described in Moderating Meetings on page 46.
7. Customize XT Series settings to best fit your needs, as described in Configuring Advanced
User Settings on page 51.
Connecting a Computer to the XT Series
About this task
Connect a computer to share a presentation or other content during a call. You connect the video
separately from the audio. The computer video is routed to the DVI port on the XT Codec Unit, while the
audio is routed to the audio-in port.
When you share a computer's sound during a call, remote participants hear the computer's audio output
as well as the audio from the Microphone Pod. However, analog microphones like the one-way
Microphone Pod use the same audio-in port as a connected computer, so to use both at the same
time, connect them via an audio mixer (see Deployment Guide for the Avaya Scopia® XT Series).
Procedure
1. If your computer has a DVI port, connect it to the DVI port on the XT Codec Unit.
Alternatively, use the supplied DVI-VGA adapter to connect a VGA cable from the adapter to
the computer's VGA port.
Figure 2: Connecting a computer's display to the XT Series
2.
Connect the computer audio to the audio-in port on the XT Codec Unit, which supports
both analog and digital optical audio.
User Guide for Avaya Video Collaboration Solution for IP Office
Version 8.3
Getting Started | 8
Page 9

Figure 3: Connecting a computer's audio to the XT Series
When you connect a computer's audio output to the XT Series, the echo cancellation for this
analog input is disabled by default (see Deployment Guide for the Avaya Scopia® XT
Series).
3. Set the computer's resolution by accessing the operating system graphics settings.
4. Select your screen resolution and refresh rates from the list of supported settings (see Table
1: Supported computer monitor resolutions and refresh rates on page 9).
Table 1: Supported computer monitor resolutions and refresh rates
Name Resolution
1080p 1920x1080 60 60
SXGA 1280x1024 60,75 60, 75
HD+ (900p) 1600x900 60 N/A
WSGA 1440x900 60 60
UVGA 1280x960 60, 85 60, 85
WXGA 1280x768 / 1280x800 60 60
720p 1280x720 60 60
XGA 1024x768 60, 70, 75 60, 70, 75
SVGA 800x600 60, 72, 75 60, 72, 75
VGA 640x480 72, 75 72, 75
Controlling the XT Series
Digital Refresh Rate
(Hz)
Analog Refresh Rate
Frequency (Hz)
There are a number of ways to interact with the Avaya Scopia® XT Series:
•
Use the XT Remote Control Unit locally on the endpoint itself to navigate the menus and perform
user functions and advanced configuration. You view the results on a connected monitor.
•
User Guide for Avaya Video Collaboration Solution for IP Office
Version 8.3
Getting Started | 9
Page 10

•
Use the Scopia® Control iPad app to control user-level functionality of the XT Series via an intuitive
touch interface. This app is limited to user features, and does not extend to administration or
advanced configuration. For more information, see User Guide for Scopia® Control.
•
Use the XT Series's web interface to perform nearly all features from the unit's web page.
Navigation
•
Accessing the XT Series Local Menu on page 10
•
About the XT Remote Control Unit on page 11
•
Accessing XT Series Web Interface on page 14
Accessing the XT Series Local Menu
About this task
After switching on the XT Series, the main menu appears on the connected monitor.
To navigate the local menus, use the XT Remote Control Unit. You can also access the system via the
web, where the main screen is laid out differently (see Accessing XT Series Web Interface
14).
on page
Figure 4: XT Series main menu
The main menu offers the following features:
•
Call starts audio and video calls.
•
Contacts allows you to view, edit, and call a contact.
•
Calendar allows you to view and join meetings scheduled for this endpoint.
•
Present starts sharing content from your computer, or displays the connected computer's content.
•
Control Camera adjusts camera position.
•
Recording allows you to record and playback a videoconference (may require a license).
•
Configure adjusts settings and checks the system status.
User Guide for Avaya Video Collaboration Solution for IP Office
Version 8.3
Getting Started | 10
Page 11

Procedure
1. Check the light on the front of the XT Codec Unit. When it is connected to power but
switched off, the LED blinks.
2.
Press the power key on the XT Remote Control Unit to turn on the XT Codec Unit. When
switched on, the LED remains on (no blinking).
3. The system home page appears on the monitors.
When you access the system for the first time only, the Quick Setup wizard is displayed (see
Configuring Basic Settings with the Quick Setup Wizard on page 15).
4. Navigate using the XT Remote Control Unit.
About the XT Remote Control Unit
There are several ways to control the Avaya Scopia® XT Series. This section explains how to use the
XT Remote Control Unit to navigate the endpoint's menus which are displayed on the endpoint's
monitor. Without a monitor, you cannot interact using the XT Remote Control Unit.
Other ways to control and interact with the XT Series include:
•
Using the web interface (see Accessing XT Series Web Interface on page 14).
•
Using Scopia® Control on an Apple iPad to control user functionality (see User Guide for Scopia
Control).
®
The XT Remote Control Unit has an improved design for a more efficient videoconferencing experience
(Figure 5: The XT Remote Control Unit on page 12).
User Guide for Avaya Video Collaboration Solution for IP Office
Version 8.3
Getting Started | 11
Page 12

Figure 5: The XT Remote Control Unit
Scroll through menus and options using the arrow keys and pressing the ok/menu key to select an item.
Enter letters and digits into a field using the remote's keypad on the XT Remote Control Unit. The
system displays the current entry method to the right of the field (Figure 6: Entry method displayed to the
right of an input field on page 12). You can switch entry methods by pressing the 1/a/A button
repeatedly while the cursor is in the input field, to switch between abc1 (default) for lower case
alphanumeric characters, ABC for upper case characters only (no digits), abc for just lower case
characters only (no digits), and 123 for digits only. To enter a letter or number, press a key repeatedly to
cycle through its characters.
Figure 6: Entry method displayed to the right of an input field
During a videoconference, you can send DTMF tones via the keypad. DTMF is often used to
communicate with an MCU or other device which accepts DTMF commands. For example, to display the
MCU menu in a call hosted on a Scopia® Elite MCU, press * at any time. For more information, see User
Guide for Scopia® Elite MCU.
Some additional shortcuts from the XT Remote Control Unit include:
•
Press and hold a number key to recall a camera preset (0-9).
•
Press and hold the Dial key to toggle Do Not Disturb (DND).
•
Press and hold the near/far key to switch between local and remote shared content.
User Guide for Avaya Video Collaboration Solution for IP Office
Version 8.3
Getting Started | 12
Page 13

Pairing an XT Remote Control Unit
About this task
If you have multiple XT Series units in the same room, you can pair a XT Remote Control Unit with its XT
Codec Unit so that every unit has its dedicated remote, so when you press a key on a remote, it triggers
an action on the correct XT Series unit. Enter the same numeric code in both the XT Series and its XT
Remote Control Unit to pair them. By default all remotes and endpoints use the same code 01.
Procedure
1. Access the general settings. From the XT Series web interface, select Basic Settings >
General. From the endpoint's main menu, select Configure > General.
You can use the XT Remote Control Unit's initial default pairing to perform this task.
Figure 7: Setting the XT Remote Control Unit Code
2. Enter a two-digit numeric code between 01 and 99 in the Remote Control Code field.
3. From the web interface only, select Save.
4. On the XT Remote Control Unit, press the * and # keys simultaneously until its red light blinks
twice.
User Guide for Avaya Video Collaboration Solution for IP Office
Version 8.3
Getting Started | 13
Page 14
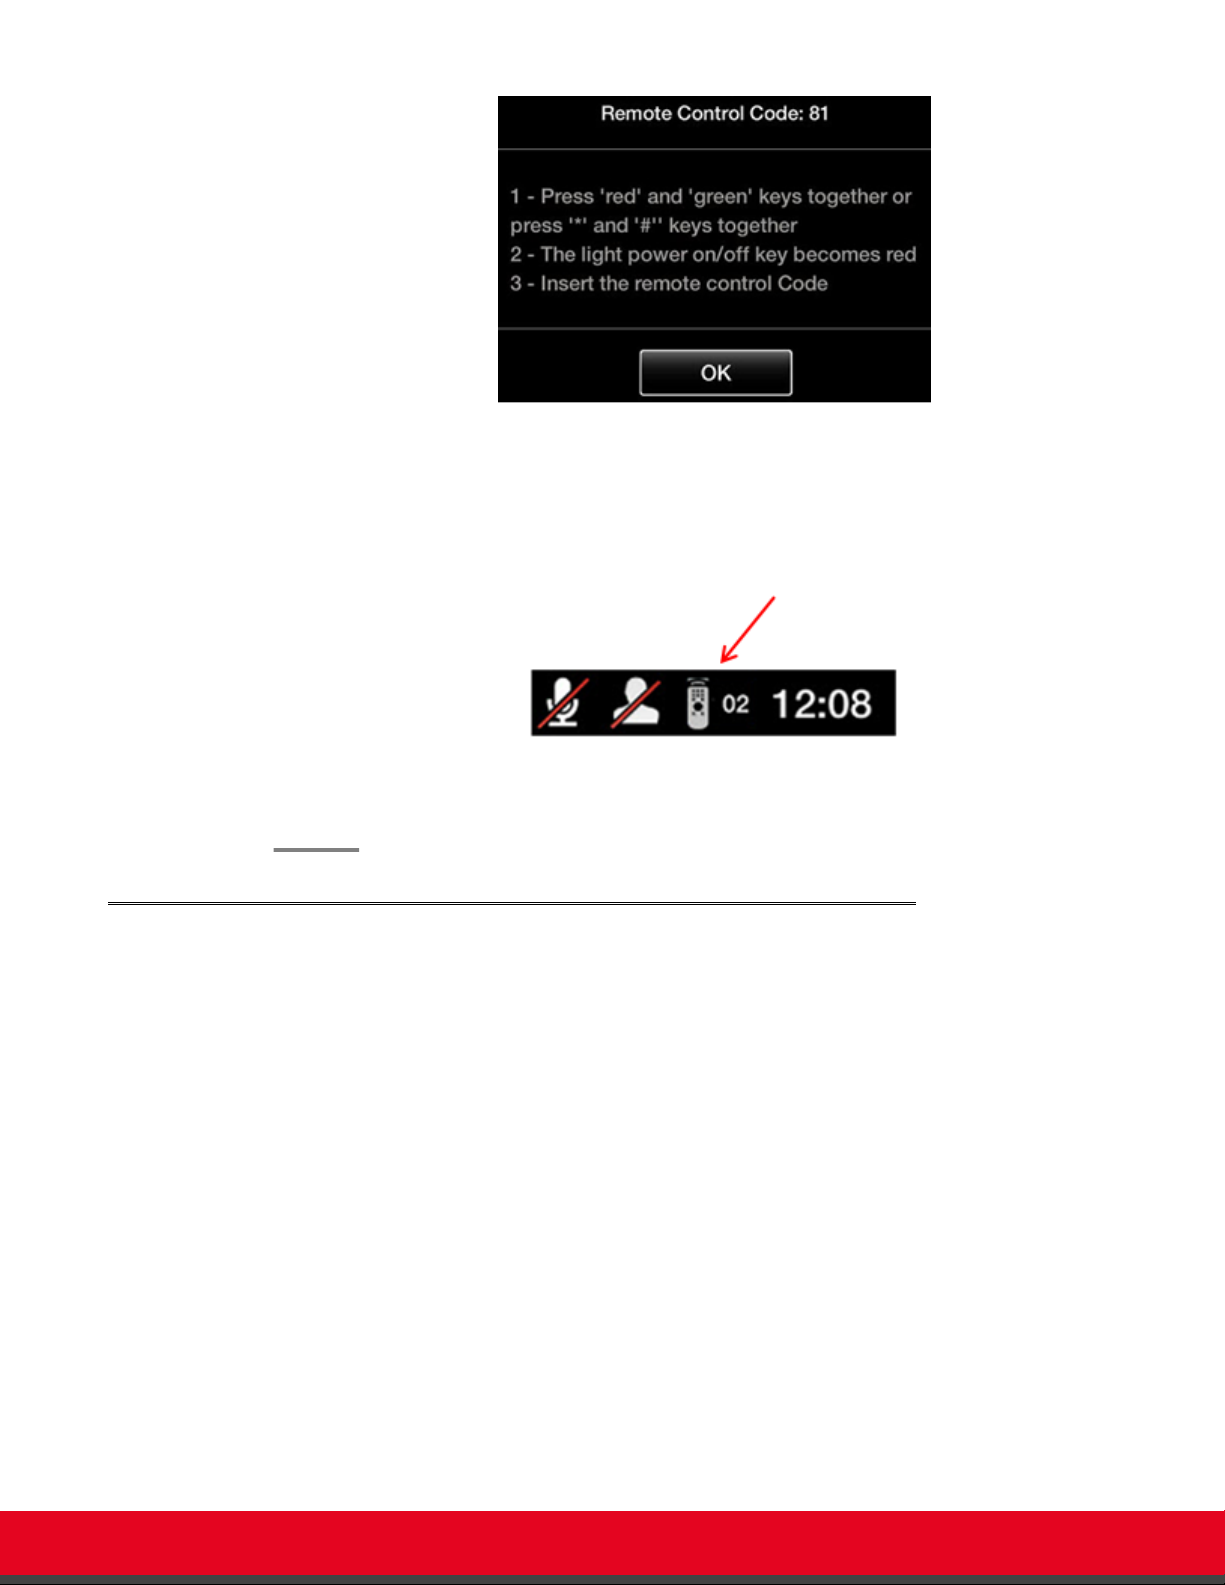
Figure 8: Setting the code on the XT Remote Control Unit
5. Using the keypad, type the same number used in the Remote control code field.
When the code is not the default 01, the system displays the paired remote icon with its new
code at the top-right corner of the screen.
6. Select Finish in the web interface, or select OK on the endpoint.
Accessing XT Series Web Interface
About this task
This procedure describes how to access the Avaya Scopia® XT Series web interface, which supports
the following internet browsers:
•
Internet Explorer version 8 or later
•
Google Chrome version 11 or later
•
Mozilla Firefox version 3.6 or later
•
Apple Safari version 5 or later
•
Opera version 11 or later
If you deployed the XT Series as a server with no monitor, you must first retrieve the unit's IP address,
as described in Deployment Guide for Avaya Scopia® XT Series. If you have a monitor, you can find the
IP address at the top bar of the endpoint's monitor.
Before you begin
Web access is enabled by default. If it was disabled, you can enable it and configure the security details
as described in Deployment Guide for Avaya Scopia® XT Series.
User Guide for Avaya Video Collaboration Solution for IP Office
Version 8.3
Getting Started | 14
Page 15

Procedure
1. Open any of the supported internet browsers and access the XT Series login page by
entering the system's IP address, like http://1.2.3.4/.
2. Enter the username and password.
The default username for the web interface is Admin with the password 1234.
Figure 9: Logging into the XT Series web interface
Important:
We recommend changing the default credentials after logging in for the first time, as
described in the Deployment Guide for Avaya Scopia® XT Series.
3. (Optional) Select the web interface language from the Language list.
4. Select Login.
Configuring Basic Settings with the Quick Setup Wizard
About this task
To start using your Avaya Scopia® XT Series, first define basic settings with the quick setup wizard,
such as the system's name, language, and network settings. This is relevant for both new installations,
or after restoring default settings. You can only calibrate the image on the endpoint itself using its
monitor, not from the web interface.
Some settings may already be customized for your organization. If required, ask the system
administrator for the device's password.
The quick setup wizard automatically appears the first time you access the XT Series, either by turning it
on or logging in to the web interface. Alternatively select Configure > Quick Setup from the Main Menu.
User Guide for Avaya Video Collaboration Solution for IP Office
Version 8.3
Getting Started | 15
Page 16

Figure 10: Accessing the Quick Setup
The quick setup wizard guides you through many of the following basic configuration tasks:
Navigation
•
Setting the System Name and Language on page 16
•
Adjusting the Image Position on page 17
•
Configuring Basic Network Settings on page 18
•
Configuring Basic Gatekeeper Settings on page 19
Setting the System Name and Language
About this task
The first screen in the Quick Setup wizard enables you to define the name of your Avaya Scopia® XT
Series, the country, and the menu language. The unit's name is displayed on the system's title bar and
to other meeting participants. For example, Hong-Kong, or 9th-Floor-Room, or NY-Office. There is
also a unicode system name to enable non-English characters, available on the web interface only. For
more advanced settings of the system name, see Deployment Guide for Avaya Scopia® XT Series.
After initial setup, you can modify these settings by selecting Configure > General from the endpoint's
menus, or from the web interface select Basic Settings > Preferences > General.
Before you begin
Access the quick setup wizard from the endpoint or web interface, as described in Configuring Basic
Settings with the Quick Setup Wizard on page 15.
Procedure
1. Define the name and language as described in Table 2: Defining name and language of the
XT Series on page 17.
User Guide for Avaya Video Collaboration Solution for IP Office
Version 8.3
Getting Started | 16
Page 17

Figure 11: Setting Country and Language
Table 2: Defining name and language of the XT Series
Field Description
System Name Enter the name of the XT Series in the System Name field.
This name is also used by default for the SIP username and
the H.323 name, which can be manually changed.
System Name Unicode (Web interface only) Enter the name here if it includes non-
ANSII characters such as Chinese or Japanese.
Country Enter the country location of the unit. The system menu and
the Language field automatically changes to the language
used in the selected country.
Language Choose the language of the system menus.
2. To adjust the image on your monitor, select Next and continue with Adjusting the Image
Position on page 17.
If performing the quick setup from the web interface, access the quick setup from the
endpoint to adjust the image. This can be done at any time.
Adjusting the Image Position
About this task
You can center the endpoint's image correctly on its monitor in this stage of the Quick Setup Wizard.
This is for deployments with a monitor connected to your Avaya Scopia® XT Series.
Procedure
1. Access the Quick Setup Wizard from the endpoint, as described in Configuring Basic
Settings with the Quick Setup Wizard on page 15.
2. Decide if the monitor's image needs adjusting, by verifying if the white border of the triangles
in the top left and bottom right corners are fully visible on all sides.
If the image is centered correctly, skip this procedure and select Next.
User Guide for Avaya Video Collaboration Solution for IP Office
Version 8.3
Getting Started | 17
Page 18

Figure 12: Examining the image position
3. Press 1 to highlight the triangle in the top left corner in blue.
4. Use the arrow keys to position the image, so all sides of the white border of the triangle are
visible in the screen, then press ok/menu.
5. Press 2 to highlight the triangle in the bottom right corner in blue.
6. Adjust the image position in the same way, until all sides of the triangle border are visible,
then press ok/menu.
7. To continue with the Quick Setup Wizard, select Next (see Configuring Basic Network
Settings on page 18).
Configuring Basic Network Settings
About this task
This procedure describes how to set up the basic network settings and the IP address of the XT Series
as part of the Quick Setup Wizard. To modify advanced network settings, see Deployment Guide for
Avaya Scopia® XT Series.
Procedure
1. Access the Quick Setup Wizard from the endpoint, as described in Configuring Basic
Settings with the Quick Setup Wizard on page 15, and skip to this step.
User Guide for Avaya Video Collaboration Solution for IP Office
Version 8.3
Getting Started | 18
Page 19

Figure 13: Defining IP Settings
2. Enter the following values:
Table 3: Configuring the IP address
Field Name Description
IP Address Mode or
Automatic IP
Address
Determines if the IP address is dynamically allocated (using
DHCP), or if you manually designate a static IP address. You must
use only static addresses for:
•
Scopia® XT Telepresence deployments
•
Units on a public network
•
SIP deployments where the unit is secured with a TLS
certificate.
IP address Enter the system static IP address. For dynamic IP addresses, this
field displays the current IP address.
Subnet mask Enter the subnet mask associated with the IP address. For dynamic
IP addresses, this field displays the current subnet mask.
Gateway (IP
Address)
Enter the default gateway static IP address. The gateway is used to
route information between two subnets, for example, between the
headquarters and a partner site. For dynamic IP addresses, this
field displays the current gateway IP address.
DNS (Server IP
Address)
Enter the DNS server IP address. The DNS server translates
domain names into IP addresses. For dynamic IP addresses, this
field displays the assigned DNS server IP address.
3. To configure your gatekeeper's settings, select Next and continue with Configuring Basic
Gatekeeper Settings on page 19.
If you are not using a gatekeeper in your deployment, select Next > Done.
User Guide for Avaya Video Collaboration Solution for IP Office
Version 8.3
Getting Started | 19
Page 20

Configuring Basic Gatekeeper Settings
About this task
Configure the gatekeeper settings if your Avaya Scopia® XT Series works with one. A gatekeeper routes
audio and video H.323 calls by resolving dial strings (H.323 alias or URI) into the IP address of an
endpoint, and handles the initial connection of calls. To modify advanced gatekeeper settings, see
Deployment Guide for Avaya Scopia® XT Series.
This is typically not relevant for IP Office deployments. Configure only if you are using a gatekeeper in
your deployment.
Procedure
1. Access the Quick Setup Wizard from the endpoint, as described in Configuring Basic
Settings with the Quick Setup Wizard on page 15, and skip to this step.
Figure 14: Gatekeeper settings
2. Configure the gatekeeper connection as described in the following table.
Ask your system administrator to help configure these fields.
Field Description
Use Gatekeeper Choose whether this endpoint is registered to a gatekeeper,
like the Avaya Scopia® ECS Gatekeeper.
This is typically not relevant for IP Office deployments.
Configure only if you are using a gatekeeper in your
deployment.
Mode or Automatic IP
Address
Choose whether the gatekeeper is configured to
automatically detect endpoints. For more information, ask
your network administrator.
User Guide for Avaya Video Collaboration Solution for IP Office
Version 8.3
Getting Started | 20
Page 21
Field Description
Gatekeeper IP address Enter the IP address of the gatekeeper.
E.164 Enter the H.323 number required to dial the XT Series.
3. Select Done to complete the Quick Setup Wizard.
Tips for Participating in a Videoconference
There are several general recommendations you should follow to optimize your videoconferencing
experience.
We recommend that you read this section before participating in a videoconference for the first time.
•
Use natural gestures and speak normally as in a real meeting.
•
Do not rustle paper or tap on the table or the microphone.
•
Keyboard clicking can be disruptive to the videoconference, so we recommend using the mute
when listening but not actively participating.
•
Zooming too close can show that your eyes are not looking directly at the camera, in some cases.
Set the zoom of the built-in camera so the frame includes the user's head and upper body.
•
If you are using a laptop during a meeting, do not place it too close to the microphone. Noise
produced by the computer fan may interfere with audio quality.
•
Always mute the microphone before moving it.
•
Avoid using your cellular phones during your meeting to avoid electromagnetic interference.
User Guide for Avaya Video Collaboration Solution for IP Office
Version 8.3
Getting Started | 21
Page 22

Chapter 3 | Starting a New Call
You can start a videoconference on the Avaya Scopia® XT Series in several ways. This section outlines how to dial
to other endpoints in different modes, how to start videoconferences with many participants, and how to answer and
end a meeting.
To quickly dial with the settings best suited for a specific contact, we recommend setting up your phone book to
include calling preferences, along with the contact's information. For example, you can set a contact to audio-only,
and this setting is automatically used when calling this contact.
Navigation
•
Starting a Meeting on page 22
•
Finding, Changing or Deleting Contacts on page 26
Starting a Meeting
About this task
Like a mobile phone, your Avaya Scopia® XT Series can dial another endpoint by directly entering a new
dial string like a number, or choose a recently dialed entry, or dial a saved contact from your address
book.
If you want to join or host a meeting with several participants, you must decide which MCU is hosting the
meeting. You can host on your own built-in MCU, or on someone else's built-in MCU, or on a
dedicatedMCU like the Scopia® Elite MCU.
To host the meeting on your own built-in MCU, you can either call out to other endpoints to join your
meeting, or you can give out your endpoint's address for them to call in to your endpoint. The endpoint
address you give out can be an IP (like 1.2.3.4), or an H.323 alias (like john_smith) or a URI address
(like john@company.com). If you invite endpoints outside your network, verify with your system
administrator that your endpoint's address is valid for external endpoints.
Your call is securely encrypted when it shows a padlock icon
administrator to configure encryption (see Deployment Guide for Avaya Scopia® XT Series).
on the monitor. Ask your system
Important:
Using encryption is subject to local regulation. In some countries it is restricted or limited for usage.
For more information, consult your local reseller.
Procedure
1. To call a new endpoint, access the direct call screen. From the XT Series web interface,
select Make your Call > Basic Options > Direct Call. From the endpoint's main menu,
select Call, or press
on the XT Remote Control Unit.
User Guide for Avaya Video Collaboration Solution for IP Office
Version 8.3
Starting a New Call | 22
Page 23

Figure 15: Enter a new dial string to contact an endpoint
Enter the dial string and select Call. The dial string can be the endpoint's number, or an
H.323 alias like john_smith, or a URI address like john@company.com.
Important:
Your organization may also have implemented a dial plan, which defines various dial
prefixes to determine the characteristics of a call. For example, you may be able to dial 8
before the videoconference number for a lower bandwidth call, or 6 for an audio-only call.
For more information on the dial plan in your organization, contact your system
administrator.
2. To dial a recently contacted endpoint, access the recent calls list. From the XT Series web
interface, select Make your call > Basic Options > Recent Calls. From the endpoint's main
menu, select Call.
Figure 16: List of recently dialed endpoints
Dial an entry by selecting it or selecting Call.
3. To dial a saved contact, access the list of contacts. From the XT Series web interface, select
Make your call > Contacts. From the endpoint's main menu, select Contacts.
User Guide for Avaya Video Collaboration Solution for IP Office
Version 8.3
Starting a New Call | 23
Page 24

Figure 17: Contact list
Dial an entry by selecting it or selecting Call.
4. To join a meeting hosted elsewhere, call the endpoint or MCU which hosts the meeting,
using any of the above dial methods.
5. To host a meeting on your built-in MCU by dialing out to other participants:
a. Call the first participant (see Starting a Meeting on page 22).
b. Call others to join. From the XT Series web interface, select Make your Call > Basic
Options > Direct Call / Contacts. From the endpoint, within the meeting with the first
participant, press ok/menu and select Participants > Invite a new participant > By
Address / From Contacts.
Figure 18: Inviting a new participant from the endpoint interface
c. Select a contact or enter a dial string to call the next participant.
d. Repeat to add more participants.
6. To host a meeting on your built-in MCU by giving your endpoint's contact details, be sure to
give the correct information.
To accept an incoming call, select Accept.
User Guide for Avaya Video Collaboration Solution for IP Office
Version 8.3
Starting a New Call | 24
Page 25

Figure 19: Answering a video call
7. To configure a call's advanced settings from a new dial string, access its advanced calling
options. From the XT Series web interface, select Make your Call > Advanced Options >
Direct Call. From the endpoint's main menu, select Call and select the down-arrow to
expand the call options.
Figure 20: Accessing advanced call options
Set the advanced parameters of your new dial string as follows:
User Guide for Avaya Video Collaboration Solution for IP Office
Version 8.3
Starting a New Call | 25
Page 26

Table 4: Entering advanced call properties
Field Name Description
Call Protocol or Call profiles If necessary, select the protocol to use when calling this
personal endpoint or meeting room:
•
Select H.323 for H.323 endpoints, such as other XT
Series endpoints, or when joining a meeting hosted
by a Scopia® Elite MCU.
•
Select SIP for SIP endpoints, such as Microsoft Lync
clients or Avaya IP Office devices.
•
Select ISDN to call ISDN endpoints.
Call Type Select whether the call is Audio-Video or Audio-Only.
Rate or Call Rate Select the bandwidth to be used when calling this
endpoint. Otherwise, the system uses the maximum
available bandwidth.
Your call is securely encrypted when it shows a padlock icon on the monitor. Ask your
system administrator to configure encryption (see Deployment Guide for Avaya Scopia® XT
Series).
Important:
Using encryption is subject to local regulation. In some countries it is restricted or limited
for usage. For more information, consult your local reseller.
8.
To end a meeting, select Disconnect from the web interface, or press Disconnect on
the XT Remote Control Unit.
If your system administrator defined a time limit for videoconferences, the system displays a
message when the limit is reached.
Figure 21: Meeting Duration Alert
User Guide for Avaya Video Collaboration Solution for IP Office
Version 8.3
Starting a New Call | 26
Page 27

Finding, Changing or Deleting Contacts
About this task
If you are using the Avaya Scopia® XT Series's built-in contacts list, known as the local LDAP server,
you can edit it to add or remove contacts. For other LDAP servers, such as the contact list of another XT
Series, you can only view and search for contacts.
Contact your administrator for details about your organization's LDAP server.
Procedure
1. To view contacts: From the XT Series web interface, select Make your call > Contacts.
From the endpoint's main menu, select Contacts.
Figure 22: Contact list
To search a contact, enter the first or last name in the search field above the contacts list.
2. To add a new contact, access the local contacts list. From the XT Series web interface,
select Make your call > Contacts > Add Contact. From the endpoint's main menu, select
Contacts > Add.
Figure 23: Add a new contact
You can add several dial strings to the same contact. From the XT Series web interface,
select Insert Number. From the endpoint, select Add Number.
User Guide for Avaya Video Collaboration Solution for IP Office
Version 8.3
Starting a New Call | 27
Page 28

Figure 24: Adding a dial string to a contact
Enter the following details.
Table 5: Entering advanced information for a contact
Field Name Description
Label Define the contact's label to provide a short description of
the contact, for example: home, office or virtual room.
Number Enter the dial string to contact this endpoint. It can be a
number, an H.323 alias like john_smith, or a URI address
like john@company.com.
Type If necessary, select the protocol to use when calling this
personal endpoint or meeting room:
•
Select H.323 for H.323 endpoints, such as other XT
Series endpoints, or when joining a meeting hosted
by a Scopia® Elite MCU.
•
Select SIP for SIP endpoints, such as Microsoft Lync
clients or Avaya IP Office devices.
•
Select ISDN to call ISDN endpoints.
Call Type Select whether the call is Audio-Video or Audio-Only.
Rate Select the default bandwidth or call bitrate to be used
You can also manually define the Type, Call Type, and Rate each time you place a call (see
Starting a Meeting on page 22.
3. To edit an existing contact, select the contact. From the XT Series web interface, select Edit
for that contact's entry. From the endpoint, press the right-arrow for that contact's entry.
User Guide for Avaya Video Collaboration Solution for IP Office
Version 8.3
when calling this contact. Otherwise, the system uses the
maximum available bandwidth.
Starting a New Call | 28
Page 29

Figure 25: Editing an existing contact
4. To delete the contact, on the web interface, view the list of contacts and select Delete. From
the endpoint interface, edit the contact and select Delete Contact.
5. To view the list of recently dialed endpoints, access the call list. From the XT Series web
interface, select Make your call > Basic Options > Recent Calls. From the endpoint's main
menu, select Call.
Figure 26: List of recently dialed endpoints
6. To save a contact from the list of recently dialed entries, select the entry. From the XT Series
web interface, select Details > Add to contacts. From the endpoint interface, , select the
entry with the right-arrow and choose Add to contacts.
Figure 27: Adding a recent call to the local contacts
7. From the web interface only, select Save.
User Guide for Avaya Video Collaboration Solution for IP Office
Version 8.3
Starting a New Call | 29
Page 30

Chapter 4 | Participating in Meetings
This chapter describes the different actions available during your videoconference, such as recording the
videoconference or sharing content with other participants:
Navigation
•
Joining a Meeting from the XT Series Calendar on page 30
•
Moving the PTZ Camera's Position on page 31
•
Adjusting the Default Volume Settings on page 33
•
Connecting a Computer to the XT Series on page 34
•
Sharing Computer Content on page 36
•
Changing Your Own Video Layout on page 37
•
Blocking your own Audio and Video on page 39
•
Blocking All Incoming Calls (DND) on page 41
Joining a Meeting from the XT Series Calendar
About this task
You can use the calendar of your Avaya Scopia® XT Series endpoint to join a scheduled
videoconference. The calendar for this endpoint is stored in Scopia® Management, hence this
functionality is only available when the XT Series is managed by Scopia® Management.
The calendar displays all Scopia® Management meetings which have invited this XT Series endpoint.
For example, you can book a physical conference room which houses an XT Series room system.
In theXT Series you can only view calendar entries to join meetings. To create or edit a Scopia
Management meeting, you must access the Scopia® Management user portal, or use the 64-bit Scopia
Add-in for Microsoft Outlook.
®
Before you begin
The XT Series must be managed by Scopia® Management (see Deployment Guide for Avaya Scopia
XT Series).
Procedure
1. Access the calendar screen to display today's scheduled meetings. From the XT Series web
interface, select Home and view the Calendar section. From the endpoint's main menu,
select Calendar.
®
®
User Guide for Avaya Video Collaboration Solution for IP Office
Version 8.3
Participating in Meetings | 30
Page 31

Figure 28: Viewing endpoint's scheduled meetings for today
2. Before the meeting starts, the XT Series displays a notification in the title bar of the endpoint
interface notifying you when the meeting is due to start. Then when the meeting is about to
start, you are invited to join.
Figure 29: Notifications when a meeting is due to start
3.
If the meeting has already started, select Join Now.
Figure 30: Joining a meeting after its start time
User Guide for Avaya Video Collaboration Solution for IP Office
Version 8.3
Participating in Meetings | 31
Page 32

Moving the PTZ Camera's Position
About this task
This section details how to set the angle and zoom of a PTZ camera connected to your Avaya Scopia
XT Series.
A PTZ camera can pan to swivel horizontally, tilt to move vertically, and optically zoom to devote all the
camera's pixels to one area of the image. For example, the XT Standard Camera is a PTZ camera with
its own power supply and remote control, and uses powerful lenses to achieve superb visual quality. In
contrast, fixed cameras like webcams only offer digital PTZ, where the zoom crops the camera image,
displaying only a portion of the original, resulting in fewer pixels of the zoomed image, which effectively
lowers the resolution. Fixed cameras also offer digital pan and tilt only after zooming, where you can pan
up to the width or length of the original camera image.
Once you have set the camera's angle and zoom, the system restores the last camera position the next
time you use the camera. You can store multiple preset camera positions if needed (see Deployment
Guide for Avaya Scopia® XT Series).
®
Procedure
1. Access the camera control settings. From the XT Series web interface, select More Actions
> Cameras Control. From the endpoint's main menu, select Control Camera.
During a meeting, press ok/menu to access the videoconference menu (Figure
31: Controlling your camera on page 32), and then select Control Camera.
2. If you have more than one camera, first select the one you want to move. From the XT Series
web interface, select the Cameras field. From the endpoint's main menu, select Control
Camera > ok/menu > Video Source. Press ok/menu repeatedly to switch between
cameras.
User Guide for Avaya Video Collaboration Solution for IP Office
Version 8.3
Figure 31: Controlling your camera
Participating in Meetings | 32
Page 33

Figure 32: Switching between cameras
3. Move the camera position using the arrows and zoom keys to position your camera.
Adjusting the Default Volume Settings
About this task
Press + or - on the XT Remote Control Unit to adjust the sound you hear when receiving a call and
during a videoconference.
To change the default speaker volume, perform the procedure in this section.
Procedure
1. To change the default volume settings, access the system's call settings. From the XT Series
web interface, select Basic Settings > Call-Answer mode > General. From the endpoint's
main menu, select Configure > Calling.
User Guide for Avaya Video Collaboration Solution for IP Office
Version 8.3
Participating in Meetings | 33
Page 34

Figure 33: Call-Answer settings
2. Drag the Volume slider to set the value.
3. From the web interface only, select Save.
Connecting a Computer to the XT Series
About this task
Connect a computer to share a presentation or other content during a call. You connect the video
separately from the audio. The computer video is routed to the DVI port on the XT Codec Unit, while the
audio is routed to the audio-in port.
When you share a computer's sound during a call, remote participants hear the computer's audio output
as well as the audio from the Microphone Pod. However, analog microphones like the one-way
Microphone Pod use the same audio-in port as a connected computer, so to use both at the same
time, connect them via an audio mixer (see Deployment Guide for the Avaya Scopia® XT Series).
Procedure
1. If your computer has a DVI port, connect it to the DVI port on the XT Codec Unit.
Alternatively, use the supplied DVI-VGA adapter to connect a VGA cable from the adapter to
the computer's VGA port.
User Guide for Avaya Video Collaboration Solution for IP Office
Version 8.3
Participating in Meetings | 34
Page 35

Figure 34: Connecting a computer's display to the XT Series
2.
Connect the computer audio to the audio-in port on the XT Codec Unit, which supports
both analog and digital optical audio.
Figure 35: Connecting a computer's audio to the XT Series
When you connect a computer's audio output to the XT Series, the echo cancellation for this
analog input is disabled by default (see Deployment Guide for the Avaya Scopia® XT
Series).
3. Set the computer's resolution by accessing the operating system graphics settings.
4. Select your screen resolution and refresh rates from the list of supported settings (see Table
6: Supported computer monitor resolutions and refresh rates on page 35).
Table 6: Supported computer monitor resolutions and refresh rates
Name Resolution
1080p 1920x1080 60 60
SXGA 1280x1024 60,75 60, 75
HD+ (900p) 1600x900 60 N/A
WSGA 1440x900 60 60
User Guide for Avaya Video Collaboration Solution for IP Office
Version 8.3
Digital Refresh Rate
(Hz)
Analog Refresh Rate
Frequency (Hz)
Participating in Meetings | 35
Page 36

Name Resolution
UVGA 1280x960 60, 85 60, 85
WXGA 1280x768 / 1280x800 60 60
720p 1280x720 60 60
XGA 1024x768 60, 70, 75 60, 70, 75
SVGA 800x600 60, 72, 75 60, 72, 75
VGA 640x480 72, 75 72, 75
Sharing Computer Content
About this task
You can share the content of your computer screen and its audio either with other participants in a call or
when you are not in a call, you can share it with those in the local conference room.
Digital Refresh Rate
(Hz)
Analog Refresh Rate
Frequency (Hz)
You can choose one of many video layouts to arrange the display of the presentation, remote video, and
local video.
The XT Series sends both live video and shared content simultaneously on separate channels, known
as dual video. This happens as long as the remote endpoint can receive dual video. If not, it will switch to
sending presentation only until you revert back to live video.
The available bandwidth is shared evenly the two streams by default, but an administrator can
customize this in the XT Series if required.
Your computer content is private, and is only shared with others when you manually choose to do so.
Before you begin
Connect your computer to the XT Series (see Connecting a Computer to the XT Series
on page 8).
Procedure
1.
To share computer content, press Present on the XT Remote Control Unit, from the
endpoint's main menu, or from the in-call menu. From the XT Series web interface, select
More Actions > Presentation.
2.
To end sharing computer content, press Present or Back on the XT Remote Control
Unit.
3. To start sharing content automatically as soon as you connect a computer, access the
general settings. From the XT Series web interface, select Basic Settings > Call-Answer
mode > General. From the endpoint's main menu, select Configure > Calling.
User Guide for Avaya Video Collaboration Solution for IP Office
Version 8.3
Participating in Meetings | 36
Page 37

Figure 36: Displaying computer content by default when not in a call
Set Local Presentation Mode to Auto. In this mode, the system always shows the
computer content when not in a call, and asks if you want to accept incoming calls.
Changing Your Own Video Layout
About this task
This section details how to change your own video layout during a call or meeting. A video layout is the
arrangement of participant images as they appear on the monitor in a videoconference. If the meeting
includes a presentation, a layout can also refer to the arrangement of the presentation image together
with the meeting participants.
The available layouts depend on the number of streams in your meeting and how many monitors you
have. There are three streams: your own video, the remote video, and a shared presentation. With one
screen, you fill it with the remote video and overlap a small window of your own video. With a shared
presentation, you must choose a video layout. With two monitors, you have more choices of video
layouts (see Figure 37: Examples of video layouts with three streams on single or dual monitors
38).
on page
User Guide for Avaya Video Collaboration Solution for IP Office
Version 8.3
Participating in Meetings | 37
Page 38

Figure 37: Examples of video layouts with three streams on single or dual monitors
As you add more participants to the meeting, each participant adds their own video stream, which
requires an MCU to arrange them into a conference layout. The conference layout is then integrated into
your XT Series as the remote video stream (see Figure 38: Multi-party videoconference places
conference layout as the remote stream on page 38).
Figure 38: Multi-party videoconference places conference layout as the remote stream
The choice of conference layouts offered by the MCU depends on the MCU model. For example, the
layouts in the Scopia® Elite MCU can display up to 28 participants, while the built-in MCU of the XT
Series can display only up to eight remote participants.
Recorded videoconferences use one monitor only. During recording, the auxiliary monitor displays the
same video layout as the primary monitor.
Before a call, your monitor(s) display your own video, except on the Scopia® XT Executive which shows
the computer content by default.
User Guide for Avaya Video Collaboration Solution for IP Office
Version 8.3
Participating in Meetings | 38
Page 39

Meeting moderators can also change the video layout for all participants in a meeting (see Changing the
Video Layout for all Participants on page 49).
Procedure
1.
To cycle through the most commonly used video layouts, press the Layouts key on the
XT Remote Control Unit repeatedly.
2.
To view all available layouts, press and hold the Layouts key on the XT Remote Control
Unit, or press ok/menu and then select Layouts.
Figure 39: Changing video layout during a call
The choices of layouts depend on the number of streams to display and the number of
connected monitors. The group icon represents remote video, while the single icon
represents local video. The graph icon represents the presentation.
3.
To reset the number of monitors to the default <auto> setting, press layouts
on the XT Remote Control Unit.
Blocking your own Audio and Video
About this task
During a call, you can block and unblock your own audio and video and either replace the video with a
placeholder static slide, or you can hide your participation altogether if your XT Series is hosting the
meeting.
and then 0
User Guide for Avaya Video Collaboration Solution for IP Office
Version 8.3
Participating in Meetings | 39
Page 40

Procedure
1. To mute your own audio, access the call menu. From the XT Series web interface, select
Mute from the top bar under the tabs. From the endpoint, select ok/menu > Mute Myself.
Alternatively you can press the mute key on the XT Remote Control Unit, or if you use the
Microphone Pod, you can press its own mute button. When your audio is muted, the icon
disappears on the display.
2. To block your own video and replace it with a static slide, access the call menu. From the XT
Series web interface, select Privacy from the top bar under the tabs. From the endpoint,
select ok/menu > Privacy Options > Privacy (see Figure 40: Blocking your own audio and
video on page 40).
Figure 40: Blocking your own audio and video
The camera moves to its sleep position when it is disabled.
The system sends a placeholder slide to remote participants, and displays the icon on
your display.
3. To block your audio and video and hide your participation in the meeting by removing your
space in participants' video layout, access the in-meeting settings. From the XT Series web
interface, select Meeting > Hide Myself. From the endpoint's in-call menu, select Meeting
Options > Hide Myself.
This feature is only available when your endpoint hosts the meeting on its built-in MCU.
Figure 41: Hiding your presence in a meeting
4. To block your video by default, access the call settings. From the XT Series web interface,
select Basic Settings > Call-Answer Mode > General. From the endpoint's main menu,
select Configure > Calling.
User Guide for Avaya Video Collaboration Solution for IP Office
Version 8.3
Participating in Meetings | 40
Page 41

Figure 42: Call settings
5. Set Privacy or Video Privacy to Yes.
6. From the web interface only, select Save.
Blocking All Incoming Calls (DND)
About this task
If you do not want to answer incoming calls, you can configure the Avaya Scopia® XT Series to block all
incoming calls by enabling Do Not Disturb (DND).
When the Do Not Disturb feature is enabled:
•
The system blocks notifications of incoming calls.
•
The icon appears in the system information area of the monitor display.
•
When a remote endpoint calls, the system informs it that you are unavailable and automatically
disconnects the calling endpoint.
You can also temporarily enable Do Not Disturb when receiving an incoming call. To enable, select Do
not disturb on the window which appears when your endpoint rings. To disable, press and hold Call
on the XT Remote Control Unit or from the endpoint's main menu select Turn off Do not disturb.
Procedure
1. Access the call settings. From the XT Series web interface, select Basic Settings > CallAnswer Mode > General. From the endpoint's main menu, select Configure > Calling.
User Guide for Avaya Video Collaboration Solution for IP Office
Version 8.3
Participating in Meetings | 41
Page 42

Figure 43: Calling preferences
2. Set Do Not Disturb to Yes.
3. From the web interface only, select Save.
User Guide for Avaya Video Collaboration Solution for IP Office
Version 8.3
Participating in Meetings | 42
Page 43

Chapter 5 | Recording Meetings
About this task
You can record and playback meetings from a locally connected USB storage device, or record to the Scopia
Desktop Content Center server. This section describes how to start, pause, or stop a recording during a
videoconference.
You can playback recordings from the local USB storage device either on the XT Series or using any standard media
player. The system saves the file as an MP4, and records the video in H.264 format with audio in AAC-LC format.
You cannot record locally to USB when encryption is enabled (see Deployment Guide for Avaya Scopia® XT Series).
If you host the meeting on your built-in MCU, you can record either three remote endpoints if your license is MCU4,
or six remote endpoints if your license is MCU9.
®
Important:
Any recordings you make are not authorized by the manufacturer and are made at the sole responsibility and
liability of the user.
Recorded videoconferences use one monitor only. During recording, the auxiliary monitor displays the same video
layout as the primary monitor.
Before you begin
•
To record to a local USB storage device, insert it in the lower USB port on the XT Series. Use a USB storage
device formatted with FAT32, EXT2, EXT3, EXT4. Other formats, even if supported, are not recommended.
Figure 44: Connecting a USB drive to the XT Series
•
To record to the Scopia® Desktop Content Center, you must be in a meeting hosted by an external MCU, and
the XT Series must be managed by Scopia® Management. The endpoint must be accessible remotely by
Scopia® Management with its address in the remote access settings (see Deployment Guide for Avaya
Scopia® XT Series or ask your system administrator).
•
(Optional) Customize your recording settings, such as video resolution, as described in Setting Recording
Preferences on page 53. For example, to increase the recording time allowed, lower the recording bitrate.
Procedure
1. Access the Recording menu. From the XT Series web interface, select More Actions > Recording.
From the endpoint's main menu, select Recording, or during a call, press ok/menu on the XT Remote
Control Unit, and select Meeting Options > Recording.
User Guide for Avaya Video Collaboration Solution for IP Office
Version 8.3
Recording Meetings | 43
Page 44

The Recording screen indicates the amount of time you can record based on the available space on your
USB storage device.
Figure 45: Start a recording
2. To start recording, select Record or Start from the menu on the left.
The recording icon appears at the top of the monitor, next to the remaining time available for the
recording. You can pause or stop the recording by selecting those buttons in the recording screen.
Figure 46: Recording icon and time remaining on this USB drive
If you started the recording at any time after the videoconference started, the recording automatically
stops when the videoconference ends. Otherwise, stop the recording by selecting Stop.
3. To playback recorded videoconferences stored on a local USB storage device, from the endpoint
interface select the recording and press ok/menu to play. From the XT Series web interface, select
Download for that meeting to save the file locally as <endpoint ID><name of
endpoint><date><time>.mp4.
User Guide for Avaya Video Collaboration Solution for IP Office
Version 8.3
Recording Meetings | 44
Page 45

Figure 47: Viewing recordings stored on local USB drive
Important:
Verify the system is not muted, to ensure you can hear the audio during playback.
4. To view a recorded meeting stored on the Scopia® Desktop Content Center, access the Scopia® Desktop
web portal and follow the links to view recordings stored there (see User Guide for Avaya Scopia
Desktop Client).
If you receive an incoming call, playback is paused and you must manually accept or reject the new call. If
you reject the call or enable Do Not Disturb, playback resumes automatically.
Inside a call, you must start presenting to share playback of the recording.
®
User Guide for Avaya Video Collaboration Solution for IP Office
Version 8.3
Recording Meetings | 45
Page 46

Chapter 6 | Moderating Meetings
A moderator has special rights in a videoconference, including blocking the sound and video of other participants,
inviting new participants, disconnecting others, determining video layouts, and closing meetings.
Navigation
•
Moderating a Videoconference on page 46
•
Changing the Video Layout for all Participants on page 49
Moderating a Videoconference
About this task
You can moderate a videoconference hosted on an external MCU or hosted on your own XT Series
built-in MCU. A moderator has special rights in a videoconference, including blocking the sound and
video of other participants, inviting new participants, disconnecting others, determining video layouts,
and closing meetings.
You can moderate a remotely hosted videoconference on an external MCU under Scopia
Management, or on another XT Series MCU when it is not using the SIP protocol.
®
This section describes how you can view the list of participants, invite new ones, block their audio if
needed, disconnect them or turn someone into a lecturer. You can also change the video layout of all
participants (see Changing the Video Layout for all Participants on page 49), but you only block your
own video, not that of a participant.
Important:
If you are not the moderator and attempt a moderator-only action, the system may ask you to enter a
PIN before continuing, if the meeting has PIN-protected moderator features.
Access the Local endpoint to configure your own endpoint if you are hosting a meeting locally on your
built-in MCU.
Procedure
1. Access the active videoconference. From the XT Series web interface, select Participants in
the meeting window. From the endpoint, press ok/menu to access the videoconference
menu, and select Participants.
User Guide for Avaya Video Collaboration Solution for IP Office
Version 8.3
Moderating Meetings | 46
Page 47

Figure 48: Moderating a hosted videoconference
2. To invite someone to join the meeting, select Invite a new participant.
You can choose an endpoint from the contacts, dial directly or choose one recently dialed.
Figure 49: Inviting new participant by address or contacts
3. To disconnect a participant, select the endpoint and select Disconnect.
4. To mute all participants, select Mute everyone or Mute all. This is typically used to eliminate
background noise from participants.
5. To mute a specific endpoint, select Mute for that endpoint.
User Guide for Avaya Video Collaboration Solution for IP Office
Version 8.3
Moderating Meetings | 47
Page 48

Figure 50: Muting a participant
6. To designate a participant as a lecturer, select Make lecturer for that endpoint.
All participants in the videoconference can see the lecturer's video in the main part of the
screen, while a smaller image shows the most recent active speaker. This requires the
hosting MCU support the H.243 standard, which enables remote videoconference
management.
7. To prevent new participants from joining a meeting hosted on an XT Series, select Lock
Meeting.
8. You can view detailed statistics about the hosting MCU, or you can view details of all the
endpoints if you are the host of the meeting. From the XT Series web interface, select
Diagnostics. Select Previous or Next to scroll through the endpoints. From the endpoint,
press ok/menu to access the videoconference menu, and select Stats. Use the arrow keys
on your XT Remote Control Unit to scroll through the endpoints.
User Guide for Avaya Video Collaboration Solution for IP Office
Version 8.3
Moderating Meetings | 48
Page 49

Figure 51: Viewing the remote endpoint's information
In the statistics window, Rx means receiving or incoming statistics, while Tx stands for
transmitting, or outgoing statistics.
9. To end the meeting and disconnect all participants, from the endpoint interface press
ok/menu and select Meeting Options > End meeting. From the XT Series web interface,
select Disconnect at the top of the meeting window.
Figure 52: Ending a meeting (moderators only)
Changing the Video Layout for all Participants
About this task
As a meeting moderator, you can determine the video layouts for all participants in your meeting. A
video layout is the arrangement of participant images as they appear on the monitor in a
videoconference. If the meeting includes a presentation, a layout can also refer to the arrangement of
the presentation image together with the meeting participants.
If you host the meeting on your XT Series built-in MCU, you can change the video layouts on the XT
Series.
The default layout is a dynamic one, which changes form dynamically depending on the number of
participants displaying video. The choice of layouts depends on your XT Series model and the number
of participants with video present in the call.
User Guide for Avaya Video Collaboration Solution for IP Office
Version 8.3
Moderating Meetings | 49
Page 50

Figure 53: Examples of video layouts when hosted on XT Series built-in MCU
Procedure
1. To change the video layout for all participants in a meeting hosted by an XT Series, from the
endpoint interface press ok/menu on the XT Remote Control Unit and select Meeting
Options > Layouts. From the XT Series web interface, select Meeting > Layouts.
Figure 54: Changing the video layout for all participants
2. Select the desired layout according to the number of participants, or select Auto to restore
the default layout.
User Guide for Avaya Video Collaboration Solution for IP Office
Version 8.3
Moderating Meetings | 50
Page 51

Chapter 7 | Configuring Advanced User
Settings
This section explains how to configure advanced user settings to fit your preferences. For example, you can set
default call settings or recording settings, and secure your unit with PIN codes.
Navigation
•
Setting Call Answering Preferences on page 51
•
Activating the Screen Saver on page 52
•
Setting Recording Preferences on page 53
•
Setting PIN Codes for the XT Series on page 54
•
Confirming Call Disconnections on page 55
Setting Call Answering Preferences
About this task
This procedure describes how to define system behavior for incoming calls. By default, the endpoint
notifies you of an incoming call, so you manually choose to answer it. However, you can automatically
answer calls after a certain number of rings, or automatically answer immediately.
Procedure
1. Access the call settings. From the XT Series web interface, select Basic Settings > CallAnswer Mode > General. From the endpoint's main menu, select Configure > Calling.
User Guide for Avaya Video Collaboration Solution for IP Office
Version 8.3
Configuring Advanced User Settings | 51
Page 52

Figure 55: Setting call answer preferences
2. Select the required option from the Automatic answer list:
•
Select Yes always for the system to automatically answer an incoming call. The
system will not prompt you to accept a call if the display shows the Home page. This is
useful for meeting rooms, where endpoints often dial in to that meeting room.
•
Select Never to always manually accept a call.
•
Select Yes if not in a call (only XT Series with a built-in MCU) to automatically answer
when the system is not in a call. During a call, it displays an incoming call notification. If
you accept an incoming call during a call, you add the caller to your videoconference.
3. (Optional) Enter the number of rings in the Answer after (Rings) list to specify after how
many rings the system accepts a call. This option is relevant only if automatic answering is
enabled.
4. From the web interface only, select Save.
Activating the Screen Saver
About this task
The screen saver helps protect your monitor from burn-in without switching it off.
Your administrator may have configured the screen saver to start automatically when Avaya Scopia® XT
Series is not used for some time.
You can activate the screen saver at any time by pressing the
Unit.
By default, the XT Series stops sending to the monitor after 15 minutes. You can modify this in the
Monitor Turn Off field. From the XT Series web interface, select Configure > Advanced > I/O
Connections > Monitor > General. From the endpoint's main menu, select Advanced Settings > I/O
Connections > Monitor > General.
User Guide for Avaya Video Collaboration Solution for IP Office
Version 8.3
Power key on the XT Remote Control
Configuring Advanced User Settings | 52
Page 53

Setting Recording Preferences
About this task
You can record and playback meetings from a locally connected USB storage device, or record to the
Scopia® Desktop Content Center server. This procedure describes how to configure your USB recording
preferences, such as the video resolution and bitrate. This is useful, for example, to increase the time
available for recording on your USB storage device.
This may require a license, depending on your model. For more information, see Deployment Guide for
Avaya Scopia® XT Series.
You can playback recordings from the local USB storage device either on the XT Series or using any
standard media player. The system saves the file as an MP4, and records the video in H.264 format with
audio in AAC-LC format.
You cannot record locally to USB when encryption is enabled (see Deployment Guide for Avaya
Scopia® XT Series). If you host the meeting on your built-in MCU, you can record either three remote
endpoints if your license is MCU4, or six remote endpoints if your license is MCU9.
Procedure
1. Access the recording settings. From the XT Series web interface, select Basic Settings >
Recording > General. From the endpoint's main menu, select Configure > Recording.
Figure 56: Setting your recording preferences
2. Define the following recording settings:
User Guide for Avaya Video Collaboration Solution for IP Office
Version 8.3
Configuring Advanced User Settings | 53
Page 54

Table 7: Configuring recording settings
Field Description
Enabled (Only in Configure > Advanced > Utilities > Recording) Select Yes to enable recording
and playback from a local USB storage device.
Resolution Select the video resolution of the recording. The frame rate is limited to 25fps. For best
quality, use the default 1080p resolution, but use a lower value if your media player does
not support higher resolutions.
When you change the resolution, the system automatically selects the optimal bitrate for
this resolution.
Bit rate Select the bitrate to determine the file size of the recording. To use less space on your
USB storage device, select a lower bitrate. For the best results, use the default value for
your chosen resolution.
Bitrate is the speed of data flow. Higher video resolutions require higher bitrates to ensure
the video is constantly updated, thereby maintaining smooth motion. If you lower the
bitrate, you lower the quality of the video. In some cases, you can select a lower bitrate
without noticing a significant drop in video quality; for example during a presentation or
when a lecturer is speaking and there is very little motion. In video recordings, the bitrate
determines the file size for each minute of recording. Bitrate is often measured in kilobits
per second (kbps).
To estimate the space you need for the recording, see Table 8: Typical file sizes based
on the bitrate on page 54. You can see how much recording time is available on your
USB storage device when you access the Recording menu (for details, see Recording
Meetings on page 43).
Audio Alert Select Yes to enable an audio message alert at the beginning of the videoconference,
indicating to all participants that the meeting is being recorded. This alert is also sent to
late participants.
Table 8: Typical file sizes based on the bitrate
Bitrate
File size for 1 minute
recording
File size for 30
minute recording
File size for 1 hour
recording
6144K 45 MB 1,350 MB 2,700 MB
4096K 30 MB 900 MB 1,800 MB
2048K 15 MB 450 MB 900 MB
1024 7.5 MB 225 MB 450 MB
512 3.75 MB 112.5 MB 225 MB
384 3 MB 85 MB 169 MB
3. From the web interface only, select Save.
User Guide for Avaya Video Collaboration Solution for IP Office
Version 8.3
Configuring Advanced User Settings | 54
Page 55

Setting PIN Codes for the XT Series
About this task
The PIN for basic settings is disabled by default. You can enable it to require users to enter the PIN for
all basic settings, such as changing the interface language. The default value for this PIN is 1234.
Before you begin
If configuring from the endpoint, you must first enable advanced configuration, as described in
Deployment Guide for Avaya Scopia® XT Series.
To modify the PIN from the web interface, you must be connected via HTTPS (see Deployment Guide
for Avaya Scopia® XT Series).
Procedure
1. Access the PIN settings. From the XT Series web interface, select Administrator Settings >
Utilities > PIN Protect Settings. From the endpoint's main menu, select Configure >
Advanced > Utilities > PIN Protect Settings.
Figure 57: Modifying the administrator PIN
2. Select Basic Settings to set or change the user's PIN code.
3. Enter the current PIN code. The default PIN is 1234.
4. Enter your new 4 digit PIN code, and re-enter if required.
5. From the web interface only, select Save.
User Guide for Avaya Video Collaboration Solution for IP Office
Version 8.3
Configuring Advanced User Settings | 55
Page 56

Confirming Call Disconnections
About this task
To prevent accidental disconnection from a call, you can configure the system to confirm before a call is
disconnected. By default, calls are disconnected when a participant ends the call, without requiring a
confirmation.
Procedure
1. Access the call settings. From the XT Series web interface, select Basic Settings > CallAnswer Mode > General. From the endpoint's main menu, select Configure > Calling.
Figure 58: Calling preferences
2. Set Confirm Disconnect to Yes.
3. From the web interface only, select Save.
User Guide for Avaya Video Collaboration Solution for IP Office
Version 8.3
Configuring Advanced User Settings | 56
Page 57

Chapter 8 | Troubleshooting the Avaya
Scopia® XT Series
This section covers troubleshooting problems that may occur when setting up and using the Avaya Scopia® XT
Series.
Navigation
•
Viewing System Information for Customer Support on page 57
•
Resolving Monitor Display Problems on page 58
•
Resolving Problems Viewing Computer Content on page 60
•
Resolving XT Remote Control Unit Problems on page 61
•
Restoring Default User Settings on page 61
•
Resolving Video or Audio Disruptions on page 62
Viewing System Information for Customer Support
About this task
When contacting customer support or your system administrator, you may need to provide information
about the system. This procedure describes how to view the following system information:
•
Software version
•
User code (MAC address)
•
IP addresses
•
Serial number
•
System name and model
•
Licenses
•
Network, gatekeeper, and SIP settings
Important:
The system serial number also appears on the label at the back of the XT Codec Unit.
Procedure
1. View system information. From the XT Series web interface, select Home. From the
endpoint's main menu, select Configure > About.
During a meeting, press ok/menu and select Stats > Configure > About.
User Guide for Avaya Video Collaboration Solution for IP Office
Version 8.3
Troubleshooting the Avaya Scopia® XT Series | 57
Page 58

Figure 59: Viewing system information
2. To view additional system information from the endpoint such as IP addresses and the
gatekeeper's registration status from the endpoint, press the Back key and select System
Status.
Figure 60: Viewing system network information
Resolving Monitor Display Problems
Problem
Solution
User Guide for Avaya Video Collaboration Solution for IP Office
Version 8.3
The system displays a flickering or blank screen.
The rear panel of the XT Codec Unit features two HD outputs for connecting a main and
auxiliary screen. For cabling, see the cabling diagram in the Quick Setup Guide.
Your system administrator must configure the system for correct video resolution.
When you are not in a call, you can set the refresh frequency of the monitor display:
•
Set to 50 Hz by pressing then 5.
•
Set to 60 Hz by pressing then 6.
Troubleshooting the Avaya Scopia® XT Series | 58
Page 59

Problem
The system displays a blank screen.
Solution
Solution
Solution
Solution
Solution
Problem
Solution
Verify the power cord of the XT Codec Unit is connected properly at both ends.
Verify the monitor’s power cord is connected properly at both ends.
Check that the monitor is connected to HD1 and the power is on.
Verify the XT Codec Unit’s LED is on. If the LED is blinking, press the Power key on the
XT Remote Control Unit.
Make sure the XT Codec Unit output is properly connected to the monitor input. Make sure
the monitor/DVI cable is connected properly at both ends.
The screen layout appears to be cropped.
Configure the monitor layout as described below.
Procedure
1. From the endpoint's main menu, select Configure > Quick Setup.
2. Select Next to navigate to the Configure Monitor page.
3. Follow the instructions on the screen to adjust the image.
Problem
Solution
If necessary, refer to Adjusting the Image Position
information.
The system menus or the remote presentation appears to be cropped.
Adjust the way the image appears on the monitor. To see your adjustments in real-time, we
recommend performing this procedure from the endpoint itself.
If configuring from the endpoint, you must first enable advanced configuration, as described
in Deployment Guide for Avaya Scopia® XT Series.
on page 17 for operational
Procedure
1. Access the monitor settings. From the XT Series web interface, select
Administrator settings > I/O connections > Monitor > Graphic Adjustments.
From the endpoint's main menu, select Configure > Advanced > I/O
connections > Monitor > Graphic Adjustments.
2. Navigate to the monitor requiring adjustment (Monitor HD1 or Monitor HD2).
3. Select your preferred image view mode.
User Guide for Avaya Video Collaboration Solution for IP Office
Version 8.3
Troubleshooting the Avaya Scopia® XT Series | 59
Page 60

Figure 61: Adjusting the monitor
Table 9: Adjustment options for the monitor
Option Description
Adjustment Mode Select Menu, presentation (default) to adjust both the
system menu and presentation, local or received.
Select Menu to adjust the system menus only.
Top, Left, Bottom,
Right
4. From the web interface only, select Save.
Drag the sliders to the required sizes until the menu or
presentation borders are visible on the monitor.
You can also adjust the image for the monitor displaying
the system menu, in the quick setup wizard as described
in Adjusting the Image Position on page 17.
Resolving Problems Viewing Computer Content
Problem
Solution
Solution
I cannot sshare a presentation from my computer or view its content.
Make sure the VGA/DVI cable is properly connected between the PC and the XT Codec Unit
(see Connecting a Computer to the XT Series on page 8).
Verify the computer's output resolution is supported by the XT Series (see Connecting a
Computer to the XT Series on page 8).
User Guide for Avaya Video Collaboration Solution for IP Office
Version 8.3
Troubleshooting the Avaya Scopia® XT Series | 60
Page 61

Resolving XT Remote Control Unit Problems
Problem
Solution
Solution
Solution
The XT Remote Control Unit does not function.
Replace the battery, as described in Avaya Scopia® XT Series Installation Guide. When the
XT Remote Control Unit's battery power is low, an icon appears in the system menus letting
you know that you should replace the battery:
•
Half-charged Battery
•
Low Battery
If the battery power is not low, configure the XT Remote Control Unit code on the XT Codec
Unit to the same number that it is set on the XT Remote Control Unit, as described in Pairing
an XT Remote Control Unit on page 13).
If you still experience problems, reconfigure the XT Remote Control Unit code to be a
number between 01-04, inclusive.
Restoring Default User Settings
About this task
This procedure explains how to restore the default settings if necessary. You can do this from the
endpoint itself only.
Before you begin
If configuring from the endpoint, you must first enable advanced configuration, as described in
Deployment Guide for Avaya Scopia® XT Series.
Procedure
1. From the endpoint's main menu, select Configure > Advanced > Utilities > Restore
System > Factory Defaults.
User Guide for Avaya Video Collaboration Solution for IP Office
Version 8.3
Troubleshooting the Avaya Scopia® XT Series | 61
Page 62

Figure 62: Restoring factory default settings
2. Confirm you want to remove all configurations.
The default settings are restored.
Resolving Video or Audio Disruptions
Problem
Possible Causes
Solution
Possible Causes
Solution
You experience disruptions in either video or audio; for example, additional noise or static.
Video or audio disruptions can occur due to electromagnetic-interference (EMI), caused by
other devices such as cellular phones.
Avoid using your cellular phones during your meeting to avoid electromagnetic interference.
Loss in audio quality may result from noise produced by a computer's cooling system.
If you are using a laptop during a meeting, do not place it too close to the microphone.
User Guide for Avaya Video Collaboration Solution for IP Office
Version 8.3
Troubleshooting the Avaya Scopia® XT Series | 62
Page 63

Glossary of Terms for Scopia® Solution
1080p
2CIF
2SIF
4CIF
4SIF
See Full HD
2CIF describes a video resolution of 704 x 288 pixels (PAL) or 704 x 240 (NTSC). It is double the width
of CIF, and is often found in CCTV products.
2SIF describes a video resolution of 704 x 240 pixels (NTSC) or 704 x 288 (PAL). This is often adopted
in IP security cameras.
4CIF describes a video resolution of 704 x 576 pixels (PAL) or 704 x 480 (NTSC). It is four times the
resolution of CIF and is most widespread as the standard analog TV resolution.
on page 67.
4SIF describes a video resolution of 704 x 480 pixels (NTSC) or 704 x 576 (PAL). This is often adopted
in IP security cameras.
720p
See HD
on page 70.
AAC
AAC is an audio codec which compresses sound but with better results than MP3.
Alias
An alias in H.323 represents the unique name of an endpoint. Instead of dialing an IP address to reach
an endpoint, you can dial an alias, and the gatekeeper resolves it to an IP address.
User Guide for Avaya Video Collaboration Solution for IP Office
Version 8.3
Glossary of Terms for Scopia® Solution | 63
Page 64

AGC (Automatic Gain Control)
Automatic Gain Control (AGC) smooths audio signals through normalization, by lowering sounds which
are too strong and strengthening sounds which are too weak. This is relevant with microphones situated
at some distance from the speaker, like room systems. The result is a more consistent audio signal
within the required range of volume.
Auto-Attendant
Auto-Attendant, also known as video IVR, offers quick access to meetings hosted on MCUs, via a set of
visual menus. Participants can select menu options using standard DTMF tones (numeric keypad). AutoAttendant works with both H.323 and SIP endpoints.
Balanced Microphone
A balanced microphone uses a cable that is built to reduce noise and interference even when the cable
is long. This reduces audio disruptions resulting from surrounding electromagnetic interference.
BFCP (Binary Floor Control Protocol)
BFCP is a protocol which coordinates shared videoconference features in SIP calls, often used by one
participant at a time. For example, when sharing content to others in the meeting, one participant is
designated as the presenter, and is granted the floor for presenting. All endpoints must be aware that the
floor was granted to that participant and react appropriately.
Bitrate
Bitrate is the speed of data flow. Higher video resolutions require higher bitrates to ensure the video is
constantly updated, thereby maintaining smooth motion. If you lower the bitrate, you lower the quality of
the video. In some cases, you can select a lower bitrate without noticing a significant drop in video
quality; for example during a presentation or when a lecturer is speaking and there is very little motion. In
video recordings, the bitrate determines the file size for each minute of recording. Bitrate is often
measured in kilobits per second (kbps).
Call Control
See Signaling on page 77.
Cascaded Videoconference
A cascaded videoconference is a meeting distributed over more than one physical Scopia® Elite MCU,
where a master MCU connects to one or more slave MCUs to create a single videoconference. It
increases the meeting capacity by combining the resources of several MCUs. This can be especially
useful for distributed deployments across several locations, reducing bandwidth usage.
User Guide for Avaya Video Collaboration Solution for IP Office
Version 8.3
Glossary of Terms for Scopia® Solution | 64
Page 65

CIF
CIF, or Common Intermediate Format, describes a video resolution of 352 × 288 pixels (PAL) or 352 x
240 (NTSC). This is sometimes referred to as Standard Definition (SD).
Content Slider
The Scopia® Content Slider stores the data already presented in the videoconference and makes it
available for participants to view during the meeting.
Continuous Presence
Continuous presence enables viewing multiple participants of a videoconference at the same time,
including the active speaker. This graphics-intensive work requires scaling and mixing the images
together into one of the predefined video layouts. The range of video layouts depends on the type of
media processing supported, typically located in the MCU.
Control
Control, or media control, sets up and manages the media of a call (its audio, video and data). Control
messages include checking compatibility between endpoints, negotiating video and audio codecs, and
other parameters like resolution, bitrate and frame rate. Control is communicated via H.245 in H.323
endpoints, or by SDP in SIP endpoints. Control occurs within the framework of an established call, after
signaling.
CP
See Continuous Presence on page 65.
Dedicated Endpoint
A dedicated endpoint is a hardware endpoint for videoconferencing assigned to a single user. It is often
referred to as a personal or executive endpoint, and serves as the main means of video communications
for this user. For example, Scopia® XT Executive. It is listed in the organization's LDAP directory as
associated exclusively with this user.
Dial Plan
A dial plan defines a way to route a call and to determine its characteristics. In traditional telephone
networks, prefixes often denote geographic locations. In videoconferencing deployments, prefixes are
also used to define the type and quality of a call. For example, dial 8 before a number for a lower
bandwidth call, or 6 for an audio-only call, or 5 to route the call to a different branch.
User Guide for Avaya Video Collaboration Solution for IP Office
Version 8.3
Glossary of Terms for Scopia® Solution | 65
Page 66

Dial Prefix
A dial prefix is a number added at the beginning of a dial string to route it to the correct destination, or to
determine the type of call. Dial prefixes are defined in the organization's dial plan. For example, dial 9 for
an outside line, or dial 6 for an audio only call.
Distributed Deployment
A distributed deployment describes a deployment where the solution components are geographically
distributed in more than one network location.
DNS Server
A DNS server is responsible for resolving domain names in your network by translating them into IP
addresses.
DTMF
DTMF, or touch-tone, is the method of dialing on touch-tone phones, where each number is translated
and transmitted as an audio tone.
Dual Video
Dual video is the transmitting of two video streams during a videoconference, one with the live video
while the other is a shared data stream, like a presentation.
Dynamic Video Layout
The dynamic video layout is a meeting layout that switches dynamically to include the maximum number
of participants it can display on the screen (up to 9 on the XT Series, or up to 28 on Scopia® Elite MCU).
The largest image always shows the active speaker.
E.164
E.164 is an address format for dialing an endpoint with a standard telephone numeric keypad, which
only has numbers 0 - 9 and the symbols: * and #.
Endpoint
An endpoint is a tool through which people can participate in a videoconference. Its display enables you
to see and hear others in the meeting, while its microphone and camera enable you to be seen and
heard by others. Endpoints include dedicated endpoints, like Scopia® XT Executive, software endpoints
User Guide for Avaya Video Collaboration Solution for IP Office
Version 8.3
Glossary of Terms for Scopia® Solution | 66
Page 67

like Scopia® Desktop Client, mobile device endpoints like Scopia® Mobile, room systems like XT Series,
and telepresence systems like Scopia® XT Telepresence.
Endpoint Alias
See Alias on page 63.
FEC
Forward Error Correction (FEC) is a proactive method of sending redundant information in the video
stream to preempt quality degradation. FEC identifies the key frames in the video stream that should be
protected by FEC. There are several variants of the FEC algorithm. The Reed-Solomon algorithm (FECRS) sends redundant packets per block of information, enabling the sender (like the Scopia® Elite MCU)
to manage up to ten percent packet loss in the video stream with minimal impact on the smoothness and
quality of the video.
FECC
Far End Camera Control (FECC) is a feature of endpoint cameras, where the camera can be controlled
remotely by another endpoint in the call.
Forward Error Correction
See FEC on page 67.
FPS
See Frames Per Second on page 67.
Frame Rate
See Frames Per Second on page 67.
Frames Per Second
Frames Per Second (fps), also known as the frame rate, is a key measure in video quality, describing
the number of image updates per second. The average human eye can register up to 50 frames per
second. The higher the frame rate, the smoother the video.
Full HD
Full HD, or Full High Definition, also known as 1080p, describes a video resolution of 1920 x 1080
pixels.
User Guide for Avaya Video Collaboration Solution for IP Office
Version 8.3
Glossary of Terms for Scopia® Solution | 67
Page 68

Full screen Video Layout
The full screen view shows one video image. Typically, it displays the remote presentation, or, if there is
no presentation, it displays the other meeting participant(s).
Gatekeeper
A gatekeeper routes audio and video H.323 calls by resolving dial strings (H.323 alias or URI) into the IP
address of an endpoint, and handles the initial connection of calls. Gatekeepers also implement the dial
plan of an organization by routing H.323 calls depending on their dial prefixes. Scopia® Management
includes a built-in Avaya Scopia® Gatekeeper, while ECS is a standalone gatekeeper.
Gateway
A gateway is a component in a video solution which routes information between two subnets or acts as a
translator between different protocols. For example, a gateway can route data between the headquarters
and a partner site, or between two protocols like the TIP Gateway, or the Scopia® 100 Gateway.
GLAN
H.225
H.235
H.239
GLAN, or gigabit LAN, is the name of the network port on the XT Series. It is used on the XT Series to
identify a 10/100/1000MBit ethernet port.
H.225 is part of the set of H.323 protocols. It defines the messages and procedures used by
gatekeepers to set up calls.
H.235 is the protocol used to authenticate trusted H.323 endpoints and encrypt the media stream during
meetings.
H.239 is a widespread protocol used with H.323 endpoints, to define the additional media channel for
data sharing (like presentations) alongside the videoconference, and ensures only one presenter at a
time.
H.243
H.243 is the protocol used with H.323 endpoints enabling them to remotely manage a videoconference.
User Guide for Avaya Video Collaboration Solution for IP Office
Version 8.3
Glossary of Terms for Scopia® Solution | 68
Page 69

H.245
H.261
H.263
H.264
H.245 is the protocol used to negotiate call parameters between endpoints, and can control a remote
endpoint from your local endpoint. It is part of the H.323 set of protocols.
H.261 is an older protocol used to compress CIF and QCIF video resolutions. This protocol is not
supported by the XT Series.
H.263 is an older a protocol used to compress video. It is an enhancement to the H.261 protocol.
H.264 is a widespread protocol used with SIP and H.323 endpoints, which defines video compression.
Compression algorithms include 4x4 transforms and a basic motion comparison algorithm called Pslices. There are several profiles within H.264. The default profile is the H.264 Baseline Profile, but
H.264 High Profile uses more sophisticated compression techniques.
H.264 Baseline Profile
See H.264 on page 69.
H.264 High Profile
H.264 High Profile is a standard for compressing video by up to 25% over the H.264 Baseline Profile,
enabling high definition calls to be held over lower call speeds. It requires both sides of the transmission
(sending and receiving endpoints) to support this protocol. H.264 High Profile uses compression
algorithms like:
•
CABAC compression (Context-Based Adaptive Binary Arithmetic Coding)
•
8x8 transforms which more effectively compress images containing areas of high correlation
These compression algorithms demand higher computation requirements, which are offered with the
dedicated hardware available in Scopia® Solution components. Using H.264 High Profile in
videoconferencing requires that both the sender and receiver's endpoints support it. This is different from
SVC which is an adaptive technology working to improve quality even when only one side supports the
standard.
H.320
H.320 is a protocol for defining videoconferencing over ISDN networks.
User Guide for Avaya Video Collaboration Solution for IP Office
Version 8.3
Glossary of Terms for Scopia® Solution | 69
Page 70

H.323
H.323 is a widespread set of protocols governing the communication between endpoints in
videoconferences and point-to-point calls. It defines the call signaling, control, media flow, and
bandwidth regulation.
H.323 Alias
See Alias on page 63.
H.350
H.350 is the protocol used to enhance LDAP user databases to add video endpoint information for users
and groups.
H.460
H.460 enhances the standard H.323 protocol to manage firewall/NAT traversal, employing ITU-T
standards. Endpoints which are already H.460 compliant can communicate directly with the PathFinder
server, where the endpoint acts as an H.460 client to the PathFinder server which acts as an H.460
server.
HD
A HD ready device describes its high definition resolution capabilities of 720p, a video resolution of 1280
x 720 pixels.
High Availability
High availability is a state where you ensure better service and less downtime by deploying additional
servers. There are several strategies for achieving high availability, including deployment of redundant
servers managed by load balancing systems.
High Definition
See HD
High Profile
See H.264 High Profile on page 69.
on page 70.
User Guide for Avaya Video Collaboration Solution for IP Office
Version 8.3
Glossary of Terms for Scopia® Solution | 70
Page 71

HTTPS
HTTPS is the secured version of the standard web browser protocol HTTP. It secures communication
between a web browser and a web server through authentication of the web site and encrypting
communication between them. For example, you can use HTTPS to secure web browser access to the
web interface of many Scopia® Solution products.
Image Resolution
See Resolution on page 76.
kbps
Kilobits per second (kbps) is the standard unit to measure bitrate, measuring the throughput of data
communication between two devices. Since this counts the number of individual bits (ones or zeros), you
must divide by eight to calculate the number of kilobytes per second (KBps).
KBps
Kilobytes per second (KBps) measures the bitrate in kilobytes per second, not kilobits, by dividing the
number of kilobits by eight. Bitrate is normally quoted as kilobits per second (kbps) and then converted to
kilobytes per second (KBps). Bitrate measures the throughput of data communication between two
devices.
LDAP
LDAP is a widespread standard database format which stores network users. The format is hierarchical,
where nodes are often represented as branch location > department > sub-department, or executives >
managers > staff members. The database standard is employed by most user directories including
Microsoft Active Directory, IBM Sametime and others. H.350 is an extension to the LDAP standard for
the videoconferencing industry.
Lecture Mode
Scopia® Desktop's lecture mode allows the participant defined as the lecturer to see all the participants,
while they see only the lecturer. All participants are muted except the lecturer, unless a participant asks
permission to speak and is unmuted by the lecturer. This mode is tailored for distance learning, but you
can also use it for other purposes like when an executive addresses employees during company-wide
gatherings.
Load balancer
A load balancer groups together a set (or cluster) of servers to give them a single IP address, known as
a virtual IP address. It distributes client service requests amongst a group of servers. It distributes loads
User Guide for Avaya Video Collaboration Solution for IP Office
Version 8.3
Glossary of Terms for Scopia® Solution | 71
Page 72

according to different criteria such as bandwidth, CPU usage, or cyclic (round robin). Load balancers are
also known as application delivery controllers (ADC).
Location
A location is a physical space (building) or a network (subnet) where video devices can share a single
set of addresses. A distributed deployment places these components in different locations, often
connected via a VPN.
Management
Management refers to the administration messages sent between components of the Scopia® Solution
as they manage and synchronize data between them. Management also includes front-end browser
interfaces configuring server settings on the server. Management messages are usually transmitted via
protocols like HTTP, SNMP, FTP or XML. For example, Scopia® Management uses management
messages to monitor the activities of an MCU, or when it authorizes the MCU to allow a call to proceed.
MBps
Megabytes per second (MBps) is a unit of measure for the bitrate. The bitrate is normally quoted as
kilobits per second (kbps) and then converted by dividing it by eight to reach the number of kilobytes per
second (KBps) and then by a further 1000 to calculate the MBps.
MCU
An MCU, or Multipoint Control Unit, connects several endpoints to a single videoconference. It manages
the audio mixing and creates the video layouts, adjusting the output to suit each endpoint's capabilities.
MCU service
See Meeting Type on page 73.
Media
Media refers to the live audio, video and shared data streams sent during a call. Presentation and Far
end camera control (FECC) are examples of information carried on the data stream. Media is transmitted
via the RTP and RTCP protocols in both SIP and H.323 calls. The parallel data stream of both live video
and presentation, is known as dual video.
Media Control
See Control
User Guide for Avaya Video Collaboration Solution for IP Office
Version 8.3
on page 65.
Glossary of Terms for Scopia® Solution | 72
Page 73

Meeting Type
Meeting types (also known as MCU services) are meeting templates which determine the core
characteristics of a meeting. For example, they determine if the meeting is audio only or audio and
video, they determine the default video layout, the type of encryption, PIN protection and many other
features. You can invoke a meeting type by dialing its prefix in front of the meeting ID. Meeting types are
created and stored in the MCU, with additional properties in Scopia® Management.
Moderator
A moderator has special rights in a videoconference, including blocking the sound and video of other
participants, inviting new participants, disconnecting others, determining video layouts, and closing
meetings. In Scopia® Desktop Client, an owner of a virtual room is the moderator when the room is
protected by a PIN. Without this protection, any participant can assume moderator rights.
MTU
The MTU, or Maximum Transmission Unit, is the maximum size of data packets sent around your
network. This value must remain consistent for all network components, including servers like the MCU
and Scopia® Desktop server, endpoints like XT Series and other network devices like LDAP servers and
network routers.
Multicast Streaming
Multicast streaming sends a videoconference to multiple viewers across a range of addresses, reducing
network traffic significantly. Scopia® Desktop server multicasts to a single IP address, and streaming
clients must tune in to this IP address to view the meeting. Multicasts require that routers, switches and
other equipment know how to forward multicast traffic.
Multi-Point
A multi-point conference has more than two participants.
Multi-tenant
Service provider, or multi-tenant, deployments enable one installation to manage multiple organizations.
All the organizations can reside as tenants within a single service provider deployment. For example,
Scopia® Management can manage a separate set of users for each organization, separate local
administrators, separate bandwidth policies etc. all within a single multi-tenant installation.
NAT
A NAT, or Network Address Translation device, translates external IP addresses to internal addresses
housed in a private network. This enables a collection of devices like endpoints in a private network,
each with their own internal IP address, can be represented publicly by a single, unique IP address. The
User Guide for Avaya Video Collaboration Solution for IP Office
Version 8.3
Glossary of Terms for Scopia® Solution | 73
Page 74

NAT translates between public and private addresses, enabling users toplace calls between public
network users and private network users.
NetSense
NetSense is a proprietary Scopia® Solution technology which optimizes the video quality according to
the available bandwidth to minimize packet loss. As the available bandwidth of a connection varies
depending on data traffic, NetSense's sophisticated algorithm dynamically scans the video stream, and
then reduces or improves the video resolution to maximize quality with the available bandwidth.
Packet Loss
Packet loss occurs when some of the data transmitted from one endpoint is not received by the other
endpoint. This can be caused by narrow bandwidth connections or unreliable signal reception on
wireless networks.
PaP Video Layout
The PaP (Picture and Picture) view shows up to three images of the same size.
Phantom Power
Microphones which use phantom power draw their electrical power from the same cable as the audio
signal. For example, if your microphone is powered by a single cable, it serves both to power the
microphone and transmit the audio data. Microphones which have two cables, one for sound and a
separate power cable, do not use phantom power.
PiP Video Layout
The PiP (Picture In Picture) view shows a video image in the main screen, with an additional smaller
image overlapping in the corner. Typically, a remote presentation is displayed in the main part of the
screen, and the remote video is in the small image. If the remote endpoint does not show any content,
the display shows the remote video in the main part of the screen, and the local presentation in the small
image.
Point-to-Point
Point-to-point is a feature where only two endpoints communicate with each other without using MCU
resources.
User Guide for Avaya Video Collaboration Solution for IP Office
Version 8.3
Glossary of Terms for Scopia® Solution | 74
Page 75

PoP Video Layout
The PoP (Picture out Picture) view shows up to three images of different size, presented side by side,
where the image on the left is larger than the two smaller images on the right.
Prefix
See Dial Prefix on page 66.
PTZ Camera
A PTZ camera can pan to swivel horizontally, tilt to move vertically, and optically zoom to devote all the
camera's pixels to one area of the image. For example, the XT Standard Camera is a PTZ camera with
its own power supply and remote control, and uses powerful lenses to achieve superb visual quality. In
contrast, fixed cameras like webcams only offer digital PTZ, where the zoom crops the camera image,
displaying only a portion of the original, resulting in fewer pixels of the zoomed image, which effectively
lowers the resolution. Fixed cameras also offer digital pan and tilt only after zooming, where you can pan
up to the width or length of the original camera image.
Q.931
Q.931 is a telephony protocol used to start and end the connection in H.323 calls.
QCIF
QCIF, or Quarter CIF, defines a video resolution of 176 × 144 pixels (PAL) or 176 x 120 (NTSC). It is
often used in older mobile handsets (3G-324M) limited by screen resolution and processing power.
Quality of Service (QoS)
Quality of Service (QoS) determines the priorities of different types of network traffic (audio, video and
control/signaling), so in poor network conditions, prioritized traffic is still fully transmitted.
Recordings
A recording of a videoconference can be played back at any time. Recordings include audio, video and
shared data (if presented). In Scopia® Desktop, any participant with moderator rights can record a
meeting. Users can access Scopia® Desktop recordings from the Scopia® Desktop web portal or using
a web link to the recording on the portal.
User Guide for Avaya Video Collaboration Solution for IP Office
Version 8.3
Glossary of Terms for Scopia® Solution | 75
Page 76

Redundancy
Redundancy is a way to deploy a network component, in which you deploy extra units as 'spares', to be
used as backups in case one of the components fails.
Registrar
A SIP Registrar manages the SIP domain by requiring that all SIP devices register their IP addresses
with it. For example, once a SIP endpoint registers its IP address with the Registrar, it can place or
receive calls with other registered endpoints.
Resolution
Resolution, or image/video resolution, is the number of pixels which make up an image frame in the
video, measured as the number of horizontal pixels x the number of vertical pixels. Increasing resolution
improves video quality but typically requires higher bandwidth and more computing power. Techniques
like SVC, H.264 High Profile and FEC reduce bandwidth usage by compressing the data to a smaller
footprint and compensating for packet loss.
Room System
A room system is a hardware videoconferencing endpoint installed in a physical conference room.
Essential features include its camera's ability to PTZ (pan, tilt, zoom) to allow maximum flexibility of
camera angles enabling participants to see all those in the meeting room or just one part of the room.
RTP
RTP or Real-time Transport Protocol is a network protocol which supports video and voice transmission
over IP. It underpins most videoconferencing protocols today, including H.323, SIP and the streaming
control protocol known as RTSP. The secured version of RTP is SRTP.
RTCP
Real-time Control Transport Protocol, used alongside RTP for sending statistical information about the
media sent over RTP.
RTSP
RTSP or Real-Time Streaming Protocol controls the delivery of streamed live or playback video over IP,
with functions like pause, fast forward and reverse. While the media itself is sent via RTP, these control
functions are managed by RTSP
User Guide for Avaya Video Collaboration Solution for IP Office
Version 8.3
Glossary of Terms for Scopia® Solution | 76
Page 77

Sampling Rate
The sampling rate is a measure of the accuracy of the audio when it is digitized. To convert analog audio
to digital, it must collect or sample the audio at specific intervals. As the rate of sampling increases, it
raises audio quality.
SBC
A Session Border Controller (SBC) is a relay device between two different networks. It can be used in
firewall/NAT traversal, protocol translations and load balancing.
Scalability
Scalability describes the ability to increase the capacity of a network device by adding another identical
device (one or more) to your existing deployment. In contrast, a non-scalable solution would require
replacing existing components to increase capacity.
Scopia® Content Slider
SD
Service
SIF
Signaling
See Content Slider
Standard Definition (SD), is a term used to refer to video resolutions which are lower than HD. There is
no consensus defining one video resolution for SD.
Also known as MCU service. See Meeting Type on page 73.
SIF defines a video resolution of 352 x 240 pixels (NTSC) or 352 x 288 (PAL). This is often used in
security cameras.
on page 65.
Signaling, also known as call control, sets up, manages and ends a connection or call. These messages
include the authorization to make the call, checking bandwidth, resolving endpoint addresses, and
routing the call through different servers. Signaling is transmitted via the H.225.0/Q.931 and
H.225.0/RAS protocols in H.323 calls, or by the SIP headers in SIP calls. Signaling occurs before the
control aspect of call setup.
User Guide for Avaya Video Collaboration Solution for IP Office
Version 8.3
Glossary of Terms for Scopia® Solution | 77
Page 78

SIP
Session Initiation Protocol (SIP) is a signaling protocol for starting, managing and ending voice and
video sessions over TCP, TLS or UDP. Videoconferencing endpoints typically are compatible with SIP or
H.323, and in some cases (like Avaya Scopia® XT Series), an endpoint can be compatible with both
protocols. As a protocol, it uses fewer resources than H.323.
SIP Server
A SIP server is a network device communicating via the SIP protocol.
SIP URI
See URI on page 81.
SIP Registrar
See Registrar
Single Sign On
Single Sign On (SSO) automatically uses your network login and password to access different enterprise
systems. Using SSO, you do not need to separately login to each system or service in your organization.
Slider
See Content Slider on page 65.
SNMP
Simple Network Management Protocol (SNMP) is a protocol used to monitor network devices by
sending messages and alerts to their registered SNMP server.
Software endpoint
on page 76.
A software endpoint turns a computer or portable device into a videoconferencing endpoint via a
software application only. It uses the system's camera and microphone to send image and sound to the
other participants, and displays their images on the screen. For example, Scopia® Desktop Client or
Scopia® Mobile.
SRTP
Secure Real-time Transport Protocol (SRTP) adds security to the standard RTP protocol, which is used
to send media (video and audio) between devices in SIP calls. It offers security with encryption,
User Guide for Avaya Video Collaboration Solution for IP Office
Version 8.3
Glossary of Terms for Scopia® Solution | 78
Page 79

authentication and message integrity. The encryption uses a symmetric key generated at the start of the
call, and being symmetric, the same key locks and unlocks the data. So to secure transmission of the
symmetric key, it is sent safely during call setup using TLS.
SSO
See Single Sign On on page 78.
Standard Definition
See SD on page 77.
STUN
A STUN server enables you to directly dial an endpoint behind a NAT or firewall by giving that
computer’s public internet address.
SVC
SVC extends the H.264 codec standard to dramatically increase error resiliency and video quality
without the need for higher bandwidth. It is especially effective over networks with high packet loss (like
wireless networks) which deliver low quality video. It splits the video stream into layers, comprising a
small base layer and then additional layers on top which enhance resolution, frame rate and quality.
Each additional layer is only transmitted when bandwidth permits. This allows for a steady video
transmission when available bandwidth varies, providing better quality when the bandwidth is high, and
adequate quality when available bandwidth is poor.
SVGA
SVGA defines a video resolution of 800 x 600 pixels.
SQCIF
SQCIF defines a video resolution of 128 x 96 pixels.
Switched video
Switching is the process of redirecting video as-is without transcoding, so you see only one endpoint's
image at a time, usually the active speaker, without any video layouts or continuous presence (CP).
Using video switching increases the port capacity of the Scopia® Elite MCU only by four times.
User Guide for Avaya Video Collaboration Solution for IP Office
Version 8.3
Glossary of Terms for Scopia® Solution | 79
Page 80

Important:
Use switched video only when all endpoints participating in the videoconference support the same
resolution. If a network experiences high packet loss, switched video might not be displayed properly
for all endpoints in the videoconference.
SXGA
SXGA defines a video resolution of 1280 x 1024 pixels.
Telepresence
A telepresence system combines two or more endpoints together to create a wider image, simulating the
experience of participants being present in the same room. Telepresence systems always designate one
of the endpoints as the primary monitor/camera/codec unit, while the remainder are defined as auxiliary
or secondary endpoints. This ensures that you can issue commands via a remote control to a single
codec base which leads and controls the others to work together as a single telepresence endpoint.
Telepresence - Dual row telepresence room
Dual row telepresence rooms are large telepresence rooms with two rows of tables that can host up to
18 participants.
TLS
TLS enables network devices to communicate securely using certificates, to provide authentication of
the devices and encryption of the communication between them.
Transcoding
Transcoding is the process of converting video into different sizes, resolutions or formats. This enables
multiple video streams to be combined into one view, enabling continuous presence, as in a typical
videoconferencing window.
UC (Unified Communications)
UC, or unified communications deployments offer solutions covering a wide range of communication
channels. These include audio (voice), video, text (IM or chat), data sharing (presentations), whiteboard
sharing (interactive annotations on shared data).
User Guide for Avaya Video Collaboration Solution for IP Office
Version 8.3
Glossary of Terms for Scopia® Solution | 80
Page 81

Unbalanced Microphone
An unbalanced microphone uses a cable that is not especially built to reduce interference when the
cable is long. As a result, these unbalanced line devices must have shorter cables to avoid audio
disruptions.
Unicast Streaming
Unicast streaming sends a separate stream of a videoconference to each viewer. This is the default
method of streaming in Scopia® Desktop server. To save bandwidth, consider multicast streaming.
URI
URI is an address format used to locate a device on a network, where the address consists of the
endpoint's name or number, followed by the domain name of the server to which the endpoint is
registered. For example, <endpoint name>@<server_domain_name>. When dialing URI between
organizations, the server might often be the Avaya Scopia® PathFinder server of the organization.
URI Dialing
Accessing a device via its URI
User profile
A user profile is a set of capabilities or parameter values which can be assigned to a user. This includes
available meeting types (services), access to Scopia® Desktop and Scopia® Mobile functionality, and
allowed bandwidth for calls.
VFU
See Video Fast Update (VFU) on page 82.
VGA
VGA defines a video resolution of 640 x 480 pixels.
Videoconference
on page 81.
A videoconference is a meeting of more than two participants with audio and video using endpoints.
Professional videoconferencing systems can handle many participants in single meetings, and multiple
simultaneous meetings, with a wide interoperability score to enable a wide variety of endpoints to join
the same videoconference. Typically you can also share PC content, like presentations, to other
participants.
User Guide for Avaya Video Collaboration Solution for IP Office
Version 8.3
Glossary of Terms for Scopia® Solution | 81
Page 82

Video Fast Update (VFU)
Video Fast Update (VFU) is a request for a refreshed video frame, sent when the received video is
corrupted by packet loss. In response to a VFU request, the broadcasting endpoint sends a new intraframe to serve as the baseline for the ongoing video stream.
Video Layout
A video layout is the arrangement of participant images as they appear on the monitor in a
videoconference. If the meeting includes a presentation, a layout can also refer to the arrangement of
the presentation image together with the meeting participants.
Video Resolution
See Resolution on page 76.
Video Switching
See Switched video
Virtual Room
A virtual room in Scopia® Desktop and Scopia® Mobile offers a virtual meeting place for instant or
scheduled videoconferences. An administrator can assign a virtual room to each member of the
organization. Users can send invitations to each other via a web link which brings you directly into their
virtual room. Virtual meeting rooms are also dialed like phone extension numbers, where a user’s virtual
room number is often based on that person’s phone extension number. You can personalize your virtual
room with PIN numbers, custom welcome slides and so on. External participants can download Scopia
Desktop or Scopia® Mobile free to access a registered user's virtual room and participate in a
videoconference.
VISCA Cable
A crossed VISCA cable connects two PTZ cameras to enable you to use the same remote control on
both.
Waiting Room
on page 79.
®
A waiting room is a holding place for participants waiting for the host or moderator to join the meeting.
While waiting, participants see a static image with the name of the owner's virtual room, with an optional
audio message periodically saying the meeting will start when the host arrives.
User Guide for Avaya Video Collaboration Solution for IP Office
Version 8.3
Glossary of Terms for Scopia® Solution | 82
Page 83

WUXGA
XGA
Zone
WUXGA defines a video resolution of 1920 x 1200 pixels.
XGA defines a Video resolution of 1024 x 768 pixels.
Gatekeepers like Avaya Scopia® ECS Gatekeeper split endpoints into zones, where a group of
endpoints in a zone are registered to a gatekeeper. Often a zone is assigned a dial prefix, and usually
corresponds to a physical location like an organization's department or branch.
User Guide for Avaya Video Collaboration Solution for IP Office
Version 8.3
Glossary of Terms for Scopia® Solution | 83
Page 84

User Guide for Avaya Video Collaboration Solution for IP Office
Version 8.3
| 84
 Loading...