

Page 1
Quick Reference for Avaya
J169 and 179 SIP IP Phones in
Open SIP
Release 4.0.9
Issue 1
©
2020-2021, Avaya Inc.
All Rights Reserved.
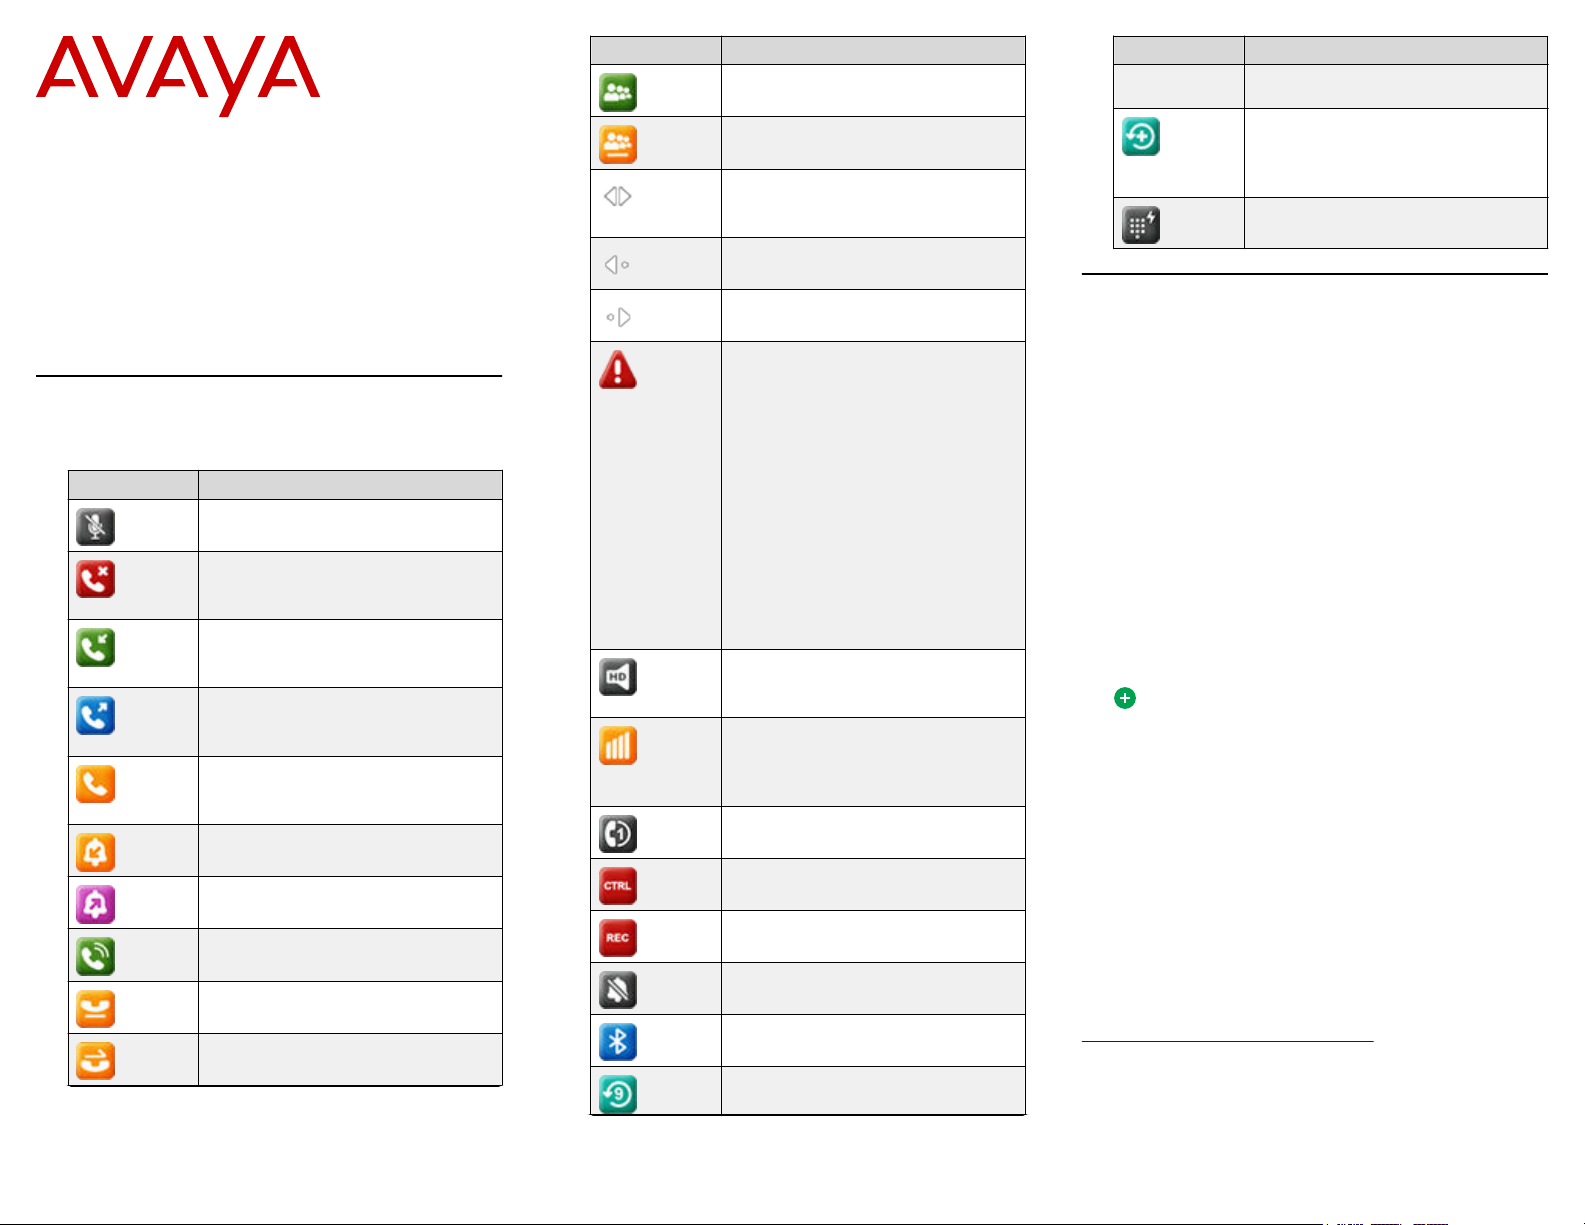
General phone icons
The following table lists the icons used in Avaya J169/
J179 IP Phones:
Icon Description
Microphone is muted.
Missed call on your phone. You can
see this icon in the Recents
application.
Incoming call; indicates you have
answered this call. You can see this
icon in the Recents application.
Outgoing call; indicates you have
made this call. You can see this
icon in the Recents application.
Bridged call; indicates this line is
being used for a call on another
phone.
Incoming call is alerting.
Outgoing call; indicates you have
made this call.
Call is active.
Call is on hold.
Call is on hold during a conference
or transfer call setup.
Table continues…
April 2021
Icon Description
Conference is active.
Conference is on hold.
Use the Right or Left navigation
arrow to see more pages /
screens / options.
Scroll left for other options.
Scroll right for other options.
Indicates that the phone is not
connected to the SIP proxy server
and is operating in Failover mode.
Some features might not be
available or work incorrectly.
If the appearance line displays this
icon, it indicates that the phone has
encountered a failure and has
preserved the media session until
the user hangs up.
This icon can also indicate that the
phone is connected to the call
server but the features are not
available.
Indicates that the call is using a
wideband codec for excellent voice
quality.
Indicates a low network
performance or presence of local
network issues that might result in
lower call quality.
The Limit Number of Concurrent
Calls (LNCC) feature is on.
Indicates that the SLA Mon™ agent
has taken control of the phone.
Indicates that the call is being
recorded for SLA Mon™.
Indicates that the audio alert for
incoming calls is off.
Indicates the Bluetooth feature is
on.
Indicates that you have missed a
call. The number in the icon
Icon Description
indicates the number of missed
calls.
Indicates that you have missed a
call. The + in the icon indicates that
the number of missed calls is more
than 9.
Autodialing feature
Operations
Entering the provisioning details
Enter the provisioning server address if the phone
prompts, for example, when you connect to the network
for the first time.
1. On Enter provisioning details screen, press one of the
following:
• Config: To enter the provisioning server address.
• Never: To never prompt for the provisioning server
address.
• Cancel: To cancel the prompt and display the Login
screen.
2. After you have pressed Config, enter the provisioning
server address in the Address field.
The address is an alphanumeric URL like http://
myfileserver.com/j100/.
Tip:
To enter the dot symbol (.) in the field, press the
alphanumeric soft key to toggle to the ABC mode.
To enter the forward slash symbol (/) in the field,
press the / soft key.
3. (Optional) Enter the Group number.
The value ranges from 0 to 999. 0 is the default value.
If you do not enter any value in this field, the phone
uses the default value.
4. Press Save.
The phone continues to boot and connect to the
provisioning server address for provisioning
configuration.
Related links
Setting Up the Avaya J179 IP Phone
Table continues…
1
Page 2

Logging in to your phone
Your extension and password are provided by your
administrator.
1. On the Login screen in the Username field, type your
extension.
2. Press Enter.
3. In the Password field, type your password.
4. Press Enter.
Logging out of your phone
Use this procedure to log out of your extension.
1. Press the Main menu.
2. Scroll to Applications and press Select.
3. Scroll to Log out, and press Select.
4. In the confirmation window, press Log out.
Locking your phone
You can lock your phone to prevent unauthorized use of
the phone when you are away. Locking your phone does
not log you out, you can still receive all calls and make
calls to emergency numbers.
To lock the phone, press Main menu, and select
Applications > Lock.
Making a call by using the manual dial mode
In a manual dial mode, you can edit the dialed input and
initiate a call using the current dialed string. When you
initiate a call, there is no dial tone, and no time out for
completing the dialed string.
• Do one of the following:
- Lift the handset.
- Press Speaker.
- Press Headset.
• Dial the number, and press the Call soft key or OK
button.
Or
• Just dial the number, and press the Call soft key or OK
button.
If your system administrator has enabled the digit
mapping feature the phone can automatically correct
wrongly dialed numbers or prevent you from dialing
certain numbers.
Related links
Basic call handling
Making a call by using speed dial
Ensure you have speed dial numbers assigned to your
contacts.
Press and hold the dial pad key assigned to the
number you want to call.
Making an emergency call
Ensure that the Emerg soft key is assigned by your
administrator.
Do one of the following:
• On the Phone screen, press the Emerg soft key,
and again press Emerg when the phone prompts
you for confirmation.
• Dial the emergency number by using the dial pad.
Setting LDAP Directory as the contact search source
You can select an LDAP directory as your contact search
source to enable searching from the Contacts application.
This selection disables other available search sources for
the Contacts application.
Ensure that the feature is activated by the administrator.
Contact your administrator for details.
1. Press Contacts.
2. (Optional) To navigate through Main menu, do the
following:
a. Scroll to Applications and press Select.
b. Scroll to Contacts and press Select.
3. To select LDAP Directory as a source for contact
search, press Search > More > Sources.
4. Scroll to LDAP contacts, and press Toggle.
LDAP Directory is now your contact search source.
Other sources are disabled. The phone displays the
following message: LDAP selected — other
search sources disabled.
5. Press Save.
Searching LDAP contacts
You can search the LDAP directory using the Contacts
application on your phone, and specify the LDAP directory
as a search source. Alternatively, the user can open the
LDAP directory application and refine the search of the
LDAP directory directly.
Set LDAP directory as the contacts search source.
1. Press Contacts.
(Optional) To navigate through Main Menu list, do
2.
one of the following:
• Scroll to Applications, and press Select.
• Scroll to Contacts, and press Select.
3. If you are searching from a LDAP Directory, scroll to
LDAP Directory, and press Select.
The phone displays the list of up to 1000 LDAP
contacts. You can use Up and Down line keys to
scroll through the list. If the phone cannot retrieve the
contacts from a LDAP server, the phone displays the
following message:
No contacts in the group.
4. Press Search.
5. Scroll to the Search type option and toggle between
Starts with and Contains.
When you select Starts with, the phone returns only
the matches that have your query at the start. When
you select Contains, the phone returns all matches
that contain your query.
6. Use the dial pad to enter multiple keywords,
separated by a blank space or a comma, into the
Search field, and press Search.
The phone displays the list of matches. If no matches
are found in the LDAP directory, the phone displays
the following message: No match found.
If more than 20 matches are found in the LDAP
directory, the phone displays the following message:
We found too many matches. Select from
the list or press Back to refine your
search.
7. (Optional) Press Details to view contact information
for a selected match.
8. (Optional) Press +Contact from the Details view to
add an LDAP contact to the list of your local contacts.
9. (Optional) Press Combine from the Details view to
select an existing local contact and merge it with the
selected LDAP contact.
Advanced features
Busy Lamp Field
With the Busy Lamp Field (BLF) feature, you can monitor
the call status of other phones connected to the same
network.
Important:
BLF lines are not call appearance lines and cannot be
used to make calls.
2
Page 3

In the Broadsoft environment, you can add a BLF user
from the Phone screen.
In the Asterisk environment, the system administrator
adds the new BLF user.
Depending on the configuration, you can use BLF lines to
the following tasks:
• Monitor the activity status of the phone.
• Receive incoming calls for another user that is
Directed Call Pickup.
• Speed Dial of a BLF user in an idle state.
• View outgoing call status.
• Barge-in on an active call.
• Unpark a call in the Broadsoft environment.
The administrator configures the action of the BLF line
key. Depending on the configuration, when you press the
BLF line key, the phone does one of the following:
First soft key is the key on the bottom left corner of the
phone screen.
• Performs the first soft key action.
• Highlights the corresponding line.
• Does not take any action if the corresponding line is
already highlighted.
However, in this case you can use the Ok button on
the phone to perform the action of the first soft key.
Adding a Broadsoft BLF user
In the Broadsoft environment, you can add a new BLF
monitored user by the common customization process of
adding a new line key on the Phone screen.
Note:
To add a BLF user in the Asterisk environment, contact
your system administrator.
Ensure that your administrator enables the BLF feature for
your extension.
1. On the Phone screen, do one of the following:
• Navigate to an empty line, and press Custom.
• On the Avaya J100 Expansion Module, press the
button corresponding to an empty line.
Depending on the way your administrator configures
your phone, the phone adds a new BLF user to the
first available line or to the selected line.
2. Press Add > More.
3. Press BLF.
4. (Optional) If there are many user names, press
Search.
(Optional) Enter the search criteria in one or both the
5.
search fields:
• First name
• Last name
6. Press Search.
7. Navigate to the name of the required user, and press
Select.
BLF call operations
Making a call to a monitored user
Ensure that the status of the monitored user is
Press Call or the corresponding BLF line key.
The phone automatically blocks an available primary
line and dials the extension of the monitored user.
Picking up an incoming call
Use this procedure to pick up an incoming call for the
monitored user.
Ensure that the administrator has activated the direct call
pick up operation on your phone.
Press Pickup or the corresponding BLF line key.
Note:
If your monitored user holds a local conference
call, you can receive multiple incoming calls for
each held participant.
Barging in on an active call
Use this procedure to barge in on an active call if the
monitored user is busy .
Ensure that the administrator has activated the direct call
pick up with barge in operation on your phone.
Press Barge in or the corresponding BLF line key.
Unparking a call
Use this procedure to unpark a parked call for the
monitored user.
idle.
A call parked by the monitored user is indicated with the
parked call icon
the corresponding line key.
Ensure that the administrator has activated the Call
Retrieve feature.
Press Unpark or the corresponding BLF line key.
and the blinking of the green LED of
BroadWorks Anywhere
With the BroadWorks Anywhere feature, you can make
and receive calls using any phone from any location. You
can use this feature to:
• Configure other phones to work in conjunction with
your business phone.
• Make calls from phones using your BroadWorks
business phone number as the Calling Line ID.
• Move calls across phones.
• Specify phones on which you can attend calls.
Note:
To activate the feature, contact your system
administrator or go to the BroadSoft web interface
yourself to activate the feature. See
www.broadsoft.com/ for more information.
Enabling and disabling BroadWorks Anywhere
1.
Press Main menu.
2.
Scroll to
3. Scroll to BroadWorks Anywhere, and press one of
the following:
• Enable: To enable the feature.
The green LED light turns on if one location is
configured, else the user is redirected to the feature
configuration to perform one of the following:
- Press Add: To add a location.
- Press Delete: To delete a location.
- Press Edit: To modify a location.
- Press Toggle: To enable or disable a location.
• Disable: To disable the feature.
The red LED light turns on, indicating that the
feature is available, but inactive.
4. (Optional) To enable or disable BroadWorks
Anywhere feature, press the corresponding line key.
Features, and press Select.
Note:
The BroadWorks Anywhere feature is enabled
only if a location is enabled.
https://
3
Page 4

Configuring BroadWorks Anywhere locations
A location is a phone number that you can use with your
primary business number. Use this procedure to configure
locations for the BroadWorks Anywhere feature.
1.
Press the
2. Scroll to Settings, and press Select.
3.
Scroll to
4. Scroll to BroadWorks Anywhere.
5. Scroll to Locations, and press Select.
6. Press Add, and configure the following:
• Phone number: The phone number that you want
to use for BroadWorks Anywhere.
• Description: A brief description about the phone
number.
• Alternate phone number: The alternate phone
number that you want to use for BroadWorks
Anywhere.
• BroadWorks call control: The BroadWorks server
controls the call. Press Toggle to enable the serverbased call control.
• Use diversion inhibitor: To prevent call redirection
for unanswered calls.
• Answer confirmation required: A confirmation
digit is required to prevent redirection of incoming
call to non BroadWorks device.
7. Press Save.
The phone number is added as a location.
8. To cancel the changes and go back to the previous
menu, press Cancel.
Main menu.
Features, and press Select.
Changing location details
Use this procedure to change saved location details.
1.
Press the
2. Scroll to Settings, and press Select.
3.
Scroll to
4. Scroll to BroadWorks Anywhere, and press Select.
5. Scroll to Locations, and press Select.
6. Press Edit.
The Location Edit screen displays the configured
locations.
7. Change the following:
• Description: To change the description, press
Backspac and then edit the description.
• BroadWorks call control: Press Toggle to enable
or disable the BroadWorks call control server.
Main menu.
Features, and press Select.
Use diversion inhibitor: Press Toggle to enable or
•
disable this field.
• Answer confirmation required: Press Toggle to
enable or disable this field.
8. Press Save.
BroadWorks Mobility
With the BroadWorks Mobility feature, you can use your
personal mobile device in conjunction with your desk IP
phone. You can make calls from your personal mobile
using a BroadWorks business number as the calling ID.
Limitations
The following are the limitations of the BroadWorks
Mobility feature:
• Only an administrator can enable or disable the
Mobility feature.
• Only an administrator can add the mobile numbers
for the Mobility feature.
Note:
To activate the feature, contact your system
administrator or go to the BroadSoft web interface to
activate the feature. See
for more information.
Enabling and disabling BroadWorks Mobility alerting
1.
Press Main menu.
2.
Scroll to Features, and press Select.
3. Scroll to BroadWorks Mobility, and press one of the
following:
• Enable: To enable the feature.
The green LED light turns on, indicating that some
or all configured mobile alerting are enabled.
• Disable: To disable the feature.
The red LED light turns on, indicating that all
configured mobile alerting are disabled.
Note:
If the LED does not light, contact your
administrator.
Configuring BroadWorks Mobility
Use this procedure to configure the mobile device you
want to use in conjunction with your office phone.
https://www.broadsoft.com/
Ensure your administrator has enabled the BroadWorks
Mobility feature for your extension.
1.
Press Main menu.
2. Scroll to Settings, and press Select.
3.
Scroll to Features, and press Select.
4. Scroll to BroadWorks Mobility, and press one of the
following:
5. Scroll to Mobile identity alerting, and press Select.
6. Do the following:
• Press Toggle for the required mobility numbers.
• Press Back to go back to the previous menu.
7. Scroll to Profile identity alerting.
8. Configure the following fields:
• Device to ring
• Include shared call appearance
• Include BroadWorks Anywhere
• Include executive assistant
• Mobile identities alerted
Flexible Seating
If configured by the system administrator, you can log in
from another agent’s phone to your extension and have
your primary phone settings there.
The phone used for guest login is called a host phone. If
the system administrator activated the Flexible Seating
feature on the host phone, you can log in to your primary
phone extension from its Features menu.
The top bar of the host phone displays the Host or the
Guest icon depending on the guest status.
Note:
This feature is available in BroadSoft environment.
Logging in to your primary phone extension from the host phone
Use this procedure to access your primary phone features
from another phone. After logging in, the host phone is
reconfigured with your primary phone settings.
If you want to use your primary phone again, you must log
out of your primary phone extension on the host phone or
turn off the host phone.
Ensure the following:
• The system administrator has auto-provisioned the
host phone with the Flexible Seating Host account.
• The system administrator has activated Flexible
Seating for the host phone.
4
Page 5

• You have turned off your primary phone.
1. Press Main menu.
2. Scroll to Applications, and press Select.
3. Scroll to Guest login, and press Select.
4. On the Guest login screen, in the Username field,
type your phone extension.
5. Press Enter.
6. In the Password field, type your password.
7. Press Enter.
The phone displays the Guest login is in
progress notification. After logging in, you are
directed to the Phone screen of your primary phone.
Logging out of your primary phone extension using a host phone
You must log out of your primary phone extension on the
host phone or turn off the host phone if you want to
resume using your primary phone.
1. Press Main menu.
2. Scroll to Applications, and press Select.
3. Scroll to Guest logout, and press Select.
The phone displays the Guest logout in
progress notification and rolls back to the host
settings.
Shared call appearance
With the Shared Call Appearance (SCA) feature, your
primary extension can be private or shared. Up to ten
additional shared extensions can be configured to appear
on your phone. All extensions are shared with other
phones connected to the same network.
Incoming calls to any shared extension alert all phones
configured with this extension.
Note:
SCA is available only in Avaya J139 IP Phone, Avaya
J159 IP Phone, Avaya J169/J179 IP Phone, and
Avaya J189 IP Phone.
To activate the feature, contact your system
administrator or go to the BroadSoft web interface
yourself to activate the feature. See https://
www.broadsoft.com/ for more information.
Joining a call in a shared line
Join a call that is active on another phone on an extension
which you are sharing. These calls are identified by the In-
use icon
Ensure that you are assigned a shared extension.
1. Scroll to the shared line.
2. Press Barge in.
3. (Optional) Press the corresponding line key beside
the held call that is active on the other phone.
Putting a call on private hold and resuming a call
If you are on call using a shared extension, use this
procedure to put your call on private hold. Putting a call on
private hold prevents any other phone with the same
shared extension from barging into the call while it is on
hold. The private hold feature can be useful when
transferring a call or preparing to create a conference call.
A unique icon
another phone on the same shared extension. When a
call is on private hold on another phone, the Barge-in
softkey is not available and the green LED does not blink.
Ensure that you are assigned a shared extension.
1. Scroll to the shared line.
2. During a call, press More.
3. Press Priv Hold.
To retrieve a call held privately on a shared extension,
press Resume or the corresponding line key beside the
held call.
indicates a call on private hold on
Shared Parking
You can park an active call to a Shared Parking room from
which other agents can retrieve it to talk to the caller. The
Phone screen displays the shared room as a BLF line.
The line icons reflect the current status of the shared
room: idle or busy.
You can move a Shared Parking line occupied by the
room and change its label from the Phone keys
customization menu.
To monitor the shared room, you must have the Shared
Parking feature configured on the phone. Contact your
system administrator for more details.
Shared Parking icons and indication
The following table shows the Shared Parking icons for
Avaya J169/J179 IP Phone Avaya J189 IP Phone and
button modules depending on the shared room state. The
icons are identical to the corresponding Idle and Parked
call BLF icons. In addition to visual indication, the phone
plays an audio alert in the same way as for a BLF line
when it has a parked call.
Shared
room
state
Idle Off Off
Busy Off Blink
Phone
and
Avaya
J100
Expansi
on
Module
icons
JBM24
Button
Module
icons
Red LED
for the
line key
Green
LED for
the line
key
Parking a call to a shared room
You might need to park an active call to the shared room
so that other agents having access to that room can
resume it.
• Make a call.
• Ensure the Shared Parking room is idle.
On the Phone screen, do one of the following:
• Scroll to the Shared Parking line, and press Park.
• Press the corresponding line key.
The call is parked to the shared room. The Shared
Parking line displays the Busy icon.
Unparking a call from a shared room
If you have access to the shared room, you can resume a
call parked to that room by the agent who answered it
first.
Ensure the Shared Parking room has a parked call.
On the Phone screen, do one of the following:
• Scroll to the Shared Parking line, and press
Unpark.
• Press the corresponding line key.
The call is unparked from the shared room, and you
can talk to the caller. The Shared Parking line displays
the Idle icon.
Customization
Enabling and disabling Bluetooth
You can use Bluetooth enabled devices with your phone.
5
Page 6

Note:
Avaya J169 IP Phone does not support the Bluetooth
feature.
• Ensure the wireless module is installed in your
phone.
1. Press the Main menu.
2. Scroll to Settings and press Select.
3. Scroll down to Bluetooth, and press Select.
4. Scroll to Bluetooth headset, and press one of the
following:
• Toggle: To enable or disable Bluetooth.
• Right Arrow key: To enable Bluetooth.
• Left Arrow key: To disable Bluetooth.
Note:
For some Bluetooth headsets, volume can be
adjusted during the first call after rebooting the
phone. Toggle the slider of the pop-up panel to the
right to increase the volume, and to the left to
decrease it.
Pairing a Bluetooth enabled headset with your phone
You can pair a maximum of ten Bluetooth enabled
headsets with the phone, but you can use only one
headset at a time. The phone displays the list of available
devices and paired devices.
• Ensure the wireless module is installed in your
phone.
• Ensure that the feature is activated by the
administrator. Contact your administrator for details.
• Ensure your Bluetooth headset is in pairing mode.
1. Press the Main menu.
2. Scroll to Settings and press Select.
3. Scroll down to Bluetooth, and press Select.
4. Scroll to Devices, and press Select.
The phone scans and displays the list of Bluetooth
enabled devices.
5. To pair a device, scroll to the headset, and press Pair.
6. To disconnect a paired headset, under Paired devices,
press Disconct.
7. To unpair a paired headset, under Paired devices,
press Forget.
Related links
Pairing a Bluetooth Headset to the J179 Phone
Customizing phone keys
Use this procedure to add, relabel, move, or delete
contacts, features, or applications from the Phone screen.
1. Press the Main menu.
2. Scroll to Settings and press Select.
3. Scroll to Phone and press Select.
4. Scroll to Phone keys customization, and press
Select.
5. Press Customize key.
6. Use Navigation keys to select the line key.
7. (Optional) On the phone screen, if the selected line is
empty, press Add, and do the following:
• To add a contact, press Contact.
• To add a feature, press Feature.
• To add an application, press App.
You can use the Navigation keys to scroll to the
required functionality, and press Select.
8. To move the selected line key, do the following:
a. Press Move.
b. Use the Navigation keys to move the selected
line.
c. (Optional) If the new location is empty, press
Select.
d. (Optional) If the new location is already assigned
a key, press Swap.
9. To set a new label, do the following:
a. Press Relabel.
b. Type the name of the label.
c. If your native language uses extended Latin or
non-Latin symbols, press More > Symbol the
soft key to open the Symbols menu and select
the necessary symbols there. Press Insert >
More > Save.
10. To delete a key, press Delete, and then confirm the
deletion.
Setting the network mode
You can set the network mode to Ethernet or Wi-Fi. You
do not need to perform this procedure if your phone is
configured to connect to Ethernet or a specific Wi-Fi
network.
Avaya J169 IP Phone does not support the Wi-Fi feature.
Ensure that the system administrator gave you access to
perform this task.
1. Press the Main menu.
2. Scroll to Settings and press Select.
3. Scroll to
4. Scroll to Network mode.
The Network mode setting shows the following
options:
• Ethernet: To connect to an Ethernet network.
• Wi-Fi: To connect phone to a Wi-Fi network.
5. Press one of the following:
• Toggle
• Right arrow key
• Left arrow key
6. When Network mode displays Wi-Fi, the following
lines are shown on the Phone screen:
• SSID: The name of the Wi-Fi network that the
• Wi-Fi network: Scroll to this line and press Select
7. After selecting the network mode, press Save.
8. When you switch Network mode from Ethernet to
Wi-Fi, see Connecting to a Wi-Fi network section.
9. When you switch Network mode from Wi-Fi to
Ethernet, press Save.
10. When the phone prompts for permission to restart,
press OK.
Press Cancel to go back to previous step.
Network and press Select.
phone is either currently connected to, or will
attempt to connect to if you start the connection
process.
to view the list of Wi-Fi networks.
Connecting to a Wi-Fi network
Use this procedure if your phone is not configured to
connect to a specific Wi-Fi network
Avaya J169 IP Phone does not support the Wi-Fi feature.
• Ensure that the system administrator gave you
access to perform this task.
• Select Wi-Fi as your network mode.
• When you set the network mode, note the SSID, as
this is the name of the Wi-Fi network that the phone
will attempt to connect to.
• Depending on the type of security in the Wi-Fi
network, obtain the required credentials. Contact
your system administrator for more details.
1. Press the Main menu.
2. Scroll to Settings and press Select.
3. Scroll to Network and press Select.
4. To access the list of available Wi-Fi networks, scroll to
Wi-Fi network, and press Select.
5. Scroll to the required Wi-Fi network, and press
Connect to start the connection process.
6
Page 7

6. Press OK to restart the phone.
7. If the security is WEP or WPA/WPA2 PSK, in
Password, enter the password for the Wi-Fi network.
8. If the security is 802.1x EAP, enter the following:
• Identity: Either your personal user ID or the shared
user ID provided by your system administrator.
• Anonymous Identity: Leave blank or use the
shared Anonymous Identity provided by your
system administrator.
• Password: Either your personal password or the
shared password provided by your system
administrator.
If the credentials are authenticated successfully, the
phone automatically restarts to complete the connection.
Changing the background image
1. Press the Main menu.
2. Scroll to Settings and press Select.
3. Scroll to Display and press Select.
4. Scroll to Background, and press Select.
5. Scroll to Primary display, and press Select.
6. Scroll down to the new image.
7. (Optional) To preview the image, press Preview and
then press Back.
8. Press Select.
9. Press Save.
Turning button clicks on and off
1. Press the Main menu.
2. Scroll to Settings and press Select.
3. Scroll to Audio settings and press Select.
4. Use the Down Arrow key to go to the Button clicks
screen.
5. Press Toggle to turn the audio on or off.
6. Press Save.
Setting a personalized ringtone
Use this procedure to set a ringtone for different uses.
1. Press the Main menu.
2. Scroll to Settings and press Select.
3. Scroll to Audio settings and press Select.
4. Scroll to Personalize ringing, and press Select.
5. Scroll to one of the following options:
• Primary
• Team Key
• Bridged CA
• Call Pickup
6. Press
7. Scroll to the ringtone, and press Select.
8. (Optional) To play the ringtone, press Play.
9. Press Save.
Select.
Setting the display language
1. Press the Main menu.
2. Scroll to Settings and press Select.
3. Scroll to Display and press Select.
4. Scroll to Language, and press Select.
5. Scroll to the language, and press Select.
6. Press one of the following when the phone prompts
for confirmation:
• Confirm
• Cancel
The phone returns to the Display screen and the
language changes to the selected language.
Setting the time format
Ensure that your administrator has enabled the time
format feature.
1. Press the Main menu.
2. Scroll to Settings and press Select.
3. Scroll to Display and press Select.
4. Use the Down Arrow key to go to the Time format
screen.
5. Press Toggle to select one of the following options:
• Time format 24 Hour
• Time format 12 Hour
6. Press Save.
For more information
Go to www.avaya.com/support for latest support
information, including the user guide, administrator guide,
installation and maintenance guide, interactive document,
and software downloads.
7
 Loading...