

Page 1

Installing and Administering Avaya
™
Vantage
Release 2.0
Issue 2
September 2018
Page 2

©
2017-2018, Avaya Inc.
All Rights Reserved.
Note
Using a cell, mobile, or GSM phone, or a two-way radio in close
proximity to an Avaya IP telephone might cause interference.
Documentation disclaimer
“Documentation” means information published in varying mediums
which may include product information, operating instructions and
performance specifications that are generally made available to users
of products. Documentation does not include marketing materials.
Avaya shall not be responsible for any modifications, additions, or
deletions to the original published version of Documentation unless
such modifications, additions, or deletions were performed by or on
the express behalf of Avaya. End User agrees to indemnify and hold
harmless Avaya, Avaya's agents, servants and employees against all
claims, lawsuits, demands and judgments arising out of, or in
connection with, subsequent modifications, additions or deletions to
this documentation, to the extent made by End User.
Link disclaimer
Avaya is not responsible for the contents or reliability of any linked
websites referenced within this site or Documentation provided by
Avaya. Avaya is not responsible for the accuracy of any information,
statement or content provided on these sites and does not
necessarily endorse the products, services, or information described
or offered within them. Avaya does not guarantee that these links will
work all the time and has no control over the availability of the linked
pages.
Warranty
Avaya provides a limited warranty on Avaya hardware and software.
Refer to your sales agreement to establish the terms of the limited
warranty. In addition, Avaya’s standard warranty language, as well as
information regarding support for this product while under warranty is
available to Avaya customers and other parties through the Avaya
Support website:
https://support.avaya.com/helpcenter/
getGenericDetails?detailId=C20091120112456651010 under the link
“Warranty & Product Lifecycle” or such successor site as designated
by Avaya. Please note that if You acquired the product(s) from an
authorized Avaya Channel Partner outside of the United States and
Canada, the warranty is provided to You by said Avaya Channel
Partner and not by Avaya.
“Hosted Service” means an Avaya hosted service subscription that
You acquire from either Avaya or an authorized Avaya Channel
Partner (as applicable) and which is described further in Hosted SAS
or other service description documentation regarding the applicable
hosted service. If You purchase a Hosted Service subscription, the
foregoing limited warranty may not apply but You may be entitled to
support services in connection with the Hosted Service as described
further in your service description documents for the applicable
Hosted Service. Contact Avaya or Avaya Channel Partner (as
applicable) for more information.
Hosted Service
THE FOLLOWING APPLIES ONLY IF YOU PURCHASE AN AVAYA
HOSTED SERVICE SUBSCRIPTION FROM AVAYA OR AN AVAYA
CHANNEL PARTNER (AS APPLICABLE), THE TERMS OF USE
FOR HOSTED SERVICES ARE AVAILABLE ON THE AVAYA
WEBSITE,
HTTPS://SUPPORT.AVAYA.COM/LICENSEINFO UNDER
THE LINK “Avaya Terms of Use for Hosted Services” OR SUCH
SUCCESSOR SITE AS DESIGNATED BY AVAYA, AND ARE
APPLICABLE TO ANYONE WHO ACCESSES OR USES THE
HOSTED SERVICE. BY ACCESSING OR USING THE HOSTED
SERVICE, OR AUTHORIZING OTHERS TO DO SO, YOU, ON
BEHALF OF YOURSELF AND THE ENTITY FOR WHOM YOU ARE
DOING SO (HEREINAFTER REFERRED TO INTERCHANGEABLY
AS “YOU” AND “END USER”), AGREE TO THE TERMS OF USE. IF
YOU ARE ACCEPTING THE TERMS OF USE ON BEHALF A
COMPANY OR OTHER LEGAL ENTITY, YOU REPRESENT THAT
YOU HAVE THE AUTHORITY TO BIND SUCH ENTITY TO THESE
TERMS OF USE. IF YOU DO NOT HAVE SUCH AUTHORITY, OR IF
YOU DO NOT WISH TO ACCEPT THESE TERMS OF USE, YOU
MUST NOT ACCESS OR USE THE HOSTED SERVICE OR
AUTHORIZE ANYONE TO ACCESS OR USE THE HOSTED
SERVICE.
Licenses
THE SOFTWARE LICENSE TERMS AVAILABLE ON THE AVAYA
WEBSITE, HTTPS://SUPPORT.AVAYA.COM/LICENSEINFO,
UNDER THE LINK “AVAYA SOFTWARE LICENSE TERMS (Avaya
Products)” OR SUCH SUCCESSOR SITE AS DESIGNATED BY
AVAYA, ARE APPLICABLE TO ANYONE WHO DOWNLOADS,
USES AND/OR INSTALLS AVAYA SOFTWARE, PURCHASED
FROM AVAYA INC., ANY AVAYA AFFILIATE, OR AN AVAYA
CHANNEL PARTNER (AS APPLICABLE) UNDER A COMMERCIAL
AGREEMENT WITH AVAYA OR AN AVAYA CHANNEL PARTNER.
UNLESS OTHERWISE AGREED TO BY AVAYA IN WRITING,
AVAYA DOES NOT EXTEND THIS LICENSE IF THE SOFTWARE
WAS OBTAINED FROM ANYONE OTHER THAN AVAYA, AN AVAYA
AFFILIATE OR AN AVAYA CHANNEL PARTNER; AVAYA
RESERVES THE RIGHT TO TAKE LEGAL ACTION AGAINST YOU
AND ANYONE ELSE USING OR SELLING THE SOFTWARE
WITHOUT A LICENSE. BY INSTALLING, DOWNLOADING OR
USING THE SOFTWARE, OR AUTHORIZING OTHERS TO DO SO,
YOU, ON BEHALF OF YOURSELF AND THE ENTITY FOR WHOM
YOU ARE INSTALLING, DOWNLOADING OR USING THE
SOFTWARE (HEREINAFTER REFERRED TO
INTERCHANGEABLY AS “YOU” AND “END USER”), AGREE TO
THESE TERMS AND CONDITIONS AND CREATE A BINDING
CONTRACT BETWEEN YOU AND AVAYA INC. OR THE
APPLICABLE AVAYA AFFILIATE (“AVAYA”).
Avaya grants You a license within the scope of the license types
described below, with the exception of Heritage Nortel Software, for
which the scope of the license is detailed below. Where the order
documentation does not expressly identify a license type, the
applicable license will be a Designated System License as set forth
below in the Designated System(s) License (DS) section as
applicable. The applicable number of licenses and units of capacity
for which the license is granted will be one (1), unless a different
number of licenses or units of capacity is specified in the
documentation or other materials available to You. “Software” means
computer programs in object code, provided by Avaya or an Avaya
Channel Partner, whether as stand-alone products, pre-installed on
hardware products, and any upgrades, updates, patches, bug fixes,
or modified versions thereto. “Designated Processor” means a single
stand-alone computing device. “Server” means a set of Designated
Processors that hosts (physically or virtually) a software application
to be accessed by multiple users. “Instance” means a single copy of
the Software executing at a particular time: (i) on one physical
machine; or (ii) on one deployed software virtual machine (“VM”) or
similar deployment.
License types
Designated System(s) License (DS). End User may install and use
each copy or an Instance of the Software only: 1) on a number of
Designated Processors up to the number indicated in the order; or 2)
up to the number of Instances of the Software as indicated in the
order, Documentation, or as authorized by Avaya in writing. Avaya
may require the Designated Processor(s) to be identified in the order
by type, serial number, feature key, Instance, location or other
specific designation, or to be provided by End User to Avaya through
electronic means established by Avaya specifically for this purpose.
Shrinkwrap License (SR). You may install and use the Software in
accordance with the terms and conditions of the applicable license
agreements, such as “shrinkwrap” or “clickthrough” license
accompanying or applicable to the Software (“Shrinkwrap License”).
Heritage Nortel Software
“Heritage Nortel Software” means the software that was acquired by
Avaya as part of its purchase of the Nortel Enterprise Solutions
Business in December 2009. The Heritage Nortel Software is the
software contained within the list of Heritage Nortel Products located
https://support.avaya.com/LicenseInfo under the link “Heritage
at
Nortel Products” or such successor site as designated by Avaya. For
Heritage Nortel Software, Avaya grants Customer a license to use
Heritage Nortel Software provided hereunder solely to the extent of
the authorized activation or authorized usage level, solely for the
purpose specified in the Documentation, and solely as embedded in,
for execution on, or for communication with Avaya equipment.
Charges for Heritage Nortel Software may be based on extent of
activation or use authorized as specified in an order or invoice.
Page 3

Copyright
Except where expressly stated otherwise, no use should be made of
materials on this site, the Documentation, Software, Hosted Service,
or hardware provided by Avaya. All content on this site, the
documentation, Hosted Service, and the product provided by Avaya
including the selection, arrangement and design of the content is
owned either by Avaya or its licensors and is protected by copyright
and other intellectual property laws including the sui generis rights
relating to the protection of databases. You may not modify, copy,
reproduce, republish, upload, post, transmit or distribute in any way
any content, in whole or in part, including any code and software
unless expressly authorized by Avaya. Unauthorized reproduction,
transmission, dissemination, storage, and or use without the express
written consent of Avaya can be a criminal, as well as a civil offense
under the applicable law.
Virtualization
The following applies if the product is deployed on a virtual machine.
Each product has its own ordering code and license types. Note,
unless otherwise stated, that each Instance of a product must be
separately licensed and ordered. For example, if the end user
customer or Avaya Channel Partner would like to install two
Instances of the same type of products, then two products of that
type must be ordered.
Third Party Components
“Third Party Components” mean certain software programs or
portions thereof included in the Software or Hosted Service may
contain software (including open source software) distributed under
third party agreements (“Third Party Components”), which contain
terms regarding the rights to use certain portions of the Software
(“Third Party Terms”). As required, information regarding distributed
Linux OS source code (for those products that have distributed Linux
OS source code) and identifying the copyright holders of the Third
Party Components and the Third Party Terms that apply is available
in the products, Documentation or on Avaya’s website at:
support.avaya.com/Copyright or such successor site as designated
by Avaya. The open source software license terms provided as Third
Party Terms are consistent with the license rights granted in these
Software License Terms, and may contain additional rights benefiting
You, such as modification and distribution of the open source
software. The Third Party Terms shall take precedence over these
Software License Terms, solely with respect to the applicable Third
Party Components to the extent that these Software License Terms
impose greater restrictions on You than the applicable Third Party
Terms.
The following applies only if the H.264 (AVC) codec is distributed with
the product. THIS PRODUCT IS LICENSED UNDER THE AVC
PATENT PORTFOLIO LICENSE FOR THE PERSONAL USE OF A
CONSUMER OR OTHER USES IN WHICH IT DOES NOT RECEIVE
REMUNERATION TO (i) ENCODE VIDEO IN COMPLIANCE WITH
THE AVC STANDARD (“AVC VIDEO”) AND/OR (ii) DECODE AVC
VIDEO THAT WAS ENCODED BY A CONSUMER ENGAGED IN A
PERSONAL ACTIVITY AND/OR WAS OBTAINED FROM A VIDEO
PROVIDER LICENSED TO PROVIDE AVC VIDEO. NO LICENSE IS
GRANTED OR SHALL BE IMPLIED FOR ANY OTHER USE.
ADDITIONAL INFORMATION MAY BE OBTAINED FROM MPEG LA,
L.L.C. SEE
Service Provider
THE FOLLOWING APPLIES TO AVAYA CHANNEL PARTNER’S
HOSTING OF AVAYA PRODUCTS OR SERVICES. THE PRODUCT
OR HOSTED SERVICE MAY USE THIRD PARTY COMPONENTS
SUBJECT TO THIRD PARTY TERMS AND REQUIRE A SERVICE
PROVIDER TO BE INDEPENDENTLY LICENSED DIRECTLY FROM
THE THIRD PARTY SUPPLIER. AN AVAYA CHANNEL PARTNER’S
HOSTING OF AVAYA PRODUCTS MUST BE AUTHORIZED IN
WRITING BY AVAYA AND IF THOSE HOSTED PRODUCTS USE
OR EMBED CERTAIN THIRD PARTY SOFTWARE, INCLUDING
BUT NOT LIMITED TO MICROSOFT SOFTWARE OR CODECS,
THE AVAYA CHANNEL PARTNER IS REQUIRED TO
INDEPENDENTLY OBTAIN ANY APPLICABLE LICENSE
AGREEMENTS, AT THE AVAYA CHANNEL PARTNER’S EXPENSE,
DIRECTLY FROM THE APPLICABLE THIRD PARTY SUPPLIER.
WITH RESPECT TO CODECS, IF THE AVAYA CHANNEL
PARTNER IS HOSTING ANY PRODUCTS THAT USE OR EMBED
THE G.729 CODEC, H.264 CODEC, OR H.265 CODEC, THE
HTTP://WWW.MPEGLA.COM.
https://
AVAYA CHANNEL PARTNER ACKNOWLEDGES AND AGREES
THE AVAYA CHANNEL PARTNER IS RESPONSIBLE FOR ANY
AND ALL RELATED FEES AND/OR ROYALTIES. THE G.729
CODEC IS LICENSED BY SIPRO LAB TELECOM INC. SEE
WWW.SIPRO.COM/CONTACT.HTML. THE H.264 (AVC) CODEC IS
LICENSED UNDER THE AVC PATENT PORTFOLIO LICENSE FOR
THE PERSONAL USE OF A CONSUMER OR OTHER USES IN
WHICH IT DOES NOT RECEIVE REMUNERATION TO: (I) ENCODE
VIDEO IN COMPLIANCE WITH THE AVC STANDARD (“AVC
VIDEO”) AND/OR (II) DECODE AVC VIDEO THAT WAS ENCODED
BY A CONSUMER ENGAGED IN A PERSONAL ACTIVITY AND/OR
WAS OBTAINED FROM A VIDEO PROVIDER LICENSED TO
PROVIDE AVC VIDEO. NO LICENSE IS GRANTED OR SHALL BE
IMPLIED FOR ANY OTHER USE. ADDITIONAL INFORMATION
FOR H.264 (AVC) AND H.265 (HEVC) CODECS MAY BE
OBTAINED FROM MPEG LA, L.L.C. SEE
WWW.MPEGLA.COM.
Compliance with Laws
You acknowledge and agree that it is Your responsibility for
complying with any applicable laws and regulations, including, but not
limited to laws and regulations related to call recording, data privacy,
intellectual property, trade secret, fraud, and music performance
rights, in the country or territory where the Avaya product is used.
Preventing Toll Fraud
“Toll Fraud” is the unauthorized use of your telecommunications
system by an unauthorized party (for example, a person who is not a
corporate employee, agent, subcontractor, or is not working on your
company's behalf). Be aware that there can be a risk of Toll Fraud
associated with your system and that, if Toll Fraud occurs, it can
result in substantial additional charges for your telecommunications
services.
Avaya Toll Fraud intervention
If You suspect that You are being victimized by Toll Fraud and You
need technical assistance or support, call Technical Service Center
Toll Fraud Intervention Hotline at +1-800-643-2353 for the United
States and Canada. For additional support telephone numbers, see
the Avaya Support website:
successor site as designated by Avaya.
Security Vulnerabilities
Information about Avaya’s security support policies can be found in
the Security Policies and Support section of
support.avaya.com/security.
Suspected Avaya product security vulnerabilities are handled per the
Avaya Product Security Support Flow (
support.avaya.com/css/P8/documents/100161515).
Downloading Documentation
For the most current versions of Documentation, see the Avaya
Support website:
as designated by Avaya.
Contact Avaya Support
See the Avaya Support website:
product or Hosted Service notices and articles, or to report a problem
with your Avaya product or Hosted Service. For a list of support
telephone numbers and contact addresses, go to the Avaya Support
website:
designated by Avaya), scroll to the bottom of the page, and select
Contact Avaya Support.
Regulatory Statements
Australia Statements
Handset Magnets Statement:
Industry Canada (IC) Statements
RSS Standards Statement
https://support.avaya.com (or such successor site as
Danger:
The handset receiver contains magnetic devices that can
attract small metallic objects. Care should be taken to avoid
personal injury.
https://support.avaya.com, or such successor site
https://support.avaya.com or such
https://support.avaya.com for
HTTP://
https://
https://
Page 4
This device complies with Industry Canada licence-exempt RSS
standard(s). Operation is subject to the following two conditions:
1. This device may not cause interference, and
2. This device must accept any interference, including
interference that may cause undesired operation of the
device.
Le présent appareil est conforme aux CNR d'Industrie Canada
applicables aux appareils radio exempts de licence. L'exploitation est
autorisée aux deux conditions suivantes:
1. L'appareil ne doit pas produire de brouillage, et
2. L'utilisateur de l'appareil doit accepter tout brouillage
radioélectrique subi, même si le brouillage est susceptible
d'en compromettre le fonctionnement.
Radio Transmitter Statement
Under Industry Canada regulations, this radio transmitter may only
operate using an antenna of a type and maximum (or lesser) gain
approved for the transmitter by Industry Canada. To reduce potential
radio interference to other users, the antenna type and its gain
should be so chosen that the equivalent isotropically radiated power
(EIRP) is not more than that necessary for successful
communication.
Conformément à la réglementation d'Industrie Canada, le présent
émetteur radio peut fonctionner avec une antenne d'un type et d'un
gain maximal (ou inférieur) approuvé pour l'émetteur par Industrie
Canada. Dans le but de réduire les risques de brouillage
radioélectrique à l'intention des autres utilisateurs, il faut choisir le
type d'antenne et son gain de sorte que la puissance isotrope
rayonnée équivalente ne dépasse pas l'intensité nécessaire à
l'établissement d'une communication satisfaisante.
This Class B digital apparatus complies with Canadian ICES-003.
Cet appareil numérique de la classe B est conforme à la norme
NMB-003 du Canada.
Radiation Exposure Statement
This equipment complies with FCC & IC RSS102 radiation exposure
limits set forth for an uncontrolled environment. This equipment
should be installed and operated with minimum distance 20cm
between the radiator & your body. This transmitter must not be colocated or operating in conjunction with any other antenna or
transmitter.
Cet équipement est conforme aux limites d'exposition aux
rayonnements ISEDétablies pour un environnement non contrôlé.
Cet équipement doit être installé et utilisé avec un minimum de 20
cm de distance entre la source de rayonnement et votre corps.
Japan Statements
Class B Statement
This is a Class B product based on the standard of the VCCI Council.
If this is used near a radio or television receiver in a domestic
environment, it may cause radio interference. Install and use the
equipment according to the instruction manual.
Denan Power Cord Statement
Danger:
Please be careful of the following while installing the
equipment:
• Please only use the connecting cables, power cord, and
AC adapters shipped with the equipment or specified by
Avaya to be used with the equipment. If you use any
other equipment, it may cause failures, malfunctioning,
or fire.
• Power cords shipped with this equipment must not be
used with any other equipment. In case the above
guidelines are not followed, it may lead to death or
severe injury.
本製品を安全にご使用頂くため、以下のことにご注意ください。
• 接続ケーブル、電源コード、AC アダプタなどの部品は、必ず
製品に同梱されております添付品または指定品をご使用くだ
さい。添付品指定品以外の部品をご使用になると故障や動作
不良、火災の原因となることがあります。
• 同梱されております付属の電源コードを他の機器には使用し
ないでください。上記注意事項を守らないと、死亡や大怪我
など人身事故の原因となることがあります。
México Statement
The operation of this equipment is subject to the following two
conditions:
1. It is possible that this equipment or device may not cause
harmful interference, and
2. This equipment or device must accept any interference,
including interference that may cause undesired operation.
La operación de este equipo está sujeta a las siguientes dos
condiciones:
1. Es posible que este equipo o dispositivo no cause
interferencia perjudicial y
2. Este equipo o dispositivo debe aceptar cualquier
interferencia, incluyendo la que pueda causar su operación
no deseada.
Power over Ethernet (PoE) Statement
This equipment must be connected to PoE networks without routing
to the outside plant.
U.S. Federal Communications Commission (FCC) Statements
Compliance Statement
The changes or modifications not expressly approved by the party
responsible for compliance could void the user’s authority to operate
the equipment.
To comply with the FCC RF exposure compliance requirements, this
device and its antenna must not be co-located or operating to
conjunction with any other antenna or transmitter.
This device complies with part 15 of the FCC Rules. Operation is
subject to the following two conditions:
1. This device may not cause harmful interference, and
2. This device must accept any interference received,
including interferences that may cause undesired
operation.
This equipment has been tested and found to comply with the limits
for a Class B digital device, pursuant to Part 15 of the FCC Rules.
These limits are designated to provide reasonable protection against
harmful interferences in a residential installation. This equipment
generates, uses and can radiate radio frequency energy and, if not
installed and used in accordance with the instructions, may cause
harmful interference to radio communications. However, there is no
guarantee that interference will not occur in a particular installation. If
this equipment does cause harmful interferences to radio or
television reception, which can be determined by turning the
equipment off and on, the user is encouraged to try to correct the
interference by one or more of the following measures:
• Reorient or relocate the receiving antenna.
• Increase the separation between the equipment and receiver.
• Connect the equipment into an outlet on a circuit different from
that to which the receiver is connected.
• Consult the dealer or an experienced radio/TV technician for
help.
Page 5

Radiation Exposure Statement
This equipment complies with FCC radiation exposure limits set forth
for an uncontrolled environment . This equipment should be installed
and operated with minimum distance of 8 in or 20 cm between the
radiator and your body. This transmitter must not be co-located or
operating in conjunction with any other antenna or transmitter.
EU Countries
This device when installed complies with the essential requirements
and other relevant provisions of the EMC Directive 2014/30/EU,
Safety LV Directive 2014/35/EU, and Radio Equipment Directive
2014/53/EU. A copy of the Declaration may be obtained from
support.avaya.com or Avaya Inc., 4655 Great America Parkway,
Santa Clara, CA 95054–1233 USA.
WiFi and BT transmitter
• Frequencies for 2412-2472 MHz, transmit power: 19.84 dBm
• Frequencies for 5180-5240 MHz, transmit power: 22.5 dBm
General Safety Warning
• Use only the Avaya approved Limited Power Source power
supplies specified for this product.
• Ensure that you:
- Do not operate the device near water.
- Do not use the device during a lightning storm.
- Do not report a gas leak while in the vicinity of the leak.
- For Accessory Power Supply - Use Only Limited Power
Supply Delta Electronics Inc. model:ADP-30HR B ,output:
48Vdc, 0.66A.
Trademarks
The trademarks, logos and service marks (“Marks”) displayed in this
site, the Documentation, Hosted Service(s), and product(s) provided
by Avaya are the registered or unregistered Marks of Avaya, its
affiliates, its licensors, its suppliers, or other third parties. Users are
not permitted to use such Marks without prior written consent from
Avaya or such third party which may own the Mark. Nothing
contained in this site, the Documentation, Hosted Service(s) and
product(s) should be construed as granting, by implication, estoppel,
or otherwise, any license or right in and to the Marks without the
express written permission of Avaya or the applicable third party.
Avaya is a registered trademark of Avaya Inc.
All non-Avaya trademarks are the property of their respective owners.
Linux® is the registered trademark of Linus Torvalds in the U.S. and
other countries.
Android, Google and Google Play are trademarks of Google Inc.
Device Usage Consent
By using the Avaya device you agree that Avaya, from time to time,
may collect network and device data from your device and may use
such data in order to validate your eligibility to use the device.
http://
Page 6

Contents
Chapter 1: Introduction.......................................................................................................... 10
Purpose................................................................................................................................ 10
Change history...................................................................................................................... 10
Chapter 2: Avaya Vantage™ overview................................................................................... 12
Device layout........................................................................................................................ 13
Layout of Avaya Vantage™ K165 and K175........................................................................ 13
Layout of Avaya Vantage™ K155....................................................................................... 14
Connectors and controls.................................................................................................. 15
Optional components for the Avaya Vantage™ device............................................................... 18
Wireless handset layout......................................................................................................... 19
Specifications........................................................................................................................ 19
Wireless handset specifications........................................................................................ 22
Camera specifications..................................................................................................... 24
Environmental specifications............................................................................................ 25
Chapter 3: Initial setup and connectivity.............................................................................. 26
Initial setup checklist.............................................................................................................. 26
Software and hardware prerequisites...................................................................................... 27
Preinstallation data................................................................................................................ 28
System Manager user profile worksheet............................................................................ 28
IP Office SIP user and extension settings.......................................................................... 29
Settings file worksheet..................................................................................................... 29
DHCP settings worksheet................................................................................................ 30
Connecting a handset to Avaya Vantage
Connecting the handset cradle to Avaya Vantage
Connecting a wired handset............................................................................................. 32
Connecting a wireless handset......................................................................................... 32
Installing the K155 wireless module........................................................................................ 34
Power management.............................................................................................................. 35
Connecting Avaya Vantage™ to the network............................................................................. 36
Device deployment through Device Enrollment Services........................................................... 37
Chapter 4: Server configuration............................................................................................ 38
DHCP and file server configuration checklist............................................................................ 38
DHCP server configuration..................................................................................................... 39
Setting up a DHCP server................................................................................................ 39
File server configuration......................................................................................................... 40
Setting up a file server..................................................................................................... 41
Avaya Aura® configuration for Avaya Vantage
Avaya Aura® System Manager configuration...................................................................... 42
PPM configuration........................................................................................................... 42
™
............................................................................... 31
™
........................................................................ 41
™
............................................................ 31
September 2018 Installing and Administering Avaya Vantage
Comments on this document? infodev@avaya.com
™
6
Page 7

Contents
Avaya Aura® Device Services configuration....................................................................... 43
IP Office configuration for Avaya Vantage
™
.............................................................................. 43
Avaya Session Border Controller for Enterprise configuration.................................................... 43
Chapter 5: Security configuration......................................................................................... 45
Password security policies..................................................................................................... 46
Certificate management......................................................................................................... 47
Certificate usage by applications............................................................................................ 48
Parameter configuration for secure installation......................................................................... 49
Chapter 6: Device configuration............................................................................................ 53
Device configuration using DHCP options............................................................................... 54
Configurable DHCP options............................................................................................. 54
DHCP site-specific options............................................................................................... 56
Device configuration using a 46xxsettings.txt settings file......................................................... 58
Configuring the settings file.............................................................................................. 59
Customization of the settings file...................................................................................... 59
User group configuration in the settings file....................................................................... 61
Device configuration using LLDP............................................................................................ 61
Initial values of parameters transmitting in LLDP frames .................................................... 62
TLV impact on system parameter values........................................................................... 63
Device configuration using the Settings menu on the device..................................................... 65
Device configuration checklist.......................................................................................... 65
Administrator password configuration................................................................................ 66
Enabling administrator settings on the device.................................................................... 67
Setting up a file server address........................................................................................ 68
Setting the DNS name and address.................................................................................. 68
Setting the Avaya Aura® Device Services server address................................................... 69
Setting a user group for a specific configuration................................................................. 70
Setting up an HTTP proxy and exception........................................................................... 70
Configuring SIP server settings........................................................................................ 71
Setting up a DHCP site-specific option number.................................................................. 72
Additional network configuration....................................................................................... 72
Chapter 7: Application setup................................................................................................. 74
Pushing applications onto the Avaya Vantage™ device............................................................. 75
Push command examples................................................................................................ 76
Uninstalling a pushed application...................................................................................... 76
Access to Google Play applications for K165 and K175............................................................ 77
Editing a black or white list............................................................................................... 77
Access to applications from unknown sources......................................................................... 79
Setting up a CSDK-based telephony application as the active application.................................. 79
Avaya telephony applications supported on Avaya Vantage
™
.............................................. 80
Package names of CSDK-based applications.................................................................... 80
Chapter 8: Kiosk mode configuration................................................................................... 82
Kiosk mode configuration checklist......................................................................................... 82
September 2018 Installing and Administering Avaya Vantage
Comments on this document? infodev@avaya.com
™
7
Page 8

Contents
Applications to be pinned in Kiosk mode................................................................................. 83
Unpinning applications in Kiosk mode............................................................................... 84
Starting Kiosk mode for the first time....................................................................................... 84
Exiting Kiosk mode................................................................................................................ 84
Chapter 9: Maintenance......................................................................................................... 85
Restoring factory settings from the Settings menu................................................................... 85
Rebooting Avaya Vantage™ from the Settings menu................................................................ 86
Failover and survivability........................................................................................................ 86
Debugging and monitoring the device..................................................................................... 86
Enabling verbose logging................................................................................................. 86
Generating a debug report............................................................................................... 87
Generating an audio report............................................................................................... 88
Opening a debug or audio report...................................................................................... 89
Configuring the SSH server settings.................................................................................. 90
Enabling port mirroring..................................................................................................... 90
Pinging a device on the network....................................................................................... 91
Chapter 10: Device upgrade.................................................................................................. 92
Firmware upgrade prerequisites............................................................................................. 92
Device upgrade process........................................................................................................ 93
Automatic upgrades............................................................................................................... 93
Upgrading Avaya Vantage™ using the Update option................................................................ 94
Upgrading Avaya Vantage™ using System Manager................................................................. 94
Upgrading Avaya Vantage™ using IP Office............................................................................. 95
CSDK-based application upgrades......................................................................................... 95
Chapter 11: Troubleshooting................................................................................................. 97
Firmware is corrupted............................................................................................................ 97
Chapter 12: Resources........................................................................................................... 99
Documentation...................................................................................................................... 99
Finding documents on the Avaya Support website........................................................... 100
Avaya Documentation Portal navigation.......................................................................... 101
Viewing Avaya Mentor videos............................................................................................... 102
Support.............................................................................................................................. 103
Using the Avaya InSite Knowledge Base......................................................................... 103
Appendix A: Supported configuration parameters........................................................... 104
Parameters for controlling configuration parameter downloads................................................ 104
Phone parameters............................................................................................................... 105
General phone functionality.................................................................................................. 106
Phone UI related settings..................................................................................................... 109
Server addresses and ports.................................................................................................. 116
Network settings.................................................................................................................. 125
General settings............................................................................................................ 125
Ethernet interface settings.............................................................................................. 132
VLAN settings............................................................................................................... 133
September 2018 Installing and Administering Avaya Vantage
Comments on this document? infodev@avaya.com
™
8
Page 9

Contents
IEEE 802.1X settings..................................................................................................... 135
Other operational parameters and settings............................................................................ 137
Active phone application................................................................................................ 138
Applications settings...................................................................................................... 138
Dial plan parameters...................................................................................................... 141
Protocol-specific parameters.......................................................................................... 142
Logging and debugging parameters................................................................................ 150
USB parameters............................................................................................................ 153
Upgrade related parameters........................................................................................... 154
General account IDs & passwords.................................................................................. 157
Phone lock and idle time parameters.............................................................................. 159
Security parameters...................................................................................................... 161
Avaya Breeze™ CSDK parameters........................................................................................ 162
Avaya Vantage™ Basic parameters....................................................................................... 169
IP Office parameters............................................................................................................ 174
September 2018 Installing and Administering Avaya Vantage
Comments on this document? infodev@avaya.com
™
9
Page 10

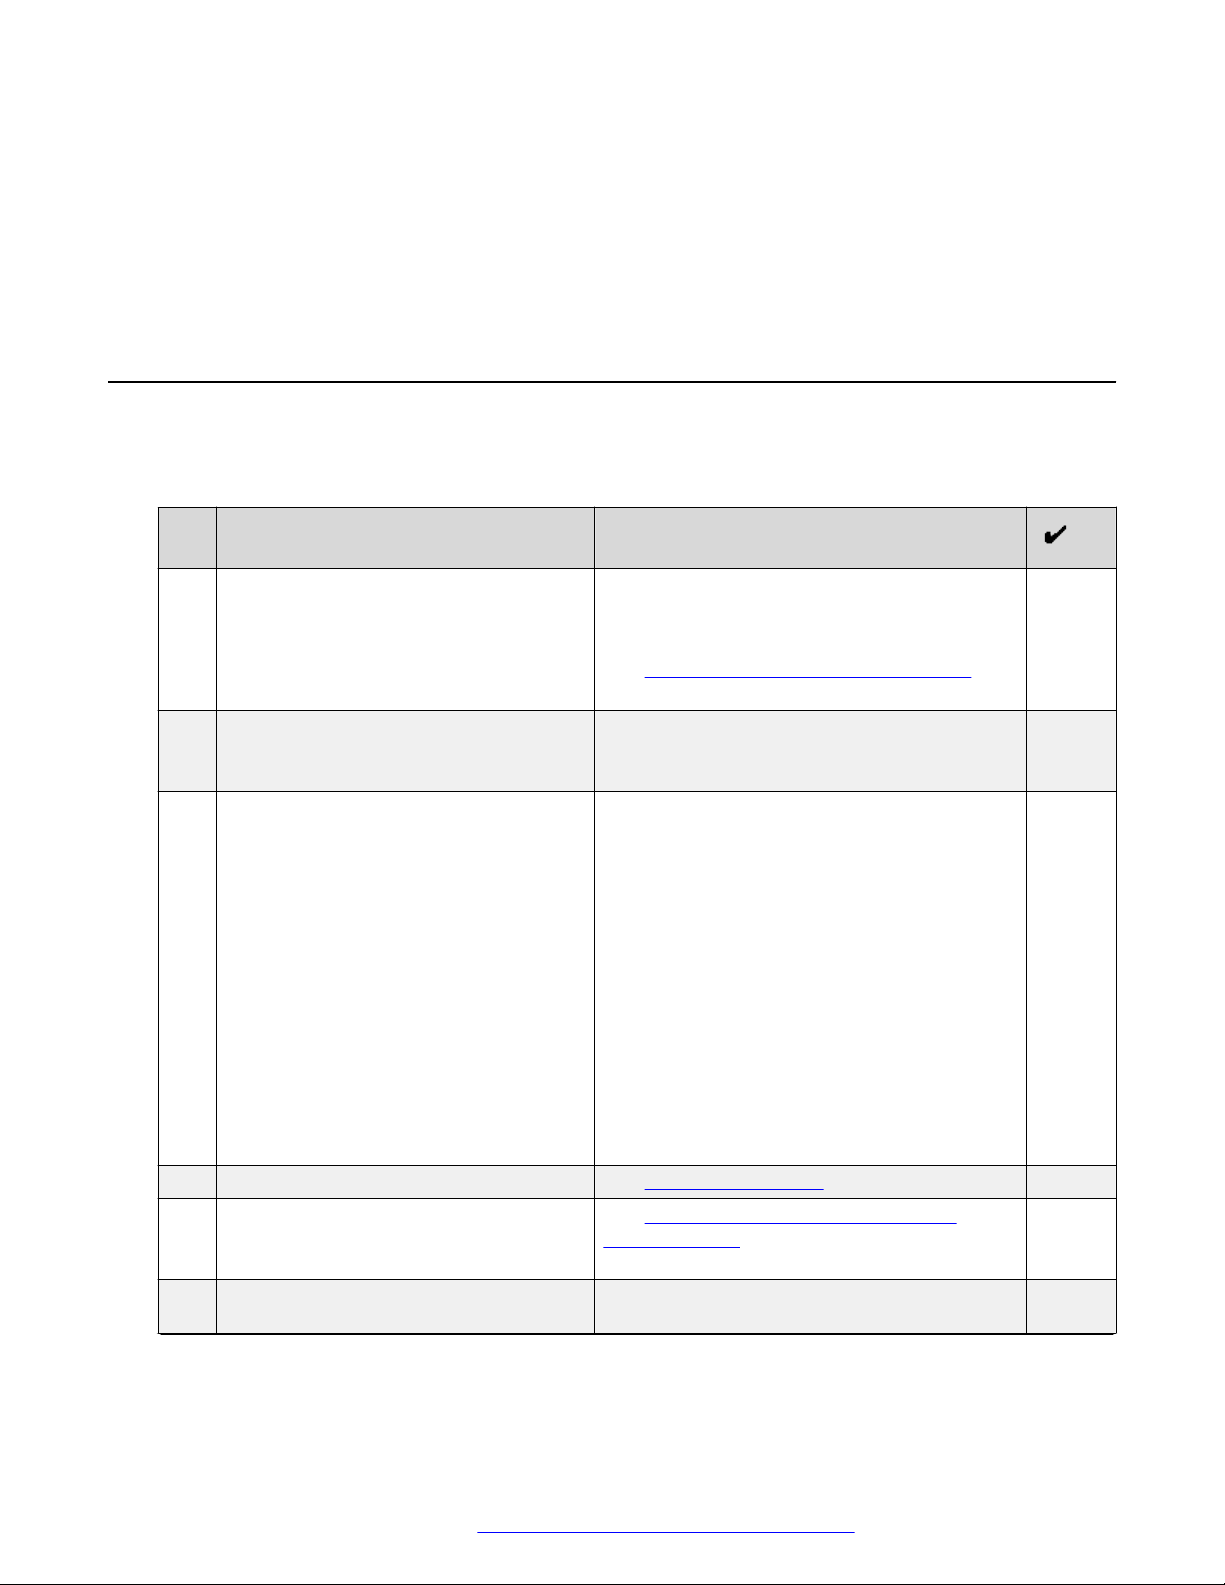
Chapter 1: Introduction
Purpose
This document provides checklists and procedures for installing, configuring, administering, and
troubleshooting Avaya Vantage™. This document is primarily intended for implementation
engineers and administrators.
Change history
Issue Date Summary of changes
Release 2.0, Issue1July 2018 • Added the wired and wireless handset model names in Optional
components for the Avaya Vantage device on page 18.
• Removed references to the Kensington lock slot in
Specifications on page 19.
• Added the SNTP server configuration requirement in Initial setup
checklist on page 26.
• Updated Software and hardware prerequisites on page 27.
• Added a new section Device deployment through Device
Enrollment Services on page 37.
• Added information about Device Enrollment Services support in
Connecting Avaya Vantage to the network on page 36, Server
configuration on page 38, File server configuration on
page 40, and Certificate usage by applications on page 48.
• Added information about using Avaya Aura® Utility Services as a
file server in File server configuration on page 40.
• Updated Parameter configuration for secure installation on
page 49.
• Updated the information about DNS server data configuration in
Device configuration checklist on page 65.
• Updated “About this task” in Setting up a file server address on
page 68.
Table continues…
September 2018 Installing and Administering Avaya Vantage
Comments on this document? infodev@avaya.com
™
10
Page 11

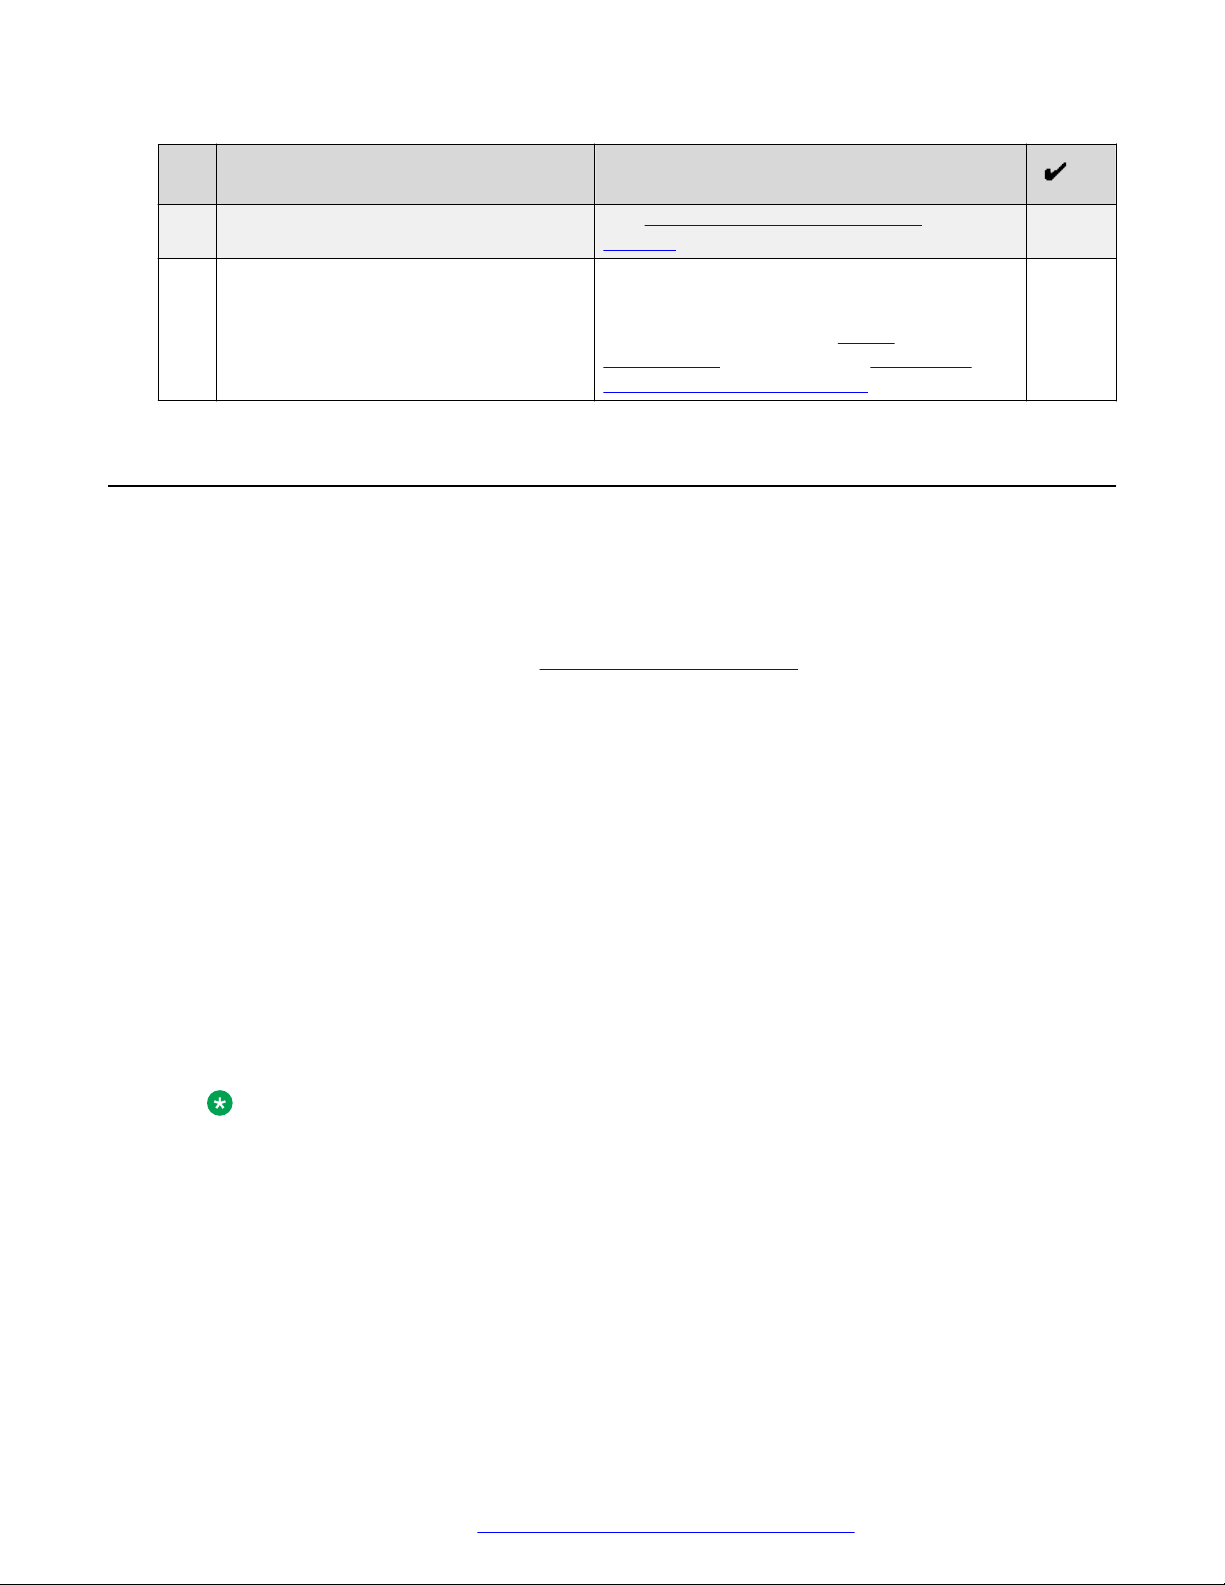
Issue Date Summary of changes
• Added information about logging in as an administrator in Setting
the Avaya Aura Device Services server address on page 69,
Setting up an HTTP proxy and exception on page 70, and
Configuring SIP server settings on page 71.
• Updated Package names of CSDK-based applications on
page 80.
• Added a new chapter: Kiosk mode configuration on page 82.
• Updated Restoring factory settings from the Settings menu on
page 85.
• Updated information about the local log level in Enabling verbose
logging on page 86.
• Mentioned the Gmail sharing limitation in Generating a debug
report on page 87.
• Updated Device upgrade process on page 93.
• Updated the cause information in Firmware is corrupted on
page 97.
Change history
Release 2.0, Issue2September
2018
• Updated parameter descriptions throughout the appendix.
• Removed information about unsupported configuration
parameters.
• Added information about the Avaya Vantage™ K155 device in the
sections under Avaya Vantage overview on page 12.
• Added Installing the K155 wireless module on page 34.
• Updated Device deployment through Device Enrollment
Services on page 37.
• Updated the sections under Application setup on page 74. This
chapter also includes information about installing applications
from unknown sources.
• Updated the sections under Device upgrade on page 92.
September 2018 Installing and Administering Avaya Vantage
Comments on this document? infodev@avaya.com
™
11
Page 12

Chapter 2: Avaya Vantage™ overview
Avaya Vantage™ is an Android™ device that provides telephony and conferencing functionality.
Avaya Vantage™ combines the advantages of a customizable unified communications solution and a
fully functional Android device. You can use the Avaya Breeze™ Client Software Development Kit
(CSDK) and custom applications to integrate communications into business processes by using
your Avaya Vantage™ device.
According to your business needs, you can choose from the following Avaya Vantage™ device
variants:
• Avaya Vantage™ K175: Standard device with an 8-inch screen and an integrated camera for full
access to video calls and conferences. You can cover the camera by using a mechanical
camera shutter.
• Avaya Vantage™ K165: Standard device with an 8-inch screen that does not include an
integrated camera. You can still receive video from other users.
• Avaya Vantage™ K155: Device with a small 5-inch screen. The device also includes a physical
keypad and an integrated camera.
Avaya Vantage™ supports the following communication applications:
• Avaya Vantage™ Basic
• Avaya Equinox
• Avaya Vantage™ Open
Note:
• IP Office Release 11.0 only supports Avaya Vantage™ Basic. IP Office Release 11.0 does
not support other clients with Avaya Vantage™.
• In Release 2.0, the Avaya Vantage™ K155 device only supports Avaya Vantage™ Basic. It
does not support Avaya Equinox® or Avaya Vantage™ Open.
®
September 2018 Installing and Administering Avaya Vantage
Comments on this document? infodev@avaya.com
™
12
Page 13
Device layout
Camera (K175 only)
Camera shutter (K175 only)
Message waiting
indicator
USB Type-C port
Volume up
Volume down
Speaker
Microphone
Stand
3.5 mm stereo
headset jack
Camera activity indicator (K175 only)
Wired or wireless handset
(optional)
Handset cradle
(optional)
Screen
Layout of Avaya Vantage™ K165 and K175
The standard Avaya Vantage™ device resembles a tablet in the portrait orientation. The only
difference in the layout of the Avaya Vantage™ K165 and K175 variants is that K175 comes with
an integrated camera and a mechanical camera shutter.
Device layout
September 2018 Installing and Administering Avaya Vantage
Comments on this document? infodev@avaya.com
™
13
Page 14
Camera
Message waiting
indicator
USB Type-A port
Speaker
Microphone
Stand
3.5 mm stereo
headset jack
Camera activity indicator
Touch screen
Wired or wireless handset
(optional)
Handset cradle
(optional)
Keypad
Avaya Vantage™ overview
Layout of Avaya Vantage™ K155
Functional keys on the keypad
The Avaya Vantage™ K155 device includes a physical keypad.
September 2018 Installing and Administering Avaya Vantage
Comments on this document? infodev@avaya.com
™
14
Page 15
Video mute
Android navigation keys
Audio mute
Headset
Speaker
Volume
Power adapter connector
RJ9 analog
headset port
RJ45 PC port
RJ45 PoE LAN port
Device layout
Connectors and controls
The following images show the options available on the Avaya Vantage™ device.
Rear panel
The rear panel contains a power adapter connector, an RJ9 headset port, and dual Ethernet ports
with an internal Ethernet switch.
September 2018 Installing and Administering Avaya Vantage
Comments on this document? infodev@avaya.com
™
15
Page 16

Slot for wireless module
Avaya Vantage™ overview
Note:
Avaya Vantage™ K165 and K175 devices from Release 1.0 only have a single Ethernet port.
Devices with hardware version 5 and later support dual Ethernet ports with an internal
Ethernet switch.
The K155 device has dual Ethernet ports with an internal Ethernet switch.
K155 devices have an additional wireless module slot in the top-right of the rear panel. The
wireless module provides Wi-Fi and Bluetooth connectivity.
Right side panel
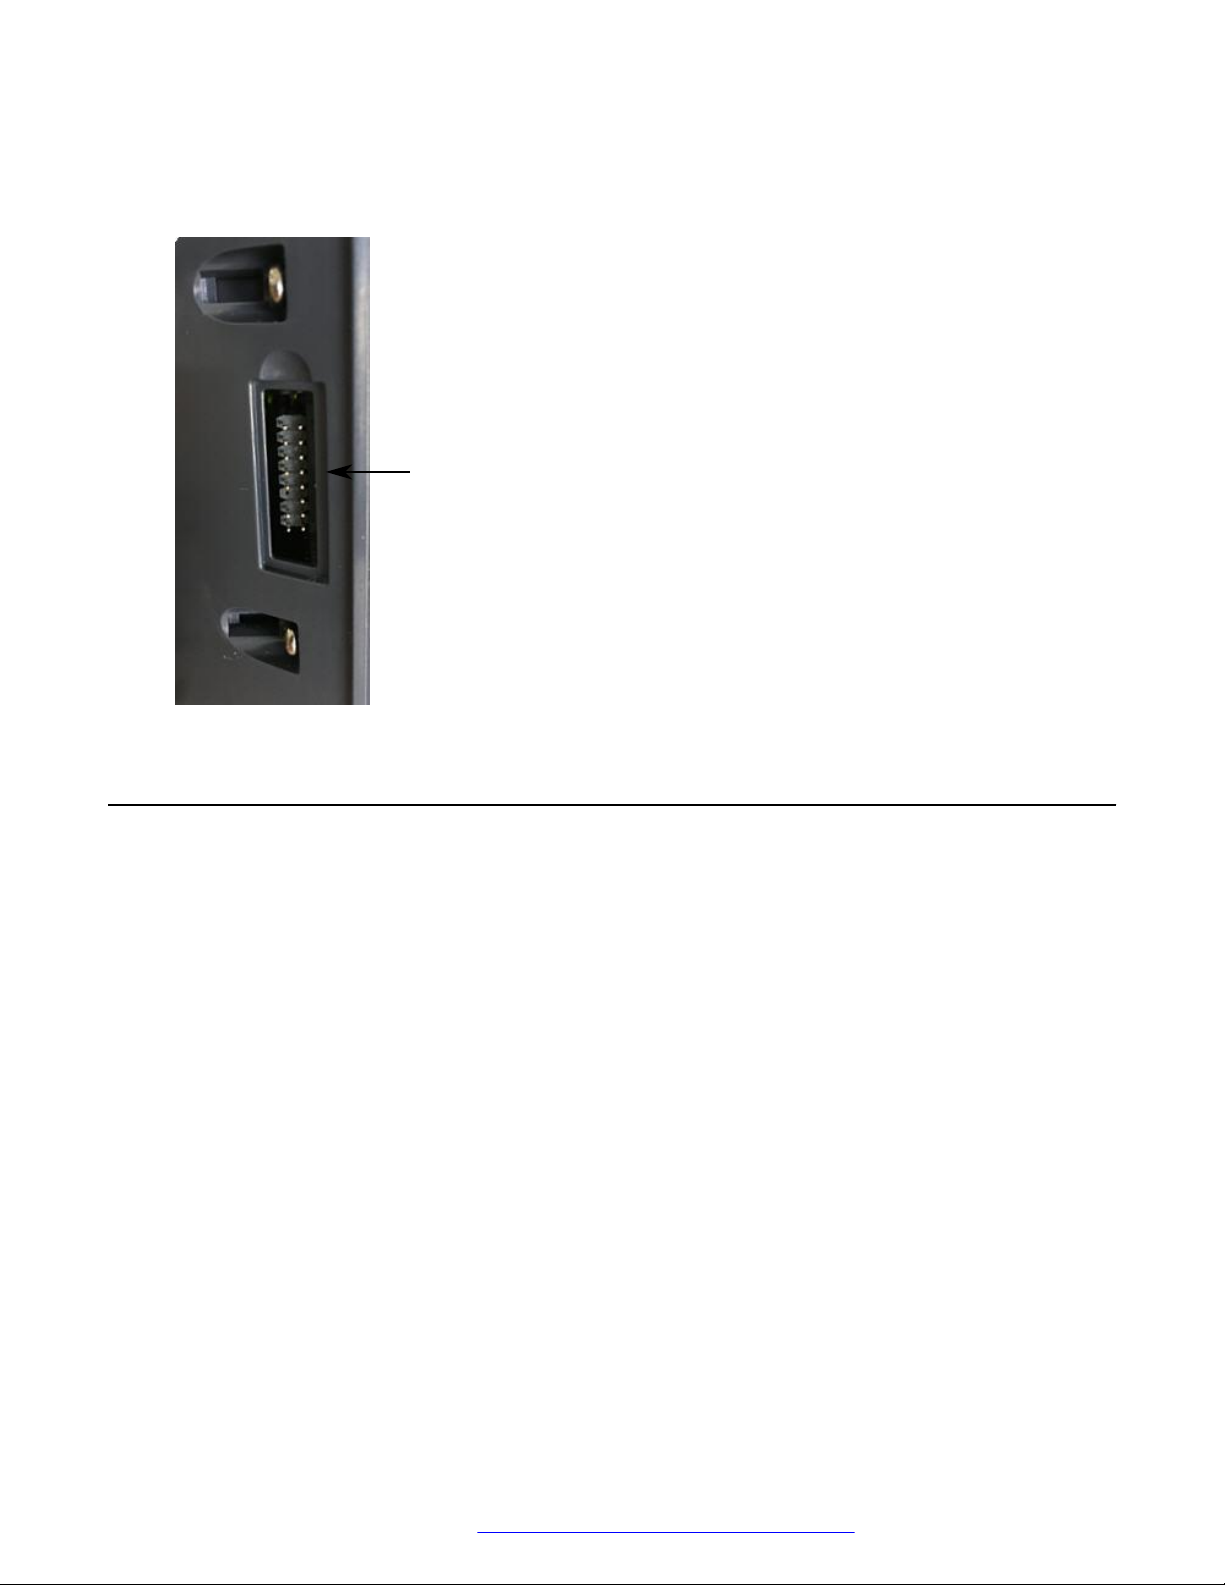
On Avaya Vantage™ K165 and K175, the right side panel contains a 3.5 mm audio jack socket and
a USB Type-C port.
September 2018 Installing and Administering Avaya Vantage
Comments on this document? infodev@avaya.com
™
16
Page 17
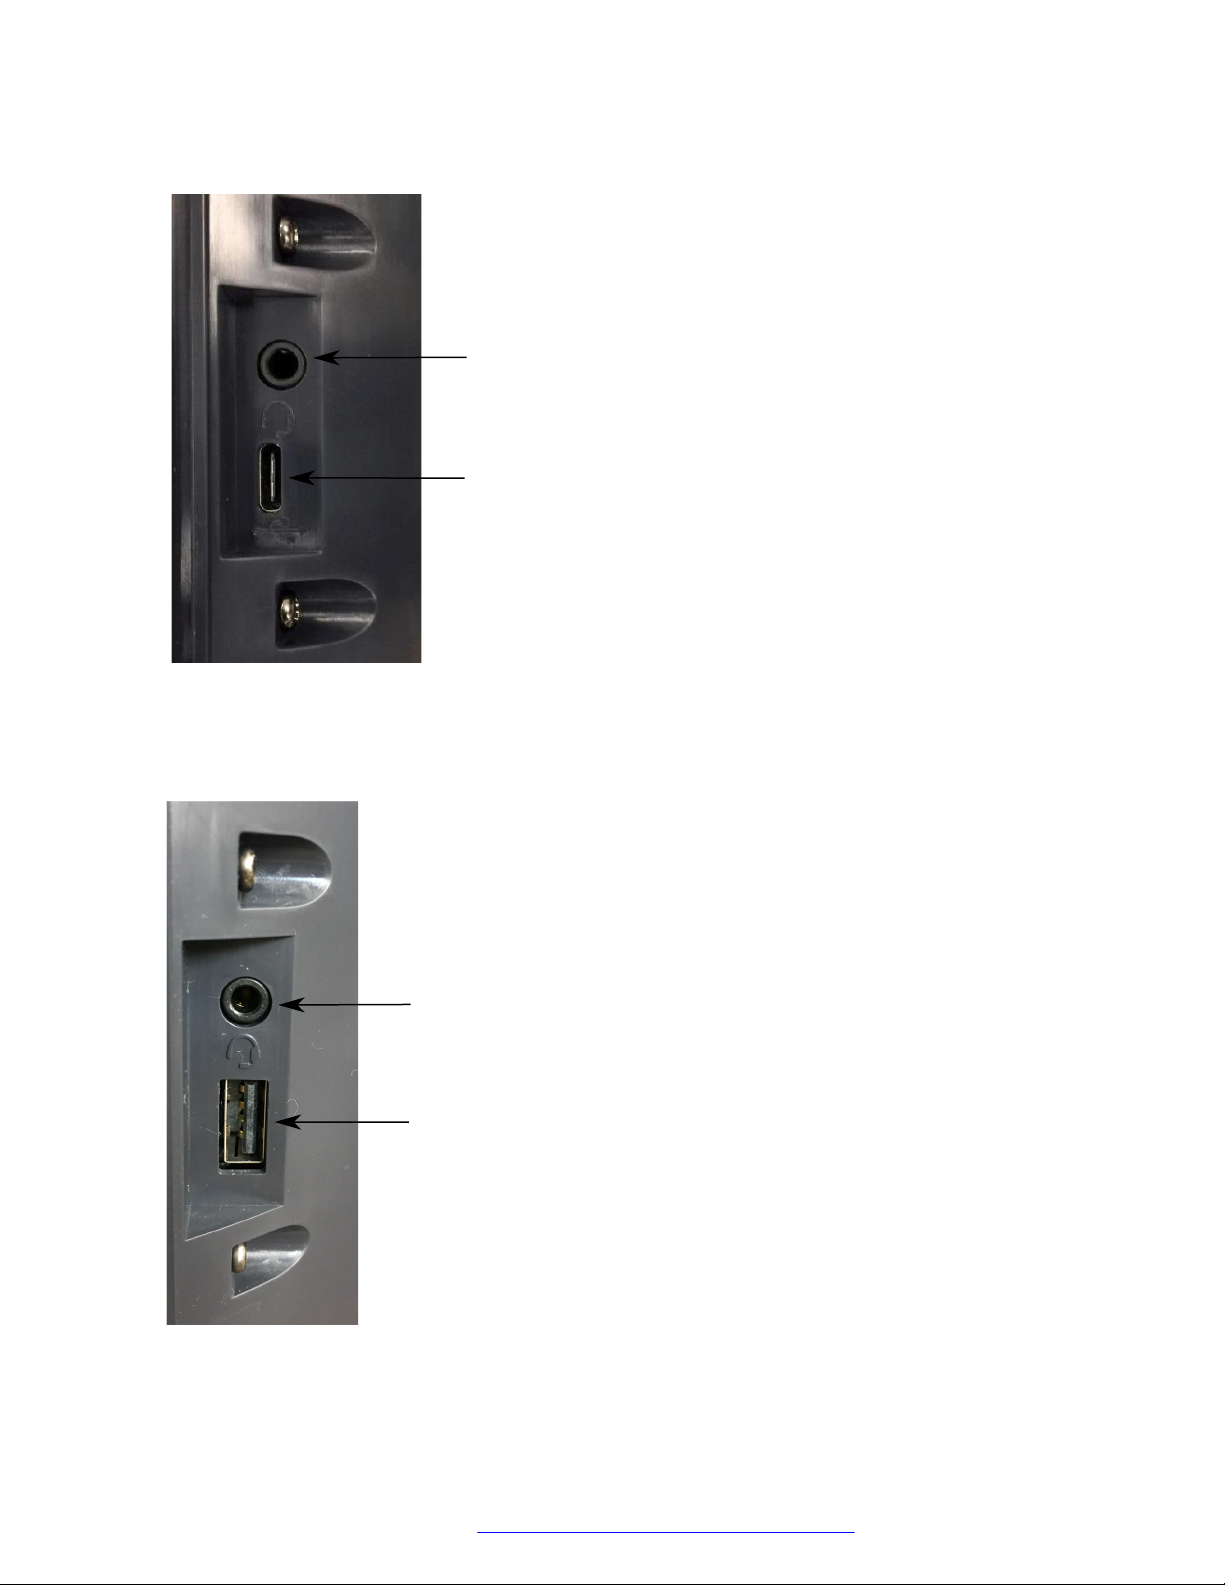
3.5 mm stereo headset jack
with microphone support
USB Type-C
port
3.5 mm stereo headset jack
with microphone support
USB Type-A
port
Device layout
On Avaya Vantage™ K155, the right side panel contains a 3.5 mm audio jack socket and a USB
Type-A port.
September 2018 Installing and Administering Avaya Vantage
Comments on this document? infodev@avaya.com
™
17
Page 18
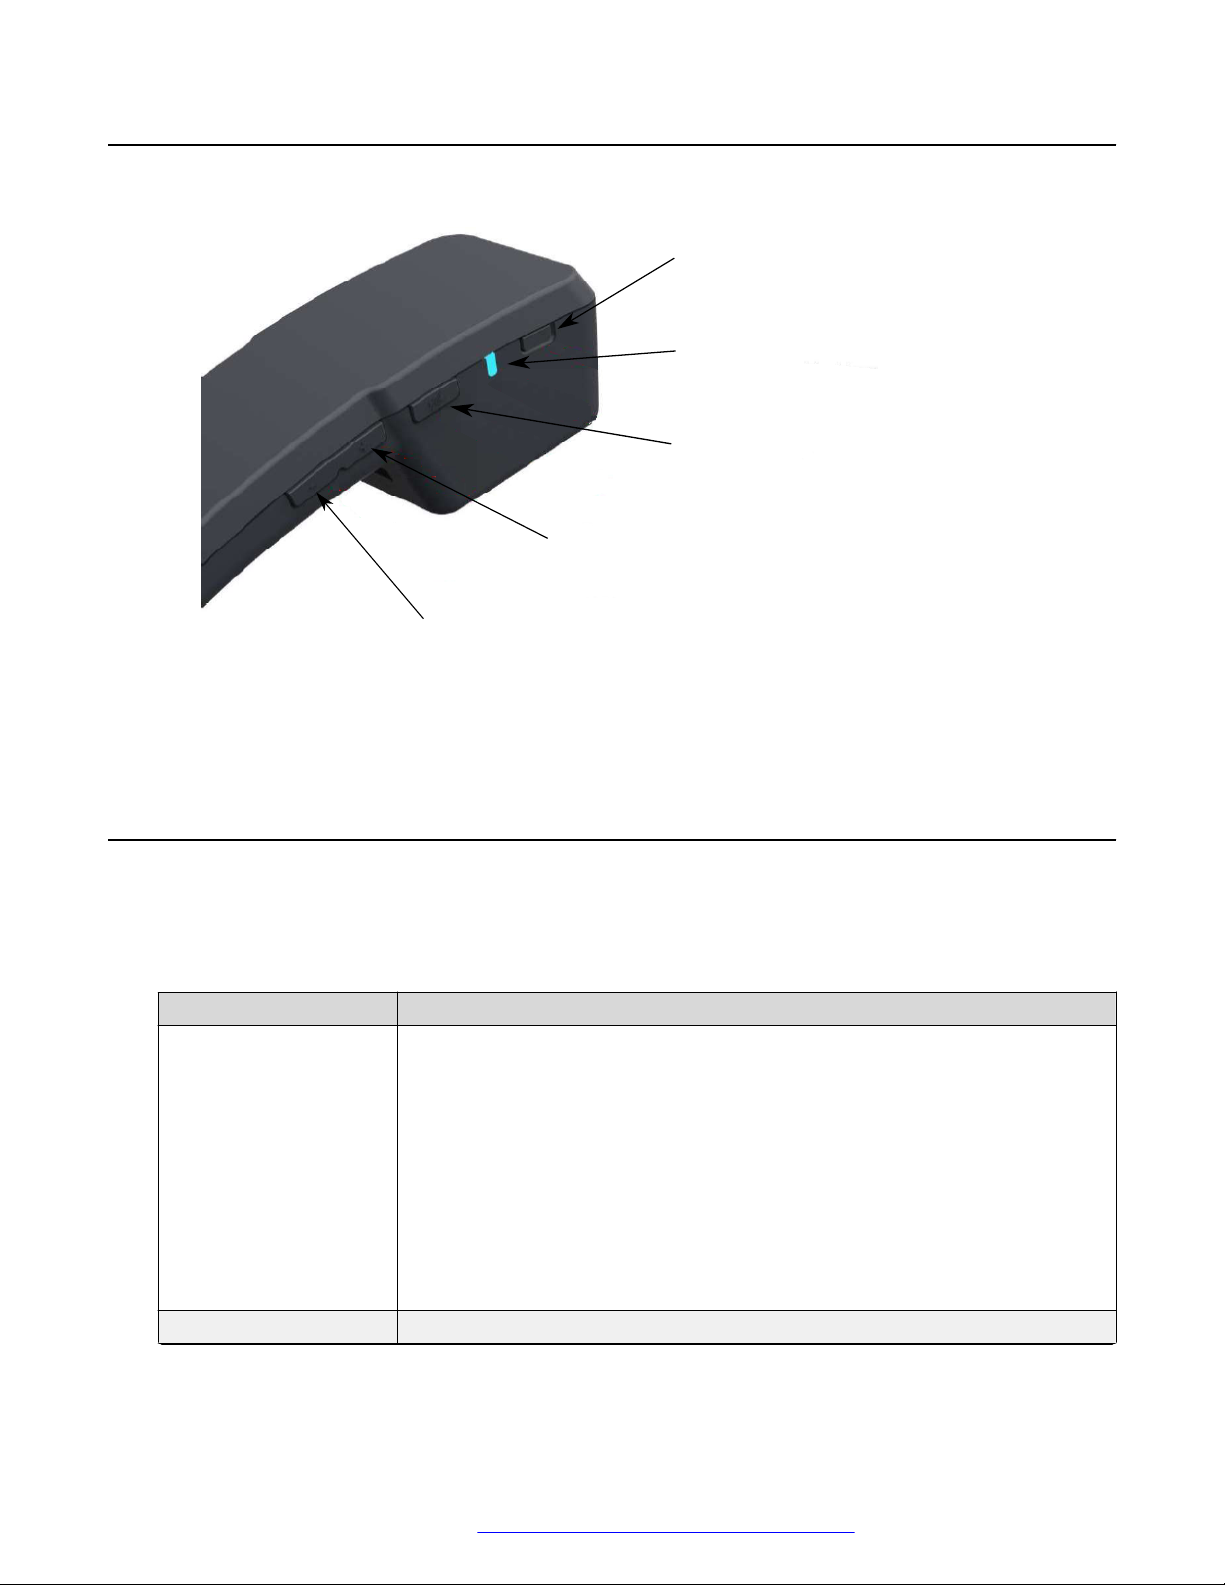
Handset cradle connector
Avaya Vantage™ overview
Left side panel
On all device variants, the left side panel contains a cordless or corded handset cradle connector.
Optional components for the Avaya Vantage™ device
You can use the following optional components with the Avaya Vantage™ device:
• J1B1 wired handset and cradle kit
• J2B1 wireless handset and cradle kit
• Replacement handset cord
• AC power adapter (international)
• AC power cord for regions
• Wireless module for K155
You must order these optional components separately.
September 2018 Installing and Administering Avaya Vantage
Comments on this document? infodev@avaya.com
™
18
Page 19
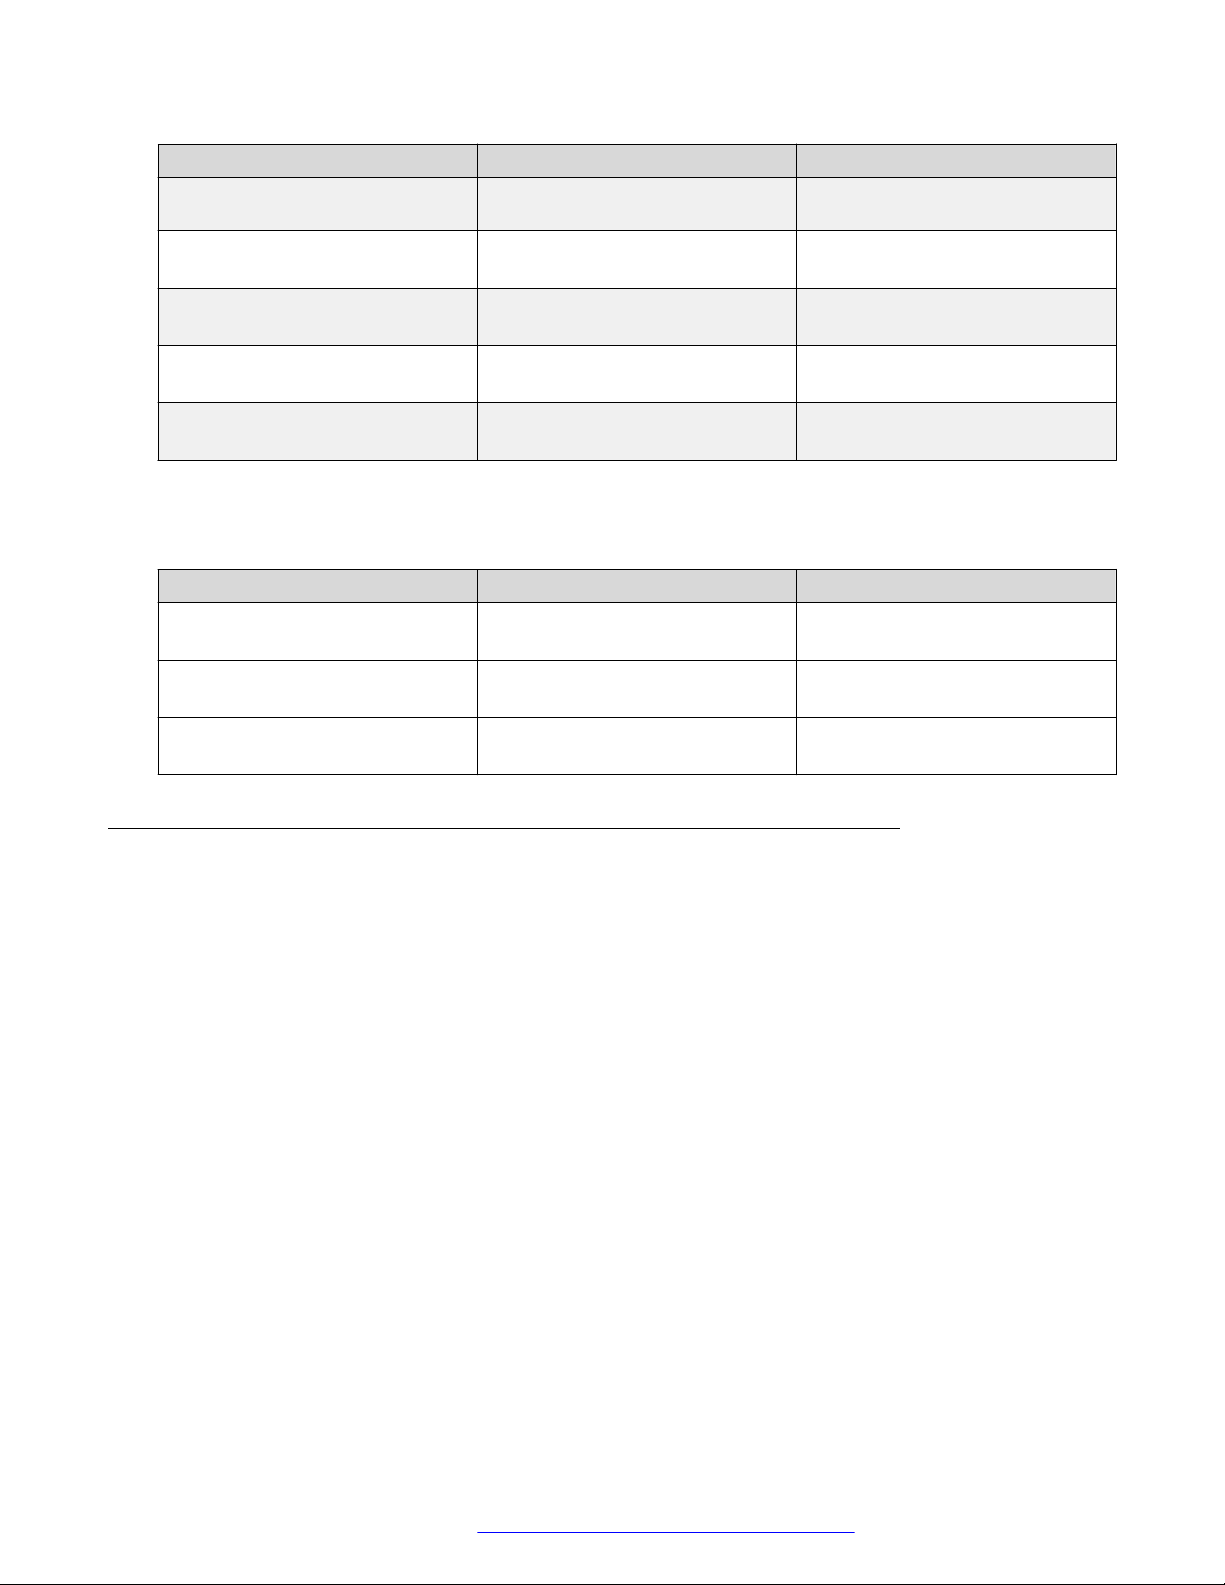
Wireless handset layout
Power button
LED indicator
Mute
Volume up
Volume down
Wireless handset layout
Specifications
The following table provides Avaya Vantage™ device specifications. Differences between device
models are mentioned as applicable.
Feature Specifications
Screen Avaya Vantage™ K165 and K175:
• Capacitive 8-inch touch screen.
• Resolution: 800×1280 px.
• 24-bits color depth.
Avaya Vantage™ K155:
• Capacitive 5-inch touch screen.
• Resolution: 1280×720 px.
• 24-bits color depth.
Internal storage 16 GB flash memory.
Table continues…
September 2018 Installing and Administering Avaya Vantage
Comments on this document? infodev@avaya.com
™
19
Page 20

Avaya Vantage™ overview
Feature Specifications
Memory 2 GB of RAM.
Operating system Android 6.0.1.
Ethernet • RJ45 primary Gigabit Ethernet (10/100/1000 Mbps) PoE LAN port.
• RJ45 secondary Gigabit Ethernet (10/100/1000 Mbps) port for personal
computer.
Bluetooth Bluetooth 4.1 supporting High Speed (HS), Low Energy (LE), and Enhanced
Data Rate (EDR) functionality.
Supported Bluetooth
profiles
• Headset Profile (HSP) in the Audio Gateway role.
• Hands Free Profile (HFP) in the Audio Gateway role.
• Human Interface Device Profile (HID) as the Bluetooth HID host for Bluetooth
keyboards and mice.
• Phone Book Access Profile (PBAP) in the Phone Book Server Equipment
(PSE) and Phone Book Client Equipment (PCE) roles.
• Advanced Audio Distribution Profile (A2DP) in the Source (SRC) role.
• Object Push Profile (OPP) in the Push server and Push client roles.
Wi-Fi • Wireless access point mode
• Wi-Fi 802.11a/b/g/n/ac
• Hotspot
Power • Power over Ethernet EEE 802.3af (Class 3) or 802.3at (Class 4).
- Up to 100 mA if using PoE 802.3af.
- Up to 500 mA if using PoE 802.3at
• Dedicated 48V AC power supply. Use Delta Electronics Inc. model
ADP-30HR B, output 48V DC, 0.66A.
Headphone connectors • 3.5 mm headset connector.
Warning:
Avoid listening at a high volume on devices that are connected to the
3.5 mm connector to prevent hearing damage.
• RJ9 headset connector for a high-quality wired headset.
USB port USB 2.0 general purpose port.
Avaya Vantage™ K165 and K175 have a Type-C USB port.
Avaya Vantage™ K155 has a Type-A USB port.
The USB port supports the following types of accessories:
• Multi-port USB hub.
• USB pen drive.
• Mouse.
• Keyboard.
September 2018 Installing and Administering Avaya Vantage
Comments on this document? infodev@avaya.com
™
Table continues…
20
Page 21

Feature Specifications
• Android devices.
Support is only limited to charging the Android device. Data transfer is not
supported.
The maximum USB port power is 500mA when the device is connected to an
AC adapter or a Class 4 PoE switch. When connected to a Class 3 PoE switch,
the maximum power supply is 100mA. USB devices that require more power
than 500mA are not supported.
Supported accessories • Wideband Bluetooth headset.
• 3.5 mm headset.
• RJ9 headset.
Audio Wideband audio available on all transducers, handset, headset, and
handsfree.
Supported codecs:
• G.722
• G.711
Specifications
• G.729
• G.726
• Opus
Physical keys (for K155
only)
Avaya Vantage™ K155 includes the following physical keys:
• Android keys
• Audio mute
• Video mute
• Headset
• Speaker
• Volume control
• Keypad with the standard keys: numbers 0-9, the asterisk (*), and the pound
key (#)
Physical security Security lock slot.
Stand Adjustable stand for K165 and K175 that you can use either as a desk stand or
a wall-mounted stand.
Fixed-angle, detachable stand for K155.
September 2018 Installing and Administering Avaya Vantage
Comments on this document? infodev@avaya.com
™
21
Page 22

Avaya Vantage™ overview
Wireless handset specifications
Specification Avaya Vantage™ wireless handset
System Bluetooth 4.1
Bluetooth profiles • Hands-free Profile 1.6
• Headset Profile
Battery 0.56 W, 3.7 V Li-Ion battery.
Battery charger Li-Ion battery management system.
Charging system Contactless charging system: inductive coupling to the cradle.
Controls • Power button.
• Mute button.
• Volume up button.
• Volume down button.
Indicators Blue LED indicator.
Operating environment
temperature
Battery charging
environment
temperature
Weight 170 grams.
0 to 49 °C (32 to 120 °F).
0 to 40 °C (32 to 104 °F).
Wireless handset features
Range
The handset uses Bluetooth technology. As a Class 2 device, the handset nominal range is 10
meters. In practical use this range might vary depending on the environment. If the handset was
out of range, the connection is reestablished automatically when the handset is back in range.
When the handset is not in range for more than 22 minutes, it turns off to prevent battery
discharge. If the handset was turned off, the connection is reestablished automatically when the
handset is turned on and back in range.
Battery service life
If used carefully, the expected service life of the battery is several years. Although the battery
capacity is diminished over time, in general it does not affect normal handset use.
Battery talk time
When fully charged, the new battery provides approximately 12 hours of talk time. You might need
to charge the battery before the first use to achieve the full talk time. To prevent damage to the
battery, the protection system does not allow the battery to discharge below a certain point. Avaya
Vantage™ displays the battery charge level on the Notifications panel.
September 2018 Installing and Administering Avaya Vantage
Comments on this document? infodev@avaya.com
™
22
Page 23

Specifications
Battery standby time
When fully charged, the new battery provides approximately 60 hours of standby time. When the
handset is not in range or Avaya Vantage™ is turned off for approximately 22 minutes, the handset
is turned off automatically to save battery. To turn on the handset again, press the Power button
for approximately 2 seconds. The handset is not turned on automatically even if it is returned to
the cradle.
Battery charging
The handset supports a contactless charging system. To charge the handset, place it in its cradle.
If the battery charge is low, the handset will notify you with warning tones. When you hear the
warning tones, return the handset to its cradle to charge the battery.
The handset uses a Lithium-Ion battery with the battery management and protection system. The
protection system allows to prevent the following situations:
• Overcharging.
• Over-discharging.
• Charging if the ambient temperature is higher than 40 °C (102 °F).
Battery recharge time
The battery fully recharges in less than 3 hours. You do not need to fully discharge the battery
before charging.
Battery disposal
At the end of the service life, remove the battery and deliver it to a battery recycling depot. Do not
dispose of the battery in the normal waste stream.
Wireless handset LED indicator
The blue LED indicator shows the current state of the handset and is also used to indicate user
actions.
Wireless handset state
Wireless handset is in the Pairing
mode.
Pairing completed successfully. LED flashes 10 times at 0.1
Wireless handset is used in a call LED flashes 3 times every 3
Wireless handset is turned on
and is connected to its base
(Connected mode).
Wireless handset is trying to
establish connection to its base
(Linkback mode).
Wireless handset is out of range
and is not trying to establish
LED indication Notes
LED flashes every 0.5 seconds. Wireless handset exits the Pairing
mode in 150 seconds.
None
seconds rate.
None
seconds
LED flashes 2 times every 5
seconds.
LED flashes every 0.5 seconds. None
LED flashes every 5 seconds. Wireless handset is turned off
None
after 22 minutes.
Table continues…
September 2018 Installing and Administering Avaya Vantage
Comments on this document? infodev@avaya.com
™
23
Page 24
Avaya Vantage™ overview
Wireless handset state LED indication Notes
connection to its base (Standby
mode).
Incoming call. LED flashes 3 times every 7
seconds.
Mute. LED is on and flashes 3 times
every 4 seconds.
Wireless handset has been
turned on.
Wireless handset has been
turned off.
LED flashes 4 times. None
LED flashes 3 times. None
None
None
Power button
The Power button provides the following functionality:
Action How to use Handset LED confirmation
Turn on the handset Press and hold the button for 2.4
seconds
Turn off the handset Press and hold the button for 3.2
seconds
Enable pairing mode Press and hold the button for 10
seconds
LED flashes 4 times
LED flashes 3 times
LED flashes at 0.5 seconds rate
Camera specifications
The following Avaya Vantage™ devices include an integrated camera:
• Avaya Vantage™ K175.
• Avaya Vantage™ K155.
If you use Avaya Vantage™ K165, which does not include an integrated camera, you can still
receive video from other devices.
Camera specifications for Avaya Vantage™ with an integrated camera
• Native resolution of 2 megapixels (1920 x 1080 p).
However, Avaya Vantage™ Basic and Avaya Equinox® do not utilize the full resolution.
• Fixed focus range of 50 cm to infinity.
• Anti-flicker filter of 50 or 60 Hz.
• Auto exposure.
• Auto white balance.
• Camera activity LED indicator.
Avaya Vantage™ notifies users that the integrated camera is active by using the green LED
indicator.
September 2018 Installing and Administering Avaya Vantage
Comments on this document? infodev@avaya.com
™
24
Page 25

• Mechanical privacy shutter for the K175 device.
Environmental specifications
The following are the permissible environmental specification ranges for operating and storing the
Avaya Vantage™ device:
Operating temperature of device 0 °C to 45 °C (32 °F to 113 °F)
Relative humidity 10% to 95% non-condensing
Storage temperature -10 °C to 50 °C (14 °F to 122 °F)
Specifications
September 2018 Installing and Administering Avaya Vantage
Comments on this document? infodev@avaya.com
™
25
Page 26
Chapter 3: Initial setup and connectivity
Initial setup checklist
The following checklist describes tasks that you must perform to set up your Avaya Vantage
device.
No. Task Notes
1 Review prerequisite information. If you do not have all required software and
hardware, Avaya Vantage™ might not function
as expected.
See Software and hardware prerequisites on
page 27.
2 Gather preinstallation data. Preinstallation data is required to perform
initial parameter setup and to create user
accounts for Avaya Vantage™.
3 Configure SNTP servers. Configure SNTP servers if the default SNTP
server addresses, 0.avaya.pool.ntp.org,
1.avaya.pool.ntp.org, 2.avaya.pool.ntp.org,
3.avaya.pool.ntp.org, which are specified in
the SNTPSRVR parameter, are not reachable
from your network.
™
Configure SNTP servers according to the
vendor’s configuration instructions. Ensure
that the SNTP server is reachable from the
network where you are installing Avaya
Vantage™.
You must set the SNTPSRVR value using
DHCP option 42 or the 46xxsettings.txt
file.
4 Configure the DHCP and file servers. See Server configuration on page 38.
5 Ensure that you have the Avaya
Vantage™ device and all required
components.
6 Connect a handset. This step is required only if you want to use a
September 2018 Installing and Administering Avaya Vantage
Comments on this document? infodev@avaya.com
See Optional components for the Avaya
Vantage device on page 18.
handset with Avaya Vantage™.
™
Table continues…
26
Page 27
Software and hardware prerequisites
No. Task Notes
See Connecting a handset to Avaya
Vantage on page 31.
7 Connect Avaya Vantage™ to your
network and, if required, to a power
supply.
Connection to a power adapter is only
required in certain conditions.
For more information, see Power
management on page 35 and Connecting
Avaya Vantage to the network on page 36.
Software and hardware prerequisites
Check the following prerequisites before you install Avaya Vantage™.
Components and other software prerequisites
The following components must be installed and configured on your network. For more information
about supported product releases, see
Avaya Compatibility Matrix.
• Avaya Aura® or IP Office server components. You can deploy Avaya Vantage™ with:
- The latest Avaya Aura® Release 6.3 Service Pack or a higher release.
- IP Office Release 11.0.
IP Office Release 11.0 only supports Avaya Vantage™ Basic. Other clients are not
supported with Release 11.0.
• A DHCP server for providing dynamic IP addresses. The DHCP server also provides the
address details of the file server that the device should use.
• A file server for downloading software distribution packages and the settings file.
You can use an external HTTP or HTTPS file server. In the Avaya Aura® environment, you
can use Avaya Aura® Utility Services as a file server. In the IP Office environment, the IP
Office system can act as a file server for most phones. However, you must use an external
HTTP or HTTPS file server for hosting and downloading software distribution packages for
Avaya Vantage™ due to the size and number of files.
Note:
Avaya Aura® Utility Services does not support ZIP files larger than 800MB. Therefore,
Avaya provides two separate Zip files, one containing the software image of K155 and
the other containing the software images of both K165 and K175, only to be used on
Avaya Aura® Utility Services. For all other file servers, you must use the single zip file
that contains the software images of K155, K165, and K175.
• Avaya Session Border Controller for Enterprise. You can configure this optional component in
networks controlled by Session Border Controller.
• One of the following conference servers for audio and video conference:
In Avaya Aura®: Avaya Aura® Conferencing or Scopia Elite MCU
September 2018 Installing and Administering Avaya Vantage
Comments on this document? infodev@avaya.com
™
27
Page 28

Initial setup and connectivity
In IP Office: Avaya Scopia® XT Series
Hardware connection prerequisites
Ensure that the LAN:
• Uses Ethernet Category 5e or Ethernet Category 6 cabling.
• Has the 802.3at or 802.3af PoE specification.
If your network does not support the 802.3at or 802.3af PoE specification, you can use an AC
power adapter, which you can order separately.
Preinstallation data
System Manager user profile worksheet
To create a user profile on System Manager for Avaya Vantage™ Basic or Avaya Equinox® in the
Avaya Aura® environment, you must have the following information:
Identity tab
• First Name
• Last Name
• Login Name
• Password
• Localized Display Name
• Endpoint Display Name
• Language Preference
• Time Zone
Communication Profile tab
Section
Communication Profile section Communication Profile Password
Communication Address section
Session Manager Profile section
Field
Handle Types are for:
• Avaya SIP
• Avaya E.164
• Avaya Presence/IM if Presence is used
Handle Fully Qualified Address
Primary Session Manager
Table continues…
September 2018 Installing and Administering Avaya Vantage
Comments on this document? infodev@avaya.com
™
28
Page 29

Section Field
Secondary Session Manager
Origination Application Sequence
Termination Application Sequence
Survivability Server
Home Location
System
Profile Type
CM Endpoint Profile section
Messaging Profile section
Extension
Use Existing Endpoints
Endpoint Template
Voice Mail Number
System
Mailbox Number
Template
Password
Delete Subscriber on Unassign of Subscriber
from User or on Delete User
Preinstallation data
IP Office SIP user and extension settings
Use IP Office Manager or IP Office Web Manager to configure a SIP user and then configure the
extension settings for the user. For information about the key settings to be configured, see Avaya
IP Office™ Platform SIP Telephone Installation Notes for Release 11.0.
Settings file worksheet
In the following table, populate the parameter values suitable for your deployment. The
parameters in the table are for environments with Avaya Vantage™ Basic or Avaya Equinox® as
the Avaya Breeze™ Client Software Development Kit application.
When using Avaya Vantage™ Open, the following parameters are not required:
SIP_CONTROLLER_LIST, SIPDOMAIN, and ACTIVE_CSDK_BASED_PHONE_APP.
Parameter
SIP_CONTROLLER_LIST
SIPDOMAIN
SNTPSRVR
Your value
Table continues…
September 2018 Installing and Administering Avaya Vantage
Comments on this document? infodev@avaya.com
™
29
Page 30
Initial setup and connectivity
Parameter Your value
FILE_SERVER_URL
TRUSTCERTS
ADMIN_PASSWORD or PROCPSWD
ISO_SYSTEM_LANGUAGE
ADMINTIMEFORMAT
TIMEZONE
COUNTRY
PUSH_APPLICATION
ACTIVE_CSDK_BASED_PHONE_APP
USER_INSTALL_APPS_GOOGLE_PLAY_STORE
Note:
• IP Office Release 11.0 only supports Avaya Vantage™ Basic. The current IP Office
release does not support Avaya Equinox® on Avaya Vantage™.
• In Release 2.0, the K155 device only supports Avaya Vantage™ Basic. It does not
support Avaya Equinox® or Avaya Vantage™ Open.
• Specifying an SNTPSRVR value that is reachable from your network is essential for SIP
registration and other setup when you start up Avaya Vantage™.
DHCP settings worksheet
You need the following information for dynamically assigning IP addresses to Avaya Vantage
devices and for initial configuration that is performed through DHCP options. In the following table,
populate the following values for your deployment:
Option or parameter
Range of IP addresses
DHCP options
FILE_SERVER_URL
HTTPSRVR
TLSSRVR
Note:
If the FILE_SERVER_URL parameter is defined, Avaya Vantage™ ignores HTTPSRVR and
TLSSRVR.
Your value
™
September 2018 Installing and Administering Avaya Vantage
Comments on this document? infodev@avaya.com
™
30
Page 31

Connecting a handset to Avaya Vantage
™
Connecting a handset to Avaya Vantage
Avaya Vantage™ provides a built-in speaker and microphone, so a handset is not required to make
and manage calls. You can purchase either wired or wireless handsets separately. To use a
handset with Avaya Vantage™, you also need to connect a handset cradle.
Connecting the handset cradle to Avaya Vantage
™
™
About this task
Use this procedure to connect your handset cradle to the Avaya Vantage™ device. The handset
cradle is required for both wired and wireless handsets.
Warning:
When installing the cradle, be careful not to bend the Avaya Vantage™ connector pins.
Before you begin
• Ensure that you have the following equipment:
- Avaya Vantage™ device.
- Handset cradle with a connection cable.
- Handset cradle stand, which varies according to the device variant.
For K165 or K175, use the adjustable cradle stand with the crossbar that comes with the
handset kit. For K155, use the fixed-angle cradle stand that comes with the device.
• Ensure that the Avaya Vantage™ device is not connected to a power source.
Procedure
1. Place the device with the right side touching the table top so that the left side, which is
where the handset cradle must be attached, is facing up.
2. On the left side of the Avaya Vantage™ device, remove the rubber gasket that protects the
cradle connector pins.
One cradle connector pin is closed so that you can position the cradle in the correct
direction.
3. Connect the handset cradle cable to the cradle connector of the Avaya Vantage™ device.
Tip:
Bend the cradle cable to make an arc so that you can join the cable with the cradle
connector easily.
4. Connect the cradle to the Avaya Vantage™ device while ensuring that the connection cable
is not squeezed between the cradle and the device.
5. (Optional) For K165 or K175, connect the handset cradle stand crossbar to the slot in the
Avaya Vantage™ stand.
September 2018 Installing and Administering Avaya Vantage
Comments on this document? infodev@avaya.com
™
31
Page 32

Initial setup and connectivity
6. Connect the handset cradle to the cradle stand using the hinge on the rear panel of the
cradle.
Next steps
Connect Avaya Vantage™ to the power source.
Connecting a wired handset
About this task
Use this procedure to connect a wired handset to your Avaya Vantage™.
Before you begin
Ensure that the handset cradle is connected to the Avaya Vantage™ device.
Procedure
1. Plug the non-spiral end of the handset cord into the handset connector on the handset
cradle.
2. Plug the other end into the connector on the handset.
Connecting a wireless handset
About this task
Use this procedure to connect or pair a wireless handset with your Avaya Vantage™ device. You
cannot use the wired handset after you connect the wireless handset. You can connect only one
wireless handset at a time.
You need administrative privilege to remove the pairing with the wireless handset.
Before you begin
Ensure the following:
• The device startup process is complete and you are logged on to the device.
• The handset cradle is connected to your Avaya Vantage™ device.
• The handset battery is charged by placing the handset in the cradle.
• The wireless handset is turned off.
Procedure
1. Lift the wireless handset from the cradle, and press and hold the top Power button for at
least 10 seconds to enter the pairing mode.
September 2018 Installing and Administering Avaya Vantage
Comments on this document? infodev@avaya.com
™
32
Page 33

Connecting a handset to Avaya Vantage
™
To indicate that the handset is in the pairing mode, the handset LED starts flashing.
2. On the Home screen, tap Applications.
3. Tap Settings.
4. Tap Bluetooth.
5. Turn Bluetooth on.
6. In the list of available devices, tap the entry that matches the ID on the handset label.
When pairing is successful, Avaya Vantage™ displays the wireless handset in the list of
paired devices as connected.
Result
You can now use your wireless handset for calls as long as the handset is turned on. When the
handset is turned off, you cannot use it for calls, but it is still paired with Avaya Vantage™. When
you turn on the handset the next time, you do not need to repeat the pairing procedure.
September 2018 Installing and Administering Avaya Vantage
Comments on this document? infodev@avaya.com
™
33
Page 34

Initial setup and connectivity
Installing the K155 wireless module
About this task
Use this procedure to install the wireless module on the K155 device for Wi-Fi and Bluetooth
connectivity. The wireless module is an optional component and you can order this module
separately.
This procedure is not applicable for the K165 and K175 devices.
Before you begin
Get a flat screwdriver that fits into the opening of the module panel.
Ensure that the K155 device is not connected to a power source.
Procedure
1. Insert the screwdriver into the opening of the module panel to release the latch.
Do not pry open the panel.
2. To remove the module panel, slide the panel out in the direction of the arrow.
September 2018 Installing and Administering Avaya Vantage
Comments on this document? infodev@avaya.com
™
34
Page 35

Power management
3. Insert the wireless module into the slot.
4. Slide the module panel inward to close it.
You do not need a screw to fasten the module. The inside of the module panel has a small
protrusion that keeps the module in place.
Power management
Avaya Vantage™ can receive power from the following sources:
• 802.3af PoE (Class 3)
• 802.3at PoE (Class 4)
• 48 Vdc power supply
If you use the 802.3at networking switch or the power adapter, Avaya Vantage™ USB port delivers
up to 500mA. If you use the 802.3af networking switch, Avaya Vantage™ USB port delivers up to
100mA.
You can use a 48 volt, 30 watt power adapter to power Avaya Vantage™ in the following
conditions:
• You are using Wi-Fi to connect to the network instead of using an PoE networking switch
port.
• The networking switch port does not support the 802.3af or 802.3at PoE specification.
• The device requires more power than 802.3af and 802.3at PoE switch port is not available.
For example, when a USB device that requires more than 0.5 watt is connected to Avaya
Vantage™ and only 802.3af PoE ports are available, Avaya Vantage™ must be connected to a
power adapter.
You must purchase the power adapter separately.
September 2018 Installing and Administering Avaya Vantage
Comments on this document? infodev@avaya.com
™
35
Page 36

Initial setup and connectivity
If Avaya Vantage™ is connected to both a 48 Vdc power supply and a PoE networking switch port,
then the following occurs if one of the power sources is disconnected:
• If the power adapter is disconnected, Avaya Vantage™ reboots. If the networking switch
supports either the 802.3at or 802.3af specification, Avaya Vantage™ continues to work after
the reboot.
• If the networking switch is disconnected, Avaya Vantage™ continues to work without a reboot.
If Avaya Vantage™ is connected to the PoE networking switch and the power adapter is
connected, Avaya Vantage™ continues to work without a reboot.
Connecting Avaya Vantage™ to the network
About this task
You can connect Avaya Vantage™ to your network by using a wireless or an Ethernet connection.
Procedure
1. (Optional) Connect a power adapter to the 48-V DC power connector at the back of Avaya
Vantage™ and plug the power adapter into an electrical outlet if:
• Your network does not support the 802.3at (PoE) or 802.3af (PoE) injector specification.
• You want to use a Wi-Fi connection.
2. To use a wired Ethernet connection:
a. Plug one end of an Ethernet cable into the LAN connector at the back of Avaya
Vantage™.
b. Plug the other end of the Ethernet cable into an available LAN port in your network.
3. To use a Wi-Fi connection:
a. Tap Settings.
b. Tap Network > Network mode.
c. Select Wi-Fi.
d. On the Network screen, tap Wi-Fi and choose the required network.
e. (Optional) If prompted, enter the network credentials.
If you are using a wireless connection, you must connect Avaya Vantage™ to a power
source.
Result
Avaya Vantage™ starts to initialize.
After the device receives the configuration file server address from DHCP, the device starts
downloading the required files from the file server. The startup process can take between 4 to 20
minutes depending on the files to be downloaded.
September 2018 Installing and Administering Avaya Vantage
Comments on this document? infodev@avaya.com
™
36
Page 37

Device deployment through Device Enrollment Services
In a Device Enrollment Services environment, if no file server address is obtained from DHCP or
LLDP, Avaya Vantage™ attempts Device Enrollment Services discovery. This is an automated
process. If you configure the file server address manually in the Settings menu, Avaya Vantage
does not attempt Device Enrollment Services discovery.
In an environment without Device Enrollment Services, the startup process progresses based on
the preinstallation data that you configured.
The device might restart as it loads the updated firmware files. After the configuration is complete,
the device displays a background, which indicates that you can now log in and use the device.
Device deployment through Device Enrollment Services
Device Enrollment Services
Device Enrollment Services provides a mechanism for Avaya endpoints to be securely
authenticated and redirected to the provisioning server. The DNS address of Device Enrollment
Services is hard coded to the device firmware. After you connect the out-of-the-box device to the
network, Device Enrollment Services redirects the device to the provisioning server and then the
installation procedure begins automatically.
™
For the Device Enrollment Services environment to work, the service provider or enterprise
administrator must configure a provisioning server in Device Enrollment Services for the device’s
MAC address. For more information about Device Enrollment Services, see Using Avaya Device
Enrollment Services to Manage Endpoints.
Avaya Vantage™ deployment through Device Enrollment Services
For the Avaya Vantage™ device to attempt Device Enrollment Services discovery, ensure that:
• DES_STAT is set to 2 in the DHCP site-specific option number (SSON), which is 242 by
default.
• FILE_SERVER_URL, HTTPSRVR, and TLSRVR are not provided by DHCP or LLDP.
• The file server address is not configured manually in the Settings menu.
When these conditions are met, the device attempts to communicate with Device Enrollment
Services during startup to obtain the provisioning server address. If the device was not associated
with a customer site and activated in Device Enrollment Services, then Avaya Vantage™ prompts
for a numeric enrollment code when it is started for the first time. This code is generated through
Device Enrollment Services.
After the startup process is completed successfully through Device Enrollment Services, the
Avaya Vantage™ device does not attempt Device Enrollment Services discovery on subsequent
reboots. The Avaya Vantage™ device reattempts Device Enrollment Services discovery only if the
administrator performs one of the following while DES_STAT is set to 2:
• Resets the device to its factory defaults.
• Activates the service from Settings > More > Auto Provisioning.
The administrator can disable the Device Enrollment Services discovery for Avaya Vantage™ by
setting DES_STAT to 0 or 1 in DHCP SSON.
September 2018 Installing and Administering Avaya Vantage
Comments on this document? infodev@avaya.com
™
37
Page 38

Chapter 4: Server configuration
To install Avaya Vantage™ in your telephony environment, you must configure the following servers:
• DHCP server: To dynamically assign IP addresses to the devices and provide device
configuration parameters. The DHCP server also provides the device with the address of the
SIP controller and file server it should use.
• HTTP or HTTPS file server: To download and save the software distribution package and the
46xxsettings.txt and K1xxSupgrade.txt files that include most of the device
configuration. Therefore, the file server address is the most important configuration for the
device installation.
In a Device Enrollment Services environment, the DHCP server is mainly used to assign IP
addresses to the devices. The device receives the file server address from Device Enrollment
Services.
In networks controlled by a Session Border Controller, you can configure Avaya Session Border
Controller for Enterprise (Avaya SBCE) to use Avaya Vantage™ devices. You can manually
configure Avaya SBCE only when the file server can be configured by end users.
DHCP and file server configuration checklist
The following checklist describes tasks that you must perform to configure Avaya Vantage
service settings.
No.
Task Notes
1. Ensure that you have all required
licenses for the DHCP and file server
software.
2. Ensure that a DHCP server is installed
and configured.
September 2018 Installing and Administering Avaya Vantage
Comments on this document? infodev@avaya.com
Contact your server software vendors to
obtain information about server licensing.
Contact your DHCP server vendor to obtain
installation documentation. For configuration
information, see DHCP server configuration on
page 39.
In the IP Office environment, you can choose
to use the IP Office system as the DHCP
server.
™
™
Table continues…
38
Page 39

No. Task Notes
DHCP server configuration
3. Ensure that a file server is installed and
configured.
Contact your file server vendor to receive
installation documentation. For configuration
information, see File server configuration on
page 40.
In the IP Office environment, Avaya Vantage
requires an external HTTP or HTTPS file
server.
For more information about setting up the DHCP and file servers in the IP Office environment, see
Avaya IP Office™ Platform SIP Telephone Installation Notes for Release 11.0.
DHCP server configuration
Configure the DHCP server to:
• Dynamically assign IP addresses to Avaya Vantage™ devices.
• Provision device and site-specific configuration parameters through various DHCP options.
In a Device Enrollment Services environment, the DHCP server is mainly used to assign IP
addresses to the devices. The device receives the file server address from Device Enrollment
Services.
™
Setting up a DHCP server
About this task
Use this procedure to set up a third-party DHCP server. Avaya Vantage™ supports any DHCP
server software as long as the software is correctly configured.
In the IP Office environment, you can use either the IP Office system as the DHCP server or a
third-party DHCP server. For more information, see Avaya IP Office™ Platform SIP Telephone
Installation Notes.
Before you begin
Contact your server software vendor to obtain server software installation and configuration
instructions.
Procedure
1. Install the DHCP server software according to the server software vendor’s instructions.
2. Create a DHCP scope to define the range of IP addresses to use.
You can define different scopes from different types of devices.
September 2018 Installing and Administering Avaya Vantage
Comments on this document? infodev@avaya.com
™
39
Page 40

Server configuration
3. Configure the required DHCP options.
The DHCP site-specific option that you configure must match the Site Specific Option
Number (SSON) that Avaya Vantage™ uses. The default SSON that Avaya Vantage™ uses
is 242 .
Related links
Configurable DHCP options on page 54
DHCP site-specific options on page 56
Site-specific configuration parameters on page 57
File server configuration
A file server is an HTTP or HTTPS server that is used for downloading and storing software
distribution packages, setting files, and other files required for Avaya Vantage™ devices.
When Avaya Vantage™ starts or restarts, it checks for software updates and settings files on the
specified file servers.
You can provide file server addresses using one of the following methods:
• DHCP
• LLDP
• The Settings menu on the Avaya Vantage™ device
• Device Enrollment Services
• 46xxsettings.txt settings file
For DHCP and the settings file, use the FILE_SERVER_URL parameter to assign the file server
address. For LLDP, you can specify the file server address in the file server TLV.
In a Device Enrollment Services environment, Device Enrollment Services redirects the device to
the file server to be used. The service provider or enterprise administrator configures the file
server in Device Enrollment Services for the device. Device Enrollment Services supports a file
server URL in either the FQDN or IP address format. While the file server can be an HTTP or
HTTPS server, Avaya recommends to use HTTPS with FQDN. For more information about Device
Enrollment Services, see Using Avaya Device Enrollment Services to Manage Endpoints.
You can also specify the file server address using the following parameters:
• HTTPSRVR, HTTPDIR and HTTPPORT parameters for an HTTP server.
• TLSSRVR, TLSDIR and TLSPORT parameters for an HTTPS server.
If the FILE_SERVER_URL parameter is defined, Avaya Vantage™ ignores all other parameters.
To use Avaya Aura® Utility Services as an HTTPS file server, you must configure the destination
TCP port for HTTPS requests as 411 instead of the default 443. You can configure the TCP port
value in FILE_SERVER_URL or TLSPORT. In addition, you must include the root CA certificate of
September 2018 Installing and Administering Avaya Vantage
Comments on this document? infodev@avaya.com
™
40
Page 41

Avaya Aura® configuration for Avaya Vantage
Avaya Aura® Utility Services identity certificate in the TRUSTCERTS. Otherwise, the device
cannot access Avaya Aura® Utility Services after all trusted certificates are downloaded.
In the IP Office environment, Avaya Vantage™ requires an external HTTP or HTTPS file server for
hosting and downloading software distribution packages. Avaya Vantage™ can accept settings
files, including auto-generated settings files, from the IP Office system as a file server. However,
the IP Office system always redirects the request for firmware files to the configured HTTP server
IP address on the IP Office system. For more information about setting up the file server in the IP
Office environment, see Avaya IP Office™ Platform SIP Telephone Installation Notes.
Setting up a file server
About this task
Use this procedure to configure an HTTP or HTTPS file server. The file server is used to download
and store distribution packages and settings files for Avaya Vantage™.
Avaya Vantage™ supports any HTTP or HTTPS server software as long as the software is
correctly configured.
™
Before you begin
Contact your server software vendor to obtain server software installation and configuration
instructions.
Procedure
1. Install the HTTP or HTTPS server software according to the server software vendor’s
instructions.
For an HTTPS connection, you might have to initially install a trust certificate through an
HTTP server and then transfer to an HTTPS server. Ensure that TRUSTCERTS includes
the root CA certificate of the HTTPS file server identity certificate.
2. Download the software distribution package and the 46xxsettings.txt settings file.
3. Extract the distribution package and save the extracted files and the 46xxsettings.txt
settings file on the file server.
Avaya Aura® configuration for Avaya Vantage
To use Avaya telephony applications or to use Avaya Vantage™ in the Avaya Aura® environment,
you can configure the following servers:
™
• Avaya Aura® System Manager: To create users for Avaya telephony applications, such as
Avaya Equinox® and Avaya Vantage™ Basic and to use Personal Profile Management (PPM).
• Avaya Aura® Device Services: To use Unified Login to log in to Avaya Vantage™ and to
manage contacts.
September 2018 Installing and Administering Avaya Vantage
Comments on this document? infodev@avaya.com
™
41
Page 42

Server configuration
Avaya Aura® System Manager configuration
Configure the Avaya Aura® System Manager server to:
• Create users for telephony applications installed on Avaya Vantage™, such as Avaya
Equinox® and Avaya Vantage™ Basic.
• Manage public contacts and shared addresses.
• Use Personal Profile Management (PPM).
For information about Avaya Aura® System Manager installation and administration, see:
• Deploying Avaya Aura® System Manager on System Platform
• Administering Avaya Aura® System Manager
PPM configuration
Personal Profile Management (PPM) is a service provided by Avaya Aura® System Manager. PPM
is not supported if you do not use Avaya Aura® environment.
Avaya Vantage™ uses PPM to:
• Obtain emergency numbers.
• Obtain configuration parameters that impact the Avaya Vantage™ platform.
• Back up and restore specific user configuration settings, such as language or time format
settings. When the user logs in to any registered device, PPM restores user data on the
device.
CSDK-based applications, such as Avaya Vantage™ Basic, use PPM for the following purposes:
• For contact management, such as retrieving and updating of PPM or Avaya Aura® contacts.
• To obtain emergency numbers and Differentiated Service Code Point (DSCP) values.
• To obtain application configuration parameters.
Until SIP registration succeeds, Avaya Vantage™ uses IP addresses specified in
SIP_CONTROLLER_LIST for the getInitialEndpointConfiguration request. If the PPM server is
unreachable, Avaya Vantage™ tries the next IP address from SIP_CONTROLLER_LIST. Similarly,
after SIP registration is complete, Avaya Vantage™ uses IP addresses from
SIP_CONTROLLER_LIST to perform all other PPM requests. If the PPM server is unreachable,
Avaya Vantage™ tries the next IP address from SIP_CONTROLLER_LIST.
PPM is disabled if the value of ACTIVE_CSDK_BASED_PHONE_APP is “” (null string), or if the
application specified in ACTIVE_CSDK_BASED_PHONE_APP is not installed.
September 2018 Installing and Administering Avaya Vantage
Comments on this document? infodev@avaya.com
™
42
Page 43

IP Office configuration for Avaya Vantage
Avaya Aura® Device Services configuration
Configure the Avaya Aura® Device Services server to:
• Use Unified Login credentials for logging in to Avaya Vantage™.
• Manage contacts.
For information about Avaya Aura® Device Services installation and administration, see:
• Deploying Avaya Aura® Device Services
• Administering Avaya Aura® Device Services
™
IP Office configuration for Avaya Vantage
Avaya Vantage™ devices are supported with IP Office Release 11.0 and later. To deploy Avaya
Vantage™ devices in the IP Office environment, the following requirements apply:
• IP Office Server Edition, IP Office Select, or IP500 V2 system running IP Office Release 11.0.
• A separate HTTP file server to host both the Avaya Vantage™ firmware and APK.
For more information, see the following documents:
• Avaya IP Office™ Platform Solution Description and Avaya IP Office™ Platform Feature
Description for general information about IP Office.
• Avaya IP Office™ Platform SIP Telephone Installation Notes for information about configuring
the IP Office system for Avaya Vantage™.
• Administering Avaya IP Office™ Platform with Manager and Administering Avaya IP Office
Platform with Web Manager for information about administering IP Office using IP Office
Manager or IP Office Web Manager.
™
Avaya Session Border Controller for Enterprise
™
configuration
The Avaya Session Border Controller for Enterprise (Avaya SBCE) is a network device that
controls real-time session traffic between networks. Avaya SBCE manages the endpoints or user
agents that are authorized to use a network. If you plan to use Avaya Vantage™ Basic in networks
controlled by Avaya SBCE, you must configure the Avaya Vantage™ Basic SIP user agent on
Avaya SBCE.
September 2018 Installing and Administering Avaya Vantage
Comments on this document? infodev@avaya.com
™
43
Page 44

Server configuration
An Avaya Vantage™ Basic SIP user agent uses the Avaya Vantage Basic/<Application
Version> (<Build number>;ro.avaya.product.model;<CSDK version>) format,
where:
• <Application Version> is the version of the Avaya Vantage™ Basic application. For
example: 1.1.0.0
• <Build number> is the build number of the Avaya Vantage™ Basic application. For
example: 0302
• ro.avaya.product.model is the MODEL4 value.
• <CSDK version> is the Avaya Breeze Client SDK version.
The following is an example of the configured Avaya Vantage™ Basic SIP user agent: Avaya
Vantage Basic/1.1.0.0 (0302;K175D02A;261.0.20).
For more information about configuring user agents on Avaya SBCE, see Administering Avaya
Session Border Controller for Enterprise.
In the IP Office environment, with Avaya SBCE resiliency, remote workers are not supported if
networks are controlled by Avaya SBCE and the SIP controller is defined in an IP address format
instead of an FQDN format.
September 2018 Installing and Administering Avaya Vantage
Comments on this document? infodev@avaya.com
™
44
Page 45

Chapter 5: Security configuration
Avaya Vantage™ provides lock and logout functionality for the protection of user privacy. Each user
has their own login and password, so when a user locks Avaya Vantage™, other users cannot unlock
the device. When Avaya Vantage™ is in a locked state, you can receive calls or make emergency
calls. Avaya Vantage™ restricts access to any user data while in the locked state.
When a user logs out from Avaya Vantage™, the station is available for other users. However, when
another user logs in to the same station, that user cannot access the previous user’s data. When a
new user logs in, Avaya Vantage™ clears the previous user’s personal data and uninstalls all
applications installed by the previous user. However, applications that are installed by the
administrator through the PUSH_APPLICATION parameter in the settings file are not affected.
When the user logs in again, Avaya Vantage™ restores the following information:
• User-defined device configuration, such as language settings.
• Application data that is backed up using a personal account, such as a Google™ account.
As an administrator, you can enable or disable the locked state using the ENABLE_PHONE_LOCK
parameter. To enable logout when the device is locked, you can set the
ALLOW_LOGOUT_WHEN_LOCKED parameter. For more information, see
time parameters on page 159. You can also set the locked state manually by using Screen lock in
the Settings > Security menu.
Phone lock and idle
For troubleshooting, Avaya Vantage™ supports the Secure Shell Protocol (SSH) and a secure
mechanism for personnel to log in to the device remotely and perform the required operations in a
secure environment. By default, SSH users do not have root access or access to private user data,
such as:
• Private keys of digital certificates.
• Authentication credentials for SIP, HTTP, 802.1X, and Exchange.
• Contact and call log information.
• Personal browser information, such as bookmarks, URL history, and cookies.
To enable SSH, Avaya Vantage™ uses the SSH_ALLOWED parameter.
Avaya Vantage™ does not support non-secure protocols and services, such as FTP, Telnet, TFTP,
rlogin, and rsh. The only exception is support of Android Debug Bridge (ADB). By default, ADB
remains disabled on Avaya Vantage™. If ADB is required for Android application development, the
user can enable ADB through the Settings menu on the device. When not required, you may
completely disable the ADB support by setting the ADBSTAT parameter to 0. When ADBSTAT is 0,
users do not get the option to enable ADB through the Settings menu.
September 2018 Installing and Administering Avaya Vantage
Comments on this document? infodev@avaya.com
™
45
Page 46

Security configuration
To enhance security, Avaya Breeze™ CSDK applications, such as Avaya Vantage™ Basic or Avaya
Equinox®, support Secure Real-time Transport Protocol (SRTP), which provides confidentiality and
message authentication to media traffic going over the LAN infrastructure. This allows Avaya
Vantage™ to encrypt calls between two or more endpoints, to prevent anyone from eavesdropping.
The Avaya Breeze™ CSDK applications also support secure signaling through SIP-TLS.
Some of the other security features are:
• TLS support for all services, such as HTTPS file downloads and SCEP over HTTPS.
• EAP-TLS and EAP-MD5 authentication methods for Ethernet.
• Support for the following Wi-Fi security protocols: WEP, WPA, WPA2 PSK, and 802.1x,
including EAP-PEAP, EAP-TLS, EAP-TTLS, and EAP-PWD with phase two authentication.
• Identity certificate and trusted certificate support. Avaya Vantage™ supports up to 100 trusted
certificates in either PEM or DER format.
• Android built-in trusted certificates that can be used by all Android applications installed on
Avaya Vantage™. According to the value set for the ENABLE_PUBLIC_CA_CERTS parameter,
Device Enrollment Services, HTTP or HTTPS file download, PPM, SCEP over HTTPS, and
Avaya Aura® Device Services use these trusted certificates.
• No built-in Avaya certificates except Avaya Product Root CA. This certificate is only used for
software signature validation.
• Application download control using a configurable XML file.
• Installation of applications from unknown sources disabled by default.
• Support for antivirus and antimalware applications.
• Android security features, such as disk encryption, remote wipe, and SELinux running in
enforcing mode.
Password security policies
In the SIP login password, you can use:
• Numbers: 0 – 9
• Capital letters: A – Z
• Lowercase letters: a – z
• Special characters: ~!@#$%^&*_-+=`|\(){}[]:;”’<>,.?/
In the Avaya Aura® environment, you can configure password policies for Avaya Vantage™ using
System Manager.
With IP Office Release 11.0, the SIP user password is required when creating a new user. For
more information, see Avaya IP Office™ Platform SIP Telephone Installation Notes.
If you use an Exchange account on Avaya Vantage™, then security policies configured for Avaya
Vantage™ must comply with the security policies configured for the Microsoft Exchange Server. If
September 2018 Installing and Administering Avaya Vantage
Comments on this document? infodev@avaya.com
™
46
Page 47

Certificate management
the device password does not comply with the Microsoft Exchange Server policies, the user might
not be able to configure or use the Exchange account. Microsoft Exchange Server policies must
allow the usage of numeric SIP passwords when using the SIP login method. Contact your
Microsoft Exchange Server vendor to obtain information about configuring password security
policies.
Note:
If you use the Unified Login feature, there are no issues with Microsoft Exchange Server
security policies. Avaya Vantage™ uses the Unified Login credentials to access the Exchange
account.
Certificate management
Digital certificates are electronic documents used to confirm the identity of the device or
application. A number of Avaya Vantage™ applications use these certificates, which include built-in
Andriod trusted certificates and downloaded trusted certificates.
• Avaya Vantage™ platform applications:
- Android: Wi-Fi 802.1x authentication, Exchange and Google accounts, and browsers using
HTTPS.
- Avaya: Configuration and firmware file downloads using HTTPS, SCEP over HTTPS,
Avaya Aura® Device Services or Authenticated file server, and PPM.
• Communication applications: Use certificates for different activities, such as SIP connectivity
using SIP over TLS and PPM over TLS and connection to Avaya Aura® Device Services
servers.
Avaya Vantage™ downloads trusted digital certificates and a PKCS12 file, and generates the
identity certificate using SCEP. When SCEP is set, Avaya Vantage™ uses the identity certificate
generated using SCEP instead of the PKCS12 file.
The downloaded trusted certificates are stored in the Android trust store under the “VPN and
APPS” and “Wi-Fi” repositories. These certificates are available for all applications, including third
party applications. The “Wi-Fi” repository contains only the downloaded trusted certificates. The
“VPN and APPS” repository contains the Android built-in CA certificates and the downloaded
trusted certificates.
To store built-in Android certificates and downloaded certificates, Avaya Vantage™ uses the
Android certificate store.
Avaya Vantage™ downloads a PKCS12 file from a URL specified in the PKCS12URL configuration
parameter. If the PKCS12PASSWORD configuration parameter does not contain the valid
password for the PKCS12 file, Avaya Vantage™ prompts users to enter the password. If the
PKCS12 file contains a trusted certificate, Avaya Vantage™ installs the PKCS12 file without the
trusted certificate. You can specify the list of trusted certificates on Avaya Vantage™ only through
TRUSTCERTS.
Identity certificates are stored in the system credential storage under the “VPN and APPS” and
“Wi-Fi” repositories. Only Avaya Vantage™ platform applications and Avaya applications, such as
Avaya Vantage™ Basic, can access the system credential storage.
September 2018 Installing and Administering Avaya Vantage
Comments on this document? infodev@avaya.com
™
47
Page 48

Security configuration
You can review certificates installed on Avaya Vantage™ device:
• The Settings > Security > EASG trusted credentials menu on the device contains EASG
certificates.
• The Settings > Security > Trusted credentials menu on the device contains CA
certificates.
• The Settings > Security > Client credentials menu on the device contains identity
certificates.
Certificate usage by applications
The following table shows certificates that are used by different applications on Avaya Vantage™.
The use of built-in Android trusted certificates by some applications depends on the
ENABLE_PUBLIC_CA_CERTS parameter setting.
Application Built-in Android
trusted certificates
Wi-Fi 802.1x with EAPTLS, EAP-TTLS
Ethernet 802.1x with
EAP-TLS
HTTPS configuration
and image files
download
PPM Y
SCEP over HTTPS Y
Avaya Aura® Device
Services or
Authentication file server
N Y Y
Y
Only when
ENABLE_PUBLIC_CA_
CERTS is set to 1.
Y
Only when
ENABLE_PUBLIC_CA_
CERTS is set to 1.
Only when
ENABLE_PUBLIC_CA_
CERTS is set to 1.
Only when
ENABLE_PUBLIC_CA_
CERTS is set to 1.
Y
Only when
ENABLE_PUBLIC_CA_
CERTS is set to 1.
Downloaded trusted
certificates
Y Y
Y Y
Y Y
Y Y
Y Y
Identity certificate
generated using SCEP
or PKCS12 file
September 2018 Installing and Administering Avaya Vantage
Comments on this document? infodev@avaya.com
™
Table continues…
48
Page 49

Parameter configuration for secure installation
Application Built-in Android
trusted certificates
Device Enrollment
Services
Redirected file server
from Device Enrollment
Services
Browser Y Y N
Exchange account Y Y Y
Google account Y Y N
Approved third-party
applications (included in
ID_CERT_APPLICATIO
N_LIST)
Non-approved third-party
applications (not
included in
ID_CERT_APPLICATIO
N_LIST)
Y
Y Y
Y Y Y
Y N N
Downloaded trusted
certificates
1
Note:
Identity certificate
generated using SCEP
or PKCS12 file
For information about IP Office security certificates, see Avaya IP Office™ Platform SIP
Telephone Installation Notes for Release 11.0.
Parameter configuration for secure installation
For secure installation, configure the following parameters.
Parameter
TRUSTCERTS File names of
TLSSRVRID 1 Specifies that the TLS server identification is required.
1
If Device Enrollment Services provides private CA certificates, then the private CA is used to validate the identity
certificate of the redirected file server. Otherwise, the Built-in Android trusted certificates are used.
Set to Description
Provides the file names of certificates to be used for
required trusted
certificates
authentication. It supports both root and intermediate
certificates and can contain up to one hundred certificate
files. Avaya Vantage™ supports both PEM and DER file
formats.
Certificates installed on the servers must have the
common name that matches the FQDN of the
Table continues…
September 2018 Installing and Administering Avaya Vantage
Comments on this document? infodev@avaya.com
™
49
Page 50

Security configuration
Parameter Set to Description
established connection. If it does not match, the
connection is dropped.
TLS_VERSION 0 or 1 Specifies which TLS versions are supported with all TLS
connections used by Android and Avaya applications.
Assign one of the following values:
• 0: TLS versions 1.0 and 1.2 are supported.
• 1: TLS version 1.2 only is permitted.
AUTH 1 Ensures usage of HTTPS file servers for configuration
and software files downloads. Once AUTH is set to 1 and
the device downloads the trusted certificates, the device
can only download files from the HTTPS server with
certificates that can be validated using the trusted
certificate repository.
FILE_SERVER_URL The address of
Assigns HTTPS or TLSRVR file servers.
your HTTPS file
server
SSH_ALLOWED 0 Keeps Secure Shell (SSH) disabled.
ADBSTAT 0 Keeps Android Debug Bridge (ADB) disabled.
SCEP parameters
Configure the following Simple Certificate Enrollment Protocol (SCEP) parameters.
Parameter
MYCERTURL String Null Specifies the URL to access the SCEP server. The
MYCERTCN String $SERIA
MYCERTDN String Null Specifies the common part of SUBJECT in the SCEP
Type Default
value
LNO
Description
device attempts to contact the server only if this
parameter is set to other than its default value.
Specifies the Common Name (CN) for SUBJECT in the
SCEP certificate request. The values can either be
$SERIALNO or $MACADDR.
If the value includes the string $SERIALNO, that string
will be replaced by the serial number of the phone.
If the value includes the string $MACADDR, that string
will be replaced by the media access control (MAC)
address of the phone.
certificate request. This value defines the part of
SUBJECT in a certificate request including
Organizational Unit, Organization, Location, State, and
Country that is common for requests from different
devices.
September 2018 Installing and Administering Avaya Vantage
Comments on this document? infodev@avaya.com
™
Table continues…
50
Page 51

Parameter configuration for secure installation
Parameter Type Default
Description
value
MYCERTKEYLEN Numeric 2048 Specifies the private key length in bits to be created in
the device for a certificate enrollment. The supported
value is 2048.
MYCERTREPLACE Numeric 90 Specifies the period of the certificate's validity interval.
This period is specified as a percentage. Avaya Vantage
uses this percentage to calculate the date of the
certificate replacement before its expiration. The range is
from 1 to 99.
When the configured period is over, Avaya Vantage
™
generates a new pair of private and public keys and
requests to sign the new CSR using SCEP from the CA
server.
MYCERTCAID String CAIdenti
fier
Specifies the Certificate Authority Identifier. CA servers
might require a specific CA Identifier string in order to
accept GetCA requests. If the device works with such a
CA, the CA identifier string can be set through this
parameter.
PKCS12URL String Null Specifies the URL where a PKCS12 file containing an
identity certificate is stored.
PKCS12PASSWORD String Null Specifies a PKCS12 password.
CERT_INSTALL_APPLI
CATION_LIST
ID_CERT_APPLICATIO
N_LIST
SCEPPASSWORD String $SERIA
String all Specifies applications that can install trusted and identity
certificates on Avaya Vantage™.
String all Specifies applications that can access identity certificates
stored on Avaya Vantage™.
Specifies a challenge password to use with SCEP. The
LNO
value of SCEPPASSWORD, if non-null, is included in a
challengePassword attribute in SCEP certificate signing
requests.
™
If the value contains $SERIALNO, $SERIALNO is
replaced by the value of SERIALNO. If the value contains
$MACADDR, $MACADDR is replaced by the value of
MACADDR without the colon separators.
VLAN parameters
Configure the following virtual local area network (VLAN) parameters:
Parameter
L2Q 0, 1, or2Specifies 802.1Q VLAN tagging mode. Assign one of the following
September 2018 Installing and Administering Avaya Vantage
Set to Notes
values:
• Auto (0) or Tag (1): The device sends tagged packets on
L2QVLAN until the VLANTEST time. If the DHCP server is
Table continues…
™
Comments on this document? infodev@avaya.com
51
Page 52

Security configuration
Parameter Set to Notes
unreachable, the device sends untagged packets. On Avaya
Vantage™, the behavior is same for both values.
• Untag (2): The device sends untagged packets.
L2QVLAN Non-
zero
value
VLANTEST 0 to 999 Specifies the number of seconds to wait for a DHCPOFFER
VLANSEP 1 Enables the VLAN separation.
PHY2TAGS 0 or 1 Specifies whether tags are stripped from frames forwarded to the
PHY2VLAN Non-
zero
value
Specifies the 802.1Q VLAN identifier. This parameter must not
have the same value as that of PHY2VLAN.
message reception on a non-zero VLAN. The default value is 60
seconds.
secondary Ethernet interface.
• 0: VLAN tags are removed from frames forwarded to the
secondary Ethernet interface.
• 1: VLAN tags are not removed from frames forwarded to the
secondary Ethernet interface.
Specifies the value of the 802.1Q VLAN identifier for tagged
frames through the secondary Ethernet interface. This parameter
must not have the same value as that of L2QVLAN.
For a full VLAN separation between the device and computer packets, the VLAN configuration
must meet the following conditions:
• VLANSEP is 1
• L2Q is 0 or 1
• L2QVLAN is not equal to 0
• PHY2VLAN is not equal to 0
• L2QVLAN is not equal to PHY2VLAN
• VLANTEST is 0 or timer is less than VLANTEST
The device tries to obtain an IP address from the DHCP server on the voice VLAN. If the device
gets an IP address, the device sends all the tagged packets on the voice VLAN. Set the
PHY2VLAN parameter to the data VLAN so that untagged packets from the computer are
assigned to the data VLAN. Tagged packets from VLAN computers other than the data VLAN are
blocked. PHY2VLAN is important for a full VLAN separation between the computer and the device
VLANs.
September 2018 Installing and Administering Avaya Vantage
Comments on this document? infodev@avaya.com
™
52
Page 53

Chapter 6: Device configuration
The following list shows the methods you can use to configure Avaya Vantage™. The methods are
listed in order of precedence:
• DHCP
- Standard
- Option 43
- Option 242
• 46xxsettings.txt file
• Avaya Aura® Device Services for Avaya Aura
• LLDP
• PPM for Avaya Aura
®
• Settings menu on the device
®
Note:
The order might be different for some parameters. For more information, see the required
parameter descriptions in “Appendix A, Supported configuration parameters”.
Most of the parameters are configurable through multiple methods. When Avaya Vantage™ receives
a new parameter value, it checks precedence rules to determine whether the new value must be
applied. Avaya Vantage™ changes the parameter value only if the precedence level of the new value
source is higher than the precedence level of the current value source. If a source precedence level
is not defined for a parameter, Avaya Vantage™ does not use values provided by this source for the
parameter.
Avaya Vantage™ modes
Depending on the ACTIVE_CSDK_BASED_PHONE_APP value, Avaya Vantage™ operates in the
following modes:
• If the ACTIVE_CSDK_BASED_PHONE_APP value contains the name of an Avaya Breeze
CSDK application, Avaya Vantage™ operates in the Avaya Breeze™ CSDK application based
mode. When in this mode, Avaya Vantage™ supports the Login screen and configuration
sharing.
Use ACTIVE_CSDK_BASED_PHONE_APP only when the active phone application is an
Avaya Breeze™ CSDK application, such as Avaya Equinox® or Avaya Vantage™ Basic. You can
push an Avaya Breeze™ CSDK application on the device as the active phone application
through the PUSH_APPLICATION parameter. If no Avaya Breeze™ CSDK application is on the
device, ACTIVE_CSDK_BASED_PHONE_APP must use the default value.
™
September 2018 Installing and Administering Avaya Vantage
Comments on this document? infodev@avaya.com
™
53
Page 54

Device configuration
• If ACTIVE_CSDK_BASED_PHONE_APP is set to the default value (“”), Avaya Vantage
operates in the non Avaya Breeze™ CSDK application based mode. In this case, some
configuration parameters are not supported and some options are not available on the
Settings menu of Avaya Vantage™. You can still configure unsupported parameters, but Avaya
Vantage™ and telephony applications will not use the configured values. For more information
about whether a parameter is supported in the non Avaya Breeze™ CSDK application based
mode, see Appendix A, Supported configuration parameters.
The main non Avaya Breeze™ CSDK application that Avaya Vantage™ supports is Avaya
Vantage™ Open. This application is currently supported with third-party SIP registrar and
communication platform, such as Broadsoft.
When in the non Avaya Breeze™ CSDK application based mode, backing up of the user
configuration on PPM is not supported. If a parameter supports backing up on PPM and is
supported in the non Avaya Breeze™ CSDK application based mode, then this parameter keeps the
configured value unless the user reverts to the factory default settings of the device.
Device configuration using DHCP options
Avaya Vantage™ connects to the DHCP server during the boot up. Use the DHCP server to
provide the following information to the device:
™
• IP address
• Subnet mask
• IP address of the HTTP or HTTPS file server
• IP address of the DNS server
Configurable DHCP options
The following options can be configured on the DHCP server:
Option
Option 43 Specifies the encapsulated vendor-specific options that clients and servers use to
Option 55 Specifies the parameter request list. Acceptable values are:
Description
exchange information. To use this option, Avaya Vantage™ sends option 60 with the
value ccp.avaya.com. Option 43 is processed only if the first code in the option is 1
with a value of 6889. All values are interpreted as strings of ASCII characters that
are accepted with or without a null termination character. Any invalid value is ignored
and the corresponding parameter value is not set.
• 1 for subnet mask.
• 3 for router IP addresses.
• 6 for domain name server IP address or addresses.
• 7 for log server IP address or addresses.
September 2018 Installing and Administering Avaya Vantage
Comments on this document? infodev@avaya.com
™
Table continues…
54
Page 55

Device configuration using DHCP options
Option Description
• 15 for domain name.
• 26 for interface MTU.
• 42 for NTP servers.
• 43 for vendor-specific information.
• 120 for Session Initiation Protocol (SIP) servers.
• DHCP_SSON for DHCP site-specific option numbers. You can assign a value
between 128 and 254.
Option 57 Specifies the maximum DHCP message size. The maximum packet size can be up
to 1500 bytes. The default value is 1000.
Option 60 Specifies the vendor class identifier. To use option 43, Avaya Vantage™ sends option
60 with the value ccp.avaya.com.
Option 242 Specifies site-specific options. Option 242 is optional. If you do not configure this
option, ensure that key parameters, such as the following, are configured elsewhere:
• FILE_SERVER_URL
• HTTPSRVR
• TLSSRVR
Avaya Vantage™ sends options 55, 57, and 60 to the DHCP server to provide additional
information required to configure the device.
For more information about configurable DHCP options, see
RFC 2132.
Codes for option 43
The codes supported by option 43 and the corresponding parameters are listed in the following
table:
Code
1 Does not set any parameter. The value must be 6889.
2 HTTPSRVR
3 HTTPDIR
4 HTTPPORT
5 TLSSRVR
6 TLSDIR
7 TLSPORT
8 TLSSRVRID
9 L2Q
10 L2QVLAN
15 SIP_CONTROLLER_LIST
18 FILE_SERVER_URL
Parameter
September 2018 Installing and Administering Avaya Vantage
Comments on this document? infodev@avaya.com
™
55
Page 56

Device configuration
Avaya Vantage™ uses information from option 43 only if the first code of option 43 is 1 with a value
of 6889. All values are interpreted as strings of ASCII characters. Avaya Vantage™ ignores invalid
values and does not set the corresponding parameters.
Parameter configuration through DHCPACK
Parameter Set to
DHCP lease
time
DHCP lease
renew time
DHCP lease
rebind time
DOMAIN The value of Option 15, if received.
DNSSRVR The value of Option 6, if received, which might be a list of IP addresses.
HTTPSRVR • The siaddr value, if it is not zero.
IPADD The yiaddr value.
LOGSRVR The value of Option 7, if received, which might be a list of IP addresses.
MTU_SIZE The value of Option 26, if received.
NETMASK The value of Option 1, if received.
ROUTER The value of Option 3, if received, which might be a list of IP addresses.
ROUTER_IN_
USE
SIP_CONTR
OLLER_LIST
SNTPSRVR The value of Option 42, if received, which might be a list of IP addresses.
The value of Option 51, if received.
The value of Option 58, if received.
The value of Option 59, if received.
• The parameter is not set if the siaddr value is zero.
The giaddr value, if this value not equal to zero and the current value of
ROUTER_IN_USE is 0.0.0.0. In other cases, the parameter is not set.
The value of Option 120, if received, which may be a list of IP addresses or DNS names.
DHCP site-specific options
You can specify configuration parameters for a certain Avaya Vantage™ device and assign these
parameters through DHCP using site-specific options.
DHCP site-specific options allow you to specify configuration parameters for a certain Avaya
Vantage™ device and assign these parameters through DHCP. A site-specific option is a sequence
of comma-separated name=value pairs, where:
• name is the name of a configuration parameter. name is case-insensitive.
• value is the value that is assigned to a configuration parameter with the name matching to
the value of name. The value of value is case-sensitive. To include spaces, tabs, or commas
in value, you must use double quotes (“”).
September 2018 Installing and Administering Avaya Vantage
Comments on this document? infodev@avaya.com
™
56
Page 57

Device configuration using DHCP options
The following is an example of a site-specific option that specifies:
• Two HTTPSRVR addresses.
• The ID of the Voice Virtual Local Access Network that the device must connect to.
• The ICMPDU parameter, which defines that Destination Unreachable messages must not be
transmitted.
HTTPSRVR=“135.51.77.120,135.51.77.139”,L2QVLAN=5,ICMPDU=0
The default DHCP option to set the site-specific configuration parameters is 242. You can also use
any option ranging between 128 and 254.
Note:
When the device receives DHCP ACK contents options 43 and 242, the device uses option
242.
™
To use configuration parameters on Avaya Vantage
, you must specify the option in DHCP Site-
Specific Option Number (SSON) on the device interface.
Site-specific configuration parameters
The following table contains a list of site-specific configuration parameters that you can define for
the device.
Parameter
CAPTIVE_PO
RTAL_SERV
ER
FILE_SERVE
R_URL
HTTPDIR Specifies the path to prepend to all configurations and data files the device might request
HTTPPORT Destination port for HTTP requests. The default value is 80.
HTTPSRVR IP addresses or DNS names of HTTP file servers used for downloading settings and
Description
Specifies the URL of a captive portal server.
Specifies the list of URL for downloading image and configuration files. This parameter
has higher precedence over HTTPSRVR, HTTPPORT, HTTPDIR, TLSSRVR, TLSDIR,
and TLSPORT.
when starting up, that is, the path, relative to the root of the HTTP file server, to the
directory in which the device configuration and date files are stored. The path may contain
no more than 127 characters and may contain no spaces. HTTPDIR is the path for all
HTTP operations.
The command is SET HTTPDIR=<path>. In configurations where the upgrade and
binary files are in the default directory on the HTTP server, do not use the
HTTPDIR=<path>.
firmware files during startup.
Since the firmware files are digitally signed, TLS is not required for security. However,
configuration files are not digitally signed, so it is recommended to use HTTPS servers for
storing configuration and firmware files.
September 2018 Installing and Administering Avaya Vantage
Comments on this document? infodev@avaya.com
™
Table continues…
57
Page 58

Device configuration
Parameter Description
ICMPDU Controls the extent to which ICMP destination unreachable messages are sent in
response to messages sent to closed ports so as not to reveal information to potential
hackers.
The default value is 1. Use this value to send destination unreachable messages for
closed ports used by the traceroute command.
ICMPRED Controls whether ICMP Redirect messages are processed. The default value is 0, which
means that redirect messages are not processed.
L2Q 802.1Q tagging mode. The default value is 0 for the automatic tagging mode.
L2QVLAN VLAN ID of the voice VLAN. The default value is 0.
PROCPSWD Security string used to access local procedures. The default value is 27238.
SIP_CONTR
OLLER_LIST
TIMEZONE Time zone configuration in the Olson name format. For example, America/New_York or
SIP proxy or registrar server IP or DNS addresses that can be 0 to 255 characters. Enter
the IP address in the dot-decimal notation. For example: 127.0.0.1. You can provide
several IP addresses separated by commas and without spaces between entries. The
default is null, which means there are no controllers.
Europe/Isle_of_Man.
TLSDIR Used as a path name that is prepended to all file names used in HTTPS GET operations
during initialization. The string length can be from 0 to 127.
TLSPORT Destination TCP port used for requests to an HTTPS server ranging from 0 to 65535. The
default value is 443, which is the standard HTTPS port.
TLSSRVR IP addresses or DNS names of Avaya file servers used to download configuration and
firmware files. Transport Layer Security (TLS) is used to authenticate the server and to
provide encrypted data exchange between Avaya Vantage™ and the server.
USER_AUTH
_FILE_SERV
ER_URL
VLANTEST The number of seconds to wait for a DHCPOFFER on a non-zero VLAN. The default
Specifies the user authenticated file server URL. Enter the address using either the dotdecimal or domain name format. Add a port number, if required. In the current release,
Avaya Vantage™ supports Avaya Aura® Device Services user authentication servers only.
value is 60 seconds.
Device configuration using a 46xxsettings.txt settings file
You can administer Avaya Vantage™ devices centrally using the 46xxsettings.txt settings file
that Avaya provides with the devices. The settings file is a text file that resides on a file server and
contains configuration parameters.
Important:
In an IP Office environment, Avaya strongly recommends that you allow the IP Office system
to auto-generate the settings files for devices rather than using the uploaded file. This helps to
automatically adjust the settings provided to devices to match changes made in the IP Office
September 2018 Installing and Administering Avaya Vantage
Comments on this document? infodev@avaya.com
™
58
Page 59

Device configuration using a 46xxsettings.txt settings file
system configuration. For more information, see Avaya IP Office™ Platform SIP Telephone
Installation Notes.
Configuring the settings file
About this task
Use this procedure to modify the settings file with appropriate values to provision the device
configuration parameters.
Procedure
1. On the file server, go to the location where the 46xxsettings.txt file is downloaded.
2. Open the 46xxsettings.txt file in a text editor.
3. Set the required parameters.
4. Save the 46xxsettings.txt file.
Result
On the next polling period, Avaya Vantage™ downloads the file and applies the settings.
Customization of the settings file
The 46xxsettings.txt settings file contains configuration parameters required to customize
Avaya Vantage™ for your enterprise. You can customize the settings file to provide different
parameters to devices according to various conditions, such as the following:
• Subnet of the your organization’s network.
• IP address of the device.
• User group.
• Device model.
You can download the 46xxsettings.txt file from the Avaya Support website and edit it to add
your own custom settings. You can use the following:
Item Description Structure Example
Tag Specifies a string in the file.
Avaya Vantage™ navigates to
that string when it interprets
the corresponding Goto
command.
A single # character followed
by a single space character
followed by a tag name. Tag
name must not include
spaces.
# K175SETTINGS
# <TAG_NAME>
September 2018 Installing and Administering Avaya Vantage
Comments on this document? infodev@avaya.com
™
Table continues…
59
Page 60

Device configuration
Item Description Structure Example
Goto
command
Allows Avaya Vantage™ to
directly navigate to the
specified tag skipping all
parameters between the
Goto command and the tag
GOTO followed by a single
space character and a tag
name in the following format:
GOTO <TAG_NAME>
mentioned in the command.
Conditional
statement
Compares the value of a
specified parameter to a
some reference value. If the
IF $<PARAMETER_NAME>
SEQ <REFERENCE_VALUE>
GOTO <TAG_NAME>
value of the parameter
exactly matches the
reference value, Avaya
Vantage™ directly navigates
to the tag specified in the
condition. If the parameter
does not exist or values do
not match, Avaya Vantage
™
ignores the conditional
statement.
GOTO K175SETTINGS
IF $MODEL4 SEQ K175
GOTO K175SETTINGS
SET
command
GET
command
Avaya Vantage™ supports the
following parameters as
testable parameters:
• GROUP
• MODEL
• MODEL4
• MACADDR
• IPADDR
• SUBNET
Assigns a value to the
specified parameter. If the
value is incorrect, Avaya
Vantage™ does not assign it
to the parameter. In this
case, Avaya Vantage
™
continues to use the default
or previously assigned value.
Avaya Vantage™ tries to
download the specified
settings file from the file
server. If the file exists,
Avaya Vantage™ downloads
this file, stops to interpret the
current settings file, and tries
to interpret the downloaded
SET <PARAMETER_NAME>
<PARAMETER_VALUE>
SET FILE_SERVER_URL
http://
192.168.125.161
GET <FILE_NAME> GET Settings.txt
Table continues…
September 2018 Installing and Administering Avaya Vantage
Comments on this document? infodev@avaya.com
™
60
Page 61

Device configuration using LLDP
Item Description Structure Example
settings file. If Avaya
Vantage™ cannot download
the file, it continues to
interpret the current settings
file.
Comment Provides additional
information about the
configuration process. Avaya
Vantage™ does not interpret
comments.
A string started with two
pound characters (##).
## <COMMENT>
## The following
section contains
upgrade-related
parameters
The 46xxsettings.txt settings file must use UTF-8 encoding. All commands, parameter
names, and tags are case insensitive and must use ASCII symbols.
Avaya Vantage™ handles the lines of the settings file one by one. Avaya Vantage™ interprets only
one command per line. All arguments of the command must be placed on the same line as the
command. To include spaces in an argument value, you must enclose the value using double
quotes (“”).
User group configuration in the settings file
Use the conditional statements with the GROUP parameter to assign specific parameters or
parameter values to different user group.
The following example shows simple settings file configuration for two user groups with the
numbers 20 and 35.
IF $GROUP SEQ 20 GOTO CALLCENTER
IF $GROUP SEQ 35 GOTO MANAGERS
GOTO END
# CALLCENTER
## Section with parameters for Group 20 ##
GOTO END
# MANAGERS
## Section with parameters for Group 35 ##
# END
After configuring user groups in the settings file, you need to assign a specific user group to a
device. For more information, see
Setting a user group for a specific configuration on page 70.
Device configuration using LLDP
Link Layer Discovery Protocol (LLDP) is an open standards layer 2 protocol that IP deskphones
use to advertise their identity and capabilities and to receive administration from an LLDP server.
LAN equipment can use LLDP to manage power, administer VLANs, and provide some
administration. The transmission and reception of LLDP is specified in IEEE Std 802.1AB-2009.
September 2018 Installing and Administering Avaya Vantage
Comments on this document? infodev@avaya.com
™
61
Page 62

Device configuration
Avaya Vantage™ supports transmission and reception of LLDP using Ethernet line interface. Avaya
Vantage™ uses the LLDP_ENABLED parameter to determine whether LLDP is enabled on the
device. You can assign one of the following values:
• 0: The transmission and reception of LLDP is disabled.
• 1: The transmission and reception of LLDP is enabled. This is the default value.
• 2: The transmission and reception of LLDP is enabled. The transmission of LLDP is started
only after Avaya Vantage™ receives an LLDP frame. Avaya Vantage™ transmits the first LLDP
frame within 2 seconds after the first LLDP frame is received.
After transmission is started, LLDP Data Units (LLDPDU) are transmitted every 30 seconds.
When Wi-Fi is selected as the network mode, the Ethernet ports on Avaya Vantage™ are disabled
and Avaya Vantage™cannot transmit LLDP frames over Ethernet.
After receiving of an LLDP frame, Avaya Vantage™ encodes the frame and stores the value of the
frame in the LLDP_RCV_CONTENT parameter. Avaya Vantage™ uses the frame data only if the
following conditions:
• The received frame has the destination MAC address set to the reserved group multicast
address (01:80:C2:00:00:0E)
• The Ethernet protocol type is 88:CC
Avaya Vantage™ processes the value of LLDP_RCV_CONTENT every time the value of
LLDP_RCV_CONTENT changes.
Initial values of parameters transmitting in LLDP frames
The following table shows the initial values of LLDP fields that are set by Avaya Vantage™ before
the first LLDP frame is transmitted.
LLDP field
LLDP_TTL 120
LLDP_SYSTEM_NAME The host name sent to the DHCP server in DHCP
LLDP_BRIDGE 0
SNMP_SYS_OID A string in the dotted-decimal character format that
LLDP_MAU • 10 if the Ethernet line interface is operating at
Value
option 12.
represents the value of the sysObjectID object in
the MIB-II system group.
10Mbps, half-duplex
• 11 if the Ethernet line interface is operating at
10Mbps, full-duplex
• 15 if the Ethernet line interface is operating at
100Mbps, half-duplex
September 2018 Installing and Administering Avaya Vantage
Comments on this document? infodev@avaya.com
™
Table continues…
62
Page 63

Device configuration using LLDP
LLDP field Value
• 16 if the Ethernet line interface is operating at
100Mbps, full-duplex
• 29 if the Ethernet line interface is operating at
1000Mbps, half-duplex
• 30 if the Ethernet line interface is operating at
1000Mbps, full-duplex
MANUFACTURER Avaya
POE_USED 1
POE_TYPICAL Typical PoE power usage of the device with
enabled backlight. The parameter is measured in
watts.
POE_MAX Maximum PoE power usage of the device with
enabled backlight. The parameter is measured in
watts. Avaya Vantage™ uses 13 for this parameter.
TLV impact on system parameter values
Avaya Vantage™ uses data transmitted in LLDP Type-Length-Value (TLV) elements to set
configuration parameters. If a received LLDP frame contains a TIA LLDP-MED Capabilities TLV,
then Avaya Vantage™ processes other TLVs in the frame only if the TIA LLDP-MED Capabilities
TLV contains a Device Type of 0 or 4. TLVs are processed in the order that they are received.
System parameter
name
L2QVLAN and L2Q IEEE 802.1 VLAN
L2Q, L2QVLAN TIA LLDP MED
TLV name Impact
L2Q is set to 1 (ON).
Name
Network Policy
(Voice) TLV
L2QVLAN is set to the VLAN ID contained in the TLV.
A check is made as to whether a reset is necessary to obtain a
new IP address due to a change in the values of the
parameters L2Q or L2QVLAN.
VLAN Name TLV is ignored if:
• The value of USE_DHCP is 0 and the value of IPADD is not
0.0.0.0.
• The current value of L2QVLAN was set by a TIA LLDP MED
Network Policy TLV.
• The VLAN name in the TLV does not contain the substring
“voice” in lower-case, upper-case or mixed-case ASCII
characters anywhere in the VLAN name.
L2Q is set to 2 (OFF) if the Tagged Flag T is set to 0
L2Q is set to 1 (ON) if the Tagged Flag T is set to 1.
Table continues…
September 2018 Installing and Administering Avaya Vantage
Comments on this document? infodev@avaya.com
™
63
Page 64

Device configuration
System parameter
TLV name Impact
name
VLAN_IN_USE TIA LLDP MED
Network Policy
(Voice Signaling)
SIP_CONTROLL
ER_LIST
TLSSRVR and
HTTPSRVR
Proprietary Call
Server TLV
Proprietary File
Server TLV
L2Q Proprietary 802.1 Q
Framing
L2QVLAN - Set to the VLAN ID in the TLV.
A check is made as to whether a reset is necessary to obtain a
new IP address due to a change in the values of the
parameters L2Q or L2QVLAN.
This TLV is ignored if:
• The value of USE_DHCP is 0 and the value of IPADD is not
0.0.0.0.
• The Application Type is not 1 (Voice) or 2 (Voice Signaling).
• The Unknown Policy Flag (U) is set to 1.
VLAN_IN_USE - set to the VLAN ID in the TLV.
This TLV is ignored if:
• The value of USE_DHCP is 0 and the value of IPADD is not
0.0.0.0.
• The Application Type is not 1 (Voice) or 2 (Voice Signaling).
• The Unknown Policy Flag (U) is set to 1.
SIP_CONTROLLER_LIST will be set to the IP addresses
specified in the TLV.
FILE_SERVER_URL will be set to the IP addresses specified
in the TLV.
If the TLV value is 1, L2Q is set to 1 (On).
If the TLV value is 2, L2Q is set to 2 (Off).
If the TLV value is 3, L2Q is set to 0 (Auto).
A check is made as to whether a reset is necessary to obtain a
new IP address due to a change in the values of the
parameters L2Q or L2QVLAN.
This TLV is ignored if:
• The value of USE_DHCP is 0 and the value of IPADD is not
0.0.0.0.
• The current L2QVLAN value was set by an IEEE 802.1
VLAN name.
• The current L2QVLAN value was set by a TIA LLDP MED
Network Policy (Voice) TLV.
September 2018 Installing and Administering Avaya Vantage
Comments on this document? infodev@avaya.com
™
64
Page 65

Device configuration using the Settings menu on the device
Device configuration using the Settings menu on the
device
Device configuration checklist
The following checklist describes task you must perform to configure Avaya Vantage™ device
settings.
No. Task Notes
1. Configure your administration password. Avaya Vantage™ does not provide access to
Administrator mode if the default administrator
password is used.
See Administrator password configuration on
page 66.
2. Ensure that you are using the
Administrator mode to configure the
device.
Improper modification of some settings can
lead to a device malfunction. Therefore, such
settings are available to administrators only.
See Enabling administrator settings on the
device on page 67.
3. Configure the file server data. You must provide an address of a file server
that is used to store software distribution
packages and settings files. If the file server
address is configured through DHCP, LLDP, or
Device Enrollment Services, you do not need
to configure the file server address. The
address can be either an IP address in dotteddecimal format or an FQDN.
Setting up a file server address on
See
page 68.
4. Configure the DNS server data. You must provide the address of the DNS
server used in your organization. In most
cases, the DNS server address is provided
through DHCP. You can also configure DNS
server data statically or through the
46xxsettings.txt file.
Both the Wi-Fi and Ethernet interfaces use the
configured DNS server and domain
information. The option to configure DNS
information specifically for each Wi-Fi network
is unavailable. Therefore, if a user toggles
between the Wi-Fi and Ethernet interfaces,
Table continues…
September 2018 Installing and Administering Avaya Vantage
Comments on this document? infodev@avaya.com
™
65
Page 66

Device configuration
No. Task Notes
then the configured DNS information is
applicable for both interfaces.
See Setting the DNS name and address on
page 68.
5. Configure a user group. You must specify a user group number to
provide configuration parameters according to
the assigned user group.
See Setting a user group for a specific
configuration on page 70.
6. Configure HTTP proxy server settings. You must provide an address of a server that
acts as a gateway between your organization’s
local network and other networks. If required,
specify addresses that can bypass the proxy
server.
Setting up an HTTP proxy and
See
exception on page 70.
7. Configure SIP server settings. You must have a SIP server to make and
handle calls. Additional SIP servers can be
configured to provide system survivability. If
the 46xxsettings.txt file cannot be
downloaded, you can configure SIP settings
through the Settings menu of the device
Configuring SIP server settings on
See
page 71.
8. Configure a DHCP site-specific option
number.
9. Configure access to third party
applications.
You must specify a DHCP site-specific option
number to provide configuration parameters
according to the assigned site-specific option.
See Setting up a DHCP site-specific option
number on page 72.
Specify which applications an user can install.
See Access to Google Play applications for
K165 and K175 on page 77.
Administrator password configuration
You must set up an administrator password to enable administrator settings on Avaya Vantage™.
Avaya Vantage™ uses the ADMIN_PASSWORD or PROCPSWD parameters to store the
password and provide access to administrator options in the Settings menu.
• If ADMIN_PASSWORD is configured, Avaya Vantage™ uses the ADMIN_PASSWORD value
and ignores the PROCPSWD value.
September 2018 Installing and Administering Avaya Vantage
Comments on this document? infodev@avaya.com
™
66
Page 67

Device configuration using the Settings menu on the device
• If ADMIN_PASSWORD is not configured and PROCPSWD has a value different from the
default, Avaya Vantage™ uses the PROCPSWD value. The default value of PROCPSWD is
27238. Avaya Vantage™ does not use the default value of PROCPSWD.
• If ADMIN_PASSWORD is not configured and PROCPSWD uses the default value, you
cannot access administrator options in the Settings menu on Avaya Vantage™.
In an IP Office environment, ADMIN_PASSWORD is added to the automatically-generated
46xxsettings.txt file if the No User Source Number (NUSN) is set for the administrator
password in IP Office Manager.
You can change the value of ADMIN_PASSWORD and PROCPSWD using the SET command in
the 46xxsettings.txt file. Additionally, you can change the value of PROCPSWD using the
following methods:
• name=value pair in a DHCPACK message sent by your DHCP server.
• PPM service configuration. You cannot configure ADMIN_PASSWORD through PPM. For
more information about configuring the PROCPSWD value through PPM, see Administering
Avaya Aura® Session Manager.
Enabling administrator settings on the device
About this task
You can enable administrator settings on Avaya Vantage™. In the administrator mode, the device
displays Settings menu options that are unavailable to end users, such as the SIP proxy
settings menu.
Before you begin
Get the administrator password that is set through ADMIN_PASSWORD or PROCPSWD.
In an IP Office environment, set ADMIN_PASSWORD using the SET_ADMIN_PASSWORD=x
NUSN, where x is the password that is added to the autogenerated 46xxsettings.txt file. For
example:
SET_ADMIN_PASSWORD=Avaya@1234
Procedure
When you are logged in, do the following:
1. On the Home screen, tap Applications.
2. Tap Settings.
3. In the upper-right corner of the screen, tap Menu > Admin login.
4. Enter the administrator password, and tap OK.
When you are logged out, do the following:
5.
On the Login screen, tap the Settings (
September 2018 Installing and Administering Avaya Vantage
Comments on this document? infodev@avaya.com
) icon.
™
67
Page 68

Device configuration
6. In the upper-right corner of the screen, tap Menu > Admin login.
7. Enter the administrator password, and tap OK.
Setting up a file server address
About this task
Use this procedure to set up a file server address for downloading software distribution packages
and settings files.
If the file server address is configured through DHCP or LLDP, you do not need to configure the
file server address in the Settings menu of Avaya Vantage™. If Device Enrollment Services is
used, then the file server redirection URL information is configured in Device Enrollment Services.
Procedure
1. On the Home screen, tap Applications.
2. Tap Settings.
3. Tap More > File server.
4. Enter the HTTP or HTTPS address of your file server.
A file server URL must have one of the following format:
http://hostname[:port][/path]
•
https://hostname[:port][/path]
•
Where:
• hostname is either an IP address in dotted-decimal format or an FQDN.
• port is an optional port number.
• path is an optional path to the directory where distribution packages and other files are
stored.
Setting the DNS name and address
About this task
As an alternative to administering DNS using DHCP, you can specify DNS server data manually.
Use this procedure to set the domain name and address of your DNS server.
Procedure
1. On the Home screen, tap Applications.
2. Tap Settings.
3. Tap More > DNS.
September 2018 Installing and Administering Avaya Vantage
Comments on this document? infodev@avaya.com
™
68
Page 69

Device configuration using the Settings menu on the device
4. Tap DNS Server.
5. Enter the IP address of the primary DNS server in DNS Server 1.
6. (Optional) If required, enter the IP address of the secondary DNS server in DNS Server 2.
7. Tap OK.
8. Tap Domain.
9. Enter the domain name of the DNS server.
10. Tap OK.
Setting the Avaya Aura® Device Services server address
About this task
Use this procedure as an alternative to administering the Avaya Aura® Device Services server
address by using the 46xxsettings.txt file. You can set the server address of Avaya Aura
Device Services if you want to use the Unified Login feature.
You must log in as an administrator to configure the Avaya Aura® Device Services information on
the device through the Settings menu.
Note:
Avaya Aura® Device Services is supported in the Avaya Aura® environment only.
Before you begin
Get the administrator password that is set through ADMIN_PASSWORD or PROCPSWD.
Procedure
1. On the Home screen, tap Applications.
2. Tap Settings.
3. In the upper-right corner of the screen, tap Menu > Admin login, and enter the
administrator password.
4. Tap More and then tap Avaya Aura Device Services (AADS).
5. Enter the address of the Avaya Aura® Device Services server and tap OK.
Related links
Administrator password configuration on page 66
Enabling administrator settings on the device on page 67
®
September 2018 Installing and Administering Avaya Vantage
Comments on this document? infodev@avaya.com
™
69
Page 70

Device configuration
Setting a user group for a specific configuration
About this task
You can create several configuration sets and upload a specific set to the Avaya Vantage™ device
according to a group identifier assigned to the device. Use this procedure to set a group identifier
to the device. You can only set the group identifier using the Settings menu of Avaya Vantage™.
Procedure
1. On the Home screen, tap Applications.
2. Tap Settings.
3. Tap More > GROUP.
4. Enter the group identifier.
The group identifier must be an integer between 0 and 999 inclusively.
5. Tap OK.
Setting up an HTTP proxy and exception
About this task
Use this procedure to specify the address of an HTTP proxy server. You can also enter exceptions
to bypass the proxy server.
You can configure the HTTP proxy through the Settings menu only as an administrator.
Before you begin
Get the administrator password that is set through ADMIN_PASSWORD or PROCPSWD.
Procedure
1. On the Home screen, tap Applications.
2. Tap Settings.
3. In the upper-right corner of the screen, tap Menu > Admin login, and enter the
administrator password.
4. Tap More, and tap HTTP/S Proxy Settings.
5. Tap Proxy host name[:port].
6. Enter the HTTP proxy host name with a port number.
7. Tap OK.
8. (Optional) To bypass the proxy server for some specific addresses, do the following:
a. Tap Bypass proxy for.
b. Enter one or more server addresses to bypass the proxy server.
September 2018 Installing and Administering Avaya Vantage
Comments on this document? infodev@avaya.com
™
70
Page 71

Device configuration using the Settings menu on the device
Use commas to separate addresses.
c. Tap OK.
Related links
Administrator password configuration on page 66
Enabling administrator settings on the device on page 67
Configuring SIP server settings
About this task
Use this procedure to register Avaya Vantage™ to the SIP server.
You can configure the SIP server and SIP domain through the Settings menu only as an
administrator.
Before you begin
Get the administrator password that is set through ADMIN_PASSWORD or PROCPSWD.
Procedure
1. On the Home screen, tap Applications.
2. Tap Settings.
3. In the upper-right corner of the screen, tap Menu > Admin login, and enter the
administrator password.
4. Tap More, and tap SIP Settings.
5. Tap SIP domain, enter the domain name for registration, and tap OK.
6. Do the following to add a SIP server to the SIP servers list:
a. Tap SIP proxy settings.
b. In the upper right corner, tap Add.
c. In the SIP proxy server field, enter the address of the SIP proxy server.
You can use either the dotted-decimal or DNS name format.
d. In the Transport type field, select the TLS or TCP protocol for the SIP server.
Avaya Vantage™ does not support UDP.
e. (Optional) In the SIP port field, enter a port number for the server to use.
Avaya Vantage™ uses the following default port numbers:
• 5060 for TCP
• 5061 for TLS
Related links
Enabling administrator settings on the device on page 67
Administrator password configuration on page 66
September 2018 Installing and Administering Avaya Vantage
Comments on this document? infodev@avaya.com
™
71
Page 72

Device configuration
Setting up a DHCP site-specific option number
About this task
Use this procedure to assign a Site-Specific Option Number (SSON). Avaya Vantage™ uses
SSON to determine which set of site-specific parameters must be downloaded from the DHCP
server. You can only set the SSON using the Settings menu of Avaya Vantage™.
Procedure
1. On the Home screen, tap Applications.
2. Tap Settings.
3. Tap More > DHCP Site-Specific Option Number (SSON).
4. Enter the required SSON.
The number must be in a range between 128 to 254.
Additional network configuration
Setting the Ethernet interface control
Procedure
1. Open the Settings menu.
2. Tap Network > Ethernet.
3. Tap Interfaces.
4. (Optional) If the interface options are disabled, enable the administrator mode.
5. To view the Ethernet mode, tap Ethernet.
The Ethernet mode is set to auto negotiation and cannot be modified.
6. To configure the secondary Ethernet interface, tap PC Ethernet and select one of the
following:
• Disabled: To disable the PC Ethernet interface.
• Auto: To enable and configure the PC Ethernet mode to auto negotiation.
Setting the 802.1x authentication mode
Procedure
1. Open the Settings menu.
2. Tap Network > Ethernet.
3. Tap IEEE 802.1x authentication.
You might need to enter the administrator password.
September 2018 Installing and Administering Avaya Vantage
Comments on this document? infodev@avaya.com
™
72
Page 73

Device configuration using the Settings menu on the device
4. (Optional) To change the setting for the Pass through mode, tap Pass through mode,
and select one of the following options:
• On: To enable multicast pass-through without proxy logoff.
• Multicast pass through and proxy logoff: To enable multicast pass-through with proxy
logoff.
• Off: To disable multicast pass-through.
5. (Optional) To change the setting for the Supplicant mode, tap Supplicant mode, and
select one of the following options:
• Off: To disable the Supplicant operation.
• On, unicast EAPOL only: To enable the Supplicant operation. The device responds
only to received unicast Extensible Authentication Protocol over LAN (EAPOL)
messages.
• On, unicast and multicast EAPOL: To enable the Supplicant operation. The device
responds to received unicast and multicast EAPOL messages.
6. (Optional) To change the Extensible Authentication Protocol (EAP) type to be used for
IEEE 802.1x authentication, tap EAP Type, and select one of the following options:
• EAP-MD5
• EAP-TLS
September 2018 Installing and Administering Avaya Vantage
Comments on this document? infodev@avaya.com
™
73
Page 74

Chapter 7: Application setup
This chapter describes how to set up applications on Avaya Vantage™. Avaya Vantage™ supports
the installation of Avaya telephony applications and third-party applications.
As of Release 1.1 Service Pack 1, the Avaya Vantage™ Basic and Avaya Equinox® Android Package
Kits (APKs) are bundled in the Avaya Vantage™ firmware package file and pushed automatically to
the Avaya Vantage™ device. If you want to use one of these CSDK-based applications as the active
telephony application, you can set the ACTIVE_CSDK_BASED_PHONE_APP parameter in the
settings file. The application you define in the parameter is installed automatically from the
application APKs that are available on the device’s local memory. Unless you define one of these
bundled applications as the active CSDK-based application, the application remains disabled and
hidden. If a newer version of Avaya Vantage™ Basic or Avaya Equinox® becomes available in
Google Play, the Avaya Vantage™ device displays an upgrade notification.
You can install or update applications on Avaya Vantage™ through the following options:
• The “Push application” method. Using this method, the administrator can initiate automatic
installation, upgrade, or uninstallation of applications without any intervention of the end user.
To push an application on the device, the administrator uploads the application APK file on the
HTTP or HTTPS server and provides the path to the file in the 46xxsettings.txt file
through the PUSH_APPLICATION parameter.
Important:
You must specify each application only once. If you specify an application more than once,
Avaya Vantage™ might not work as expected.
• Google Play. You must enable access to Google Play by using the
USER_INSTALL_APPS_GOOGLE_PLAY_STORE parameter. End users can download
applications from Google Play for K165 and K175. The system administrator can restrict
installation of certain applications by using a configuration file.
• Third-party application stores or unknown sources. You must enable installation of applications
from unknown sources by using the USER_INSTALL_APPS_UNKNOWN_SOURCES
parameter. This option is disabled by default. When enabled, end users can download
application APKs from common third-party application stores or other sources, such as emails
or websites, to Avaya Vantage™.
With the telephony application APKs that are bundled with the Avaya Vantage™ firmware package,
you do not need to use the installation options listed above. However, if you choose to install or
update using these options, they take priority over the bundled APKs. If you use one of these
options, Avaya Vantage™ Basic and Avaya Equinox® will still remain hidden and disabled until one of
these applications is defined as the active CSDK-based application.
September 2018 Installing and Administering Avaya Vantage
Comments on this document? infodev@avaya.com
™
74
Page 75

Pushing applications onto the Avaya Vantage™ device
The installation options, in order of priority, for the Avaya CSDK applications are:
1. Google Play store (for K165 and K175)
2. PUSH_APPLICATION parameter
3. Bundled APKs
Note:
IP Office Release 11.0 only supports Avaya Vantage™ Basic. Other applications, such as Avaya
Equinox® on Avaya Vantage™, are not currently supported with IP Office.
™
Pushing applications onto the Avaya Vantage
device
About this task
Use this procedure to push applications to Avaya Vantage™ without any intervention of the end
user. Through the PUSH_APPLICATION parameter, you can initiate automatic installation,
upgrade, or uninstallation of applications.
Important:
While setting the PUSH_APPLICATION parameter, you must specify each application only
once. If you specify an application more than once, Avaya Vantage™ might not work as
expected.
Before you begin
Ensure that you have uploaded the application APK file on the HTTP or HTTPS file server or a
network endpoint.
Procedure
1. Open the 46xxsettings.txt settings file in a text editor.
2. To push a new application to the device, do one of the following depending on the
scenario:
• The settings file contains the string SET PUSH_APPLICATION <a list of URLs>
and the list of URLs contains at least one entry: Enter a comma after the last entry,
followed by the URL where the new application package file is located.
• The settings file does not contain the string SET PUSH_APPLICATION <a list of
URLs>: Add a new string with the text SET PUSH_APPLICATION, followed by a space
and the URL where the application package file is located.
If the application package file is stored in the root directory of the HTTP or HTTPS file
server, you can provide the file name only. If the application package file is stored in a
subdirectory of your HTTP or HTTPS file server, you must provide a relative path to the
file. If the application package file is stored on a network endpoint, you must provide the
full path to the package file.
September 2018 Installing and Administering Avaya Vantage
Comments on this document? infodev@avaya.com
™
75
Page 76

Application setup
3. To upgrade an application that was already pushed to the device, do the following:
a. In the string SET PUSH_APPLICATION <a list of URLs>, locate the URL of the
previous version of the application package file.
b. Replace this URL with the URL where the latest version of the application package file
is located.
4. Save the settings file.
5. Upload the settings file on the file server.
Result
In the next polling period, Avaya Vantage™ downloads the settings file and the application package
and installs the application on the device.
Push command examples
The following is a simple example of using the Push command when the application package file
is stored in the root directory of your HTTP or HTTPS file server:
SET PUSH_APPLICATION "com.avaya.android.vantage.basic_release_2.0.0.0.apk"
The following is a simple example of using the Push command when the application package file
is stored on a network endpoint:
SET PUSH_APPLICATION "http://www.avaya.com/applications/download/
com.avaya.android.vantage.basic_release_2.0.0.0.apk"
Uninstalling a pushed application
Procedure
1. Open the 46xxsettings.txt settings file in a text editor.
2. From the string containing the SET PUSH_APPLICATION command, delete the path to the
application that must be uninstalled.
3. Save the settings file.
4. Upload the settings file on the file server.
Result
On the next polling period, Avaya Vantage™ uninstalls the application from the device.
September 2018 Installing and Administering Avaya Vantage
Comments on this document? infodev@avaya.com
™
76
Page 77

Access to Google Play applications for K165 and K175
Access to Google Play applications for K165 and K175
For K165 and K175, Google Play is the main source of Android applications. According to your
company’s policies, you can determine:
• Whether end users can install applications from Google Play.
• Which applications end users can install from Google Play.
Access to Google Play
You can control access to Google Play by using the
USER_INSTALL_APPS_GOOGLE_PLAY_STORE parameter in the 46xxsettings.txt file. To
enable installation of third-party applications from Google Play, you must set
USER_INSTALL_APPS_GOOGLE_PLAY_STORE to 1.
Access to specific applications
You can determine the availability of certain applications from Google Play by completing a black
or white list section in an XML-based configuration file:
• White list: End users can install applications from the white list only. End users cannot install
any applications that are not in the white list. If the white list section is configured and the list
is empty, users cannot install applications from Google Play.
• Black list: End users cannot install applications that are mentioned in the black list. If the
black list is empty, users can install any third-party application from Google Play.
You can configure either a white list or a black list, but not both at a time.
The APPS_CONTROL_FILE parameter defines the location of the configuration file.
If the configuration file is not specified, users can install any application from Google Play.
Example: XML-based application control file with a white list
<?xml version="1.0" encoding="utf-8"?>
<applicationControl
xmlns="http://xml.avaya.com"
xmlns:xsi="http://www.w3.org/2001/XMLSchema-instance"
xsi:schemaLocation="http://xml.avaya.com applicationControl.xsd">
<allowedUserInstalledAppsUsingGooglePlayStore type="whitelist">
<app packagename="com.avaya.android.flare" />
<app packagename="com.avaya.android.vantage.basic" />
</allowedUserInstalledAppsUsingGooglePlayStore>
</applicationControl>
Editing a black or white list
Before you begin
If you do not already have one, create an XML-based configuration file for third-party application
control.
Procedure
1. Open the XML-based configuration file in a text editor.
September 2018 Installing and Administering Avaya Vantage
Comments on this document? infodev@avaya.com
™
77
Page 78

Application setup
2. To add or edit the black list, do the following:
3. To add or edit the white list, do the following:
a. (Optional) If the <allowedUserInstalledAppsUsingGooglePlayStore
type=“blacklist”> section is not already present in the configuration file, add the
section:
<allowedUserInstallAppsUsingGooglePlayStore type=“blacklist”>
</allowedUserInstallAppsUsingGooglePlayStore>
b. In the <allowedUserInstalledAppsUsingGooglePlayStore
type=“blacklist”> section, list the applications you want to include.
Use the following format to list the application:
<app packagename=“<Type the package name here>” />
Example:
<allowedUserInstallAppsUsingGooglePlayStore type=“blacklist”>
<app packagename=“com.restricted.application” />
<app packagename=“com.hacker.software” />
</allowedUserInstallAppsUsingGooglePlayStore>
a. (Optional) If the <allowedUserInstalledAppsUsingGooglePlayStore
type=“whitelist”> section is not already present in the configuration file, add the
section:
<allowedUserInstalledAppsUsingGooglePlayStore type=“whitelist”>
</allowedUserInstallAppsUsingGooglePlayStore>
b. In the <allowedUserInstalledAppsUsingGooglePlayStore
type=“whitelist”> section, list the applications you want to include.
Use the following format:
<app packagename=“<Type the package name here>” />
Example:
<allowedUserInstallAppsUsingGooglePlayStore type=“whitelist”>
<app packagename=“com.avaya.communicator” />
<app packagename=“com.avaya.android.vantage.basic” />
</allowedUserInstallAppsUsingGooglePlayStore>
4. Save the configuration file.
5. Upload the file on the file server.
6. In the settings file, set the APPS_CONTROL_FILE parameter to define the URL that
specifies the location of the XML-based configuration file.
Result
On the next polling period, Avaya Vantage™ downloads the file and applies the settings.
September 2018 Installing and Administering Avaya Vantage
Comments on this document? infodev@avaya.com
™
78
Page 79

Access to applications from unknown sources
Access to applications from unknown sources
On Avaya Vantage™, installation of third-party applications from unknown sources is disabled by
default. When you enable this option, end users can download application APKs from common
third-party application stores and other sources, such as emails and websites, to Avaya Vantage™.
When installation from unknown sources is enabled, on K155, Application Stores Links (
becomes available and provides links to common third-party application stores, such as F-Droid
and GetJar.
You can change this installation setting by using the
USER_INSTALL_APPS_UNKNOWN_SOURCES parameter in the settings file. You can set the
value of USER_INSTALL_APPS_UNKNOWN_SOURCES to one of the following:
• 0: Installation of third-party applications is disabled. End users cannot change the status
through the Settings > Security menu on the device.
• 1: Installation of third-party applications is disabled by default. End users can change the
status through the Settings > Security menu.
• 2: Installation of third-party applications is enabled by default. End users can change the
status through the Settings > Security menu.
Setting up a CSDK-based telephony application as the active application
About this task
)
If you want to use a CSDK-based telephony application as the active telephony application, you
must set up the ACTIVE_CSDK_BASED_PHONE_APP parameter.
As of Release 1.1 SP 1, the Avaya Vantage™ Basic and Avaya Equinox® APKs are bundled in the
Avaya Vantage™ firmware package and pushed automatically to the Avaya Vantage™ device.
However, unless you define one of these bundled applications as the active CSDK-based
application, the application remains disabled and hidden.
For more information about parameter values, see
applications on page 80.
Important:
Only one CSDK-based application can be the active telephony application at a time.
Therefore, ACTIVE_CSDK_BASED_PHONE_APP must contain only one package name.
Package names of CSDK-based
Procedure
1. Open the 46xxsettings.txt settings file in a text editor.
2. If the settings file contains the string SET ACTIVE_CSDK_BASED_PHONE_APP
<“application package name”>, replace the existing package name with the
package name of the required application.
September 2018 Installing and Administering Avaya Vantage
Comments on this document? infodev@avaya.com
™
79
Page 80

Application setup
3. If the settings file does not contain the string SET ACTIVE_CSDK_BASED_PHONE_APP
<“application package name”>, do the following:
For example:
SET PUSH_APPLICATION
com.avaya.android.vantage.basic_playstore_2.0.0.0.0406_100718_120334e.apk
SET ACTIVE_CSDK_BASED_PHONE_APP “com.avaya.android.vantage.basic”
4. Save and upload the e settings file on the file server.
In the next polling period, Avaya Vantage™ downloads the settings file and applies the
settings accordingly.
If not already installed, the telephony application that you define in the
ACTIVE_CSDK_BASED_PHONE_APP parameter is installed using the APK available on
the device’s local memory. Avaya Vantage™ enables the application for the end user.
a. Create a new string in the file below the string SET PUSH_APPLICATION <a list
of URLs>.
b. In the new string, enter the following:
SET ACTIVE_CSDK_BASED_PHONE_APP <“name of the application
package”>
Avaya telephony applications supported on Avaya Vantage
In the current release, Avaya Vantage™ supports the following Avaya telephony applications:
Application
Avaya Vantage™ Basic Yes
Avaya Equinox
Avaya Vantage™ Open No
®
Avaya Breeze™ CSDK-based?
Yes
If you want to use an CSDK-based telephony application, you also need to set up the
ACTIVE_CSDK_BASED_PHONE_APP parameter. For more information, see
Package names of
CSDK-based applications on page 80.
Note:
Avaya Vantage™ with IP Office Release 11.0 only supports the Avaya Vantage™ Basic
application. Avaya Equinox® and Avaya Vantage™ Open are not supported.
Package names of CSDK-based applications
The following table shows package names of the CSDK-based phone applications. If you want to
use the CSDK-based phone application, you need to set the
ACTIVE_CSDK_BASED_PHONE_APP parameter using the corresponding package name.
™
September 2018 Installing and Administering Avaya Vantage
Comments on this document? infodev@avaya.com
™
80
Page 81

Setting up a CSDK-based telephony application as the active application
Application Package name
Avaya Equinox
®
“com.avaya.android.flare”
Avaya Vantage™ Basic “com.avaya.android.vantage.basic”
Parameter settings for IP Office environments
With IP Office, the K1xxSupgrade.txt file is automatically-generated. This file defines the
ACTIVE_CSDK_BASED_PHONE_APP and PUSH_APPLICATION parameters, as shown in the
following example:
## IPOFFICE/11.0.0.0.0 build 830 10.133.134.138 AUTOGENERATED
SET APPNAME K1xx_SIP-R1_1_0_1_3105.tar
SET ACTIVE_CSDK_BASED_PHONE_APP "com.avaya.android.vantage.basic"
SET PUSH_APPLICATION
com.avaya.android.vantage.basic_playstore_1.1.0.1.0002_280318_8334068.apk
Note:
If you include the line GET 46xxsettings.txt, then all lines after this line will be ignored.
You must include such lines in the 46xxsettings.txt file.
September 2018 Installing and Administering Avaya Vantage
Comments on this document? infodev@avaya.com
™
81
Page 82

Chapter 8: Kiosk mode configuration
You can configure Avaya Vantage™ and supported applications to work in Kiosk mode. With this
mode, you can limit the applications that end users can access. Therefore, end users will only be
able to access specific applications for a predetermined purpose and will not be able to access the
underlying system.
For the device to work as a kiosk, you must pin the Avaya Kiosk application as a special Home
screen launcher, where only predefined applications are available to the end user. To avoid getting a
scroll bar, Avaya recommends that you define up to six applications to be pinned on the Home
screen of the launcher.
When Avaya Vantage™ is in Kiosk mode:
• The end user cannot change the location of the application icons presented on the Home
screen of the launcher.
• The device does not display a notification bar.
• The Android Home button is unavailable.
• Users can only use the Back button to return to the Home screen.
Kiosk mode configuration checklist
No.
Task Notes
1 Push the Avaya Kiosk application to
the Avaya Vantage™ device.
2 Define the Android applications to be
locked on the Home screen.
Use the PUSH_APPLICATION parameter to install the
Kiosk application on the device.
The Avaya Kiosk application APK file is part of the
Avaya Vantage™ firmware distribution package.
For more information about pushing applications to the
device, see
Vantage device on page 75.
Use the PIN_APP parameter to pin the required
Android applications on the Home screen of the
launcher. To avoid getting a scroll bar, Avaya
Pushing applications onto the Avaya
Table continues…
September 2018 Installing and Administering Avaya Vantage
Comments on this document? infodev@avaya.com
™
82
Page 83

No. Task Notes
recommends that you define up to six applications to
be pinned on the Home screen.
You must also include the Avaya Kiosk application
package name in the PIN_APP parameter value. For a
list of applications that can be pinned in Kiosk mode,
Applications to be pinned in Kiosk mode on
see
page 83.
Applications to be pinned in Kiosk mode
To unpin, see
page 84.
3 Customize the wallpaper. Use the CURRENT_LOGO parameter to set a
wallpaper of your choice for the Home screen.
4 Reboot the device. After you complete the necessary configuration, reboot
the device to apply the settings.
5 Log on to the device and start Kiosk
mode.
This is a one-time activity. On subsequent reboots, the
special Home screen for Kiosk mode opens
automatically.
See Starting Kiosk mode for the first time on page 84.
Unpinning applications in Kiosk mode on
Applications to be pinned in Kiosk mode
Use the PIN_APP parameter to pin the required applications to the Home screen of the launcher.
The following is a list of application packages that must be part of the PIN_APP parameter value:
• “com.avaya.endpoint.avayakiosk”: This is the Avaya Kiosk application that provides the
special Home screen.
• “com.avaya.endpoint.login” and “com.avaya.endpoint.upgrade”: These are required to
provide login and upgrade capabilities in Kiosk mode.
To provide telephony capabilities to end users in Kiosk mode, you can pin one of the following
Avaya CSDK-based telephony applications:
• “com.avaya.android.vantage.basic”: Avaya Vantage™ Basic.
• “com.avaya.android.flare”: Avaya Equinox®.
Changes to the PIN_APP parameter setting only take effect after you reboot the Avaya Vantage
device.
An example of the parameter setting:
SET PIN_APP
“com.avaya.endpoint.avayakiosk,com.avaya.android.vantage.basic,com.android.chrome,com.av
aya.endpoint.login,com.avaya.endpoint.upgrade,com.avaya.endpoint.avayavoiceassistant”
September 2018 Installing and Administering Avaya Vantage
Comments on this document? infodev@avaya.com
™
™
83
Page 84

Kiosk mode configuration
Unpinning applications in Kiosk mode
Procedure
To unpin applications, log in using the administrator password defined in ADMIN_PASSWORD or
PROCPSWD.
Starting Kiosk mode for the first time
Before you begin
• Complete the configuration tasks. See Kiosk mode configuration checklist on page 82.
• Reboot the Avaya Vantage™ device.
Procedure
1. Log on to the device using the SIP user credentials.
2. On the Home screen, tap the Avaya Kiosk application icon.
The device displays the special Home screen of the launcher and the icons for the pinned
applications.
On subsequent reboots, the special Home screen opens automatically.
Exiting Kiosk mode
About this task
Use this procedure to exit the Kiosk mode and access the device normally.
Procedure
1. On the Home screen of the launcher, tap the Lock icon.
2. Enter the administrator password that is configured in ADMIN_PASSWORD or
PROCPSWD.
3. Tap OK.
September 2018 Installing and Administering Avaya Vantage
Comments on this document? infodev@avaya.com
™
84
Page 85

Chapter 9: Maintenance
Restoring factory settings from the Settings menu
About this task
Use this procedure to remove all user information stored on the device and to restore original
manufacturer settings. This procedure describes how to perform a factory reset from the Settings
menu on the device. You can also perform a factory reset from the boot recovery menus.
Resetting a device removes the following information from the device:
• All administered values
• User-specified data, including information about all accounts
• Device settings
• Application data and settings that were not loaded as part of the device firmware
• Wi-Fi network configuration
To be able to recover settings or data after a factory reset, you must back them up using a
personal third-party account, such as Google™ account.
Before you begin
Get the administrator password that is set through ADMIN_PASSWORD or PROCPSWD.
In an IP Office environment, you must set the ADMIN_PASSWORD using the
SET_ADMIN_PASSWORD=x NUSN, where x is the password that is added to the autogenerated
46xxsettings.txt file. For example:
SET_ADMIN_PASSWORD=Avaya@1234
Procedure
1. On the Home screen, tap Applications.
2. Tap Settings.
3. In the upper-right corner of the screen, tap Menu > Admin login, and enter the
administrator password.
4. Tap Backup & reset > Factory data reset.
5. Tap Reset device.
6. Tap Erase everything.
The device restarts. The process takes approximately 20 minutes to complete.
September 2018 Installing and Administering Avaya Vantage
Comments on this document? infodev@avaya.com
™
85
Page 86

Maintenance
Related links
Firmware is corrupted on page 97
Rebooting Avaya Vantage™ from the Settings menu
About this task
Use this procedure to restart Avaya Vantage™ manually. You can also reboot Avaya Vantage™ to
initiate an upgrade.
Procedure
1. Go to the Settings menu.
2. Tap Backup & reset.
3. Tap Reboot and then tap Yes to confirm.
If the file server contains a new version of software, Avaya Vantage™ downloads and
installs updates according to the configured upgrade policy.
Failover and survivability
If the control server that is currently active fails, the exact behavior of a communication application
is determined by the application’s internal policies. The exact list of operations that can be
performed during failover might be different for each application.
Debugging and monitoring the device
Enabling verbose logging
About this task
Use this procedure to set the scope of log messages and the events to be included in log
messages.
Before you begin
Get the administrator password that is set through ADMIN_PASSWORD or PROCPSWD.
Procedure
1. On the Home screen, tap Applications.
September 2018 Installing and Administering Avaya Vantage
Comments on this document? infodev@avaya.com
™
86
Page 87

Debugging and monitoring the device
2. Tap Settings.
3. In the upper-right corner of the screen, tap Menu > Admin login, and enter the
administrator password.
4. Tap Debugging options.
5. Tap Log.
6. Tap Log Categories and select the log categories to be included in log messages.
7. Tap Remote Logging to configure parameters for system logging.
a. Select the Remote Logging check box to enable system logging.
b. From the Remote Log Level list, select the events to be included in log messages.
By default, logs only include errors.
c. In the Remote log server field, provide the address of the server where you want
logs to be stored.
8. Tap Local logging to configure parameters for local logging.
a. Select the Local Logging check box to enable local logging.
b. From the Local Log Level list, select the events to be included in log messages.
The default setting is 4, which displays warnings.
c. Tap Clear Local Log Files to delete local logging files and core dump files.
Generating a debug report
About this task
Use this procedure to generate a debug report. The debug option is also available when you are
logged out of the device.
You can save the report in the internal flash memory of Avaya Vantage™, on a USB mass storage
device, or on an HTTP or HTTPS server. When you generate a debug report, Avaya Vantage
overwrites any existing report, if applicable. The report remains available in the internal flash
memory for up to 14 days.
Record the encryption password carefully because you cannot decrypt the report without the
password.
Procedure
1. Tap Settings.
2. Tap Debugging options > Generate debug report.
™
3. Enter the password for encryption and decryption of the report.
4. Select one of the following destinations:
• Internal flash memory
September 2018 Installing and Administering Avaya Vantage
Comments on this document? infodev@avaya.com
™
87
Page 88

Maintenance
5. Tap Generate.
• HTTP/S file server
• USB flash drive
The USB flash drive option is available only when a USB mass storage device is
connected to Avaya Vantage™.
Avaya Vantage™ generates a debug report, debugreport.tar.gz, and stores it in the
internal flash memory at /mnt/sdcard/AvayaVantageLogs. If you selected the USB or
HTTP/S option, a copy of the report is saved in the selected destination.
6. (Optional) On K165 and K175, to share the report, click
.
You can share the report through most email systems, with the exception of Gmail, which
does not support tar.gz files. Instead of Gmail, you can use Google Drive.
The success of the sharing operation depends on the file size and the selected option. For
example, while most email systems support an attachment that is up to 20 MB only,
Google Drive can support up to 10 GB.
The icon is not available if you are logged out of the device.
Generating an audio report
About this task
Use this procedure to generate a separate audio report instead of a complete debug report. The
audio debugging option is also available when you are logged out of the device.
You can save the report in the internal flash memory of Avaya Vantage™, on a USB mass storage
device, or on an HTTP or HTTPS server. When you generate an audio report, Avaya Vantage
overwrites any existing report, if applicable. The report remains available in the internal flash
memory for up to 14 days.
Ensure that you record the encryption password carefully because you cannot decrypt the report
without the password.
™
Procedure
1. Tap Settings.
2. Tap Debugging options > Generate audio report.
3. Enter the password for encryption and decryption of the report.
4. Select one of the following destinations:
• Internal flash memory
• HTTP/S file server
• USB flash drive
The USB flash drive option is available only when a USB mass storage device is
connected to Avaya Vantage™.
September 2018 Installing and Administering Avaya Vantage
Comments on this document? infodev@avaya.com
™
88
Page 89

Debugging and monitoring the device
5. Tap Generate.
Avaya Vantage™ generates an audio report, media_report.tar.gz, and stores it in the
internal flash memory at /mnt/sdcard/AvayaVantageLogs. If you selected the USB or
HTTP/S option, a copy of the report is saved in the selected destination.
6. (Optional) On K165 and K175, to share the report, click .
You can share the report through most email systems, with the exception of Gmail, which
does not support tar.gz files. Instead of Gmail, you can use Google Drive.
The success of the sharing operation depends on the file size and the selected option. For
example, while most email systems support an attachment that is up to 20 MB only,
Google Drive can support up to 10 GB.
The
icon is not available if you are logged out of the device.
Opening a debug or audio report
About this task
Use this procedure to decrypt a debug or audio report. To review log data, you must decrypt the
reports.
Procedure
1. Copy the report to a folder on your computer.
2. Open the command line interface and navigate to the folder where you copied the report.
3. Run one of the following commands:
• To decrypt the debug report:
openssl aes-128-cbc -d -salt -k <password> -in debugreport.tar.gz
-out debugreport.decrypted.tar.gz
• To decrypt the audio report:
openssl aes-128-cbc -d -salt -k <password> -in
media_report.tar.gz -out media_report.decrypted.tar.gz
Replace <password> with the password that you provided when generating the report.
On Windows-based computers, you can install OpenSSL from binaries to run the openssl
command.
The decrypted reports are saved in the following archive files:
• Debug report: debugreport.decrypted.tar.gz
• Audio report: media_report.decrypted.tar.gz
4. To extract the decrypted archive file, do one of the following:
• On Windows-based computers, use any program that can extract zip archives.
September 2018 Installing and Administering Avaya Vantage
Comments on this document? infodev@avaya.com
™
89
Page 90

Maintenance
• On Linux systems, run the following command:
tar –zxvf <archive_file_name>
Configuring the SSH server settings
About this task
Use this procedure to enable challenge-response authentication on SSH.
Before you begin
Get the administrator password that is set through ADMIN_PASSWORD or PROCPSWD.
Procedure
1. Tap Settings.
2. In the upper-right corner of the screen, tap Menu > Admin login, and enter the
administrator password.
3. Tap Debugging options > SSH server settings.
4. (Optional) To enable SSH remote access, select the SSH server mode check box.
5. (Optional) To enable sroot access, select the SSH server root mode check box.
Enabling port mirroring
About this task
Use this procedure to copy the Ethernet packets that are transmitted or received on the network to
the secondary Ethernet port.
This functionality is only available if you have an embedded Ethernet switch on Avaya Vantage™.
Before you begin
Get the administrator password that is set through ADMIN_PASSWORD or PROCPSWD.
Procedure
1. Tap Settings.
2. In the upper-right corner of the screen, tap Menu > Admin login, and enter the
administrator password.
3. Tap Debugging options > Port mirroring.
4. Select the Port mirroring check box.
September 2018 Installing and Administering Avaya Vantage
Comments on this document? infodev@avaya.com
™
90
Page 91

Debugging and monitoring the device
Pinging a device on the network
About this task
Use this procedure to ensure that Avaya Vantage™ can reach a particular IP address or a host on
the network.
This option is also available when you are logged out of the device.
Procedure
1. Tap Settings.
2. Tap Debugging options > Host to ping.
3. Enter the IP address or host name of the device.
4. Tap OK.
If Avaya Vantage™ can resolve the IP address, it displays the ping statistics that include the
number of packets transmitted and received, packet loss percentage, and time taken.
September 2018 Installing and Administering Avaya Vantage
Comments on this document? infodev@avaya.com
™
91
Page 92

Chapter 10: Device upgrade
You must upgrade the Avaya Vantage™ firmware to keep the device up-to-date, gain access to new
features, and enhance stability and security.
Avaya Vantage™ downloads upgrade images and configuration files from a file server by using
HTTP or HTTPS.
Firmware upgrade options
You can perform the device firmware upgrade in the following ways:
• Automatic: Configure the device to poll periodically for a newer version of the software in the
file server and automatically download the upgraded software.
• Manual: Upgrade the device manually without the device waiting for a polling interval by:
- Using the Update now option in the Settings > About Avaya Vantage > Software
information menu on the device. With this option, the device immediately downloads and
installs the software if an updated software version is available.
- Rebooting the device from the Settings > Backup & reset menu on the device, System
Manager, IP Office System Status Application, or IP Office System Monitor. If an updated
version of software is available, then the device upgrades immediately after the reboot or
later according to the upgrade policy configured for the device.
Firmware upgrade prerequisites
Before upgrading the device firmware, perform the following actions:
• Download the newest distribution package and updated 46xxsettings.txt settings file on
the file server.
• Ensure that the upgrade related parameters, such as UPGRADE_POLICY and
UPGRADE_POLLING_PERIOD, are set correctly in the 46xxsettings.txt file according
to your requirement. For more information, see
• Provide a path to the file server in the FILE_SERVER_URL configuration parameter.
Note:
If FILE_SERVER_URL is not defined, Avaya Vantage™ uses HTTPSRVR, HTTPPORT,
and HTTPDIR for an HTTP file server, or TLSSRVR, TLSPORT, and TLSSIR for an
HTTPS file server.
September 2018 Installing and Administering Avaya Vantage
Comments on this document? infodev@avaya.com
Upgrade related parameters on page 154.
™
92
Page 93

Device upgrade process
Device upgrade process
Avaya Vantage™ upgrade images consist of packages. During the upgrade process, Avaya
Vantage™ downloads and installs only new or changed packages from the upgrade image. The
upgrade image stores information about packages in a Package.gz file. This file contains a list of
all packages in the image and provides information about versions of each package. Using
packages can reduce download times, network traffic, and the resets required to complete the
upgrade.
To perform an upgrade, Avaya Vantage™ does the following:
1. Receives the file server address from DHCP, LLDP, Device Enrollment Services, or the
device interface.
2. Connects to the file server and searches for the K1xxSupgrade.txt file.
If IP Office is the file server, it auto-generates an appropriate file unless one has been
uploaded to its file storage.
3. Compares its software version with the version specified in the K1xxSupgrade.txt file.
4. If a newer version of the software distribution package is available, downloads
Packages.gz from the file server and determines which packages can be upgraded.
5. Downloads the required packages.
6. Restarts and applies the new software.
7. Locates and downloads the 46xxsettings.txt settings file that is specified in the
K1xxSupgrade.txt file.
You must ensure that the 46xxsettings.txt file is available on the file server.
Otherwise Avaya Vantage™ does not apply the software updates.
If IP Office is the file server, it auto-generates an appropriate file and adjusts various
settings in that auto-generated file to match the settings in the IP Office system
configuration.
Automatic upgrades
You can configure the settings file to allow Avaya Vantage™ to periodically check for a newer
version of the software on the file server. If the file server contains new software, Avaya Vantage
automatically downloads and installs upgrade files. Avaya Vantage™ downloads upgrade files in
the background so the download does not affect the user experience.
You can specify the following upgrade policies in the settings file:
™
• Schedule download for a specific time and day in a week.
• Schedule installation on a specific date and time.
September 2018 Installing and Administering Avaya Vantage
Comments on this document? infodev@avaya.com
™
93
Page 94

Device upgrade
• Set the polling interval for a new image file.
For more information about parameters to be set for upgrade policies, see Upgrade related
parameters on page 154.
Automatic upgrades do not interrupt active calls. Avaya Vantage™ starts the upgrade after all calls
are completed.
Upgrading Avaya Vantage™ using the Update option
About this task
Use this procedure to manually check for upgrade files and to download and install upgrade files
immediately if updated software is available.
Procedure
1. Go to the Settings menu of the device.
2. Tap About Avaya Vantage > Software information.
3. Tap Update now.
If the file server contains new software, Avaya Vantage™ starts the upgrade. If Avaya
Vantage™ has the latest software, the Your phone is up to date message is
displayed on the screen.
Upgrading Avaya Vantage™ using System Manager
About this task
Use this procedure to perform a bulk upgrade of Avaya Vantage™ in the Avaya Aura® environment.
The actual procedure might differ depending on the System Manager version you are using. For
more information, see Administering Avaya Aura® System Manager.
Procedure
1. Log in to System Manager.
2. In the System Manager interface, provide the range of Avaya Vantage™ IP addresses that
require an upgrade.
3. Click Reboot.
After reboot, Avaya Vantage™ downloads the upgrade file from the file server. Avaya
Vantage™ compares the current version of the software with the version specified in the
upgrade file. If the file server contains the newer version of software, Avaya Vantage
performs the upgrade.
September 2018 Installing and Administering Avaya Vantage
Comments on this document? infodev@avaya.com
™
™
94
Page 95

Upgrading Avaya Vantage™ using IP Office
Upgrading Avaya Vantage™ using IP Office
About this task
Use this procedure to perform an upgrade of Avaya Vantage™ in the IP Office environment.
Procedure
To upgrade a specific Avaya Vantage™ device, do the following:
1. Restart the device using one of the following IP Office applications:
• System Status Application
• System Monitor
For more information, see Using Avaya IP Office™ Platform System Monitor and Using
Avaya IP Office™ Platform System Status Application.
If an updated version of software is available for Avaya Vantage™, then the device
upgrades immediately after the reboot.
To upgrade all Avaya Vantage™ devices, do the following:
2. Upgrade the IP Office system using the Upgrade Wizard of IP Office Manager.
3. Select the check box to restart all SIP devices in the environment after the system
upgrade.
For more information about upgrading through IP Office Manager, see Administering
Avaya IP Office™ Platform with Manager.
The upgrade process updates any SIP phone firmware files held on the system. If an
updated version of software become available for Avaya Vantage™, then the device
upgrades immediately after the reboot.
CSDK-based application upgrades
Avaya Vantage™ Basic or Avaya Equinox® can be configured as the active CSDK-based telephony
application on Avaya Vantage™. You can update the CSDK-based application on Avaya Vantage
through the following options:
• The “Push application” method. Through the PUSH_APPLICATION parameter, you can
initiate automatic installation of the latest version of the application without any intervention
from the end user.
™
• Google Play. If a newer version of Avaya Vantage™ Basic or Avaya Equinox® becomes
available in Google Play, Avaya Vantage™ displays an upgrade notification. End users can
update the application from Google Play for K165 and K175.
• Android Package Kits (APKs). These APKs of the CSDK-based applications are bundled in
the Avaya Vantage™ firmware package file and pushed automatically to the Avaya Vantage
September 2018 Installing and Administering Avaya Vantage
Comments on this document? infodev@avaya.com
™
™
95
Page 96

Device upgrade
device. If installation of applications from unknown sources is enabled, then end users can
also download application APKs from other sources, such as emails or websites.
For more information about installing and updating applications on Avaya Vantage™, see the
sections under
Application setup on page 74.
September 2018 Installing and Administering Avaya Vantage
Comments on this document? infodev@avaya.com
™
96
Page 97

Chapter 11: Troubleshooting
This chapter describes known troubleshooting issues that customers might encounter while
performing installation, configuration, and maintenance.
Firmware is corrupted
Condition
Firmware is corrupted so you must restore firmware to its original state.
Cause
Firmware corruption can occur because of a power outage when the device is upgraded, or
because of a corrupt system file or an invalid checksum file.
Solution
Use the boot recovery procedure to clear the device and restore Avaya Vantage™ to its factory
settings.
Use the boot recovery menu options only when the device does not boot up properly for some
reason. The boot recovery menu provides you options to delete all stored data or swap the
boot banks on the device and try to bring up the Android operating system again.
1. Connect an external USB keyboard to the device.
If the keyboard is USB Type-A, then you require a USB Type-A to Type-C adapter to
connect to the USB Type-C port on the K165 or K175 device.
2. Reboot the device.
3. Press and hold Volume Up.
After the boot, Avaya Vantage™ displays the Recovery menu.
Note:
You can navigate within the Recovery menu using the following buttons:
• To navigate between menu options, press Volume Up or Volume Down.
• To select the menu option, press and hold Volume Up or Volume Down.
4. Tap Enter BRM to navigate to Avaya Vantage™ boot recovery options.
5. Enter the administrator password using the external USB keyboard connected to the
device.
September 2018 Installing and Administering Avaya Vantage
Comments on this document? infodev@avaya.com
™
97
Page 98

Troubleshooting
Avaya Vantage™ starts the boot recovery procedure and displays a list of options.
6. Select one of the following options:
• Reboot: Stops the boot recovery procedure and reboots the device.
• Clear phone : Resets the device to its factory settings.
• Erase /cache only: Erases the cache partition of the device that is primarily used to
store recovery logs and temporary files.
• Erase /data only: Erases the data stored on the device.
• Swap memory banks: Swaps the boot banks on the device so the primary boot bank
becomes the secondary boot bank. Avaya Vantage™ always has 2 copies of firmware:
- Current firmware. Avaya Vantage™ uses this firmware to boot up.
- Previously installed firmware. This firmware is updated every time the firmware on the
device is upgraded.
• Force SELinux Permissive mode: Starts the system with SELinux in Permissive mode.
When Permissive mode is enabled, the SELinux security policy is disabled, but the
system still logs all events related to the security policy.
September 2018 Installing and Administering Avaya Vantage
Comments on this document? infodev@avaya.com
™
98
Page 99

Chapter 12: Resources
Documentation
See the following related documents at http://support.avaya.com.
Title Use this document to: Audience
Overview
Avaya Aura® Session Manager
Overview and Specification
Implementing
Deploying Avaya Aura® Session
Manager
Upgrading Avaya Aura® Session
Manager
Deploying Avaya Aura® System
Manager on System Platform
Deploying Avaya Aura
Conferencing: Basic Installation
Avaya IP Office™ Platform SIP
Telephone Installation Notes
Administering
Administering Avaya Aura® Session
Manager
®
Understand characteristics and capabilities,
including feature descriptions,
interoperability, performance specifications,
security, and licensing requirements of
Avaya Aura® Session Manager.
Deploy Avaya Aura® Session Manager. Implementation
Upgrade Avaya Aura® Session Manager. Implementation
Deploy Avaya Aura® System Manager. Implementation
Deploy Avaya Aura® Conferencing. Implementation
Deploy SIP endpoints on IP Office. Implementation
Administer and maintain Avaya Aura
Session Manager.
®
• Customers
• Sales, services,
and support
personnel
personnel and
service
administrators
personnel and
service
administrators
personnel and
service
administrators
personnel and
service
administrators
personnel and
service
administrators
System
administrators
Table continues…
September 2018 Installing and Administering Avaya Vantage
Comments on this document? infodev@avaya.com
™
99
Page 100

Resources
Title Use this document to: Audience
Administering Avaya Aura® System
Manager
Administering Avaya Aura
®
Administer and maintain Avaya Aura
System Manager.
Administer Avaya Aura® Conferencing. System
®
Conferencing
Administering Avaya Session Border
Controller for Enterprise
Administering Avaya IP Office
™
Platform with Manager
Administering Avaya Vantage
™
Open
Administer Avaya Session Border
Controller for Enterprise.
Perform administration tasks using IP Office
Manager.
Administer the Media and Provisioning
Server required to perform calls using
Avaya Vantage™ Open.
Maintaining
Maintaining Avaya Aura® Session
Maintain Avaya Aura® Session Manager. System
Manager
Troubleshooting Avaya Aura
Session Manager
®
Troubleshoot known issues for Avaya Aura
Session Manager.
®
Using
Using Avaya Vantage™ and Avaya
Vantage™ Basic
Using Avaya Equinox® for Android,
Use Avaya Vantage™ and Avaya Vantage
Basic.
Use Avaya Equinox®. • End users
™
iOS, Mac, and Windows
Using Avaya Vantage™ Open Use Avaya Vantage™ Open. • End users
System
administrators
administrators
System
administrators
System
administrators
System
administrators
administrators and IT
personnel
System
administrators and IT
personnel
• End users
• Support personnel
• Support personnel
Using Avaya Device Enrollment
Services to Manage Endpoints
Use Device Enrollment Services to manage
endpoints or devices.
Finding documents on the Avaya Support website
Procedure
1. Navigate to
2. At the top of the screen, type your username and password and click Login.
3. Click Support by Product > Documents.
4. In Enter your Product Here, type the product name and then select the product from the
list.
5. In Choose Release, select an appropriate release number.
http://support.avaya.com/.
• Support personnel
Non-Avaya users,
including service
providers and
resellers
September 2018 Installing and Administering Avaya Vantage
Comments on this document? infodev@avaya.com
™
100
 Loading...