

Avaya Vantage 1.0 Quick Start Manual
Vantage 1.0
Quick Start Guide
Place your Vantage device near your network socket (and near your main supply
socket, in case a power adapter is used).
Connect the Device:
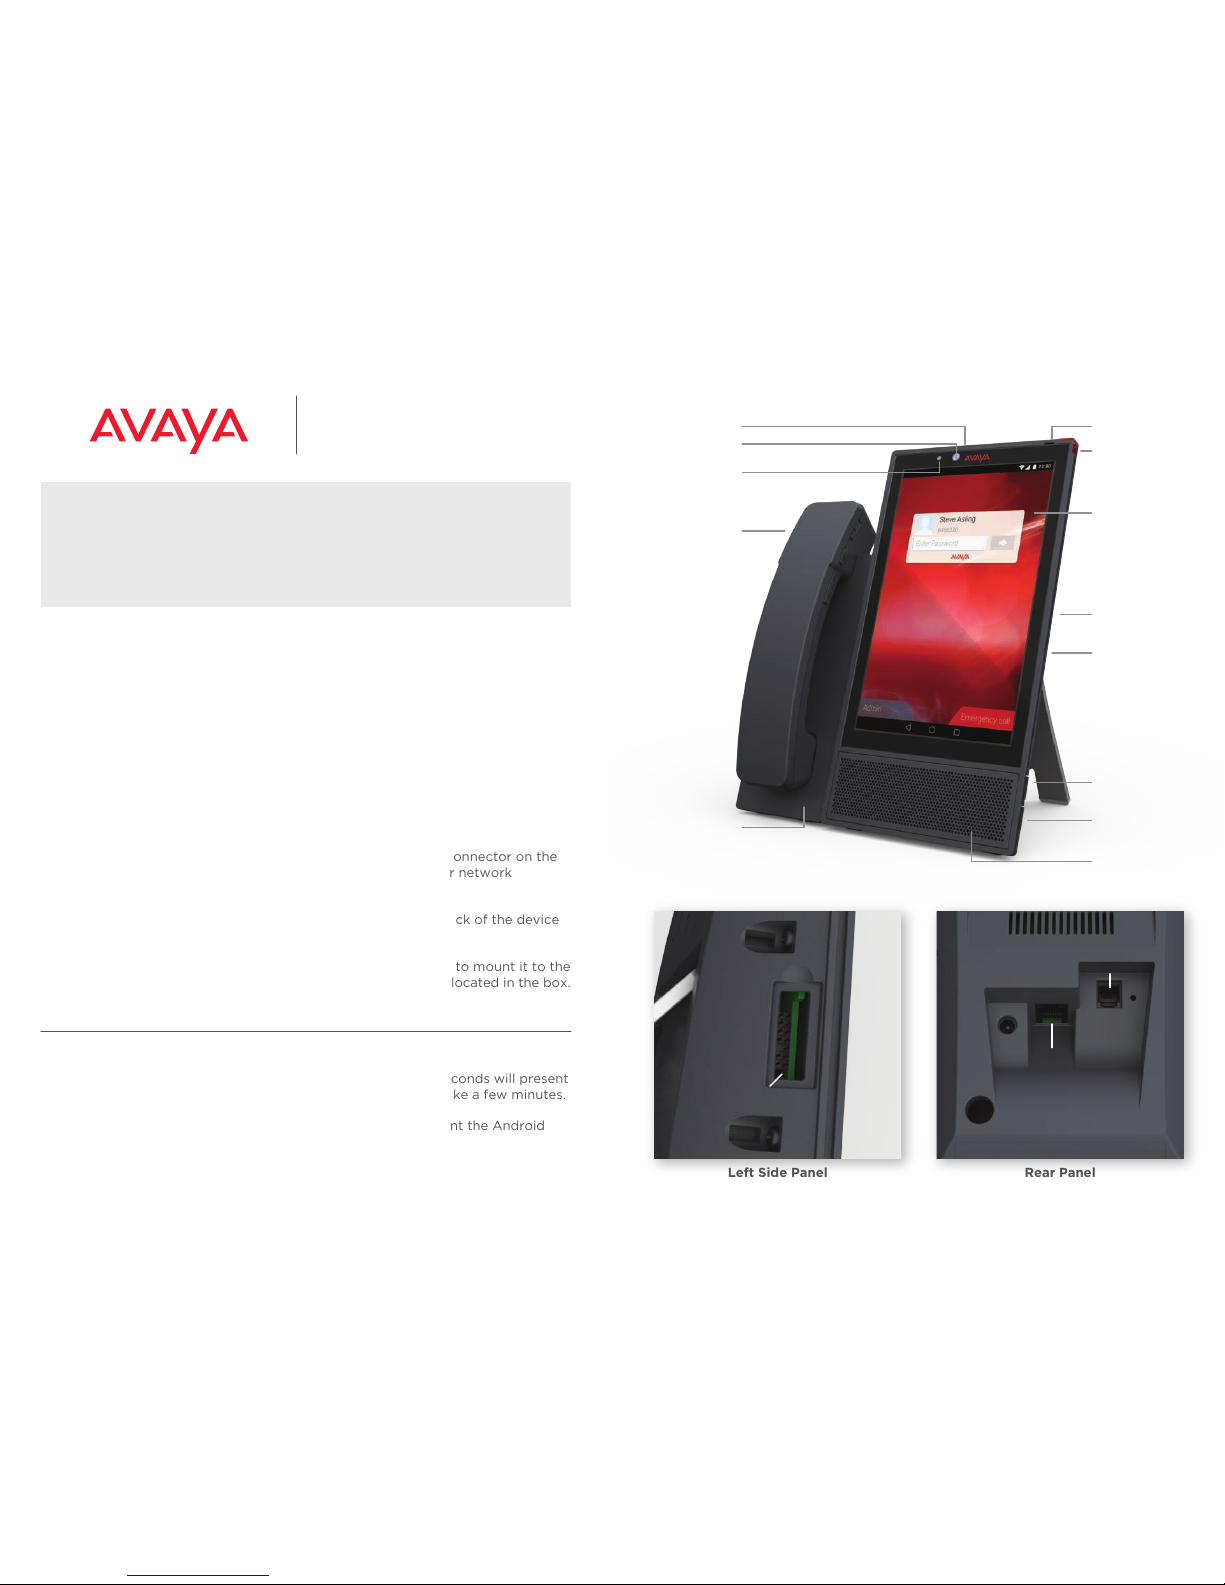
1. Handset connection - Remove the rubber cover from the handset connector on
the left side panel of the device. Next, plug the flat handset cable into the “Handset Cradle Connector” on the left side panel of the Vantage device. Please do
not use force and be careful not to twist any of the PINs. Note, any connection
or removal of the cradle while the device is turned on may trigger a reboot.
2. If you’re using a wired handset, plug one side of the RJ-9 handset cord into the
handset and the other side into the handset cradle base.
3. Plug one side of the Ethernet cable into the “Ethernet Port” connector on the
rear panel at the back of the device and the other end into your network
telephone socket.
4. If you are using an external power adapter, plug it into the back of the device
and into a wall socket
5. Place the device comfortably on your desk. If you would like to mount it to the
wall, please use the Vantage Wall Mount accessory instructions located in the box.
6. Remove the LCD plastic protector.
Box contents:
•Vantage Device
•Vantage Wall mount accessory
•Instructions
Additional Vantage Accessories may be ordered separately: Wired Handset,
Bluetooth Handset, Ethernet cable, External power supply.
Setup
Once the device is plugged in, it will boot up and after a few seconds will present
the Avaya Logo followed by a progress bar. This process will take a few minutes.
After boot, swipe up the lock screen, the device will then present the Android
Welcome Wizard:
Continued on the other side.
Startup
Power Adapter
Connector
RJ9 Headset
Port
Left Side Panel Rear Panel
Handset Cradle
Connector
RJ45 Ethernet
Port
Handset
(optional)
Handset Cradle
(optional)
Camera Activity
Indicator
Camera Shutter
Message
Waiting
Indicator
Screen
3.5mm Audio
Jack (side)
Volume Up
Button
Volume Down
Button
USB Type-C
Port (side)
Microphone
Speaker
Camera

Wireless Handset Layout
It is highly recommended that you upgrade your device to the latest firmware
published by Avaya. Please contact your IT Administrator for further details.
Configure your device to point to an http file server containing the latest
firmware version from the Avaya support site and settings file by pressing:
Apps icon > Settings > More > File Server
On the http server, Your IT Administrator should place the firmware for both
Vantage and Vantage Basic\Equinox application and 46xxsettings file. Many
configurations can be set as part of 46xxsettings.txt file. A template of it may be
found on the Avaya Support site, but the minimum configuration required is of
your network provider (SIP server and domain) and active phone application.
Firmware Updates
Bluetooth Pairing Instructions:
1. Take the Bluetooth handset o the cradle and put it in pairing mode - Long
press the power button for about 20 seconds.
2. Go to: Apps > Settings > Bluetooth menu, turn BT on and choose the BT
handset - which should appear as Avaya-J100-XXXXXX (last 6 digits of the HS MAC).
3. After successfully pairing, the status will change to connected and a new
handset icon will appear on the right side of the screen.
Bluetooth Handset Users
Once your main phone application is installed (for example: Avaya Vantage
Basic, Equinox, Vantage Open), the device will reboot. You will then be prompted to enter your user name/extension and password credentials. After the first
login, you will be prompt to read and accept Eula terms. After doing so, you will
be able to receive and make calls. For further details, open the application
tutorial from the Application menu, or obtain the Using Avaya Vantage™ Basic on
an Avaya Vantage™ Device from the Avaya Support site.
You can find further documentation on the Avaya Vantage Device landing page
on the Support page: https://support.avaya.com/products/P1644/avaya-vantage
Additionally, you can find many videos on the Avaya YouTube channel:
https://www.youtube.com/user/Avaya
Phone Usage
Startup continued.
1. Choose your desired language.
2. If you are using Ethernet, you may skip WI-FI selection screen using SKIP at
the right bottom corner. Review and approve any pop-up messages. Your
Google Account may be configured at a later time.
3. In case you would like to use WI-FI you may select it and add your Google
account, if desired.
4. You can enter your name to be used in applications or you can press NEXT
leaving the entry blank, if you prefer.
5. Press NEXT after reading and selecting Google services.
** In the case a file server is configured automatically by the admin via DHCP
containing a settings file the Android Wizard will be skipped.
The device’s home screen will be presented. You are now ready to use your
Vantage device. You may start using any Standard Android application with your
Vantage device.
Power Button
LED Status Indicator
Mute Button
Volume Up Button
Volume Down Button
700514010
 Loading...