

Avaya UC Installation And Maintenance Manual

15-601011 Issue 03l – (28 August 2012)
Unified Communications Module
Installation and Maintenance
IP Office

Unified Communications Module Installation and Maintenance Page 2
15-601011 Issue 03l (28 August 2012)IP Office
© 2012 AVAYA All Rights Reserved.
Notices
While reasonable efforts have been made to ensure that the information in
this document is complete and accurate at the time of printing, Avaya
assumes no liability for any errors. Avaya reserves the right to make changes
and corrections to the information in this document without the obligation to
notify any person or organization of such changes.
Documentation disclaimer
Avaya shall not be responsible for any modifications, additions, or deletions
to the original published version of this documentation unless such
modifications, additions, or deletions were performed by Avaya.
End User agree to indemnify and hold harmless Avaya, Avaya's agents,
servants and employees against all claims, lawsuits, demands and judgments
arising out of, or in connection with, subsequent modifications, additions or
deletions to this documentation, to the extent made by End User.
Link disclaimer
Avaya is not responsible for the contents or reliability of any linked Web sites
referenced within this site or documentation(s) provided by Avaya. Avaya is
not responsible for the accuracy of any information, statement or content
provided on these sites and does not necessarily endorse the products,
services, or information described or offered within them. Avaya does not
guarantee that these links will work all the time and has no control over the
availability of the linked pages.
Warranty
Avaya provides a limited warranty on this product. Refer to your sales
agreement to establish the terms of the limited warranty. In addition, Avaya’s
standard warranty language, as well as information regarding support for this
product, while under warranty, is available to Avaya customers and other
parties through the Avaya Support Web site: http://www.avaya.com/support.
Please note that if you acquired the product from an authorized Avaya reseller
outside of the United States and Canada, the warranty is provided to you by
said Avaya reseller and not by Avaya.
Licenses
THE SOFTWARE LICENSE TERMS AVAILABLE ON THE AVAYA WEBSITE,
HTTP://SUPPORT.AVAYA.COM/LICENSEINFO/ ARE APPLICABLE TO ANYONE
WHO DOWNLOADS, USES AND/OR INSTALLS AVAYA SOFTWARE,
PURCHASED FROM AVAYA INC., ANY AVAYA AFFILIATE, OR AN AUTHORIZED
AVAYA RESELLER (AS APPLICABLE) UNDER A COMMERCIAL AGREEMENT
WITH AVAYA OR AN AUTHORIZED AVAYA RESELLER. UNLESS OTHERWISE
AGREED TO BY AVAYA IN WRITING, AVAYA DOES NOT EXTEND THIS
LICENSE IF THE SOFTWARE WAS OBTAINED FROM ANYONE OTHER THAN
AVAYA, AN AVAYA AFFILIATE OR AN AVAYA AUTHORIZED RESELLER, AND
AVAYA RESERVES THE RIGHT TO TAKE LEGAL ACTION AGAINST YOU AND
ANYONE ELSE USING OR SELLING THE SOFTWARE WITHOUT A LICENSE. BY
INSTALLING, DOWNLOADING OR USING THE SOFTWARE, OR AUTHORIZING
OTHERS TO DO SO, YOU, ON BEHALF OF YOURSELF AND THE ENTITY FOR
WHOM YOU ARE INSTALLING, DOWNLOADING OR USING THE SOFTWARE
(HEREINAFTER REFERRED TO INTERCHANGEABLY AS “YOU” AND “END
USER”), AGREE TO THESE TERMS AND CONDITIONS AND CREATE A
BINDING CONTRACT BETWEEN YOU AND AVAYA INC. OR THE APPLICABLE
AVAYA AFFILIATE (“AVAYA”).
Avaya grants End User a license within the scope of the license types
described below. The applicable number of licenses and units of capacity for
which the license is granted will be one (1), unless a different number of
licenses or units of capacity is specified in the Documentation or other
materials available to End User. "Designated Processor" means a single
stand-alone computing device. "Server" means a Designated Processor that
hosts a software application to be accessed by multiple users. "Software"
means the computer programs in object code, originally licensed by Avaya
and ultimately utilized by End User, whether as stand-alone products or
pre-installed on Hardware. "Hardware" means the standard hardware
originally sold by Avaya and ultimately utilized by End User.
License types
Designated System(s) License (DS). End User may install and use each copy
of the Software on only one Designated Processor, unless a different number
of Designated Processors is indicated in the Documentation or other materials
available to End User. Avaya may require the Designated Processor(s) to be
identified by type, serial number, feature key, location or other specific
designation, or to be provided by End User to Avaya through electronic means
established by Avaya specifically for this purpose.
Copyright
Except where expressly stated otherwise, no use should be made of materials
on this site, the Documentation(s) and Product(s) provided by Avaya. All
content on this site, the documentation(s) and the product(s) provided by
Avaya including the selection, arrangement and design of the content is
owned either by Avaya or its licensors and is protected by copyright and other
intellectual property laws including the sui generis rights relating to the
protection of databases. You may not modify, copy, reproduce, republish,
upload, post, transmit or distribute in any way any content, in whole or in
part, including any code and software. Unauthorized reproduction,
transmission, dissemination, storage, and or use without the express written
consent of Avaya can be a criminal, as well as a civil, offense under the
applicable law.
Third Party Components
Certain software programs or portions thereof included in the Product may
contain software distributed under third party agreements ("Third Party
Components"), which may contain terms that expand or limit rights to use
certain portions of the Product ("Third Party Terms"). Information regarding
distributed Linux OS source code (for those Products that have distributed the
Linux OS source code), and identifying the copyright holders of the Third
Party Components and the Third Party Terms that apply to them is available
on the Avaya Support Web site: http://support.avaya.com/Copyright.
Preventing toll fraud
"Toll fraud" is the unauthorized use of your telecommunications system by an
unauthorized party (for example, a person who is not a corporate employee,
agent, subcontractor, or is not working on your company's behalf). Be aware
that there can be a risk of toll fraud associated with your system and that, if
toll fraud occurs, it can result in substantial additional charges for your
telecommunications services.
Avaya fraud intervention
If you suspect that you are being victimized by toll fraud and you need
technical assistance or support, call Technical Service Center Toll Fraud
Intervention Hotline at +1-800-643-2353 for the United States and Canada.
For additional support telephone numbers, see the Avaya Support Web site:
http://support.avaya.com
Suspected security vulnerabilities with Avaya products should be reported to
Avaya by sending mail to: securityalerts@avaya.com.
Trademarks
Avaya and Aura are trademarks of Avaya, Inc.
The trademarks, logos and service marks (“Marks”) displayed in this site, the
documentation(s) and product(s) provided by Avaya are the registered or
unregistered Marks of Avaya, its affiliates, or other third parties. Users are
not permitted to use such Marks without prior written consent from Avaya or
such third party which may own the Mark. Nothing contained in this site, the
documentation(s) and product(s) should be construed as granting, by
implication, estoppel, or otherwise, any license or right in and to the Marks
without the express written permission of Avaya or the applicable third party.
Avaya is a registered trademark of Avaya Inc. All non-Avaya trademarks are
the property of their respective owners.
Downloading documents
For the most current versions of documentation, see the Avaya Support Web
site: http://www.avaya.com/support
Contact Avaya Support
Avaya provides a telephone number for you to use to report problems or to
ask questions about your product. The support telephone number is
1-800-242-2121 in the United States. For additional support telephone
numbers, see the Avaya Web site: http://www.avaya.com/support

Unified Communications Module Installation and Maintenance Page 3
15-601011 Issue 03l (28 August 2012)IP Office
Contents
Contents
The Unified Communications Module1.
..................................................................... 81.1 Unified Communications Module
..................................................................... 101.2 Using Linux
..................................................................... 101.3 Additional Documentation
..................................................................... 111.4 Network Configuration Limitations
..................................................................... 111.5 Small Community Networks
..................................................................... 121.6 Licenses
..................................................................... 121.7 Voicemail Pro Features
Module Installation2.
..................................................................... 152.1 IP Address Notes
..................................................................... 162.2 IP Office Configuration
..................................................................... 172.3 System Shutdown
..................................................................... 182.4 Inserting the Module
..................................................................... 192.5 Initializing the Module Services
..................................................................... 232.6 System and Module Start Up
..................................................................... 242.7 Logging on to the Web Menus
..................................................................... 262.8 Changing the Web Password
..................................................................... 272.9 Upgrading Software
Voicemail Pro Configuration3.
..................................................................... 313.1 Adding Voicemail Licenses
..................................................................... 323.2 IP Office Configuration
..................................................................... 333.3 Installing the Voicemail Pro Client
..................................................................... 343.4 Logging in to the Voicemail Server
..................................................................... 353.5 Changing the Voicemail Server Password
..................................................................... 363.6 Transferring Voicemail Server Settings
..................................................................... 383.7 Backup/Restore Limitations
one-X Portal for IP Office Configuration4.
..................................................................... 414.1 Adding Licenses
..................................................................... 424.2 Enabling one-X Portal for IP Office Users
..................................................................... 434.3 Initial one-X Portal for IP Office Login
..................................................................... 444.4 Initial AFA Login
Server Maintenance5.
..................................................................... 475.1 Logging In
..................................................................... 495.2 Changing the Web Password
..................................................................... 505.3 Starting/Stopping Application Services
............................................................................ 505.3.1 Starting a Service
............................................................................ 505.3.2 Stopping a Service
............................................................................ 505.3.3 Setting a Service to Auto Start
..................................................................... 515.4 Server Shutdown
..................................................................... 515.5 Rebooting the Server
..................................................................... 525.6 Changing the IP Address Settings
..................................................................... 535.7 Date and Time Settings
..................................................................... 545.8 Upgrading Applications
............................................................................ 545.8.1 Loading Application Files onto the Server
............................................................................ 555.8.2 Upgrading Application Files
..................................................................... 565.9 Uninstalling an Application
..................................................................... 575.10 File Repositories
............................................................................ 575.10.1 Source Files
............................................................................ 575.10.2 Setting the Repository Locations
............................................................................ 585.10.3 Uploading Local Files
............................................................................ 595.10.4 Creating Remote Software Repositories
Server Menus6.
..................................................................... 636.1 Home
..................................................................... 646.2 Logs
............................................................................ 646.2.1 View
............................................................................ 656.2.2 Download
..................................................................... 666.3 Updates
............................................................................ 676.3.1 Services
............................................................................ 686.3.2 System
..................................................................... 696.4 Settings
............................................................................ 696.4.1 General
............................................................................ 716.4.2 System
..................................................................... 736.5 Windows Clients
Module Maintenance7.
..................................................................... 777.1 Module LEDs
..................................................................... 777.2 Module Buttons
..................................................................... 787.3 Module Removal
..................................................................... 797.4 Attaching a Monitor and Keyboard
..................................................................... 807.5 Transferring Voicemail Server Settings
..................................................................... 827.6 Module Battery
..................................................................... 837.7 Upgrading Software
..................................................................... 857.8 Module Software Reinstallation
Additional Processes8.
..................................................................... 908.1 Changing the Root Password
..................................................................... 918.2 SSH File Transfers
..................................................................... 928.3 Command Line
............................................................................ 938.3.1 General Commands
............................................................................ 958.3.2 Administrator Commands
............................................................................ 968.3.3 Configuration Commands
...............................................................................99Index


Unified Communications Module Installation and Maintenance Page 5
15-601011 Issue 03l (28 August 2012)IP Office
The Unified Communications
Module
Chapter 1.


Unified Communications Module Installation and Maintenance Page 7
15-601011 Issue 03l (28 August 2012)IP Office
The Unified Communications Module:
1. The Unified Communications Module
The Unified Communications Module is an IP500 base card supported by IP500 V2 systems running IP Office Release 8.0
or higher software. The module is supported by systems running in IP Office Essential Edition, IP Office Preferred Edition
or IP Office Advanced Edition mode and acts as an automatic PREFERRED EDITION license for such systems.
The module is a PC server, enabling various Linux based IP Office applications to run as embedded applications within the
IP500 V2 control unit rather than requiring a separate PC. The Unified Communications Module hosts the following
applications:
· Linux
The base operating system installed is CentOS, a Linux operating system. However, no specific knowledge of Linux
is required for installation or maintenance of the Unified Communications Module.
· one-X Portal for IP Office
This is a web browser based application that user's can use to control making and answering calls on their phone. It
also provides a range of gadgets for the user to access features such as their directory, call log and voicemail
messages. The one-X Portal for IP Office application is configured and managed remotely using web browser
access. Each user who wants to use one-X Portal for IP Office needs to be licensed . The Unified Communications
Module acts as an automatic Preferred Edition license that is normally required by the application.
· Voicemail Pro
This is a voicemail server. It provides mailbox services to all users and hunt groups on the IP Office system for
which it is configured. In addition it can be customized to provide a range of call routing and voicemail services. The
Voicemail Pro service is configured and managed remotely using the Windows Voicemail Pro client. A copy of the
Voicemail Pro client can be downloaded and installed from the Unified Communications Module. The number of
simultaneous connections to voicemail is licensed .The Unified Communications Module acts as an automatic
Preferred Edition license for Voicemail Pro application.
· Web Control Menus
The server's own settings are configured and managed remotely using web browser access.
Unified Communications Module Capacity
The capacity of the Unified Communications Module is:
· IP Office Users: Up to 200 users when running Voicemail Pro and one-X Portal for IP Office. More than 200
users when running just Voicemail Pro.
· Simultaneous one-X Portal for IP Office Users: 50.
· Maximum voicemail ports: Up to 20 ports when running Voicemail Pro and one-X Portal for IP Office. Up to
40 ports when running just Voicemail Pro.
· Small Community Network: Maximum 6 systems.
Linux is a registered trademark owned by Linus Torvalds.
12
73
12
Unified Communications Module Installation and Maintenance Page 8
15-601011 Issue 03l (28 August 2012)IP Office
1.1 Unified Communications Module
This module is supported for IP Office Release 8.0 Q1 2012 Service Pack and higher. The module is an embedded server
that allows Linux based IP Office applications to be run within the IP Office control unit rather than requiring a separate
PC.
· Supports
Voicemail Pro and or one-X Portal for IP Office applications. The module
is only supported by systems running IP Office Essential Edition, IP Office
Preferred Edition or IP Office Advanced Edition modes.
· IP Office Users: Up to 200 users when running Voicemail Pro
and one-X Portal for IP Office. More than 200 users when
running just Voicemail Pro.
· Simultaneous one-X Portal for IP Office Users: 50.
· Maximum voicemail ports: Up to 20 ports when running
Voicemail Pro and one-X Portal for IP Office. Up to 40 ports
when running just Voicemail Pro.
· Small Community Network: Maximum 6 systems.
· Licenses
The presence of this module acts as an automatic Preferred Edition
license for the IP Office system, enabling 4 ports of voicemail. Additional
voicemail ports can be licensed up to a maximum of 20. A separate
Essential Edition license is still required as a pre-requisite.
· IP500 Control Unit:
· IP500 V2 Control Unit: IP Office Release 8.0 Q1 2012 Service Pack
or higher.
· Maximum per Control Unit: 1 per control unit.
· IP500 Trunk Card Support:
· ! WARNING: Do Not Remove the Port Cover Except for Maintenance
The card is supplied with a removable plastic cover that locates over the external ports (LAN, USB and HDMI) on
the faceplate of the card. This cover should always be in place during normal operation of the card. The cover
should only be temporarily removed during maintenance actions that require access to the ports and should be
replaced when the maintenance is completed.
· ! WARNING: Card Remains Hot After System Shutdown
When removing an Unified Communications Module from a system, care should be taken not to touch the heat sink
on the module. The heat sink remains hot for a long period after system shutdown.
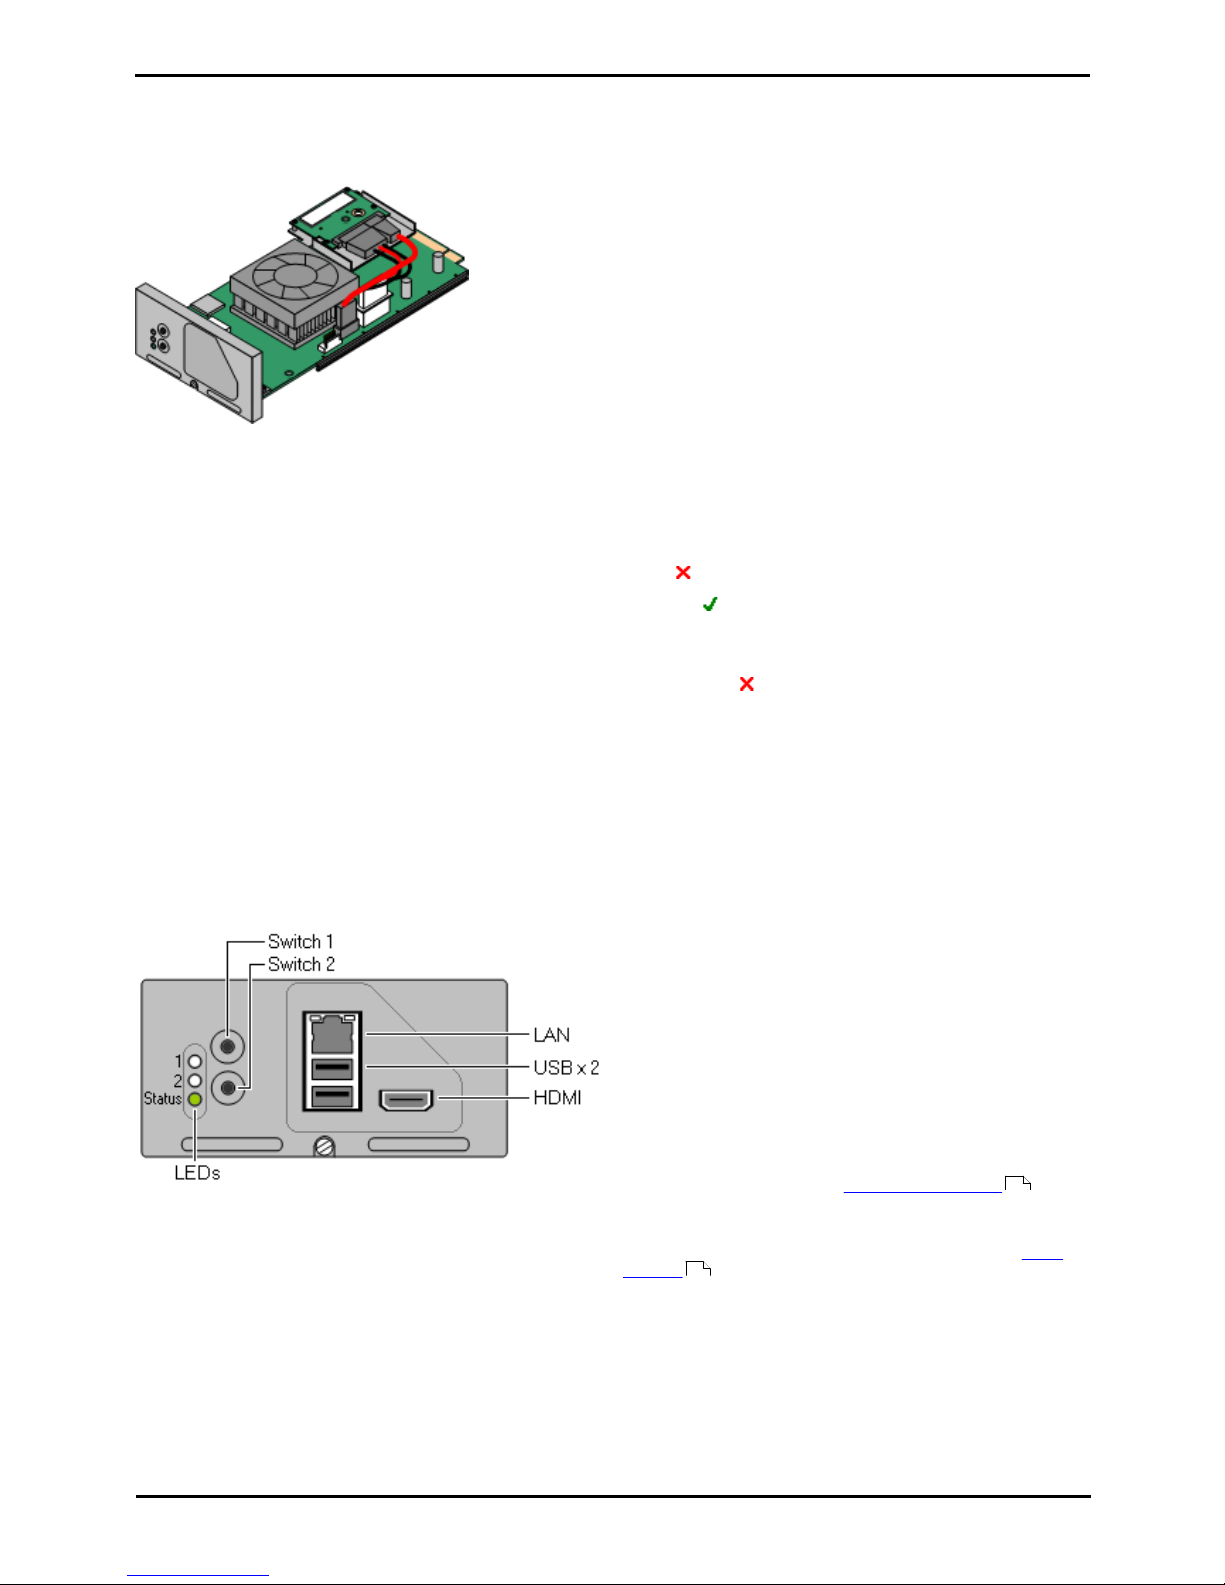
Ports
The card is supplied with a removable plastic cover that
locates over the external ports (LAN, USB and HDMI) on the
faceplate of the card. This cover should always be in place
during normal operation of the card. The cover should only
be temporarily removed during maintenance actions that
require access to the ports and should be replaced when the
maintenance is completed. Whilst removed, the following
ports are accessible:
· LAN
This port is not used.
· USB
These USB2 ports can be used for the temporary
connection of devices during module maintenance .
USB2 memory devices should be USB 2.0 compatible.
· HDMI
This port can be used for temporary connection of a video
monitor during module maintenance.
76
79

Unified Communications Module Installation and Maintenance Page 9
15-601011 Issue 03l (28 August 2012)IP Office
The Unified Communications Module: Unified Communications Module
LEDs
The Unified Communications Module provides the following LEDs:
· Upper LEDs
· Orange: Module BIOS starting.
· Lower LED
· Solid Red: Unpacking and initializing.
· Flashing Red: Module initialization.
· Flashing Green: Module operating system starting or shutting down.
· Solid Green with Amber blink: OK. IP Office heartbeat okay.
· Off with Amber blink: Module shutdown. IP Office heartbeat okay.
· If the module is already running when the system restarts, its lower LED remains green when the LEDs on the other
base cards are solid red. If the module is not running when the system restarts, its lower LED remains off when the
LEDs on the other base cards are solid red. The lower LED on the module then flashes red when the LEDs on the other
base cards flash red during system initialization; before reverting to either green or off when the system reboot is
complete.
Buttons
The Unified Communications Module provides the following buttons:
· Upper Button/Button 1
This button can be used for the following functions:
· Shutdown
If the module is running, pressing this button for more than 2 seconds will start a module shutdown. A
completed shutdown is indicated by the lower LED changing to off with regular amber blinks only.
· Startup
If the module has been shutdown, pressing this button will cause it to startup.
· Alternate Boot
When the module is about to boot, shown by both upper LEDs being orange, pressing and holding the switch
until those LEDs change to off instructs the module to attempt to boot from any device attached to its USB
ports. See Module Software Reinstallation .
· Switch 2: Not used.
85

Unified Communications Module Installation and Maintenance Page 10
15-601011 Issue 03l (28 August 2012)IP Office
1.2 Using Linux
Despite using a Linux based operating system, knowledge or experience of Linux by the installer and maintainer is not
required. The Unified Communications Module is designed to be configured and maintained remotely using its web browser
interface. Other services running on the server are administered using separate client applications.
No access to the Linux command line is used except for changing the root user password . Using the Linux command
line to perform any other actions may cause unexpected operation of the Unified Communications Module and is not
supported except when specifically instructed by Avaya.
1.3 Additional Documentation
In addition to reading this manual, you should also have, have read and be familiar with the following manuals before
attempting to install a Unified Communications Module system.
Application Installation and Configuration
· one-X Portal for IP Office Administration Manual
This manual covers the installation and administration menus used for the one-X Portal for IP Office application.
This manual is essential if the one-X Portal for IP Office needs to be configured to support multiple IP Office servers
in a Small Community Network.
· Voicemail Pro Linux Installation Manual
This manual covers scenarios where multiple servers are installed within a Small Community Network.
· Voicemail Pro Administration Manual
By default the voicemail server will provide mailbox services to all users and hunt groups without any configuration
being needed. This manual covers the administration of the voicemail server using the Voicemail Pro client in order
to enable additional features.
Technical Bulletins
All releases of IP Office software are accompanied by a technical bulletin. The bulletin will include details of changes that
may have occurred too late to be included in this documentation. The bulletins will also detail what has changed in the
software release compared to previous releases and any specific actions required or restrictions that apply if upgrading
from a previous release.
Other Documentation and Documentation Sources
All the documentation for IP Office systems is available from the following web sites:
· Avaya Support Web Site - http://support.avaya.com
· Avaya IP Office Knowledge Base - http://marketingtools.avaya.com/knowledgebase
90

Unified Communications Module Installation and Maintenance Page 11
15-601011 Issue 03l (28 August 2012)IP Office
The Unified Communications Module: Additional Documentation
1.4 Network Configuration Limitations
The IP Office control unit has two physical LAN interfaces: LAN1 and LAN2. The ports labeled LAN and WAN respectively.
Traffic between the IP Office control unit and the Unified Communications Module is on LAN1 of the IP Office system.
Scenarios where users of the Unified Communications Module applications, especially one-X Portal for IP Office, are
accessing the IP Office and thus the Unified Communications Module via the IP Office system's LAN2 (WAN) port should be
avoided for more than 30 users.
They should also be avoided where NAT is being applied to traffic between LAN1 and LAN2. These restrictions should be
observed even when the IP Office system is in a Small Community Network where the H323 SCN trunks may be routed via
the other LAN.
1.5 Small Community Networks
Up to 32 IP Office systems can be connected together using H323 SCN trunks to form a Small Community Network,
supporting up to 1000 users. The servers in the system automatically share information about users and other features in
order to act as a single system.
· The Unified Communications Module is only supported as an application server for a Small Community Network of
up to 6 systems. It is also limited to supporting only 200 users if it is running the one-X Portal for IP Office
application.
When installing a Unified Communications Module within a Small Community Network, it is important to be aware of the
following factors affecting the different server applications:
· one-X Portal for IP Office
Only a single instance of the one-X Portal for IP Office application is supported within a Small Community Network.
· When run on a Unified Communications Module, one-X Portal for IP Office is only supported for up to 200 users
and 50 simultaneous sessions. To support more users and sessions (500), the one-X Portal for IP Office
application needs to be installed on a separate server from the Unified Communications Module.
· Following installation of the Unified Communications Module with one-X Portal for IP Office application on it,
addition configuration steps are required to configure the one-X Portal for IP Office application with details of
the other IP Office systems. This addition configuration is covered in the one-X Portal for IP Office Installation
Manual.
· Voicemail Pro
In an Small Community Network, one Voicemail Pro server is used to store all mailboxes and their related
messages, greeting and announcements. This is referred to the centralized voicemail server. However, additional
Voicemail Pro servers can be installed to perform some other specific roles as listed below. Full details of the setup
for these roles is covered in the Voicemail Pro manuals.
· Centralized Voicemail Server
In the network, one Voicemail Pro server is used as the centralized voicemail server for all IP Office systems in
the network. This server is used to store all mailboxes and their related messages, greeting and
announcements. This is mandatory regardless of the presence of any additional options below. The IP Office
associated with the centralized server holds the licenses for voicemail server support. The other servers in the
network do not require any voicemail licenses in order to use this server as their voicemail server.
· Fallback IP Office
Without needing to install another Voicemail Pro server, the IP Office hosting the centralized voicemail
server can be configured such that, if for any reason it is stopped or disabled, the centralized voicemail
server switches to being controlled by another IP Office in the network.
· Distributed Voicemail Servers
Additional Voicemail Pro servers can be installed and associated with other IP Office systems to provide call
services for that system. For example to record messages, play announcements, etc. However, any messages
it records are then automatically transferred to and stored on the centralized server. The IP Office associated
with the distributed server requires the appropriate licenses for voicemail server support.
· Backup Voicemail Server
An additional sever, with the Voicemail Pro application can be specified as the backup server for the centralized
server. If for any reason the voicemail application on the centralized server is stopped or disabled, the
centralized IP Office will switch to using the backup voicemail server for its voicemail functions. During normal
operation the centralized and backup voicemail servers automatically exchange information about mailboxes
and voicemail service configuration. The backup voicemail server uses the licenses provided by the centralized
IP Office. A distributed server cannot also be used as a backup server and vice versa.

Unified Communications Module Installation and Maintenance Page 12
15-601011 Issue 03l (28 August 2012)IP Office
1.6 Licenses
The use of various features are licensed, for example, which users are able to use the one-X Portal for IP Office
application. These licenses are entered into the IP Office configuration.
For the Unified Communications Module it is important to understand the role of the following system licenses:
· Essential Edition
This license is a pre-requisite for the Preferred Edition license below.
· Preferred Edition (Voicemail Pro)
This license is required for use of the Voicemail Pro application. It also enables 4 voicemail ports. It is also required
as a pre-requisite for the user profile licenses required for one-X Portal for IP Office users. The Unified
Communications Module acts as an automatic Preferred Edition license for the system.
· Preferred Edition Additional Voicemail Ports
These licenses can be used to add additional voicemail ports in addition to the 4 enabled by the Preferred
Edition (Voicemail Pro) license above. Multiple licenses can be added, up to a total of 20 ports when running
Voicemail Pro and one-X Portal for IP Office, or up to 40 ports when running just Voicemail Pro.
· VMPro TTS (Linux Voicemail Pro)
This license enables the use of text-to-speech facilities using the optional Linux TTS software. One license per
simultaneous instance of TTS usage. This license is also used for user email reading.
· User Profile Licenses
In order to log into and use the one-X Portal for IP Office application, a user must be configured and licensed to one
of the following user profile roles in the IP Office configuration: Office Worker, Teleworker or Power User. Each
role requires an available Office Worker, Teleworker or Power User license in the IP Office configuration.
1.7 Voicemail Pro Features
Voicemail Pro runs on both Windows and Linux servers. For Voicemail Pro server running on Linux such as with the Unified
Communications Module, the following Voicemail Pro features are not supported:
· VB Scripting
· 3rd Party Database
Integration
· VPNM
· UMS Web Voicemail
(However, access via IMAP and one-X Portal for IP Office are available as
alternatives.)
· ContactStore
When logged into the voicemail server using the Voicemail Pro client, those features not supported are grayed out or
hidden. If those features are present in an imported call flow, they will not function and calls attempting to use those
features will be disconnected.
The Voicemail Pro client's backup and restore functions cannot currently be used to move voicemail data between a Linux
based server and a Windows based server or vice versa. The client functions for importing and exporting module and the
call flow database can be used.
For Small Community Network scenarios where multiple voicemail servers are present, for example distributed and backup
server, a mix of Linux based and Windows based servers are allowed.

Unified Communications Module Installation and Maintenance Page 13
15-601011 Issue 03l (28 August 2012)IP Office
Module Installation
Chapter 2.

Unified Communications Module Installation and Maintenance Page 14
15-601011 Issue 03l (28 August 2012)IP Office
2. Module Installation
Pre-Requisites
· This manual assumes that the installer is already experienced with the installation of an IP500 V2 system, including
the installation of IP500 base cards. It also assumes that the installer is familiar with the configuration of a IP Office
system using IP Office Manager and System Status Application.
· This manual assumes that the IP Office system has already been installed and licensed for IP Office Essential
Edition mode running IP Office Release 8.0 Q1 2012 Service Pack or higher.
· The Unified Communications Module defaults to using the IP Office system as its source for time and date
information. Therefore the IP Office system must be configured to either use a specific external time server to
obtain its time or to have its time set manually.
Additional Documentation
Depending on the application to be supported by the Unified Communications Module, Voicemail Pro and or one-X Portal
for IP Office, the following manuals are also required plus any information requirements specified in those manuals.
· one-X Portal for IP Office Administration Manual
This manual covers the installation and administration menus used for the one-X Portal for IP Office application.
This manual is essential if the one-X Portal for IP Office needs to be configured to support multiple IP Office servers
in a Small Community Network.
· Voicemail Pro Linux Installation Manual
This manual covers scenarios where multiple servers are installed within a Small Community Network.
· Voicemail Pro Administration Manual
By default the voicemail server will provide mailbox services to all users and hunt groups without any configuration
being needed. This manual covers the administration of the voicemail server using the Voicemail Pro client in order
to enable additional features.
Information Required
· IP Office Service User Names and Passwords
Service user names and passwords for IP Office Manager and System Status Application access to the IP Office
system.
· IP Address Details
The IP address of the IP Office system's LAN1 interface is used for the initial configuration of the module. During
that configuration separate IP address settings for the module are set.
· Licenses
Check that you have the necessary licenses for the expected operation. The licenses must match the Dongle Serial
Number shown in the IP Office system's configuration.
Tools Required
· Windows PC
This PC or an existing PC is needed to run IP Office Manager and System Status Application. The PC needs to have
a LAN connection to the IP Office control unit.
· 5mm Flat-blade Screwdriver
This is required to remove a slot cover from the front of the IP Office control unit and to secure the newly installed
Unified Communications Module.
· Anti-Static Wrist Strap and Ground Point
These should be used when inserting and removing cards from the IP Office control unit.
Transferring Settings from Other Servers
If the module is replacing an existing Voicemail Pro and or one-X Portal for IP Office server, the settings from those
servers can be transferred to the module. The methods for this are outlined in the sections Transferring Voicemail Server
Settings and Transferring one-X Portal for IP Office Settings.
80

Unified Communications Module Installation and Maintenance Page 15
15-601011 Issue 03l (28 August 2012)IP Office
Module Installation:
2.1 IP Address Notes
During installation the Unified Communications Module is assigned an IP address. The Unified Communications Module can
also use DHCP to obtain an address. It can also be given a DNS name.
The IP500 V2 system has two physical LAN interfaces: LAN1 and LAN2. The ports labeled LAN and WAN respectively. The
Unified Communications Module is physically connected to the LAN1 network of the system and needs to have an address
on that subnet.
These notes detail how the IP addresses are used.
· User and Administration IP Addresses
User and administrator access to the Unified Communications Module and the applications hosted by the module
use the following addresses.
· Unified Communications Module
A newly installed Unified Communications Module uses the IP Office system's LAN1 IP address for browser
access to the module's initial configuration menu. During that initial configuration, an IP address for future
access to the Unified Communications Module is set.
· one-X Portal for IP Office
The one-X Portal for IP Office service running on the Unified Communications Module is accessed using the
module's IP address or DNS name suffixed with :8080 as the port number.
· Voicemail Pro
The voicemail server service running on the Unified Communications Module is accessed by the Voicemail Pro
client using the module's IP address.
· Internal Addresses
The following addresses are used only for internal connections between the IP Office system and the applications
running on its Unified Communications Module. These addresses are fixed and normally automatically set. However
you need to be aware of them as they appear in the IP Office system and one-X Portal for IP Office configuration
settings.
· one-X Portal for IP Office Connection: 169.254.0.1
This address is used for the CSTA and DSML provider connections from the one-X Portal for IP Office
application to the IP Office. It is also used as the SNTP time source address for the Unified Communications
Module.
· Voicemail Pro Connection: 169.254.0.2
This address is used for as the internal address for connections to the voicemail server. It is set as the IP
address of the voicemail server in the IP Office system's configuration. It is also used as the voicemail provider
address by the one-X Portal for IP Office application.
LAN2 and NAT Limitation
Traffic between the IP Office control unit and the Unified Communications Module is on LAN1 of the IP Office system.
Scenarios where users of the Unified Communications Module applications, especially one-X Portal for IP Office, are
accessing the IP Office and thus the Unified Communications Module via the IP Office system's LAN2 (WAN) port should be
avoided for more than 30 users.
They should also be avoided where NAT is being applied to traffic between LAN1 and LAN2. These restrictions should be
observed even when the IP Office system is in a Small Community Network where the H323 SCN trunks may be routed via
the other LAN.

Unified Communications Module Installation and Maintenance Page 16
15-601011 Issue 03l (28 August 2012)IP Office
2.2 IP Office Configuration
The following are pre-requisites for the system supporting a Unified Communications Module.
· The IP Office system must be running IP Office Release 8.0 Q1 2012 Service Pack or higher software.
· The IP Office system must be configured and licensed for Essential Edition mode operation.
· The system must be configured to use either an external time server or to have its time and date set manually.
Changing the System Time Settings
1.
Start IP Office Manager and receive the configuration from the IP Office system.
2.
Select System and select the System tab.
3.
For a system with an Unified Communications Module, the default Time Setting Config Source setting of Voicemail
Pro/Manager should not be used. The value should be changed as follows:
· To Use an External Time Server
Change the setting to SNTP. The additional fields for setting the address of the time server or servers to use
are displayed.
· To Set the Time Manually
Change the setting to None. The system's time and date are now set through the menu of an Avaya phone
user who has System Phone Rights.
4.
Click on the save icon to send the configuration back to the IP Office.
Checking/Entering Licenses
The IP Office system requires an Essential Edition license.
1.
Start IP Office Manager and receive the configuration from the IP Office system.
2.
Select License.
3.
To add a license, click and select License. Enter the new license and click OK. We recommend licenses are
added by cutting and pasting them from the supplied file. That avoids potential issues with mistyping.
4.
The Status of the new license should show Unknown and the name the license should match the type of license
entered. If the name shows as Invalid, the most likely cause is incorrect entry of the license key characters.
5.
Click on the save icon to send the configuration back to the IP Office.
6.
Use Manager to receive the configuration again and check that the status of the license. It should now be Valid.
Unified Communications Module Installation and Maintenance Page 17
15-601011 Issue 03l (28 August 2012)IP Office
Module Installation: IP Office Configuration
2.3 System Shutdown
Before adding or removing any hardware from the IP Office system, it must be shutdown using one of the shutdown
methods below. Failing to shutdown the system correctly may cause lose of configuration data.
· ! WARNINGS
· A shutdown must always be used to switch off the system. Simply removing the power cord or switching off
the power input may cause the loss of configuration data.
· This is not a polite shutdown, any user calls and services in operation will be stopped. Once shutdown, the
system cannot be used to make or receive any calls until restarted.
· The shutdown process takes up to a minute to complete. When shutting down a system with a Unified
Communications Module installed, the shutdown can take up to 3 minutes while the card safely closes all open
files and closes down its operating system. During this period the module's LED 1 remains green.
· When shutdown, the LEDs shown on the system are as follows. Do not remove power from the system or
remove any of the memory cards until the system is in this state:
· LED1 on each IP500 base card installed will also flash red rapidly plus LED 9 if a trunk daughter card
is fitted to the base card.
· The CPU LED on the rear of the system will flash red rapidly.
· The System SD and Optional SD memory card LEDs on the rear of the system are extinguished.
· To restart a system when shutdown indefinitely, or to restart a system before the timed restart, switch power
to the system off and on again.
System Shutdown Using the AUX Button
When the AUX button on the rear of the system is pressed for more than 5 seconds, the IP500 V2 control unit will
shutdown with the restart timer set to 10 minutes. Wait until the state of the LEDs on the system match those listed above
before switching off power to the system.
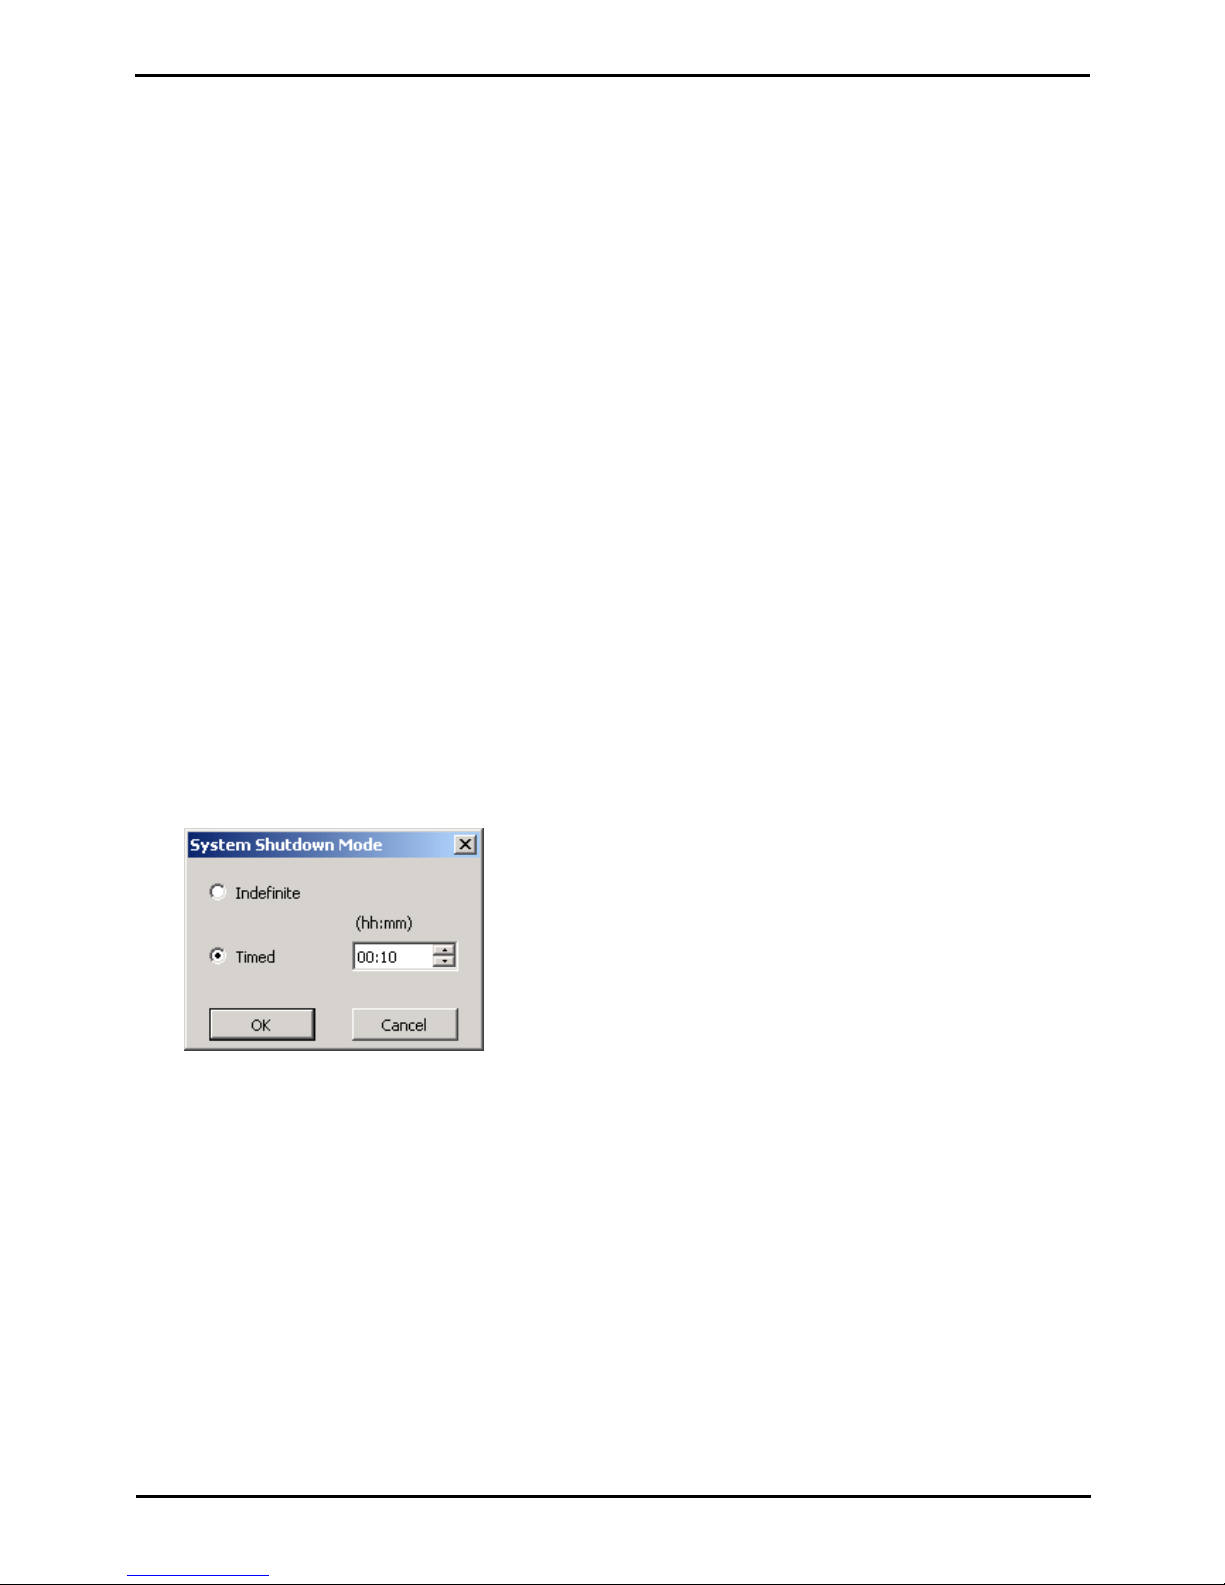
System Shutdown Using IP Office Manager
1.
Using IP Office Manager, select File | Advanced | System Shutdown.
2.
Using the Select IP Office menu, the System Shutdown Mode menu is displayed.
3.
Select Indefinite and click OK.
4.
Wait until the state of the LEDs on the system match those listed above before switching off power to the system.
System Shutdown Using the System Status Application
1.
Start System Status Application and access the system's status output.
2.
In the navigation panel select System.
3.
At the bottom of the screen select Shutdown System.
4.
Select Indefinite and click OK.
5.
Wait until the state of the LEDs on the system match those listed above before switching off power to the system.
Unified Communications Module Installation and Maintenance Page 18
15-601011 Issue 03l (28 August 2012)IP Office
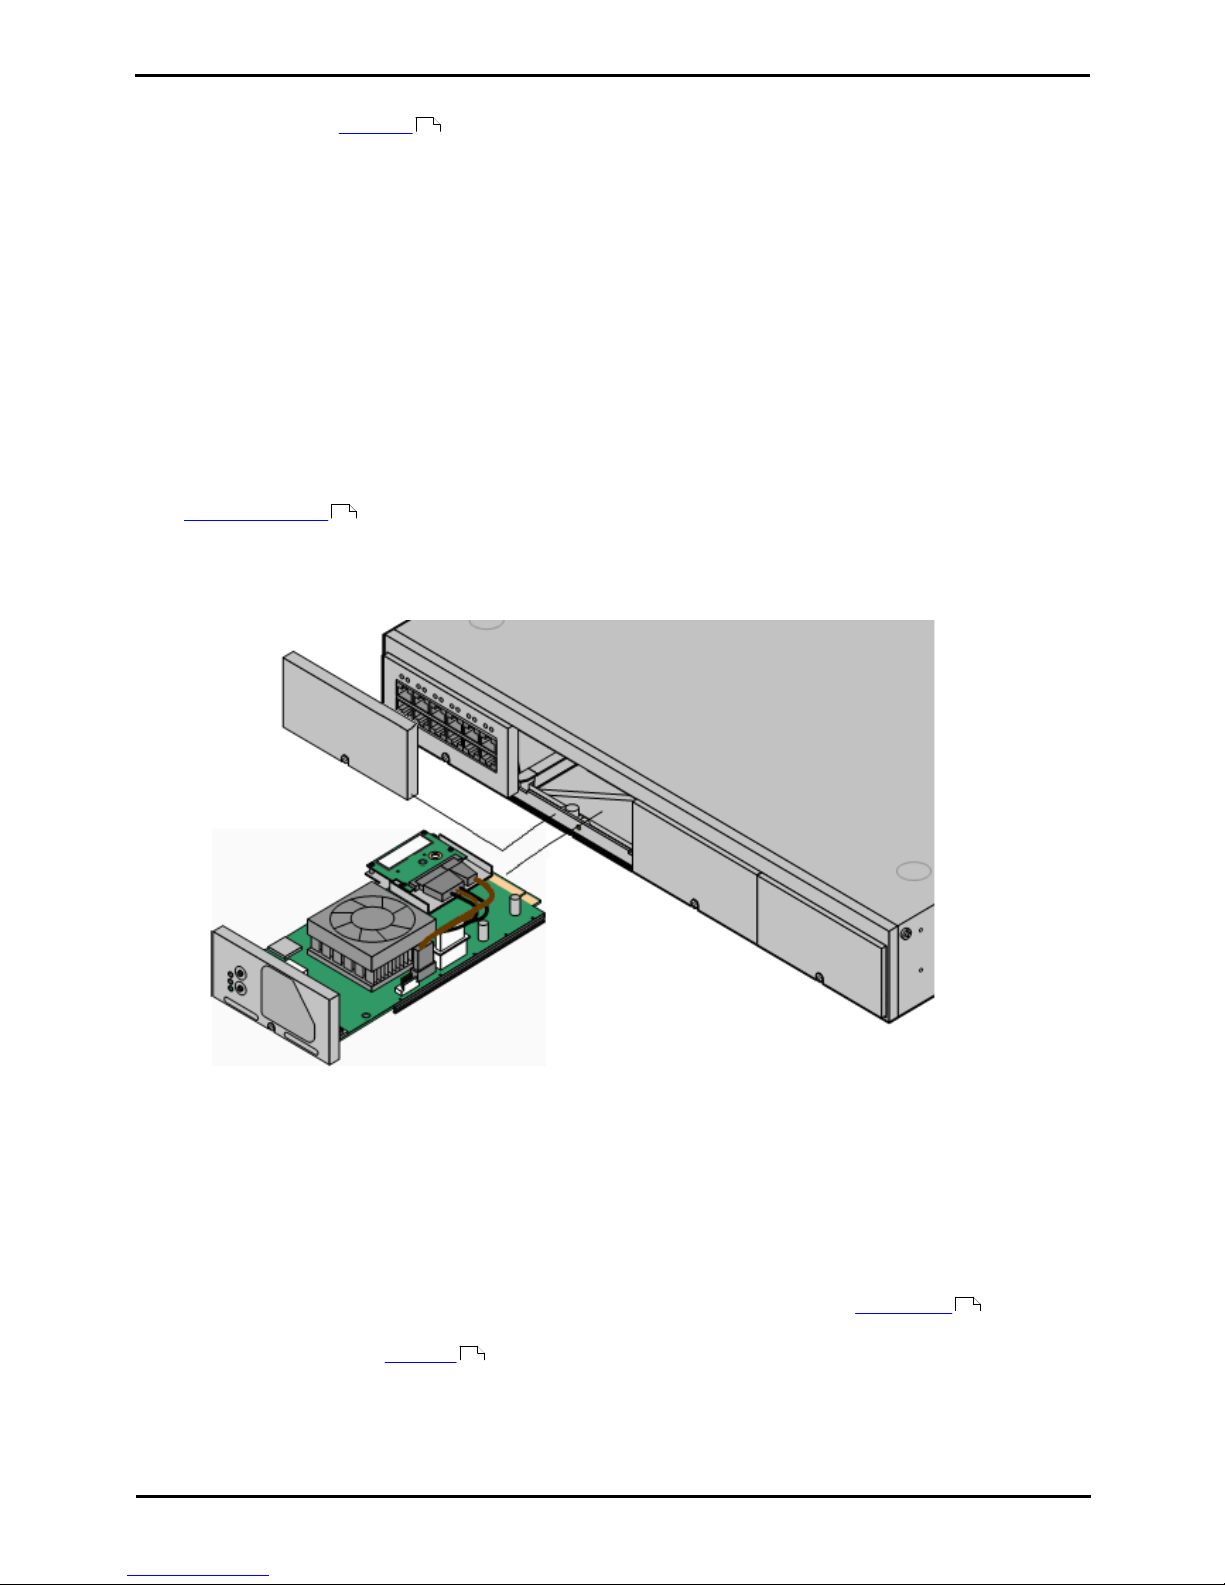
2.4 Inserting the Module
Once the system has been shutdown , the module can be inserted.
· ! WARNINGS
· Correct anti-static protection steps should be taken while handling circuit boards.
· Cards must never be added to or removed from the control unit while it has power connected.
· Tools Required
· o 5mm Flat-blade screwdriver.
· o Anti-static wrist strap and ground point.
Installing the card:
1.
If not already done, ensure that the plastic cover that fits over the external ports on the card's faceplate is in place.
The plastic cover is supplied with the card.
2.
Check that there is no power to the control unit. If the system is on, shutdown the system using one of the correct
shutdown methods .
· Do not simply switch off power to a system. Whenever possible a system should be switched off using a correct
shutdown method first.
3.
Using a flat-bladed screwdriver, remove the cover from the slot on the front of the control unit that will be used for
the module. This cover is no longer required but should be retained until installation has been completed.
4.
Allowing the module to rest against the bottom of the slot, begin sliding it into the control unit. When half inserted,
check that the module rails have engaged with the slot edges by trying to gently rotate it. If the module rotates
remove it and begin inserting it again.
5.
While inserting the module, also check to ensure that cables on the module do not interfere with the insertion
operation.
6.
The module should slide in freely until almost fully inserted. At that point, apply pressure at the base of the front of
the module to complete insertion.
7.
Using a flat-bladed screwdriver, secure the module.
8.
Once the module is installed, reapply power to the system. The system will go through its normal start up process.
The LEDs on the Unified Communications Module will also indicate the card's status, see Module LEDs . The
module is started once the lower LED changes to green with regular amber flashes.
9.
The card now needs to be initialized .
17
17
77
19
Unified Communications Module Installation and Maintenance Page 19
15-601011 Issue 03l (28 August 2012)IP Office
Module Installation: Inserting the Module
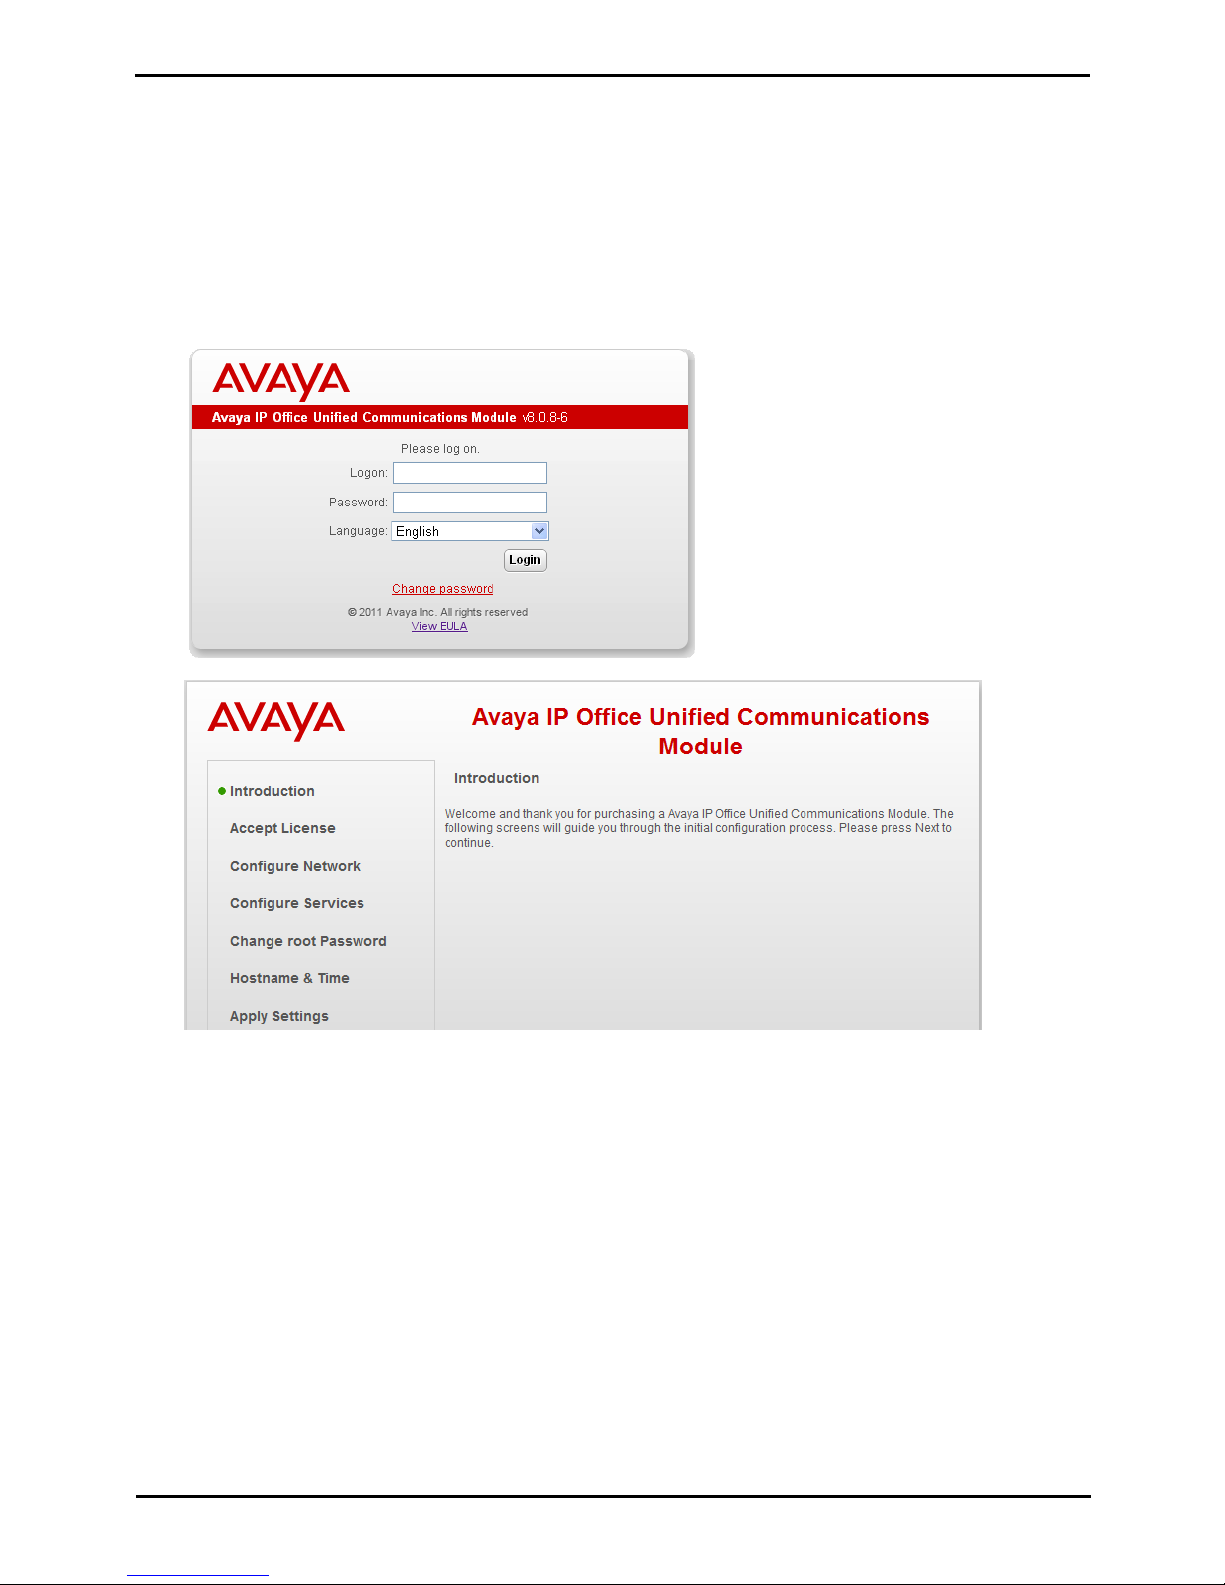
2.5 Initializing the Module Services
Following installation and start up of the newly installed module, the services provided by the module need to be started
and initialized. This is done via web browser access to the module.
1.
From a client PC, start the browser and enter http:// followed by the LAN1 IP address of the IP Office system and
:7070. For example http://192.168.42.1:7070.
· The IP Office system's LAN1 address is used just for this initial configuration. During this process, you will set
IP address details for the Unified Communications Module that are then used for future access to the card. Note
that only the LAN1 IP address should be used for this process, not the LAN2 IP address.
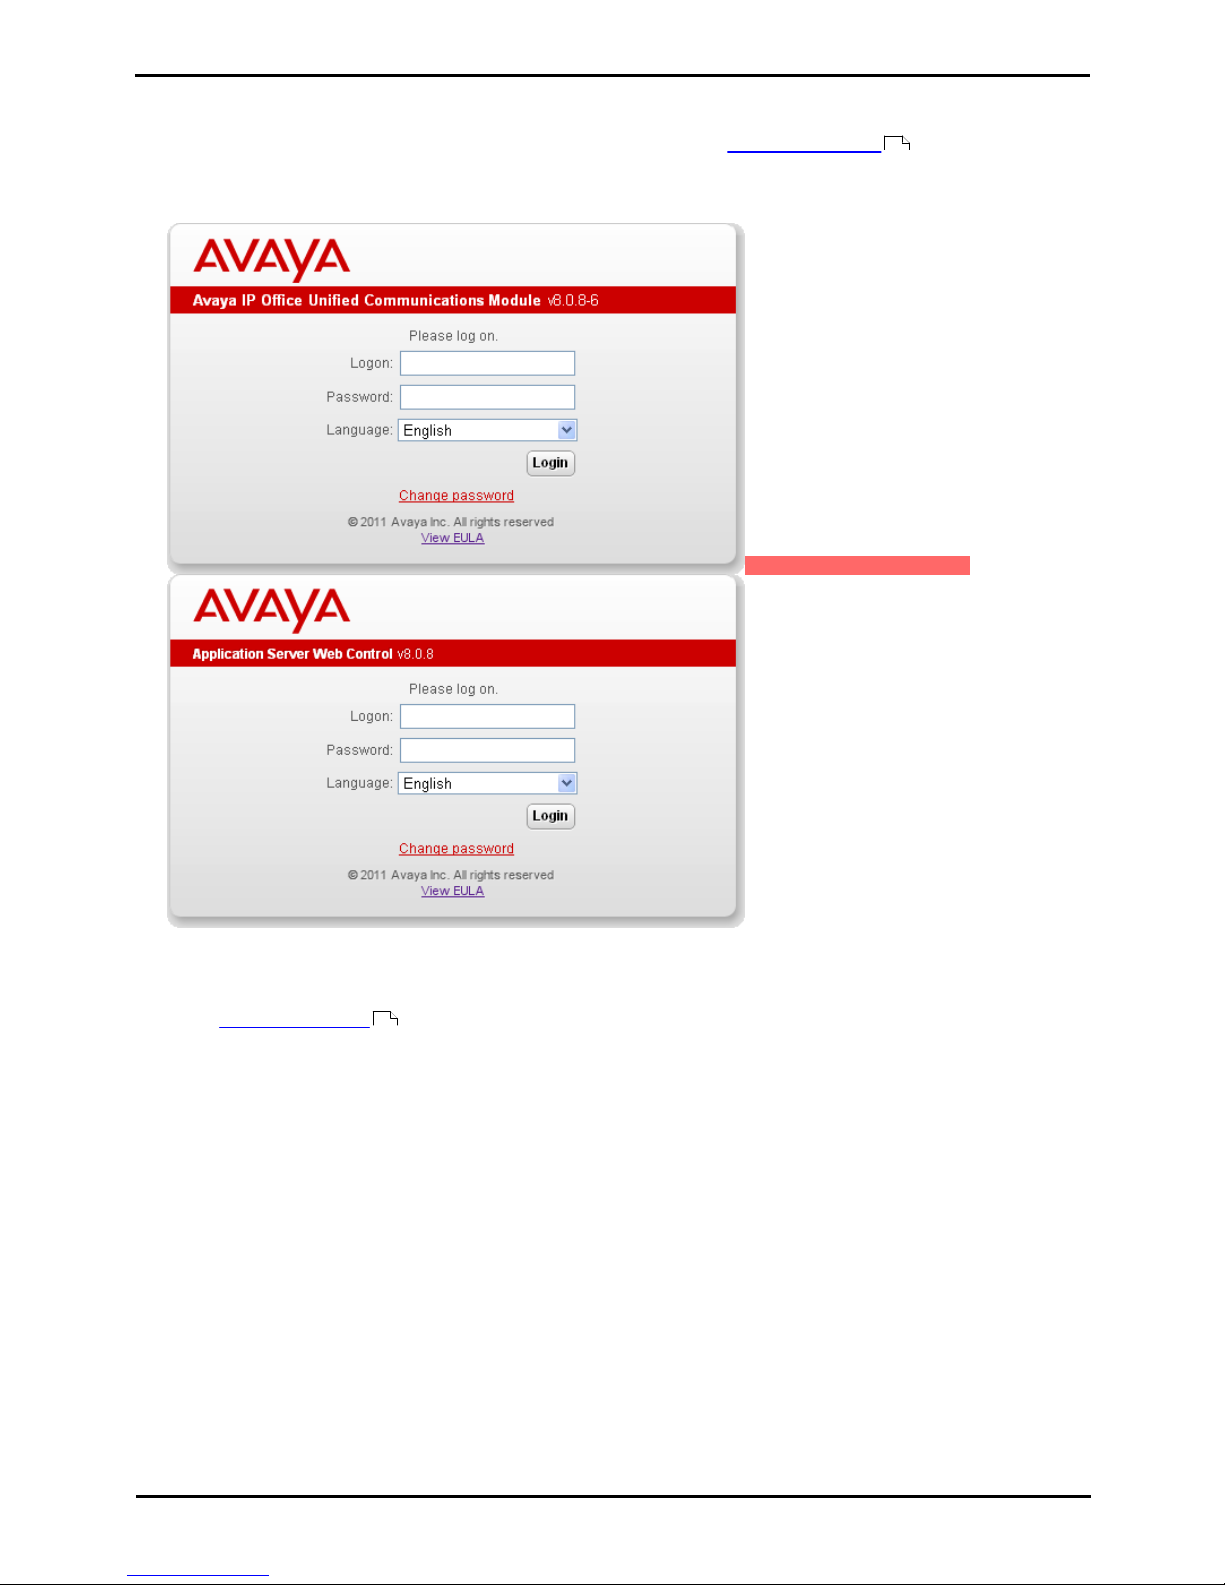
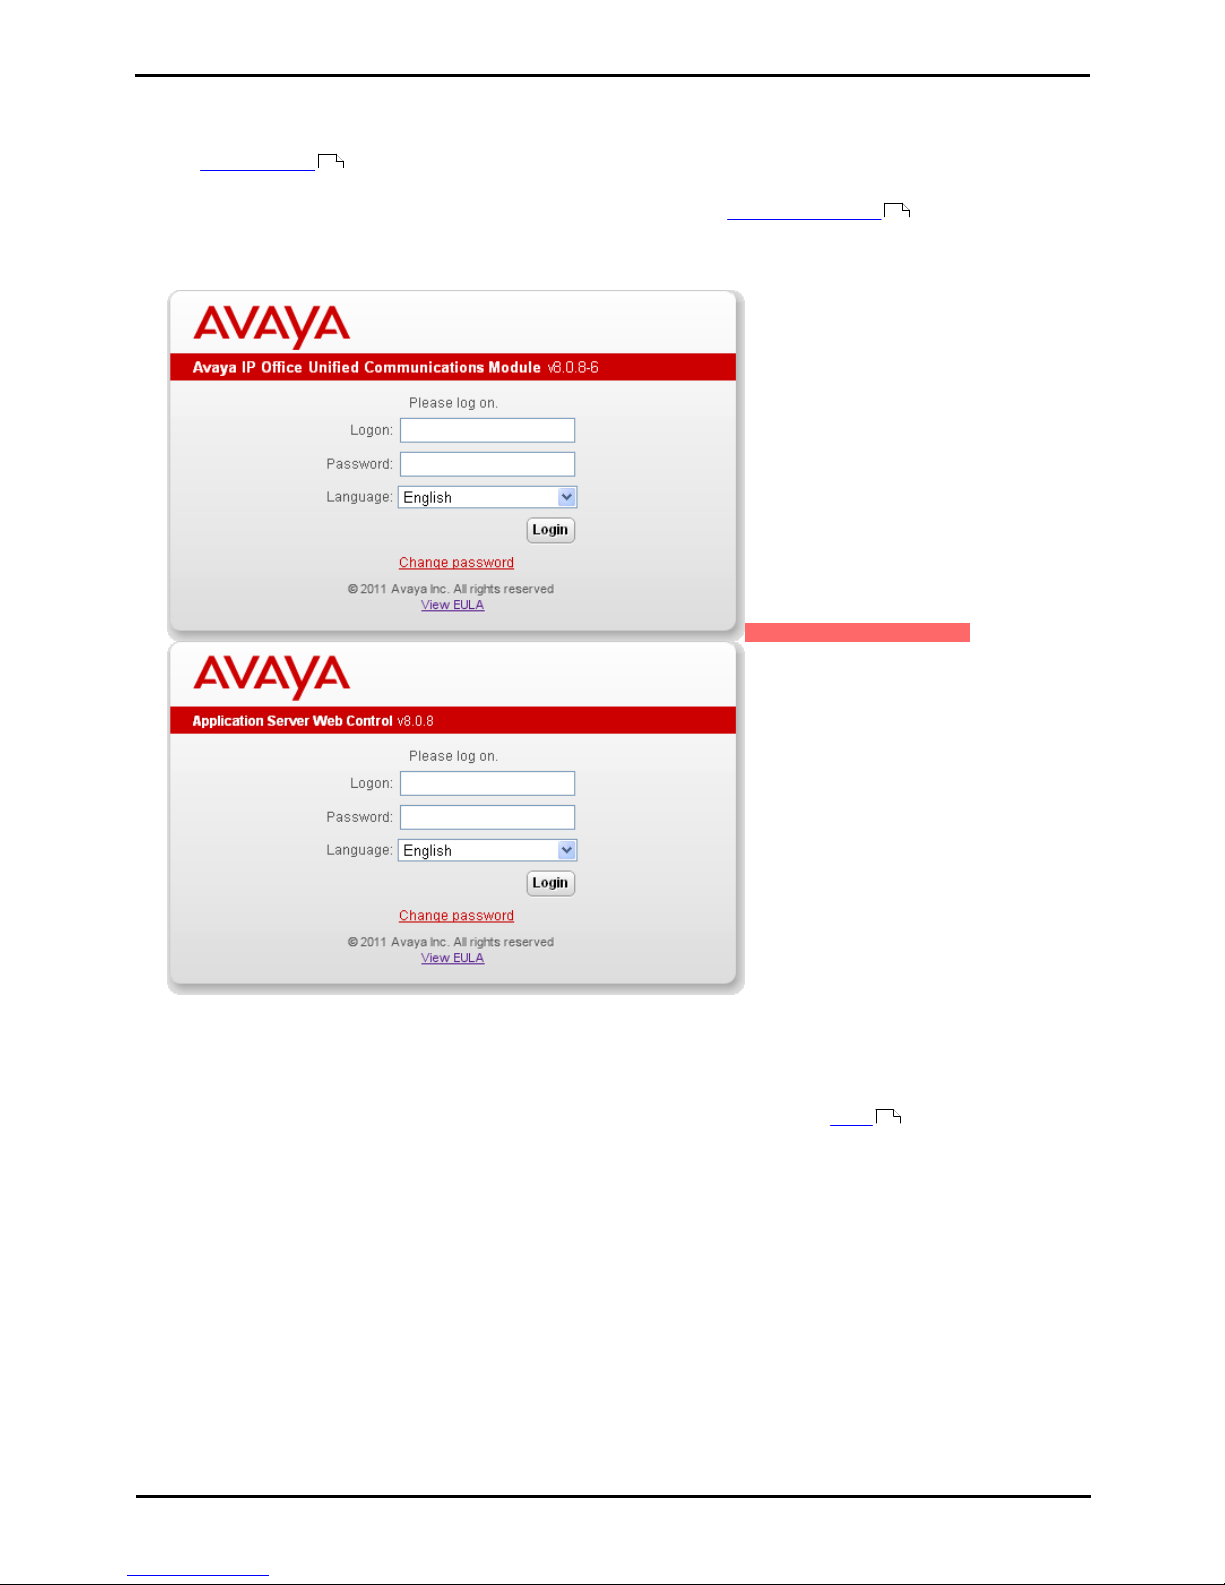
2.
The Unified Communications Module login page is displayed. The default name and password are webcontrol and
web.
3.
Click Login. The menu for initial setup is displayed.
4.
Click Next. If you accept the license, select I Agree and click Next.

Unified Communications Module Installation and Maintenance Page 20
15-601011 Issue 03l (28 August 2012)IP Office
5.
Enter the IP address and DNS settings that the module should use. These will be used for future access to the
module and its applications.
6.
Select the services that you want the Unified Communications Module to provide for the Unified Communications
Module system.
7.
Click Next. Enter and confirm a new password. This is the root user password for access to the operating system. It
is not normally used during Unified Communications Module configuration and maintenance. However, ensure that
you note the password set.
Unified Communications Module Installation and Maintenance Page 21
15-601011 Issue 03l (28 August 2012)IP Office
Module Installation: Initializing the Module Services
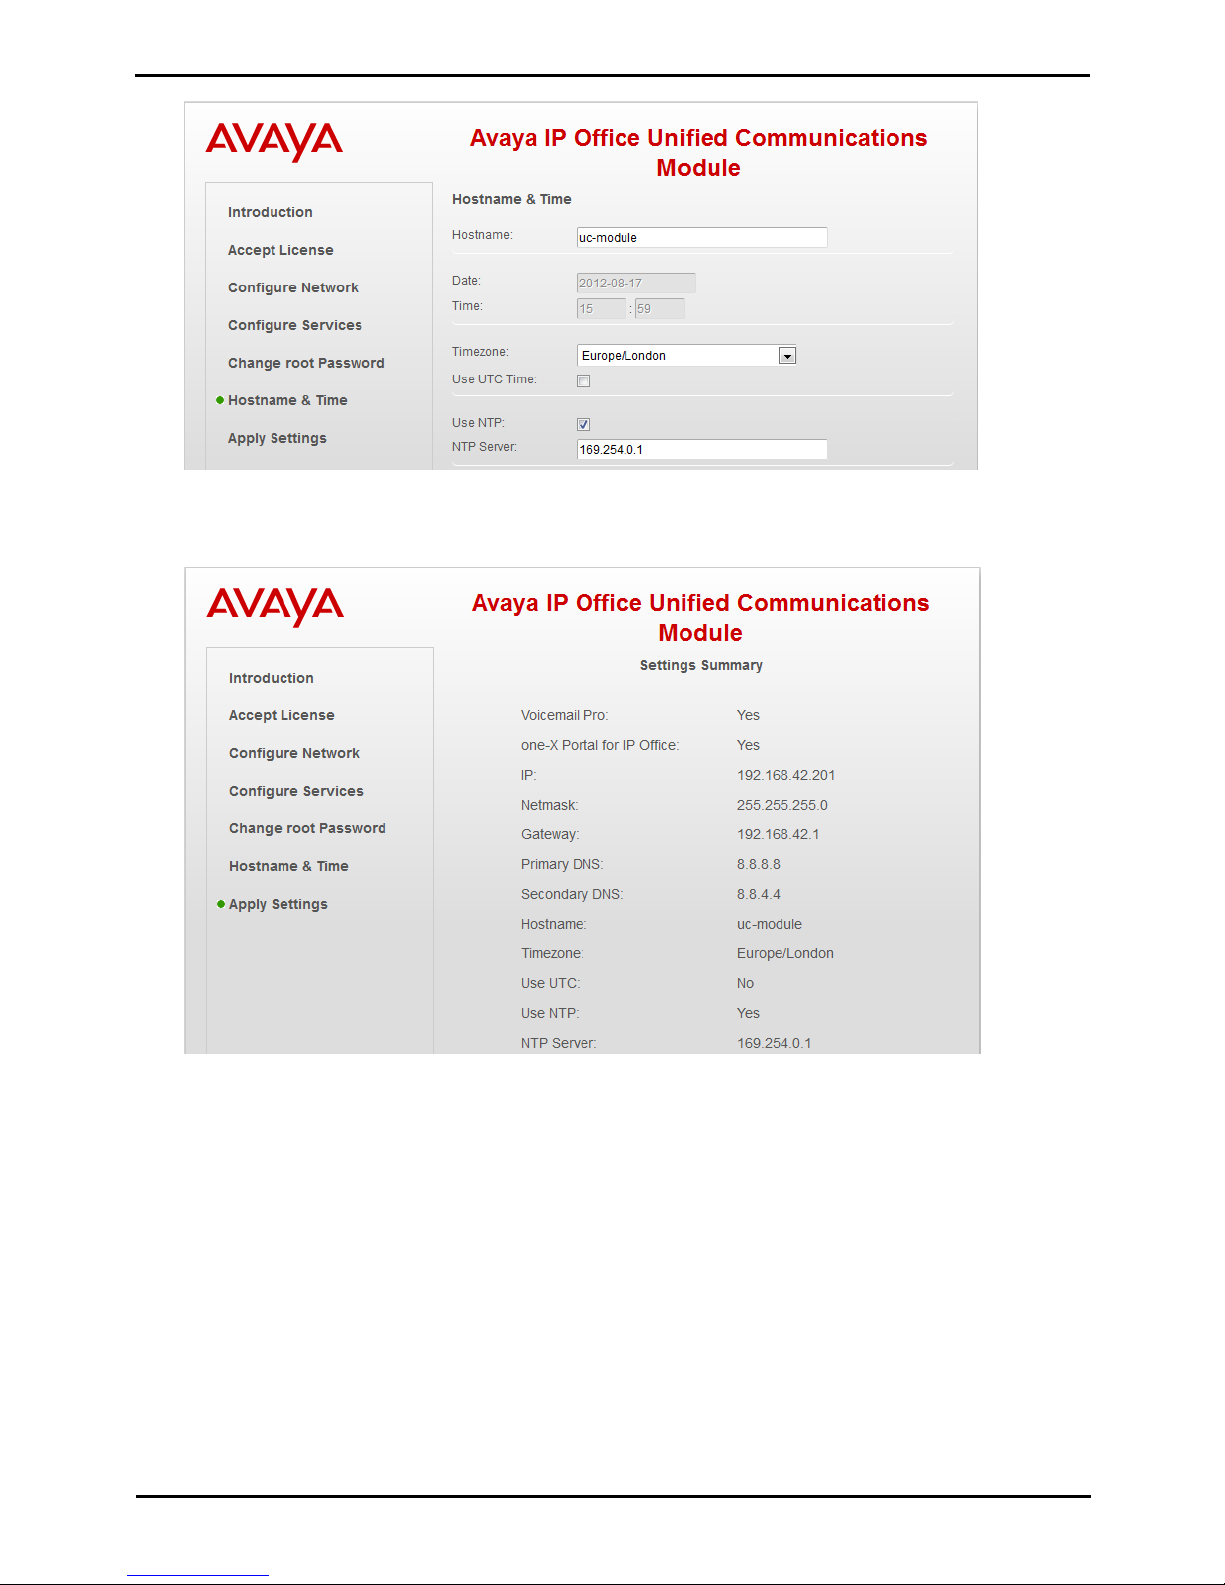
8.
Click Next. Enter basic details for the module.
· The default setting for the NTP Server is 169.254.0.1. This is an internal address for the IP Office system. If
this address is used, the IP Office system must be configured to gets its time from an external source or to
have its time set manually.
9.
Click Next. A summary of the settings is displayed.
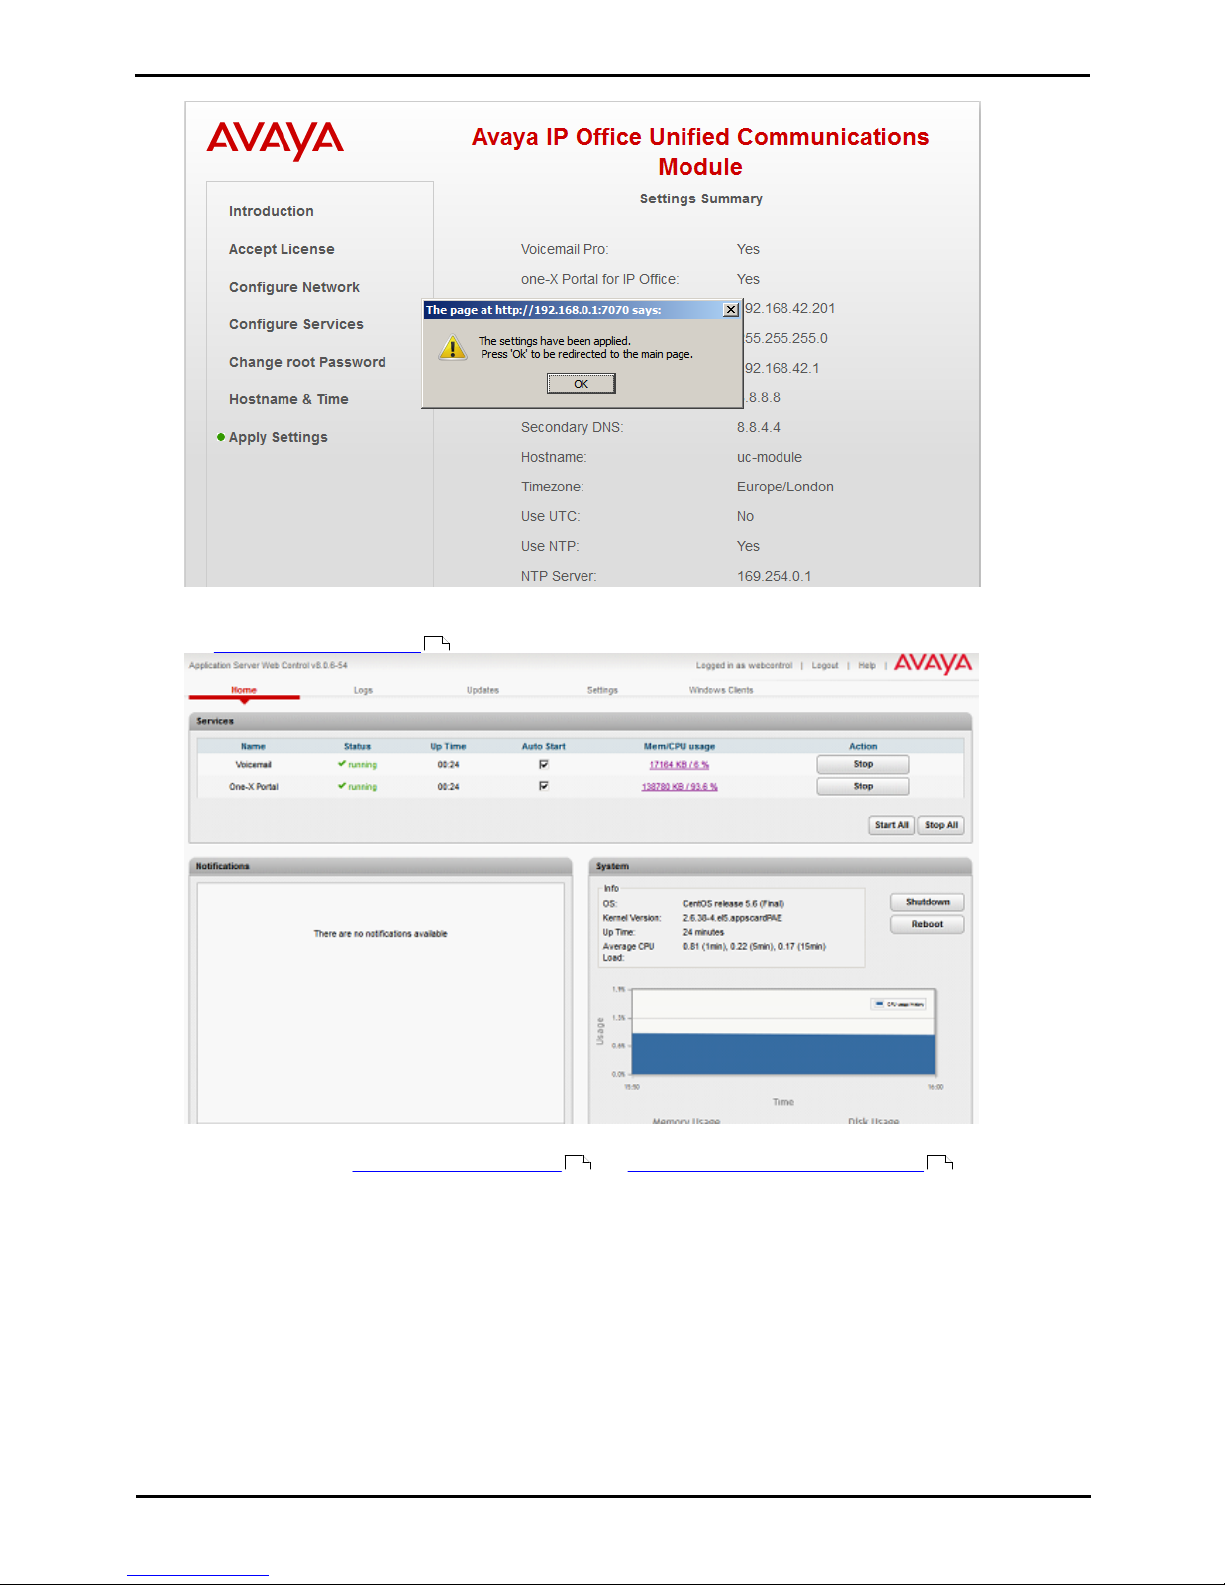
10.
Click Apply. Alternatively use the the Previous and Next options to readjust the settings.
Unified Communications Module Installation and Maintenance Page 22
15-601011 Issue 03l (28 August 2012)IP Office
11.
Once configuration is complete, the module will restart with the new settings.
12.
The module will attempt to redirect your browser to the module's new IP address. If this does not succeed you will
have to enter the new address manually. However, whichever way you will need to login again. You should now see
the server configuration menus .
13.
Though the module and the selected services have been started, additional configuration to support those services
may be required. See Voicemail Pro Configuration and one-X Portal for IP Office Configuration .
67
30 40

Unified Communications Module Installation and Maintenance Page 23
15-601011 Issue 03l (28 August 2012)IP Office
Module Installation: Initializing the Module Services
2.6 System and Module Start Up
The status of the Unified Communications Module can be checked using System Status Application.
1.
Using System Status Application, access the system.
2.
Select System. The System Hardware Summary includes the UC Module.
3.
Under System in the navigation tree, click on UC Module. Details of the module are displayed. The buttons at the
bottom of the display can be used to shutdown and startup the module.
Unified Communications Module Installation and Maintenance Page 24
15-601011 Issue 03l (28 August 2012)IP Office
2.7 Logging on to the Web Menus
1.
From a client PC, start the browser and enter http:// followed by the address of the Unified Communications
Module and :7070. The port number used can be changed through the Settings | General page after logging
in.
2.
The Unified Communications Module login page is displayed. The default name and password are webcontrol and
web.
IF PREBUILT,STANDARD
3.
Select the Language required.
4.
Enter the name and password configured for Unified Communications Module administration.
· The default name and password are webcontrol and web. The password can be changed by selecting the
Change Password option.
69
49
Unified Communications Module Installation and Maintenance Page 25
15-601011 Issue 03l (28 August 2012)IP Office
Module Installation: Logging on to the Web Menus
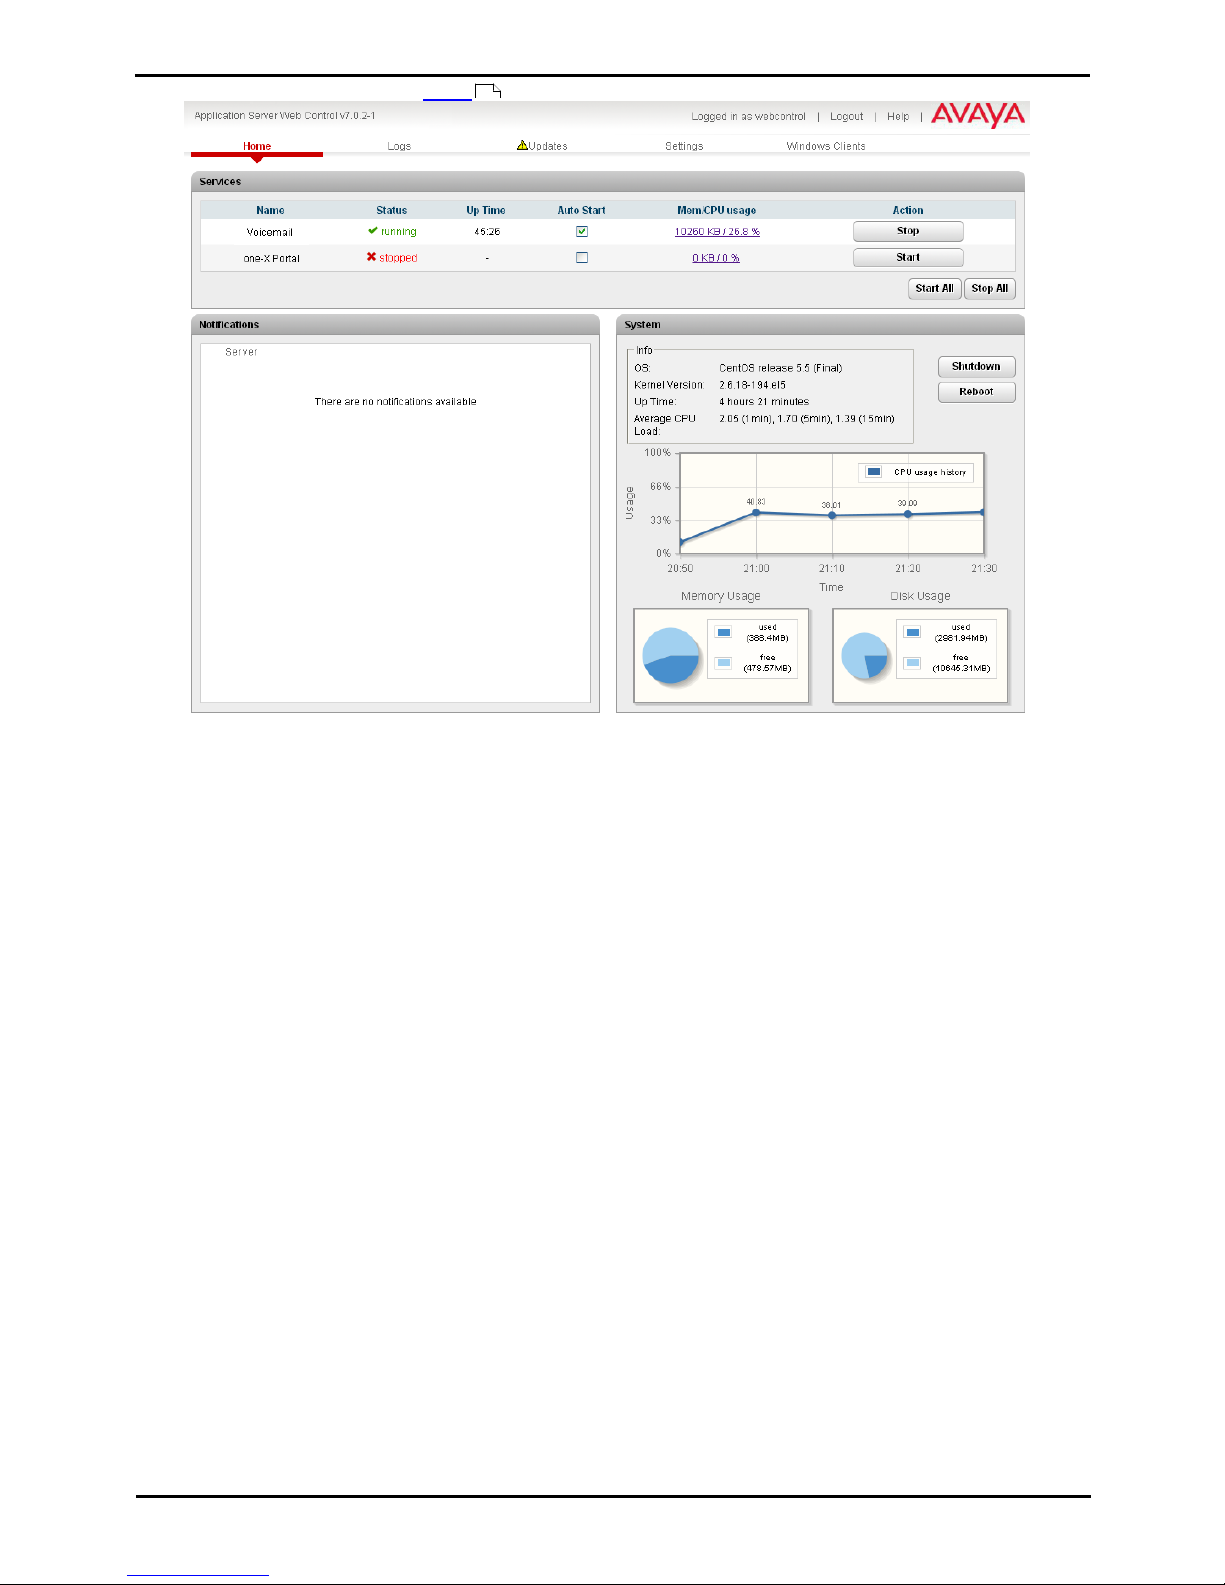
5.
If the login was successful, the Home page for the server is displayed.
63
Unified Communications Module Installation and Maintenance Page 26
15-601011 Issue 03l (28 August 2012)IP Office
2.8 Changing the Web Password
From the Logon menu you can select the Change Password option to perform a password change. When selected, fields
are displayed to entry the current password and for entry and confirmation of the new password. This password is also
used for SSH file access to the server.
1.
From a client PC, start the browser and enter http:// followed by the address of the Unified Communications
Module and :7070. The port number used can be changed through the Settings | General page after logging
in.
2.
The Unified Communications Module login page is displayed. The default name and password are webcontrol and
web.
IF PREBUILT,STANDARD
3.
Select the Language required.
4.
Click on the Change password link. The change password menu is displayed.
Enter the current password and the new password.
5.
Click OK. The menu will confirm whether the change was successful or not.
6.
If the new password is accepted, click Cancel to return to the Login menu and then login with the new
password.
91
69
47

Unified Communications Module Installation and Maintenance Page 27
15-601011 Issue 03l (28 August 2012)IP Office
Module Installation: Changing the Web Password
2.9 Upgrading Software
The Unified Communications Module is supplied with a full set of software pre-installed. However, this may not match the
software level of the IP Office system or the latest set of application software available for the module. Therefore it may be
necessary to upgrade the card after installation.
Most upgrades for the Unified Communications Module will be made available as a set of .rpm files for the components
being upgraded. These will be made available via the Avaya support website http://support.avaya.com. Using these is the
recommended method for upgrading rather than a module software .iso reinstallation , as it is both quicker and does
not remove the current user data. It is also done remotely from the same PC as logging in with web control rather than
requiring physical access to the system.
Separate .rpm files may be made available for one-X Portal for IP Office, the voicemail server, voicemail language prompts
and voicemail TTS languages. Refer to the IP Office Technical Bulletins for each release to confirm the new .rpms available
and whether any other pre-requisite .rpm files are also needed. For the Unified Communications Module, an unzip
application may also need to be installed or upgraded. A separate unzip .rpm is made available when that is the case.
Note also that .rpm files are also used by other Linux based IP Office solutions. In all cases you must confirm that the .
rpm downloaded is compatible for use with the Unified Communications Module.
The upload process for each .rpm takes a couple of minutes. The installation process for each .rpm also takes a couple of
minutes.
· ! WARNINGS
· Loss of Services
During this process, the services provided by the Unified Communications Module are not available to users.
Therefore users should be warned in advance or this process should be performed outside normal business
hours.
· Read the Technical Bulletins
Ensure that you have read and understood all Avaya Technical Bulletins relevant to the software release. These
will include notes and information that was not available at the time this document was created.
85

Unified Communications Module Installation and Maintenance Page 28
15-601011 Issue 03l (28 August 2012)IP Office
Upgrading Software
1.
Login to the server's web configuration pages.
2.
Select the Settings menu and then the General sub-menu.
3.
Check that the Local checkbox for Applications is selected.
4.
Click on the Browse button and browse to the location of the file that you want to load and select the file. The
file name should now be listed in the File field.
5.
Click Add. The server will now start uploading the file.
6.
Repeat the process for any other files.
7.
Select Updates. There should be a warning icon next to Updates indicating that there are out of date applications
on the server.
8.
Scroll down the Services list. The applications for which you have just uploaded .rpm files should display a Status
of out of date or not installed.
9.
If an unzip .rpm has been uploaded, that application should be installed before upgrading any of the other
applications.
a.
Locate unzip in the Application list. If the Status is not installed, click on Install.
b.
The installation process takes less than a minute and is completed when the Status of the application changes
to up to date.
10.
For any applications where the Status is out of date:
a.
Location the application and click Update.
b.
For some applications the server will warn if the application is currently in use. Select Yes to stop the
application and disconnect any calls or services it was currently providing.
c.
Wait for the upgrade to complete when the Status of the application changes to up to date.
11.
Once all the new .rpm files have been installed, select Home. Check that the required Services are running.
Restart the services if necessary.
47
57

Unified Communications Module Installation and Maintenance Page 29
15-601011 Issue 03l (28 August 2012)IP Office
Voicemail Pro Configuration
Chapter 3.

Unified Communications Module Installation and Maintenance Page 30
15-601011 Issue 03l (28 August 2012)IP Office
3. Voicemail Pro Configuration
By default the Voicemail Pro application will provide basic mailbox services for all users and hunt groups created in the IP
Office configuration. For installations with just a single IP Office and Voicemail Pro server this will normally occur without
any further configuration.
Details of IP Office and Voicemail Pro configuration are covered by the Voicemail Pro Linux Installation manual and
Voicemail Pro Administration manuals. This section of this manual covers only the minimum steps recommended to ensure
that the voicemail server is operating correctly and is secure. Those are:
Voicemail Pro Initial Configuration
a.
IP Office Configuration
i.
Adding voicemail licenses .
ii.
Check the Voicemail Type Setting .
b.
Voicemail Pro Configuration
i.
Install the Voicemail Pro client .
ii.
Log in to the Voicemail Pro server .
iii.
Change the default administrator password .
Transferring Settings from a Previous Server
If the IP Office system was already configured to operate with an external Voicemail Pro server that is now being replaced,
the settings, prompts and messages on the old server can be transferred to the new server. After completing the steps
above, see Transferring Voicemail Server Settings .
Notes
For use of UMS options, the Voicemail Pro service needs to communicate with a MAPI proxy application installed on a
Windows PC. The installation package for the MAPI proxy can be downloaded from the server's Windows Client
menu. For full details refer to the Voicemail Pro Linux Installation manual.
31
32
33
34
34
36
73
 Loading...