

Page 1

IP Telephony
Contact Centers
Mobility
Services
Avaya one-X™ Deskphone Edition 1.0
9620, 9630, 9640, 9650
connected to Integral Enterprise
Bedienungsanleitung
Operating instructions
Manual de manejo
Notice d’utilisation
Istruzioni d’uso
Gebruiksaanwijzing
Page 2

Wichtige Hinweise
D
Inhalt dieser Bedienungsanleitung
In dieser Bedienungsanleitung ist beschrieben, wie Sie Ihr Avaya one-X™ Deskphone 9620, Avaya one-X™ Deskphone 9630, Avaya one-X™ Deskphone 9640 und
Avaya one-X™ Deskphone 9650 angeschlossen an Avaya Integral Enterprise bedienen.
Benutzerhandbücher mit allen Funktionen und in verschiedenen Sprachen finden
Sie auf den CDs, die dem Communication Server beiliegen, oder im Internet unter
support.ayaya.com
Konformitätserklärung
Wir, Avaya GmbH & Co.KG, erklären, dass die Telefone Avaya one-X™ Deskphone
9620, Avaya one-X™ Deskphone 9630, Avaya one-X™ Deskphone 9640 und Avaya
one-X™ Deskphone 9650 sowie das Avaya one-X™ Deskphone SMB24 Button
Modul mit den grundlegenden Anforderungen und anderen relevanten Bestimmungen der Richtlinie 1999/5/EU (Radio und Telekommunikation Terminal Equipment,
R&TTE) übereinstimmen.
Die Telefone sind zum Anschluss an Ethernet/LAN-Schnittstellen von IP-fähigen
Systemen von Avaya bestimmt und erfüllen die grundlegenden Anforderungen
gemäß der EG-Richtlinie 1999/5/EU (R&TTE).
Die Avaya one-X™ Deskphone SMB24 Button Module sind bauartbedingt nur zum
Betrieb an den oben genannten Telefonen vorgesehen.
Diese Telefone sind bauartbedingt nicht zum direkten Betrieb an Schnittstellen
öffentlicher Telekommunikationsnetze vorgesehen. Für die Funktion der IP-Telefone
in LAN/Intranet Umgebungen, in denen kein Avaya-System vorhanden ist, kann von
Avaya keine Garantie für einen erfolgreichen Betrieb übernommen werden.
Falls beim Betrieb Probleme auftreten sollten, so wenden Sie sich bitte zunächst an
Ihren Fachhändler oder an Ihren Systembetreuer.
Die vollständige Konformitätserklärung kann auf folgender Internetadresse angefordert werden: www.avaya.de/gcm/emea/de/includedcontent/conformity.htm
suchen Sie unter Index das Stichwort "Konformitätserklärung".
.
oder
2
Page 3

Altgeräte richtig entsorgen - die Umwelt dankt es Ihnen
Mit diesem Symbol gekennzeichnete Elektro- und Elektronik-Altgeräte können gefährliche Substanzen für Mensch und Umwelt enthalten. Sie dürfen
aus diesem Grund nicht zusammen mit unsortiertem Siedlungsabfall (Hausmüll) entsorgt werden. Zur Schonung unserer Umwelt stehen daher öffentliche Sammelstellen für die Entsorgung der mit diesem Symbol
gekennzeichneten Elektro- und Elektronik-Altgeräte zur Verfügung.
Um eine Verbreitung dieser Substanzen in unserer Umwelt zu verhindern und
die Belastung natürlicher Ressourcen zu verringern, besteht aber auch die
Möglichkeit, am Avaya-Rücknahmesystem für gebrauchte Geräte teilzunehmen. Im Rahmen dieses Systems werden die Altgeräte einer fachgerechten
stofflichen Verwertung bzw. einzelne Komponenten einer Wiederverwendung
zugeführt.
Tipps zum Aufstellort
Verwenden Sie für Ihr Telefon eine rutschfeste Unterlage, besonders bei neuen oder
mit Pflegemitteln behandelten Möbeln. Lacke oder Pflegemittel können Stoffe enthalten, die die Füße Ihres Telefons aufweichen, und die aufgeweichten Gerätefüße
könnten auf der Oberfläche der Möbel unerwünschte Spuren hinterlassen. Avaya
kann für derartige Schäden nicht haften.
Reparaturen
Reparaturen und Eingriffe in das Gerät dürfen nur von qualifizierten Fachkräften
ausgeführt werden. Öffnen Sie das Telefon nicht. Sonst könnten Schäden entstehen,
die das Telefon betriebsunfähig machen.
D
3
Page 4
D
Ihr Telefon auf einen Blick
1
2
3
4
6
7
11
12
14
15
16
17
13
18
19
20
21
5
24
22411
22399
9620
1
2
3
4
6
7
11
12
14
15
16
17
13
18
19
20
21
5
22
24
8
22399
22567
22411
9630/
9640
4
Page 5
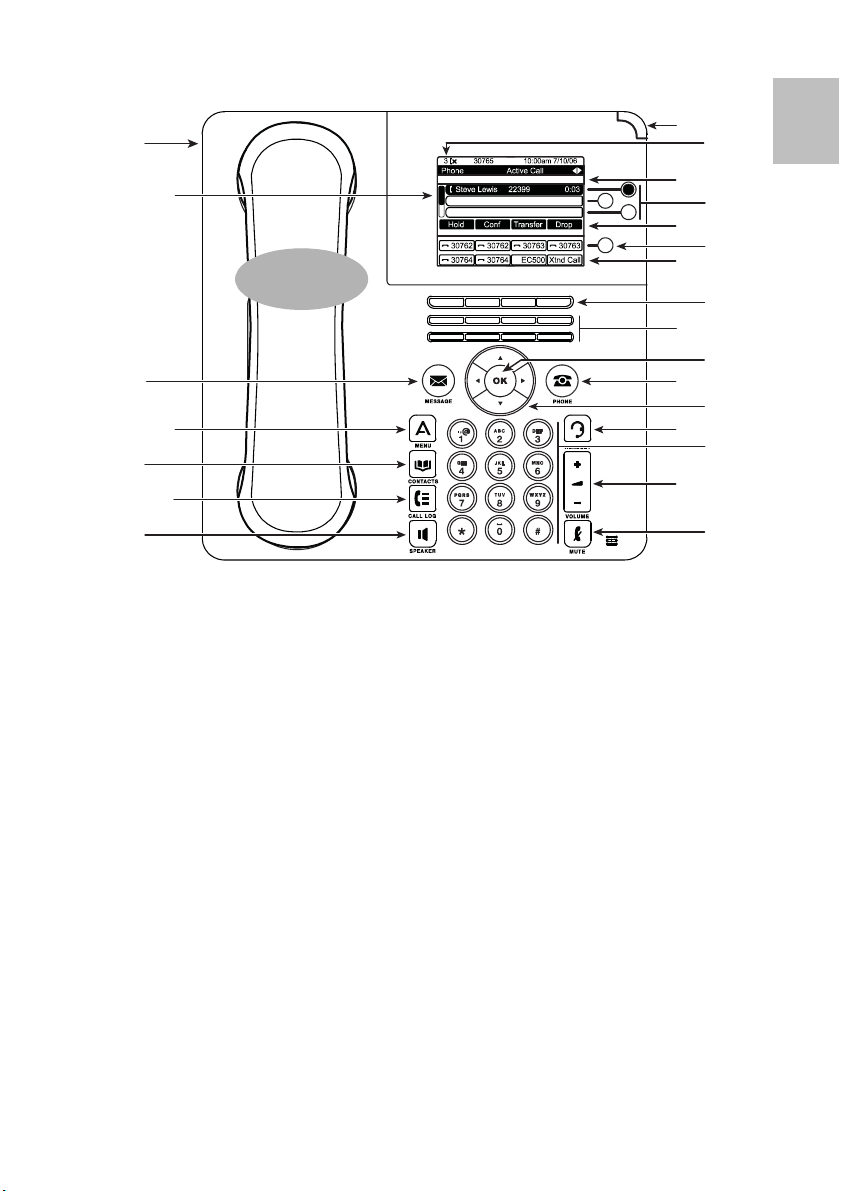
1
2
3
4
6
7
11
12
14
15
10
13
18
16
20
21
5
24
8
9
17
19
23
30777
30765
9650
D
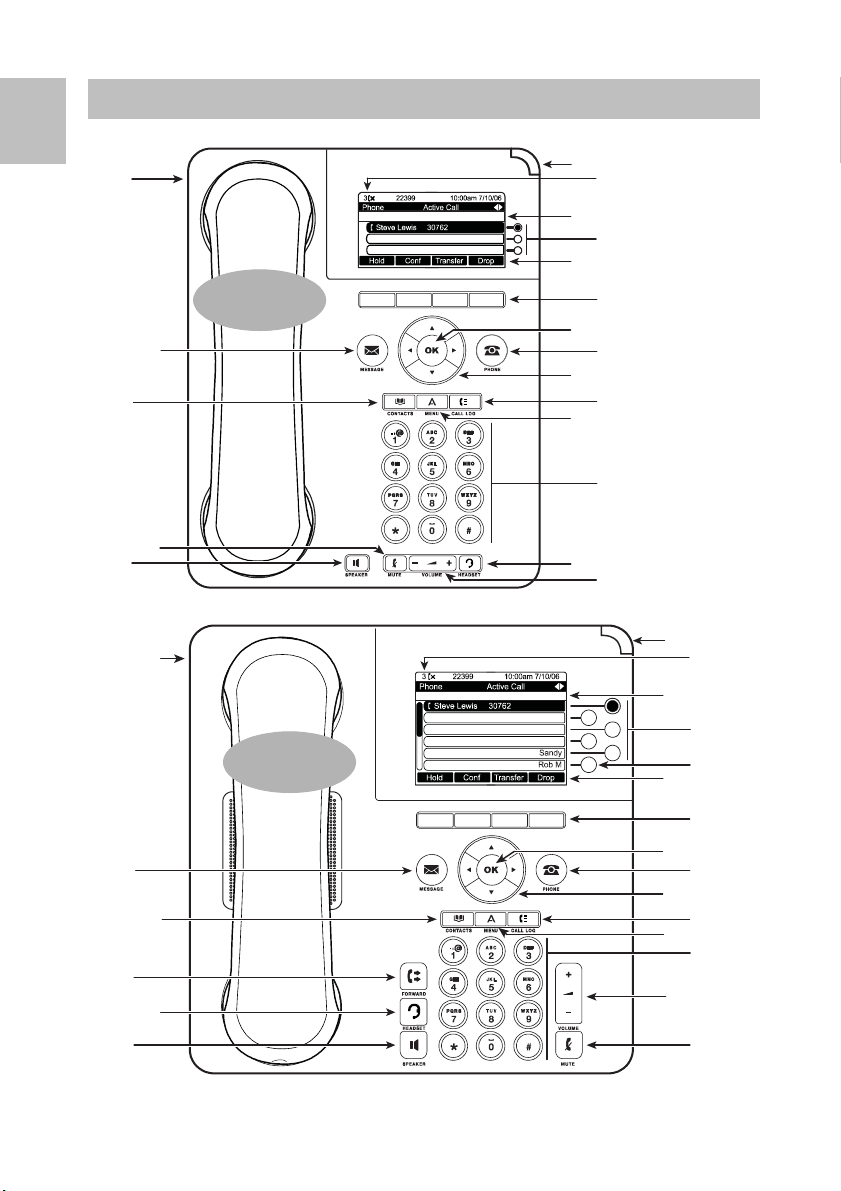
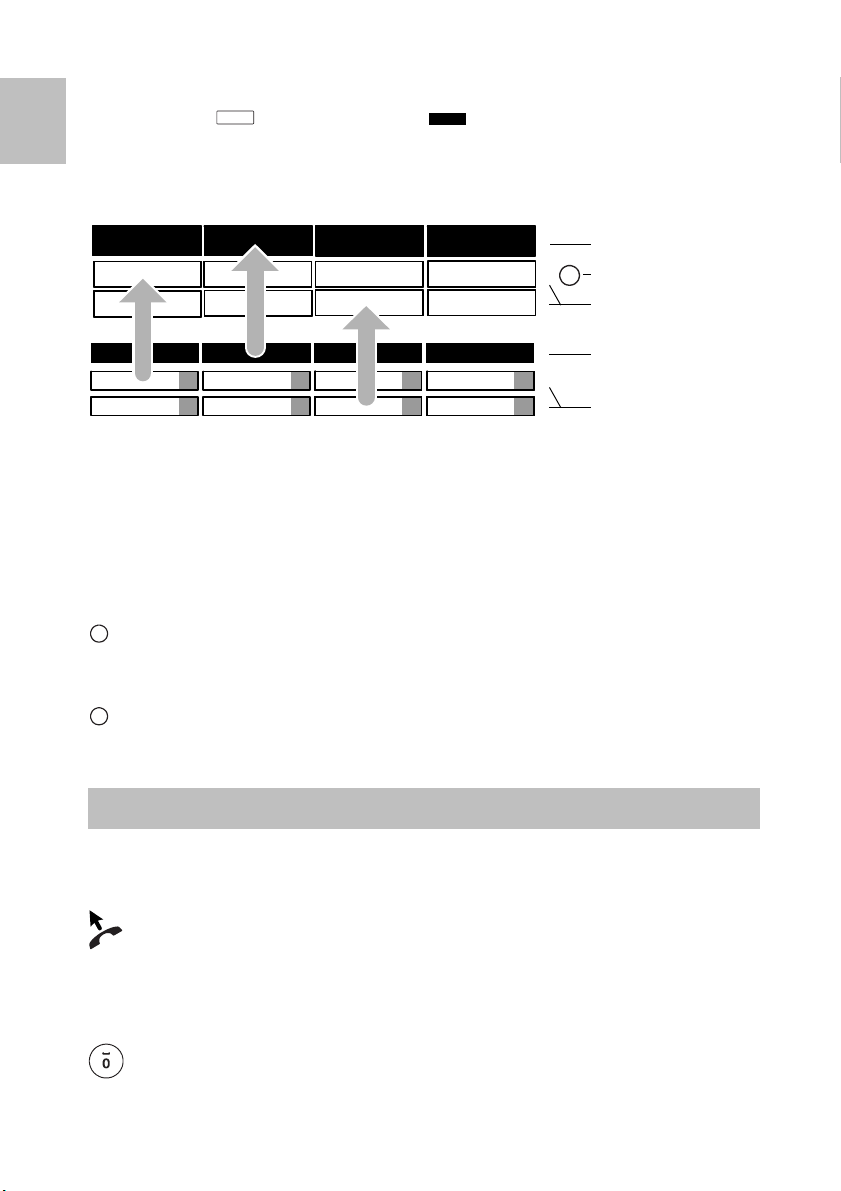
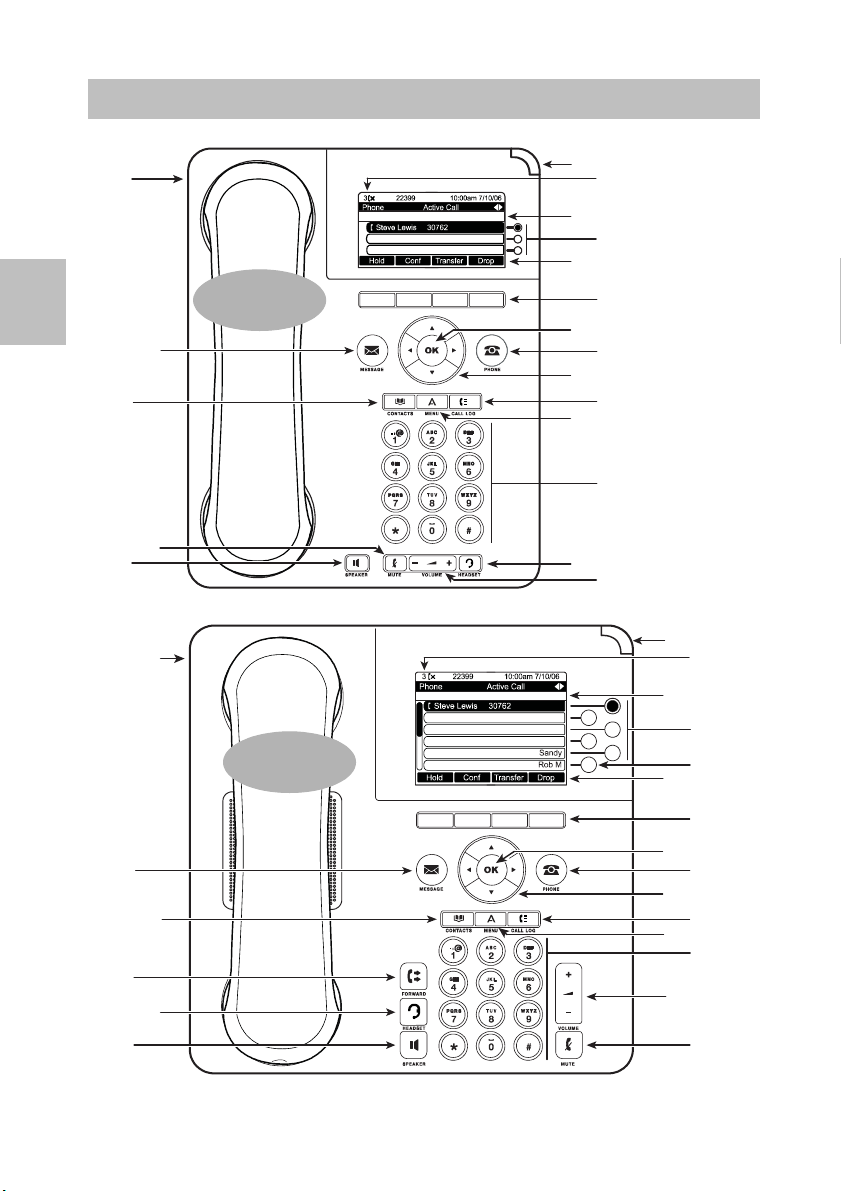
1 USB Port (Gehäuserückseite) 13 Taste OK
2 Nachrichten Anzeige 14 T
3 Anruflisteneintrag 15 T
4 Infozeile 16 J
5 Displaytasten oder -LEDs (9620)
neben Menüpunkten
6 Softkeys Belegung 18 L
7Softkeys 19H
8 Funktionen Ebenenumschaltung 20 S
9 Funktionen der Funktionstasten 21 LAUTSPRECHER (SPEAKER)
10 Funktionstasten 22 R
ACHRICHT (MESSAGE) 23 Scrollbalken
11 N
12 Navigationstasten 24 Tastenblock
ELEFON (PHONE)
ELEFONBUCH (CONTACTS)
OURNAL (CALL LOG)
17 Avaya MENÜ (MENU)
AUTSTÄRKE (VOLUME)
EADSET (HEADSET)
TUMM (MUTE)
UFUMLEITUNG (FORWARD)
5
Page 6
IP-Telefon in Betrieb nehmen
D
IP-Telefon anschließen und registrieren
Nach dem Anstecken an das LAN (Local Area Network) und an die Stromversorgung
(nur wen
ware aktiviert und anschließend automatisch ein Suchlauf nach einem Gatekeeper
(verantwortlich für Zugangsberechtigung) gestartet. Im Regelfall wird ein Gatekeeper gefunden, und Sie können anschließend schon jemanden anrufen. Anrufe
annehmen ist hingegen noch nicht möglich. Dazu müssen Sie erst Ihre Rufnummer
und Ihre PIN eingeben.
n Telefon nicht über LAN gespeist wird) wird im Telefon zunächst die Soft-
Zur Statusmeldung Neuen Benutzer anmelden blättern.
Auswahl bestätigen.
... Nebenstellennummer eingeben.
Zum Menüpunkt SecPIN oder PIN blättern.
... PIN eingeben.
Auswahl bestätigen. Anschließend erscheint die Meldung "Sichere
Anmeldung erfolgt" oder "Anmeldung erfolgt" im Display. Sie sind nun auch
unter der von Ihnen eingegebenen Rufnummer (Nebenstellennummer) erreichbar.
• Die Grundeinstellung der PIN für eine unverschlüsselte Kommunikation
(falls "PIN" abgefragt wird) ist "0000".
• Die Grundeinstellung der PIN für eine sichere verschlüsselte Kommunikation (falls "SecPIN" abgefragt wird) erfahren Sie von Ihrem Systembetreuer.
• Nach der ersten Anmeldung zur sicheren Kommunikation werden Sie in
einer Infomeldung aufgefordert, Ihre PIN zu ändern. Die sofortige Änderung ist sinnvoll, damit sich niemand, der die Grundeinstellung Ihrer PIN
kennt, an einem anderen Telefon unter dieser Rufnummer anmelden kann.
• Sie sind immer nur an einem Telefon unter Ihrer Rufnummer (Nebenstellennummer) erreichbar.
Wenn Sie sich also an einem zweiten Telefon mit PIN und Nebenstellennummer anmelden, sind Sie anschließend dort unter Ihrer Rufnummer
(Nebenstellennummer) erreichbar, jedoch nicht mehr am ersten Telefon.
6
Page 7
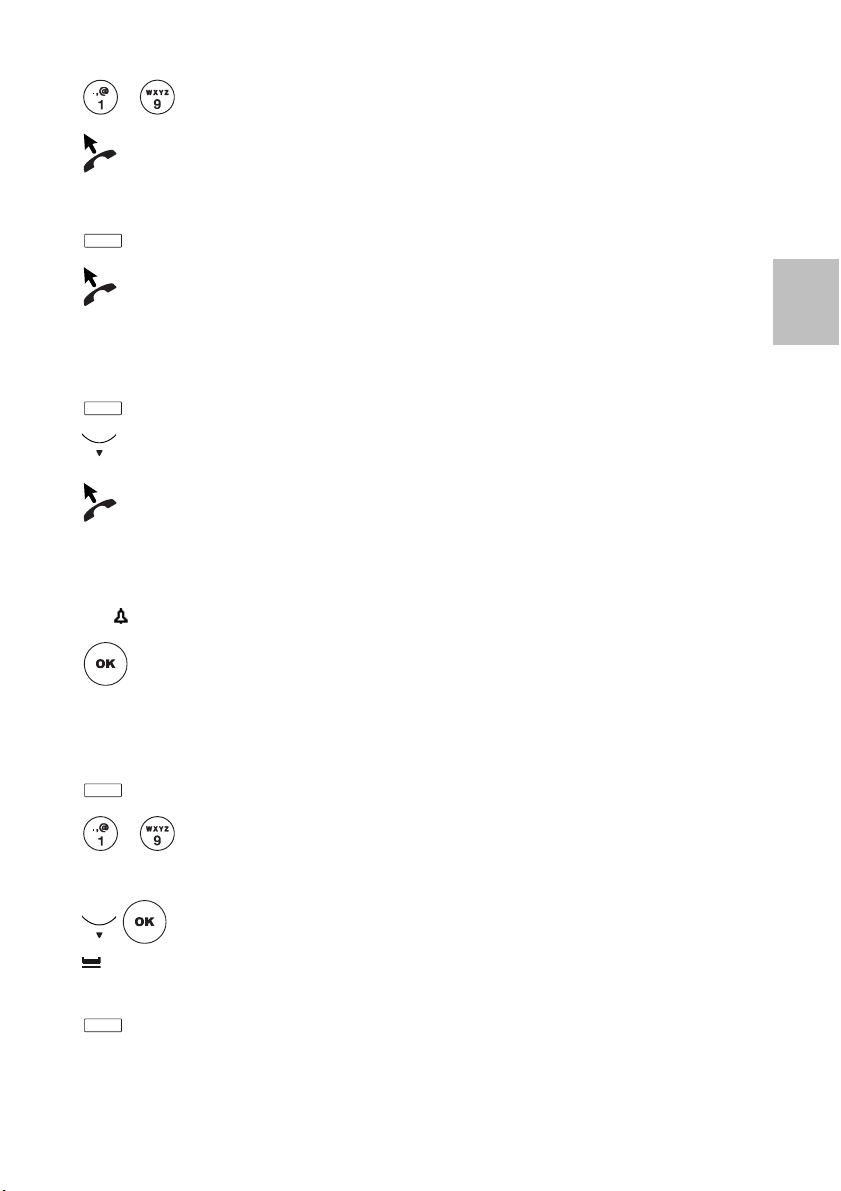
Mit Hilfe des Menüs können Sie die meisten Funktionen auswählen und bedienen.
Grundregeln der Bedienung
Um sich die Bedienung zu erleichtern, können Sie häufig gebrauchte Funktionen auf
Funktionstasten legen. Im Lieferzustand sind einige Tasten bereits mit Funktionen
belegt.
Manche Funktionen lassen sich nur mit einer PIN-Nummer bedienen. Im Lieferzu-
→
stand ist diese identisch mit der PIN beim Anmelden (
Funktionen im Menü auswählen
Taste MENÜ drücken.
oder zum gewünschten Menüpunkt blättern.
Auswahl bestätigen. Es wird die markierte Funktion angezeigt. In vielen Fällen
erscheint auch ein Untermenü. Im Untermenü können Sie genauso blättern wie im
Menü.
Hinweis: Wenn Sie während eines Gesprächs oder bei abgenommenem Hörer die
Taste M
selbst Einstellungen vornehmen.
Schnellauswahl mit Displaytasten
Bei den Telefonen 9630–50 können Sie die Funktionen in den Menüpunkten direkt
mit einem Tastendruck aufrufen:
Menüpunkt steht, wird aufgerufen.
ENÜ drücken, können Sie Informationen zu IP-Einstellungen sehen und auch
Displaytaste drücken. Die Funktion, die in dem nebenstehenden
S. 6).
D
Einen Vorgang abbrechen oder beenden
Falls Sie sich bei einer Eingabe oder Einstellung im Menü vertan haben:
Softkey "Abbruch" drücken, um den Vorgang abzubrechen. Nicht gespei-
cherte Änderungen werden verworfen.
Softkey "Zurück" drücken, um den Vorgang zu beenden. Sie gelangen
dann wieder in die nächsthöhere Menüebene bzw. zum Ruhedisplay.
Was zeigt das Ruhedisplay?
1. Zeile: Ihren Namen oder Rufnummer, Datum und Uhrzeit, gegebenenfalls ein
Symbol für verpasste Anrufe.
2. und 3. Zeile: Informationen zur Bedienung
Zeilen neben den Displaytasten oder -LEDs: Meldungen zum Status Ihres Telefons
(Rufumleitungen, Termin aktiviert, ...)
Untere Zeilen: Aktuelle Funktionen der Softkeys und Funktionstasten (nur 9650)
7
Page 8
D
Funktionen
Funktionstasten
Aux 4
Aux 3
Aux 2Aux 1
Aux 8
Aux 6
Aux 5
Partner1
Partner7
Rufuml.Wahlwh.
Softkeys
Bedeutung Softkeys
Ebenenumschalter
(nur 9650)
Anrufen und angerufen werden
Softkeys
Die 4 Softkeys ( – 9620, 9630, 9640; – 9650) haben wechselnde Funkti-
onen. Welche Funktionen das sind, hängt von dem aktuellen Zustand des Telefons
ab. Die aktuelle Funktion jeder Taste steht direkt darüber in einer unteren Displayzeile als Text oder als Symbol. Sie steht dort in weißer Schrift auf schwarzem Hintergrund.
Funktionen in mehreren Ebenen (9630 - 9650)
Zusätzlich zu den Softkeys können Ihnen im Display 8 (9650) bzw. 4 (9630, 9640)
weitere Funktionen angezeigt werden. Diese Funktionen können Sie mit einem Tastendruck auf die Funktionstasten (9650) oder Softkeys (9630, 9640) aufrufen.
Beim 9650 können Sie bis zu 7 Ebenen mit Funktionen belegen; beim 9630 und
9640 sind es bis zu 5 Ebenen.
Drücken Sie die Taste Ebenenumschaltung, um zur nächsten Ebene umzuschalten. Die Anzeige wechselt zu den Funktionen dieser Ebene. In welcher Ebene Sie
sich befinden, wird kurz in der Infozeile angezeigt.
9630, 9640: Nach der letzten Ebene wird wieder auf die Softkey-Belegung
(untere Displayzeile) umgeschaltet. Wenn Sie die Taste Ebenenumschaltung lange
drücken, schalten Sie sofort wieder auf die Softkey-Belegung um.
Wenn Sie angerufen werden
Ihr Telefon klingelt. Im Display wird ein Anruf angezeigt.
abheben.
Innerhalb und außerhalb Ihrer Telefonanlage anrufen
Im Ruhedisplay:
bei externen Rufnummern Ihre Amtskennziffer eingeben, normalerweise die "0"
(Fragen Sie dazu Ihren Systembetreuer).
8
Page 9
... Rufnummer eingeben.
abheben.
Jemanden mit einem Tastendruck anrufen
Zieltaste für gewünschten Teilnehmer drücken.
Abheben.
Wahlwiederholung
Sie können eine der 10 zuletzt gewählten Rufnummern erneut wählen.
Softkey "Wahlwh." drücken.
zur gewünschten Rufnummer blättern, z. B. 06975051234.
abheben.
Anruf während eines Gesprächs (Anklopfen, Zweitanruf)
Sie werden während eines Gesprächs angerufen. Im Display wird der Anruf angezeigt, z. B. 06975058, und die Displaytaste oder -LED daneben blinkt.
Anruf annehmen.
D
Rückfragen und Weiterverbinden
Während Sie telefonieren:
Softkey „Rückfr.“ drücken.
... Nummer eingeben, bei der Sie rückfragen wollen.
... zurück zum ersten Gesprächspartner, Rückfrageteilnehmer wartet:
Zum Menüpunkt mit der schnell blinkenden Displaytaste/ -LED, z. B.
06975058 blättern und bestätigen. Der andere Gesprächsteilnehmer wartet
jetzt.
... oder Rückfragegespräch beenden und wartenden Gesprächspartner verbinden:
Softkey „Überga...“ drücken.
9
Page 10
D
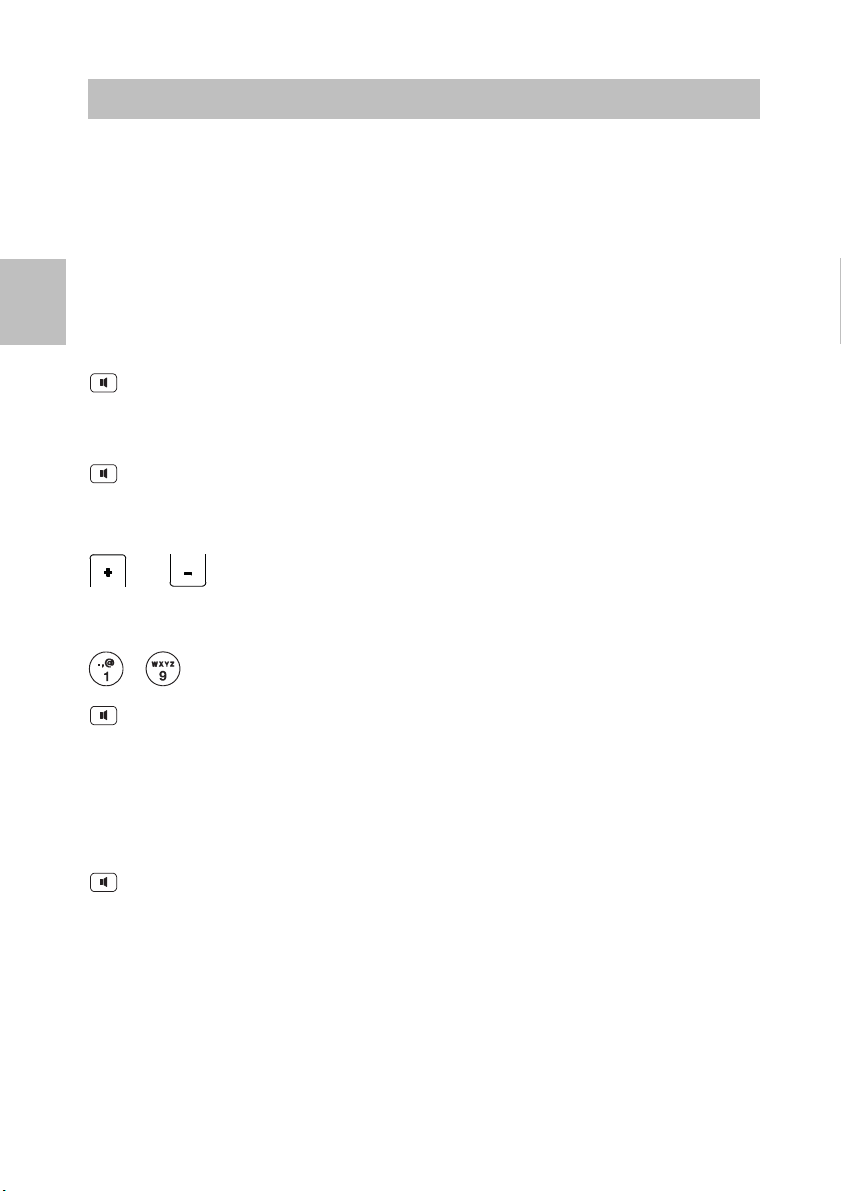
Ohne Hörer telefonieren
Sie können den Lautsprecher Ihres Telefons einschalten, um Ihren Gesprächspartner laut im Raum zu hören.
Außerdem können Sie jemanden mit Freisprechen anrufen. Sie brauchen dann nicht
den Hörer abzunehmen. Auch während eines Gesprächs können Sie Freisprechen
einschalten und dann bei aufgelegtem Hörer weitertelefonieren.
Lauthören/Freisprechen beim Gespräch einschalten
Während Sie mit abgehobenem Hörer telefonieren:
Auf Lauthören umschalten:
Taste LAUTSPRECHER drücken (Leuchtdiode geht an). Sie hören den
Gesprächspartner über den Gehäuselautsprecher laut im Raum.
Auf Freisprechen umschalten:
Taste L
mikrofon ist eingeschaltet. Sie können den Hörer auflegen und frei sprechen.
Lautsprecher-Lautstärke einstellen:
Jemanden mit aufgelegtem Hörer anrufen (Freisprechen)
... Rufnummer eingeben.
Taste L
Wenn der gewünschte Gesprächspartner sich meldet, hören Sie ihn laut im Raum
und können bei aufgelegtem Hörer mit ihm sprechen.
Freisprechen - Gespräch beenden
Während Sie mit Freisprechen telefonieren und Ihr Hörer aufliegt:
Taste L
AUTSPRECHER nochmal drücken (Leuchtdiode blinkt). Das Gehäuse-
und Tasten + und – drücken.
AUTSPRECHER drücken (Leuchtdiode geht an).
AUTSPRECHER drücken (Leuchtdiode geht aus).
10
Page 11

Sie können mit den Zifferntasten auch Buchstaben und Zeichen eingeben, z. B. für
Text eingeben
Namen im persönlichen Telefonbuch. Die Buchstaben stehen auf den Zifferntasten.
Ihr Telefon schaltet automatisch auf die Eingabe von Buchstaben und Zeichen um,
wenn dies nötig ist.
Beispiel: Sie möchten den Namen "Böhm" eingeben:
Zifferntaste "2" zweimal drücken: B
Zifferntaste "6" sechsmal drücken: ö
Zifferntaste "4" zweimal drücken: h
Zifferntaste "6" einmal drücken: m
Buchstaben löschen
Softkey „Rücktast“ löscht das Zeichen links von der Markierung.
Wechseln zwischen Groß- und Kleinbuchstaben
Taste "#" drücken, um zwischen Groß- und Kleinschreibung zu wechseln.
Sonderzeichen eingeben
Nicht alle möglichen Zeichen stehen auf den Zifferntasten. Zusätzlich zu den aufgedruckten Zeichen sind auf jeder Taste noch weitere hinterlegt.
D
11
Page 12
Important information
GB
Contents of this operating manual
This operating manual describes how to use your Avaya one-X™ Deskphone 9620,
Avaya one-X™ Deskphone 9630, Avaya one-X™ Deskphone 9640 and Avaya oneX™ Deskphone 9650 connected to an Avaya Integral Enterprise.
User manuals describing all the functions in various languages are available on the
CDs provided with the communication server or on the Internet at
support.avaya.com
Declaration of conformity
We, Avaya GmbH & Co.KG, declare that the telephones Avaya one-X™ Deskphone
9620, Avaya one-X™ Deskphone 9630, Avaya one-X™ Deskphone 9640 and Avaya
one-X™ Deskphone 9650 as well as the Avaya one-X™ Deskphone SMB24 button
module comply with the fundamental requirements and other relevant provisions of
Directive 1999/5/EU (Radio and Telecommunications Terminal Equipment, R&TTE).
These telephones are intended for connection to Ethernet/LAN interfaces of IPcapable Avaya telecommunications systems and fulfill the basic requirements of
Directive 1999/5/EU (R&TTE).
The Avaya one-X™ Deskphone SMB24 button modules are only intended for use
with the above-mentioned telephones.
The design of these telephones makes them unsuitable for direct operation on
interfaces of public telecommunications networks. Avaya cannot guarantee
successful operation of the IP telephones in LAN or Intranet environments in which
no Avaya telecommunications system is present.
If any problems should occur during operation, please initially contact your specialist
dealer or your system administrator.
The complete declaration of conformity can be requested at the following Internet
address: www.avaya.de/gcm/emea/de/includedcontent/conformity.htm
"declaration of conformity" in the index.
.
or look for
12
Page 13

Always dispose of old equipment correctly – keep our environment tidy
Old electrical and electronic equipment marked with this symbol can contain
substances hazardous to human beings and the environment. Never dispose
of these items together with unsorted municipal waste (household waste). In
order to protect the environment, public collection points have been set up to
ensure the correct disposal of old electrical and electronic equipment marked
with this symbol.
To reduce the risk of these substances being released into the environment
and to reduce the burden on natural resources, it is also possible to
participate in Avaya's used equipment return system. This system ensures
the correct recycling of old equipment as well as the reuse of individual
components.
Tips on phone location
Place the telephone on a non-slip surface, especially if the furniture is new or has
recently been cleaned or polished. Varnishes or cleaning agents may contain
substances which soften the base parts of your telephone, and softened bases can
leave undesirable marks on furniture. Avaya cannot assume liability for damage of
this kind.
Repairs
The equipment may only be opened or repaired by a qualified technician. Do not
open the telephone yourself. Doing so could damage the unit and cause it to
malfunction.
GB
13
Page 14
GB
Your telephone at a glance
1
2
3
4
6
7
11
12
14
15
16
17
13
18
19
20
21
5
24
22411
22399
9620
1
2
3
4
6
7
11
12
14
15
16
17
13
18
19
20
21
5
22
24
8
22399
22567
22411
9630/
9640
14
Page 15

1
2
3
4
6
7
11
12
14
15
10
13
18
16
20
21
5
24
8
9
17
19
23
30777
30765
9650
GB
1 USB port (rear of the casing) 13 OK key
2 Message indicator 14 P
3 Call list entry 15 P
4 Information line 16 C
5 Display keys or LEDs (9620) next to
menu items
6 Assignment of softkeys 18 V
7Softkeys 19HEADSET
8 Switch level functions 20 M
9 Function key functions 21 SPEAKER
10 Function keys 22 C
ESSAGE 23 Scroll bar
11 M
12 Navigation keys 24 Key block
HONE
HONE BOOK (CONTACTS)
ALL LOG
17 Avaya MENU
OLUME
UTE
ALL DIVERSION (FORWARD)
15
Page 16
Initial operation of your IP telephone
Connecting and registering the IP telephone
After connection to the power supply and to the LAN (Local Area Network) a search
for a gatekeeper (responsible for access rights) is automatically started in the
run
telephone. Usually a gatekeeper is found, and you can then make a call right away.
However, it will not yet be possible to take calls. To do this you first have to enter
your number and PIN.
GB
Scroll to the Log in new user status message.
Confirm selection.
... Enter extension number.
Scroll to the SecPIN or PIN menu item.
... Enter the PIN.
Confirm selection. The display then shows the message "Secure log-on
complete" or "Log-on complete." From now on you can also be reached under
the number (extension number) that you have entered.
• For unencrypted communication the default setting for the PIN is 0000 (if
user is asked for a PIN).
• For secure encrypted communication your system administrator will tell you
the default setting for the PIN (if user is asked for a SecPIN).
• After the first time you log on to secure communication, an information
message will ask you to change your PIN. It is advisable to change your
PIN right away so that no one who knows your default PIN can log on to
another phone using this phone number.
• You can only ever be reached on one telephone under your number
(extension number).
So if you log on to a second telephone with PIN and extension number, you
can then be reached there under your number (extension number) but no
longer on the first telephone.
16
Page 17
You can select and use most of the functions from the menu. To make operation
Basic rules of operation
easier, you can assign frequently used functions to the function keys. Some keys
have already been assigned functions in their factory settings.
Some functions can only be used by entering a PIN. In delivery condition this is the
same as the PIN used to log on (→ Page 16).
Selecting functions in the menu
Press the MENU key.
Or scroll to the desired menu item.
Confirm selection. The selected function is displayed. A submenu also
appears in many cases. You can scroll in the submenu just as you can in the menu.
Note: If you press the M
lifted, you can view information about the IP settings and also implement settings
yourself.
Speed dial with display keys
For 9630–50 telephones you can directly select the functions in the menu items by
pressing a key:
Press the display key. The function that is displayed in the adjoining
menu item is selected.
Canceling or exiting an action
If you have made a mistake in an entry or a setting in the menu:
Press the "Cancel" key to cancel the action. Unsaved changes will be
discarded.
Press the "Back" key to cancel the action. You then move up one menu
level or go to the idle display.
ENU function key during a call or when the receiver has been
GB
What does the idle display show?
Line 1: Your name or phone number, the date and time and a symbol for missed
calls, if applicable.
Lines 2 and 3: Operating information
Lines next to the display keys or LEDs: Messages regarding the status of your
telephone (call diversion, appointment enables, etc.)
Lower lines: Current functions of the softkeys and function keys (only 9650)
17
Page 18
GB
Functions
Function keys
Aux 4Aux 3Aux 2Aux 1
Aux 8
Aux 6
Aux 5
Partner 1
Partner7
CallFwdRedial
Softkeys
Meaning of softkeys
Switch level
(only 9650)
Calling and being called
Softkeys
The four Softkeys ( – 9620, 9630, 9640; – 9650) have alternating
functions. These functions depend on the current status of the telephone. The
current function of each key is displayed directly above it in a lower display line as
text or as a symbol. It is written in white lettering on a black background.
Functions in several levels (9630 - 9650)
In addition to the softkeys, other functions can be displayed in display 8 (9650) or 4
(9630, 9640). These functions can be accessed by pressing the function keys (9650)
or softkeys (9630, 9640).
In the 9650 you can assign functions to up to seven levels; in the 9630 and 9640 you
can assign up to five levels.
Press the "Switch level" key to switch to the next level. The display switches to
the functions of this level. The information line shows the level in which you currently
are.
9630, 9640: After the last level the system switches back to the softkey
assignment (lower display line). When you press the Long switch level key, the
system will immediately switch to the softkey assignment.
When you are called
Your telephone rings. The call is shown on the display.
Lift the handset.
Making a call within and outside of your telephone system
In the idle display:
For external numbers, enter your external line code. This is normally "0"
(please ask your system administrator).
18
Page 19
... Enter the desired number.
Lift the handset.
Calling someone with the touch of a button
Press the destination key for the desired subscriber.
Lift the handset.
Redial
You can redial one of the last 10 numbers called.
Press the "Redial" softkey.
Scroll to the desired number, e.g. 06975051234.
Lift the handset.
Receiving a call during a conversation (call waiting, second call)
You receive a call while you are on the phone. The display shows who the caller is,
e.g. 06975058, and the display key or LED next to it is flashing.
Answer the call.
Consultation and call forwarding
During a call:
Press the "Refback" softkey.
... Enter the number you wish to consult.
... Return to original caller, new caller is put on hold:
GB
Scroll to the menu item with the rapidly flashing display key/LED, e. g.
06975058 and confirm. The other party is now on hold.
... Or end call with new caller and return to waiting party:
Press the "Transfer" softkey.
19
Page 20
You can activate the loudspeaker of your telephone in order to hear the caller without
Making calls without using the handset
having to use the handset.
You can also use handsfree calling. You do not need to pick up the handset. You can
also activate handsfree mode during a call and then continue the conversation with
the receiver on-hook.
GB
Switching on monitoring/handsfree during a call
While calling with the handset lifted:
Switching to monitoring:
Press the SPEAKER function key (LED lights up). You can then hear the caller
through the built-in loudspeaker.
Switching to handsfree:
Press the S
microphone is switched on. You can replace the handset and speak handsfree.
Adjusting the loudspeaker volume:
and Press the + and – keys.
Making a call with the receiver on-hook (handsfree)
... Enter the desired number.
Press the S
When the desired party answers, you can hear them out loud and you can also talk
to them with the receiver on-hook.
Handsfree - ending the call
While you are telephoning handsfree with the receiver on-hook:
PEAKER function key once more (LED lights up). The built-in
PEAKER function key (LED lights up).
Press the S
20
PEAKER function key (LED turns off).
Page 21

The numeric keys can also be used to enter letters and characters, e.g. for names in
Entering text
the personal phone book. The letters are printed on the numeric keys. Your
telephone automatically switches to entry of letters and numbers when this is
necessary.
Example: You want to enter the name "Böhm":
Press number key "2" twice: B
Press number key "6" six times: ö
Press number key "4" twice: h
Press number key "6" once: m
Deleting letters
The "Bksp" key deletes the character to the left of the marker.
Switching between upper case and lower case letters
Press the "#" key to switch between upper case and lower case letters.
Entering special characters
Not all possible symbols appear on the numeric keys. All the keys provide additional
characters to the ones printed on them.
GB
21
Page 22

Indicaciones importantes
E
Contenido de este manual de instrucciones
En este manual se describe cómo se maneja su Avaya one-X™ Deskphone 9620,
Avaya one-X™ Deskphone 9630, Avaya one-X™ Deskphone 9640 y Avaya one-X™
Deskphone 9650 conectados al Avaya Integral Enterprise.
Encontrará también los manuales del usuario con todas las funciones y en los
distintos idiomas en los CDs depositados en el Communication Server o en Internet,
en la dirección support.avaya.com
Declaración de conformidad
Nosotros, Avaya GmbH & Co.KG, declaramos que los teléfonos Avaya one-X™
Deskphone 9620, Avaya one-X™ Deskphone 9630, Avaya one-X™ Deskphone
9640 y Avaya one-X™ Deskphone 9650, así como el módulo de teclado Avaya oneX™ Deskphone SMB24 cumplen con todos los requisitos básicos y demás
disposiciones relevantes de la Directiva 1999/5/UE (Equipos de terminales de
telecomunicaciones y de radio, R&TTE).
Estos teléfonos están diseñados única y exclusivamente para conectarlos a
interfaces Ethernet/LAN de los sistemas aptos para IP de Avaya y cumplen con los
requisitos básicos según la directiva 1999/5/UE (R&TTE).
El módulo de teclado Avaya one-X™ Deskphone SMB24 está construido para su
utilización exclusiva con los teléfonos citados antes.
Estos teléfonos no están construidos ni previstos para su conexión directa a las
interfaces de una red telefónica pública. Avaya no garantiza el buen funcionamiento
de los teléfonos IP en entornos LAN/Intranet en los que no haya un sistema de
Avaya.
En caso de que surgieran problemas durante el funcionamiento, por favor, diríjase
en primer lugar a su distribuidor autorizado o a su administrador de sistemas.
La declaración de conformidad completa se puede consultar en la siguiente
dirección de Internet: www.avaya.de/gcm/emea/de/includedcontent/conformity.htm
busque la palabra "Declaración de conformidad" en el índice alfabético.
.
o
22
Page 23

Elimine correctamente los aparatos en desuso – El medio ambiente se lo agradecerá.
Los aparatos eléctricos y electrónicos que hayan alcanzado el fin de su vida
útil y que lleven este símbolo pueden contener sustancias peligrosas para las
personas y el medio ambiente. Por eso, no está permitido desecharlos junto
con los residuos domésticos sin clasificar (la basura doméstica). Con el fin de
proteger el entorno, hay puntos de recogida públicos que se encargan de la
eliminación de los aparatos eléctricos y electrónicos que ya no sirvan y que
estén marcados con este símbolo.
Para evitar que estas sustancias se difundan por el medio ambiente y para
reducir la contaminación de los recursos naturales, también existe la
posibilidad de participar en el sistema de recogida de aparatos usados de
Avaya. En el marco de este sistema, los aparatos en desuso se reciclan
adecuadamente según el material o, en el caso de ciertos componentes, se
preparan para su reutilización.
Consejos útiles para la colocación del teléfono
Utilice para su teléfono una base antideslizante, especialmente en caso de muebles
nuevos o tratados con productos para su conservación. Los barnices o los productos
de conservación pueden contener sustancias que ablanden las patas del teléfono y
las patas reblandecidas pueden dejar huellas no deseadas en los muebles. Avaya
no se hace responsable de tales daños.
Reparaciones
Las reparaciones e intervenciones en el equipo solo deben ser realizadas por
personal especializado y que cuente con la debida formación. No abra el teléfono.
De lo contrario podrían producirse daños que inutilizarán el teléfono.
E
23
Page 24

E
Su teléfono de una ojeada
1
2
3
4
6
7
11
12
14
15
16
17
13
18
19
20
21
5
24
22411
22399
9620
1
2
3
4
6
7
11
12
14
15
16
17
13
18
19
20
21
5
22
24
8
22399
22567
22411
9630/
9640
24
Page 25

E
1
2
3
4
6
7
11
12
14
15
10
13
18
16
20
21
5
24
8
9
17
19
23
30777
30765
9650
1 Puerto USB (lado posterior de la
13 Tecla de aceptar
carcasa)
2 Indicación de mensajes 14 T
ELÉFONO (PHONE)
3 Registro de la lista de llamadas 15 GUÍA TELEFÓNICA (CONTACTS)
4 Línea informativa 16 R
5 Teclas de display o LEDs (9620)
junto a las opciones del menú
6 Asignación de teclas directas 18 V
7 Softkeys o teclas directas 19 MICROPLASTÓN (HEADSET)
8 Funciones cambio de página 20 S
9 Funciones de las teclas de función 21 A
10 Teclas de función 22 DESVÍO DE LLAMADAS (FORWARD)
ENSAJE (MESSAGE) 23 Barra de desplazamiento
11 M
12 Teclas de navegación 24 Teclado
EG LLAM (CALL LOG)
ENÚ Avaya (MENU)
17 M
OLUMEN (VOLUME)
ILENCIO (MUTE)
LTAVOZ (SPEAKER)
25
Page 26

Puesta en servicio del teléfono IP
Conectar el teléfono IP y registrarlo
Después de conectarlo a la red local LAN (Local Area Network) y a la fuente de
mentación (solo si el teléfono no recibe suministro a través de la red LAN), en el
ali
teléfono se activa primero el software y, a continuación, se inicia automáticamente la
búsqueda de un Gatekeeper (responsable del derecho de acceso). Por norma
general se encuentra un Gatekeeper, y a continuación ya puede realizar una
llamada. Sin embargo aún no puede aceptar llamadas. Para ello, primero debe
introducir su número de teléfono y su PIN.
Desplazarse al mensaje de estado Dar de alta nuevo usuario.
Confirmar la selección.
E
... Introducir el número de extensión.
Ir hasta el punto de menú SecPIN o PIN.
... Introducir el PIN.
Confirmar la selección. A continuación, en el display aparece el mensaje
"Registro seguro realizado“ o "Registro realizado". Desde ese momento Ud.
también estará en disposición de recibir llamadas al número de llamada
(número de extensión) introducido por Ud.
• El ajuste inicial del PIN para una comunicación sin codificar (en caso de
que se solicite el "PIN“) es "0000“.
• Consulte a su administrador de sistema el ajuste básico del PIN para una
comunicación cifrada segura (en caso de que se solicite "SecPIN“).
• Después de registrarse por primera vez y para garantizar una
comunicación segura, un mensaje de información le recordará que cambie
su PIN. Es recomendable cambiarlo de inmediato para que nadie que
conozca el ajuste básico del PIN pueda registrarse con este número de
llamada.
• Ud. siempre estará disponible con su número de llamada (número de
extensión) en un solo teléfono.
De modo que si se registra en un segundo teléfono con su PIN y el número
de extensión, a continuación estará disponible allí con su número de
llamada (número de extensión) y dejará de estarlo en el primer teléfono.
26
Page 27

El menú le permite seleccionar y manejar la mayoría de las funciones. Para facilitar
Reglas básicas de manejo
el manejo existe la posibilidad de asignar las funciones usadas con frecuencia a
teclas de función. En el ajuste de fábrica, algunas teclas ya tienen una función
programada.
Hay algunas funciones cuya utilización requiere un PIN. En el estado de fábrica,
este PIN coincide con el PIN al abrir sesión (→ pág. 26).
Seleccionar funciones en el menú
Pulsar la tecla MENÚ.
o ir al punto de menú deseado.
Confirmar la selección. Se visualiza la función seleccionada. En muchos
casos también aparece un submenú. En el submenú Ud. puede desplazarse de la
misma manera que en el menú.
Indicación: Durante una conversación o con el teléfono descolgado al pulsar la tecla
M
ENÚ se puede ver información sobre la configuración IP y también realizar ajustes
en ella.
Selección rápida con las teclas de display
En los teléfonos 9630–50 las funciones de las opciones del menú se pueden abrir
directamente pulsando una tecla:
Pulsar la tecla de display. Se abre la función que figure en la opción de
menú junto a ella.
Cancelar o terminar un proceso
En caso de que se haya equivocado al introducir un dato o al realizar un ajuste
en el menú:
Pulsar esta tecla directa "Cancelar" para cancelar el proceso. Se perderán
los datos que no se hubieran guardado antes.
Pulsar esta tecla directa "Atrás" para finalizar el proceso. A continuación
vuelve al nivel de menú inmediatamente superior o al display sin actividad.
¿Qué es lo que muestra el display sin actividad?
Línea 1: Su nombre o número de llamada, la fecha y la hora, y un símbolo de las
llamadas perdidas (si las hay).
2ª y 3ª líneas: Información sobre el manejo
La línea junto a las teclas de display o LEDs: Mensajes sobre el estado de su
teléfono (desvío de llamadas, cita activada, ...)
Líneas inferiores: Las funciones actuales de las teclas directas y de función (solo
9650).
E
27
Page 28

E
Funciones
Teclas de función
Aux 4Aux 3Aux 2Aux 1
Aux 8
Aux 6
Aux 5
Partner1
Partner7
Desv.llaRep.marc
Softkeys o teclas
Significado de
Cambio de página
(solo 9650)
las teclas direts
directas
Llamar y recibir llamadas
Softkeys o teclas directas
Las 4 teclas directas ( – 9620, 9630, 9640; – 9650) tienen funciones
cambiantes. Las funciones que sean depende del estado actual del teléfono. La
función actual de cada tecla figura directamente encima, en forma de texto o de
símbolo en la línea de abajo del display. En el display aparece con letra blanca
sobre un fondo negro.
Funciones en varios niveles (9630 - 9650)
Además de las teclas directas, en el display 8 (9650) o en el 4 (9630, 9640) se
pueden mostrar más funciones. Estas funciones se pueden llamar pulsando las
teclas de función (9650) o las teclas directas (9630, 9640).
En el 9650 se pueden programar hasta 7 niveles de funciones, en el 9630 y el 9640
los niveles son 5.
Pulse la tecla de cambio de página para pasar al siguiente nivel. La indicación
cambia a las funciones de esa página. En la línea de información se indica
brevemente en que nivel se encuentra en ese momento.
9630, 9640: Después del última página el programa pasa a la asignación de
tecla directa (en la última línea del display). Al pulsar durante un intervalo
prolongado la tecla de cambio de página, se cambia de inmediato al modo de tecla
directa.
Si Ud. recibe una llamada
Suena su teléfono. En el display se visualiza una llamada.
Descolgar.
Llamada dentro y fuera de su central telefónica
Con el display sin actividad:
En los números externos introduzca su código de línea, que suele ser el "0"
(consulte a su administrador de sistema).
28
Page 29

... Introducir el número de llamada.
Descolgar.
Llamar a alguien pulsando una tecla
Pulsar tecla de función para el abonado deseado.
Descolgar microteléfono.
Repetición de marcación
Ud. puede repetir la marcación de uno de los diez números marcados más
recientemente.
Pulsar la tecla "Rellamada".
Hojear hasta el número de llamada deseado, p. ej. 915051234.
Descolgar.
Entrada de una llamada durante una conversación (Llamada en espera, segunda llamada)
Ud. recibe una nueva llamada mientras está hablando por teléfono. En la pantalla se
muestra el número, p. ej. 91575058, y la tecla de display o el LED adyacentes
parpadean.
E
Contestar la llamada.
Consultar y transferir la llamada
Mientras Ud. está telefoneando:
Pulsar la tecla directa "Consulta".
... Introducir el número al que quiera retener.
... Volver al primer interlocutor, el interlocutor consultado queda en espera:
Para ir a la opción del menú con la tecla de display que parpadea
rápidamente/ -LED, p. ej.
91575058 y confirmar la selección. El otro interlocutor se queda en espera.
... O finalizar la consulta y transferir al interlocutor que está en espera:
Pulsar la tecla "Transfer.".
29
Page 30

E
Telefonear con el auricular colgado
Ud. también puede oír la voz de su interlocutor conectando el altavoz de su teléfono.
Además, puede llamar a alguien empleando la función Manos libres. En este caso
no es necesario descolgar el auricular. También puede activar la función Manos
libres durante una conversación y seguir hablando por teléfono con el auricular
colgado.
Activar Altavoz/Manos libres durante la conversación
Mientras telefonea con el auricular descolgado:
Conmutar a altavoz:
Pulsar la tecla ALTAVOZ (se enciende el LED). Al conectar el altavoz, oirá la voz
amplificada de su interlocutor.
Conmutar a Manos libres:
Pulsar de nuevo la tecla ALTAVOZ (parpadea el LED). El micrófono de la carcasa
está conectado. Ahora puede Ud. colgar el auricular y hablar con el modo Manos
libres
Ajustar el volumen del altavoz:
Pulsar las teclas y + y –
Llamar a alguien con el auricular colgado (Manos libres)
... Introducir el número de llamada.
Pulsar la tecla A
Cuando el interlocutor deseado conteste, le oirá en voz alta por el altavoz y podrá
hablar con él con el auricular colgado.
Manos libres: Terminar la conversación
Mientras Ud. telefonea con Manos libres y con el auricular colgado:
Pulsar la tecla A
30
LTAVOZ (se enciende el LED).
LTAVOZ (se apaga el LED).
Page 31

Mediante las teclas numéricas también puede introducir letras y caracteres, p. ej.
Introducir texto
para los nombres del directorio personal. Las letras figuran sobre las teclas de
número. Su teléfono conmuta automáticamente a la introducción de letras y
caracteres cuando es preciso.
Ejemplo: Ud. desea introducir el nombre "Böhm":
Pulse dos veces la tecla numérica "2": B
Pulse seis veces la tecla numérica "6": ö
Pulse dos veces la tecla numérica "4": h
Pulse una vez la tecla numérica "6": m
Borrar letras
La tecla directa "Volver" borra el carácter a la izquierda de la marca.
Cambiar entre mayúsculas y minúsculas
Pulsar la tecla "#" para conmutar entre mayúsculas y minúsculas.
Introducir caracteres especiales
No todos los caracteres posibles aparecen en las teclas de cifras. Además de los
caracteres que vienen impresos en las teclas, cada tecla tiene otros caracteres
programados.
E
31
Page 32

Remarques importantes
F
Contenu de cette notice d'utilisation
Cette notice d'utilisation décrit comment utiliser votre Avaya one-X™ Deskphone
9620, Avaya one-X™ Deskphone 9630, Avaya one-X™ Deskphone 9640 et Avaya
one-X™ Deskphone 9650 sur le serveur Avaya Integral Enterprise.
Vous trouverez les manuels d'utilisateur en différentes langues avec toutes les
fonctions sur les CD joints au serveur de communication ou sur Internet à l'adresse
support.avaya.com
Déclaration de conformité
Nous, Avaya GmbH & Co.KG, déclarons que les téléphones Avaya one-X™
Deskphone 9620, Avaya one-X™ Deskphone 9630, Avaya one-X™ Deskphone
9640 et Avaya one-X™ Deskphone 9650, ainsi que le module touches Avaya oneX™ Deskphone SMB24 satisfont aux exigences fondamentales ainsi qu'aux autres
dispositions pertinentes de la directive européenne 1999/5/CE sur les équipements
hertziens et les équipements terminaux de télécommunications.
Les téléphones sont destinés à être raccordés sur des interfaces Ethernet/LAN de
systèmes compatibles IP d'Avaya et satisfont aux exigences essentielles
conformément à la directive CE 1999/5/EU(R&TTE).
Les modules touches Avaya one-X™ Deskphone SMB24 ont été conçus
exclusivement pour une utilisation avec les téléphones cités plus haut.
Ces téléphones ne sont pas conçus pour être raccordés directement à des
interfaces du réseau de télécommunication public. Avaya ne saurait garantir un
fonctionnement correct de ces téléphones IP dans des environnements de réseau
local ou Intranet dépourvus de système Avaya.
En cas de problème, veuillez vous adresser tout d’abord à votre revendeur ou au
service de prise en charge de votre système.
La déclaration de conformité en allemand et dans son intégralité peut être
demandée à l'adresse Internet suivante :
www.avaya.de/gcm/emea/de/includedcontent/conformity.htm
l'index le mot-clé « Déclaration de conformité ».
.
ou chercher dans
32
Page 33

Mise au rebut conforme des appareils usagés - par respect pour l'environnement
Les appareils électriques et électroniques usagés dotés de ce symbole
peuvent comporter des substances dangereuses pour l'homme et pour
l'environnement. Pour cette raison, il est interdit de les jeter avec des déchets
domestiques non triés. C'est pourquoi, afin de préserver notre
environnement, des centres collecteurs publics se trouvent à disposition pour
l'élimination des appareils électriques et électroniques usagés dotés de ce
symbole.
Afin d'éviter une diffusion de ces substances dans notre environnement et de
réduire les contraintes imposées aux ressources naturelles, il existe toutefois
aussi la possibilité de participer au système de reprise Avaya destiné aux
appareils usagés. Dans le cadre de ce système, les appareils usagés sont
mis au recyclage conforme des matières ou certains composants sont
réutilisés.
Astuces relatives au lieu de montage
Utilisez une base anti-dérapante pour votre téléphone, notamment en cas de
meubles neufs ou traités avec des produits d'entretien. La peinture ou les produits
d'entretien peuvent contenir des substances suceptibles de ramollir les pieds de
votre téléphone, et ceux-ci risquent alors de laisser des traces indésirables sur la
surface du meuble. Avaya ne peut être tenu responsable de tels dommages.
Réparations
Seules les personnes qualifiées sont autorisées à réparer le téléphone et à effectuer
des interventions sur l’appareil. N’ouvrez jamais le téléphone. Cela pourrait
provoquer des dommages irréparables.
F
33
Page 34

F
Vue d’ensemble de votre téléphone
1
2
3
4
6
7
11
12
14
15
16
17
13
18
19
20
21
5
24
22411
22399
9620
1
2
3
4
6
7
11
12
14
15
16
17
13
18
19
20
21
5
22
24
8
22399
22567
22411
9630/
9640
34
Page 35

1
2
3
4
6
7
11
12
14
15
10
13
18
16
20
21
5
24
8
9
17
19
23
30777
30765
9650
1 Port USB (dos du boîtier) 13 Touche OK
2 Témoin de messages 14 T
3 Entrée de la liste d'appels 15 A
4 Ligne d'informations 16 J
5 Touches ou diodes d'affichage
ÉLÉPHONE (PHONE)
NNUAIRE (CONTACTS)
OURNAL (CALL LOG)
17 MENU Avaya (MENU)
F
(9620) à côté des rubriques
6 Affectation des touches
programmables
7 Touches programmables 19 C
8 Fonctions commutation de niveau 20 S
9 Fonctions des touches de fonction 21 H
OLUME (VOLUME)
18 V
ASQUE (HEADSET)
ECRET (MUTE)
AUT-PARLEUR (SPEAKER)
10 Touches de fonction 22 RENVOI D’APPEL (FORWARD)
ESSAGE (MESSAGE) 23 Barre de défilement
11 M
12 Touches de navigation 24 Pavé de touches
35
Page 36

Mise en service du téléphone IP
F
Raccorder et enregistrer le téléphone IP
Dès que le raccordement au réseau local (LAN : Local Area Network) et à
alimentation électrique est en place (uniquement lorsque le téléphone n'est pas
l'
alimenté par le biais du LAN), l'activation du logiciel dans le téléphone a lieu et est
suivie automatiquement par la recherche d'un portier (responsable de l'autorisation
d'accès). En général, un portier est trouvé et vous pouvez aussitôt effectuer un
appel. Il n'est cependant pas encore possible de répondre aux appels. Vous devez,
pour ce faire, entrer auparavant votre numéro d'appel et votre code PIN.
Feuilletez jusqu'au message d'état Assigner utilisateur.
Validez la sélection.
... Entrer un numéro de désignation logique supplémentaire.
Feuilletez jusqu’à la rubrique SecPIN ou PIN.
... Entrer le code PIN.
Validez la sélection. Le message « Assignation sécurisée en cours » ou «
Assignation en cours » apparaît ensuite sur l'afficheur. Vous êtes à présent
joignable au numéro d'appel que vous avez entré (numéro de désignation
logique supplémentaire).
• Le paramètre par défaut du code PIN pour une communication non chiffrée
(si le « PIN » est demandé) est « 0000 ».
• Le paramètre par défaut du code PIN pour une communication chiffrée
sécurisée (si « SecPIN » est demandé) est communiqué par votre
administrateur système.
• Après la première assignation, une information vous invite à changer votre
code PIN. Le changement immédiat est utile afin que toute personne
connaissant le réglage par défaut de votre code PIN ne puisse s'assigner à
un autre téléphone sous ce numéro d'appel.
• Vous êtes joignable à un poste uniquement et à votre numéro d'appel
(numéro de désignation logique supplémentaire).
Si, par conséquent, vous vous assignez à un second téléphone avec le
code PIN et le numéro de désignation logique supplémentaire, il est alors
possible de vous y joindre avec votre numéro d'appel, mais vous ne serez
plus joignable à votre premier téléphone.
36
Page 37

Vous pouvez, à l’aide du menu, sélectionner et exécuter les principales fonctions.
Règles élémentaires d'utilisation
Pour une utilisation plus aisée de l’appareil, vous pouvez attribuer aux touches de
fonction les fonctions fréquemment utilisées. Certaines fonctions sont déjà affectées
à certaines touches au départ de l'usine.
Certaines fonctions peuvent être utilisées uniquement avec un code PIN.
À la livraison, celui-ci est identique au numéro à employer lors de l'assignation
(→ p. 36).
Sélectionner les fonctions dans le menu
Appuyez sur la touche MENU.
ou feuilletez jusqu’à la rubrique souhaitée.
Validez la sélection. La fonction sélectionnée s’affiche. Dans de nombreux
cas, un sous-menu s’affiche. Vous pouvez également feuilleter le sous-menu
comme le menu.
Remarque : Si vous appuyez sur la touche M
communication ou que le combiné est décroché, vous pouvez visualiser des
informations concernant les configurations IP et les modifier.
Sélection rapide avec les touches d'affichage
Sur les téléphones 9630–50, vous pouvez appeler directement les fonctions dans
les rubriques de menu à l'aide d'une pression sur une touche :
Appuyez sur la touche d'affichage . La fonction qui se trouve dans la
rubrique de menu voisine est appelée.
Annuler ou terminer une opération
Si vous avez saisi une entrée ou un réglage incorrect dans le menu :
Appuyez sur la touche programmable « Annuler » pour annuler
l'opération. Les modifications non mémorisées sont annulées.
Appuyez sur la touche programmable « Retour » pour terminer l'opération.
Vous revenez alors au niveau de menu supérieur ou à l'afficheur au repos.
Qu'indique l'afficheur au repos ?
Ligne 1 : votre nom ou numéro d'appel, la date et l'heure, le cas échéant un symbole
d'appels manqués.
Ligne 2 et 3 : informations sur l'utilisation
Lignes en face des touches ou diodes d'affichage : des informations sur l’état de
votre téléphone (renvois d'appel, rendez-vous activé, ...).
Lignes inférieures : fonctions actuelles des touches programmables et des touches
de fonction (uniquement 9650)
ENU lorsque vous êtes en
F
37
Page 38

F
Fonctions
Touches de fonction
Aux 4Aux 3Aux 2Aux 1
Aux 8
Aux 6
Aux 5
Parten.1
Parten.7
Renv.appRenumér.
Touches
Signification des
Commutateur de
(uniquement 9650)
touches programmabe
programmbes
niveaux
Appeler et être appelé
Touches programmables
Les 4 touches programmables ( – 9620, 9630, 9640; – 9650) ont des
fonctions variables. Les fonctions dépendent de l'état actuel du téléphone. La
fonction actuelle de chaque touche est indiquée directement au dessus de la touche
dans une ligne inférieure de l'afficheur sous la forme de texte ou d'un symbole. Elle
est affichée en blanc sur fond noir.
Fonctions à plusieurs niveaux (9630 - 9650)
Outre les touches programmables, l'afficheur peut vous indiquer 8 (9650) ou 4
(9630, 9640) autres fonctions. Vous pouvez appeler ces fonctions d'une simple
pression sur les touches de fonction (9650) ou sur les touches programmables
(9630, 9640).
Sur le 9650, vous pouvez affecter jusqu'à 7 niveaux de fonctions ; sur le 9630 et le
9640, jusqu'à 5 niveaux.
Appuyez sur la touche Commutation de niveau pour passer au niveau suivant.
L'affichage passe aux fonctions de ce niveau. La ligne d'informations vous indique
brièvement le niveau auquel vous vous trouvez.
9630, 9640 : après le dernier niveau, l'affichage repasse à l'affectation de la
touche programmable (ligne inférieure de l'afficheur). Si vous effectuez une pression
prolongée sur la touche Commutation de niveau, vous repassez immédiatement à
l'affectation de la touche programmable.
Lorsque vous recevez un appel
Votre téléphone sonne. L'afficheur indique un appel.
Décrochez.
Appeler dans votre installation téléphonique ou en dehors de celle-ci
Afficheur au repos :
Pour les appels externes, composez le préfixe d'accès au réseau public,
généralement le « 0 » (consultez votre gestionnaire de système).
38
Page 39

... Composez le numéro d'appel.
Décrochez.
Appeler quelqu'un par simple appui sur une touche
Appuyez sur la touche d'appel direct du correspondant désiré.
Décrochez.
Réémettre le dernier numéro composé
Vous pouvez recomposer automatiquement un des 10 derniers numéros d'appel
composés.
Appuyez sur la touche programmable de droite "Renumér.".
Feuilletez jusqu'au numéro souhaité, par ex. 06975051234.
Décrochez.
Appel pendant une communication (intrusion, deuxième appel)
Vous recevez un appel en cours de communication. L'afficheur indique un appel, par
ex. 06975058 et la touche ou la diode d'affichage voisine clignote.
Prenez l'appel.
Double-appel et transfert
Pendant la communication :
Appuyez sur la touche programmable « Double-appel ».
... Composez le numéro du destinataire du double-appel.
... Retourner au premier correspondant, deuxième correspondant attend :
Feuilletez jusqu'à la rubrique dont la touche/diode d'affichage clignote
rapidement, par ex.
06975058 et validez. L'autre correspondant est en attente.
... ou terminez la communication en double-appel et connectez votre correspondant
en attente :
Appuyez sur la touche programmable « Transfé. ».
39
F
Page 40

Pour entendre ce que vous dit le correspondant sans décrocher, activez le haut-
Appeler sans décrocher
parleur de votre téléphone.
Vous pouvez également appeler quelqu’un en mains-libres. Vous n’avez alors pas
besoin de décrocher le combiné. Vous pouvez également activer la fonction Mainslibres en cours de communication pour poursuivre la conversation en laissant le
combiné raccroché.
Activer l'écoute amplifiée / le mains-libres pendant la conversation
Pendant que vous téléphonez combiné décroché :
Commuter sur Ecoute amplifiée :
Appuyez sur la touche HAUT-PARLEUR (la diode s'allume). Vous entendez votre
correspondant par le haut-parleur de l’appareil.
Commuter sur Mains-libres :
Appuyez une nouvelle fois sur la touche HAUT-PARLEUR (la diode clignote). Le
microphone de l'appareil est activé. Vous pouvez reposer le combiné et parler les
mains libres.
Régler le volume de l'écoute amplifiée :
Appuyez sur les touches et + et -.
F
Appeler quelqu'un avec le combiné raccroché (mains-libres)
... Composez le numéro d'appel.
Appuyez sur la touche H
Lorsque votre correspondant répond, vous l'entendez dans toute la pièce et vous
pouvez lui parler alors que le combiné est raccroché.
Terminer une communication en Mains-libres
Lorsque vous téléphonez en mains-libres avec le combiné raccroché :
Appuyez sur la touche H
40
AUT-PARLEUR (la diode s'allume).
AUT-PARLEUR (la diode s'éteint).
Page 41

Les touches numériques vous permettent d'entrer des lettres et des chiffres, par
Entrer un texte
exemple, pour les noms insérés dans l'annuaire local. Les lettres figurent sur les
touches numériques. Lorsque c'est nécessaire, votre téléphone bascule
automatiquement sur la saisie de lettres et de caractères.
Exemple : vous souhaitez entrer le nom « Lamy » :
Appuyez trois fois sur la touche numérotée « 5 » : L
Appuyez une fois sur la touche numérotée « 1 » : a
Appuyez une fois sur la touche numérotée « 6 » : m
Appuyez trois fois sur la touche numérotée « 9 » : y
Effacer des lettres
La touche programmable « Ret.arr. » efface le caractère situé à gauche du
curseur.
Passer des lettres majuscules aux lettres minuscules
Appuyez sur la touche « # » pour passer des majuscules aux minuscules et
inversement.
Saisir des caractères spéciaux
Tous les caractères possibles ne sont pas inscrits sur les touches. En plus des
caractères imprimés, d'autres caractères sont également présents en arrière-plan
sur chaque touche.
F
41
Page 42

Avvertenze importanti
Contenuto del presente manuale d'uso
Il presente manuale d'uso descrive le modalità di utilizzo degli apparecchi Avaya
one-X™ Deskphone 9620, Avaya one-X™ Deskphone 9630, Avaya one-X™
Deskphone 9640 e Avaya one-X™ Deskphone 9650 in collegamento con il software
Integral Enterprise di Avaya.
Il manuale dell'utente con tutte le funzioni è disponibile in diverse lingue su un CD
allegato al Communication Server, oppure nel sito Internet support.ayaya.com
Dichiarazione di conformità
Avaya GmbH & Co. KG dichiara che i telefoni Avaya one-X™ Deskphone 9620,
Avaya one-X™ Deskphone 9630, Avaya one-X™ Deskphone 9640 e Avaya one-X™
Deskphone 9650 nonché il Modulo dei pulsanti Avaya one-X™ Deskphone SMB24
sono conformi ai requisiti e alle corrispondenti disposizioni della direttiva comunitaria
1999/5/EU (Radio and Telecommunication Terminal Equipment, R&TTE).
I telefoni sono predisposti per il collegamento a interfacce Ethernet/LAN di sistemi IP
di Avaya e sono conformi ai requisiti previsti dalla direttiva comunitaria 1999/5/CE
(R&TTE).
I Moduli dei pulsanti Avaya one-X™ Deskphone SMB24 possono essere utilizzati
solo con i telefoni sopra menzionati.
Il tipo di costruzione di questi telefoni ne impedisce l'allacciamento diretto ad
interfacce della rete telefonica pubblica. Avaya non è in grado di garantire il corretto
funzionamento dei telefoni IP in ambienti LAN/Intranet privi di un sistema Avaya.
Nel caso in cui dovessero presentarsi problemi durante il funzionamento
dell'apparecchio, contattare innanzitutto il proprio gestore di impianto telefonico.
È possibile richiedere la dichiarazione di conformità completa all'indirizzo Internet:
www.avaya.de/gcm/emea/de/includedcontent/conformity.htm
nell'indice alla voce "Dichiarazione di conformità".
oppure cercare
.
I
42
Page 43

Smaltimento dei vecchi apparecchi nel rispetto dell'ambiente
Gli apparecchi elettrici ed elettronici contraddistinti dal presente simbolo
possono contenere sostanze pericolose per le persone e per l'ambiente. Per
tale motivo detti apparecchi non devono essere smaltiti insieme a rifiuti urbani
(residui domestici) non differenziati. A tutela dell'ambiente sono pertanto
disponibili luoghi di raccolta pubblici per lo smaltimento degli apparecchi
elettrici ed elettronici contraddistinti dal sopraindicato simbolo.
Per evitare la dispersione di tali sostanze nell'ambiente e un impatto
eccessivo sulle risorse naturali è inoltre possibile prendere parte al sistema di
ritiro degli apparecchi usati predisposto da Avaya. In base a questo sistema i
vecchi apparecchi vengono sottoposti a procedure specifiche di recupero dei
materiali e i singoli componenti vengono riutilizzati.
Consigli per l'ubicazione di allestimento
Si consiglia di impiegare per il telefono una base di appoggio antisdrucciolevole,
soprattutto su mobili nuovi o trattati con prodotti per la cura. Vernici o prodotti per la
cura dei mobili a volte contengono sostanze che potrebbero ammollire i piedini
dell'apparecchio i quali, a loro volta, potrebbero lasciare tracce indesiderate sulla
superficie dei mobili. Avaya non si assume nessuna responsabilità per danni del
genere.
Riparazioni
Eventuali riparazioni o interventi sull'apparecchio devono essere eseguiti
unicamente da personale qualificato. Non aprire il telefono. Aprendo il telefono si
possono causare danni tali da pregiudicarne il funzionamento.
43
I
Page 44

Panoramica di questo telefono
1
2
3
4
6
7
11
12
14
15
16
17
13
18
19
20
21
5
24
22411
22399
9620
1
2
3
4
6
7
11
12
14
15
16
17
13
18
19
20
21
5
22
24
8
22399
22567
22411
9630/
9640
I
44
Page 45

1
2
3
4
6
7
11
12
14
15
10
13
18
16
20
21
5
24
8
9
17
19
23
30777
30765
9650
1 Porta USB (retro dell'apparecchio) 13 Tasto OK
2 LED di avviso per messaggi 14 T
3 Immissione della lista chiamate 15 E
4 Riga delle informazioni 16 R
5 Tasti display o LED (9620) a fianco
ELEFONO (PHONE)
LENCO TELEFONICO (CONTACTS)
EGISTRO CHIAMATE (CALL LOG)
17 MENU Avaya (MENU)
alle voci di menu
6 Funzione delle softkey 18 V
7 Softkey 19 C
8 Funzioni di cambio di livello 20 M
9 Funzioni dei tasti funzione 21 ALTOPARLANTE (SPEAKER)
10 Tasti funzione 22 D
ESSAGGIO (MESSAGE) 23 Barra di scorrimento
11 M
12 Tasti di navigazione 24 Tastiera
OLUME (VOLUME)
UFFIE E MICROFONO (HEADSET)
UTO (MUTE)
EVIAZIONE CHIAMATE (FORWARD)
I
45
Page 46

Messa in funzione del telefono IP
Collegamento e registrazione del telefono IP
Dopo l'allacciamento alla LAN (Local Area Ne
(solo se il telefono non viene alimentato dalla LAN), sul telefono si attiva prima il
software e poi si avvia automaticamente la ricerca del gatekeeper (responsabile
dell'autorizzazione all'accesso). Una volta trovato il gatekeeper è possibile effettuare
le telefonate ma non è ancora possibile riceverle. Per poter telefonare è necessario
immettere il proprio numero telefonico e il proprio PIN.
Navigare fino al messaggio di stato Attivazione nuovo utente.
Confermare la selezione.
... Immettere il numero interno.
Navigare fino alla voce di menu SecPIN o PIN .
... Digitare il PIN.
Confermare la selezione. Sul display viene visualizzato il messaggio
"Attivazione sicura riuscita"o "Attivazione riuscita". Ora siete raggiungibili al
numero telefonico immesso (numero interno).
twork) e all'alimentazione elettrica
• L'impostazione di base del PIN per le comunicazioni non cifrate (qualora
venga richiesto il "PIN") è "0000".
• Per l'impostazione di base del PIN per le comunicazioni cifrate sicure
(qualora venga richiesto il "SecPIN") rivolgersi all'amministratore di
sistema.
I
• Dopo il primo login per la comunicazione sicura vi verrà richiesto con un
messaggio di modificare il vostro PIN. La modifica immediata è
consigliabile così da impedire a chiunque conosca l'impostazione di base
del PIN di effettuare il login su un altro telefono utilizzando questo numero.
• Con il proprio numero telefonico si è sempre raggiungibili solo su un
telefono (numero interno).
Se ci si registra su un secondo telefono con il PIN e il numero interno si è
raggiungibili su quel telefono ma non più sul primo.
46
Page 47

Con l'aiuto del menu è possibile selezionare e attivare la maggior parte delle
Istruzioni d'uso fondamentali
funzioni. Per semplificare l'impiego si possono assegnare le funzioni usate di
frequente ai tasti funzione. Al momento della consegna ad alcuni tasti sono già
attribuite determinate funzioni.
Alcune funzioni sono utilizzabili solo con un codice PIN. Allo stato di fornitura il
codice PIN è identico a quello della registrazione (→ Pag. 46).
Selezione delle funzioni nel menu
Premere il tasto MENU.
o navigare sino alla voce di menu desiderato.
Confermare la selezione. Viene visualizzata la funzione selezionata. In molti
casi appare anche un menu secondario. È possibile sfogliare il menu secondario
esattamente come il menu principale.
Nota: Se durante una conversazione o a ricevitore sollevato si preme il tasto M
è possibile visualizzare informazioni relative alle impostazioni IP o modificare le
impostazioni stesse.
Selezione rapida mediante i tasti display
Nei telefoni 9630–50 è possibile richiamare le funzioni delle voci di menu
direttamente premendo un tasto:
Premere un tasto display. La funzione presente nel menu a lato viene
richiamata.
Interruzione o conclusione di una procedura
In caso di errore nell'immissione o nell'impostazione nel menu:
Premere la softkey "Annulla" per annullare la procedura. Le modifiche non
memorizzate vengono annullate.
Premere la softkey "Indietro" per terminare la procedura. Si accede
nuovamente al livello di menu superiore o al display in stand-by.
Indicazioni del display in stand-by
Riga 1: il proprio nome o il numero di telefono, la data e l'ora, eventualmente il
simbolo per le chiamate perse.
Righe 2 e 3: Informazioni sull'utilizzo
Righe a fianco ai tasti display o ai LED: Messaggi sullo stato del telefono (deviazioni
di chiamate, appuntamento attivato, ...)
Righe inferiori: Funzioni attuali delle softkey e dei tasti funzione (solo 9650)
ENU,
I
47
Page 48

Softkey
Funzioni
Tasti funzione
Aux 4Aux 3Aux 2Aux 1
Aux 8
Aux 6
Aux 5
Partner1
Partner7
Dev.ch.Richiama
Softkey
Significato softkey
Commutatore
(solo 9650)
di livello
Effettuare e ricevere chiamate
Le 4 softkey ( – 9620, 9630, 9640; – 9650) hanno funzioni di volta in volta
diverse. Quali siano tali funzioni dipende dall'attuale stato del telefono. L'attuale
funzione di ogni tasto è visibile direttamente al di sopra di esso in una delle righe
inferiori sotto forma di testo o di simbolo ed è rappresentata a caratteri bianchi su
sfondo nero.
Funzioni su più livelli (9630 - 9650)
Oltre alle softkey, è possibile visualizzare sul display 8 (9650) o 4 (9630, 9640)
ulteriori funzioni. Tali funzioni possono essere richiamate premendo i tasti funzione
(9650) o le softkey (9630, 9640).
Nell'apparecchio 9650 è possibile assegnare funzioni a un massimo di 7 livelli; negli
apparecchi9630 e 9640 a un massimo di 5 livelli.
Premere il tasto Cambio di livello per passare al livello successivo. Vengono
visualizzate le funzioni di questo livello. Il livello nel quale ci si trova viene mostrato
brevemente nella riga delle informazioni.
9630, 9640: dopo l'ultimo livello il sistema torna all'assegnazione delle softkey
(riga display inferiore). Tenendo premuto a lungo il tasto per il cambio di livello si
passa subito all'assegnazione delle softkey.
Quando si riceve una chiamata
I
Il telefono squilla. Il display segnala una chiamata.
Sollevare il ricevitore.
Chiamata interna ed esterna al proprio impianto telefonico
Sul display in stand-by:
In caso di numeri di telefono esterni digitare il prefisso urbano, normalmente lo
"0" (rivolgersi a tale riguardo al proprio amministratore di sistema).
48
Page 49

... Digitare il numero telefonico.
Sollevare il ricevitore.
Chiamata premendo un tasto
Premere il tasto di selezione preordinata per l'utente desiderato.
Sollevare il ricevitore.
Ripetizione selezione
Potete riselezionare uno dei 10 numeri di telefono chiamati per ultimi.
Premere la softkey "Richiama".
Cercare il numero di telefono desiderato, ad es. 06975051234.
Sollevare il ricevitore.
Chiamata durante una conversazione (sollecito, seconda chiamata)
Si riceve una chiamata durante una conversazione. Sul display viene visualizzata la
chiamata, ad es. 06975058, e il tasto display o il LED a lato lampeggia.
Accettare chiamata.
Richiamata e inoltro
Mentre si sta telefonando:
Premere la softkey "Richiamata".
... Digitare il numero di chi si vuole richiamare.
... ritornare al primo interlocutore, l'utente della richiamata è in attesa:
Sfogliare mediante il tasto display/LED a lampeggiamento rapido fino alla
voce di menu, ad es.
06975058, e confermare. L'altro interlocutore è ora in attesa.
... o concludere la conversazione di richiamata e collegare in linea gli interlocutori in
attesa:
Premere la softkey "Trasfer.".
49
I
Page 50

L'utente può attivare l'altoparlante di questo telefono per sentire la voce
Telefonare senza ricevitore
dell'interlocutore in tutta la stanza.
Inoltre si possono effettuare chiamate in vivavoce. In questo caso non è necessario
sganciare il ricevitore. È inoltre possibile inserire il modo vivavoce anche nel corso di
una telefonata, continuando così a parlare con il ricevitore deposto.
Accendere durante la conversazione Ascolto amplificato / Viva voce
Mentre si telefona con il ricevitore sollevato:
Commutare sul vivavoce:
Premere il tasto ALTOPARLANTE (il diodo luminoso si accende). In tutta la stanza
è udibile la voce dell'interlocutore tramite l'altoparlante integrato nell'alloggiamento.
Commutare sul vivavoce:
Premere nuovamente il tasto A
microfono dell'alloggiamento è acceso. Potete abbassare il ricevitore e parlare
liberamente.
Regolazione del volume dell'altoparlante:
e Premere i tasti + e -.
Telefonata con il ricevitore deposto (vivavoce)
... Digitare il numero telefonico.
Premere il tasto A
Quando l'interlocutore risponde è possibile sentirlo in modo amplificato nella stanza
e si può parlare tenendo il ricevitore abbassato.
Conclusione della conversazione in vivavoce
I
Durante la telefonata in vivavoce con ricevitore deposto:
Premere il tasto A
LTOPARLANTE (il diodo luminoso si accende).
LTOPARLANTE (il diodo luminoso si spegne).
LTOPARLANTE (il diodo luminoso lampeggia). Il
50
Page 51

È possibile inserire con i tasti numerici anche lettere e caratteri, ad es. per i nomi
Immissione di un testo
della rubrica telefonica personale. Le lettere si trovano sui tasti numerici. Il telefono
si porta automaticamente in modalità di immissione di lettere e caratteri quando è
necessario.
Esempio: si desidera immettere il nome "Bodo":
Premere due volte il tasto numerico "2": B
Premere tre volte il tasto numerico "6": o
Premere una volta il tasto numerico "3": d
Premere tre volte il tasto numerico "6": o
Cancellazione delle lettere
La softkey "Bksp" consente di cancellare il carattere a sinistra della selezione.
Commutare tra lettere maiuscole e minuscole
Premere il tasto "#" per passare dalle lettere maiuscole alle minuscole e
viceversa.
Inserimento caratteri speciali
Non tutti i simboli possibili si trovano sui tasti numerici. Oltre ai caratteri stampigliati
sul tasto, ogni tasto è correlato anche ad altri caratteri.
I
51
Page 52

Belangrijke aanwijzingen
Inhoud van deze gebruiksaanwijzing
In deze gebruiksaanwijzing wordt beschreven hoe u de Avaya one-X™ Deskphone
9620, Avaya one-X™ Deskphone 9630, Avaya one-X™ Deskphone 9640 en Avaya
one-X™ Deskphone 9650 aangesloten op de Avaya Integral Enterprise bedient.
De gebruiksaanwijzingen met alle functies en in verschillende talen vindt u op de
CD's die bij de Communication Server worden meegeleverd of via het internet op
support.ayaya.com
Conformiteitsverklaring
Wij, Avaya GmbH & Co.KG, verklaren dat de telefoons Avaya one-X™ Deskphone
9620, Avaya one-X™ Deskphone 9630, Avaya one-X™ Deskphone 9640 en Avaya
one-X™ Deskphone 9650, evenals de Avaya one-X™ Deskphone SMB24 Button
Modul, voldoen aan de fundamentele eisen en andere relevante bepalingen van de
richtlijn 1999/5/EU (Radioapparatuur en telecommunicatie-eindapparatuur, R&TTE).
De telefoons zijn bedoeld voor aansluiting op Ethernet/LAN-interfaces van IPondersteunende systemen van Avaya en voldoen aan de fundamentele eisen van
EG-richtlijn 1999/5/EU (R&TTE).
De Avaya one-X™ Deskphone SMB24 Button Moduls zijn door de constructie enkel
geschikt voor het gebruik met de bovengenoemde telefoons.
Deze telefoons zijn door hun constructie niet geschikt voor het gebruik met
interfaces van publieke telecommunicatienetwerken. Bij gebruik van deze IPtelefoons in LAN/Intranet-omgevingen waarin geen Avaya systeem aanwezig is, kan
Avaya niet instaan voor een goede werking.
Indien er problemen optreden, neem dan eerst contact op met uw dealer of met uw
systeembeheerder.
De volledige conformiteitsverklaring kan op het volgende internetadres worden
opgevraagd: www.avaya.de/gcm/emea/de/includedcontent/conformity.htm
in de index onder het trefwoord "Conformiteitsverklaring" (conformity) zoeken.
.
of u kunt
NL
52
Page 53

Gooi oude apparaten op correcte wijze weg - het milieu is u dankbaar
Oude elektrische en elektronische apparaten die van dit symbool voorzien
zijn, kunnen gevaarlijke stoffen voor mens en milieu bevatten. Dergelijke
apparaten mogen daarom niet samen met ongescheiden restafval (huisafval)
worden weggegooid. Voor het behoud van het milieu staan er derhalve
openbare inzamelplaatsen ter beschikking voor het inzamelen van
elektrische en elektronische apparaten die voorzien zijn van dit symbool.
Om verspreiding van deze stoffen in het milieu te voorkomen en belasting
van de natuurlijke hulpbronnen te verminderen, is het echter ook mogelijk om
deel te nemen aan het Avaya terugnamesysteem voor gebruikte apparaten.
Bij dit systeem worden de afzonderlijke componenten van de oude apparaten
geschikt gemaakt voor hergebruik en worden stoffen vakkundig verwerkt.
Tips voor de plaats van opstelling
Gebruik voor uw telefoon, vooral bij nieuwe of met onderhoudsmiddelen behandelde
meubelen een slipvrije onderlegger. Lak en onderhoudsmiddelen kunnen stoffen
bevatten die de kunstvoetjes van uw telefoon kunnen aantasten, waardoor deze
misschien ongewenste sporen achterlaten op het meubilair. Avaya kan niet
aansprakelijk worden gesteld voor dergelijke schade.
Reparaties
Reparaties en ingrepen aan het toestel mogen uitsluitend door vakkundig personeel
worden uitgevoerd. Maak de telefoon niet open. Er kunnen beschadigingen
ontstaan, waardoor de telefoon niet meer functioneert.
53
NL
Page 54

Toesteloverzicht
1
2
3
4
6
7
11
12
14
15
16
17
13
18
19
20
21
5
24
22411
22399
9620
1
2
3
4
6
7
11
12
14
15
16
17
13
18
19
20
21
5
22
24
8
22399
22567
22411
9630/
9640
NL
54
Page 55

1
2
3
4
6
7
11
12
14
15
10
13
18
16
20
21
5
24
8
9
17
19
23
30777
30765
9650
1 USB-poort (achterkant van de
13 OK-toets
behuizing)
2 Berichtenindicatielampje 14 T
ELEFOON (PHONE)
3 Vermelding uit de gesprekslijst 15 TELEFOONBOEK (CONTACTS)
4 Inforegel 16 J
5 Displaytoetsen of -LED’s (9620)
naast menupunten
6 Programmering softkeys 18 V
7Softkeys 19HEADSET (HEADSET)
8 Functies niveau-omschakeling 20 S
9 Functies van de functietoetsen 21 L
10 Functietoetsen 22 OPROEPOMLEIDING (FORWARD)
ERICHT (MESSAGE) 23 Scroll-balk
11 B
12 Navigatietoetsen 24 Toetsenblok
OURNAAL (CALL LOG)
17 Avaya
MENU (MENU)
OLUME (VOLUME)
TIL (MUTE)
UIDSPREKER (SPEAKER)
NL
55
Page 56

IP-telefoon in gebruik nemen
IP-telefoon aansluiten en aanmelden
Na aansluiting op het LAN (Local Area Network)
de telefoon niet via het LAN wordt gevoed) wordt in de telefoon eerst de software
geactiveerd en wordt er vervolgens automatisch naar een gatekeeper
(verantwoordelijk voor de toegangsautorisatie) gezocht. Doorgaans wordt een
gatekeeper gevonden en kunt u meteen iemand oproepen. Het beantwoorden van
een oproep is echter nog niet mogelijk. Hiertoe moet u eerst uw oproepnummer en
uw PIN invoeren.
Naar de statusmelding Meld nieuwe gebruiker bladeren.
Keuze bevestigen.
... Toestelnummer invoeren.
Naar het menupunt SecPIN of PIN bladeren.
... PIN invoeren.
Keuze bevestigen. Vervolgens verschijnt de melding "Beveiligde
aanmelding gelukt" of "Aanmelding gelukt" op de display. U bent nu ook
bereikbaar onder het oproepnummer (toestelnummer) dat u hebt ingevoerd.
en de stroomvoorziening (alleen als
• De standaardinstelling van de PIN voor een ongecodeerde communicatie
(indien "PIN" gevraagd wordt) is "0000".
• De standaardinstelling van de PIN voor een ongecodeerde communicatie
(indien "SecPIN" gevraagd wordt) krijgt u van uw systeembeheerder.
• Na de eerste keer aanmelden voor beveiligde communicatie wordt u d.m.v.
een infomededeling gevraagd om uw PIN te wijzigen. Het is verstandig om
dit onmiddellijk te doen zodat iemand die de standaardinstelling van uw
PIN kent zich niet op een andere telefoon met dit oproepnummer aan kan
melden.
• U bent altijd op maar één toestel onder uw oproepnummer
(toestelnummer) bereikbaar.
Als u zich dus op een tweede toestel aanmeldt met PIN en toestelnummer,
bent u vervolgens daar onder uw oproepnummer (toestelnummer)
NL
bereikbaar, maar niet meer op het eerste toestel.
56
Page 57

Met behulp van de menu’s kunt u de meeste functies kiezen en gebruiken. Om de
Basisregels voor het gebruik
bediening eenvoudiger te maken, kunt u vaak gebruikte functies op functietoetsen
programmeren. Bij levering zijn sommige toetsen al geprogrammeerd.
Veel functies kunnen alleen met een PIN-code worden benut. Bij levering is deze
identiek met de PIN voor aanmelden (→ pag. 56).
Functies in het menu selecteren
Druk op de toets MENU.
of naar het gewenste menupunt bladeren.
Keuze bevestigen. De gemarkeerde functie wordt weergegeven. In veel
gevallen wordt eveneens een submenu weergegeven. In het submenu kunt u op
dezelfde manier bladeren als in het hoofdmenu.
Aanwijzing: Als u tijdens een gesprek of bij opgenomen hoorn op de toets M
drukt, kunt u informatie over IP-instellingen bekijken en zo nodig zelf instellingen
aanbrengen.
Snelkeuze met displaytoetsen
Bij de telefoons 9630–50 kunt u de functies in de menupunten direct door een druk
op de toets oproepen:
displaytoets indrukken. De functie, die in het menupunt ernaast staat,
wordt opgeroepen.
Een bewerking afbreken of beëindigen
Als u zich vergist hebt:
softkey "Afbreken" indrukken om de bewerking af te breken. Niet
opgeslagen wijzigingen worden genegeerd.
softkey "Terug" indrukken om de bewerking te beëindigen. U keert dan
terug naar het vorige (hogere) menuniveau, resp. naar de display in stand-by.
ENU
Wat geeft de display in stand-by weer?
1e regel: uw naam of oproepnummer, datum en tijd, eventueel een symbool voor
gemiste oproepen.
2e en 3e regel: Informatie over de bediening
Regels naast de displaytoetsen of -LED’s: Statusmeldingen voor uw telefoon
(oproepomleidingen, afspraak geactiveerd, ...)
Onderste regels: Actuele functies van de softkeys en functietoetsen (alleen 9650)
NL
57
Page 58

Softkeys
Functies
Functietoetsen
Aux 4Aux 3Aux 2Aux 1
Aux 8
Aux 6
Aux 5
Partner 1
Partner7
Opr. oml.Opr.herh
Softkeys
Betekenis softkeys
Niveau-omschakelaar
(alleen 9650)
Bellen en gebeld worden
De 4 softkeys ( – 9620, 9630, 9640; – 9650) hebben wisselende functies.
Welke functies dit zijn, hangt af van de actuele status van de telefoon. De actuele
functie van elke toets wordt direct erboven op een onderste displayregel als tekst of
als symbool aangeduid. De functie wordt hier wit op een zwarte achtergrond
weergegeven.
Functies op meerdere niveaus (9630 - 9650)
Naast de softkeys kunnen in display 8 (9650) of 4 (9630, 9640) meer functies
worden aangeduid. Deze functies kunt u door een druk op de functietoetsen (9650)
of softkeys (9630, 9640) oproepen.
Bij de 9650 kunt u maximaal 7 niveaus met functies programmeren; bij 9630 en 9640
zijn dit maximaal 5 niveaus.
Druk op de toets niveau-omschakeling om naar het volgende niveau om te
schakelen. De weergave wisselt naar de functies van dit niveau. Op de inforegel
wordt aangeduid op welk niveau u zich bevindt.
9630, 9640: Na het laatste niveau wordt er weer overgeschakeld op de softkeyprogrammering (onderste displayregel). Wanneer u de toets niveau-omschakeling
lang indrukt, dan wordt er direct weer overgeschakeld op de softkey-programmering.
U wordt opgeroepen
Uw telefoon rinkelt. Op de display wordt een gesprek weergegeven.
opnemen.
Intern en extern bellen
Display in stand-by:
NL
bij externe oproepnummers uw netnummer invoeren, normaliter "0" (informeer
bij uw systeembeheerder).
58
Page 59

... Oproepnummer invoeren.
opnemen.
Iemand met een druk op een toets bellen
Snelkiestoets voor de gewenste abonnee indrukken.
Opnemen.
nummerherhaling
U kunt een van de 10 laatstgekozen telefoonnummers nogmaals kiezen.
De softkey "Nr.herh." indrukken.
naar het gewenste telefoonnummer bladeren, bijv. 06975051234.
opnemen.
Tweede gesprek tijdens een gesprek (aankloppen, tweede gesprek)
U wordt tijdens een gesprek gebeld. Op de display word de oproep weergegeven,
bijv 06975058, en knippert de displaytoets of -LED ernaast.
Gesprek aannemen.
Ruggespraak en doorverbinden
Terwijl u telefoneert:
De softkey "Rug.spr." indrukken.
... Nummer invoeren van de persoon met wie u ruggespraak wilt houden.
... terug naar de eerste gesprekspartner, ruggespraakdeelnemer wacht:
Naar het menupunt met de snel knipperende displaytoets/ -LED, bijv.
06975058 bladeren en bevestigen. De andere gesprekspartner wacht nu.
... of ruggespraakgesprek beëindigen en met de wachtende gesprekspartner
verbinden:
De softkey "Doorsch." indrukken.
NL
59
Page 60

U kunt uw gesprekspartner via de luidspreker horen of u kunt zonder hoorn met hem
Zonder hoorn telefoneren
praten.
Bovendien kunt u iemand handsfree bellen. U hoeft de hoorn dan niet op te nemen.
Bovendien kunt u tijdens een gesprek handsfree spreken en dan verder telefoneren
terwijl de hoorn neerligt.
Monitoring/handsfree tijdens het gesprek inschakelen
Terwijl u met de hoorn telefoneert:
Omschakelen op monitoring:
Toets LUIDSPREKER indrukken (de LED gaat aan). U kunt via de luidspreker naar
uw gesprekspartner luisteren.
Omschakelen op handsfree:
NL
Toe ts L
behuizing is ingeschakeld. U kunt de hoorn neerleggen en vrij spreken.
Luidsprekervolume instellen:
Iemand met neergelegde hoorn bellen (handsfree)
... Oproepnummer invoeren.
Toe ts L
Als de gewenste gesprekspartner zich meldt, hoort u deze via de luidspreker en kunt
u met de gesprekspartner spreken terwijl de hoorn op de haak ligt.
Handsfree - gesprek beëindigen
Terwijl u handsfree telefoneert en de hoorn neerligt:
Toe ts L
UIDSPREKER nogmaals indrukken (de LED knippert). De microfoon in de
en Toetsen + en – indrukken.
UIDSPREKER indrukken (de LED gaat aan).
UIDSPREKER indrukken (de LED gaat uit).
60
Page 61

U kunt met de cijfertoetsen ook letters en tekens invoeren, bijv. voor namen in het
Tekst invoeren
persoonlijke telefoonboek. De letters staan op de cijfertoetsen. Uw telefoon schakelt
automatisch over op het intoetsen van letters en andere tekens wanneer dit nodig is.
Voorbeeld: U wilt de naam "Böhm" invoeren:
Cijfertoets "2" twee keer indrukken: B
Cijfertoets "6" zes keer indrukken: ö
Cijfertoets "4" twee keer indrukken: h
Cijfertoets "6" een keer indrukken: m
Letters wissen
Softkey "Bksp" wist het teken links van de markering.
Wisselen tussen hoofdletters en kleine letters
Toets "#" indrukken om te wisselen tussen hoofdletters en kleine letters.
Speciale tekens invoeren
Niet alle mogelijke tekens staan op de cijfertoetsen. Naast de gedrukte tekens zijn er
onder elke toets nog meer tekens geprogrammeerd.
NL
61
Page 62

Page 63

Page 64

Avaya GmbH & Co. KG
Kleyerstraße 94
D-60326 Frankfurt am Main
(Germany)
T 0 800 266 - 10 00
F 0 800 266 - 12 19
(International)
T +49 69 7505 - 28 33
F +49 69 7505 - 5 28 33
© 2008 All rights reserved for Avaya Inc. and Avaya GmbH & Co. KG.
4.999.120.469 · 02/08 · Edition 1.0 · Integral Enterprise · de en es fr it nl
infoservice@avaya.com
avaya.de
 Loading...