

Page 1

BayRS Version 15.0
Part No. 308628-15.0 Rev 00
June 2001
600 Technology Park Drive
Billerica, MA 01821-4130
Configuring IP Exterior Gateway Protocols (BGP and EGP)
Page 2

Copyright © 2001 Nortel Networks
All rights reserved. June 2001.
The information in this document is subject to change without notice. The statements, configurations, technical data,
and recommendations in this document are believed to be accurate and reliable, but are presented without express or
implied warranty. Users must t ak e full respo nsib ility fo r th e ir app lica tio ns o f any products specified in this document.
The information in this document is proprietary to Nortel Networks Inc.
The software described in this docume nt is furnished under a license agreement and may only be used in accordance
with the terms of that license. The software license agreement is included in this document.
Trademarks
Nortel Networks, the Nortel Networks logo, the Globemark, Unified Networks, AN, ARN, ASN, BayRS, BCC, and
Passport are trademarks of Nortel Networks.
Adobe and Acrobat Reader are trademarks of Adobe Systems Incorporated.
Ethernet is a tradema r k of X ero x C orp oration.
Restricted Rights Legend
Use, duplication, or disclosure by the United States Government is subject to restrictions as set forth in subparagraph
(c)(1)(ii) of the Rights in Technical Data and Computer Software clause at DFARS 252.227-7013.
Notwithstanding any other license ag reement that may pertain to, or accompany the delivery of, this comput er
software, the rights of the United States Government regarding its use, reproduction, and disclosure are as set forth in
the Commercial Computer Software-Restricted Rights cl ause at FAR 52.227-19.
Statement of Conditions
In the interest of improving internal design, operational function, and/or reliability, Nortel Networks Inc. reserves the
right to make changes to the pr oducts described in this document without notice.
Nortel Networks Inc. does not assume any liability that may occur due to the use or application of the product(s) or
circuit layout(s) described herein.
Portions of the code in this software product may be Copyright © 1988, Regents of the University of California. All
rights reserved. Redistribution and use in source and binary forms of such portions are permitted, provided that the
above copyright notice and this paragraph are duplicated in all such forms and that any documentation, advertising
materials, and other materials related to such distribution and use acknowledge that such portions of th e software were
developed by the University of California, Berkeley. The name of the University may not be used to endorse or
promote products derived from such portions of the software without specific prior written permission.
SUCH PORTIONS OF THE SOFTWARE ARE PROVIDED “AS IS” AND WITHOUT ANY EXPRESS OR
IMPLIED WARRANTIES, INCLUDING, WITHOUT LIMITATION, THE IMPLIED WARRANTIES OF
MERCHANTABILITY AND FITNESS FOR A PARTICULAR PURPOSE.
In addition, the program and information contained herei n are l icensed only pursuant to a license agreement that
contains restrictions on use and disclosure (that may incorporate by reference certain limitations and notices imposed
by third parties).
ii
308628-15.0 Rev 00
Page 3

Nortel Networks Inc. Software License Agreement
NOTICE: Please carefully read this license agreement before copying or usin g the accompanying software or
installing the hardware unit with pre-enabled software (each of which is referred to as “Software” in this Agreement).
BY COPYING OR USING THE SOFTWARE, YOU ACCEPT ALL OF THE TERMS AND CONDITIONS OF
THIS LICENSE AGREEMENT. THE TERMS EXPRESSED IN THIS AGREEMENT ARE THE ONLY TERMS
UNDER WHICH NORTEL NETWORKS WILL PERMIT YOU TO USE THE SOFTWARE. If you do not accept
these terms and conditions, return the product, unused and in the original shipping container, within 30 days of
purchase to obtain a credit for the full purchase price.
1. License grant. Nortel Networks Inc. (“Nortel Networks”) grants the end user of the Software (“Licensee”) a
personal, nonexc lusi v e, no ntransferab le licen se: a) to u se the So ftw are eithe r on a sing le compu ter or, if applicable, on
a single authorized device identified by host ID, for which it was originally acquired; b) to copy the Software solely
for backup purposes i n support of authorized use of the Software; and c) to use and copy the associated user manual
solely in support of authorized use of the Software by Licensee. This license applies to the Software only and does not
extend to Nortel Networks Agent software or other Nortel Networks software products. Nortel Networks Agent
software or other Nortel Networks software products are licensed for use under the terms of the applicable Nortel
Networks Inc. Software License Agreement that accompanies such software and upon payment by the end user of the
applicable license fees for such software.
2. Restrictions on use; reservation of rights. The Software and user manuals are protected under copyright laws.
Nortel Networks and/or its licensors retain all title and ownership in both the Software and user manuals, including
any revisions made by Nortel Networks or its licensors. The copyright notice must be reproduce d and included with
any copy of any portion of the Software or user manuals. Licensee may not modify, translate, decompile, disassemble,
use for any competitive analysis, reverse engineer, distribute, or create derivative works from the Software or user
manuals or any copy, in whole or in part. Except as expressly provided in this Agreement, Licensee may not copy or
transfer the Software or user manuals, in whole or in part. The Software and user manuals embody Nortel Networks’
and its licensors’ confidential and pro pri etary inte lle ctu al pro p erty. Licensee shall not sublicense, assign, or otherwise
disclose to any third party the Software, or any information about the operation, design, performance, or
implementation of the Software and user manuals that is confidential to Nortel Networks and its licensors; however,
Licensee may grant permission to its consultants, subcontractors, and agents to use the Software at Licensee’s facility,
provided they have agreed to use the Software only in accordance with the terms of this license.
3. Limited warranty . Nortel Networks warrants each item of Software, as delivered by Nortel Networks and properly
installed and operated on Nortel Networks hardware or other equipment it is originally licensed for, to function
substantially as described in its accompanying user manual duri ng its warranty period, which begins on the date
Software is first shipped to Licensee. If an y item of Softwa re fails to so f unction during its wa rranty period, as the sole
remedy Nortel Networks will at its discretion provide a suitable fix, patch, or workaround for the problem that may be
included in a future Software release. Nortel Networks further warrants to Licensee that the media on which the
Software is provided will be free from defec ts in materials and wo rkmanship under normal u se for a period of 90 days
from the date Software is first shipped to Licensee. Nortel Networks will replace defective media at no charge if it is
returned to Nortel Net w orks during the warrant y period along with proof of the date of shipment . This warranty does
not apply if the media has been damaged as a result of accident, misuse, or abuse. The L i censee assumes all
responsibility for selection of the Softw are to achieve Licensee’s intended results and for the installation, use, and
results obtained from the Software. Nortel Networks does not warrant a) that the functions contained in the software
will meet the Licensee’s requirements, b) that the Softw are will operate in the hardw are or software combina tions that
the Licensee may select, c) that the operation of the Software will be uninterrupted or error free, or d) that all defects
in the operation of the Softw are will be correcte d. Nortel Netw orks is not oblig ated to remedy any Sof tware defec t that
cannot be reproduced with the latest Software release. These warranties do not apply to the Software if it has been
(i) altered, except by Nortel Networks or in accordance with its instructions; (ii) used in conjunction with another
vendor’s produc t, resulting in the defect; or (iii) damaged by improper environment, abuse, misuse, accident, or
negligence. THE FOREGOING WARRANTIES AND LIMITATIONS ARE EXCLUSIVE REMEDIES AND ARE
IN LIEU OF ALL OTHER WARRANTIES EXPRESS OR IMPLIED, INCLUDING WITHOUT LIMITA T ION ANY
WARRANTY OF MERCHANTABILITY OR FITNESS FOR A PARTICULAR PURPOSE. Licensee is responsible
308628-15.0 Rev 00
iii
Page 4

for the security of its own data and information and for maintaining adequate procedures apart from the Software to
reconstruct lost or altered files, data, or programs.
4. Limitation of liability. IN NO EVENT WILL NORTEL NETWORKS OR ITS LICENSORS BE LIABLE FOR
ANY COST OF SUBSTITUTE PROCUREMENT; SPECIAL, INDIRECT, INCIDENTAL, OR CONSEQUENTIAL
DAMAGES; OR ANY DAMAGES RESULTING FROM INACCURATE OR LOST DATA OR LOSS OF USE OR
PROFITS ARISING OUT OF OR IN CONNECTION WITH THE PERFORMANCE OF THE SOFTWARE, EVEN
IF NORTEL NETWORKS HAS BEEN ADVISED OF THE POSSIBILITY OF SUCH DAMAGES. IN NO EVENT
SHALL THE LIABILITY OF NORTEL NETWORKS RELATING TO THE SOFTWARE OR THIS AGREEM ENT
EXCEED THE PRICE PAID TO NORTEL NETWORKS FOR THE SOFTWARE LICENSE.
5. Government licensees. This provision applies to all Softw a re and do cum entation acquired directly o r in di rectly by
or on behalf of the United States Government. The Software and documentation are commercial products, licensed on
the open market at market prices, and were developed entirely at private expense and without th e use of any U.S.
Government funds. The license to the U.S. Government is granted only with restricted rights, and use, duplication, or
disclosure by the U.S. Government is subject to the restrictions set forth in subparagraph (c)(1) of the Commercial
Computer Software––Restricted Rights clause of FAR 52.227-19 and the limitatio ns set o ut in this license for civilian
agencies, and subparagraph (c)(1)(ii) of the Rights in Technical Data and Computer Software clause of DFARS
252.227-7013, for agencies of the Department of Defense or their successors, which ever is applicable.
6. Use of software in the European Community. This provision applies to all Software acquired for use within the
European Community. If Licensee uses the Software within a country in the European Community, the Software
Directive enacted by the Council of European Communities Directive dated 14 May, 1991, will apply to the
examination of the Software to facilitate interoperability. Licensee agrees to notify Nortel Networks of any such
intended examination of the Software and may procure support and assistance from Nortel Networks.
7. Term and termination. This license is effective until ter mina ted; however, all of the restrictions with respect to
Nortel Networks’ copyright in the Software and user manuals will cease being effective at the date of expiration of the
Nortel Networks copyright; t hose restrictions relating to use and disclosure of Nortel Networks’ confidential
information shall continue in effect. Licensee may terminate this license at any time. The license will automatically
terminate if Licensee fails to comply with any of the terms and conditions of the license. Upon termination for any
reason, Licensee will immediately destroy or return to Nortel Networks the Software, user manuals, and all cop ies.
Nortel Networks is not liable to Licensee for damages in any form solely by reason of the termination of this license.
8. Export and re-export. Licensee agrees not to export, directly or indirectly, the Software or related technical data or
information without f irst obta ining a n y required e xport lice nses or oth er go v ernmenta l appro vals. Without limiting the
foregoing, Licen see , on b e half of itself and its subsidiarie s an d affiliates, agrees that it will not , wi tho ut first obtaining
all export licenses and approvals required by the U.S. Government: (i) export, r e-export, transfer, or divert any such
Software or technical data, or any direct product thereof, to any country to which such exports or re-exports are
restricted or embargoed under United States export control laws and regulations, or to any national or resident of such
restricted or embargoed countries; or (ii) provide the Software or related technical data or information to any military
end user or for any military end use, including the design, development, or production of any chemical, nuclear, or
biological weapons.
9. General. If any provision of this Agreement is held to be invalid or unenforceable by a court of competent
jurisdiction, the remainder of the provisions of this Agreement shall remain in full force and effect. This Agreement
will be governed by the laws of the state of California.
Should you have any questions concerning this Agreement , contact Nortel Networks Inc. , 2375 N. Glenville Dr.,
Richardson, TX 75082.
LICENSEE ACKNOWLEDGES THAT LICENSEE HAS READ THIS AGREEMENT, UNDERSTANDS IT, AND
AGREES TO BE BOUND BY ITS TERMS AND CONDITIONS. LICENSEE FURTHER AGREES THAT THIS
AGREEMENT IS THE ENTIRE AND EXCLUSIVE AGREEMENT BETWEEN NORTEL NETWORKS AND
LICENSEE, WHICH SUPERSEDES ALL PRIOR ORAL AND WRITTEN AGREEMENTS AND
COMMUNICATIONS BETWEEN THE PARTIES PERTAINING TO THE SUBJECT MATTER OF THIS
AGREEMENT. NO DIFFERENT OR ADDITIONAL TERMS WILL BE ENFORCEABLE AGAINST
NORTEL NETWORKS UNLESS NORTEL NETWORKS GIVES ITS EXPRESS WRITTEN CONSENT,
INCLUDING AN EXPRESS WAIVER OF THE TERMS OF THIS AGREEMENT.
iv
308628-15.0 Rev 00
Page 5

Contents
Preface
Before You Begin ............................................................................................................. xv
Text Conventions .............................................................................................................xvi
Acronyms ........................... .......................... .......................... ......................... ...............xviii
Related Publications ........................................................................................................ xx
How to Get Help ..............................................................................................................xxi
Chapter 1
Exterior Gateway Protocols (BGP and EGP)
Autonomous Systems and Gateway Protocols ...............................................................1-1
Border Gateway Protocol (BGP) ..............................................................................1-3
Exterior Gateway Protocol (EGP) .............................................................................1-3
Classless Interdomain Routing ................................................................................1-4
BGP Concepts and Terminology .....................................................................................1-4
Peer-to-Peer Sessions .............................................................................................1-5
Stub and Multihomed Autonomous Systems ...........................................................1-6
Interior BGP Routing ... ...... ....... ...... ............................................. ....... ...... ....... ...... ...1-6
IBGP Route Reflector ...............................................................................................1-7
Equal-Cost Multipath ................................................................................................1-8
BGP Updates ...........................................................................................................1-8
Path Attributes ..........................................................................................................1-9
BGP/OSPF Interaction ...........................................................................................1-10
BGP-4 Confederations ...........................................................................................1-11
BGP-4 TCP MD5 Message Authentication ........................................................... .1-11
BGP Implementation Notes ..........................................................................................1-12
308628-15.0 Rev 00
v
Page 6

Chapter 2
Starting BGP and EGP Services
Starting BGP with the BCC ............................................................................................2-1
Step 1: Configuring Global BGP ..............................................................................2-1
Step 2: Defining a Peer-to-Peer Connection ............................................................2-2
Starting IP and BGP with Site Manager .........................................................................2-3
Deleting BGP with Site Manager ..............................................................................2-4
Deleting BGP-3 and BGP-4 with Site Manager ........................................................2-5
Starting IP and EGP with Site Manager .........................................................................2-6
Deleting EGP from the Router .................................................................................2-7
Chapter 3
Configuring Global BGP Parameters
Disabling and Reenabling BGP ................................ ...... ....... .........................................3-2
Supplying a BGP Router ID ............................................................................................3-4
Identifying the Local AS ..................................................................................................3-5
Disabling and Reenabling IBGP Support .............................. ...... ...................................3-6
Specifying Route Types for IBGP Advertisements ..........................................................3-7
Enabling BGP Interaction with OSPF and RIP ...............................................................3-9
Setting the Update Interval Timer .................................................................................3-10
Allowing Redundant Connections ................................... ....... ...... ...... ...........................3-11
Enabling Multihop Connections ....................................................................................3-13
Disabling and Reenabling Dynamic Policy Configuration ............ ...... ...........................3-15
Configuring the BGP Soloist Slot Mask ........................................................................3-16
Disabling and Reenabling Route Aggregation ............................. ...... ....... ...... ....... ...... .3-17
Enabling and Disabling Black Hole Punching ...............................................................3-18
Disabling and Reenabling the BGP-4 MED Attribute ....................................................3-20
Configuring BGP-4 Confederations ..............................................................................3-21
Disabling BayRS Local Preference Calculation and Route Selection ...........................3-25
Calculating BGP-4 Local Preference Values ..........................................................3-25
Best-Route Selection ............................................... ....... ...... ...... ...........................3-27
Configuring BGP Message Logging .............................................................................3-29
Configuring EBGP Route Flap Damping ......................................................................3-31
Assigning Weight Classes and Values to an AS ...........................................................3-37
vi
308628-15.0 Rev 00
Page 7

Chapter 4
Configuring BGP Peers
Defining a Peer-to-Peer Session ....................................................................................4-2
Initiating a Peer-to-Peer Session ....................................................................................4-4
Negotiating the BGP Version ..........................................................................................4-6
Keeping the Connection Alive .........................................................................................4-8
Setting the External Advertisement Timer ......................................................................4-9
Specifying a Holddown Time ........................................................................................4-11
Setting a Minimum AS Origination Interval ...................................................................4-12
Overriding the Local AS Number ..................................................................................4-14
Specifying a Maximum Update Size .............................................................................4-14
Specifying a Time-to-Live Value ...................................................................................4-16
Specifying the Next-Hop Router ...................................................................................4-17
Setting the Route Echo Switch .....................................................................................4-18
Disabling and Reenabling Loop Detection ...................... ....... ...... .................................4-20
Configuring Peers over an Unnumbered Point-to-Point Link ........................................4-21
Configuring and Enabling MD5 Authentication .............................................................4-22
Entering and Storing MD5 Authentication Keys .....................................................4-23
Initializing TCP with the MD5 Option ......................................................................4-24
Generating MD5 Signatures on Transmitted BGP TCP Packets ............................4-24
Verifying MD5 Signatures on Received BGP TCP Packets ...................................4-25
Configuring BGP-4 Authentication .........................................................................4-25
Chapter 5
Configuring BGP Accept and Announce Policies
Configuring a BGP Accept Policy ...................................................................................5-2
Specifying Match Criteria for a BGP Accept Policy ..................................................5-6
Supplying Modification Values for a BGP Accept Policy ........................................5-10
Configuring a BGP Announce Policy ............................................................................5-13
Announce Policy Guidelines ...................................................................................5-13
Specifying Match Criteria for a BGP Announce Policy ...........................................5-16
Supplying Modification Values for a BGP Announce Policy ...................................5-22
Configuring BGP-4 AS Path Pattern-Matching .............................................................5-27
308628-15.0 Rev 00
vii
Page 8

Chapter 6
Configuring a Route Reflector
Configuring a Single Route Reflector in an AS ...............................................................6-3
Configuring a Route Reflector Cluster ............................................................................6-5
Configuring Multiple RR Clusters in an AS .....................................................................6-7
Configuring an RR Client ..............................................................................................6-10
Chapter 7
Configuring Route and Traffic Balancing
Configuring IBGP for Route and Traffic Balancing ..........................................................7-1
Configuring EBGP for Route and Traffic Balancing ........................................................7-5
Chapter 8
Customizing EGP Services
EGP Concepts and Terminology .....................................................................................8-2
EGP Implementation Notes ............................................................................................8-5
Customizing EGP on the Router ....................................................................................8-6
Enabling and Disabling EGP ....................................................................................8-6
Supplying a Local AS Number .................................................................................8-7
Configuring a Neighbor ...................................................................................................8-7
Specifying the Neighbor’s Address ..........................................................................8-8
Specifying the Gateway Mode ..................................................................................8-9
Enabling and Disabling the Neighbor Relationship ................................................8-10
Choosing the Acquisition Mode ..............................................................................8-11
Choosing the Poll Mode .........................................................................................8-12
Setting Neighbor Timers ........................................................................................8-13
Appendix A
Site Manager Parameters
BGP Parameters ............................................................................................................ A-2
BGP Configuration Parameters ............................................................................... A-3
BGP Global Parameters .......................................................................................... A-4
BGP-3 Global Parameter ...................................................................................... A-11
BGP-4 Global Parameter ...................................................................................... A-11
BGP Peer Parameters ........................................................................................... A-11
BGP AS Weight and Weight Class Parameters .................................................... A-20
BGP Event Message Parameters .. ....... ...... ....... ...... ....... ...... ...... ....... ................... A-24
viii
308628-15.0 Rev 00
Page 9

EGP Parameters .......................................................................................................... A-25
EGP Global Parameters ....................................................................................... A-25
EGP Neighbor Parameters .................................................................................... A-26
Routing Policy Par a meters .......................................................................................... A-29
Common Accept Policy Parameters ...................................................................... A-29
EGP-Specific Accept Policy Parameters ............................................................... A-34
BGP-3-Specific Accept Policy Parameters ........................................................... A-36
BGP-4-Specific Accept Policy Parameters ............................................................ A-40
Common Announce Policy Parameters ................................................................. A-50
EGP-Specific Announce Policy Parameters .......................................................... A-68
BGP-3-Specific Announce Policy Parameters ....................................................... A-70
BGP-4-Specific Announce Policy Parameters ....................................................... A-74
Appendix B
Converting Cisco to Nortel Networks Equivalents
Configuration Command Equivalents ............................................................................ B-1
Interpreting the Configuration Command Equivalents Table ......................................... B-6
Comparing the Operational Commands ................... ...... ....... ...... ...... ....... ...... ....... ...... .. B-8
Interpreting the Operational Commands Table .............................................................. B-9
Comparing BGP Route Selection Processes .............................................................. B-11
Regular Expression Symbols ...................... ...... ....... ...... ....... ...... ................................ B-12
Nortel Networks AS Path Pattern-Matching Symbols .................................................. B-13
Index
308628-15.0 Rev 00
ix
Page 10

Page 11

Figures
Figure 1-1. Internetwork Segmented into Three Autonomous Systems .....................1-2
Figure 1-2. BGP Connecting Two Autonomous Systems Running OSPF ..................1-4
Figure 1-3. Transit AS .................................................................................................1-7
Figure 3-1. BGP Confederation ................................................................................3-23
Figure 4-1. Establishing and Confirming a Connection Between BGP Peers ............4-4
Figure 4-2. BGP over an Unnumbered Point-to-Point Link .......................................4-21
Figure 6-1. IBGP Single Route Reflector Topology ....................................................6-2
Figure 7-1. BGP/OSPF Autonomous System ............................................................7-2
Figure 7-2. IBGP ECMP Route Balancing ..................................................................7-3
Figure 7-3. IBGP ECMP Traffic Balancing ..................................................................7-4
Figure 7-4. ECMP Static Routes ................... ....... ...... ....... .........................................7-6
Figure 8-1. EGP Connection Between Two Autonomous Systems Running RIP .......8-2
308628-15.0 Rev 00
xi
Page 12

Page 13

Tables
Table 1-1. BGP-3 Path Attributes ..............................................................................1-9
Table 1-2. BGP-4 Mandatory Path Attributes ............................................................1-9
Table 1-3. BGP-4 Optional Path Attributes .............................................................1-10
Table 3-1. Route Types for BGP Advertisements ......................................................3-8
Table 3-2. Slot Mask Parameter Values ..................................................................3-16
Table 3-3. Black Hole Punching Parameter Settings ..............................................3-19
Table 3-4. Best-Route Selection Rules ........................................ ....... ...... .............. 3 -27
Table 3-5. Local Preference Calculation Method ....................................................3-28
Table 3-6. Route Flap Damping Template Parameters ...........................................3-33
Table 4-1. MD5 Signature Verification Rules on BGP TCP Packets .......................4-25
Table 5-1. BCC Definition Parameters for BGP Accept Policies ...............................5-4
Table 5-2. BCC Match Parameters for BGP Accept Policies ....................................5-7
Table 5-3. BCC Modification Parameters for BGP Accept Policies .........................5-10
Table 5-4. BCC Definition Parameters for BGP Announce Policies ........................5-14
Table 5-5. BCC Match Parameters for BGP Announce Policies .............................5-17
Table 5-6. BCC Modification Parameters for BGP Announce Policies ....................5-22
Table 5-7. Characters in AS Path Pattern-Matching ...............................................5-27
Table 7-1. IBGP ECMP Methods ..............................................................................7-4
Table 7-2. EBGP ECMP Methods .............................................................................7-8
Table 8-1. Router Mode Determinator ......................................................................8-3
Table B-1. Cisco to Nortel Networks BGP Translation ............................................. B-2
Table B-2. Cisco and Nortel Networks BGP Operational Commands ...................... B-8
Table B-3. Route Selection Process Comparison .................................................. B-11
Table B-4. Regular Expression Symbols ................................................................ B-12
Table B-5. Nortel Networks AS Path Pattern-Matching Symbols ........................... B-13
308628-15.0 Rev 00
xiii
Page 14

Page 15

Preface
Routers at the borders or edg es of a utonomous s ystems a re call ed gateways. These
gateways use exterior gateway protocols to exchange rea chability information
with each other and route packets between routing domains. This guide describes
how to configure and use the IP Border Gateway Prot ocol (BGP) and the Exte rior
Gateway Protocol (EGP).
You can use the Bay Command Console (BCC*) or Site Manager to configure
BGP and EGP on a router. In this guide, you will find instructions for using both
the BCC and Site Manager.
Before You Be gin
Before using this guide, you must complete the following procedures. For a new
router:
• Install the router (see the installation guide that came with your router).
• Connect the router to the network and create a pilot configuration file (see
Quick-Starting Routers, Configuring Remote Access for AN and Passport
ARN Routers
Make sure that you are running the latest version of Nortel Networks* BayRS*
and Site Manager software. For information about upgrading BayRS and Site
Manager, see the upgrading guide for your version of BayRS.
308628-15.0 Rev 00
, or
Connecting ASN Routers to a Network)
.
xv
Page 16

Configuring IP Exterior Gateway Protocols (BGP and EGP)
Text Conventions
This guide uses the following text conventions:
angle brackets (< >) Indicate that you choose the text to enter based on the
description inside the brackets. Do not type the
brackets when entering the command.
Example: If the command syntax is:
ping
<ip_address>
ping 192.32.10.12
, you enter:
bold text
Indicates command names and options and text that
you need to enter.
Example: Enter
Example: Use the
show ip {alerts | routes
dinfo
command.
}.
braces ({}) Indicate required elements in syntax descriptions
where there is more than one option. You must choose
only one of the options. Do not type the braces when
entering the command.
Example: If the command syntax is:
show ip {alerts | routes
show ip alerts or show ip routes
}
, you must enter either:
, but not both.
brackets ([ ]) Indicate optional elements in syntax descriptions. Do
not type the brackets when entering the command.
Example: If the command syntax is:
show ip interfaces [-alerts
show ip interfaces
or
]
, you can enter either:
show ip interfaces -alerts
.
ellipsis points (. . . ) Indicate that you repeat the last element of the
command as needed.
xvi
Example: If the command syntax is:
ethernet/2/1
ethernet/2/1
[<parameter> <value>]
and as many parameter-value pairs as
needed.
. . .
, you enter
308628-15.0 Rev 00
Page 17

Preface
italic text Indicates new terms, book titles, and variables in
command syntax descri pti ons. Where a v a ri abl e is two
or more words, the words are connected by an
underscore.
Example: If the command syntax is:
show at <valid_route>
valid_route
is one variable and you substitute one value
for it.
screen text Indicates system output, for example, prompts and
system messages.
Example:
Set Trap Monitor Filters
separator ( > ) Shows menu paths.
Example: Protocols > IP identifi es the IP option on t h e
Protocols menu.
vertical line (
) Separates choices for command keywords and
|
arguments. Enter only one of the choices. Do not type
the vertical line when entering the command.
Example: If the command syntax is:
show ip {alerts | routes}
show ip alerts
or
, you enter either:
show ip routes
, but not both.
308628-15.0 Rev 00
xvii
Page 18

Configuring IP Exterior Gateway Protocols (BGP and EGP)
Acronyms
This guide uses the following acronyms:
ARP Address Resolution Protocol
AS autonomous system
ATM asynchronous transfer mode
BGP Border Gatew a y Protoc ol
CIDR classless interdomain rout ing
DES data encryption standard
EBGP Exterior Border Gateway Protocol
ECMP equal-cost multipath
EGP Exterior Gateway Protocol
FDDI Fiber Distributed Data Interface
HSSI High Speed Serial Interface
IBGP Interior Border Gateway Protocol
xviii
ICMP Internet Control Message Protocol
IGP interior gateway protocol
IP Internet Protocol
ISP Internet service provider
LAN local area network
MD5 M essage Digest 5
MED multiexit discriminator
MEK message encryption key
MIB management information base
MSS maximum segment size
NLRI network layer reachability information
NPK node protection key
NVRAM nonvolatile random access memory
OSPF Open Shortest Path First
308628-15.0 Rev 00
Page 19

Preface
PPP Point-to-Point Protocol
PVC permanent virtual circuit
RARP Reverse Address Resolution Protocol
RFC request for comments
RIP Routing Information Protocol
RR route reflector
SMDS Switched Multimegabit Data Service
TCP Transmission Control Protocol
UDP User Datagram Protocol
WAN wide area network
308628-15.0 Rev 00
xix
Page 20

Configuring IP Exterior Gateway Protocols (BGP and EGP)
Related Publications
For more information about IP services, refer to the following publications:
• Reference for BCC IP show Commands (part number 308603-14.20 Rev 00)
show
Provides descriptions of all
commands that display BGP configuration and statistical data.
• Configuring IP, ARP, RARP, RIP, and OSPF Services (part number
308627-15.0 Rev 00)
Provides a description of IP, ARP, RARP, RIP, and OSPF services and
instructions for configuring them.
• Configuring GRE, NAT, RIPSO, and BFE Services (part number
308625-14.20 Rev 00)
Provides a description of Generic Routing Encapsulation (GRE), Network
Address Translation (NAT), Revised IP Security Option (RIPSO), and Blacker
front-end services and instructions for configuring them.
You can print selected technical manuals and release notes free, directly from the
Internet. Go to the www.nortelnetworks.com/documentation URL. Find the
product for which you ne ed do cumen tat ion. Then locate the speci fic category and
model or version for your hardware or software product. Use Adobe* Acrobat
Reader* to open the manuals and release notes, search for the sections you need,
and print them on most standard printers. Go to Adobe Systems at the
www.adobe.com URL to download a free copy of the Adobe Acrobat Reader.
commands for IP services, including the
xx
You can purchase selected documentation sets, CDs, and technical publications
through the Internet at the www1.fatbrain.com/documentation/nortel/ URL.
308628-15.0 Rev 00
Page 21

How to Get Help
If you purchased a service contract for your Nortel Networks product from a
distributor or authorized reseller, contact the technical support staff for that
distributor or reseller for assistance.
If you purchased a Nort el Net w orks s ervic e progr am, cont act on e of t he fol lo win g
Nortel Networks Technical Solutions Centers:
Technical Solutions Center Telephone
Europe, Middle East, and Africa (33) (4) 92-966-968
North America (800) 4NORTEL or (800) 466-7835
Asia Pacific (61) (2) 9927-8800
China (800) 810-5000
An Express Routing Code (ERC) is available for many Nortel Networks products
and services. When you use an ERC, your call is routed to a technical support
person who speciali zes in supp orting t hat product or servi ce. To locate an ERC for
your product or service, go to the www12.nortelnetworks.com/ URL and click
ERC at the bottom of the page.
Preface
308628-15.0 Rev 00
xxi
Page 22

Page 23

Chapter 1
Exterior Gateway Protocols (BGP and EGP)
This chapter introduces the concepts and terminology used in this guide.
Topic Page
Autonomous Systems and Gateway Protocols 1-1
BGP Concepts and Terminology 1-4
BGP Implementation Notes 1-12
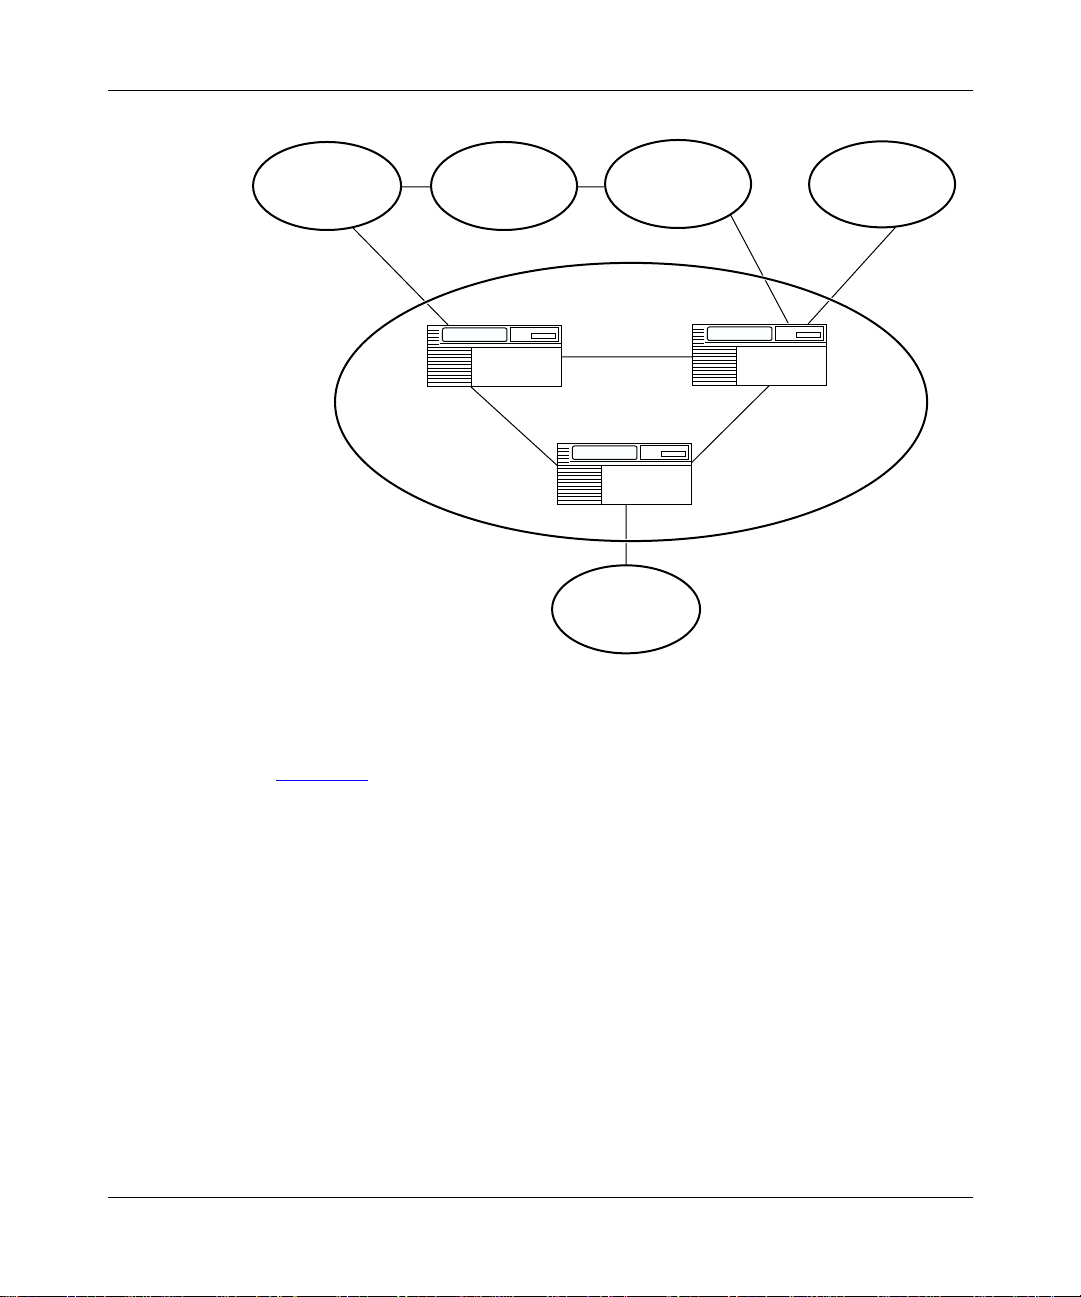
Autonomous Systems a nd Gateway Protocols
LANs and WANs interconnected by IP routers for m a group of netw orks call ed an
internetwork. For administrative purposes, an internetwork is divided into
autonomous systems. An autonomous system (AS) is a group of routers (called
gateways in IP terminolog y) and host s run by a singl e techni cal admi nistr ator th at
has a single, clearly defined routing policy. Each autonomous system has its own
unique AS number as signe d by the app ropri ate In ter net Regi stry entit y. Figure 1-1
shows a sample internetwork segmented into three autonomous systems.
308628-15.0 Rev 00
1-1
Page 24
Configuring IP Exterior Gateway Protocols (BGP and EGP)
LAN
A
Router
1
Autonomous
system 1
LAN
F
Autonomous
system 2
LAN
C
Router
9
Router
2
Router
8
LAN
G
LAN
B
Router
3
Router
4
Router
Autonomous
system 3
Router
7
LAN
E
5
LAN
D
Router
6
Figure 1-1. Internetwork Segmented into Three Autonomous Systems
The routers at the edges (or borders) of autonomous systems are called gateways.
These gate ways use exterior gatewa y protocols to exchange reachability
information and to route packets between routing domains.
1-2
IP0006B
308628-15.0 Rev 00
Page 25

Border Gateway Protocol (BGP)
The Border Gateway Protocol (BGP) is an exterior gateway protocol used by
border routers to exchange network reachability information with other BGP
systems. BGP routers form peer relationships with other BGP routers in other
autonomous systems or within the same autonomous system. BGP peers transmit
and receive current ro uting in form ation over a reli able tr anspor t la yer conne ction,
making periodic updates unnecessary. BGP is designed for inter-AS exchanges,
but can be used between multiple routing domains (for example, RIP to OSPF).
BGP peers exchange complete routing information only after the peer connection
is established. Thereafter, BGP peers exchange routing updates. An update
includes a network number, a list of autonomous systems that the routing
information passed through (the AS path), and other path attributes that describe
the route to a set of dest inati on net works. When mul tipl e path s are avail able, BGP
compares the path attributes to choose the preferred path.
BGP exchanges information between ASs as well as between routers in the same
AS. To differentiate between these uses, the latter is called interior BGP (IBGP).
Exterior Gateway Protocols (BGP and EGP)
Exterior Gateway Protocol (EGP)
You use the Exterior Gateway Protocol to exchange network reachability
information between routers in different autonomous systems. An interior
gateway protocol (IGP), such as RIP or OSPF, is used with in an AS to facilitate
the communication of routing information within an autonomous system. The
routers that serve as the end points of a connection between two autonomous
systems also run an exterior gateway protocol, such as EGP-2.
Routers establish EGP neighbor relationships to periodically exchange reliable
network reachability inf ormation. EGP neig hbors exchange complete reachability
information, not just upda tes. T he rout er us es this infor mat ion to mainta in a li st of
gateways, the networks the gateways can reach, and the corresponding distances.
Chapter 8, “
308628-15.0 Rev 00
Customizing EGP Services,” describes the use of EGP.
1-3
Page 26
Configuring IP Exterior Gateway Protocols (BGP and EGP)
Classless Interdomain Routing
Classless interdomain routing (CIDR) is an addressing scheme that uses supernet
addresses to represent multiple IP destinations. Rather than advertise a separate
route for each destination network in a supernet, a router uses a supernet address
to advertise a single route (called an aggregate route) that represents all the
destinations. CIDR reduces the size of the routing tables used to store advertised
IP routes. BGP-4 supports classless interdomain routing.
BGP Concepts and Terminology
BGP is an exterior gateway protocol designed to exchange network reachability
information with other BGP systems in other autonomous systems or within the
same autonomous system.
Figure 1-2
shows two autonomous systems: AS1 and AS2. Networks within AS1
and AS2 are connected by routers running an interior gateway protocol—in this
case, OSPF. The two ASs are connected by routers that run an exterior gateway
protocol—BGP—in addition to OSPF.
OSPF
AS1
OSPF
OSPF
OSPF/
BGP
Exterior
BGP
connection
OSPF/
BGP
AS2
OSPF
OSPF
IP00025A
Figure 1-2. BGP Connecting Two Autonomous Systems Running OSPF
1-4
308628-15.0 Rev 00
Page 27

Exterior Gateway Protocols (BGP and EGP)
Nortel Networks supports BGP-3 and BGP-4:
• BGP-3 assumes that eac h adver tised networ k is a n atura l clas s netwo rk (A , B,
or C), based on its high-order bits. BGP-3 cannot advertise subnets or
supernets.
• BGP-4 has no concept of address classes. Each network listed in the network
layer reachability information (NLRI) portion of an update message contains
a prefix length field, which describes the length of the mask associated with
the network. The prefix length field allows for both supernet and subnet
advertisement. The supernet advertisement is what makes classless
interdomain routing (CIDR) possible. See “Class le ss Int erdomain Routing”
on page 1-4.
In addition, BGP-4 supports BGP confederations and TCP MD5 message
authentication.
This sect i on covers the following topics:
Topic Page
Peer-to-Peer Sessions 1-5
Stub and Multihomed Autonomous Systems 1-6
Interior BGP Routing 1-6
IBGP Route Reflector 1-7
Equal-Cost Multipath 1-8
BGP Updates 1-8
Path Attributes 1-9
BGP/OSPF Interaction 1-10
BGP-4 Confederations 1-11
BGP-4 TCP MD5 Message Authentication 1-11
Peer-to-Peer Sessions
A BGP router employs a BGP speaker, which is an entity within the router that
transmits and receives BGP messages and acts upon them. A BGP speaker forms
a neighbor relationship with another BGP speaker by establishing a peer-to-peer
session. See Chapter 4, “
308628-15.0 Rev 00
Configuring BGP Peers.”
1-5
Page 28

Configuring IP Exterior Gateway Protocols (BGP and EGP)
Stub and Multihomed Autonomous Systems
An AS can include one or more BGP speakers t hat e st abl is h peer-to-peer ses si ons
with BGP speakers in other autonomous systems to provide external route
information for the networks within the A S. A multihomed AS has multiple BGP
speakers. A stub AS has a single BGP speaker that establishes a peer-to-peer
session with one external BGP speaker. The BGP speaker provides external route
information only for the networks contained within its own AS.
Interior BGP Routing
Nortel Networks implements interior BGP (IBGP) intra-AS routing. With IBGP,
each router in the AS runs an interior gateway protocol (IGP), such as OSPF, for
internal routing updates and also maintains an IBGP connection to each BGP
border router. The IBGP information, along with the IGP route to the originating
BGP border router, determines the next hop to use for external networks.
Some IGPs carry no BGP information. However, an OSPF type 5 LSA can carry
BGP-specific information in its tag field. Each router uses IBGP exclusively to
determine reachability to external networks. When an IBGP update for a network
is received, it is passed to IP for inclusio n in the routing table only if a viable IGP
route to the correct border gateway is available.
1-6
An AS with more than one BGP spe aker c an use I BGP to p rovide a tra nsit s ervic e
for networks outside the AS. An AS that provides this service is called a transit
AS (Figure 1-3
).
308628-15.0 Rev 00
Page 29
Exterior Gateway Protocols (BGP and EGP)
AS 10
AS 20
AS 50
Figure 1-3. Transit AS
BGP A
IGP
BGP C
AS 30
AS 11
AS 12
BGP B
IP0021A
In Figure 1-3, AS 20 is the transit AS. It provides information about its internal
networks, as well as transit networks, to the remaining ASs. The IBGP
connections between BGP routers A, B, and C provide consistent routing
information to the ASs.
IBGP Route Reflector
A BGP router configured for IBGP establishes a peer-to-peer session with every
other IBGP speaker in the AS. In an AS with a large number of IBGP speakers,
this full-mesh topology can result in high bandwidth and maintenance costs. For
example, a full-mesh topology for an AS with 50 IBGP speakers requires 1225
internal peer-to-peer connections.
308628-15.0 Rev 00
1-7
Page 30

Configuring IP Exterior Gateway Protocols (BGP and EGP)
T o avoid the high cost s of a full-me sh topology to support IBGP speakers wit hin a
large AS, you can configure a router to function as an IBGP route reflector (RR).
An IBGP speaker that needs to communicate with other BGP speakers in the AS
establishes a single peer-to-peer RR client session with the IBGP route reflector.
For information about the IBGP route reflector, see Chapter 6, “Configuring a
Route Reflector.”
Equal-Cost Multipath
Equal-cost multipath (ECMP) support allows a BGP speaker to perform route or
traffic balancing within an AS by using multiple equal-cost routes submitted to
the routing table by OSPF, RIP, or static routes. For instructions on configuring
route and traffic balancing, see Chapter 7, “
Balancing.” For more information ab out equal- cost multi path, see Configuring IP,
ARP, RARP, RIP, and OSPF Services.
BGP Updates
BGP-3 and BGP-4 speakers exchange routing updates that include a network
number and a list of autonomous systems that the routing information has passed
through (the AS path) as well as a list of unreachable networks. In addition, an
update includes the following:
Configuring Route and Traffic
1-8
• List of path attributes
• Local preference value—BGP-4 only. (See “
Preference Calculation and Route Selection” on page 3-25.)
Disabling BayRS Local
308628-15.0 Rev 00
Page 31

Path Attributes
A BGP-3 update message has a variable-length sequence of path attributes. Each
attribute inclu des an attr ibute valu e and an attri bute descr iption. Table 1-1
mandatory and optional BGP-3 path attributes.
Table 1-1. BGP-3 Path Attributes
Attribute Description
AS path Mandatory attribute containing a list of the ASs that must be traversed
Origin Mandatory attribute containing one of the following values:
Next hop Mandatory attribut e that speci fies the IP a ddre ss of the rout er to u se as
Inter-AS Optional attribute used to choose between paths to the destinations
Unreachable Discretionary attribute used to indicate destinations that have become
Exterior Gateway Protocols (BGP and EGP)
lists the
to reach th e given destinations
• IGP (the path is valid all the way to the IGP of the originating AS)
• EGP (the path was advertised using EGP by the last AS in the AS
path)
• Incomplete (the path is valid only to the last AS in the AS path)
a next hop for the advertised destinations
listed
unreachable
A BGP-4 update message has a variable-length sequence of path attributes. Each
attribute include s an attri bute valu e and an att ribute d escripti on. Table 1-2
mandatory BGP-4 path attributes.
Table 1-2. BGP-4 Mandatory Path Attributes
308628-15.0 Rev 00
lists the
Attribute Description
AS path Contains a list of the ASs that must be traversed to reach the given
destinations
Origin Contains one of the following values:
• IGP (the path is valid all the way to the IGP of the originating AS)
• EGP (the path was advertised using an EGP by the last AS in the
AS path)
• Incomplete (the path is valid only to the last AS in the AS path)
Next hop Specifies the IP address of the router to use as a next hop for the
advertised destinations
1-9
Page 32

Configuring IP Exterior Gateway Protocols (BGP and EGP)
In addition, the BGP-4 update message can include the optional path attributes
listed in Table 1-3
Table 1-3. BGP-4 Optional Path Attributes
Attribute Description
Multiexit discriminator Chooses between paths to the destinations listed
Local preference Allows AS border routers to indicate the preference
Atomic aggregate Ensures that certain network layer reachability
Aggregator Identifies which AS performed the most recent route
Cluster list Lists the members of a route reflector cluster
Originator ID Identifies the originator of the route into a route
BGP community Identifies the communities to which the route
.
they assigned to a chosen route when advertising it
to IBGP peers
information (NLRI) is not deaggregated
aggregation. This attribute contains the last AS
number that formed the aggregate route followed by
the IP address of the BGP speaker that for med the
aggregate route.
reflector cluster
belongs. (A comm unity is a group of destinat ions that
share some common property.)
BGP/OSPF Interaction
RFC 1745 defines the in ter ac ti on b et we en BGP and OSPF whe n OSPF is the IGP
within an autonomous system. For routers running both protocols, the OSPF
router ID and the BGP ID must be the same IP address. A BGP route policy must
be configured to allow BGP advertisement of OSPF routes.
Interaction between BGP-4 and OSPF includes the ability to advertise supernets
to support classless interdomain routing (CIDR). BGP-4 allows interdomain
supernet advertisements; OSPF can carry supernet advertisements within a
routing domain.
1-10
308628-15.0 Rev 00
Page 33

BGP-4 Confederations
The BGP confederation feature can reduce the size and complexity of an IBGP
mesh by breaking large autonomous systems into a confederation of smaller
subautonomous systems. This division reduces the size of IBGP meshes and the
complexity of the associated configuration management. Other autonomous
systems view the c onfede rati on as a sing le AS wi th the co nfeder atio n ID as its AS
number. BGP confederations are available only with BGP-4.
The BGP-4 confederation feature complies with RFC 1965 and provides the
following functions:
• Lets you configure a confederation ID on the router
• Implements new AS_PATH segment types
• Lets you configure new AS_PATH variables, AS_CONFED_SET and
AS_CONFED_SEQUENCE, for specifying confederation para mete rs
• Implements correct AS_PATH setting and manipulation to neighboring
autonomous systems that are within and outside the confederation
Exterior Gateway Protocols (BGP and EGP)
Configuring BGP-4 Confederations” on page 3-21 for a detailed description
See “
of this feature and for configuration information.
BGP-4 TCP MD5 Message Authentication
BGP-4 lets you configure the authentication of BGP messages by TCP MD5
signatures, in compliance with RFC 2385, “Protection of BGP Sessions via the
TCP MD5 Signature Option.” When BGP authentication is enabled, a BGP
speaker can verify that the BGP messages it receives from its peers are actually
from a peer and not from a third party masquerading as a peer.
See “
Configuring and Enabling MD5 Authentication” on page 4-22 for a detailed
description of this feature and for configuration information.
308628-15.0 Rev 00
1-11
Page 34

Configuring IP Exterior Gateway Protocols (BGP and EGP)
BGP Implementation Notes
The following guidelines are crucial to successful BGP configuration.
Caution:
If you do not follow these guidelines, BGP either will not work
efficiently or will become disabled on the interfaces involved.
• BGP will not operate with an IP router in nonforwarding (host-only) mode.
Make sure that the routers yo u want BGP to o perate with are in forwarding
mode. For instructions on setting the forwarding mode, see Configuring IP,
ARP, RARP, RIP, and OSPF Services.
• If you are using BGP for a multihomed AS (one that contains more than one
exit point), Nortel Networks strongly encourages you to use OSPF for your
IGP and BGP for your sole exterior gateway protocol, or use intra-AS IBGP
routing. For information about configuring OSPF, see Configuring IP, ARP,
RARP, RIP, and OSPF Services.
• If OSPF is the IGP, you should use the default OSPF tag construction. Using
EGP or modifying the OSPF tags makes network administration and proper
construction of BGP path attributes more difficult.
• For any router supporting both BGP and OSPF, the OSPF router ID and the
BGP identifier must be set to the same IP address.
• For BGP to run as a soloist, Internet service provider (ISP) mode must be
enabled. For instructions on enabling ISP mode, see Configuring IP, ARP,
RARP, RIP, and OSPF Services.
1-12
• In configurations where BGP speakers reside on routers that have multiple
network connections over multiple IP interfaces (the typical case for IBGP
speakers), consider using the address of the router’s circuitless (virtual) IP
interface as the local peer address. In this way, you ensure that BGP is
reachable as long as t here i s an activ e circ uit on t he rou ter. For instructions on
configuring the circuitless (or virtual ) IP interface, s ee Configuring IP, ARP,
RARP, RIP, and OSPF Services.
• By default, an external BGP speaker will neither advertise any routes to a
peer, nor inject any routes into its IGP. Configure route policies to enable any
route advertisement. For instructions on configuring policies, see Chapter 5,
“Configuring BGP Accept and Announce Policies.”
308628-15.0 Rev 00
Page 35

Exterior Gateway Protocols (BGP and EGP)
• Coordinate routing policies among all BGP speakers within an AS so that
every BGP border router within an AS constructs the same path attributes for
an external path.
• Configure accept and announce policies on all IBGP connections to accept
and propagate all ro utes. Mak e c onsist ent r outin g poli cy decis ions o n e xt ernal
BGP connections.
• To configure BGP and download full Internet routes on the Passport* 5430
Multiservice Access Switch, you must install the router with 64 MB of
memory.
308628-15.0 Rev 00
1-13
Page 36

Page 37

Chapter 2
Starting BGP and EGP Services
This chapter describes how to use the BCC and Site Manager to start BGP
services using default values and how to use Site Manager to start EGP services
using default values. It also describes how to use Sit e Manager to delete BGP and
EGP services.
Topic Page
Starting BGP with the BCC
Starting IP and BGP with Site Manager 2-3
Starting IP and EGP with Site Manager 2-6
Starting BGP with the BCC
To start BGP using the BCC:
1. Configure BGP on the router.
2. Define a BGP peer-to-peer connection.
Note:
Before you configure BGP-4, see “BGP Implementation Notes” on
page 1-12 for information.
Step 1: Configuring Global BGP
To configure BGP on the r out er, go to the global IP pr ompt ( for e xample,
and enter:
bgp router-id
<router_id>
2-1
box; ip
)
308628-15.0 Rev 00
2-1
Page 38

Configuring IP Exterior Gateway Protocols (BGP and EGP)
router_id
is the BGP router ID e xpressed as an oct et stri ng. The ro uter ID typicall y
is a circuitless IP interface used by BGP to communicate wi th other BGP routers.
If the router is also running OSPF, the BGP ID must match the OSPF ID.
For example, the following command configures global BGP with a router ID
(local IP address) of 2.2.2.2:
ip#
bgp router-id 2.2.2.2
bgp#
BGP is now running on t he router with de fault va lues for al l BGP parameters. You
customize BGP by modifying BGP parameters as described in Chapter 3,
“Configuring Global BGP Parameters.”
Step 2: Defining a Peer-to-Peer Connection
For BGP to exchange routing information with BGP peers located in other
autonomous systems or within the same AS, you must configure at least one peer
connection.
To define a peer-to-p eer connection, go to the BGP p rompt (f or example,
) and enter:
bgp
<local_ip_address> remote <remote_ip_address>
peer local
<as_number>
as
box; ip;
2-2
local_ip_address
is the address, expressed in dotted-decimal format, of an IP
interface on the local router.
remote_ip_address
as_number
is the number of the AS in which the remote peer is located.
is the address of an IP interface on the remote peer router.
For example, the following command defines a peer-to-peer connection between
local IP interface 2.3.3.3 and remote interface 2.3.3.4. The remote BGP peer is
located in AS 4.
bgp#
peer local 2.3.3.3 remote 2.3.3.4 as 4
peer/2.3.3.3/2.3.3.4#
The BGP pee r-t o-peer relationship is established with default values for all BGP
peer parameters. You customize the peer-to-peer connection by modifying BGP
peer parame ters as described in Chapter 4, “
Configuring B GP Peers.”
308628-15.0 Rev 00
Page 39

Starting IP and BGP with Site Manager
Before you can select a protocol to run on the router, you must configure a circuit
that the protocol can use as an interface to an attached network. For information
and instructions, see Configuring WAN Line Services and Configuring Ethernet,
FDDI, and Token Ring Services.
After you configure the circuit, you can access the Site Manager Select Protocols
window.
Note:
Before you configure BGP-4, see “BGP Implementation Notes” on
page 1-12 for information.
To start IP and BGP from the Select Protocols window, complete the following
steps:
Site Manager Procedure
Starting BGP and EGP Services
You do this System responds
1. In the Select Protocols window, select the
following protocols:
•IP
•
Then click on OK.
2. Set the following parameters:
•
•
•
•
Click on
descriptions in
RIP, and OSPF Services
3. Click on OK. The BGP Configuration window opens.
4. Set the following parameters:
•
•
Click on
descriptions on page A-3.
5. Click on OK. The BGP Peer window opens.
BGP
IP Address
Subnet Mask
Transmit Bcast Addr
UnNumbered Assoc Address
or see the parameter
Help
Configuring IP, ARP, RARP,
.
Identifier
Local AS
or see the parameter
Help
The IP Configuration window opens.
(continued)
308628-15.0 Rev 00
2-3
Page 40

Configuring IP Exterior Gateway Protocols (BGP and EGP)
Site Manager Procedure
You do this System responds
6. Set the following parameters:
•
Pee r Address
•
Pee r AS
•
Local Address
•Peer Mode
Click on
descriptions beginning on page A-11.
7. Click on OK. Site Manager enables default BGP
Help
or see the parameter
Deleting BGP with Site Manager
You can delete BGP from all router circuits on which it is currently enabled.
To d elete BGP using Site Manager, comple te the following steps:
You do this System responds
(continued)
service and returns you to the
Configuration Manager window.
Site Manager Procedure
2-4
1. In the Configuration Manager window,
choose
2. Choose
3. Choose
4. Choose
5. Click on OK. Site Manager removes BGP from all circuits
Protocols
. The IP menu opens.
IP
BGP
Delete BGP
.
. The BGP menu opens.
. Site Manager asks you to confirm the
The Protocols menu opens.
deletion of BGP.
on the router and returns you to the
Configuration Manager window.
308628-15.0 Rev 00
Page 41

Deleting BGP-3 and BGP-4 with Site Manager
You can delete BGP-3 and BGP-4 from all router circuits on which they are
currently enabled.
To delete BGP-3 using Site Manager, complete the following steps:
Site Manager Procedure
You do this System responds
Starting BGP and EGP Services
1. In the Configuration Manager window ,
choose
2. Choose
3. Choose
4. Choose
5. Click on OK. Site Manager removes BGP-3 from all
Protocols
. The IP menu opens.
IP
BGP
Delete BGP-3
.
. The BGP menu opens.
. Site Manager asks you to confirm the
The Protocols menu opens.
deletion of BGP-3.
circuits on the router and returns you to the
Configuration Manager window.
To delete BGP-4 using Site Manager, complete the following steps:
Site Manager Procedure
You do this System responds
1. In the Configuration Manager window,
choose
2. Choose
3. Choose
4. Choose
5. Click on OK. Site Manager removes BGP-4 from all
Protocols
. The IP menu opens.
IP
BGP
Delete BGP-4
.
. The BGP menu opens.
. Site Manager asks you to confirm the
The Protocols menu opens.
deletion of BGP-4.
circuits on the router and returns you to
the Configuration Manager window.
308628-15.0 Rev 00
2-5
Page 42

Configuring IP Exterior Gateway Protocols (BGP and EGP)
Starting IP an d EGP with Site Manager
Before you can select a protocol to run on the router, you must configure a circuit
that the protocol can use as an interface to an attached network. For information
and instructions, see Configuring WAN Line Services and Configuring Ethernet,
FDDI, and Token Ring Services.
After you configure the circuit, you can access the Site Manager Select Protocols
window.
To start IP and EGP from the Select Protocols window, complete the following
steps:
Site Manager Procedure
You do this System responds
1. In the Select Protocols window, select the
following protocols:
•IP
•
Then click on OK.
2. Set the following parameters:
•
•
•
•
Click on
description in
RIP, and OSPF Services
3. Click on OK. The EGP Configuration window opens.
4. Set the following parameters:
•
•
•
Click on
descriptions beginning on page A-25.
5. Click on OK. Site Manager enables EGP service and
EGP
IP Address
Subnet Mask
Transmit Bcast Addr
UnNumbered Assoc Address
or see the parameter
Help
Configuring IP, ARP, RARP,
.
Local Autonomous System ID
(decimal)
Remote Peer IP Address
Gateway Mode
or see the parameter
Help
The IP Configuration window opens.
returns you to the Config ur ation Manag er
window.
2-6
308628-15.0 Rev 00
Page 43

The instructions in this chapter show you how to start EGP using default values.
For information about modifying EGP default values, see Chapter 8,
“Customizing EGP Services.”
Deleting EGP from the Router
You can delete EGP from all router circuits on which it is currently enabled. To
delete EGP, complete the following steps:
You do this System responds
Starting BGP and EGP Services
Site Manager Procedure
1. In the Configuration Manager window,
choose
2. Choose
3. Choose
4. Choose
5. Click on OK. Site Manager removes EGP from all circuits
Protocols
. The IP menu opens.
IP
EGP
Delete EGP
.
. The EGP menu opens.
. Si te Manager asks you to confir m the
The Protocols menu opens.
deletion of EGP.
on the router and returns you to the
Configuration Manager window.
308628-15.0 Rev 00
2-7
Page 44

Page 45

Chapter 3
Configuring Global BGP Parameters
You customize global BGP parameters for your AS as described under the
following topics:
Topic Page
Disabling and Reenabling BGP 3-2
Supplying a BGP Router ID 3-4
Identifying the Local AS 3-5
Disabling and Reenabling IBGP Support 3-6
Specifying Route Types for IBGP Advertisements 3-7
Enabling BGP Interaction with OSPF and RIP 3-9
Setting the Update Interval Timer 3-10
Allowing Redundant Conne cti ons 3-11
Enabling Multihop Connections 3-13
Disabling and Reenabling Dynamic Policy Configuration 3-15
Configuring the BGP Soloist Slot Mask 3-16
Disabling and Reenabling Route Aggregation 3-17
Enabling and Disabling Black Hole Punching 3-18
Disabling and Reenabling the BGP-4 MED Attribute 3-20
Configuring BGP-4 Confederations 3-21
Disabling BayRS Local Preference Calculation and Route Selection 3-25
Configuring BGP Message Logging 3-29
Configuring EBGP Route Flap Damping 3-31
Assigning Weight Classes and Values to an AS 3-37
308628-15.0 Rev 00
3-1
Page 46

Configuring IP Exterior Gateway Protocols (BGP and EGP)
Disabling and Reenabling BGP
When you start BGP on the router, BGP is automatically enabled for both BGP-3
and BGP-4 peer-to-peer connections.
You can use the BCC and Site Manager to disable and reenable BGP-4 on the
router. You can also use Site Manager to disable and reenable BGP-3 and BGP-4.
BGP will not operate with an IP router in not-forwarding (host-only)
Note:
mode. Make sure that the routers you want BGP to operate with are in
forwarding mode.
mode, see Configuring IP, ARP, RARP, RIP, and OSPF Services.
Using the BCC
For instructions on configuring the router for forwarding
To disable and re enable BGP, go to the BGP prompt (for example,
and enter:
state
is either
state
For example, the following command disables BGP:
bgp#
Using Site Manager
To disable and reenable BGP, complete the following steps:
You do this System responds
1. In the Configuration Manager window,
choose
2. Choose
3. Choose
4. Choose
<state>
enabled
state disabled
Protocols
IP
. The IP menu opens.
BGP
. The BGP menu opens.
BGP Global
box; ip; bgp
(default) or
.
. The Edit BGP Global Parameters window
disabled
Site Manager Procedure
.
The Protocols menu opens.
opens.
(continued)
)
3-2
308628-15.0 Rev 00
Page 47

Configuring Global BGP Parameters
Site Manager Procedure
You do this System responds
5. Set the
Help
page A-4
6. Click on OK. You return to the Configuration Manager
7. In the Configuration Manager window,
choose
8. Choose
9. Choose
10.Choose
11. Set the
or see the pa rameter description on page
A-11
12. Click on OK. You return to the Configuration Manager
13.In the Configuration Manager window,
choose
14.Choose
15.Choose
16.Choose
17. Set the
or see the pa rameter description on page
A-11
18. Click on OK. You return to the Configuration Manager
BGP Enable
or see the parameter description on
.
Protocols
. The IP menu opens.
IP
. The BGP menu opens.
BGP
BGP-3 Global
Enable
.
Protocols
. The IP menu opens.
IP
. The BGP menu opens.
BGP
BGP-4 Global
Enable
.
parameter . Clic k on
.
. The Edit BGP-3 Global Parameters m enu
parameter . Click on
.
. The Edit BGP-4 Global Parameters
parameter . Click on
Help
Help
(continued)
window.
The Protocols menu opens.
opens.
window.
The Protocols menu opens.
window opens.
window.
308628-15.0 Rev 00
3-3
Page 48

Configuring IP Exterior Gateway Protocols (BGP and EGP)
Supplying a BGP Router ID
The BGP identifier is the IP address of an interface on the router. When you
enable BGP on the router, you must specify a configured IP address as the router
ID. You can change the router ID to the IP address of another router IP interface.
If both OSPF and BGP are running on the router, the OSPF router ID
Note:
and the BGP router ID must be identical . In addition, the ro uter ID must match
one of the IP addresses configured on the router.
You can use the BCC or Site Manager to supply a BGP identifier for the router.
Using the BCC
To change the BGP router ID, go to the BGP prompt (for example,
and enter:
router-id
ip_address
For example, the following command specifies IP address 2.2.2.2 for the BGP
router ID:
bgp#
bgp#
Using Site Manager
To change the BGP router ID, complete the following steps:
You do this System responds
1. In the Configuration Manager window,
choose
2. Choose
3. Choose
4. Choose
<ip_address>
is the address of an IP interface on the router.
router-id 2.2.2.2
Site Manager Procedure
The Protocols menu opens.
Protocols
IP
. The IP menu opens.
BGP
BGP Global
.
. The BGP menu opens.
. The Edit BGP Global Parameters window
opens.
box; ip; bgp
(continued)
)
3-4
308628-15.0 Rev 00
Page 49

Configuring Global BGP Parameters
You do this System responds
5. Set the
on
on page A-4
6. Click on OK. You return to the Configuration Manager
BGP Identifier
Help
or see the parameter description
.
Identifying the Local AS
Each autonomous system in the Internet has a unique AS ID. You can use the
BCC or Site Manager to supply the ID of the AS in which the BGP router is
located.
Using the BCC
To specify the ID of the local AS, go to the BGP prompt (for example,
bgp
) and enter:
local-as
local_as
<local_as>
is the number of the AS (fr om 0 t h r ough 65535 ) where the router resi de s.
Site Manager Procedure
parameter. Click
window.
(continued)
box; ip;
For example, the following command specifies AS 5 as the local AS:
bgp#
bgp#
Using Site Manager
To specify the ID of the local AS, complete the following steps:
You do this System responds
1. In the Configuration Manager window,
choose
2. Choose
3. Choose
308628-15.0 Rev 00
local-as 5
Protocols
IP
. The IP menu opens.
BGP
Site Manager Procedure
The Protocols menu opens.
.
. The BGP menu opens.
(continued)
3-5
Page 50

Configuring IP Exterior Gateway Protocols (BGP and EGP)
Site Manager Procedure
You do this System responds
4. Choose
5. Set the
on
on page A-4
6. Click on OK. You return to the Configuration Manager
BGP Global
BGP Local AS
Help
or see the parameter description
.
. The Edit BGP Global Parameters window
parameter . Click
opens.
window.
Disabling and Reenabling IBGP Support
By default, BGP supports IBGP intra-AS sessions. (For information, see “BGP
Concepts and Terminology” on page 1-4).
A BGP transit AS should use IBGP intra-AS routing. A stub or multihomed AS
usually does not use IBGP routing.
You can use the BCC or Site Manager to disable and reenable IBGP support.
Using the BCC
(continued)
3-6
To disable and reenable IBGP support, go to the BGP prompt (for example,
ip; bgp
intra-as-routing
state
) and enter:
is either
<state>
enabled
(default) or
disabled
.
For example, the following command disables IBGP:
intra-as-routing disabled
bgp#
bgp#
308628-15.0 Rev 00
box;
Page 51

Using Site Manager
To disable and reenable IBGP support, complete the following steps:
You do this System responds
Configuring Global BGP Parameters
Site Manager Procedure
1. In the Configuration Manager window,
choose
2. Choose
3. Choose
4. Choose
5. Set the
Help
page A-5
6. Click on OK. You return to the Configuration Manager
Protocols
IP
. The IP menu opens.
BGP
BGP Global
BGP Intra-AS
or see the parameter description on
.
.
. The BGP menu opens.
. The Edit BGP Global Parameters window
parameter . C lick o n
The Protocols menu opens.
opens.
window.
Specifying Route Types for IBGP Advertise m ents
If IBGP is enabled, you can specify the types of routes that BGP advertises in
IBGP sessions. By default, IBGP propagates only routes learned from external
BGP peers. You can use the BCC o r Sit e Ma nager to c onfigu re I BGP to prop agate
routes learned from all route sources (excluding IBGP and OSPF interarea and
intra-area routes, which IBGP never advertises).
308628-15.0 Rev 00
3-7
Page 52

Configuring IP Exterior Gateway Protocols (BGP and EGP)
Using the BCC
To specify the types of routes that IBGP advertises, go to the BGP prompt (for
example,
box; ip; bgp
redistribute-protocols
) and enter:
<
protocols>
protocols
T a ble 3-1. Route Types for BGP Advertisements
Route Type Meaning
bgp (default) BGP propagates routes learned from external BGP peers.
all BGP propagates routes from all route sources.
For example, the followi ng command c onfigu res BGP to adve rtis e rout es fr om all
route sources:
bgp#
bgp#
Using Site Manager
T o spec if y the types of rou tes that BGP advertis es in IBGP sessi ons, comp lete the
following steps:
You do this System responds
1. In the Configuration Manager window,
choose
2. Choose
3. Choose
4. Choose
5. Set the
Click on
description on page A-5
6. Click on OK. You return to the Configuration Manager
is one of the values listed in Table 3-1.
redistribute-protocols all
Site Manager Procedure
Protocols
. The IP menu opens.
IP
BGP
BGP Global
BGP From Protocols
Help
.
. The BGP menu opens.
. The Edit BGP Global Parameters window
parameter.
or see the parameter
.
The Protocols menu opens.
opens.
window.
3-8
308628-15.0 Rev 00
Page 53

Configuring Global BGP Parameters
Enabling BGP Interaction with OSPF and RIP
By default, BGP does not exchange routes with OSPF or RIP. However, you can
configure the r outer to allow BGP to advertise BGP-learned route s to OSPF, RIP,
or both OSPF and RIP.
You can use the BCC or Site Manager to configure the router to advertise
BGP-learned routes.
Using the BCC
To configure the router to advertise BGP-learned information to OSPF, RIP, or
both, go to the BGP prompt (for example,
box; ip; bgp
) and enter:
igp-interaction
protocols
none
•
ospf
•
rip
•
For example, the following command configures BGP to advertise routes to both
RIP and OSPF:
bgp#
bgp#
Using Site Manager
To configure the router to advertise BGP-learned information to OSPF, RIP, or
both,
You do this System responds
1. In the Configuration Manager window,
choose
2. Choose
3. Choose
<protocols>
is one of the following values:
(default): BGP adve rtises no routes to OSPF or RIP.
: BGP advertises BGP-learned routes to OSPF.
: BGP advertis es BGP-learned routes to RIP.
igp-interaction {ospf rip}
complete th e following st eps:
Site Manager Procedure
The Protocols menu opens.
Protocols
. The IP menu opens.
IP
BGP
.
. The BGP menu opens.
(continued)
308628-15.0 Rev 00
3-9
Page 54

Configuring IP Exterior Gateway Protocols (BGP and EGP)
Site Manager Procedure
You do this System responds
4. Choose
5. Set the
parameter. Click on
parameter description on page A-10
6. Click on OK. You return to the Configuration Manager
BGP Global
BGP/IGP Interaction Control
. The Edit BGP Global Parameters window
Help
or see the
Setting the Update Interval Timer
BGP periodically injects external BGP routes into the routing table. The default
minimum interval between route injections is 5 seconds.
You can use the BCC or Site Manager to change the minimum number of seco nds
between route injections.
Using the BCC
To change the minimum number of seconds between route injections, go to the
BGP prompt (for example,
box; ip; bgp
(continued)
opens.
.
window.
) and enter:
3-10
<
inject-time
seconds
seconds>
is the minimum interval (from 1 through 2,147,483,647) between route
injections.
For example, the following command causes BGP to inject external BGP routes
into the routing table with a minimum interval of 10 seconds:
bgp#
inject-time 10
bgp#
308628-15.0 Rev 00
Page 55

Using Site Manager
To change the minimum number of seconds between route injections, complete
the following steps:
You do this System responds
Configuring Global BGP Parameters
Site Manager Procedure
1. In the Configuration Manager window,
choose
2. Choose
3. Choose
4. Choose
5. Set the
Click on
description on page A-6
6. Click on OK. You return to the Configuration Manager
Protocols
IP
. The IP menu opens.
BGP
BGP Global
BGP Interval Timer
Help
.
. The BGP menu opens.
. The Edit BGP Global Parameters window
parameter.
or see the parameter
.
Allowing Redundant Connections
By default, BGP performs redundancy checking on peer-to-peer TCP sessions.
BGP can maintain only one TCP session with a remote BGP peer. If the remote
peer attempts to establish another session on another physical connection, BGP
rejects the session. BGP uses a collision-detection method based on the router ID
to check for redundant sessions.
You can disable redundancy che cking to allo w TCP sessions with the same remote
peer on multiple physical connections.
configuration with multiple sessions on multiple physical connections is
redundancy: if on e conne ction fail s, the peers can co mmunica te ove r anot her l ink.
The disadvantage is that such a configuration results in multiple copies of each
route.
The Protocols menu opens.
opens.
window.
The advantage of a peer-to-peer
You can use the BCC or Site Manager to disable redundancy checking and to
specify the maximum number of redundant routes that BGP allows. By default,
BGP allows up to 255 redundant routes.
308628-15.0 Rev 00
3-11
Page 56

Configuring IP Exterior Gateway Protocols (BGP and EGP)
Using the BCC
To disable or reenable redundancy checking, go to the BGP prompt (for example,
box; ip; bgp
redundant-connection
state
is either
) and enter:
enabled
state>
<
(default) or
disabled
To specify the maximum number of redundant routes, go to the BGP prompt and
enter:
max_routes>
max-redundant-routes
<
.
max_routes
For example, the following command sequence disables BGP redundancy
checking, allowing BGP t o es ta bli sh mul ti pl e TCP s essions (on differe nt physical
connections) with the same remot e pee r and configures BGP to maintain up to 50
redundant routes:
bgp#
bgp#
bgp#
The following command reenables redundancy checking to allow only one TCP
session with the same remote peer:
bgp#
bgp#
Using Site Manager
To d i sable or reenable redunda ncy checking, com plete the following steps:
You do this System responds
1. In the Configuration Manager window,
choose
2. Choose
3. Choose
is the maximum number of redundant routes (from 0 through 255).
redundant-connection disabled
max-redundant-routes 50
redundant connection enabled
Site Manager Procedure
The Protocols menu opens.
Protocols
. The IP menu opens.
IP
BGP
.
. The BGP menu opens.
(continued)
3-12
308628-15.0 Rev 00
Page 57

Configuring Global BGP Parameters
Site Manager Procedure
You do this System responds
4. Choose
5. Set the
parameter. Click on
parameter description on page A-7
6. Click on OK. You return to the Configuration Manager
BGP Global
Detect Redundant Connections
. The Edit BGP Global Parameters window
Help
or see the
Enabling Multihop Connections
By default, BGP enforces the one-hop rule for BGP peers (the remote peer must
be located on a directly attached network.)
You can use the BCC or Site Manager to override the restriction and allow
multihop connections.
Caution:
establish a BGP connection tha t t rav erses a third-party AS, which may viola te
policy considerations and may also introduce forwarding loops.
Enabling multihop BGP connections can cause EBGP speakers to
(continued)
opens.
.
window.
Using the BCC
To override the one-hop rule and allow multihop connections, go to the BGP
prompt (for example,
multi-hop
state
For example, the following command enables BGP for multihop peer
connections:
bgp#
bgp#
308628-15.0 Rev 00
<state>
is either
multi-hop enabled
enabled or disabled
box; ip; bgp
) and enter:
(default).
3-13
Page 58

Configuring IP Exterior Gateway Protocols (BGP and EGP)
Using Site Manager
To override the one-hop rule and allow multihop connections, complete the
following steps:
Site Manager Procedure
You do this System responds
1. In the Configuration Manager window,
choose
2. Choose
3. Choose
4. Choose
5. Set the
parameter. Click on
parameter description on page A-7
6. Click on OK. You return to the Configuration Manager
Protocols
. The IP menu opens.
IP
BGP
BGP Global
Multi-hop Ebgp Connection
.
. The BGP menu opens.
. The Edit BGP Global Parameters window
or see the
Help
.
The Protocols menu opens.
opens.
window.
3-14
308628-15.0 Rev 00
Page 59

Configuring Global BGP Parameters
Disabling and Reenabling Dynamic Policy Configuration
By default, BGP reconfigures IP policies dynamically. This means that if you
modify a policy, BGP dynamically reevaluates all affected routes in light of the
modified policy. BGP then sends the appropriate withdraw or update message to
the affected peers. BGP keeps track of the routes sent to each peer, allowing for
precise determination of which routes to send and which to withdraw.
If you modify an IP policy with this feature disabled, BGP restarts all BGP
connections.
Note:
There is no advantage to disabling dynamic policy configuration.
Disabling this parameter will adversely affect BGP protocol operation
overhead and network stability.
You can use the following Site Manager procedure to disable and reenable
dynamic policy configuration:
Site Manager Procedure
308628-15.0 Rev 00
You do this System responds
1. In the Configuration Manager window,
choose
2. Choose
3. Choose
4. Choose
5. Set the
Support
the parameter description on page A-7
6. Click on OK. You return to the Configuration Manager
Protocols
IP
. The IP menu opens.
BGP
BGP Global
BGP Dynamic Policy Change
parameter. Click on
.
. The BGP menu opens.
. The Edit BGP Global Parameters window
Help
or see
The Protocols menu opens.
opens.
.
window.
3-15
Page 60

Configuring IP Exterior Gateway Protocols (BGP and EGP)
Configuring the BGP Soloist Slot Mask
By default, BGP runs as a soloist on a slot determined by the BGP soloist slot
mask. Nortel Networks recommends that the slot mask include only
nonforwarding slots, so that BGP operations (route calculation, for example)
occur on one slot while the other slots maintain maximum forwarding capability.
If the slot on which the soloist is running fails, BGP runs on an eligible slot. By
default, BGP considers all sl ots with IP inter faces to be eli gible slots . You can use
the BCC or Site Manager to specify one or more slots for the BGP soloist.
Using the BCC
To configure the BGP slot mask, go to the BGP prompt (for example,
bgp
) and enter:
<
slot-mask
is one of the values listed in Table 3-2. To include mor e than one sl ot, encl ose
slot
slot>
box; ip;
the slot numbers in braces.
T able 3-2. Slot Mask Parameter Values
Value Meaning
all-slots (default) The BGP soloist can run on all slots.
1 to 14 The BGP soloist can run only on the specified slots.
For example, the following co mman d conf igu re s slo ts 2, 3, and 4 to be eligible to
run the BGP soloist:
bgp#
slot-mask {2 3 4}
bgp#
3-16
308628-15.0 Rev 00
Page 61

Using Site Manager
To configure the BGP slot mask, c omplete the following steps:
You do this System responds
Configuring Global BGP Parameters
Site Manager Procedure
1. In the Configuration Manager window,
choose
2. Choose
3. Choose
4. Choose
5. Set the
Click on
description on page A-7
6. Click on OK. You return to the Configuration Manager
Protocols
IP
. The IP menu opens.
BGP
BGP Global
BGP Soloist Slots
Help
.
. The BGP menu opens.
. The Edit BGP Global Parameters window
parameter.
or see the parameter
.
The Protocols menu opens.
opens.
window.
Disabling and Reenabling Rou te Aggregation
By default, BGP aggregates non-BGP-originated subnet routes to their
corresponding natural network routes for advertisement to BGP peers. Disabling
route aggregation causes BGP to advertise each subnet.
You can use the BCC or Site Manager to disable this feature. (This switch does
not affect the advertisement of BGP-originated routes.)
Using the BCC
T o dis able or reenabl e route aggre gatio n for non-BGP-origin ated subnet routes, go
to the BGP prompt (for example,
subnet-aggregation
state
For example, the following command disables subnet aggregation:
bgp#
bgp#
308628-15.0 Rev 00
state>
<
is either
enabled
(default) or
subnet-aggregation disabled
box; ip; bgp
disabled
.
) and enter:
3-17
Page 62

Configuring IP Exterior Gateway Protocols (BGP and EGP)
Using Site Manager
To disable or reenable route aggregation, complete the following steps:
Site Manager Procedure
You do this System responds
1. In the Configuration Manager window,
choose
2. Choose
3. Choose
4. Choose
5. Set the
Click on
description on page A-8
6. Click on OK. You return to the Configuration Manager
Protocols
IP
. The IP menu opens.
BGP
BGP Global
Aggregate Subnets
Help
.
. The BGP menu opens.
. The Edit BGP Global Parameters window
parameter.
or see the parameter
.
The Protocols menu opens.
opens.
window.
Enabling and Disabling Black Hole Punching
If BGP advertises aggregate routes, you can configure BGP to submit each
aggregate route to the routing table as a
to drop a packet whose lo ngest matchi ng destina tion pref ix is the black hole route.
(For more information about black hole routes, see
RIP, and OSPF Services
.)
By default, BGP does not submit a black hole route to the IP routing table for an
aggregate route that it advertises to a BGP peer.
black hole. This setting forces the rou ter
Configuring IP, ARP, RARP,
3-18
You can use the BCC or Site Manager t o enable black h ole punch ing. You can also
configure IP to return an ICMP dest ination unreac hable message to the se nder of a
packet that best matches the black hole route.
308628-15.0 Rev 00
Page 63

Using the BCC
Configuring Global BGP Parameters
To enable or disable black hole punching, go to the BGP prompt (for example,
box; ip; bgp
black-hole-punching
action
Table 3-3. Black Hole Punchin g Parameter Settings
Value Meaning
disabled (default) Disables black hole punching
drop Enables black hole punching. IP drops packets for the black
reject Enables black hole punching. IP drops packets for the black
) and enter:
action>
<
is one of the values described in Table 3-3
hole route destination without returning an ICMP message to
the sender.
hole route destination and returns an ICMP destination
unreachable message to the sender.
.
For example, the following command causes BGP to submit aggregate routes to
the routing table as bla ck hole routes. IP dro ps packet s for the blac k hole route but
does not return ICMP destination unreachable messages to the sender.
bgp#
bgp#
308628-15.0 Rev 00
black-hole-punching drop
3-19
Page 64

Configuring IP Exterior Gateway Protocols (BGP and EGP)
Using Site Manager
To enable or disable black hole punching, complete the following steps:
Site Manager Procedure
You do this System responds
1. In the Configuration Manager window,
choose
2. Choose
3. Choose
4. Choose
5. Set the
Click on
description on page A-8
6. Click on OK. You return to the Configuration Manager
Protocols
IP
. The IP menu opens.
BGP
BGP Global
Black Hole Routes
Help
.
. The BGP menu opens.
. The Edit BGP Global Parameters window
parameter.
or see the parameter
.
The Protocols menu opens.
opens.
window.
Disabling and Reenabling th e BGP-4 MED Attribute
By default, BGP-4 considers the multiex it discriminator (MED) path attribute in
the route selection process (see Table 1-3 on page 1-10
You can use the BCC or Site Manager to configure BGP-4 so that it disregard s the
MED attribute in the route selection process.
Using the BCC
).
3-20
To configure BGP-4 to disregard the MED attribute in t he r out e s el ect ion process,
go to the BGP prompt (for example,
med-comparison
state
is either
state>
<
enabled
(default) or
disabled
box; ip; bgp
) and enter:
.
For example, the following command causes BGP-4 to disregard the MED
attribute in an update when selecting a route:
bgp#
med-comparison disabled
bgp#
308628-15.0 Rev 00
Page 65

Using Site Manager
To configure BGP-4 to disregard the MED attribute in t he r out e s el ect ion process,
complete the following steps:
You do this System responds
Configuring Global BGP Parameters
Site Manager Procedure
1. In the Configuration Manager window,
choose
2. Choose
3. Choose
4. Choose
5. Set the
on
on page A-9
6. Click on OK. You return to the Configuration Manager
Protocols
IP
. The IP menu opens.
BGP
BGP Global
Route with MED
Help
or see the parameter description
.
. The BGP menu opens.
. The Edit BGP Global Parameters window
parameter. Click
.
Configuring BGP-4 Confede rations
If this router is a member of an autonomous system that is a confederation of
sub-ASs, you can configure the confederation ID. You can also specify the list of
this BGP speaker’s peers in other sub-ASs within the same confederation.
If the confederation ID is not configured (nil), this AS is not a member of any
confederation. If the list of confederatio n peers is empty (nil), no peers to this
speaker exist among the neighbor ASs that are members of this confederation.
The Protocols menu opens.
opens.
window.
You can use the BCC or Site Manager to configure BGP-4 confederations.
308628-15.0 Rev 00
3-21
Page 66

Configuring IP Exterior Gateway Protocols (BGP and EGP)
Using the BCC
Figure 3-1
shows an example of a BGP-4 confederation. In this example, the
following steps establish sub-ASs 65000 and 65001 as confederation peers.
Specify sub-AS 65002 as the local AS number and the external visible AS
1.
number 20 as the BGP confederation identifier by entering:
bgp#
local-as 65002
bgp#
confederation-id 20
Specify the local AS numbers of the other sub-ASs within the same
2.
confederation as confederation peers by entering:
bgp#
confederation-peers {65000 65001}
Specify BGP peers within the confederation by entering:
3.
bgp#
peer 192.32.194.1/192.32.194.2 as 65000
peer/192.32.194.1/192.32.194.2#
bgp#
peer 192.32.194.5/192.32.194.6 as 65001
peer/192.32.194.5/192.32.194.6#
bgp#
peer 192.32.195.2/192.32.195.1 as 65002
peer/192.32.195.2/192.32.195.1#
bgp#
peer 192.32.195.5/192.32.195.6 as 65002
peer/192.32.195.5/192.32.195.6#
bgp#
Specify BGP peers in another AS or con federation wi th their local AS number
4.
back
back
back
back
(Router 3)
(Router 6)
(Router 8)
(Router 9)
(if not a confederation) or their confederation ID (if a confederation) by
entering:
3-22
bgp#
peer 192.32.195.1/192.32.195.2 as 55
peer/192.32.195.1/192.32.195.2#
bgp#
A sub-AS number cannot be the same as any external BGP peer AS;
Note:
back
however, internal sub-AS numbers can be assigned to a sub-AS in another
confederation. Suggestion: Use the reserved AS number range. (IANA
reserved numbers are 64512 through 65535.)
308628-15.0 Rev 00
Page 67

Configuring Global BGP Parameters
Sub-AS
65001
Router 2
Router 1
Sub-AS
65000
AS 20
Router 3
Router 4
Router 9
Router 6
Router 7
Sub-AS
65002
Router 5
To AS 55
Router 8
IP0107A
Figure 3-1. BGP Confederation
308628-15.0 Rev 00
3-23
Page 68

Configuring IP Exterior Gateway Protocols (BGP and EGP)
Using Site Manager
To configure a confederation, complete the following steps:
Site Manager Procedure
You do this System responds
1. In the Configuration Manager window,
choose
2. Choose
3. Choose
4. Choose
5. Set the following parameters:
•
•
Click on
descriptions beginning on page A-10
6. Click on OK. You return to the Configuration Manager
Protocols
. The IP menu opens.
IP
BGP
BGP Global
Confederation ID
Confederation Peer
Help
.
. The BGP menu opens.
. The Edit BGP Global Parameters window
or see the parameter
The Protocols menu opens.
opens.
.
window.
3-24
308628-15.0 Rev 00
Page 69

Configuring Global BGP Parameters
Disabling BayRS Local Preference Calculation and Route Selection
A BGP speaker calculates a local preference value for each route that it receives
from an external peer and passes this value as the local_pref attribute in routing
updates that it announces to its internal BGP (IBGP) peers. A BGP sp eaker that
receives a routing update from an IBGP peer uses the local_pref attribute in its
best-route selection process.
By default, BGP calculates a local-preference value by using the algorithm
described in “
best-route selection process is described in “
Different implementations of BGP use different methods of arriving at a local
preference value. However, within an AS, all BGP speakers should use the same
method to determine local preference and to select the best routes.
Calculating BGP-4 Local Preference Values” on page 3-25. The
Best-Route Selection” on page 3-27.
Note:
For a comparison of
processes, see “Comparing BGP Route Selection Processes” on page B-11.
If you are configuring BGP in a network that also includes routers from vendors
other than Nortel Networks, you can disable BayRS local preference calculation
and route selection. Instead, BGP assigns a value of 100 to externally received
routes and uses the rules listed in Table 3-4 on page 3-27
the Nortel Networks and Cisco route selection
Calculating BGP-4 Local Preference Values
BGP-4 update messages c ont ain a l ocal preference valu e t hat an AS border router
can assign to a route when advertising it to IBGP peers. The calculation of the
local preference attribute is specific to each implementation. A higher value
indicates that the route is more preferred.
The router uses the following equation t o calcul ate a va lue for t he local p referenc e
attribute:
local_preference
origin_value
routes.
is 0 for routes with an origin path attribute of IGP or 4096 for other
= 8191 -
origin_value
-
AS_path_weight
for best-route selection.
308628-15.0 Rev 00
3-25
Page 70

Configuring IP Exterior Gateway Protocols (BGP and EGP)
AS_path_weight
is a sum of weight values associated with AS numbers listed in
the route’s AS Path attribute. These weight values can be configured and default
to 8. For information about configuring AS path weights, contact the Nortel
Networks Technical Solutions Center.
A steep penalty is applied to routes that are advertised with an origin attribute
other than IG P or incomplete .
For an OSPF internal route or a d ir ect route, the loc al preference attri but e is set to:
local_preference
is the OSPF metric for an OSPF route or the configured cost for a direct
metric
= (8191 + 256 - (
metric
+ 255))
route.
For a RIP route, an EGP route, an OSPF ASE route, or a static route, the local
preference attribute is set to:
local_preference
is the RIP metric for a RIP route, the EGP metric for an EGP route, the
metric
= (256 -
metric
)
OSPF metric for an OSPF ASE route, or the configured cost for a static route.
Local preference valu es f or OSPF int ernal routes and dir ect rou tes ar e higher than
the local preference values calculated for BGP routes.
3-26
308628-15.0 Rev 00
Page 71

Best-Route Selection
BGP uses the rules in Table 3-4 as tie-breakers to select the best BGP route. This
table lists the rules in the order in which they are evaluated.
Table 3-4. Best-Route Selection Rules
Configuring Global BGP Parameters
Default Preference Tiebreaker Rules
(local-pref-calculation enabled)
1. Choose the route with the lower route weight.
2. Choose the route with the hig her local preferen ce
attribute.
3. Choose the route with the shortest AS path.
4. Choose the route with the smallest ORIGIN
(IGP < EGP < INCOMPLETE).
5. Choose the route with the lower multiexit
discriminator (MED) attribute if both routes
include this optional attribute.
6. Choose the route with the lower interior cost to
the next hop.
7. Choose external BGP over IBGP.
8. Choose the route with the lower BGP identifier.
9. Choose the route wit h the lowe r BGP connection
remote address.
10.Choose the route with the lowe r BGP connection
local address.
Calculated Preference Tiebreaker Rules
(local-pref-calculation disabled)
1. If the next hop is inaccessible, do not consider it.
2. Consider larger BGP administrative weights first.
3. If the routes have the same weight, consider the
route with the highest local preference .
4. If the routes have the same local preference,
prefer the route that the local router originated.
5. If no route was locally originated, prefer the
shorter AS path.
6. If the routes have the same AS path length,
prefer the lowest origin code (IGP is preferred
over EGP, which is preferred over incomplete).
7. If the origin codes are the same and all paths
come from the AS, prefe r the path with the lowes t
multiexit discriminator (MED) metric. Treat a
missing MED metric as 0.
8. If the MED metrics are the same, prefer external
paths over internal paths.
9. If IGP synchronization is disabled and only
internal paths rema in, p refer the p ath th rough the
closest neighbor.
10.Prefer the route with the lowest IP address value
for the BGP router ID.
Using the BCC
To configure local preference calculation, go to the BGP prompt (for example,
box; ip; bgp
local-pref-calculation
state
308628-15.0 Rev 00
) and enter:
<state>
is one of the values shown in Table 3-5.
3-27
Page 72

Configuring IP Exterior Gateway Protocols (BGP and EGP)
Table 3-5. Local Preference Calculation Method
State Meaning
enabled (default) BGP uses the decision rules in the first column of Table 3-4 for
local preference calculation and best-route selection.
disabled BGP does not perform local preference calculation. Instead, it
assigns a value of 100 to th e route and use s a modified form ula for
best-route selection.
For example, the following command disables BayRS BGP local preference
calculation and route selection:
local-pref-calculation disabled
bgp#
bgp#
Using Site Manager
To disable or reenable local preference calculation, complete the following steps:
Site Manager Procedure
3-28
You do this System responds
1. In the Configuration Manager window,
choose
2. Choose
3. Choose
4. Choose
5. Set the
parameter. Click on
parameter description on page A-9
6. Click on OK. You return to the Configuration Manager
Protocols
IP
. The IP menu opens.
BGP
BGP Global
Local Pref Calculation
.
. The BGP menu opens.
. The Edit BGP Global Parameters window
Help
or see the
.
The Protocols menu opens.
opens.
window.
308628-15.0 Rev 00
Page 73

Configuring BGP Message Logging
By default, the router logs only a few event messages generated by BGP. To
troubleshoot a problem, you can configure the router to log BGP event messages
for the entire router or for a specific peer-to-peer session by specifying:
• Local and remote addresses of a peer-to-peer session or sessions
• Message severity level: fault, warning, information, trace, debug, or all levels
• BGP message type: open, keepalive, update, or notification
When you are not troubleshooting a problem, configure BGP message logging to
limit the number of debug messages that BGP generates and logs. If you allow
BGP to log all debug messages, the debug messages will overrun and overwrite
the log file.
For more information about event messages, see the BayRS event
Note:
message database at http://www25.nortelnetworks.com/library/tpubs/events.
(You also can access the event message database from the BayRS
documentation CD.)
Configuring Global BGP Parameters
Using the BCC
To configure BGP event message logging, go to the debug-control prompt (for
example,
debug-control
log-message-type {debug
log-packet-type {disabled
To disable event mes sag e logging, set the
(the default value).
308628-15.0 Rev 00
box; ip; bgp; debug-control
) and enter:
|
info
open
warning
|
update
|
|
box; ip; bgp; peer/2.2.2.2/2.2.2.4;
or
|
|
fault
|
notification
log-packet-type
trace
|
all-levels}
|
keepalive}
parameter to
disabled
3-29
Page 74

Configuring IP Exterior Gateway Protocols (BGP and EGP)
For example, the following command sequence configures the router to log BGP
warning, fault, and trace messages for open and keepalive packets for a peer
connection, and then disables message logging:
peer/2.2.2.2/2.2.2.4#
debug-control/2.2.2.2/2.2.2.4#
debug-control/2.2.2.2/2.2.2.4#
debug-control/2.2.2.2/2.2.2.4#
debug-control/2.2.2.2/2.2.2.4#
peer/2.2.2.2/2.2.2.4#
Using Site Manager
To configure BGP event message logging, complete the following steps:
You do this System responds
1. In the Configuration Manager window,
choose
2. Choose
3. Choose
4. Choose
5. Click on
6. Set the following parameters:
• Peer Local/Remote
• Message Level
• Message Trace Switch
Click on
descriptions beginning on page A-24
7. Click on OK. You return to the BGP DEBUG
8. Click on
debug-control
log-message-type {warning fault trace}
log-packet-type {open keepalive}
log-packet-type disabled
back
Site Manager Procedure
The Protocols menu opens.
Protocols
. The IP menu opens.
IP
BGP
BGP DEBUG.
Add
Help
Apply
.
. The BGP menu opens.
The BGP DEBUG Parameters window
opens.
. The NEW BGP DEBUG window opens.
or see the parameter
.
Parameters window.
, and then click on
. You return to the Configuration Manager
Done
window.
3-30
308628-15.0 Rev 00
Page 75

Configuring Global BGP Parameters
Configuring EBGP Route Flap Damping
The frequent change of network reacha bili ty inf ormatio n th at can be caused b y an
unstable route is commonly referred to as route flap. Route flap damping is a
technique for suppressing information about unstable routes.
When configuring the damping of unstable EBGP routes, the route flap damping
mechanism performs the following functions:
• Determines the stability of an EBGP rout e
• Suppresses the use and advertisement of unstable EBGP routes
• Unsuppresses a route that has regained stability
To determine the stability of a route in the IP routing table, BGP maintains a
penalty value for the route based on its recent history. Each time the route flaps
(that is, each time it is withdrawn from the routing tabl e), BGP increments this
penalty value. During the period of time that the route does not flap, BGP
decrements the penalty val u e. I n thi s way, as the instability of the route increases,
the penalty value rises. As the route becomes more stable, the penalty value falls.
To monitor BGP for route flaps, you set the route damping parameter on a BGP
accept policy th at matches the r oute. BGP cre ates a pen alty val ue for th e route an d
sets the value to 0. BGP increments the penalty value each time that the route
flaps.
BGP provides a route flap damping template that allows you to control the way
BGP evaluates a route’s penalty and how, based on the penalty, it decides to
suppress or unsuppress the route. The template consists of the following
parameters:
• Cutoff threshol d. If the penalt y value rises above the valu e that you speci fy as
• Reuse threshold. If the pen al ty val ue fall s bel ow the value that you specify as
• Reachable decay. If the route is still rea chable af ter the pe riod of ti me that you
• Unreachable decay. If the route is still unreachable after the period of time
308628-15.0 Rev 00
the cutoff threshold, BGP suppresses the route.
the reuse threshold, BGP unsuppresses the route.
specify, BGP reduces the penalty value by half. (BGP uses a half-life decay
algorithm to decrement the penalty value.)
that you specify, BGP reduces the penalty value by half. ( BGP uses a half -li fe
decay algorithm to decrement the penalty value.)
3-31
Page 76

Configuring IP Exterior Gateway Protocols (BGP and EGP)
• Maximum holddown time. If the rou te remains supp ressed after t he number of
minutes that you specify, BGP unsuppresses it (even if the penalty value
exceeds the threshold). This action does not change the penalty value.
• Memory limit. If the status of the route remains unchanged, either reachable
or unreachable, after the number of minutes that you specify, BGP
unsuppresses the route (if it is suppressed) and resets the penalty value and
flap count to 0.
A route that has been suppressed may not be immediately available for
Note:
use as soon as the penalty value crosses the configured threshold.
You can also use the BCC or Site Manage r to crea te a route f lap damping t emplate
and a BGP accept policy for route flap damping.
Using the BCC
T o create a route fl ap damping te mplate, go t o the BGP prompt (for e xample,
ip; bgp
damping-template name <name>
name
) and enter:
is a unique name identifying the template (from 1 through 20 characters).
box;
A template-specific prompt appears.
For example, the following command creates a route flap damping template
named steady:
bgp#
damping-template name steady
damping-template/steady#
To change the default values of the parameters for a template that you created, go
to the template-specific prompt (for example,
damping-template/steady
<parameter> <value>
Table 3-6 l
ists the parameters and values that you can enter
) and enter:
box; ip; bgp;
.
3-32
308628-15.0 Rev 00
Page 77

Configuring Global BGP Parameters
Table 3-6. Route Flap Damping Template Parameters
Parameter
cutoff-threshold
reuse-threshold
reachable-decay
unreachable-decay
max-hold-down
memory-limit
Default Value
2000
750
5
15
45
45
Meaning
Specifies a maximum threshold (1 through 20000)
for the route penalty value
Specifies a minimum threshold (1 through 20000)
for the route penalty value
Specifies the number of minutes (1 through 45)
that the route can remain reachable before BGP
decrements the penalty value by half
Specifies the number of minutes (1 through 45)
that the route c an re ma in unreachable befo re BGP
decrements the penalty value by half
Specifies the maximum number of minutes
(1 through 60) that a route can remain suppressed
Specifies the maximum number of minutes
(1 through 60) tha t the s tatus of a ro ute c an rem ain
unchanged—reachable or unreachable—before
BGP resets the penalty value and flap count to 0
and unsuppresses the route
To apply the template to an inbound BGP routing update:
Go to the BGP prompt (for example,
1.
box; ip; bgp)
.
2.
308628-15.0 Rev 00
Create and name a BGP accept policy.
For instructions on creating a BGP accept policy, see “
Accept Policy” on page 5-2.
An accept policy-specific prompt appears.
Configuring a BGP
3-33
Page 78

Configuring IP Exterior Gateway Protocols (BGP and EGP)
Modify the accept policy by entering the following commands:
3.
action accept
route-damping enabled
route-damping-template {default
is the name of the template that you want to apply to the unstable route.
name
Match the acc ept policy to the unstable route.
4.
<name>
|
}
For instructions, see “
Specifying Match Criteri a for a BGP Acc ept Policy ” on
page 5-6.
For example, the following command sequence creates a BGP accept policy
named fred that causes BGP to apply the route flap damping template steady to
updates for network 3.4.0.0:
accept fred
bgp#
accept/fred/bgp#
accept/fred/bgp#
accept/fred/bgp#
accept/fred/bgp#
match/bgp/accept/fred#
network/3.4.0.0/255.255.0.0/exact/bgp/accept/fred#
action accept
route-damping enabled
route-damping-template steady
match
network 3.4.0.0/16/exact
3-34
308628-15.0 Rev 00
Page 79

Using Site Manag er
To create a route flap damping template, complete the following steps:
You do this System responds
Configuring Global BGP Parameters
Site Manager Procedure
1. In the Configuration Manager window,
choose
2. Choose
3. Choose
4. Choose
5. Choose
6. Click on
7. Click on
8. Set the following parameters:
• Name
• Cutoff Threshold
• Reuse Threshold
• Reachable Decay
• Unreachable Decay
• Max HoldDown
• Memory Limit
Click on
descriptions beginning on page A-47.
9. Click on OK. You return to the Route Flap Dampening
10. Click on
Protocols
. The IP menu opens.
IP
Policy Filters
BGP-4
Accept Policies
Route Flap
Add
Help
Done
.
. The Policy Filters menu opens.
. The BGP-4 menu opens.
. The BGP4 Accept Policy Filters window
. The Route Flap Dampening List window
. The Route Flap Dampening
or see the parameter
. You return to the BGP4 Accept Policy
The Protocols menu opens.
opens.
opens.
Configuration window opens.
List window.
Filters window.
308628-15.0 Rev 00
3-35
Page 80

Configuring IP Exterior Gateway Protocols (BGP and EGP)
To apply a route flap damping template to an existing BGP accept policy,
complete the following steps:
Site Manager Procedure
You do this System responds
1. In the Configuration Manager window,
choose
2. Choose
3. Choose
4. Choose
5. Choose
6. Click on the accept policy to which you
want to apply route flap damping.
7. Set the following parameters:
• BGP Route Flap Dampening
• BGP Route Flap Dampening
Click on
descriptions beginning on page A-45
Note: The BGP Route Flap Dampening
Template parameter is grayed out unless
the BGP Route Flap Dampening
parameter is set to ENABLE.
8. Click on
Protocols
. The IP menu opens.
IP
Policy Filters
BGP-4
Accept Policies
Template
Help
Apply
.
. The Policy Filters menu opens.
. The BGP-4 menu opens.
. The BGP4 Accept Policy Filters window
or see the parameter
.
, and then click on
Done
The Protocols menu opens.
opens.
The parameter values for that policy
appear in the window.
. You return to the Configuration Manager
window.
3-36
308628-15.0 Rev 00
Page 81

Configuring Global BGP Parameters
Assigning Weight Classes and Values to an AS
You can assign a weight class to any AS number and a weight value to a weight
class. Weights provide a way either to prefer or to avoid routes that pass through
certain ASs. The weights of each AS in a path are added, and the path with the
smallest total weight is the preferred path. An assigned weight can range from 1
through 15 plus an infi ni ty value. Any path containing an AS wei ght of i nfi nity is
avoided.
AS weight classes allow you to assign multiple weight values to the same AS.
This feature allows you to consider an AS path differently for different networks.
For example, consider a situation in which two networks—192.32.1.0 and
192.32.2.0—are both reachable by two paths. The first path to each network
shares a common AS—AS 5. The second path to each network also shares a
common AS—AS 10. If you want to favor AS 5 in the path to 192.32.1.0 and AS
10 in the path to 192.32.2.0, you c an assign one wei ght class to AS 5 in the path to
network 192.32.1.0 and another class to AS 5 in the path to 192.32.2.0.
When a BGP router receives a new route, it evaluates the route against any
existing accept policies. If after this evaluation the path still is to be used, the
router calculates the total weight of the path. Configure the same AS weights on
all BGP routers in an AS.
You can use Site Manager to assign a weight and a weight class to an AS by
completing the following st eps:
308628-15.0 Rev 00
Site Manager Procedure
You do this System responds
1. In the Configuration Manager window,
choose
2. Choose
3. Choose
4. Choose
5. Click on
Protocols
IP
. The IP menu opens.
BGP
Weights
Add
.
. The BGP menu opens.
. The BGP AS Weight Parameters wind ow
. The BGP AS Weights window opens.
The Protocols menu opens.
opens.
(continued)
3-37
Page 82

Configuring IP Exterior Gateway Protocols (BGP and EGP)
Site Manager Procedure
You do this System responds
6. Set the following parameters:
•
AS
•
Weight Value 1 through 8
Click on
descriptions beginning on page A-20
7. Click on OK. You return to the BGP AS Weight
8. Click on
or see the parameter
Help
.
. You return to the Configuration Manager
Done
(continued)
Parameters window.
window.
3-38
308628-15.0 Rev 00
Page 83

Chapter 4
Configuring BGP Peers
A BGP speaker forms a neighbor relat ionship by estab lishing a TCP connecti on to
another BGP speaker or peer, based on local configuration information. You can
configure a BGP peer-to-peer session by setting the BGP parame te rs de scr ibed in
the following sections:
Topic Page
Defining a Peer-to-Peer Session 4-2
Initiating a Peer-to-Peer Session 4-4
Negotiating the BGP Version 4-6
Keeping the Connection Alive 4-8
Setting the External Advertisement Timer 4-9
Specifying a Holddown Time 4-11
Setting a Minimum AS Origination Interval 4-12
Overriding the Local AS Number 4-14
Specifying a Maximum Update Size 4-14
Specifying a Time-to-Live Value 4-16
Specifying the Next-Hop Router 4-17
Setting the Route Echo Switch 4-18
Disabling and Reenabling Loop Detection 4-20
Configuring Peers over an Unnumbered Point-to-Point Link 4-21
Configuring and Enabling MD5 Authentication 4-22
308628-15.0 Rev 00
4-1
Page 84

Configuring IP Exterior Gateway Protocols (BGP and EGP)
Defining a Peer-to-Pe er Session
To define a peer-to-peer session, specify the following:
• Local IP interface address
• Remote IP interface addres s
• AS number of the autonomous system in which the remote BGP peer is
located
In configurations where BGP speakers reside on routers that have multiple
network connections over multiple IP interfaces (the typical case for IBGP
speakers), consider using the address of the router’s circuitless (virtual) IP
interface as the local peer address. In this way, you ensure that BGP is reachable
as long as there is an active circuit on the router.
If the remote peer is located in a different AS from the local peer, the remote
address must be on the same subnet as the local address. (To override this
restriction, see “
and the remote peer are located in the same AS, BGP assumes that you are
configuring an IBGP session and does not impose this restriction.
Enabling Multihop Connections” on page 3-13.)
If the local peer
Using the BCC
4-2
You can use the BCC or Site Manager to specify this information.
To define a peer-to-peer session, go to the BGP prompt (for example,
bgp
) and enter
peer local
local_address
remote_address
as_number
:
<local_address>
remote
<remote_address>
as
<as_number>
is the IP address of the local interface.
is the IP address of the remote interface.
is the number of the AS in which the remote peer is located.
box; ip;
For example, the following command defines a session with a remote peer in
AS 5. The local IP interface is 2.2.2.2. The interface for the remote peer is 2.2.2.5.
bgp#
peer local 2.2.2.2 remote 2.2.2.5 as 5
peer/2.2.2.2/2.2.2.5#
308628-15.0 Rev 00
Page 85

Using Site Manager
To define a peer-to-peer session, complete the following steps:
You do this System responds
Configuring BGP Peers
Site Manager Procedure
1. In the Configuration Manager window,
choose
2. Choose
3. Choose
4. Choose
5. Click on the IP interface for which you
want to edit BGP peer parameters.
6. Click on
7. Click on
8. Set the following parameters:
• Peer Address
•
• Local Address
•
Click on
descriptions beginning on page A-11
9. Click on OK. You return to the BGP Peer List window.
10. Click on
Protocols
. The IP menu opens.
IP
BGP
Peers
BGP Peers
Add
Peer AS
Peer Mode
Help
Apply
.
. The BGP menu opens.
. The IP Interface List for BGP window
. The BGP Peer List window opens.
. The BGP Peer window opens.
or see the parameter
, and then click on
Done
The Protocols menu opens.
opens.
.
. Y ou retu rn to the IP Inte rface List for BGP
window.
308628-15.0 Rev 00
4-3
Page 86

Configuring IP Exterior Gateway Protocols (BGP and EGP)
Initiating a Peer-to-Peer Session
A BGP speaker ini tiates a pe er-t o-p eer connect ion b y period icall y is suing an o pen
message.
messages.
BGP speakers respond to connection requests by returning open
In Figure 4-1
, for example, BGP speaker A sends an open message to BGP
speaker B to request a connection; BGP speaker B responds by sending an open
message to BGP speaker A.
Open message A to B
BGP
BGP
speaker A
Speaker A
BGP
BGP
speaker A
Speaker A
Open message B to A
Keepalive message A to B
Keepalive message B to A
BGP
BGP
speaker B
Speaker B
BGP
BGP
speaker B
Speaker B
IP0022B
Figure 4-1. Establishing and Confirming a Connection Between BGP
Peers
All BGP speakers respond to connection requests from other speakers.
By default, BGP attempts to initiate a connection on each interface configured for
peer-to-peer communicat ion. If the atte mpt is unsucces sful, BGP retrie s every 120
seconds (default interval).
4-4
You can use the BCC or Site Manager to change the default retry interval or
disable the initiation function by setting the retry parameter to 0.
308628-15.0 Rev 00
Page 87

Using the BCC
Configuring BGP Peers
To set the retry interval, go to a BGP peer prompt (for example,
peer/2.2.2.2/2.2.2.3
<
retry
interval
attempts to initi ate a pee r-to- peer se ssion. Settin g thi s value to 0 disab les at tempt s
to initiate a peer-to-peer session.
For example, the following command causes BGP to retry every 60 seconds to
establish a peer-to-peer session between IP interfaces 2.2.2.2 and 2.2.2.3:
peer/2.2.2.2/2.2.2.3#
peer/2.2.2.2/2.2.2.3#
Using Site Manager
To set the retry in terval, complete the following steps:
You do this System responds
1. In the Configuration Manager window,
choose
2. Choose
3. Choose
4. Choose
5. Click on the IP interface for which you
want to edit BGP peer parameters.
6. Click on
7. Click on the peer for which you want to
edit parameters.
8. Set the
Click on
description on page A-14
9. Click on
box; ip; bgp;
) and enter
:
interval>
is the number of seconds (from 1 through 2,147,483,647) between
retry 60
Site Manager Procedure
The Protocols menu opens.
Protocols
. The IP menu opens.
IP
BGP
Peers
BGP Peers
Connect Retry Timer
Help
Apply
.
. The BGP menu opens.
. The IP Interface List for BGP window
opens.
. The BGP Peer List window opens.
The parameters for that peer appear in
the window.
parameter.
or see the parameter
.
, and then click on
. Y ou retu rn to the IP Inte rface List for BGP
Done
window.
308628-15.0 Rev 00
4-5
Page 88

Configuring IP Exterior Gateway Protocols (BGP and EGP)
Negotiating the BGP Version
BGP peers negotiate the version of BGP that they will use to exchange routing
information. If you enab le both BGP-3 and BGP-4, t he rou ter fi rst at tempts to use
BGP-4. If the BGP peer is not a BGP-4 speaker, the router uses BGP-3.
By default, BGP considers BGP-4 as both the minimum and maximum acc eptable
version for negotiation.
You can use the BCC or Site Manager to specify BGP-3 as the minimum or
maximum acceptable version.
Using the BCC
To specify the minimum version, go to a BGP peer prompt
bgp; peer/2.2.2.2/2.2.2.3
<
min-version
version
is either
version>
bgp3
or
) and
bgp4
enter:
(default).
T o spe cify the maxi mum versi on, go to a BGP pe er prompt
bgp; peer/2.2.2.2/2.2.2.3
<
max-version
version
is either
version>
bgp3
or
) and
bgp4
enter:
(default).
(for example,
(for example,
box; ip;
box; ip;
4-6
308628-15.0 Rev 00
Page 89

Using Site Manager
To specify the minimum and maximum version of BGP, complete the following
steps:
You do this System responds
Configuring BGP Peers
Site Manager Procedure
1. In the Configuration Manager window,
choose
2. Choose
3. Choose
4. Choose
5. Click on the IP interface for which you
want to edit BGP peer parameters.
6. Click on
7. Click on the peer for which you want to
edit parameters.
8. Set the following parameters:
•
•
Click on
descriptions starting on page A-13
9. Click on
Protocols
. The IP menu opens.
IP
BGP
Peers
BGP Peers
Min BGP Version
Max BGP Version
Help
Apply
.
. The BGP menu opens.
. The IP Interface List for BGP window
. The BGP Peer List window opens.
or see the parameter
.
, and then click on
Done
The Protocols menu opens.
opens.
The parameters for that peer appear in
the window.
. Y ou retu rn to the IP Inte rface List for BGP
window.
308628-15.0 Rev 00
4-7
Page 90

Configuring IP Exterior Gateway Protocols (BGP and EGP)
Keeping the Connection Alive
After a session is es tabli sh ed, BGP peer s peri odical ly is sue kee paliv e message s to
maintain the connection. By default, BGP issues a keepalive message every 30
seconds.
You can use the BCC or Site Manager to specify how often BGP issues a
keepalive message on this peer-to-p eer session or to disable t he keepalive f unction
by setting the value to 0.
Using the BCC
T o set the k eepa li ve interv al, go to a BGP peer prompt (fo r exa mple,
peer/2.2.2.2/2.2.2.3
keepalive
seconds
2,147,483,647) on this peer ses sion. Set ting this value to 0 disables the sending of
keepali ve messages.
For example, the following command causes BGP to send a keepalive message
every 10 seconds on interface 2.2.2.2 to the peer at 2.2.2.5:
peer/2.2.2.2/2.2.2.5/5#
peer/2.2.2.2/2.2.2.5/5#
Using Site Manager
To set the keepalive interval, complete the following steps:
You do this System responds
1. In the Configuration Manager window,
choose
2. Choose
3. Choose
4. Choose
box; ip; bgp;
) and enter:
<
seconds>
specifies how often BGP sends a keepalive message (from 1 through
keepalive 10
Site Manager Procedure
The Protocols menu opens.
Protocols
IP
. The IP menu opens.
BGP
Peers
.
. The BGP menu opens.
. The IP Interface List for BGP window
opens.
(continued)
4-8
308628-15.0 Rev 00
Page 91

Configuring BGP Peers
Site Manager Procedure
You do this System responds
5. Click on the IP interface for which you
want to edit BGP peer parameters.
6. Click on
7. Click on the peer for which you want to
edit parameters.
8. Set the
on
on page A-15
9. Click on
BGP Peers
KeepAlive Timer
Help
or see the parameter description
Apply
. The BGP Peer List window opens.
parameter . Click
.
, and then click on
Done
. Y ou retu rn to the IP Inte rface List for BGP
(continued)
The parameters for that peer appear in
the window.
window.
Setting the Extern al Ad ve rtisement Ti mer
After a connection is established, the BGP speaker uses one or more update
messages to send the entire IP routing table (compliant with local BGP announce
policies). BGP, however, does not require the entire routing table to be sent again.
Therefore, the BGP speaker must keep a current version of the routing
information rece ived fro m all i ts peer s for as long as t he connec tion to each pe er is
valid. This information is updated by means of update messages whenever
changes occur.
By default, BGP examines the routing table for changes every 30 seconds. If a
change has occurred, BGP issues an update message on the connection.
You can use the BCC or Site Manager to specify a value for the external
advertisement timer.
Using the BCC
To specify a value for the external advertis ement timer, go to a BGP peer prompt
(for example ,
advertise-time
seconds
interval at which BGP examines th e routing table for changes before issuing an
update message on this peer session.
308628-15.0 Rev 00
box; ip; bgp; peer/2.2.2.2/2.2.2.3
<
seconds>
) and enter:
is an integer (from 1 through 2,147,483,647) specifying the minimum
4-9
Page 92

Configuring IP Exterior Gateway Protocols (BGP and EGP)
For example, the following command sets the external ad vertisement timer to 20
seconds for the peer session established between interfaces 2.2.2.2 and 2.2.2.5:
peer/2.2.2.2/2.2.2.5#
peer/2.2.2.2/2.2.2.5#
Using Site Manager
To s pecify a value for the external advertisement timer, complete the following
steps:
You do this System responds
1. In the Configuration Manager window,
choose
2. Choose
3. Choose
4. Choose
5. Click on the IP interface for which you
want to edit BGP peer parameters.
6. Click on
7. Click on the peer for which you want to
edit parameters.
8. Set the
parameter. Click on
parameter description on page A-14.
9. Click on
advertise-time 20
Site Manager Procedure
The Protocols menu opens.
Protocols
IP
. The IP menu opens.
BGP
Peers
BGP Peers
External Advertisement Tim er
Apply
.
. The BGP menu opens.
. The IP Interface List for BGP window
opens.
. The BGP Peer List window opens.
The parameters for that peer appear in
the window.
Help
or see the
, and then click on
Done
. Y ou retu rn to the IP Inte rface List for BGP
window.
4-10
308628-15.0 Rev 00
Page 93

Specifying a Hold down Time
The holddown time is the amount of time that either peer waits for a keepalive or
update message before declaring the connection down.
A BGP speaker that initiates a connection inserts a holddown time value into the
open message. The peer responds with an open message that also contains a
holddown time value. If the BGP speakers establish a session, they use the lesser
value (which must be greater than 2 seconds). There are two exceptions to this
rule:
• If one peer sends a nonzero holddown time, the peers use the nonzero
holddown time on the session.
• If both peers send zero holddown times, the peers observe no holddown time
on the session.
By default, BGP inserts a value of 90 seconds into the open message.
You can use the BCC or Site Manager to reset the holddown time value or to
disable the holddown function by setting this value to 0.
Configuring BGP Peers
Using the BCC
T o specify a hol ddo wn time, go to a BGP peer prompt (f or exam ple,
peer/2.2.2.2/2.2.2.3
holddown
seconds
for a keepalive or update message before declaring the connection down.
For example, the following command sets the holddown time to 60 seconds for
the peer session established between interfaces 2.2.2.2 and 2.2.2.5:
peer/2.2.2.2/2.2.2.5#
peer/2.2.2.2/2.2.2.5#
308628-15.0 Rev 00
box; ip; bgp;
) and enter:
<seconds>
is the number of s eco nds (f rom 3 t hrough 2,1 47,483,647 ) tha t BGP w ai ts
holddown 60
4-11
Page 94

Configuring IP Exterior Gateway Protocols (BGP and EGP)
Using Site Manager
To s pecify a holdd own ti me, complete the following steps:
Site Manager Procedure
You do this System responds
1. In the Configuration Manager window,
choose
2. Choose
3. Choose
4. Choose
5. Click on the IP interface for which you
want to edit BGP peer parameters.
6. Click on
7. Click on the peer for which you want to
edit parameters.
8. Set the
Help
page A-15.
9. Click on
Protocols
IP
. The IP menu opens.
BGP
Peers
BGP Peers
Holdtime
or see the parameter description on
Apply
.
. The BGP menu opens.
. The IP Interface List for BGP window
. The BGP Peer List window opens.
parameter. Click on
, and then click on
Done
The Protocols menu opens.
opens.
The parameters for that peer appear in
the window.
. Y ou retu rn to the IP Inte rface List for BGP
window.
Setting a Minimum AS Origination Interval
By default, a BGP speaker that issues an update to adve rtise a change in the AS
must wait at least 15 seconds before advertising a subsequent change.
Using the BCC
4-12
You can use the BCC or Site Manager to specify a different interval.
To specify a different interval, go to a BGP peer prompt (for example,
bgp; peer/2.2.2.2/2.2.2.3
min-originate-time
seconds
is an integer (from 1 through 2,147,483,647) indicating the minimum
) and enter:
seconds>
<
number of seconds that BGP waits between advertisements.
308628-15.0 Rev 00
box; ip;
Page 95

For example, the following command causes BGP to wait at least 30 seconds
between updates on the peer session established between interfaces 2.2.2.2 and
2.2.2.5:
peer/2.2.2.2/2.2.2.5# min-originate-time 30
peer/2.2.2.2/2.2.2.5#
Using Site Manager
To change the minimum AS origination interval, complete the following steps:
You do this System responds
Configuring BGP Peers
Site Manager Procedure
1. In the Configuration Manager window,
choose
2. Choose
3. Choose
4. Choose
5. Click on the IP interface for which you
want to edit BGP peer parameters.
6. Click on
7. Click on the peer for which you want to
edit parameters.
8. Set the
parameter. Click on
parameter description on page A-16
9. Click on
Protocols
IP
. The IP menu opens.
BGP
Peers
BGP Peers
Min AS Origination Interval
Apply
.
. The BGP menu opens.
. The IP Interface List for BGP window
. The BGP Peer List window opens.
Help
or see the
.
, and then click on
Done
The Protocols menu opens.
opens.
The parameters for that peer appear in
the window.
. Y ou retu rn to the IP Inte rface List for BGP
window.
308628-15.0 Rev 00
4-13
Page 96

Configuring IP Exterior Gateway Protocols (BGP and EGP)
Overriding the Local AS Number
By default, a BGP speaker that issues an open message to initiate a peer-to-peer
session uses the AS number that you set with the Local AS parameter.
You can use Site Manager to specify a different AS number (overriding the
default) by completing the following steps:
Site Manager Procedure
You do this System responds
1. In the Configuration Manager window,
choose
2. Choose
3. Choose
4. Choose
5. Click on the IP interface for which you
want to edit BGP peer parameters.
6. Click on
7. Click on the peer for which you want to
edit parameters.
8. Set the
parameter. Click on
parameter description on page A-16
9. Click on
Protocols
IP
. The IP menu opens.
BGP
Peers
BGP Peers
Local AS to Advertise to Peer
Apply
.
. The BGP menu opens.
. The IP Interface List for BGP window
. The BGP Peer List window opens.
Help
or see the
.
, and then click on
Done
Specifying a Maximum Update Size
By default, a BGP speaker sends update messages with a maximum size of 800
You can reset the maximum update message size.
bytes.
advertises a single route is larger than the configured message size, the actual
message size can override the configured value.
The Protocols menu opens.
opens.
The parameters for that peer appear in
the window.
. Y ou retu rn to the IP Inte rface List for BGP
window.
If the update message th at
4-14
You can use the BCC or Site Manager to specify a maximum upd ate message s ize.
308628-15.0 Rev 00
Page 97

Using the BCC
Configuring BGP Peers
To specify a maximum update size, go to a BGP peer prompt (for example,
ip; bgp; peer/2.2.2.2/2.2.2.3
max-update-size
bytes
this peer session.
For example, the following command specifies a maximum size of 950 bytes for
updates sent on the peer session established between interfaces 2.2.2.2 and
2.2.2.5:
peer/2.2.2.2/2.2.2.5#
peer/2.2.2.2/2.2.2.5#
Using Site Manager
To specify a maximum update size, complete the following steps:
You do this System responds
1. In the Configuration Manager window,
choose
2. Choose
3. Choose
4. Choose
5. Click on the IP interface for which you
want to edit BGP peer parameters.
6. Click on
7. Click on the peer for which you want to
edit parameters.
8. Set the
Click on
description on page A-16
9. Click on
box;
) and enter:
bytes>
<
is the maximum size (from 64 through 4096) of updates that BGP sends on
max-update-size 950
Site Manager Procedure
The Protocols menu opens.
Protocols
. The IP menu opens.
IP
BGP
Peers
BGP Peers
Peer Max Update Size
Help
Apply
.
. The BGP menu opens.
. The IP Interface List for BGP window
opens.
. The BGP Peer List window opens.
The parameters for that peer appear in
the window.
parameter .
or see the parameter
.
, and then click on
. Y ou retu rn to the IP Inte rface List for BGP
Done
window.
308628-15.0 Rev 00
4-15
Page 98

Configuring IP Exterior Gateway Protocols (BGP and EGP)
Specifying a Time-to-Live Value
Each IP data packet includes a time-to-live (TTL) value. The TTL value specifies
the maximum number of hops that the pack et i s all o wed to tra verse in the network
before an intermediate router discards the packet. The TTL counter prevents
packets from looping endlessly through the network. For instructions on setting
the global IP TTL value, see Configuring IP, ARP, RARP, RIP, and OSPF Services.
By default, BGP implements a TTL value as follows:
• IBGP peers use the TTL value set for global IP.
• BGP enforces the one-hop rule for EBGP peers, that is, the remote peer must
be located on a directly attached network.
If you enable multihop connections for EBGP peers, EBGP peers also use the
TTL value set for global IP (see “Enabling Multihop Connections” on page 3-13).
You can specify a TTL value for a BGP session that overrides the TTL value set
for IP. To specify a TTL value for a BGP peer connection, go to a BGP peer
prompt (for example,
ttl
<hops>
box; ip; bgp; peer/2.2.2.2/2.2.2.3
) and enter:
4-16
hops
is the time-to-live value (expressed as the number of hops from 1 through
255) that BGP inserts in outbound updates sent on this peer session. The default
value is 0 (to use the same TTL value set for global IP).
For example, the following command sequence enables multihop connections for
all EBGP peers, configures a session with a remote peer i n AS 5, and causes BGP
to insert a TTL value of 4 in each outbound update sent over the peer connection:
multi-hop enabled
bgp#
peer local 2.2.2.2 remote 3.3.3.3 as 5
bgp#
peer/2.2.2.2/3.3.3.3#
peer/2.2.2.2/3.3.3.3#
ttl 4
308628-15.0 Rev 00
Page 99

Specifying the Next-Hop Router
A BGP update message has a path attribute called NEXT_HOP that specifies the
IP address of the router to use as the next hop for the advertised destinations. By
default, the NEXT_HOP at tribute can specify the IP address of a route r other than
this BGP router.
Configuring the peer to advertise a next hop other than itself can eliminate extra
forwarding hops. However, you can configure the router to always send the local
BGP peer’s IP address as the next hop in all advertisements.
Using the BCC
To specify whether the BGP peer router sends its own address as the next hop in
advertisements, go to a BGP peer prompt (for example,
peer/2.2.2.2/2.2.2.3
) and enter:
Configuring BGP Peers
box; ip; bgp;
next-hop-self
state
For example, the following command causes BGP to send the local peer’s I P
address as the next hop in all advertisements:
peer/2.2.2.2/2.2.2.5#
peer/2.2.2.2/2.2.2.5#
Using Site Manager
To specify whether the BGP peer router sends its own address as the next hop in
advertisements, complete the following steps:
You do this System responds
1. In the Configuration Manager window,
choose
2. Choose
3. Choose
4. Choose
is either
Protocols
IP
BGP
Peers
<state>
enabled
. The IP menu opens.
. The BGP menu opens.
. The IP Interface List for BGP window
disabled
or
next-hop-self enabled
.
(default).
Site Manager Procedure
The Protocols menu opens.
opens.
(continued)
308628-15.0 Rev 00
4-17
Page 100

Configuring IP Exterior Gateway Protocols (BGP and EGP)
Site Manager Procedure
You do this System responds
5. Click on the IP interface for which you
want to edit BGP peer parameters.
6. Click on
7. Click on the peer for which you want to
edit parameters.
8. Set the
Help
page A-18
9. Click on
BGP Peers
Next Hop Self
or see the parameter description on
.
Apply
. The BGP Peer List window opens.
parameter . Clic k on
, and then click on
Setting the Route Echo Switch
The peer route echo switch controls the way that the router echoes a BGP route
that is chosen for forwarding. Echoing in this case means advertising the route
back to the peer from which it was received.
By default, the router advertises the route back as unreachable. However, you can
configure the router to advertise the route back as reachable and to include the
local AS.
(continued)
The parameters for that peer appear in
the window.
Done
. Y ou retu rn to the IP Inte rface List for BGP
window.
4-18
You can use the BCC or Site Manager to set the peer route echo switch.
308628-15.0 Rev 00
 Loading...