

Page 1

BCM Rls 6.0
InTouch
Task Based Guide
Page 2

InTouch
Copyright © 2010 Avaya Inc.
All Rights Reserved.
Notices
While reasonable efforts have been made to ensure that the information in this document is complete and accurate
at the time of printing, Avaya assumes no liability for any errors. Avaya reserves the right to make changes and
corrections to the information in this document without the obligation to notify any person or organization of such
changes.
Documentation disclaimer
Avaya shall not be responsible for any modifications, additions, or deletions to the original published version of
this documentation unless such modifications, additions, or deletions were performed by Avaya. End User agree to
indemnify and hold harmless Avaya, Avaya’s agents, servants and employees against all claims, lawsuits, demands
and judgments arising out of, or in connection with, subsequent modifications, additions or deletions to this
documentation, to the extent made by End User.
Link disclaimer
Avaya is not responsible for the contents or reliability of any linked Web sites referenced within this site or
documentation(s) provided by Avaya. Avaya is not responsible for the accuracy of any information, statement or
content provided on these sites and does not necessarily endorse the products, services, or information described or
offered within them. Avaya does not guarantee that these links will work all the time and has no control over the
availability of the linked pages.
Warranty
Avaya provides a limited warranty on this product. Refer to your sales agreement to establish the terms of the
limited warranty. In addition, Avaya’s standard warranty language, as well as information regarding support for
this product, while under warranty, is available to Avaya customers and other parties through the Avaya Support
Web site: http://www.avaya.com/support
Please note that if you acquired the product from an authorized reseller, the warranty is provided to you by said
reseller and not by Avaya.
Licenses
THE SOFTWARE LICENSE TERMS AVAILABLE ON THE AVAYA WEBSITE,
HTTP://SUPPORT.AVAYA.COM/LICENSEINFO/ ARE APPLICABLE TO ANYONE WHO DOWNLOADS,
USES AND/OR INSTALLS AVAYA SOFTWARE, PURCHASED FROM AVAYA INC., ANY AVAYA
AFFILIATE, OR AN AUTHORIZED AVAYA RESELLER (AS APPLICABLE) UNDER A COMMERCIAL
AGREEMENT WITH AVAYA OR AN AUTHORIZED AVAYA RESELLER. UNLESS OTHERWISE
AGREED TO BY AVAYA IN WRITING, AVAYA DOES NOT EXTEND THIS LICENSE IF THE
SOFTWARE WAS OBTAINED FROM ANYONE OTHER THAN AVAYA, AN AVAYA AFFILIATE OR AN
AVAYA AUTHORIZED RESELLER, AND AVAYA RESERVES THE RIGHT TO TAKE LEGAL ACTION
AGAINST YOU AND ANYONE ELSE USING OR SELLING THE SOFTWARE WITHOUT A LICENSE. BY
INSTALLING, DOWNLOADING OR USING THE SOFTWARE, OR AUTHORIZING OTHERS TO DO SO,
YOU, ON BEHALF OF YOURSELF AND THE ENTITY FOR WHOM YOU ARE INSTALLING,
DOWNLOADING OR USING THE SOFTWARE (HEREINAFTER REFERRED TO INTERCHANGEABLY
AS "YOU" AND "END USER"), AGREE TO THESE TERMS AND CONDITIONS AND CREATE A
BINDING CONTRACT BETWEEN YOU AND AVAYA INC. OR THE APPLICABLE AVAYA AFFILIATE
("AVAYA").
Copyright
Except where expressly stated otherwise, no use should be made of the Documentation(s) and Product(s) provided
by Avaya. All content in this documentation(s) and the product(s) provided by Avaya including the selection,
arrangement and design of the content is owned either by Avaya or its licensors and is protected by copyright and
other intellectual property laws including the sui generis rights relating to the protection of databases. You may not
modify, copy, reproduce, republish, upload, post, transmit or distribute in any way any content, in whole or in part,
including any code and software. Unauthorized reproduction, transmission, dissemination, storage, and or use
without the express written consent of Avaya can be a criminal, as well as a civil offense under the applicable law.
Third Party Components
Certain software programs or portions thereof included in the Product may contain software distributed under third
party agreements ("Third Party Components"), which may contain terms that expand or limit rights to use certain
portions of the Product ("Third Party Terms"). Information regarding distributed Linux OS source code (for those
Products that have distributed the Linux OS source code), and identifying the copyright holders of the Third Party
Components and the Third Party Terms that apply to them is available on the Avaya Support Web site:
http://support.avaya.com/Copyright.
Trademarks
The trademarks, logos and service marks ("Marks") displayed in this site, the documentation(s) and product(s)
provided by Avaya are the registered or unregistered Marks of Avaya, its affiliates, or other third parties. Users
are not permitted to use such Marks without prior written consent from Avaya or such third party which may own
the Mark. Nothing contained in this site, the documentation(s) and product(s) should be construed as granting, by
implication, estoppel, or otherwise, any license or right in and to the Marks without the express written permission
of Avaya or the applicable third party. Avaya is a registered trademark of Avaya Inc. All non-Avaya trademarks
are the property of their respective owners.
2 NN40011-051 Issue 1.2 BCM Rls 6.0
Page 3

InTouch
Downloading documents
For the most current versions of documentation, see the Avaya Support. Web site: http://www.avaya.com/support
Contact Avaya Support
Avaya provides a telephone number for you to use to report problems or to ask questions about your product. The
support telephone number is 1-800-242-2121 in the United States. For additional support telephone numbers, see
the Avaya Web site: http://www.avaya.com/support
Copyright © 2010 ITEL, All Rights Reserved
The copyright in the material belongs to ITEL and no part of the material may
be reproduced in any form without the prior written permission of a duly
authorised representative of ITEL.
NN40011-051 Issue 1.2 BCM Rls 6.0 3
Page 4

InTouch
Table of Contents
InTouch .............................................................................. 6
Overview .......................................................................................... 6
Features of InTouch ........................................................................................... 6
Prerequisites ...................................................................................................... 6
PC Hardware & Software Requirements ........................................................... 7
Flowchart ......................................................................................... 8
Creating a LAN CTE Client Privilege in Element Manager .............. 9
Accessing Element Manager ............................................................................. 9
Creating the LAN CTE Entry ............................................................................ 12
Installing LAN CTE Software on the Client PC .............................. 16
Installing the InTouch Application .................................................. 24
Starting InTouch for the first time ................................................... 30
Multiple DN Numbers ....................................................................................... 31
Accessing the InTouch Options screen.......................................... 32
The InTouch Interface .................................................................... 36
The InTouch Outlook Toolbar ........................................................ 37
Adding Contacts ............................................................................ 38
Prime Contacts .............................................................................. 42
Promoting a Contact ........................................................................................ 42
Outlook Calendar ‘Mining’ ................................................................................ 44
The Call Window ............................................................................ 45
Making a Call ................................................................................. 45
Viewing Missed Calls ..................................................................... 47
InTouch Presence/ Status updates ................................................ 49
Additional Information .................................................... 50
InTouch Administrator Installation .................................................. 50
Pre-Installation Steps ....................................................................................... 50
InTouch Installation Steps ............................................................................... 52
4 NN40011-051 Issue 1.2 BCM Rls 6.0
Page 5

InTouch
Troubleshooting .............................................................. 54
Generating a Diagnostics File ........................................................ 54
Avaya Documentation Links .......................................... 58
NN40011-051 Issue 1.2 BCM Rls 6.0 5
Page 6
InTouch
InTouch
Overview
InTouch is a new application that runs within Microsoft Outlook on your
Windows based PC. It integrates Email, Instant Messaging (through Skype
and/or MSN Messenger) BCM Telephony Features and Calendar
Management in a powerful yet intuitive software portal.
Features of InTouch
Listed below are some of the key features of InTouch:
One touch interaction between Email, BCM Telephony, Outlook
Calendar and Instant Messaging.
Integrates with MSN Messenger and Skype applications.
Simplifies multiple communication methods.
Create a singular contact list from various address books
View availability with Outlook calendar mining for Prime Contacts
Prerequisites
Before commencing installation, please ensure that the following criteria is
met:
LAN CTE must be installed on each computer that will use the InTouch
application, refer to the Installing LAN CTE Software on the Client
PC section of this guide for more information. Also, a LAN CTE Client
Privilege should be configured for each computer using InTouch (refer
to the Creating a LAN CTE Client Privilege in Element Manager
section of this guide).
Microsoft .Net framework 3.5 (service pack 1) must also be installed.
Each user has a registered DN, and Email account on the Exchange
server.
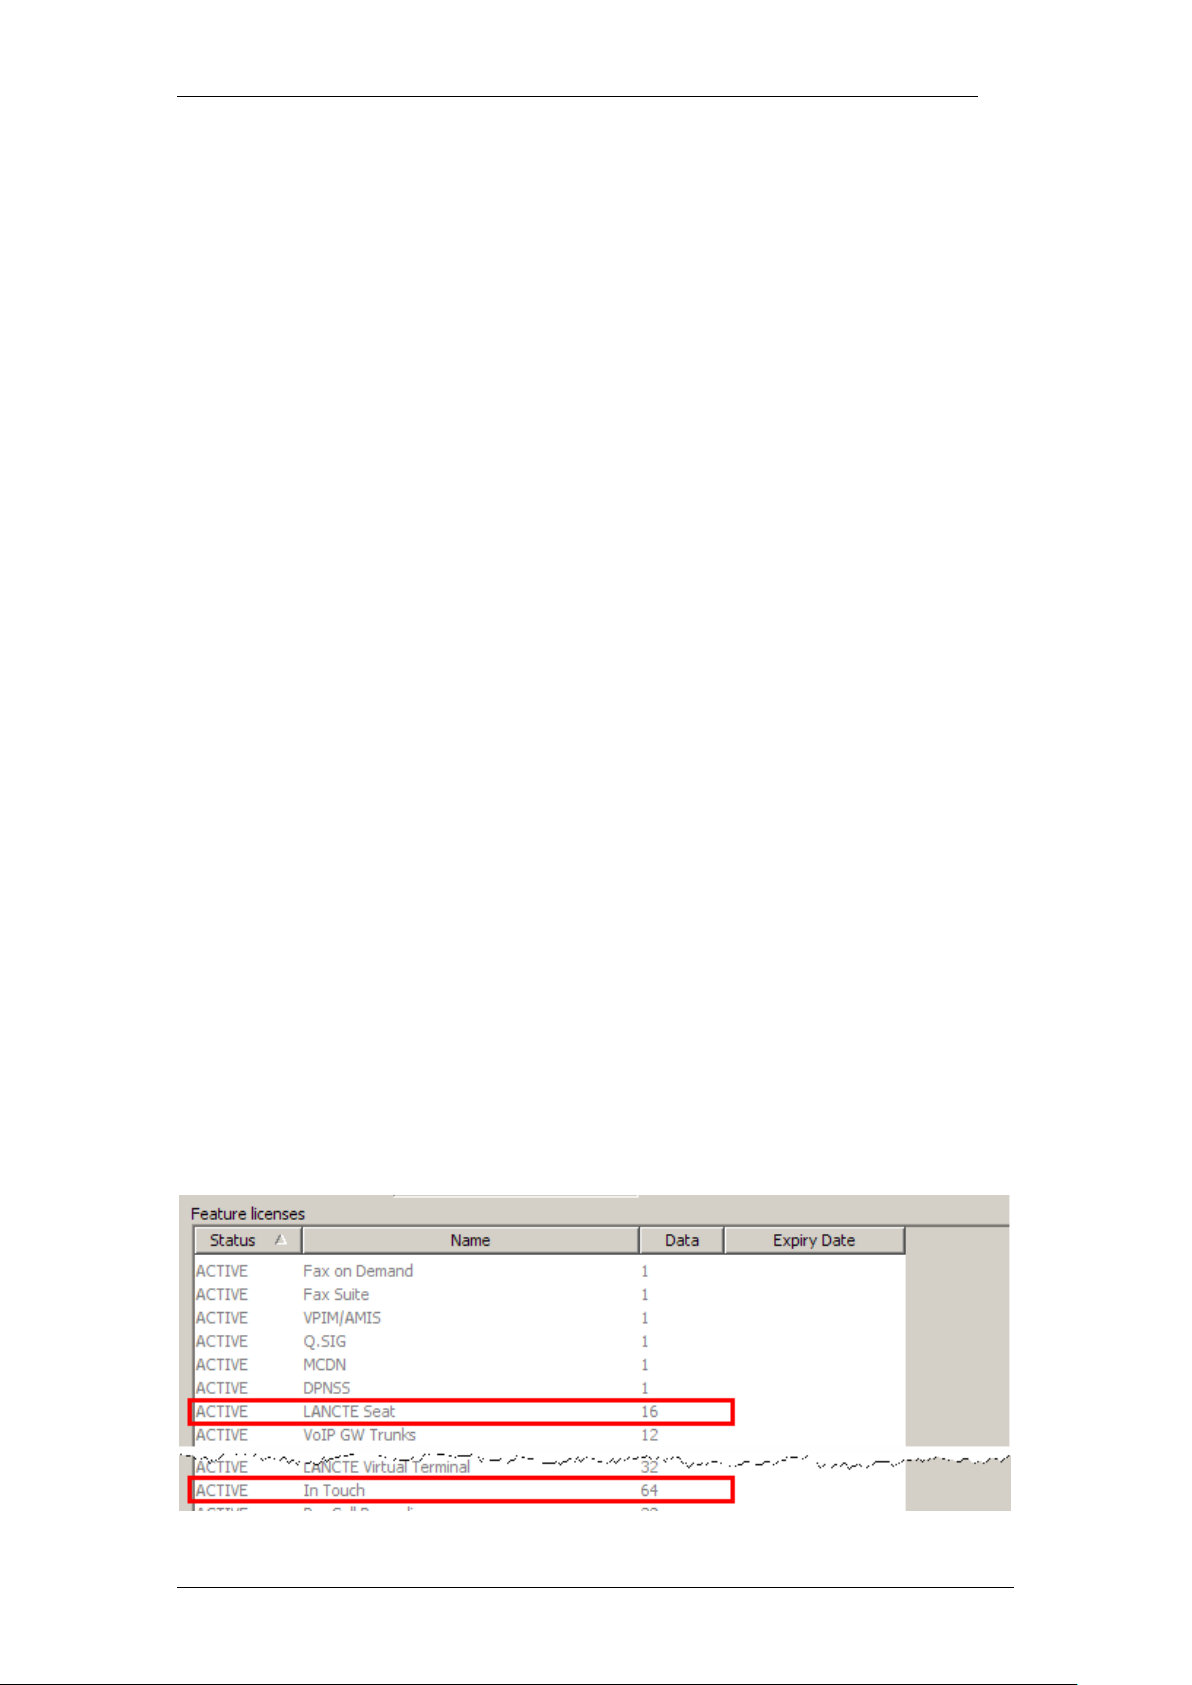
You have purchased enough LAN CTE and InTouch licences to meet
demand.
6 NN40011-051 Issue 1.2 BCM Rls 6.0
Page 7

InTouch
PC Hardware & Software Requirements
The hardware and software requirements for the InTouch application are
listed below.
Operating System
Windows XP Professional SP3
Windows Vista SP2 Business, Ultimate or Enterprise editions (32/64
bit)
Windows 7 Professional, Enterprise, and Ultimate editions (32/64 bit)
Microsoft .NET Framework
Framework 3.5 Service Pack 1 – (at the time of writing, this can be
obtained from http://www.microsoft.com/net/Download.aspx)
Microsoft Outlook
2002 (XP)
2003
2007
Microsoft Exchange
2000
2003
Minimum Skype Version (optional)
3.8.0.188
Minimum MSN Version (optional)
14.0
BCM Software Version (minimum)
BCM 50 Release 5.0
BCM 450 Release 5.0
Windows Installer Version
Windows Installer 3.1
Minimum Hardware Requirements
1 GHz 32-bit (x86) or 64-bit (x64) processor
1 GB of system memory
At least 20 MB of available space for installation and an additional 10
MB of available space for configuration and any cached contact data
A Network Connection with a speed of 10Mb/s (minimum)
Note. The space needed on your computers hard drive will vary depending on
the amount of contacts stored within the InTouch application.
NN40011-051 Issue 1.2 BCM Rls 6.0 7
Page 8

InTouch
Install LAN CTE on each computer that
requires the InTouch application.
(Refer to the Installing LAN CTE Software on
the Client PC section of this guide)
Install the InTouch application.
(Refer to the Installing the InTouch
Application section of this guide)
Ensure your computer meets the required
specification.
(Refer to the Prerequisites & PC Hardware &
Software Requirements sections of this guide)
Configure LAN CTE in Element Manager.
(Refer to the Creating a LAN CTE Client
Privilege in Element Manager section of this
guide)
Familiarise yourself with the functionality of the
application.
(Refer to all sections from Starting InTouch
for the First Time in this guide)
Flowchart
Use the following flowchart to guide you through installation and functionality
of the InTouch application.
8 NN40011-051 Issue 1.2 BCM Rls 6.0
Page 9

InTouch
Creating a LAN CTE Client Privilege in Element
Manager
Before installing the InTouch application, you should setup the LAN CTE
Client Privilege entries. These are created within Element Manager; and they
associate your extension (DN) to your computer. You should configure an
entry for each computer that will be running the InTouch application.
Accessing Element Manager
LAN CTE client privileges are setup within Element Manager. To access this
application use the following procedure.
1. To access the Business Element Manager application from the Start
Menu, navigate to Start, Programs, Avaya, Business
Communications Manager, Business Element Manager.
2. Alternatively, double-click on the Business Element Manager desktop
icon.
NN40011-051 Issue 1.2 BCM Rls 6.0 9
Page 10
InTouch
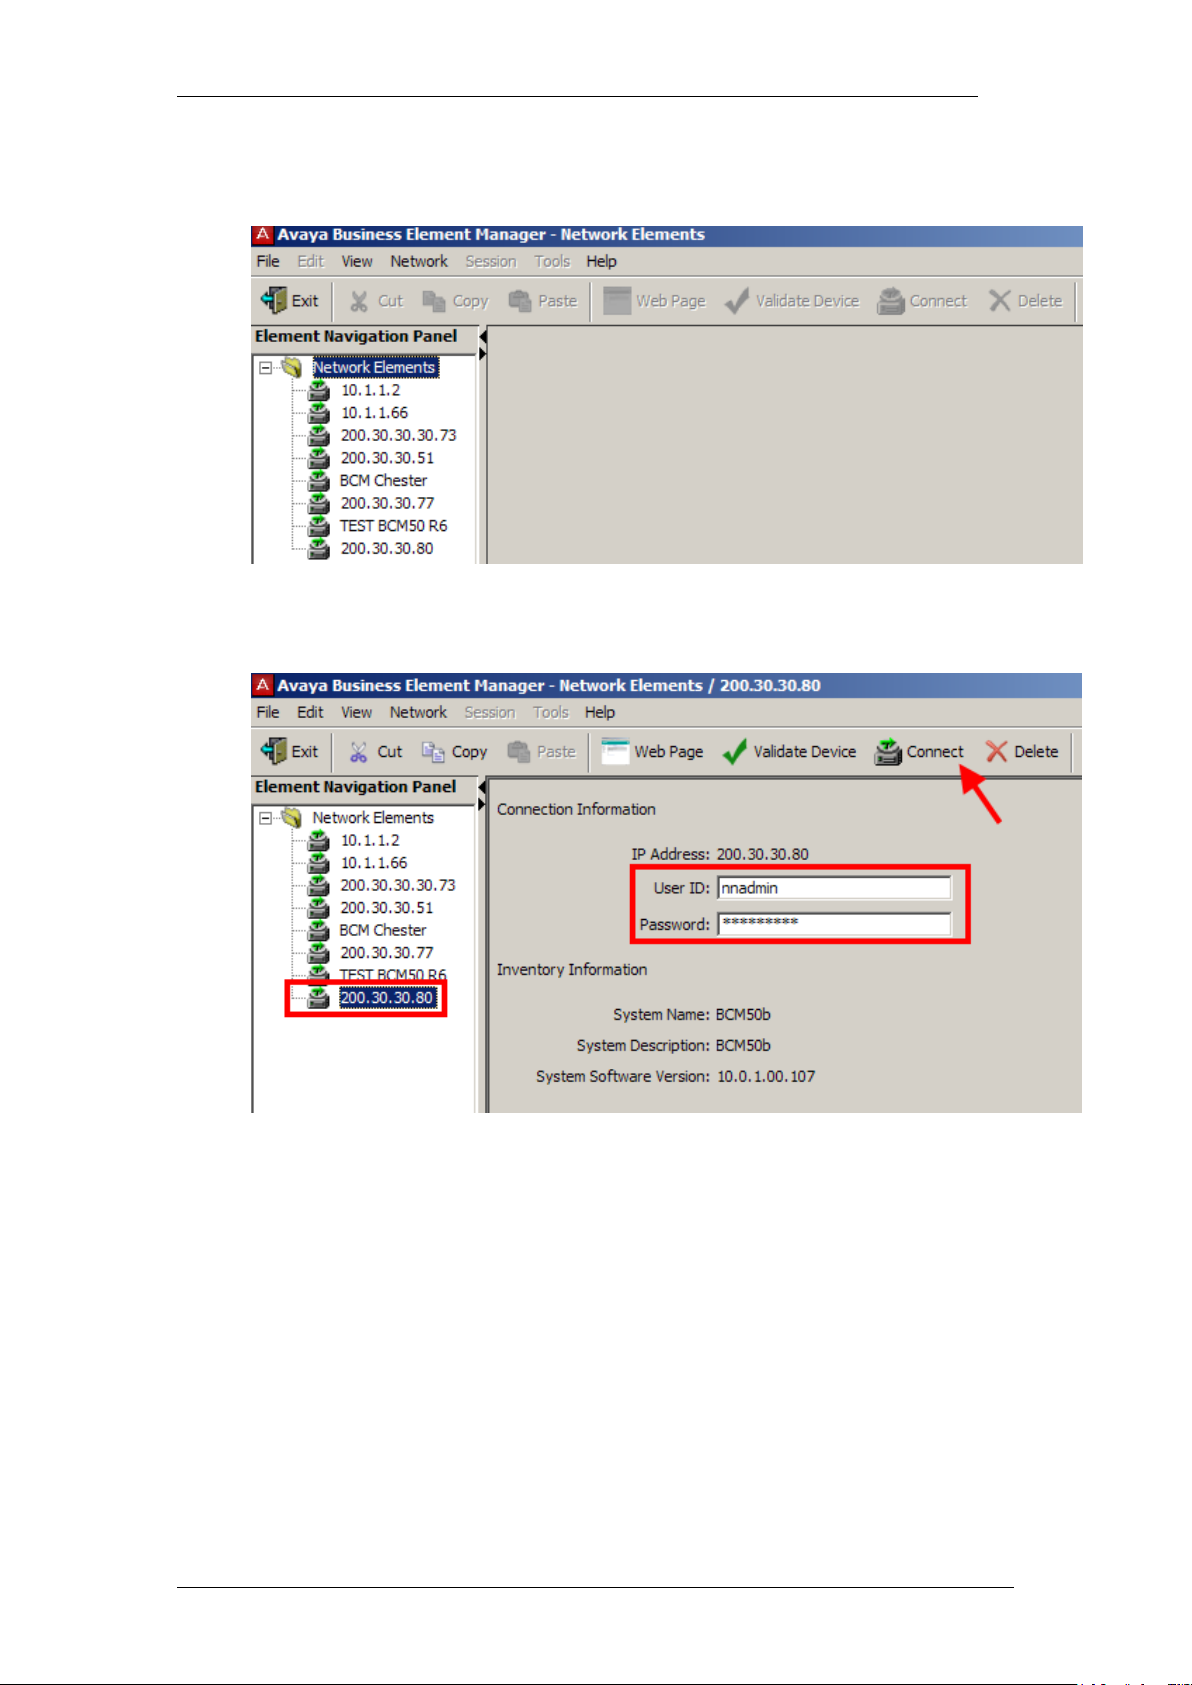
3. You will be presented with the Element Manager interface.
4. Open the Network Elements folder and select the IP Address of the
BCM.
5. Enter the User Name of the BCM in the User Name field, by default this
is nnadmin. Then enter the Password in the Password field, by default
the password is PlsChgMe!. Click the Connect button.
10 NN40011-051 Issue 1.2 BCM Rls 6.0
Page 11
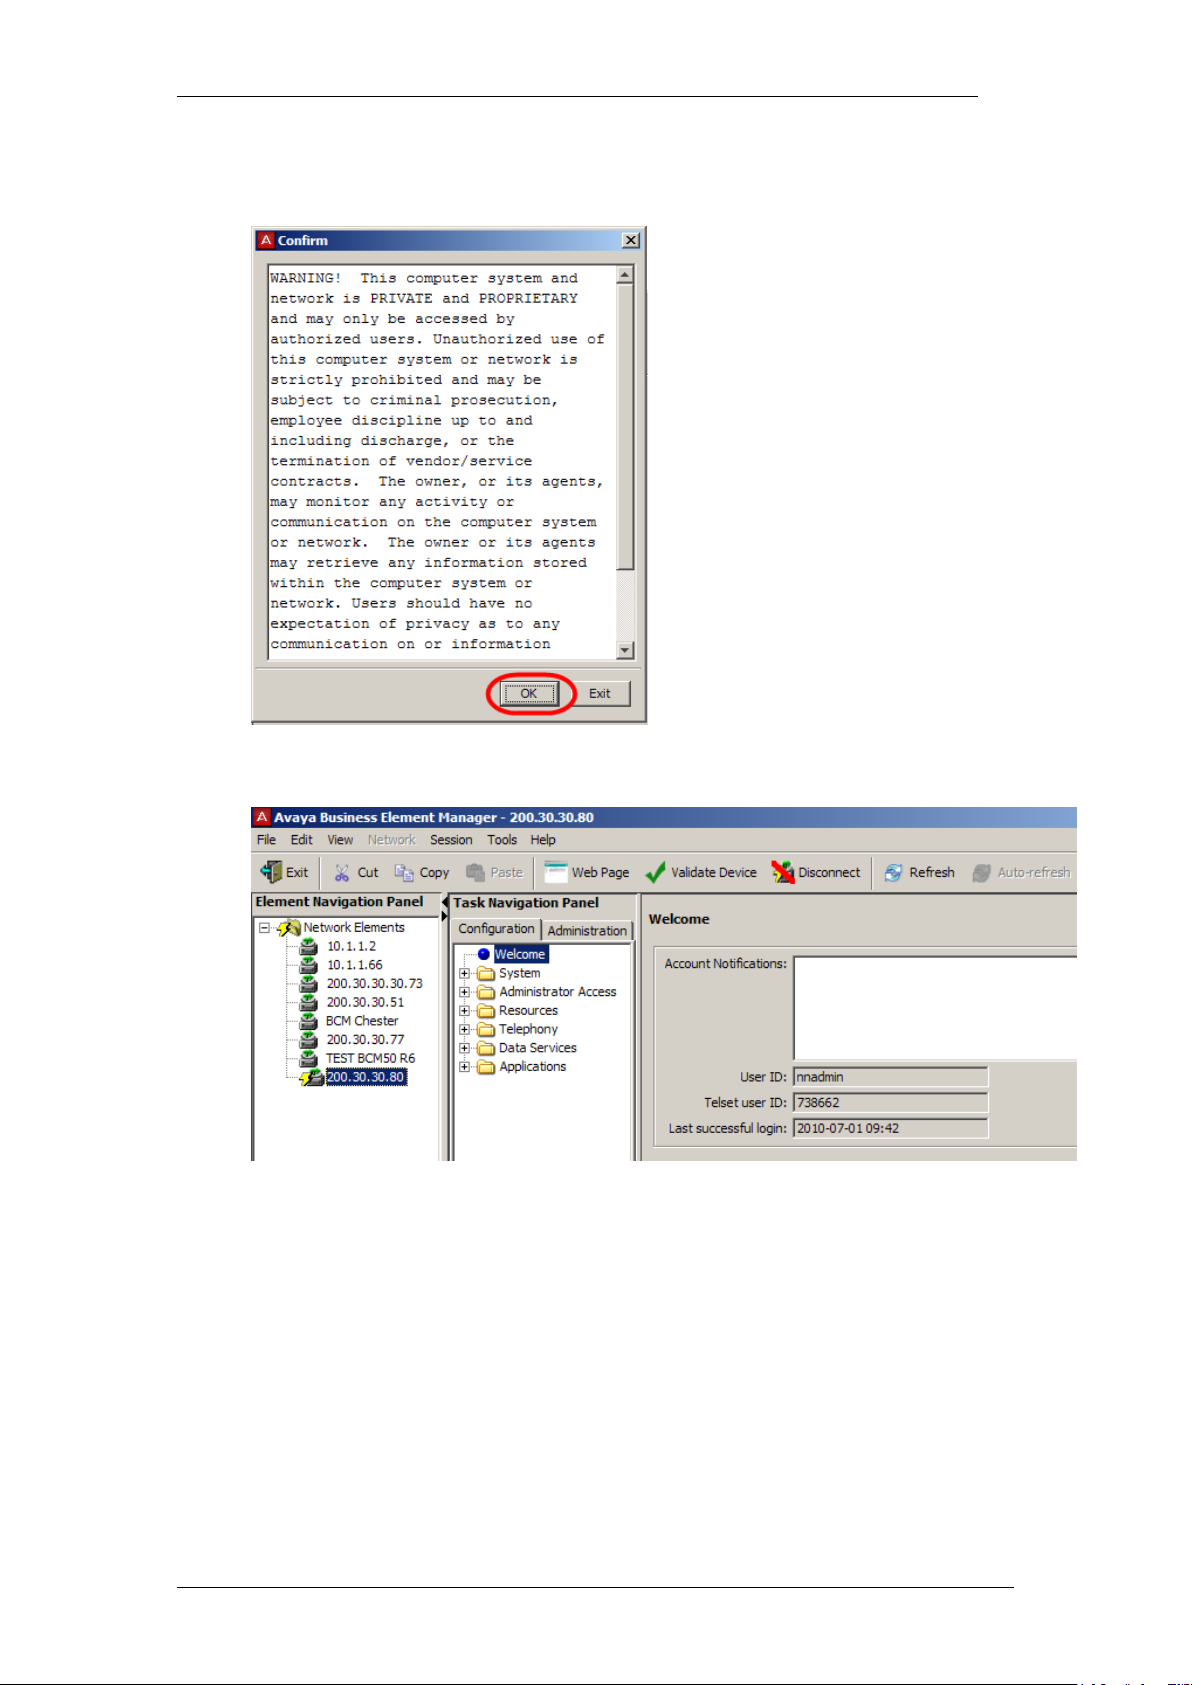
6. A warning screen will appear, read the warning and click OK.
InTouch
7. You will be presented with the Element Manager interface.
NN40011-051 Issue 1.2 BCM Rls 6.0 11
Page 12
InTouch
Creating the LAN CTE Entry
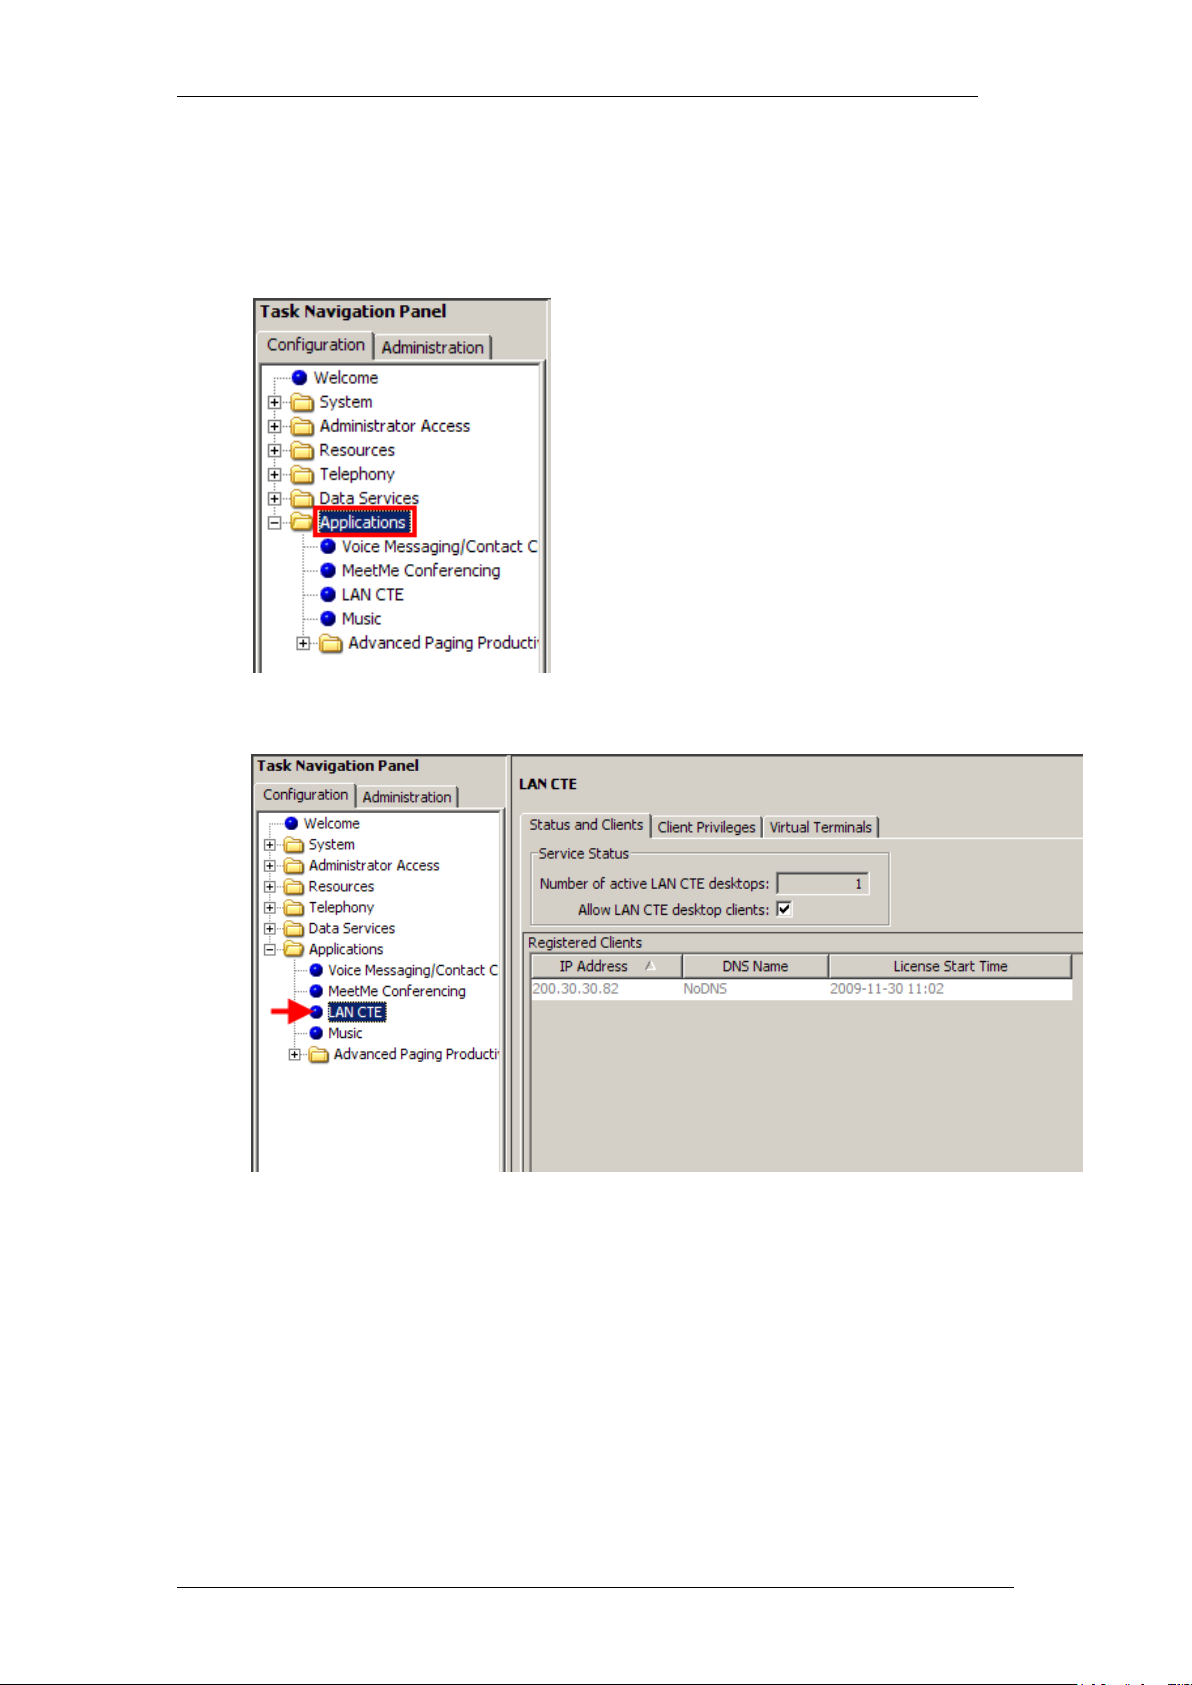
1. Once you have accessed the Element Manager application, click on
the Applications Folder.
2. Next, click on the LAN CTE option.
12 NN40011-051 Issue 1.2 BCM Rls 6.0
Page 13
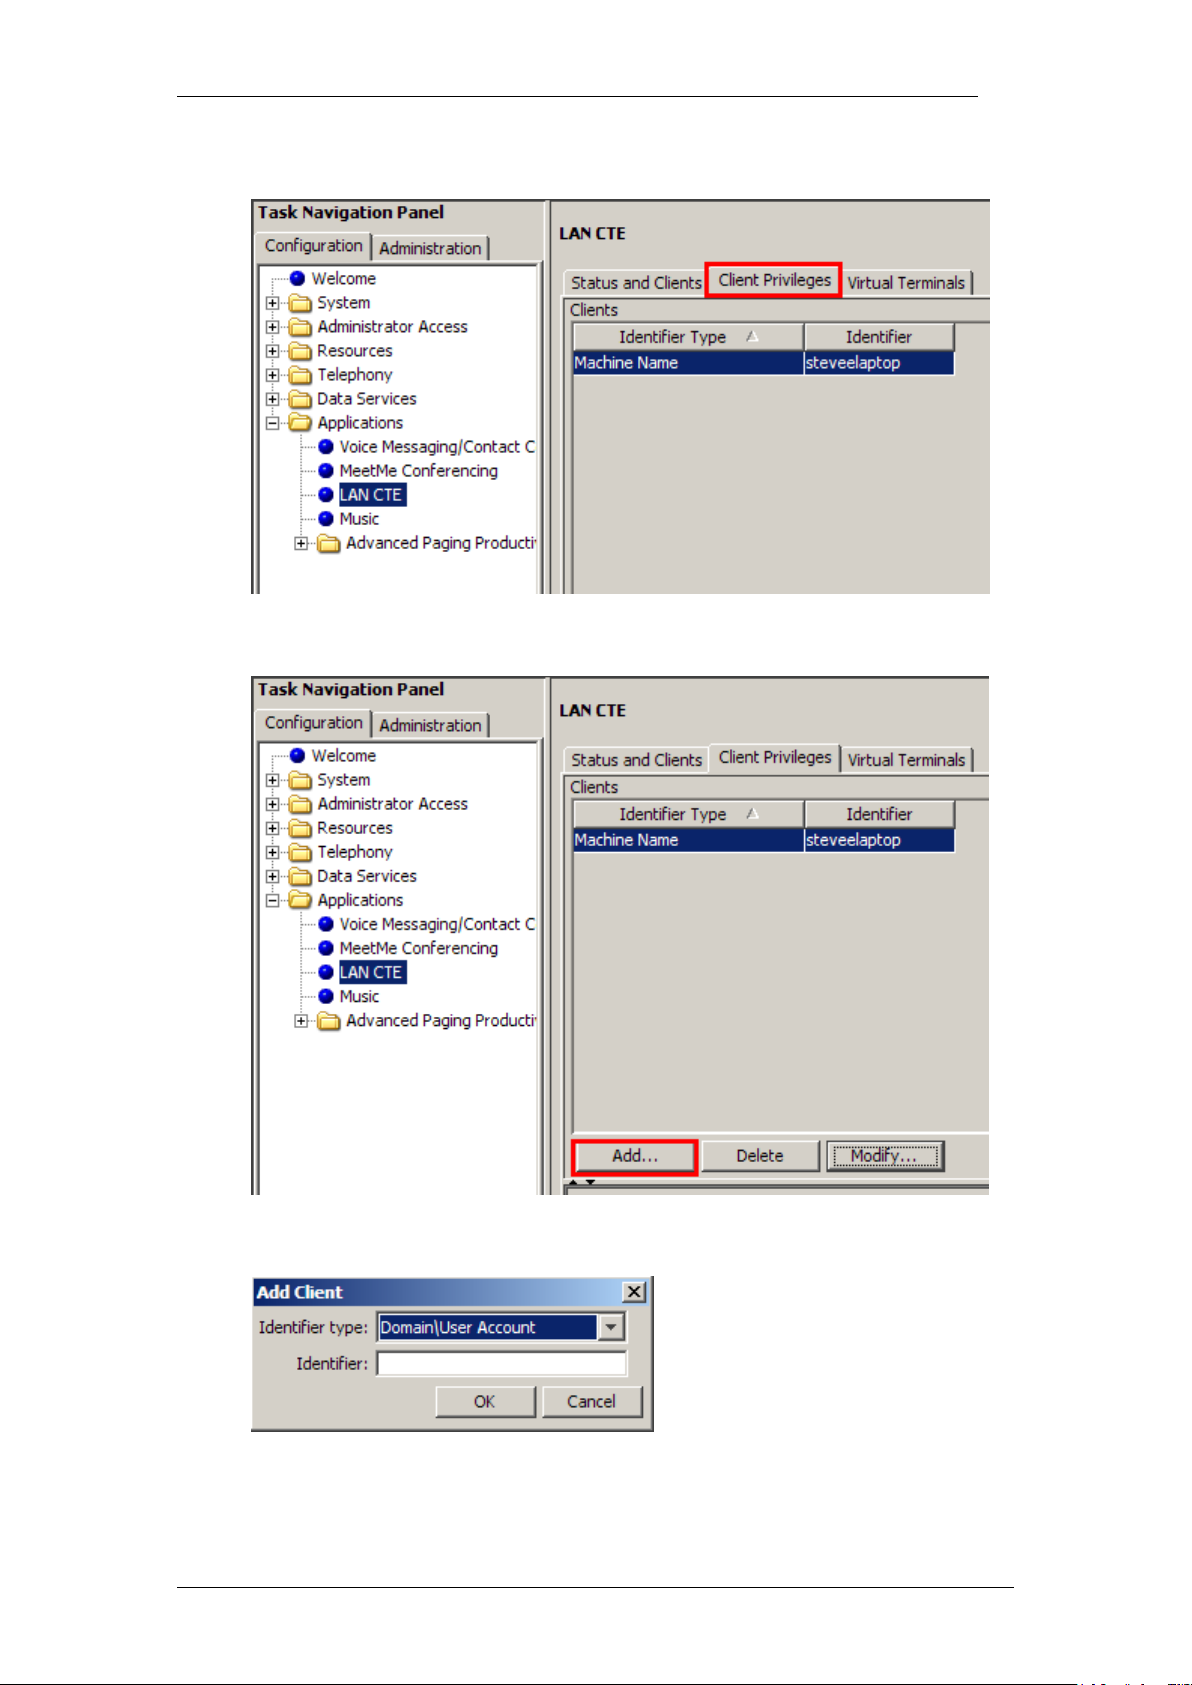
3. And finally, the Client Privileges tab.
4. To create a new Client Privilege, click on the Add button.
InTouch
5. This will open the new entry window.
NN40011-051 Issue 1.2 BCM Rls 6.0 13
Page 14
InTouch
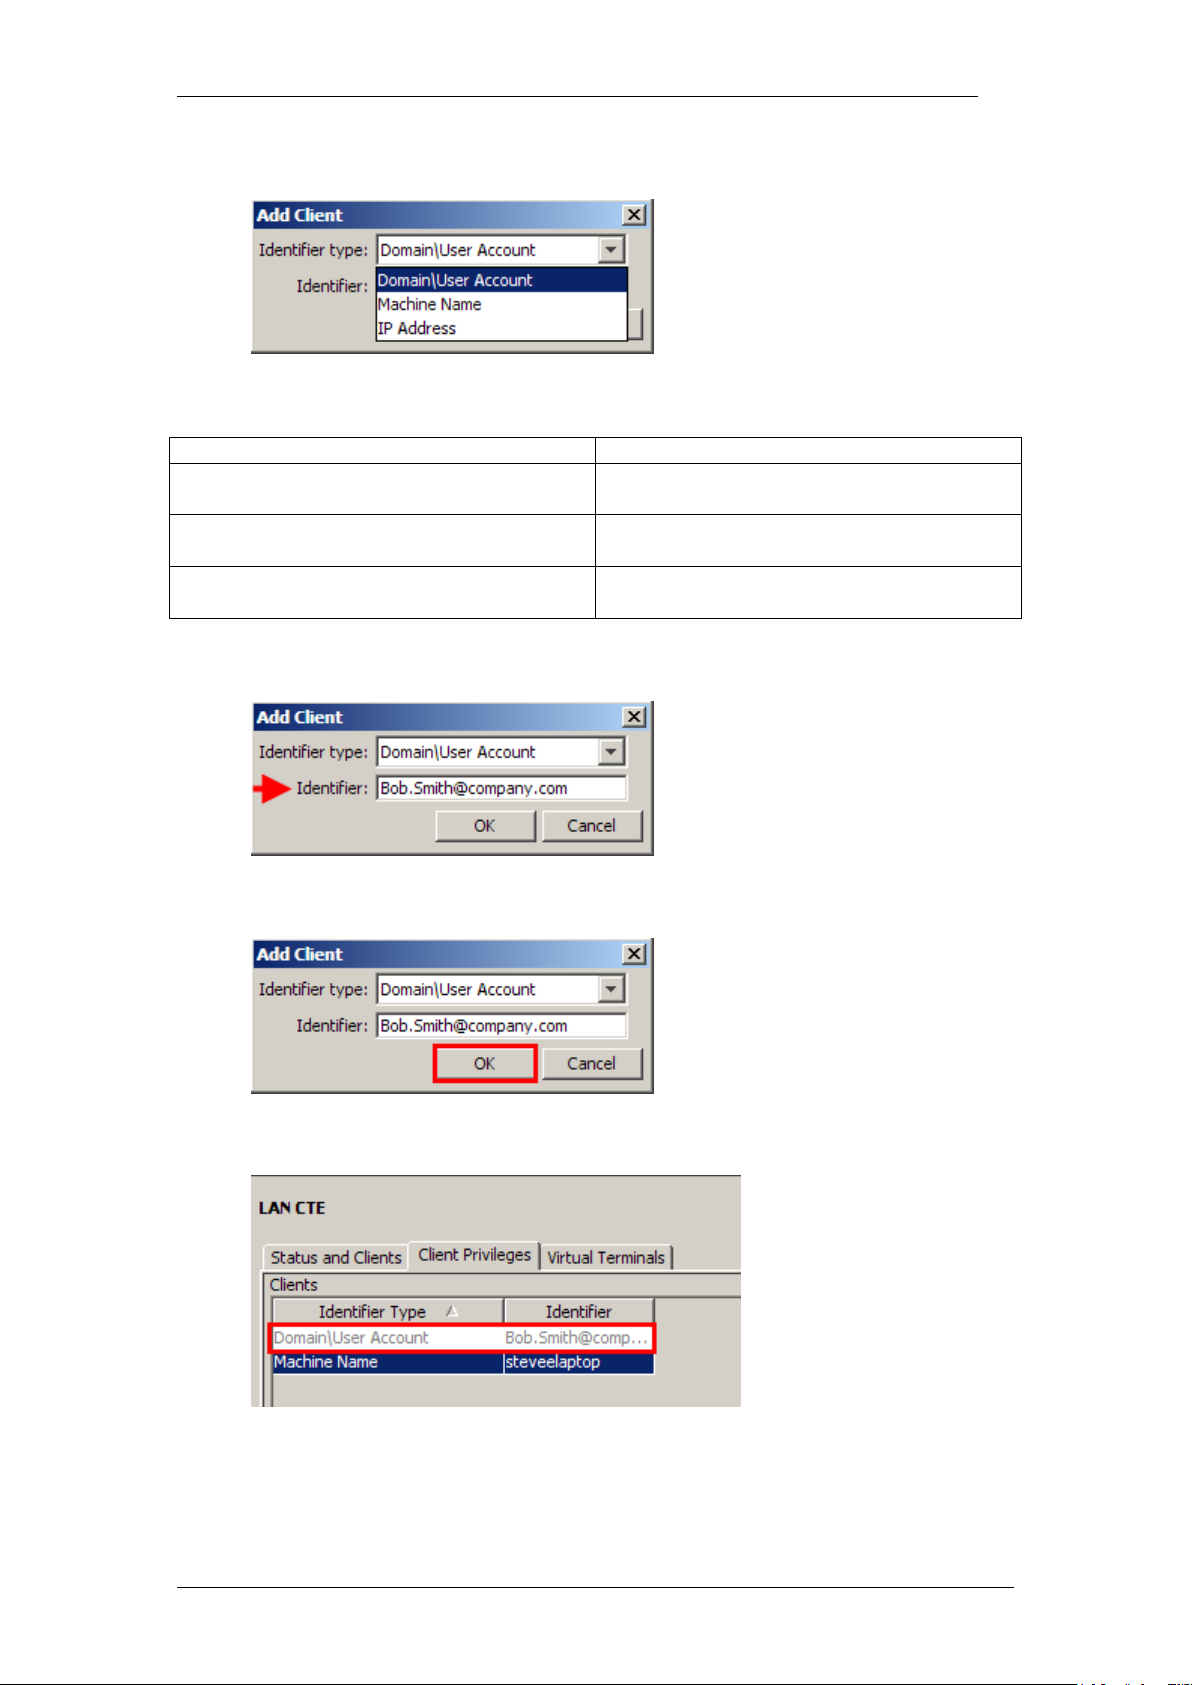
Attribute
Description
Domain\User Account
Enter your network domain name (e.g.
Bob.Smith@company.com).
Machine Name
Your computers domain name (e.g.
bobsmith_desktop).
IP Address
Your computers IP address (e.g.
10.1.1.10).
6. Use the drop down menu to select what Identifier you would like to use.
Identifier Type Options
7. Once selected, enter the relevant details in the Identifier field.
8. Then click the OK button to save the settings.
9. Your newly created entry will be displayed in the Clients list.
14 NN40011-051 Issue 1.2 BCM Rls 6.0
Page 15

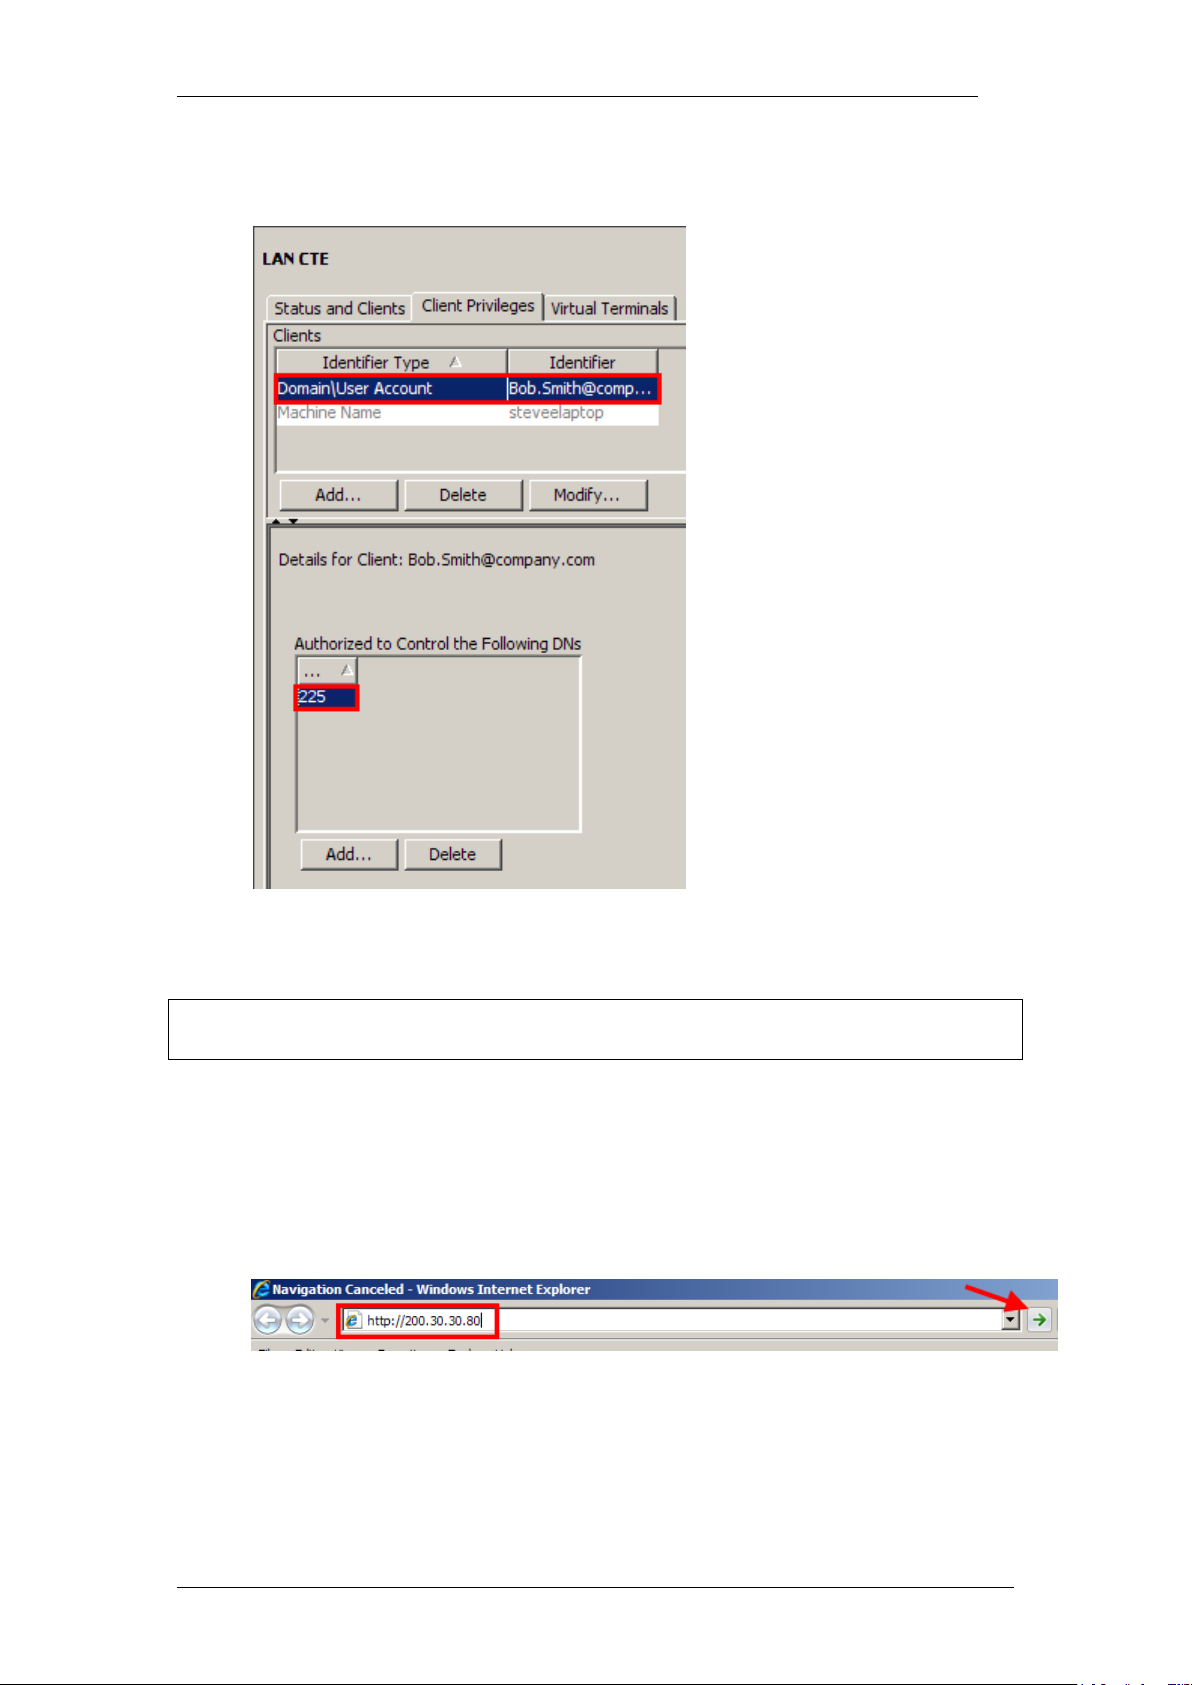
10. Next, click on the Add button at the bottom of the ‘Authorized to
Control the Following DN’s’ box.
InTouch
11. Enter the DN associated for this entry, (this can be repeated if multiple
DN’s are necessary).
12. Click the OK button to save the details.
NN40011-051 Issue 1.2 BCM Rls 6.0 15
Page 16
InTouch
13. You have now successfully associated the Desktop/User to the
relevant DN(s).
14. Now install the LAN CTE application on the required PC. Refer to the
Installing LAN CTE Software on the Client PC section of this guide.
Note: You should repeat this process for all computers that require the
InTouch application.
Installing LAN CTE Software on the Client PC
1. Open Internet Explorer.In the address field type (replacing the relevant
part with your BCM IP address): http://<bcm ip address>/
2. Click on Go, or press Return on your keyboard.
16 NN40011-051 Issue 1.2 BCM Rls 6.0
Page 17
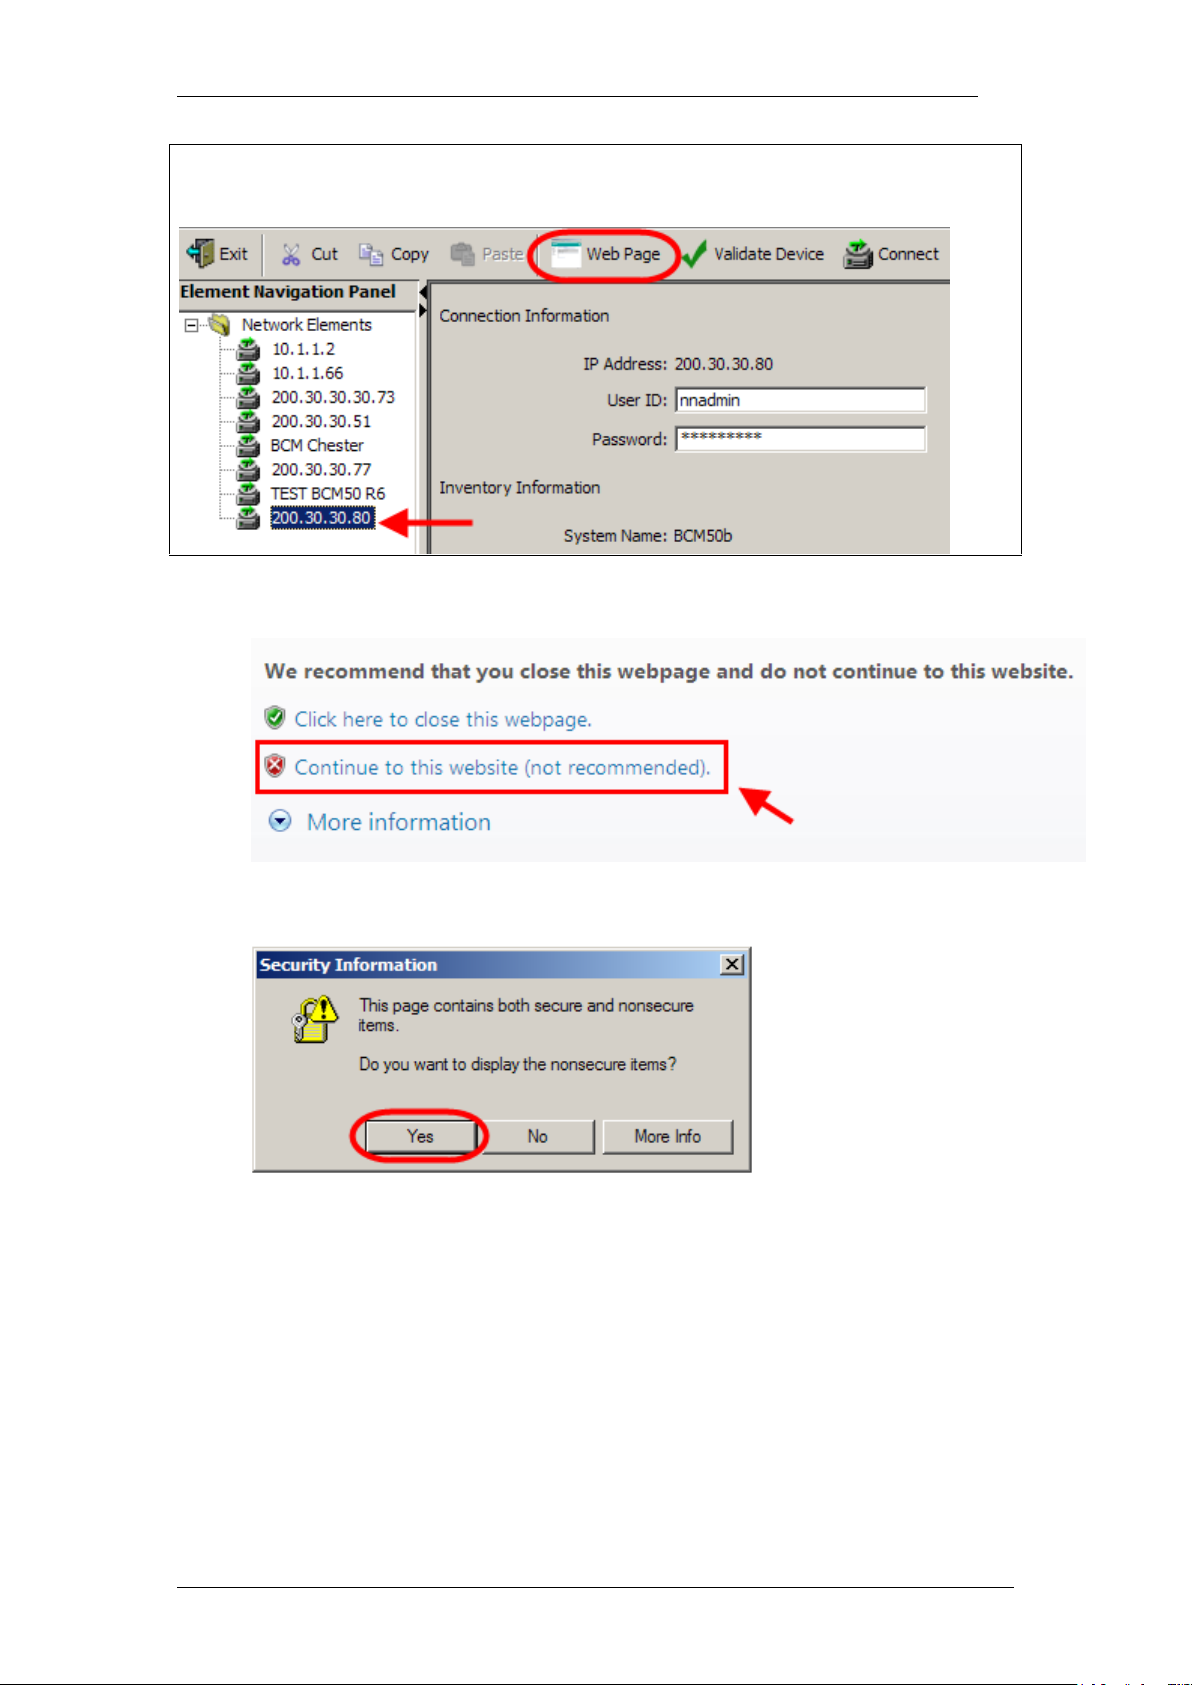
Note: You can also use the Web Page button in Element Manager to launch
a web broswer session. The BCM you wish to access must be selected in the
Element Navigation Panel to do this.
3. If you are presented with the Certificate Error window, click on
Continue to this website (not recommended).
InTouch
4. Accept any further security messages that you may get presented with.
NN40011-051 Issue 1.2 BCM Rls 6.0 17
Page 18
InTouch
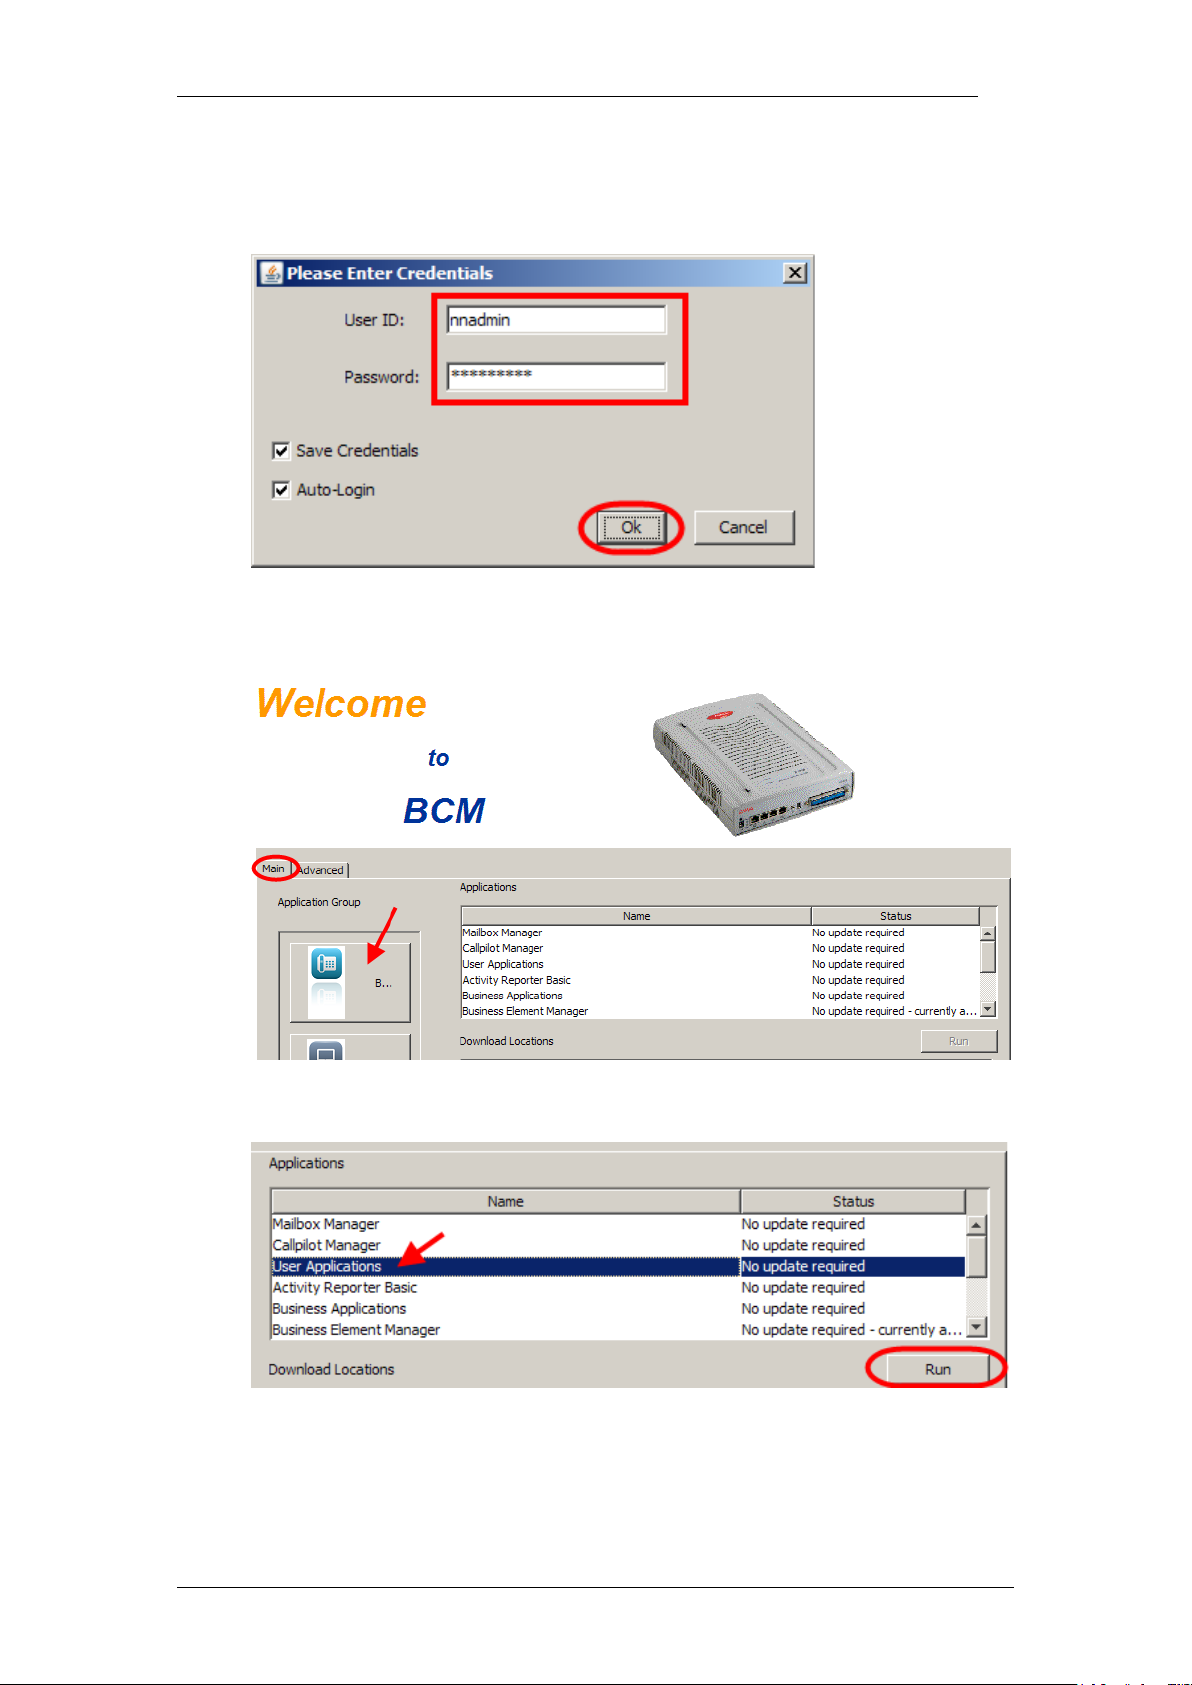
5. You will now see the login screen, enter your BCM User name and
Password. By default these are set to User ID: nnadmin Password:
PlsChgMe! Click on OK.
6. In the Welcome to BCM window, ensure the Main tab has been
selected, and the BCM button clicked.
7. In the Applications area, select User Applications,and click on Run.
8. Again, accept any security messages that appear, and if prompted
enter any login details.
18 NN40011-051 Issue 1.2 BCM Rls 6.0
Page 19

9. In the User Applications screen. Click LAN CTE Client.
InTouch
10. Click the Download LAN CTE Client link.
NN40011-051 Issue 1.2 BCM Rls 6.0 19
Page 20

InTouch
11. Select the Run button.
12. Accept the Security Warning and click on Run.
20 NN40011-051 Issue 1.2 BCM Rls 6.0
Page 21

13. The Install Shield screen will appear. Click Next.
InTouch
14. The Software License screen will appear. Select the I accept the
terms of the license agreement radio button. Then click Next.
NN40011-051 Issue 1.2 BCM Rls 6.0 21
Page 22

InTouch
15. Ensure that the Computer Telephony Engine tick box and the TAPI
Service Provider tick box are ticked and click Next.
16. Enter the Published IP Address or the Machine Name of the
Business Communications Manager. Click Next.
22 NN40011-051 Issue 1.2 BCM Rls 6.0
Page 23

InTouch
17. You will be requested to review a selection summary screen. Read the
details to ensure they are correct and click Next. If the details are not
correct click Back.
18. The Ready to Install the Program screen will appear. Click Install.
NN40011-051 Issue 1.2 BCM Rls 6.0 23
Page 24

InTouch
Note: The PC should always be rebooted after the LAN CTE installation has
been completed.
Note: It is possible for an administrator to offer a pre-configured installation
procedure, which would reduce the installation time for large number of
installs. Refer to the InTouch Administrator Installation section of this guide
for instructions of how to create the pre-configuration file.
19. The Install Wizard Complete window will appear. Click Finish. The
PC should be rebooted after LAN CTE has been installed.
20. Repeat this process for EVERY PC that will use LAN CTE.
Installing the InTouch Application
Once LAN CTE is configured within Element Manager and the LAN CTE
application installed on the PC, you can begin the InTouch installation. Please
visit www.avaya.com to download the InTouch installation files.
24 NN40011-051 Issue 1.2 BCM Rls 6.0
Page 25

InTouch
1. For this scenario, we will begin the installation process by double
clicking on the InTouch_setup icon, contained within the location you
downloaded/extracted the file to.
2. You will be presented with the Welcome screen. Click Next to continue.
NN40011-051 Issue 1.2 BCM Rls 6.0 25
Page 26

InTouch
3. Accept the Licence agreement by clicking into the relevant field and
click Next to continue.
4. Specify your desired installation location (the default location will be
populated). Once complete click Next to proceed.
26 NN40011-051 Issue 1.2 BCM Rls 6.0
Page 27

InTouch
5. Select your desired language (the default is English, United States) and
click Next.
6. The application checks for any Skype and/or MSN Messenger
installations, it also checks for your registered DN before providing you
with a summary. Click Install to begin.
NN40011-051 Issue 1.2 BCM Rls 6.0 27
Page 28

InTouch
Note: If you are an administrator requiring a streamlined process for rolling
out the application to multiple computers, please refer to the InTouch
Administrator Installation section of this guide.
7. Outlook should be closed prior to installation, however the installer will
prompt you if this is required. Once the program is closed, you can click
on Retry.
Note. If Outlook is already closed, this message will not appear.
8. The program will install automatically on your computer
28 NN40011-051 Issue 1.2 BCM Rls 6.0
Page 29

9. Once complete, click on Finish to end the installation.
InTouch
NN40011-051 Issue 1.2 BCM Rls 6.0 29
Page 30

InTouch
Starting InTouch for the first time
Once installed, you can open Outlook and test the installation. If you have a
single DN registered to you on the BCM – InTouch will automatically start with
those telephony details.
If you do not have a DN registered on the BCM, or InTouch cannot find any
telephony details for you, it will display the following error.
30 NN40011-051 Issue 1.2 BCM Rls 6.0
Page 31

InTouch
You may need a LAN CTE Client Privilege entering on the BCM (please refer
to the Creating a LAN CTE Client Privilege in Element Manager section of
this guide for more information.)
Multiple DN Numbers
If you have several registered DN numbers on the BCM, InTouch will present
you with a list at startup. The user must select the primary telephone number
for InTouch to use (for telephony services).
1. Click on the drop down arrow and select the number you wish to use
for the InTouch client
2. Click on the OK button to save the details. This is the DN that InTouch
will use automatically at startup.
3. If the administrator changes the BCM DN list whilst the InTouch client
is running, the user will receive the following message.
NN40011-051 Issue 1.2 BCM Rls 6.0 31
Page 32

InTouch
4. The user will be prompted to select another DN number for the InTouch
client to use for it’s telephony services.
Accessing the InTouch Options screen
You may need to access the InTouch options screen, perhaps to enter or
change some of your telephony details. This is accessible from within the
Outlook application.
1. First, go to the Tools menu in Outlook.
2. Then click on Options.
32 NN40011-051 Issue 1.2 BCM Rls 6.0
Page 33

3. Next, click on the InTouch Options tab.
InTouch
4. You are now presented with the InTouch Options screen.
NN40011-051 Issue 1.2 BCM Rls 6.0 33
Page 34

InTouch
Attribute
Description
Extended Logging
This option enables extended logging of
InTouch messages.
Language
Select the Language for InTouch to use
Extension
Input the DN that the application will use
for any BCM call related features.
Voicemail Number
The number any forwarded calls would
be directed to for Voicemail. The
Voicemail DN can be found by entering
Feature 985 on any telephone with a
display.
Set Forward Targets
Allows you to enter any forwarding
names/numbers that can be selected
from a drop down list within Outlook.
Enable Intra-Company Dialling
Enables or disables intra company
dialling.
Intra-Company Number Length
Phone numbers with fewer digits than the
specified length are dialed as internal
numbers. Phone numbers that match the
specified length are dialed with the intracompany prefix. The entered number
length must be longer than internal
extensions.
Intra-Company Dialling Prefix
Phone numbers that match the specified
length (as mentioned above) are dialed
with this prefix.
InTouch Options Screen
34 NN40011-051 Issue 1.2 BCM Rls 6.0
Page 35

InTouch
5. Once you have entered the required information, click on OK to save
the settings.
6. Your InTouch details are now stored for future use.
NN40011-051 Issue 1.2 BCM Rls 6.0 35
Page 36

InTouch
The InTouch Interface
The interface is displayed within Outlook and cannot be resized or removed
without uninstalling or disabling the application. The InTouch panel will be
blank at first, but can be configured to display any contacts from multiple
locations (this is discussed later in this guide).
Here is an overview of the interface.
Note. Skype and MSN Messenger status information will only be shown if
they are installed and active on your computer, or the computer of any
contacts you have in your list.
36 NN40011-051 Issue 1.2 BCM Rls 6.0
Page 37

InTouch
Attribute
Description
Call
Displays all ways to initiate a call with the
individual (depending on what is
installed) and can include BCM
telephony, Skype and MSN Messenger
calls.
Instant Messaging
Start a chat session using the Skype or
MSN Messenger software (if available).
Email
Open a blank Email to this recipient.
Scheduler
Schedule a task that will prompt you to
call this individual at a specific time and
date.
Forward to Voicemail
Forward a call to your specified
voicemail.
Forward to
Select a forwarding target to send a call
to.
Clear Call Forward
Clear any call forward set against your
DN.
Do Not Disturb
Sets your DN to Do Not Disturb. Click
again to disable the feature.
The InTouch Outlook Toolbar
InTouch also installs a toolbar within the Outlook client offering single click
functionality for various features. The displayed options may vary depending
on which version of Outlook you have installed, and the contact information
held for the person you are dealing with.
All available toolbar options are displayed below.
InTouch Toolbar Options
Note. For more information on inputting Call Forward Targets, refer to the
Accessing the InTouch Options Screen section of this guide.
NN40011-051 Issue 1.2 BCM Rls 6.0 37
Page 38

InTouch
Adding Contacts
Adding contacts to the application is a very simple process. InTouch will
display all contacts, including the Outlook global address book and any
personal entries you have stored – along with your Skype and MSN contacts
(if applicable) allowing you to add them to a centralised list that is displayed
within the application window.
1. To add new contacts first click on the Add Contacts button.
2. The Add Contacts box is displayed (by default this shows the phone
directory of the BCM).
38 NN40011-051 Issue 1.2 BCM Rls 6.0
Page 39

InTouch
3. You can include a contact by clicking into the box on the left of the
entry.
4. As you tick each contact, your client window will reflect the additions.
NN40011-051 Issue 1.2 BCM Rls 6.0 39
Page 40

InTouch
5. To add contacts from another source (for example your MSN address
book) select this from the drop down menu.
6. Once selected the address book for that source will be displayed.
Select any contacts by placing a tick next to them.
7. These will be added to the client window as you select them.
8. To use the search facility, start typing the name of the contact you are
looking for and InTouch will present you with any matches.
40 NN40011-051 Issue 1.2 BCM Rls 6.0
Page 41

InTouch
9. Your contact list can be compiled of Outlook, Personal, Skype and
MSN Messenger contacts. Any associated Presence or Status updates
are also displayed via the client window.
Note. If a contact has multiple communication methods (e.g. MSN Messenger
and Skype) all associated presence or status updates will be displayed next to
that contact entry (see below).
Note. To see what the status icons mean for any of the applications, hover
your mouse pointer over the icon to see a description.
NN40011-051 Issue 1.2 BCM Rls 6.0 41
Page 42

InTouch
Prime Contacts
Prime contacts are essentially normal contacts that have been ‘promoted’
within the client window. Prime contacts appear with a different background
colour to normal contacts (white) and are always shown at the top of the list.
This makes your frequently used contacts easily accessible without the need
to search.
Promoting a Contact
Promoting a contact adds that contact to the Prime Contacts list.
1. To promote a regular contact to the Prime Contacts list, right click on
any entry.
42 NN40011-051 Issue 1.2 BCM Rls 6.0
Page 43

InTouch
2. Next, click on the Make this a prime contact option.
3. Your newly promoted Prime Contact will now be displayed at the top of
the client window.
4. To demote a contact back to the normal list, again right click on the
entry and select the Make this a normal contact option.
NN40011-051 Issue 1.2 BCM Rls 6.0 43
Page 44

InTouch
Outlook Calendar ‘Mining’
Mining is a term used to depict the applications ability to review/ read contacts
calendar entries and display a status according to the availability of a Prime
contact.
Different types of status icons are displayed for these contacts to show
whether a person is.
Available – has no calendar entries showing at the current time.
Busy – has a current calendar entry that is active.
Out of Office – the calendar currently shows this person as unavailable.
The following details the respective icons used to depict the status of a Prime
Contacts, based upon their Outlook calendar availability.
Note. This is performed on Prime Contact entries only; normal contacts will
not be applicable to calendar mining.
44 NN40011-051 Issue 1.2 BCM Rls 6.0
Page 45

InTouch
Attribute
Description
Answer
Answers an incoming call
Skype
(Only available if the contact is running
Skype) This button initiates a Skype chat
session.
MSN
(Only available if the contact is running
MSN Messenger) This button initiates a
MSN Messenger chat session.
E-mail
(Only available if the contact has an
associated Email address) This button
generates a new Email message.
Hold
This button places a call on hold, or unholds a currently held call.
Call Back
(Only available if the CLID is available)
This button creates a new calendar entry
in Outlook as a call back reminder.
Hang up
Disconnects the current call.
The Call Window
The call window appears whenever you make or receive a call. Depending on
the contacts capabilities, certain functions may be activated for use. All
available functions are listed below.
Call Window Functions
Making a Call
There are three different ways to initiate a call from within the InTouch client.
The first way is to simply enter a telephone number into the Enter Number
field (near the bottom of the screen) and click Dial.
NN40011-051 Issue 1.2 BCM Rls 6.0 45
Page 46

InTouch
The next method (utilising contact entries) is to click on the + symbol next to a
contacts name.
This expands the view to show any contact details for that entry, including
internal or external telephone numbers and Email addresses. To call one of
these numbers, double click on the entry.
The final method is to right click on a contact entry.
46 NN40011-051 Issue 1.2 BCM Rls 6.0
Page 47

Then click on any phone number to initiate a call.
Viewing Missed Calls
InTouch
The second button at the top of the client window is Missed Calls. When you
click on this, your viewing window will display the Missed Calls panel.
To return to the Contact list, click on the Contacts button at the top of the
client window.
NN40011-051 Issue 1.2 BCM Rls 6.0 47
Page 48

InTouch
Should you miss any calls whilst the application is running, the button
changes colour to notify you, showing the total number of calls that have been
unanswered.
The Missed Call list will display the telephone number(s), along with the date
and time of the call. If possible, the name of the person calling will be
displayed (if they are a contact from within your list).
By right clicking on an entry, you will see any other information held for that
contact, for example, an Email address or mobile phone number.
48 NN40011-051 Issue 1.2 BCM Rls 6.0
Page 49

InTouch
InTouch Presence/ Status updates
Not including Prime Contacts, MSN Messenger and Skype, (as they have
their own presence states and icons) normal contacts within InTouch have
their own telephony status symbols that are displayed within the client
application.
There are 4 status icons that may be displayed to show BCM Telephony
states within the InTouch application.
Note. The Information Unavailable status may be encountered at system
start-up, when InTouch is querying the BCM telephony lines – or when a soft
phone is not running/ connected to the BCM.
Note. Prime Contact status updates differ from regular contacts; please refer
to the Outlook Calendar ‘Mining’ section of this guide.
NN40011-051 Issue 1.2 BCM Rls 6.0 49
Page 50

InTouch
Additional Information
InTouch Administrator Installation
System administrators may require a process to roll out the InTouch
application to multiple desktop machines in a short period of time. This is a
two part process, first completed by the administrator (following the preinstallation steps) then by either user or administrator (installing the required
applications locally from a published location on your network).
Note: This task is not a requirement, but will make the rollout process quicker
for system administrators tasked with many installations. These tasks are in
addition to the prerequisites set out at the beginning of this guide.
Pre-Installation Steps
1. Ensure that the contact information for each user is correct, and
contains the users DN and email address information (a mobile
telephone number is optional).
2. Download the InTouch administrator setup files from www.avaya.com.
3. Download the LAN CTE client installer from your BCM (refer to the
Installing LAN CTE Software on the Client PC section of this guide).
4. Download the .Net framework 3.5 service pack 1 from
http.//www.microsoft.com/net/Download.aspx.
5. Place all installer files in a central location on your network (that is
accessible for installation purposes).
50 NN40011-051 Issue 1.2 BCM Rls 6.0
Page 51

InTouch
6. Run the InTouch Configuration Manager application by double
clicking on it.
7. This opens the Configuration Manager window. Enter any required
details as defined below.
NN40011-051 Issue 1.2 BCM Rls 6.0 51
Page 52

InTouch
8. Next, specify the central network location (defined previously) to export
your settings file to. Click on Save.
9. Your central network location should now contain:
The It Touch setup file.
The InTouch Configuration Manager file (if required).
Lan CTE Client file.
The Microsoft .NET 3.5 Service pack 1 file.
The SettingsMain.XML file.
InTouch Installation Steps
Once the files are all centrally located on your network, you can easily install
them onto the local user machines. To do this correctly, please follow the
steps below in numerical order (as depicted).
1. Create LAN CTE associations between PC’s and DN’s (refer to the
Creating a LAN CTE Client Privilege in Element Manager section of this
guide
2. Install the LAN CTE client (refer to the Installing LAN CTE Software
on the Client PC section of this guide for more information).
3. Install the Microsoft .Net 3.5 application, downloaded from the
Microsoft web site.
52 NN40011-051 Issue 1.2 BCM Rls 6.0
Page 53

InTouch
4. Install the InTouch application; refer to the Installing the InTouch
Application section of this guide.
5. Test the application by opening Outlook, adding any additional
information as necessary. For more information on this, please refer to
the Starting InTouch for the First Time section of this guide.
6. Installed this way, InTouch will not present the configuration error
message when installing (as shown in the Installing the InTouch
Application section of this guide).
Note: It is not a requirement to have BCM DN numbers populated in an active
directory (accessible from the Global Address Book) – but this would enhance
the overall user experience.
Note: It is not advisable to perform the InTouch installation on a computer
connected to the network location that contains your installation files via a
VPN connection.
NN40011-051 Issue 1.2 BCM Rls 6.0 53
Page 54

InTouch
Troubleshooting
For general troubleshooting tips, please refer to the InTouch Administration
Guide. For support purposes, this section will demonstrate how to generate a
diagnostic text file that may be used to help diagnose system related
problems.
Generating a Diagnostics File
The Diagnostics tool is located in the ‘About’ section of the application. To
access it, please follow the procedure below.
1. Click on the About InTouch icon at the bottom of the client window
(located next to the Help icon).
2. This will open the About page, Click on the Diagnostics button.
54 NN40011-051 Issue 1.2 BCM Rls 6.0
Page 55

InTouch
3. This will present you with a snapshot view of the related components
utilised by the application (as applicable), and will provide the version
and status of those elements.
4. If you require a more detailed report, you can generate a text file that
contains information such as.
What processes are running on the computer?
Installed DLL files and locations
Software names and versions
Build information of the computer
Click on the Export option to begin the process.
NN40011-051 Issue 1.2 BCM Rls 6.0 55
Page 56

InTouch
5. Name the file and select a location where you would like it to be stored,
then click on OK.
56 NN40011-051 Issue 1.2 BCM Rls 6.0
Page 57

InTouch
6. Once created, you can access the file by double clicking on it. This
can now be printed or sent to any support personnel who may assist in
troubleshooting the application.
NN40011-051 Issue 1.2 BCM Rls 6.0 57
Page 58

InTouch
Avaya Documentation Links
InTouch Administration Guide
InTouch User Guide
58 NN40011-051 Issue 1.2 BCM Rls 6.0
 Loading...