

Page 1

Intelligent Contact Center Set Up and
Operation Guide
Avaya Business Communications Manager
Document Status: Standard
Document Number: NN40170-301
Document Version: 02.02
Date: October 2010
Page 2

© 2010 Avaya Inc.
All Rights Reserved.
Notices
While reasonable efforts have been made to ensure that the information in this document is complete and accurate at the time of printing,
Avaya assumes no liability for any errors. Avaya reserves the right to make changes and corrections to the information in this document
without the obligation to notify any person or organization of such changes.
Documentation disclaimer
Avaya shall not be responsible for any modifications, additions, or deletions to the original published version of this documentation
unless such modifications, additions, or deletions were performed by Avaya. End User agree to indemnify and hold harmless Avaya,
Avaya’s agents, servants and employees against all claims, lawsuits, demands and judgments arising out of, or in connection with,
subsequent modifications, additions or deletions to this documentation, to the extent made by End User.
Link disclaimer
Avaya is not responsible for the contents or reliability of any linked Web sites referenced within this site or documentation(s) provided by
Avaya. Avaya is not responsible for the accuracy of any information, statement or content provided on these sites and does not
necessarily endorse the products, services, or information described or offered within them. Avaya does not guarantee that these links will
work all the time and has no control over the availability of the linked pages.
Warranty
Avaya provides a limited warranty on this product. Refer to your sales agreement to establish the terms of the limited warranty. In
addition, Avaya’s standard warranty language, as well as information regarding support for this product, while under warranty, is
available to Avaya customers and other parties through the Avaya Support Web site: http://www.avaya.com/support
Please note that if you acquired the product from an authorized reseller, the warranty is provided to you by said reseller and not by Avaya.
Licenses
THE SOFTWARE LICENSE TERMS AVAILABLE ON THE AVAYA WEBSITE, HTTP://SUPPORT.AVAYA.COM/LICENSEINFO/
ARE APPLICABLE TO ANYONE WHO DOWNLOADS, USES AND/OR INSTALLS AVAYA SOFTWARE, PURCHASED FROM
AVAYA INC., ANY AVAYA AFFILIATE, OR AN AUTHORIZED AVAYA RESELLER (AS APPLICABLE) UNDER A
COMMERCIAL AGREEMENT WITH AVAYA OR AN AUTHORIZED AVAYA RESELLER. UNLESS OTHERWISE AGREED TO
BY AVAYA IN WRITING, AVAYA DOES NOT EXTEND THIS LICENSE IF THE SOFTWARE WAS OBTAINED FROM ANYONE
OTHER THAN AVAYA, AN AVAYA AFFILIATE OR AN AVAYA AUTHORIZED RESELLER, AND AVAYA RESERVES THE
RIGHT TO T AKE LEGAL ACTION AGAINST YOU AND ANYONE ELSE USING OR SELLING THE SOFTWARE WITHOUT A
LICENSE. BY INSTALLING, DOWNLOADING OR USING THE SOFTWARE, OR AUTHORIZING OTHERS TO DO SO, YOU,
ON BEHALF OF YOURSELF AND THE ENTITY FOR WHOM YOU ARE INSTALLING, DOWNLOADING OR USING THE
SOFTWARE (HEREINAFTER REFERRED TO INTERCHANGEABLY AS "YOU" AND "END USER"), AGREE TO THESE
TERMS AND CONDITIONS AND CREATE A BINDING CONTRACT BETWEEN YOU AND AVAYA INC. OR THE
APPLICABLE AVAYA AFFILIATE ("AVAYA").
Copyright
Except where expressly stated otherwise, no use should be made of the Documentation(s) and Pr oduct( s) p rovided by Avaya. All content
in this documentation(s) and the product(s) pr ov id ed by Avaya including the selection, arrangement and design of the content is owned
either by Avaya or its licensors and is protected b y copyright and other intellectual property laws including the sui generis rights relating
to the protection of databases. You may not modify, copy, reproduce, republish, upload, post, transmit or distribute in any way any
content, in whole or in part, including any code and software. Unauthorized reproduction, transmission, dissemination, storage, and or
use without the express written consent of Avaya can be a criminal, as well as a civil offense under the applicable law.
Third Party Components
Certain software programs or portions thereof included in the Product may contain software distributed under third party agreements
("Third Party Components"), which may contain terms that expand or limit rights to use certain portions of the Product ("Third Party
Terms" ). Information regarding distributed Linux OS source code (for those Products that have distributed the Linux OS source code),
and identifying the copyright holders of the Third Party Components and the Third Party Terms that apply to them is available on the
Avaya Support Web site: http://support.avaya.com/Copyright.
Trademarks
The trademarks, logos and service marks ("Marks") displayed in this site, the documentation(s) and product(s) pr ovided by Avaya are the
registered or unregistered Marks of Avaya, its affiliates, or other third parties. Users are not permitted to use such Marks without prior
written consent from A vaya or such third party which may own the Mark. Nothing contained in this site, the documentation(s) and
product(s) should be construed as granting, by implication, estoppel, or otherwise, any license or right in and to the Marks without the
express written permission of Avaya or the applicable third party. Avaya is a registered trademark of Avaya Inc. All non-Avaya
trademarks are the property of their respective owners.
Downloading documents
For the most current versions of documentation, see the Avaya Support. Web site: http://www.avaya.c om/support
Contact Avaya Support
Avaya provides a telephone number for you to use to report problems or to ask questions about your product. The support telephone
number is 1-800-242-2121 in the United States. For additional support telephone numbers, see the Avaya Web site: http://
www.avaya.com/support
Page 3

Task List
Task List . . . . . . . . . . . . . . . . . . . . . . . . . . . . . . . . . . . . . . . . . . . . . . . . . . . . . . 3
Contents . . . . . . . . . . . . . . . . . . . . . . . . . . . . . . . . . . . . . . . . . . . . . . . . . . . . . . 7
Getting started . . . . . . . . . . . . . . . . . . . . . . . . . . . . . . . . . . . . . . . . . . . . . . . . 15
About setting up Contact Center . . . . . . . . . . . . . . . . . . . . . . . . . . . . . . . . . 27
To enable a keycode for Avaya Business Communications Manager ..........................27
To start Avaya CallPilot Manager on Avaya BCM .........................................................28
To check which mailbox interface you use ....................................................................33
Using Feature Codes . . . . . . . . . . . . . . . . . . . . . . . . . . . . . . . . . . . . . . . . . . 35
To determine the Feature Codes...................................................................................35
To program a memory button ........................................................................................36
Setting up Contact Center agents . . . . . . . . . . . . . . . . . . . . . . . . . . . . . . . . 41
To add an agent ............................................................................................................44
To add more than one agent .........................................................................................47
To change agent information .........................................................................................49
To reset an agent’s password .......................................................................................50
To delete an agent.........................................................................................................50
To force an agent off .....................................................................................................51
3
Setting up skillsets . . . . . . . . . . . . . . . . . . . . . . . . . . . . . . . . . . . . . . . . . . . . 53
To set up or change a skillset........................................................................................56
To set up DID routing for Avaya BCM ...........................................................................58
To add a CLID/DNIS Route ...........................................................................................61
To change a CLID/DNIS Route .....................................................................................62
To delete a CLID/DNIS Route .......................................................................................63
To assign an agent to a skillset .....................................................................................64
To change an agent’s priority in a skillset......................................................................65
To unassign an agent from a skillset .............................................................................66
To view agents in a skillset ............................................................................................66
To enable a skillset........................................................................................................67
To disable a skillset .......................................................................................................67
To unconfigure a skillset................................................................................................68
Configuring automatic log in ..........................................................................................69
Setting up skillset mailboxes . . . . . . . . . . . . . . . . . . . . . . . . . . . . . . . . . . . . 71
To determine a skillset’s mailbox number and Message Waiting Indication telephone.72
To initialize a skillset mailbox ........................................................................................73
To open a skillset mailbox - Norstar Voice Mail.............................................................74
To open a skillset mailbox - Avaya CallPilot ..................................................................74
To open a skillset mailbox from an outside telephone...................................................74
To open a skillset mailbox directly from an outside telephone ......................................75
To change a skillset mailbox password .........................................................................76
To reset a skillset mailbox password.............................................................................76
To record a Primary or Alternate skillset mailbox greeting ............................................78
Intelligent Contact Center Set Up and Operation Guide
Page 4

4 Task List
To choose a Primary or Alternate skillset mailbox greeting...........................................80
To record a Personalized skillset mailbox greeting .......................................................82
To delete a Personalized mailbox greeting ...................................................................83
To play skillset mailbox messages - Norstar Voice Mail................................................84
To play skillset mailbox messages - CallPilot ................................................................86
To retrieve an erased message - Norstar Voice Mail ....................................................87
To retrieve an erased message - CallPilot ....................................................................87
To reply to an internal caller - Norstar Voice Mail..........................................................89
To reply to an internal caller - CallPilot..........................................................................89
To reply to an external caller - Norstar Voice Mail.........................................................90
To reply to an external caller - CallPilot .........................................................................90
Off-premise Message Notification . . . . . . . . . . . . . . . . . . . . . . . . . . . . . . . . 91
To assign an outdial method to a skillset mailbox .........................................................92
To set up Off-premise Message Notification to a phone number ..................................93
To set up Off-premise Message Notification to an extension ........................................95
To set up Off-premise Message Notification to a pager ................................................97
To set up Off-premise Message Notification to more than one destination ...................99
To change the time range or type of message parameters .........................................101
To change the destination from phone to another destination ....................................103
To change the destination from pager to phone or extension .....................................105
To change the destination from phone or extension to pager .....................................106
To delete a destination number ...................................................................................108
To add a destination number .......................................................................................109
To turn Off-premise Message Notification on or off .....................................................110
Recording Avaya NES Contact Center greetings . . . . . . . . . . . . . . . . . . 111
To record a Contact Center greeting ...........................................................................113
To import a previously recorded greeting ....................................................................115
To export a previously recorded greeting ....................................................................117
Setting up Intelligent Routing . . . . . . . . . . . . . . . . . . . . . . . . . . . . . . . . . . 119
To assign Intelligent Overflow Routing ........................................................................125
To move an Intelligent Overflow rule ...........................................................................128
To modify an Intelligent Overflow Rule ........................................................................128
Setting up Routing Tables . . . . . . . . . . . . . . . . . . . . . . . . . . . . . . . . . . . . . 131
To set up EWT.............................................................................................................133
To set up an EWT Table..............................................................................................134
To delete an EWT Table..............................................................................................136
To change an EWT Table............................................................................................137
To add a Greeting step ................................................................................................139
To add a Distribute for step .........................................................................................141
To add a Goto step......................................................................................................142
To add a Transfer step ...............................................................................................143
To add a Disconnect step ............................................................................................144
To assign hours of operation to a skillset ....................................................................145
To set the Service Mode for a skillset..........................................................................147
To set up the Day Routing Table example ..................................................................148
To set up the Night Routing Table example ................................................................150
To review Routing Table steps ....................................................................................151
To modify Routing Table steps ....................................................................................151
NN40170-301NN40170-301
Page 5

Task List 5
To delete Routing Table steps.....................................................................................152
Creating Caller Input Rules . . . . . . . . . . . . . . . . . . . . . . . . . . . . . . . . . . . . 153
To create a Caller Input Rule.......................................................................................153
To change the rule length for a Caller Input Table ......................................................158
To change a Caller Input Rule .....................................................................................158
To delete a Caller Input rule ........................................................................................159
To clear a Caller Input Rule Table ...............................................................................159
Line administration . . . . . . . . . . . . . . . . . . . . . . . . . . . . . . . . . . . . . . . . . . . 161
To set the Answer Lines status ...................................................................................161
To configure a line .......................................................................................................162
To configure several lines............................................................................................163
Setting up Avaya NES Contact Center general properties . . . . . . . . . . . 165
To assign the Contact Center language ......................................................................166
To set up the general Avaya NES Contact Center properties .....................................168
To generate the System Configuration Report ............................................................172
Monitoring Avaya NES Contact Center call activity . . . . . . . . . . . . . . . . 173
To set up Silent Monitor on Avaya Business Communications Manager ....................174
To log on and monitor agent calls ...............................................................................175
To use Not Ready........................................................................................................180
To change your supervisor password..........................................................................181
Activity Codes . . . . . . . . . . . . . . . . . . . . . . . . . . . . . . . . . . . . . . . . . . . . . . . 187
To create an Activity Code ..........................................................................................197
To change an Activity Code.........................................................................................198
To delete an Activity Code...........................................................................................198
To import a list of Activity Codes .................................................................................199
To set up or change Activity Code settings for an agent .............................................201
To set up or change Activity Codes for a skillset .........................................................201
Tips for operating Avaya NES Contact Center . . . . . . . . . . . . . . . . . . . . . 203
Examples of Avaya NES Contact Center configurations . . . . . . . . . . . . 207
Troubleshooting Avaya NES Contact Center . . . . . . . . . . . . . . . . . . . . . . 227
To reset the Operator password using CallPilot Manager ...........................................227
To reset the Operator password using a phone ..........................................................228
To reset the Contact Center Administrator password..................................................228
To change a skillset mailbox CDN...............................................................................232
Avaya NES Contact Center Programming Record . . . . . . . . . . . . . . . . . . 235
Glossary . . . . . . . . . . . . . . . . . . . . . . . . . . . . . . . . . . . . . . . . . . . . . . . . . . . . 247
Intelligent Contact Center Set Up and Operation Guide
Page 6

6 Task List
NN40170-301NN40170-301
Page 7

Contents
Task List . . . . . . . . . . . . . . . . . . . . . . . . . . . . . . . . . . . . . . . . . . . . . . . . . . . . . . 3
Contents . . . . . . . . . . . . . . . . . . . . . . . . . . . . . . . . . . . . . . . . . . . . . . . . . . . . . . 7
Chapter 1
Getting started . . . . . . . . . . . . . . . . . . . . . . . . . . . . . . . . . . . . . . . . . . . . . . . . 15
About this Guide . . . . . . . . . . . . . . . . . . . . . . . . . . . . . . . . . . . . . . . . . . . . . . . . . . . . . 15
About Contact Center . . . . . . . . . . . . . . . . . . . . . . . . . . . . . . . . . . . . . . . . . . . . . . 15
Contact Center Update . . . . . . . . . . . . . . . . . . . . . . . . . . . . . . . . . . . . . . . . . . . . . 15
Avaya NES Contact Center features . . . . . . . . . . . . . . . . . . . . . . . . . . . . . . . . . . . 20
Using CallPilot call routing with Contact Center . . . . . . . . . . . . . . . . . . . . . . . . . . 21
Auto Attendant . . . . . . . . . . . . . . . . . . . . . . . . . . . . . . . . . . . . . . . . . . . . . . . . . . . 22
Custom Call Routing (CCR) . . . . . . . . . . . . . . . . . . . . . . . . . . . . . . . . . . . . . . . . . 22
Audience . . . . . . . . . . . . . . . . . . . . . . . . . . . . . . . . . . . . . . . . . . . . . . . . . . . . . . . . . . . 22
Acronyms . . . . . . . . . . . . . . . . . . . . . . . . . . . . . . . . . . . . . . . . . . . . . . . . . . . . . . . . . . . 23
Symbols and text conventions . . . . . . . . . . . . . . . . . . . . . . . . . . . . . . . . . . . . . . . . . . . 24
Related Publications . . . . . . . . . . . . . . . . . . . . . . . . . . . . . . . . . . . . . . . . . . . . . . . . . . 25
Customer Service . . . . . . . . . . . . . . . . . . . . . . . . . . . . . . . . . . . . . . . . . . . . . . . . . . . . 26
7
Chapter 2
About setting up Contact Center . . . . . . . . . . . . . . . . . . . . . . . . . . . . . . . . . 27
Using Avaya CallPilot Manager to set up Contact Center . . . . . . . . . . . . . . . . . . . . . . 27
Enabling keycodes . . . . . . . . . . . . . . . . . . . . . . . . . . . . . . . . . . . . . . . . . . . . . . . . . . . 27
Starting CallPilot Manager . . . . . . . . . . . . . . . . . . . . . . . . . . . . . . . . . . . . . . . . . . . . . . 28
About the CallPilot Manager interface . . . . . . . . . . . . . . . . . . . . . . . . . . . . . . . . . . 29
System timeout . . . . . . . . . . . . . . . . . . . . . . . . . . . . . . . . . . . . . . . . . . . . . . . . . . . . . . 29
Contact Center access . . . . . . . . . . . . . . . . . . . . . . . . . . . . . . . . . . . . . . . . . . . . . . . . 29
Setting up Contact Center from a two line display telephone . . . . . . . . . . . . . . . . . . . 30
System timeout . . . . . . . . . . . . . . . . . . . . . . . . . . . . . . . . . . . . . . . . . . . . . . . . . . . . . . 31
Using the dialpad . . . . . . . . . . . . . . . . . . . . . . . . . . . . . . . . . . . . . . . . . . . . . . . . . . . . . 31
Symbols and conventions used in this guide . . . . . . . . . . . . . . . . . . . . . . . . . . . . . . . . 32
About telephone buttons . . . . . . . . . . . . . . . . . . . . . . . . . . . . . . . . . . . . . . . . . . . . . . . 32
Checking which telephone mailbox interface you use . . . . . . . . . . . . . . . . . . . . . . . . . 33
Chapter 3
Using Feature Codes . . . . . . . . . . . . . . . . . . . . . . . . . . . . . . . . . . . . . . . . . . . 35
Feature Codes . . . . . . . . . . . . . . . . . . . . . . . . . . . . . . . . . . . . . . . . . . . . . . . . . . . . . . . 35
Programming a memory button with a Feature Code . . . . . . . . . . . . . . . . . . . . . . . . . 36
Feature Codes used by Contact Center Administrator and Supervisors . . . . . . . . . . . 37
Feature Codes used by Avaya NES Contact Center agents . . . . . . . . . . . . . . . . . . . . 38
Intelligent Contact Center Set Up and Operation Guide
Page 8

8 Contents
Agent Feature Codes . . . . . . . . . . . . . . . . . . . . . . . . . . . . . . . . . . . . . . . . . . . . . . 38
Chapter 4
Setting up Contact Center agents . . . . . . . . . . . . . . . . . . . . . . . . . . . . . . . . 41
About adding agents . . . . . . . . . . . . . . . . . . . . . . . . . . . . . . . . . . . . . . . . . . . . . . . . . . 41
Agent properties . . . . . . . . . . . . . . . . . . . . . . . . . . . . . . . . . . . . . . . . . . . . . . . . . . . . . 42
Adding an agent or a supervisor . . . . . . . . . . . . . . . . . . . . . . . . . . . . . . . . . . . . . . . . . 44
Adding more than one agent . . . . . . . . . . . . . . . . . . . . . . . . . . . . . . . . . . . . . . . . . . . . 46
Changing agent information . . . . . . . . . . . . . . . . . . . . . . . . . . . . . . . . . . . . . . . . . . . . 48
Resetting an agent’s password . . . . . . . . . . . . . . . . . . . . . . . . . . . . . . . . . . . . . . . . . . 50
Deleting an agent . . . . . . . . . . . . . . . . . . . . . . . . . . . . . . . . . . . . . . . . . . . . . . . . . . . . 50
Forcing an agent off . . . . . . . . . . . . . . . . . . . . . . . . . . . . . . . . . . . . . . . . . . . . . . . . . . . 51
Chapter 5
Setting up skillsets . . . . . . . . . . . . . . . . . . . . . . . . . . . . . . . . . . . . . . . . . . . . 53
About skillsets . . . . . . . . . . . . . . . . . . . . . . . . . . . . . . . . . . . . . . . . . . . . . . . . . . . . . . . 53
How incoming calls are sent to a skillset . . . . . . . . . . . . . . . . . . . . . . . . . . . . . . . . . . . 53
Skillset properties . . . . . . . . . . . . . . . . . . . . . . . . . . . . . . . . . . . . . . . . . . . . . . . . . . . . 54
Setting up or changing a skillset . . . . . . . . . . . . . . . . . . . . . . . . . . . . . . . . . . . . . . . . . 56
Setting up DID routing . . . . . . . . . . . . . . . . . . . . . . . . . . . . . . . . . . . . . . . . . . . . . . . . . 58
Setting up CLID/DNIS Routing . . . . . . . . . . . . . . . . . . . . . . . . . . . . . . . . . . . . . . . . . . 59
Examples of using CLID/DNIS Routing . . . . . . . . . . . . . . . . . . . . . . . . . . . . . . . . . 59
CLID/DNIS Routing Table properties . . . . . . . . . . . . . . . . . . . . . . . . . . . . . . . . . . 60
Changing a CLID/DNIS Route . . . . . . . . . . . . . . . . . . . . . . . . . . . . . . . . . . . . . . . 62
Assigning an agent to a skillset . . . . . . . . . . . . . . . . . . . . . . . . . . . . . . . . . . . . . . . . . . 63
Dynamic Agent Priority . . . . . . . . . . . . . . . . . . . . . . . . . . . . . . . . . . . . . . . . . . . . . 63
Changing an agent’s priority in a skillset . . . . . . . . . . . . . . . . . . . . . . . . . . . . . . . . . . 65
Unassigning an agent from a skillset . . . . . . . . . . . . . . . . . . . . . . . . . . . . . . . . . . . . . . 66
Viewing agents in a skillset . . . . . . . . . . . . . . . . . . . . . . . . . . . . . . . . . . . . . . . . . . . . . 66
Enabling a skillset . . . . . . . . . . . . . . . . . . . . . . . . . . . . . . . . . . . . . . . . . . . . . . . . . . . . 67
Disabling a skillset . . . . . . . . . . . . . . . . . . . . . . . . . . . . . . . . . . . . . . . . . . . . . . . . . . . . 67
Unconfiguring a skillset . . . . . . . . . . . . . . . . . . . . . . . . . . . . . . . . . . . . . . . . . . . . . . . . 68
Automatic login . . . . . . . . . . . . . . . . . . . . . . . . . . . . . . . . . . . . . . . . . . . . . . . . . . . . . . 68
Chapter 6
Setting up skillset mailboxes . . . . . . . . . . . . . . . . . . . . . . . . . . . . . . . . . . . . 71
About skillset mailboxes . . . . . . . . . . . . . . . . . . . . . . . . . . . . . . . . . . . . . . . . . . . . . . . 71
Determining a skillset mailbox number . . . . . . . . . . . . . . . . . . . . . . . . . . . . . . . . . . . . 71
Initializing a skillset mailbox . . . . . . . . . . . . . . . . . . . . . . . . . . . . . . . . . . . . . . . . . . . . . 72
Opening a skillset mailbox . . . . . . . . . . . . . . . . . . . . . . . . . . . . . . . . . . . . . . . . . . . . . . 74
Opening a skillset mailbox remotely . . . . . . . . . . . . . . . . . . . . . . . . . . . . . . . . . . . 74
Skillset mailbox password . . . . . . . . . . . . . . . . . . . . . . . . . . . . . . . . . . . . . . . . . . . . . . 75
Changing a skillset mailbox password . . . . . . . . . . . . . . . . . . . . . . . . . . . . . . . . . 75
NN40170-301NN40170-301
Page 9

Contents 9
Resetting a skillset mailbox password . . . . . . . . . . . . . . . . . . . . . . . . . . . . . . . . . 76
Recording skillset mailbox greetings . . . . . . . . . . . . . . . . . . . . . . . . . . . . . . . . . . . . . . 77
Examples of Primary and Alternate greetings . . . . . . . . . . . . . . . . . . . . . . . . . . . . 77
Choosing a Primary or Alternate skillset mailbox greeting . . . . . . . . . . . . . . . . . . . . . 79
Recording a Personalized skillset mailbox greeting . . . . . . . . . . . . . . . . . . . . . . . . . . 80
Deleting a Personalized skillset mailbox greeting . . . . . . . . . . . . . . . . . . . . . . . . . . . . 82
Checking skillset mailboxes for messages . . . . . . . . . . . . . . . . . . . . . . . . . . . . . . . . . 83
Playing skillset mailbox messages . . . . . . . . . . . . . . . . . . . . . . . . . . . . . . . . . . . . . . . 84
Retrieving erased messages . . . . . . . . . . . . . . . . . . . . . . . . . . . . . . . . . . . . . . . . . . . . 87
Replying to messages . . . . . . . . . . . . . . . . . . . . . . . . . . . . . . . . . . . . . . . . . . . . . . . . . 88
Replying to an internal caller . . . . . . . . . . . . . . . . . . . . . . . . . . . . . . . . . . . . . . . . . . . . 88
Replying to an external caller . . . . . . . . . . . . . . . . . . . . . . . . . . . . . . . . . . . . . . . . 89
Chapter 7
Off-premise Message Notification . . . . . . . . . . . . . . . . . . . . . . . . . . . . . . . . 91
About Off-premise Message Notification . . . . . . . . . . . . . . . . . . . . . . . . . . . . . . . . . . . 91
Assigning an outdial method to a skillset mailbox . . . . . . . . . . . . . . . . . . . . . . . . . . . . 92
Off-premise Message Notification parameters . . . . . . . . . . . . . . . . . . . . . . . . . . . 92
Setting up Off-premise Message Notification . . . . . . . . . . . . . . . . . . . . . . . . . . . . . . . 93
About setting up Off-premise Message Notification to a pager number . . . . . . . . 96
Changing Off-premise Message Notification . . . . . . . . . . . . . . . . . . . . . . . . . . . . . . . 101
Deleting a destination number . . . . . . . . . . . . . . . . . . . . . . . . . . . . . . . . . . . . . . . . . . 108
Adding a destination number . . . . . . . . . . . . . . . . . . . . . . . . . . . . . . . . . . . . . . . . . . . 109
Turning Off-premise Message Notification on or off . . . . . . . . . . . . . . . . . . . . . . . . . 110
Chapter 8
Recording Avaya NES Contact Center greetings . . . . . . . . . . . . . . . . . . . 111
About Avaya NES Contact Center greetings . . . . . . . . . . . . . . . . . . . . . . . . . . . . . . . 111
Examples of Avaya NES Contact Center greetings . . . . . . . . . . . . . . . . . . . . . . . . . 111
Recording a Avaya NES Contact Center greeting . . . . . . . . . . . . . . . . . . . . . . . . . . . 112
Importing a Contact Center greeting . . . . . . . . . . . . . . . . . . . . . . . . . . . . . . . . . . . . . 115
Exporting a Contact Center greeting . . . . . . . . . . . . . . . . . . . . . . . . . . . . . . . . . . . . . 116
Chapter 9
Setting up Intelligent Routing . . . . . . . . . . . . . . . . . . . . . . . . . . . . . . . . . . . 119
About Intelligent Routing . . . . . . . . . . . . . . . . . . . . . . . . . . . . . . . . . . . . . . . . . . . . . . 119
Intelligent Overflow Routing . . . . . . . . . . . . . . . . . . . . . . . . . . . . . . . . . . . . . . . . . . . . 119
Examples of Intelligent Overflow Routing rules . . . . . . . . . . . . . . . . . . . . . . . . . . . . . 121
Assigning Intelligent Overflow Routing to a skillset . . . . . . . . . . . . . . . . . . . . . . . . . . 125
Moving an Intelligent Overflow rule . . . . . . . . . . . . . . . . . . . . . . . . . . . . . . . . . . . 127
To delete an Intelligent Overflow Rule . . . . . . . . . . . . . . . . . . . . . . . . . . . . . . . . 129
Intelligent Contact Center Set Up and Operation Guide
Page 10

10 Contents
Chapter 10
Setting up Routing Tables. . . . . . . . . . . . . . . . . . . . . . . . . . . . . . . . . . . . . . 131
About Routing Tables . . . . . . . . . . . . . . . . . . . . . . . . . . . . . . . . . . . . . . . . . . . . . . . . 131
Fax Detection . . . . . . . . . . . . . . . . . . . . . . . . . . . . . . . . . . . . . . . . . . . . . . . . . . . . . . 131
Expected Wait Time . . . . . . . . . . . . . . . . . . . . . . . . . . . . . . . . . . . . . . . . . . . . . . . . . 132
Recording EWT greetings . . . . . . . . . . . . . . . . . . . . . . . . . . . . . . . . . . . . . . . . . . 133
About types of Routing Table steps . . . . . . . . . . . . . . . . . . . . . . . . . . . . . . . . . . . . . . 137
Greeting step parameters . . . . . . . . . . . . . . . . . . . . . . . . . . . . . . . . . . . . . . . . . . 138
Adding a Greeting step . . . . . . . . . . . . . . . . . . . . . . . . . . . . . . . . . . . . . . . . . . . . 139
Adding a Distribute for step . . . . . . . . . . . . . . . . . . . . . . . . . . . . . . . . . . . . . . . . . 141
Adding a Goto step . . . . . . . . . . . . . . . . . . . . . . . . . . . . . . . . . . . . . . . . . . . . . . . 142
Adding a Transfer step . . . . . . . . . . . . . . . . . . . . . . . . . . . . . . . . . . . . . . . . . . . . 142
Adding a Disconnect step . . . . . . . . . . . . . . . . . . . . . . . . . . . . . . . . . . . . . . . . . . 143
Assigning Routing Table hours of operation . . . . . . . . . . . . . . . . . . . . . . . . . . . . . . . 145
Setting the Service Mode for skillsets . . . . . . . . . . . . . . . . . . . . . . . . . . . . . . . . . 146
Example of a Day Routing Table . . . . . . . . . . . . . . . . . . . . . . . . . . . . . . . . . . . . . . . . 148
Example of a Night Routing Table . . . . . . . . . . . . . . . . . . . . . . . . . . . . . . . . . . . . . . . 150
Changing a Routing Table . . . . . . . . . . . . . . . . . . . . . . . . . . . . . . . . . . . . . . . . . . . . . 151
Chapter 11
Creating Caller Input Rules. . . . . . . . . . . . . . . . . . . . . . . . . . . . . . . . . . . . . 153
Using wildcard characters . . . . . . . . . . . . . . . . . . . . . . . . . . . . . . . . . . . . . . . . . . . . . 156
An example of using Intelligent Caller Routing, Advanced . . . . . . . . . . . . . . . . . 157
Changing a Caller Input rule . . . . . . . . . . . . . . . . . . . . . . . . . . . . . . . . . . . . . . . . . . . 158
Deleting a Caller Input rule . . . . . . . . . . . . . . . . . . . . . . . . . . . . . . . . . . . . . . . . . . . . 159
Clearing a Caller Input Rule Table . . . . . . . . . . . . . . . . . . . . . . . . . . . . . . . . . . . . . . 159
Chapter 12
Line administration . . . . . . . . . . . . . . . . . . . . . . . . . . . . . . . . . . . . . . . . . . . 161
Setting the Answer Lines status . . . . . . . . . . . . . . . . . . . . . . . . . . . . . . . . . . . . . . . . 161
Configuring lines . . . . . . . . . . . . . . . . . . . . . . . . . . . . . . . . . . . . . . . . . . . . . . . . . . . . 162
Chapter 13
Setting up Avaya NES Contact Center general properties . . . . . . . . . . . 165
Assigning the Avaya NES Contact Center language . . . . . . . . . . . . . . . . . . . . . . . . . 165
General Avaya NES Contact Center properties . . . . . . . . . . . . . . . . . . . . . . . . . . . . 167
MMCC Public Hostname . . . . . . . . . . . . . . . . . . . . . . . . . . . . . . . . . . . . . . . . . . . 167
Reserved channels . . . . . . . . . . . . . . . . . . . . . . . . . . . . . . . . . . . . . . . . . . . . . . . 167
Avaya NES Contact Center Reporting properties Address . . . . . . . . . . . . . . . . 167
Supervisor Help Request Timeout . . . . . . . . . . . . . . . . . . . . . . . . . . . . . . . . . . . 168
Selection Method (Supervisor Help From) . . . . . . . . . . . . . . . . . . . . . . . . . . . . . 168
Enable Caller ID . . . . . . . . . . . . . . . . . . . . . . . . . . . . . . . . . . . . . . . . . . . . . . . . . 168
Setting up general Avaya NES Contact Center properties . . . . . . . . . . . . . . . . . . . . 168
NN40170-301NN40170-301
Page 11

Contents 11
System Configuration Report . . . . . . . . . . . . . . . . . . . . . . . . . . . . . . . . . . . . . . . . . . 170
Chapter 14
Monitoring Avaya NES Contact Center call activity . . . . . . . . . . . . . . . . . 173
Monitoring call activity . . . . . . . . . . . . . . . . . . . . . . . . . . . . . . . . . . . . . . . . . . . . . . . . 173
Monitoring agent calls with Silent Monitor . . . . . . . . . . . . . . . . . . . . . . . . . . . . . . . . . 173
Setting up Silent Monitor on your system . . . . . . . . . . . . . . . . . . . . . . . . . . . . . . 174
Using Silent Monitor with Answer DN . . . . . . . . . . . . . . . . . . . . . . . . . . . . . . . . . 175
Monitoring tips . . . . . . . . . . . . . . . . . . . . . . . . . . . . . . . . . . . . . . . . . . . . . . . . . . . . . . 175
Logging on and monitoring agent calls . . . . . . . . . . . . . . . . . . . . . . . . . . . . . . . . . . . 175
An agent requests help while you are in a monitoring session . . . . . . . . . . . . . . 176
About monitoring sessions . . . . . . . . . . . . . . . . . . . . . . . . . . . . . . . . . . . . . . . . . . . . 177
Monitoring skillsets . . . . . . . . . . . . . . . . . . . . . . . . . . . . . . . . . . . . . . . . . . . . . . . . . . 178
To monitor skillsets . . . . . . . . . . . . . . . . . . . . . . . . . . . . . . . . . . . . . . . . . . . . . . . . . . 178
An example of monitoring skillsets . . . . . . . . . . . . . . . . . . . . . . . . . . . . . . . . . . . 179
Using a memory button to monitor calls waiting in skillsets . . . . . . . . . . . . . . . . 179
Taking some Not Ready time . . . . . . . . . . . . . . . . . . . . . . . . . . . . . . . . . . . . . . . . . . 180
Programming Not Ready to a memory button . . . . . . . . . . . . . . . . . . . . . . . . . . . 180
Logging off . . . . . . . . . . . . . . . . . . . . . . . . . . . . . . . . . . . . . . . . . . . . . . . . . . . . . . . . . 181
Changing your supervisor password . . . . . . . . . . . . . . . . . . . . . . . . . . . . . . . . . . . . . 181
Supervisor Help . . . . . . . . . . . . . . . . . . . . . . . . . . . . . . . . . . . . . . . . . . . . . . . . . . . . . 181
How Supervisor Help works . . . . . . . . . . . . . . . . . . . . . . . . . . . . . . . . . . . . . . . . 182
Configuring Supervisor Help . . . . . . . . . . . . . . . . . . . . . . . . . . . . . . . . . . . . . . . . . . . 183
How to handle Supervisor help requests . . . . . . . . . . . . . . . . . . . . . . . . . . . . . . . . . . 183
How to handle missed requests . . . . . . . . . . . . . . . . . . . . . . . . . . . . . . . . . . . . . . . . 184
An example of retrieving an escalated request . . . . . . . . . . . . . . . . . . . . . . . . . . 184
Chapter 15
Activity Codes . . . . . . . . . . . . . . . . . . . . . . . . . . . . . . . . . . . . . . . . . . . . . . . 187
What Activity Codes are . . . . . . . . . . . . . . . . . . . . . . . . . . . . . . . . . . . . . . . . . . . . . . 187
Optional and Prompted Activity Code logging . . . . . . . . . . . . . . . . . . . . . . . . . . . 187
Examples of Activity Code calls . . . . . . . . . . . . . . . . . . . . . . . . . . . . . . . . . . . . . . . . . 189
Activity Codes Avaya NES Contact Center automatically enters: Autopegs and System Activity
Codes . . . . . . . . . . . . . . . . . . . . . . . . . . . . . . . . . . . . . . . . . . . . . . . . . . . . . . . . . . . 189
Autopegs . . . . . . . . . . . . . . . . . . . . . . . . . . . . . . . . . . . . . . . . . . . . . . . . . . . . . . . 190
Examples of Autopeg calls . . . . . . . . . . . . . . . . . . . . . . . . . . . . . . . . . . . . . . . . . 190
System Activity Codes . . . . . . . . . . . . . . . . . . . . . . . . . . . . . . . . . . . . . . . . . . . . 191
System Activity Codes that Avaya NES Contact Center records . . . . . . . . . . . . 191
Examples of System Activity Code calls . . . . . . . . . . . . . . . . . . . . . . . . . . . . . . . 192
Prompted and Optional Activity Code logging . . . . . . . . . . . . . . . . . . . . . . . . . . . . . . 192
Examples of Prompted and Optional Calls . . . . . . . . . . . . . . . . . . . . . . . . . . . . . 193
How Activity Codes interact with system features . . . . . . . . . . . . . . . . . . . . . . . . . . . 194
Transfer to Agent . . . . . . . . . . . . . . . . . . . . . . . . . . . . . . . . . . . . . . . . . . . . . . . . 194
Intelligent Contact Center Set Up and Operation Guide
Page 12

12 Contents
Break Time . . . . . . . . . . . . . . . . . . . . . . . . . . . . . . . . . . . . . . . . . . . . . . . . . . . . . 195
Creating, changing, and deleting Activity Codes . . . . . . . . . . . . . . . . . . . . . . . . . . . . 197
Importing Activity Codes . . . . . . . . . . . . . . . . . . . . . . . . . . . . . . . . . . . . . . . . . . . . . . 198
Creating a list of Activity Codes . . . . . . . . . . . . . . . . . . . . . . . . . . . . . . . . . . . . . 198
Communicating Activity Codes to supervisors and agents . . . . . . . . . . . . . . . . . . . . 200
Assigning Activity Code settings to agents and skillsets . . . . . . . . . . . . . . . . . . . . . . 201
Generating Activity Code reports . . . . . . . . . . . . . . . . . . . . . . . . . . . . . . . . . . . . . . . . 201
How agents enter Activity Codes . . . . . . . . . . . . . . . . . . . . . . . . . . . . . . . . . . . . . . . . 201
Chapter 16
Tips for operating Avaya NES Contact Center . . . . . . . . . . . . . . . . . . . . . 203
Agent administration . . . . . . . . . . . . . . . . . . . . . . . . . . . . . . . . . . . . . . . . . . . . . . 203
Skillset administration . . . . . . . . . . . . . . . . . . . . . . . . . . . . . . . . . . . . . . . . . . . . . 203
Avaya NES Contact Center greetings . . . . . . . . . . . . . . . . . . . . . . . . . . . . . . . . . 203
Routing Table administration . . . . . . . . . . . . . . . . . . . . . . . . . . . . . . . . . . . . . . . 204
Avaya NES Contact Center general parameters . . . . . . . . . . . . . . . . . . . . . . . . . . . . 204
How to calculate the longest time a caller can be on hold . . . . . . . . . . . . . . . . . . . . . 205
Tips to improve the efficiency of Avaya NES Contact Center . . . . . . . . . . . . . . . . . . 206
Assigning DNs . . . . . . . . . . . . . . . . . . . . . . . . . . . . . . . . . . . . . . . . . . . . . . . . . . . . . . 206
Chapter 17
Examples of Avaya NES Contact Center configurations . . . . . . . . . . . . . 207
Avaya NES Contact Center with Reporting . . . . . . . . . . . . . . . . . . . . . . . . . . . . . . . 207
General Configuration . . . . . . . . . . . . . . . . . . . . . . . . . . . . . . . . . . . . . . . . . . . . . . . 209
General Properties . . . . . . . . . . . . . . . . . . . . . . . . . . . . . . . . . . . . . . . . . . . . . . . 210
Caller Input Rules . . . . . . . . . . . . . . . . . . . . . . . . . . . . . . . . . . . . . . . . . . . . . . . . 210
Expected Wait Time . . . . . . . . . . . . . . . . . . . . . . . . . . . . . . . . . . . . . . . . . . . . . . 211
Activity Codes . . . . . . . . . . . . . . . . . . . . . . . . . . . . . . . . . . . . . . . . . . . . . . . . . . . 211
Lines . . . . . . . . . . . . . . . . . . . . . . . . . . . . . . . . . . . . . . . . . . . . . . . . . . . . . . . . . . 211
Skillset 1 . . . . . . . . . . . . . . . . . . . . . . . . . . . . . . . . . . . . . . . . . . . . . . . . . . . . . . . 212
Skillset 2 . . . . . . . . . . . . . . . . . . . . . . . . . . . . . . . . . . . . . . . . . . . . . . . . . . . . . . . 214
Skillset 3 . . . . . . . . . . . . . . . . . . . . . . . . . . . . . . . . . . . . . . . . . . . . . . . . . . . . . . . 217
Skillset 4 . . . . . . . . . . . . . . . . . . . . . . . . . . . . . . . . . . . . . . . . . . . . . . . . . . . . . . . 219
Multimedia Contact Center . . . . . . . . . . . . . . . . . . . . . . . . . . . . . . . . . . . . . . . . . . . . 221
General properties . . . . . . . . . . . . . . . . . . . . . . . . . . . . . . . . . . . . . . . . . . . . . . . 221
Activity Codes . . . . . . . . . . . . . . . . . . . . . . . . . . . . . . . . . . . . . . . . . . . . . . . . . . . 222
Lines . . . . . . . . . . . . . . . . . . . . . . . . . . . . . . . . . . . . . . . . . . . . . . . . . . . . . . . . . . 223
Skillset 5 . . . . . . . . . . . . . . . . . . . . . . . . . . . . . . . . . . . . . . . . . . . . . . . . . . . . . . . 223
Chapter 18
Troubleshooting Avaya NES Contact Center . . . . . . . . . . . . . . . . . . . . . . 227
Resetting passwords . . . . . . . . . . . . . . . . . . . . . . . . . . . . . . . . . . . . . . . . . . . . . . . . . 227
Resetting the Operator password . . . . . . . . . . . . . . . . . . . . . . . . . . . . . . . . . . . . 227
NN40170-301NN40170-301
Page 13

Contents 13
Resetting the Contact Center Administrator password . . . . . . . . . . . . . . . . . . . . 228
Agent problems . . . . . . . . . . . . . . . . . . . . . . . . . . . . . . . . . . . . . . . . . . . . . . . . . . . . . 228
Agent log on problems . . . . . . . . . . . . . . . . . . . . . . . . . . . . . . . . . . . . . . . . . . . . 228
Important considerations about how agents use features . . . . . . . . . . . . . . . . . . 229
Skillset problems . . . . . . . . . . . . . . . . . . . . . . . . . . . . . . . . . . . . . . . . . . . . . . . . . . . . 231
Problems enabling skillsets . . . . . . . . . . . . . . . . . . . . . . . . . . . . . . . . . . . . . . . . . 231
Problems changing skillset properties . . . . . . . . . . . . . . . . . . . . . . . . . . . . . . . . . 231
Problems viewing skillset settings . . . . . . . . . . . . . . . . . . . . . . . . . . . . . . . . . . . . 232
Problems transferring calls to the voicemail extension . . . . . . . . . . . . . . . . . . . . 232
Call processing problems . . . . . . . . . . . . . . . . . . . . . . . . . . . . . . . . . . . . . . . . . . . . . 232
Chapter 19
Avaya NES Contact Center Programming Record . . . . . . . . . . . . . . . . . . 235
Feature Codes . . . . . . . . . . . . . . . . . . . . . . . . . . . . . . . . . . . . . . . . . . . . . . . . . . . . . . 236
General Avaya NES Contact Center properties . . . . . . . . . . . . . . . . . . . . . . . . . . . . 236
Operator/Business Status. . . . . . . . . . . . . . . . . . . . . . . . . . . . . . . . . . . . . . . . . . . . . . 236
Avaya NES Contact Center skillsets . . . . . . . . . . . . . . . . . . . . . . . . . . . . . . . . . . . . . 237
Avaya NES Contact Center Greetings . . . . . . . . . . . . . . . . . . . . . . . . . . . . . . . . . . . 238
Intelligent Overflow Routing . . . . . . . . . . . . . . . . . . . . . . . . . . . . . . . . . . . . . . . . . . . . 239
Avaya NES Contact Center agents . . . . . . . . . . . . . . . . . . . . . . . . . . . . . . . . . . . . . . 240
Skillset assignments . . . . . . . . . . . . . . . . . . . . . . . . . . . . . . . . . . . . . . . . . . . . . . . . . . 241
Skillset mailboxes . . . . . . . . . . . . . . . . . . . . . . . . . . . . . . . . . . . . . . . . . . . . . . . . . . . 242
Routing Tables . . . . . . . . . . . . . . . . . . . . . . . . . . . . . . . . . . . . . . . . . . . . . . . . . . . . . 243
Caller Input Rules . . . . . . . . . . . . . . . . . . . . . . . . . . . . . . . . . . . . . . . . . . . . . . . . . . . 244
Intelligent CLID/DNIS Routing . . . . . . . . . . . . . . . . . . . . . . . . . . . . . . . . . . . . . . . . . . 245
Line answering . . . . . . . . . . . . . . . . . . . . . . . . . . . . . . . . . . . . . . . . . . . . . . . . . . . . . . 246
Glossary . . . . . . . . . . . . . . . . . . . . . . . . . . . . . . . . . . . . . . . . . . . . . . . . . . . . 247
Index . . . . . . . . . . . . . . . . . . . . . . . . . . . . . . . . . . . . . . . . . . . . . . . . . . . . . . . 253
Intelligent Contact Center Set Up and Operation Guide
Page 14

14 Contents
NN40170-301NN40170-301
Page 15

Chapter 1
Getting started
About this Guide
The Intelligent Contact Center Set Up and Operation Guide describes how to set up and configure
Contact Center on a Avaya Business Communications Manager (Avaya BCM) using Avaya
CallPilot Manager and telset based administration. The information in this document applies to
both the BCM50 and the BCM450 platforms running BCM Release 5.0.
About Contact Center
Contact Center is an application that handles incoming calls as efficiently and economically as
possible. Contact Center answers calls, then routes the calls to agents in a skillset that most closely
matches the needs of the caller. Calls can be routed based on the origin of the call, the destination
of the call, or the information entered by the caller. Callers can be given high or low priorities.
Callers can overflow to different groups or skillsets of agents, transfer out of the system, leave a
message, and hear announcements or informative messages.
15
You set up and operate Contact Center through Avaya CallPilot Manager, the web-based interface,
and from a display telephone. Contact Center, as part of CallPilot, supports two user interfaces:
Norstar Voice Mail (NVM) and CallPilot. The default setting is NVM. See the Avaya CallPilot
Manager Set Up and Operation Guide (NN40170-300) for more information about choosing an
interface.
Contact Center Update
Contact Center is the evolution of the existing Call Center capability on Avaya BCM. Intelligent
Contact Center offers additional functionality, such as Reporting for Contact Center and
Multimedia Contact Center. You can also choose the specific number of agents and skillsets that
your business requires.
You purchase Intelligent Contact Center and then purchase the number of agents, skillsets,
Reporting, and Multimedia as required. Intelligent Contact Center has increased maximum
capacities, for example 80 active agents and 50 skillsets for BCM450, and 50 active agents and 30
skillsets for BCM50. Table 1 shows the capacities available for the BCM450 system. Table 2
shows the capacities available for the BCM50 system.
Intelligent Contact Center Set Up and Operation Guide
Page 16

16 Chapter 1 Getting started
Table 1 Intelligent Contact Center Capacities for BCM450
Features Intelligent Contact Center for BCM450
Skillsets Default 1, maximum 50
Configured agents (available agent IDs) Maximum 250
Active agents (includes supervisors)
Active agents are agents who are logged on to one
skillset or a combination of skillsets.
Dynamic agent priority levels 20
Dynamic call priority levels 20
Active calls in all skillsets 100
Maximum active calls per skillset 100
Maximum lines configured for Avaya NES Contact
Center
Voice ports with CEC 63
Voice ports without CEC 35
Voice ports used for fax with CEC 8
Voice ports used for fax without CEC 4
Routing tables per skillset 2
Greetings 150
Maximum time per greeting 1000 mins
Maximum time for all greetings >370 hours / Gigabyte
Default 2, maximum 80
100
Steps per routing table 20
Overflow rules per skillset 20
Skillset mailboxes
One mailbox is created for each configured skillset.
No skillset mailbox is configured by default and a
maximum 50 skillset mailboxes can be configured.
Supervisor functionality, including call monitoring Silent monitor
Supervisor Help Available with Silent Monitor.
Maximum simultaneous monitoring sessions without
CEC
Maximum simultaneous monitoring session with CEC 40
Caller Input Tables 50
Basic Intelligent Caller Input Routing: the ability to
route a call to an Operator, Auto Attendant, skillset
mailbox or CCR Tree.
Default 0, Maximum 50
20
Available
NN40170-301NN40170-301
Page 17

Chapter 1 Getting started 17
Features Intelligent Contact Center for BCM450
Advanced Intelligent Caller Input Routing: the ability
to route a call based on multidigit fixed or variable
strings
Delegated Avaya NES Contact Center
Administration: the System Administrator can create a
password to give a Avaya NES Contact Center
Administrator or supervisor access to Contact Center
administration.
Intelligent Overflow Routing: rules you create to
overflow, change the priority of, and move calls to
multiple skillsets, a skillset mailbox, an internal or
external number, a mailbox, the Auto Attendant or an
operator.
Intelligent CLID/DNIS Routing 1000 rules
Overflow skillsets Default 0, maximum 49
Available
Available
Available
Service Mode: you specify the start and end times for
the day and night skillset for each day of the week
Limited Feature 983 telephone administration Available
Avaya CallPilot Manager Available
Reporting for Contact Center Available
Expected Wait Time 20 tables
Activity Codes 2,000 entries
Multimedia Contact Center Available
Available
Must be enabled with keycode
Reporting for Contact Center must be enabled to
configure Activity Codes
Must be enabled with keycode
Intelligent Contact Center Set Up and Operation Guide
Page 18

18 Chapter 1 Getting started
Table 2 Intelligent Contact Center Capacities for BCM50
Features Intelligent Contact Center for BCM50
Skillsets Default 1, maximum 30
Configured agents (available agent IDs) Maximum 100
Active agents (includes supervisors)
Active agents are agents who are logged on to one
skillset or a combination of skillsets.
Dynamic agent priority levels 20
Dynamic call priority levels 20
Active calls in all skillsets 30
Maximum active calls per skillset 30
Maximum lines configured for Avaya NES Contact
Center
Voice ports (shared with Callpilot or dedicated) Minimum 2, default 10, maximum 10
Routing tables per skillset 2
Greetings 50
Maximum time per greeting 30 mins
Maximum time for all greetings 1500 mins
Steps per routing table 20
Overflow rules per skillset 20
Skillset mailboxes Default 0, Maximum 30
Default 2, maximum 50
30
Supervisor functionality, including call monitoring Silent monitor
Supervisor Help Available with Silent Monitor.
Maximum simultaneous monitoring sessions 6
Caller Input Tables 30
Basic Intelligent Caller Input Routing: the ability to
route a call to an Operator, Auto Attendant, skillset
mailbox or CCR Tree.
Advanced Intelligent Caller Input Routing: the ability
to route a call based on multidigit fixed or variable
strings
Delegated Avaya NES Contact Center
Administration: the System Administrator can create a
password to give a Avaya NES Contact Center
Administrator or supervisor access to Contact Center
administration.
Available
Available
Available
NN40170-301NN40170-301
Page 19

Chapter 1 Getting started 19
Features Intelligent Contact Center for BCM50
Intelligent Overflow Routing: rules you create to
overflow, change the priority of, and move calls to
multiple skillsets, a skillset mailbox, an internal or
external number, a mailbox, the Auto Attendant or an
operator.
Intelligent CLID/DNIS Routing 1000 rules
Overflow skillsets Default 0, maximum 29
Available
Service Mode: you specify the start and end times for
the day and night skillset for each day of the week
Limited Feature 983 telephone administration Available
Avaya CallPilot Manager Available
Reporting for Contact Center Available
Expected Wait Time 5 tables
Activity Codes 2,000 entries
Multimedia Contact Center Available
Available
Must be enabled with keycode
Reporting for Contact Center must be enabled to
configure Activity Codes
Must be enabled with keycode
Intelligent Contact Center Set Up and Operation Guide
Page 20

20 Chapter 1 Getting started
Avaya NES Contact Center features
Contact Center has many features that give your Contact Center advanced and flexible call
handling.
Intelligent Routing
Flexible routing steps
Intelligent Routing gives you advanced methods for routing calls through
your Contact Center. How calls are directed is based on various input
conditions.
Intelligent CLID/DNIS Routing:
• routes calls according to CLID/ANI, DNIS, ISDN Calling Number
• is applied when calls first enter the Contact Center
Intelligent Caller Input Routing, Basic:
• is the ability to route calls to the Auto Attendant, a Custom Call Routing
(CCR) Tree, the operator, or a skillset mailbox
• routing is applied when the caller presses a telephone button in
response to instructions played in a greeting
Intelligent Caller Input Routing, Advanced:
• includes the Basic capabilities, plus the ability to create rules that route
calls to other skillsets and locations depending on the caller input
• enables you to change the priority of the call
Intelligent Overflow Routing:
• routes calls to an extension, other skillsets, the operator, a mailbox, an
external phone number, the Auto Attendant, a skillset mailbox, or a
CCR Tree
• enables you to change the priority of the call
You can assign these routing steps to Day and Night Routing Tables,
Overflow and Advanced Call Input Routing:
• transfer to a mailbox
• transfer to an extension
• transfer to an external telephone number
• transfer to the Auto Attendant
• transfer to an operator
• transfer to a skillset mailbox
• transfer to a CCR Tree
• move to another skillset using Advanced Call Input Routing
• play a recorded greeting
• play an Expected Wait Time Greeting
• Distribute
• Disconnect
Dynamic agent priority
Choice of call presentations
NN40170-301NN40170-301
You can assign agents different priority levels depending on the skillset to
which they are logged on.
You can assign agents forced calls, or let agents answer calls manually.
Page 21

Chapter 1 Getting started 21
Dynamic call priority
Delegated access to Contact
Center
Multimedia Contact Center
Avaya CallPilot Manager
Call monitoring
Reporting for Contact Center
You can have the priority of a call changed in the Intelligent CLID/DNIS
Routing table, the Intelligent Caller Input Routing Table and the Intelligent
Overflow Routing table.
With call priority, all calls that have a higher priority are handled before
lower priority calls, no matter how long the lower priority calls are waiting.
For an example of using Intelligent Overflow Routing to control call priority,
see “Example 2” on page 121.
You or the System Administrator can create a username and password to
give a supervisor access to Contact Center administration.
If you have Multimedia Contact Center enabled, agents can have
multimedia sessions with callers through the internet. Callers click an
HTML link to connect to the Contact Center.
CallPilot Manager is a web-based interface you can use to administer
CallPilot and Contact Center.
Agents can monitor the call activity in the skillsets they are logged on to.
You and supervisors can monitor the call activity per skillset or on a system
wide basis.
You can generate the System Configuration report to view Contact Center
settings.
If you have Reporting for Contact Center enabled, you can view real time
statistics and comprehensive management information about the
day-to-day performance of your Contact Center. See the Reporting for
Contact Center Setup and Operations Guide (NN40040-602) for more
information.
Using CallPilot call routing with Contact Center
CallPilot is a versatile business communications tool that you can use to:
• answer incoming calls
• offer callers a selection of options to route their calls or access information
• provide advanced voicemail, Auto Attendant and call handling capabilities
Avaya CallPilot has two powerful call routing features: Auto Attendant (AA) and Custom Call
Routing (CCR). These features route incoming calls to telephones and voice mailboxes. You can
also use these features to route calls to Avaya NES Contact Center skillsets.
Intelligent Contact Center Set Up and Operation Guide
Page 22
22 Chapter 1 Getting started
Auto Attendant
The Auto Attendant answers incoming calls and presents callers with a greeting. After the
greeting, the Auto Attendant Menu offers callers a range of options that they can select using the
dialpad of their telephone. Using these options, callers can transfer themselves from the Auto
Attendant to a skillset by entering the Control DN of the skillset.
Note: Include the number of the Control DN in your Auto Attendant Greeting.
For information about how to configure the Auto Attendant, see the Avaya CallPilot Set Up and
Operation Guide (NN40090-300).
Custom Call Routing (CCR)
With CCR you can replace the Auto Attendant menu with an expanded menu that can include
several sub-menus to offer callers a wider range of options. You can give callers access to a
Contact Center skillset by adding an internal transfer that transfers the caller to the Control DN of
the skillset.
For more information about transfers and CCR, see the Avaya CallPilot Manager Set Up and
Operation Guide (NN40090-300).
These text conventions are used in this guide to indicate the information described:
Convention Description
bold Courier
text
italic text Indicates book titles
plain Courier
text
FEATURE
HOLD
RELEASE
Audience
Indicates command names and options and text that you need to enter.
Example: Use the
Example: Enter
info command.
show ip {alerts|routes}.
Indicates command syntax and system output (for example, prompts
and system messages).
Example:
Set Trap Monitor Filters
Indicates that you press the button with the coordinating icon on
whichever set you are using.
This guide is for system administrators who configure and maintain Contact Center on an Avaya
BCM. To use this guide you must:
• be an authorized system administrator
• be knowledgeable of CallPilot and Contact Center
NN40170-301NN40170-301
Page 23

Acronyms
The following is a list of acronyms used in this guide.
Table 1
Acronym Description
BCM Avaya Business Communications Manager
CCR Custom Call Routing
CDN Control Directory Number
CFAC Call Forward All Calls
CFB Call Forward on Busy
CFNA Call Forward No Answer
CLID Calling Line Identification
CO Central Office
COS Class of Service
DID Direct Inward Dialing
DN Directory Number
DND Do Not Disturb
DTMF Dual Tone Multi-Frequency
EWT Expected Wait Time
MWI Message Waiting Indication
NVM Norstar Voice Mail
Chapter 1 Getting started 23
Intelligent Contact Center Set Up and Operation Guide
Page 24

24 Chapter 1 Getting started
Symbols and text conventions
These symbols are used to Highlight critical information for the Avaya BCM system:
Caution: Alerts you to conditions where you can damage the equipment.
Danger: Alerts you to conditions where you can get an electrical shock.
Warning: Alerts you to conditions where you can cause the system to fail or work
improperly.
Note: A Note alerts you to important information.
Tip: Alerts you to additional information that can help you perform a task.
Security note: Indicates a point of system security where a default should be changed,
or where the administrator needs to make a decision about the level of security required
!
for the system.
Warning: Alerts you to ground yourself with an antistatic grounding
strap before performing the maintenance procedure.
Warning: Alerts you to remove the Avaya BCM main unit and
expansion unit power cords from the ac outlet before performing any
maintenance procedure.
NN40170-301NN40170-301
Page 25

Chapter 1 Getting started 25
These conventions and symbols are used to represent the Business Series Terminal display and.
Convention Example Used for
Word in a special font (shown in
the top line of the display)
Underlined word in capital letters
(shown in the bottom line of a two
line display telephone)
Dialpad buttons
Pswd:
PLAY
£
Command line prompts on display telephones.
Display option. Available on two-line display
telephones
option on the display to proceed.
Buttons you press on the dialpad to select a
particular option.
. Press the button directly below the
These text conventions are used in this guide to indicate the information described.
Convention Description
bold Courier
text
Indicates command names and options and text that you need to enter.
Example: Use the
Example: Enter
info command.
show ip {alerts|routes}.
italic text Indicates book titles
plain Courier
text
FEATURE
HOLD
Indicates command syntax and system output (for example, prompts
and system messages).
Example:
Set Trap Monitor Filters
Indicates that you press the button with the coordinating icon on
whichever set you are using.
RELEASE
Related Publications
This guide refers to the following additional documents:
CallPilot Manager Set Up and Operation Guide (NN40170-300)
CallPilot Telephone Administration Guide (NN40170-601)
CallPilot Contact Center Telephone Administration Guide (NN40170-600)
Contact Center Agent Guide (NN40040-101)
Contact Center Supervisor Guide (NN40040-102)
Keycode Installation Guide (NN40010-301)
Intelligent Contact Center Set Up and Operation Guide
Page 26

26 Chapter 1 Getting started
Customer Service
Visit the Avaya Web site to access the complete range of services and support that Avaya
provides. Go to http://www.avaya.com/support or go to one of the pages listed in the following
sections.
Navigation
• “Getting technical documentation” on page 26
• “Getting product training” on page 26
• “Getting help from a distributor or reseller” on page 26
• “Getting technical support from the Avaya Web site” on page 26
Getting technical documentation
To download and print selected technical publications and release notes directly from the Internet,
go to http://www.avaya.com/support.
Getting product training
Ongoing product training is available. For more information or to register, you can access the Web
site at http://www.avaya.com/support. From this Web site, you can locate the Training contacts
link on the left-hand navigation pane.
Getting help from a distributor or reseller
If you purchased a service contract for your Avaya product from a distributor or authorized
reseller, contact the technical support staff for that distributor or reseller for assistance.
Getting technical support from the Avaya Web site
The easiest and most effective way to get technical support for Avaya products is from the Avaya
Technical Support Web site at http://www.avaya.com/support.
NN40170-301NN40170-301
Page 27
Chapter 2
About setting up Contact Center
You can set up Contact Center using a display telephone on your phone system, or using the
web-based Avaya CallPilot Manager on a web browser from a computer on your network. For
some Contact Center tasks, such as initializing skillset mailboxes, you must use a phone. See the
Contact Center Telephone Administration Guide for more information.
Using Avaya CallPilot Manager to set up Contact Center
Avaya CallPilot Manager operates on your Business Communications Manager (Avaya BCM)
system. You access Avaya CallPilot Manager on a web browser from a computer on your network.
System requirements
Before you use Avaya CallPilot Manager, you must enable CallPilot and Contact Center on your
Avaya BCM. You enable CallPilot and Contact Center with a keycode. To enable keycodes see
“Enabling keycodes” on page 27.
27
Note: For information about computer and browser requirements for CallPilot
Manager and Contact Center, see the CallPilot Manager Set Up and Operation
Guide (NN40170-300).
Enabling keycodes
You enable keycodes to activate Intelligent Contact Center, to increase the number of agents in
your Contact Center, to increase the number of skillsets, and to enhance your Contact Center with
options such as Multimedia Contact Center and Reporting for Contact Center.
To enable a keycode for Avaya Business Communications
Manager
1 Log on to Business Element Manager and select the Avaya Business Communications
Manager you want to access.
For information about logging on to Element Manager, see the Avaya Business
Communications Manager 5.0 Administration and Security Guide.
2 On the Task Navigation Panel, click the Configuration tab.
The configuration folders display.
3 Click the System folder and then click the Keycodes task.
The Keycodes panel appears.
Intelligent Contact Center Set Up and Operation Guide
Page 28
28 Chapter 2 About setting up Contact Center
4 Click Load File.
The Open file dialog box appears.
5 Browse to where you saved the keycode file you downloaded from KRS.
6 Click Open.
The file uploads and the feature appears in the Keycodes list.
Note: See the Keycode Installation Guide for more information.
Starting CallPilot Manager
To start Avaya CallPilot Manager on Avaya BCM
1 Log on to Business Element Manager and select the BCM you want to access.
For information about logging on to Business Element Manager, see the Avaya Business
Communications Manager 5.0 Administration and Security Guide.
2 On the Task Navigation Panel, click the Configuration tab.
The configuration folders display.
3 Click the Application folder and then click the Voice Messaging/Contact Center task.
The Voice Messaging/Contact Center panel appears.
4 Click Launch CallPilot Manager.
The CallPilot Manager Main Menu web page opens.
NN40170-301NN40170-301
Page 29
Chapter 2 About setting up Contact Center 29
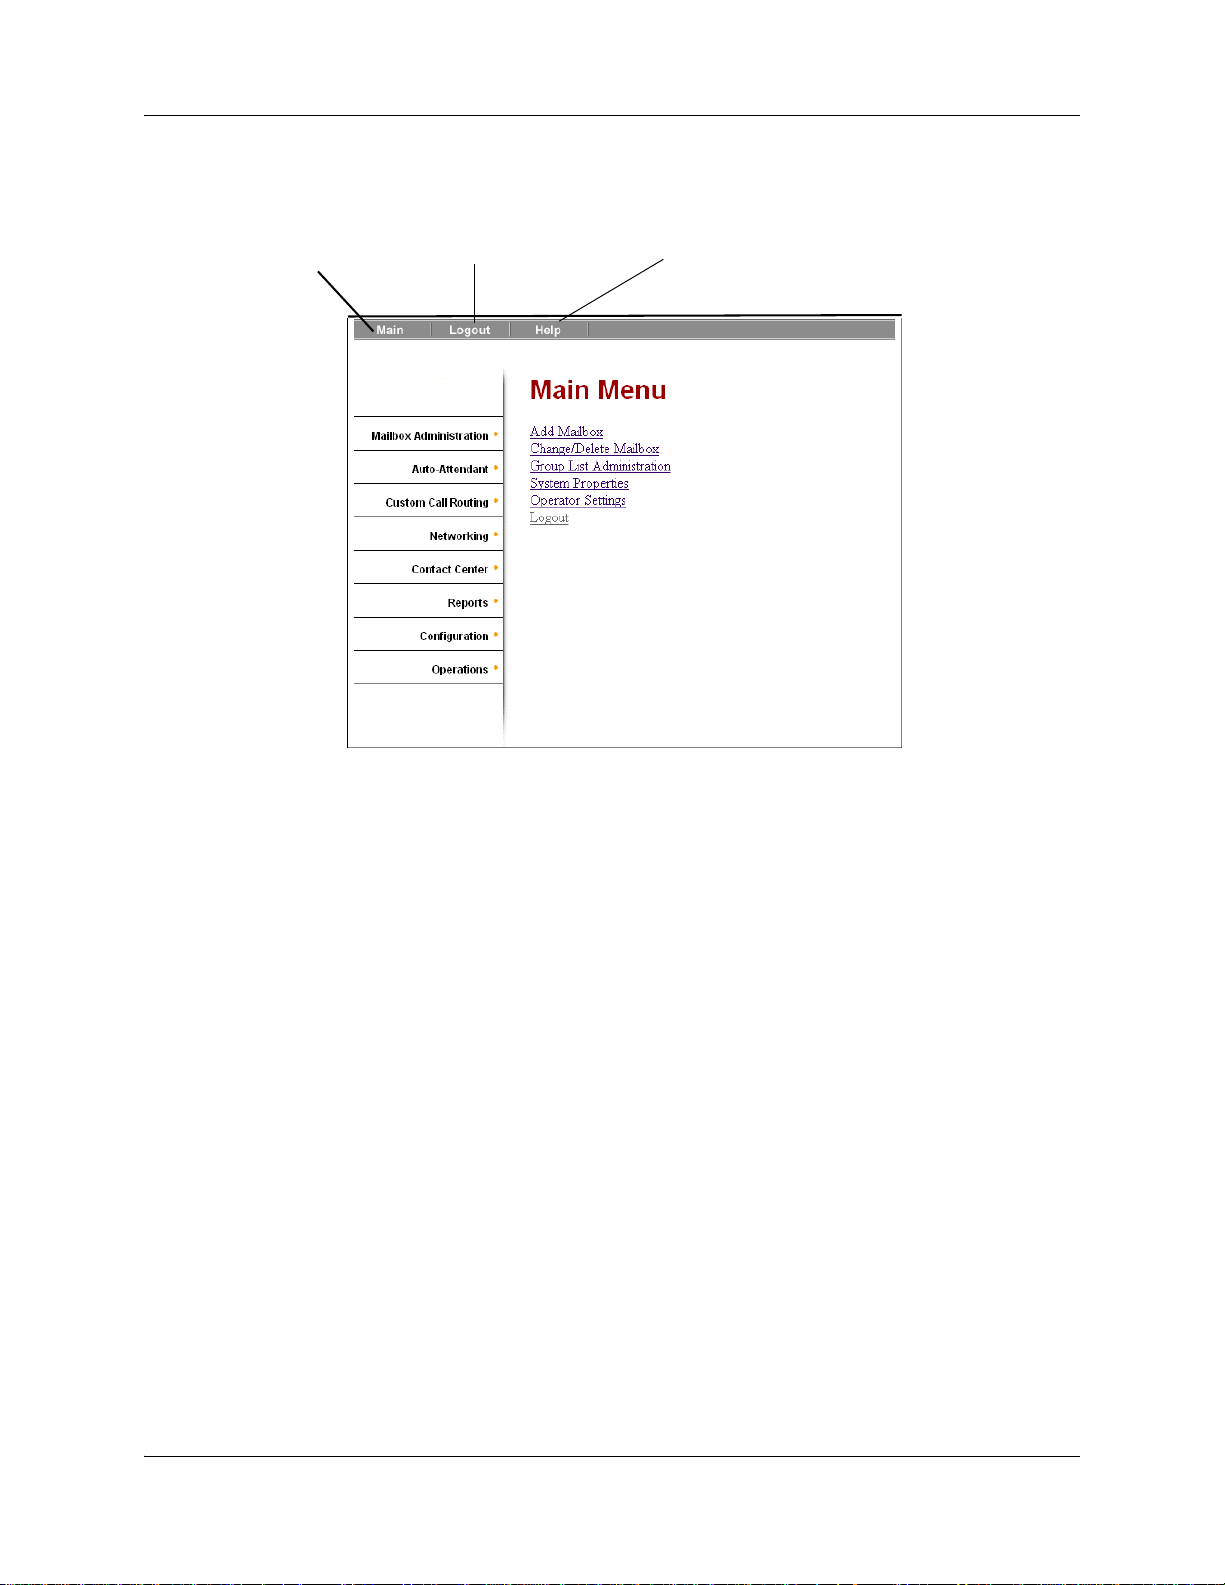
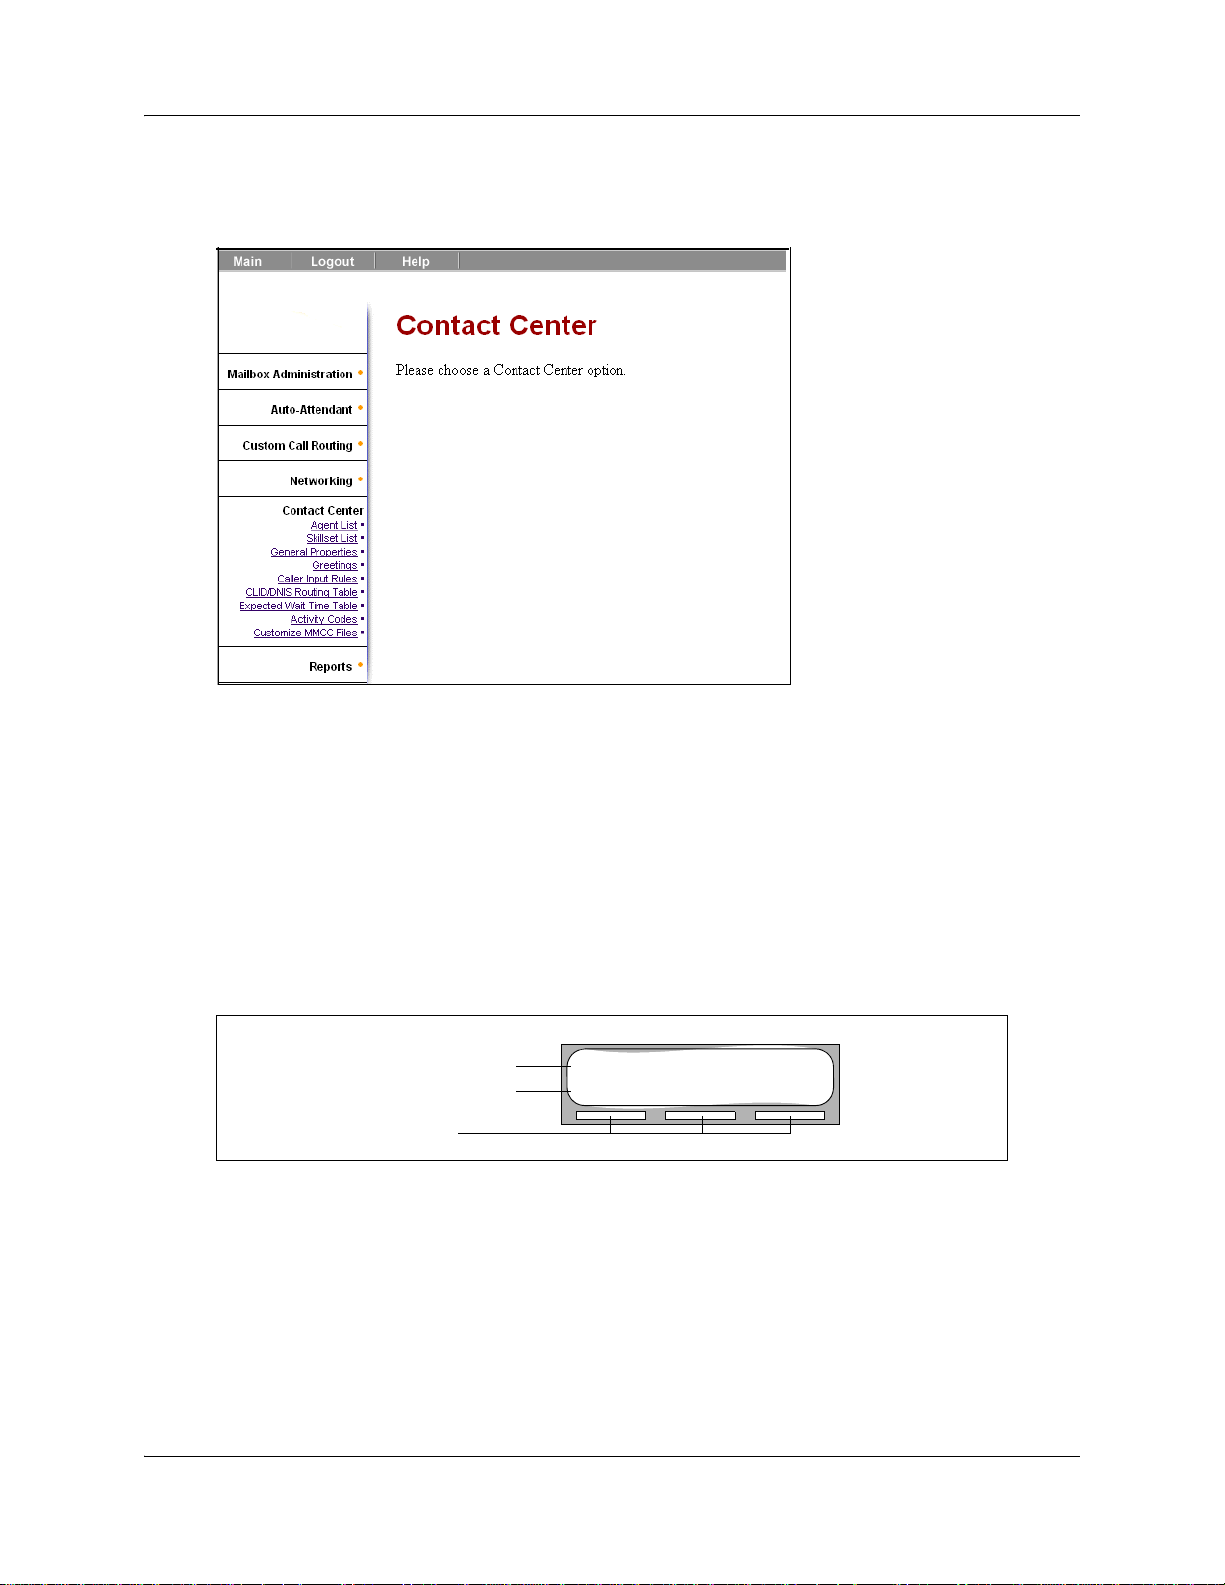
About the CallPilot Manager interface
Main Menu
Headings
expand and
display their
links when you
click them.
Quit CallPilot Manager
Opens online HelpReturn to
System timeout
A CallPilot Manager session times out after 10 minutes of inactivity. This is a security feature that
prevents unauthorized access to the system.
If your session times out, the login page appears and a message that says that the session has
expired. You must log on to continue programming Contact Center.
If the system times out while you are working on a page, any settings that you have not entered on
the system by pressing the Submit button are not entered.
Contact Center access
If you use an Avaya BCM system, there is no dedicated or default CallPilot or Contact Center
Administrator user ID and password. For BCM, you can create users with CallPilot and Contact
Center rights in Element Manager. You can also change the users' passwords in Element Manager.
All settings under the Contact Center heading in CallPilot Manager are available, once you have
set up Contact Center access in Element Manager.
Intelligent Contact Center Set Up and Operation Guide
Page 30
30 Chapter 2 About setting up Contact Center
For information about Contact Center access rights, see the Avaya Business Communications
Manager 5.0 Administration and Security Guide.
Setting up Contact Center from a two line display telephone
In addition to using Avaya CallPilot Manager, you can set up Contact Center with a two line
display telephone using F983.
Two line display phones show Avaya CallPilot
two-line display can show up to three display options at once. In some instances, an option does
not have a corresponding display button, and you must select the option by pressing buttons on the
dial.
An example of a two-line display
Display command line
Display button options
Display buttons
Avaya NES Contact Center agents can use two line display telephones and one line display
telephones. Supervisors must use two line display telephones with the handsfree mute feature.
Telephones without a display, such as telephones attached to an analog terminal adapter, cannot be
used for Contact Center agent tasks. Avaya recommends that you read the telephone user card for
your telephone before proceeding. For more information, see the CallPilot Contact Center
Telephone Administration Guide).
TM
and Contact Center commands and options. A
Skillset 1: Enabled
SKILL NEXT
NN40170-301NN40170-301
Page 31

System timeout
If you pause longer than two minutes (120 seconds) when you program Contact Center on a two
line display telephone, the system times out and ends the session. This safety feature prevents
unauthorized use of the system.
If the system times out while you are setting up Contact Center, the settings are still entered in the
system. To continue programming, you must log on again and change the settings.
Using the dialpad
The buttons on your display telephone dialpad act as both numbers and letters. Each button
represents a number and letters of the alphabet.
Chapter 2 About setting up Contact Center 31
To enter a character
To accept a character
To delete a character
Letters and numbers on the
Press the dialpad button that represents the letter or number. Press the
button again to see the next letter or number.
Press
£ or press another . When you press another , the cursor
advances, and the display shows the first character on the new .
Press the
BKSP display button.
⁄ 1 ’ - ¤ A B C 2 a b c ‹ D E F 3 d e f
› G H I 4 g h i fi J K L 5 j k l fl M N O 6 m n o
‡ P Q R S 7 p q r s ° T U V 8 t u v · W X Y Z 9 w x y z
• Quit ‚ Q Z Zero q z £ Accepts the displayed letter
enters a comma (,)
The display can show up to 16 characters. The prompt remains on the display if you enter fewer
than ten characters. If you enter information where the prompt and the information is fewer than
16 characters, you can see both the prompt and the information you enter.
Pswd:1111
OTHR RETRY
This is an example of a display with fewer than 16 characters, where
the command line prompt remains on the display.
Name:
RETRY BKSP
P
RETRY BKSP
This display shows the Name: command line prompt.
When you begin to enter the last name, the Name: command line
prompt disappears. For example, if you enter the name Partridge, you
press ‡ for P, and the display drops the Name: prompt.
Intelligent Contact Center Set Up and Operation Guide
Page 32

32 Chapter 2 About setting up Contact Center
PARTRIDGE
RETRY BKSP
Although the name is only nine characters long, the command line
prompt is not shown on the display after you enter the entire name.
The prompt disappears for these command line prompts:
• Name:
•Log:
•Dest ph:
Symbols and conventions used in this guide
These conventions and symbols are used to represent the Business Series Terminal display and.
Convention Example Used for
Word is in a special font (in the top
line of the display)
Underlined word in capital letters
(shows bottom line of a two line
display telephone)
Dialpad buttons
Pswd:
PLAY
£
Command line prompts on display telephones.
Display option. Available on two-line display
telephones
option on the display to proceed.
Buttons you press on the dialpad to select a
particular option.
. Press the button directly below the
About telephone buttons
This table shows the Business Series Terminal buttons. Use the buttons that pertain to the type of
telephone you use.
Button name T7100, T7208, T7316
Feature
Handsfree Bottom right-hand
Hold
Volume Control
Release
You can enter , ƒ or and the code to use a feature.
For example, press ·°⁄ to access your mailbox.
button
≥≥
√√
®®
M7100, M7208, M7310,
M7324
ƒ
©
M7100N, M7208N,
M7310N, M7324N
NN40170-301NN40170-301
Page 33

Chapter 2 About setting up Contact Center 33
The Avaya 7100 Digital Deskphone works differently from other telephones on your system
because it does not have line buttons. Where other telephones require that you select a line button
to answer a call, on the Avaya 7100 Digital Deskphone terminal you pick up the handset. Where
other telephones require you to select a line button to take a call off hold, you press ≥ on the
Avaya 7100 Digital Deskphone terminal.
On Avaya 7100 Digital Deskphone terminals, you can answer a second call by pressing ≥.
Your active call is put on hold and you connect to the waiting call. You can have no more than two
active calls at one time.
Checking which telephone mailbox interface you use
CallPilot supports two interfaces: Norstar Voice Mail and Avaya CallPilotTM.
The System Administrator determines which interface is assigned to your mailbox.
Follow the procedures in this guide that apply to the interface you use.
Some procedures apply to both interfaces.
To check which mailbox interface you use
0 new 0 saved
PLAY REC
No messages
COMP MBOX
1 Press ·•⁄.
Follow the voice prompts or the display button options to open
your mailbox.
2 Check the display to see which interface you use:
This is the Norstar Voice Mail interface.
This is the CallPilot interface.
3 Press ® to end the session.
Intelligent Contact Center Set Up and Operation Guide
Page 34

34 Chapter 2 About setting up Contact Center
NN40170-301NN40170-301
Page 35

Chapter 3
Using Feature Codes
You use Feature Codes to perform Avaya NES Contact Center functions on your telephone.
Feature Codes
Feature Codes are assigned during installation. This guide shows the default Feature Codes. Avaya
NES Contact Center can also use custom Feature Codes. If the default Feature Codes are used by
another application, your system automatically assigns custom Feature Codes. If your System
Administrator has assigned custom Feature Codes, you can use the table “Feature Codes” on page
236 to record the Custom Feature Codes.
To determine the Feature Codes
1 Press ·•⁄.
35
Login/out: F9xx
NEXT
Ready Mode: F9xx
NEXT
2 The display shows the name and number of the Log In/Log Out
Feature Code. xx represents a number between 00 and 99.
3 Press NEXT
4 The display shows the name and number of the Ready Mode Feature
Code.
5 Press NEXT
6 When the display shows QUIT
7 Press ® to end the session.
.
to see more Feature Codes.
you have seen all the Feature Codes.
Intelligent Contact Center Set Up and Operation Guide
Page 36

36 Chapter 3 Using Feature Codes
Programming a memory button with a Feature Code
Each Feature Code can be programmed to a memory button. We recommend that you use memory
buttons with indicators to program the Feature Codes. A memory button indicator is the triangle
next to a memory button.
You can use memory buttons to monitor call activity, and view the Login/Logout and Not Ready
status of agents. For information about how the status appears, see the Avaya NES Contact Center
Agent Guide (NN40040-101).
For information about using programmed memory buttons to monitor call activity, see “Skillset
properties” on page 54.
To program a memory button
1 Press •‹.
Do not lift your handset.
Program Features
Press a button
QUIT
Feature Code:
QUIT
F__
QUIT CLEAR
2 The display shows Program Features.
3 Press a memory button with an LCD indicator.
4 Press .
5 Enter the Feature Code number that you want to program.
For example, enter ·‚· to program the Display
Waiting Calls Feature Code. See the tables “Feature Codes
used by Avaya NES Contact Center agents” on page 38 and
“Agent Feature Codes” on page 38 for the Feature Codes.
Repeat steps 1 through 5 for each Feature Code you want to
program.
Programmed
6 The display shows that the button is programmed, and then
ends the session.
Use the paper labels that come with your telephone to identify the programmed button. To use the
Feature Code, press the labeled button.
NN40170-301NN40170-301
Page 37

Chapter 3 Using Feature Codes 37
Feature Codes used by Contact Center Administrator and Supervisors
Use this Feature Code To...
Open Mailbox
·°⁄
Operator Settings
·°¤
Voicemail DN
·°fi
Display Waiting Calls
Skillset Status
·‚·
• open skillset mailboxes
• record skillset mailbox greetings
• listen to messages in the skillset mailbox
• set or change the operator extension
• indicate whether the operator is available
• select the day and night service modes for skillsets
• change the password for Operator Settings
For more information on using the Operator Feature Code, see “Setting the Service
Mode for skillsets” on page 146 and “Resetting the Operator password” on page
227.
• display the skillset mailbox number (Control DN) for each skillset
• display the extension for Message Waiting Indication for the skillset mailbox
• reset the passwords of the Contact Center Administrator and the operator
For more information about the Control DN, see “Determining a skillset mailbox
number” on page 71.
• view real-time status information about skillsets. You can see how busy your
Contact Center is so that you can adjust skillset staffing
• view whether a skillset is enabled or disabled
• view the number of agents logged on to the skillset
• view the number of calls waiting
• view the longest wait time of a call
To provide easy, one-button access to this feature, program a memory button that
has an indicator with
Refer to “Programming a memory button with a Feature Code” on page 36.
·‚·.
Log on/Log off
·‚›
Monitor agents
·‚fi
Supervisor Help
·‚fl
Not Ready
·‚°
Record a Call
·°·
Professional Call Recording
··fi
• log on or off.
• lets you monitor agents
• lets you take agents’ help requests
• extend a Break Time period if agents need time after calls to do paperwork or
wrap up tasks. For more information about Break Time properties for a skillset,
see “Break Time” on page 54.
• record an active telephone call. The recorded message is usually placed in your
mailbox. With appropriate setup, the call can also be placed as a .wav file in a
network location.
• record an active call, a three-party conference call, a multi-party conference call,
a Meet-Me Conferencing conference call, a privacy conference call or a silently
monitored call for hunt groups or Contact Centers. The feature delivers the
recorded call as a WAV file, together with the call log data, to an email address
or it is streamed to a server. Professional Call Recording works through the
provisioning of recording rules which the system administrator configures.
Intelligent Contact Center Set Up and Operation Guide
Page 38

38 Chapter 3 Using Feature Codes
Note: You can use The Log on/Log off and the Not Ready Feature Codes, but they are used
primarily by agents. For information about the Feature Codes used by agents, see “Feature
Codes used by Avaya NES Contact Center agents” on page 38.
Note: While you use a feature, if you press the Feature ð button your present feature session
ends. Do not press ð unless you want to end your current feature session.
Feature Codes used by Avaya NES Contact Center agents
If you have Custom Feature Codes, record them in the table “Feature Codes” on page 236.
Agent Feature Codes
For more information about Agent Feature Codes, see the Avaya NES Contact Center Agent Guide
(NN40040-101). For more information about Feature Codes used by supervisors, see the “Feature
Codes used by Contact Center Administrator and Supervisors” on page 37.
Agents use this Feature Code To...
Open Mailbox
·°⁄
Log on/Log off
Monitor skillsets
• access messages in a skillset mailbox
• log on when they are in the office
• view the status of the skillsets they are logged on to. Agents can
·‚›
Supervisor Help
• requests help from a supervisor
·‚fl
Activity Codes
·‚‡
Not Ready
• start a session where they can enter Activity Codes
• For more information about Activity Codes, see “Activity Codes” on
• activate or cancel the Not Ready feature on their telephone. If the
·‚°
• If an agent does not answer a call within a certain number of rings, the
program a memory button with the Log on/Log off Feature Code. The
status of the calls waiting in the skillset is shown by the flash rate of
the indicator. For more information, see “Skillset properties” on page
54.
page 187.
work resulting from a call requires extra time to complete, an agent
can use the Not Ready Feature Code to prevent Avaya NES Contact
Center from routing another call to them. If an agent makes a phone
call, or if a supervisor is monitoring a call, they first use the Not Ready
Feature Code to make themselves busy. When the agent is ready to
receive calls, they use this Feature Code to cancel the Not Ready
feature and receive calls again.
call is returned to the skillset and the agent telephone is automatically
placed into Auto Busy Mode or Auto Logout Mode. The agent must
manually cancel the Auto Busy Mode feature by using the Not Ready
Feature Code to continue to receive calls.
NN40170-301NN40170-301
Page 39

Chapter 3 Using Feature Codes 39
Display Waiting Calls
·‚·
Record a Call
·°·
Professional Call Recording
··fi
Note: While you are using a feature, if you press the Feature button your present
feature session ends. Do not press unless you want to end your current feature
session.
• Agents who answer calls only during peak call periods can use
Display Waiting Calls to see which skillsets have the most call activity.
• view the status of calls in all skillsets. Agents can program a memory
button with the Display Waiting Calls/Monitoring calls. The status of
calls waiting is shown by the flash rate of the indicator. For more
information see “Skillset properties” on page 54.
• record an active telephone call. The recorded message is usually
placed in your mailbox. With appropriate setup, the call can also be
placed as a .wav file in a network location.
• record an active call, a three-party conference call, a multi-party
conference call, a Meet-Me Conferencing conference call, a privacy
conference call or a silently monitored call for hunt groups or Contact
Centers. The feature delivers the recorded call as a WAV file, together
with the call log data, to an email address or it is streamed to a server.
Professional Call Recording works through the provisioning of
recording rules which the system administrator configures.
Intelligent Contact Center Set Up and Operation Guide
Page 40

40 Chapter 3 Using Feature Codes
NN40170-301NN40170-301
Page 41

Chapter 4
Setting up Contact Center agents
Agents handle the calls in your Contact Center. Supervisors are agents with additional capabilities.
Supervisors can monitor calls between agents and callers.
Active agents are agents who are logged in to one skillset or a combination of skillsets. For
example: if Agent 1 is logged in to skillset 1, then one agent is active. If Agent 1 is logged in to
skillset 1and skillset 2, then one agent is active. If Agent 1 and Agent 2 are logged into skillset 1
then 2 agents are active. If Agent 1, Agent 2, and Agent 3 are logged into skillset 1 then three
agents are active.
About adding agents
Before you can add agents to your Contact Center, you must purchase and enable a keycode for the
number of agents that you want to add. The number of agents you can add to your Contact Center
is determined by the number of agents the keycode enables. For information about enabling a
keycode, see “Enabling keycodes” on page 27.
41
For more information about Contact Center agents, see the Contact Center Agent Guide
(NN40040-101).
Intelligent Contact Center Set Up and Operation Guide
Page 42

42 Chapter 4 Setting up Contact Center agents
Agent properties
Agent ID
Name
Automatic Login DN
Supervisor
Automatic Answer
Each agent is assigned a unique ID number. Contact Center assigns the
lowest available ID number. You can assign a different ID number.
Statistics are collected and reported for each ID number. For more
information about statistics, see “Monitoring call activity” on page 173 and
the Reporting for Contact Center Setup and Operations Guide.
The agent name can be a maximum of 13 characters. If you do not enter a
name, a default agent name appears as the word Agent and the ID
number, for example, Agent12.
Enter the DN to which the agent is automatically logged in.
With Automatic Login, you can configure agents to be automatically logged
back in to Avaya NES Contact Center in the event of a system reboot
during the business day. Agents, who are configured to be automatically
logged in, are logged back in to the Contact Center when it restarts
provided that the configured DN is available. For more information see,
“Automatic login” on page 68.
Super represents the status of the agent. No in the Super column means
that an agent that does not have supervisor status. Yes in the Super
column means that an agent has supervisor status.
Automatic Answer is optional. Select Automatic Answer if you want to
force-deliver calls to an agent.
If Automatic Answer is enabled, the agent hears a tone on their telephone
and headset that indicates that a call is delivered. The agent is
automatically in the handsfree mode. It is important that agents use the Not
Ready feature when they are not available to receive calls.
If Automatic Answer is not enabled, calls ring at the agent's telephone and
the agent must answer calls manually.
NOTE: For information on how to use Automatic Answer with the
telephones you use in your Contact Center, see “Automatic Answer” on
page 230.
Override Skillset Break Time
Not Ready Timeout
Manual Not Ready Timeout
NN40170-301NN40170-301
The Override Skillset Break Time overrides the default skillset break time.
You can configure each individual agent's break time. The time is set on an
agent basis rather than on a skillset wide basis.
The Not Ready Timeout is for agents who have missed a call and been
made busy. You configure the not ready timeout setting to automatically
place the agent in the available state after a preconfigured time out. After
the administrator configured wait time, agents are automatically placed
back into service. Agents still retain the flexibility to manually make
themselves ready. You can configure the timeout for each agent and it will
override the break time configured for the skillset.
The Manual Not Ready Timeout feature forces agents back into service
after the specified time. You configure the manual not ready timeout
setting, so agents, using F908, can manually place themselves back in the
available state after a preconfigured time out. Agents use F908 to give
themselves a break from receiving calls. If this option is not set, agents can
remain in F908 indefinitely.
Page 43

Chapter 4 Setting up Contact Center agents 43
Audible Not Ready
Notification Interval
Missed Call Option
Activity Code Entry Type
You configure the Audible Not Ready Notification Interval so an audible
tone plays at the agent's telephone set on a configurable interval as long as
the agent is in the not ready state. The tone plays after the length of every
interval.
For example, if the interval is ten seconds and the agent enters the not
ready state then a tone is not played for ten seconds and then is played
every ten seconds thereafter.
You must configure a not ready timeout for the agent to use the Audible Not
Ready Timeout feature.
The Missed Call Option controls how a call is treated if an agent does not
answer the call. Make Not Ready assigns an agent's telephone to respond
as it does with the Not Ready feature enabled. Automatic Logout
automatically logs an agent out of their skillset if they do not answer a call.
The default is Make Not Ready (Return to Skillset).
To assign how many rings before the Missed Call Option, change the timer
for Transfer Callback Timeout.
If you use a Avaya BCM, see the Avaya Business Communications
Manager 5.0 Administration and Security guide.
Activity Code entry types are Prompted and Optional. If you select
Prompted, the agent is prompted to enter Activity Codes on their telephone.
If you select Optional, an Activity Code session is not automatically
displayed on the agent’s telephone, but they can press F907 and enter
Activity Codes.
Record A Call
The agent can press F907 at any time during the active call. Prompted
displays F907 after the call is disconnected, but Optional does not.
Optional is the default.
For more information about Activity Codes, see “Activity Codes” on page
187. This option appears if Reporting for Avaya NES Contact Center is
enabled.
Lets subscribers use the Record A Call feature. With Record A Call
(
If you want to change the Record A Call setting, select Disabled,
Announced, or Silent from the Record-a-call drop-down list. The default
setting is Disabled.
The recorded message is placed in the subscriber’s mailbox. With appropriate setup, the call can also be placed as a .wav file in a network location.
Before you activate Record A Call, ask the parties on the call for permission
to record the call.
For more information about Record A Call, see the CallPilot Manager Set
Up and Operation Guide (NN40090-300).
·°·), you can record an active telephone call.
Intelligent Contact Center Set Up and Operation Guide
Page 44

44 Chapter 4 Setting up Contact Center agents
Max Message Length
Recorded Call Destination
Max Message Length is the maximum length of the recorded message.
The range is 1 to 60 minutes.
This attribute appears only if Intelligent Call Center (ICC) keycode is
installed.
Select where you want the recorded call to be stored: Personal Mailbox,
Skillset Mailbox, Mailbox, or SFTP destination.
If you want to add or change a network location where the Record-a-call
will be recorded (as well as the subscriber mailbox), you need to specify the
appropriate SFTP destination. SFTP destinations can be specified using
Element Manager. From the Element Manager, click Configuration >
Application > Voice Messaging/Contact Center to specify the SFTP destinations.
When a system administrator defines an SFTP folder as a storage location
on the network, these storage locations must be on an SCP server. The
BCM supports OpenSSH 3.7.
Note: Avaya BCM does not support secure file transfer protocol (SFTP)
as element manager (EM) screens in Silent Record a Call (SRC) and
Backup Restore Utility (BRU) indicate. Instead, the secure copy protocol
(SCP) is supported. Therefore, wherever an SFTP server is required, a
server supporting SCP should be setup instead. Additionally, all instances
of the phrase “SFTP” in the EM should be taken to mean “SCP.”
In addition to these agent properties, you can assign agents Dynamic Priority when you assign
them to a skillset. For more information, see “Dynamic Agent Priority” on page 63.
Adding an agent or a supervisor
You can use the table “Avaya NES Contact Center agents” on page 240 to record the agents you
add.
Note: When adding an agent, the Automatic Login feature does not appear. You must
use the Change command in the Agent List to assign Automatic Login.
To add an agent
1 Start Avaya CallPilot Manager.
2 Click the Contact Center heading.
NN40170-301NN40170-301
Page 45

3 Click the Agent List link.
The Contact CenterAgent List appears.
4 Click Add.
The Add Agent page appears.
Chapter 4 Setting up Contact Center agents 45
5 If you want to change the Agent ID number, in the Agent ID box type the new Agent ID.
6 In the Name box type the name of the agent.
Intelligent Contact Center Set Up and Operation Guide
Page 46

46 Chapter 4 Setting up Contact Center agents
7 Select the Supervisor check box if you want to give the agent supervisor functionality.
The default is not selected.
8 Select the Automatic Answer check box if you want calls to be force-delivered to the agent.
The default is not selected.
9 Select Override Skillset Break Time if you want to configure the agent’s break time.
The default is not selected.
10 Select Not Ready Timeout if you want to the agent to be automatically placed back in the
available state after a pre-configured timeout.
The agent must first be in a Not Ready state before using this feature.
11 Select Manual Not Ready Timeout if you want the agent to manually place themselves back
in the available state after a pre-configured timeout.
12 Select Audible Not Ready Notification Interval if you want to extend the Not-Ready
Timeout feature.
The agent is notified, through the telephone set, when they are in the Not-Ready state.
13 From the Missed Call Option list box select Make Not Ready (Return to Skillset) or
Automatic Logout.
14 If you use Activity Codes, from the Activity Code Entry Type list box select Optional or
Prompted. The default is Optional.
15 Select Record-a-call if you want to record an active call.
If you want to change the record call setting, select Disabled, Announced, or Silent from the
Record-a-call drop-down list. The default setting is Disabled.
16 In the Max Message Length box, type the maximum length of the recorded message, if you
choose to record a call.
17 Select the Destination of the recorded call.
An SFTP destination appears only if Intelligent Call Center (ICC) keycode is installed.
SFTP destinations can be specified using Busines Element Manager.
When a system administrator defines an SFTP folder as a storage location on the network,
these storage locations must be on an SCP server. Avaya BCM supports OpenSSH 3.7.
Note: BCM does not support secure file transfer protocol (SFTP) as element manager (EM)
screens in Silent Record a Call (SRC) and Backup Restore Utility (BRU) indicate. Instead, the
secure copy protocol (SCP) is supported. Therefore, wherever an SFTP server is required, a
server supporting SCP should be setup instead. Additionally, all instances of the phrase
“SFTP” in the EM should be taken to mean “SCP.”
18 Click Submit
.
Adding more than one agent
You can save time by adding more than one agent at a time. When you add multiple agents, the
agents have the default agent name and parameters.
NN40170-301NN40170-301
Page 47

Chapter 4 Setting up Contact Center agents 47
You can use the table “Avaya NES Contact Center agents” on page 240 to record the agents you
add.
To add more than one agent
1 Start CallPilot Manager.
2 Click the Contact Center heading.
3 Click the Agent List link.
The Agent List page appears.
4 Click the Add Many Agents link.
The Add Many Agents page appears.
5 In the From box, type the lowest agent ID number of the agents you want to create.
6 In the To box type the highest agent ID number of the agents you want to create.
The Agent ID numbers you enter must be between 1 and 250.
7 Select the Supervisor check box if you want the agents to have Supervisor status.
8 Select the Automatic Answer check box if you want calls to be force-delivered to the agent.
The default is not selected.
9 Select Override Skillset Break Time if you want to configure the agent’s break time.
The default is not selected.
10 Select Not Ready Timeout if you want the agent to be automatically placed back in the
available state after a pre-configured timeout.
The agent must first be in a Not Ready state before using this feature.
11 Select Manual Not Ready Timeout if you want the agent to manually place themselves back
in the available state after a pre-configured timeout.
12 Select Audible Not Ready Notification Interval if you want to extend the Not-Ready
Timeout feature.
The agent is notified, through the telephone set, when they are in the Not-Ready state.
13 From the Missed Call Option list box select Make Not Ready (Return to Skillset) or
Automatic Logout.
14 If you use Activity Codes, from the Activity Code Entry Type list box select Optional or
Prompted. The default is Optional.
15 Select Record-a-call if you want to record an active call.
If you want to change the record call setting, select Disabled, Announced, or Silent from the
Record-a-call drop-down list. The default setting is Disabled.
16 In the Max Message Length box, type the maximum length of the recorded message, if you
choose to record a call.
17 Select the Destination of the recorded call.
An SFTP destination appears only if Intelligent Call Center (ICC) keycode is installed.
SFTP destinations can be specified using Business Element Manager.
When a system administrator defines an SFTP folder as a storage location on the network,
these storage locations must be on an SCP server. Avaya BCM supports OpenSSH 3.7.
Intelligent Contact Center Set Up and Operation Guide
Page 48

48 Chapter 4 Setting up Contact Center agents
Note: BCM does not support secure file transfer protocol (SFTP) as element manager (EM)
screens in Silent Record a Call (SRC) and Backup Restore Utility (BRU) indicate. Instead, the
secure copy protocol (SCP) is supported. Therefore, wherever an SFTP server is required, a
server supporting SCP should be setup instead. Additionally, all instances of the phrase
“SFTP” in the EM should be taken to mean “SCP.”
18 Click Submit.
Note: Any agents who have an agent ID number that is between the numbers you enter
in the From and To boxes are not changed. These agents are not included in the number
of agents added.
Changing agent information
You can change an agent’s
•name
• Automatic Login DN
• supervisor status
• Automatic Answer setting
• Override Skillset Break Time
• Not Ready Timeout
• Manual Not Ready Timeout
• Audible Not Ready Notification
• Missed Call Option
• Activity Code setting
• Record-a-call
• Max Message Length
• Recorded Call Destination
NN40170-301NN40170-301
Note: You cannot change the properties of an agent who is logged on. Ask the agent to
log off and then make the changes.
Page 49

Chapter 4 Setting up Contact Center agents 49
To change agent information
1 Start CallPilot Manager.
2 Click the Contact Center heading.
3 Click the Agent List link.
The Agent List page appears.
4 Click the Change link for the agent you want to change.
The Change Agent page appears.
If the agent if logged on, a message appears that says that the agent must log off first.
5 Change the properties that you want to change for the agent.
6 Click Submit.
Repeat steps 4 and 5 for each agent you want to change.
Intelligent Contact Center Set Up and Operation Guide
Page 50

50 Chapter 4 Setting up Contact Center agents
Resetting an agent’s password
If an agent forgets their password, you can reset the password back to the default value (0000).
After you reset the password, the agent must change their password the next time they log on.
To reset an agent’s password
1 Log on to CallPilot Manager.
2 Click the Contact Center heading.
3 Click the Agent List link.
The Agent List page appears.
4 Click the Reset Password link for the agent whose password you want to reset.
A message appears that asks you to confirm the request to reset the password.
5 Click OK.
A message appears that the agent’s password is reset. The agent password is set to 0000.
6 Click OK.
Deleting an agent
Deleting an agent removes the agent from Contact Center. The agent is removed from the Agent
List and all the skillsets they are assigned to.
If you want to remove an agent from a skillset, see “Unassigning an agent from a skillset” on page
66.
Note: You cannot delete an agent who is logged on. Ask the agent to log off and then
delete them.
To delete an agent
1 Start CallPilot Manager.
2 Click the Contact Center heading.
3 Click the Agent List link.
The Agent List page appears.
4 Click the Delete link for the agent you want to delete.
A message appears that asks you to confirm the deletion.
If the agent you want to delete is logged on, the Delete button is not available.
If the agent you want to delete has logged on while you are deleting them, a message appears
that says that the agent must log off before you can delete them.
5 Click OK.
A message appears that says the agent is deleted.
6 Click OK.
NN40170-301NN40170-301
Page 51

Forcing an agent off
Agents usually log out when they are no longer available to receive calls. If an agent leaves and
does not log off, you can force the agent off. An agent that is forced off does not receive any new
Contact Center calls.
To force an agent off
1 Start CallPilot Manager.
2 Click the Contact Center heading.
3 Click the Agent List link.
The Agent List page appears.
4 Click the Force Off link for the agent you want to log off.
A message appears that asks you to confirm the request to force off the agent.
5 Click OK.
A message appears that says the agent is logged off.
6 Click OK.
The agent status changes to Logged Off on the Agent List page.
Chapter 4 Setting up Contact Center agents 51
Note: If the agent you force off is on a call, the call is not interrupted.
Intelligent Contact Center Set Up and Operation Guide
Page 52

52 Chapter 4 Setting up Contact Center agents
NN40170-301NN40170-301
Page 53

Chapter 5
Setting up skillsets
About skillsets
Contact Center skillsets answer and distribute calls to agents as they become available. Skillsets
hold calls for different Contact Center departments, such as sales and technical support.
The default number of skillsets is zero. You purchase the number of skillsets you require up to a
maximum of 50. For more information see “Contact Center Update” on page 15.
You cannot change the properties of a skillset while it is in use. For more information, see “Skillset
properties” on page 54 and “Configuring lines” on page 162.
How incoming calls are sent to a skillset
53
Incoming calls are sent to a skillset in one of the following ways:
• You assign a line to be answered directly by a skillset. For information about assigning lines
see “Line administration” on page 161.
• A receptionist, agent or subscriber receives a call and transfers the call to a skillset.
They can transfer the call to a skillset by pressing ‡‚ or TRANSFER
CDN of the skillset. The receptionist, agent or subscriber must not use the Call Pickup feature.
• The Automated Attendant or a CCR Tree answers the call and the caller makes a selection that
routes them to the CDN of the skillset. For more information, see “Auto Attendant” on page
22 and “Custom Call Routing (CCR)” on page 22.
• Calls can be forwarded to the Control Directory Number (CDN) of the skillset by Call
Forward All Calls (CFAC), Call Forward No Answer (CFNA) or Call Forward On Busy
(CFB). For information about these features, see the Avaya Business Communications
Manager 5.0 Administration and Security Guide.
Note: Agents are restricted in how they can use CFAC, CFNA, and CFB. For more
information, see “Important considerations about how agents use features” on page 229.
and entering the
Note: Avaya NES Contact Center does not support CFAC to an external number.
If the agent configures CFAC to an external number, the calls are dropped.
Intelligent Contact Center Set Up and Operation Guide
Page 54

54 Chapter 5 Setting up skillsets
Skillset properties
Skillset
Control DN
Name
MWI DN
(Message Waiting Indication
extension)
The number between 1 and 50 that is assigned to the skillset.
If you have a Avaya BCM50, the number between 1 and 30.
The Control Directory Number is the extension associated with the skillset.
Incoming calls transfer to the CDN of each skillset from extensions, the
Automated Attendant or Custom Call Routing. The CDN is the skillset
mailbox number. To determine which Control DN to use refer to “Assigning
DNs” on page 206.
The skillset name is displayed:
• on Contact Center displays to identify the skillset
• in reports
• as the skillset mailbox name
The skillset name can be a maximum of 16 characters. If you do not enter a
name, the skillset name defaults to SKILLn where n is the skillset number.
The name for each skillset is the same as the skillset mailbox name.
The Message Waiting Indication extension is an optional phone number
that indicates that a skillset mailbox has messages waiting. The MWI
extension that you assign shows Message for you on the telephone display
when there are new messages in the skillset mailbox. The MWI DN
defaults to None. If you forget the MWI extensions for a skillset mailbox,
you can view the MWI extensions by using the procedure “Determining a
skillset mailbox number” on page 71.
Note: If you plan to use Attendant Extension, you must enter an MWI DN.
You can use MWI DN without an attendant extension, but you cannot
configure an attendant extension without an MWI DN.
Method
(Method of Call Distribution)
Break Time
The MWI DN must be a different number than the attendant extension.
The method of call distribution determines to which of several available
agents to route the call. There are two methods of call distribution: Least
Busy and Preferred. Least Busy routes the call to the agent who has been
available the longest. Preferred routes the call to the agent with the highest
priority (best qualified agent is 1). If there are several agents with the
highest priority, the agent available longest with that priority will be
selected. The default method of call distribution is Least Busy.
You can assign agents different priorities depending on the skillsets to
which they belong. For more information, see “Dynamic Agent Priority” on
page 63.
Break Time is a time period for agents to complete paperwork after they
finish a call. After an agent completes a call, they are taken out of the
skillset for the Break Time. The agent can extend or cancel the Break Time
by using the Not Ready Feature Code. For more information, see “Not
Ready” on page 37. The Break Time period can last from 00:00 to 59:59.
The Break Time default is 00:30 seconds. You can change the Break Time
period to 00:00 if an agent does not need a Break Time.
If your Contact Center uses Activity Codes, set the Break Time to longer
than 10 seconds to allow time for Activity Code entry.
NN40170-301NN40170-301
Page 55

Chapter 5 Setting up skillsets 55
Delay Answer
Primary Alert
Secondary Alert
Attendant extension
Delay Answer is a toll-saving feature that prevents Contact Center from
answering calls and playing greetings when there are no agents available.
When a call comes in on a line belonging to a skillset that has no free
agents, the call is not answered until either the Delay Answer time elapses
or an agent becomes available, whichever happens first. During the Delay
Answer time, the waiting callers hear ringback.
To activate the Delay Answer feature, enter a time for Delay Answer. The
Delay Answer time can be a minimum of zero seconds and a maximum of
10 minutes. The default Delay Answer time is 00:00.
Alert times are time limits for calls waiting in skillsets. You can set the alert
time for all calls for each skillset.
When the alert time has passed, it produces a flash on a memory button
indicator. A slowly flashing indicator alerts you that a call has exceeded the
Primary alert time. A quickly flashing indicator alerts you that a call has
exceeded the Secondary alert time. The indicator stops flashing when the
calls are handled.
You assign alert times in minutes and seconds. There is no default value
for alert times. Secondary alerts must be greater than primary.
Agents do not have to be logged on to see the Display Waiting Calls
memory button flashing. A memory button must be programmed with the
Display Waiting Calls Feature Code and the Primary alert time must be set
up for the memory button to show waiting calls status.
The attendant extension is the extension used if a caller requests to talk to
the operator after the caller transfers to the Automated Attendant or CCR.
The attendant extension is optional.
Prompt Language
Use previous _ calls to
calculate EWT
EWT Increase Allowed
If you do not assign an attendant extension, the call is sent to the system
attendant extension. If a call is transferred to an Auto Attendant greeting
table, the call is sent to the greeting table attendant.
Note: You must enter an MWI DN before you enter an attendant extension.
If you enter an attendant extension without an MWI DN assigned, you
receive an error message prompting you to enter the MWI DN.
The attendant extension must be a different number than the MWI DN.
Prompt Language can be either Primary or Alternate. The Prompt language
is the language choice used for prompting callers who transfer to the
Automated Attendant or CCR. Prompt Language appears only on a system
that is configured as bilingual.
You can enter a number between 2 and 256 calls.
For more information about Expected Wait Time see “Expected Wait Time”
on page 132.
Selected by default, which means that EWT will be recalculated if it
increases, and the appropriate EWT greeting will be played.
For more information about Expected Wait Time see “Expected Wait Time”
on page 132.
Intelligent Contact Center Set Up and Operation Guide
Page 56

56 Chapter 5 Setting up skillsets
Initial Call Duration
Activity Code Entry Type
The Initial Call Duration is used to compute expected wait time until
sufficient call statistics are obtained. This can be a value between 00:01:00
and 24:00:00.
For more information about Expected Wait Time see “Expected Wait Time”
on page 132.
Activity Code entry types are Prompted and Optional. If you select
Prompted, the agent is prompted to enter Activity Codes on their telephone.
If you select Optional, an Activity Code session is not automatically
displayed on the agent’s telephone, but they can press F907 and enter
Activity Codes.
Optional is the default.
For more information about Activity Codes see “Activity Codes” on page
187. This option appears if Reporting for Contact Center is enabled.
Setting up or changing a skillset
You can record skillset properties in the table “Avaya NES Contact Center skillsets” on page 237.
Note: Before you can change a skillset you must disable the skillset and wait until there
are no calls in the skillset. You cannot change a skillset while it is in use.
To set up or change a skillset
1 Start CallPilot Manager.
2 Click the Contact Center heading.
3 Click the Skillset List link.
The Skillset List page appears.
4 If you want to set up a skillset, click the Configure link for the skillset you want to set up
or
NN40170-301NN40170-301
Page 57

Chapter 5 Setting up skillsets 57
if you want to change a skillset, click the Properties link for the skillset you want to change.
The Skillset Properties page appears.
5 In the Control DN box, type the extension for the skillset.
For more information, see “Control DN” on page 54.
6 In the Name box type the name for this skillset. The skillset name can be a maximum of 16
characters.
7 In the MWI DN box, type the extension of the telephone that you want to display the Message
Waiting Indicator for the Skillset Mailbox.
If you plan to use an Attendant Extension, you must enter an MWI DN.
8 From the Method list box, select Least Busy or Preferred.
The default is Least Busy.
9 In the Break Time box enter the Break Time period.
The default Break Time is 00:30.
10 In the Delay Answer box enter the delay answer time.
The default delay answer time is 00:00.
11 To enable the Primary Alert, select the Primary Alert check box and enter the Primary Alert
time.
12 To enable the Secondary Alert, select the Secondary Alert check box and enter the Secondary
Alert time. The Secondary Alert time must be greater than the Primary Alert time.
13 If you want to assign an attendant to the skillset, in the Attendant Ext box type the extension
of the attendant.
You must enter an MWI DN before you enter an attendant extension.
14 If your system is configured for bilingual operation, from the Prompt Language list box,
select Primary or Alternate. The Prompt Language list box does not appear if you do not use
Intelligent Contact Center Set Up and Operation Guide
Page 58

58 Chapter 5 Setting up skillsets
bilingual operation. For more information on bilingual operation see “Assigning the Avaya
NES Contact Center language” on page 165.
15 If you use Expected Wait Time (EWT), enter the number of calls you want to use to calculate
EWT in the Use Previous ___ calls to calculate EWT box. This is the number of previous
calls that are used to calculate the average call duration of a skillset. The number can range
from 2 to 256. The default is 10. For more information about EWT see “Expected Wait Time”
on page 132.
16 If you use Expected Wait Time, leave the EWT Increase Allowed check box selected if you
want the system to recalculate the EWT if it increases and continue to play the appropriate
EWT greeting. If you clear the check box, callers will not hear recalculated expected wait
times if the wait time increases. Whether you select the check box or not, callers will hear the
appropriate EWT greeting if the wait time decreases.
17 If you use Expected Wait Time, in the Initial Call Duration box enter in hh:mm:ss format the
initial average call duration that is used to compute EWT. The average call duration is updated
whenever a call is released from an agent. The default is 00:03:00.
18 If you use Activity Codes, from the Activity Code Entry Type list box select Prompted or
Optional. The default is optional. For more information about Activity Codes see “Activity
Codes” on page 187.
19 Click Submit.
A message appears that says a new mailbox is created and that you must initialize the mailbox
before you enable the skillset. For how to initialize a mailbox see, “Initializing a skillset
mailbox” on page 72.
20 Click OK.
Setting up DID routing
You can route calls based on their Direct Inward Dialing (DID) number. DID is the ability to make
a telephone call directly into an internal extension, without having to go through the operator.
To route DID calls, set up a DID target line and assign the target line to a skillset.
To set up DID routing for Avaya BCM
1 In Business Element Manager, set up a DID target line.
For information about setting up a DID target line on Avaya BCM, see the Avaya Business
Communications Manager 5.0 Administration and Security Guide.
2 In CallPilot Manager, configure the target line number to be answered by Contact Center.
For information about configuring lines, see “Configuring lines” on page 162.
NN40170-301NN40170-301
Page 59

Setting up CLID/DNIS Routing
You can set up CLID/DNIS Routing Tables. CLID/DNIS Routing is the initial routing that
Contact Center calls encounter. The CLID/DNIS Routing you set up lets Contact Center route
calls quickly, based on their incoming line number. Callers are routed to skillsets depending on
who the caller calls, the line on which the call enters, or from where the caller calls. Your CLID/
DNIS Routing Table can have a maximum of 1000 rules.
Examples of using CLID/DNIS Routing
Routing using CLID/ANI
If your company has preferred customers or customers who have access to special services, you
can set up CLID/ANI routing that recognizes the phone numbers the customers are calling from.
Customers whose phone numbers are recognized are immediately routed to appropriate skillsets.
The callers do not need to enter additional digits to route their calls.
Routing using DNIS
Chapter 5 Setting up skillsets 59
If your company has a customer who is a purchasing agent who frequently contacts a sales line,
you can set up DNIS routing that recognizes the phone number the customer is calling. Customers
who call the sales directory numbers are immediately routed to sales skillsets.
Routing using Multimedia Contact Center
If your company has Multimedia Contact Center enabled, callers can click an HTML icon and
enter the phone number they want an agent to call them at. Calls that arrive from a multimedia call
are recognized as Multimedia Contact Center calls and routed to the appropriate skillsets. You can
set up CLID/ANI rules for Multimedia Contact Center Calls. The phone number that the caller
enters in the web browser is the phone number that Multimedia Contact Center dials when an
agent receives the call.
Routing using a Line
If your company uses a rotary number without DNIS capability that uses lines 1 to 3, you can set
up routing to send calls that come in on these lines to a specific skillset.
Routing using CLID and a Line
If your company uses a rotary number and subscribes to a CLID service, you can set up routing
based on CLID and Line to route a special customer.
Routing using CLID/ANI and DNIS
If your company has customers who call the sales group or the service group frequently, you can
set up routing based on CLID/ANI and DNIS to quickly route these customers. You can route the
customers to a skillset with agents that specialize in service or sales to these customers.
Intelligent Contact Center Set Up and Operation Guide
Page 60

60 Chapter 5 Setting up skillsets
CLID/DNIS Routing Table properties
Line
CLID/ANI
DNIS
The line is the line number the call comes in on. Any calls that arrive on this
line are assigned the routing you select.
The line number you enter must be a line that is configured to be answered
by a skillset.
The CLID (Calling Line Identification) or ANI (Automatic Number
Identification) number identifies the caller or the location the call was made
from.
Any calls that have this CLID or ANI number are assigned the priority from
1-20 that you select.
If a call matches the CLID/ANI information in the routing table, the call is
routed to the skillset you choose. You can change the priority, from 1-20, of
the call in the skillset that is assigned for the line on which the call comes
in.
If you select the Multimedia Calls check box, you must have a CLID/ANI
entry, either a phone number or an asterisk (*).
An asterisk (*) in the CLID/ANI field represents all Multimedia Contact
Center calls, including browser only calls, and phone and browser calls.
If you select Multimedia Calls and enter an asterisk in the CLID/ANI field,
then all Multimedia Contact Center calls are routed to that specific skillset.
If you want to route the phone and browser calls to another skillset, then
program a CLID/ANI entry with a telephone number. This is a separate
entry from browser only calls.
DNIS (Dialed Number Identification Service) sends a call directly to an
internal extension without going through the operator. A DNIS number
identifies the number the call is made to.
If a call matches the DNIS information in the routing table, the call is routed
to the skillset you choose. You can change the priority of the call in the
skillset that is assigned for the line the call comes in on.
Multimedia Calls
Action
NN40170-301NN40170-301
Select the Multimedia Calls check box if you want Multimedia Contact
Center calls assigned to this route. You must have Multimedia Contact
Center enabled.
Incoming Multimedia Contact Center calls are assigned the Priority you
select.
If you select the Multimedia Calls check box, you must have a CLID/ANI
entry, either a phone number or an asterisk (*). An asterisk (*) in the CLID/
ANI field represents all Multimedia Contact Center calls, including browser
only calls and phone and browser calls. If you select Multimedia Calls and
enter an asterisk (*) in the CLID/ANI field, then all Multimedia Calls are
routed to the specific skillset. If you want to route the phone and browser
calls to another skillset, then program a CLID/ANI entry with a telephone
number. So it is a separate entry from the browser only calls
If you do not select the Multimedia Calls check box, you must enter one of
CLID/ANI, DNIS, or Line number.
The action is the treatment that is applied to the call:
• You can move the call to another skillset
• You can change the priority of the call from 1-20
• You can move the call to another skillset and change the priority of the
call
Page 61

Note: The CLID routing table can support 1000 rules. Each rule can be a number, or a
range, such as 416*.
To add a CLID/DNIS Route
1 Start CallPilot Manager.
2 Click the Contact Center heading.
3 Click the CLID/DNIS Routing Table link.
The Intelligent CLID/DNIS Routing page appears.
Chapter 5 Setting up skillsets 61
4 Click the Insert link.
The CLID/DNIS Setup page appears.
5 Set the method to identify the call:
• If you want to create a rule based on the line a call comes in on, in the Line box enter the
line number.
• If you want to create a CLID or ANI rule, in the CLID/ANI box type the CLID or ANI
number you want to assign this routing to. The CLID or ANI number identifies the caller
or the location the call was made from.
• If you want to create a DNIS rule in the DNIS box type the DNIS number you want to
assign to this route. The DNIS number identifies the number the call is made to.
Intelligent Contact Center Set Up and Operation Guide
Page 62

62 Chapter 5 Setting up skillsets
• If you want to create a rule for CLID/ANI and a rotary number, in the CLID/ANI box
type the CLID or ANI number and in the Line box type the line number
• If you want to create a rule for CLID/ANI and DNIS, in the CLID/ANI box type the
CLID or ANI number and in the DNIS box type the DNIS number
• If you have Multimedia Contact Center enabled and you want to assign routing to
Multimedia Contact Center calls, select the Multimedia Calls check box. If you select the
Multimedia Calls check box, you must enter a CLID/ANI number or an asterisk.
If you do not select the Multimedia Calls check box, you must enter either a Line, CLID/
ANI, or DNIS number.
6 Select the type of routing you want to apply to the call:
• if you want to move the call to another skillset, select Move to Skillset and from the
Skillset list box select the number of the skillset you want to route the call to
• if you want to move the call to another skillset and assign it a different priority:
—select Move to Skillset
— from the Skillset list box select the number of the skillset you want to route the call to
— from the New Call Priority list box select a priority from 1-20 for the call
• if you want to change the priority of the call, select Change Call Priority Only and from
the New Call Priority list box select a priority from 1-20 for the call
7 Click Submit.
Changing a CLID/DNIS Route
You can change the type of routing that applies to a CLID/DNIS call. If you want to change the
type of call the routing applies to, you must create a new route in the CLID/DNIS Routing Table.
To change a CLID/DNIS Route
1 Start CallPilot Manager.
2 Click the Contact Center heading.
3 Click the CLID/DNIS Routing Table link.
The Intelligent CLID/DNIS Routing page appears.
4 Click the Change link for the route you want to change.
The CLID/DNIS Setup page appears for the route.
5 Select the type of routing you want to apply to the call:
• If you want to move the call to another skillset, select Move to Skillset and from the
Skillset list box select the number of the skillset you want to route the call to.
• If you want to move the call to another skillset and assign it a different priority:
— Select Move to Skillset.
—From the Skillset list box select the number of the skillset you want to route the call
to.
—From the New Call Priority list box select a priority from 1-20 for the call.
NN40170-301NN40170-301
Page 63

• If you want to change the priority of the call, select Change Call Priority Only, and from
the New Call Priority list box select a priority from 1-20 for the call.
6 Click Submit.
To delete a CLID/DNIS Route
1 Start CallPilot Manager.
2 Click the Contact Center heading.
3 Click the CLID/DNIS Routing Table link.
The Intelligent CLID/DNIS Routing page appears.
4 Click the Delete link for the route you want to delete.
The routing is removed from the CLID/DNIS Routing Table.
Assigning an agent to a skillset
You can assign an agent to one or more skillsets. Each agent is responsible for answering calls for
the skillsets they are assigned to.
Chapter 5 Setting up skillsets 63
Note: Before you can add an agent to a skillset, the skillset must be disabled. For how to
disable a skillset see “Disabling a skillset” on page 67.
Dynamic Agent Priority
Agents can have different priorities depending on the skillset to which they are logged on. For
example, when an agent is a member of the English skillset, their priority can be 1 because they are
fluent in English. The same agent can have a priority of 3 when they are logged on to the Spanish
skillset, and a priority of 6 when they are logged on to the German skillset.
If the method of call distribution for the skillset is Preferred, the agent with the highest priority
receives the call. The agent priority ranges from 1 to 20. 1 is the highest agent priority for the most
qualified agents. The default value is 10. For more information about method of call distribution,
see “Method” on page 54.
Intelligent Contact Center Set Up and Operation Guide
Page 64

64 Chapter 5 Setting up skillsets
To assign an agent to a skillset
1 Start CallPilot Manager.
2 Click the Contact Center heading.
3 Click the Skillset List link.
The Skillset List page appears.
4 Click the Agents link for the skillset that you want to add agents to.
The skillset must be configured before the Agents link appears.
The Assigned Agents page appears.
5 Click Assign.
The Assign Agents page appears with the available agents displayed.
6 Click the Assign check box for each agent that you want to add to the skillset.
7 From the Priority list box, select the Priority of the agent.
1 is the highest priority.
8 Click Submit.
The agent you selected appears on to the Assigned Agents page.
If you want to assign another agent to this skillset, follow steps 5 through 8.
9 Click Close to return to the Skillset List page.
NN40170-301NN40170-301
Page 65

Changing an agent’s priority in a skillset
Agents can have different priorities depending on the skillset to which they are logged on. For
example, when an agent is a member of the English skillset, their priority can be 1, because they
are fluent in English. The same agent can have a priority of 3 when they are logged on to the
Spanish skillset and, a priority of 6 when they are logged on to the German skillset.
Before you can change an agent's priority:
• Disable the skillset. See “Disabling a skillset” on page 67.
• Log off the agent. See “Forcing an agent off” on page 51.
To change an agent’s priority in a skillset
1 Start CallPilot Manager.
2 Click the Contact Center heading.
3 Click the Skillset List link.
The Skillset List page appears.
4 Click the Agents link for the skillset you want to change the agent priority of.
The Assigned Agents page appears.
Chapter 5 Setting up skillsets 65
5 Click Change.
The Change Agent Priorities page appears.
6 Click the Change check box for the agent whose priority you want to change.
You can select more than one agent if you want to assign them the same priority.
7 From the Priority list box select the priority you want to assign.
8 Click Submit.
The Assigned Agents page shows the new priority.
Repeat steps 5 through 8 for each agent you want to change.
Or
1 Start CallPilot Manager.
2 Click the Contact Center heading.
3 Click the Skillset List link.
The Skillset List page appears.
4 Click the Agents link for the skillset you want to change the agent priority of.
The Assigned Agents page appears.
5 Click the Change link beside the agent’s name whose priority you want to change.
The Change Agent Priority page appears.
6 From the Priority list box select the priority you want to assign.
7 Click Submit.
The Assigned Agents page shows the new priority.
Intelligent Contact Center Set Up and Operation Guide
Page 66

66 Chapter 5 Setting up skillsets
Unassigning an agent from a skillset
When you unassign an agent from a skillset, the agent is removed from the skillset but is not
deleted from Avaya NES Contact Center.
Before you unassign an agent from a skillset, you must disable the skillset. See “Disabling a
skillset” on page 67.
If you want to delete an agent from Contact Center, see “Deleting an agent” on page 50.
If you want to log an agent off, see “Forcing an agent off” on page 51.
To unassign an agent from a skillset
1 Start CallPilot Manager.
2 Click the Contact Center heading.
3 Click the Skillset List link.
The Skillset List page appears.
4 Click the Agents link for the skillset you want to unassign an agent from.
The Assigned Agents page appears.
5 Click the Unassign link for the agent you want to remove.
A message appears that asks you to confirm your request to unassign the agent.
Note: If the agent you are unassigning is logged on, a message appears that says the
agent is logged on and asks you to force the agent off or ask them to log off.
To unassign the agent, Click OK.
6 Click OK.
The agent is removed from the Assigned Agents page.
7 Click Close to return to the Skillset List page.
Viewing agents in a skillset
To view agents in a skillset
1 Start CallPilot Manager.
2 Click the Contact Center heading.
3 Click the Skillset List link.
The Skillset List page appears.
4 Click the Agents link for the skillset you want to view.
The agents who are assigned to the skillset appear on the Assigned Agents page.
NN40170-301NN40170-301
Page 67

5 Click Close to return to the Skillset List page.
Note: For information about monitoring agents and skillsets, see “Monitoring Avaya
NES Contact Center call activity” on page 173.
Enabling a skillset
After you set up a skillset, the skillset is disabled until you enable it.
Before you can enable a skillset you must:
• Set up the skillset with a valid Control DN.
For information, see “Setting up or changing a skillset” on page 56.
• Initialize the skillset mailbox.
For information, see “Initializing a skillset mailbox” on page 72.
• Record skillset mailbox greetings.
For information, see “Recording skillset mailbox greetings” on page 77.
• Set up the Day and Night Routing Tables.
For information, see “Example of a Day Routing Table” on page 148.
Chapter 5 Setting up skillsets 67
To enable a skillset
1 Start CallPilot Manager.
2 Click the Contact Center heading.
3 Click the Skillset List link.
The Skillset List page appears.
4 Click the Enable link for the skillset to you want to enable.
On the Skillset List page in the Status column the skillset changes from Disabled to Enabled.
A message appears that says what Service Mode the skillset is in.
Note: To change the Service Mode of a skillset, see “Setting the Service Mode for
skillsets” on page 146.
Disabling a skillset
You must disable a skillset if you want to change the skillset properties or administer the lines.
If you disable a skillset, no new calls go to the skillset. Any calls that are in the skillset get
distributed until the calls are ended.
To disable a skillset
1 Start CallPilot Manager.
2 Click the Contact Center heading.
Intelligent Contact Center Set Up and Operation Guide
Page 68

68 Chapter 5 Setting up skillsets
3 Click the Skillset List link.
The Skillset List page appears.
4 Click the Disable link for the skillset you want to disable.
A message appears that asks you to confirm the request to disable the skillset.
5 Click OK.
On the Skillset List page in the Status column the skillset changes from Enabled to Disabled.
Unconfiguring a skillset
You must disable a skillset if you want to change the skillset properties or administer the lines.
Before you unconfigure a skillset:
1 Disable the skillset by following the procedure “Disabling a skillset” on page 67.
2 Unassign any lines that are assigned to it by following the procedure “Configuring lines” on
page 162.
Warning: If you unconfigure a skillset, you delete the skillset properties and the
programming for the skillset. The skillset properties deleted include the assigned agents,
day and night routing tables, service mode, overflow table and skillset mailbox.
To unconfigure a skillset
1 Start CallPilot Manager.
2 Click the Contact Center heading.
3 Click the Skillset List link.
The Skillset List page appears.
4 Click the Unconfigure link for the skillset you want to unconfigure.
A message appears that asks you to confirm the request to unconfigure the skillset.
5 Click OK.
The programming for the skillset is removed from the Skillset List page.
Automatic login
Automatic login is designed for survivability in the event of a system reboot during the business
day. With automatic login, you can configure agents to be automatically logged back in to Avaya
NES Contact Center if there is a system reboot during the business day. Agents, who are
configured to be automatically logged in, are logged back in to Contact Center when it restarts
provided that the configured DN is available.
NN40170-301NN40170-301
Page 69

Chapter 5 Setting up skillsets 69
If the DN is not available, then the agent is not logged in automatically until Contact Center is
restarted and the DN is available. The agent can be logged in manually to another DN or the same
DN if the configured DN was not available at start-up. The agent can also be manually logged out
of a DN and logged into an alternate DN or the same DN.
Note: Automatic login does not automatically log in agents after you configure it.
You must restart voicemail or reboot the Avaya BCM to enable automatic login.
You can restart voicemail through Business Element Manager. Navigate to the
Administration panel > General > Service Manager > voicemail and choose
Restart. This impacts voicemail functionality and a warning message appears.
Configuring automatic log in
1 From the Contact Center menu, select the Agent List link.
The Agent List page appears.
2 From the Agent list, select an agent and click Change.
The agent’s properties page appears.
3 In the Automatic Login DN box, enter the DN to which the agent is automatically logged in.
4 Click Submit.
5 From the Contact Center menu, select the Skillset List link.
The Skillset List page appears.
6 From the Skillset List, select the skillset to which the agent is assigned and click Agents.
The Assigned Agents page appears.
Intelligent Contact Center Set Up and Operation Guide
Page 70

70 Chapter 5 Setting up skillsets
7 Select the agent and click Change.
The Change SS Agent page appears.
8 Select the Automatic Login check box.
9 Click Submit.
NN40170-301NN40170-301
Page 71

Chapter 6
Setting up skillset mailboxes
About skillset mailboxes
Each skillset has a mailbox that stores messages left by callers. A skillset mailbox is created
automatically when you set up a skillset. There is one skillset mailbox for each skillset. The
skillset mailbox number is the same as the Control Directory Number (CDN) of the skillset.
Skillset mailboxes have these Class of Service settings:
• they use the primary prompt language
• their maximum message time is 15 minutes
• their maximum message length is three minutes
• their maximum message retention is 30 days
• they have a maximum greeting length of one minute
71
The default Class of Service for skillset mailboxes is 1.
To prepare a skillset mailbox to receive messages:
• know the skillset mailbox number (CDN) of each skillset mailbox.
If you do not know the skillset mailbox number, see “Determining a skillset mailbox number”
on page 71
• initialize the skillset mailbox
• record the skillset mailbox greetings
You can use the table “Skillset mailboxes” on page 242 to record the skillset mailboxes you set up.
Determining a skillset mailbox number
You must know a skillset mailbox number before you can set up the skillset mailbox. The skillset
mailbox number is the mailbox’s Control DN. If you know the skillset mailbox number, you can
initialize the mailbox. Refer to “Initializing a skillset mailbox” on page 72.
Intelligent Contact Center Set Up and Operation Guide
Page 72

72 Chapter 6 Setting up skillset mailboxes
To determine a skillset’s mailbox number and Message Waiting
Indication telephone
1 Press ·°fi.
VM: xxxx
MeetMe: xxxx
CDN 1:xxxx
CDN 2:xxxx
Ext 1: xxx
NEXT
NEXT
NEXT
NEXT
NEXT
2 The skillset mailbox number for skillset 1 is displayed.
If None appears the skillset is not configured.
Press NEXT
to continue.
3 Press NEXT
4 Press NEXT
5 Press NEXT
6 The Message Waiting Indication (MWI) extension is displayed.
If there are messages in the skillset 1 mailbox, MWI appears at this
extension. You assign the MWI extension when you set up the
skillset. If Unavail appears you have not set up an MWI extension.
7 Press next to view the skillset mailbox number and MWI extension
for each skillset.
8 Press ® to end the session.
Initializing a skillset mailbox
You must initialize a skillset mailbox before you can retrieve or listen to messages that are left in
it.
Choose a password for the skillset mailbox that is between four to eight digits long and does not
start with zero. Give the skillset mailbox passwords to the agents who are responsible for
retrieving messages.
Initializing a skillset mailbox involves:
• choosing a password from four to eight digits long that does not start with zero
• changing the skillset mailbox default password to the new password
• recording the skillset mailbox name in the Company Directory
NN40170-301NN40170-301
Page 73

To initialize a skillset mailbox
1 Press ·°⁄.
2 Log on by following the voice prompts.
Use the skillset mailbox number and ‚‚‚‚, the
default password.
Chapter 6 Setting up skillset mailboxes 73
Must change pswd
Pswd:
RETRY OK
Again:
RETRY OK
Record name:
RETRY OK
Accept name?
RETRY PLAY
<Skillset name>
3 This display appears briefly to indicate that you must
change the password.
4 Enter a new skillset mailbox password from four to eight
digits long that does not start with zero.
Press OK
5 Reenter the skillset mailbox password and press OK
or £.
or £.
6 At the tone, record the skillset mailbox name in the
Company Directory. Do not use handsfree.
Include the skillset mailbox number in the recording, For
example, “Sales, mailbox 5813.”
Press OK
7 Press OK
or £ to end the recording.
or £ to accept the recording
or
press PLAY
or ⁄ to listen to the recording
or
press RETRY
or ¤ to re-record your name.
8 The recorded name plays and the skillset mailbox name is
displayed.
The skillset mailbox name is the name you entered when
you set up the skillset properties.
9 Press ® to end the session.
Intelligent Contact Center Set Up and Operation Guide
Page 74

74 Chapter 6 Setting up skillset mailboxes
Opening a skillset mailbox
You can open an initialized skillset mailbox from:
• your extension
• another extension
• an outside tone dial telephone
To open a skillset mailbox - Norstar Voice Mail
1 Press ·°⁄.
Pswd:
OTHR RETRY
1 new 1 saved
PLAY REC
2 Enter the skillset mailbox password and press OK
or
if you are at another extension, or if you are using a
Guest mailbox, press OTHR
prompt. When this prompt appears, enter the skillset
mailbox number and password.
3 After you open the skillset mailbox, the telephone
display shows how many new and saved messages are in
the mailbox.
To open a skillset mailbox - Avaya CallPilot
1 Press ·°⁄.
Mbox:
RETRY OK
Pswd:
RETRY OK
2 Press £
or
if you are at another extension, enter the skillset mailbox
number and then press OK
3 Enter the skillset mailbox password and press OK
£.
or £
or • to display the Log:
or £.
or
Opening a skillset mailbox remotely
To open a skillset mailbox from an outside telephone
• If a skillset mailbox is a Mailbox node in a CCR Tree, press the one digit number and you
automatically transfer to the skillset mailbox
or
NN40170-301NN40170-301
Page 75

Chapter 6 Setting up skillset mailboxes 75
• Call an Operator, receptionist or subscriber and ask them to transfer you to the skillset mailbox
number using ·°fl
• After you reach the skillset mailbox, press •• during the greeting to open the skillset
mailbox. If you are in Europe or Australia press °°.
• At the voice prompt, enter the skillset mailbox number and password and press £. Follow the
voice prompts.
To open a skillset mailbox directly from an outside telephone
Follow either procedure to open a skillset mailbox remotely.
1 Call a telephone line that is answered by the Automated Attendant.
2 Press •• during the Automated Attendant Menu prompt.
If you are in Europe or Australia press °°.
3 Enter the skillset mailbox number and password, and then press £.
4 Follow the voice prompts.
or
1 Call your own extension number.
2 Press •• during your personal greeting.
If you are in Europe or Australia press °°.
3 Enter the skillset mailbox number and password, and then press £.
4 Follow the voice prompts.
Skillset mailbox password
To decrease the chances of unauthorized access to a skillset mailbox, change its password every 30
days.
Keep a written copy of the skillset mailbox passwords in “Skillset mailboxes” on page 242.
Give the skillset mailbox passwords only to the agents who retrieve messages at your Contact
Center. For security reasons, choose an uncommon password, not a predictable password like
1234 or 1111. If someone knows a skillset mailbox password, they can access the skillset mailbox
and play or delete messages. They can also access CallPilot and use it fraudulently or disrupt
service.
Changing a skillset mailbox password
You can change a skillset mailbox password at any time. A password must be from four to eight
digits long and cannot start with zero.
Intelligent Contact Center Set Up and Operation Guide
Page 76

76 Chapter 6 Setting up skillset mailboxes
To change a skillset mailbox password
1 Press ·°⁄.
Follow the voice prompts or the display buttons to open the
skillset mailbox.
<Skillset name>
Pswd:
RETRY OK
Again:
RETRY OK
Password OK
2 The skillset mailbox name appears briefly and the recorded name
plays.
3 If you use the CallPilot interface:
• Press °› to open the Mailbox Password menu
•Go to step 4
If you use the Norstar Voice Mail interface:
• Press ADMIN
• Press PSWD
•Go to step 4
4 Enter your new mailbox password and press OK
5 Re-enter your new mailbox password and press OK
6 This display appears briefly.
7 Press ® to end the session.
or °
or ›
or £.
or £.
Resetting a skillset mailbox password
Note: Reset a password only if the agent who accesses the skillset mailbox forgets the
password or is “locked-out”. The password for the reset mailbox is 0000. The agent who
accesses the skillset mailbox cannot retrieve skillset mailbox messages until they create
a new password. Tell the agent to change the default password as soon as possible.
While the skillset mailbox has the default password, the mailbox is vulnerable to
unauthorized access.
To reset a skillset mailbox password
1 Start CallPilot Manager.
2 Click the Mailbox Administration heading.
The Mailbox List page appears.
NN40170-301NN40170-301
Page 77

3 Click the Reset Password link for the skillset mailbox you want to reset the password for.
A message appears that asks you to confirm your request to change the password.
4 Click OK.
The password is reset to 0000, the default password.
Recording skillset mailbox greetings
After you initialize a skillset mailbox, record the greetings for it.
You can record Primary, Alternate and Personalized greetings for each skillset mailbox. You
record a Primary skillset mailbox greeting for everyday use. The Alternate skillset mailbox
greeting is an optional greeting you can record for special circumstances. If your Avaya NES
Contact Center subscribes to Caller ID, you can record Personalized skillset mailbox greetings.
If you record Primary and Alternate skillset mailbox greetings, you must choose which greeting
plays to callers who reach the skillset mailbox.
You can also record greetings in an Alternate Language. Callers can press · while the greeting is
playing to listen to the voice prompts in the Alternate Language. Remember to inform callers in
the Primary skillset mailbox greeting that they can press · to hear the Alternate Language.
Chapter 6 Setting up skillset mailboxes 77
The skillset mailbox must use the Norstar Voicemail interface for callers to be able to press · to
hear the Alternate language. Callers cannot select an alternate language if the skillset mailbox uses
the CallPilot interface.
If the Operator Status is set to Yes, and a caller presses ‚ during the skillset mailbox greeting, the
caller transfers to the receptionist or Operator. For information about Operator Status, see the
CallPilot Manager Set Up and Operation Guide (NN40090-300). Inform callers in the skillset
mailbox greetings that they can press ‚ to speak to the receptionist or Operator.
If the Operator Status is set to No, a caller who presses ‚ during the skillset mailbox greeting is
informed the Operator is not available, and is transferred to the skillset mailbox.
Examples of Primary and Alternate greetings
You must record a Primary greeting for each skillset mailbox. In the Primary greeting include the
skillset mailbox name that is listed in the Company Directory. For example:
“Hello. You have reached the Sales Department at Bridgestone Computers. At the sound of the
tone, please leave your name, phone number and a brief message. One of our agents will return
your call as soon as possible. Thank you.”
You can record an Alternate greeting for each skillset mailbox. Use an Alternate greeting for
special circumstances. In the Alternate skillset mailbox greeting include the skillset mailbox name
that is listed in the Company Directory.
For example:
“Season’s Greetings! You have reached the Sales Department at Bridgestone Computers. At the
sound of the tone, please leave your name, phone number and a brief message. One of our agents
will return your call when we re-open on December 27. Thank you.”
Intelligent Contact Center Set Up and Operation Guide
Page 78

78 Chapter 6 Setting up skillset mailboxes
To record a Primary or Alternate skillset mailbox greeting
1 Press ·°⁄.
Follow the voice prompts or the display button options to
open the skillset mailbox.
<Skillset name>
Greeting options
REC
CHOOSE
Greeting:
PRIME ALT
Not recorded
2 The skillset mailbox name appears briefly.
3 If you use the CallPilot interface:
•Press °¤ to open the Greetings Options menu
•Go to step 4
If you use the Norstar Voice Mail interface:
• Press ADMIN
• Press GREET
or °
or ¤
•Go to step 4
4 Press REC
5 Press PRIME
or ⁄.
or ⁄ to record the Primary greeting
or
press ALT
or ¤ to record the Alternate greeting.
If you are changing a greeting, the current greeting starts to
play.
6 If this is the first time you are recording a greeting, this display
appears briefly.
Record now?
YES
Record greeting:
RETRY OK
Accept greeting?
RETRY PLAY
NN40170-301NN40170-301
NO QUIT
7 Press YES
8 Press OK
9 Press OK
or ⁄ and record your greeting at the tone.
or £ to end the recording.
or £ to accept the recording
or
press PLAY
or ⁄ to listen to the greeting
or
press RETRY
or ¤ to rerecord the greeting.
10 Press ® to end the session.
Page 79

Chapter 6 Setting up skillset mailboxes 79
Choosing a Primary or Alternate skillset mailbox greeting
If you record a Primary and an Alternate skillset mailbox greeting, you must choose which
greeting plays. You can change the selection at any time and as often as needed. If you do not
choose a greeting, the Primary skillset mailbox greeting plays.
If you choose the Alternate mailbox greeting, you must set whether the mailbox accepts messages.
If you choose Yes the skillset mailbox receives messages in the normal way.
If you choose No:
• messages cannot be left in the skillset mailbox
• the Alternate mailbox greeting takes precedence over all other greetings
• if a caller presses a to fast forward the message, they hear a voice prompt that says this is a
special greeting
• if a caller presses a to send a fax, the fax goes to the General Delivery Mailbox, not the skillset
mailbox.
If you choose the Alternate mailbox greeting, remember to change back to the Primary mailbox
greeting at the appropriate time.
Intelligent Contact Center Set Up and Operation Guide
Page 80

80 Chapter 6 Setting up skillset mailboxes
To choose a Primary or Alternate skillset mailbox greeting
1 Press ·°⁄.
Follow the voice prompts or the display button options on
your telephone to open the skillset mailbox.
<Skillset name>
Greeting options
REC CHOOSE
Use greeting:
PRIME ALT
2 The skillset mailbox name appears briefly.
3 If you use the CallPilot interface:
• Press °¤ to open the Greetings Options menu
•Go to step 4
If you use the Norstar Voice Mail interface:
• Press ADMIN
• Press GREET
or °
or ¤
•Go to step 4
4 Press CHOOSE
5 Press PRIME
or ¤ to select a greeting.
or ⁄ to select the Primary mailbox greeting
and
go to step 7
or
press
ALT or ¤ to select the Alternate mailbox greeting
and
go to step 6.
Accept msgs:Y
CHNG OK
6 If you choose the Alternate mailbox greeting, you are asked
whether the mailbox can accept messages.
Press CHNG
or ⁄ to toggle from yes to no
or
press OK
or £ to accept.
7 Press ® to end the session.
Recording a Personalized skillset mailbox greeting
If your Contact Center subscribes to Caller ID, you can record a maximum of three Personalized
greetings for each skillset mailbox. For Personalized skillset mailbox greetings, you program
Avaya NES Contact Center to recognize a specific telephone number. The Personalized skillset
mailbox greeting plays only for a call from the specific telephone number.
NN40170-301NN40170-301
Page 81

Chapter 6 Setting up skillset mailboxes 81
If you record a Personalized greeting, program the skillset mailbox to receive messages and
choose an Alternate mailbox greeting, the Personalized greeting takes precedence over any other
greetings. If you program the skillset mailbox not to receive messages and choose an Alternate
mailbox greeting, the Alternate mailbox greeting takes precedence over any other greeting,
including Personalized mailbox greetings.
In the Personalized skillset mailbox greeting include the skillset mailbox name that is listed in the
Company Directory. For example:
“Hi John. You have reached the Sales Department at Bridgestone Computers. At the sound of the
tone, please leave your order. One of our agents will return your call if you need to speak to
someone directly. Thank you.”
Intelligent Contact Center Set Up and Operation Guide
Page 82

82 Chapter 6 Setting up skillset mailboxes
To record a Personalized skillset mailbox greeting
1 Press ·°⁄.
Follow the voice prompts or the display button options on
your telephone, to open the skillset mailbox.
<Skillset name>
Greeting options
REC CHOOSE
Greeting:
PRIME ALT PERS
Greeting:
RETRY OK
Ph:
CHNG OK
Ph:
RETRY OK
2 The skillset mailbox name appears briefly.
3 If you use the CallPilot interface:
• Press °¤ to open the Greetings Options menu
•Go to step 4
If you use the Norstar Voice Mail interface:
• Press ADMIN
• Press GREET
or °
or ¤
•Go to step 4
4 Press REC
5 Press PERS
or ⁄.
or ‹ to record a Personalized greeting.
6 Enter a Personalized greeting number of 1, 2 or 3.
7 Press CHNG
or ⁄.
8 Enter the phone number (maximum 10 digits) that you are
assigning the Personalized mailbox greeting to.
Press
OK or £ to accept the phone number.
Record greeting:
RETRY OK
Accept greeting?
RETRY PLAY
9 Lift your handset.
At the tone, record your greeting.
Press OK
10 Press OK
or £ to end the recording.
or £ to accept the greeting,
or
press PLAY
or⁄ to listen to the greeting
or
press RETRY
or ¤ to re-record the greeting.
11 Press ® to end the session.
Deleting a Personalized skillset mailbox greeting
If you no longer need a Personalized mailbox greeting, you can delete it.
NN40170-301NN40170-301
Page 83

Chapter 6 Setting up skillset mailboxes 83
To delete a Personalized mailbox greeting
1 Press ·°⁄.
Follow the voice prompts or the display button options on
your telephone, to open the skillset mailbox.
2 If you use the CallPilot interface:
• Press °¤ to open the Greetings Options menu
•Go to step 3
If you use the Norstar Voice Mail interface:
• Press ADMIN
• Press GREET
or °
or ¤
•Go to step 3
Greeting options
REC
CHOOSE
Greeting:
PRIME ALT
Greeting:
RETRY OK
Ph: XXXXXXX
CHNG DEL
3 Press REC
4 Press PERS
or ⁄.
or ‹ to choose a Personalized mailbox
greeting.
5 Enter the Personalized greeting number (1, 2, or 3) that
you want to delete.
6 Press DEL
or ¤ to delete the greeting.
7 Press ® to end the session.
Checking skillset mailboxes for messages
Frequently check the skillset mailboxes for messages. Only one agent can retrieve messages from
each skillset mailbox at a time.
If different agents access the messages in the skillset mailbox throughout the day, each agent
should:
• listen to the message
• write down what the message says
• erase the message
• return the caller’s telephone call
If the caller is not available, the agent can try again later or pass the message on to another agent.
If the agent who listens to the message erases the message after writing down what it says:
• the next agent does not waste time listening to the same message
Intelligent Contact Center Set Up and Operation Guide
Page 84

84 Chapter 6 Setting up skillset mailboxes
• the next agent knows if the callback was successful or not
• only one agent contacts the caller
If only one agent is responsible for retrieving messages at your contact center, this agent does not
need to transcribe and delete each message before callback. This agent handles messages and
knows the status of the old messages.
Playing skillset mailbox messages
Use the procedure for playing messages that corresponds to the interface you use:
• “To play skillset mailbox messages - Norstar Voice Mail” on page 84
• “To play skillset mailbox messages - CallPilot” on page 86
To play skillset mailbox messages - Norstar Voice Mail
Use this procedure if you use the Norstar Voice Mail interface.
1 Press ·°⁄.
Follow the voice prompts or the display button options on
your telephone to open the skillset mailbox.
2 new 0 saved
PLAY
REC
2 Press PLAY
or ¤ to listen to your messages.
For other options, see the table “Playing skillset mailbox
messages - Norstar Voice Mail” on page 84.
3 Press ® to end the session.
The table “Playing skillset mailbox messages - Norstar Voice Mail” shows the message options
available to you during and after playing messages.
Playing skillset mailbox messages - Norstar Voice Mail
Option Available
while
playing
Back up
⁄
or
Available
after
playing
Description
Rewinds the message nine seconds and resumes playing
it.
< <<
Copy
fi
or
Sends a copy of the message to one or more mailboxes.
If you record an introduction, it must be longer than three
seconds.
COPY
End of
Message
‹‹
or
> >>
> >>
Goes to the end of the message.
NN40170-301NN40170-301
Page 85

Playing skillset mailbox messages - Norstar Voice Mail
Chapter 6 Setting up skillset mailboxes 85
Option Available
while
playing
Envelope
Erase
‡
°
or
Available
after
playing
ERASE
Forward
Next
‹
or
> >>
fl
or
££
Pause/
Continue
¤
or
STOP/
PLAY
Previous
›
Description
Plays the information in the message envelope. Envelope
information includes the date and time the message was
sent and, if the message is internal, the directory name of
the sender.
Deletes the message currently playing. If no messages
are playing, deletes the last message played. Deleted
messages remain in the skillset mailbox until the session
ends. (Refer to Notes 1 and 2 on page 86.)
Advances the message nine seconds and continues
playing from that point. A message can be forwarded as
many times as required.
Plays the next message in the skillset mailbox. If you use
this while a message is playing, it stops playing the
current message and plays the next message in the
skillset mailbox.
Temporarily stops a message. When you stop the
message, you can play the previous message, continue
playing the current message, or skip to the next message.
Stops playing the current message and plays the previous
message.
Quit
Replay
Replay
Reply
Save
Message
Volume
Control
•
⁄⁄
or
< <<
< <<
⁄
·
or
REPLY
‡‡
or
SAVE
•
Stops playing the message and plays the Mailbox main
menu options.
Replays the message from the beginning.
Replays the last message.
Replies to a message. (Refer to Note 3 on page 86)
The reply can be either:
- a message to an internal sender’s mailbox
- a telephone call to an internal or external
party (Refer to Note 4 on page 86.)
Saves the message being played. (If you do not delete a
message, it is automatically saved). This option is not
shown on the display unless you erase a message. If you
erase a message and play the message again, you can
press
SAVE on a two-line display telephone. (Refer to
Note 2 on page 86.)
Adjusts the volume of the message that is playing. The
volume increases each time you press
presses, the volume returns to the lowest level.
•. After four
Intelligent Contact Center Set Up and Operation Guide
Page 86

86 Chapter 6 Setting up skillset mailboxes
Notes:
1 Because the skillset mailbox has limited message storage space, delete any messages you no
longer need. After a certain time period, your saved messages are erased automatically. Ask
your System Administrator about this.
2 You can retrieve a deleted message only if you have not quit the session in which you deleted
it. For information about retrieving deleted messages, see “Retrieving erased messages” on
page 87”.
3 Applies only if the Reply feature is enabled.
4 You can reply to an outside caller by dialing them back if your company subscribes to service.
For further information about replying to an outside caller, see “Replying to an external caller”
on page 89.
To play skillset mailbox messages - CallPilot
Use this procedure if you use the CallPilot interface.
1 Press ·°⁄.
Follow the voice prompts or the display button options to
open the skillset mailbox.
A voice prompt announces the number of new and saved
messages that you have.
No messages
COMP MBOX
2 You can play any message that you want to listen to.
Press ¤
to play the current message.
For other message commands, see the table “Playing
skillset mailbox messages - CallPilot”.
3 Press ® to end the session.
The table “Playing skillset mailbox messages - CallPilot” shows the message options that are
available to you during and after playing messages.
Playing skillset mailbox messages - CallPilot
Available
during and
after
Option
Skip Back
Skip
Forward
⁄
‹
playing Description
Rewinds the message five seconds and resumes playing it at that
point.
Advances the message five seconds and continues playing from that
point.
Previous
Message
NN40170-301NN40170-301
›
Stops playing the current message and plays the previous message.
Page 87

Playing skillset mailbox messages - CallPilot
Available
during and
after
Option
playing Description
Chapter 6 Setting up skillset mailboxes 87
Next
Message
Call
Sender
Help
Reply
Envelope
Forward
Message
Reply
All
Delete
fl
·
•
‡⁄
‡¤
‡‹
‡›
‡fl
Plays the next message in the skillset mailbox. If you use this while a
message is playing, it stops playing the current message and plays
the next message in the skillset mailbox.
Places a call to the sender of a message.
Offers a Help menu.
Replies to a message.
Plays the information in the message envelope. Envelope information
includes the date and time the message was sent and, if the
message is internal, the directory name of the sender.
Forwards the message to one or more mailboxes. You can record an
introduction to the forwarded message.
Replies to a message and all recipients of the message. (Refer to
Note 3 on page 86.)
Deletes the current message. Deleted messages remain in the
skillset mailbox until the session ends. (Refer to Notes1 and 2 on
page 86.)
Retrieving erased messages
After you play your messages and end your skillset mailbox session, any messages that you do not
erase are saved. Since message storage space is limited, we recommend that you erase messages
that are no longer needed.
You can retrieve an erased message if you are still in the skillset mailbox session. An erased
message remains in the skillset mailbox until you end the current session.
To retrieve an erased message - Norstar Voice Mail
After you erase a new or saved message, the number of new or saved messages shown on the
display is decreased by one. Even though the display shows 0 new 0 saved, you can still play and
retrieve any erased skillset mailbox messages. Press PLAY
To retrieve an erased message - CallPilot
You can retrieve a deleted message. A deleted message remains in the skillset mailbox until you
end the current session. Locate the deleted message. Then press ‡fl to restore the message.
or ¤ to listen to the erased message.
Intelligent Contact Center Set Up and Operation Guide
Page 88

88 Chapter 6 Setting up skillset mailboxes
After you play the erased message, you can restore it. If you end the current session without
restoring the erased message, it is permanently erased from the skillset mailbox.
Replying to messages
You can reply to internal and external callers. You can reply to an external caller if your company
subscribes to.
The messages you record must be longer than three seconds. The system times out after five
seconds of silence.
Use the procedure for replying to messages that applies to the interface you use:
• “To reply to an internal caller - Norstar Voice Mail” on page 89
• “To reply to an internal caller - CallPilot” on page 89
Replying to an internal caller
If you use and you want to use
Norstar Voice Mail reply to the caller’s
extension
leave a message in the
caller’s mailbox
CallPilot reply to the caller’s
extension
leave a message in the
caller’s mailbox
CALL to transfer to the internal caller’s extension.
MSG to record and send a reply to the internal caller’s
mailbox.
Call Sender · to transfer to the internal caller’s
extension.
Reply ‡⁄ to record and send a reply to the
internal caller’s mailbox.
NN40170-301NN40170-301
Page 89

Chapter 6 Setting up skillset mailboxes 89
To reply to an internal caller - Norstar Voice Mail
1 Press ·°⁄.
Follow the voice prompts or the display button options
to open the skillset mailbox.
1 new 0 saved
PLAY
REC
End of message
REPLY ERASE
Reply to msg
MSG CALL
2 Press PLAY
or ¤.
3 After you listen to the message, press REPLY
4 Press CALL
or ¤ to call the caller
or
press MSG
or ⁄ to record and send a reply.
To reply to an internal caller - CallPilot
1 Press ·°⁄
Follow the voice prompts or the display button options on
your telephone to open the skillset mailbox.
2 A mailbox summary is announced.
While you are in your message list, you can play any
message.
3 Press ¤ to play the current message.
or ·.
4 Press · to call the caller
or
press ‡⁄ to record and send a reply.
Replying to an external caller
You can reply to an external caller if your company subscribes to a Caller ID service and the
skillset mailbox has an outdial method assigned to it. For information about outdial method, see
“Assigning an outdial method to a skillset mailbox” on page 92. Before you use the Reply option
you must play the message.
Use the procedure that applies to the interface you use.
Intelligent Contact Center Set Up and Operation Guide
Page 90

90 Chapter 6 Setting up skillset mailboxes
To reply to an external caller - Norstar Voice Mail
1 Press ·°⁄.
Follow the voice prompts or the display button options to
open the skillset mailbox.
1 new 0 saved
PLAY REC
End of message
REPLY ERASE
2 Press PLAY
or ¤.
3 After you listen to the message, press REPLY
CallPilot dials the external number directly.
To reply to an external caller - CallPilot
1 Press ·°⁄.
Follow the voice prompts or the display button options to
open the skillset mailbox.
2 A mailbox summary is announced.
While you are in the message list you can play any
message.
3 Press ¤ to play the current message.
4 Press · to call the caller.
CallPilot dials the external number directly.
or ·.
NN40170-301NN40170-301
Page 91

Chapter 7
Off-premise Message Notification
About Off-premise Message Notification
Off-premise Message Notification notifies you or a designated agent when there are new or urgent
messages in the skillset mailbox. You can receive Off-premise Message Notification at any tone
dial telephone number, pager or extension.
Note: Set up Off-premise Message Notification for non-business hours. Then
Off-Premise Message Notification does not consume a Reserved or voice channel during
busy periods.
You can receive notification of a message at a maximum of five different destination numbers.
When the number of retry attempts is reached for each destination number, the next number in the
series is called. For example, Avaya NES Contact Center can call your car phone first when there
is a message in the skillset mailbox. If there is no answer, Avaya NES Contact Center waits five
minutes and calls your car phone again. If there is still no answer, Avaya NES Contact Center calls
your car phone a third time. If there is no answer after three calls, Avaya NES Contact Center calls
the your home phone. Avaya NES Contact Center continues to call at five minute intervals until
the call is answered or all of the destinations are called three times.
91
Off-premise Message Notification, the Retry Intervals and Maximum Number of Attempts for
skillset mailboxes are assigned through the Class of Service settings in CallPilot Manager. Skillset
mailboxes have a default Class of Service of 1.
Class of Service 1 has these default settings for Off-premise Message Notification:
• Off-premise Message Notification enabled
• a Retry Interval of five minutes
• a Maximum Number of Attempts of 3
For information about changing Class of Service settings, see the CallPilot Manager Set Up and
Operation Guide.
You must assign start and stop times for phone and destinations. Off-premise Message
Notification begins when the start time is reached. Set the start time for a time when you are at the
destination number so that you are there to receive calls.
A person who receives a Off-premise Message Notification call can cancel Off-premise Message
Notification to their destination number. This is useful if a destination is incorrectly programmed
and a wrong party receives the calls.
The recipient of an Off-premise Message Notification call hears the following voice prompt:
“Message for (name of mailbox owner). To log on press ⁄. If you have received this call by
mistake, please press ¤.
Intelligent Contact Center Set Up and Operation Guide
Page 92

92 Chapter 7 Off-premise Message Notification
After you set the Off-premise Message Notification parameters, Off-premise Message Notification
is enabled automatically.
Assigning an outdial method to a skillset mailbox
The outdial method determines which line, line pool or route code the system uses for Off-premise
Message Notification.
The default for outdial method is None. You must assign an outdial method before you can use an
external telephone or a pager as an Off-premise Message Notification destination.
For more information about line pools and route codes, see your system documentation.
Warning: Do not change the extension number assigned to the skillset mailbox. If this
extension number is changed, callers in the skillset cannot access the skillset mailbox
and you cannot change the Skillset general parameters.
To correct a wrong extension number, change the extension number to the Control DN
of the skillset.
To assign an outdial method to a skillset mailbox
1 Start CallPilot Manager.
2 Click the Mailbox Administration heading.
The Mailbox List page appears.
3 Click the Change link for the skillset mailbox you want to set up an outdial route for.
The Mailbox page for the mailbox appears.
4 From the Outdial Type list box select the type of outdial method you want to use.
5 If you use a line or a line pool, in the Line/Pool# type the number of the outgoing line or line
pool number you want to assign to the skillset mailbox for outdialing.
6 Click Submit.
Off-premise Message Notification parameters
You can set up the parameters for Off-premise Message Notification from any phone.
The parameters are:
• destination type (phone, extension or pager)
• destination number (phone, extension or pager)
• time range for receiving calls at phone numbers or extension (Pagers are notified any time
there is a qualifying message.)
NN40170-301NN40170-301
Page 93

Chapter 7 Off-premise Message Notification 93
• types of message you want to receive (all new messages or just urgent messages)
Note: The restrictions that apply to your phone line also apply to Off-premise Message
Notification numbers. For example, if you cannot dial long distance phone numbers
from your phone, you cannot have a long distance Off-premise Message Notification
destination number.
Setting up Off-premise Message Notification
Follow these instructions if you have not set up Off-Premise Message Notification and are setting
it up for the first time. If you have set up Off-Premise Message Notification, see the section on
“Changing Off-premise Message Notification” on page 101.
To set up Off-premise Message Notification to see
a phone number page 93
an extension page 95
a pager page 97
To set up Off-premise Message Notification to a phone number
1 Press ·°⁄.
Follow the voice prompts or the display button options to open the
skillset mailbox.
2 If you use the CallPilot interface:
• Press °fi to open the Mailbox Tools
Msg notify
ADMIN
Destination:
PHONE
SELECT
EXT
• Press NOTIF
Notification menu
•Go to step 3
If you use the Norstar Voice Mail interface:
• Press ADMIN
• Press fl to open the Off-premise Message Notification
menu
•Go to step 3
3 Press ADMIN
4 Press PHONE
or ⁄ to set up Off-premise Message Notification.
or ⁄ to choose a phone number destination.
or ¤ to open the Off-premise Message
or °
Intelligent Contact Center Set Up and Operation Guide
Page 94

94 Chapter 7 Off-premise Message Notification
Ph:
RETRY OK
<x>
ADD OK
Start hhmm:
RETRY OK
<start time>
RETRY AM
<start time>
RETRY OK
5 Enter the destination phone number and press OK or £. The
destination phone number is a maximum of 30 digits.
6 Press OK
or £ to accept the destination phone number
represented by <x>
or
press ADD
or ¤ to add special characters and use your dialpad or
follow the voice prompts to add characters.
After you add special characters, press OK
or £ to accept the
destination number.
7 Enter the start time for Off-premise Message Notification. This is a
four-digit field. Any single-digit hour and minute must be preceded
by a zero.
8 Press AM
or ⁄
or
PM
or ¤.
9 Press OK
or £ to accept the start time.
Stop hhmm:
RETRY OK
<stop time>
RETRY AM
<stop time>
RETRY OK
More dest?
YES NO
Start:<start time>
CHNG
Stop:<stop time>
CHNG
10 Enter the time when Off-premise Message Notification is to stop.
This is a four digit field. Any single-digit hour and minute must be
preceded by a zero.
11 Press AM
or ⁄
or
PM
or ¤.
12 Press OK
13 Press YES
or £ to accept the stop time.
or ⁄ if you want to set up another destination number
or
press NO
or £ if you do not want to set up another destination
number.
14 Press NEXT
or £ to accept the start time that you entered
or
press CHNG
15 Press NEXT
or ⁄ to change the start time.
or £ to accept the stop time that you entered
or
press CHNG
or ⁄ to change the stop time.
NN40170-301NN40170-301
Page 95

Chapter 7 Off-premise Message Notification 95
Msg type: new
CHNG OK
16 Press OK or £ if you want to be notified when the skillset
mailbox receives a new message
or
press CHNG
or ⁄ if you want to be notified only when the
skillset mailbox receives an urgent message.
Msg notify
ADMIN SELECT
17 Press ® to end the session.
To set up Off-premise Message Notification to an extension
1 Press ·°⁄.
Follow the voice prompts or the display button options to open the
skillset mailbox.
2 If you use the CallPilot interface:
• Press °fi to open the Mailbox Tools
• Press NOTIF
Notification menu
•Go to step 3
If you use the Norstar Voice Mail interface:
or ¤ to open the Off-premise Message
Msg notify
ADMIN
Destination:
PHONE EXT
Ext:
RETRY OK
Accept:<x>
RETRY OK
Start hhmm:
RETRY OK
<start time>
RETRY AM
• Press ADMIN
or °
• Press fl to open the Off-premise Message Notification
menu
•Go to step 3
3 Press ADMIN
4 Press EXT
5 Enter the destination number and press OK
6 Press OK
The
<x> represents the extension.
or ⁄ to set up Off-premise Message Notification.
or ¤ to choose an extension as the destination.
or £.
or £ to accept the destination extension.
7 Enter the start time for Off-premise Message Notification. This is a
four-digit field. Any single-digit hour and minute must be preceded
by zero.
8 Press AM
or ⁄
or
PM
or ¤.
Intelligent Contact Center Set Up and Operation Guide
Page 96

96 Chapter 7 Off-premise Message Notification
<start time>
RETRY OK
Stop hhmm:
RETRY OK
<stop time>
RETRY AM
<stop time>
RETRY OK
More dest?
YES NO
Start:<start time>
CHNG
9 Press OK
or £ to accept the start time.
10 Enter the time when Off-premise Message Notification is to stop.
This is a four digit field. Any single-digit hour and minute must be
preceded by a zero.
11 Press AM
or ⁄
or
PM
or ¤.
12 Press OK
13 Press YES
or £ to accept the stop time.
or ⁄ if you want to set up another destination number
or
press NO
or £ if you do not want to set up another destination
number.
14 Press NEXT
or £ to accept the start time that you entered
or
press CHNG
or ⁄ to change the start time.
Stop:<stop time>
CHNG
Msg type: new
CHNG OK
15 Press NEXT
or
press CHNG
16 Press OK
mailbox receives a new message
or £ to accept the stop time that you entered
or ⁄ to change the stop time.
or £ if you want to be notified when you the skillset
or
press CHNG
or ⁄ if you want to be notified only when the skillset
mailbox receives an urgent message.
Msg notify
ADMIN SELECT
17 Press ® to end the session.
About setting up Off-premise Message Notification to a pager number
Example of a destination pager number
If you are assigning a pager destination number from behind a PBX, remember to insert a ·
(depending on your system) before the £ to access an outside line.
There is a combined limit of 30 characters for the pager phone number and the pager message.
For example, to reach your pager, enter:
£›¤fififi⁄¤‹›£‹
NN40170-301NN40170-301
Page 97

Chapter 7 Off-premise Message Notification 97
where:
• £ specifies the next digits are special characters
• › recognize dial tone
• ¤ specifies that the next digits are the numbers to be dialed
• fififi⁄¤‹› is the pager phone number dialed
• ‹ inserts a timed pause
Depending on the company supplying your paging service, the programming sequence can vary.
For more information about setting the destination phone number parameters for your pager,
contact your pager company.
To set up Off-premise Message Notification to a pager
1 Press ·°⁄.
Follow the voice prompts or the display button options to open the
skillset mailbox.
2 If you use the CallPilot interface:
Msg notify
ADMIN
Destination:
PHONE EXT
Pager:
RETRY OK
SELECT
• Press °fi to open the Mailbox Tools
• Press NOTIF
or ¤ to open the Off-premise Message
Notification menu
•Go to step 3
If you use the Norstar Voice Mail interface:
• Press ADMIN
or °
• Press fl to open the Off-premise Message Notification
menu
•Go to step 3
3 Press ADMIN
4 Press PAGER
or ⁄ to set up Off-premise Message Notification.
or ‹ to select a pager number destination.
5 Enter the destination pager number and press OK
or £.
Intelligent Contact Center Set Up and Operation Guide
Page 98

98 Chapter 7 Off-premise Message Notification
<x>
ADD OK
Show:<xxxx>
CHNG
More dest?
YES NO
6 Press OK or £ to accept the destination pager number represented
by <x>
or
press ADD
or ¤ to add special characters and use your dialpad or
follow the voice prompts to add characters.
After you add special characters, press OK
7 Press NEXT
or £ to accept the default pager message represented
or £.
by <xxxx>. The default pager message sent by Avaya CallPilot is
the Avaya CallPilot extension. This is the sequence of digits that is
sent after the pager service is dialed, to notify you of who is paging
you
or
press CHNG
or ⁄ to change the pager message.
The combined limit is 30 characters for the pager phone number
and the pager message.
8 Press YES
or ⁄ if you want to set up another destination number
or
press NO
or £ if you do not want to set up another destination
number.
Msg type: new
CHNG OK
Msg notify
ADMIN SELECT
9 Press OK
or £ to be notified when the skillset mailbox receives a
new message
or
press CHNG
or ⁄ to change the message type to be notified only
when the skillset mailbox receives an urgent message.
10 Press ® to end the session.
NN40170-301NN40170-301
Page 99

Chapter 7 Off-premise Message Notification 99
To set up Off-premise Message Notification to more than one
destination
You can receive notification of a message at a maximum of five different destination numbers.
The following steps show you how to enter a phone number destination and then add a pager
destination for the first time.
1 Press ·°⁄.
Follow the voice prompts or the display button options to open the
skillset mailbox.
2 If you use the CallPilot interface:
• Press °fi to open the Mailbox Tools
• Press NOTIF
Notification menu
•Go to step 3
If you use the Norstar Voice Mail interface:
or ¤ to open the Off-premise Message
Msg notify
ADMIN SELECT
Destination:
PHONE
Ph:
RETRY OK
<x>
ADD OK
Start: hhmm:
RETRY OK
EXT
• Press ADMIN
or °
• Press fl to open the Off-premise Message Notification
menu
•Go to step 3
3 Press ADMIN
4 Press PHONE
5 Enter the destination phone number and press OK
or ⁄ to set up Off-premise Message Notification.
or ⁄ to choose a destination phone number.
or £. The
destination phone number cannot be longer than 30 digits.
6 Press OK
or £ to accept the destination phone number,
represented by <x>
or
press ADD
or ¤ to add special characters and use your dialpad or
follow the voice prompts to add characters.
7 Enter the start time for Off-premise Message Notification. This is a
four-digit field. Any single-digit hour and minute must be preceded
by a zero.
<start time>
RETRY AM
8 Press AM
or
PM
or ¤.
or ⁄
Intelligent Contact Center Set Up and Operation Guide
Page 100

100 Chapter 7 Off-premise Message Notification
<start time>
RETRY
Stop hhmm:
RETRY
<stop time>
RETRY AM
<stop time>
RETRY OK
More dest?
YES
NO
Notify2: none
SETUP
Destination:
PHONE EXT
Pager:
RETRY OK
9 Press OK or £ to accept the start time.
10 Enter the time when Off-premise Message Notification is to stop.
This is a four digit field. Any single digit hour and minute must be
preceded by a zero.
11 Press AM
or ⁄
or
or ¤.
PM
12 Press OK
13 Press YES
14 Press SETUP
15 Press PAGER
16 Enter the destination pager number and press OK
or £ to accept the stop time.
or ⁄ to set up another destination number.
to set up another destination number.
or ‹ to select a pager number destination.
or £.
<xxxx>
ADD OK
Show<xxxx>
CHNG
Notify2: pager
CHNG OTHR
17 Press OK
or £ to accept the destination pager number
represented by <x>
or
press ADD
or ¤ to add special characters and use your dialpad or
follow the voice prompts to add characters.
After you add special characters, press OK
18 Press NEXT
or £ to accept the default pager message represented
or £.
by <xxxx>. The default pager message sent by Avaya CallPilot is
the Avaya CallPilot extension. This is the sequence of digits that is
sent after the pager service is dialed, to notify you of who is paging
you
or
press CHNG
or ⁄ to change the pager message.
The combined limit is 30 characters for the pager phone number
and the pager message.
19 The display shows that the second destination is a pager.
Press NEXT
or £ to continue.
NN40170-301NN40170-301
 Loading...