

Page 1

The i2004 Internet Telephone
User Guide
June 2001
Page 2

The i2004 Internet Telephone User Guide
The i2004 Internet Telephone User Guide shows you how to install and operate
your i2004 Internet Telephone.
Contents
Page Number
I. Introduction – About the i2004 Internet Telephone................................... 4
Input on the i2004 Internet Telephone........................................................... 4
i2004 Internet Telephone - Introduction......................................................... 5
Display Screen ................................................................................................. 7
Softkeys............................................................................................................ 8
Multiple Line Appearances................................................................................ 9
Icons............................................................................................................... 10
II. Getting Started............................................................................................ 11
Installing the i2004 Internet Telephone........................................................ 11
Connecting the i2004 Internet Telephone....................................................... 11
Initializing the i2004 Internet Telephone ......................................................... 12
III. Using Your i2004 Internet Telephone........................................................ 17
Basic Calls................................................................................................... 17
Making a Call .................................................................................................. 18
Pre-Dialing...................................................................................................... 19
Answering a Call............................................................................................. 20
Call Waiting – Multiple Line Appearance ................................................. 21
Placing and Retrieving a Call on Hold............................................................. 22
Transferring a Call.......................................................................................... 23
Conferencing Calls......................................................................................... 24
Adding Additional Calls............................................................................ 25
Adding on Incoming Calls to your Conference......................................... 26
Forwarding Calls............................................................................................. 27
Inspect............................................................................................................ 28
Do Not Disturb................................................................................................ 29
Message Waiting and Message Retrieval....................................................... 30
Enhanced Features..................................................................................... 32
Call Park......................................................................................................... 32
Call Pickup..................................................................................................... 34
Ring Again...................................................................................................... 35
Privacy and Privacy Release.......................................................................... 36
Directory Features....................................................................................... 37
Outbox and Redial.......................................................................................... 37
Call Log.......................................................................................................... 39
Personal Directory.......................................................................................... 42
i2004 Internet Telephone - User Guide • © 2001 • NTC51.01.03.06 • Version 06-1
Page 2
Page 3

Abbreviated Dialing......................................................................................... 44
Speed Call...................................................................................................... 45
Services....................................................................................................... 47
Changing Language....................................................................................... 48
Changing Phone Options................................................................................ 49
Using Session Features.................................................................................. 51
Setting or Changing your Password ............................................................... 52
Viewing Network Info...................................................................................... 53
Changing Display Formats............................................................................. 54
i2004 Internet Telephone - User Guide • © 2001 • NTC51.01.03.06 • Version 06-1
Page 3
Page 4

I. Introduction – About the i2004 Internet
Telephone
Input on the i2004 Internet Telephone
This device complies with Part 15 of the FCC Rules. Operation is subject to the
following two conditions: (1) this device may not cause harmful interference, and
(2) this device must accept any interference received, including interference that
may cause undesired operation.
NOTE: This equipment has been tested and found to comply with the limits for a
digital device, pursuant to Part 15 of the FCC Rules. These limits are designed to
provide reasonable protection against harmful interference when the equipment
is operated in a commercial environment. This equipment generates, uses, and
can radiate radio frequency energy and, if not installed and used in accordance
with the instruction manual, may cause harmful interference to radio
communications. Operation of this equipment in a residential area is likely to
cause harmful interference in which case the user will be requ ired to correct the
interference at his own expense.
Use only with Nortel recommended, approved Limited Power Source; output
rated: 16VAC, 500mA, 50/60Hz.
i2004 Internet Telephone - User Guide • © 2001 • NTC51.01.03.06 • Version 06-1
Page 4
Page 5
i2004 Internet Telephone - Introduction
Internet Protocol (IP) telephony is the next generation of telecommunication
services that integrates voice and data capabilities to enhance everyday
communications and increase productivity. IP telephony takes advantage of new
high-bandwidth central office technologies to provide any service, anywhere, at
anytime – instantly.
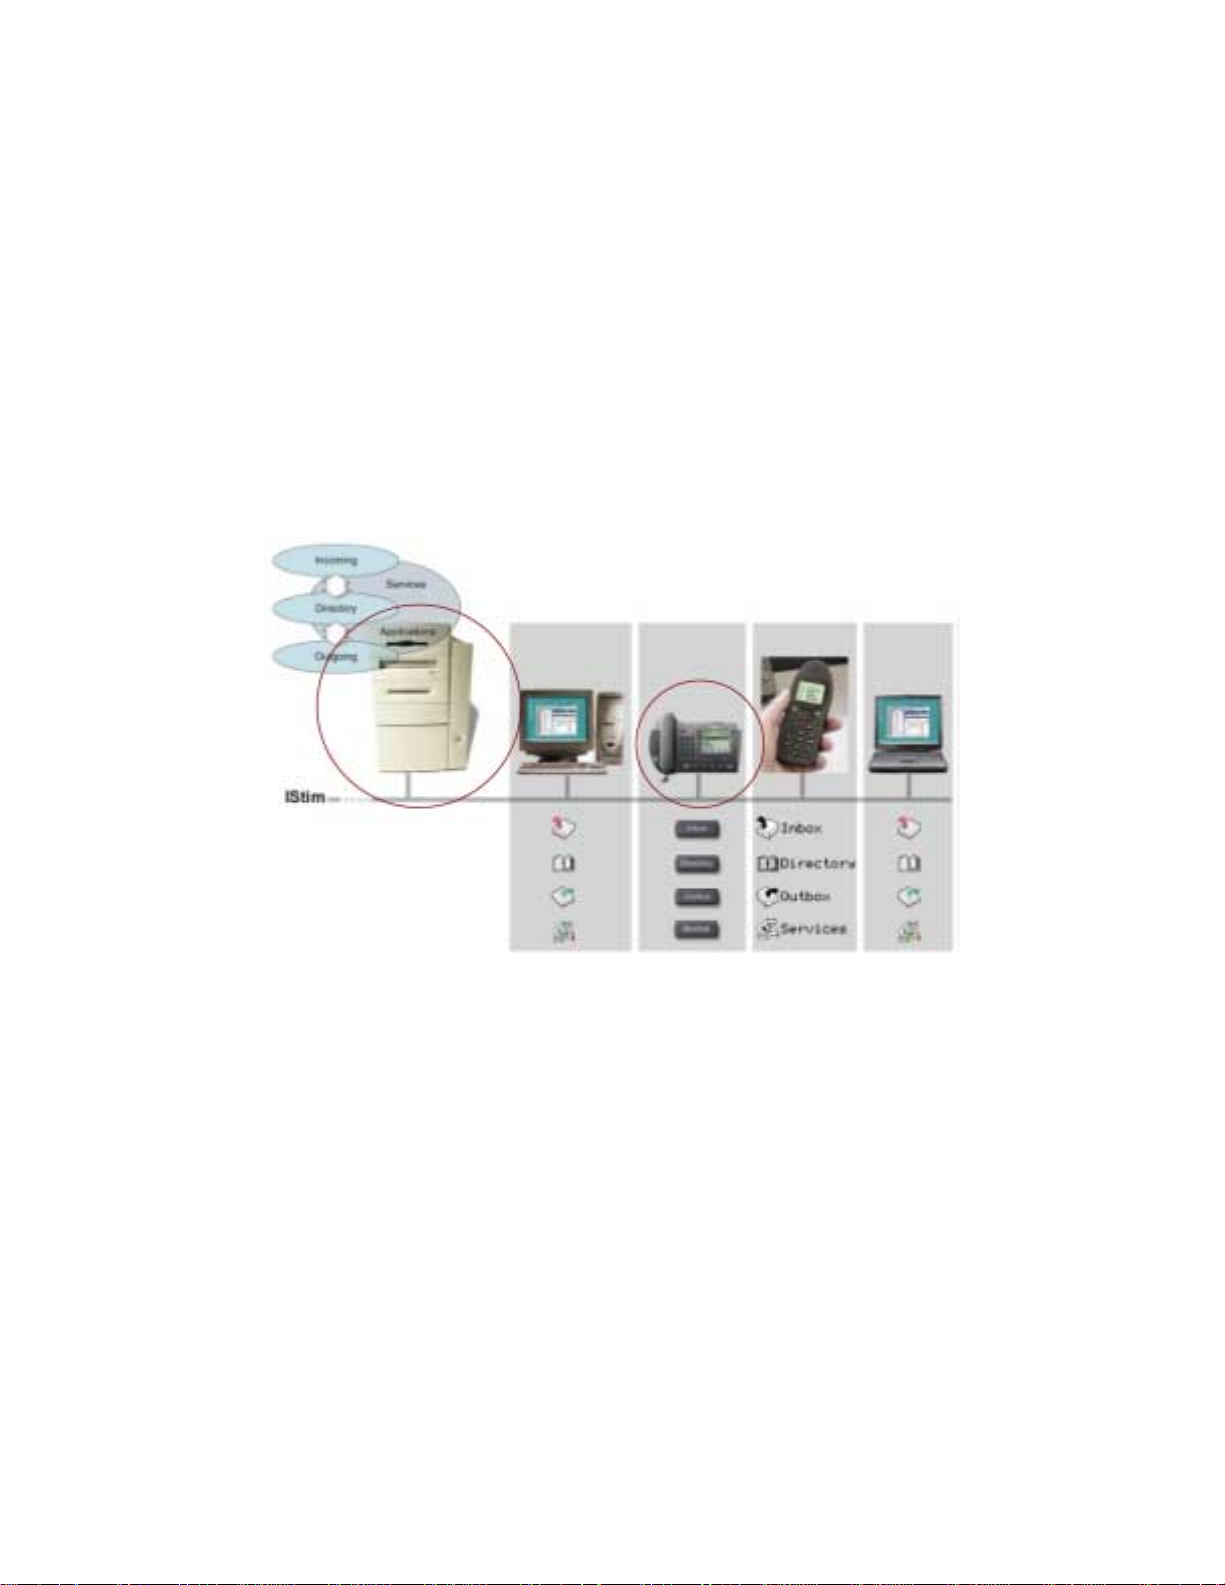
Nortel Networks has developed the i2004 Internet Telephone to work on your
corporate local area network (LAN) to deliver voice over IP (VoIP) services. The
i2004 Internet Telephone works in concert with your existing Centrex- or PBXbased telephone system (see Figure 1).
Figure 1
The i2004 Internet Telephone and the Terminal Proxy Server software are built
on H.323 standards established by the International Telecommunications Union
for multimedia communications over packet-based networks such as a corporate
LAN. This means your phone will work in harmony with other IP-based software
and hardware.
The design of the i2004 Internet Telephone includes one-button access to
features like speakerphone, and voicemail and supports the unique requirements
of various users. Additional features and functionality of the i2004 Internet
Telephone include its display screen, softkeys, and multiple line appearances.
i2004 Internet Telephone - User Guide • © 2001 • NTC51.01.03.06 • Version 06-1
Page 5
Page 6
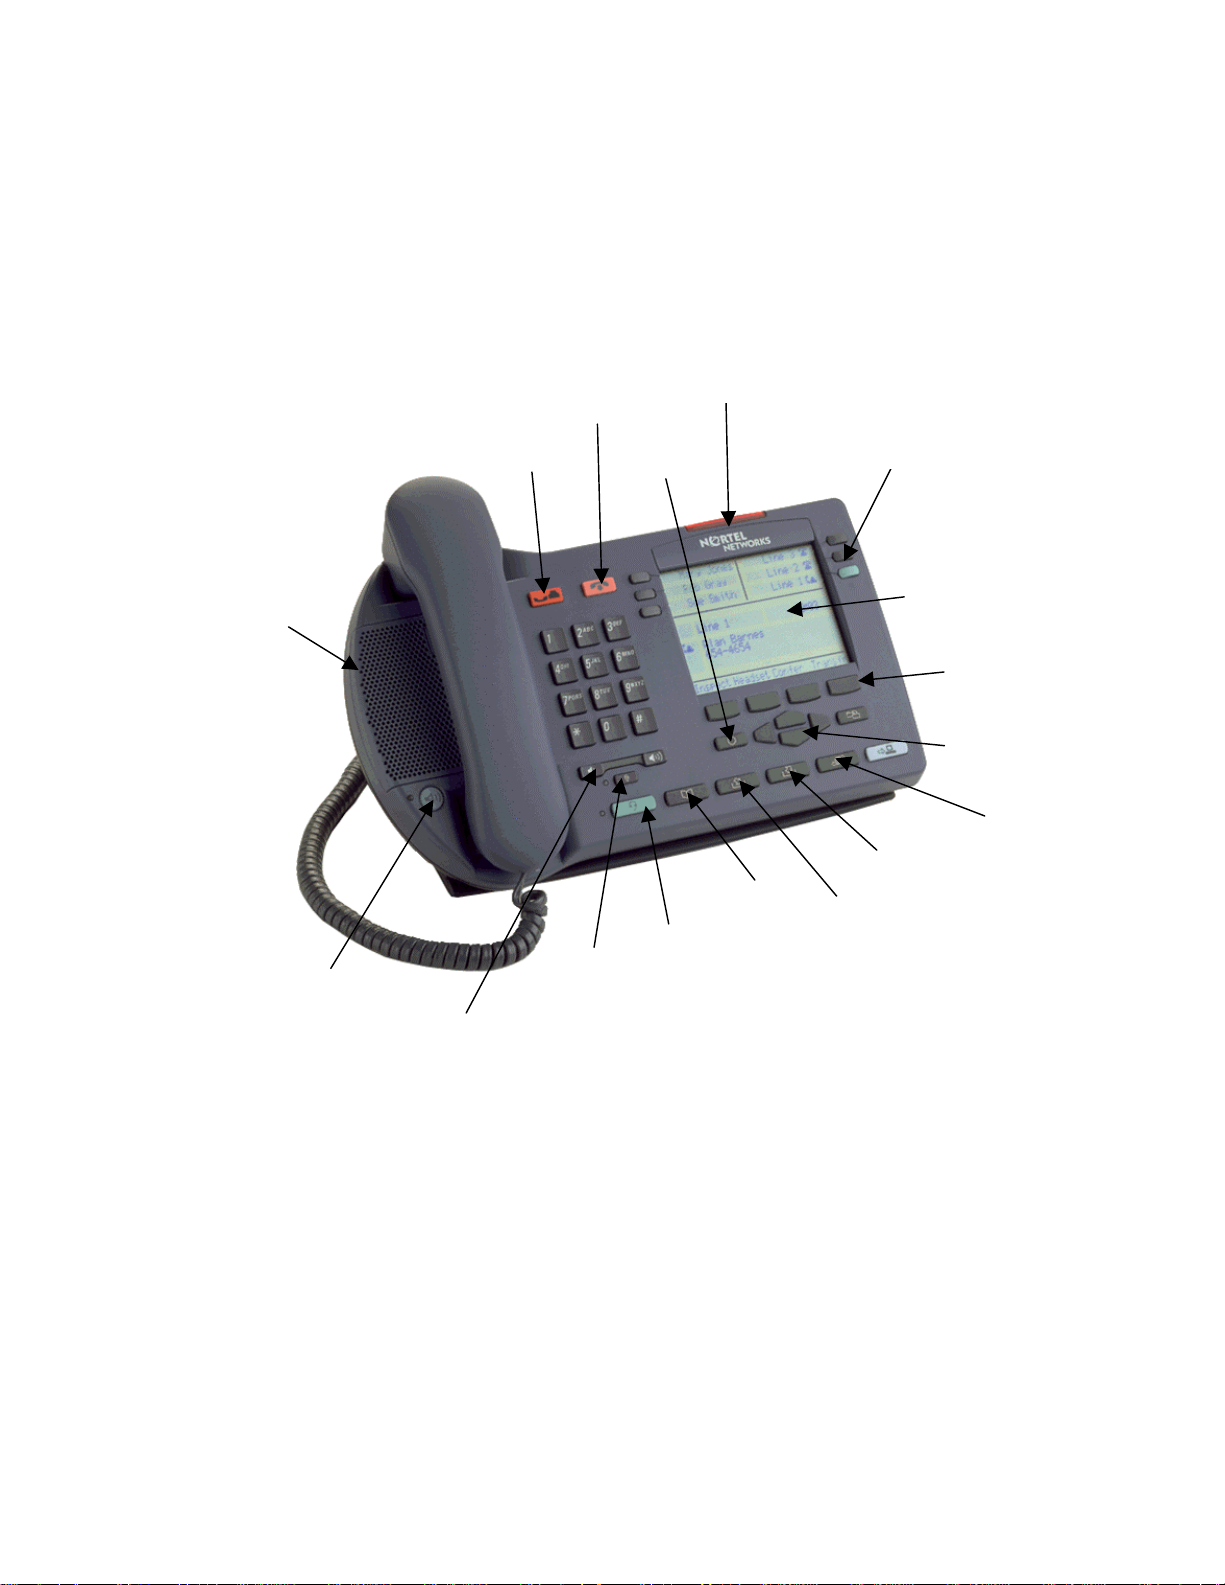
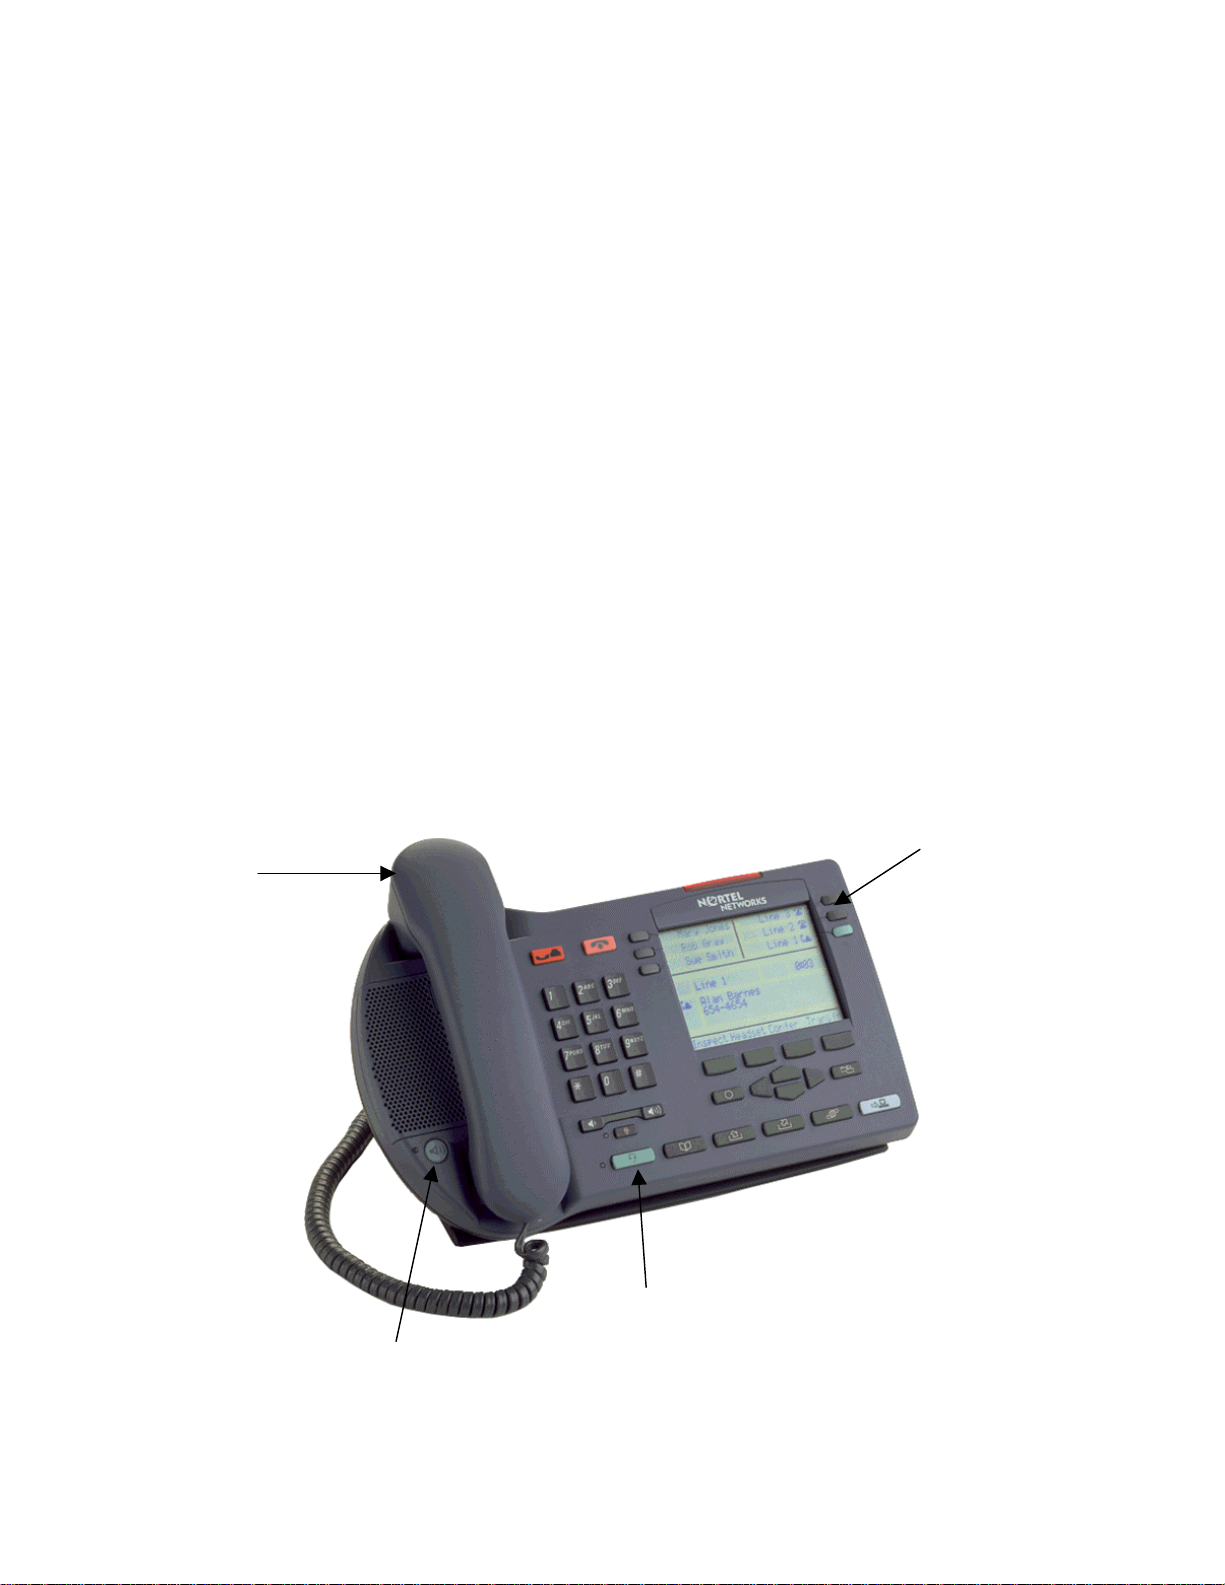
The i2004 Internet Telephone includes special keys that provide instant access
p
to features of the set (see Figure 2). The use of these keys is discussed in more
detail throughout this User Guide.
Figure 2
Set Lamp
S
eaker
Goodbye key
Hold key
Quit key
6 Programmable feat ur e keys
w/soft-labels
Display
4 Softkeys
Navigation
Cluster
Handsfree key w/LED
Volume Control
Services key
Outbox key
Directory key
Inbox key
Headset
key w/LED
Mute key
w/LED
i2004 Internet Telephone - User Guide • © 2001 • NTC51.01.03.06 • Version 06-1
Page 6
Page 7
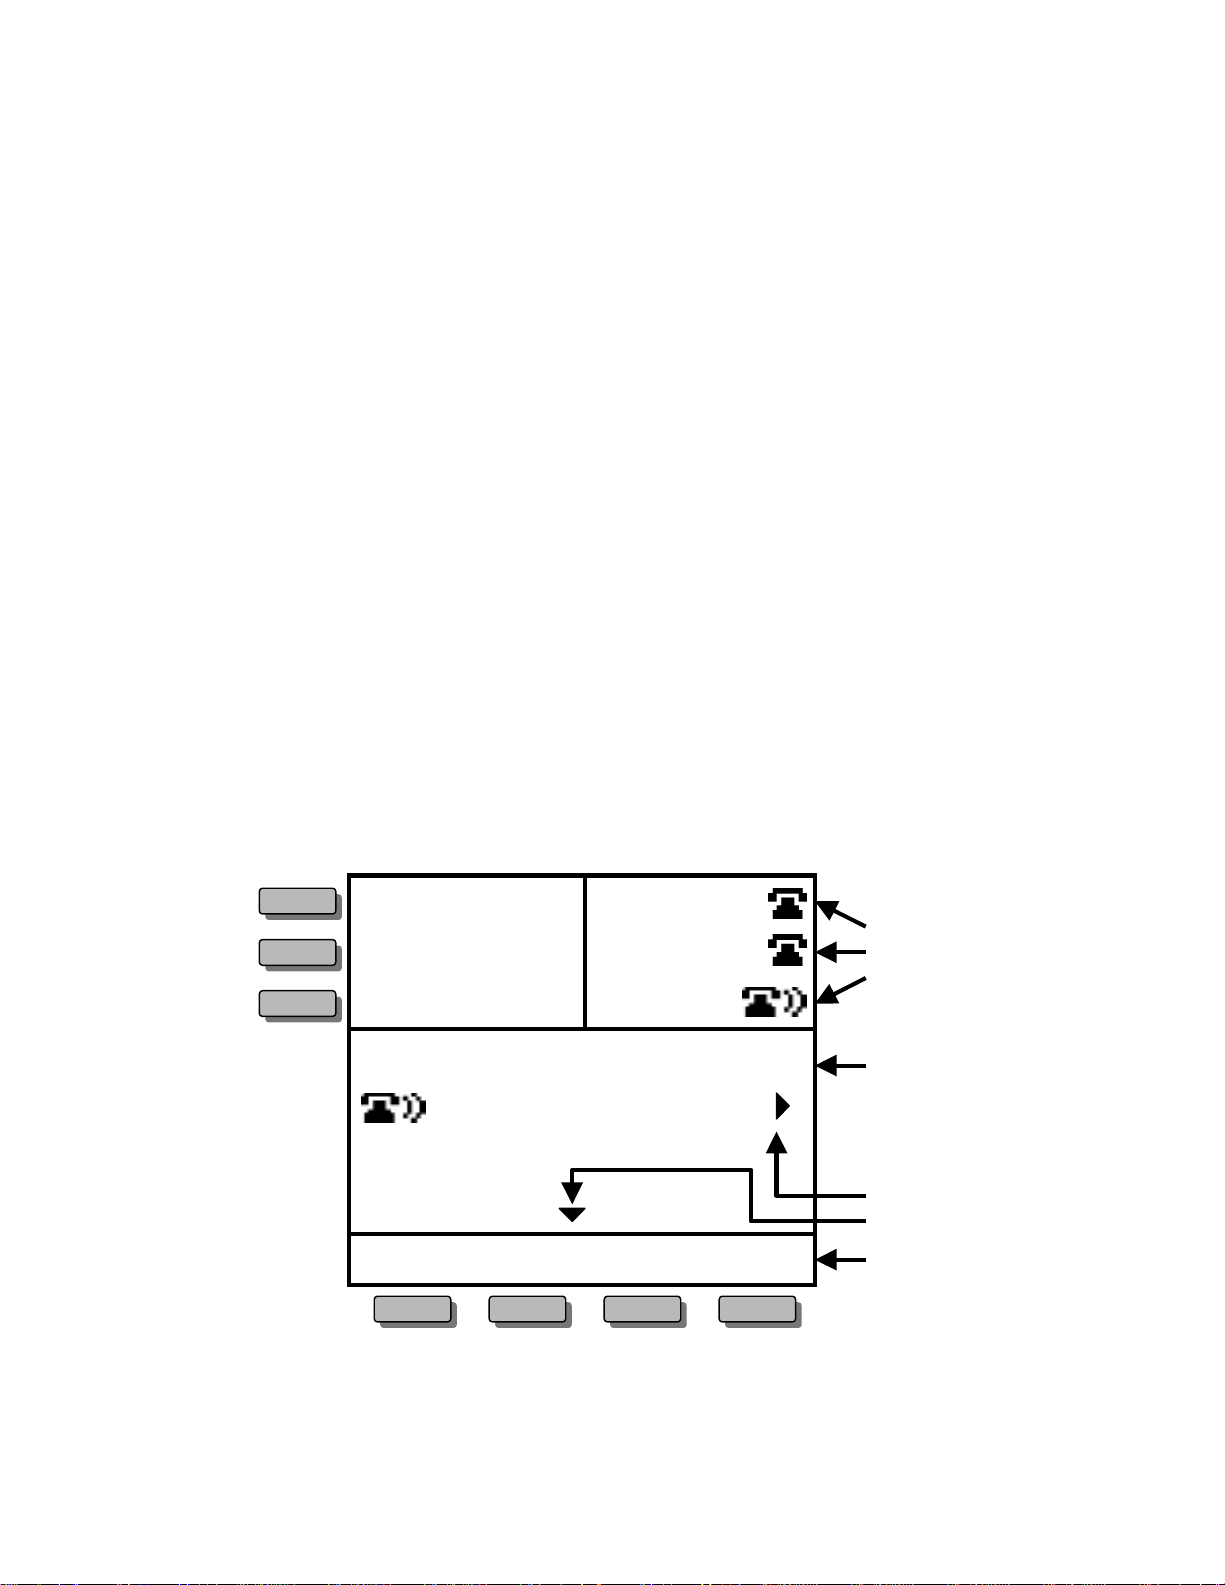
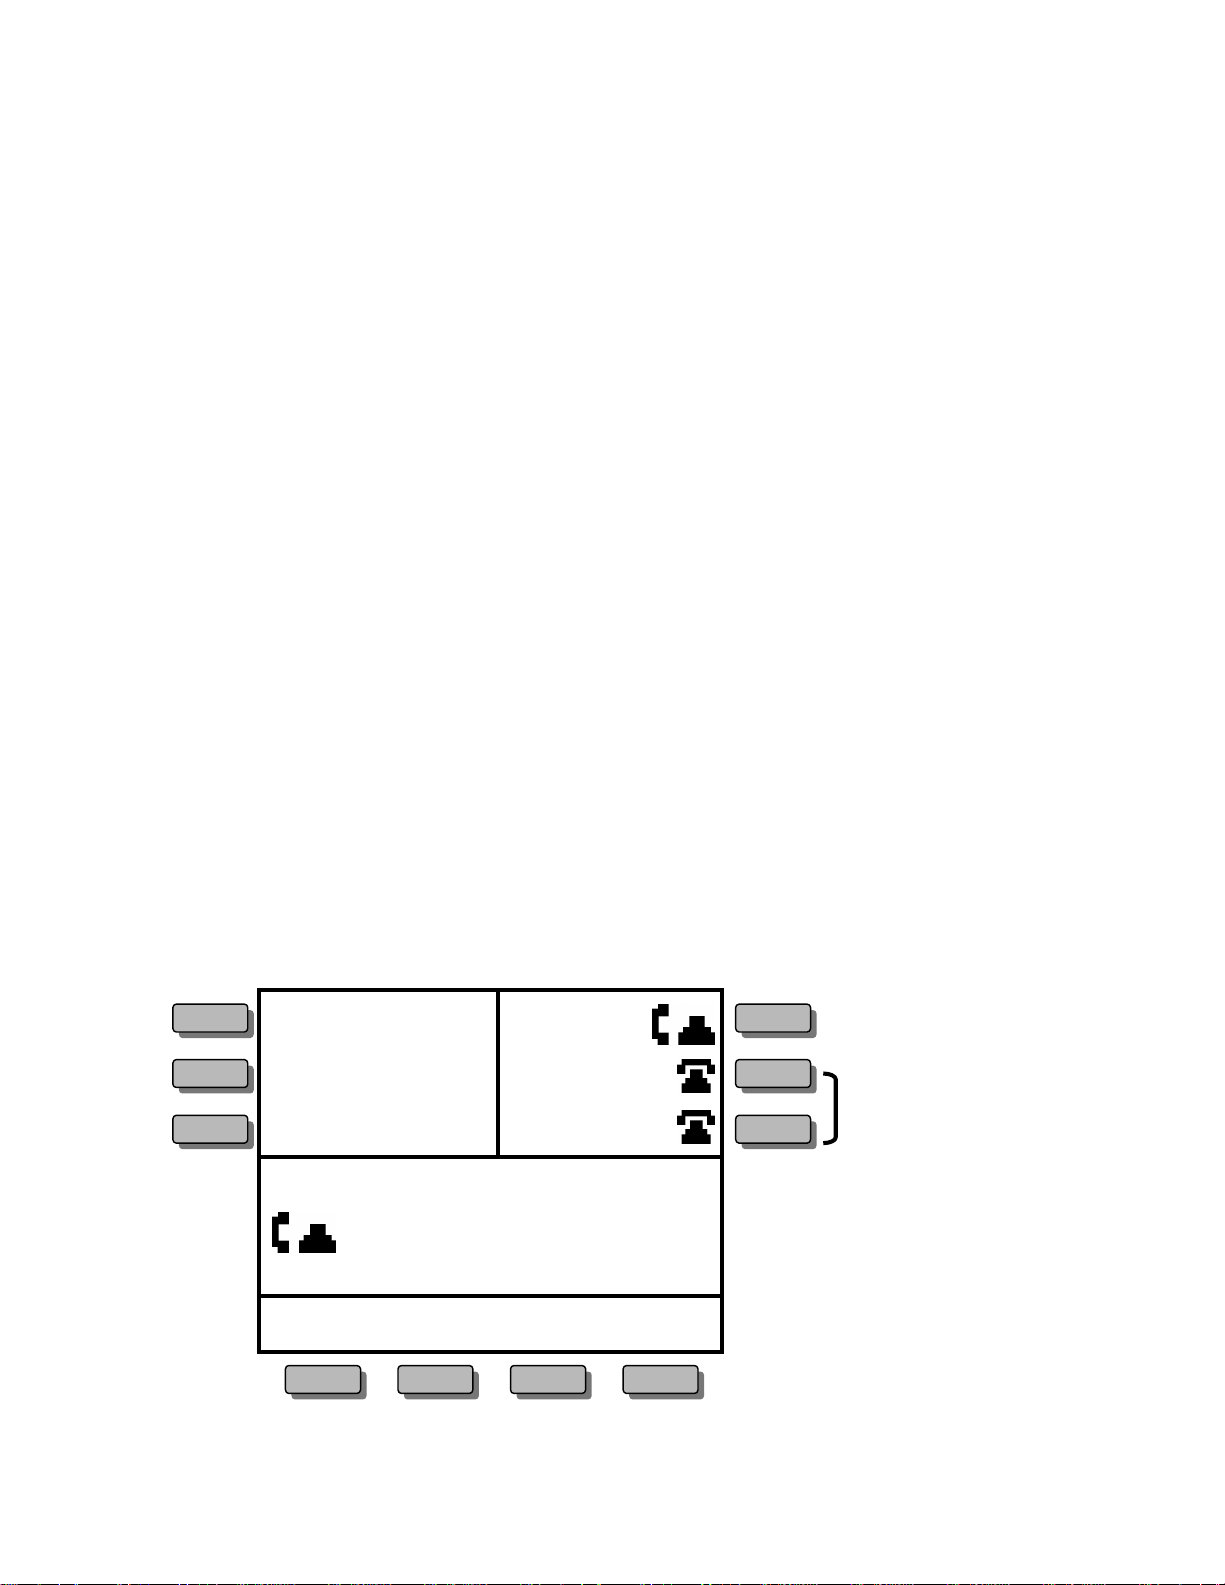
Display Screen
The i2004 Internet Telephone is a feature-rich capable telephone that has a
built-in display screen for ease of use.
The display screen has three areas to show different types of information (see
Figure 3). The top half of the display screen shows the available telephone lines
associated with your i2004 Internet Telephone. Your primary telephone line will
always be associated with the lower right-hand LINE key and is highlighted with
a special green key.
The middle portion of the display screen is the main information area and
identifies incoming callers by name and number (if programmed with Caller ID)
and provides status messages. When the telephone is idle, this display area
identifies the current date and time and reminds you if your phone is forwarded
or blocked from receiving incoming calls.
The lower portion of the display screen provides "on screen" information about
the available features programmed for each softkey on your i2004 Internet
Telephone. These features are easily accessed by pressing the corresponding
keys.
Figure 3
6135559654
6135559870
6135559870
6135559870 10/06 03:23pm
Chuck Jones
6544654
Inspect
Conf Transfer
Telephone
Lines
Main Information
Area
More Info. Icons
Softkey Labels
i2004 Internet Telephone - User Guide • © 2001 • NTC51.01.03.06 • Version 06-1
Page 7
Page 8
Softkeys
The softkeys on the i2004 Internet Telephone add greater versatility and provide
easy access to features that are customized for your current call activity. For
example, while on a call, softkeys offer one-button access to Call Conference
and Call Transfer – no more activation codes to remember! W hen the phone is
idle, softkey features may include Inspect, Forward and Do Not Disturb. Each
available option is identified on the display screen above the appropriate softkey.
If your i2004 Internet Telephone is programmed with more than four features
(the number of softkeys available), additional features can be accessed through
nested menu options. Pressing MORE… will provide one-button access to the
remainder of the feature list (see Figure 4).
Figure 4
6135559654
6135559870
6135559870
10/06 03:23pm
Inspect Forward DND more...
i2004 Internet Telephone - User Guide • © 2001 • NTC51.01.03.06 • Version 06-1
Page 8
Page 9
Multiple Line Appearances
The i2004 Internet Telephone includes six programmable keys for multiple
telephone lines and line appearances that can be updated by your system
administrator. Each unique line and appearance for that line has a dedicated key
assigned to it using the programmable LINE keys. Line key labels display the
associated phone number, or “Line X” with the primary line labeled “Line 1"
based on your system's configuration.
The i2004 Internet Telephone allows for multiple appearances of the same
telephone line. You can have two line appearances of your primary directory
number to facilitate call handling (see Figure 5). This feature prevents your
callers from reaching busy signals when you are on another call, and it functions
like Call Waiting. Caller ID is available on your additional line so you will know
who is calling before you interrupt your current call. Now you can choose to pick
up the call, conference it into your current call, or ignore it and allow your caller
to be forwarded to your voicemail!
A single telephone line that is established as a Multiple Appearance Directory
Number (MADN) can appear on multiple phones, making call sharing easier to
manage in a busy office. MADN lines will display the same label across all
terminals that share the line.
The i2004 Internet Telephone includes special features that permit you to
determine the status of the line before accessing it and that provide for call
privacy so other MADN group users do not interrupt your call. Special icons
identify the status of each telephone line: ringing, on hold, or idle.
Figure 5
6135559654
MADN
6135559870
– 2 line appearances
6135559870
of Primary
Directory Number
6135559654 10/06 03:23pm
Inspect Forward DND
i2004 Internet Telephone - User Guide • © 2001 • NTC51.01.03.06 • Version 06-1
Page 9
Page 10
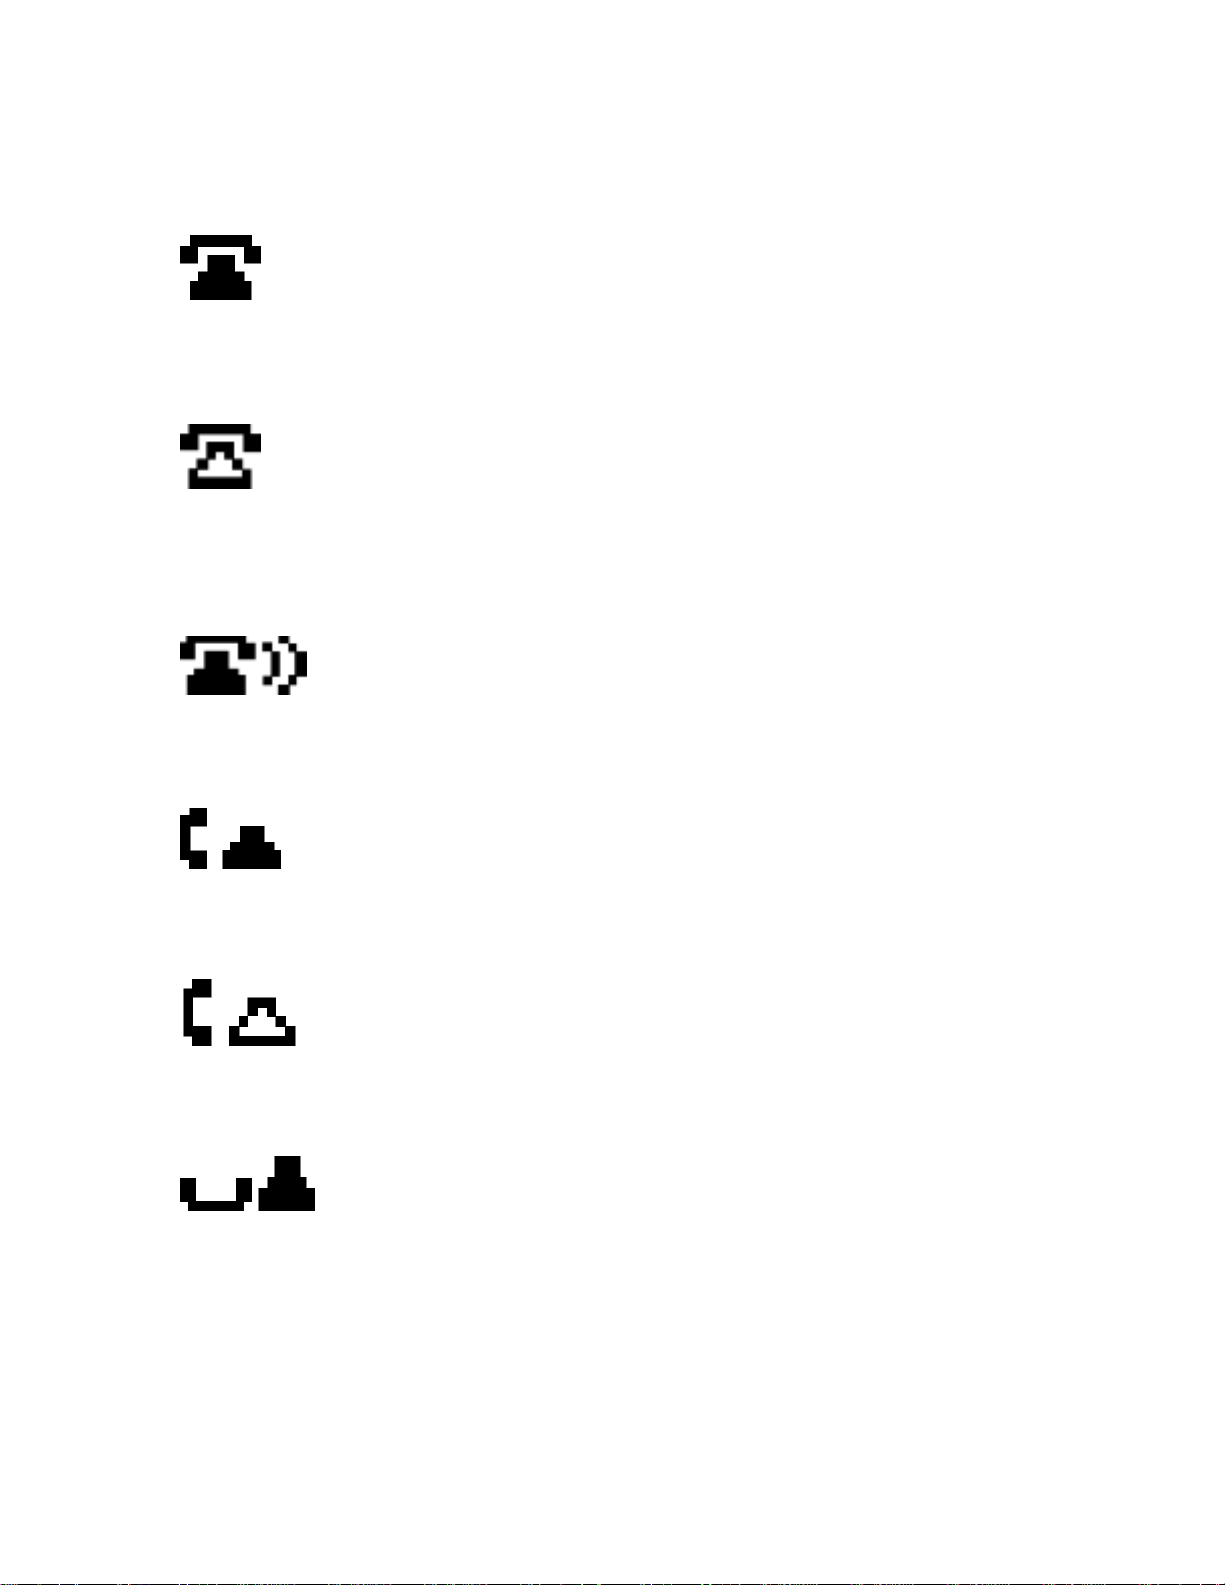
Icons
Description of icon:
This icon will appear when the telephone line is idle. In a MADN group,
this icon indicates that all members in the MADN group are idle.
This icon indicates another MADN member has gone off-hook. MADN
member A will show this hollow icon on their set to indicate that a
member in the MADN group is using the line.
This icon indicates an incoming, ringing call. In a MADN group all
members in the MADN group will show this icon.
This icon indicates the telephone line is off-hook either initiating or
answering a call, or has bridged onto a call presented to a MADN group.
This icon indicates another MADN member is active on the line.
This icon indicates that an active call has been put on Hold. In a MADN
This icon indicates that an active call has been put on Hold. In a MADN
group the icon will only blink if no other MADN members are active on the
group the icon will only blink if no other MADN members are active on the
call.
call.
i2004 Internet Telephone - User Guide • © 2001 • NTC51.01.03.06 • Version 06-1
Page 10
Page 11

II. Getting Started
Installing the i2004 Internet Telephone
Before installing your i2004 Internet Telephone, consult your system
administrator to avoid serious damage to the set.
Your system administrator must create a terminal profile and provide you with an
IP address and other information required to initialize the set. Be sure you have
this information before installation:
• You will need the primary Directory Number or DNKey
• You will need to know whether your system uses full, partial or no DHCP
• If your system does not use full DHCP, you will need the parameter
information listed in the table on page 14.
Connecting the i2004 Internet Telephone
CAUTION – Severe damage will occur if this set is plugged into an ISDN
connection. Consult your system administrator to assure that you are plugging
your set into a 10/100 BaseT Ethernet jack.
To connect the i2004 Internet Telephone, follow these steps:
Step 1: Connect one end of the handset cord to the handset jack
on the telephone base, and connect the other end of the handset
cord to the handset.
Step 2: Connect one end of the line cord to the line cord jack on
the telephone base and the other end of the line cord to an IP voice
network, using a CAT-5 cable with an RJ45 connector.
Step 3: Plug the AC Power adapter into the base of the telephone,
and plug the adapter into the nearest 120V AC (60 Hz) outlet.
i2004 Internet Telephone - User Guide • © 2001 • NTC51.01.03.06 • Version 06-1
Page 11
Page 12

Initializing the i 2004 Internet Telephone
When you first connect your i2004 Internet Telephone to a power source, all
hardkey indicator lights and softkey icons may flash. This indicates that the
phone has not yet been initialized. You may need to contact your system
administrator to determine the correct information to use during the initialization
procedure.
When the i2004 Internet Telephone is first powered up, one would see the
introduction screen as shown in Figure 6 below. To begin the initialization
process, you must enter a KEY SEQUENCE while the introduction screen
appears after powering your i2004 Internet Telephone. If the key sequence is not
entered within the first two seconds of the initialization process, your set will be
initialized with previously entered parameters.
Enter the initialization key sequence by pressing each of the four softkeys
(located at the bottom of the display screen) once, pressing from left to right.
Figure 6
Nortel Networ ks
i2004 Internet Telephone - User Guide • © 2001 • NTC51.01.03.06 • Version 06-1
Page 12
Page 13

The default entry for each parameter will be displayed on the screen (see Figure
7).
NOTE: Some versions of the i2004 begin with the prompt ‘SET IP’. You will then
be asked to edit or accept all of the parameter information in the table on page
14. The last parameter prompt will be ‘DHCP?’. In this situation, you should enter
‘0’ – the set will then display ‘Locating server’ (see Figure 8 and go to the
instructions that follow it).
Figure 7
Manual Cfg
DHCP? (0-No, 1-Yes)
OK BkSpace Clear Cancel
On most i2004 sets, you are first prompted to set DHCP parameters.
If the i2004 will use DHCP, enter a ‘1’ on the keypad. You will be asked to
indicate the level of DHCP us e; enter ‘0’ for f ull DHCP (parameters will be set
automatically) or ‘1’ for partial DHCP (parameters will be partia lly entered). Once
parameters are entered, ‘Locating server’ will appear on the display (see Figure
8 and go to the instructions that follow it).
If the i2004 will not use DHCP, enter a ‘0’ on the keypad. You will be prompted
to set all necessary parameters manually.
As you enter parameters manually, use the BkSpace or Clear softkeys to edit the
default entry. BkSpace will delete e ach character as the key is pressed. Clear will
delete the entire entry.
Enter requested information in the menu fields by pressing the number keys on
the dialpad. Press the * key to enter a period (".") when entering the set's IP
address.
i2004 Internet Telephone - User Guide • © 2001 • NTC51.01.03.06 • Version 06-1
Page 13
Page 14

Pressing OK will record the entry and advance the initialization to the next
parameter. Pressing Cancel will abandon the manual configuration process and
restart the power-up process.
Each parameter must have a corresponding entry. An error "beep" will notify you
if you attempt to advance to the next parameter without a field entry.
The following table defines the required parameters.
Parameter Definition
SET IP IP address for the i2004 Internet Telephone
NETMASK Net submask
DEF GW Default gateway IP network address
S1 IP Primary server IP address
S1 PORT Primary server port number
S1 ACTION Primary action code (enter 1 for UNIStim)
S1 RETRY COUNT Primary retry count (value from 0-255, enter 10)
S2 IP Secondary server IP address
S2 PORT Secondary server port number
S2 ACTION Secondary action code (enter 1 for UNIStim)
S2 RETRY COUNT Secondary retry count (value from 0-255, enter 10)
Your system platform may require additional parameters. See your system
specific User Guide for details.
i2004 Internet Telephone - User Guide • © 2001 • NTC51.01.03.06 • Version 06-1
Page 14
Page 15

When each parameter has been entered, your i2004 Internet Telephone will
attempt to connect to the server (see Figure 8).
Figure 8
Locating Server. . . . _
If your telephone set cannot locate the server, it will automatically retry every two
minutes. After several attempts, if your telephone set does not locate the server,
contact your system administrator for assistance.
After successfully connecting to the server, you will be prompted to enter the
DNKey (see Figure 9). If your primary directory number is unique, enter your 10digit primary Directory Number (DN). Otherwise, obtain this information from your
system administrator.
Figure 9
08/00 03:31pm
Enter DNKey
OK Clear BkSpc Exit
Your system administrator may have assigned a password to your DN. If so, you
will be prompted to enter the password.
i2004 Internet Telephone - User Guide • © 2001 • NTC51.01.03.06 • Version 06-1
Page 15
Page 16

These prompts will only occur once, so if your i2004 Internet Telephone has
completed the initialization process previously, this step will not occur.
If you enter an incorrect DNKey or password, your disp la y will show "Initialization
Failed" and identify one of several errors displayed in the following table.
DNKey Not
Found
DNKey In Use
DN Not Found
DN Is Not
Unique
Password Not
Correct
• the user entered a twenty-digit DN key that does
not exist
• the user entered a DN key that is currently being
used by another set
• the user entered a 10-digit primary DN that does
not exist
• the user entered a 10-digit MADN DN. The user
must enter a twenty-digit DN key to uniquely
identify the set
• the user entered the incorrect password
If the telephone set was previously initialized, just connect the telephone cords
and power adapter - no additional actions are required to begin using your i2004
Internet Telephone.
i2004 Internet Telephone - User Guide • © 2001 • NTC51.01.03.06 • Version 06-1
Page 16
Page 17
III. Using Your i2004 Internet Telephone
Basic Calls
The i2004 Internet Telephone gives you multiple options to make a call. Each of
these options is described in detail. You can make a call either in the off-hook
mode or in the on-hook mode by using your handset, headset, or hands-free
speaker (see Figure 10).
Normal Dialing:
1. Using your Handset
2. Using your Headset key or Handsfree key
Pre-Dialing:
1. Pre-dialing with your Handset
2. Pre-dialing with your Headset key or Handsfree key
Figure 10
Handset
Line keys
Headset key w/LED
Handsfree key w/LED
i2004 Internet Telephone - User Guide • © 2001 • NTC51.01.03.06 • Version 06-1
Page 17
Page 18

Making a Call
Using your Handset
1. Lift the HANDSET to make a call using the primary line or lift the HANDSET and press a LINE
key to select another line.
2. Enter the phone number.
3. Press GOODBYE to end the call (or replace the HANDSET).
The primary line is always selected unless you select another LINE key.
Using your Headset or Handsfree Keys
1. Press the green HANDSFREE or HEADSET key.
2. Enter the phone number.
3. Press GOODBYE to end the call.
Dial tone is heard from the speaker if HANDSFREE was selected.
When placing a call in one of the of f-hook positions, the display will show the
number you are dialing. If there is a corresponding name in the Centrex switch
associated with the number you are dialin g, it will appear on the display (see
Figure 11).
Figure 11
User presses line key,
handsfree key, or headset key
6135559654
6135559870
10/01 03:23pm
Inspect Forward
6135559654
6135559870
6135559870 10/01 03:23pm
6135559654
6135559870
10/01 03:23pm
Chuck Jones
6544654
Inspect
Inspect
i2004 Internet Telephone - User Guide • © 2001 • NTC51.01.03.06 • Version 06-1
Page 18
Page 19

Pre-Dialing
Pre-dialing allows you to verify the phone number dialed on the phone’s display
before completing your call.
Pre-dialing with your Handset
1. Enter the phone number (no dial tone will be heard).
2. Lift the HANDSET.
3. Replace the HANDSET to end the call (or press GOODBYE).
The primary line is used to place the call.
Pre-dialing with your Headset or Handsfree Keys
1. Enter the phone number (no dial tone will be heard).
2. Press the HANDSFREE or HEA DSET key and the call is routed to the appropriate speaker.
3. Press GOODBYE to end the call.
The primary line is used to place the call.
Pressing a LINE key after entering a phone number on the keypad will
automatically activate the HANDSFREE function on your phone. All the line
icons will appear as idle until you press a LINE, HEADSET or HANDSFREE key
or lift the HANDSET (see Figure 12).
If you make an error while entering the phone number, you do not have to cancel
the call. Just press the BKSPC softkey to delete the entered numbers
individually, correct the entry, and complete your call.
Figure 12
6135559654
6135559870
6135559870
04/17 03:23pm
6544654
Inspect BkSpc Exit
i2004 Internet Telephone - User Guide • © 2001 • NTC51.01.03.06 • Version 06-1
Page 19
Page 20

Answering a Call
The calling party’s name and number, if available, will be displayed on incoming
calls if the telephone is idle (if the phone is holding a call, not on an active call,
receiving Caller ID from another call, or in a functional area such as the
Directory). In some instances, only the number will be displayed. If name and
number are not delivered , the display will state, “Unknown Caller.”
If the telephone is idle
1. Answer the call by:
• lifting the handset,
• pressing the LINE or HANDSFREE key (for hands free speaker use), or
• pressing the HEADSET key for headset use.
2. Press GOODBYE to end the call.
Incoming calls will ring the set and display a ringing phone on the LINE key.
If you are on another call, the new name and number will display for three
seconds after the first ring, then revert to the current call’s display (see Figure
13).
While on another call
1. Answer the new call by pressing the LINE key for the incoming call.
2. Your first caller will be automatically placed on hold, and your display will show the new caller.
3. Press GOODBYE to end the current call, or press HOLD to place this caller on hold.
4. Press the appropriate LINE key to return to either caller.
A short tone is heard to alert you to another incoming call.
i2004 Internet Telephone - User Guide • © 2001 • NTC51.01.03.06 • Version 06-1
Page 20
Page 21

Call Waiting – Multiple Line Appearance
If the new call is on the second line appearance of your primary line, your caller
will not hear a busy signal, and the incoming call can be handled like any other
call. Press the LINE key, and your current call will be automatically placed on
hold while you speak to the new caller. Press the LINE key of the held call to
return to the first caller (see Figure 13).
Figure 13
6135559654
6135559870
6135559870
6135559870 04/17 01:32pm
Chuck Jones
6544654
Inspect Confer Transfr
Incoming call on 6135559870
6135559654
Current Call
6135559870
6135559870
6135559870 04/17 01:34pm
Laura Whithead
8315654
Inspect Confer Transfr
(transient 3 sec. CLID)
6135559654
6135559870
6135559870
6135559870 04/17 01:38pm
Chuck Jones
6544654
Inspect Confer Transfr
Answer Call on 6135559870
6135559654
6135559870
6135559870
6135559870 04/17 01:38pm
Laura Whithead
8315654
Inspect Confer Transfr
On hold
i2004 Internet Telephone - User Guide • © 2001 • NTC51.01.03.06 • Version 06-1
Page 21
Page 22

Placing and Retrieving a Call on Hol d
This feature allows you to answer additional incoming calls or to hold a call until
you are ready for the caller. Your i2004 Internet Telephone has an orange key
designated for the HOLD function.
While on a call
1. Press the HOLD key.
2. Press the appropriate LINE key to retrieve the call, or press HOLD again to return to the last
call placed on hold.
The Line icon key flashes to indicate that the line is on hold (see Figure 14).
Figure 14
6135559654
6135559870
6135559870
6135559870 04/17 01:34pm
Chuck Jones
6544654
Inspect Confer Transfr
Press
Hold
6135559654
6135559870
6135559870
6135559870 04/17 01:34pm
Chuck Jones
6544654
Inspect Forward
Call is
on hold
i2004 Internet Telephone - User Guide • © 2001 • NTC51.01.03.06 • Version 06-1
Page 22
Page 23

Transferring a Call
Softkeys make transferring an active call to another telephone number simple.
This feature allows you to transfer calls in several ways:
• announcing your transferred call before releasing it,
• speaking with your called party privately before releasing the call, or
• transferring the call directly.
Your display screen will prompt you through the steps required to use this
feature and will provide the status of the call (see Figure 15).
While on an active call
1. Press the TRANSFR softkey - your active call will be automatically placed on hold.
2. Enter the phone number you want to transfer your active call to.
3. Press TRANSFR again when you are ready to “send” the call to the dialed number.
4. Your set will return to idle.
Figure 15
6135559654
6135559870
6135559870
6135559870 10/02 03:30pm
Chuck Jones
6544654
Inspect Confer Transfr
6135559654
6135559870
6135559870
6135559870 10/02 03:30pm
Inspect
6135559654
6135559870
6135559870
6135559870 10/02 03:32pm
54762
Calling...
Inspect Confer Transfr
6135559654
6135559870
6135559870
10/02 03:33pm
Inspect Forward
Enter Digits 54762
i2004 Internet Telephone - User Guide • © 2001 • NTC51.01.03.06 • Version 06-1
Page 23
Page 24

Conferencing Calls
r
Use call conferencing when you need to join several callers together. Your i2004
Internet Telephone allows you to establish conference calls by individually
adding each phone number, or by conferencing active calls together (see Figure
16).
Setting up a 3-way conference call
1. Start with an active call by calling the telephone number of one of the conference individuals.
2. Press the CONFER softkey - your active call will be automatically placed on hold and an idle
line will be seized.
3. Enter the phone number of the next individual you want to conference with.
4. Press JOIN to bring all parties together and begin the conference call.
After dialing your second caller, delay pressing JOIN and you may speak
privately before beginning the conference call.
When you press JOIN, the line used to call th e second party will become
available for other calls.
Figure 16
6135559654
6135559870
6135559870
6135559870 10/02 03:30pm
Chuck Jones
6544654
Inspect Confer Transf
6135559654
6135559870
6135559870
6135559870 10/02 03:32pm
Inspect
Enter Digits 54762
6135559654
6135559870
6135559870
6135559870 10/02 03:33pm
54762
Calling...
Inspect Join Transfer
6135559654
6135559870
6135559870
6135559870 10/02 03:34pm
Conference Call
Inspect AddNext DrpLast Transfr
i2004 Internet Telephone - User Guide • © 2001 • NTC51.01.03.06 • Version 06-1
Page 24
Page 25

Adding Additional Calls
Adding additional callers to your active conference call is just as simple as using
the softkey options (see Continuation of Figure 16).
NOTE: The maximum number of people that can be conferenced in a call is
limited by the bridge size provisioned on the switch. Please check with your
service administrator.
Adding a new party while on an active 3-way conference call
1. Press the ADDNEXT softkey, your conference call will automatically be placed on hold and an
idle line will be seized.
2. Enter the phone number of the individual you want to add to the conference.
3. Press JOIN to rejoin your conference call.
The DRPLAST softkey allows you to remove the last phone number added to
the conference call. Press this softkey while on an active conference call and the
last party added to the call will be dropped from the conference.
If your i2004 Internet Telephone is configured with Flex Call, pressing
GOODBYE will remove you from the conference call while leaving the ot her
parties connected even if you originated the conference call. Check with your
system administrator to determine how your set and the associated features are
configured.
Continuation of Figure 16
6135559654
6135559870
6135559870
6135559870 04/17 02:15pm
Conference Call
Inspect AddNext DrpLast
6135559654
6135559870
6135559870
6135559870 04/17 02:15pm
Inspect
Digits 54895
Enter
6135559870 04/17 02:15pm
54895
Calling...
Inspect Join
6135559870 04/17 02:15pm
Conference Call
Inspect AddNext DrpLast
6135559654
6135559870
6135559870
6135559654
6135559870
6135559870
i2004 Internet Telephone - User Guide • © 2001 • NTC51.01.03.06 • Version 06-1
Page 25
Page 26

Adding on Incoming Calls to your Conference
Your i2004 Internet Telephone allows you to easily connect two independent
calls for an immediate three-way conference (see Figure 17).
When pressing the Confer sof tkey, your i2004 Internet Telephone will always
seize an available line on your set. To con ference two active callers you will need
to release this line to complete your conference.
Setting up a 3-way conference call by joining two active calls
1. While on an active call, press the CONFER softkey - an available line will be seized and your
caller will be placed on hold.
2. Press the LINE key to retrieve the other caller (not the call placed on hold in step 1) - the
seized line will be released.
3. Press JOIN to begin the conference.
Be sure to press JOIN instead of TRANSFR. Pressing TRANSFR will transfer
your first caller to your second caller and disconnect you from the call. You can
use the ADDNEXT and DRPLAST softkeys to further enhance your conference
call.
Figure 17
User selects
6135559654
6135559654
6135559870
6135559870
6135559870 10/26 03:20pm
Chuck Jones
6544654
Inspect Confer Transfr
6135559654
6135559870
6135559870
6135559870 10/26 03:21pm
Inspect
6135559654
6135559870
6135559870
6135559654 10/26 03:21pm
Heather Chute
8315654
Inspect Join
6135559654
6135559870
6135559870
6135559870 10/26 03:21pm
Conference Call
Inspect AddNext DrpLast
i2004 Internet Telephone - User Guide • © 2001 • NTC51.01.03.06 • Version 06-1
Page 26
Page 27

Forwarding Calls
A special softkey allows you to easily forward your calls. You can select the most
recently ‘forwarded to’ number, or change the number your calls are forwarded to
(see Figure 18).
When forwarding your calls, incoming calls to ALL telephone numbers assigned
to your i2004 Internet Telephone are forwarded to the number you designate.
If you attempt to forward to an invalid number, the following error will display on
the screen – “Invalid Forward to DN.”
When your phone is idle
1. Press the FORWARD softkey.
2. Press the LASTFWD softkey. The number last forwarded to will be displayed.
Or…
1. Press the CLEAR softkey to enter a new forwarding number.
2. Press OK to complete the forwarding of your calls.
Figure 18
6135559654
6135559870
6135559870
6135559654
6135559870
6135559870
All lines forwarded to
6135559654
6135559870
6135559870
Forward All lines to
When your calls are forwarded, a comment on your display screen will remind
you of the number you have forwarded to. A softkey option allows you to cancel
call forwarding from your i2004 Internet Telephone and accept incoming calls.
When your phone is forwarded
1. Press the CNCLFWD softkey to cancel call forwarding.
i2004 Internet Telephone - User Guide • © 2001 • NTC51.01.03.06 • Version 06-1
Page 27
Page 28

Inspect
If your i2004 Internet Telephone has two or more line appearances, the Inspect
feature is available. Inspect allows you to view information about a line without
accessing it first. When you inspect a line, the call status and Caller ID
information (if available) will display on your set. You can inspect lines that are in
use, on hold, or ringing with a new call (see Figure 19).
When your phone is idle, ringing, on hold, or active
1. Press the INSPECT softkey.
2. Press the LINE key for the line you wish to inspect.
If the line you inspect is active, on hold, or ringing, the Caller ID record will
display in the main information area of the display. If the line is idle, the directory
number and status ("No Call") will display.
Figure 19
Inspect ringing line Inspect active line
User presses “INSPECT”
User presses “INSPECT”
6135559654
6135559870
Inspect 10/26 05:20pm
Press line key to
Inspect that line
Exit
6135559654
6135559870
6135559870
6135559870 10/26 05:21pm
Heather Chute
8315654
6135559654
6135559870
Inspect 10/26 05:22pm
Press line key to
Inspect that line
Exit
6135559654
6135559870
6135559870
6135559654 10/26 05:23pm
Chuck Jones
6544654
i2004 Internet Telephone - User Guide • © 2001 • NTC51.01.03.06 • Version 06-1
Page 28
Page 29

Do Not Disturb
Work at your desk uninterrupted with this feature on your i2004 Internet
Telephone. Do Not Disturb (also known as Make Busy) prevents incoming calls
from ringing on your set. Calls to numbers other than your primary line, such as
MADN group numbers, won't ring on your set either, so ringing phones will not
interrupt your work. Incoming calls will hear busy signal (see Figure 20).
When your phone is idle
1. Press the DND softkey.
When you activate this feature, a comment on your display screen will remind
you that your set will not accept incoming calls. A softkey optio n allows you to
deactivate this feature easily and return your phone to an idle status, ready for
incoming calls (see Figure 20).
When Do Not Disturb is activated
1. Press the CNCLDND softkey to cancel Do Not Disturb.
Figure 20
Inspect Forward DND
Do Not Disturb ON
6135559654
6135559870
10/05 04:20pm
6135559654
6135559870
10/05 04:21pm
6135559654
6135559870
Do Not Disturb Cancelled
(transient)
6135559654
6135559870
10/05 04:22pm
Inspect Forward CnclDND
i2004 Internet Telephone - User Guide • © 2001 • NTC51.01.03.06 • Version 06-1
Page 29
Inspect Forward
Page 30

Message Waiting and Message Retrieval
Your i2004 Internet Telephone will tell you when you have messages in your
voice mailbox if you subscribe to voice mail services from your local
telecommunication s provider. Your display will provide a message ("Message
Waiting"), and the Set Lamp will flash when the phone is idle (see Figure 21).
To check for messages
1. Go off hook and enter the phone number for your voice mail provider.
2. Review your messages.
3. Press GOODBYE to end your call.
When you have listened to your voice mail messages, the Set Lamp will
extinguish, and the display will return to idle status.
Figure 21
6135559654
6135559870
6135559870
Message Waiting
Inspect Forward
10/05 02:20pm
i2004 Internet Telephone - User Guide • © 2001 • NTC51.01.03.06 • Version 06-1
Page 30
Page 31

If your i2004 Internet Telephone is provisioned with a network-based messaging
y
application, connecting to your mailbox is as easy as pressing the INBOX key.
To check for messages
1. Press INBOX – ‘Inbox’, ‘Messages’ and the CALL softkey will appear on the display.
2. Press the CALL softkey to call your messaging system with the primary line.
3. Review your messages.
4. Press GOODBYE to end your call.
Figure 22
User presses Inbox ke
6135559654
6135559870
6135559870
10/05 03:30pm
Inbox
Messages
6135559654
6135559870
6135559870
6135559870 10/05 03:30pm
12345
Calling...
6135559654
6135559870
6135559870
6135559870 10/05 03:31pm
Messages
12345
Inspect
Inspect
i2004 Internet Telephone - User Guide • © 2001 • NTC51.01.03.06 • Version 06-1
Page 31
Page 32

Enhanced Features
Call Park
Your i2004 Internet Telephone allows you to temporarily hold a call so it can be
retrieved from another set with the single press of a softkey even if you do not
know in advance where you will be retrieving the call (see Figure 23).
While on an active call
1. Press the PARK softkey.
The call will be "parked" and the set becomes idle and ready for new callers. The "parked" call is
now ready to be retrieved from any set.
Figure 23
6135559654
6135559870
6135559870
6135559870 10/05
Harry Jones
7259471
Park Privacy
6135559654
6135559870
6135559870
10/05 03:30pm
Inspect Forward DND UnPark
i2004 Internet Telephone - User Guide • © 2001 • NTC51.01.03.06 • Version 06-1
Page 32
Page 33

You can retrieve a parked call just as easily (see Figure 24).
p
K
r
6135559870
When your phone is idle
1. Press the UNPARK softkey.
2. Enter the telephone number of the line where the call was parked.
3. Press the OK softkey.
The primary line will be used to capture the call.
Figure 24
6135559654
6135559870
6135559870
10/05 04:20pm
Forward DND UnPark
Enter digits
6135559654
6135559870
6135559870
UnPark
Enter phone number:
6135559654
6135559870
6135559870
UnPark
Enter phone number
OK Clear Bkspace
6135559654
6135559870
6135559870
6135559870 10/05 03:30
Harry Jones
m
O
Bkspace
i2004 Internet Telephone - User Guide • © 2001 • NTC51.01.03.06 • Version 06-1
Page 33
Inspect Confer Transf
Page 34

Call Pickup
p
i2004 Internet Telephone users that are in the same Call Pickup group can
answer ringing calls from other sets in their pickup group (see Figure 25). The
system administrator establishes these pickup groups. You may want to check
with your system administrator to determine if your set is part of a pickup group
and to determine the other users in your group.
When your phone is idle
1. Lift the HANDSET to use the primary line, or lift the HANDSET and press a LINE key to select
another line.
2. Press the PICKUP softkey.
The incoming call in the pickup group will be routed to your line.
Figure 25
6135559654
6135559870
6135559870
10/05 03:30pm
Inspect Forward DND
Select a line
6135559654
6135559870
6135559870
6135559870 10/05 00:00pm
6135559654
6135559870
6135559870
6135559870 10/05 00:02pm
Harry Jones
7259471
Inspect Confer Transfr
Inspect Forward DND Picku
i2004 Internet Telephone - User Guide • © 2001 • NTC51.01.03.06 • Version 06-1
Page 34
Page 35

Ring Again
g Ag
g
In busy offices, it can be difficult to reach your party without getting a busy signal.
Ring Again will notify you when the number you are trying to call becomes
available (see Figure 26).
While on a "busy" call
1. When you hear the "busy signal", press RINGAGN. The line will be released and the feature
activated.
2. Your display will identify that the feature is activated.
When the line becomes available, a tone through the speaker will notify you,
prompting action to complete the call. If you decide not to complete the call, you
may cancel the Ring Again feature by pressing CNCLRA.
When Ring Again is active
1. Lift the HANDSET, (or press HANDSFREE or HEADSET), and press CALL. The network will
connect you to the party that you have been trying to reach and you will hear the ring back
tone.
Figure 26
6135559870 10/01 11:20am
Inspect RingAgn
6135559870
6135559870
6135559870
6155555654
6135559870
6135559870
6135559870
10/01 11:21am
Ring Again active:
6155555654
Busy...
When your party becomes available
6135559870
6135559870
6135559870
6135559870 10/01 11:40am
6155555654
Rin
Call Exit
6135559870
6135559870
6135559870
6135559870
6155555654
ain
10/01 11:40am
Callin
...
Inspect 0 Calls CnclRa More...
Inspect Confer Transfr
i2004 Internet Telephone - User Guide • © 2001 • NTC51.01.03.06 • Version 06-1
Page 35
Page 36

Privacy and Privacy Release
y
6135559870
6135559870
6135559870
(
)
6135559870
6135559870
y
(
)
Typically, lines in a MADN group can be shared by several users, and more than
one user can access a call at the same time. To ensure privacy on sensitive
calls, the Privacy feature prevents others in your MADN group from joining your
call. Check with your system administrator to determine how your MADN lines
are programmed (see Figure 27).
While on a call
1. Press the PRIVACY softkey.
2. Press the PRIVREL softkey at any time to allow others in your MADN group to join the call.
The Privacy feature deactivates at the end of a call and must be reactivated on
subsequent calls if required.
If your MADN group is programmed as “private” all calls are placed and retrieved
in the Privacy mode. Your MADN group users can join your call if you activate
the Privacy Release feature by pressing the PRIVREL softkey. This feature then
deactivates at the end of a call and must be reactivated on subsequent calls.
Figure 27
6135559654
6135559870
6135559870 10/05 00:02pm
Harry Jones
7259471
Park Privac
6135559654
6135559870
6135559870
Privacy Activated
transient
6135559654
6135559870
6135559870 10/05 00:02pm
Harry Jones
7259471
Park PrivRel
6135559654
6135559870
6135559870
Privacy Released
transient
6135559654
6135559870
6135559870 10/05 00:02pm
Harry Jones
7259471
Park Privac
i2004 Internet Telephone - User Guide • © 2001 • NTC51.01.03.06 • Version 06-1
Page 36
Page 37

Directory Features
Outbox and Redial
Your i2004 Internet Telephone is equipped with an Outbox feature which logs the
last ten dialed numbers. You may access your Outbox list to display and redial
any listed number by using your softkeys. If you subscribe to Caller ID services
from your local service provider, the party's name may also display in your
Outbox records.
Select numbers in your Outbox by using the navigation keys to move throughout
the list, or press the number on your keypad that corresponds with the Outbox
entry and quickly move to that listing in your Outbox. For example, pressing the
number 6 on your dialpad will move to the sixth listing in your Outbox (see Figure
28).
To access your OUTBOX
1. Press OUTBOX – up to three names or numbers will appear on your display.
2. Use your navigation keys to move up or down in the list. When you get to the end of the listed
numbers, your display will show – End of List –
3. The name or number selected will appear in bold text.
4. Press EXIT or press the QUIT key to exit the menus.
You can place a call from your Outbox by pressing the CALL softkey - the caller
selected will be dialed. While viewing your Outbox log, lift the HEADSET or press
HANDSFREE to automatically dial the number selected.
Pressing the View softkey will display the number associated with a na me in
your Outbox list.
Use the AddDir softkey to add the number from your Outbox to your Personal
Directory. See the section called Personal Directory in this User Guide for
additional information regarding editing your Directory.
Pressing Exit will exit the Outbox log and return to an idle state.
i2004 Internet Telephone - User Guide • © 2001 • NTC51.01.03.06 • Version 06-1
Page 37
Page 38

Figure 28
6135559654
6135559870
6135559870
Redial
7259471
7259471
72594717259471
45876
Laura Whitehead
Call View AddDir Exit
6135559654
6135559870
6135559870
Redial
7259471
45876
45876
4587645876
Laura Whitehead
6135559654
6135559870
6135559870
Redial
7259471
45876
Laura Whitehead
Laura Whitehead
Laura WhiteheadLaura Whitehead
Call View AddDir Exit
6135559654
6135559870
6135559870
Redial
2733633
61113
– End of List –
– End of List –
– End of List –– End of List –
Call View AddDir Exit
Call View AddDir Exit
i2004 Internet Telephone - User Guide • © 2001 • NTC51.01.03.06 • Version 06-1
Page 38
Page 39

Call Log
Your i2004 Internet Telephone includes a Call Log, which displays caller
information for recently received calls. The number of calls displayed is
determined by the TPS system. A softkey on your set will identify the number of
callers in your call log, and your screen will display the caller’s name and phone
number and the date and time of the call (see Figure 29).
Each call display will include a phone icon identifying whether the call was
answered
“N” designates a new call while a “V” identifies that the log has been previously
viewed. Each record will include the caller's number (and name if identified) and
date and time of call.
The CALLS softkey will identify the number of unviewed caller records in your
log, (i.e., xxCALLS). Caller records are displayed in the order calls were received
with the most recent caller first. Th e 'more info' icon will display at the bo ttom of
your screen and using your navigation keys will move you through your call log.
The display screen will note the number of times a call was received if multiple
calls were received from the caller. In this case, the 'more info' icon will display
and you must use the navigation keys to move right and left to display the data
for these additional calls for the same caller record. Multiple calls from the same
caller will be sorted with the most recent call first.
or missed and whether the log has been viewed or not. An
When your phone is idle
1. Press the xxCALLS softkey.
2. Use your navigation keys to move through the list of callers.
3. Press QUIT on your set to exit the call log.
i2004 Internet Telephone - User Guide • © 2001 • NTC51.01.03.06 • Version 06-1
Page 39
Page 40

Figure 29
6135559654
6135559870
6135559870
10/27 06:00pm
Inspect 10 Calls Forward More
6135559654
6135559870
6135559870
10 of 10 N
6133333859
Joe Smith
Tue, Oct 26 03:00pm
CallBck Delete Exit More
10/27 06:00pm
2x
Press the More soft key to see
AddDir and BlckDel
6135559654
6135559870
6135559870
09 of 10
6133333859
Linda Jones
Tue, Oct 26 12:22pm
CallBck Delete Exit More
10/27 06:01pm
If you receive an incoming call while viewing your Call Log, answering the call will
automatically exit the Call Log.
You can delete calls from your Call Log by pressing the DELETE softkey. Clear
the entire log by pressing MORE and then the BLCKDEL softkey.
Other softkey options include Call Back and Add to Directory.
Press CALLBCK while viewing the Call Log to place a call to the displayed party.
i2004 Internet Telephone - User Guide • © 2001 • NTC51.01.03.06 • Version 06-1
Page 40
Page 41

In many business environments, the displayed number must be edited before
you are able to complete a call. For example, your telephone system may require
that you dial a "9" to seize a line outside the business' network. You may have to
insert a "1" in the num ber string if the call will be a long distance call.
Edit the displayed number by using your navigation keys to move the cursor
throughout the number displayed. Pressing digits on your dialpad will insert digits
in the number string to the left of the cursor. Pressing the ERASE softkey will
remove the character above the cursor in the number string.
Then, originate the call by pressing DIAL (an available line will be automat ically
seized), lifting your handset (an available line will be seized), or pressing
HEADSET or HANDSFREE.
Pressing CANCEL will return you to the Call Log without placing a call to the
displayed number.
Easily add numbers to your personal directory while viewing your Call Log. Press
MORE, then ADDDIR and an entry will be included in your personal directory
which contains the name and number displayed in your Call Log. See the
Personal Directory section of this guide for additional information regarding
editing your directory records.
i2004 Internet Telephone - User Guide • © 2001 • NTC51.01.03.06 • Version 06-1
Page 41
Page 42

Personal Directory
Your i2004 Internet Telephone is equipped with a Personal Directory which is
accessed by pressing the DIRECTORY key on your set. Because your Personal
Directory is stored on the server that manages your i2004 system, your directory
is saved even if your set loses power.
Numbers are listed in your Directory in alphabetic order by the first name
entered. If your administrator has defined a directory assistance number, then
the first listing will be ‘TPS directory.’ This listin g represents the directory
assistance number defined by your administrator. Display your Directory entries
by pressing the navigation keys, or press the number on your dialpad which
corresponds with the first letter of your party's first name. For example, pressing
'4' will jump to the listings in your directory beginning with the letter 'G'.
While numbers from your Outbox and Call Log can be quickly added to your
Directory using the AddDir softkey, the Directory can also be updated manually
(see Figure 30).
To update your DIRECTORY
1. Press DIRECTORY – the first listing in your directory will display.
2. Press New.
3. Enter the name by pressing the corresponding numbers on your keypad.
4. Press OK.
5. Enter the telephone number associated with your Directory entry.
6. Press SAVE to save your changes.
If you make a mistake while entering the name or telephone number, use the
navigation keys to move forward or backward to edit the existing entry.
The numeric keys on your dialpad are associated with the letters of the alphabet.
Additionally, press '1' for the following characters: comma, dash, apostrophe,
ampersand, period, and the number 1. Press the '0' key to enter a space.
i2004 Internet Telephone - User Guide • © 2001 • NTC51.01.03.06 • Version 06-1
Page 42
Page 43

Figure 30
K
K
6135559870
6135559870
Directory
TPS Directory
6785559328
Chuck Jones
Call Edit Delete New
Add Entry
Enter Name
05/23 10:20am
6135559870
6135559870
05/23 10:21am
Add Entry
Enter Name
Heather Chute
O
Add Entry
Enter Number
6785556119
Erase Cance
6135559870
6135559870
05/23 10:22am
6135559870
6135559870
05/23 10:22am
O
Erase Cancel
Save Erase Cancel
While viewing your directory you may edit entries using the softkeys available in
the same manner as you would enter new directory listings. Use your navigation
keys to move the blinking cursor within the text or number displayed to insert
new numbers or letters in the saved directory listing.
To edit your DIRECTORY
1. Select the listing that needs editing by using your navigation keys – the selected entry will
appear in bolded text.
2. Press EDIT.
3. The listed name will display first. Press OK if the entry is correct. If changes are required,
move the blinking cursor to left of the character that needs changing. Press ERASE to
remove digits from the listing, or press the appropriate key on your dialpad to add digits.
4. Press OK. The phone number associated with the listing will be displayed.
5. Make changes to the number listed, or press OK if the entry is correct.
6. Press SAVE to save your changes.
i2004 Internet Telephone - User Guide • © 2001 • NTC51.01.03.06 • Version 06-1
Page 43
Page 44

Abbreviated Dialing
The Personal Directory available with your i2004 Internet Telephone makes
abbreviated dialing simple. Because your directory lists names as well as
numbers, there are no codes to remember.
Remember the numbers listed in your Directory appear in alphabetic order (see
Figure 31).
To dial a number listed in your directory
1. Press the DIRECTORY key on your set – the first listing in your directory will display.
2. Press the 'down' navigation key to select the appropriate directory listing, or press the number
on your dialpad which corresponds with the first letter in the directory listing you wish to dial.
Your selected listing will appear in bolded text.
3. When the directory listing is selected, press CALL – an available line will be seized and your
call completed.
4. Press END to disconnect your active call.
Figure 31
6135559870
6135559870
6135559870
Directory
TPS Directory
Chuck Jones
Harry Jones
Heather Chute
Call Edit Exit More
Directory
TPS Directory
Chuck Jones
Harry Jones
Heather Chute
Call Edit Exit More
05/23 3:16pm
6135559870
6135559870
6135559870
05/23 3:16pm
6135559870
6135559870
6135559870
6135559870
Harry Jones
7259471
Inspect Confer Transfr
Press the More soft key to see
New, Delete and View soft keys.
05/23 3:16pm
Calling...
i2004 Internet Telephone - User Guide • © 2001 • NTC51.01.03.06 • Version 06-1
Page 44
Page 45

Speed Call
You can also assign 1- and 2-digit codes to specific numbers to make speed
calling even more efficient. Your i2004 Internet Telephone uses softkeys to make
this task simple (see Figure 32).
When your phone is idle
1. Press SPDCALL.
2. Enter an available 'speed dial code' – this will be the number(s) you dial to place a call to your
party.
3. Press OK – you will be prompted to enter the phone number you want to associate with this
code.
4. Press OK to save your entries.
To delete a Speed Call assignment
1. Press SPDCALL.
2. Enter the 1- or 2-digit speed call code you wish to remove.
3. Press DELETE.
Figure 32
6135559654
6135559870
6135559870
10/27 03:40pm
Inspect 0 Calls SpdCall More
6135559654
6135559870
6135559870
10/27 03:40pm
Speed Call
Enter Speed Call Code
OK Delete
6135559654
6135559870
6135559870
10/27 03:40pm
Speed Call
Enter Speed Call Number
Pause
6135559654
6135559870
6135559870
10/27 03:40pm
Speed Call
Enter Speed Call Number
OK BkSpc Pause
i2004 Internet Telephone - User Guide • © 2001 • NTC51.01.03.06 • Version 06-1
Page 45
Page 46

Now that your set is programmed, placing a call with Speed Call is simple.
When your phone is idle
1. Lift the handset (or press HEADSET or HANDSFREE).
2. Press the SPDCALL softkey.
3. Press the 1- or 2-digit code assigned to the party you wish to call.
4. Press OK. Your call will be placed.
Your display will show the number called, preceded by the speed dial code.
i2004 Internet Telephone - User Guide • © 2001 • NTC51.01.03.06 • Version 06-1
Page 46
Page 47

Services
You can customize several settings on your i2004 Internet Telephone through
the Services function. Pressing SERVICES accesses a series of nested menus
which allows you to view Firmware and set information and change the set's
language, time zone, display appearance, and other phone options.
When your phone is idle
1. Press SERVICES on your set – the first level of the nested menus will appear on your display.
2. Use your navigation keys to move up or down in the list of services. When you get to the end
of the listed options, your display will show – End of List –. Press the right navigation key to
view an explanation of the option.
3. The option selected will be highlighted. Once you find the service or option you wish to edit,
press the SELECT softkey.
4. After making your change, press OK to save the edits.
5. Press EXIT or press the QUIT key to exit the menus.
The services available are:
• Language
• Phone Options
• Session
• Network Info
• Display Format
See the remaining sections in this guide for information on changing a specific
option.
i2004 Internet Telephone - User Guide • © 2001 • NTC51.01.03.06 • Version 06-1
Page 47
Page 48

Changing Language
Your i2004 Internet Telephone is equipped to display commands and other
screen options in two different languages; English and French. The Services
menu allows you to change the default language used by your set.
When your phone is idle
1. Press SERVICES – the first level of the nested menus will appear on your display.
2. Use your navigation keys to choose Language.
3. Press SELECT.
4. Use your navigation keys to choose the appropriate language – your selection will appear in
bolded text. Press OK
5. Press OK to 'reset' your set with the new option, or press CANCEL to cancel your change.
i2004 Internet Telephone - User Guide • © 2001 • NTC51.01.03.06 • Version 06-1
Page 48
Page 49

Changing Phone Options
The Phone Options menu in Services allows you to customize the display and
ringing of your i2004 Internet Telephone. Menu options include: Display
Contrast, Time Zone, Timed Display and Incoming Call Alert.
To change Display Contrast
1. Press SERVICES.
2. Use your navigation keys to choose Phone Options and press SELECT.
3. Use your navigation keys to choose Display Contrast and press SELECT.
4. Use your left and right navigation keys to decrease or increase the display's contrast levels.
5. Press OK to save your changes.
The display on your i2004 Internet Telephone displays the current time.
Choosing the correct time zone will ensure your display includes the correct time.
To change Time Zone
1. Press SERVICES.
2. Use your navigation keys to choose Phone Options and press SELECT.
3. Use your navigation keys to choose Time Zone and press SELECT.
4. Use your up and down navigation keys to choose the correct time zone for your geographic
area – your selection will appear in bolded text.
5. Press OK to save your changes.
The Timed Display option is available on your i2004 Internet allows you to
change the amount of time a transient message is displayed on your set's
screen.
To change Timed Display
1. Press SERVICES.
2. Use your navigation keys to choose Phone Options and press SELECT.
3. Use your navigation keys to choose Timed Display and press SELECT.
4. Use your up and down navigation keys to increase or decrease the amount of time you want
transient messages to display on your set – your selection will appear in bolded text.
5. Press SAVE to save your changes.
i2004 Internet Telephone - User Guide • © 2001 • NTC51.01.03.06 • Version 06-1
Page 49
Page 50

Users of the i2004 Internet Telephone can choose the way the phone identifies
incoming calls. Available options include typical ringing, a single burst tone, or no
audible indication at all.
To change Incoming Call Alert
1. Press SERVICES.
2. Use your navigation keys to choose Phone Options and press SELECT.
3. Use your navigation keys to choose Incoming Call Alert and press SELECT.
4. Use your up and down navigation keys to choose the appropriate option – your selection will
appear in bolded text.
5. Press SAVE to save your changes.
i2004 Internet Telephone - User Guide • © 2001 • NTC51.01.03.06 • Version 06-1
Page 50
Page 51

Using Session Features
The Session menu in Services provides for logging off your i2004 Internet
Telephone, resetting the telephone terminal, and establishing a new password or
changing an existing password.
To Log Out
1. Press SERVICES.
2. Use your navigation keys to choose Session and press SELECT.
3. Use your navigation keys to choose Log Out and press SELECT.
4. Press OK to save your changes – your set will display "Enter the DNKey". Pressing CANCEL
will discard the request and return your set to idle.
Resetting your i2004 Internet Telephone will un-register the set with your system
software, then re-register using the previously identified DNKey. This feature
may be useful if your set becomes unstable.
To Reset
1. Press SERVICES.
2. Use your navigation keys to choose Session and press SELECT.
3. Use your navigation keys to choose Reset and press SELECT.
4. Press OK to save your changes or press CANCEL to discard the request and return to idle.
i2004 Internet Telephone - User Guide • © 2001 • NTC51.01.03.06 • Version 06-1
Page 51
Page 52

Setting or Changing your Password
To establish a password
1. Press SERVICES.
2. Use your navigation keys to choose Session and press SELECT.
3. Use your navigation keys to choose Change Password and press SELECT.
4. Enter your selected password using the keys on your dialpad – your password may contain
only numeric characters.
5. Press OK.
6. Enter your selected password again to confirm.
7. Press SAVE – if both entries were correct, your password will be saved.
To change a password
1. Press SERVICES.
2. Use your navigation keys to choose Session and press SELECT.
3. Use your navigation keys to choose Change Password and press SELECT.
4. Enter your existing password using the keys on your dialpad.
5. Enter a new password by using the keys on your dialpad – your password may contain only
numeric characters.
6. Press OK.
7. Enter your selected password again to confirm.
8. Press SAVE – if both entries were correct, your password will be saved.
i2004 Internet Telephone - User Guide • © 2001 • NTC51.01.03.06 • Version 06-1
Page 52
Page 53

Viewing Network Info
The Network Info menu provides the user with specific information about the
i2004 Internet Telephone, including the terminal address, TPS address, and
firmware version.
The terminal address information contains the public IP address and port
(labeled Pub and separated by a colon), the private IP address (labeled Priv) and
the MAC address (labeled MAC).
To view Terminal Address
1. Press SERVICES.
2. Use your navigation keys to choose Network Info and press SELECT.
3. Use your navigation keys to choose Terminal Address and press SELECT.
4. Press EXIT when you have completed viewing the information.
The TPS address information contains the TPS's virtual IP address and listening
port (labeled IPv and separated by a colon), the physical IP address (labeled
IPp), and the software version (labeled Version).
To view TPS Address
1. Press SERVICES.
2. Use your navigation keys to choose Network Info and press SELECT.
3. Use your navigation keys to choose TPS Address and press SELECT.
4. Press EXIT when you have completed viewing the information.
The last option available in the Network Info menu is Firmware Version.
To view Firmware Version
1. Press SERVICES.
2. Use your navigation keys to choose Network Info and press SELECT.
3. Use your navigation keys to choose Firmware Version and press SELECT.
4. Press EXIT when you have completed viewing the information.
i2004 Internet Telephone - User Guide • © 2001 • NTC51.01.03.06 • Version 06-1
Page 53
Page 54

Changing Display Formats
Users can change the format of time and date displays on the i2004 Internet
Telephone.
Time displays include a 12-hour clock, twenty-four-hour clock and French time
format.
Date displays include the month appearing in text or numeric form in the
following formats: MM/DD, DD/MM, Mon DD and DD Mon.
To change Time Format
1. Press SERVICES.
2. Use your navigation keys to choose Display Format and press SELECT.
3. Use your navigation keys to choose Time Format and press SELECT.
4. Available formats will be displayed – use your navigation keys to choose a new format – your
selection will appear in bolded text.
5. Press OK to save your changes, or press Exit to cancel.
To change Date Format
1. Press SERVICES.
2. Use your navigation keys to choose Display Format and press SELECT.
3. Use your navigation keys to choose Date Format and press SELECT.
4. Available formats will be displayed – use your navigation keys to choose a new format – your
selection will appear in bolded text.
5. Press OK to save your changes, or press Exit to cancel.
i2004 Internet Telephone - User Guide • © 2001 • NTC51.01.03.06 • Version 06-1
Page 54
 Loading...