

Avaya i20 Installation & Quick Start Manual

IP Telephony
Contact Centers
Mobility
Services
Avaya Distributed Office i120 Installation Quick Start
03-602289
Issue 1
May 2007
This document contains the information that you need to start using
your Avaya Distributed Office in the shortest possible time.
1.What to check before you install your Avaya Distributed Office.
2.Mount your Avaya Distributed Office.
3.Ground your Avaya Distributed Office.
4.Connect your Avaya Distributed Office to your telephones,
computers, and network. See the Installation Poster.
Connect your computer to the Services port on the AM110, using
an Ethernet cable.
5.Power up your Avaya Distributed Office.
- The PWR LED and the CPU LED on the front panel illuminate to
indicate that the installation is successful.
6.Configure. Point your Web browser to https://192.11.13.6
.
Congratulations! You are now ready to use your i120. For more
information on how to leverage the system, see the Avaya Distributed
Office Document Map.

avaya.com
2
Check
Safety
Before you start the installation, refer to the following
safety information
• Grounding. Refer to “General grounding
requirements” on page 5
• Rack mounting. Refer to “Mounting your i120 in a
rack” on page 3
Installation location
When deciding where to position the i120, ensure
that:
• It is accessible and cables can be connected easily.
• Cabling is away from sources of electrical noise
such as radio transmitters, broadcast amplifiers,
power lines and fluorescent lighting fixtures.
• Water or moisture cannot enter the case of the
i120.
• There is a free flow of air around the i120 and the
vents in the sides of the case are not blocked.
Required equipment
Prepare the tools you need to mount the i120
according to the following table:
Unpack
The Avaya Distributed Office i120 is shipped with the
following items. If any items are missing or damaged,
contact your supplier. Retain the packaging in case
you need to ship the i120.
Four rubber feet
One Grounding
Cable Assembly
Power Cord (drawing shows US
power cord)
To mount on... Prepare these tools
Table Stylus to fix the feet.
Rack or wall Phillips head screwdriver.
Flat wall Screws to fasten i120 to the
wall.
Uneven wall • Plywood board: 16.3” x
18.3”, 0.8” thick (415 x
465 mm, 20 mm thick).
• Wood screws.
• Screws to fasten the i120 to
the board.
• You might also need wire cutters to attach the
grounding conductors, if your site uses a ground
block.
• To configure your i120, you will need a computer
with a screen resolution of 1024x768 pixels or
higher and either Internet Explorer 6.0 or higher or
Mozilla Firefox 1.5 or higher.
Nine 5/16"
(8 mm) Flat-Head
Screws
Two mounting
brackets
One mounting
racket with cable
holder
Jumper for
NVRAM init.
• Getting Started with your Distributed
Office i120, 03-602018 (this document)
• Troubleshooting Tips for Avaya Distributed Office,
03-602028.
• Unleash the Full Potential of Avaya Distributed
Office, 03-602022.
• Documentation Map for Avaya Distributed Office,
03-602021
• Quick Reference Guide for Avaya Distributed
Office voice mail, 03-602108.
• Avaya Distributed Office Documentation CD,
03-602138.
• Profiles for Avaya Distributed Office DVD
• Ensure that the rack is bolted to the floor and is
earthquake protected, if required. If the rack is not
securely fixed in place, do not continue with the
installation.
• If you are mounting your i120 is in a rack with other
equipment already installed, position the i120 to
avoid imbalance.
You can attach mounting brackets without cable
guides to:
• Each side of the front of the i120, so that the front
of the i120 is flush with the rack.
• The middle of each side panel of the i120, so that
the i120 projects forward from the rack.
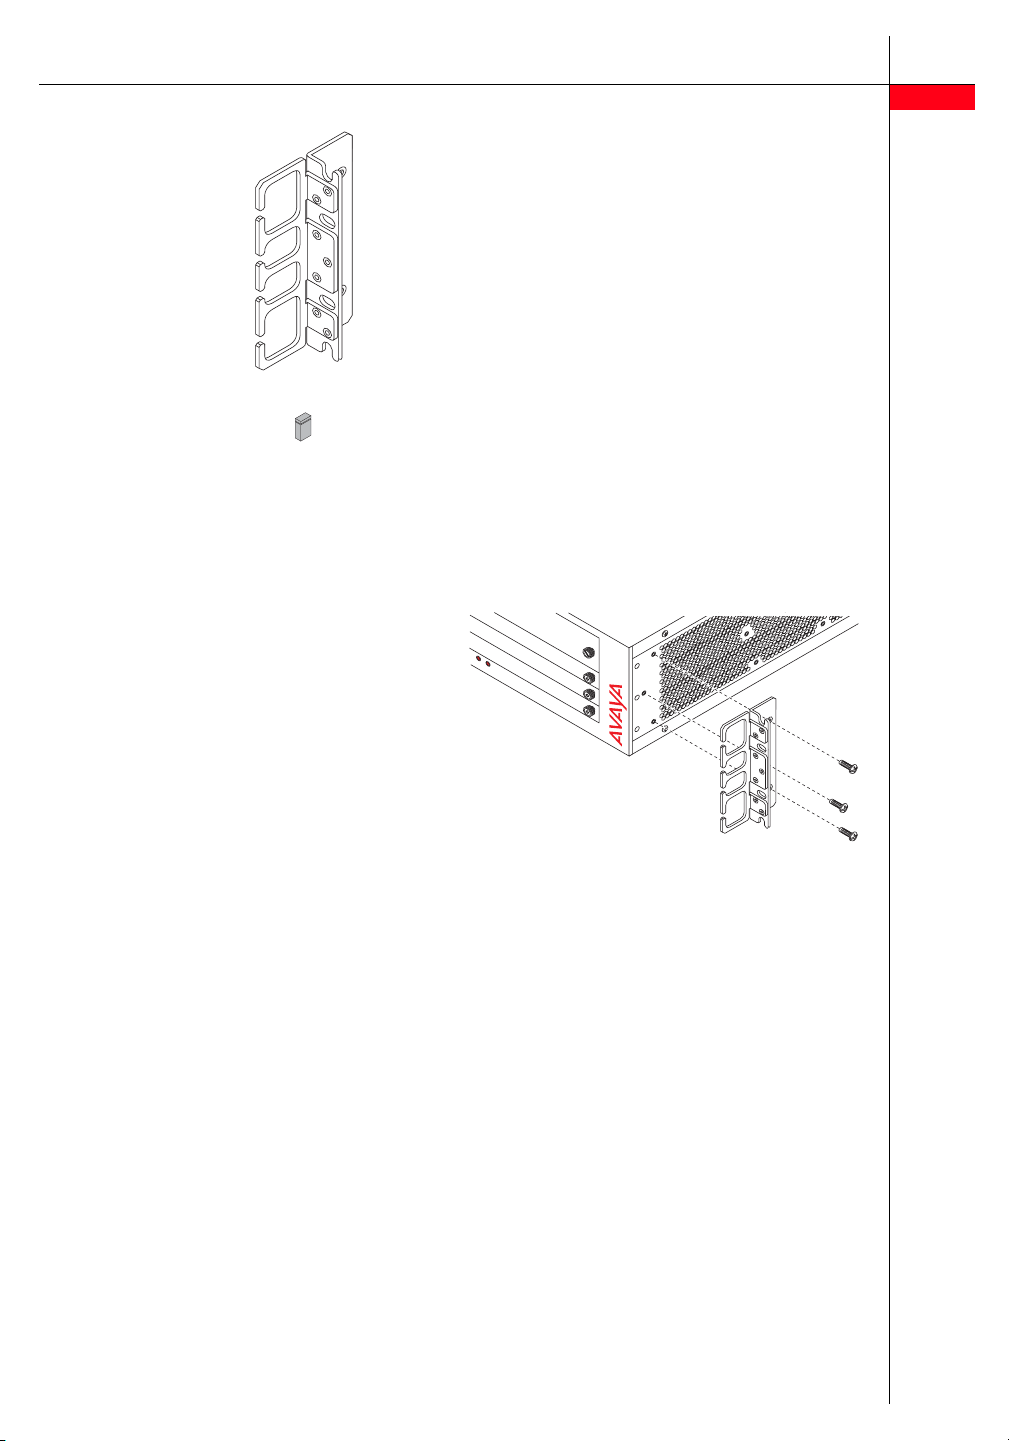
You can attach a mounting bracket with cutouts that
guide cables to the side of the i120. These cutouts
provide easier access to the front panel and help you
manage the placement of the cables.
RST
ASB
i120
Distributed
Office
3
Mount
Placing your i120 on a table
To install the i120 as a tabletop unit, you must attach
the provided rubber feet to the underside of the i120.
1. Remove the four feet from the packaging.
2. Turn the i120 upside down.
- Ensure the base of the i120 is clean.
3. Peel the feet off the backing sheet.
4. Position each foot into one of the mounting sites,
near each corner of the i120.
5. Press each foot firmly so that it adheres strongly to
the i120.
Mounting your i120 in a rack
You can mount the i120 in a standard 19-inch rack.
Note: The i120 can weigh up to 41 pounds (18.7 kg).
Two people may be needed to mount the i120 in the
rack.
You must attach the supplied mounting brackets to the
front or the middle of the i120.
• To rack-mount the i120 at the front, attach one
regular bracket and the bracket with cable guides.
• To rack-mount the i120 at the middle:
1 Attach two regular mounting brackets on the
sides of the chassis in the mid-mount position
2 Attach the mounting bracket with the cable
guides to the front of the chassis.
 Loading...