

Page 1

Part No. 212687-A
February 2002
4401 Great America Parkway
Santa Clara, CA 95054
How to Use the Wall-Mounting Brackets Kit
*212687-A*
Page 2

Copyright © 2001 Nortel Networks
All rights reserved. February 2002.
The information in this document is subject to change without notice. The
statements, configurations, technical data, and recommendations in this
document are believed to be accurate and reliable, but are presented without
express or implied warranty. Users must take full responsibility for their
applications of any products specified in this document. The information in
this document is proprietary to Nortel Networks NA.
Trademarks
NORTEL NETWORKS is a trademark of Nortel Networks.
Nortel Networks is a trademark of Nortel Networks.
All other trademarks and registered trademarks are the property of their
respective owners.
Statement of Conditions
In the interest of improving internal design, operational function, and/or
reliability, Nortel Networks NA Inc. reserves the right to make changes to the
products described in this document without notice.
Nortel Networks NA Inc. does not assume any liability that may occur due to
the use or application of the product(s) or circuit layout(s) described herein.
2
Page 3

Introduction
The optional wall-mounting brackets kit provides you with an
alternate method of installing your Nortel Networks* module.
Contact your Nortel Networks representative for information
about which Nortel Networks products use the wall-mounting
brackets.
This guide includes information about the following topics:
• “Before you begin,” next
• “Package contents” on page 4
• “Installing the module on a wall” on page 5
• “Installing a single module” on page 6
• “Installing two modules” on page 8
• “Attaching the module to the wall” on page 10
• “How to get help” on page 12
Before you begin
Make sure the area where you will install and use the module
meets these environmental requirements:
• Ambient temperature between 41° and 104° F
(5° and 40° C)
• Relative humidity between 5% and 85% noncondensing
• No nearby heat sources such as hot air vents or direct
sunlight
• No nearby sources of severe electromagnetic noise
3
Page 4
• No excessive dust
• Adequate power source within six feet; one 15-Amp circuit
required for each power supply
• At least 2 inches (5.08 cm) on each side of the switch unit for
ventilation
• Adequate space at the front and rear of the switch for access
to cables
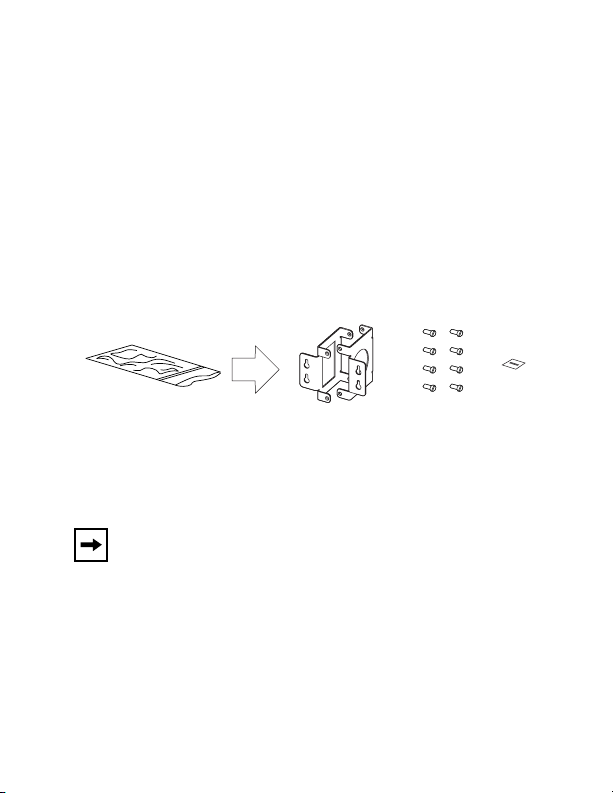
Package contents
10631FA
Wall-mounting hardware:
• Wall-mount brackets
• Screws for attaching brackets to the switch
• Safety cover to use with a cascade module in a wall installation
Note: Nortel Networks does not include screws for
attaching the module to a wall. Because wall
compositions vary at different sites, Nortel Networks
recommends that an experienced maintenance person
choose the appropriate wall-mounting hardware to install
the module safely.
4
Page 5

Installing the module on a wall
Required tools and material:
• Phillips screwdriver for attaching brackets to the module
• Four screws appropriate to the composition of the wall where
you will install the module
• Screwdriver appropriate to your wall-mounting hardware for
attaching the module to the wall
• (Recommended) sheet of 1/2-inch plywood attached to the
wall where you will install the module
• Expanding wall anchors if you are installing the module on a
hollow wall
• (Optional) drill for making pilot holes in the wall
• Plastic cable clamps to route and support the port cables after
you install the switch
Be aware of the following considerations when you plan the wall
installation:
• To install two modules, remember to consider their combined
weight.
• Attached cables increase the weight of the installation, and
the accumulated weight of these cables increases with the
height of the mounting location.
• Place the module at a height that allows you to see the LEDs.
• Remove any installed rack-mount brackets or rubber
footpads from the module.
5
Page 6

Installing a single module
Note: The bracket with the round opening goes on the
right side of the module, where the round fan vents are
located.
1 Slip a bracket over each side of the module with the bracket
tabs against the recessed mounting holes on the bottom of
the switch.
9754FA
6
Page 7

2 Fasten the brackets to the module, using two flathead screws
in each bracket.
9758FA
To complete the module installation, go to “Attaching the
module to the wall” on page 10.
7
Page 8

Installing two modules
Note: The bracket with the round opening goes on the
right side of the module, where the round fan vents are
located.
1 Set each bracket with the top tabs of the bracket against the
recessed mounting holes in the bottom of one module.
9759FA
2 Fasten the brackets to the bottom of the module, using two
flathead screws in each bracket.
9760FA
8
Page 9

3 Set the second module on its back panel. Slide the first
module with attached brackets over the second module.
9761FA
4 Using two flathead screws in each bracket, fasten the
brackets to the bottom of the second module.
9762 FA
9
Page 10

Attaching the module to the wall
Note: Attach the module to the wall with the front
panel facing up. Any other position compromises safety
standards.
1 Using the dimensions of the module you intend to mount,
drill pilot holes in the wall for the mounting screws.
a
b
9763EA
2 Insert the mounting screws partway into the wall.
9764FB
10
Page 11

Note: If you are attaching the module to a hollow wall,
use expanding wall anchors.
3 Set the module in place over the screws. Tighten the screws
to secure the module to the wall.
4 Attach network cables. Use plastic cable clamps to support
the cables and route them away from fans and vents on the
switch.
Do not let cables hang freely from the port connectors. The
weight of these cables can damage the connectors.
11
Page 12

How to get help
If you purchased a service contract for your Nortel Networks
product from a distributor or authorized reseller, contact the
technical support staff for that distributor or reseller for
assistance.
If you purchased a Nortel Networks service program, contact one
of the following Nortel Networks Technical Solutions Centers.
Technical Solutions Center Telephone
EMEA (33) (4) 92-966-968
North America (800) 2LANWAN or (800) 252-6926
Asia Pacific (61) (2) 9927-8800
China (800) 810-5000
An Express Routing Code (ERC) is available for many Nortel
Networks products and services. When you use an ERC, your
call is routed to a technical support person who specializes in
supporting that product or service. To locate an ERC for your
product or service, go to the www12.nortelnetworks.com/ URL
and click ERC at the bottom of the page.
12
 Loading...