

Page 1

CallPilot.
TM
Release 2.0
Desktop Messaging User Guide
for Novell GroupWise
Page 2

Updates to the
Desktop Messaging User Guides
Internet Clients
Page 3 Call the sender of a message
Call the sender of a message is not supported.
Page 4 About this guide
The internet mail clients that are supported are:
• Microsoft Outlook 98 (Corporate Mode)
• Microsoft Outlook 2000
• Microsoft Outlook 2002 (XP)
• Lotus Notes - 5.x and 6.x
• GroupWise - 6.x
Unified Messaging on Business Communications Manager also supports:
• Microsoft Outlook Express - 5.x
• Microsoft Outlook Express - 6.x
• Microsoft Outlook 98 (Internet Mail Mode)
• Microsoft Outlook 2000 (Internet Mail Mode)
• Microsoft Outlook 2002 (XP) (Internet Mail Mode)
• Netscape Messenger (Netscape Communicator) - 4.7x
• Netscape Messenger (Netscape Communicator) - 6.2x
• Netscape Messenger (Netscape Communicator) - 7.0x
• Qualcomm Eudora Pro - 5.x
Page 3
settings
My CallPilot is not supported.
Page 6 CallPilot Player
The Call the sender button is not available.
Page 10 Linking to My CallPilot
Linking to My CallPilot is not supported.
Page 11 Addressing messages
When you address messages from internet mail clients the open VPIM messaging format
described in the online help is not supported. To address messages to remote sites use the
format:
Access web-based My CallPilot to view user information and change your feature
<Remote SMTP/VPIM prefix><Remote Mailbox>@LocalCallPilotServer
For example: 14165557171@CallPilot.MyOrg.com
Where 1416555 is the VPIM prefix of the remote site, 7171 is the mailbox on the remote site,
and CallPilot.MyOrg.com is the FQDN of the local CallPilot.
Business Communications Manager & CallPilot 100/150
Page 3

About forwarding Desktop Messaging messages
Do not use the right-click menu to forward a Desktop Messaging message. To forward a message, either:
• open the message and forward it from the CallPilot window
or
• for Outlook, select the message in the Outlook Inbox and forward it from the Outlook toolbar.
About viewing faxes
Imaging for Windows, which can be used as a fax viewer, is installed by default on Windows 95B, Windows 98,
Windows NT, and Windows 2000 operating systems. But if you use Windows XP, Imaging for Windows is not
included unless you have installed it. Ask your system administrator whether you have Imaging for Windows
installed on your system.
If you use a Windows XP system and you do not have Imaging for Windows installed, you can view faxes in the
default Windows XP fax viewer by double-clicking the fax. You can create one fax image at a time by using the
fax driver.
Outlook, Lotus Notes, Groupwise
Page 3 Call the sender of a message
Call the sender of a message is not supported.
Page 3
Access web-based My CallPilot to view user information and change your feature settings
My CallPilot is not supported.
Page 6 CallPilot Player
The Call the sender button is not available.
Page 10 Composing fax and text messages
On the Compose Fax dialog box you can use the Subject field to add additional information to the fax cover page,
for example the name of the recipient, when you send a fax directly to a fax machine. The maximum length you
can enter in the Subject field is 80 characters.
Page 11 Calling the sender of a message
Calling the sender of a message is not supported.
Page 12 Setting message options
Delivery Receipt is not supported.
Page 14 Personal distribution lists
Group Lists are the equivalent of Personal Distribution Lists. Group Lists can be created by the system
administrator only. Group Lists appear in the server address book with the letters "GL" after the group list name
and cannot be created from the telephone.
Page 19 Linking to My CallPilot
Linking to My CallPilot is not supported.
1-800-4 NORTEL
www.nortelnetworks.com
Printed in Canada
18 September 2003
Page 4

Contents
Welcome to CallPilot . . . . . . . . . . . . . . . . . . . . . . . . . . . . . . . . . . .3
Getting started . . . . . . . . . . . . . . . . . . . . . . . . . . . . . . . . . . . . . . . .4
Logging in . . . . . . . . . . . . . . . . . . . . . . . . . . . . . . . . . . . . . . . . . . .5
Working with your CallPilo t messages . . . . . . . . . . . . . . . . . . . . . .6
Playing voice messages . . . . . . . . . . . . . . . . . . . . . . . . . . . . . . . .7
Viewing fax messages . . . . . . . . . . . . . . . . . . . . . . . . . . . . . . . . . .8
Composing voice messages . . . . . . . . . . . . . . . . . . . . . . . . . . . . .9
Composing fax and text messages . . . . . . . . . . . . . . . . . . . . . . .10
Calling the sender of a message . . . . . . . . . . . . . . . . . . . . . . . . .11
Forwarding and replying to messages . . . . . . . . . . . . . . . . . . . . .11
Adding attachments to messages . . . . . . . . . . . . . . . . . . . . . . . .12
Setting message options . . . . . . . . . . . . . . . . . . . . . . . . . . . . . . .12
Addressing messages . . . . . . . . . . . . . . . . . . . . . . . . . . . . . . . . .13
Personal distribution list s . . . . . . . . . . . . . . . . . . . . . . . . . . . . . . .14
Changing your mailbox settings . . . . . . . . . . . . . . . . . . . . . . . . . .15
Changing mail delivery settings . . . . . . . . . . . . . . . . . . . . . . . . . .16
Changing your address book settings . . . . . . . . . . . . . . . . . . . . .17
Changing audio settings . . . . . . . . . . . . . . . . . . . . . . . . . . . . . . .18
Linking to My CallPilot . . . . . . . . . . . . . . . . . . . . . . . . . . . . . . . . .19
Working offline . . . . . . . . . . . . . . . . . . . . . . . . . . . . . . . . . . . . . . .20
Document information . . . . . . . . . . . . . . . . . . . . . . . . . . . . . . . . .21
2
Page 5

Welcome to CallPilot
CallPilot from Nortel Networks is an advanced business
communications system that offers exceptional flexibility for
managing your messaging needs.
You can work with CallPilot from your telephone or your computer.
Desktop Messaging gives you access to your CallPilot mailbox
through your Novell GroupWise e-mail. Here are some of the many
ways you can use CallPilot with your e-mail:
Listen to voice messages.
View and print fax messages.
Record and send voice messages.
Create and send fax messages.
Forward and reply to voice and fax messages.
Call the sender of a message.
Add message options such as urgent and private.
Add voice, fax, or text file attachments to messages.
Create personal distribution lists.
Change your CallPilot password.
Access web-based My CallPilot to view user information
and change your feature settings.
Some features mentioned in this guide may not be available for
your CallPilot mailbox. For details, refer to the
Feature availability
topic in the Desktop Messaging online Help, or ask your
administrator.
3
Page 6

Getting started
About this guide
This user guide is an overview of how to use CallPilot with your Novell GroupWise
e-mail.
The instructions and sc reen imag es sho w n in th is gu ide p rov ide g ener a l information for
using CallPilot w ith your e-m ail. Specific details ma y vary depen ding on yo ur computer’s
operating sy s te m an d t he features available for your CallPilot mailbox.
For further assistance in using CallPilot, refer to the Desktop Messaging online Help.
What you need
Before you start to use CallPilot, your administrator ensures that your e-mail account is
correctly configured for CallPilot. Your computer must be set up according to the
followi ng requirements:
CallPilot Player to play and record voice messages
Microsoft Imaging for Windows or other imaging software to view faxes
Nortel Fax Driver to create faxes
Novell GroupWise 5.5 or 6.x groupware e-mail client
Windows 95 B, Windows 98 SE, Windows 2000 Professional, Windows XP,
Windows NT4 SP6a
Monitor with 256-color 800 x 600 capability
15 Mbytes of free disk space to install software
Sound card and speakers for playing voice messages on your computer
A microphone connected to your computer, or a telephone situated near your
computer , for recording voice messages
A LAN (Ethernet) connection to the CallPilot server
ISDN, ADSL, or dial-up modem connection for accessing CallPilot messages
Internet Explorer 5.x and 6. x; or Net scape 6.2x and ab ov e, t o access My CallPil ot
4
Page 7
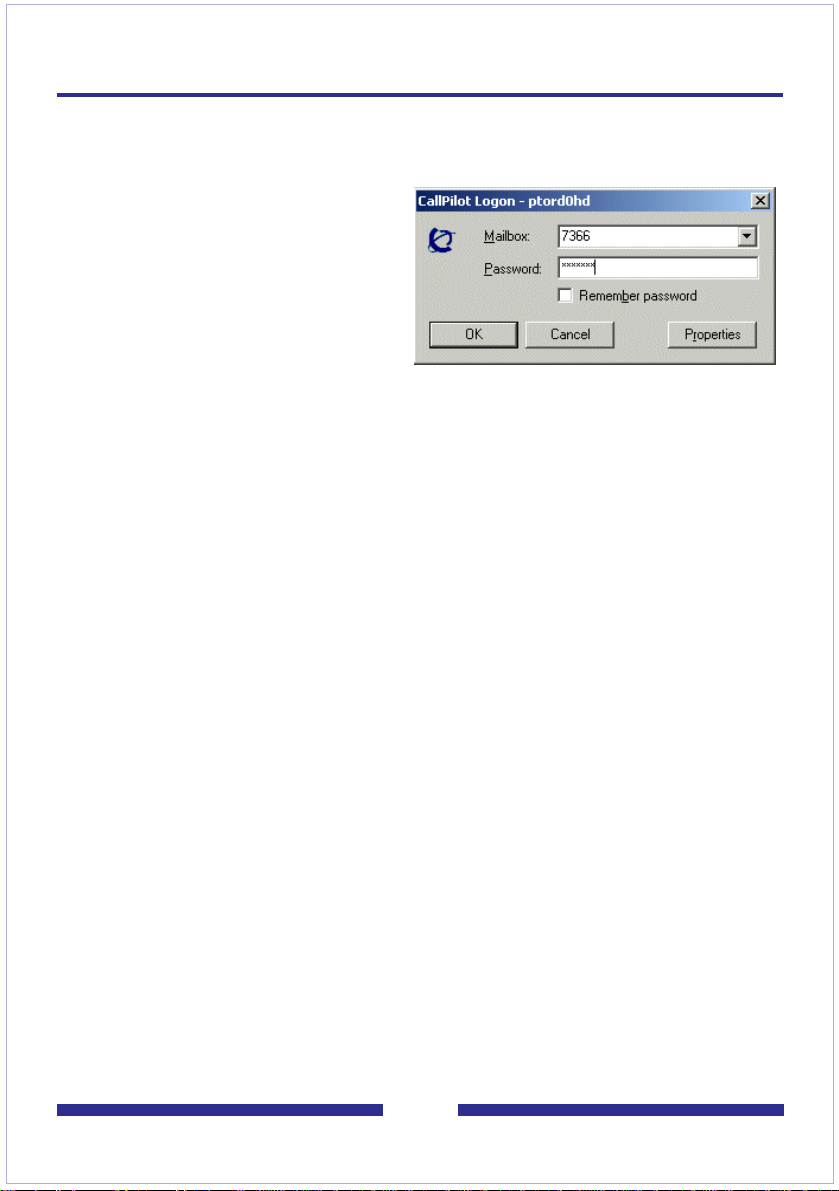
Logging in
When you log i n to your e-mail, you can log in to CallPilot at the same t im e .
To log in from Novell GroupWise
1 Open your Nove ll Gr oup Wis e
e-mail. The CallPilot Logon
dialog box appears.
2 In Mailbox, type or select your
mailbox number.
3 In Passwo rd, type y our CallPilot
password.
4 Check Remember password if
you want CallPilot to log in
automatically.
5 Click OK.
Note: Do not leave the Remember password box checked on a shared computer.
To log out
When you exit Novell GroupWise, you automaticall y log out from CallPilot.
Remote login
You can log in to your mail bo x fro m an y com puter th at has C allPi lot ins tall ed and
configured in the same way as your office computer. For example, you can use a
computer set up for guest access, or your home computer with a dial-up connection to
the server.
5
Page 8

Working with your CallPilot messages
When you open your e-mail with CallPilot installed, your CallPilot messages appear in
the CallPilot De sktop Messaging folder.
Your CallPilot Inbox
New
message
Urgent
message
Note: If necessary, adjust your screen resolution so that the CallPilot New Message
icon is visible on the GroupWise toolbar.
To check for new messages
The CallPilot message waiting indicator on your screen turns red when you have
a new mess ag e. To turn the indicator o n o r o ff, see Changing mail delivery
settings, page 16 . Ne w mess age s appe ar in bold .
To open a message
To open a CallPilot message, double-click the message line. See Playing voice
messages, page 7, and Viewing fax messages, page 8.
To delete a message
To delete a CallPilot me ss a ge in your Inbox, clic k the message to select it, the n, on t he
Edit menu, click Delete. Or, in an open message, click the Delete icon. The message is
deleted imme di at ely. (You cannot delete a message using right-click >Delete and
Empty.)
Compose new
message
Message was
received
Message was
opened by the
recipient
6
Page 9

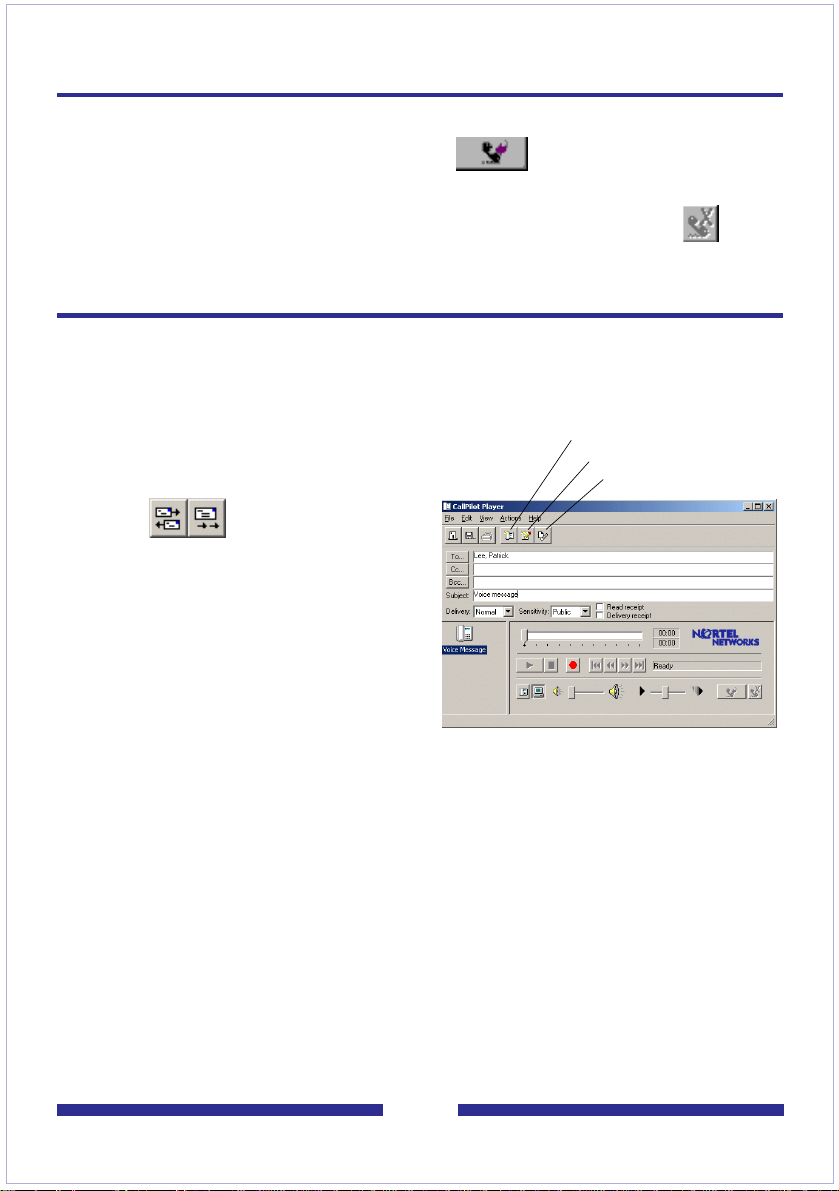
Playing voice messages
When you op en a voice-only message , th e C al lPi lo t P layer appears. In mixed
voice and fax or text messages, click the Voice icon to open the CallPilot Player.
To select your telephone or computer to play voice messages
You can choose to p la y y our voice messages from y ou r tele phon e or y our co mp uter. To
change from on e to the other, or to chan ge th e tel ep hone number that CallPilot di al s ,
see Changing audio settings, pa ge 18. You can also click th e Telephone or Computer
icon on the Call Pil ot Pl ayer to change the setti ng .
To play a message from your telephone
1 To play a voice message when your telephone is selected for playback, double-
click the message in your CallPilot Inbox and answer your telephone when it rings.
2 Use the buttons on the Call Pilot Player to play or stop the me ssage , g o ba ckw a rd
and forward, and call the sender.
3 When you are finished, hang up and close the message.
To play a message from your computer
1 To play a voice message when your computer is selected for playback, double-
click the message in your CallPilot Inbox. The message plays through your
computer’s speakers or your headphones.
2 Use the buttons on the Call Pilot Player to play or stop the me ssage , g o ba ckw a rd
and forward, adjust the volume and speed, and call the sender.
3 When you are finished, close the message.
Position in
message
Play/Re-play
Stop
Play messages
from telephone
Play messages
from computer
volume
Adjust
Go to start/
Skip back
Go to end/
Skip forward
Adjust
speed
Close
message
Forward
Reply
Open previous
message
Open next
message
Delete
message
Status
Disconnect
Call the
sender
7
Page 10

Viewing fax messages
To view faxes on your computer, you must have Imaging for Windows or other
imaging software installed on your computer. In addition, your CallPilot
administrator must enable fax capability for your mailbox.
To view a fax message
1 Double-click a fax message in your CallPilot Inbox. When you open a fax-only
message, the fax image appears right away. In mixed voice and fax or text
messages, click the Fax icon to view the fax.
2 While viewing the fax, you can enlarge or reduce the image, rotate or move it,
print it, delete it, save it, forward it and reply to it.
3 When you are finished, close the message.
Print
Delete
message
Select part
of image
Drag/scroll
image
Close
message
Forward
Reply
Call Sender
Change page
views
Go to next or
previous page
Rotate left
Rotate right
Zoom in
Zoom out
Note: If you are using imaging software othe r than Microsoft Imaging for Windows as
your default viewer, the appearance of the fax message may di ffer from this one, an d
you may not be able to use some of the controls shown here, such as Zoom in and
Zoom out.
8
Page 11

Composing voice messages
You can record a voice message from the computer or the telephone, then address and
send it the same way as an e-mail message.
To record and send a voice message
1 In your CallPilot Inbox, click the New CallPilot Message icon .
2 On the new message form, click the Telephone icon in the toolbar to open the
CallPilot Player.
3 On the CallPilot Player, click the red Record button to start recording.
4 If you are recording from the computer, record your message into the
microphone. Clic k Sto p to end the reco rding. Clic k Play to review it. To add to the
recording, click Record, speak again, then click Stop.
If you are recording from the telephone, answer when it rings. At the tone,
record your message. Click Stop to end the recording. Click Play to review it.
To add to the recording or re-record it, move the playback slider to the desired
position, click Record, speak again, then click Stop. Hang up the telephone.
5 Click To… to address from the CallPilot, e-mail, or pe rsonal Address Book. See
Addressing messages, page 13. Or type a formatted address in the To... field.
6 Add attachments and options if required. See Adding attachments to messages,
page 12, and Setting mess age optio ns, page 12.
7 On the toolbar, click the Send Message icon.
Send message
Save message
Address
message
Set options
Playback slider
Play
Stop
Record from
telephone
Record from
computer
Record Adjust
Adjust
volume
Go to start/
Skip back
Go to end/
Skip forward
speed
To save a newly created voice message as a file
1 On a new message form, record a message, and on the File menu, click Save as... .
2 In the File name box, type a name for the file, select a folder to keep the file in,
then click Save. Save voice files as .vbk files; CallPilot can automatically convert
.vbk files to .wav files when sending to non-CallPilot users. See Changing mail
delivery settings, page 16.
9
Attach file
Telephone icon
opens CallPilot
Player
Page 12

Composing fax and text messages
To create and send a fax message
To create a fax, your CallPilot mailbo x m u st have fax ca pa bi li ty. The CallPilo t recipients
of your fax must also hav e fax capability to vie w th e fax on their computer. If your
recipients acc es s their messages from their tele ph on e , they can view the fax only by
printing it. You can also send your fax to a fax machine.
1 Open the document that you w ant to f a x. It mus t be 8.5 in. (21.5 cm) wide or less .
2 On the File menu, click Print.
3 From the list of printers, select Nortel Fax, then click Print or OK.
4 The Compose F ax dial og bo x appea rs. Bef ore s ending th e fa x, y ou can add more
documents, including a cover page, by repeating steps 1 to 3. You can also view
the fax, and save it as a file.
5 Select a Send option.
To send a simple fax, type the fax machine number(s) or CallPilot mailbox
number (‘m’ plus number, e.g. m7366), type a subject, then click Send.
To send your fax as an attachment to a new CallPilot message, select Send
using... , then click Send.
File name
Send fax
Send as an
attachment
Save to send
later
View before
sending
Delete before
sending
Change order
of files to be
faxed
6 If you selected Send using…, a new message form opens with your fax file
attached. Address the message from the CallPilot, e-mail, or personal Address
Book. See Addressing messages, page 13. Or type the formatted address in the
To... field.
7 Add attachments and options if required. See Adding attachments to messages,
page 12, and Setting mess age optio ns, page 12.
8 Click Send.
To create and send a text message
To create a text m es s age, open a new CallPilot m es s ag e form and type or pa s te pl ai n
text into i t, the n cl ick the Send Message icon.
10
Page 13
Calling the sender of a message
You can respond to a message with a tel eph one call instead of a recorded me ss age.
1 In an open message, click Call Sender .
2 Answer the telephone when it rings. CallPilot immediately calls the sender of the
message.
3 When you finish the call, hang up the telephone or click Disconnect .
Forwarding and replying to messages
You can forwa rd a mes sage , and comp ose an introdu ctio n to sen d with it. You can also
compose a reply to the sender of a message, or to the sender and all recipients of a
message.
To forward or reply to a message
1 In an open message, click Forward
or Reply.
2 If you click Reply, select Reply to
Sender or Reply to All.
3 On the new message form,
compose a voice, fax, or text
message.
4 Address forwarded me ss age s the
same way as a new message.
Replies are addressed
automatically.
5 Add attachments, set options, and
change the subject line if required.
6 Click the Send Message icon.
Note: Your administr a tor may block me ss a ge s forwarded to exte rnal e-m a il addresses.
Compose voice message
Compose text message
Attach file
11
Page 14

Adding attachments to messages
Before se nd in g a m es s ag e , you can attach a voice, fax, or text file to it. Voice f il es c an
be .vbk or .w av format for CallPilot r ec ip ients ; CallPilot can automatically convert .vbk
files to .wav files when sending to non-CallPilot users. See Changi ng ma il del ivery
settings, page 16. F a x file s mu st be .tif format. Te x t files m ust be .txt f ormat .
To attach a file to a message
1 On a new message form, click the
Attach File icon.
2 In the Open box, select or type the
name of the file that you want to
attach.
3 Click Open to attach the file and
return to the new CallPilot
message.
Setting message options
Before sending a message, you can set options for handling and delivery.
To set message options
1 On a new message form, select Delivery, Sensitivity, and Receipt options, as
required.
For Deliv ery , select Urgent, or leave th e se tti ng as Normal.
For Sensitivity, select Private, or leave the setting as Public.
Be aware that mes sag es yo u send marke d Priv at e can be f o rwa rde d b y the
recipient. Also, recipients in non-Cal lPi lo t sy s tem s m ay not be informed of Priv ate
settings. In your message, tell the r ec ip ie nt th at the m es sag e is Private.
For Receipt acknowledgment, check Read receipt to request acknowledgment
that your recipient opened the message. Check Delivery receipt to request
acknowledgment that your recipient received the message.
2 Continue to compose, address, and send the message as usual.
12
Page 15

Addressing messages
To address a message from an Address Book
You can address a Ca llPil ot me ssa ge f rom th e Ca llPi lot Ad dress Bo ok on the s erver, or
you can sel ect ad dre sses from your personal Ad dre ss Book.
The CallPilot Address Book on the server is maintained by y our organizati on, and
contains the addresses of the CallPilot users and distribution lists that you are
allowed to use. You cannot edit this list. You can download th e Address Book to
your computer so that you can work in offline mode. See Changing your address
book settings, page 17.
Your personal Address Book is the list of e-mail addresses that you maintain on
your computer. You can add CallPilot addresses to this list.
1 In a new CallPilot message, click To… .
2 In the Address Book, select CallPilot Address Book or Address Book.
3 Select the name of the recipient or distribution list.
4 Click To ->. You can select more addresses, clicking To -> after each one.
5 Click OK to return to the new CallPilot message.
To add CallPilot addresses to your personal Address Book
You can add Call Pi lo t a dd r es s es and distribution lists to your personal Address Book.
Y o u may want to distinguish between CallPilot and e-mail addresses by adding CallPilot
after the recip ie nt ’s na m e .
1 In your Inbox, on the Tools menu, click Address Book.
2 Select CallPilot Address Book, and right-click on a name.
3 Click Copy Names between Address Books, then select an Address Book.
Or, you can create an address manually and add it to y ou r p ers o nal Address Book.
To address a message manually
You can type an addre ss dire ctl y into t he To field o f a ne w me ssa ge . Re f er to t he onl ine
Help for th e correct addressing f ormats.
13
Page 16

Personal distribution lists
You can create CallPilot personal distribution lists in GroupWise, in My CallPilot, or on
your telephone. Y ou cannot access a list created in GroupWise from your telephone or
from My CallPilot.
To use existing CallPilot personal distribution lists
You can address messages using CallPilot personal distribution lists that you created in
My CallPilot or o n your telephone. In Group Wi se, select these lists f rom t he Cal lPilot
Address Book or add them to your personal Address Book.
To create a personal distribution list in GroupWise
You create a Call Pi lo t p ers on al d is tribution list in GroupWise the same way that y ou
create an e-mail personal distribution l is t. Yo u ca nnot access a list created i n
GroupWise f rom your telephone or from M y Cal lP il ot.
1 In your Inbox, on the Tools menu, click Address Book.
2 Select CallPilot Address Book or your personal Address Book.
3 Select names, clicking To... after each one.
4 When you have finished entering names, click Save Group.
5 In Save as Group, type a name for the list, then click OK.
To edit a personal distribution list
You can add or delete name s in a perso nal di st ribu tion li st .
1 In your Inbox, on the Tools menu, click Address Book.
2 Click Information, then Edit Group.
3 Make the required changes, then click OK.
14
Page 17

Changing your mailbox settings
To view or change your CallPilot access settings
Your administrator enters the default CallPilot access information for you. You can
change these s ettings if required. Refe r to t he online Help for a detailed explanation.
1 In your e-mail Inbox, on the Tools menu, click CallPilot Desktop Messaging >
CallPilot Desktop Messaging Options.
(Or, on the CallPilot Player, select View > Options.)
2 Click the General tab to display your current access settings.
3 Make any changes required, then click OK.
To change your CallPilot password
This is the same password that you use from the telephone.
1 Repeat steps 1 and 2 above,
then click Change Password.
2 In Old password, type your
current password.
3 In New password, type your
new password.
4 In Validate password, type your
new password again.
5 Click OK to save the change.
6 Click OK to exit the General
settings.
15
Page 18

Changing mail delivery settings
To view or change your mail settings
Your administrator en ters the def au lt mai l setti ngs f o r yo u. You can chan ge them if
required. Refer to the online Help for a detailed explanation.
1 In your e-mail Inbox, on the Tools menu, click CallPilot Desktop Messaging >
CallPilot Desktop Messaging Options.
2 Click the Mail tab to display the current mail settings.
3 The default settings shown here are recommended for most users.
Notification - You can set CallPilot to update your message list automatically,
manually, or at intervals such as every 5 minutes. (Choose Manually to save
costs on long distance or ISDN connections.)
Convert voice messages to WAV for non-CallPilot users - Your recorded
messages are automatically converted from .vbk to .wav files when you send
them to non-CallPilot users.
Show message waiting indicator (MWI) on taskbar - Th e CallPilot telephone icon
on the Windows taskbar turns red when y ou have a new message.
4 Make any changes required, then click OK.
16
Page 19

Changing your address book settings
To view or change your Address Book settings
Your administrat or en ters the default Address Bo ok s e tti ng s for you. You can change
them if requir ed. Refer to the online Help for a detailed explana ti on .
1 In your e-mail Inbox, on the Tools menu, click CallPilot Desktop Messaging >
CallPilot Desktop Messaging Options.
2 Click the Address Book tab to display the current Address Book settings.
3 Make any changes required, then click OK.
To download the Address Book to your computer
You can downlo ad the CallPilo t Addres s Book from the s erver to your compu ter , a nd tell
CallPilot to go to this list so that you can w ork offline.
1 Select the Address Book tab as described above.
2 Click Download now. The server address book downloads to your computer.
3 Select Use local address book. From now on, when you click To… in a CallPilot
message, whether working online or offline, you go to the address book that you
downloaded to your computer.
4 Check Remind me… to remember to update this list by downloading it from the
server occasionally. Set the number of days between reminders.
5 Click OK.
Whenever you want to addr ess directly from the server ag ai n, re se le ct Use server
address book.
17
Page 20

Changing audio settings
To change the audio device and volume
You can play a nd record your messages f rom your telephone or your c om pu ter.
1 In your e-mail Inbox, on the Tools menu, click CallPilot Desktop Messaging >
CallPilot Desktop Messaging Options.
(Or, on the CallPilot Player, select View > Options.)
2 Click the Audio tab to display the current Audio settings.
3 In Device, click Telephone if you want to play and record your voice messages
from your telephone. Make sure the correct telephone number appears.
Or, click Computer if you want to play and record your voice messages through
your computer’s sp eakers and microphone.
Note: You can also change your audio device on the CallPilot Player.
4 In Volume, check the two Volume check boxes if you want to coordinate your
CallPilot vol um e s et tings with your c om pu ter’s speaker a nd microphone volumes.
5 If you want a reminder to check these settings before playing or recording voice
messages, check Confirm settings... .
6 If you want to download voice messages to your computer before playing them,
check Download file... . This option is useful if you are using a modem.
18
Page 21

Linking to My CallPilot
Desktop Messaging provides links to the web-based resources in My CallPilot. T o vie w
or change the URL for My CallPilot, see Changing y ou r mailbox settings, page 15. For
more informatio n on M y Cal lPi lo t, refer to the My CallPilot User Guide.
1 In your e-mail Inbox, on the Tools menu, click CallPilot Desktop Messaging > My
CallPilot.
2 Select one of the tabs.
To view or change your CallPilot feature settings
1 In My CallPilot, click the CallPilot Features tab.
2 Select any feature and make changes to your setup as required. Any changes
you make to a feature go into effect im mediately whether you use CallPilot from
your computer or from your telephone.
To view user information
In My CallPilot, click the Useful Inf ormation tab to vie w on li ne us e r i nformation sp ec if ic
to your ma il box.
19
Page 22

Working offline
To work offline, you need a computer that has CallPilot installed and configured in the
same way as your office computer. You can download your messages and addresses to
this computer before working offline.
1 (Optional) You may want to download your CallPilot messages to the computer
that you will use offline. Log in to your e-mail and CallPilot, and on the Tools
menu, click CallPilot Desktop Messaging, then click Download all CallPilot
Messages. When your messages are downloaded, log out.
2 (Optional) You may w ant to do wnlo ad the s erver Ad dress B ook to y our compu ter.
See Changing your address book settings, page 17.
3 Open your e-mail while not connected to the network, and wait for the CallPilot
Logon window to appear. You do not need to enter your password.
4 Click Cancel.
You can then work offline, reviewing your messages and recording and addressing new
messages. Y ou must use your computer’s speakers and microphone to play and record
messages offline; you cannot use a telephone for offline access. CallPilot will send your
messages the n ext time you log in to the CallPilot server.
20
Page 23

Document information
CallPilot Desktop Messaging
User Guide
for Novell GroupWise
Copyright © 2002 Nortel Networks, All Rights Reserved
Information is subject to change without notice. Nortel Networks
reserves the right to make changes in design or components as
progress in engineering and manufacturing may warrant.
This user guide is distributed in soft copy only.
Product release: 2.0
Document issue: Standard 1.0
Date: September 2002
21
 Loading...