

Page 1

Installing the Avaya Converged Platform
130 Series
Release 4.0
Issue 4
October 2019
Page 2

©
2019, Avaya Inc.
All Rights Reserved.
Notice
While reasonable efforts have been made to ensure that the
information in this document is complete and accurate at the time of
printing, Avaya assumes no liability for any errors. Avaya reserves
the right to make changes and corrections to the information in this
document without the obligation to notify any person or organization
of such changes.
Documentation disclaimer
“Documentation” means information published in varying mediums
which may include product information, operating instructions and
performance specifications that are generally made available to users
of products. Documentation does not include marketing materials.
Avaya shall not be responsible for any modifications, additions, or
deletions to the original published version of Documentation unless
such modifications, additions, or deletions were performed by or on
the express behalf of Avaya. End User agrees to indemnify and hold
harmless Avaya, Avaya's agents, servants and employees against all
claims, lawsuits, demands and judgments arising out of, or in
connection with, subsequent modifications, additions or deletions to
this documentation, to the extent made by End User.
Link disclaimer
Avaya is not responsible for the contents or reliability of any linked
websites referenced within this site or Documentation provided by
Avaya. Avaya is not responsible for the accuracy of any information,
statement or content provided on these sites and does not
necessarily endorse the products, services, or information described
or offered within them. Avaya does not guarantee that these links will
work all the time and has no control over the availability of the linked
pages.
Warranty
Avaya provides a limited warranty on Avaya hardware and software.
Refer to your sales agreement to establish the terms of the limited
warranty. In addition, Avaya’s standard warranty language, as well as
information regarding support for this product while under warranty is
available to Avaya customers and other parties through the Avaya
Support website:
https://support.avaya.com/helpcenter/
getGenericDetails?detailId=C20091120112456651010 under the link
“Warranty & Product Lifecycle” or such successor site as designated
by Avaya. Please note that if You acquired the product(s) from an
authorized Avaya Channel Partner outside of the United States and
Canada, the warranty is provided to You by said Avaya Channel
Partner and not by Avaya.
“Hosted Service” means an Avaya hosted service subscription that
You acquire from either Avaya or an authorized Avaya Channel
Partner (as applicable) and which is described further in Hosted SAS
or other service description documentation regarding the applicable
hosted service. If You purchase a Hosted Service subscription, the
foregoing limited warranty may not apply but You may be entitled to
support services in connection with the Hosted Service as described
further in your service description documents for the applicable
Hosted Service. Contact Avaya or Avaya Channel Partner (as
applicable) for more information.
Hosted Service
THE FOLLOWING APPLIES ONLY IF YOU PURCHASE AN AVAYA
HOSTED SERVICE SUBSCRIPTION FROM AVAYA OR AN AVAYA
CHANNEL PARTNER (AS APPLICABLE), THE TERMS OF USE
FOR HOSTED SERVICES ARE AVAILABLE ON THE AVAYA
WEBSITE,
HTTPS://SUPPORT.AVAYA.COM/LICENSEINFO UNDER
THE LINK “Avaya Terms of Use for Hosted Services” OR SUCH
SUCCESSOR SITE AS DESIGNATED BY AVAYA, AND ARE
APPLICABLE TO ANYONE WHO ACCESSES OR USES THE
HOSTED SERVICE. BY ACCESSING OR USING THE HOSTED
SERVICE, OR AUTHORIZING OTHERS TO DO SO, YOU, ON
BEHALF OF YOURSELF AND THE ENTITY FOR WHOM YOU ARE
DOING SO (HEREINAFTER REFERRED TO INTERCHANGEABLY
AS “YOU” AND “END USER”), AGREE TO THE TERMS OF USE. IF
YOU ARE ACCEPTING THE TERMS OF USE ON BEHALF A
COMPANY OR OTHER LEGAL ENTITY, YOU REPRESENT THAT
YOU HAVE THE AUTHORITY TO BIND SUCH ENTITY TO THESE
TERMS OF USE. IF YOU DO NOT HAVE SUCH AUTHORITY, OR IF
YOU DO NOT WISH TO ACCEPT THESE TERMS OF USE, YOU
MUST NOT ACCESS OR USE THE HOSTED SERVICE OR
AUTHORIZE ANYONE TO ACCESS OR USE THE HOSTED
SERVICE.
Licenses
THE SOFTWARE LICENSE TERMS AVAILABLE ON THE AVAYA
WEBSITE,
HTTPS://SUPPORT.AVAYA.COM/LICENSEINFO,
UNDER THE LINK “AVAYA SOFTWARE LICENSE TERMS (Avaya
Products)” OR SUCH SUCCESSOR SITE AS DESIGNATED BY
AVAYA, ARE APPLICABLE TO ANYONE WHO DOWNLOADS,
USES AND/OR INSTALLS AVAYA SOFTWARE, PURCHASED
FROM AVAYA INC., ANY AVAYA AFFILIATE, OR AN AVAYA
CHANNEL PARTNER (AS APPLICABLE) UNDER A COMMERCIAL
AGREEMENT WITH AVAYA OR AN AVAYA CHANNEL PARTNER.
UNLESS OTHERWISE AGREED TO BY AVAYA IN WRITING,
AVAYA DOES NOT EXTEND THIS LICENSE IF THE SOFTWARE
WAS OBTAINED FROM ANYONE OTHER THAN AVAYA, AN AVAYA
AFFILIATE OR AN AVAYA CHANNEL PARTNER; AVAYA
RESERVES THE RIGHT TO TAKE LEGAL ACTION AGAINST YOU
AND ANYONE ELSE USING OR SELLING THE SOFTWARE
WITHOUT A LICENSE. BY INSTALLING, DOWNLOADING OR
USING THE SOFTWARE, OR AUTHORIZING OTHERS TO DO SO,
YOU, ON BEHALF OF YOURSELF AND THE ENTITY FOR WHOM
YOU ARE INSTALLING, DOWNLOADING OR USING THE
SOFTWARE (HEREINAFTER REFERRED TO
INTERCHANGEABLY AS “YOU” AND “END USER”), AGREE TO
THESE TERMS AND CONDITIONS AND CREATE A BINDING
CONTRACT BETWEEN YOU AND AVAYA INC. OR THE
APPLICABLE AVAYA AFFILIATE (“AVAYA”).
Avaya grants You a license within the scope of the license types
described below, with the exception of Heritage Nortel Software, for
which the scope of the license is detailed below. Where the order
documentation does not expressly identify a license type, the
applicable license will be a Designated System License as set forth
below in the Designated System(s) License (DS) section as
applicable. The applicable number of licenses and units of capacity
for which the license is granted will be one (1), unless a different
number of licenses or units of capacity is specified in the
documentation or other materials available to You. “Software” means
computer programs in object code, provided by Avaya or an Avaya
Channel Partner, whether as stand-alone products, pre-installed on
hardware products, and any upgrades, updates, patches, bug fixes,
or modified versions thereto. “Designated Processor” means a single
stand-alone computing device. “Server” means a set of Designated
Processors that hosts (physically or virtually) a software application
to be accessed by multiple users. “Instance” means a single copy of
the Software executing at a particular time: (i) on one physical
machine; or (ii) on one deployed software virtual machine (“VM”) or
similar deployment.
License types
Designated System(s) License (DS). End User may install and use
each copy or an Instance of the Software only: 1) on a number of
Designated Processors up to the number indicated in the order; or 2)
up to the number of Instances of the Software as indicated in the
order, Documentation, or as authorized by Avaya in writing. Avaya
may require the Designated Processor(s) to be identified in the order
by type, serial number, feature key, Instance, location or other
specific designation, or to be provided by End User to Avaya through
electronic means established by Avaya specifically for this purpose.
Heritage Nortel Software
“Heritage Nortel Software” means the software that was acquired by
Avaya as part of its purchase of the Nortel Enterprise Solutions
Business in December 2009. The Heritage Nortel Software is the
software contained within the list of Heritage Nortel Products located
https://support.avaya.com/LicenseInfo under the link “Heritage
at
Nortel Products” or such successor site as designated by Avaya. For
Heritage Nortel Software, Avaya grants Customer a license to use
Heritage Nortel Software provided hereunder solely to the extent of
the authorized activation or authorized usage level, solely for the
purpose specified in the Documentation, and solely as embedded in,
for execution on, or for communication with Avaya equipment.
Charges for Heritage Nortel Software may be based on extent of
activation or use authorized as specified in an order or invoice.
Page 3

Copyright
Except where expressly stated otherwise, no use should be made of
materials on this site, the Documentation, Software, Hosted Service,
or hardware provided by Avaya. All content on this site, the
documentation, Hosted Service, and the product provided by Avaya
including the selection, arrangement and design of the content is
owned either by Avaya or its licensors and is protected by copyright
and other intellectual property laws including the sui generis rights
relating to the protection of databases. You may not modify, copy,
reproduce, republish, upload, post, transmit or distribute in any way
any content, in whole or in part, including any code and software
unless expressly authorized by Avaya. Unauthorized reproduction,
transmission, dissemination, storage, and or use without the express
written consent of Avaya can be a criminal, as well as a civil offense
under the applicable law.
Virtualization
The following applies if the product is deployed on a virtual machine.
Each product has its own ordering code and license types. Unless
otherwise stated, each Instance of a product must be separately
licensed and ordered. For example, if the end user customer or
Avaya Channel Partner would like to install two Instances of the
same type of products, then two products of that type must be
ordered.
Third Party Components
“Third Party Components” mean certain software programs or
portions thereof included in the Software or Hosted Service may
contain software (including open source software) distributed under
third party agreements (“Third Party Components”), which contain
terms regarding the rights to use certain portions of the Software
(“Third Party Terms”). As required, information regarding distributed
Linux OS source code (for those products that have distributed Linux
OS source code) and identifying the copyright holders of the Third
Party Components and the Third Party Terms that apply is available
in the products, Documentation or on Avaya’s website at:
support.avaya.com/Copyright or such successor site as designated
by Avaya. The open source software license terms provided as Third
Party Terms are consistent with the license rights granted in these
Software License Terms, and may contain additional rights benefiting
You, such as modification and distribution of the open source
software. The Third Party Terms shall take precedence over these
Software License Terms, solely with respect to the applicable Third
Party Components to the extent that these Software License Terms
impose greater restrictions on You than the applicable Third Party
Terms.
The following applies only if the H.264 (AVC) codec is distributed with
the product. THIS PRODUCT IS LICENSED UNDER THE AVC
PATENT PORTFOLIO LICENSE FOR THE PERSONAL USE OF A
CONSUMER OR OTHER USES IN WHICH IT DOES NOT RECEIVE
REMUNERATION TO (i) ENCODE VIDEO IN COMPLIANCE WITH
THE AVC STANDARD (“AVC VIDEO”) AND/OR (ii) DECODE AVC
VIDEO THAT WAS ENCODED BY A CONSUMER ENGAGED IN A
PERSONAL ACTIVITY AND/OR WAS OBTAINED FROM A VIDEO
PROVIDER LICENSED TO PROVIDE AVC VIDEO. NO LICENSE IS
GRANTED OR SHALL BE IMPLIED FOR ANY OTHER USE.
ADDITIONAL INFORMATION MAY BE OBTAINED FROM MPEG LA,
L.L.C. SEE
Service Provider
THE FOLLOWING APPLIES TO AVAYA CHANNEL PARTNER’S
HOSTING OF AVAYA PRODUCTS OR SERVICES. THE PRODUCT
OR HOSTED SERVICE MAY USE THIRD PARTY COMPONENTS
SUBJECT TO THIRD PARTY TERMS AND REQUIRE A SERVICE
PROVIDER TO BE INDEPENDENTLY LICENSED DIRECTLY FROM
THE THIRD PARTY SUPPLIER. AN AVAYA CHANNEL PARTNER’S
HOSTING OF AVAYA PRODUCTS MUST BE AUTHORIZED IN
WRITING BY AVAYA AND IF THOSE HOSTED PRODUCTS USE
OR EMBED CERTAIN THIRD PARTY SOFTWARE, INCLUDING
BUT NOT LIMITED TO MICROSOFT SOFTWARE OR CODECS,
THE AVAYA CHANNEL PARTNER IS REQUIRED TO
INDEPENDENTLY OBTAIN ANY APPLICABLE LICENSE
AGREEMENTS, AT THE AVAYA CHANNEL PARTNER’S EXPENSE,
DIRECTLY FROM THE APPLICABLE THIRD PARTY SUPPLIER.
WITH RESPECT TO CODECS, IF THE AVAYA CHANNEL
PARTNER IS HOSTING ANY PRODUCTS THAT USE OR EMBED
THE H.264 CODEC OR H.265 CODEC, THE AVAYA CHANNEL
HTTP://WWW.MPEGLA.COM.
https://
PARTNER ACKNOWLEDGES AND AGREES THE AVAYA
CHANNEL PARTNER IS RESPONSIBLE FOR ANY AND ALL
RELATED FEES AND/OR ROYALTIES. THE H.264 (AVC) CODEC
IS LICENSED UNDER THE AVC PATENT PORTFOLIO LICENSE
FOR THE PERSONAL USE OF A CONSUMER OR OTHER USES
IN WHICH IT DOES NOT RECEIVE REMUNERATION TO: (I)
ENCODE VIDEO IN COMPLIANCE WITH THE AVC STANDARD
(“AVC VIDEO”) AND/OR (II) DECODE AVC VIDEO THAT WAS
ENCODED BY A CONSUMER ENGAGED IN A PERSONAL
ACTIVITY AND/OR WAS OBTAINED FROM A VIDEO PROVIDER
LICENSED TO PROVIDE AVC VIDEO. NO LICENSE IS GRANTED
OR SHALL BE IMPLIED FOR ANY OTHER USE. ADDITIONAL
INFORMATION FOR H.264 (AVC) AND H.265 (HEVC) CODECS
MAY BE OBTAINED FROM MPEG LA, L.L.C. SEE
WWW.MPEGLA.COM.
Compliance with Laws
You acknowledge and agree that it is Your responsibility for
complying with any applicable laws and regulations, including, but not
limited to laws and regulations related to call recording, data privacy,
intellectual property, trade secret, fraud, and music performance
rights, in the country or territory where the Avaya product is used.
Preventing Toll Fraud
“Toll Fraud” is the unauthorized use of your telecommunications
system by an unauthorized party (for example, a person who is not a
corporate employee, agent, subcontractor, or is not working on your
company's behalf). Be aware that there can be a risk of Toll Fraud
associated with your system and that, if Toll Fraud occurs, it can
result in substantial additional charges for your telecommunications
services.
Avaya Toll Fraud intervention
If You suspect that You are being victimized by Toll Fraud and You
need technical assistance or support, call Technical Service Center
Toll Fraud Intervention Hotline at +1-800-643-2353 for the United
States and Canada. For additional support telephone numbers, see
the Avaya Support website:
successor site as designated by Avaya.
Security Vulnerabilities
Information about Avaya’s security support policies can be found in
the Security Policies and Support section of
support.avaya.com/security.
Suspected Avaya product security vulnerabilities are handled per the
Avaya Product Security Support Flow (https://
support.avaya.com/css/P8/documents/100161515).
Downloading Documentation
For the most current versions of Documentation, see the Avaya
Support website:
as designated by Avaya.
Contact Avaya Support
See the Avaya Support website:
product or Hosted Service notices and articles, or to report a problem
with your Avaya product or Hosted Service. For a list of support
telephone numbers and contact addresses, go to the Avaya Support
website:
designated by Avaya), scroll to the bottom of the page, and select
Contact Avaya Support.
Trademarks
The trademarks, logos and service marks (“Marks”) displayed in this
site, the Documentation, Hosted Service(s), and product(s) provided
by Avaya are the registered or unregistered Marks of Avaya, its
affiliates, its licensors, its suppliers, or other third parties. Users are
not permitted to use such Marks without prior written consent from
Avaya or such third party which may own the Mark. Nothing
contained in this site, the Documentation, Hosted Service(s) and
product(s) should be construed as granting, by implication, estoppel,
or otherwise, any license or right in and to the Marks without the
express written permission of Avaya or the applicable third party.
Avaya is a registered trademark of Avaya Inc.
https://support.avaya.com (or such successor site as
https://support.avaya.com, or such successor site
https://support.avaya.com or such
https://support.avaya.com for
HTTP://
https://
Page 4

All non-Avaya trademarks are the property of their respective owners.
Linux® is the registered trademark of Linus Torvalds in the U.S. and
other countries.
Page 5

Contents
Chapter 1: Introduction............................................................................................................ 7
Purpose.................................................................................................................................. 7
Change history........................................................................................................................ 7
Chapter 2: Overview................................................................................................................. 8
Avaya Converged Platform overview......................................................................................... 8
Key features........................................................................................................................... 8
Supported software................................................................................................................. 9
Registration............................................................................................................................ 9
Avaya Technical Onboarding Process..................................................................................... 10
Dell server overview.............................................................................................................. 12
Front view of Dell™ PowerEdge™ R640 Server........................................................................ 13
Back view of Dell™ PowerEdge™ R640 Server........................................................................ 14
Avaya Converged Platform Appliance profiles.......................................................................... 15
Dell PowerEdge R640 server dimensions................................................................................ 16
Environmental requirements................................................................................................... 17
Power requirements.............................................................................................................. 19
Chapter 3: Installation............................................................................................................ 20
Installation checklist............................................................................................................... 20
Electrostatic discharge........................................................................................................... 20
Package contents.................................................................................................................. 21
Installing the server .............................................................................................................. 22
Attaching cables.................................................................................................................... 26
Connecting power................................................................................................................. 27
Chapter 4: Configuration........................................................................................................ 30
Purpose................................................................................................................................ 30
Dell R640 XL ESXi Configuration............................................................................................ 30
Overview........................................................................................................................ 30
Configuring ESXi Network Settings................................................................................... 30
Configuring autostart on ESXi host using Embedded Host Client......................................... 43
Configuring SNMP v2 on an ESXi 6.5 host ....................................................................... 44
Services Port Configuration.............................................................................................. 46
Management of the TLS protocol configuration for vSphere 6.5 U2 Environment.................. 52
Performing server recovery or software remastering................................................................. 58
Replacing the host server................................................................................................. 64
Adding the license key for server recovery or software remastering..................................... 65
Dell USB R640 RAID Configuration........................................................................................ 66
Introduction..................................................................................................................... 66
Preparing to configure Dell R640 RAID controller............................................................... 66
Configuring the controller properties................................................................................. 69
October 2019 Installing the Avaya Converged Platform 130 Series 5
Comments on this document? infodev@avaya.com
Page 6

Contents
Creating a virtual disk...................................................................................................... 71
Virtual disk size............................................................................................................... 74
Checking information about the virtual disk........................................................................ 75
Dell R640 SNMP trap configuration using iDRAC9................................................................... 76
Configuring SNMP traps for Dell R640 using iDRAC9......................................................... 76
SNMP alerts................................................................................................................... 77
Configuring SNMP alerts using iDRAC9............................................................................ 77
Configuring a user account for SNMP v3 traps................................................................... 78
Chapter 5: Regulatory information........................................................................................ 80
Regulatory information........................................................................................................... 80
Chapter 6: Resources............................................................................................................. 81
Documentation...................................................................................................................... 81
Finding documents on the Avaya Support website............................................................. 82
Avaya Documentation Portal navigation............................................................................ 82
Viewing Avaya Mentor videos................................................................................................. 83
Support................................................................................................................................ 84
October 2019 Installing the Avaya Converged Platform 130 Series 6
Comments on this document? infodev@avaya.com
Page 7
Chapter 1: Introduction
Purpose
This document provides installation procedures and information for the Avaya Converged Platform
130 Appliance server.
This document is intended for the professional who is involved in installation activities for the
Avaya Converged Platform 130 Appliance server.
Change history
Issue Date Summary of changes
4 October 2019 Updated the chapter Configuration to include the installation of ESXi
from an ISO for Server Recovery or Remaster of the software.
3 February 2019 Added a new chapter Configuration.
2 January 2019 Added a new section Avaya Converged Platform Appliance profiles.
1 August 2018 Initial release.
October 2019 Installing the Avaya Converged Platform 130 Series 7
Comments on this document? infodev@avaya.com
Page 8

Chapter 2: Overview
Avaya Converged Platform overview
Avaya Converged Platform (ACP) is a turnkey hardware solution that is available for many Avaya
applications. Refer to your product application specific documentation. Avaya Converged Platform
100 series offers a single virtualized or bare metal server delivering Avaya unified communication
and contact center applications.
The Avaya Converged Platform 100 series is comprised of three Models:
1. ACP 110: This is a bare metal server used by a few applications. The applications
determine if the Operating System (OS) is preloaded at Avnet.
2. ACP 120: The is the Dell R640 shipped from Avnet with Avaya Virtualized Platform
preloaded. The ACP 120 is synonymous with AVP. AVP 7.1.3.3 or greater, or AVP 8.0.1 or
greater is required.
3. ACP 130: This is the Dell R640 shipped from Avnet with ESXi 6.5 preloaded and with a
standard VMware license.
Note:
This document focuses on Avaya Converged Platform 130 (ACP 130).
Avaya Converged Platform 130 Appliance utilizes VMware vSphere ESXi 6.5 U2 with a Standard
License.
Note:
On the Avaya Converged Platform 130 Appliance, VMware Vsphere 6.5 Standard is loaded
and the license key is installed.
The license key label is located on the lid of the Avaya Converged Platform 130 Appliance
server.
Key features
The Avaya Dell PowerEdge R640 is the underlying server hardware for the Avaya Converged
Platform 100 series. The PowerEdge R640 is a dual-socket, 1U platform designed for Avaya’s
portfolio of applications. The R640 updates the CPU and other server technologies over previous
Avaya Common Server releases. It will be used as the base platform for all new Avaya offers. The
October 2019 Installing the Avaya Converged Platform 130 Series 8
Comments on this document? infodev@avaya.com
Page 9

Supported software
architecture of the R640 is designed to maximize performance and provide the flexibility to
optimize configurations based on Avaya’s applications and customer use cases.
Supported software
The Avaya Converged Platform 100 series is a hardware platform designed to support many
different software solutions. For more information about supported software, consult the individual
Avaya solution documentation.
The Avaya Converged Platform 130 Appliance supports virtualization. The Avaya Converged
Platform 130 Appliance uses VMware vSphere ESXi as the hypervisor.
Registration
In order to receive support from Avaya Services, Avaya Customers and Avaya Channel Partners
must have their end user product information in Global Registration Tool (GRT).
End user product install base is a pre-requisite for services support of Avaya Converged Platform.
Registration establishes accurate inventory, test SAL connectivity, alarm configuration (if
necessary), and ensures proper on-boarding of customers into all levels of Avaya support.
General information on registration can be found at https://support.avaya.com/registration.
Avaya Global Registration Tool (GRT)
The Avaya Associate and / or the Channel partner need to make sure that the customer FL
reflects the install base information for the Avaya Converged Platform Server. The server serial
number would be included in this information. The following process must be adhered to by the
Avaya Associate and/ or Channel partner:
GRT at:
• Avaya Partner to check Functional Location (FL) at “View Install Base”
- If FL is good = no action
- If FL is not good – “Equipment/Site move only” process to follow
Example of the Avaya Converged Platform 110,120, and 130 platform Serial number:
This serial number will be included in the View Install Base associated with your FL.
October 2019 Installing the Avaya Converged Platform 130 Series 9
Comments on this document? infodev@avaya.com
Page 10
Overview
Avaya Technical Onboarding Process
The following onboarding process must be followed to ensure Secure Access Link remote access
to your application.
Ensure that you have the correct FL for the Onboarding process, at
Note:
• US Sold To (functional location) location number format: 000XXXXXXX (000 + 7 digits or
can be 00 + 8 digits as well).
• Outside of US (Rest of the World) FL# (Ship To) location number: 00XXXXXXXX (always
00 + 8 digits).
https://grt.avaya.com/grt/.
Note:
Ensure you have your IP address and host names for iDRAC and the ESXi host.
Technical Onboarding Only:
October 2019 Installing the Avaya Converged Platform 130 Series 10
Comments on this document? infodev@avaya.com
Page 11
Avaya Technical Onboarding Process
Please select the device you intend to technical onboard and follow the process.
If you face any GRT issues, visit the general Knowledge Base at https://support.avaya.com/ext/
index?page=content&id=FAQ101925.
October 2019 Installing the Avaya Converged Platform 130 Series 11
Comments on this document? infodev@avaya.com
Page 12
Overview
• The iDRAC IP address is linked with the Avaya Converged Platform server.
• The ESXi Host IP is linked with the Avaya Converged Platform ESXi host.
You must enter Device IP Address, Device Hostname, and Gateway SEID for at least one SE
code in your template. Please populate this data in order to proceed with TOB with Connectivity.
Follow the online process.
Note:
Secure Access Link Registration (also called technical onboarding) requires a verified
customer install base and FL or Sold to.
Dell server overview
The Avaya Converged Platform servers category includes Dell servers that support Avaya
software solutions, some requiring additional hardware and memory requirements beyond the
standard configuration. This book covers the standard configuration only—consult specific Avaya
product documentation for application-specific or solution-specific server configurations.
• Avaya Converged Platform servers are supplied under an OEM relationship and Avaya
servers are treated differently than commercially available servers from the vendors.
• Avaya Converged Platform servers are turnkey appliances. No servers designed for a
particular application can be repurposed for use with another application. The only exception
to this is when an application has provided an upgrade or migration path from an existing
October 2019 Installing the Avaya Converged Platform 130 Series 12
Comments on this document? infodev@avaya.com
Page 13
Front view of Dell™ PowerEdge™ R640 Server
server state to a different server state with the appropriate kits, tools, documentation, and
training materials.
• Avaya Converged Platform 130 servers must not be updated with BIOS or firmware updates
from the vendor’s website. Only Avaya provided BIOS/Firmware updates can be used.
Updating directly from the vendor’s website will result in an unsupported configuration. BIOS/
Firmware updates are made available on
• Avaya Converged Platform 130 ESXi updates should only be obtained from Avaya. Updating
directly from the hardware vendor or VMware’s websites will result in an unsupported
configuration. Note that the OEM server vendor (in this case Dell) provides Avaya with their
latest certified package of the ESXi software. This ensures that any updates will be
compatible with the underlying hardware, drivers, etc. Once Avaya has an update from the
vendor, the new image is fully vetted with the Avaya solutions to assess any potential
performance or capacity impacts. This image is then made available on http://plds.avaya.com
and is customer installable.
• Do not contact Dell for Service; all support, warranty, repair, and maintenance are through
the Avaya processes.
• Avaya strongly recommends that all servers are protected with an uninterrupted Power
Supply for power surge and interruption protection. Avaya is not responsible for servers
damaged by power surges, brown outs, black outs etc. when the server is connected to
standard power mains and has no protection.
http://plds.avaya.com and are customer installable.
• Dell’s RAID battery is a consumable item that can be purchased as a part without a Service
ticket. Customers are responsible for installing them, the procedure for which is in the
Maintaining and troubleshooting document or in appropriate OEM vendor documentation.
• Quality assurance - product integrity testing or environmental international restrictions/ has
been completed by Dell and verified with Avaya through the use of Design for Environmental
Checklists. These lists include: batteries, printed wiring boards, plastic parts, product
packaging, RoHS, green requirements, and energy efficiency.
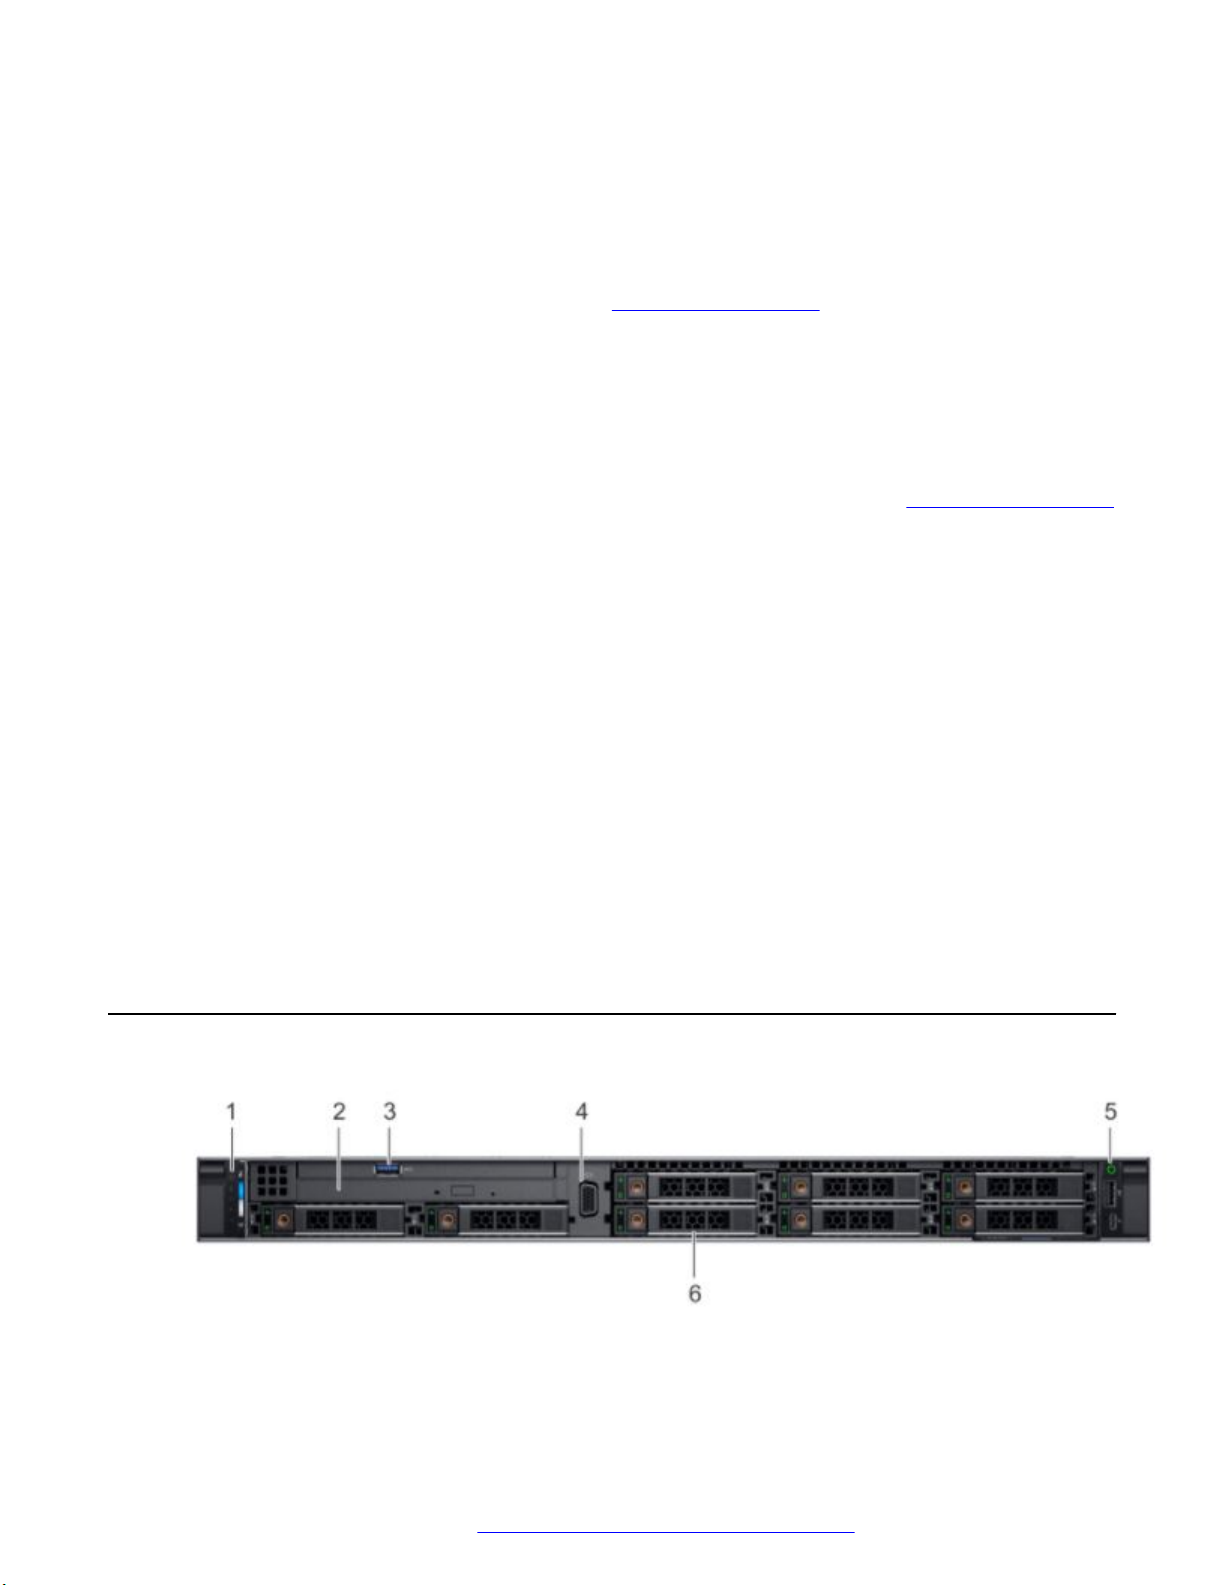
Front view of Dell™ PowerEdge™ R640 Server
Figure 1: Front view of Dell PowerEdge R640 server
October 2019 Installing the Avaya Converged Platform 130 Series 13
Comments on this document? infodev@avaya.com
Page 14
Overview
No. Item Icon Description
1 Left control panel NA Displays the system health, system ID, and status LED indicators.
• Status LED: Enables you to identify failed hardware components.
There are up to five status LEDs and an overall system health LED
(Chassis health and system ID) bar.
2 Optical drive N/A One slim SATA DVD-ROM drive.
Note:
DVD devices are data only.
3 USB port The USB port is USB 3.0 compliant.
4 VGA port Enables you to connect a display device to the system.
5 Right control panel NA Contains the power button, USB port, iDRAC Direct micro port, and the
iDRAC Direct status LED.
6 Drive slots NA Enable you to install hard drives that are supported on your system.
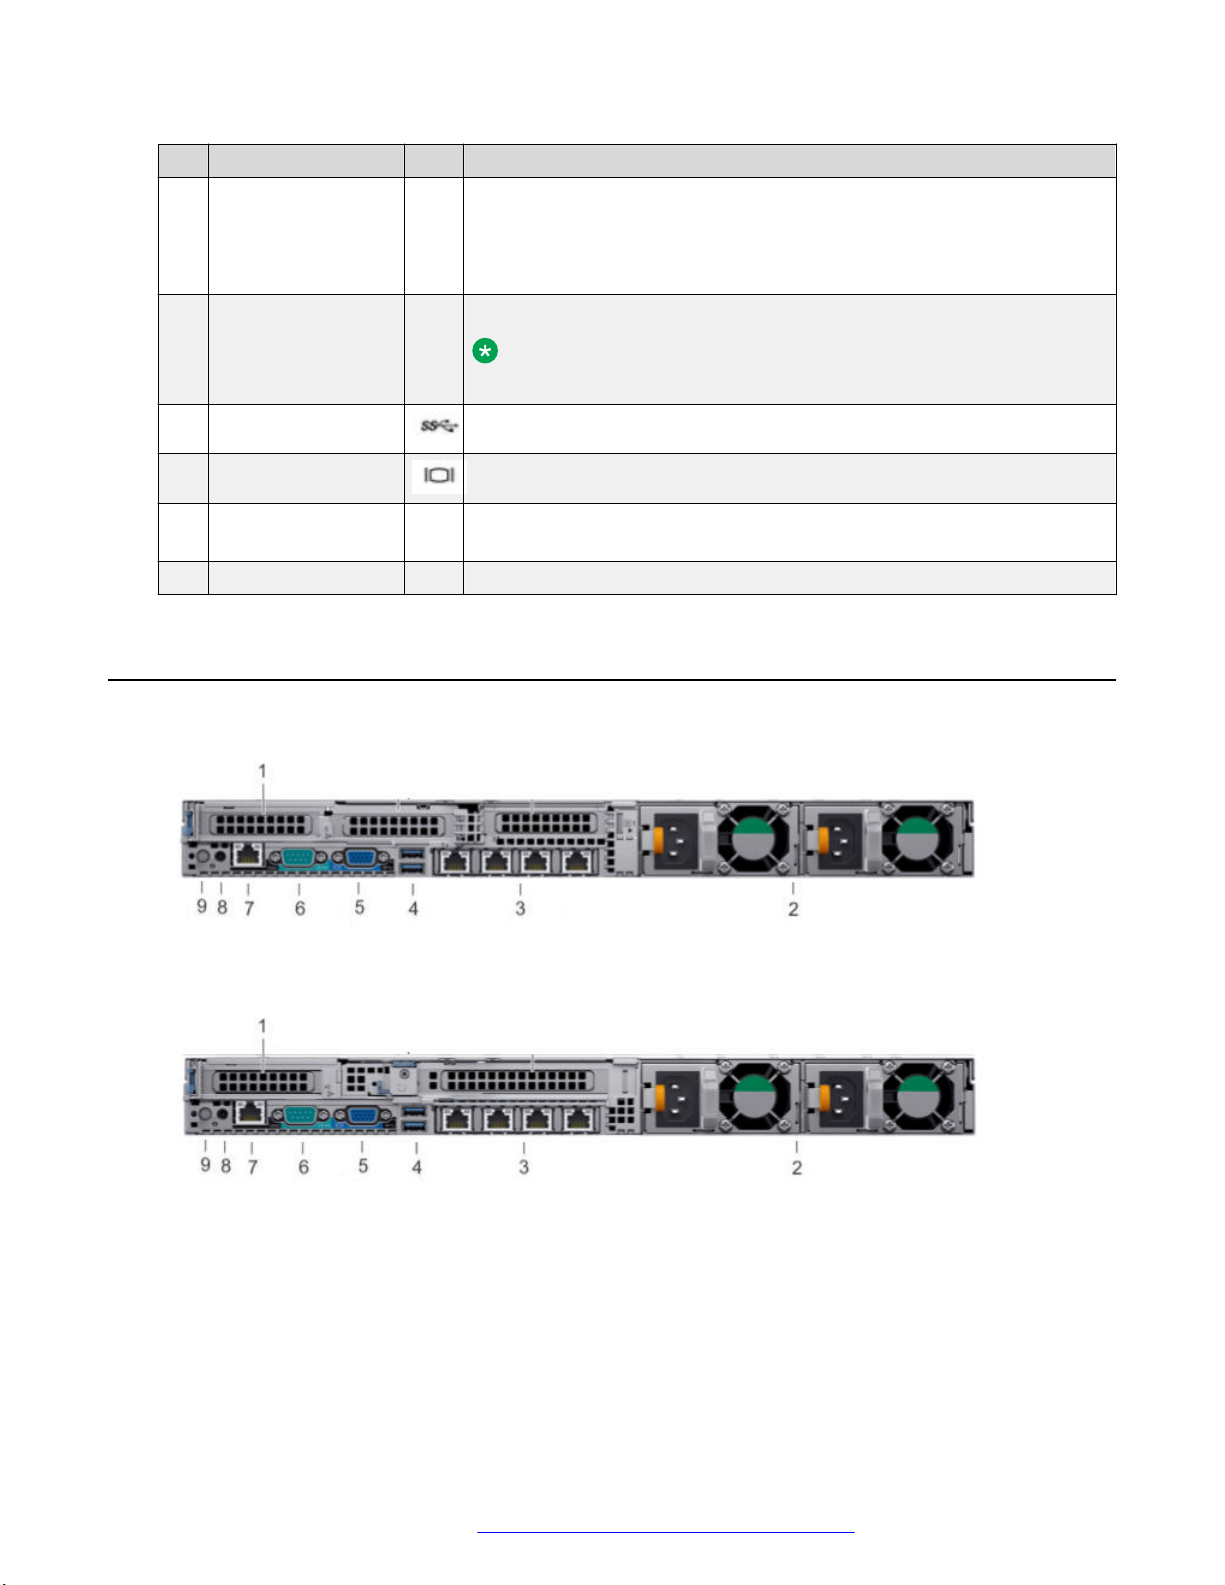
Back view of Dell™ PowerEdge™ R640 Server
Figure 2: Back view of Dell PowerEdge R640 single CPU server
Figure 3: Back view of Dell PowerEdge R640 dual CPU server
October 2019 Installing the Avaya Converged Platform 130 Series 14
Comments on this document? infodev@avaya.com
Page 15
Avaya Converged Platform Appliance profiles
No. Item Icon Description
1 PCIe expansion
card slot(s)
2 Power supply unit
(2)
3 NIC port (4) The NIC ports that are integrated on the network daughter card (NDC)
4 USB 3.0 port The USB ports are of 9-pin and 3.0-compliant. These ports enable you
5 VGA port Enables you to connect a display device to the system.
6 Serial port Enables you to connect a serial device to the system.
N/A Enables you to install PCI Express expansion cards.
Note:
Avaya Converged Platform profile 2, 3, 4, 5, and 51 have a 2-port
1GbE NIC.
N/A Wattage and voltage type depends on configuration.
provide network connectivity.
to connect USB devices to the system.
7 iDRAC9 Enterprise
port
8 CMA power port N/A The Cable Management Arm (CMA) power port enables you to connect
9 System
identification button
Enables you to remotely access iDRAC.
to the CMA.
The System Identification (ID) button is available on the front and back
panel of the systems. Press the button to identify a system in a rack by
turning on the system ID button. You can also use the system ID button
to reset iDRAC and to access BIOS using the Step Through mode.
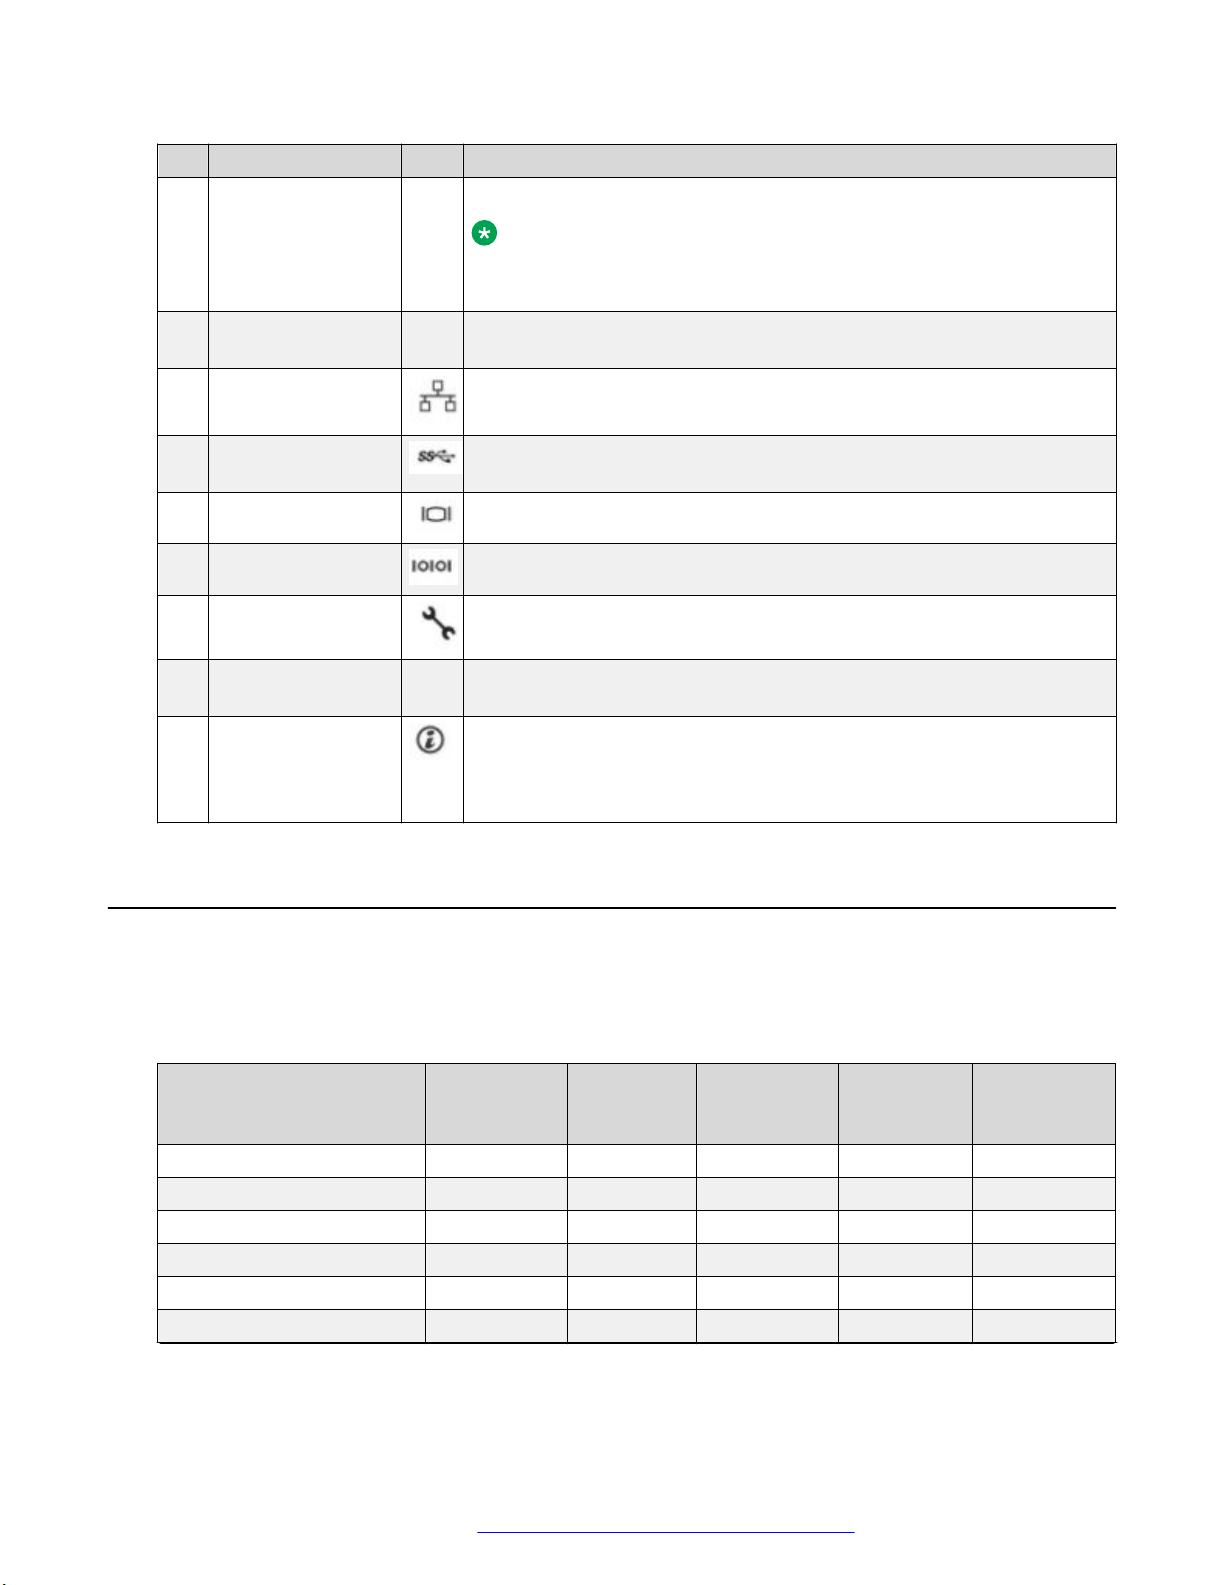
Avaya Converged Platform Appliance profiles
In the Avaya Converged Platform 100 Series Release 4.0, the server constructs are reduced and
shared among Avaya Converged Platform 110 Appliance, Avaya Converged Platform 120
Appliance, and Avaya Converged Platform 130 Appliance.
Appliance Constructs Profile #2 Profile #3 Profile #4 Profile #5 Profile #51
(ACP 130
Only)
RMU 1U 1U 1U 1U 1U
Intel Skylake CPU S-4114 S-4114 G-6132 G-6132 G-6132
Number of CPUs Sockets 1 2 1 2 2
Number of Cores/Server 10 20 14 28 28
Core Frequency (GHz) 2.2 2.2 2.6 2.6 2.6
Number of 8GB RDIMMs 3 6 - - -
Table continues…
October 2019 Installing the Avaya Converged Platform 130 Series 15
Comments on this document? infodev@avaya.com
Page 16
Overview
Appliance Constructs Profile #2 Profile #3 Profile #4 Profile #5 Profile #51
Number of 16 GB RDIMMs - - 6 12 12
Memory/Server in GB 24 48 96 192 192
10K 2.5” SAS HDD Size GB 600 600 600 600 600
Number of HDDs 2.5” 10K
SAS
RAID Options 5 6 6 6 6
Usable Virtual Disk
Capacity
Network 1 Gb ports 6 6 6 6 6
Power Supplies (750W) 2 2 2 2 2
Rail Kit Y Y Y Y Y
DVD-RO Drive Y Y Y Y Y
3 4 4 6 8
1.2/1.09 TiB 1.2/1.09 TiB 1.2/1.09 TiB 2.4/2.18 TiB 3.6/3.27 TiB
(ACP 130
Only)
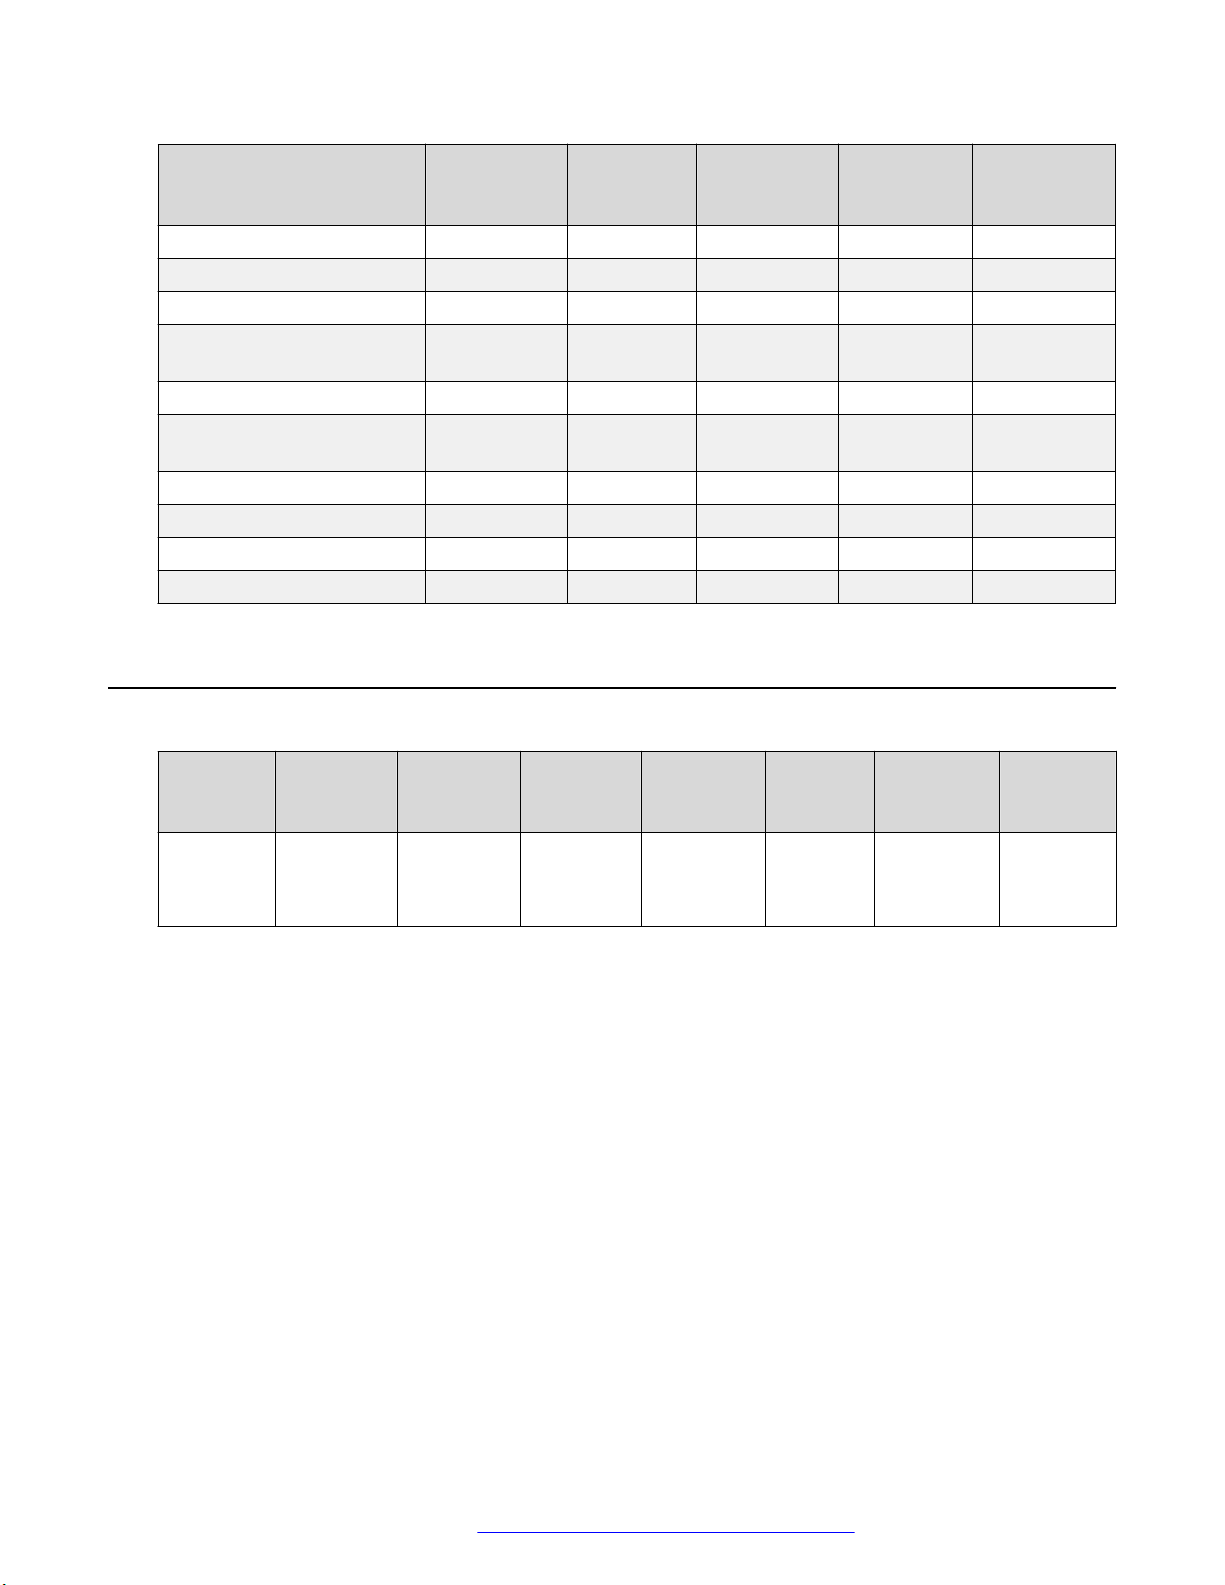
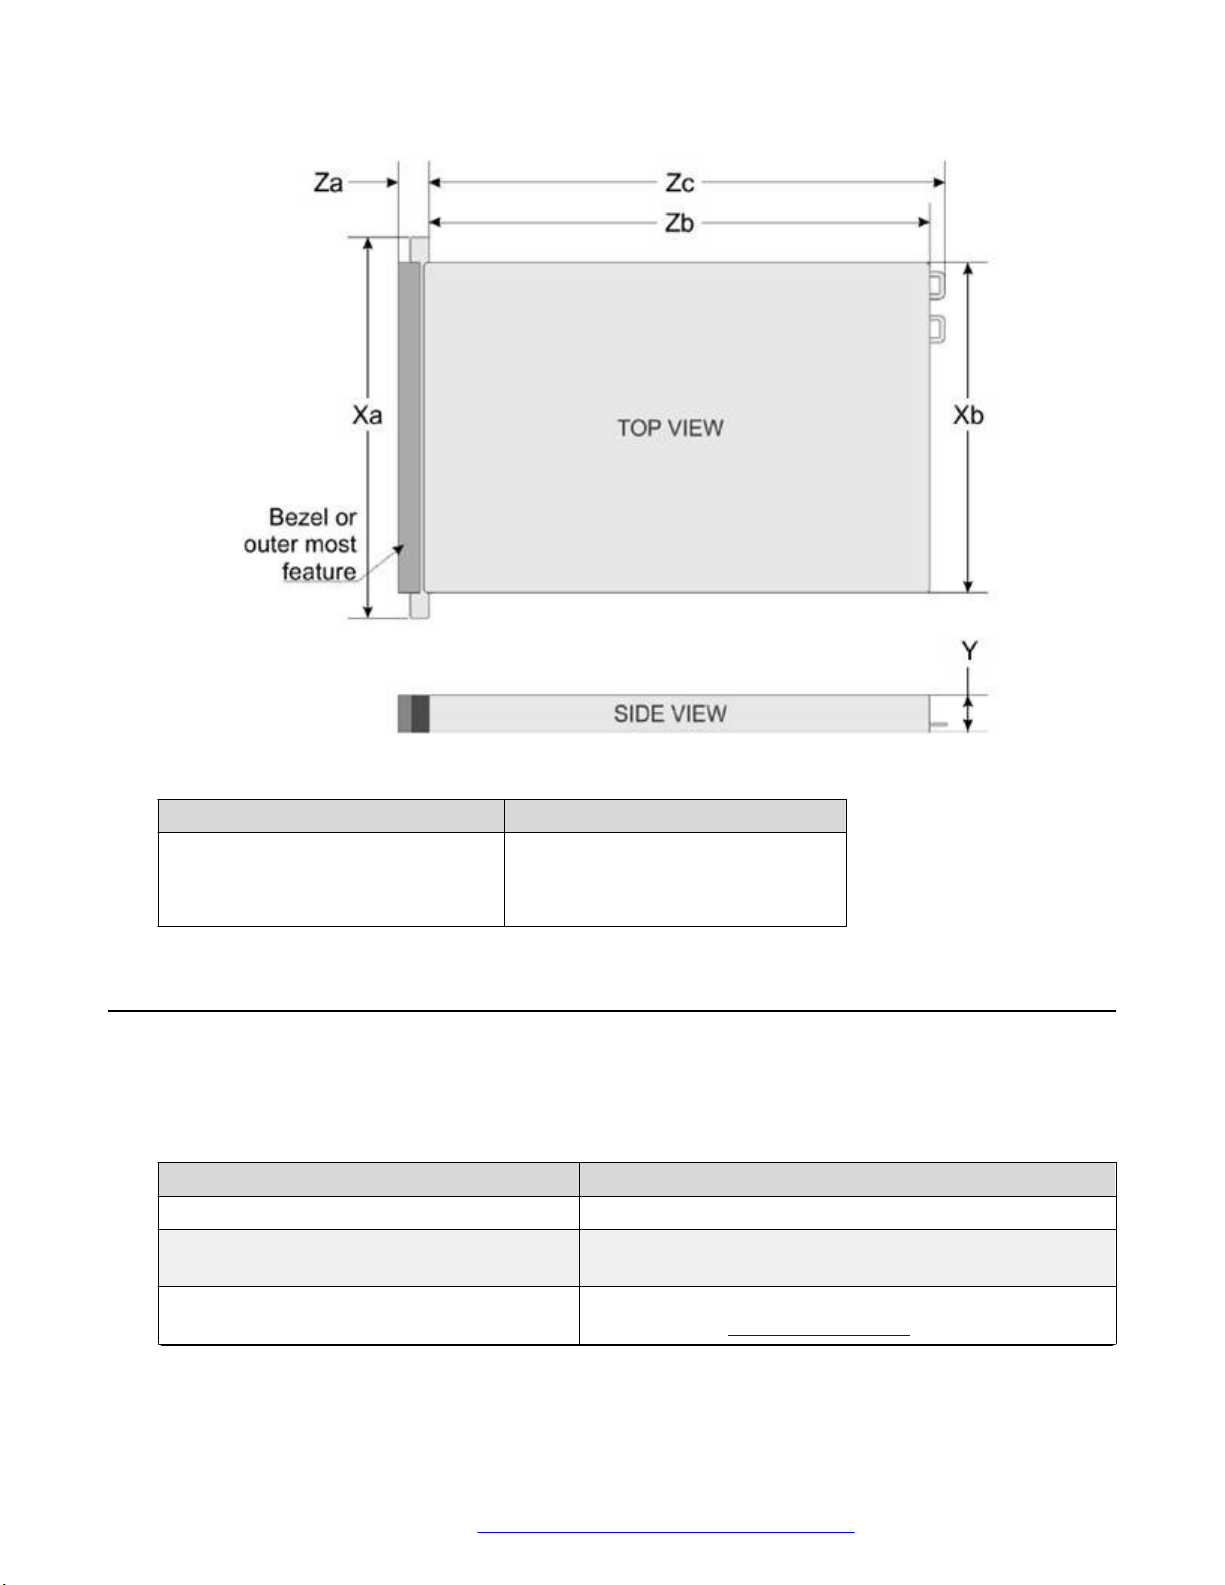
Dell PowerEdge R640 server dimensions
R640
Server
8x2.5 inch
HDDs
Xa Xb Y Za (with
bezel)
482.0 mm
(18.97
inches)
434.0 mm
(17.08
inches)
42.8 mm
(1.68
inches)
35.84 mm
(1.41
inches)
Za
(without
bezel)
22.0 mm
(0.87
inches
Zb* Zc
683.05 mm
(26.89
inches)
721.91
(28.42
inches)
October 2019 Installing the Avaya Converged Platform 130 Series 16
Comments on this document? infodev@avaya.com
Page 17
Environmental requirements
Weight
System
Avaya Converged Platform 100
series
Dell PowerEdge R640
Maximum Weight
21.9 kilogram
(48.28 lbs)
Environmental requirements
The tables in this section list the environmental requirements for the server.
Table 1: Temperature
Temperature
Storage –40°C to 65°C (–40°F to 149°F)
Continuous operation (for altitude less than
950 m or 3117 ft)
Fresh air For information about fresh air, see Expanded Operating
Specifications
10°C to 35°C (50°F to 95°F) with no direct sunlight on the
equipment.
Temperature at https://www.dell.com.
Table continues…
October 2019 Installing the Avaya Converged Platform 130 Series 17
Comments on this document? infodev@avaya.com
Page 18
Overview
Temperature Specifications
Maximum temperature gradient (operating
20°C/h (68°F/h)
and storage)
Table 2: Relative humidity
Relative humidity Specifications
Storage 5% to 95% RH with 33°C (91°F) maximum dew point.
Atmosphere must be non-condensing at all times.
Operating 10% to 80% relative humidity with 29°C (84.2°F)
maximum dew point.
Table 3: Maximum vibration
Maximum vibration Specifications
Operating 0.26 G
Storage 1.88 G
at 5 Hz to 350 Hz (all operation orientations).
rms
at 10 Hz to 500 Hz for 15 min (all six sides
rms
tested).
Table 4: Maximum shock
Maximum shock Specifications
Operating Six consecutively executed shock pulses in the positive
and negative x, y, and z axes of 6 G for up to 11 ms.
Storage Six consecutively executed shock pulses in the positive
and negative x, y, and z axes (one pulse on each side of
the system) of 71 G for up to 2 ms.
Table 5: Maximum altitude
Maximum altitude
Specifications
Operating 3048 m ( 10,000 ft)
Storage 12,000 m (39,370 ft)
Table 6: Operating temperature de-rating
Operating temperature de-rating
Specifications
Up to 35°C (95°F) Maximum temperature is reduced by 1°C/300 m (1°F/547
ft) above 950 m (3,117 ft).
35°C to 40°C (95°F to 104°F) Maximum temperature is reduced by 1°C/175 m (1°F/319
ft) above 950 m (3,117 ft).
40°C to 45°C (104°F to 113°F) Maximum temperature is reduced by 1°C/125 m (1°F/228
ft) above 950 m (3,117 ft).
October 2019 Installing the Avaya Converged Platform 130 Series 18
Comments on this document? infodev@avaya.com
Page 19
Table 7: Standard operating temperature
Standard operating temperature Specifications
Continuous operation (for altitude less than
950 m or 3117 ft)
5°C–40°C (41°F–104°F) with no direct sunlight on the
equipment.
Power requirements
The system supports up to two AC power supply units (PSU).
Table 8: PSU specifications
Power requirements
PSU Class Heat dissipation
(maximum)
750 W AC Platinum 2891 BTU/hr 50/60 Hz 100–240 V AC, autoranging
Table 9: ACP 100 Series - Dell R640 Power Requirements
ACP100 Series Dell R640 System VA rating Heat Output (BTU/hr) Peak Power Max.
Profile 2 200 680 270
Profile 3 340 1161 457
Profile 4 283 1066 365
Profile 5 504 1721 655
Profile 51 528 1802 685
Frequency Voltage
(Watts)
October 2019 Installing the Avaya Converged Platform 130 Series 19
Comments on this document? infodev@avaya.com
Page 20
Chapter 3: Installation
Installation checklist
Use the following checklist to complete the installation of the server.
No. Task Description Notes
1 Discharge electrostatic energy. See Electrostatic discharge on
page 20.
2 Inspect package contents. See Package contents on
page 21.
3 Install the server using the rail kit. See Installing the server on
page 22.
4 Attach cables. See Attaching cables on
page 26.
5 Connect power. See Connecting power on
page 27.
The following items are application-specific. Refer to the application-specific documentation for
additional information on:
• Initial configuration and IP address assignment.
• Ethernet port cabling.
• Application shutdown procedures.
Electrostatic discharge
Electrostatic discharge (ESD) is a discharge of stored static electricity that can damage equipment
and impair electrical circuitry. Electrostatic voltages can result from friction including, pulling
cabling through conduits, walking across carpeted areas, and building static charge in clothing.
When you improperly handle electronic components, ESD damage occurs and can result in
complete or intermittent failures. While networking equipment is commonly designed and tested to
withstand common mode ESD events, voltage can sometimes discharge to some connector pins,
which can potentially damage the networking equipment.
October 2019 Installing the Avaya Converged Platform 130 Series 20
Comments on this document? infodev@avaya.com
Page 21

Package contents
To protect against ESD damage, take the following measures before you connect data cables to
the device:
• Always use antistatic wrist straps. Make sure you adjust the strap to provide good skin
contact.
• Ensure that you properly ground work surfaces and equipment racks for protection against
electrostatic discharge. You must connect the common point to the building ground wire. In a
properly wired building, the nearest reliable ground is typically at the electrical outlet.
• Avoid contact between equipment and clothing. The wrist or ankle strap protects only the
equipment from ESD voltages on the body; ESD voltages on clothing can still cause damage.
• Avoid touching any connector pins.
• Do not remove the wrist or ankle strap until the installation is complete.
Package contents
The following items are provided with your server. Contact Avaya Support if any of the following
items are not present.
• Dell A7 ReadyRails II sliding rail assembly kit
- Two Dell A7 ReadyRails II sliding rail assemblies
- Two hook and loop straps
• Cable management arm kit
- Cable management arm
- Static support tray
- Status indicator cable
- Cable tie wraps
- Right attachment bracket
- Left attachment bracket
• Server faceplate
• Server faceplate key
• Rack Installation Instructions Booklet
• Enterprise Products Safety, Environmental and Regulatory Information Booklet.
October 2019 Installing the Avaya Converged Platform 130 Series 21
Comments on this document? infodev@avaya.com
Page 22

Installation
Installing the server
About this task
Use this procedure to install the server using the provided rail kit.
Before you begin
Warning:
• Before you begin, read and follow the safety instructions in your Safety, Environmental,
and Regulatory information document shipped with your system.
• To avoid injury, do not attempt to lift the system by yourself.
• Verify that the rack is installed according to the manufacturer's instructions and in
accordance with all local codes and laws. Verify that the rack is grounded in accordance
with local electrical code.
Note:
• Avaya customers are required to have a VGA monitor, USB keyboard, and USB mouse
available for use by installation and servicing technicians.
• This rail kit is compatible with square, unthreaded round, and threaded round hole racks.
Procedure
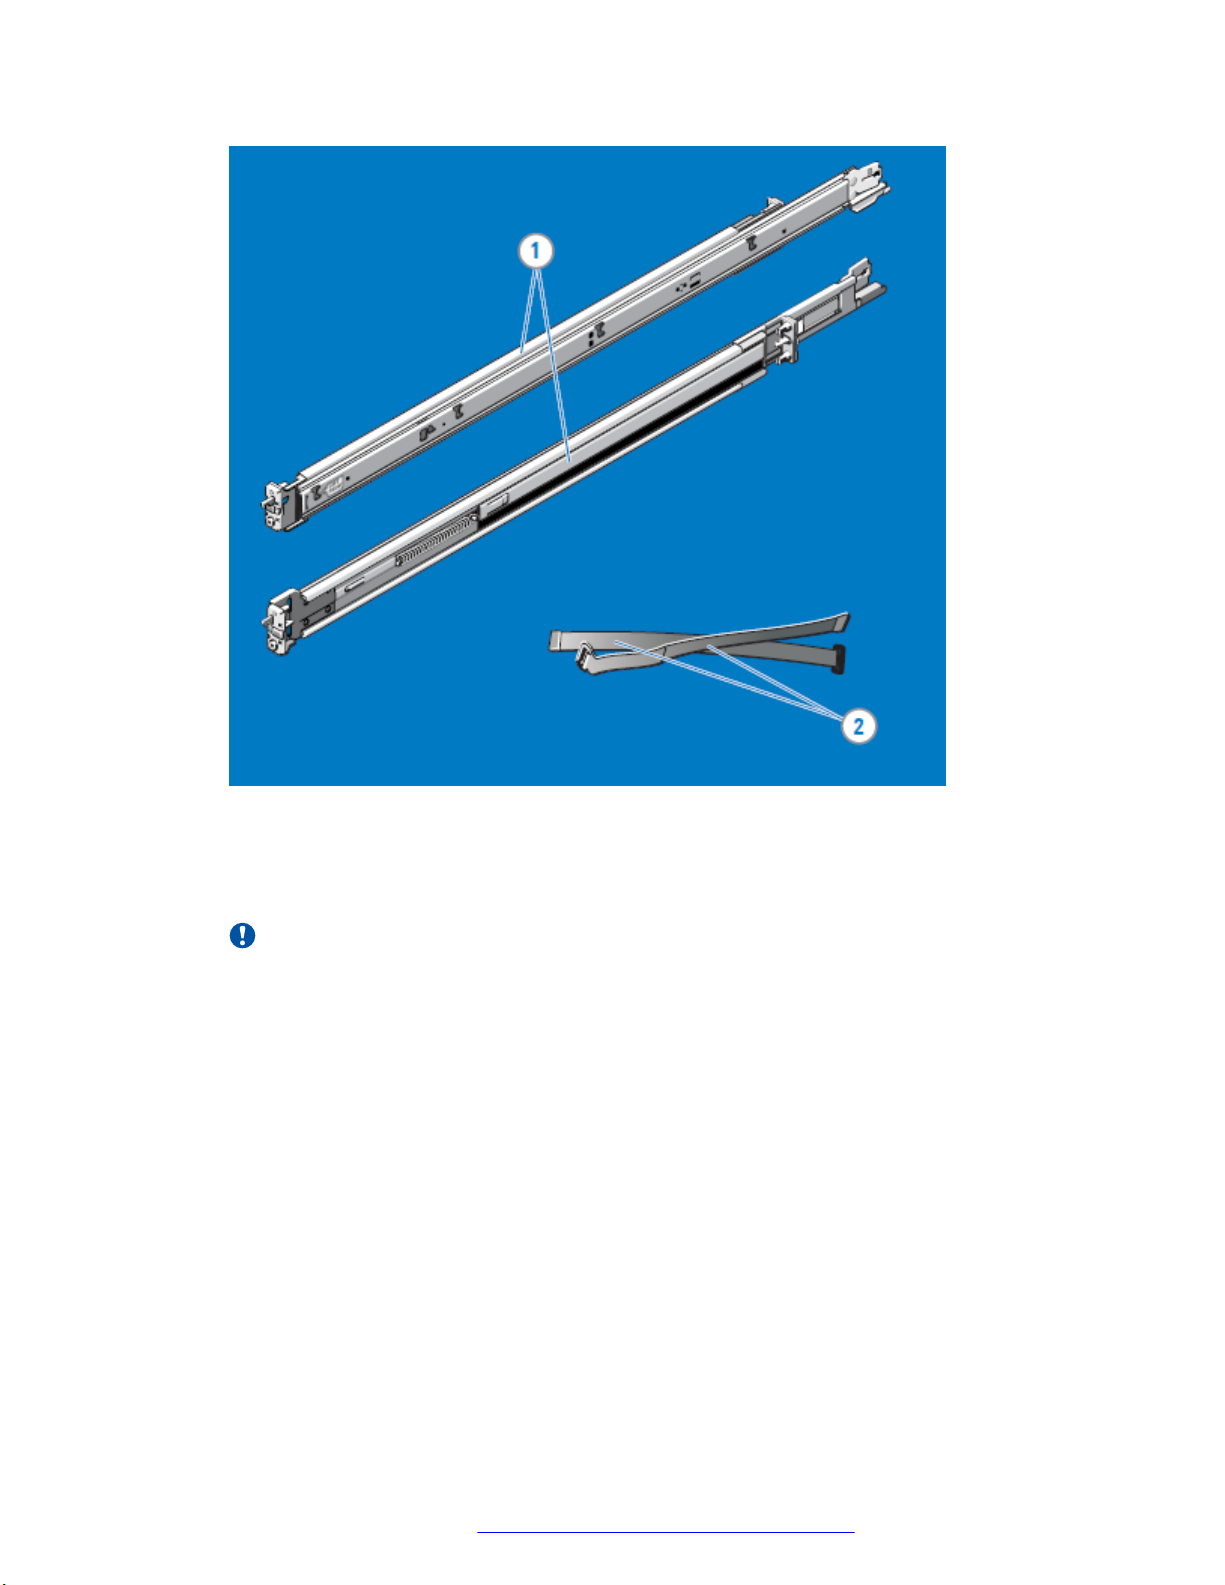
1. Identify and separate the components of the Dell A7 ReadyRails II sliding rail assembly kit.
October 2019 Installing the Avaya Converged Platform 130 Series 22
Comments on this document? infodev@avaya.com
Page 23
Installing the server
• Two Dell A7 ReadyRails II sliding rail assemblies — (1)
• Two hook and loop straps — (2)
2. Place the kit components within easy reach of your work area.
Important:
Rail kit installation is performed using either Step 3 or Step 4 depending on the type of
rails in use. Read each step carefully and consult your installation environment before
proceeding.
October 2019 Installing the Avaya Converged Platform 130 Series 23
Comments on this document? infodev@avaya.com
Page 24
Installation
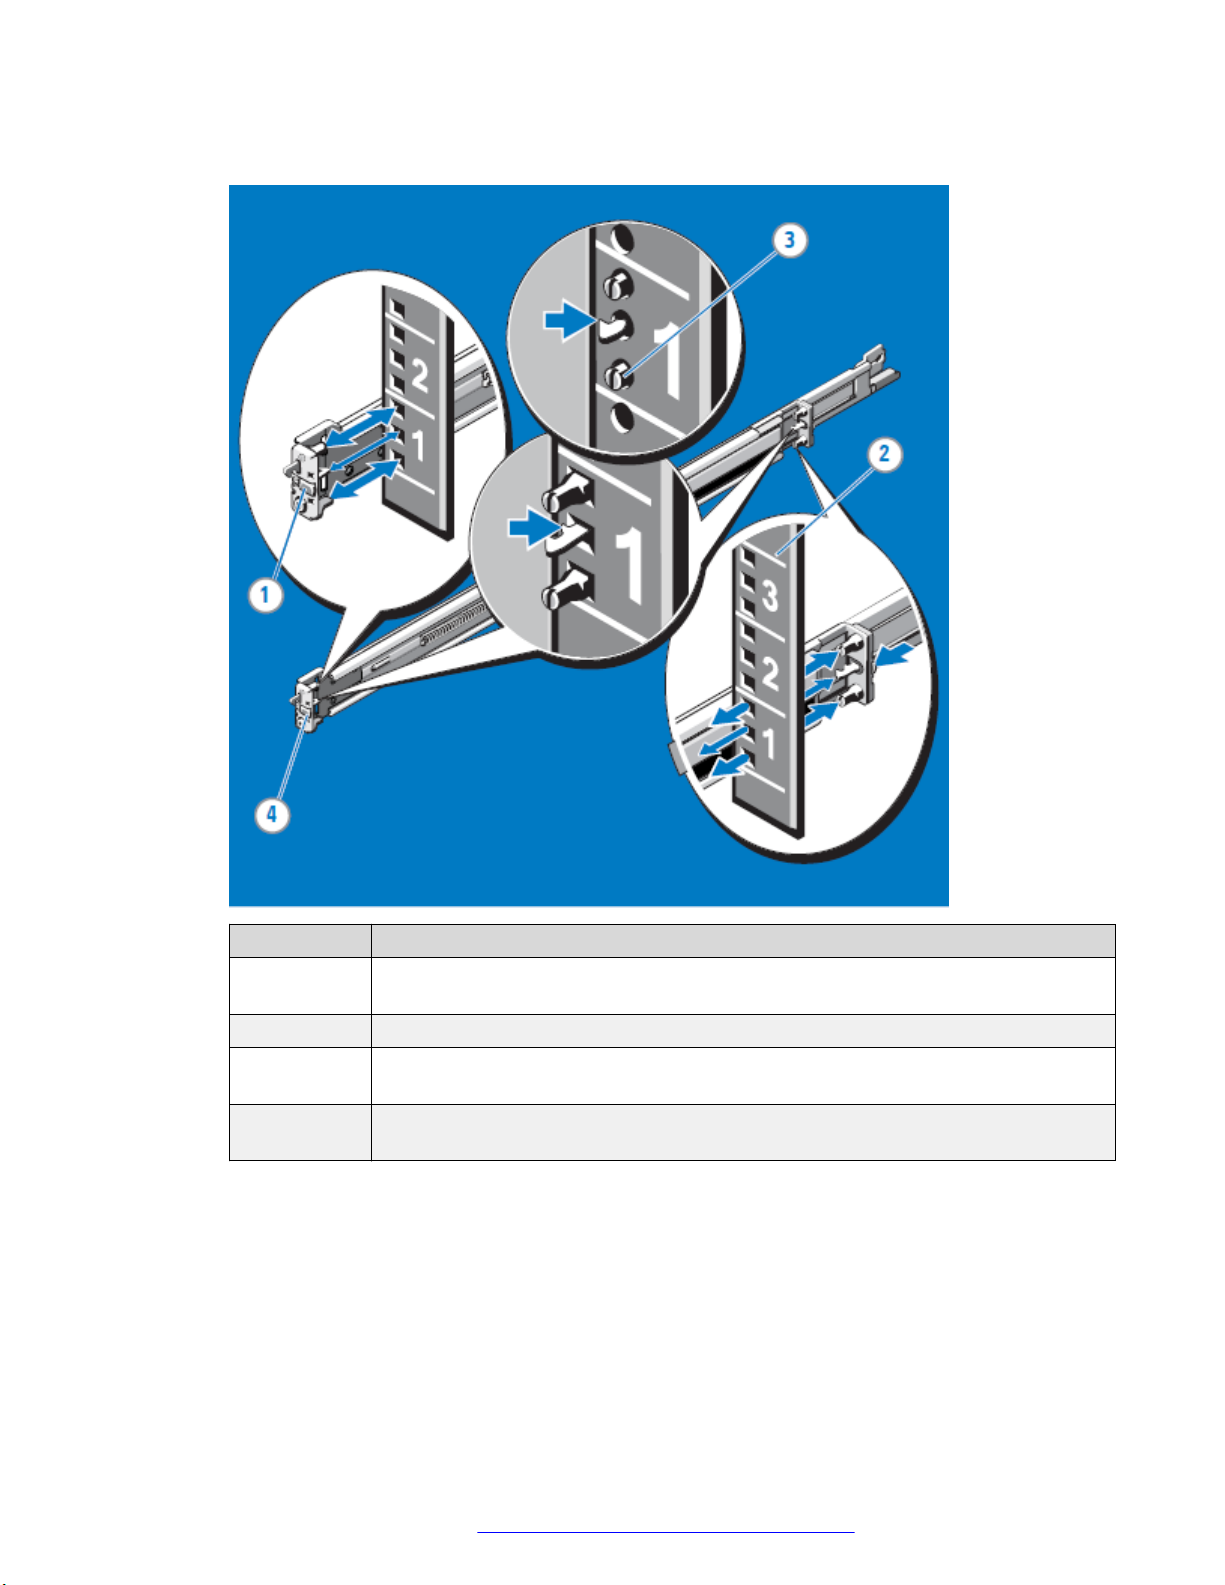
3. Perform the following actions to install toolless rails (Square Hole or Round Hole Racks):
Task order Task
1 Position the left and right rail end pieces labeled FRONT facing inward and orient
each end piece to seat in the holes on the front side of the vertical rack flanges.
2 Align each end piece in the bottom and top holes of the desired rack spaces.
3 Engage the back end of the rail until it fully seats on the vertical rack flange and
the latch clicks into place.
4 Repeat these steps to position and seat the front end piece on the vertical rack
flange.
October 2019 Installing the Avaya Converged Platform 130 Series 24
Comments on this document? infodev@avaya.com
Page 25
Installing the server
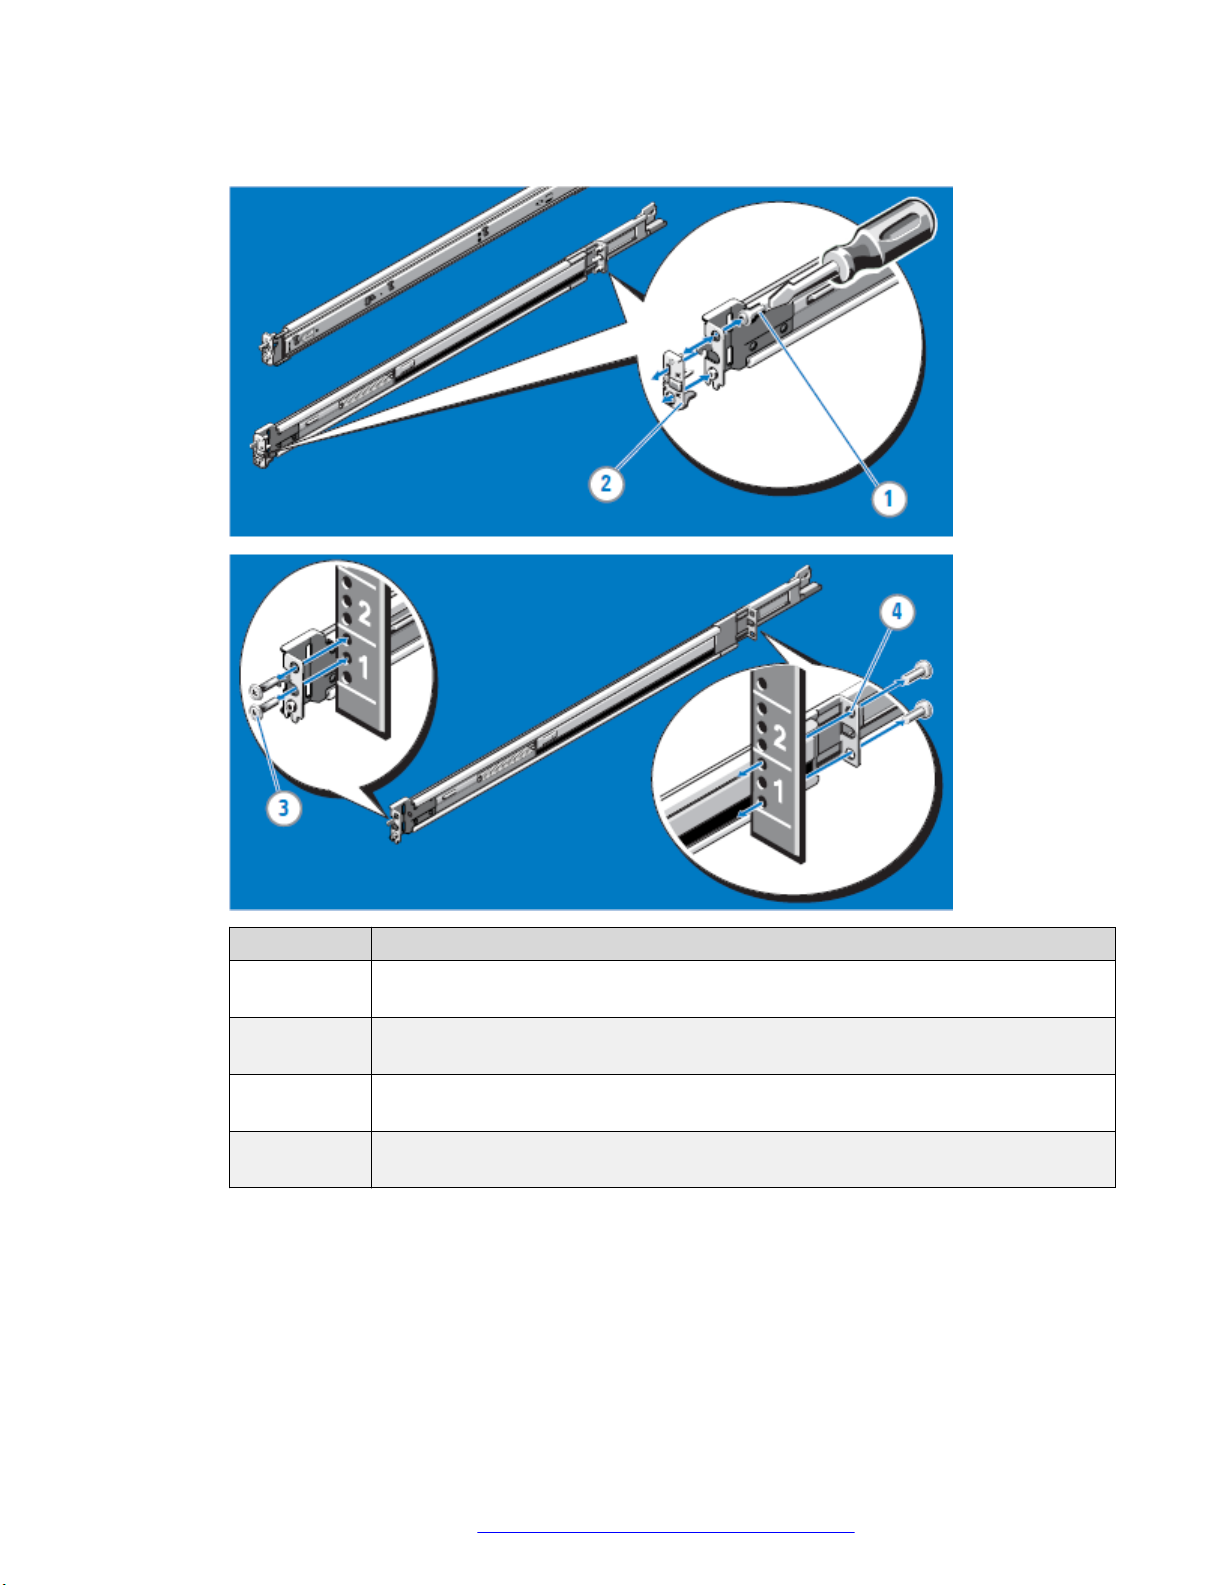
4. Perform the following actions to install toolless rails (Threaded Hole Racks):
Task order Task
1 Remove the pins from the front and rear mounting brackets using a flat-tipped
screwdriver.
2 Pull and rotate the rail latch subassemblies to remove them from the mounting
brackets.
3 Attach the left and right mounting rails to the front vertical rack flanges using two
pairs of screws.
4 Slide the left and right back brackets forward against the rear vertical rack flanges
and attach them using two pairs of screws.
October 2019 Installing the Avaya Converged Platform 130 Series 25
Comments on this document? infodev@avaya.com
Page 26
Installation
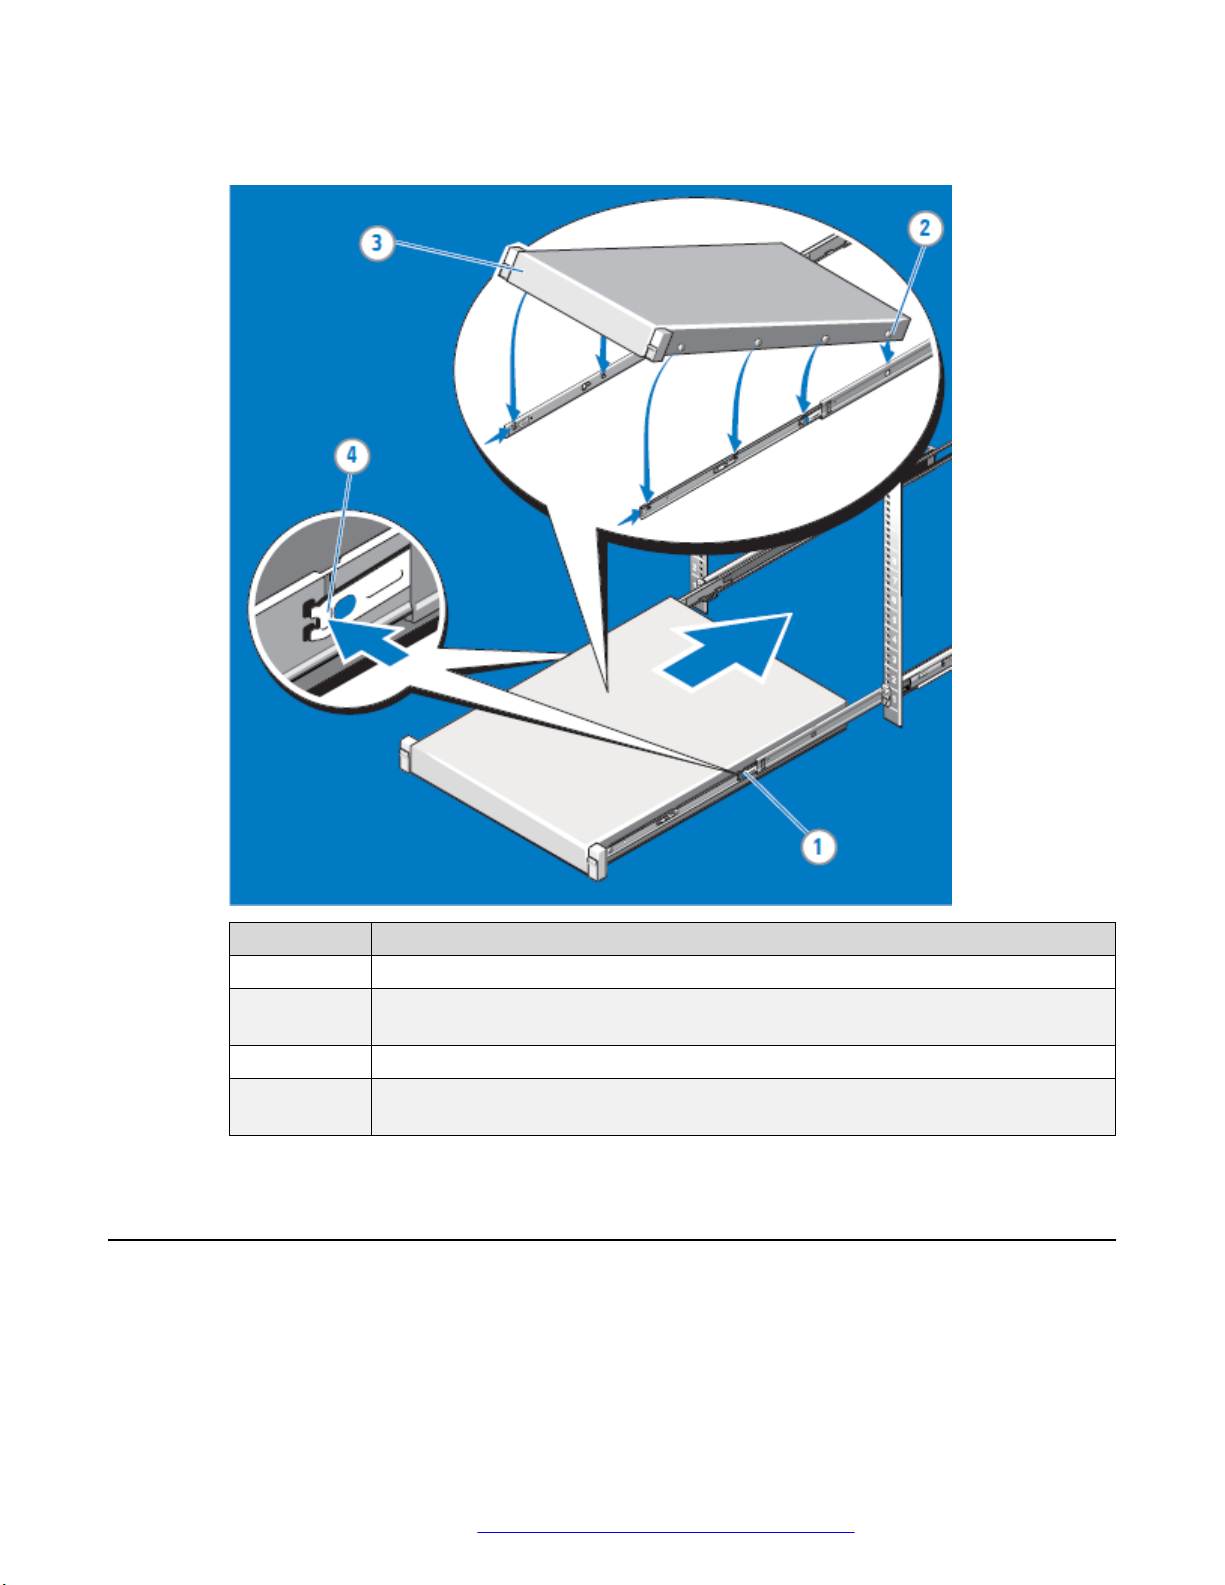
5. Perform the following actions to install the system in the rack:
Task order Task
1 Pull the inner slide rails out of the rack until they lock into place.
2 Locate the rear rail standoff on each side of the system and lower them into the
rear J-slots on the slide assemblies.
3 Rotate the system downward until all the rail standoffs are seated in the J-slots.
4 Push the system inward until the lock levers click into place. Press the slide-
release lock buttons on both rails and slide the system into the rack
Attaching cables
About this task
Use this procedure to attach network and I/O cables to the system.
October 2019 Installing the Avaya Converged Platform 130 Series 26
Comments on this document? infodev@avaya.com
Page 27

Connecting power
Note:
Consult application-specific documentation for information on peripheral and management
device connectivity.
Before you begin
Ensure the system has been installed and secured as outlined in
before you attach cables. Ensure you have taken precautions against electrostatic discharge as
outlined in
Electrostatic discharge on page 20 before you begin.
Installing the server on page 22
Procedure
1. Connect the network cables to the RJ45 port on the system.
2. Connect optional peripherals using the USB ports on the system. If configuring ESXi for
the first time, a USB keyboard will be required.
3. Connect an optional management device using the console port on the system. If
configuring ESXi for the first time, a VGA monitor will be required.
Connecting power
About this task
Use this procedure to connect power to the system.
October 2019 Installing the Avaya Converged Platform 130 Series 27
Comments on this document? infodev@avaya.com
Page 28

Installation
Note:
A region-specific power cable is shipped separately from the server package based on what
was entered in the Configurator Tool.
Before you begin
Ensure the system has been installed and secured before you attach cables. Ensure you have
take precautions against electrostatic discharge before you begin. See the following sections for
more information:
• Installing the server on page 22
• Electrostatic discharge on page 20
Procedure
1. Connect the system to the appropriate power source.
2. Loop and secure the power cable using the retention strap.
3. Attach USB keyboard and VGA monitor to system before powering up.
4. Power on the system.
The following image shows the location of the power button.
October 2019 Installing the Avaya Converged Platform 130 Series 28
Comments on this document? infodev@avaya.com
Page 29

Connecting power
October 2019 Installing the Avaya Converged Platform 130 Series 29
Comments on this document? infodev@avaya.com
Page 30

Chapter 4: Configuration
Purpose
This chapter provides instructions required after physical installation to complete the system setup
of an Avaya integrated staged server, prior to deploying Avaya Application OVAs. This chapter
also includes instructions to disable TLS 1.0 and 1.1 and to configure SNMP v2 settings for ESXi.
Dell R640 XL ESXi Configuration
Overview
The Avaya Converged Platform130 (ACP 130) is initially supported on Dell R640 servers. This
section provides the instructions required after physical installation to complete the system setup
prior to deploying Avaya Application OVAs.
Required items
• Dell R640 server
• console VGA monitor
• USB keyboard
Configuring ESXi Network Settings
About this task
Use this procedure to configure ESXi Network Settings.
Before you begin
Ensure that you have the following:
• Dell R640 Server
• Console VGA Monitor
• USB Keyboard
October 2019 Installing the Avaya Converged Platform 130 Series 30
Comments on this document? infodev@avaya.com
Page 31

Procedure
1. Connect a VGA monitor and USB keyboard to the server.
Connection points for VGA monitor and USB keyboard are also on the rear of the server.
Dell R640 XL ESXi Configuration
2. Power on the server.
The initialization process will take a few minutes. Do not press any additional keys strokes
until prompted to do so.
October 2019 Installing the Avaya Converged Platform 130 Series 31
Comments on this document? infodev@avaya.com
Page 32

Configuration
3. Once ESXi has loaded, select F2 to administer configuration settings.
October 2019 Installing the Avaya Converged Platform 130 Series 32
Comments on this document? infodev@avaya.com
Page 33

4. Log in as a root user, using the password, ACP130_pw.
Dell R640 XL ESXi Configuration
5. From the System Customization menu, select Configure Password. Create a unique
new password to better secure the server, and press Enter to submit the change and
return to the System Customization menu.
Important:
Once a new password is configured, be sure to keep track of the new password. If the
new password is lost or forgotten, ESXi will need to be reinstalled.
October 2019 Installing the Avaya Converged Platform 130 Series 33
Comments on this document? infodev@avaya.com
Page 34

Configuration
6. Select Configure Management Network and press Enter.
October 2019 Installing the Avaya Converged Platform 130 Series 34
Comments on this document? infodev@avaya.com
Page 35

7. Select IPv4 Configuration and press Enter.
Dell R640 XL ESXi Configuration
October 2019 Installing the Avaya Converged Platform 130 Series 35
Comments on this document? infodev@avaya.com
Page 36

Configuration
8. Tab to Set static IPv4 address and network configuration and press the spacebar to
select this option. Tab down to enter related IP information. When complete, press Enter.
October 2019 Installing the Avaya Converged Platform 130 Series 36
Comments on this document? infodev@avaya.com
Page 37

Dell R640 XL ESXi Configuration
9. The Manual label should now be associated with the IP address fields, indicating static
addressing is now required.
October 2019 Installing the Avaya Converged Platform 130 Series 37
Comments on this document? infodev@avaya.com
Page 38

Configuration
10. Select DNS Configuration and press Enter.
11. Obtain DNS server addresses and a hostname automatically will be selected as
default. Tab to Use the following DNS server addresses and hostname and press the
October 2019 Installing the Avaya Converged Platform 130 Series 38
Comments on this document? infodev@avaya.com
Page 39

Dell R640 XL ESXi Configuration
spacebar to select it. Tab down to enter the IP address(es) of the DNS server and the
hostname of the server. When complete, press Enter.
October 2019 Installing the Avaya Converged Platform 130 Series 39
Comments on this document? infodev@avaya.com
Page 40

Configuration
12. After pressing Enter a second time from the main Configure Network Management
screen, VMware prompts the administrator to save the configuration. Type Y (Yes) to save,
and then press Esc to back out to the previous admin level.
October 2019 Installing the Avaya Converged Platform 130 Series 40
Comments on this document? infodev@avaya.com
Page 41

Dell R640 XL ESXi Configuration
13. From the System Customization screen, select Troubleshooting Options.
14. ESXi Shell is enabled by the Integrator. However, for a new install of ESXi, you must
enable this setting. From the submenu, highlight Disable ESXi Shell. The function is
October 2019 Installing the Avaya Converged Platform 130 Series 41
Comments on this document? infodev@avaya.com
Page 42

Configuration
disabled by default; press Enter to change the state to Enabled, as seen on the right side
of the screen.
*Shell will be enabled for all deployments unless otherwise requested by the customer
October 2019 Installing the Avaya Converged Platform 130 Series 42
Comments on this document? infodev@avaya.com
Page 43

Dell R640 XL ESXi Configuration
15. SSH is enabled by the Integrator. However, for a new install of ESXi, you must enable this
setting. Highlight Disable SSH. This function is disabled by default; press Enter to change
the state to Enabled. Then press Esc to exit the admin process.
The server is now ready for OVA installation. You may now access the system using the
root login and your customer defined password.
Configuring autostart on ESXi host using Embedded Host Client
About this task
To start VMs automatically when ESXi host starts up, you can use ESXi Embedded Host Client to
configure autostart on the ESXi host.
Procedure
1. Log into the ESXi Embedded Host Client using a web browser.
2. In the Navigator pane on the left, click Manage.
3. On the System tab, click Autostart.
4. Click Edit settings.
October 2019 Installing the Avaya Converged Platform 130 Series 43
Comments on this document? infodev@avaya.com
Page 44

Configuration
5. In the Change autostart configuration window, set the autostart configuration as follows:
a. In the Enabled field, select Yes.
b. In the Start delay field, type 120.
c. In the Stop delay field, type 120.
d. In the Stop action field, click Shut down.
e. In the Wait for heartbeat field, select no.
6. Click Save.
7. Click the right mouse button on the host name, and click Reboot to restart the server.
Next steps
After the server has restarted, verify that all VMs are powered on and are correctly configured.
Configuring SNMP v2 on an ESXi 6.5 host
About this task
The SNMP configuration can report ESXi related traps and alarms to multiple trap receivers. The
SNMP v2 setting is available on ESXi. This section provides steps on configuring SNMP v2.
Note:
The SSH functionality must be enabled on ESXi. The Avaya installation guidelines direct
administrators to enable SSH, so this should not be an issue. If, however, ESXi shell is not
enabled, refer to steps 14 and 15 above under the “Steps for Configuring ESXi Network
Settings” section to enable ESXi shell and SSH.
October 2019 Installing the Avaya Converged Platform 130 Series 44
Comments on this document? infodev@avaya.com
Page 45

Procedure
1. From a Putty session, via SSH, access the ESXI host.
Dell R640 XL ESXi Configuration
2. Type the following command to set the community string to be exchanged between the
ESXi host and the trap receiver(s):
esxcli system snmp set -–communities <community string>
3. Administer the trap receivers:
esxcli system snmp set –targets <SAL_GW_IP_ADDRESS>@<port#>/<community>
Example with multiple targets, separated by a comma:
esxcli system snmp set –targets 10.1.1.1@162/avaya123,10.1.1.2@162/avaya123
4. Enable SNMP on the host using the following command:
esxcli system snmp set --enable true
October 2019 Installing the Avaya Converged Platform 130 Series 45
Comments on this document? infodev@avaya.com
Page 46

Configuration
5. Confirm the settings with the following command:
esxcli system snmp get
Services Port Configuration
Purpose
This section provides instructions for configuring the Avaya Converged Platform 130 Series
services port using the ACP130srvprt-cfg.sh script. The services port will provide Avaya
support and technicians with access to the server for maintenance and troubleshooting activities.
Configuring Avaya Converged Platform 130 Services Port
About this task
Use this procedure to configure Avaya Converged Platform 130 Services Port.
Important:
For any Avaya Converged Platform 130 server shipped before March 15, 2019, the services
port was not configured at the factory. Avaya Converged Platform 130 server recovery or
software remastering will require the ACP130srvprt-cfg.sh script to be copied to the ESXi
shell and the script to be run. On a recovery, this script should be run prior to deploying any
OVAs. Refer to the Before you begin section below before running the services port script, to
validate the configuration before proceeding. The ACP130srvprt-cfg.sh script can be
obtained from http://plds.avaya.com using the PLDS download ID ACP0000002.
October 2019 Installing the Avaya Converged Platform 130 Series 46
Comments on this document? infodev@avaya.com
Page 47

Dell R640 XL ESXi Configuration
Before you begin
Validate that the Services port group has not been created and configured or that another
application has not configured the vSwitch1 for their product implementation.
• Log in to the vSphere Web Client for the ESXi Host.
• Go to Networking > Port Groups.
• Validate that there is not a Services port group created or that another application has not
already assigned to vSwitch1 for their product deployment.
- If Services port and vSwitch1 has not been created, follow the procedure below to create
it.
- If the Services port is configured, then there is no need to run the script to configure the
Services port. If the vSwitch1 has been created for another use besides a Services port,
contact Avaya Support for configuration of the Services port if needed. Do not run the
script and overwrite the existing vSwitch1 arrangement.
Important:
Running the script will overwrite the current services port group or vSwitch1 if it is configured.
Procedure
1. Copy file ACP130srvprt-cfg.sh to the Avaya Converged Platform 130 ESXi 6.5
directory /bin.
2. Use WinSCP from a Windows machine or scp from a Linux machine for copying file to
ESXi host.
Using WinSCP
Using Linux SCP
October 2019 Installing the Avaya Converged Platform 130 Series 47
Comments on this document? infodev@avaya.com
Page 48

Configuration
3. Refer to the screen shot below for the steps to configure Avaya Services Port:
a. Log in to the ACP130 ESXi 6.5 host SSH console using root credentials, using
PuTTY.
The default password is: ACP130_pw
b. Run the following command:
cd /bin
c. Ensure that the file, ACP130srvprt-cfg.sh is present and permissions for root are
executable (make executable if required [“chmod 755” command in scrape below]).
d. Run ./ACP130srvprt-cfg.sh, to configure vSwitch1.
e. Verify vSwitch0 and vSwitch1 are now configured and the services port group is set
to IP address 192.11.13.6/30 on vmk1. Type exit to terminate the session.
The services port is now configured.
October 2019 Installing the Avaya Converged Platform 130 Series 48
Comments on this document? infodev@avaya.com
Page 49

Dell R640 XL ESXi Configuration
Validating vSwitch1 Configuration
About this task
Use this procedure to verify vSwitch1 configuration using the the vSphere ESXi host interface
under Networking.
Procedure
1. Login into the vSphere Web Client for the ESXi Host.
October 2019 Installing the Avaya Converged Platform 130 Series 49
Comments on this document? infodev@avaya.com
Page 50

Configuration
2. Go to Networking > Port Groups.
The Services standard port group should be created and assigned to vSwitch1.
3. Select
Services.
The Services vSwitch topology should display the following:
• VMkernel port (1): vmk1 should be configured with the 192.11.13.6 IP address
• Physical adapter is vmnic1.
• VLAN ID 0
4. Go to Networking > Virtual Services.
5. Select vSwitch1, and validate the following details:
• VMkernel port (1): vmk1 should be configured with the 192.11.13.6 IP address.
• Physical adapter is vmnic1
• VLAN ID 0
October 2019 Installing the Avaya Converged Platform 130 Series 50
Comments on this document? infodev@avaya.com
Page 51

Dell R640 XL ESXi Configuration
Sample Service’s vSwitch Configuration
The following illustration represents a sample Application deployment with a pre-configured
Services port:
October 2019 Installing the Avaya Converged Platform 130 Series 51
Comments on this document? infodev@avaya.com
Page 52

Configuration
Management of the TLS protocol configuration for vSphere 6.5 U2 Environment
As of March 2019, TLS v1.0 and TLS v1.1 are disabled in Avaya Converged Platform 130 servers
shipping from the Avaya integrator. TLS v1.0 and TLS v1.1 on servers shipped prior to March
2019 might be enabled. This section provides instructions for disabling TLS v1.0 and TLS v1.1.
Using the vCenter application
Management of the TLS protocol configuration requires direct interaction with the vCenter
application. The standard Avaya Converged Platform 130 offer does not include vCenter. Since
the ACP 130 server will most likely not have vCenter deployed, you can temporary use the free
version of the application.
Download a free 60–day trial of vCenter from the VMware website:
vmware/details?productId=614&downloadGroup=VC650
https://my.vmware.com/web/
TLS protocol management
This section covers the process for disabling TLS v1.0 and TLS v1.1 and enabling TLS v1.2 only
within the vCenter Server Appliance and ESXi host. By default, TLS v1.0, v1.1 and v1.2 are
enabled, TLS v1.2 cannot be disabled. Use TLS Reconfigurator Utility Tool to enable and
disable TLS protocols. You can download the tool from the VMware website.
Note:
If you have your ACP 130 server shipped and provided prior to the end of March 2019, you
must disable TLS v1.0 and v1.1 and enable only TLS v1.2 by following the procedures in this
section.
For more information on TLS, see the VMware Knowledge Base article:
article/2147469
Related links
Installing the TLS Reconfigurator Utility Tool on page 52
Viewing Enabled TLS Version on page 53
Configuring TLS v1.2 only for vCenter Server Appliance and Platform Services Controller
Appliance on page 54
Configuring TLS v1.2 only for an individual ESXi host on page 55
Validating TLS v1.0 and v1.1 disablement on an ESXi Host on page 56
https://kb.vmware.com/s/
Installing the TLS Reconfigurator Utility Tool
About this task
For vCenter Server Appliance 6.5 U2, the version of the TLS Reconfigurator Utility Tool to install
will be the following:
VMware-vSphereTlsReconfigurator-6.5.0-7766806.x86_64.rpm
October 2019 Installing the Avaya Converged Platform 130 Series 52
Comments on this document? infodev@avaya.com
Page 53

Dell R640 XL ESXi Configuration
Procedure
1. Go to My.VMware.com to download the .rpm file listed above for vCenter Server
Appliance 6.5 U2.
2. Using WinSCP upload the .rpm file to a location on the vCenter Server Appliance.
3. Open an SSH session into the vCenter Server Appliance using the root credentials.
4. Locate the directory where the .rpm file was uploaded.
5. Run the following command to install the TLS Reconfigurator Utility Tool:
rpm -Uvh VMware-vSphereTlsReconfigurator-6.5.0-7766806.x86_64.rpm
Related links
Management of the TLS protocol configuration for vSphere 6.5 U2 Environment on page 52
Viewing Enabled TLS Version
About this task
Use the following procedure to identify the TLS versions enabled on your vCenter Server
Appliance environment before making the TLS changes.
Procedure
1. Connect to the vCenter Server Appliance using SSH and administrative credentials.
2. Run the following command to navigate to the VcTlsReconfigurator directory.
cd /usr/lib/vmware-TlsReconfigurator/VcTlsReconfigurator
3. Run the following command to view enabled TLS versions. The output of this command
should be similar to the following example:
./reconfigureVc scan
October 2019 Installing the Avaya Converged Platform 130 Series 53
Comments on this document? infodev@avaya.com
Page 54

Configuration
Related links
Management of the TLS protocol configuration for vSphere 6.5 U2 Environment on page 52
Configuring TLS v1.2 only for vCenter Server Appliance and Platform Services Controller Appliance
About this task
Use the following procedure to disable TLS v1.0 and TLS v1.1 and enable v1.2 only for the
vCenter Server Appliance and Platform Services Controller Appliance.
Before you begin
• Create a snapshot of the vCenter Server Appliance virtual machine before performing this
procedure.
• The vCenter Server Appliance must be rebooted when all tasks in the procedure have been
completed. Ensure this procedure is performed in a maintenance window where the
temporary unavailability of the VCSA instance will not impact service.
Procedure
1. Open an SSH session into the vCenter Server Appliance.
2. Enable Bash shell by typing shell in the command line.
3. Run the following command to change to the following directory:
cd /usr/lib/vmware-vSphereTlsReconfigurator/VcTlsReconfigurator
4. To disable TLSv1.0 and TLS v1.1 and enable only TLSv1.2, execute the following
command:
./reconfigureVc update -p TLSv1.2
Note:
It will provide a message stating that the vCenter Server is going to be restarted. Type
Y to continue.
October 2019 Installing the Avaya Converged Platform 130 Series 54
Comments on this document? infodev@avaya.com
Page 55

Dell R640 XL ESXi Configuration
5. When the TLS change completes it will provide a list like the one below showing the
enabled TLS version for each service.
Related links
Management of the TLS protocol configuration for vSphere 6.5 U2 Environment on page 52
Configuring TLS v1.2 only for an individual ESXi host
About this task
Use the following procedure to disable TLS v1.0 and TLS v1.1 and enable TLS v1.2 only for an
individual ESXi host
Before you begin
• The ESXi host must be rebooted for the change to take effect. Ensure this procedure is
performed in a maintenance window where the temporary unavailability of the host will not
impact service.
• When running the script on an individual ESXi host it will prompt for a password. This is the
vCenter Server Appliance root or administrator@vsphere.local password.
October 2019 Installing the Avaya Converged Platform 130 Series 55
Comments on this document? infodev@avaya.com
Page 56

Configuration
• Reverting TLS changes in an ESXi host is not supported.
Procedure
1. Open an SSH session into the vCenter Server Appliance.
2. Enable Bash shell by typing shell in the command line
3. Type the following command to change to the following directory:
4. To disable TLSv1.0 and TLS v1.1 and enable TLSv1.2 only on an individual ESXi host,
cd /usr/lib/vmware-vSphereTlsReconfigurator/EsxTlsReconfigurator
execute the following command:
./reconfigureEsx vCenterHost -h <ESXi_Host_Name> -u <Administrative_User> -p
TLSv1.2
Once completed, the host will be flagged for a reboot.
Related links
Management of the TLS protocol configuration for vSphere 6.5 U2 Environment on page 52
Validating TLS v1.0 and v1.1 disablement on an ESXi Host
About this task
Use the following procedure to validate if TLS v1.0 and v1.1 have been disabled on an ESXi host
Procedure
1. To validate TLS v1.0, disablement do the following:
a. Open an SSH session into the ESXi host.
b. Enable Bash shell by typing shell in the command line.
c. Type the following command to validate if TLS v1.0 has been disabled:
openssl s_client -connect localhost:443 -tls1
Command results should display that there is no certificate and no Master-Key
assigned. See example below
October 2019 Installing the Avaya Converged Platform 130 Series 56
Comments on this document? infodev@avaya.com
Page 57

Dell R640 XL ESXi Configuration
If there is a peer certificate and a Master-Key listed, TLS v1.0 is still enabled.
2. To validate TLS v1.1 disablement, do the following:
a. Open an SSH session into the ESXi host.
b. Enable Bash shell by typing shell in the command line.
c. Type the following command to validate if TLS v1.1 has been disabled:
openssl s_client -connect localhost:443 -tls1_1
Command results should display that there is no certificate and no Master-Key
assigned. See example below:
October 2019 Installing the Avaya Converged Platform 130 Series 57
Comments on this document? infodev@avaya.com
Page 58

Configuration
If there is a peer certificate and a Master-Key listed, TLS v1.1 is still enabled
Related links
Management of the TLS protocol configuration for vSphere 6.5 U2 Environment on page 52
Performing server recovery or software remastering
About this task
In the event of server failure, you should take necessary steps to recover the server data. You may
also need to replace or remaster the system software on Avaya Converged Platform 130
Appliance.
Before you begin
Ensure that you have the following:
• Console VGA monitor
• USB Keyboard
• Appropriate ESXi software downloaded from PLDS. See PSN027079u- Avaya Converged
Platform 130 Dell® R640 Customized Image of VMware ESXi 6.5 U2.
• Latest Avaya certified BIOS/FW update for ACP 130. See PSN027078u- Avaya Converged
Platform 130 Dell® R640 Avaya Certified BIOS/FW Update.
If you are replacing the server, first attempt to import the drives from the failed server. For more
information, see
Process.
October 2019 Installing the Avaya Converged Platform 130 Series 58
Replacing the host server on page 64 and Dell® R640 FRU Replacement
Comments on this document? infodev@avaya.com
Page 59

Performing server recovery or software remastering
Procedure
1. Download the ESXi installation ISO file from PLDS.
2. Burn the ESXi installation ISO file on a DVD.
3. Place the ESXi installation DVD in the DVD tray and boot the server.
The initialization process will take a few minutes. Do not press any additional keys until
prompted to do so.
4. On the Welcome screen, press Enter to continue.
October 2019 Installing the Avaya Converged Platform 130 Series 59
Comments on this document? infodev@avaya.com
Page 60

Configuration
5. On the EULA screen, press F11 to accept the EULA and continue the installation.
The installation program scans the server to identify all available drives to accept the
software.
6. On the Select a Disk to Install or Upgrade screen, ensure that the PERC H730P Mini
drive is highlighted and press Enter to continue.
October 2019 Installing the Avaya Converged Platform 130 Series 60
Comments on this document? infodev@avaya.com
Page 61

Performing server recovery or software remastering
Note:
If the PERC H730P Mini is not displayed as a disk for installation, then configure the
RAID Controller first. For more information, see Dell R640 RAID Configuration on
page 66. Once the RAID configuration is complete, you can start the installation
process again.
October 2019 Installing the Avaya Converged Platform 130 Series 61
Comments on this document? infodev@avaya.com
Page 62

Configuration
7. On the Please select a keyboard layout screen, use the arrow keys to select the language
to be used on the ACP 130 solution, and press Enter to continue.
8. On the Enter a root password screen, type ACP130_pw in the Root password and
Confirm password fields.
9. Press Enter to continue.
October 2019 Installing the Avaya Converged Platform 130 Series 62
Comments on this document? infodev@avaya.com
Page 63

Performing server recovery or software remastering
10. On the Confirm install screen, press F11 to confirm the installation of the software.
11. After the installation is complete, remove the DVD from the tray.
12. Press Enter to reboot and load the ESXi software.
The server will shutdown and reboot.
13. Proceed with the next steps.
October 2019 Installing the Avaya Converged Platform 130 Series 63
Comments on this document? infodev@avaya.com
Page 64

Configuration
Next steps
After the ESXi software is loaded on rebooting the server, do the following:
• Configure ESXi network settings. For more information, see
Settings on page 30.
• Add the license key and install the license. For more information, see
for server recovery or software remastering on page 65.
The license key is located on the server lid. If this is a server replacement, move the lid from
the original server to the newly installed server.
• Enable the Services Port. For more information, see Services Port Configuration on page 46.
Configuring ESXi Network
Adding the license key
Replacing the host server
About this task
In the event of server failure, you may need to replace the host server on Avaya Converged
Platform 130 Appliance.
Before you begin
Ensure that you have the following:
• Console VGA monitor
• USB Keyboard
• Correct ESXi software downloaded from PLDS. See PSN027079u- Avaya Converged
Platform 130 Dell® R640 Customized Image of VMware ESXi 6.5 U2
• Latest Avaya certified BIOS/FW update for ACP 130. See PSN027078u- Avaya Converged
Platform 130 Dell® R640 Avaya Certified BIOS/FW Update
Procedure
1. Import the drives from the failed server. For more information, see Dell® R640 FRU
Replacement Process.
2. Do one of the following:
• If importing the drives is successful, reboot the server. Replacement server now has all
previous configurations of ESXi.
If applicable, configure the iDRAC for remote access and alarming.
• If importing the drives is not successful, configure the RAID array. For more information,
see Dell® R640 FRU Replacement Process.
Update the BIOS/Firmware of the platform. For more information, see PSN027078u-
Avaya Converged Platform 130 Dell® R640 Avaya Certified BIOS/FW Update.
3. Enable and configure iDRAC on the replacement server. For more information, see Avaya
Converged Platform 130 Series iDRAC9 Best Practices.
October 2019 Installing the Avaya Converged Platform 130 Series 64
Comments on this document? infodev@avaya.com
Page 65

Performing server recovery or software remastering
Next steps
Continue with the procedure to perform server recovery.
Adding the license key for server recovery or software remastering
About this task
To perform server recovery or software remastering, you will need to add the original VMware
license key.
Before you begin
Ensure that you:
• Take the VMware license key from the original server lid.
• Move the original server lid to the new ACP 130 server if you are replacing the server.
Procedure
1. Log in to the ESX/ESXi host at the URL https://[IP Address of host]/ui.
Replace [IP Address of host] in the URL with the actual IP address of the host.
2. In the Navigator pane on the left, click Manage.
3. On the Licensing tab, click Assign license.
October 2019 Installing the Avaya Converged Platform 130 Series 65
Comments on this document? infodev@avaya.com
Page 66

Configuration
4. In the Assign license window, enter the license key in the License key field.
5. Click Check license.
6. After the license checking is complete, click Assign license.
Dell USB R640 RAID Configuration
Introduction
The Dell R640 RAID controller (H730P Mini) is an enterprise-class controller providing a robust
infrastructure to maximize server uptime.
This section describes the procedures to configure the Dell R640 RAID controller (H730P Mini) for
Avaya Converged Platform (ACP) 1XX RAID Array configurations.
Note:
The user needs a VGA monitor, a USB keyboard and a USB mouse to configure the RAID
Controller.
Preparing to configure Dell R640 RAID controller
About this task
Use this procedure to prepare the Dell R640 RAID controller (H730P Mini) for Avaya ACP 1XX
RAID Array configuration. For that, you must delete all the existing configurations from the
controller.
October 2019 Installing the Avaya Converged Platform 130 Series 66
Comments on this document? infodev@avaya.com
Page 67

Dell USB R640 RAID Configuration
Important:
This procedure will delete all previously written data on the HDDs. Use this procedure only if
the previously configured RAID array/virtual drive needs to be deleted and re-created.
Before you begin
• Connect your VGA monitor, USB keyboard, and USB mouse to the server.
• Power up the server.
Procedure
1. When the hardware boot screen appears, select <F2>System Setup.
Blue highlight indicates that you selected the System Setup Menu.
2. Clear all existing arrays by doing the following:
a. Click Device Settings > Integrated RAID Controller 1: Dell <PERC H730P Mini>
Configuration Utility.
October 2019 Installing the Avaya Converged Platform 130 Series 67
Comments on this document? infodev@avaya.com
Page 68

Configuration
b. On the Main Menu, click Configuration Management > Clear Configuration.
This command deletes all existing configurations from the RAID controller.
c. Check the Confirm box, select Yes, and click OK.
October 2019 Installing the Avaya Converged Platform 130 Series 68
Comments on this document? infodev@avaya.com
Page 69

Dell USB R640 RAID Configuration
d. (Optional) On the Configuration Management window, if you see the Manage
Foreign Configuration link, then click Manage Foreign Configuration > Clear
Foreign Configuration.
e. Check the Confirm box, select Yes, and click OK.
3. Click Back.
Next steps
Proceed to
controller and configure its advance properties.
Configuring the controller properties on page 69 for the steps to manage the
Configuring the controller properties
About this task
Use this procedure to manage the controller and configure its advance properties.
Before you begin
Delete all existing configurations on the RAID controller.
October 2019 Installing the Avaya Converged Platform 130 Series 69
Comments on this document? infodev@avaya.com
Page 70

Configuration
Procedure
1. On the Main Menu of Integrated RAID Controller 1: Dell <PERC H730P Mini>
Configuration Utility, click Controller Management.
This section displays and allows modifications of the advance controller properties.
2. Scroll down and click Advanced Controller Properties.
October 2019 Installing the Avaya Converged Platform 130 Series 70
Comments on this document? infodev@avaya.com
Page 71

Dell USB R640 RAID Configuration
3. Under Controller Properties, set Auto Import Foreign Configuration to Enabled.
4. Click Apply Changes.
5. Scroll down and click OK.
6. Click Back.
Next steps
Proceed to Creating a virtual disk on page 71 for the steps to create a virtual disk by selecting
the RAID level, physical disks, and virtual disk parameters.
Creating a virtual disk
About this task
Use this procedure to create a virtual disk by selecting the RAID level, physical disks, and virtual
disk parameters.
Before you begin
• Delete all existing configurations on the RAID controller.
• Configure the controller properties.
• Ensure that Auto Import Foreign Configuration is set to Enabled.
October 2019 Installing the Avaya Converged Platform 130 Series 71
Comments on this document? infodev@avaya.com
Page 72

Configuration
Procedure
1. On the Main Menu of Integrated RAID Controller 1: Dell <PERC H730P Mini>
2. Click Create Virtual Disk.
Configuration Utility, click Configuration Management.
If there is no option to create a virtual disk, then all disks in the system must already be
assigned to an array. You must delete all the existing configuration before creation of a
new virtual disk.
3. Configure the virtual disk parameters as follows:
a. In Select RAID Level, select the RAID level specified by the appropriate Avaya
Converged Platform configuration.
Following are the RAID configurations for Avaya Converged Platform.
Avaya Converged Platform 1XX Profile 2 = 3x600 GB > RAID5
Avaya Converged Platform Profiles 3&4 = 4x600 GB > RAID6
Avaya Converged Platform Profile 5 = 6x600 GB > RAID6
Avaya Converged Platform Profile 51 = 8x600GB > RAID6
b. In Virtual Disk Name, do not change the default value, that is, VD0, unless you are
specified another Virtual Disk Name.
c. Under Configure Virtual Disk Parameters, set the Strip Element Size value to 256
KB.
October 2019 Installing the Avaya Converged Platform 130 Series 72
Comments on this document? infodev@avaya.com
Page 73

Dell USB R640 RAID Configuration
d. Scroll down and select Fast Default Initialization.
The following is an example of configuring the virtual disk parameters:
4. On the
Create Virtual Disk screen, click Select Physical Disks.
5. Under Choose Unconfigured Physical Disks, select all the unconfigured physical disks
for the Avaya Converged Platform profile configuration, as mentioned in step 3.
The following is an example with 4 physical disks selected.
6. Click Apply Changes, then click OK.
7. Check that the virtual disk size is approximately of the expected size as shown in Virtual
disk size on page 74.
October 2019 Installing the Avaya Converged Platform 130 Series 73
Comments on this document? infodev@avaya.com
Page 74

Configuration
8. Click Create Virtual Disk.
9. Check the Confirm box, select Yes, and click OK.
The system creates a new virtual disk.
10. Click Back.
Next steps
Proceed to
basic properties of a specific virtual disk.
Checking information about the virtual disk on page 75 for the steps to check the
Virtual disk size
The configuration of the RAID controller is possible only with the specification of the data storage
space available. The following table provides the expected virtual disk sizes for the RAID
configuration.
RAID configuration
5 3x600 GB = 1.8 TB 1.2 1.09 2
6 4x600 GB = 2.4 TB 1.2 1.09 3, 4
6 5x600 GB = 3.0 TB 1.8 1.64
6 6x600 GB = 3.6 TB 2.4 2.18 5
6 7x600 GB = 4.2 TB 3.0 2.73
6 8x600 GB = 4.8 TB 3.6 3.27 51
Raw Storage
Usable Capacity in
Terabytes
Usable Capacity in
Tebibytes
ACP Base Profile
(no optional HDDs)
Note:
The table provides the usable capacity both in Terabytes and Tebibytes, as operating systems
may calculate data storage space in Tebibytes.
October 2019 Installing the Avaya Converged Platform 130 Series 74
Comments on this document? infodev@avaya.com
Page 75

Checking information about the virtual disk
About this task
Use this procedure to check the basic properties of a specific virtual disk.
Procedure
1. In the Main Menu of Integrated RAID Controller 1: Dell <PERC H730P Mini>
Configuration Utility, click Virtual Disk Management.
The system shows the virtual disks available.
Dell USB R640 RAID Configuration
2. Click the virtual disk name.
3. Under Basic Properties, check the information about the virtual disk. You can see the
following parameters of the virtual disk:
• Name
• RAID Level
• Status
• Size
October 2019 Installing the Avaya Converged Platform 130 Series 75
Comments on this document? infodev@avaya.com
Page 76

Configuration
4. Click Back > Back > Finish > Finish > Finish to escape configuration menus.
Result
Server RAID configuration is now complete. The created Virtual Drive is now available for software
installation.
Dell R640 SNMP trap configuration using iDRAC9
Configuring SNMP traps for Dell R640 using iDRAC9
About this task
You can configure SNMP traps for Dell R640 Avaya Converged Platform 130 Appliance servers
using the iDRAC9 interface.
Before you begin
Log into the iDRAC9 web interface using the IP address and login details that were specified while
configuring iDRAC. See Avaya iDRAC9 Best Practices document for configuring the iDRAC.
Procedure
1. Navigate to Configuration > System settings > SNMP Traps Configuration.
The values shown in the following screenshot are only examples. The values may vary
based on your requirements.
2. Select the State check box.
3. In the Destination Address field, enter the destination IP address of the SNMP receiver.
4.
Note:
Execute this step only if SNMP v3 traps are set.
(Optional) In the SNMP v3 Users field, click the drop-down arrow and click the user
account that is enabled for SNMP v3.
To associate a user account with SNMP v3 traps, see Editing a user account to enable it
for SNMP v3 traps.
5. In the Community String field, enter the SNMP community string value.
6. In the SNMP Trap Format field, click the required value.
October 2019 Installing the Avaya Converged Platform 130 Series 76
Comments on this document? infodev@avaya.com
Page 77

Dell R640 SNMP trap configuration using iDRAC9
The values shown in the following screenshot are only examples. The values may vary
based on your requirements.
7. Click Apply.
Next steps
After the SNMP traps are configured, you can send a test SNMP trap to confirm the configuration
by clicking the Send option in the Test SNMP Trap column.
SNMP alerts
SNMP is frequently used to monitor systems for fault conditions such as temperature violations,
hard drive failures, and voltage fault conditions. The iDRAC generates events that result in Simple
Network Management Protocol (SNMP) traps and entries in the iDRAC Lifecycle Log.
The iDRAC generates events in response to changes in the status of sensors and other monitored
parameters. When an event with predefined characteristics occurs on your system, the SNMP
subagent sends information about the event, along with trap variables, to the management
console.
Each event generates an identifier called the trap ID and a list of trap variables that provide
additional details about the event. The traps of the iDRAC MIB are organized into five subgroups
of traps. Each subgroup corresponds to one of the following five categories of events that iDRAC
supports:
• System Health
• Storage Health
• Updates
• Audit
• Configuration
Configuring SNMP alerts using iDRAC9
Before you begin
Log into the iDRAC9 web interface using the IP address and login details that were specified while
configuring iDRAC. See Avaya iDRAC9 Best Practices document for configuring the iDRAC.
October 2019 Installing the Avaya Converged Platform 130 Series 77
Comments on this document? infodev@avaya.com
Page 78

Configuration
Procedure
1. Navigate to Configuration > System settings > Alert Configuration.
2. In the Alerts field, click Enabled.
3. In the Alerts and Remote System Log Configuration section, in the SNMP Trap column,
select the required SNMP trap check boxes.
For Avaya SAL systems, select the check box in the heading row of SNMP Trap column to
select all the available SNMP traps.
4. Click Apply.
Configuring a user account for SNMP v3 traps
About this task
To configure an SNMP v3 traps, you must associate a user account with the traps. The password
of this user account is used to encrypt the SNMP v3 traps. The same password must be used by
the SNMP v3 trap receiver to decrypt trap information.
Before you begin
Log into the iDRAC9 web interface using the IP address and login details that were specified while
configuring iDRAC. See Avaya iDRAC9 Best Practices document for configuring the iDRAC.
October 2019 Installing the Avaya Converged Platform 130 Series 78
Comments on this document? infodev@avaya.com
Page 79

Dell R640 SNMP trap configuration using iDRAC9
Procedure
1. Navigate to iDRAC Settings > Users.
2. In the Local Users section, select the user that you want to edit for SNMP v3 traps.
3. Click Edit.
4. On the User Configuration tab, scroll down to the Advanced settings section.
5. In the SNMP v3 field click Enabled.
6. In the Authentication type field, click the required authentication type.
7. In the Privacy type field, click the required privacy type.
8. Click Save.
October 2019 Installing the Avaya Converged Platform 130 Series 79
Comments on this document? infodev@avaya.com
Page 80

Chapter 5: Regulatory information
Regulatory information
For a complete listing of the DELL PowerEdge R640 regulatory information, refer to the following
links:
• DELL Regulatory and Environmental Datasheet — http://downloads.dell.com/rdoc/dell
%20emc%20poweredge%20r640,e39s,e39s001,dell%20regulatory%20and
%20environmental%20datasheet.pdf
• EUROPEAN UNION - CE Declaration of Conformity —
%20emc%20poweredge%20r640,e39s,e39s001,european%20union%20-%20ce
%20declaration%20of%20conformity.pdf
http://downloads.dell.com/rdoc/dell
October 2019 Installing the Avaya Converged Platform 130 Series 80
Comments on this document? infodev@avaya.com
Page 81

Chapter 6: Resources
Documentation
The following documents are available on Avaya support site at http://support.avaya.com/:
Title Description Audience
Avaya Converged Platform 100 Series
Avaya Converged Platform Overview
and Specification
Installing the Avaya Converged Platform
130 Series
Maintaining and Troubleshooting the
Avaya Converged Platform 130 Series
Avaya Converged Platform 130 Series
iDRAC9 Best Practices
PSN027078u- Avaya Converged
Platform 130 Dell® R640 Avaya Certified
BIOS/FW Update
PSN027079u- Avaya Converged
Platform 130 Dell® R640 Customized
Image of VMware ESXi 6.5 U2
Describes the key features
of Avaya Converged
Platform
Describes how to install
Avaya Converged
Platform 130 Series.
Describes procedures to
maintain and troubleshoot
Avaya Converged
Platform 130 Series.
Describes the best
practices of using
Integrated Dell Remote
Access Controller
(iDRAC).
This is a Product Support
Notice about Dell® R640
Avaya Certified BIOS/FW
Update, Version 2.0.
This is a Product Support
Notice about the
availability of Dell® R640
Customized Image of
VMware ESXi U2, A07,
Build#10719125.
IT Management, sales and
deployment engineers, solution
architects, and support personnel
Sales and deployment engineers,
solution architects, and support
personnel
Sales and deployment engineers,
solution architects, and support
personnel
System administrators
Related links
Finding documents on the Avaya Support website on page 82
Avaya Documentation Portal navigation on page 82
October 2019 Installing the Avaya Converged Platform 130 Series 81
Comments on this document? infodev@avaya.com
Page 82

Resources
Finding documents on the Avaya Support website
Procedure
1. Navigate to http://support.avaya.com/.
2. At the top of the screen, type your username and password and click Login.
3. Click Support by Product > Documents.
4. In Enter your Product Here, type the product name and then select the product from the
list.
5. In Choose Release, select an appropriate release number.
6. In the Content Type filter, click a document type, or click Select All to see a list of all
available documents.
For example, for user guides, click User Guides in the Content Type filter. The list
displays the documents only from the selected category.
7. Click Enter.
Related links
Documentation on page 81
Avaya Documentation Portal navigation
Customer documentation for some programs is now available on the Avaya Documentation Portal
at https://documentation.avaya.com.
Important:
For documents that are not available on the Avaya Documentation Portal, click Support on
the top menu to open
Using the Avaya Documentation Portal, you can:
• Search for content in one of the following ways:
- Type a keyword in the Search field.
- Type a keyword in Search, and click Filters to search for content by product, release, and
document type.
- Select a product or solution and then select the appropriate document from the list.
• Find a document from the Publications menu.
https://support.avaya.com.
• Publish a PDF of the current section in a document, the section and its subsections, or the
entire document.
•
Add content to your collection by using My Docs (
October 2019 Installing the Avaya Converged Platform 130 Series 82
Comments on this document? infodev@avaya.com
).
Page 83

Viewing Avaya Mentor videos
Navigate to the My Content > My Docs menu, and do any of the following:
- Create, rename, and delete a collection.
- Add content from various documents to a collection.
- Save a PDF of selected content in a collection and download it to your computer.
- Share content in a collection with others through email.
- Receive content that others have shared with you.
•
Add yourself as a watcher by using the Watch icon (
Navigate to the My Content > Watch list menu, and do the following:
- Set how frequently you want to be notified, starting from every day to every 60 days.
- Unwatch selected content, all content in a document, or all content on the Watch list page.
As a watcher, you are notified when content is updated or deleted from a document, or the
document is removed from the portal.
• Share a section on social media platforms, such as Facebook, LinkedIn, and Twitter.
• Send feedback on a section and rate the content.
Note:
Some functionality is only available when you log in to the portal. The available functionality
depends on the role with which you are logged in.
Related links
Documentation on page 81
Viewing Avaya Mentor videos
).
Avaya Mentor videos provide technical content on how to install, configure, and troubleshoot
Avaya products.
About this task
Videos are available on the Avaya Support website, listed under the video document type, and on
the Avaya-run channel on YouTube.
Procedure
• To find videos on the Avaya Support website, go to
of the following actions:
- In Search, type Avaya Mentor Videos to see a list of the available videos.
- In Search, type the product name. On the Search Results page, select Video in the
Content Type column on the left.
October 2019 Installing the Avaya Converged Platform 130 Series 83
Comments on this document? infodev@avaya.com
http://support.avaya.com and perform one
Page 84

Resources
• To find the Avaya Mentor videos on YouTube, go to www.youtube.com/AvayaMentor and
perform one of the following actions:
- Enter a key word or key words in the Search Channel to search for a specific product or
topic.
- Scroll down Playlists, and click the name of a topic to see the available list of videos
posted on the website.
Note:
Videos are not available for all products.
Support
Go to the Avaya Support website at http://support.avaya.com for the most up-to-date
documentation, product notices, and knowledge articles. You can also search for release notes,
downloads, and resolutions to issues. Use the online service request system to create a service
request. Chat with live agents to get answers to questions, or request an agent to connect you to a
support team if an issue requires additional expertise.
October 2019 Installing the Avaya Converged Platform 130 Series 84
Comments on this document? infodev@avaya.com
Page 85

Index
A
array configuration ............................................................... 66
attaching cables ...................................................................
autostart virtual machines
using embedded host client ..........................................43
Avaya Converged Platform 130 Series Services Port
configuration ........................................................................ 46
Avaya Converged Platform appliance profiles .....................
Avaya Technical Onboarding Process ................................. 10
26
15
B
Back view of Dell™ PowerEdge™ R640 Server
R640 Server ................................................................. 14
basic properties ................................................................... 75
C
collection
delete ............................................................................82
edit name ......................................................................82
generating PDF ............................................................ 82
sharing content ............................................................. 82
configure
SNMP alerts ................................................................. 77
SNMP traps .................................................................. 76
Configure
autostart on ESXi ..........................................................43
configuring
Avaya Converged Platform 130 Services port ..............46
controller properties ......................................................69
ESXi Network Settings ................................................. 30
SNMP v2 on ESXi 6.5 host ...........................................44
the advance controller properties .................................
connecting power .................................................................27
content
publishing PDF output .................................................. 82
searching ...................................................................... 82
sharing ..........................................................................82
watching for updates .................................................... 82
creation of a virtual disk ....................................................... 71
69
D
data storage space ..............................................................
deleting configurations .........................................................
Dell PowerEdge R640 Server dimensions ...........................16
documentation ..................................................................... 81
documentation portal ...........................................................
finding content .............................................................. 82
navigation ..................................................................... 82
74
66
82
document changes ................................................................ 7
E
electrostatic discharge .........................................................
environmental requirements ................................................
ESXi configuration ...............................................................
20
17
30
F
finding content on documentation portal ..............................
Front view of the server
R640 server .................................................................. 13
82
I
installation checklist ............................................................. 20
installing
LS Reconfigurator Utility Tool ....................................... 52
installing the server ..............................................................22
K
key features ........................................................................... 8
M
My Docs ...............................................................................82
O
overview
Avaya Converged Platform .............................................8
Dell server .................................................................... 12
P
package contents .................................................................
physical disks .......................................................................71
power requirements ............................................................. 19
preparing for configuration ...................................................66
purpose ..................................................................................
21
R
RAID controller ....................................................................
RAID level ............................................................................71
registration .............................................................................
regulatory information .......................................................... 80
replacing host server ..................................................... 58, 64
66
7
9
October 2019 Installing the Avaya Converged Platform 130 Series 85
Comments on this document? infodev@avaya.com
Page 86

Index
S
Sample Service’s vSwitch Configuration ............................. 51
searching for content ...........................................................
server recovery .................................................................... 58
adding license key ........................................................ 65
sharing content .................................................................... 82
SNMP alerts
configure .......................................................................77
overview ....................................................................... 77
SNMP traps
configure using iDRAC ................................................. 76
SNMP v3 traps
edit user account .......................................................... 78
software remastering ........................................................... 58
adding license key ........................................................ 65
support .................................................................................84
supported software ................................................................ 9
82
T
TLS protocol configuration ...................................................52
V
validating
vSwitch1 Configuration .................................................49
videos .................................................................................. 83
viewing
Enabled TLS Version ....................................................53
virtual disk ............................................................................75
virtual disk parameters .........................................................
virtual disk size .................................................................... 74
vSphere 6.5 U2 Environment ...............................................52
71
W
watch list .............................................................................. 82
October 2019 Installing the Avaya Converged Platform 130 Series 86
Comments on this document? infodev@avaya.com
 Loading...