

Page 1

Nortel Business Communications Manager 5.0
Configuration — System
Release: 5.0
Document Revision:
02.04
NN40170-501
Page 2

Document status: Standard
Document issue: 02.04
Document date: September 2009
Product release: BCM 5.0
Job function: Configuration
Type: Technical Publication
Language type: English
Copyright © 2009 Nortel Networks
All Rights Reserved.
NORTEL, the globemark design, and the NORTEL corporate logo are trademarks of Nortel
Networks.
Page 3

Contents
Contents 3
New in this release 7
Features 7
Introduction 11
Fundamentals 13
Configuration interfaces 13
Scheduled services 15
Call-by-call service selection 15
Dynamic device configuration for BCM450 15
SNMP management 19
Music source and BcmAmp 20
System configuration 23
BCM50 and BCM450 system configuration preparation 25
Connecting to the BCM system through the OAM port 26
Accessing the BCM Web page 26
Downloading and installing Element Manager 27
Downloading the Startup Profile template 27
Downloading the factory default programming record 28
Connecting to the BCM system 29
Viewing or modifying the Welcome panel 29
Saving the programming record 31
Basic parameters configuration 33
BCM50 and BCM450 configuration with Telset Administration 35
Entering the keycode 35
Configuring the IP address 36
Configuring the modem 37
Selecting the region 38
Selecting the telephony startup template and start DN 38
Initializing voice mail 38
Creating Telset user accounts 38
Copyright © 2009, Nortel Networks
Nortel Business Communications Manager 5.0
Configuration — System
NN40170-501 02.04 Standard
September 2009
Page 4

4 Contents
BCM50 and BCM450 configuration with Element Manager 41
Entering the keycode 41
Configuring the IP address 42
Configuring the modem 43
Configuring the startup template for telephony services 43
Initializing voice mail 44
Entering a name for your system 44
Configuring the date and time settings 45
Configuring DHCP server settings 46
Configuring IP Phones 48
Configuring SNMP settings 50
Configuring the SNMP manager list 51
Deleting an SNMP manager 52
Configuring SNMP community strings 52
Deleting SNMP community strings 53
Configuring service access points 53
Deleting service access points 54
Configuring SNMP trap destinations 55
Viewing and modifying SNMP trap destinations 56
Deleting SNMP Trap Destinations 57
Creating user accounts 57
BCM50 and BCM450 configuration with Startup Profile 59
Setting the Excel macro security level 60
Customizing a Startup Profile for your system 60
Loading the Startup Profile data onto your BCM system 62
BCM50 and BCM450 internal resources configuration 63
Configuring IP trunks 63
Configuring IP sets and applications 64
BCM450 MBM and legacy Norstar configuration 67
Configuring main unit MBMs 68
Configuring legacy Norstar modules 69
Configuring expansion unit MBMs 71
Deconfiguring MBMs and Norstar modules 73
BCM50 and BCM450 trunk module configuration 75
Configuring the trunk module parameters 75
Configuring call-by-call service selection 76
Provisioning module lines and loops 76
Dial-up resources configuration 79
ISDN interface management 79
ISDN interface connection or disconnection 82
ISDN channel parameters configuration 83
Copyright © 2009, Nortel Networks
Nortel Business Communications Manager 5.0
Configuration — System
NN40170-501 02.04 Standard
September 2009
Page 5

Contents 5
Modem interface management 85
Modem interface connection or disconnection 87
Modem dial-out link parameters configuration 88
WAN Failover on BCM50 91
ISDN dial-in parameters configuration 93
Automatic dial-out interface configuration 98
Dial-up interfaces as primary connections 100
Static routes for dial-out configuration 102
BCM50 and BCM450 scheduled services 103
Configuring schedule names and timers 103
Configuring scheduled service 104
BCM50 and BCM450 music source configuration 107
Selecting the audio jack as a music source 107
Selecting a network device as a music source 108
Accessing the Music Manager administration Web page 109
Loading music onto the BCM50 and BCM450 110
Adding music to the play list 111
Removing music from the play list 111
Deleting music from the BCM50 and BCM450 112
Using the BcmAmp Player 112
Basic configuration testing 115
BCM50 and BCM450 main unit testing 117
Testing the main unit 117
Troubleshooting the main unit 118
BCM50 and BCM450 expansion unit testing 119
Testing the expansion unit for BCM50 and BCM450 119
Troubleshooting the expansion unit for BCM450 120
Troubleshooting the expansion unit for BCM50 121
BCM50 and BCM450 media bay modules testing 123
Testing a station MBM 123
Testing a trunk MBM 124
Determining why an MBM does not appear in Element Manager 124
BCM50 and BCM450 analog terminal adapter testing 127
Correcting a non-functioning ATA2 for BCM450 127
Correcting no dial tone at the ATA2 on BCM450 127
Confirming correct ATA2 wiring for BCM450 128
Correcting a non-functioning ATA2 for BCM50 129
Correcting no dial tone at the ATA2 on BCM50 129
Confirming correct ATA2 wiring for BCM50 129
Copyright © 2009, Nortel Networks
Nortel Business Communications Manager 5.0
Configuration — System
NN40170-501 02.04 Standard
September 2009
Page 6

6 Contents
System parameters reference 131
BCM50 and BCM450 initial parameters 131
BCM50 and BCM450 startup parameters 132
Call-by-call services available 133
Trunk module parameters 134
System capacity reference 143
BCM450 device type capacity 143
Market profile attributes reference 145
Interface availability 145
Tones and cadences 148
Core parameters for market profiles 158
Analog trunk parameters 175
GASM8 parameters 184
GASI parameters 187
ATA2 parameters 189
Voice mail 193
ISDN line services 195
Analog and digital trunk types 196
Copyright © 2009, Nortel Networks
Nortel Business Communications Manager 5.0
Configuration — System
NN40170-501 02.04 Standard
September 2009
Page 7

New in this release
The information in this chapter applies to both the BCM50 and the BCM450
platforms running BCM 5.0.
This is the initial release of the BCM 5.0 platform. This document contains
information about configuring the BCM 5.0 system in Release 5.0.
Features
See the following sections for information found in this document.
BCM 5.0 configuration
You configure your BCM 5.0 system to provide the required system
functionality. A BCM 5.0 system cannot function until it is configured.
You can configure basic parameters (initial parameters and startup
parameters) through Element Manager, Telset Administration, or the Startup
Profile template. For more information about configuring your BCM 5.0 system
see, BCM 5.0 system configuration preparation (page 25).
Element Manager configuration
To configure your BCM 5.0 system most efficiently, you can download and
install Element Manager on your computer. You can configure all BCM 5.0
system parameters through Element Manager. For more information see,
Business Element Manager (page 13)and BCM 5.0 configuration with
Business Element Manager (page 45).
Telset Administration configuration
You can use Telset Administration through a digital telephone with a two-line
display to set the BCM 5.0 configuration parameters.
You cannot set all the basic parameters using Telset Administration.
Therefore, after configuring the initial parameters, you must use Element
Manager to set the startup parameters. For more information see, Tel se t
Administration (page 15) and BCM 5.0 configuration with Telset
Administration (page 39).
Copyright © 2009, Nortel Networks
Nortel Business Communications Manager 5.0
Configuration — System
NN40170-501 02.04 Standard
September 2009
Page 8

8 New in this release
Startup Profile configuration
An experienced administrator uses the Startup Profile tool to customize a
template with common BCM 5.0 system parameters. The administrator uses
this template to configure a single system or multiple systems. For more
information see,Startup Profile (page 14) and BCM 5.0 configuration with
Startup Profile (page 65).
Internal resources configuration
You can configure the internal resources on your BCM 5.0 main unit. The
internal resources include IP trunks, IP sets, and applications resources. For
more information see, IP sets and applications configuration (page 17) and
BCM 5.0 internal resources configuration (page 71).
Media Bay Module configuration
You can configure media bay modules (MBMs) for the BCM 5.0. Configuring
main unit media bay modules (MBM) is a two-stage process. First, identify the
type of installed MBMs to the BCM 5.0 system, and then configure the
required variables. The BCM 5.0 system provides default values for your
MBM.
For more information see, BCM450 MBM and legacy Norstar configuration
(page 75).
Trunk configuration
Configure the trunk module parameters to define the line properties for your
BCM 5.0 system. For more information see, IP trunk module configuration
(page 16)and BCM450 MBM and legacy Norstar configuration (page 75).
Music source configuration
The Music on Hold and Background Music features provide music to users.
For these features to function properly, you must connect a music source to
the BCM 5.0 system and configure the music source. For more information
see, BCM 5.0 music source configuration (page 121).
Configuration testing
Perform basic testing and troubleshooting on BCM main unit, expansion units,
media bay modules (MBM), and analog terminal adapter (ATA) For more
information see, Basic configuration testing (page 129), BCM 5.0 main unit
testing (page 133), BCM 5.0 expansion unit testing (page 137), BCM 5.0
media bay modules testing (page 141), and BCM 5.0 analog terminal adapter
testing (page 145).
Copyright © 2009, Nortel Networks
Nortel Business Communications Manager 5.0
Configuration — System
NN40170-501 02.04 Standard
September 2009
Page 9

Dynamic device configuration for BCM450
Attention: Dynamic device configuration is supported only on BCM450 and
not on BCM50.
With dynamic device configuration, DN and line number allocation and
assignment is dynamically performed by the system, as required, until either
all hardware administered to a system is populated with the necessary DNs
and line numbers, or the system has reached the maximum capacity.
For more information about dynamic device configuration, see the following
sections:
• Dynamic device configuration for BCM450 (page 16)
• BCM 5.0 internal resources configuration (page 71)
• BCM450 MBM and legacy Norstar configuration (page 75)
New in this release 9
Copyright © 2009, Nortel Networks
Nortel Business Communications Manager 5.0
Configuration — System
NN40170-501 02.04 Standard
September 2009
Page 10

10 New in this release
Copyright © 2009, Nortel Networks
Nortel Business Communications Manager 5.0
Configuration — System
NN40170-501 02.04 Standard
September 2009
Page 11

Introduction
The information in this chapter applies to both the BCM50 and the BCM450
platforms running BCM 5.0.
This guide describes how to configure the Business Communications
Manager (BCM 5.0) systems.
Navigation
• Fundamentals (page 13)
• System configuration (page 23)
• BCM 5.0 system configuration preparation (page 25)
• Basic parameters configuration (page 37)
• BCM 5.0 internal resources configuration (page 71)
• BCM450 MBM and legacy Norstar configuration (page 75)
• BCM 5.0 trunk module configuration (page 85)
• Dial-up resources configuration (page 91)
• BCM 5.0 scheduled services (page 115)
• BCM 5.0 music source configuration (page 121)
• Basic configuration testing (page 129)
• System parameters reference (page 151)
• System capacity reference (page 163)
• Market profile attributes reference (page 165)
Copyright © 2009 Nortel Networks
Nortel Business Communications Manager 5.0
Configuration — System
NN40170-501 02.04 Standard
September 2009
Page 12

12 Introduction
Copyright © 2009 Nortel Networks
Nortel Business Communications Manager 5.0
Configuration — System
NN40170-501 02.04 Standard
September 2009
Page 13

Fundamentals
The information in this chapter applies to both the BCM50 and the BCM450
platforms running BCM 5.0.
This section provides conceptual information about BCM 5.0 configuration.
Navigation
• Configuration interfaces (page 13)
• Scheduled services (page 15)
• Call-by-call service selection (page 15)
• Dynamic device configuration for BCM450 (page 16)
• SNMP management (page 19)
• Music source and BcmAmp (page 21)
Configuration interfaces
This section describes the methods to configure your BCM 5.0 system.
While Element Manager is the primary management application, BCM 5.0
also supports the programming of telephony and applications areas through
Telset Administration, and through the Startup Profile template.
Business Element Manager
The primary management application for configuring and administering the
BCM 5.0 system is Business Element Manager. Business Element Manager
is a client-based management application that runs on a Windows computer,
or on a Citrix server.
You use Business Element Manager to connect to the BCM 5.0 devices to be
managed either through an IP network connection, or through the OAM port
on a BCM 5.0 main unit.
Copyright © 2009, Nortel Networks
Nortel Business Communications Manager 5.0
Configuration — System
NN40170-501 02.04 Standard
September 2009
Page 14

14 Fundamentals
You can download Business Element Manager from the BCM 5.0 web page
and install it on your computer at any time. However, you cannot connect to a
BCM 5.0 system with Business Element Manager until the BCM 5.0 main unit
is installed and running.
Installing Business Element Manager in a Citrix environment
You can run Business Element Manager in a Citrix environment using Citrix
Presentation Server 4.0 on Windows Server 2003 (all editions).
When you run Business Element Manager in a Citrix environment, install
Business Element Manager on a Citrix server. You can run Citrix Program
Neighborhood to connect to the server and launch the Business Element
Manager.
Business Element Manager is designed for single-user environments. A
single installation of Business Element Manager extends the same user
preferences to any Citrix user, including the device list and any saved
passwords. Citrix administrators can ensure a secure environment by using
one of the following approaches:
• install a copy of Business Element Manager for each user or group of
users in different folders, with Windows permissions set for the folder to
control access.
• in cases where a shared device tree is permitted, ensure that users do not
save passwords, but instead enter a password each time they connect.
Startup Profile
The Startup Profile is a template containing the basic configuration
parameters that you edit using Microsoft Excel. The Startup Profile is used to
accelerate the initial installation programming of system-level parameters. It
helps bring the BCM 5.0 system to a basic operational and ready-tocustomize state without using either Business Element Manager or Telset
Administration.
The administrator must fill out the Startup Profile template, save it onto a USB
storage device and insert the storage device into the USB port of the BCM 5.0
main unit before the initial start-up. On start-up the BCM 5.0 system reads the
information and starts up with the correct system parameters and feature
licensing already in place.
Copyright © 2009, Nortel Networks
Nortel Business Communications Manager 5.0
Configuration — System
NN40170-501 02.04 Standard
September 2009
Page 15

Telset Administration
Installers who are already familiar with Telset Administration can perform
programming from the keypad of any telephone connected to the BCM 5.0
device. This alleviates the need for access to a computer at the customer site.
For more information about using Telset programming on the BCM 5.0, see
the following documents:
• Telset Administration Guide (NN40170-604)
• CallPilot Telephone Administration Guide (NN40090-500)
• Intelligent Contact Center Telephone Administration Guide (NN40170-
600)
Scheduled services
Use scheduled services to control how calls are answered in off-hours
(Ringing Groups), how calls are routed at various times of the day, and how
restrictions are applied on lines and telephones at specific times of the day.
With Business Element Manager, you can perform the following configuration
functions for scheduled services:
• determine which schedules are active on the system for routing,
restriction, and ringing schedules.
Fundamentals 15
• set the time periods within each schedule for each day of the week.
• rename schedules.
Schedules are activated and deactivated through control telephones.
Restriction and Routing services require a service control password before
users can change scheduling on a control telephone. You use the Service
Control Password field to delete a current entry, and add a new password.
Make a note of the password; the panel shows only asterisks.
Call-by-call service selection
The PRI Call-by-call Service Selection is region-specific to North America for
a DTM set to a PRI module type.
By default, incoming calls on a PRI are routed based on the Called Party
Number information within the call request. The last number of digits of the
called party number that match the Received Number Length setting are used
as Receive Digits to find a target line.
In North American PRI, the Call-by-Call services provides alternate routing
maps to be defined in various ways, depending on the protocol defined for this
PRI.
Copyright © 2009, Nortel Networks
Nortel Business Communications Manager 5.0
Configuration — System
NN40170-501 02.04 Standard
September 2009
Page 16

16 Fundamentals
Dynamic device configuration for BCM450
Attention: Dynamic device configuration is supported only on BCM450 and
not on BCM50
With dynamic device configuration, DN and line number allocation and
assignment is dynamically performed by the system, as required, until either
all hardware administered to a system is populated with the necessary DNs
and line numbers, or the system has reached the maximum capacity.
Dynamic device configuration applies to internal components on the main unit
including IP trunks, IP sets, and applications, as well as media bay modules
(MBM) and legacy Norstar modules on the main unit and expansion unit.
Directory numbers
If you configure a set of directory numbers (either IP Sets or MBM DNs) with
Assign Target Lines selected, the DNs have Target Lines assigned to them
(assuming there are unused Target Lines available).
If you deconfigure some of these DNs, the state of the originally assigned
Target Lines associated with these DNs are still programmed with the original
DNs' Public and Private Configured numbers and they remain assigned to
their DN positions.
The result of deconfiguring DNs from the set above is a new DN set configured
on the same bus on the system (IP Sets, Applications, MBM devices). The first
number of the DNs in this new set still have the Target Lines assigned to them
that were originally assigned. This is independent of the Assign Target Lines
option selection for this new Configured DN set.
The net effect is that if an administrator configures DNs with Target Lines and
then decides to deconfigure and reconfigure some as different DNs, the
original Target Line assignments and Pub/Priv number programming follows
the reconfigured DNs.
IP trunk module configuration
Although IP trunks are not physical devices and you cannot remove them from
the system, BCM 5.0 supports modification of IP trunk line numbers.
You can assign a larger range of line numbers than what is actually licensed
for IP trunks. The effect is to reserve the line numbers beyond the current
licensed line count for future additional IP trunk licenses. Lines beyond the
licensed count do not boot until the necessary keycodes are provided to
enable the additional lines.
Copyright © 2009, Nortel Networks
Nortel Business Communications Manager 5.0
Configuration — System
NN40170-501 02.04 Standard
September 2009
Page 17

The list of line numbers for IP trunks must be consecutive. If the available line
numbers are segmented and the necessary number of consecutive line
numbers does not exist, you receive an error. If this occurs, you must remove
other lines in the system and restart line numbering for devices so the lines
numbers are not as segmented and consecutive groups can be obtained for
all devices.
If additional licensing is added later for more IP trunks such that the licensed
number of IP trunks is greater than the currently provisioned number, then the
system will not automatically request additional line numbers for the new
trunks. In this case the administrator must configure the new line numbers to
populate the additional IP trunks. If additional licensed IP trunks are added
and line numbers are reserved such that these additional trunks are covered,
then no additional line numbering configuration operations are necessary.
IP sets and applications configuration
Main unit telephony resources includes a list of IP set DNs and a range of
application DNs. Services assigned to the IP sets or applications device type
are the DNs of these sets or DNs that an application can use respectively.
Application DNs are the DNs assigned to applications such as the CallPilot
DN, the MeetMe DN, or Contact Center skillset DNs.
Fundamentals 17
The ability to assign IP set and application DN services is limited by the
maximum number of DNs for IP sets and applications respectively, and also
by the maximum total number of relocatable DNs on the system.
There may be notes or warnings in the Configuration dialog box to notify the
administrator of the impact of the configuration action. This may include a
recommendation to restart, or that a service may be restarted automatically.
Additional configuration options specify whether or not target lines are desired
for the DNs, and if so a starting public DN, and starting private DN can be
assigned to target lines.
An available target line is one that is currently unassigned to any DN (even a
Hunt Group DN) and has no programmed private or public receive digits
assigned to it. Target line numbers may or may not be consecutive.
Conflicts of public or private line DNs, where the DN is used elsewhere, results
in a failure of the public or private DN assignment to the set in question, but
does not cause the entire request to fail. The sets are configured, but not all
are successfully assigned public or private target line numbers if resource
limitations prevent it.
Copyright © 2009, Nortel Networks
Nortel Business Communications Manager 5.0
Configuration — System
NN40170-501 02.04 Standard
September 2009
Page 18

18 Fundamentals
Once a target line is configured with public or private numbers, deconfiguring
DNs that have appearances of those target lines does not remove the public
or private numbers from those target lines.
The DNs assigned to IP sets or applications do not need to be consecutive. If
the relevant pool DNs are renumbered or changed, so the consecutive DNs
do not exist, then the IP sets or applications have non-consecutive DNs. For
this reason the low and high values for IP sets and applications represent the
lowest and highest DN value currently in the respective assigned range. The
total number of DNs assigned is not all the DN values in between the low and
high values.
Configuring IP or Application DNs is a cumulative action. Every new
successful configuration request adds the relevant count of IP or Application
DNs to the existing range. Existing DNs are not affected or changed in any
way. The default number of DNs to add is normally zero. This is a protection
mechanism. You must change the number of DNs in the Number of DNs to
add field to the desired number of additional DNs.
When you configure DNs there is an exception to the number of DNs you can
add. The BCM 5.0 system requires a minimum of three configured application
DNs for applications to function correctly. When you configure application
DNs, if there are fewer than three currently configured application DNs, then
the minimum number possible to configure is set so that the final configured
application DN count is at least three. For example, if through Set-based
administration you complete a DN deconfiguration, and only two configured
application DN remains, then the next time you configure application DNs the
system would permit a minimum of two additional DNs to be configured for a
final total of three.
Finally, you can partially configure IP sets and applications (but not MBMs)
with fewer DNs than the licensed device count. The MBM needs to either read
MBM DNs or Digital/Analog station DNs. If there are not sufficient DNs defined
in the relevant pools then the number of available DNs are allocated to the
services list.
Main unit and expansion unit MBM configuration on BCM450
Attention: Main unit and expansion unit MBM configuration is applicable
only for BCM450
During media bay module (MBM) configuration, the BCM450 system provides
suggested default values for the MBM. These suggestions include DNs or line
numbers. If you change configuring data from the defaults provided and the
configuration fails, then the configuration reverts back to the suggested
values.
Copyright © 2009, Nortel Networks
Nortel Business Communications Manager 5.0
Configuration — System
NN40170-501 02.04 Standard
September 2009
Page 19

Fundamentals 19
When configuring a line device, a starting line number is specified. Based on
the MBM type and region configuration, the appropriate number of line
numbers are allocated and associated with the ports of the MBM. If insufficient
resources are available to complete the requested configuration then the
device configuration fails.
For combination devices, configuration of the individual components is treated
separately. It is possible for one part of a combination device to get configured
while the other part fails because of insufficient resources.
The location of a device is independent of the bus value associated with a
device. For example, an MBM in location “Main MBM 1” can be assigned Bus
10 in one configuration, but subsequent changes to the configuration can
result in “Main MBM 1” assigned to Bus 11 (or any other valid bus value). The
bus assigned to a device is now one of several resources that a device
receives during configuration to become operational.
It is possible for a configuring request of a device to fail if sufficient resources
are not available. This can be a result of insufficient contiguous line numbers,
not enough remaining DNs, or no busses remaining. If sufficient resources are
not available for a configuring request, the system presents a dialog box that
the device configuration request failed.
When a BRI MBM is configured all loops on the MBM are defaulted as T-loops
and the administrator must provide a starting line number for a BRI MBM upon
configuration. It is important to note that a BRI MBM uses eight consecutive
line numbers. This is to ensure a consecutive series of line numbers across a
BRI MBM regardless of the loop type setting.
You configure the R2MFC MBM as a DTI-PRI MBM with additional
configuration to set the attributes of the PRI protocol such that the device
operates as an R2MFC.
DNs are dynamic and changing a loop on a BRI-ST device from S to T type
completely removes those DNs from the system.
DSMn16+/32+ MBMs are capable of double density. If you want to maximize
TDM sets on a system using an expansion unit, you need to set the dip
settings on the DSM32+ MBMs in the chassis to double density mode.
SNMP management
SNMP (Simple Network Management Protocol) is a set of protocols for
managing complex networks. SNMP-compliant devices, called agents, store
metadata in Management Information Bases (MIBs) and provide this data to
SNMP requesters.
Copyright © 2009, Nortel Networks
Nortel Business Communications Manager 5.0
Configuration — System
NN40170-501 02.04 Standard
September 2009
Page 20

20 Fundamentals
You can configure general SNMP settings, including enabling and disabling
the SNMP agent, enabling and disabling versions of the SNMP agent, defining
access permissions, and adding and deleting SNMP management stations.
You can create a list of SNMP managers who are permitted to query the BCM
5.0 system by specifying their IP addresses. If you have specified SNMP
managers, the BCM 5.0 SNMP agent will respond only to SNMP requests
from those IP devices.
You can use external SNMP clients, such as HP OpenView, to monitor the
BCM 5.0 system by means of read-only SNMP requests.
The BCM main unit supports the following versions of SNMP:
• SNMP v1 — the first implementation of SNMP; this version supports such
protocols as IP
• SNMP v2C — provides improved efficiency and error handling
• SNMP v3 — provides improvements in security and privacy
Using the Business Element Manager, you can select which versions of
SNMP you want the BCM agent to support. For more information, see
Configuring SNMP settings (page 55).
Management Information Bases provide access to the managed objects of a
system and specify the format of traps. BCM 5.0 supports the following MIBs:
• RFC 1213 — MIB II
• RFC 2863 — Interface MIB
• RFC 2737 — Entity MIB
• RFC 2790 — Host MIB
• RFC 2261 — SNMP framework
• SmallSiteEvent MIB for traps
• The device sysObjectIDs are defined in the BCM Small Site Common MIB,
and are defined for the BCM main unit. The following tabe summarizes the
sysObjectID assignments:
Table 1 sysObjectID assignments
Model Main Unit sysObjectID Integrated Router sysObjectID
BCM450 1.3.6.1.4.1.562.37.1.8 —
BCM50 and BCM50b 1.3.6.1.4.1.562.37.1.4 —
BCM50a and BCM50ba 1.3.6.1.4.1.562.37.1.4 1.3.6.1.4.1.562.37.1.5
BCM50e and BCM50be
1.3.6.1.4.1.562.37.1.4
1.3.6.1.4.1.562.37.1.6
Copyright © 2009, Nortel Networks
Nortel Business Communications Manager 5.0
Configuration — System
NN40170-501 02.04 Standard
September 2009
Page 21

Music source and BcmAmp
This section describes the music source for your BCM 5.0 system.
Music source
The Music on Hold and Background Music features provide music to users.
For these features to function properly, a music source must be connected to
the BCM.
There are three ways you can connect the music source to the BCM 5.0
system:
• You can connect an external music source through an analog input to the
BCM.
• You can use the IP Music feature to connect to Music Manager. Music
Manager is an audio player application that resides on the BCM 5.0
system and provides a streaming audio signal to the BCM 5.0 system.
• You can use the IP Music feature to connect to an external music source
on the data network.
You must connect the external music source to your network and it must be
accessible to the BCM 5.0 system. The external music source must also
produce a streaming audio signal that is compatible with the BCM 5.0 system.
Fundamentals 21
Select Music Manager if you are using the IP Music feature to connect to the
music source available on the BCM. If you select Music Manager, you must
configure the BcmAmp application before you can use it.
Select Streaming Server if you are using the IP Music feature to connect to a
music source on the data network. If you select Streaming Server, you must
configure the Network Device before you can use it.
For information about connecting external music through and analog input,
see Installation — System (NN40170-303).
BcmAmp application
The audio files loaded onto the BCM 5.0 system are loaded into the same disk
space that is used for CallPilot messages. Therefore, every minute of audio
file loaded onto the BCM 5.0 system reduces the amount of message storage
space available to CallPilot by one minute. To ensure the proper operation of
both Music Manager and CallPilot, the following restrictions are applied to
uploading audio files.
• The maximum size of any single sound file you load onto the BCM 5.0
system is 150 MB.
• The maximum amount of disk space available for Music Manager audio
files is 1 GB.
Copyright © 2009, Nortel Networks
Nortel Business Communications Manager 5.0
Configuration — System
NN40170-501 02.04 Standard
September 2009
Page 22

22 Fundamentals
• To ensure there is sufficient disk space for CallPilot, Music Manager
Administration prevents you from uploading files if there is less than 1 GB
of free disk space on the BCM 5.0 system.
To minimize the time required to upload audio files, record the audio files as a
single channel (mono) using 8-bit samples at a rate of 8 kHz.
Copyright © 2009, Nortel Networks
Nortel Business Communications Manager 5.0
Configuration — System
NN40170-501 02.04 Standard
September 2009
Page 23

System configuration
The information in this chapter applies to both the BCM50 and the BCM450
platforms running BCM 5.0.
Configure your BCM 5.0 system to provide the required system functionality.
A BCM 5.0 system cannot function until it is configured.
Prerequisites to system configuration
• Ensure your BCM 5.0 system is properly installed. For more information
about installing a BCM 5.0 system, see Installation — System (NN40170-
303).
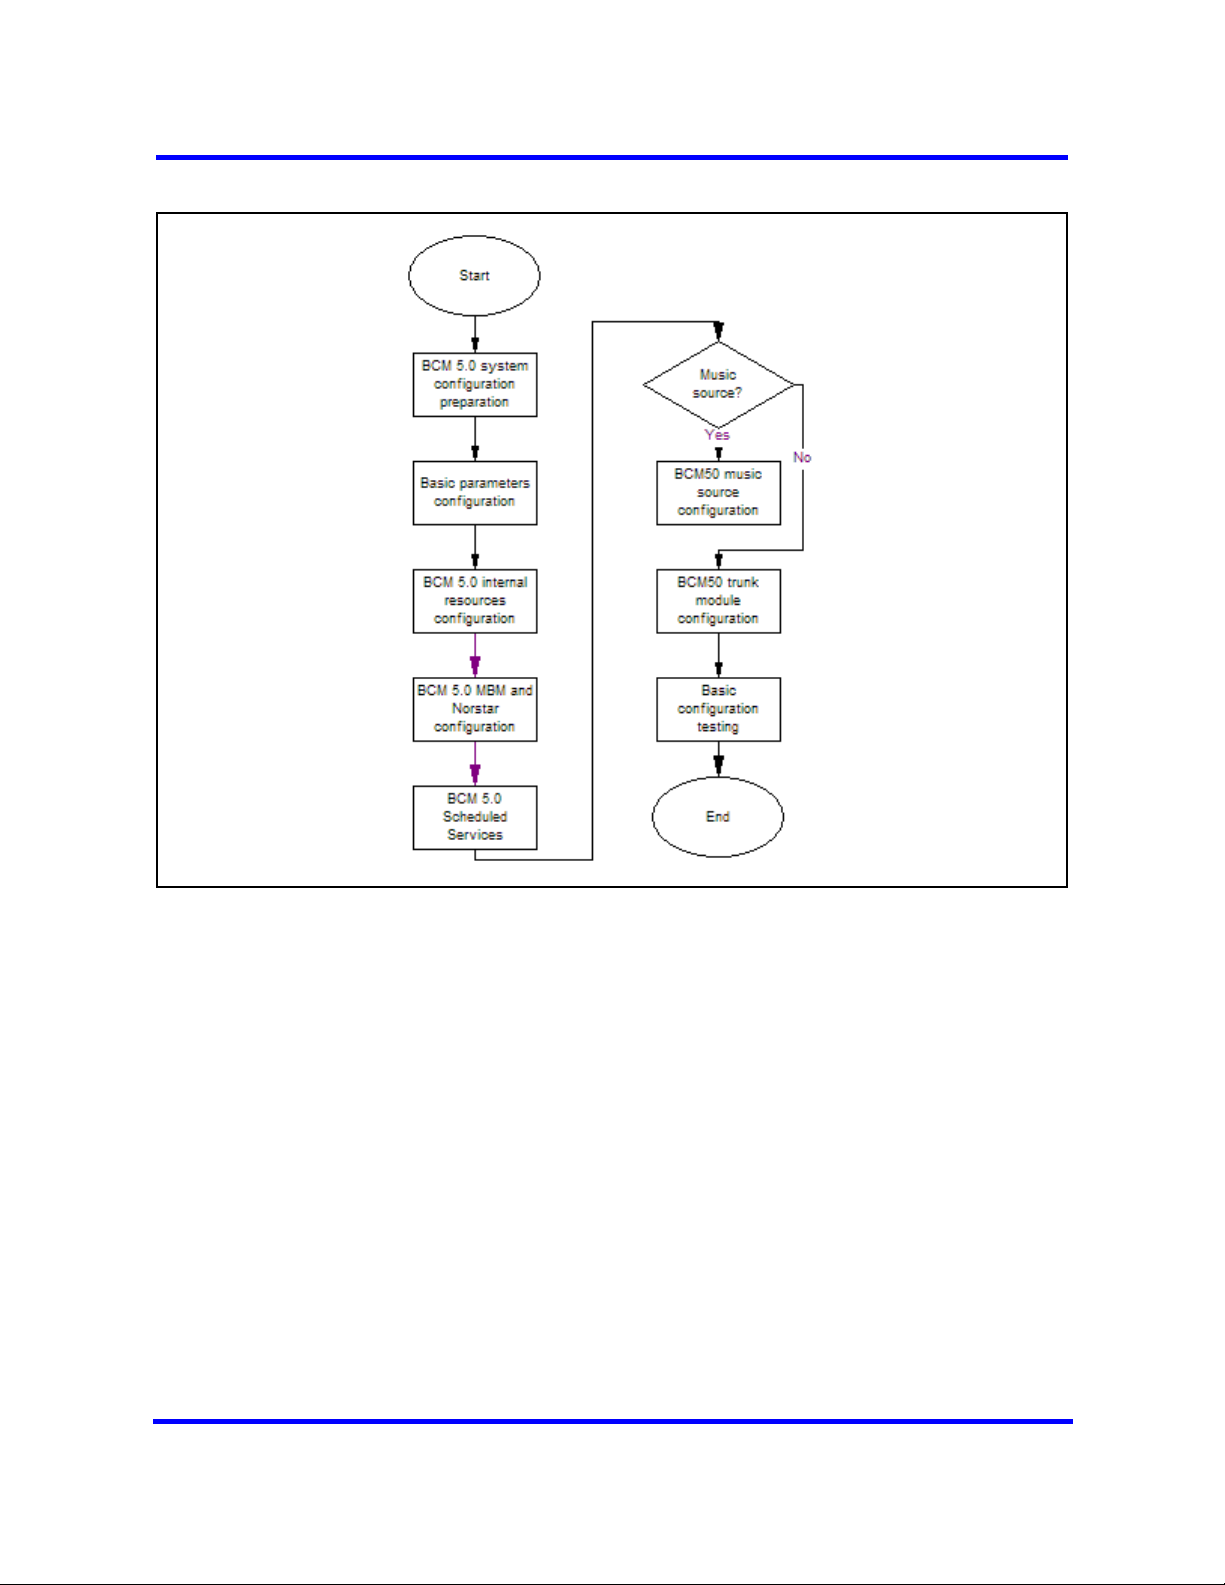
System configuration tasks
This work flow shows you the sequence of tasks you perform to configure your
BCM450 system. To link to any tasks, go to System configuration navigation
(page 24).
Copyright © 2009, Nortel Networks
Nortel Business Communications Manager 5.0
Configuration — System
NN40170-501 02.04 Standard
September 2009
Page 24
24 System configuration
Figure 1 System configuration tasks
System configuration navigation
• BCM 5.0 system configuration preparation (page 25)
• Basic parameters configuration (page 37)
• BCM 5.0 internal resources configuration (page 71)
• BCM450 MBM and legacy Norstar configuration (page 75)
• BCM 5.0 trunk module configuration (page 85)
• BCM 5.0 scheduled services (page 115)
• BCM 5.0 music source configuration (page 121)
• Basic configuration testing (page 129)
Copyright © 2009, Nortel Networks
Nortel Business Communications Manager 5.0
Configuration — System
NN40170-501 02.04 Standard
September 2009
Page 25

BCM 5.0 system configuration preparation
The information in this chapter applies to both the BCM50 and the BCM450
platforms running BCM 5.0.
To configure your BCM 5.0 system most efficiently, you can download and
install Business Element Manager on your computer. You can download the
Startup Profile template, if you want to use it to set the basic parameters for
your BCM 5.0 system. A programming record template that provides the
default parameters is also available for download.
Prerequisites to BCM 5.0 system configuration preparation
• You can use the latest Business Element Manager version to manage all
previous BCM systems that require Business Element Manager. You need
only one instance of Business Element Manager on your computer.
• Business Element Manager supports the following OS systems:
— Windows Server 2003
— Windows Server 2008
— Windows XP
— Windows XP with Service Pack 3
— Windows Vista (Business, Ultimate, and Enterprise versions)
— Windows Vista with Service Pack 2 (Business, Ultimate, and
• Business Element Manager has the following system requirements:
— RAM: minimum 256 MB, recommended 512 MB
— free space: 150 MB
— A Citrix server supports access to Business Element Manager
Copyright © 2009, Nortel Networks
Enterprise versions)
Nortel Business Communications Manager 5.0
Configuration — System
NN40170-501 02.04 Standard
September 2009
Page 26

26 BCM 5.0 system configuration preparation
BCM450 system configuration preparation procedures
This task flow shows you the sequence of procedures you perform to prepare
your BCM450 system for configuration. To link to any procedure, go to BCM
5.0 system configuration preparation navigation.
Figure 2 BCM450 system configuration preparation procedures
Copyright © 2009, Nortel Networks
Nortel Business Communications Manager 5.0
Configuration — System
NN40170-501 02.04 Standard
September 2009
Page 27

BCM 5.0 system configuration preparation 27
BCM 5.0 system configuration preparation navigation
• Connecting to the BCM system through the OAM port (page 27)
• Accessing the BCM Web page (page 28)
• Downloading and installing Business Element Manager (page 29)
• Downloading the Startup Profile template (page 29)
• Downloading the factory default programming record (page 30)
• Connecting to the BCM system (page 30)
• Viewing or modifying the Welcome panel (page 31)
• Saving the programming record (page 34)
Connecting to the BCM system through the OAM port
If you must change the BCM IP address (due to a conflict with your network),
you can connect to the BCM system through the OAM port.
Prerequisites
• Before using the default address on your network, check with your system
administrator. If this address conflicts with the LAN settings, you can
cause network damage if you connect to the network without changing the
IP address.
• Obtain a standard Ethernet cable.
Procedure steps
Step Action
1 Connect one end of the Ethernet cable to the OAM port on the main unit.
2 Connect the other end of the Ethernet cable to the Ethernet port on your
computer.
The DHCP-enabled computer is assigned IP address 10.10.11.2.
(255.255.255.252).
--End--
Connecting to the BCM system through the LAN port
Connect your BCM main unit to the LAN to enable LAN access for your
system.
Prerequisites
• Obtain a standard Ethernet cable.
Copyright © 2009, Nortel Networks
Nortel Business Communications Manager 5.0
Configuration — System
NN40170-501 02.04 Standard
September 2009
Page 28

28 BCM 5.0 system configuration preparation
• The DHCP server on the main unit is enabled (IP Phones only) by default.
If your network already contains a DHCP server, disable the DHCP server
on the main unit.
Procedure steps
Step Action
1 Connect one end of the Ethernet cable to your LAN.
2 Plug the other end of the Ethernet cable into one of the available two LAN
ports on the BCM 5.0 main unit (two right-most ethernet ports).
The OAM port does not support VoIP devices.
Accessing the BCM Web page
After you connect your computer to the BCM system, you can download
Business Element Manager from the Administrator Applications area of the
BCM Web page.
--End--
Prerequisites
• Ensure you connect your computer to the BCM system, either through the
OAM port or through a LAN connection.
Procedure steps
Step Action
1 Open a Web browser and enter the BCM system IP address:
• If your BCM 5.0 is installed on a network, type the address on the
• If your BCM 5.0 is installed but not yet configured, connect directly to
The Enter Network Password dialog box appears.
2 Enter the user name and password (defaults are shown):
• User name: nnadmin
• Password: PlsChgMe!
3 Click OK.
The Welcome to BCM Web page appears.
network in the form, http://xxx.xxx.xxx.xxx.
the BCM 5.0 through the OAM port and type, http://10.10.11.1
Copyright © 2009, Nortel Networks
Nortel Business Communications Manager 5.0
Configuration — System
NN40170-501 02.04 Standard
September 2009
Page 29

BCM 5.0 system configuration preparation 29
--End--
Downloading and installing Business Element Manager
Download and install Business Element Manager to configure and set
parameters for your BCM system.
Prerequisites
• Access the BCM Web page. For more information, see Accessing the
BCM Web page (page 28).
Procedure steps
Step Action
1 From Application Group, click BCM.
The Applications panel appears.
2 From the Applications panel, double-click BCM Element Manager.
Business Element Manager downloads, installs, and opens automatically.
--End--
Downloading the Startup Profile template
Download the Startup Profile template from the BCM Web page for your
specific hardware platform, if you do not have a copy of the Startup Profile
template on your computer.
Prerequisites
• Access the BCM Web page. For more information, see Accessing the
BCM Web page (page 28).
Procedure steps
Step Action
1 From Application Group, click BCM.
The Applications panel appears.
2 From the Applications panel, select Other Administrator Applications.
3 The Administrator Applications page appears.
4 From the Administrator Applications page, click Startup Profile Template.
5 The Startup Profile Template panel appears.
Copyright © 2009, Nortel Networks
Nortel Business Communications Manager 5.0
Configuration — System
NN40170-501 02.04 Standard
September 2009
Page 30

30 BCM 5.0 system configuration preparation
6 Read the information on this panel.
7 Click Download Startup Profile Template on the right side of the screen,
and follow the instructions to download the template.
--End--
Downloading the factory default programming record
Download the factory default programming record from the BCM Web page, if
you want a record of the default parameter values for the BCM system.
Prerequisites
• Access the BCM Web page. For more information, see Accessing the
BCM Web page (page 28).
Procedure steps
Step Action
1 From Application Group, click BCM.
The Applications panel appears.
2 From the Applications panel, select Other Administrator Applications
3 From the Administrator Applications page, click Factory Default
Programming Record.
4 The Factory Default Programming Record panel appears.
5 Read the information on this panel.
6 Click Download Factory Default Programming Record on the right side
of the screen, and follow the instructions to download the template.
Connecting to the BCM system
Connect to your BCM system to configure your system with Business Element
Manager.
Prerequisites
• Download and install Business Element Manager. For more information,
see Downloading and installing Business Element Manager (page 29).
--End--
Copyright © 2009, Nortel Networks
Nortel Business Communications Manager 5.0
Configuration — System
NN40170-501 02.04 Standard
September 2009
Page 31

Procedure steps
Step Action
1 Launch Business Element Manager.
2 From the Network menu, click New Network Element > Business
Communications Manager.
3 In the IP Address box, type the BCM system IP address.
4 In the User ID and Password boxes, type the following information:
• User ID: nnadmin
• Password: PlsChgMe!
5 Click OK.
6 From the Network Elements list, select your BCM system IP address.
7 Ensure that the user name and password are entered.
8 Click Connect.
You are now connected to the BCM system.
BCM 5.0 system configuration preparation 31
--End--
Viewing or modifying the Welcome panel
The Welcome panel displays information for the current account logged on the
system. The administrator is prompted to change the password before any
programming menus are accessible.
Figure 3 Initial Welcome panel
The initial Welcome panel displays:
• on the first login to the BCM by nnadmin
Copyright © 2009, Nortel Networks
Nortel Business Communications Manager 5.0
Configuration — System
NN40170-501 02.04 Standard
September 2009
Page 32

32 BCM 5.0 system configuration preparation
• when the administrator has selected the forced password change option
on an account
• if the password has expired
Procedure steps
Step Action
1 Launch Business Element Manager.
2 From the Network menu, click New Network Element > Business
Communications Manager.
3 In the IP Address box, type the BCM system IP address.
4 In the User ID and Password boxes, type the following information:
• User ID: nnadmin
• Password: PlsChgMe!
5 Click OK.
6 From the Network Elements list, select your BCM system IP address.
7 Ensure that the user name and password are entered.
8 Click Connect.
The Welcome panels appears.
9 If prompted to change the password, in the Change Password box, enter a
new password.
--End--
Attention: Once the password has been changed the entire navigation tree
is accessible.
Copyright © 2009, Nortel Networks
Nortel Business Communications Manager 5.0
Configuration — System
NN40170-501 02.04 Standard
September 2009
Page 33

BCM 5.0 system configuration preparation 33
Variable definitions
Variable Value
User ID This read-only value is the user ID you used to log on to the
system.
Password To change password, select the field and enter new password.
The password must satisfy the password policy requirements for
the system.
If you are not prompted to change the password the following Welcome panel
information displays.
Copyright © 2009, Nortel Networks
Nortel Business Communications Manager 5.0
Configuration — System
NN40170-501 02.04 Standard
September 2009
Page 34

34 BCM 5.0 system configuration preparation
Figure 4 Welcome panel
Variable definitions
Variable Value
Account Notifications
User ID This read-only value is the user ID you used to log on to the
Telset User ID This read-only value is the user ID used to logon to the telset
Last successful login
This read-only value displays BCM administrative messages or
notifications regarding the current user.
system.
configuration interfaces for telephony and CallPilot applications.
This read-only value is the date and time that this user account
was last logged in the system.
Saving the programming record
Save the programming record that contains the current settings of all or part
of your Business Element Manager data. These files can be saved in either
HTML or Excel spreadsheet format. You can access the programming record
in the same way you access any other HTML file or by using Excel, version
2002 or later, for the spreadsheet format.
Attention: The Save Programming Record task does not take very long
because it does not include the DN settings. Saving the DN settings is a
separate step and it can take up to 45 minutes.
Prerequisites
• Launch Business Element Manager and connect to your BCM system. For
more information, see Connecting to the BCM system (page 30).
• The Save All Data selection can take up to 45 minutes to complete. Your
computer must stay connected to the element during this time, as the Save
Copyright © 2009, Nortel Networks
Nortel Business Communications Manager 5.0
Configuration — System
NN40170-501 02.04 Standard
September 2009
Page 35

All Data function is actively writing into the file specified until the function
is complete.
Procedure steps
Step Action
1 In Business Element Manager, select the item on the task navigation panel
for which you want to save the data into an HTML report or Excel workbook.
An item can be a task item, task bullet, or a folder.
2 Select Session > device IP address > Save Programming Record >
Save Selected Data.
A warning appears.
3 Read the warning information and click Yes.
A Save dialog box appears.
4 In the Save: box choose the path where you want the file stored.
5 In the Files of type: box, choose the format in which you want to save the
data (HTML or Microsoft Excel spreadsheet).
BCM 5.0 system configuration preparation 35
6 Enter a File name.
Nortel recommends that you make the current date and system name part
of the file name.
7
Click Save to save the DN data. This takes approximately 45 minutes
to save the DNs.
8 Click Save to save the programming record.
--End--
Copyright © 2009, Nortel Networks
Nortel Business Communications Manager 5.0
Configuration — System
NN40170-501 02.04 Standard
September 2009
Page 36

36 BCM 5.0 system configuration preparation
Copyright © 2009, Nortel Networks
Nortel Business Communications Manager 5.0
Configuration — System
NN40170-501 02.04 Standard
September 2009
Page 37

Basic parameters configuration
The information in this chapter applies to both the BCM50 and the BCM450
platforms running BCM 5.0.
Configure basic parameters (initial parameters and startup parameters)
through Telset Administration, Business Element Manager, or the Startup
Profile template.
Prerequisites to basic parameters configuration
• Prepare your BCM 5.0 system for configuration. For more information, see
BCM 5.0 system configuration preparation (page 25).
• For an overview of the initial parameters and startup parameters, see
System parameters reference (page 151).
Basic parameters configuration tasks
This work flow shows you the sequence of tasks you perform to configure the
basic parameters of your BCM450 system. To link to any tasks, go to Basic
parameters configuration navigation (page 38).
Copyright © 2009, Nortel Networks
Nortel Business Communications Manager 5.0
Configuration — System
NN40170-501 02.04 Standard
September 2009
Page 38

38 Basic parameters configuration
Figure 5 Basic parameters configuration tasks
Basic parameters configuration navigation
• BCM 5.0 configuration with Telset Administration (page 39)
• BCM 5.0 configuration with Business Element Manager (page 45)
• BCM 5.0 configuration with Startup Profile (page 65)
Copyright © 2009, Nortel Networks
Nortel Business Communications Manager 5.0
Configuration — System
NN40170-501 02.04 Standard
September 2009
Page 39

BCM 5.0 configuration with Telset Administration
The information in this chapter applies to both the BCM50 and the BCM450
platforms running BCM 5.0.
You can use Telset Administration through a digital telephone with a two-line
display to set the BCM 5.0 configuration parameters.
You cannot set all the basic parameters using Telset Administration. For
example, you cannot enter a keycode using the Telset Administration
interface. You must enter the keycodes using the Business Element Manager
interface or the USB interface. For more information and procedures on how
to download and apply keycodes on your BCM 5.0 system, see the Keycode
Installation Guide.
Prerequisites to BCM 5.0 configuration with Telset Administration
• Connect a digital telephone with a two-line display to your BCM system.
• For information about using Telset Administration to set parameters, see
the Telset Administration Guide (NN40170-604).
BCM450 configuration with Telset Administration procedures
This task flow shows you the sequence of procedures you perform to
configure the initial parameters of your BCM system through Telset
Administration. To link to any procedure, go to BCM 5.0 configuration with
Telset Administration navigation (page 40).
Nortel Business Communications Manager 5.0
Copyright © 2009, Nortel Networks
Configuration — System
NN40170-501 02.04 Standard
September 2009
Page 40

40 BCM 5.0 configuration with Telset Administration
Figure 6 BCM450 configuration with Telset Administration procedures
BCM 5.0 configuration with Telset Administration navigation
• Configuring the IP address (page 41)
• Configuring the modem (page 41)
• Selecting the region (page 42)
• Selecting the telephony startup template and start DN (page 42)
• Initializing voice mail (page 42)
• Creating Telset user accounts (page 43)
Copyright © 2009, Nortel Networks
Nortel Business Communications Manager 5.0
Configuration — System
NN40170-501 02.04 Standard
September 2009
Page 41

Configuring the IP address
Configure the BCM IP address for full network connectivity.
Prerequisites
You must enter the keycode for your BCM 5.0 system to access the features.
For more detailed information about retrieving and entering the keycode for
your system, see the Keycode Installation Guide (NN40010-301).
Procedure steps
Step Action
1 Select Feature 9*8 from a two-line display telephone.
2 Enter the following user ID and password:
• User ID: SETNNA
• Password: CONFIG
The numerical values of the user ID and password are 738662 and 266344,
respectively.
BCM 5.0 configuration with Telset Administration 41
3 Press OK.
4 Press NEXT to scroll through the menu and select IP Address.
5 Press OK.
6 Press CHNGE to modify the IP settings.
The display screen shows whether DHCP is enabled or disabled.
7 Press DIS to disable DHCP or ENL to enable DHCP.
The system must reboot to enable DHCP.
8 Press IP to modify the following IP settings:
• IP Address
• Subnet Mask
• Default Gateway
These settings have no effect if the DHCP is disabled.
9 Press Back and select System Restart to reboot the system.
Configuring the modem
Configure the BCM system modem to provide connection to the system
through the modem.
--End--
Copyright © 2009, Nortel Networks
Nortel Business Communications Manager 5.0
Configuration — System
NN40170-501 02.04 Standard
September 2009
Page 42

42 BCM 5.0 configuration with Telset Administration
Prerequisites
• For more information about modem configuration, see Configuration—
Telephony (NN40170-502).
Procedure steps
Step Action
1 Select Feature 9*8 from a two-line display telephone.
2 Enter the following user ID and password:
• User ID: SETNNA
• Password: CONFIG
The numerical values of the user ID and password are 738662 and 266344,
respectively.
3 Press OK.
4 Press NEXT to scroll through the menu and select Modem.
5 Press OK. The display screen shows whether the modem is enabled or
disabled.
6 If the modem is disabled, press ENL to enable the modem.
7 If the modem is enabled, press DIS to disable the modem.
--End--
Selecting the region
Set the Region using Feature **PROFILE from a two-line display telephone.
For more information about using Telset Administration to set parameters, see
the Telset Administration Guide (NN40170-604).
Selecting the telephony startup template and start DN
Set the DID or PBX template and Start DN using Feature **STARTUP from a
two-line display telephone.
This is available for only 15 minutes after the system starts.
For more information about using Telset Administration to set parameters, see
the Telset Administration Guide (NN40170-604).
Initializing voice mail
Initialize your voice-mail system using Feature 983 from a two-line display
telephone.
Copyright © 2009, Nortel Networks
Nortel Business Communications Manager 5.0
Configuration — System
NN40170-501 02.04 Standard
September 2009
Page 43

For information about using Telset Administration to initialize your voice mail
system, see the CallPilot Telephone Administration Guide (NN40090-500).
Creating Telset user accounts
You can create Telset user accounts using Telset Administration.
Prerequisites
• You can create only Telset accounts using Telset Administration. To create
Business Element Manager accounts, you must use Business Element
Manager.
Procedure steps
Step Action
1 Select Feature 9*8 from a two-line display telephone.
2 Enter the following user ID and password:
• User ID: SETNNA
• Password: CONFIG
BCM 5.0 configuration with Telset Administration 43
The numerical values of the user ID and password are 738662 and 266344,
respectively.
3 Press OK
4 Press NEXT to scroll through the menu and select User Accounts.
5 Press OK.
The Accounts screen appears.
6 Press CHNGE to create an account.
7 Press NEXT to scroll through the list of available accounts.
8 Press CRT to create the account.
If you see the DEL command instead of the CRT command, the account
already exists.
9 Press BACK.
The Accounts screen appears.
10 Press NEXT.
The password screen appears.
11 Press CHNGE to change the password.
12 Press NEXT to scroll through the list of available accounts.
13 Press CHNGE to change the password for the selected account.
14 Enter the new password for the account.
Copyright © 2009, Nortel Networks
Nortel Business Communications Manager 5.0
Configuration — System
NN40170-501 02.04 Standard
September 2009
Page 44

44 BCM 5.0 configuration with Telset Administration
15 Enter the new password again to confirm it.
--End--
Copyright © 2009, Nortel Networks
Nortel Business Communications Manager 5.0
Configuration — System
NN40170-501 02.04 Standard
September 2009
Page 45

BCM 5.0 configuration with Business Element Manager
The information in this chapter applies to both the BCM50 and the BCM450
platforms running BCM 5.0.
You can configure all BCM system parameters through Business Element
Manager.
Prerequisites to BCM 5.0 configuration with Business Element
Manager
• Launch Business Element Manager and connect to your BCM system. For
more information, see Connecting to the BCM system (page 30).
BCM450 configuration with Element Manager procedures
This task flow shows you the sequence of procedures you perform to
configure the system parameters of your BCM system through Element
Manager. To link to any procedure, go to BCM 5.0 configuration with Business
Element Manager navigation (page 46).
Copyright © 2009, Nortel Networks
Nortel Business Communications Manager 5.0
Configuration — System
NN40170-501 02.04 Standard
September 2009
Page 46

46 BCM 5.0 configuration with Business Element Manager
Figure 7 BCM450 configuration with Element Manager procedures
BCM 5.0 configuration with Business Element Manager navigation
• Entering the keycode (page 47)
• Configuring the IP address (page 47)
• Configuring the modem (page 48)
• Configuring the startup template for telephony services (page 49)
• Initializing voice mail (page 49)
• Entering a name for your system (page 50)
Copyright © 2009, Nortel Networks
Nortel Business Communications Manager 5.0
Configuration — System
NN40170-501 02.04 Standard
September 2009
Page 47

• Configuring the date and time settings (page 50)
• Configuring DHCP server settings (page 51)
• Configuring IP Phones (page 54)
• Configuring SNMP settings (page 55)
• Configuring the SNMP manager list (page 56)
• Configuring SNMP community strings (page 57)
• Configuring service access points (page 58)
• Configuring SNMP trap destinations (page 60)
• Creating user accounts (page 62)
Entering the keycode
Enter the keycode for your BCM 5.0 system to access the features.
Prerequisites
• Ensure you generate the keycode file for your BCM 5.0 system and that
the keycode file is stored on your computer.
BCM 5.0 configuration with Business Element Manager 47
• For more detailed information about retrieving and entering the keycode
for your system, see the Keycode Installation Guide (NN40010-301).
Procedure steps
Step Action
1 Select Configuration > System > Keycodes.
The Keycodes panel appears.
2 Click Load Keycode File.
The Open dialog box appears.
3 Select the keycode file for your system, and then click Open.
Configuring the IP address
Configure the BCM IP address for full network connectivity.
Prerequisites
• If you modify any of the attributes, the Business Element Manager session
disconnects.
--End--
Copyright © 2009, Nortel Networks
Nortel Business Communications Manager 5.0
Configuration — System
NN40170-501 02.04 Standard
September 2009
Page 48

48 BCM 5.0 configuration with Business Element Manager
Procedure steps
Step Action
1 Select Configuration > System > IP Subsystem.
2 Select the LAN Interfaces tab.
3 Select Customer LAN from the LAN Interfaces Summary. The IP
Configuration pane appears.
4 Click Modify.
5 Enter the IP address.
6 Enter the IP subnet mask.
7 Enter the Default gateway.
8 Click OK.
--End--
Variable definitions
Variable Value
Obtain IP address dynamically If this is selected, the BCM system attempts to use IP address
information from a DHCP server. If this is not selected, you
must enter values for static IP address, IP subnet mask, and
Default gateway.
IP address The IP address of the BCM system.
IP subnet mask The subnet mask used by the BCM system.
Default gateway The gateway used by the BCM system.
Configuring the modem
Configure the BCM system modem to connect to the system through the
modem.
If you have the appropriate platform privilege, you can remotely dial into BCM
Voicemail and enable the analog modem through any traditional PSTN, ISDN,
or analog trunk. This feature eliminates the need for support personnel to
make site visits to perform management operations.
Prerequisites
• For more information about modem configuration, see Configuration —
Telephony (NN40170-502).
Copyright © 2009, Nortel Networks
Nortel Business Communications Manager 5.0
Configuration — System
NN40170-501 02.04 Standard
September 2009
Page 49

BCM 5.0 configuration with Business Element Manager 49
Procedure steps
Step Action
1 Select Configuration > Resources > Dial Up Interfaces.
2 Click the Modem Dial-In Parameters tab.
3 Select the Enable modem dial-in check box to enable the modem.
--End--
Configuring the startup template for telephony services
Configure the startup telephony services to set or modify the values for the
region, template, and start DN. Telephony services restarts with all telephony
programming at default values. Performing a cold reset of telephony services
erases all telephony programming, as well as all Voice Message mailboxes
and messages.
Procedure steps
Step Action
1 Select Administration > Utilities > Reset.
2 Click Cold Reset Telephony Services.
The Cold Reset Telephony dialog box appears.
3 Configure the Cold Reset Telephony attributes.
4 Click OK.
--End--
Variable definitions
Variable Value
Region Specifies the startup region.
DID or PBX template Specifies the startup template.
Start DN Specifies the startup DN. The default is 221.
Initializing voice mail
Initialize your voice mail system to enable users access voice mail features.
Copyright © 2009, Nortel Networks
Nortel Business Communications Manager 5.0
Configuration — System
NN40170-501 02.04 Standard
September 2009
Page 50

50 BCM 5.0 configuration with Business Element Manager
Prerequisites
• For more information, see the CallPilot Manager Set Up and Operation
Guide (NN40090-300).
Procedure steps
Step Action
1 Select Configuration > Applications > Voice Messaging/Contact
Center.
2 Click Launch CallPilot Manager.
The Quick Install Wizard form appears. If your voice mail system is already
initialized, you do not see the Quick Install Wizard. Instead you see the
CallPilot Manager: Main Menu Web page.
3 Configure the attributes on the Quick Install Wizard form.
--End--
Entering a name for your system
Enter a descriptive name for your system to identify your system on the
network.
Procedure steps
Step Action
1 Select Configuration > System > Identification.
2 In the System name box, enter a name for your system.
The system name must be a unique alphanumeric name that cannot begin
with a number or hyphen (-), and cannot end with hyphen or period (.)
Configuring the date and time settings
Set the date and time settings for your BCM system.
Procedure steps
Step Action
--End--
1 Select Configuration > System > Date and Time.
Copyright © 2009, Nortel Networks
Nortel Business Communications Manager 5.0
Configuration — System
NN40170-501 02.04 Standard
September 2009
Page 51

BCM 5.0 configuration with Business Element Manager 51
The Date and Time panel appears.
2 In the Current Date and Time panel, configure the Date and Time attributes.
--End--
Variable definitions
Variable Value
Date and Time source Set to NTP if the system uses a network server to determine
the correct time and date.
Set to Trunk to receive time and date settings from PSTN (if
available).
Set to Manual to manually configure the time and date for your
system.
NTP server address If Date and Time source is set to NTP, enter an address for the
server.
Synch every (s) The number of seconds specified to elapse between contacts
with the NTP server.
1-XXXX: Number of seconds between contacts with the NTP
server.
NTP security mode Select whether the NTP security mode is secured or
unsecured.
Raise alarm if clock differs by at least
(s)
NTP key ID ID for accessing the NTP.
NTP key string Control key corresponding to ID for accessing the NTP.
Date and time Use the calendar to select the correct date and time.
Time zone Select the time zone for this system.
The number of discrepancy seconds specified that must occur
before the system notifies you of a time difference from the
NTP server, if the system automatically checks with the NTP
server.
Configuring DHCP server settings
Configure the DHCP server settings on your BCM main unit or on the
integrated router.
Prerequisites
• If you have a main unit with an integrated router, you must first disable the
DHCP server on the integrated router to use the DHCP server on the main
unit.
Copyright © 2009, Nortel Networks
Nortel Business Communications Manager 5.0
Configuration — System
NN40170-501 02.04 Standard
September 2009
Page 52

52 BCM 5.0 configuration with Business Element Manager
Procedure steps
Step Action
1 Select Configuration > Data Services > DHCP Server.
2 Select the General Settings tab.
3 Configure the attributes.
--End--
Copyright © 2009, Nortel Networks
Nortel Business Communications Manager 5.0
Configuration — System
NN40170-501 02.04 Standard
September 2009
Page 53

BCM 5.0 configuration with Business Element Manager 53
Variable definitions
Variable Value
Use DHCP Server on Integrated
Router
This attribute is available only on main units with an integrated
router (BCM450a, BCM450e, BCM450ba, BCM450be).
Specify whether or not to use the DHCP server on the
integrated router.
If selected, the DHCP server on the integrated router is used,
and the DHCP server on the main unit is disabled.
If cleared, the DHCP server on the main unit is active. You
must first disable the DHCP server on the integrated router to
avoid networking conflicts.
DHCP server is Select Enabled - IP Phones Only, Enabled - All Devices, or
Disabled from the list.
IP domain name The domain name of the network.
Primary DNS IP address Specify the IP addresses of the primary DNS server in a valid
dot format.
BCM automatically assigns the value for this parameter. If the
IP address or subnet mask for the corresponding LAN interface
changes, this value is overwritten. Use caution when changing
this value.
Secondary DNS IP address Specify the IP addresses of the secondary DNS server in a
valid dot format.
BCM automatically assigns the value for this parameter. If the
IP address or subnet mask for the corresponding LAN interface
changes, this value is overwritten. Use caution when changing
this value.
WINS server address Specify the IP address of the WINS server.
BCM automatically assigns the value for this parameter. If the
IP address or subnet mask for the corresponding LAN interface
changes, this value is overwritten. Use caution when changing
this value.
WINS node type Specify a client WINS node type.
The BCM system automatically sets this value to H-node on all
DHCP clients. This setting configures the DHCP client PCs to
use P-node name resolution before resorting to B-node name
resolution.
Use caution if you change this attribute.
Lease time Specify the time, in seconds, for an address assignment until
the client lease expires.
The default is 259 200 seconds (72 hours).
Copyright © 2009, Nortel Networks
Nortel Business Communications Manager 5.0
Configuration — System
NN40170-501 02.04 Standard
September 2009
Page 54

54 BCM 5.0 configuration with Business Element Manager
Configuring IP Phones
Configure the IP Phones for your BCM system to enable their full functionality.
Procedure steps
Step Action
1 Select Configuration > Resources > Telephony Resources.
2 From the Configured Device column, select IP Sets.
The Details for Module area appears in the lower pane with the IP Terminal
Global Settings tab as the default.
3 Configure the IP Terminal Global Settings attributes.
4 To automatically configure IP Phones with DNs assigned:
• Select the Enable registration check box.
• Select the Enable global registration password check box.
• Leave the Global password box blank.
• Select the Auto-assign DNs check box.
• After the IP Phones are operational, clear the Enable registration
check box.
--End--
Copyright © 2009, Nortel Networks
Nortel Business Communications Manager 5.0
Configuration — System
NN40170-501 02.04 Standard
September 2009
Page 55

BCM 5.0 configuration with Business Element Manager 55
Variable definitions
Variable Value
Enable registration Select this check box to allow new IP clients to register with the
system.
Remember to clear this check box after you finish registering
the new telephones.
Enable global registration password To require the installer to enter a password after IP telephones
are configured and registered to the system, select this box.
If this box is not selected (disabled), a valid Telset user ID and
password is required to register IP phones.
Global password If you select the Enable Global Registration Password check
box, enter the password the installer enters on the IP
telephone to connect to the system.
If this check box is empty, no password prompt occurs during
registration.
Auto-assign DNs If you select this check box, the system assigns an available
DN as an IP terminal requests registration. It does not prompt
the installer to enter a set DN.
If this check box is empty, the installer receives a prompt to
enter the assigned DN during the programming session.
Advertisement/Logo Any information in this box appears on the display of all IP
telephones. For example, your company name or slogan (24
characters in length).
Configuring SNMP settings
Configure SNMP settings to either enable or disable the SNMP agent, security
level, and version.
Procedure steps
Step Action
1 Select Configuration > Administrator Access > SNMP.
2 Select the General tab.
It is normally selected by default.
3 From the SNMP Settings area, click Modify.
The Modify SNMP Settings dialog box appears.
4 Configure the attributes for Modify SNMP Settings.
5 Click OK.
Copyright © 2009, Nortel Networks
Nortel Business Communications Manager 5.0
Configuration — System
NN40170-501 02.04 Standard
September 2009
Page 56

56 BCM 5.0 configuration with Business Element Manager
--End--
Variable definitions
Variable Value
Enable SNMP Agent Choose whether to enable or disable the SNMP agent by
selecting (or not selecting) the check box.
Minimum required security Select the minimum required security for SNMP from the
list.Options are: noAuthNoPriv or authNoPriv
SNMP Version Support Select the SMNP version support from the list. Options are:
V1-V2-V3
V3
V2-V1
Configuring the SNMP manager list
Configure the SNMP manager list by specifying one or more manager IP
address.
Prerequisites
• Use the SNMP manager list to specify IP addresses that can connect to
the SNMP agent.
Procedure steps
Step Action
1 Select Configuration > Administrator Access > SNMP.
2 Select the General tab.
It is normally selected by default.
3 In the SNMP Manager List area, click Add.
The Add Manager dialog box appears.
4 In the Manager IP Address box, enter the IP address.
The IP address must correspond to the PC where the SNMP manager
software is installed. Do not use the dynamic IP address that the PC
receives when the dial-up link activates (when the BCM 5.0 initiates dialing).
Using the dynamic IP address causes the removal of the required static
route. The format for the IP address is X.X.X.X:P, where P is the port.Setting
the IP address to 0.0.0.0 authorizes all SNMP managers to query the
system.
5 Click OK.
Copyright © 2009, Nortel Networks
Nortel Business Communications Manager 5.0
Configuration — System
NN40170-501 02.04 Standard
September 2009
Page 57

6 Repeat step 3 to step 5 to add another manager IP address.
Deleting an SNMP manager
You can delete an SNMP manager if it is no longer required.
Procedure steps
Step Action
1 Select Configuration > Administrator Access > SNMP.
2 Select the General tab.
It is normally selected by default.
3 In the SNMP Manager List area, select a manager in the IP Manager IP
address table.
Click Delete.
A confirmation message appears.
BCM 5.0 configuration with Business Element Manager 57
--End--
4 Click Yes to confirm the deletion.
Configuring SNMP community strings
Configure SNMP community settings to add a community string and specify
the type of access. An SNMP community string is a value, similar to a user ID
or a password, that allows access to a device's statistics. SNMP managers
send a community string along with each SNMP request. If the community
string is correct, the BCM 5.0 responds with the requested information. If the
community string is incorrect, the BCM 5.0 discards the request and does not
respond. Community strings are used for SNMP v1 and v2C only.
Procedure steps
Step Action
1 Select Configuration > Administrator Access > SNMP.
2 Select the Community Strings tab.
3 Click Add. The Add Community String dialog box appears.
--End--
4 Configure the Add Community String attributes.
5 Click OK.
Copyright © 2009, Nortel Networks
Nortel Business Communications Manager 5.0
Configuration — System
NN40170-501 02.04 Standard
September 2009
Page 58

58 BCM 5.0 configuration with Business Element Manager
6 Repeat step 3 to step 5 to add more community strings.
--End--
Variable definitions
Variable Value
Community string Enter the name used as a key to uniquely identify an individual
community entry on the SNMP agent.
Type of access Specify the read and write access for this community. Available
options are Read-Only and Read/Write.
Deleting SNMP community strings
You can delete an SNMP community string if it is no longer required.
Procedure steps
Step Action
1 Select Configuration > Administrator Access > SNMP.
2 Select the Community Strings tab.
3 In the Community Strings table, select the community string that you want
to delete.
4 Click Delete.
A confirmation message appears.
5 Click Yes to confirm the deletion.
Configuring service access points
Service access points are associated with the enhanced security and privacy
features of SNMP v3. The Service Access Point tab is not visible if SNMPv3
is not selected on the SNMP General Settings tab. You can add, modify, and
delete service access points.
Procedure steps
--End--
Step Action
1 Select Configuration > Administrator Access > SNMP.
Copyright © 2009, Nortel Networks
Nortel Business Communications Manager 5.0
Configuration — System
NN40170-501 02.04 Standard
September 2009
Page 59

BCM 5.0 configuration with Business Element Manager 59
2 Select the Service Access Points tab.
The Service Access Points tab appears.
3 Click Add.
The Add Service Access points dialog box appears.
4 Configure the Add Service Access Points attributes.
5 Click OK.
--End--
Variable definitions
Variable Value
User name Enter the name of the user associated with the service access
point.
Authentication Protocol Select the authentication protocol. Options are: None, MD5,
SHA.
Type of Access Select the type of access. Options are: Read Only and Read/
Write.
Encryption Protocol Select the encryption. Options are: None, DES, 3DES, AES.
Engine ID Enter an engine ID when you add a user that will be used for
SNMP v3 communications. The engine ID is made up of
hexadecimal digits with a colon separating each digit.
Leave the engine ID blank when you add a user that will have
access to the MIB, or in the case of SNMP v3 MIB queries.
Authentication Pass Phrase Enter the Authentication pass phrase for the service access
point. Press the Tab key when you have entered the phrase.
Privilege Pass Phrase Enter the Privilege pass phrase for the service access point.
Press the Tab key when you have entered the phrase.
Deleting service access points
You can delete service access points.
Procedure steps
Step Action
1 Select Configuration > Administrator Access > SNMP.
2 Select the Service Access Points tab.
The Service Access Points tab appears.
3 In the Service Access Points table select a service access point.
Copyright © 2009, Nortel Networks
Nortel Business Communications Manager 5.0
Configuration — System
NN40170-501 02.04 Standard
September 2009
Page 60

60 BCM 5.0 configuration with Business Element Manager
4 Click Delete.
A confirmation message appears.
5 Click Yes.
--End--
Configuring SNMP trap destinations
An SNMP trap is a signal that tells the SNMP manager that an event has
occurred on the system. The SNMP system enables SNMP traps to be
generated based on all or some events and alarms generated on the BCM 5.0
system. Any information that is displayed in the Alarms panel can generate an
SNMP trap.
BCM 5.0 alarms that meet the SNMP trap criteria are forwarded to the SNMP
trap reporting interface according to defined trap community strings. SNMP
trap notifications are displayed in your SNMP trap software.
SNMP traps are generated by the BCM 5.0 if you have enabled SNMP for
specific BCM 5.0 alarms. You configure SNMP settings using the Alarm
Settings task in the Business Element Manager.
Attention: You can configure and administer SNMP trap destinations in
both the Configuration tab and the Administration tab of the Business
Element Manager. This allows operators who manage BCM 5.0 faults to
configure SNMP trap destinations without having to access the SNMP
settings on the Configuration panel. SNMP must be enabled on the SNMP
General panel if you want to configure and use SNMP trap destinations from
the SNMP Trap Destinations panel on Administration panel.
Procedure steps
Step Action
1 Select Configuration > Administrator Access > SNMP.
2 Select the SNMP Trap Destinations tab.
The SNMP Trap Destinations tab appears.
3 Click Add.
The Add Trap Destinations dialog box appears.
4 Configure the Add Trap Destinations attributes.
5 Click OK.
Copyright © 2009, Nortel Networks
Nortel Business Communications Manager 5.0
Configuration — System
NN40170-501 02.04 Standard
September 2009
Page 61

BCM 5.0 configuration with Business Element Manager 61
--End--
Variable definitions
Variable Value
Name Enter a name for the trap.
Host Enter the IP address of the trap destination.
Port Enter the UDP port number from which the trap will be sent.
The default value is 162.
SNMP version Select the version of the SNMP Agent for the trap. Options are:
v1/v2C, and v3.
Community String Enter the community string to use for the SNMP trap.
User Name For v3 only, enter the user name for the SNMP trap.
Viewing and modifying SNMP trap destinations
Once you have configured SNMP settings, you can view and administer
SNMP trap destinations.
Attention: You can configure and administer SNMP trap destinations in
both the Configuration tab and the Administration tab of the Business
Element Manager. This allows operators who manage BCM 5.0 faults to
configure SNMP trap destinations without having to access the SNMP
settings on the Configuration panel. SNMP must be enabled on the SNMP
General panel if you want to configure and use SNMP trap destinations from
the SNMP Trap Destinations panel on Administration panel.
Procedure steps
Step Action
1 Select Configuration > Administrator Access > SNMP.
2 Select the SNMP Trap Destinations tab.
The SNMP Trap Destinations tab appears.
3 In the Trap Destinations table, select a trap destination.
4 Click Modify.
The Add Trap Destinations dialog box appears.
5 Configure the Modify Trap Destinations attributes.
6 Click OK.
Copyright © 2009, Nortel Networks
Nortel Business Communications Manager 5.0
Configuration — System
NN40170-501 02.04 Standard
September 2009
Page 62

62 BCM 5.0 configuration with Business Element Manager
--End--
Variable definitions
Variable Value
Name Enter a name for the trap.
Host Enter the IP address of the trap destination.
Port Enter the UDP port number from which the trap will be sent.
The default value is 162.
SNMP version Select the version of the SNMP Agent for the trap. Options are:
v1/v2C, and v3.
Community String Enter the community string to use for the SNMP trap.
User Name For v3 only, enter the user name for the SNMP trap.
Deleting SNMP Trap Destinations
You can delete SNMP Trap Destinations.
Procedure steps
Step Action
1 Select Configuration > Administrator Access > SNMP.
2 Select the SNMP Trap Destinations tab.
The SNMP Trap Destinations tab appears.
3 In the SNMP Trap Destinations table, select a trap destination.
4 Click Delete.
A confirmation message appears.
5 Click Yes.
Creating user accounts
Create user accounts to allow specific user to access the BCM 5.0 system.
Procedure steps
Step Action
--End--
Copyright © 2009, Nortel Networks
Nortel Business Communications Manager 5.0
Configuration — System
NN40170-501 02.04 Standard
September 2009
Page 63

BCM 5.0 configuration with Business Element Manager 63
1 Select Configuration > Administrator Access > Accounts and
Privileges.
2 Select the View by Accounts tab.
3 Click Add to add a user account.
The Add Account dialog box appears.
4 Configure the Add Account attributes.
5 Click OK.
6 Repeat step 3 to step 5 to create more user accounts.
--End--
Variable definitions
Variable Value
Description Enter a description for this account.
User ID Enter a descriptive name for the user or the user function.
Password Enter a password for this account.
Telset user ID (numeric) If the user performs administration through the Telset interface,
enter a number for the user ID.
Telset password (numeric) Enter a password for the Telset User ID.
Modem Callback Number If Callback is required, enter the number to which the system
calls back to verify the dial-up user access.
Modem Callback Passcode This is the code the system uses to confirm the callback is
legitimate.
ISDN Callback Number If ISDN Callback is required, enter the number to which the
system calls back to verify the dial-up user access.
Change Password On Login Select this check box to force the user to change the password
upon first login.
Change Password On Login Telset Select this check box to force the user to change the Telset
password upon first login.
Copyright © 2009, Nortel Networks
Nortel Business Communications Manager 5.0
Configuration — System
NN40170-501 02.04 Standard
September 2009
Page 64

64 BCM 5.0 configuration with Business Element Manager
Copyright © 2009, Nortel Networks
Nortel Business Communications Manager 5.0
Configuration — System
NN40170-501 02.04 Standard
September 2009
Page 65

BCM 5.0 configuration with Startup Profile
The information in this chapter applies to both the BCM50 and the BCM450
platforms running BCM 5.0.
An experienced administrator uses the Startup Profile tool to customize a
template with common BCM system parameters. The administrator uses this
template to configure a single system or multiple systems.
Prerequisites for BCM 5.0 configuration with Startup Profile
• The Startup Profile works only on a BCM system with no keycodes loaded.
After the keycodes are loaded, the Startup Profile does not work. This
condition prevents unintentional overwriting of the parameters of a
configured system.
• You require a computer with a USB port and Microsoft Excel 2000 or
newer.
• You require a portable USB storage device compatible with USB 1.1 or
USB 2.0 (formatted for FAT32).
• Loading the Startup Profile adds approximately 5 minutes to the time for
the BCM system to boot. After you successfully apply the Startup Profile,
the BCM system automatically reboots to complete the BCM system
configuration. After the BCM system reboots, the Startup Profile is fully
loaded.
• Make sure you download and install the correct profile template for the
BCM50 platform and the BCM450 platform.
BCM450 configuration with Startup Profile procedures
This task flow shows you the sequence of procedures you perform to
configure the basic parameters using the Startup Profile. To link to any
procedure, go to BCM 5.0 configuration with Startup Profile navigation
(page 66).
Nortel Business Communications Manager 5.0
Copyright © 2009, Nortel Networks
Configuration — System
NN40170-501 02.04 Standard
September 2009
Page 66

66 BCM 5.0 configuration with Startup Profile
Figure 8 BCM450 configuration with Startup Profile procedures
BCM 5.0 configuration with Startup Profile navigation
• Setting the Excel macro security level (page 66)
• Customizing a Startup Profile for your system (page 67)
• Loading the Startup Profile data onto your BCM system (page 68)
Setting the Excel macro security level
The Startup Profile template uses macros to perform certain functions. You
must set your Excel macro security level to medium or low to enable the
macros.
Prerequisites
• You require a copy of the Startup Profile template. For more information,
see Downloading the Startup Profile template (page 29).
Nortel Business Communications Manager 5.0
Copyright © 2009, Nortel Networks
Configuration — System
NN40170-501 02.04 Standard
September 2009
Page 67

BCM 5.0 configuration with Startup Profile 67
Procedure steps
Step Action
1 Open Microsoft Excel.
2 From the Tools menu, select Macro.
3 Select Security.
4 Select Medium or Low.
5 Click Ok.
6 Exit from Excel.
7 Open the Startup Profile template (in Excel).
8 Enable macros if you are prompted.
--End--
Customizing a Startup Profile for your system
Customize a Startup Profile for your BCM system to facilitate the setting of the
BCM parameters.
Prerequisites
• You require a copy of the Startup Profile template. For more information,
see Downloading the Startup Profile template (page 29).
• You cannot copy and paste data between cells in the Startup Profile. If you
attempt this, the data validation within the spreadsheet becomes corrupt.
If corruption occurs, download another copy of the Startup Profile template
from the BCM main unit.
• Never edit the Startup Profile (.sps file) directly; always use the Startup
Profile editor to make changes.
Procedure steps
Step Action
1 Open the Startup Profile template (Microsoft Excel template).
For instructions about using the Startup Profile template, see the Usage
Instructions tab.
2 Click the StartupProfileTemplate tab to begin entering information in the
Startup Profile template.
3 Enter your BCM system ID in the System ID box in the Startup Profile
template.
Copyright © 2009, Nortel Networks
Nortel Business Communications Manager 5.0
Configuration — System
NN40170-501 02.04 Standard
September 2009
Page 68

68 BCM 5.0 configuration with Startup Profile
The system ID is on the box of the main unit and on the main unit itself. If
you enter the wrong system ID, the Startup Profile does not work with your
system.
4 Click the large button at the top of the Startup Profile template to save a
version of the Startup Profile (.sps file) and a version of the Startup Profile
editor (Excel spreadsheet) on your computer.
The file names for the Startup Profile editor and the Startup Profile consist
of the system ID followed by the appropriate extension.
5 Enter the remaining information into the Startup Profile editor that you want
loaded onto the BCM main unit.
The Startup Profile editor contains explanations of the various parameters.
Click the cell where you want to enter information, and the Help text
appears.
6 You can specify which parameters to load onto your system by selecting
Apply.
If you do not want to load certain parameters, select Ignore.
7 After you enter all the information, click the large button at the top of the
Startup Profile template to save a version of the Startup Profile (.sps file)
and a version of the Startup Profile editor (Excel spreadsheet) on your
computer.
8 Exit from Microsoft Excel.
9 Insert the USB storage device into the USB port of the computer.
10 Copy the Startup Profile (.sps file) to the root directory of the USB storage
device.
11 To load your keycodes using the Startup Profile, copy the keycode file to the
root directory of the USB storage device.
The name of the keycode file on the USB storage device must exactly match
the file name you entered in the Startup Profile editor.
12 Remove the USB storage device from the USB port of the computer.
The Startup Profile is now stored on the USB storage device.
--End--
Loading the Startup Profile data onto your BCM system
Load the Startup Profile data onto your BCM system to set the selected BCM
system parameters.
Prerequisites
• Customize the startup profile template for your system. For more
information, see Customizing a Startup Profile for your system (page 67).
Copyright © 2009, Nortel Networks
Nortel Business Communications Manager 5.0
Configuration — System
NN40170-501 02.04 Standard
September 2009
Page 69

• Loading the Startup Profile adds approximately 5 minutes to the time for
the BCM system to boot.
• Make sure the bootup sequence is complete before removing the USB
storage device from the BCM system.
• Do not use the Startup Profile on a functional BCM system because the
parameter values in the Startup Profile replace those on the system.
Procedure steps
Step Action
1 Disconnect the power supply from the main unit.
2 Insert the USB storage device into the USB port on the main unit. If the BCM
system has a UPS, insert the USB storage device into the Linux-compatible
USB hub.
3 Connect the power supply to the BCM system.
The BCM automatically detects the Startup Profile file and loads the
information during the bootup sequence. After the BCM system reboots, the
Startup Profile is fully loaded.
BCM 5.0 configuration with Startup Profile 69
4 If the status LED flashes red (error), view the log file (written to the USB
storage device) for a description of the Startup Profile errors.
If no errors exist, the BCM system automatically reboots to complete the
system configuration. After the reboot finishes, the power and status LEDs
are solid green.
5 Remove the USB storage device from the USB port on the BCM or the USB
hub.
--End--
Copyright © 2009, Nortel Networks
Nortel Business Communications Manager 5.0
Configuration — System
NN40170-501 02.04 Standard
September 2009
Page 70

70 BCM 5.0 configuration with Startup Profile
Copyright © 2009, Nortel Networks
Nortel Business Communications Manager 5.0
Configuration — System
NN40170-501 02.04 Standard
September 2009
Page 71

BCM 5.0 internal resources configuration
The information in this chapter applies to both the BCM50 and the BCM450
platforms running BCM 5.0.
This section provides information about configuring the internal resources on
your BCM main unit. The internal resources include IP trunks, IP sets, and
applications resources.
Prerequisites to BCM 5.0 internal resources configuration
• Launch Business Element Manager and connect to your BCM system. For
more information, see Connecting to the BCM system (page 30).
• Ensure the required number of IP trunks, IP sets, and applications
resources are part of your keycode.
• For information about configuring internal resources through Telset
Administration, see Telset Administration Guide (NN40170-604).
• For information about system capacity, see System capacity reference
(page 163).
BCM450 internal resources configuration procedures
This task flow shows you the sequence of procedures you perform to
configure IP trunk, IP set, and application resources on your BCM system. To
link to any procedure, go to BCM 5.0 internal resources configuration
navigation.
Nortel Business Communications Manager 5.0
Copyright © 2009, Nortel Networks
Configuration — System
NN40170-501 02.04 Standard
September 2009
Page 72

72 BCM 5.0 internal resources configuration
Figure 9 BCM450 internal resources configuration procedures
BCM 5.0 internal resources configuration navigation
• Configuring IP trunks (page 72)
• Configuring IP sets and applications (page 73)
Configuring IP trunks
The BCM system automatically configures your IP trunks. You can modify this
default configuration to re-organize the line numbers on your system.
To configure IP trunk modules through Telset Administration, select **Config
> Hardware > Main unit > IP Trunks.
Procedure steps
Step Action
1 Select Configuration > Resources > Telephony Resources.
2 In the Modules section, select the internal IP Trunks that you want to
configure.
3 Click Configure to display the Configure dialog box.
The system automatically assigns values that are appropriate for your
system.
4 Enter the values for the required variables.
Copyright © 2009, Nortel Networks
Nortel Business Communications Manager 5.0
Configuration — System
NN40170-501 02.04 Standard
September 2009
Page 73

BCM 5.0 internal resources configuration 73
5 Click OK.
--End--
Variable definitions
Variable Value
Module type This read-only value is the type of module allocated to this
resource. In this case the value is IP Trunks.
Note A read-only value that provides information relevant to IP trunk
configuration.
Start Line The first line number in the sequence of consecutive lines
assigned to your IP Trunks.
The list of line numbers for IP trunks must be consecutive. If the
available line numbers are segmented and the necessary
number of consecutive line numbers does not exist, you receive
an error message and the system does not assign the line
numbers. If this occurs, you must remove other lines in the
system and restart line numbering for devices so the lines
numbers are not segmented and enough consecutive groups are
obtained for all devices.
Total Number of Lines The total number of lines that you want to assign to your IP Trunk
resource.
Configuring IP sets and applications
The BCM system automatically configures your IP sets and applications
resource DNs. You can modify this default configuration to re-organize the
DNs on your system.
Author’s note: This procedure has not been tested as the functionality is not
yet available in the current software. It will be verified when the functionality
becomes available.
To configure IP sets and applications resources through Telset Administration,
select **Config > Hardware > Main unit > IP Sets.
Procedure steps
Step Action
1 Select Configuration > Resources > Telephony Resources.
2 In the Modules section, select the internal IP sets or Applications that you
want to configure.
Copyright © 2009, Nortel Networks
Nortel Business Communications Manager 5.0
Configuration — System
NN40170-501 02.04 Standard
September 2009
Page 74

74 BCM 5.0 internal resources configuration
3 Click Configure to display the Configure dialog box.
The system automatically assigns values that are appropriate for your
system.
4 Enter the values for the required variables.
5 Click OK.
--End--
Variable definitions
Variable Value
Module type This read-only value is the type of module allocated to this
resource. In this case the value is IP Sets or Applications.
Note A read-only value that provides information relevant to
application resource configuration. This variable is available only
when you select applications.
Start DN The lowest DN in the range of DNs assigned to your resource.
The DNs in the range can be consecutive or non-consecutive.
Number of DNs to add The total number of DNs that you want to assign to your IP Set
or Applications resource.
Public received digits/OLI The public received digits/OLI (outgoing line identification) are
the digits that display on the telephone called from this DN over
the public network. This number is usually the same as the DN.
Private received digits/OLI The private received digits/OLI (outgoing line identification) are
the digits that display on the telephone called from this DN over
the private network. This number is usually the same as the DN.
Assign target lines Select this checkbox to assign target lines to your DNs.
Copyright © 2009, Nortel Networks
Nortel Business Communications Manager 5.0
Configuration — System
NN40170-501 02.04 Standard
September 2009
Page 75

BCM450 MBM and legacy Norstar configuration
The information in this chapter applies only to BCM450 platform running BCM
5.0.
Attention: Legacy Norstar configuration is not supported on BCM50.
This section provides information about configuring and deconfiguring the
media bay modules (MBM) and legacy Norstar modules in your BCM main
unit.
Prerequisites to BCM450 MBM and legacy Norstar configuration
• Launch Business Element Manager and connect to your BCM system. For
more information, see Connecting to the BCM system (page 30).
• For information about configuring internal resources through Telset
Administration, see Telset Administration Guide (NN40170-604).
• You can add a FEM in the main unit only to connect legacy Norstar
modules. A FEM does not function in an expansion unit.
• There must be enough DNs available in the system to populate the entire
MBM being configured, or you cannot configure the MBM and the MBM
does not function.
• There must be enough consecutive line numbers available in the system
to populate the entire MBM, or you cannot configure the MBM and the
MBM configuration does not change.
• The target lines assigned to the DNs are auto-selected by the system and
do not need to be consecutive. The system attempts to find sufficient free
target lines to assign one to each allocated DN.
• Configure the R2MFC MBM as a DTI-PRI MBM with additional
configuration requirements to set the attributes of the PRI protocol such
that the device operates as an R2MFC module.
Copyright © 2009, Nortel Networks
Nortel Business Communications Manager 5.0
Configuration — System
NN40170-501 02.04 Standard
September 2009
Page 76

76 BCM450 MBM and legacy Norstar configuration
BCM450 MBM and legacy Norstar configuration procedures
This task flow shows you the sequence of procedures you perform to the
configure MBMs and legacy Norstar modules for your BCM system. To link to
any procedure, go to BCM450 MBM and legacy Norstar configuration
navigation.
Figure 10 BCM450 MBM and legacy Norstar configuration procedures
Copyright © 2009, Nortel Networks
Nortel Business Communications Manager 5.0
Configuration — System
NN40170-501 02.04 Standard
September 2009
Page 77

BCM450 MBM and legacy Norstar configuration navigation
• Configuring main unit MBMs (page 77)
• Configuring legacy Norstar modules (page 78)
• Configuring expansion unit MBMs (page 80)
• Deconfiguring MBMs and Norstar modules (page 82)
Configuring main unit MBMs
Configure main unit media bay modules (MBM) through a two-stage process.
First, identify the type of installed MBMs to the BCM system, and then
configure the required variables. The BCM system suggests default values for
your MBM. You can modify the default values depending on your system
preference.
To configure main unit MBMs through Telset Administration, select **Config >
Hardware > Main unit > MBMs.
Prerequisites
• If you do not configure the MBM, it cannot function in your system.
• Set the MBM dip switches to factory default values (all on). In the case of
a FEM, the dip switches on the FEM must be defaulted such that all six
ports on the FEM are enabled. If you install an MBM in the main unit with
a different dip switch configuration, the MBM will not function.
BCM450 MBM and legacy Norstar configuration 77
• For information about installing media bay modules (MBM), see Nortel
Business Communications Manager 450 5.0 Installation — System
(NN40170-303).
• For information about configuring a FEM, see Configuring legacy Norstar
modules (page 78).
Procedure steps
Step Action
1 Select Configuration > Resources > Telephony Resources.
2 In the Modules section, double-click Configured Device in the row of the
MBM to configure.
3 From the list, select the type of MBM that you installed in this location in the
main unit.
4 Click Configure to display the Configure dialog box.
The system suggests values that are appropriate for your system.
5 If required, modify the suggested values to customize your system.
6 Click OK.
Copyright © 2009, Nortel Networks
Nortel Business Communications Manager 5.0
Configuration — System
NN40170-501 02.04 Standard
September 2009
Page 78

78 BCM450 MBM and legacy Norstar configuration
Even if you are not modifying the default configuration, you must click OK to
activate the MBM with the assigned values.
--End--
Attention: You must have sufficient resources to configure MBMs. If
sufficient resources (DNs available on system, consecutive line numbers) do
not exist to configure an MBM, you receive an error message. The MBM and
the entry configuration revert back to Empty/None.
Variable definitions
Variable Value
Module type This read-only value is the type of module allocated to this
resource. In this case the value is the type of MBM.
Start DN The lowest DN in the range of DNs assigned to your resource.
The DNs in the range can be consecutive or non-consecutive.
Public received digits/OLI The public received digits/OLI (outgoing line identification) are
the digits that display on the telephone called from this DN over
the public network. This number is usually the same as the DN.
Private received digits/OLI The private received digits/OLI (outgoing line identification) are
the digits that display on the telephone called from this DN over
the private network. This number is usually the same as the DN.
Assign target lines Select this checkbox to assign target lines to your DNs.
Start Line The first line number in the sequence of consecutive lines
assigned to your MBM.
Attention: The variables that appear in the configure dialog box differ depending upon the type of MBM
you choose to configure.
Configuring legacy Norstar modules
Configure legacy Norstar modules with your FEM to use the functionality of
your legacy Norstar modules. The BCM system suggests default values for
your modules. You can modify this default configuration depending on your
system preference.
To configure legacy Norstar modules through Telset Administration, select
**Config > Hardware > Main unit > MBMs > FEM.
Prerequisites
• A legacy Norstar module must be connected to your BCM system through
a FEM installed in the main unit.
Copyright © 2009, Nortel Networks
Nortel Business Communications Manager 5.0
Configuration — System
NN40170-501 02.04 Standard
September 2009
Page 79

• You cannot configure a FEM, instead you must configure the sub-modules
(legacy Norstar modules) listed below the FEM.
• If you do not configure the legacy Norstar module, it cannot function in
your system.
Procedure steps
Step Action
1 Select Configuration > Resources > Telephony Resources.
2 In the Modules section, double-click Configured Device in the location row
where you installed your FEM.
3 From the Configured Device list, select FEM.
A list of locations for legacy Norstar modules appears below the FEM
location.
4 Select the legacy Norstar module location (listed below the FEM) that you
want to configure.
5 Double-click Configured Device for the selected Norstar module.
BCM450 MBM and legacy Norstar configuration 79
6 From the Configured Device list, select the type of Norstar module
connected to this FEM location.
If you select Norstar TM, the Configure button appears dimmed. You must
select the type of Norstar TM, for example Loop TC, from the Configured
Device list before you can configure it.
7 Click Configure to display the Configure dialog box.
The system suggests values that are appropriate for your system.
8 If required, modify the suggested values to customize your system.
9 Click OK.
Even if you are not modifying the default configuration, you must click OK to
activate the module with the assigned values.
10 Repeat step 4 to step 9 for each Norstar module connected to your FEM.
Attention: You must have sufficient resources to configure MBMs. If
sufficient resources (DNs available on system, consecutive line numbers) do
not exist to configure an MBM, you receive an error message. The MBM and
the entry configuration revert back to Empty/None.
--End--
Copyright © 2009, Nortel Networks
Nortel Business Communications Manager 5.0
Configuration — System
NN40170-501 02.04 Standard
September 2009
Page 80

80 BCM450 MBM and legacy Norstar configuration
Variable definitions
Variable Value
Module type This read-only value is the type of module allocated to this
resource. In this case the value is the type of MBM.
Start DN The lowest DN in the range of DNs assigned to your resource.
The DNs in the range can be consecutive or non-consecutive.
Public received digits/OLI The public received digits/OLI (outgoing line identification) are
the digits that display on the telephone called from this DN over
the public network. This number is usually the same as the DN.
Private received digits/OLI The private received digits/OLI (outgoing line identification) are
the digits that display on the telephone called from this DN over
the private network. This number is usually the same as the DN.
Assign target lines Select this checkbox to assign target lines to your DNs.
Start Line The first line number in the sequence of consecutive lines
assigned to your MBM.
Configuring expansion unit MBMs
Configure expansion unit media bay modules (MBM) through a two-stage
process. First, you identify the type of installed MBMs to the BCM system, and
then you configure the required variables. The BCM system suggests default
values for your MBM. You can modify this default configuration depending on
your system preference.
To configure MBMs in the expansion unit through Telset Administration, select
**Config > Hardware > Main Unit > Expansion.
Prerequisites
• If you do not configure the MBM, it cannot function in your system.
• You can force a specific dip switch setting for your MBMs. Nortel
recommends that you leave the dip switches in the default position. The
DIP switches in an expansion unit must be set to select a valid module
number.
• A FEM does not function in an expansion unit. A FEM must be installed in
the main unit.
Procedure steps
Step Action
1 Select Configuration > Resources > Telephony Resources.
2 In the Modules section, double-click Configured Device in the row where
Copyright © 2009, Nortel Networks
Expansion 1 is located.
Nortel Business Communications Manager 5.0
Configuration — System
NN40170-501 02.04 Standard
September 2009
Page 81

BCM450 MBM and legacy Norstar configuration 81
3 Select MBM-6.
You will now see a list of slots in the Locations row for the expansion.
4 From the list, select the type of MBM that you installed in this location in the
expansion unit.
5 Click Configure to display the Configure dialog box.
The system suggests values that are appropriate for your system.
6 If required, modify the suggested values to customize your system.
7 Click OK.
Even if you are not modifying the default configuration, you must click OK to
activate the MBM with the assigned values.
--End--
Attention: You must have sufficient resources to configure MBMs. If
sufficient resources (DNs available on system, consecutive line numbers) do
not exist to configure an MBM, you receive an error message. The MBM and
the entry configuration revert back to Empty/None.
Copyright © 2009, Nortel Networks
Nortel Business Communications Manager 5.0
Configuration — System
NN40170-501 02.04 Standard
September 2009
Page 82

82 BCM450 MBM and legacy Norstar configuration
Variable definitions
Variable Value
Module type This read-only value is the type of module allocated to this
resource. In this case the value is the type of MBM.
Start DN The lowest DN in the range of DNs assigned to your resource.
The DNs in the range can be consecutive or non-consecutive.
Public received digits/OLI The public received digits/OLI (outgoing line identification) are
the digits that display on the telephone called from this DN over
the public network. This number is usually the same as the DN.
Private received digits/OLI The private received digits/OLI (outgoing line identification) are
the digits that display on the telephone called from this DN over
the private network. This number is usually the same as the DN.
Assign target lines Select this checkbox to assign target lines to your DNs.
Start Line The first line number in the sequence of consecutive lines
assigned to your MBM.
DIP The DIP switch configuration for the installed MBM. Nortel
recommends that you leave the MBM dip switches in the default
position (all set to on).
This variable only applies to an MBM installed in the expansion
unit.The DIP switches must be set in an expansion unit.
Deconfiguring MBMs and Norstar modules
Deconfiguring a previously configured device removes assigned resources to
that device. However, target lines will remain assigned to the same bus. If that
bus is then re-configured with DNs, those target lines will be assigned to those
DNs. Refer to “Directory numbers” on page 16 for more information.
Prerequisites
• If a currently configured MBM is changed to Empty/None or changed to a
different MBM type, all associated provisioned resources are freed and
that MBM is rendered deconfigured and inoperable.
• The line numbers against a T-interface loop cannot be deleted. To remove
the line numbers assigned to a BRI, you must remove the BRI device.
Procedure steps
Step Action
1 Select Configuration > Resources > Telephony Resources.
2 In the Modules section, select the MBM or legacy Norstar module to
Copyright © 2009, Nortel Networks
deconfigure.
Nortel Business Communications Manager 5.0
Configuration — System
NN40170-501 02.04 Standard
September 2009
Page 83

BCM450 MBM and legacy Norstar configuration 83
3 Click Deconfigure.
The Deconfigure confirmation box appears.
4 Click OK to confirm deconfiguration of the selected MBM or legacy Norstar
module.
--End--
Copyright © 2009, Nortel Networks
Nortel Business Communications Manager 5.0
Configuration — System
NN40170-501 02.04 Standard
September 2009
Page 84

84 BCM450 MBM and legacy Norstar configuration
Copyright © 2009, Nortel Networks
Nortel Business Communications Manager 5.0
Configuration — System
NN40170-501 02.04 Standard
September 2009
Page 85

BCM 5.0 trunk module configuration
The information in this chapter applies to both the BCM50 and the BCM450
platforms running BCM 5.0.
Configure the trunk module parameters to define the line properties for your
BCM system.
Prerequisites to BCM 5.0 trunk module configuration
• Launch Business Element Manager and connect to your BCM system. For
more information, see Connecting to the BCM system (page 30).
• You can access trunk module configuration through Telset Administration
using **CONFIG > Hardware.
BCM450 trunk module configuration procedures
This task flow shows you the sequence of procedures you perform to
configure your BCM trunk modules. To link to any procedure, go to BCM 5.0
trunk module configuration navigation.
Copyright © 2009, Nortel Networks
Nortel Business Communications Manager 5.0
Configuration — System
NN40170-501 02.04 Standard
September 2009
Page 86

86 BCM 5.0 trunk module configuration
Figure 11 BCM450 trunk module configuration procedures
BCM 5.0 trunk module configuration navigation
• Configuring the trunk module parameters (page 86)
• Configuring call-by-call service selection (page 87)
• Provisioning module lines and loops (page 88)
Configuring the trunk module parameters
Configure the trunk module parameters to define the line properties for your
BCM system.
Prerequisites
• For more information about the configurable parameters for a trunk
module, see Trunk module parameters (page 155).
Nortel Business Communications Manager 5.0
Copyright © 2009, Nortel Networks
Configuration — System
NN40170-501 02.04 Standard
September 2009
Page 87

Procedure steps
Step Action
1 Select Configuration > Resources > Telephony Resources.
2 On the Modules panel, click the trunk module entry that you want to view.
3 On the Trunk Module Parameters tab, review the settings to ensure they
support the type of line function provided from the Central Office (CO).
--End--
Configuring call-by-call service selection
Configure the PRI Call-by-call Service Selection, which is region-specific to
North America, for a DTM set to a PRI Module type.
Prerequisites
• Applies to modules that support T1, PRI, or DASS2.
• Configure the trunk module parameters. For more information, see
Configuring the trunk module parameters (page 86).
BCM 5.0 trunk module configuration 87
Procedure steps
Step Action
1 Select Configuration > Resources > Telephony Resources.
2 On the Modules panel, click the trunk module entry that you want to view.
3 From the Call-by-Call Service Selection tab, set the attributes.
--End--
Copyright © 2009, Nortel Networks
Nortel Business Communications Manager 5.0
Configuration — System
NN40170-501 02.04 Standard
September 2009
Page 88

88 BCM 5.0 trunk module configuration
Variable definitions
Variable Value
Service Type Foreign Exchange Define the applicable services for the protocol defined on the
Module record.
Translation Mode Define how the incoming digits get mapped to line numbers
(target lines or DISA/AUTO DNs) within the system.
Translate All Calls To Enter the appropriate information for the mode chosen.
Provisioning module lines and loops
Configure the module lines and loops for your BCM system.
Prerequisites
• Configure the trunk module parameters. For more information, see
Configuring the trunk module parameters (page 86).
Procedure steps
Step Action
1 Select Configuration > Resources > Telephony Resources.
2 On the Modules panel, click the trunk module entry that you want to view.
The panel that appears depends on the type of module that is selected.
3 Provision the lines, virtual channels, and loops for your module.
• The Provision Line tab panel is used for all trunks except DPNSS and
BRI loops.
• The DPNSS module shows the Provision Virtual Channels tab panel.
• BRI loops require an extra step, so the Provision Loops tab panel
appears after a BRI module is selected.
Variable definitions
Variable Value
Provision Lines tab
--End--
Line <line number> This is a list of the lines assigned to the module.
Provisioned <check box> If the check box is selected beside a line, that line is available for
call traffic.
Nortel Business Communications Manager 5.0
Copyright © 2009, Nortel Networks
Configuration — System
NN40170-501 02.04 Standard
September 2009
Page 89

BCM 5.0 trunk module configuration 89
Variable Value
Provision Virtual Channels tab
Virtual Channel <read-only> A virtual channel assigned to the DPNSS module.
Provisioned <check box> If the check box is selected beside a channel, that channel is
available for call traffic.
Provision Loops tab
Loop <loop-number> These are the loop numbers assigned to the selected BRI
module.
Modules have four loops, but only loops designated as T-loops
require provisioning.
Provisioned <check box> If the check box is selected beside a loop, that loop has lines that
can be provisioned.
Copyright © 2009, Nortel Networks
Nortel Business Communications Manager 5.0
Configuration — System
NN40170-501 02.04 Standard
September 2009
Page 90

90 BCM 5.0 trunk module configuration
Copyright © 2009, Nortel Networks
Nortel Business Communications Manager 5.0
Configuration — System
NN40170-501 02.04 Standard
September 2009
Page 91

Dial-up resources configuration
The information in this chapter applies to both the BCM50 and the BCM450
platforms running BCM 5.0.
On the Dial-out Interfaces panel you can add, configure, and control the
connection status of both ISDN and Modem dial-out interfaces. These
interfaces can be used for the Automatic dial-out service.
Consider the following guidelines when using remote dial-in:
• The remote dial-in for administration and the backup WAN link share the
same modem. If a remote administration user is connected while the
primary link breaks, the automatic backup function does not occur.
• While using the back-up interface, BCM always calls. BCM does not
answer an incoming call from a router on the V.92 interface.
Dial-up resources configuration navigation
• ISDN interface management (page 91)
• ISDN interface connection or disconnection (page 94)
• ISDN channel parameters configuration (page 95)
• Modem interface management (page 97)
• Modem interface connection and disconnection (page 99)
• Modem dial-out link parameters configuration (page 100)
• WAN Failover on BCM50 (page 103)
• ISDN dial-in parameters configuration (page 105)
• Automatic dial-out interface configuration (page 110)
• Dial-up interfaces as primary connections (page 112)
• Static routes for dial-out configuration (page 114)
ISDN interface management
This section provides information about managing ISDN interfaces.
Nortel Business Communications Manager 5.0
NN40170-501 02.04 Standard
Copyright © 2009, Nortel Networks
Configuration — System
September 2009
Page 92

92 Dial-up resources configuration
Prerequisites for ISDN interface management
• ISDN interfaces can only be configured on a BCM50 with an integrated
BRI module, or on a BCM50 with a BRI MBM installed in the expansion
unit. A maximum of two BRI-ISDN interfaces are supported on each
BCM50. Each of these interfaces supports two ISDN B-channels.
ISDN interface management navigation
• Adding an ISDN interface (page 92)
• Enabling an ISDN interface (page 92)
• Disabling an ISDN interface (page 93)
• Deleting an ISDN interface (page 93)
Adding an ISDN interface
Use the following procedure to add an ISDN interface to the BCM 5.0 system.
Procedure steps
Step Action
1 Click
2 On the Dial-out Interfaces tab, click Add.
Configuration > Resources > Dial Up Interfaces.
The Add Dial up Interface dialog box appears.
3 Select ISDN from the Interface type drop-down list.
4 Enter a logical name in the Interface name field.
5 Select the Automatic Dialout check box to use this interface for scheduled
services.
6 Click OK.
The interface appears in the Dial-out Interfaces table.
Enabling an ISDN interface
An interface must be enabled to function as a backup connection. If the BCM
5.0 experiences a primary connection failure, it will dial-out using the dial-up
interface configured as the backup. Use the following procedure to enable and
ISDN interface.
Procedure steps
--End--
Step Action
Copyright © 2009, Nortel Networks
Nortel Business Communications Manager 5.0
Configuration — System
NN40170-501 02.04 Standard
September 2009
Page 93

1 Click Configuration > Resources > Dial Up Interfaces.
2 On the Dial-out Interfaces tab, select the ISDN interface.
3 On the Channel Characteristics tab, enter the Dial-out number for the
ISDN interface.
4 On the Dial-out Interface ta b, s elect the Enable check box next to the ISDN
interface to enable.
Attention: BCM 5.0 only allows the configuration of two ISDN auto-dialout
interfaces. When both of these interfaces are enabled ISDN dial-in is disabled.
Disabling an ISDN interface
Use the following procedure to disable and ISDN interface.
Procedure steps
Step Action
Dial-up resources configuration 93
--End--
1
2 On the Dial-out Interface tab, clear the Enable check box next to the
Click Configuration > Resources > Dial Up Interfaces.
interface.
Deleting an ISDN interface
Use the following procedure to delete an ISDN interface.
Procedure steps
Step Action
1 Click
2 Clear the Enable check box.
3 Click the ISDN interface you want to delete.
4 Click Delete.
Configuration > Resources > Dial Up Interfaces > Dial-out
interfaces tab.
A confirmation dialog box appears.
--End--
5 Click Yes.
Copyright © 2009, Nortel Networks
The interface is deleted.
Nortel Business Communications Manager 5.0
Configuration — System
NN40170-501 02.04 Standard
September 2009
Page 94

94 Dial-up resources configuration
--End--
ISDN interface connection or disconnection
Interfaces can be connected manually, or they can be triggered to connect by
auto dial-out, see Adding an automatic dial-out interface (page 111). Auto
dial-out routes can not be added if the interface is already manually
connected, unless the interface is already connected with auto dial-out routes
configured.
ISDN interface connection or disconnection navigation
• Connecting an ISDN interface (page 94)
• Disconnecting an ISDN interface (page 94)
Connecting an ISDN interface
Use the following procedure to connect an ISDN interface.
Procedure steps
Step Action
1 Click
2 On the Dial-out Interfaces tab, select the interface to connect.
3 Select the Enable check box.
4 In the IP Address Specification tab, specify the remote IP address to
5 In the top panel, click Connect.
Configuration > Resources > Dial Up Interfaces.
which to connect.
Disconnecting an ISDN interface
Use the following procedure to disconnect an ISDN interface.
Procedure steps
Step Action
1
Click Configuration > Resources > Dial Up Interfaces.
--End--
2 On the Dial-out Interfaces tab select the interface to disconnect.
3 Click Disconnect.
Copyright © 2009, Nortel Networks
A confirmation dialog box appears.
Nortel Business Communications Manager 5.0
Configuration — System
NN40170-501 02.04 Standard
September 2009
Page 95

4 Click Yes.
--End--
ISDN channel parameters configuration
This section provides information about configuring ISDN channel
parameters.
ISDN channel parameters configuration navigation
• Configuring parameters for an ISDN channel (page 95)
• Configuring the ISDN Link Parameters (page 96)
Configuring parameters for an ISDN channel
Use the following procedure to configure the parameters for an ISDN channel.
Procedure steps
Step Action
Dial-up resources configuration 95
1
2 Click the ISDN interface to configure.
3 Select the Channel Characteristics tab.
4 Double-click the field to modify.
5 Make the necessary changes.
Click Configuration > Resources > Dial Up Interfaces.
--End--
Copyright © 2009, Nortel Networks
Nortel Business Communications Manager 5.0
Configuration — System
NN40170-501 02.04 Standard
September 2009
Page 96

96 Dial-up resources configuration
Variable definitions
Variable Value
Channel There are two ISDN channels available for dial out, ISDN1 and ISDN2.
These channels are assigned automatically.<read-only>
Dial-out Number Enter the primary phone number to use to make an ISDN connection.
If needed, include area codes and all necessary digits to dial an
external number. The phone number must contain only numerical
digits (no alphabetical or other characters are allowed).
Default: blank <numeric string>
Alternate Number
Enter the alternate phone number to use to make an ISDN
connection.
If needed, include area codes and all necessary digits to dial an
external number. The phone number must contain only numerical
digits (no alphabetical or other characters are allowed).
Default: blank <numeric string>
Line Type Select either 64K Digital or 56K Digital line.
BCM 5.0 ISDN supports two types of Unrestricted Digital Information
(UDI) bit streams: UDI, and UDI-56. With UDI, data is transmitted at
64kbps (64K Digital). With UDI-56, a 1 bit is inserted in the eighth bit
position of each B-channel time slot while the other 7 bits form the
56kbps channel (56K Digital).
Default: 64K Digital
Negotiate Line Type Choose whether the system selects a line with a slower speed if
unable to connect at the previously set speed.
Default: enabled
Configuring the ISDN Link Parameters
Use the following procedure to configure ISDN link parameters.
Procedure steps
Step Action
1 Click
2 Click the ISDN interface to configure.
3 Click the Link Parameters tab.
4 Configure the ISDN Link Parameters.
Copyright © 2009, Nortel Networks
Configuration > Resources > Dial Up Interfaces.
The Link Parameters panel appears.
--End--
Nortel Business Communications Manager 5.0
Configuration — System
NN40170-501 02.04 Standard
September 2009
Page 97

Dial-up resources configuration 97
Variable definitions
Variable Value
PPP Settings
IdleTime out (s) The interval after which the ISDN interface disconnects when there is
no traffic.
Default: 90 seconds
<0-36000>
Note: A value of 0 makes the connection persistent.
Maximum receive unit The maximum size of the packets that can be received. <128_1500>
Default: 1500
Maximum transmission unit The maximum size of the packets that can be received.
<128_1500> Default: 1500
IP header compression Enable or disable IP header compression.
Note: This feature must be enabled at both ends of the connection.
Default: enabled
Software compression Enable or disable software compression. When enabled, all dial-up
connections use BSD Scheme for compression.
Default: disabled
Access Settings
Authentication Select the authentication type for the link.
Default: CHAP
User Name Select the user name used for authenticating to the remote end.
Modem interface management
Attention: Modem interface management is not applicable for BCM50.
BCM supports one V.34 modem connection to, and from, the BCM450.
Modem interface management navigation
• Adding a modem interface (page 97)
• Enabling a modem interface (page 98)
• Disabling a modem interface (page 98)
• Deleting a modem interface (page 99)
Adding a modem interface
Use this procedure to add a modem interface.
Copyright © 2009, Nortel Networks
Nortel Business Communications Manager 5.0
Configuration — System
NN40170-501 02.04 Standard
September 2009
Page 98

98 Dial-up resources configuration
Procedure steps
Step Action
1 Click
2 Click Add.
Configuration > Resources > Dial Up Interfaces > Dial-out
Interfaces tab.
The Add Dial Up Interface dialog box appears.
3 Select Modem from the Interface type drop-down list.
4 Enter a logical name in the Interface name field.
5 Select the Automatic dialout check box to use this interface for scheduled
service.
6 Click OK.
The interface appears in the Dial-out Interfaces table.
Enabling a modem interface
An interface must be enabled to function as a backup connection. If the
BCM450 experiences a primary connection failure, it will dial-out using the
dial-up interface configured as the backup.
Procedure steps
--End--
Step Action
1 Click
2 On the Dial-out Interfaces tab, select the modem.
3 On the Link Parameters tab, enter the Dial-out number for the modem.
4 On the Dial-out Interfaces table, select the Enable check box for the
Disabling a modem interface
Use this procedure to disable a modem interface.
Copyright © 2009, Nortel Networks
Configuration > Resources > Dial Up Interfaces.
modem.
The interface is now enabled.
--End--
Nortel Business Communications Manager 5.0
Configuration — System
NN40170-501 02.04 Standard
September 2009
Page 99

Procedure steps
Step Action
1 Click Configuration > Resources > Dial Up Interfaces.
2 On the Dial-out Interfaces tab, select the modem to disable.
3 On the Dial-out Interfaces tab, clear the Enable check box next to the
modem.
Deleting a modem interface
Use this procedure to delete a modem interface.
Procedure steps
Step Action
Dial-up resources configuration 99
--End--
1
2 Clear the Enable check box.
3 Click the modem interface.
4
5 Click Yes.
Click Configuration > Resources > Dial Up Interfaces.
Click Delete.
A confirmation dialog box appears.
The interface is deleted.
--End--
Modem interface connection and disconnection
This section provides information about how to connect and disconnect a
modem interface.
Modem interface connection and disconnection navigation
• Connecting a modem interface (page 99)
• Disconnecting a modem interface (page 100)
Connecting a modem interface
Use the following procedure to connect a modem interface.
Copyright © 2009, Nortel Networks
Nortel Business Communications Manager 5.0
Configuration — System
NN40170-501 02.04 Standard
September 2009
Page 100

100 Dial-up resources configuration
Procedure steps
Step Action
1
2 On the Dial-out Interfaces tab, select the interface to connect.
3 Select the Enable check box.
4 In the IP Address Specification tab, specify the remote IP address to
5 In the top panel, click Connect.
Click Configuration > Resources > Dial Up Interfaces.
which to connect.
Disconnecting a modem interface
Use the following procedure to disconnect a modem interface.
Procedure steps
Step Action
1
2 On the Dial-out Interfaces tab, select the interface to disconnect.
3 Click Disconnect.
Click Configuration > Resources > Dial Up Interfaces.
A confirmation dialog box will appear.
--End--
4 Click Yes.
--End--
Modem dial-out link parameters configuration
This section provides information about configuring dial-out parameters for
modem links.
Modem dial-out link parameters configuration navigation
• Configuring modem link parameters (page 100)
• Configuring the modem IP address specifications (page 102)
Configuring modem link parameters
Use the following procedure to configure the link parameters for the modem.
Nortel Business Communications Manager 5.0
Copyright © 2009, Nortel Networks
Configuration — System
NN40170-501 02.04 Standard
September 2009
 Loading...