

Page 1

Avaya 6120 and 6140 WLAN Handsets Installation and Configuration Addendum
Avaya 6120 and 6140 WLAN Handsets overview
This document is an update to the WLAN IP Telephony Installation and Configuration Guide
(NN40010-303).
The Avaya 6120 and 6140 WLAN Handsets operate with the Avaya Business
Communications Manager (Avaya BCM) 6.0 and are fully functional handsets specifically
designed for the busy office environment. Your Avaya 6120 and 6140 WLAN Handsets uses
radio wave technology to send and receive voice and data transmissions. It is designed to
operate much like a cell phone. However, the Handsets use the private communication system
installed in your facility and will not operate outside the area covered by this system.
Avaya 6120 and 6140 WLAN Handsets
Avaya BCM
Avaya 6120 WLAN Handset
Avaya 6140 WLAN Handset
Page 2

2 Avaya 6120 and 6140 WLAN Handsets and the 2210 WLAN Handset
Avaya 6120 and 6140 WLAN Handsets and the 2210 WLAN Handset
The Avaya 6120 and 6140 WLAN Handsets function the same as the 2210 WLAN Handset except
for the following differences. For information on the installation and configuration of the Avaya
6120 and 6140 WLAN Handsets, see the 2210 WLAN Handset information in the Avaya WLAN
IP Telephony Installation and Configuration Guide (NN40010-303).
Table 1
Avaya 6120 and 6140 WLAN Handsets and 2210 WLAN Handset comparison matrix
Avaya 6120 and 6140 WLAN
Handsets 2210 WLAN Handset
Navigation buttons and Enter (Nav
keys) located below the soft keys
are used to navigate through menu
options.
Four buttons control four soft keys Two rocker buttons control four soft keys
Left arrow and Star button enable scrolling to the
left for menu navigation.
Right arrow and Pound button enable scrolling to
the right for menu navigation.
Menu key displays the full description of the Display
soft keys abbreviations and accesses the handset
features.
Opening and using the Admin Menu on the Avaya 6120 and 6140 WLAN Handsets
The Admin menu contains configuration options that are stored locally on each wireless handset.
Every wireless handset is independent. If the default settings are not desired, the Admin options
must be configured in each separate wireless handset that requires different settings.
1 With the wireless handset powered OFF, press and hold the Start key.
2 While you press the Start key, press the End key.
3 Release the End key, and then release the Start key.
The first option on the Admin menu appears.
If an Admin password is configured, you must enter the password to open the Admin menu.
The default password is 123456. If no password is configured, the display proceeds directly
into the Admin menu.
4 Press the navigation keys and the soft keys on the wireless handset to scroll through the menu
options.
Figure 1 Navigation keys illustrates the navigation keys.
NN40050-400
Page 3
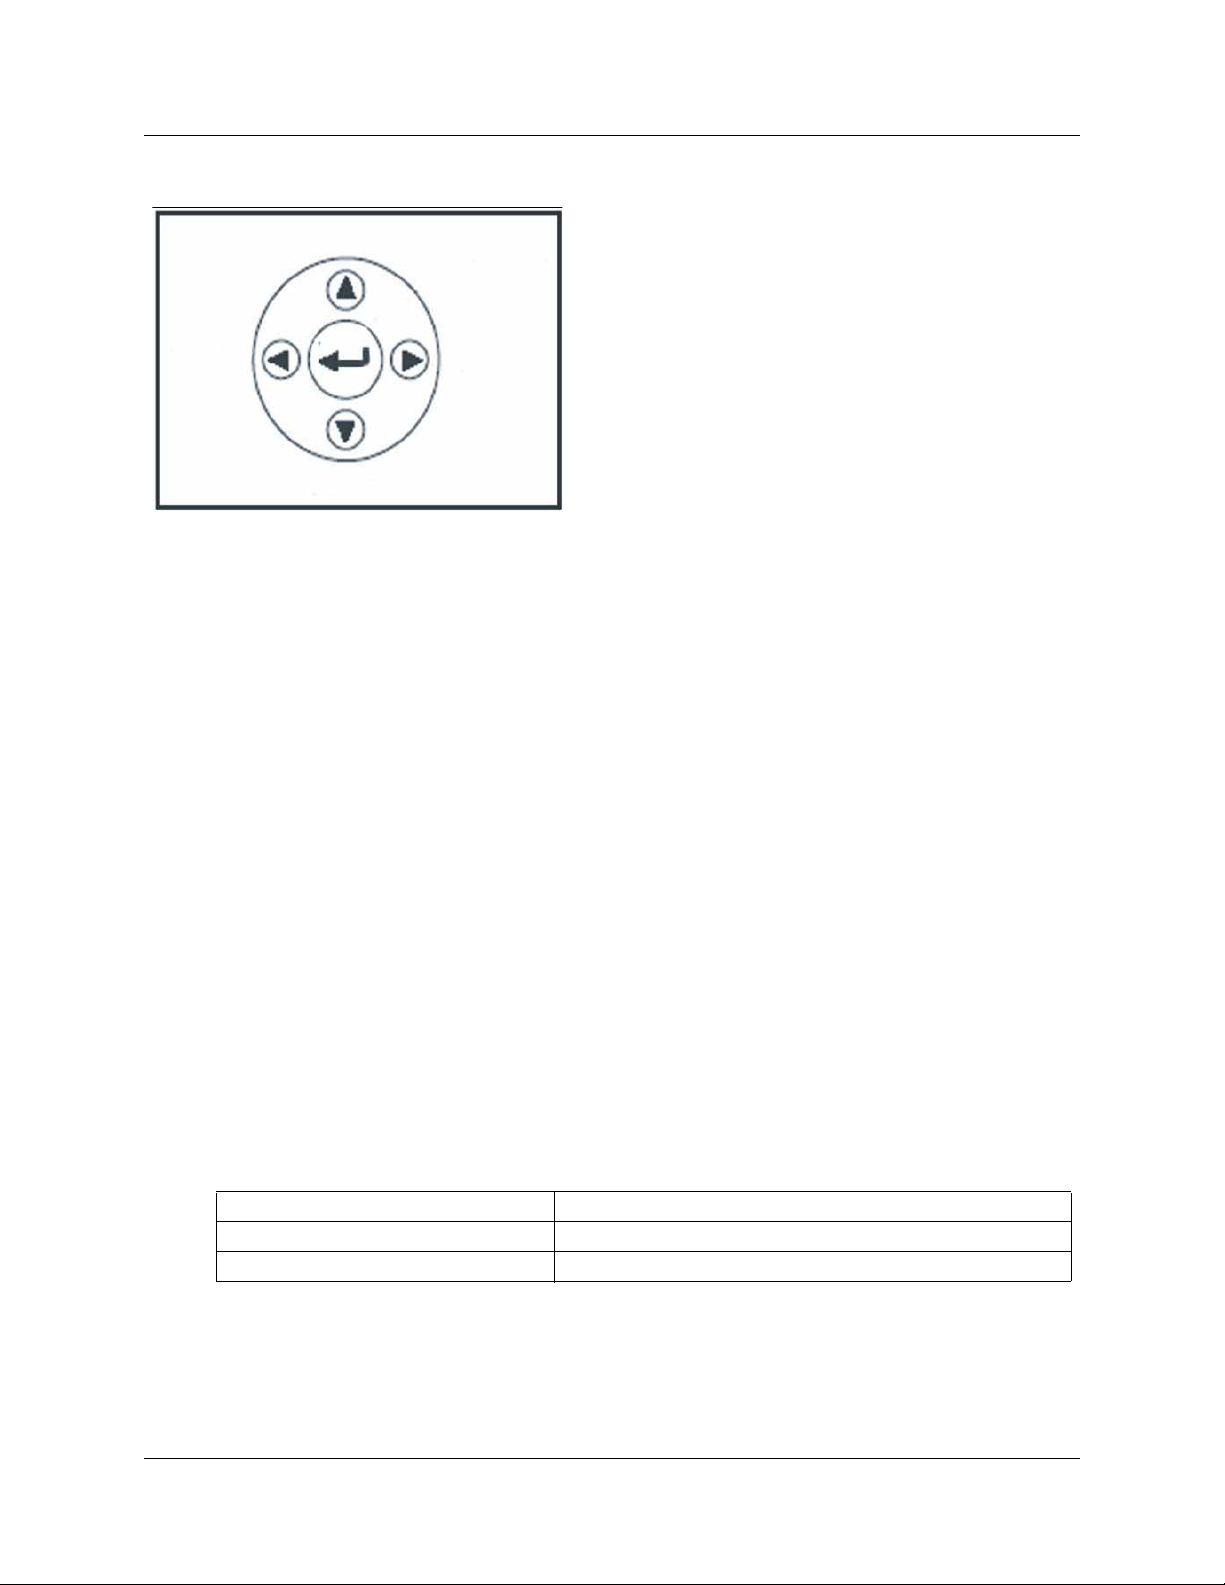
Figure 1 Navigation keys
An asterisk (*) beside an option indicates that it is selected.
• Press Nav up or down, to display the previous and next menu options.
• Press Enter to select a menu option or item.
• Press Nav < to backspace when editing an entry.
• Press Back soft key to return to the previous menu level.
• Press the Clr soft key to delete an entry and then enter new data.
• Press the Del soft key to cancel the entry and return to the previous menu level.
Avaya 6120 and 6140 WLAN Handsets and the 2210 WLAN Handset 3
• Press the Exit soft key to exit the menus.
Making an alphanumeric entry
1 Enter a number by pressing any keypad button.
2 Press the number key again to display the first letter associated with that key.
3 Press the CAPS/caps soft key to toggle the case.
4 Press the key again to scroll through the letters associated with that key.
Example: if you press 2 repeatedly, 2, A, B, C (CAPS on) or 2,a, b, c (CAPS off) appear on
the display.
Use the following keys to enter nonnumeric characters or other characters that are not
represented on the keypad.
Table 2
Keys
To enter Press
. - _! # $ % & ‘ ( ) , : ; \ = @ ~ * *
Space #
5 After the correct entry appears, press Nav > to move to the next character, and repeat for each
digit and letter of the entry.
Avaya 6120 and 6140 WLAN Handsets Installation and Configuration Addendum
Page 4

4 Avaya 6120 and 6140 WLAN Handsets and the 2210 WLAN Handset
6 Press the Save soft key to save the entry and return to the menu.
OR
Press the Exit soft key to abort and return to the menu without saving any changes.
NN40050-400
Page 5

Admin menu options
Table 3 Admin menu options for the Avaya 6120 and 6140 WLAN Handsets lists the Admin menu
options for the Avaya 6120 and 6140 WLAN Handsets. Detailed descriptions of each item follow
the table. An asterisk (*) beside a setting indicates the default setting.
Admin menu options 5
Avaya 6120 and 6140 WLAN Handsets Installation and Configuration Addendum
Page 6

6 Admin menu options
NN40050-400
Page 7

Table 3 Admin menu options
Admin menu options 7
Admin menu
option
Phone config Language *English
2nd level 3rd level 4th level 5th level
Française
Deutsch
Español
Português
Norsk
Telephony
Protocol
Push-to-talk PTT
Time Zone [list]
Daylight
Saving
Protected Spd Dial Enter Number Enter number Assign speed-dial
Password
[Disable/Enable]
Change
Password
Set Terminal Type
[2004/3rd Party]
Startup Keylock
Speakerphone
[Disable/Enable]
OAI
[Disable/Enable]
Location Services On
Type 030*Type 032
Enable/Disable
Allowed Channels *Channel 1
Name
Channels
Priority Channel
On/Off
*GMT
*DST No Adjust DST
Auto <USA> DST
Auto <Euro> DST
Auto <AUS>
* Off
*Channel 2
***
*Channel 24
*Channel 1
*Channel 2
***
*Channel 24
Name Channel
Set
transmission
interval
IP address *___.___.___.___
1, 5, 10
Avaya 6120 and 6140 WLAN Handsets Installation and Configuration Addendum
Page 8

8 Admin menu options
Table 3 Admin menu options
Admin menu
option
Network config IP addresses *Use DHCP Full DHCP
NN40050-400
2nd level 3rd level 4th level 5th level
Partial DHCP Server1 IP
Address
Server1 Port
Server2 IP
Address
Server2 Port
Static IP Phone IP
Default
Gateway
TFTP Server IP
Subnet Mask
Syslog Server
IP
Time Server IP
SVP IP
Call Server Info Server1 IP
Address
Server1 Port
Server2 IP
Address
Server2 Port
OAI Sever IP
SSID [Enter]
Security *None
WEP Authentication Open System
Shared Key
Reg. Domain:
*none
WEP
On/*Off
Key Information Default Key
Rotation Secret
WPA2-PSK Passphrase
Pre-Shared
Key
Cisco FSR Username
Password
WPA-PSK Passphrase
Pre-Shared
Key
01-02
[802.11
*WEP Off
WEP On
Key Length
Key 1-4
Config]
Page 9

Table 3 Admin menu options
Admin menu options 9
Admin menu
option
Diagnostics Run Site Survey
Restore defaults
2nd level 3rd level 4th level 5th level
Diagnostics Mode
[Disable/Enable]
Syslog Mode *Disabled
Error Handling
Mode
Halt on Error
Restart on Error
Errors
Events
Full
*b and b/g
mixed
g only
[Transmit Power]
*Maximum
5 mW
<7dBm>
10 mW
<10dBm>
20 mW
<20dBm>
40 mW
<40dBm>
50 mW
<17dBm>
100 mW <20dbm>
Language
Choose a language from those on the list.
Telephony Protocol
Use Telephony Protocol to select the VoIP protocol that your site is licensed to download and run.
The UNIStim Protocol to use for the Avaya 6120 and 6140 WLAN Handsets is 032. Any other
protocol causes the handsets to malfunction.
Push-to-talk
All 24 Push-to-talk channels are allowed by default. The Push-to-talk menu provides the following
options:
• Allowed Channels- Toggle the allowed status of any allowed channel by scrolling to the
channel to be disallowed and pressing Enter. Allowed channels are displayed with an asterisk
(*) in the left column. Only those channels allowed in the Admin menu appear on the Config
menu, where they can be subscribed to by the user.
• Named Channels- You can name allowed channels. The name appears instead of the channel
Avaya 6120 and 6140 WLAN Handsets Installation and Configuration Addendum
Page 10

10 Admin menu options
number when channel information appears on the handset. The name appears on the local
handset only; it does not appear on target handsets.
• Priority Channel- You can configure the priority channel, also referred to as channel 25, which
makes it available to all Push-to-talk handsets. When you make a Push-to-talk broadcast on the
priority channel, it overrides any active Push-to-talk transmission on all other channels. You
can name the priority channel.
Time zone
Worldwide time zone options are available. Select your time zone from the list. Greenwich Mean
Time (GMW) is the default.
Daylight Saving
You can adjust the handset for daylight savings time. The following are the Daylight Savings
menu options:
• DST No Adjust (Default)
• DST Auto (USA)
• DST Auto (AUS)
• DST Auto (EURO)
Protected Spd Dial
The protected speed-dial number appears as the first item on the speed-dial list and is specially
marked with an asterisk (*) as the first character in its name. It is usually programmed to a number
to be called in emergency situations. If the Call Server offers directory services, Redial, Speeddial, and Phonebook features in the handset are disabled, including the protected speed-dial
number feature. Any entry here is overridden by the Call Server.
Password [Disable/Enable] and Change Password
The password option controls access to the administrative functions in the Admin menu of the
wireless handset. Configure the password in each handset for which controlled access is desired.
By default, the password is disabled when the handset is shipped.
To modify the password requirement, enter the default or previously configured password to
verify the change. The Password option operates as a toggle between Enabled and Disabled. Press
Enter to change the password protection state. Change Password appears only if the password is
enabled.
Attention: Record the wireless handset Admin password and store it in a safe place. Do not lose
the Admin password! If the Admin password is lost or forgotten, you can be required to return the
handset to Avaya to have the password reset.
Set Terminal Type
The terminal type configures the Avaya 6120 and 6140 WLAN Handsets for the type of PBX in
use. The BCM system requires the 3rd Party setting. The current Terminal Type is shown on the
information line. Press Enter to toggle to the alternate setting.
Startup Keylock
Startup Keylock deactivates the keypad during startup so that initialization cannot be interrupted.
This is a toggle option; the info line displays whether the option is enabled or disabled. Select No
NN40050-400
Page 11

Admin menu options 11
Startup Keylock to disable and select Startup Keylock On to enable.
Speakerphone
You can disable the speakerphone when quiet handset operation is required. Disabling the
speakerphone removes the speakerphone soft key from the active mode display. The current
speakerphone setting is shown on the information line. Press Enter to toggle to the alternate
setting.
OAI [Disable/Enable]
With the Avaya Open Application Interface (OAI), the wireless handsets can connect with the
optional WLAN Application Gateway 2246. This device allows third-party computer applications
to display alphanumeric messages on the wireless handset display and take input from the wireless
handset keypad.
If a WLAN Application Gateway 2246 is installed in the system, OAI can be optionally enabled in
the wireless handset. Select whether the wireless handset can attempt to connect to the WLAN
Application Gateway 2246 by pressing Enter to toggle to the alternate setting.
If OAI is enabled, and a WLAN Application Gateway 2246 IP address is available to the wireless
handset (either through DHCP or Static IP configuration), the wireless handset communicates with
the WLAN Application Gateway 2246 at power-on, and then periodically during the time the
wireless handset is powered on.
If a WLAN Application Gateway 2246 is not installed at the site, disable the OAI feature to
preserve network bandwidth and battery life.
IP addresses
The Avaya 6120 WLAN handset can operate in three modes: DHCP enabled, either Full DHCP or
Partial DHCP, and Static IP. Select the mode for operation from the IP Address menu:
• Use DHCP—uses Dynamic Host Configuration Protocol to assign an IP address each time the
handset is turned on. If DHCP is enabled, the handset also receives all other IP address
configurations from the DHCP server.
— Full DHCP—enables DHCP for all IP addresses.
— Partial DHCP—enables static IP address configuration for Server 1, Server 1 Port, Server 2,
and Server 2 Port. All other IP addresses are assigned by DHCP.
Server 1 (2) IP address—the IP addresses of the Avaya device. If using Static IP configuration,
this is the IP address of the device. If DHCP is used, the handset tries to obtain the IP address
and port information by using the following DHCP options: 43, 128, 144, 157, 191, and 251.
Server 1 (2) Port—the port number used by Avaya device to communicate with IP telephones.
If using Static IP configuration consult your Avaya documentation for port numbers. If DHCP
is used, the handset tries to obtain the IP address and port information by using the following
DHCP options: 43, 128, 144, 157, 191, and 251.
• Static IP—allows you to manually set a fixed IP address. If selected, the handset prompts for
the IP Addresses of each configurable network component. When entering addresses, enter the
digits only, including leading zeroes. No periods are required.
Regardless of the mode in which the handset is operating, you must configure the following
components:
Avaya 6120 and 6140 WLAN Handsets Installation and Configuration Addendum
Page 12

12 Admin menu options
• Phone IP—the IP address of the handset. This is automatically assigned if DHCP is used. If
using Static IP configuration, you must obtain a unique IP address for each handset from your
network administrator.
• Default Gateway and Subnet Mask—used to identify subnets, when using a complex network
that includes routers. Both of these must be configured either with an IP address under Static
IP (not configured to 000.000.000.000 or 255.255.255.255) or with DHCP for the handset to
contact any network components on a different subnet. If configured on the DHCP server, use
option 3 for the Default Gateway and option 1 for the Subnet Mask. Contact your network
administrator for the proper settings for your network.
Attention: A Avaya 6120 and 6140 WLAN Handsets cannot roam across subnets because it
cannot change its IP address while it is operational. Ensure that all your access points are
attached to the same subnet for proper operation. If DHCP is enabled, you can change the
subnet of the handset by powering off the handset, and then powering it back on when it is
within range of access points on the new subnet.
• TFTP Server IP—the IP address of a TFTP server on your network that holds firmware images
for updating the handsets. If this feature is configured (not configured to 0.0.0.0 or
255.255.255.255), either by using Static IP configuration or by using DHCP option 66 (TFTP
Server), or the Boot server/next server (siaddr) field, the handset checks for newer firmware
each time it is powered on or comes back into range of your network. This check takes only a
second and ensures that all handsets in your network are kept up-to-date with the same version
of firmware.
• Syslog Server IP—the IP address of the Syslog Server. See the Diagnostics section for more
information.
• Time Server IP—the IP address of the time server.
• SVP IP address—the IP address of the SVP Server. If using Static IP configuration, this is
simply the IP address of the SVP Server. To have a permanent IP address, the SVP Server must
be statically configured. If DHCP is used, the handset tries the following, in this order:
— DHCP option 151
— a DNS lookup of SLNKSVP2 if the DHCP options 6 (DNS Server) and 15 (Domain Name)
are configured.
• Call Server Info—the IP addresses of the BCM. When setting static IP addresses, the IP
addresses and Port addresses must be configured for Svr1 and Svr 2. For more information, see
Partial DHCP.
• OAI Server IP—the IP address of the NetLink (NL) OAI Gateway (if applicable). If using
Static IP configuration, this is simply the IP address of the NL OAI Gateway. If DHCP is being
used, the handset tries the DHCP option 152.
SSID
Enter the SSID.
Security
The following are the security options:
Attention: For Wired Equivalent Privacy (WEP), WiFi Protected Access using PSK Preshared
Key (WPA-PSK), and WPA2-PSK configure each of the following options to match exactly the
settings in your APs. Encryption codes appear as they are entered. For security reasons, codes do
NN40050-400
Page 13

Admin menu options 13
not appear on the display when a user returns to the Admin menu, Encryption options.
• *NONE—disables any 802.11 encryption or security authentication mechanisms.
• WEP—a wireless encryption protocol that encrypts data frames on the wireless medium,
allowing for greater security in the wireless network. If WEP is used, you must configure each
handset to correspond with the encryption protocol configured in the access points. Select the
entries from the options below to enable the handset to acquire the system.
— Authentication—Select either Open System or Shared Key.
— WEP Enable/Disable—Select either Enable WEP or Disable WEP.
— Key Information—Configure the following:
– Default Key—Enter the key # specified for use by the handsets. This is 1 through 4.
– Key Length—Select either 40-bit or 128-bit depending on the key length specified for use at
this location.
– Key 1-4—Scroll to the key option that corresponds to the Default Key that you entered
above. Enter the encryption key as a sequence of hexadecimal characters. (Use the 2 and 3
keys to access hexadecimal digits A-F.)
— Rotation Secret—This is used for proprietary WEP key rotation. To determine whether this
feature is supported in your system, see your custom document.
• WPA2-PSK—The security features of WPA2-PSK are available and can be used if supported
by the access points in the facility. Select one of the following:
— Passphrase—enter a passphrase between 8 and 63 characters in length.
— Direct Entry—enter the 256-bit key code.
Attention: For information about whether WPA2-PSK is recommended for an AP, consult the
Configuration Note for the installed APs. Configure the recommended version on the AP and
select the corresponding option on the Admin menu.
• Cisco FSR—To provide the highest level of security without compromising voice quality on
Cisco Aironet WLAN APs, the Fast Secure Roaming (FSR) mechanism is implemented. FSR
is designed to minimize call interruptions for wireless handset users as they roam throughout a
facility. Existing Aironet 350, 1100, and 1200 APs can require a firmware upgrade to support
FSR. Cisco FSR requires advanced configuration of the Cisco access points at your site. See
the Cisco representative for detailed documentation about configuring your access points and
other required security services on your wired network. To configure Cisco FSR in the
wireless handset, you must enter a Radius Server username and password into each handset.
— Username—Enter a username that matches an entry on your Radius server. Usernames are
alphanumeric strings, and can be entered using the alphanumeric string entry technique.
— Password—Enter the password that corresponds to this Username.
• WPA-PSK—The security features of WPA-PSK are available and can be used if supported by
the access points in the facility. Select one of the following:
— Passphrase—enter a passphrase between 8 and 63 characters in length.
– 8-character passphrase—weak
– 20-character passphrase—minimum
– 20 to 30-character passphrase—recommended
– 63-character passphrase—very strong
— Direct Entry—enter the 256-bit key code.
Avaya 6120 and 6140 WLAN Handsets Installation and Configuration Addendum
Page 14

14 Admin menu options
Regulatory domain, 802.11 configuration, and transmit power
Regulatory domain, 802.11 configuration, and transmit power are interdependent settings. After
the domain and 802.11 type are established, you can configure the transmit power.
Attention: The 802.11 options and the transmit power options, must be configured to match the
corresponding settings used by the APs in the facility.
The FCC requirements dictate that the menu for changing the domain be available by password,
which in this case is the LINE key. To configure the domain, press LINE and then select the
domain:
• 01 North America
•02 Europe
After you establish the regulatory domain, the 802.11 Config options appear on the display. You
can choose only one option; 802.11 (b and b/g mixed) is the default. If 802.11 (a) is selected,
another menu opens so that you can select the 802.11a transmission frequency. Only those ranges
that are allowed in the selected domain appear. You can select multiple ranges. The selected mode
and ranges are marked with an asterisk (*). Press the Done soft key after you finish specifying the
802.11 mode.
After you press the Done soft key, the Transmit Power menu opens. Only those power levels that
apply to the domain and 802.11 mode are listed. You can select only one level. The default varies
with the domain and 802.11 mode. The selected level is marked with an asterisk (*).
Run Site Survey
Select this option to activate the Site Survey mode. Site Survey runs immediately upon selecting
this option.
Diagnostics Mode
Diagnostics Mode evaluates the overall quality of the link between the handsets, the AP, and the
infrastructure equipment (call server, WLAN IP Telephony Manager 2245, and gateways).
Diagnostics Mode can be used when the handset is active. When Diagnostics Mode is activated in
the Admin menu, the handset enters the diagnostic state. The handset can display diagnostics any
time it is on a call.
Syslog Mode
Configure Syslog Mode to one of the following options:
• Disabled—turns syslog off
• Errors—logs events that are considered errors
• Events—logs all errors, plus some events of interest
NN40050-400
Page 15

Full—logs all errors and all other events of interest
Table 4
Message Type Events Errors Full
Failed handoff Yes Yes Yes
Successful handoff No Yes Yes
Security error Yes Yes Yes
Call start or end No Yes Yes
Audio error threshold exceeded Yes Yes Yes
Audio stats No No Yes
Radio error threshold exceeded Yes Yes Yes
Radio stats No No Yes
Error Handling Mode
The Halt on Error option causes the handset to stop operating if an error message is received.
Unless the error is a fatal one, normal operation can be resumed by power cycling the handset.
Press START or remove and replace the Battery Pack. The Restart On Error option causes the
handset to make every effort to reboot quietly and quickly to standby mode. In either scenario, a
call in progress is lost. Error detail can be captured by the Syslog Server and can also be available
for downloading with the Handset Administration Tool.
Admin menu options 15
Syslog message levels
(every
5 s)
(every
5 s)
Restore Defaults
The Restore Defaults option restores all user and administrative parameters, except Telephony
Protocol, to the factory default configurations.
Avaya 6120 and 6140 WLAN Handsets Administration Tool
The Handset Administration Tool for the Avaya 6120 and 6140 WLAN Handsets is a software
utility that you install on a PC that has a USB port that can be cabled to the USB port of the Dual
Charger. Configuration options include:
• configuring all options on the Admin Menu
• configuring all options on the Config Menu
• assisting with troubleshooting by recording error information
• upgrading the handset firmware
To install the Handset Administration Tool, install the software utility as described in the
procedure "Installing the Handset Administration Tool".
Personal computer and hardware requirements
• Personal computer (PC) running Windows 2000 or Windows XP with a USB port
• Dual Charger for the Avaya 6120 and 6140 WLAN Handsets
Avaya 6120 and 6140 WLAN Handsets Installation and Configuration Addendum
Page 16

16 Admin menu options
• Power supply for the appropriate country or region
• Dual Slot Handset Charger USB Cable or comparable cable (with 5-pin mini-B connector)
Attention: USB cables vary in the ability to make a proper connection to the Dual Charger USB
port. Use the USB cable recommended by Avaya to ensure compatibility.
Installing the Handset Administration tool
Attention: You cannot uninstall the Handset Administration Tool because it runs from its current
location and stores its settings locally. It does not modify your system or registry.
1 On the PC, create a folder for Avaya 6120 and 6140 WLAN Handsets configuration.
2 Follow the instructions http://www.avaya.com/downloadingcontent to download the
following file to your local terminal:
• Product Category: Wireless LAN
• Product Name: Avaya 6120 WLAN Handset or Avaya 6140 WLAN Handset
• Content Type: Supporting Software
Obtain the precise Release, Status, and Title of the file from your next level of support.
3 Download the Handset Administration Tool software .zip file to the folder you created in
Step 1.
4 Extract the individual files from the .zip file to the same folder.
5 Double-click the HandsetAdminXxyy_yy_yy_yy.exe file to run the utility.
6 Read and accept the SpectraLink Software License Agreement.
Use the Handset Administration Tool
The Handset Administration Tool has two separate functional areas: the Administration Console
and the Handset Settings Editor.
With the Administration Console, you can connect to the handset, configure and change the
password, retrieve error messages, update handset firmware, and update the Handset
Administration Tool software.
With the Handset Settings Editor, you can configure handsets and create, save and copy Admin
menu options.
The Handset Administration Tool uses indicators to alert you to the status of the action being
performed:
• Green—the adjacent label is true and this state is desirable or required.
• Yellow—the adjacent label is true and this state requires caution or attention. For example, a
yellow New folder indicator cautions that the file path is to be created. A yellow File exists
indicator cautions that the file is to be overwritten.
• Red—the adjacent label is true and this state is undesirable or is accompanied by an error. A
message, on the prompt line or in a dialog box, describes the nature of the error.
• Gray—the adjacent label is not true, for example, the handset is not connected.
NN40050-400
Page 17

Admin menu options 17
• Blinking—file status indicators blink yellow when the file status is being queried but is not yet
known (for example: when attempting to access slow drives or unresponsive network devices).
File status indicators blink red when the path is invalid (mistyped). The Handset indicator
blinks when the handset password must be entered.
A prompt line at the bottom of the window provides information about what action to take or the
status of the utility.
Connecting to the Avaya 6120 and 6140 WLAN Handsets
1 In the Handset Administration Tool, select the Connect tab.
2 Power off the handset and insert it into the Dual Charger.
3 Type the password.
You must enter a password the first time you insert the handset.
The default password is 123456.
Attention: If you check the Remember password box, the password is retained as the default
password for all handsets. Unique passwords for each handset are not remembered.
4 Click Submit.
After a connection is established between the program and the handset, the Handset
connected indicator turns green and Connected appears on the prompt line. The handset is
now ready for configuration.
Password configuration
Use the Handset Administration Tool to enable or disable the password requirement, or to change
a current password. Connect to the handset and select the Password tab. If the Enable password
check box is unchecked, no password is required to access Admin Settings in the handset Standby
menu.
Changing the password
1 In the Handset Administration Tool, select the Password tab.
2 Type the current password.
3 Type the new password.
4 Retype the new password.
5 Click Change password.
Error information
Use the Error info tab of the Handset Administration Tool to assist the customer service team in
troubleshooting handset errors. Use this utility, as directed by customer service, to save any errors
as a file that you can send to customer service for handling.
Use the Browse button to establish the path and then enter a file name. Future save operations
Avaya 6120 and 6140 WLAN Handsets Installation and Configuration Addendum
Page 18

18 Admin menu options
point to this same location as the default; the same file can be overwritten if desired. A list box
displays the most recently used file names. The File time window displays the modification
timestamp of the file in the Save as window.
To save a file, click the Get file button. The file is copied from the handset to the location. The
Read/Write indicators indicate each action as it occurs. A progress indicator above the prompt line
shows file transfer progress.
Firmware updates
Select the Firmware tab and update the firmware in the handset by copying it from a location on
your computer to the handset memory.
Each file must be individually downloaded into the handset. This is not an efficient method of
updating any quantity of handsets, but it works for testing new code and in extremely small
installations. If there is a TFTP server that is broadcasting older code, the handsets continue to
download code over the air and revert to the older code after you power cycle them.
Updating the Avaya 6120 and 6140 WLAN Handsets firmware
1 Follow the instructions http://www.avaya.com/downloadingcontent to download the
following file to your local terminal:
• Product Category: Wireless LAN
• Product Name: Avaya 6120 WLAN Handset or Avaya 6140 WLAN Handset
• Content Type: Releases
Obtain the precise Release, Status, and Title of the file from your next level of support.
2 Create a new folder for the firmware update.
3 From the .zip file, extract the bin files to the folder that you created in Step 2.
4 Use the Handset Administration Tool to connect to the handset.
5 In the Handset Administration Tool, select the Firmware tab.
6 Click Browse to locate and select the firmware files.
A list box displays the most recently used filenames. The File time indicator displays the
modification timestamp of the selected file. The file version and handset version indicators
display the version of the selected file and the version of the handset firmware for
comparison.
7 Verify that the correct firmware update file is selected and click Update.
The file is copied from the location to the handset. The Read/Write indicators indicate each
action as it occurs. During a firmware update, you can open other tabs. The handset indicators
on the tabs indicate the status of the update.
8 Repeat Step 6 and Step 7 for each of the.bin files.
If an Error indication occurs, ensure that the handset is properly seated and that the USB cable is in
good condition and connected securely, and then retry the update. Contact Customer Service if an
error persists.
NN40050-400
Page 19

Version
To view the serial number of the handset and the current firmware version, select the Version tab.
To update the Handset Administration Tool, click the Update Application button.
Admin menu settings
Select the Settings tab in the Handset Administration Tool to configure required and optional
settings in the Admin Menu. You can also assign end user Config Menu options such as user
name. Which options are available depends on the firmware used by the handsets. For specific
configuration requirements, see the Configuration and Administration document that pertains to
the protocol used by the system at your site.
The handset serial number and firmware version appear on the Settings tab. To display the version
of the Handset Administration Tool, click Show Tool Version.
To enter and modify menu settings, click Show Settings Editor. After the Handset Settings Editor
appears, to close the Settings tab window, click Close this window. To reopen the Settings tab
window from the Handset Settings Editor, select View>Admin functions.
Admin menu options 19
Handset Settings Editor toolbar
With the Handset Settings Editor toolbar you can name, open, and save configuration files. You
can also download and upload configuration settings to and from the handset in the charger.
Figure 2 Handset Settings Editor toolbar
Use the three file name windows to open and save settings by System,Group or User type as
separate files. To assign a file name, type it into the field and click Save. By default, the files are
saved in a new folder named ConfigData in the folder where the program is stored. The new folder
is created automatically the first time a file is saved. To open an existing file, click Open and
browse to the file. Use the File menu to customize the file structure.
The file indicators beside the Save buttons use four colors to indicate the status of the file
displayed in the window:
• Red—file does not exist. The file name in the window is not yet created.
• Yellow—file not loaded. The file name in the window exists in the ConfigData folder but is not
loaded into the Editable settings.
• Green—unsaved edits. After you make changes in the Editable settings fields, the green
indicator indicates the changes are not saved. Gray—file up-to-date. The settings are saved.
There are two columns of configuration options. The Editable settings column shows settings that
you can save as files. The Handset settings column shows settings that you can copy from or copy
Avaya 6120 and 6140 WLAN Handsets Installation and Configuration Addendum
Page 20

20 Admin menu options
to the handset in the cradle. By using the Copy settings arrows and boxes, you can copy settings to
the handset column and then write the settings to the handset in the charger.
You can also copy the configuration from a handset to the Editable settings area and then edit or
save it. Use the Sys, Grp, and Usr check boxes to specify and copy only the settings that you
require.
Use the Read Handset and Write Handset buttons to initiate the transfer of configuration data from
or to the handset in the charger.
Four indicators (labeled Handset, Read, Write, and Error) indicate the status of the configuration
transfer.
Create a configuration plan
When you first create a configuration plan, you enter information into the Editable settings fields,
indicate which of the three categories each option belongs to, and save as System, Group, or User
files.
Attention: Do not create a plan that saves an option in two different categories. Be sure to
establish option categories that do not overlap. For example, Speakerphone and Push-to-talk
settings are typically tagged as Grp options and saved in Group files.
After you establish which options are categorized as System, Group, or User, enter the
configuration information into the Editable settings fields. Begin with the System options and
enter all system-level field values. Click the Sys category button on the left side of the window for
each option. To save these settings as a System file, enter the file name in the System file name
field and click Save.
To create each Group plan, enter the values in the fields designated as Group types. Click the Grp
category button on the left side of the window for each option. Save each plan under a different
name in the Group file name field.
Create one basic User file for default (or desired) values for each User field. Click the Usr category
button on the left side of the window for each option.
Attention: Although you need not save user settings for each handset, it is useful to do so. For
example, you can save a user’s ring preferences from a handset being replaced so that the new
handset can be configured the same way. If you decide to save the configuration for each handset,
it is easiest to do this during the configuration process.
Configuration planning worksheet
Use a worksheet similar to the one shown to design your configuration plan.
NN40050-400
Page 21

Admin menu options 21
Figure 3 Sample planning worksheet
Download or upload a configuration plan
After you establish your configuration plans, the settings can easily be downloaded to the
handsets.
Downloading a configuration plan to a Avaya 6120 and 6140 WLAN Handsets
1 Use the Handset Settings Editor toolbar to open the System, Group, and User plans for this
handset.
2 Enter information unique to the handset, for example, the Extension and User Name
fields.The Extension field has a Next button that is useful for configuring a quantity of
handsets.
3 Copy the settings to the Handset settings fields.
4 Click Write Handset to begin the download.
After the Handset indicator turns off, the download is finished and you can remove the
handset from the charger.
5 (Optional) To save the settings unique to this handset, ensure that the correct extension
number or other file name exists in the User file name field and then click Save.You can also
load files or edit settings for the next handset—Step 1 and Step 2 during the download.
6 Remove the handset from the charger.
Uploading a configuration plan to a Avaya 6120 and 6140 WLAN Handsets
1 On the Handset Settings Editor toolbar, click Read Handset.
After the Handset indicator turns off, the upload is complete and the handset settings appear
in the Handset settings fields.
2 (Optional) Copy settings to Editable settings fields.
3 (Optional) Create configuration plans.
OR
Save the settings by user or extension.
Avaya 6120 and 6140 WLAN Handsets Installation and Configuration Addendum
Copyright 2010
Document number: NN40050-400
02.01
June 2010
Page 22

22 Admin menu options
NN40050-400
 Loading...