

Page 1

IP Office
5602/4602 Phone User Guide
Issue 2b (20th July 2005)
Page 2

Table of Contents
The Telephone............................................................................................................................ 3
Overview..................................................................................................................................................... 3
Call Appearance Keys ................................................................................................................................ 4
Call Appearance Key Icons.................................................................................................................... 5
Basic Call Handling Features....................................................................................................6
Answer a Call ............................................................................................................................................. 6
Making a Call.............................................................................................................................................. 6
Clearing a Call ............................................................................................................................................ 6
Redial ......................................................................................................................................................... 7
Headset Working ........................................................................................................................................ 7
Speaker ...................................................................................................................................................... 7
Mute............................................................................................................................................................ 7
Hold ............................................................................................................................................................ 8
Transfer ...................................................................................................................................................... 9
Conference ............................................................................................................................................... 10
Message ................................................................................................................................................... 10
System Features ...................................................................................................................... 11
Introduction............................................................................................................................................... 11
Answering Calls........................................................................................................................................ 11
Call Forwarding ........................................................................................................................................ 11
Diverting Calls .......................................................................................................................................... 12
Do Not Disturb .......................................................................................................................................... 12
Voicemail .................................................................................................................................................. 12
Default Feature Codes ............................................................................................................................. 13
Index.......................................................................................................................................... 15
5602/4602 Phone User Guide Page ii
IP Office Issue 2b (20th July 2005)
Page 3
The Telephone
Overview
This guide covers the use of the Avaya 5602 and 4602 telephones on the Avaya IP Office telephone
system. Both phones are similar, however the 5602 is only supported on the IP Office whereas the 4602
is supported on a range of Avaya telephone systems.
5602/4602 Phone User Guide Page 3
IP Office Issue 2b (20th July 2005)
Page 4
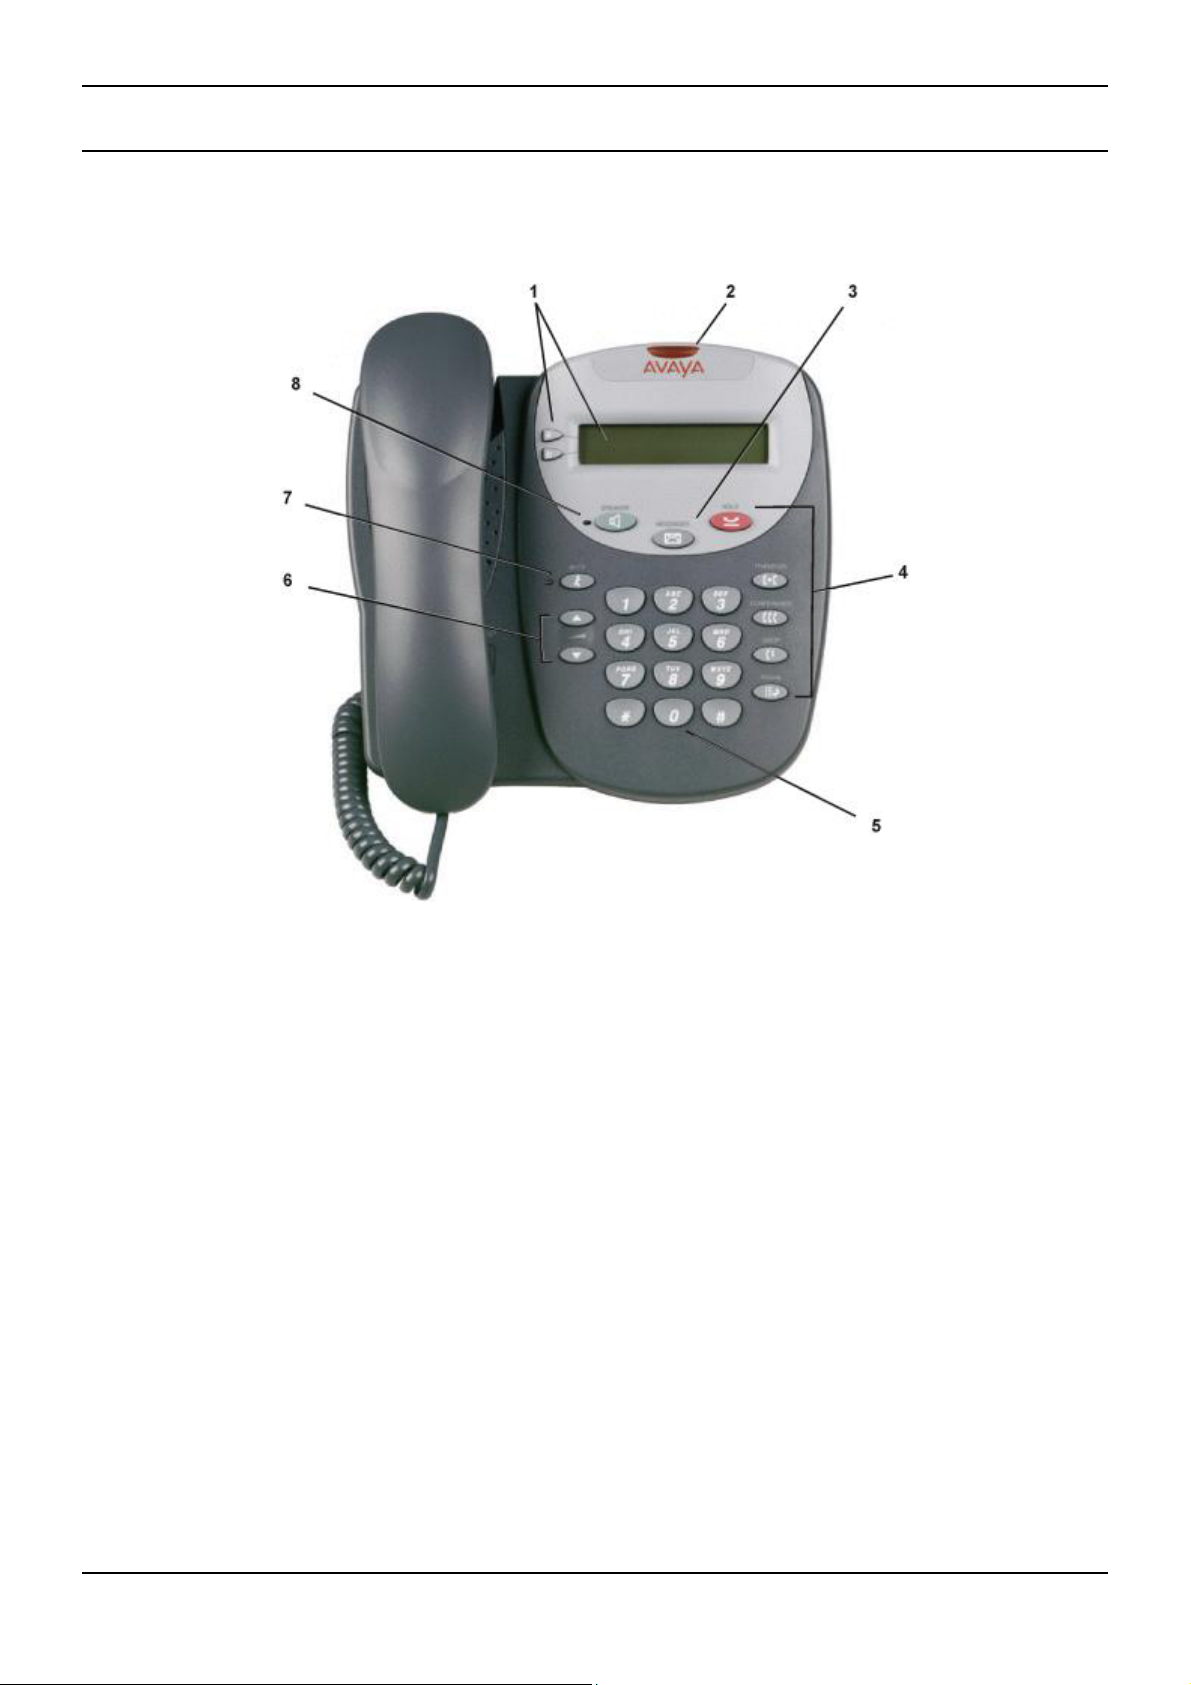
5602 User
1. Display and Call Appearance Keys: Two Call Appearance Keys allow the user to handle
multiple calls and the display shows call information. Details on system features (allocated by
your System Administrator) can also be displayed.
2. Message lamp: Lit when the user has voicemail messages. Can also be set to flash when the
phone is ringing.
3.
Messages: Access the user's mailbox.
4. Call Handling Buttons:
• Hold: Place call on hold. See Hold.
• Transfer: Transfer call. See Transfer.
• Conference: Conference held calls. See Conference.
• Drop: Drop call. See Clearing a Call.
• Redial: Redial last number dialed. See Redial.
5. Dial pad: Standard 12-button pad for dialing telephone numbers.
6.
Volume Controls: Adjusts the speaker, handset, headset, or ringer volume depending on
which is currently in use.
Mute: Turns the microphone on/off. When in use, the associated light is on and the caller
7.
cannot hear you.
8.
Speaker: Access the speakerphone. The light associated with this button turns on when the
speakerphone is active.
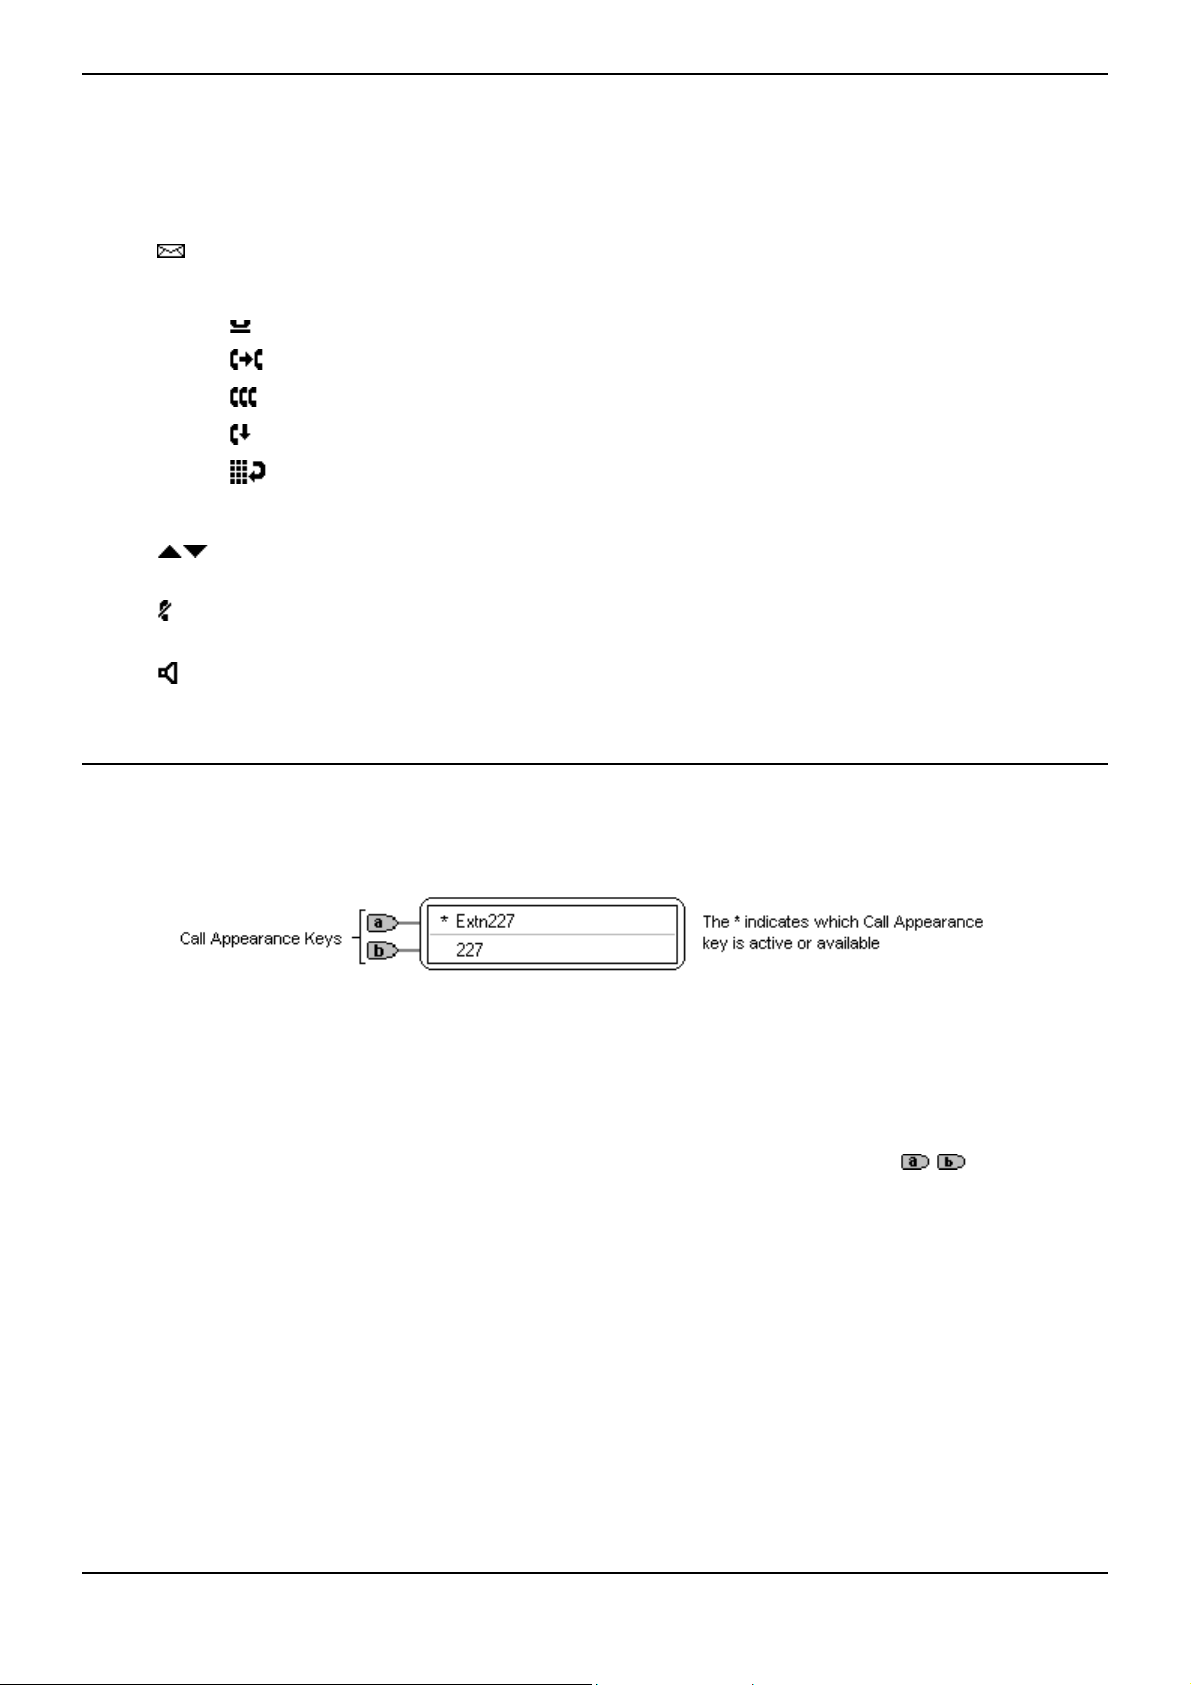
Call Appearance Keys
Normally, the call handling screen contains two keys set as 'call appearance' keys. Having more than
one call appearance key is useful. When holding a call you can answer another call and then use the call
appearance keys to switch between calls.
CAUTIONS:
1. Having two Call Appearance keys is very useful. When holding a call you can answer/make
another call and then switch between calls or transfer or conference. If you are set to receive call
waiting indication, the waiting call is shown against the next call appearance key.
2. Although your System Administrator can replace the Call Appearance Keys
• A Bridged Appearance
• A Line Appearance
• Call Coverage Appearance
• System Features
/ with:
This would severely restrict the use of features such as conference and transfer.
It is for these reasons that it is strongly recommended that all Call Appearance keys remain at
their default settings.
5602/4602 Phone User Guide Page 4
IP Office Issue 2b (20th July 2005)
Page 5

The Telephone
Call Appearance Key Icons
The icons displayed against the Call Appearance Keys allow you to determine the status (for example,
on Hold) of each call. Icons also indicate whether a feature has been activated for a particular button.
Incoming Call:
• A symbol next to a call appearance key indicates an incoming call. Pressing the adjacent
/ key answers the call and puts any other current call on hold.
Connected:
• A symbol next to a call appearance key indicates that it is the currently connected call. The
caller's telephone number (if available) is also shown.
On Hold:
• Pressing Hold or the adjacent key puts the call on hold, a symbol next to a call
appearance key indicate a call on hold and an H is also shown on the display.
• Pressing the adjacent key takes the call off hold.
5602/4602 Phone User Guide Page 5
IP Office Issue 2b (20th July 2005)
Page 6

Basic Call Handling Features
Answer a Call
When a call arrives at your phone, you hear a ringing tone and a flashing bell icon ( ) appears on the
associated call appearance display. The following describes how to use your handset to answer calls. To
answer calls using a headset, see Headset Working.
To answer an incoming call:
Do one of the following:
• If you are not active on another call, answer the call by lifting your handset.
You can also press
speak to the caller.
or
• If you are active on a call already, place the active call on Hold and then answer the incoming
call (see Hold).
Speaker to listen to the incoming call, but you must use the handset to
Making a Call
You can make calls from the phone using a variety of methods as follows:
To manually make a call:
1. Dial the required number on the key pad (remember to include the required access code (for
example, 9) for an outside line) and listen to the progress of the call.
2. Adjust the speaker volume as necessary.
• To change the volume use the and buttons. The display shows the volume level.
(There are eight volume levels.)
3. If the call is not answered, you can clear the call by pressing
or
4. When the call is answered, you must pick up the handset to speak to the called party
To automatically make a call:
Do either of the following:
• Press Redial and a call appearance key to have the phone dial the last number that you
dialed.
Speaker or Drop
Clearing a Call
To clear an established call either:
1. Replace the handset
or
2. Press
will then hear silence.
5602/4602 Phone User Guide Page 6
IP Office Issue 2b (20th July 2005)
Drop. You will hear dial tone, unless you are in ‘call centre mode’ of working when you
Page 7

Basic Call Handling Features
Redial
The Redial feature automatically redials the last extension or outside number (up to 24 digits) you dialed.
To redial the last number that you dialed
1. Press
Redial.
Headset Working
If a headset is to be used on your phone, it must replace the handset. E.g. unplug the handset (from the
socket on the side of the phone) and replace with the headset cable. Discard the handset.
To answer an incoming call:
1. Press the call appearance key next to the flashing bell icon (
To clear a headset call:
Press
To manually make a call:
1. Dial the number (remember to include the required access code (for example, 9) for an outside
line) and listen to the progress of the call.
Drop.
) and speak.
To automatically make a call you can:
1. Automatically dial the last number that you dialed by pressing
Redial
Speaker
The Speaker facility allows you to monitor incoming calls, but you must use the handset to speak to the
caller. You can also use Speaker to terminate an existing call.
The
the speaker is active.
Speaker button switches the speaker on/off. The light associated with this button turns on when
Mute
With a call in progress, you can stop the other party from hearing you. This feature works for both
handset or headset working.
To switch off your handset/headset microphone:
1. Press
Mute. The lamp beside MUTE comes on.
5602/4602 Phone User Guide Page 7
IP Office Issue 2b (20th July 2005)
Page 8

5602 User
Hold
If, with a call in progress, a second call arrives and is shown against a Call Appearance key, you can
then Hold the first call and answer the second call.
To put an existing call on hold:
1. Press
changes to
2. Answer the second call by pressing the Call Appearance button with the
symbol changes to
To return to the held call:
1. If you have a call in progress, then first put that call on hold as above.
2. To retrieve a held call, simply press the Call Appearance button with the
Notes:
1. After a pre-set time (defined by your System Administrator), you are reminded that you have a
call on hold by the
2. If the system feature AutoHold is on (consult your System Administrator) then you can hold an
active call (
pressing the second call’s Call Appearance button (
3. To transfer a held call see Transfer.
Hold or the or Call Appearance button with the symbol against it. The symbol
; showing that the line is on hold.
symbol against it. The
; showing that the line is connected.
against it.
hold icon changing for a few moments to and the phone ringing.
) by pressing the second call’s Call Appearance button ( ). If AutoHold is off, then
) will drop the first call.
5602/4602 Phone User Guide Page 8
IP Office Issue 2b (20th July 2005)
Page 9

Basic Call Handling Features
Transfer
The Transfer feature allows you to transfer a call from your telephone to another extension or outside
number.
To transfer the current call to another extension:
1. With a call in progress, press
2. When you hear dial tone, dial the number to which the call is to be transferred.
3. Do one of the following:
• To transfer the call without announcing it, either hang up or press Transfer again.
The transfer is complete. If the transferred call is not answered within a preset time, it is
returned to you.
• To announce the call before transferring it, wait for the called party to answer.
• If the called party is willing to accept the call, press Transfer again to
complete the transfer.
• If the called party does not wish to accept the call, press Drop. You can return
to the held call by pressing its call appearance button.
• If the line is busy or if there is no answer, press Drop. You can return to the held call
by pressing its call appearance button.
To transfer a new call to a held call using Conference:
1. With a call in progress and you wish to make an enquiry call or another call arrives, press
Hold. Make or answer the second call. The second call requires to be transferred to the first held
call.
Transfer.
2. To transfer the new call to the held call, press
complete.
Conference and then Drop. The transfer is
5602/4602 Phone User Guide Page 9
IP Office Issue 2b (20th July 2005)
Page 10

5602 User
Conference
The Conference feature allows you to conference other parties (including yourself) into a call.
Note: The number of parties allowed in a conference is controlled by your telephone system.
To add another party to a call
1. Press
2. Dial the number of the person you want to add to the call.
3. Wait for an answer.
4. To add the person to the call, press
5. Repeat Steps 1 through 4 for additional conference connections.
To add a held call to an active call
1. Press
2. All held calls are added to the conference.
Conference.
• If the called party does not answer or does not want to join the conference, press . You
can return to the held call by pressing its call appearance button.
again.
Conference.
Message
Your Message lamp turns on when a caller has left a message for you.
Press the
button to retrieve your messages, and follow the prompts.
5602/4602 Phone User Guide Page 10
IP Office Issue 2b (20th July 2005)
Page 11

System Features
Introduction
As well as your phones specific features, you can access a number of system features by dialing short
codes.
These instructions are for the system's default configuration. They assume that you are using the default
feature codes. It also assumes that you have full access to all features and the public telephone network.
Answering Calls
Ringing at your own extension:
Simply pick up the handset. When in headset mode, press the button associated with the alerting call.
The default ringing cadences are:
• Internal calls have a single ring cadence
• External calls have a double ring cadence.
These can be changed by your System Administrator.
Ringing at another extension:
You can answer from your own phone by using Call Pick-Up; lift your handset and dial:
• *30 to answer a call ringing anywhere.
• *31 to answer a call within your group.
• *32*201# to answer the call for a particular extension, in this example 201.
Note: If your phone rings for any longer than a specified period (15 seconds in default), any re-direction
feature that you have activated, such as voicemail or call forwarding, will come into effect.
Call Forwarding
Your calls can be forwarded to another extension or an external number either when you are away from
your desk (on no answer), when your extension is busy, and all calls (for example when you go on
holiday).
• To switch forward direct station (i.e. not Hunt Group) calls on dial *01, to switch it off
dial *02.
• To switch forward on busy on dial *03, to switch it off dial *04.
• To switch forward on no answer on dial *05, to switch it off dial *06.
• To set the number to which your calls are forwarded dial *07*201#, forwarding to 201 in this
example.
5602/4602 Phone User Guide Page 11
IP Office Issue 2b (20th July 2005)
Page 12

5602 User
Diverting Calls
You can divert your calls to another extension. In the examples below N is the extension to which you
want your calls diverted. Note that, if you do not answer calls at the temporary extension, they are
forwarded to your own voicemail or call forwarding number.
At another extension:
• *12*N# from the extension you are temporarily using.
• *13*N# to re-direct the calls back to your own extension, before you return to it.
At your own extension:
• *14*N# from your own extension.
• *14*# to cancel either feature from your own extension.
Do Not Disturb
You may choose to receive no calls at all or only those from particular callers on your exceptions list:
• To switch Do Not Disturb on (with or without exceptions) dial *08, to switch it off dial *09.
• *10*N# to add a number to the exception list.
• *11*N# to delete a number from the exception list.
Note: Your callers, other than your exceptions, either hear busy tone or are re-directed to your
voicemail.
Voicemail
Where your system has voicemail support and has been installed:
• To switch voicemail on dial *18, to switch it off dial *19.
• To retrieve your voicemail, use the code *17.
Your voicemail may be set up to deliver your messages by calling you whenever you hang up: this
feature is known as Voicemail Ringback.
• To turn Voicemail Ringback on dial *48; to turn it off dial *49.
Dialing a number while listening to your messages invokes further facilities:
Once messages have been delivered, they are held on the system for 24 hours (this is fixed for
Voicemail Lite, but can be varied by your System Administrator if your IP Office is equipped with
Voicemail Pro).
You can collect your voicemail from another extension by using the PIN your System Administrator has
set up for you. You can collect your messages if you are out of the office, by either dialing from a number
that has been registered for the purpose or by dialing your extension number and PIN when prompted. If
validation is successful, then dial 1 to retrieve your mail.
The System Administrator also specifies the reception number, to which the call is diverted if the caller
dials 0, and your email address if your voicemail and email are integrated.
5602/4602 Phone User Guide Page 12
IP Office Issue 2b (20th July 2005)
Page 13

System Features
Default Feature Codes
The following are the normal default feature codes available to all users. Your System Administrator may
add additional codes for other features and for speed dials.
The N where shown, should be replaced by the appropriate number. For example, with *07*N#, replace
N with the extension to which you want your calls forwarded when you have forwarding switched on.
*00 Cancel All Forwarding *32*N# Call Pick Up Extension
*01 Forward Unconditionally On *33*N# Call Queue
*02 Forward Unconditionally Off *34 Hold Music
*03 Forward on Busy On *35*N# Extn Login
*04 Forward on Busy Off *36*N# Extn Logout
*05 Forward on No Answer On *37*N# Park Call
*06 Forward on No Answer Off *38*N# Ride Call
*07*N# Forward to number *39 Relay On
*08 Do Not Disturb On *40 Relay Off
*09 Do Not Disturb Off *41 Relay Pulse
*10*N# Do Not Disturb Exception Add *42 Relay On
*11*N# Do Not Disturb Exception Delete *43 Relay Off
*12*N# Follow Me Here *44 Relay Pulse
*13*N# Follow Me Here Cancel *45*N# Call Steal
*14*N# Follow Me To *46 Call Steal
*15 Call Waiting On *47 Conference Add
*16 Call Waiting Off *48 Voicemail Ringback On
*17 Voicemail Collect *49 Voicemail Ringback Off
*18 Voicemail On *50 Forward Hunt Group Calls On
*19 Voicemail Off *51 Forward Hunt Group Calls Off
*20*N# Set Hunt Group Night Service *52 Clear Call
*21*N# Clear Hunt Group Night Service *53*N# Call Pickup Members
*29 Toggle Calls *57*N# Forward on busy number
*30 Call Pick Up Any *70*N# Dial Physical Extn by Number
*31 Call Pick Up Group *71*N# Dial Physical Extn by ID
5602/4602 Phone User Guide Page 13
IP Office Issue 2b (20th July 2005)
Page 14

Page 15

Index
0
07*N 13
1
10*N 12, 13
11*N 12, 13
12*N 12, 13
13*N 12, 13
14*N 12, 13
2
20*N 13
201
forwarding 11
21*N 13
3
32*N 13
33*N 13
35*N 13
36*N 13
37*N 13
38*N 13
4
45*N 13
5
53*N 13
57*N 13
7
70*N 13
71*N 13
A
Access
speakerphone 3
Access 3
Answer
Call 6, 11
Answer 6, 11
Answer/make 4
AutoHold 8
Avaya 3
Avaya 5602 3
Avaya IP Office 3
B
Bridged Appearance
4
Busy Off 13
Busy On 13
C
Call Appearance 4
Call Appearance
button
pressing 8
Call Appearance
button 8
Call Appearance Key
Icons 4
Call Appearance
Keys
replace 4
Call Appearance
Keys 3, 4, 8
Call Coverage
Appearance 4
Call Forwarding 11
Call Handling
Buttons 3
Call Pick Up Any 13
Call Pick Up
Extension 13
Call Pick Up Group
13
Call Pick-Up 11
Call Pickup Members
13
Call Queue 13
Call Steal 13
Call Waiting Off 13
Call Waiting On 13
Call’s Call
Appearance button 8
Calls
Answer 6
Answering 11
Clearing 6
Diverting 12
Incoming 4
Making 6
Calls 4, 6, 11, 12
Cancel All
Forwarding 13
CAUTIONS 4
Centre mode’ 6
Clear Call 13
Clear Hunt Group
Night Service 13
Clearing
Call 6
Clearing 6
Conference 9, 10
Conference Add 13
D
Default Feature
Codes 13
Dial Physical Extn 13
Diverting
Calls 12
Diverting 12
Do Not Disturb 12
Drop 6, 9
E
Email 12
Extn Login 13
Extn Logout 13
F
Follow Me Here 13
Follow Me Here
Cancel 13
Follow Me To 13
Forward Hunt Group
Calls Off 13
Forward Hunt Group
Calls On 13
Forward
Unconditionally Off
13
Forward
Unconditionally On
13
Forwarding
201 11
Forwarding 11
H
Handset Socket 3
Handset/headset 7
Headset Working 7
Hold
Pressing 4
Hold 4, 6, 8, 9
Hold Music 13
Hunt Group 11
I
ID 13
Incoming
Call 4
Incoming 4
Introduction 11
IP Office 3, 12
L
Line Appearance 4
M
Making
Call 6
Making 6
Message 10
Mute 7
N
No Answer Off 13
No Answer On 13
Not Disturb 12
Not Disturb
Exception Add 13
Not Disturb
Exception Delete 13
Not Disturb Off 13
Not Disturb On 13
Number 13
O
On/off 3, 7
Overview 3
P
Park Call 13
PIN 12
Press Conference 10
Press Drop 6, 7
Press Hold 8
Press Mute 7
Press Redial 6, 7
Pressing
Call Appearance
button 8
Hold 4
Redial 7
Speaker 6
Pressing 4, 6, 7, 8
R
Redial
pressing 7
Redial 3, 7
Redials 7
Relay Off 13
Relay On 13
Relay Pulse 13
Repeat Steps 10
Replace
Call Appearance
Keys 4
Replace 4
Ride Call 13
S
Set Hunt Group
Night Service 13
Speaker
pressing 6
Speaker 6, 7
Speaker button 7
Speakerphone
Access 3
Speakerphone 3
Standard 12-button 3
System
Administrator 3, 4, 8,
11, 12, 13
System Features 4
T
Toggle Calls 13
Transfer 9
V
Voicemail 3, 11, 12
Voicemail Collect 13
Voicemail Lite 12
Voicemail Off 13
Voicemail On 13
Voicemail Pro 12
Voicemail Ringback
12
Voicemail Ringback
Off 13
Voicemail Ringback
On 13
Volume Controls 3
5602/4602 Phone User Guide Page 15
IP Office Issue 2b (20th July 2005)
Page 16

Page 17

5602/4602 Phone User Guide Page 17
IP Office Issue 2b (20th July 2005)
Page 18

Performance figures and data quoted in this document are typical, and must be specifically
confirmed in writing by Avaya before they become applicable to any particular order or contract.
The company reserves the right to make alterations or amendments to the detailed
specifications at its discretion. The publication of information in this document does not imply
freedom from patent or other protective rights of Avaya or others.
Intellectual property related to this product (including trademarks) and registered to Lucent
Technologies have been transferred or licensed to Avaya.
All trademarks identified by the ® or ™ are registered trademarks or trademarks, respectively,
of Avaya Inc. All other trademarks are the property of their respective owners.
This document contains proprietary information of Avaya and is not to be disclosed or used
except in accordance with applicable agreements.
Any comments or suggestions regarding this document should be sent to
"wgctechpubs@avaya.com".
© 2005 Avaya Inc. All rights reserved.
Avaya
Sterling Court
15 - 21 Mundells
Welwyn Garden City
Hertfordshire
AL7 1LZ
England
Tel: +44 (0) 1707 392200
Fax: +44 (0) 1707 376933
Web: http://www.avaya.com
5602/4602 Phone User Guide Page 18
IP Office Issue 2b (20th July 2005)
 Loading...