

Page 1

Avaya 4027, 4070, and
4075 DECT Handsets User
Guide
Avaya Communication Server 1000
Document Status: Standard
Document Version: 02.04
Part Code: NN43120-122
Date: January 2013
Page 2

© 2013 Avaya Inc. All Rights Reserved.
Notice
While reasonable efforts have been made to ensure
that the information in this document is complete and
accurate at the time of printing, Avaya assumes no
liability for any errors. Avaya reserves the right to
make changes and corrections to the information in
this document without the obligation to notify any
person or organization of such changes.
Documentation disclaimer
“Documentation” means information published by
Avaya in varying mediums which may include
product information, operating instructions and
performance specifications that Avaya generally
makes available to users of its products.
Documentation does not include marketing materials.
Avaya shall not be responsible for any modifications,
additions, or deletions to the original published
version of documentation unless such modifications,
additions, or deletions were performed by Avaya.
End User agrees to indemnify and hold harmless
Avaya, Avaya's agents, servants and employees
against all claims,
lawsuits, demands and judgments arising out of, or in
connection with, subsequent modifications, ad ditions
or deletions to this documentation, to the extent
made by End User.
Link disclaimer
Avaya is not responsible for the contents or reliability
of any linked websites referenced within this site or
documentation provided by Avaya. Avaya is not
responsible for the accuracy of any information,
statement or content provided on these sites and
does not necessarily endorse the products, services,
or information described or offered within them.
Avaya does not guarantee that these links will work
all the time and has no control over the availability of
the linked pages.
Warranty
Avaya provides a limited warranty on its hardware
and Software (“Product(s)”). Refer to your sales
agreement to establish the terms of the limited
warranty. In addition, Avaya’s standard warranty
language, as well as information regarding support
for this Product while under warranty is available to
Avaya customers and other parties through the
Avaya Support website:
http://support.avaya.com
Please note that if you acquired the Product(s) from
an authorized Avaya reseller outside of the United
States and Canada, the warranty is provided to you
by said Avaya reseller and not by Avaya. “Software”
means computer programs in object code, provided
by Avaya or an Avaya Channel Partner, whether as
stand-alone products or pre-installed on hardware
products, and any upgrades, updates, bug fixes, or
modified versions thereto.
Licenses
THE SOFTWARE LICENSE TERMS AV AILABLE ON
THE AVAYA WEB SITE, HTTP://
SUPPORT.AVAYA.COM/LICENSEINFO ARE
APPLICABLE TO ANYONE WHO DOWNLOADS,
USES AND/OR INSTALLS AVAYA SOFTWARE,
PURCHASED FROM AVAYA INC., ANY AVAYA
AFFILIATE, OR AN AUTHORIZED AVAYA
RESELLER (AS APPLICABLE) UNDER A
COMMERCIAL AGREEMENT WITH AVAYA OR AN
AUTHORIZED AVAYA RESELLER. UNLESS
OTHERWISE AGREED TO BY AVAYA IN WRITING,
AVAYA DOES NOT EXTEND THIS LICENSE IF THE
SOFTWARE WAS OBTAINED FROM ANYONE
OTHER THAN AVAYA, AN AVAYA AFFILIATE OR AN
AVAYA AUTHORIZED RESELLER; AVAYA
RESERVES THE RIGHT TO TAKE LEGAL ACTION
AGAINST YOU AND ANYONE ELSE USING OR
SELLING THE SOFTWARE WITHOUT A LICENSE.
BY INSTALLING, DOWNLOADING OR USING THE
SOFTWARE, OR AUTHORIZING OTHERS TO DO
SO, YOU, ON BEHALF OF YOURSELF AND THE
ENTITY FOR WHOM YOU ARE INSTALLING,
DOWNLOADING OR USING THE SOFTWARE
(HEREINAFTER REFERRED TO
INTERCHANGEABLY AS “YOU” AND “END USER”),
AGREE TO THESE TERMS AND CONDITIONS
AND CREATE A BINDING CONTRACT BETWEEN
YOU AND AVAYA INC. OR THE APPLICABLE
AVAYA AFFILI ATE ( “AVAYA”).
Heritage Nortel Software
“Heritage Nortel Software” means the software that
was acquired by Avaya as part of its purchase of the
Nortel Enterprise Solutions Business in December
2009. The Heritage Nortel Software currently
available for license from Avaya is the software
contained within the list of Heritage Nortel Produ cts
located at http://support.avaya.com/licenseinfo
the link “Heritage Nortel Products”. For Heritage
Nortel Software, Avaya grants Cust omer a license to
use Heritage Nortel Software provided hereunder
solely to the extent of the authorized activation or
authorized usage level, solely for the purpose
specified in the Documentation, and solely as
embedded in, for execution on, or (in the event the
applicable Documentation permits installa tion on
non-Avaya equipment) for communication with A vaya
equipment. Charges for Heritage Nortel Software
may be based on extent of activation or use
authorized as specified in an order or invoice.
Copyright
Except where expressly stated othe r w is e , no use
should be made of materials on this site, the
Documentation, Software, or hardware provided by
Avaya. All content on this site, the documentation
and the Product provided by Avaya including the
selection, arrangement and design of the content is
owned either by Avaya or its licensors and is
protected by copyright and other intellectual property
laws including the sui generis rights relating to the
protection of databases. You may not modify, copy,
reproduce, republish, upload, post, transmit or
under
Page 3

distribute in any way any content, in whole or in part,
including any code and software unless expressly
authorized by Avaya. Unauthorized reproduction,
transmission, dissemination, storage, and or use
without the express written consent of Avaya can be
a criminal, as well as a civil offense under the
applicable law.
Third-party components
“Third Party Components” mean certain software
programs or portions thereof included in the Software
that may contain software (including open source
software) distributed under third party agreements
(“Third Party Components”), which contain terms
regarding the rights to use certain portions of the
Software (“Third Party Terms”). Information regarding
distributed Linux OS source code (for tho se Product s
that have distributed Linux OS source code) and
identifying the copyright holders of the Third Party
Components and the Third Party Terms that apply is
available in the Documentation or on A vaya’s website
at: http://support.avaya.com/Copyright
the Third Party Terms for any such Third Party
Components.
Note to Service Provid e r
The Product may use Third Party Components that
have Third Party Terms that do not allow hosting and
may need to be independently licensed for such
purpose.
Preventing Toll Fraud
“Toll Fraud” is the unauthorized use of your
telecommunications system by an unauthorized party
(for example, a person who is not a corporate
employee, agent, subcontractor, or is not working on
your company's behalf). Be aware that there can be a
risk of T oll Fraud associated with your system and
that, if Toll Fraud occurs, it can result in substantial
additional charges for your telecommunications
services.
Avaya Toll Fraud intervention
If you suspect that you are being victimized by Toll
Fraud and you need technical assistance or support,
call Technical Service Center Toll Fraud Intervention
Hotline at +1-800-643-2353 for the United States and
Canada. For additional support telephone numbers,
see the Avaya Support website: http://
support.avaya.com.Suspected security vulnerabilities
with Avaya products should be reported to Avaya by
sending mail to: securityalerts@avaya.com.
Trademarks
The trademarks, logos and service marks (“Marks”)
displayed in this site, the Documentation and
Product(s) provided by Avaya are the registered or
unregistered Marks of Avaya, its affiliates, or other
third parties. Users are not permitted to use such
Marks without prior written consent from Avaya or
such third party which may own the Mark. Nothing
contained in this site, the Documentation and
Product(s) should be construed as granting, by
implication, estoppel, or otherwise, any license or
. You agree to
right in and to the Marks without the express written
permission of Avaya or the applicable third party.
Avaya is a registered trademark of Avaya Inc.
All non-Avaya trademarks are the property of their
respective owners, and “Linux” is a registered
trademark of Linus Torvalds.
Downloading documents
For the most current versions of documentation, see
the Avaya Support website:
http://support.avaya.com
Contact Avaya Support
See the Avaya Support website: http://
support.avaya.com for product notices and articles,
or to report a problem with your Avaya product.
For a list of support telephone numbers and contact
addresses, go to the Avaya Support website: http://
support.avaya.com, scroll to the bottom of the page,
and select Contact Avaya Support.
Page 4

Revision history
January 2012
Stan dard 02.0 4. This documen t is up-issu ed to reflect updates to
battery pack information.
April 2011
Stan da rd 02.03 . This d ocument is up -issue d to includ e details on
answering a second incoming call and to support th e ne w
handset software Release 3.xx
March 2011
Standard 02.02. This document is up-issued to support DECT
Release 5.0 and Communication Server 1000 Release 7.5.
November 2010
Standard 02.01. This document is up-issued to support DECT
Release 5.0 and Communication Server 1000 Release 7.5..
June 2010
Standard 01.11. This document is up-issued to support Avaya
Communication Server 1000 Release 7.0.
May 2009
Stan dard 01.10. This document is up-i ssued to support the DECT
4027, 4070, and 4075 Handsets. Minor corrections.
April 2009
Stan dard 01.09. This document is up-i ssued to support the DECT
4027, 4070, and 4075 Handsets.
April 2008
Standard 01.08. This document is issued to support the DECT
4027 and 4070 Handsets and to reflect editorial changes.
4
Page 5

March 2008
Standard 01.07. This document is issued to support the DECT
4027 and 4070 Handsets and to reflect editorial changes.
March 2008
Standard 01.06. This document is issued to support the DECT
4027 and 4070 Handsets and to reflect editorial changes.
March 2008
Standard 01.05. This document is issued to support the DECT
4027 and 4070 Handsets and to reflect editorial changes.
February 2008
Standard 01.04. This document is issued to support the DECT
4027 and 4070 Handsets and to reflect editorial changes.
February 2008
Standard 01.03. This document is issued to support the DECT
4027 and 4070 Handsets and to reflect change to the technical
content.
February 2008
Standard 01.02. This document is issued to support the DECT
4027 and 4070 Handsets and to reflect change to the technical
content and editorial changes.
January 2008
Standard 01.01. This document is issued to support the DECT
4027 and 4070 Handsets.
5
Page 6

Contents
Welcome to Avaya 4027, 4070, 4075 DECT Handsets . . . . 14
Feature overview . . . . . . . . . . . . . . . . . . . . . . . . . . . . . . . . . . 14
Regulatory and safety information . . . . . . . . . . . . . . . . . . . . . 15
Safety precautions . . . . . . . . . . . . . . . . . . . . . . . . . . . . . . . . . 17
Getting started . . . . . . . . . . . . . . . . . . . . . . . . . . . . . . . . . . . 19
Installing the MEM card and Bluetooth wireless module . . . . 19
Installing the battery pack (4027 and 4070 only) . . . . . . . . . . 19
Installing the charger . . . . . . . . . . . . . . . . . . . . . . . . . . . . . . . 21
Charging the batteries . . . . . . . . . . . . . . . . . . . . . . . . . . . . . . 23
Important battery information . . . . . . . . . . . . . . . . . . . . . . 23
Charging guidelines . . . . . . . . . . . . . . . . . . . . . . . . . . . . . 24
Charging and operating times . . . . . . . . . . . . . . . . . . . . . 25
Charge display . . . . . . . . . . . . . . . . . . . . . . . . . . . . . . . . . 27
Switching the handset on or off . . . . . . . . . . . . . . . . . . . . . . . 28
Display areas . . . . . . . . . . . . . . . . . . . . . . . . . . . . . . . . . . . . . 28
Icon line . . . . . . . . . . . . . . . . . . . . . . . . . . . . . . . . . . . . . . 29
Dialogue area . . . . . . . . . . . . . . . . . . . . . . . . . . . . . . . . . . 30
Soft key line . . . . . . . . . . . . . . . . . . . . . . . . . . . . . . . . . . . 35
LED indicator (4075 only) . . . . . . . . . . . . . . . . . . . . . . . . . 35
Handset controls . . . . . . . . . . . . . . . . . . . . . . . . . . . . . . . . . . . 37
Key functions in Idle mode . . . . . . . . . . . . . . . . . . . . . . . . 38
Key functions in Call mode . . . . . . . . . . . . . . . . . . . . . . . . 40
Key functions in Dialogue mode . . . . . . . . . . . . . . . . . . . . 42
Key functions in Menu mode . . . . . . . . . . . . . . . . . . . . . . 42
Key functions in Edit mode . . . . . . . . . . . . . . . . . . . . . . . . 43
Locking or unlocking the dialpad . . . . . . . . . . . . . . . . . . . 47
6
Page 7

DECT system configuration . . . . . . . . . . . . . . . . . . . . . . . . 48
Accessing the Connectivity menu . . . . . . . . . . . . . . . . . . . . . . 48
Subscribing the handset to a DECT system . . . . . . . . . . . . . . 49
Manually selecting the DECT system . . . . . . . . . . . . . . . . . . . 51
Enabling automatic DECT system selection . . . . . . . . . . . . . . 52
Deregistering the handset . . . . . . . . . . . . . . . . . . . . . . . . . . . 53
Editing the system name and phone number . . . . . . . . . . . . . 53
Call features . . . . . . . . . . . . . . . . . . . . . . . . . . . . . . . . . . . . . 55
Make calls . . . . . . . . . . . . . . . . . . . . . . . . . . . . . . . . . . . . . . . . 55
Dialling a number . . . . . . . . . . . . . . . . . . . . . . . . . . . . . . . 56
Predial mode . . . . . . . . . . . . . . . . . . . . . . . . . . . . . . . . . . 56
Using Speed dial . . . . . . . . . . . . . . . . . . . . . . . . . . . . . . . 57
Using Loudspeaker . . . . . . . . . . . . . . . . . . . . . . . . . . . . . 57
Using the telephone book to dial a number . . . . . . . . . . . 58
Using the Central Directory to dial a number . . . . . . . . . . 59
Making an SOS call . . . . . . . . . . . . . . . . . . . . . . . . . . . . . 61
Making an Emergency call . . . . . . . . . . . . . . . . . . . . . . . . 61
Answer calls . . . . . . . . . . . . . . . . . . . . . . . . . . . . . . . . . . . . . . 62
Answering a call in Normal mode . . . . . . . . . . . . . . . . . . . 63
Answering a second incoming call . . . . . . . . . . . . . . . . . . 63
Answering a call using any key . . . . . . . . . . . . . . . . . . . . 64
Auto-answering mode . . . . . . . . . . . . . . . . . . . . . . . . . . . 64
Muting the ringer . . . . . . . . . . . . . . . . . . . . . . . . . . . . . . . 64
Rejecting a call . . . . . . . . . . . . . . . . . . . . . . . . . . . . . . . . . 64
Change settings during a call . . . . . . . . . . . . . . . . . . . . . . . . . 65
Adjusting the headset or loudspeaker volume . . . . . . . . . 65
Using mute during a call . . . . . . . . . . . . . . . . . . . . . . . . . . 66
Transfer calls . . . . . . . . . . . . . . . . . . . . . . . . . . . . . . . . . . . . . 66
Transferring a call . . . . . . . . . . . . . . . . . . . . . . . . . . . . . . 66
Voice mail . . . . . . . . . . . . . . . . . . . . . . . . . . . . . . . . . . . . . . . . 66
Accessing voice mail . . . . . . . . . . . . . . . . . . . . . . . . . . . . 68
7
Page 8

Defining a voice mail number . . . . . . . . . . . . . . . . . . . . . . 69
Calls list . . . . . . . . . . . . . . . . . . . . . . . . . . . . . . . . . . . . . . . . . 71
All calls list . . . . . . . . . . . . . . . . . . . . . . . . . . . . . . . . . . . . . . . 73
Accessing the All calls list . . . . . . . . . . . . . . . . . . . . . . . . 74
Viewing information about a call . . . . . . . . . . . . . . . . . . . 74
Dialling a number . . . . . . . . . . . . . . . . . . . . . . . . . . . . . . . 75
Transferring a number to your Contacts list . . . . . . . . . . . 75
Transferring a number to the caller filter list . . . . . . . . . . . 76
Deleting an entry . . . . . . . . . . . . . . . . . . . . . . . . . . . . . . . 77
Deleting all entries . . . . . . . . . . . . . . . . . . . . . . . . . . . . . . 78
Answered calls list . . . . . . . . . . . . . . . . . . . . . . . . . . . . . . . . . 79
Accessing the Answered calls list . . . . . . . . . . . . . . . . . . 79
Viewing information about an answered call . . . . . . . . . . 79
Dialling a number . . . . . . . . . . . . . . . . . . . . . . . . . . . . . . . 80
Transferring a number to your Contacts list . . . . . . . . . . . 80
Transferring a number to the caller filter list . . . . . . . . . . . 82
Deleting an entry . . . . . . . . . . . . . . . . . . . . . . . . . . . . . . . 83
Deleting all entries . . . . . . . . . . . . . . . . . . . . . . . . . . . . . . 83
Dialled calls list . . . . . . . . . . . . . . . . . . . . . . . . . . . . . . . . . . . . 84
Accessing the Dialled calls list . . . . . . . . . . . . . . . . . . . . . 84
Viewing information about a dialled call . . . . . . . . . . . . . . 85
Dialling a number . . . . . . . . . . . . . . . . . . . . . . . . . . . . . . . 85
Transferring a number to your contacts list . . . . . . . . . . . 86
Transferring a number to the Caller filter list . . . . . . . . . . 87
Deleting an entry . . . . . . . . . . . . . . . . . . . . . . . . . . . . . . . 88
Deleting all entries . . . . . . . . . . . . . . . . . . . . . . . . . . . . . . 89
Missed calls list . . . . . . . . . . . . . . . . . . . . . . . . . . . . . . . . . . . . 89
Accessing the Missed calls list . . . . . . . . . . . . . . . . . . . . . 91
Viewing information about a missed call . . . . . . . . . . . . . 91
Dialling a number . . . . . . . . . . . . . . . . . . . . . . . . . . . . . . . 92
Transferring a number to your Contacts list . . . . . . . . . . . 92
Transferring a number to the Caller filter list . . . . . . . . . . 94
8
Page 9

Deleting an entry . . . . . . . . . . . . . . . . . . . . . . . . . . . . . . . 95
Deleting all entries . . . . . . . . . . . . . . . . . . . . . . . . . . . . . . 95
Contacts . . . . . . . . . . . . . . . . . . . . . . . . . . . . . . . . . . . . . . . . 97
Accessing the Contacts menu . . . . . . . . . . . . . . . . . . . . . 98
Adding a new contact . . . . . . . . . . . . . . . . . . . . . . . . . . . . 98
Adding a contact number . . . . . . . . . . . . . . . . . . . . . . . . . 99
Editing a contact number . . . . . . . . . . . . . . . . . . . . . . . . 100
Deleting a contact number . . . . . . . . . . . . . . . . . . . . . . . 102
Editing a contact name . . . . . . . . . . . . . . . . . . . . . . . . . . 103
Editing a contact ringtone . . . . . . . . . . . . . . . . . . . . . . . . 104
Deleting a contact . . . . . . . . . . . . . . . . . . . . . . . . . . . . . 105
Speed dial feature . . . . . . . . . . . . . . . . . . . . . . . . . . . . . 105
Transfer numbers to your contacts list . . . . . . . . . . . . . . 108
Messaging . . . . . . . . . . . . . . . . . . . . . . . . . . . . . . . . . . . . . . 110
Message limitations . . . . . . . . . . . . . . . . . . . . . . . . . . . . . . . 111
New messages and drafts . . . . . . . . . . . . . . . . . . . . . . . . . . 111
Accessing the Messaging menu . . . . . . . . . . . . . . . . . . 111
Saving a new message or editing a draft . . . . . . . . . . . . 112
Sending a message . . . . . . . . . . . . . . . . . . . . . . . . . . . . 113
Deleting a draft message . . . . . . . . . . . . . . . . . . . . . . . . 115
Deleting all draft messages . . . . . . . . . . . . . . . . . . . . . . 116
Inbox . . . . . . . . . . . . . . . . . . . . . . . . . . . . . . . . . . . . . . . . . . . 117
Accessing the Messaging Inbox . . . . . . . . . . . . . . . . . . . 117
Reading a message . . . . . . . . . . . . . . . . . . . . . . . . . . . . 118
Replying to a message . . . . . . . . . . . . . . . . . . . . . . . . . . 118
Forwarding a message . . . . . . . . . . . . . . . . . . . . . . . . . . 119
Saving a number to the contacts list . . . . . . . . . . . . . . . 121
Deleting a message . . . . . . . . . . . . . . . . . . . . . . . . . . . . 121
Deleting all messages from the Inbox . . . . . . . . . . . . . . 122
Sent messages . . . . . . . . . . . . . . . . . . . . . . . . . . . . . . . . . . . 124
Accessing the Sent Messages menu . . . . . . . . . . . . . . . 124
9
Page 10

Reading a sent message . . . . . . . . . . . . . . . . . . . . . . . . 124
Forwarding a sent message . . . . . . . . . . . . . . . . . . . . . . 125
Deleting a sent message . . . . . . . . . . . . . . . . . . . . . . . . 126
Deleting all sent messages . . . . . . . . . . . . . . . . . . . . . . 127
Message settings . . . . . . . . . . . . . . . . . . . . . . . . . . . . . . . . . 128
Accessing the message Settings menu . . . . . . . . . . . . . 128
Configuring the Overwrite option . . . . . . . . . . . . . . . . . . 128
Managing sent messages . . . . . . . . . . . . . . . . . . . . . . . 130
Configuring Message display setting . . . . . . . . . . . . . . . 130
Configuring Automatic Answer setting . . . . . . . . . . . . . . 131
Configuring Silent Answer setting . . . . . . . . . . . . . . . . . 132
Normal and urgent messages . . . . . . . . . . . . . . . . . . . . . . . 133
Confirming urgent messages . . . . . . . . . . . . . . . . . . . . . 134
Message list full . . . . . . . . . . . . . . . . . . . . . . . . . . . . . . . . . . 135
Calendar . . . . . . . . . . . . . . . . . . . . . . . . . . . . . . . . . . . . . . . 136
Accessing the Calendar . . . . . . . . . . . . . . . . . . . . . . . . . 137
Changing the calendar format . . . . . . . . . . . . . . . . . . . . 137
Selecting a date . . . . . . . . . . . . . . . . . . . . . . . . . . . . . . . 138
Adding an appointment . . . . . . . . . . . . . . . . . . . . . . . . . 139
Viewing an appointment . . . . . . . . . . . . . . . . . . . . . . . . . 140
Editing an appointment . . . . . . . . . . . . . . . . . . . . . . . . . 141
Copying an appointment . . . . . . . . . . . . . . . . . . . . . . . . 143
Deleting an appointment . . . . . . . . . . . . . . . . . . . . . . . . 144
Calculator, Stopwatch, and Alarms . . . . . . . . . . . . . . . . . 146
Using the Calculator . . . . . . . . . . . . . . . . . . . . . . . . . . . . . . . 146
Using the Stopwatch . . . . . . . . . . . . . . . . . . . . . . . . . . . . . . . 148
Alarms . . . . . . . . . . . . . . . . . . . . . . . . . . . . . . . . . . . . . . . . . 150
Nonrecurrent alarms . . . . . . . . . . . . . . . . . . . . . . . . . . . 150
Recurrent alarms . . . . . . . . . . . . . . . . . . . . . . . . . . . . . . 153
10
Page 11

Telephone settings . . . . . . . . . . . . . . . . . . . . . . . . . . . . . . . 158
General settings . . . . . . . . . . . . . . . . . . . . . . . . . . . . . . . . . . 158
Accessing the General settings menu . . . . . . . . . . . . . . 159
Profile configuration . . . . . . . . . . . . . . . . . . . . . . . . . . . . 159
Configuring the time and date . . . . . . . . . . . . . . . . . . . . 163
Choosing a language . . . . . . . . . . . . . . . . . . . . . . . . . . . 165
Configuring shortcuts . . . . . . . . . . . . . . . . . . . . . . . . . . . 166
Configuring the LED Indicator (4075 only) . . . . . . . . . . . 167
Security options . . . . . . . . . . . . . . . . . . . . . . . . . . . . . . . 168
Defining the handset name . . . . . . . . . . . . . . . . . . . . . . 173
Resetting the handset . . . . . . . . . . . . . . . . . . . . . . . . . . 174
Resetting the MEM card . . . . . . . . . . . . . . . . . . . . . . . . . 175
Viewing information . . . . . . . . . . . . . . . . . . . . . . . . . . . . 176
Audio settings . . . . . . . . . . . . . . . . . . . . . . . . . . . . . . . . . . . . 176
Accessing the Sounds and alerts menu . . . . . . . . . . . . . 177
Configuring the ring volume . . . . . . . . . . . . . . . . . . . . . . 178
Defining the ring external melody . . . . . . . . . . . . . . . . . . 178
Defining the ring internal melody . . . . . . . . . . . . . . . . . . 179
Defining the Ring unknown call melody . . . . . . . . . . . . . 180
Defining the Normal message melody . . . . . . . . . . . . . . 180
Defining the Urgent message melody . . . . . . . . . . . . . . 181
Defining the Ring emergency melody . . . . . . . . . . . . . . 182
Enabling the Increasing ring feature . . . . . . . . . . . . . . . 182
Configuring Alert volume . . . . . . . . . . . . . . . . . . . . . . . . 183
Defining the Alert tone melody . . . . . . . . . . . . . . . . . . . . 184
Enabling Increasing alert . . . . . . . . . . . . . . . . . . . . . . . . 184
Enabling the Vibrator . . . . . . . . . . . . . . . . . . . . . . . . . . . 185
Enabling the Key sound . . . . . . . . . . . . . . . . . . . . . . . . . 186
Enabling Confirmation sound . . . . . . . . . . . . . . . . . . . . . 187
Enabling the Coverage warning . . . . . . . . . . . . . . . . . . . 188
Enabling the Charger warning . . . . . . . . . . . . . . . . . . . . 189
Configuring Missed call time . . . . . . . . . . . . . . . . . . . . . 190
Configuring Cadence Mode . . . . . . . . . . . . . . . . . . . . . . 190
11
Page 12

Display settings . . . . . . . . . . . . . . . . . . . . . . . . . . . . . . . . . . 192
Accessing the Display settings menu . . . . . . . . . . . . . . . 192
Wallpaper customisation . . . . . . . . . . . . . . . . . . . . . . . . 193
Selecting a theme . . . . . . . . . . . . . . . . . . . . . . . . . . . . . 195
Startup customisation . . . . . . . . . . . . . . . . . . . . . . . . . . . 196
Configuring Power save . . . . . . . . . . . . . . . . . . . . . . . . . 198
Call settings . . . . . . . . . . . . . . . . . . . . . . . . . . . . . . . . . . . . . 199
Accessing the call settings menu . . . . . . . . . . . . . . . . . . 200
Accessing call and message statistics . . . . . . . . . . . . . . 200
Answer mode configuration . . . . . . . . . . . . . . . . . . . . . . 201
Caller filter configuration . . . . . . . . . . . . . . . . . . . . . . . . 203
Emergency call configuration . . . . . . . . . . . . . . . . . . . . . 210
Mandown configuration (4075 only) . . . . . . . . . . . . . . . . 212
Activating the Silent charging feature . . . . . . . . . . . . . . . 219
Connectivity settings . . . . . . . . . . . . . . . . . . . . . . . . . . . . . . . 220
Accessing additional features
using FFC or SPRE codes . . . . . . . . . . . . . . . . . . . . . . . . . 222
Handset accessories . . . . . . . . . . . . . . . . . . . . . . . . . . . . . 224
Available accessories . . . . . . . . . . . . . . . . . . . . . . . . . . . . . . 224
Belt clip . . . . . . . . . . . . . . . . . . . . . . . . . . . . . . . . . . . . . . . . . 226
Installing the headset . . . . . . . . . . . . . . . . . . . . . . . . . . . . . . 230
Removing and installing the battery pack (4075 only) . . . . . 230
Charging the battery pack (4075 only) . . . . . . . . . . . . . . . . . 232
MEM card installation and removal . . . . . . . . . . . . . . . . . . . 234
Bluetooth wireless technology module installation . . . . . . . . 237
Bluetooth wireless technology headset installation . . . . . . . 241
Terms you should know . . . . . . . . . . . . . . . . . . . . . . . . . . 248
Index . . . . . . . . . . . . . . . . . . . . . . . . . . . . . . . . . . . . . . . . . . 250
12
Page 13

13
Page 14

Welcome to Avaya 4027, 4070, 4075 DECT Handsets
Welcome to Avaya 4027, 4070,
4075 DECT Handsets
Avaya Digital Enhanced Cordless Telecommunications (DECT) 4027,
4070, and 4075 DECT Handsets are cordless phones with enhanced
features suitable for office use. The handsets include a single-press SOS
key used to make one-touch calls or send messages to a particular
contact number.
The Avaya 4070 and 4075 DECT Handset offer a text-messaging facility
to send and receive messages. The messaging feature is not available on
the 4027 DECT Handset. The 4075 DECT Handset offers all of the
features of the 4070 DECT Handset, as well as Mandown and an LED
Indicator. The 4075 DECT Handset also offers IP54 protection a nd has a
changeable battery that uses inductive charging technology.
Avaya 4027, 4070, 4075 DECT Handsets are compatible both with
traditional DECT system (based on DMC cards) and with the SIP DECT
solution.
Note: This User Guide is applicable to handset software release 2.00
or later. On Avaya 4027 and 4070 DECT Handsets with an earlier
software version, some of the described features are not available.
To determine the software release installed on your handset, see
“Viewing information” (page 176).
Basic information about your handset is described in the following
sections:
• “Feature overview” (page 14)
• “Regulatory and safety information” (page 15)
• “Safety precautions” (page 17)
Feature overview
You can use your Avaya 4027, 4070, 4075 DECT Handsets to perform
the following tasks:
14
Page 15
Welcome to Avaya 4027, 4070, 4075 DECT Handsets
• send and receive messages (4070 and 4075 DECT Handsets only)
• configure audio and display settings
• create daily and recurrent alarms
• use the calculator and stopwatch
If you use your handset with Avaya SIP DECT, the following additional
features are available:
• automatic update of the time and date settings when switching on the
handset
• send and receive messages without DECT Messenger (4070 and
4075 only)
• individual ring melodies to distinguish between internal and external
calls
• central directory
Regulatory and safety information
Read the following information before you use your Avaya 4027, 4070,
and 4075 DECT Handset.
CAUTION
Like all cordless telephones, this handset uses radio
signals, which do not guarantee a connection under all
circumstances. Do not rely exclusively on cordless
telephones when making indispensable calls (such as
medical emergencies).
This device complies with the essential requirements and other relevant
provisions of the R&TTE Directive 1999/5/EC, the Restriction of
Hazardous Substances (RoHS) 2002/95/EC, and the WEEE Directive
2002/95/EC.
15
Page 16
Welcome to Avaya 4027, 4070, 4075 DECT Handsets
You can obtain a copy of the Declaration of Conformity from Avaya using
the following Web page:
http://www.avaya.com/support
Avaya 4027 Wireless DECT Handset PTC 207/08/079
Avaya 4070 Wireless DECT Handset PTC 207/08/080
Avaya 4075 Wireless DECT Handset PTC 207/10/005
PTC Notice for New Zealand
The grant of a Telepermit for any item of terminal equipment indicates
only that Telecom has accepted that the item complies with minimum
conditions for connection to its network. It indicates no endorsement of
the product by Telecom, nor does it provide any sort of warranty. Above
all, it provides no assurance that any item will work correctly in all
respects with another item of Telepermitted equipment of a different make
or model, nor does it imply that any product is compatible with all of
Telecom's network services.
16
Page 17
Welcome to Avaya 4027, 4070, 4075 DECT Handsets
Avaya 4027 and 4070 DECT Handsets comply with IP50, Avaya 4075
DECT Handset complies with IP54, according to IEC 60 529. Use only in
countries where authorized.
Declaration of Conformity
Hereby, Avaya declares that the Avay a 4027,
4070, 4075 DECT Handsets are in
compliance with the essential requirements
and other relevant provisions of Directive
1999/5/EC.
This equipment complies with EMC requirements of Class B.
Safety precautions
Observe the following safety precautions before you use your handset.
CAUTION
Modifications to this equipment not approved by Avaya
can make this equipment noncompliant with the applied
requirements.
17
Avaya recommends that you use only compatible
headsets.
Page 18
Welcome to Avaya 4027, 4070, 4075 DECT Handsets
WARNING
Do not open the handset when it is switched on or
connected to the charger; doing so can expose you to
high voltage. Only authorised service personnel must
perform repairs.
Do not dispose of defective or used batteries in
municipal waste. Return old batteries to the battery
supplier, a licensed dealer, or a designated collection
facility. Do not destroy batteries.
Do not remove, install, or charge batteries in hazardous
environments (such as explosive environments),
hospitals or vehicles.
If your interior handset becomes wet, do not use a blow
dryer or oven to dry it. Switch off the handset, remove
the battery, shake out excess liquid from the handset,
and let it dry for 72 hours at room temperature.
CAUTION
The handset product contains a magnet. Do not allow
metallic objects to come in contact with the magnet,
because that can deteriorate audio quality and damage
the handset. Do not allow the charger and the b attery to
come into contact with conductive objects, such as keys,
paper clips, rings, or bracelets.
Keep the handset at least 10 centimeters away from
other electronic equipment.
WARNING
Keep the charger, handset, and accessories out of
reach of small children.
18
Page 19

Getting started
Getting started
This section describes the tasks you must complete before you use your
handset.
Use the following information to prepare your handset for use, and to
familiarize yourself with the operation of the handset:
• “Installing the MEM card and Bluetooth wireless module” (page 19)
• “Installing the battery pack (4027 and 4070 only)” (page 19)
• “Installing the charger” (page 21)
• “Charging the batteries” (page 23)
• “Charge display” (page 27)
• “Switching the handset on or off” (page 28)
• “Display areas” (page 28)
• “Handset controls” (page 37)
Installing the MEM card and Bluetooth wireless module
If your handset is supplied with a MEM card or Bluetooth® wireless
technology module, see the following sections:
• “MEM card installation and removal” (page 234)
• “Bluetooth wireless technology module installation” (page 237)
Installing the battery pack (4027 and 4070 only)
You must install the battery pack before you can use your handset. The
battery compartment is on the back of the handset as shown in Figure 1.
19
Page 20
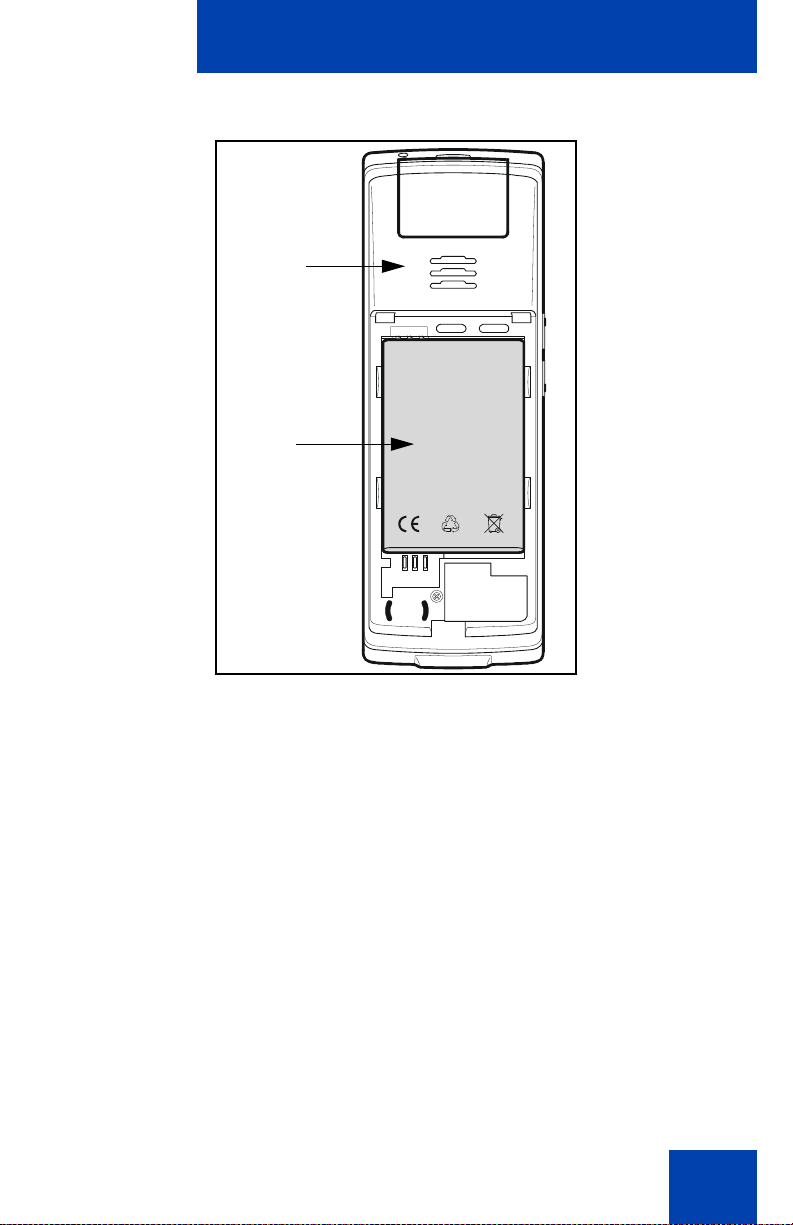
Figure 1: Battery pack
Battery
Handset
pack
Getting started
BATTERY PACK
To install a battery pack in your handset, perf or m the fo llow ing step s:
1. Place the handset face down on a flat surface.
2. Remove the battery compartment cover.
3. Push the battery pack into the casing as shown in Figure 2.
4. Press the battery pack down until it locks.
5. Replace the battery cover.
20
Page 21
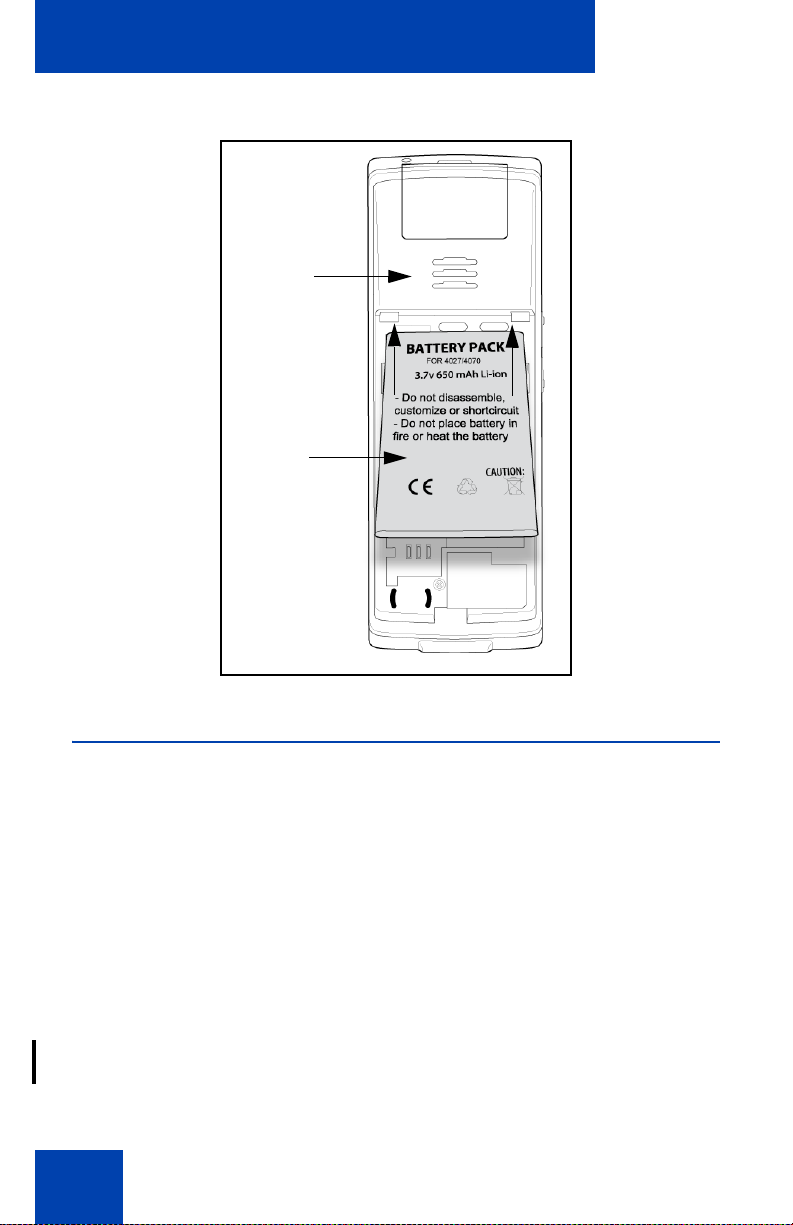
Getting started
Handset
Battery
pack
Figure 2: Installing the battery pack
Installing the charger
To install the charger, perform the following steps:
1. Place the charger on a flat surface.
2. Connect the AC adapter cable to the terminal on the bottom of the
charger.
3. Connect the adapter to an electrical outlet.
4. Place the handset on the charger as shown in Figure 3.
Note: (4075 only) The Avaya 4075 DECT Handset ch arger has a slot
that you can use to charge a battery pack without having the ba ttery
pack installed in the phone. See “Charging the battery pack (4075
only)” (page 232) for more details.
21
Page 22
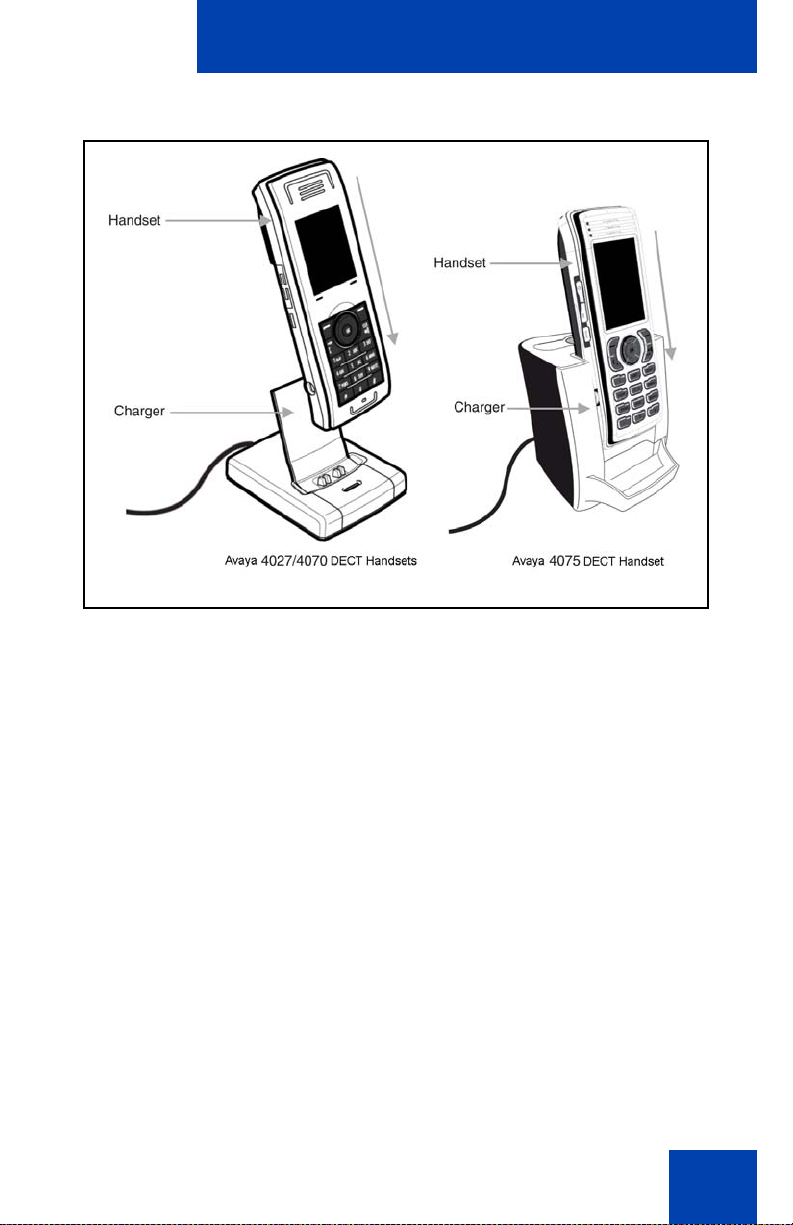
Figure 3: Installing the charger
Getting started
22
Page 23
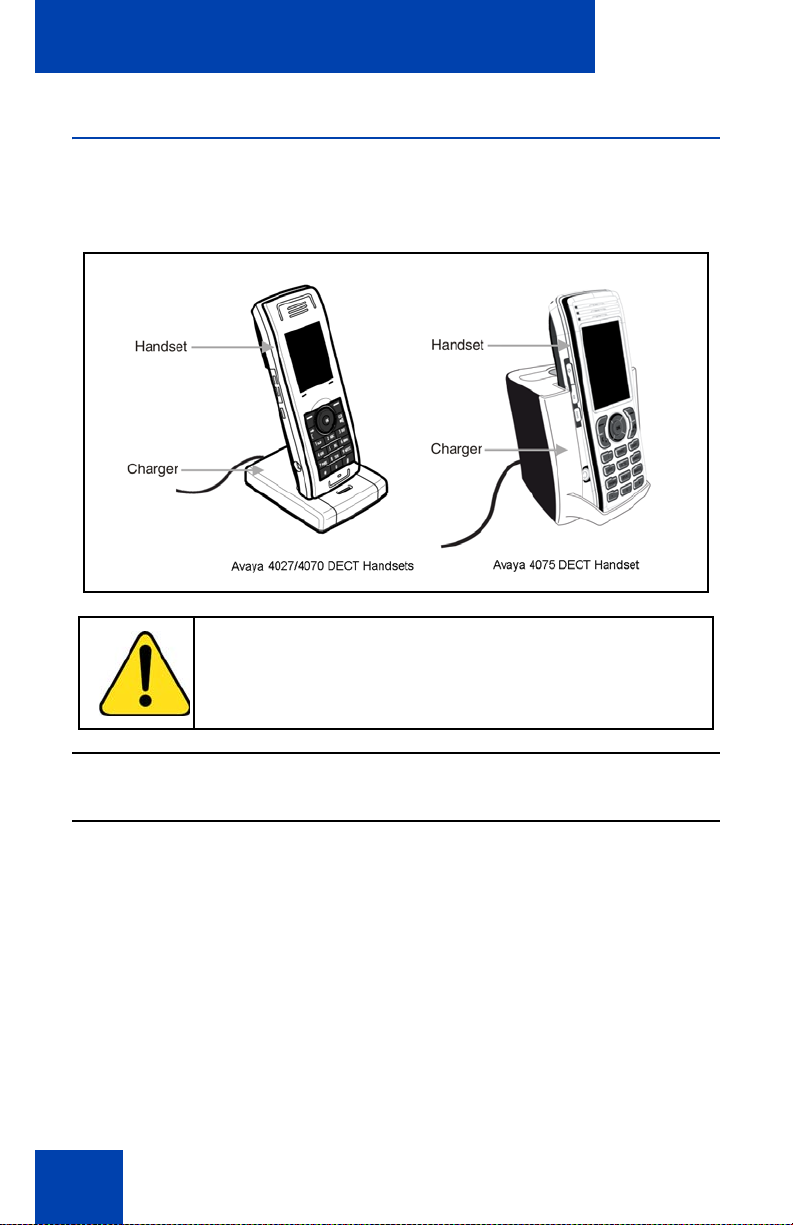
Getting started
Charging the batteries
Place the handset in the charger as shown in the following figure.
Figure 4: Handset installed on charger
CAUTION
The batteries become hot during the charge cycle.
Attention: The handset, if switched off, automatically switches on
when placed in the charger.
Important battery information
Battery pack life varies, depending on handset model and features and
system infrastructure.
Maximum battery pack performance is achieved after a few charge/
discharge cycles.
If multiple battery packs are supplied with your handset, Avaya
recommends that each be fully charged upon receipt to prolong battery
life. Battery packs slowly lose their charge if they are unused. To maintain
23
Page 24

Getting started
battery potential, charge unused battery packs occasionally or alternate
Battery Pack use.
After a length of time, battery packs lose the ability to maintain a charge
and perform at maximum capacity, and need to be replaced. This is
normal for all batteries. The recommended battery replacement interval is
every 12-13 months with normal usage.
Any battery which exhibits swelling, cracking, or other abnormality should
be disposed of promptly and properly.
If your battery pack requires replacement, contact your system
administrator.
Use the battery pack only as directed. Heat or cold reduces the
performance and service life of the batteries. Handsets with hot or cold
batteries can become temporarily out-of-service, even if the batteries are
fully charged. Charge the batteries only using the DECT Handset charger
supplied with the handset.
Attention: Use a CPC N0162957 charger if you have an Avaya 4027
or 4070 DECT Handset, and a CPC N0206072 charger if
you have an Avaya 4075 DECT Handset.
Charging guidelines
Observe the following when you charge your handset:
• Overnight charging is best done while the handset is turned off.
• If the handset does not charge, clean battery pa ck , cha rg er , an d
handset contacts with an alcohol swab.
• When the handset is properly seated, the backlight comes on briefly
and the handset beeps to indicate that charging has begun.
• Charge the battery for at least 6 hours before you use the handset for
the first time. This protective measure extends the service life of the
batteries.
Note: The batteries attain maximum power output only after several
charging and discharging cycles.
24
Page 25
Getting started
• Do not leave the handset inserted into the charger for more than 30
days without using it.
• You can charge and discharge the batteries hundreds of times, but
eventually they wear out. If the operating time (talk and standby time)
becomes significantly shorter than usual, replace the batteries.
• To maintain optimum operating time, periodically discharge th e
batteries by leaving the handset off the charg er and switched on, until
the handset switches itself off. Use only this method to discharge the
batteries. If you want to accelerate the discharge of the battery, you
can enable the display. For more information about configuring power
save, see “Configuring Power save” (page 198).
Note: Extreme temperatures influence the charging capability of the
batteries.
Charging and operating times
Discharged batteries require 6 hours to completely recharge. Completely
charged batteries provide the handset with approximately 8 hours of talk
time and 100 hours of standby time.
WARNING
Use only the batteries that Avaya provides or
authorises.
25
Charge the batteries only using the supplied charger.
Do not replace the batteries in potentially explosive
environments, such as rooms where flammable liquids
or gasses are present.
Do not dispose of batteries in a fire. Recycle or dispose
of batteries in accordance with local regulat ion s.
Page 26
Getting started
WARNING
You must charge your handset before you reset the
handset time and date. Every time you remove the
battery pack or switch the handset off it loses the time
and date information; you must manually reset it after
you reinstall the battery pack or switch the handset off
and on.
If your system provides the date and time information to
DECT Handsets, the date and time settings update
automatically when you switch on the handset. Contact
your system administrator to determine if you can use
this feature.
Attention: Your handset displays the battery status accurately after
charging for at least 6 hours.
Attention: You must have a mains connection to operate the charger.
CAUTION
Do not install the charger, handset, and accessories in
the following locations:
• near water, moisture, sources of heat, or direct
sunlight
• near devices that generate strong magnetic fields,
including electrical appliances, fluorescent lamps,
computers, radios, televisions, and fax or telephone
terminals
• in locations where the handset can be covered or
where excessive dust is present, or in areas subje ct
to vibration, shock, or extreme temperature
fluctuations
• in locations with poor ventilation
26
Page 27
Getting started
CAUTION
Use only the plug-in AC adapter and battery type
supplied, and use only approved accessories.
Ensure the mains voltage of the adapter matches the
local mains voltage.
Do not use AC adapters that are visibly damaged
(cracked or broken) and keep the ventilation slits on the
AC adapters free from obstruction.
Attention: The handset, if switched off, automatically switches on
when placed in the charger.
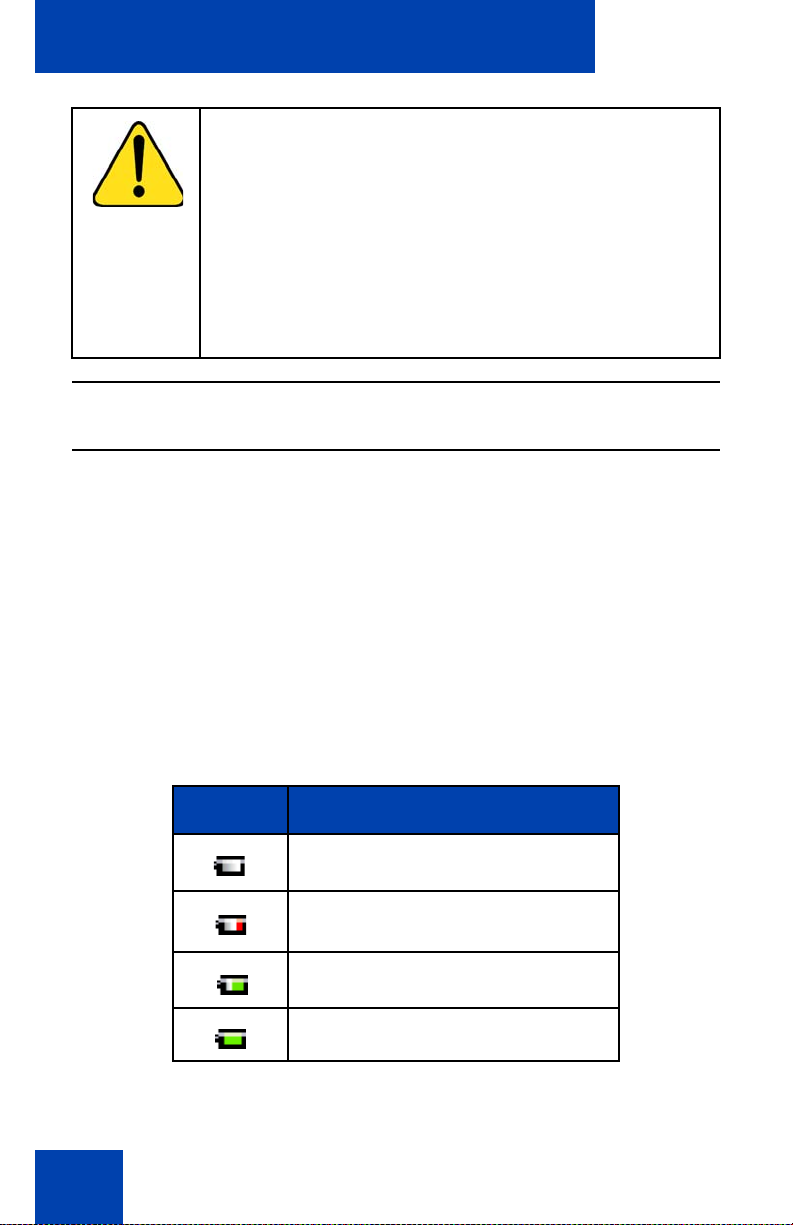
Charge display
A battery charge status symbol appears on the display. Wh en th e b attery
is nearly discharged, the battery charge status symbol flashes and a
warning tone sounds. If you are on a call when this happens, the handset
switches off after approximately 3 to 5 minutes. If you are not on a call
and the handset is not in the charging station, the message “Battery
empty” appears on the display. You cannot make calls while this
message appears.
The following table shows the battery charge status icons.
Table 1: Battery charge status icons
Icon Description
empty
less than 33%
more than 33% and less than 75%
more than 75%
27
Page 28

Getting started
Note: (4075 only) You can configure the LED indicator to flash when
the handset battery is low. When you place the handset on the
charger, the LED indicator turns off. See “Configuring the LED
Indicator (4075 only)” (page167) for more details.
Switching the handset on or off
To switch your handset on or off, perform the following step:
1. Long press the Clr key to switch your handset on or
off.
Display areas
The Avaya 4027, 4070, 4075 DECT Handsets include a Liquid Crystal
Display (LCD), and the 4070 and 4075 DECT include a backlit dialpad.
The Avaya 4075 DECT Handset also includes an LED indicator above the
display area, to the left of the speaker.
The display is divided into the following three areas:
• “Icon line” (page 29)
• “Dialogue area” (page 30)
• “Soft key line” (page 35)
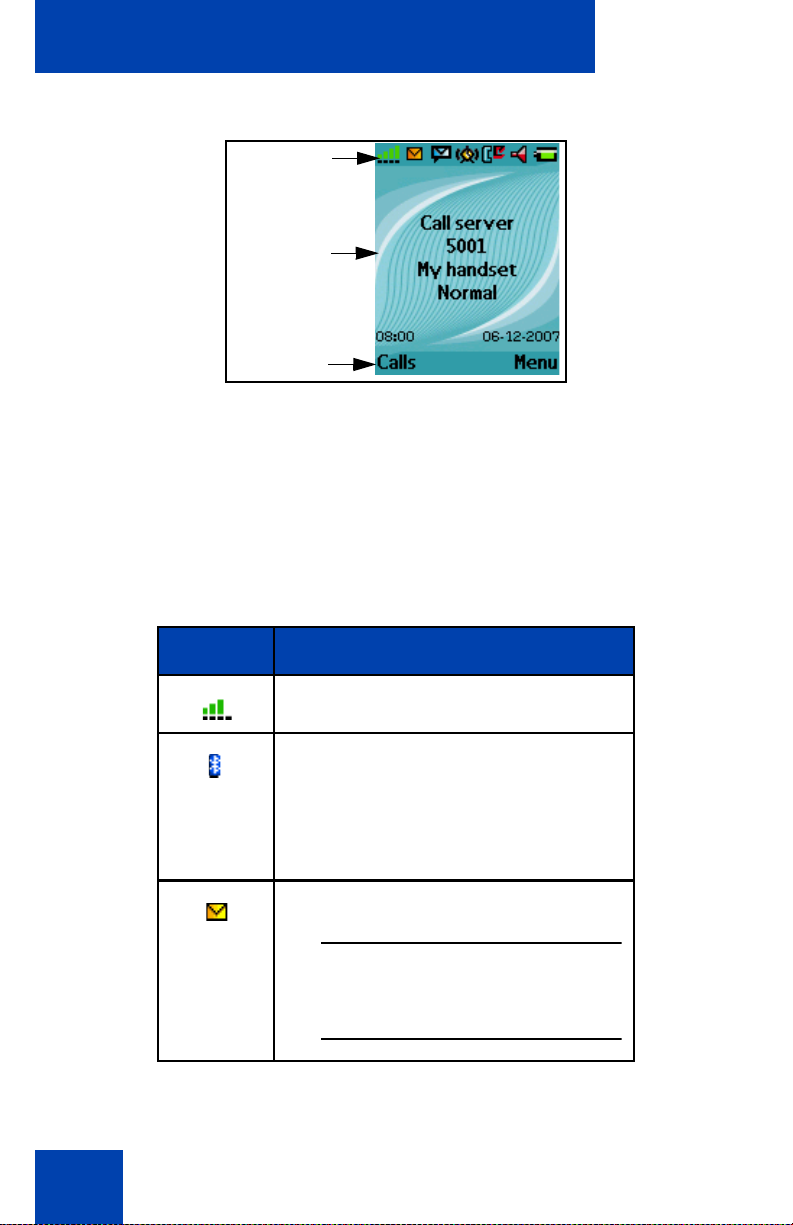
The following figure shows the various areas of the display.
28
Page 29
Getting started
Icon line
Dialogue
area
Soft key
line
Figure 5: Handset display
Icon line
The icon line displays the status of the handset. The icons for the level of
radio signal and battery charge status always appear in the icon line.
Other icons appear only when the correspo nd in g fu nct ion s ar e act i ve .
The following table shows the icons in the icon line.
Table 2: Icon line icons
29
Icon Description
Level of radio signal
Bluetooth wireless connection status
(only for 4070 and 4075 DECT
Handsets)
See Table 18 for Bluetooth wireless
connection status icons.
New text message received
Attention: This icon, if active,
appears in place of the Bluetooth
wireless connection icon.
Page 30
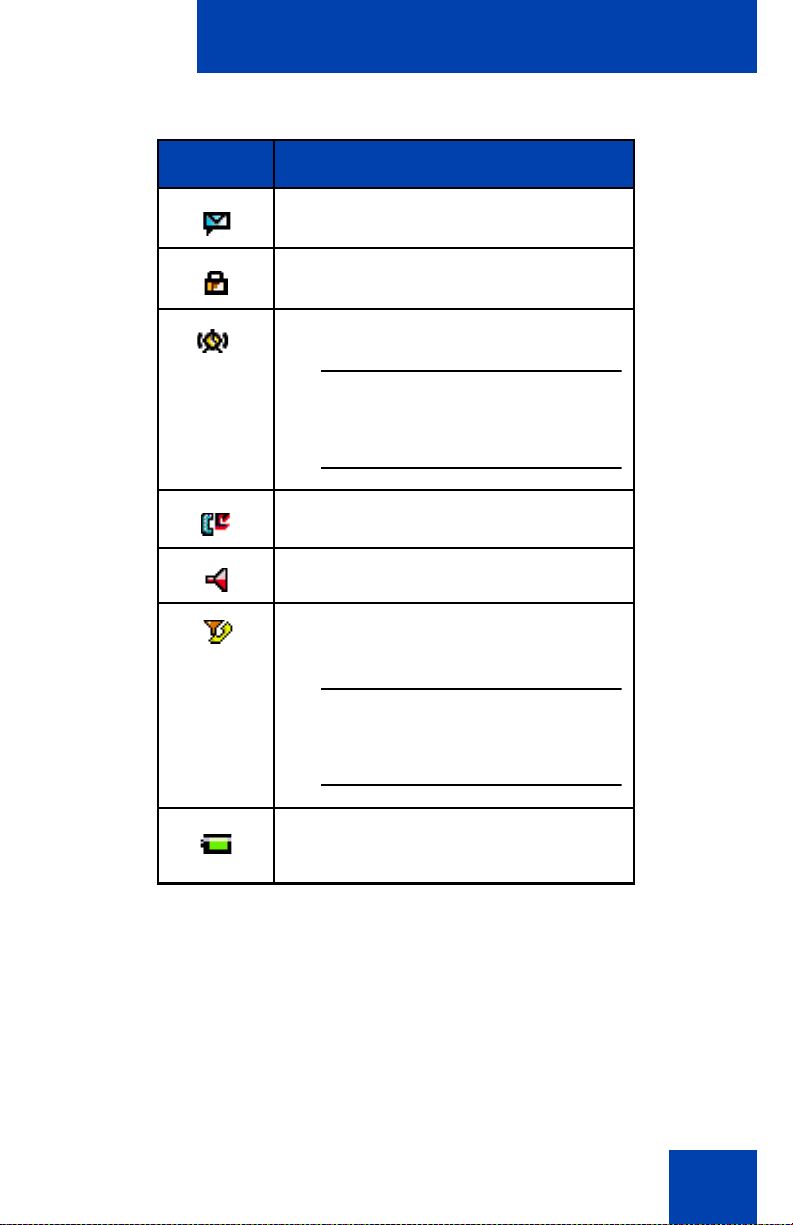
Table 2: Icon line icons
Icon Description
Voice message waiting indication
Dialpad locked
Activated alarm
Attention: This icon, if active,
appears in place of the Dialpad
locked icon.
Missed calls
Ringer deactivated
Caller filter (only for Avaya 4070 and
4075 DECT Handsets)
Getting started
Attention: This icon, if active,
appears in place of the Ringer
deactivated icon.
Battery charge status.
See Table 1 for Battery status icons.
Dialogue area
The Dialogue area is the main area of the handset display. The
information that appears in the Dialogue area varies according to the
operational mode of the handset.
Idle mode
In Idle mode, the following information appears in the dialogue area:
30
Page 31

Getting started
• the name of the DECT system
• the Directory Number (DN) of the handset
• the handset name (if configured)
• the name of the active profile
• the time and date
If you leave the range of the DECT system, the message “No Network”
appears.
The following figure shows the handset in Idle mode.
Figure 6: Idle mode
For more information about key functions, see “Key functions in Idle
mode” (page 38).
Call mode
In Call mode, the following information appears in the dialogue area:
• the number or name (if available) of the calling party for an incoming
call and the number or name (if added to your contacts list or your
communication system supports Dialed Name Display feature) of the
called party for an outgoing call
• the loudspeaker icon (if enabled)
• the microphone muted icon (if muted)
31
Page 32

Getting started
In call mode in the dialogue area a second call indication can appear, for
example "waiting" and the number or name of the calling party. This
option is applicable only for SIP DECT if call waiting feature is configured.
The text of the second call indication is configured by your communication
system administrator
The following table shows the icons that can appear in the dialogue area
when in Call mode.
Table 3: Dialogue area icons
Icon Description
Incoming call
Outgoing call
Loudspeaker on
Microphone muted while loudspeaker on
Microphone muted while loudspeaker off
For more information about key functions associated with the icons in the
preceding table, see “Key functions in Call mode” (page 40).
Dialogue mode
In Dialogue mode, icons or information appear in the Dialogue area
according to the operational mode of the handset
32
Page 33

Getting started
The following figure shows the Missed call(s) page.
Figure 7: Missed call(s) page
For more information about key functions, see “Key functions in Dialogue
mode” (page 42).
Menu mode
In Menu mode, menu items (entries) or menu sections appear in the
dialogue area.
The following figure shows the Main menu.
Figure 8: Main menu
33
Page 34

Getting started
Menu
sections
Menu
items
The following figure shows the General settings menu.
Figure 9: General settings menu
For more information about key functions see “Key functions in Menu
mode” (page 42).
Edit mode
In Edit mode, you can use the dialogue area to enter and edit digits
(numbers, date, time, or PIN) and text.
The following figure shows the Contacts name editing page.
Figure 10: Contacts name editing page
34
Page 35

Getting started
The following figure shows the Contact number editing page.
Figure 11: Contacts number editing page
The following figure shows the appointment Start date editing page.
Figure 12: Appointment Start date editing page
For more information about key functions, see “Key functions in Edit
mode” (page 43).
Soft key line
Soft keys appear below the handset dialogue area. The key functions
change automatically according to the operational state of the handset.
For example, when the handset is in idle mode, you can press the Menu
soft key, as shown in Figure 5, to access the Main menu.
LED indicator (4075 only)
An LED indicator appears to the left of the speaker on the Avaya 4075
DECT Handset. This indicator can flash red, green, or orange. Red
35
Page 36

Getting started
signals a high-priority event, green a medium prior ity event, and orange a
low-priority event.
You can assign one of the following events to each priority level:
• Missed calls
• Text messages
• Voice messages
• Text and voice messages
• Mandown
• Low battery
For an example of event assignments, see the following table:
Table 4: Example event assignments
Priority LED Colour
Example event
assignment
High Red Low battery
Medium Green Missed call
Low Orange New message
With these example assignments in place, the following can occur:
• If you miss a call, the LED indicator flashes green.
• When the LED indicator is flashing green to indicate a missed call,
and a new message arrives, the LED indicator continues to flash
green because green signal events have a higher priority th an orange
signal events.
• When the LED indicator is flashing green to indicate a missed call,
and the battery becomes low on charge, the LED indicator flashes red
because red signal events have a higher priority than green signal
events.
The LED indicator priorities are permanently assigned (red always
indicates high priority, green medium, and orange low). LED indicator
36
Page 37

Getting started
priorities do not control the order in which the dialogs for the
corresponding events appear on the display.
See “Configuring the LED Indicator (4075 only)” (page 167) for more
details.
Handset controls
Use the following figure to familiarise yourself with the handset display
and keys.
Figure 13: Handset controls
This section describes the following components and functions of your
Avaya 4027, 4070, or 4075 DECT Handset:
• “Key functions in Idle mode” (page 38)
• “Key functions in Call mode” (page 40)
37
Page 38

Getting started
• “Key functions in Dialogue mode” (page 42)
• “Key functions in Menu mode” (page 42)
• “Key functions in Edit mode” (page 43)
• “Locking or unlocking the dialpad” (page 47)
Key functions in Idle mode
The following table describes the handset key functions in Idle mode.
Table 5: Keys functions in Idle mode
Key Description
Left soft
key
Right soft
key
Up key Press the programmable Up
Down key Press the programmable Down
Left key Press the programmable Left
Right key Press the programmable Right
Press the Calls soft key to access the
Calls menu.
Press the Menu soft key to access
the Main menu.
navigation key to access the shortcut
assigned to that key. The default
shortcut assigned is the Contacts
menu.
navigation key to access the shortcut
assigned to that key. The default
shortcut assigned is the Central
Directory menu.
navigation key to access the shortcut
assigned to that key. The default
shortcut assigned is the Messaging
menu.
navigation key to access the shortcut
assigned to that key. The default
shortcut assigned is the Profile
menu.
38
Page 39

Getting started
Table 5: Keys functions in Idle mode (Continued)
Key Description
OK key Press the OK key, and then the Lock
or Unlock soft key to lock or unlock
the dialpad.
Call key Press the Call key to initiate a call.
Clear key Long press the Clr key to switch your
handset on or off.
SOS key Long press the SOS key to make an
emergency call (if configured).
Attention: You can make an
emergency call using the SOS
key even if the dialpad is locked.
1–9 • Press the 1–9 keys to enter
predial mode.
• Long press the 1–9 keys to speed
dial a number (if configured).
0 Press the 0 key to enter predial mode.
* • Press the * key to enter predial
mode.
• Long press the * key to enter a
comma to indicate a pause when
you edit a number.
39
Page 40

Getting started
Table 5: Keys functions in Idle mode (Continued)
Key Description
# • Press the # key to enter predial
mode.
• Long press the # key to switch
between the current active profile
and the Silent profile.
For more information about Idle mode, see “Idle mode” (page 30).
Key functions in Call mode
The following table describes the handset key functions in Call mode.
Table 6: Key functions in Call mode
Key Description
Left soft
key
Right soft
key
Up key Press the Up navigation key to
Down key Press the Down navigation key to
• Press the Spk on or Spk off soft
key to turn the loudspeaker on or
off during a call.
• Press the Silence soft key to
mute the ringer for an incoming
call.
• Press the Mute soft key to mute
the microphone during a call.
• Press the Reject soft key to reject
an incoming call.
access the Contacts menu.
access the Central Directory menu
(available only if provided by your
communication system).
40
Page 41

Getting started
Table 6: Key functions in Call mode (Continued)
Key Description
OK key • Press the OK soft key to turn the
loudspeaker on or off during a
call.
• Press the OK key to answer an
incoming call in handsfree mode
(using the loudspeaker).
Call key Press the Call key to place the
established call on hold (and access a
dial tone if only one call is active) or to
switch between calls if more than one
call is active.
Clear key Press the Clr key to end a call.
Volume
up key
Volume
down key
0–9,*,# Press the 0–9,*, or # key to enter
For more information about Call mode, see “Call mode” (page 31).
+
Press the Volume up key to increase
the handset volume during a call.
A beep sounds when you reach the
Max volume level.
Press the Volume down key to
decrease the handset volume during
a call.
A beep sounds when you reach the
Min volume level.
digits,*, or #.
41
Page 42

Getting started
Key functions in Dialogue mode
The following table describes the handset key functions in Dia logue
mode.
Table 7: Key functions in Dialogue mode
Key Description
Left soft
key
Right soft
key
Clear key Press the Clr key to exit Dialogue
SOS key Long press the SOS key to make an
For more information about Dialogue mode, see “Dia logue mode”
(page 32).
Press the Left soft key to select the
item marked in the display.
Press the Right soft key to select the
item marked in the display.
mode.
emergency call (if configured).
Key functions in Menu mode
The following table describes the handset key functions in Menu mode.
Table 8: Key functions in Menu mode
Key Description
Left soft
key
Press the Left soft key to select the
item marked in the display.
Right soft
key
Up key Press the Up key to position the
Press the Right soft key to select the
item marked in the display.
cursor.
42
Page 43

Getting started
Table 8: Key functions in Menu mode (Continued)
Key Description
Down key Press the Down key to position the
cursor.
Left key Press the Left key to position the
cursor.
Right key Press the Right key to position the
cursor.
Clear key • Press the Clr key to cancel the
current action and to return to the
previous menu.
• Long press the Clr key to return
to Idle mode.
SOS key Long press the SOS key to make an
emergency call (if configured).
For more information about Menu mode, see “Menu mode” (page 33).
Key functions in Edit mode
The following table describes the handset key functions in Edit mode.
Table 9: Key functions in Edit mode
Key Description
Left soft
key
Right soft
key
43
Press the Left soft key to select the
item that is currently highlighted.
Press the Right soft key to select the
item that is currently highlighted.
Page 44

Getting started
Table 9: Key functions in Edit mode (Continued)
Key Description
Up key Press the Up key to position the
cursor.
Down key Press the Down key to position the
cursor.
Left key Press the Left key to position the
cursor.
Right key Press the Right key to position the
cursor.
Clear key • Press the Clr key to cancel the
current action and to return to the
previous menu.
• Long press the Clr key to return
to Idle mode.
SOS key Long press the SOS key to make an
emergency call (if configured).
1 • Press the 1 key one or more
times to enter the digit (for
example, to enter a number, date,
time, or PIN).
• Press the 1 key one or more
times to enter a special character.
For more information, see “Key
functions in text mode” (page 46).
44
Page 45

Getting started
Table 9: Key functions in Edit mode (Continued)
Key Description
2–9 • Press the 2–9 keys to enter the
digits (for example, to enter a
number, date, time, or PIN).
• Press the 2–9 keys one or more
times to enter a letter. For more
information, see “Key functions in
text mode” (page 46).
0 • Press the 0 key to enter the digit
(for example, to enter a number,
date, time, or PIN).
• Press the 0 key one or more
times to insert a space or a
punctuation mark. For more
information, see “Key functions in
text mode” (page 46).
* • Press the * key one or more times
to enter a special character. For
more information, see “Key
functions in text mode” (page 46).
• Long press the * key to enter a
comma when you edit a number.
The comma indicates a pause.
45
Page 46

Getting started
Table 9: Key functions in Edit mode (Continued)
Key Description
# Press the # key to switch between
modes:
• mode "abc": enter lowercase
characters
• mode "Abc": enter an uppercase
character followed by lowercase
characters
• mode "ABC": enter uppercase
characters
• mode "123": enter digits
You can use your handset keys to enter a number, symbol, or character
in text mode.
The following table shows the keys you can press, (when the handset is
in text mode) to insert letters, numbers, or symbols.
Table 10: Key functions in text mode
Key Uppercase Lowercase
1 1 £ $ ¥ € @ % & # § ^ 1 £ $ ¥ € @ % & # § ^
2 A B C 2 Æ À Á Â Ä Å Ç a b c 2 æ à á ä å ç
3 D E F 3 È É Ê Ë d e f 3 è é ê ë
4 G H I 4 Í Î Ï g h i 4 í î ï
5J K L 5 j k l 5
6 M N O 6 Œ Ó Ô Ö Ø m n o 6 œ ó ô ö ø
7 P Q R S 7 Š ß p q r s 7 š ß
8 T U V 8 Ù Ú Û Ü t u v 8 ù ú û ü
9 W X Y Z 9 Ÿ Ž w x y z 9 ÿ ž
46
Page 47

Getting started
Lock
Unlock
Key Uppercase Lowercase
0 (space) . , ? ! 0 : ¿ ¡ “ ‘ ; _ ~ (space) . , ? ! 0 : ¿ ¡ “ ‘ ; _ ~
* * / + - = ( ) < > { } [ ] | \ * / + - = ( ) < > { } [ ] | \
Locking or unlocking the dialpad
Use the dialpad Lock feature to prevent accidental operation of the
handset. When the Lock feature is active and you receive an incoming
call, the dialpad temporarily unlocks so you can answer the call. The Lock
reactivates when you terminate the call.
To lock the dialpad, perform the following step:
Attention: You can dial 911 or 112, or use the SOS key, when the
dialpad is locked.
1. Press the OK key to toggle between the Calls soft
key and the Lock soft key.
2. Press the Lock soft key.
To unlock the dialpad, perform the following step:
1. Press the OK key
2. Press the Unlock soft key within three seconds.
Attention: The Unlock soft key is available for only three seconds
after you press the OK key.
To configure automatic dialpad Lock, see “Automatic dialpad lock”
(page 170).
47
Page 48

DECT system configuration
Menu
Select
DECT system configuration
Use the information in this section to configure your DECT handset to
work with a DECT system.
This section describes the following tasks:
• “Accessing the Connectivity menu” (page 48)
• “Subscribing the handset to a DECT system” (page 49)
• “Manually selecting the DECT system” (page 51)
• “Enabling automatic DECT system selection” (page 52)
• “Deregistering the handset” (page 53)
• “Editing the system name and phone number” (page 53)
For more information about using the handset controls, see “Handset
controls” (page 37).
Accessing the Connectivity menu
To access the Connectivity menu, perform the following steps:
1. Press the Menu soft key to access the Main menu.
2. Press the Up or Down key to highlight the Settings
icon.
3. Press the Select soft key.
4. Press the Left or Right key to highlight the
Connectivity menu.
48
Page 49

DECT system configuration
Subscribing the handset to a DECT system
You must subscribe the handset to at least one DECT system before you
can use the handset to make a call. The handset can operate with a
maximum of four DECT systems, for which the handset stores the name
of the system in a subscription record. Whenever the handset enters the
range of a subscribed DECT system, the name of the system appears on
the handset display.
Attention: If your supplier preinstalls the handset, you need not
subscribe your handset to a system. When the handset is
not yet subscribed to a system, the message “Register”
appears.
Use the PABX-PIN code to register the handset with a
DECT system.
Before you subscribe to a DECT system, obtain the following information
from your system administrator:
• PARK code: A system ID that enables your telephone to differentiate
between DECT systems when more than one DECT system is
present.
• DECT system name: The name of the system to which you subscribe.
After you enter the system name, it appears on the idle display.
• Phone number: The local phone number assigned to your DECT
handset.
Attention: Once you have obtained your PIN code, you have 15
minutes to subscribe the handset. After 15 minutes have
elapsed, the PIN code is deactivated you must activate a
new one.
To subscribe your handset to a DECT system, perform the following
steps:
1. Open the Connectivity menu as shown in
“Accessing the Connectivity menu” (page 48).
49
Page 50

DECT system configuration
Register
Select
Empty
Select
Yes
Save
OK
2. Press the Up or Down key to highlight the Register
option.
3. Press the Select soft key to start the registration
process.
4. Press the Up or Down key to choose one of the
following:
If the handset is subscribed to fewer than four
systems, choose Empty
OR
If the handset is already subscribed to four
systems, choose the name of the system to
overwrite.
5. Press the Select soft key, and then press the Yes
soft key if you want to overwrite a system.
The PARK prompt appears.
6. Use the Dialpad to enter the PARK code.
Attention: If more than one DECT system overlaps
in your location, you are sometimes required to
enter a PARK code (system ID). If only one DECT
system is available, make no entry, and press the
Skip soft key.
7. Press the Save soft key.
The PIN prompt appears.
8. Use the Dialpad to enter the PIN (authorisation
code).
9. Press the OK soft key.
The Network name prompt appears.
50
Page 51

DECT system configuration
Save
Save
Network select
Select
Select
10. Use the Dialpad to enter the system name.
11. Press the Save soft key.
The Number prompt appears.
12. Use the Dialpad to enter the phone number
assigned to your handset.
13. Press the Save soft key.
14. Press the Clr key one or more times to return to the
idle display.
You can now use the handset to make and receive calls.
Manually selecting the DECT system
If you subscribe the handset to more than one DECT system, you can
manually select which system the handset uses. To manually select a
DECT system, perform the following steps:
51
1. Open the Connectivity menu using the steps in
“Accessing the Connectivity menu” (page 48).
2. Press the Up or Down key to highlight the Network
select option.
3. Press the Select soft key.
4. Choose the name of the system from the list.
5. Press the Select soft key.
The name of the currently active system highlights.
6. Press the Clr key one or more times to return to the
idle display.
Page 52

DECT system configuration
Network select
Select
Auto. select
Select
Enabling automatic DECT system selection
If you subscribe the handset to more than one DECT system, you can
configure your handset to automatica lly select the system to which it
connects.
If Automatic selection is enabled, when the handset moves out of range of
the current system, it automatically attempts to connect and log on to
another available (subscribed) DECT system.
To enable automatic selection of a DECT system, perform the following
steps:
1. Open the Connectivity menu using the steps in
“Accessing the Connectivity menu” (page 48).
2. Press the Up or Down key to highlight the Network
select option.
3. Press the Select soft key.
4. Highlight Auto. select.
5. Press the Select soft key.
The name of the currently active system highlights.
6. Press the Clr key one or more times to return to the
idle display.
52
Page 53

DECT system configuration
Deregister
Select
Select
Yes
No
Deregistering the handset
To deregister the handset from a DECT system, perform the following
steps:
1. Open the Connectivity menu, using the steps in
“Accessing the Connectivity menu” (page 48).
2. Press the Up or Down key to highlight the
Deregister option.
3. Press the Select soft key.
4. Press the Up or Down key to highlight the system
to deregister.
5. Press the Select soft key.
6. Choose one of the following:
Press the Yes soft key to deregister the selected
DECT system.
OR
Press the No soft key to exit without making any
changes.
7. Press the Clr key one or more times to return to the
idle display.
Editing the system name and phone number
To edit the system name and phone number of your handset, perform the
following steps:
1. Open the Connectivity menu using the steps in
“Accessing the Connectivity menu” (page 48).
53
Page 54

DECT system configuration
Network select
Select
Select
Edit
Save
Save
2. Press the Up or Down key to highlight the Network
select option.
3. Press the Select soft key.
4. Press the Up or Down key to highlight the system
to edit.
5. Press the Select soft key.
6. Choose the name of the system from the list.
7. Press the Edit soft key.
The name of the currently active system highlights.
8. Use the Dialpad to edit the system name and.
9. Press the Save soft key.
10. Use the Dialpad to edit the local phone number.
11. Press the Save soft key.
12. Press the Clr key one or more times to return to the
idle display.
54
Page 55

Call features
Call features
Use the information in this section to make and receive calls, and to
configure and use call features:
• “Make calls” (page 55)
• “Answer calls” (page 62)
• “Change settings during a call” (page 65)
• “Transfer calls” (page 66)
• “Voice mail” (page 66)
Make calls
This section describes the features associated with making a call. You
can make a call from your handset using any of the following methods:
• “Dialling a number” (page 56)
• “Predial mode” (page 56)
• “Using Speed dial” (page 57)
• “Using Loudspeaker” (page 57)
• “Using the telephone book to dial a number” (page 58)
• “Using the Central Directory to dial a number” (page 59)
• “Making an SOS call” (page 61)
• “Making an Emergency call” (page 61)
Attention: To conserve the battery charge of your handset, the display
automatically dims during calls. Press the OK key to restore
the display.
To configure the number of seconds that elapse before the
display dims, change the “first value” timer in Power save
settings. For more information, see “Configuring Power
save” (page 198).
55
Page 56

Call features
Dialling a number
To dial a number, perform the following steps:
1. Press the Call key.
2. Use the Dialpad to enter the phone number.
You can add additional digits to the number you
dial. For example, in some offices you must add a
digit at the beginning of the number to place a call
to an outside line.
Predial mode
Use the information in this section to enter a phone number before you
dial.
Predialling a number
To predial a number, perform the following steps:
1. Use the Dialpad to enter the phone number.
You can add additional digits to the number you
dial. For example, in some offices you must add a
digit at the beginning of the number to place a call
to an outside line.
2. Press the Call key to dial the number.
OR
Press the OK key to dial the number using the
Loudspeaker.
Editing a number in Predial mode
To edit a number in Predial mode, perform the following steps:
1. Use the Left or Right key to position the insertion
point.
56
Page 57

Call features
2. Use the Dialpad to enter the new digits.
Press the Clr key to delete individual digits or to
cancel predial.
Long press the * key to insert a comma to indicate
a pause when you enter a number.
3. Press the Call key.
4. Press the Clr key to return to the idle display.
Attention: When you predial a number, if the input cursor is positioned
after the telephone number, the new digits are inserted at
the end of that telephone number. If the input cursor is
positioned at any other point, the new digits are inserted in
front of the insertion point.
Using Speed dial
Use the Speed dial feature to make calls by dialling a one-digit code.
To use speed dial, perform the following step:
1. Long press the number key assigned to the phone
number.
You can use speed dial only after it is configured.
For more information, see “Assigning a speed dial
number” (page 106).
Using Loudspeaker
Your handset includes a Loudspeaker feature to allow several people in a
room to listen to a call. You can predial a call using the Loudspeaker by
first dialling the number, and then pressing the OK key.
When the loudspeaker function is active, the loudspeaker icon appears.
When using loudspeaker:
57
Page 58

Call features
Spk. on
Spk. off
Menu
Select
• Place the handset upright on a smooth, flat surf ace, and ensure that
the loudspeaker and microphone free of obstruction.
• Position the handset approximately 0.5 metres away from yourself
while you speak.
To enable the Loudspeaker feature during a call, perform the following
steps:
1. Make or answer a call.
2. Press the Spk. on soft key to enable the feature.
The loudspeaker icon appears.
+
3. Press the Volume up or Volume down key to
configure the volume.
4. Press the Spk. off soft key to disable the feature.
Using the telephone book to dial a number
To use the handset telephone book to dial a number, perform the
following steps:
1. Press the Menu soft key to access the Main menu.
2. Press the Up or Down key to highlight the
Contacts icon.
3. Press the Select soft key.
58
Page 59

Call features
Private
Select
Menu
4. If your communication system supports the Central
Directory feature, press the Up or Down key to
highlight the Private option, and press the Select
soft key.
OR
If your communication system does not support the
Central Directory feature, skip this step.
5. Press the Up or Down keys to select the number
you want to dial.
OR
Enter the first characters of the name using the
OR
dialpad. For example enter “B” to disp lay th e firs t
name in the contacts list starting with the letter B.
For more information, see Table 9, “Key functions
in text mode” (page 46).
6. Press the Call key to make a call.
Using the Central Directory to dial a number
Your handset allows you to use the Central Directory to dial a number.
The Central Directory is a database that contains user names and
Directory Numbers (DN).
Attention: The Central Directory feature is available only if provided by
your communication system.
To use the Central Directory to dial a number, perform the following steps:
1. Press the Menu soft key to access the Main menu.
59
Page 60

Call features
Select
Central Directory
Select
2. Press the Up or Down key to highlight the
Contacts icon.
3. Press the Select soft key.
4. Press the Up or Down key to select the Central
Directory option.
5. Press the Select key.
6. Perform one of the following:
Press the OK key and press the Up and Down
keys to select the user you want to dial.
OR
OR
Enter the first characters of the name using the
dialpad. For example enter “B” to disp lay th e firs t
name in the contacts list starting with the letter B.
For more information, see Table 9, “Key functions
in text mode” (page 46).
7. Optionally, press the More soft key to learn the
number of the selected user (Info option).
8. Press the Call key to make a call.
60
Page 61

Call features
Making an SOS call
Use this option to make emergency calls to a specific telephone number.
When you press the SOS key, the phone sends a text message or
initiates a voice call.
Attention: The Messaging feature is available on Avaya 4070 and
4075 DECT Handsets only.
You must program an SOS number to use the SOS
function. For more information, see “Emergency call
configuration” (page 210).
To make an SOS call, perform the following step:
1. Long press the SOS key to dial the number or send
a message.
Making an Emergency call
When the dialpad is locked, the only calls you can make are SOS calls, or
Emergency calls to 911 or 112.
To make an emergency call when the handset is locked use the following
steps:
1. Dial the number (either 911 or 112)
61
Page 62

Call features
OR
2. Perform one of the following:
Press the Call key to make the call using the
handset, or using a wired headset if you have one
installed.
OR
Press the OK key or Left soft key to make the call
using the loudspeaker
Note: If you have a Bluetooth wireless technology
headset installed, the handset makes the
emergency call using the Bluetooth headset when
you press Call key, OK key, or Call soft key.
Answer calls
When you receive an incoming call, the ringer sounds and the call alert
symbol flashes. You can choose to answer or reject an incoming call. This
section describes the following features:
• “Answering a call in Normal mode” (page 63)
• “Answering a call using any key” (page 64)
• “Auto-answering mode” (page 64)
• “Muting the ringer” (page 64)
• “Answering a second incoming call” (page 63)
• “Rejecting a call” (page 64)
Attention: To conserve the battery charge of your handset, the display
automatically dims during calls. Press the OK key to restore
the display.
To configure the number of seconds that elapse before the
display dims, change the “first value” timer in Power save
settings. For more information, see “Configuring Power
save” (page 198).
62
Page 63

Call features
Answering a call in Normal mode
To answer a call in Normal mode, perform the following step:
1. Press the Call key (Loudspeaker is off).
OR
v
Press the OK key (Loudspeaker is on).
Answering a second incoming call
When the handset is busy and a second call comes in, you will hear a
ticker tone and the display shows “waiting” and the number or name of
the calling party (call waiting display indication is applicable only to SIP
DECT).
To answer a second incoming call, perform the following step:
Press the * (for SIP DECT) or R (for Traditional DMC-based DECT) key.
The call will be answered in the same way (Loudspeaker on or off) as the
currently established call. By means of the * (SIP DECT) or R (DMC-
based DECT) key, you can toggle between
the two calls. It behaves in a similar way as having a call on hold.
Note: If you end one of the calls, the handset will go on hook and
then you will automatically get an incoming call from the other party.
Attention: Answering a second call is possible only if
Call Waiting feature is configured on your communication
system.
63
Page 64

Call features
Silence
Reject
Answering a call using any key
To answer a call using any key, perform the following step:
1. Press any key on the dialpad to answer the call.
Attention: This feature is available only when configured. For more
information, see “Answer mode configuration” (page 201).
Auto-answering mode
In Auto-answering mode, calls are answered automatically on the
handset.
Attention: This feature is available only when configured. For more
information, see “Answer mode configuration” (page 201).
Muting the ringer
To mute the ringer, perform the following step:
1. Press the Silence soft key to mute the ringer during
a call alert.
Rejecting a call
To reject an incoming call, perform the following step:
1. Press the Reject soft key during a call alert.
The call diverts to your voice mail system or
another number if call forward feature is configured.
Contact your system administrator to determine if
you can use this feature.
64
Page 65

Call features
Attention: If you reject or do not answer a call, or if the call is blocked
by Caller Filter (4070 and 4075 only), the message Number
of missed calls: N Show? appears on the display, where N
is the number of calls that have been blocked, missed, or
rejected.
Press the Yes soft key to open the Missed or press the No
soft key to close the dialogue. For more information, see
“Missed calls list” (page 89).
Change settings during a call
During a call, you can adjust the headset or loudspeaker volume or mute
the handset.
This section describes the following tasks:
• “Adjusting the headset or loudspeaker volum e ” (page 65)
• “Using mute during a call” (page 66)
Adjusting the headset or loudspeaker volume
During a call, you can change the headset or loudspeaker volume using
the volume keys. A bar in the display increases or decreases to indicate
the volume setting. A beep sounds at the minimum or maximum volume.
To adjust the headset or loudspeaker volume, perform the following ste p:
1. Press the Volume up or Volume down key.
When you adjust the headset or loudspeaker volume, the handset
remembers the new setting the next time you use the handset.
65
Page 66

Call features
Mute
Unmute
Using mute during a call
To mute and unmute the handset microphone, perform the following
steps:
1. Press the Mute soft key to deactivate the handset
microphone.
2. Press the Unmute soft key to activate the handset
microphone.
Transfer calls
You can use this option to transfer a call or add a third party to a
conference call. The behavior of the Transfe r feature can va ry depending
on your system configuration. Contact your system administrator to find
out what transfer options are available for your use.
Transferring a call
To transfer a call, perform the following steps:
1. Press the Call key to place the active call on hold.
2. Use the Dialpad to dial the phone number of the
third party.
3. Press the Call key to alternate between the two
callers.
4. Press the Clr key to transfer the call.
Voice mail
Use the Voice mail feature to listen to voice messages left by calling
parties. You can receive a voice mail in the following situations:
66
Page 67

Call features
Yes
No
• if your handset is switched off
• if your handset is busy
• if your handset is out of the coverage area
A new voice message dialogue appears once per caller, when the caller
leaves a first new message in the mailbox. A voice mail symbol appears
in the icon line and disappears after you play the message.
Attention: The Voice mail feature is available only whe n configured on
the PBX.
The following figure shows the voice mail display page.
Figure 14: New voice message page
To listen to a New voice message, perform the following step:
1. Choose one of the following:
Press the Yes soft key to listen to the new voice
message. To do so, you must first configure a voice
mail number. See “Defining a voice mail number”
OR
(page 69) for more information.
OR
Press the No soft key to close the dialogue. For
more information, see “Configuring Message
display setting” (page 130).
67
Page 68

Call features
Menu
Select
Note: (4075 only) You can configure the LED indicator to flash when
voice mail messages are waiting. After you have listened to the voice
mail message, the LED indicator turns off. See “Configuring the LED
Indicator (4075 only)” (page167), for more details.
Use this section to perform the following tasks:
• “Accessing voice mail” (page 68)
• “Defining a voice mail number” (page 69)
Accessing voice mail
To access voice mail, perform the following steps:
1. Press the Menu soft key to access the Main menu.
2. Press the Up or Down key to highlight the
Messaging icon.
3. Press the Select soft key.
4. Press the Left or Right key to select the Inbox
menu.
68
Page 69

Call features
Listen to voice mail
Select
Voice mail number
5. Press the Up or Down key to select the Listen to
voice mail option.
6. Press the Select soft key.
The handset automatically dials the voice mail
access number.
Attention: Ensure th at you configure the voice mail
access number in the messaging settings. For
more information about configuring message
settings, see “Defining a voice mail number”
(page 69).
7. Press the Clr key one or more times to return to the
idle display.
Defining a voice mail number
To define a voice mail access number, perform the following steps:
1. Open the Settings menu using the steps in
“Accessing the message Settings menu”
(page 128).
2. Press the Up or Down key to highlight the Voice
mail number option.
69
Page 70

3. Press the Select soft key.
Select
Enter number
Lookup contact
4. Press the Up or Down key to choose one of the
following options:
— Highlight Enter number to use the Dialpad to
enter the number, and then press the Save soft
key. Long press the * key to insert a comma to
indicate a pause.
— Highlight Loo kup contact to select the number
from your contacts list, and then press the
Select soft key. Press the Up or Down key to
choose a contact, and press the Select soft
key.
5. Press the Clr key one or more times to return to the
idle display.
Attention: Yo u can also dial the voice mail number directly.
Call features
70
Page 71

Calls list
Calls list
Attention: Some menu items may be locked or unavailable to users.
Please contact your system administrator for more details.
The Calls list stores information about dialled, answered, or missed ca lls
(maximum 50 entries for all lists).
Attention: The maximum number of entries you can store varies
depending on the amount of storage space used by other
features.
Attention: If the Call Waiting feature is configured on your
communication system no information about a second
incoming call is stored in any of the calls lists.
When there is more than one call to or from a phone number, only the
most recent call appears in the appropriate call list.
The Calls menu contains four tabs: All, Answered, Dialled, and Missed.
You can open the required list by pressing the Left or Right key. When
you open the list, the call information appears. The first entry is
highlighted, the contact name or CLID (Calling Line Identification) and the
time and date appear.
71
Page 72

Figure 15: Calls list with normal text size
Tabs
CLID
Call time
and date
Figure 16: Calls list with small text size
Calls list
Attention: Depending on the selected Time and Date format, the font
size varies, as shown in Figure 16.
If you change the time format to am/pm mode and the date format is dd/
mm/yyyy (for example 06/12/2007), or mm/dd/yyyy (for example 12/06/
2007), or dd-mmm-yyyy (06-Dec-2007), only the date appears in the lists.
You can view the time of the call by following the procedures for viewing
call information which are found in each Calls list section.
This section describes the following features:
• “All calls list” (page 73)
• “Answered calls list” (page 79)
72
Page 73

Calls list
• “Dialled calls list” (page 84)
• “Missed calls list” (page 89)
The following table describes the Calls list tabs.
Table 11: Calls list tabs
Tab Description
All calls
Answered calls
Dialled calls
Missed calls
All calls list
The All calls list shows all entries from the Answered, Dialled, and Missed
calls lists. The most recent entry appears at the top of the list.
This section describes the following tasks:
• “Accessing the All calls list” (page 74)
• “Viewing information about a call” (page 74)
• “Dialling a number” (page 75)
• “Transferring a number to your Contacts list” (page 75)
• “Transferring a number to the caller filter list” (page 76)
• “Deleting an entry” (page 77)
73
Page 74

Calls list
Calls
More
View
• “Deleting all entries” (page 78)
Attention: To conserve the battery charge of your handset, the display
automatically dims during calls. Press the OK key to restore
the display.
To configure the number of seconds that elapse before the
display dims, change the “first value” timer in Power save
settings. For more information, see “Configuring Power
save” (page 198).
Accessing the All calls list
To access the All calls list, perform the following steps:
1. Press the Calls soft key.
2. Press the Left or Right key to select the All calls
list.
Viewing information about a call
To view the information about calls in the All calls list, such as time and
date, perform the following steps:
1. Open the All calls list using the steps in “Accessing
the All calls list” (page 74).
2. Press the Up or Down key to highlight the required
entry.
3. Press the More soft key.
4. Press the Up or Down key to highlight the View
option.
74
Page 75

Calls list
Select
More
5. Press the Select soft key.
6. Press the Clr key one or more times to return to the
idle display.
Dialling a number
To dial a number from the All calls list, perform the following steps:
1. Open the All calls list using the steps in “Accessing
the All calls list” (page 74).
2. Press the Up or Down key to highlight the required
entry.
Attention: If you want to predial from the All calls
list, press the More soft key , press the Up or Down
key to highlight the Edit before call option, and
press the Select soft key.
3. Press the Call key to dial the number.
Transferring a number to your Contacts list
To transfer a number from the Missed calls list to a new entry in your
Contacts list, perform the following steps:
1. Open the All calls list using the steps in “Accessing
the All calls list” (page 74).
2. Press the Up or Down key to highlight the required
entry.
3. Press the More soft key.
75
Page 76

Calls list
Save
Select
Contacts
Select
Add
Save
Yes
4. Press the Up or Down key to highlight the Save
option.
5. Press the Select soft key.
6. Press the Up or Down key to highlight the
Contacts option.
7. Press the Select soft key.
8. Press the Add soft key and use the Dialpad to edit
the number and enter the name (if necessar y).
9. Press the Save soft key.
10. Press the Yes soft key to confirm the changes.
11. Press the Clr key one or more times to return to the
idle display.
Transferring a number to the caller filter list
Attention: The Caller filter feature is available on the Avaya 4070 and
4075 DECT Handsets only.
To transfer a number from the All calls list to the caller filter list, perform
the following steps:
1. Open the All calls list using the steps in “Accessing
the All calls list” (page 74).
76
Page 77

Calls list
More
Save
Select
Caller filter
Select
Save
2. Press the Up or Down key to highlight the required
entry.
3. Press the More soft key.
4. Press the Up or Down key to highlight the Save
option.
5. Press the Select soft key.
6. Press the Up or Down key to highlight the Caller
Filter option.
7. Press the Select soft key.
8. Use the Dialpad to edit the number and enter the
name (if necessary).
9. Press the Save soft key.
10. Press the Clr key one or more times to re turn to the
idle display.
Deleting an entry
To delete an entry from the All calls list, perform the following steps:
1. Open the All calls list using the steps in “Accessing
the All calls list” (page 74).
2. Press the Up or Down key to highlight the required
entry.
77
Page 78

Calls list
More
Delete entry
Select
Yes
More
Delete all
Select
Yes
3. Press the More soft key.
4. Press the Up or Down key to highlight the Delete
entry option.
5. Press the Select soft key.
6. Press the Yes soft key to confirm the changes.
7. Press the Clr key one or more times to re turn to the
idle display.
Deleting all entries
To delete all entries from the All calls list, perform the following steps:
1. Open the All calls list using the steps in “Accessing
the All calls list” (page 74).
2. Press the Up or Down key to highlight the required
entry.
3. Press the More soft key.
4. Press the Up or Down key to highlight the Delete
all option.
5. Press the Select soft key.
6. Press the Yes soft key to confirm the changes.
7. Press the Clr key one or more times to return to the
idle display.
78
Page 79

Calls list
Calls
Answered calls list
The Answered calls list stores information about the answered calls. The
most recent entry appears at the top of the list.
This section describes the following tasks:
• “Accessing the Answered calls list” (page 79)
• “Viewing information about an answered call” (page 79)
• “Dialling a number” (page 80)
• “Transferring a number to your Contacts list” (page 80)
• “Transferring a number to the caller filter list” (page 82)
• “Deleting an entry” (page 83)
• “Deleting all entries” (page 83)
Accessing the Answered calls list
To access the Answered calls list, perform the following steps:
1. Press the Calls soft key.
2. Press the Left or Right key to select the Answered
calls list.
Viewing information about an answered call
To view information about an answered call, such as time and date,
perform the following steps:
1. Open the Answered calls list using the steps in
“Accessing the Answered calls list” (page 79).
2. Press the Up or Down key to highlight the required
entry.
79
Page 80

Calls list
More
View
Select
3. Press the More soft key.
4. Press the Up or Down key to highlight the View
option.
5. Press the Select soft key.
6. Press the Clr key one or more times to return to the
idle display.
Dialling a number
To dial a number from the Answered calls list, perform the follo wing steps:
1. Open the Answered calls list using the steps in
“Accessing the Answered calls list” (page 79).
2. Press the Up or Down key to highlight the required
entry.
Attention: If you want to predial from the
Answered calls list, press the More soft key, press
the Up or Down key to hig hlight the Edit before call
option, and press the Select soft key.
3. Press the Call key to dial the number.
Transferring a number to your Contacts list
To transfer a number from the Missed calls list to a new entry in your
Contacts list, perform the following steps:
1. Open the Answered calls list using the steps in
“Accessing the Answered calls list” (page 79).
80
Page 81

Calls list
More
Save
Select
Contacts
Select
Add
Save
Yes
2. Press the Up or Down key to highlight the required
entry.
3. Press the More soft key.
4. Press the Up or Down key to highlight the Save
option.
5. Press the Select soft key.
6. Press the Up or Down key to highlight the
Contacts option.
7. Press the Select soft key.
8. Press the Add soft key and use the Dialpad to edit
the number and enter the name (if necessar y).
81
9. Press the Save soft key.
10. Press the Yes soft key to confirm your changes.
11. Press the Clr key one or more times to return to the
idle display.
Page 82

Calls list
More
Save
Select
Caller filter
Select
Save
Transferring a number to the caller filter list
Attention: The Caller filter feature is available on the Avaya 4070 and
4075 DECT Handsets only.
To transfer a number from the Answered calls list to the caller filter list,
perform the following steps:
1. Open the Answered calls list using the steps in
“Accessing the Answered calls list” (page 79).
2. Press the Up or Down key to highlight the required
entry.
3. Press the More soft key.
4. Press the Up or Down key to highlight the Save
option.
5. Press the Select soft key.
6. Press the Up or Down key to highlight the Caller
Filter option.
7. Press the Select soft key.
8. Use the Dialpad to edit the number and enter the
name (if necessary).
9. Press the Save soft key.
10. Press the Clr key one or more times to return to the
idle display.
82
Page 83

Calls list
More
Delete entry
Select
Yes
More
Deleting an entry
To delete an entry from the Answered calls list, perform the following
steps:
1. Open the Answered calls list using the steps in
“Accessing the Answered calls list” (page 79).
2. Press the Up or Down key to highlight the required
entry.
3. Press the More soft key.
4. Press the Up or Down key to highlight the Delete
entry option.
5. Press the Select soft key.
6. Press the Yes soft key to confirm the changes.
7. Press the Clr key one or more times to return to the
idle display.
Deleting all entries
To delete all entries from the Answered calls list, perform the following
steps:
1. Open the Answered calls list using the steps in
“Accessing the Answered calls list” (page 79).
2. Press the Up or Down key to highlight the required
entry.
3. Press the More soft key.
83
Page 84

Calls list
Delete all
Select
Yes
Calls
4. Press the Up or Down key to highlight the Delete
all option.
5. Press the Select soft key.
6. Press the Yes soft key to confirm the changes.
7. Press the Clr key one or more times to re turn to the
idle display.
Dialled calls list
The Dialled calls list stores information about dialled calls. The most
recent entry appears at the top of the list.
This section describes the following tasks:
• “Accessing the Dialled calls list” (page 84)
• “Viewing information about a dialled call” (page 85)
• “Dialling a number” (page 85)
• “Transferring a number to your Contacts list” (page 75)
• “Transferring a number to the Caller filter list” (page 87)
• “Deleting an entry” (page 88)
• “Deleting all entries” (page 89)
Accessing the Dialled calls list
To access the Dialled calls list, perform the following steps:
1. Press the Calls soft key.
84
Page 85

Calls list
More
View
Select
2. Press the Left or Right key to select the Dialled
calls list.
Viewing information about a dialled call
To view information about a dialled call, such as time and date, perform
the following steps:
1. Open the Dialled calls list using the steps in
“Accessing the Dialled calls list” (page 84).
2. Press the Up or Down key to highlight the required
entry.
3. Press the More soft key.
4. Press the Up or Down key to highlight the View
option.
5. Press the Select soft key.
6. Press the Clr key one or more times to re turn to the
idle display.
Dialling a number
To dial a number from the Dialled calls list, perform the following steps:
1. Open the Dialled calls list using the steps in
“Accessing the Dialled calls list” (page 84).
85
Page 86

Calls list
More
Save
Select
Contacts
Select
2. Press the Up or Down key to highlight the required
entry.
Attention: If you want to predial from the Dialled
calls list, press the More soft key, press the Up or
Down key to highlight the Edit before call option,
and then press the Select soft key.
3. Press the Call key to dial the number.
Transferring a number to your contacts list
To transfer a number from the Missed calls list to a new entry in your
Contacts list, perform the following steps:
1. Open the Dialled calls list using the steps in
“Accessing the Dialled calls list” (page 84).
2. Press the Up or Down key to highlight the required
entry.
3. Press the More soft key.
4. Press the Up or Down key to highlight the Save
option.
5. Press the Select soft key.
6. Press the Up or Down key to highlight the
Contacts option.
7. Press the Select soft key.
86
Page 87

Calls list
Add
Save
Yes
More
Save
Select
8. Press the Add soft key and use the Dialpad to edit
the number and enter the name (if necessar y).
9. Press the Save soft key.
10. Press the Yes soft key to confirm the changes.
11. Press the Clr key one or more times to re turn to the
idle display.
Transferring a number to the Caller filter list
Attention: The Caller filter feature is available on the Avaya 4070 and
4075 DECT Handsets only.
To transfer a number from the Dialled calls list to the Caller filter list,
perform the following steps:
1. Open the Dialled calls list using the steps in
“Accessing the Dialled calls list” (page 84).
2. Press the Up or Down key to highlight the required
entry.
3. Press the More soft key.
4. Press the Up or Down key to highlight the Save
option.
5. Press the Select soft key.
87
Page 88

Calls list
Caller filter
Select
Save
More
Delete entry
Select
Yes
6. Press the Up or Down key to highlight the Caller
filter option.
7. Press the Select soft key.
8. Use the Dialpad to edit the number and enter the
name (if necessary).
9. Press the Save soft key.
10. Press the Clr key one or more times to re turn to the
idle display.
Deleting an entry
To delete an entry from the Dialled calls list, perform the following steps:
1. Open the Dialled calls list using the steps in
“Accessing the Dialled calls list” (page 84).
2. Press the Up or Down key to highlight the required
entry.
3. Press the More soft key.
4. Press the Up or Down key to highlight the Delete
entry option.
5. Press the Select soft key.
6. Press the Yes soft key to confirm the changes.
88
Page 89

Calls list
More
Delete all
Select
Yes
7. Press the Clr key one or more times to re turn to the
idle display.
Deleting all entries
To delete all entries from the Dialled calls list, perform the following steps:
1. Open the Dialled calls list using the steps in
“Accessing the Dialled calls list” (page 84).
2. Press the Up or Down key to highlight the required
entry.
3. Press the More soft key.
4. Press the Up or Down key to highlight the Delete
all option.
5. Press the Select soft key.
6. Press the Yes soft key to confirm the changes.
7. Press the Clr key one or more times to re turn to the
idle display.
Missed calls list
The Missed calls list stores information about unanswered calls. The most
recent entry appears at the top of the list.
Note: (4075 only) You can configure the LED indicator to flash when
you have missed calls. After you view information about missed calls,
the LED indicator turns off. See “Configuring the LED Indicator (4075
only)” (page 167), for more details.
The Missed calls list includes the following features:
89
Page 90

Calls list
• Recently missed (unanswered, rejected or blocked by Caller filter
(4070 and 4075 only)) and unchecked calls are bolded.
Attention: If you configure the handset to display the time using am/
pm, the date appears for recently missed unchecked calls,
but the time does not appear.
• When you do not answer a call, or a call is rejected or blocked by
Caller Filter (4070 and 4075 only), the handset stores the number in
the Missed calls list.
• If you answer a call from a number in the Missed calls list, the
handset moves the number from the Missed calls list to the Answered
calls list.
• If you dial a number from the Missed calls list, the number
automatically moves from the Missed calls list to the Dialled calls list.
This section describes the following tasks:
• “Accessing the Missed calls list” (page 91)
• “Viewing information about a missed call” (page 91)
• “Dialling a number” (page 92)
• “Transferring a number to your Contacts list” (page 92)
• “Transferring a number to the Caller filter list” (page 94)
• “Deleting an entry” (page 95)
• “Deleting all entries” (page 95)
The following table shows the missed call icons.
Table 12: Missed calls icon
Icon Description
Unanswered or rejected call
Blocked call by Caller filter (4070 and 4075
only)
90
Page 91

Calls list
Yes
Calls
More
Accessing the Missed calls list
When the message “Number of missed calls: N Show?” appears, you
have missed one or more calls (N is the number of calls you missed).
Note: The message “Number of missed calls: N Show?” indicates
the total number of missed calls, including both new calls and calls
you have already checked in the Missed calls list.
To access the Missed calls list, perform the following steps:
1. When the message “Number of missed calls: N
Show?” appears, perform one of the following :
OR
Press the Yes soft key.
OR
Press the Calls soft key, and then press the Left or
Right key to select the Missed calls list.
The list of missed calls appears.
Viewing information about a missed call
To view the information about a missed call, such as time and date,
perform the following steps:
1. Open the Missed calls list using the steps in
“Accessing the Missed calls list” (page 91).
2. Press the Up or Down key to highlight the required
entry.
3. Press the More soft key.
91
Page 92

Calls list
View
Select
4. Press the Up or Down key to highlight the View
option.
5. Press the Select soft key.
6. Press the Clr key one or more times to re turn to the
idle display.
Dialling a number
To dial a number from the Missed calls list, perform the following steps:
1. Open the Missed calls list using the steps in
“Accessing the Missed calls list” (page 91).
2. Press the Up or Down key to highlight the required
entry.
Attention: To predial from the Missed calls list,
press the More soft key, press the Up or Down key
to highlight the Edit before call option, and press
the Select soft key.
3. Press the Call key to dial the number.
Transferring a number to your Contacts list
To transfer a number from the Missed calls list to a new entry in your
Contacts list, perform the following steps:
1. Open the Missed calls list using the steps in
“Accessing the Missed calls list” (page 91).
92
Page 93

Calls list
More
Save
Select
Contacts
Select
Add
Save
Yes
2. Press the Up or Down key to highlight the required
entry.
3. Press the More soft key.
4. Press the Up or Down key to highlight the Save
option.
5. Press the Select soft key.
6. Press the Up or Down key to highlight the
Contacts option.
7. Press the Select soft key.
8. Press the Add soft key and use the Dialpad to edit
the number and enter the name (if necessar y).
93
9. Press the Save soft key.
10. Press the Yes soft key to confirm the changes.
11. Press the Clr key one or more times to re turn to the
idle display.
Page 94

Calls list
More
Save
Select
Caller filter
Select
Save
Transferring a number to the Caller filter list
Attention: The Caller filter feature is available only on the Avaya 4070
and 4075 DECT Handsets.
To transfer a number from the Missed calls list to the Caller filter list,
perform the following steps:
1. Open the Missed calls list using the steps in
“Accessing the Missed calls list” (page 91).
2. Press the Up or Down key to highlight the required
entry.
3. Press the More soft key.
4. Press the Up or Down key to highlight the Save
option.
5. Press the Select soft key.
6. Press the Up or Down key to highlight the Caller
Filter option.
7. Press the Select soft key.
8. Use the Dialpad to edit the number and enter the
name (if necessary).
9. Press the Save soft key.
10. Press the Clr key one or more times to re turn to the
idle display.
94
Page 95

Calls list
More
Delete entry
Select
Yes
More
Deleting an entry
To delete an entry from the Missed calls list, perform the following steps:
1. Open the Missed calls list using the steps in
“Accessing the Missed calls list” (page 91).
2. Press the Up or Down key to highlight the required
entry.
3. Press the More soft key.
4. Press the Up or Down key to highlight the Delete
entry option.
5. Press the Select soft key.
6. Press the Yes soft key to confirm the changes.
7. Press the Clr key one or more times to re turn to the
idle display.
Deleting all entries
To delete all entries from the Missed calls list, perform the following steps:
1. Open the Missed calls list using the steps in
“Accessing the Missed calls list” (page 91).
2. Press the Up or Down key to highlight the required
entry.
3. Press the More soft key.
95
Page 96

Calls list
Delete all
Select
Yes
4. Press the Up or Down key to highlight the Delete
all option.
5. Press the Select soft key.
6. Press the Yes soft key to confirm the changes.
7. Press the Clr key one or more times to re turn to the
idle display.
96
Page 97

Contacts
Contacts
Attention: Some menu items may be locked or unavailable to users.
Please contact your system administrator for more details.
You can use your handset to store contact numbers and names.
The Contacts menu allows you to store a maximum of 50 phone number s
and names without a MEM card, or a maximum of 200 with an installed
MEM card. You can search for names in the Contacts list.
Attention: The maximum number of entries you can store varies
depending on the amount of storage space used by other
features.
The following restrictions apply:
• Each entry must have a unique name, however, you can store the
same number under more than one name.
• Each entry can include a maximum of 16 characters in the name, and
a maximum of 32 digits in the contact number.
• Each entry can contain up to 4 numbers. You can identify each
number using one of the following types: work, mobile, home, or
other.
• If you receive a call from a caller whose number is in the Contact list,
the caller name appears on the display.
This section describes the following tasks.
• “Accessing the Contacts menu” (page 98)
• “Adding a new contact” (page 98)
• “Adding a contact number” (page 99)
• “Editing a contact number” (page 100)
• “Deleting a contact number” (page 102)
97
Page 98

• “Editing a contact name” (page 103)
Menu
Select
New contact
Add
• “Editing a contact ringtone” (page 104)
• “Deleting a contact” (page 105)
• “Speed dial feature” (page 105)
• “Transfer numbers to your contacts list” (page 108)
• “Transferring numbers to the caller filter list” (page 108)
Accessing the Contacts menu
To access the Contacts menu, perform the following steps:
1. Press the Menu soft key.
2. Press the Up or Down key to highlight the
Contacts icon.
3. Press the Select soft key.
Attention: If your communication system supports
the Central Directory feature, press the Up or
Down key to highlight the Private option, and then
press the Select soft key.
Contacts
Adding a new contact
To add a new contact, perform the following steps:
1. Open the Contacts menu using the steps in
“Accessing the Contacts menu” (page 98).
2. Highlight the New contact option.
3. Press the Add soft key.
98
Page 99

Contacts
Save
Save
Yes
More
Edit contact
Select
4. Use the Dialpad to enter the phone number.
Long press the * key to insert a comma to indicate
a pause when you enter a number.
5. Press the Save soft key.
6. Use the Dialpad to enter the name.
7. Press the Save soft key.
8. Press the Yes soft key to the save the contact.
9. Press the Clr key one or more times to return to the
idle display.
Adding a contact number
A contact can have more than one number associated with it; a maximum
of 50 phone numbers without a MEM card, or a maximum of 200 with an
installed MEM card. To add an additional number to a contact, perform
the following steps:
99
1. Open the Contacts menu using the steps in
“Accessing the Contacts menu” (page 98).
2. Press the Up or Down key to choose the contact to
edit.
3. Press the More soft key.
4. Press the Up or Down key to highlight the Edit
contact option.
5. Press the Select soft key.
Page 100

Contacts
New number
AddOKSave
Save
Yes
More
6. Press the Up or Down key to highlight the New
number option.
7. Press the Add soft key to add a new number for
this contact.
8. Press the Up or Down key to highlight the required
number type.
9. Press the OK soft key.
10. Use the Dialpad to enter the phone number.
11. Press the Save soft key.
12. Press the Save soft key.
13. Press the Yes soft key to confirm the changes.
14. Press the Clr key one or more times to return to the
idle display.
Editing a contact number
To edit a contact number, perform the following steps:
1. Open the Contacts menu using the steps in
“Accessing the Contacts menu” (page 98).
2. Press the Up or Down key to choose the contact to
edit.
3. Press the More soft key.
100
 Loading...