

Page 1

IP Office
20CC Turret Phone
40DHB0002UKAJ Issue 3 (04/03/2002)
Page 2

Page 2 – Contents
Contents
The 20CC Turret Phone ............................................................ 3
Making Calls .............................................................................. 5
Speed Dials ............................................................................... 7
Account Codes .......................................................................... 8
Busy or Unanswered ................................................................. 9
Actions During a Call ............................................................... 10
Answering Calls ....................................................................... 11
Transfer, Park & Hold Calls ..................................................... 13
Diverting Calls.......................................................................... 15
DSS Keys ................................................................................ 17
ACD Working ........................................................................... 19
Manager-Secretary Working.................................................... 20
Manager-Secretary Setup........................................................ 21
Ringer Controls........................................................................ 23
Other Features......................................................................... 25
Phone Settings ........................................................................ 26
Voicemail ................................................................................. 27
System Features...................................................................... 30
Index ........................................................................................ 31
IP Office - 20CC Turret Phone 40DHB0002UKAJ Issue 3 (04/03/2002)
Page 3
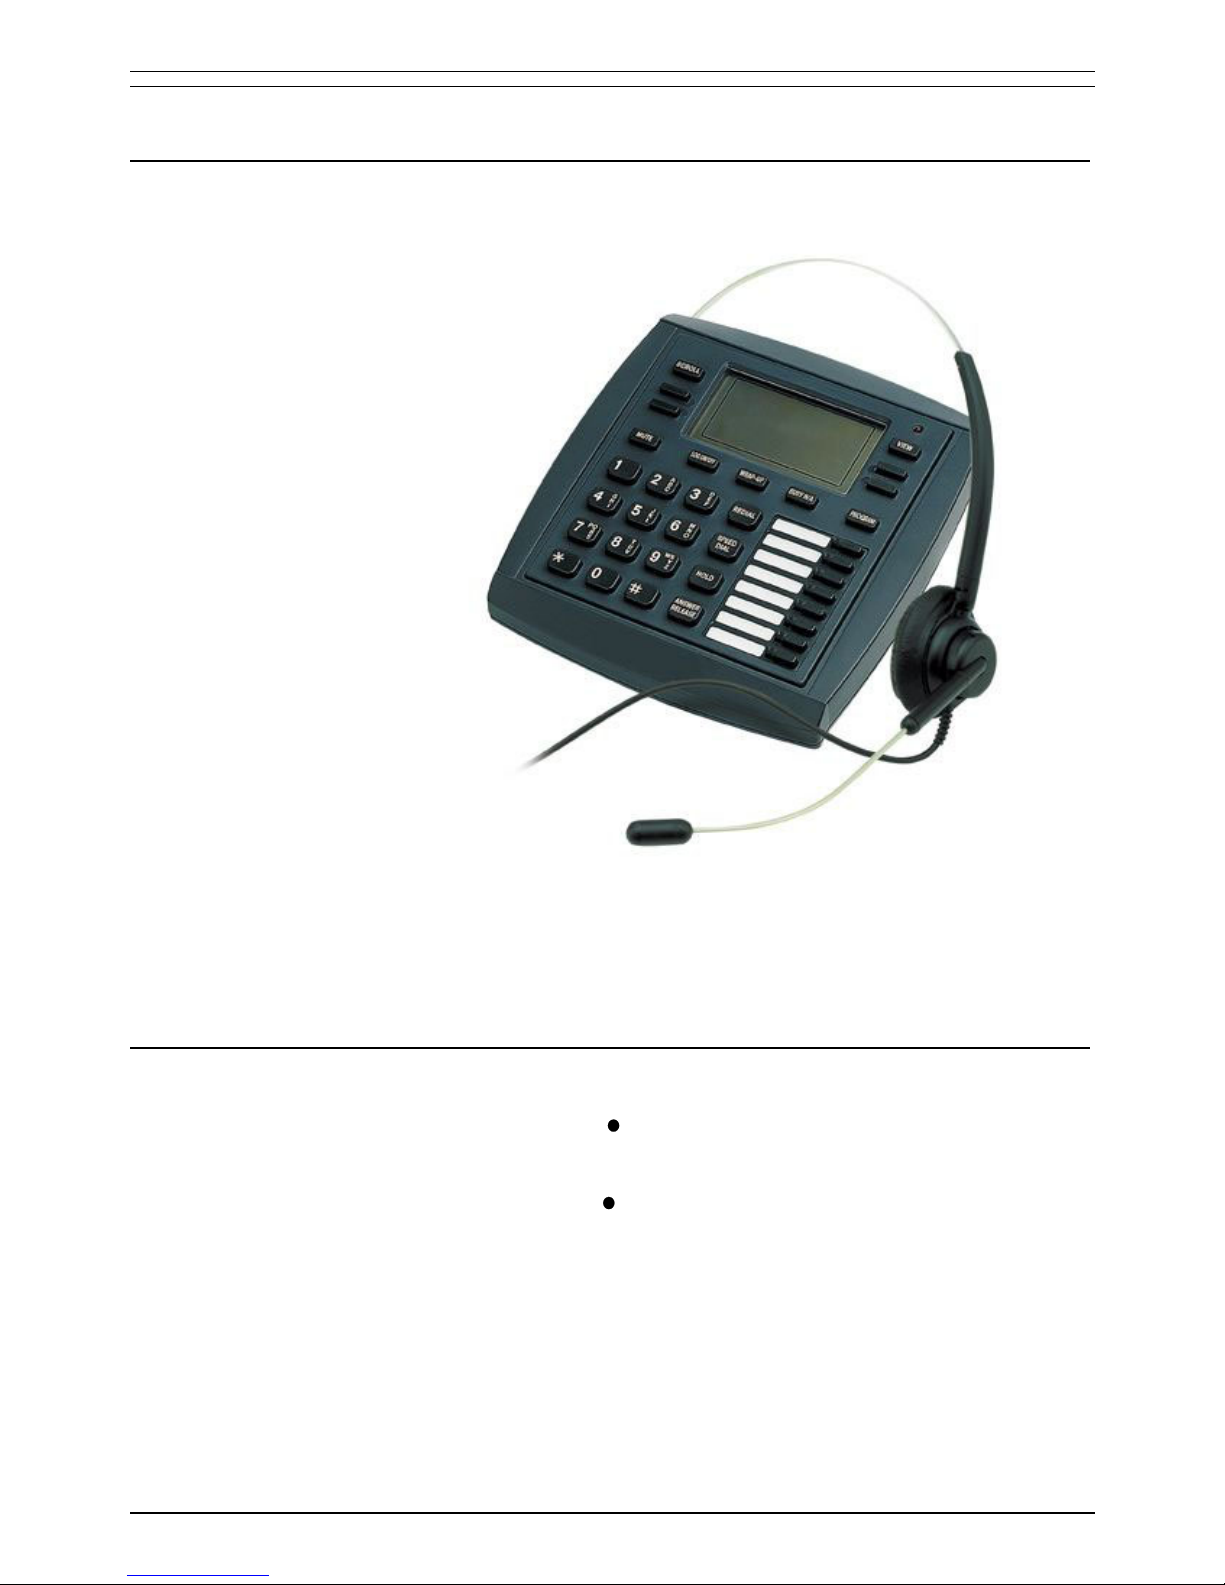
The 20CC Turret Phone – Page 3
The 20CC Turret Phone
Introduction to the 20CC Turret Phones
The diagram below shows a 20CC turret phone.
This guide is for 20CC when used on an IP Office telephone system.
The guide covers most of the features supported by the 20CC. However,
your phone may not be enabled to use all of the features available. If you
are unsure which features you can use, contact your System Administrator.
Using the SCROLL Key
Sometimes there are more options available than the phone can display.
When this happens, a
-symbol appears next to the SCROLL key. Press
SCROLL to display the other options.
Similarly, the phone display changes during calls and according to your
own customisation. A
-symbol next to a display key indicates an option
you can use by pressing that key. Thus this guide cannot always detail
when you would have to press the SCROLL key to access a function.
40DHB0002UKAJ Issue 3 (04/03/2002) IP Office - 20CC Turret Phone
Page 4
Page 4 – Contents
Headset Usage & Answer Release
The 20CC is designed for use with headsets. Pressing the ANSWER
RELEASE key has the same effect as lifting or replacing the handset.
If the headset is connected via a Multi-Purpose Amplifier (MPA) box, the
barrier box supplied with the turret must also be used with the barrier box
connected directly to the socket marked H/SET under the turret. Use of the
barrier box protects the turret in high static environments.
Tones & Ringing
The phone uses various tones and rings to indicate events. A sample of
these appears below. You can alter the ringer volume, sound, switch it
on/off, etc. (see page 22).
Incoming Calls
:
• Repeated Single Ring: Internal call.
• Repeated Double Ring: External call.
• Single Tone: Page call (see page 11).
Making Calls
:
• Dial Tone: Dial number.
• Broken Dial Tone: Phone on divert or no calls (see page 15).
• Repeated Tone: Busy number (see page 9).
• Continuous Tone: Number called unobtainable.
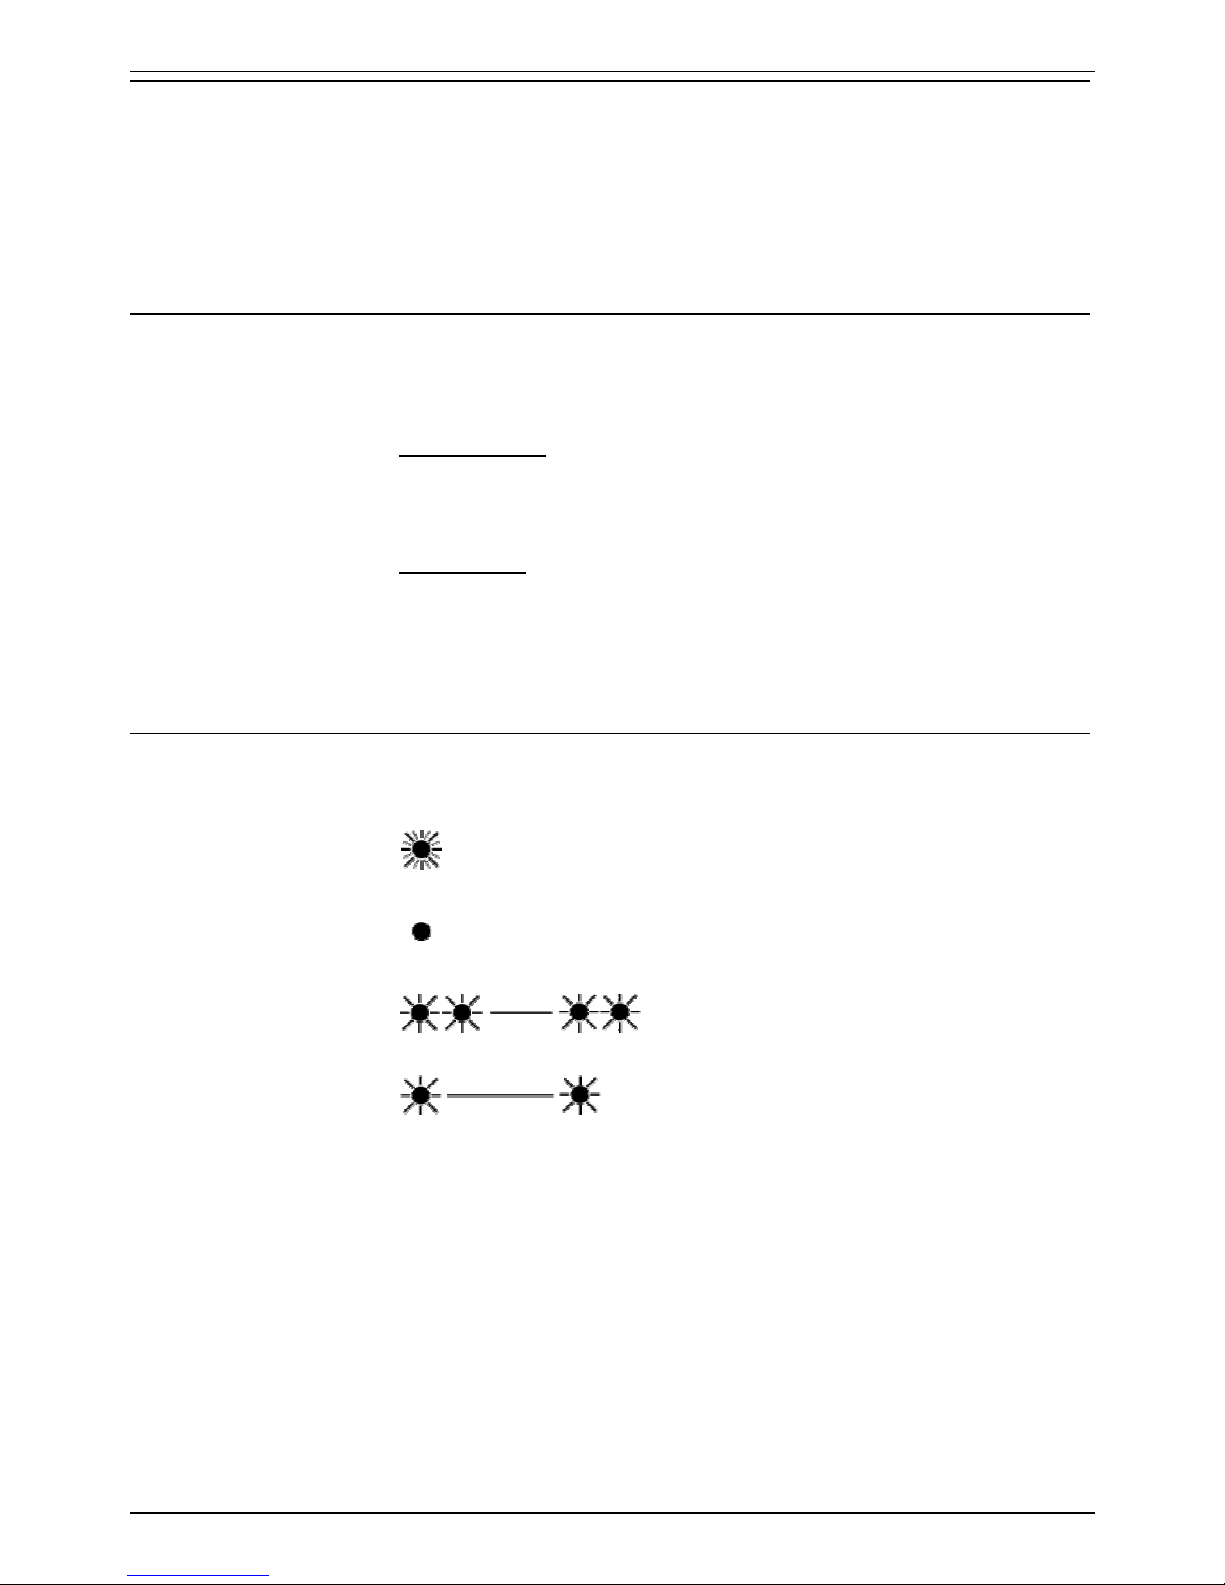
The Phone Lamp
The phone uses its lamp (above the VIEW key) to show calls and
messages.
Fast Flashing Lamp: Call Waiting, see page 12.
Lamp On: Message, see page 11.
Repeating Double Flash: External call.
Repeating Single Flash: Internal call.
IP Office - 20CC Turret Phone 40DHB0002UKAJ Issue 3 (04/03/2002)
Page 5

Making Calls – Page 5
Making Calls
Notes on Making Calls
When making calls, the display shows details about call progress. It also
shows messages if you cannot make the call.
• Call barring:
The system can bar you from dialling particular numbers or types of
number (e.g. national, international). As the call barring settings vary for
each site, this guide cannot fully detail their effect.
Making Internal Calls
During the call, the display shows the call progress. You can also make
calls using the
INDeX Directory feature (see Making Calls from the INDeX
Directory below) or DSS keys (see page 17 & page 20 ).
To dial an internal call
:
1. Dial the extension number. A broken dial tone indicates that the
extension is on divert.
2. If unanswered, your phone provides options to wait or notify the
extension (see page 9).
Making a Page Call
You can page other 20 series phones (2030, 2050, 20AT, 20CC and 20DT)
or groups containing 20 series phones. They hear the call without doing
anything though you cannot hear them. Some can also turn the page into a
normal call (see page 11). If the phone paged is diverting calls, the page
also diverts (except group pages).
To page an extension or group
:
1. Press
PAGE. Your phone displays PAGING.
2. Dial the number or press a DSS key (see page 17).
• If busy or unavailable, the display shows options to wait or leave a
message (see page 9).
3. Speak and then press ANSWER RELEASE.
40DHB0002UKAJ Issue 3 (04/03/2002) IP Office - 20CC Turret Phone
Page 6

Page 6 – Contents
Making External Calls
The system may apply call barring to some or all external numbers. You
can bar your phone by wrong passcode entry (see page 26).
To dial an external call
:
1. Dial the external number. There is no need to dial a Prefix for an
external call unless your System Administrator has specified otherwise.
• If the phone displays •ACCOUNT then you need to enter an account
code before dialling the external number, see page 8.
2. If "NO ACCOUNT CODE" appears, see page 8.
Redialling External Numbers
You can redial any of the last 10 external numbers dialled
To redial the last external number used
:
1. Press REDIAL until the number required appears and then press
•CALL.
• To remove a number from the redial memory press •DELETE.
Making Calls from the INDeX Directory
Your phone can display an index of telephone extension names from which
you can select and make calls.
To make a call using the INDeX
:
1. Press
INDeX for an internal call or SPEED DIAL and then INDeX for
an external number.
2. Press the key matching the 1
st
letter of the name you want. For example,
to display names beginning with L, press the JKL key 3 times.
• To move through the names beginning with L, press the -keys on
the right and left of the current name.
• To skip forward 10 names, press SKIP.
• To select another letter, press a letter key.
3. To dial the name/number shown, press
CALL, otherwise to exit the
INDeX, press ANSWER RELEASE.
IP Office - 20CC Turret Phone 40DHB0002UKAJ Issue 3 (04/03/2002)
Page 7

Speed Dials – Page 7
Speed Dials
Using Speed Dials
The system can store external numbers as speed dials.
• System speed dials
: Ask your System Administrator for a list. Note that
call barring may still apply.
• Personal speed dials: Your phone can also store up to 10 speed dials
for your own use (see below).
• Short Code Speed Dials: Additional speed dials may be available as
short codes, ask your System Administrator for a list.
To dial a speed dial
:
1. Press SPEED DIAL.
• To select a personal speed dial : Press
OWN and dial the
personal speed dial store number (0 to 9) or press the matching
DSS key (the DSS keys match personal speed dials 1 to 8 (1 at the
top)).
• To select a system speed dial by number : Press
SYSTEM and
dial the store number (100 to 999).
• If "ENTER ACCOUNT" appears, see page 8.
2. Continue as for a normal call.
Storing Personal Speed Dials
To store a personal speed dial:
1. Press PROGRAM and then SPEED DIAL.
2. Enter the phone's passcode (see page 26).
3. The display shows 0-9 OR DSS KEY. Press the number (0 to 9) or DSS
key under which you want to store the speed dial.
• DSS key 1 matches personal speed dial number 1, DSS key 2
matches personal speed dial number 2, etc.
4. The display shows the current stored number (if set). Press
DELETE
and dial the number.
5. When finished, press DONE.
6. Select another store or press PROGRAM to finish.
40DHB0002UKAJ Issue 3 (04/03/2002) IP Office - 20CC Turret Phone
Page 8

Page 8 – Contents
Account Codes
If ENTER ACCOUNT or NO ACCOUNT Appears
If ENTER ACCOUNT or NO ACCOUNT appears when making a call, then
you must enter an account code to continue. The system checks this
against its list of codes before allowing the call. You must also do this
before making a call if your phone displays •ACCOUNT.
To enter an account code at any time during a call, see page 8.
To enter a forced account code
:
1. Dial the account code. If you make a mistake, press
DELETE to delete
the last digit entered.
2. When you have entered the full code, press
DONE.
3. If the system does not recognise the code it displays REENTER
ACCOUNT. Repeat the entry or end the call.
4. If the code is recognised, your call can continue.
Adding Voluntary Account Codes
You can enter an account code during any external call. The system will
record the call on its call log, including the account code. The system
checks the code against its list of valid codes (ask your System
Administrator for a copy).
To enter a voluntary account code
:
1. During the call, press
ACCOUNT.
2. Enter an account code. If you make a mistake, press
DELETE to
delete the last digit entered.
3. When you have entered the full code, press
DONE.
4. If the system does not recognise the code, the phone displays RE-
ENTER ACCOUNT.
IP Office - 20CC Turret Phone 40DHB0002UKAJ Issue 3 (04/03/2002)
Page 9

Busy or Unanswered – Page 9
Busy or Unanswered
Options If Busy or Unanswered
If your phone displays NUMBER BUSY when you call another extension,
pressing SCROLL reveals a number of options you can use. Note that the
busy extension may have settings to forward your call to another extension
or to voice mail. The default time before this happens is 15 seconds.
• •CALLBACK
Arranges a callback that rings your phone when the extension called
becomes free or is next used.
• •VMAIL
If the system has voice mail installed, connects you to the extensions
mailbox to leave a message.
• •MESSAGE:
Lights the lamp of the extension called. It also stores your number as a
message to reply.
• •CAMP_ON:
Though displayed this option is not currently supported.
Arrange a Callback
If the extension you call is busy or just rings, you can set a callback. When
that extension becomes free or is next used, your phone rings. If you
answer, the other extension rings.
After setting a callback you can make other calls, it will not take place while
you are busy. You can only arrange one callback at any time.
The Ringer Timeout sets how long a callback rings your extension before it
cancels (see page 24).
To arrange a Callback
:
1. When NUMBER BUSY appears, press SCROLL and then
CALLBACK (the option does not appear if you already have a
callback set).
2. The system ends your call attempt and your phone shows
CALLBACK.
To cancel the Callback
:
1. Press
CALLBACK. You can do this even whilst the callback is taking
place and your phone is ringing.
Leave a Message
You can leave your extension number as a message for someone to call
you (see page 11). If their extension has a message lamp, it lights.
To leave a message
:
1. When NUMBER BUSY appears, press SCROLL and then press
MESSAGE.
40DHB0002UKAJ Issue 3 (04/03/2002) IP Office - 20CC Turret Phone
Page 10

Page 10 – Contents
Actions During a Call
Changing the Call Volume
You can change the caller volume during a call. The phone has separate
volume levels for both the speaker and the handset.
To change the call volume
:
1. During a call, press
VOLUME. To change volume without making a
call just press ANSWER RELEASE first.
2. A slider appears. Adjusts this using the
-keys on its left (softer) and
right (louder).
3. When finished, press
DONE.
Muting Calls
Using mute you can stop the caller from hearing you though you can still
hear them.
To switch mute on/off
:
1. Press MUTE. The
-symbol disappears from the display whilst a call is
muted..
Software Release
Occasionally you may need to talk to someone for support about your
phone or phone system. It may be useful to tell that person what software
your phone system uses.
To display the software release
:
1. During a call, press PROGRAM, the phone displays the software
installed on your system. To do this without making a call, just press
ANSWER RELEASE first.
2. Press SCROLL to return to the normal display.
Create a Conference Call
During a call, you can add callers to create a conference of up to 64 calls in
total. This option is not supported on all systems.
To start or add to a conference
:
1. Press HOLD to hold your current call (or conference).
2. Call the new person that you want in the conference.
3. If answered, ask if they wish to join a conference; if "yes" press
CONFER, if "no" press HOLD.
4. If unanswered, press HOLD to retrieve to the first call.
To exit the conference
:
1. Press ANSWER RELEASE.
To park all the conference parties
:
1. Press
PARK (see page 14). This option is not available to the
extension that created the conference.
IP Office - 20CC Turret Phone 40DHB0002UKAJ Issue 3 (04/03/2002)
Page 11

Answering Calls – Page 11
Answering Calls
Answering Normal Calls
When calls arrive, the display shows information about the call before you
answer. It gives a repeated double flash for external calls or a repeated
single flash for internal calls. The ringer also shows the call type by a
repeated single or double ring if on (see page 23).
To answer the call
:
1. Press ANSWER RELEASE.
Answering a Page Call
When someone pages your phone (see page 5) or a group to which it
belongs (your phone does not have to be in group), the system connects
the page after giving a tone. You can hear the page but they cannot hear
you. The display shows PAGING and the pager's number. If you answer a
page it turns into a normal call.
To answer a page
:
1. Press ANSWER/RELEASE.
Answering a Message
Other extensions can leave their number on your phone (see page 9). Your
phone can store several messages. It shows CALL FOR MESSAGE, the
caller's number and the lamp comes on. The exceptions are:
• If "Message From Voice Mail" appears, this indicates voice mail (see
page 27).
To answer or cancel a message
:
1. To view any other message, press
NEXT if shown.
2. To call the extension, press
CALL.
3. To clear the message, press
CANCEL.
4. At the last message, press
AGAIN to repeat the list.
40DHB0002UKAJ Issue 3 (04/03/2002) IP Office - 20CC Turret Phone
Page 12

Page 12 – Contents
Answering Other Extensions - Call Pickup
Your extension can store a pickup group number. If an extension in your
pickup group rings, then the
PICKUP option appears. You can also
pickup calls using DSS (see page 17) or Soft DSS keys (see page 20).
To pick up any ringing phone
:
1. This option is available via a short code, contact your System
Administrator.
To pick up calls in your pickup group:
1. Press
PICKUP to show the longest ringing call.
2. To pick up the call shown, press VIEW.
3. To cancel the pickup display, press ANSWER RELEASE.
To set the phone's pickup group
:
1. Press PROGRAM and then SCROLL. Press
PICKUP.
2. Enter the phone's passcode (see page 26).
3. The display shows the current pickup group (if set).
4. Press
CANCEL and enter a new pickup group number.
5. Press PROGRAM to finish.
You can also use the system's short codes for call pick-up. These are :
*30 to answer a call ringing anywhere. •
•
•
*31 to answer a call within your group.
*32*201# to answer the call for ringing a particular extension, in this
example 201.
Answering a Call Waiting
If your phone has call waiting in use, then when someone else calls you
during a call, the display will flip between details of your current call and the
waiting caller. Your phones lamp will also flash and you will hear a call
waiting tone every six seconds.
To turn call waiting on use the code *15; to turn it off use *16.
To answer a call waiting:
1. Either end your current call and press ANSWER RELEASE or press
HOLD to hold your current call.
2. The waiting call rings your phone.
3. Press
HOLD to switch between the current call and held call.
Answering Missed Calls
A digit on the display such as 9 indicates the number of unanswered calls
that have rung your phone. Pressing the display key next to the number
allows you to see the caller's number and either
CALL or DELETE the
entry.
IP Office - 20CC Turret Phone 40DHB0002UKAJ Issue 3 (04/03/2002)
Page 13

Transfer, Park & Hold Calls – Page 13
Transfer, Park & Hold Calls
Transferring Calls
You can transfer a call to an extension that is ringing or giving busy tone. If
the call waits unanswered for too long, it may recall to your extension.
To transfer a call using hold
:
1. Press HOLD to hold your current call.
2. Dial the extension to which you want to transfer the call.
• Announced transfer
: Wait to be answered. If okay to transfer, press
ANSWER RELEASE. If not okay to transfer or unanswered, press
HOLD.
• Unannounced transfer
: Press ANSWER RELEASE immediately
(even if you hear ringing or busy tone).
To transfer a call using dial ahead
:
1. Dial the number of the other extension.
2. If the display shows FREE, press ANSWER RELEASE to transfer,
otherwise press
CANCEL.
To transfer an external call using park
:
1. Press
PARK to park the current call. The parked call is displayed as
your extension number followed by a zero, eg.
2200. If you now
parked another call it would display as your extension number followed
by a one, eg.
2201 and so on.
2. Note the number displayed and at another extension dial *38*N# when N
is the number displayed for the parked call on your phone, eg.
*38*2200#.
Holding Calls
You can put a call on hold during which the caller will hear music on hold is
installed on your system. Note that a held call will re-ring at your extension
after a short period (either the systems 15 second default or your phone's
ringer timeout setting, see "Setting the Ringer Timeout" on page 24)
To hold a call
:
1. Press HOLD. Do not press ANSWER RELEASE now as that will end
the call.
2. Retrieve the call by pressing HOLD again or make another call (enquiry
call) and then press HOLD to switch between the current and held call.
40DHB0002UKAJ Issue 3 (04/03/2002) IP Office - 20CC Turret Phone
Page 14
Page 14 – Contents
Parking Calls (Park and Ride)
You can retrieve parked calls at any other extension on the system. Your
phone displays calls you parked by a flashing
-symbol next to the line
number. You can park several calls simultaneously.
To park an external call
:
1. During the call, press
PARK. The parked call is displayed as your
extension number followed by a zero, eg.
2200. If you now parked
another call it would display as your extension number followed by a
one, eg.
2201 and so on.
To unpark calls parked at your extension
:
1. Press the display key next to the flashing
-symbol.
To unpark a call at another extension
:
1. Note the number displayed and at another extension dial *38*N# when N
is the number displayed for the parked call on your phone, eg.
*38*2200#.
Dialling Ahead
On incoming call you can display the status of another extension without
interrupting your call.
To dial ahead during a call
:
1. Dial the number that you want to check.
2. The extension's status appears on the right-hand display; FREE, BUSY
or NU (Number Unobtainable).
3. Press CANCEL.
If the extension displayed is free
:
1. For an unannounced transfer, press ANSWER RELEASE.
2. To make an enquiry, press HOLD. This holds your current caller and
rings the dial ahead extension.
3. If unanswered, press HOLD to retrieve your first call.
4. If answered, either press ANSWER RELEASE to transfer your call or
press HOLD again to switch between calls.
You can set your phone to always automatically hold your current call and
ring the dial ahead number if it is free rather than display FREE.
To select show free or ring if free
:
1. Press PROGRAM and then SCROLL. Press
CALLFREE.
2. Enter the phone's passcode (see page 26).
3. To change the current setting, press
CHANGE.
4. Press
DONE and then press PROGRAM to finish.
IP Office - 20CC Turret Phone 40DHB0002UKAJ Issue 3 (04/03/2002)
Page 15

Diverting Calls – Page 15
Diverting Calls
Setting the Divert Number
Note that whilst the phone appears to allow the storing of separate divert
numbers for different situations, only two divert numbers are stored. A
number can be set for diverting All and a separate number can be set for
diverting On Busy and No Ans.
To set a divert number
:
1. Press PROGRAM and then DIVERT.
2. Enter your phone's passcode (see "The Phone Passcode" on page 26).
3. Select the type required, as described above.
4. The display shows the current diversion number (if set).
5. Press
CANCEL and then dial the new number.
6. Press
DONE and select another divert if required.
7. Press PROGRAM to finish.
You can also use the system call forwarding short codes to set the divert
number and the type of divert action in use.
To switch forward all calls on dial *01, to switch it off dial *02. •
•
•
•
To switch forward on busy on dial *03, to switch it off dial *04.
To switch forward on no answer on dial *05, to switch it off dial *06. Note
that forward on no answer does not work if you also have voicemail.
To set the number to which your calls are fowarded dial *07*201#,
forwarding to 201 in this example.
Switching Divert All On/Off
Pressing LOG ON/OFF switches Divert All on or off. When on, all your calls
go to the Divert All number. That extension can call you and transfer calls
back. Switching LOG ON/OFF on cancel group or no calls.
To switch divert all on/off
:
1. Press LOG ON/OFF. When on, a
-appears above the key. You also
hear broken dial tone if you press ANSWER RELEASE but you can still
make calls.
Switching No Calls On/Off
Pressing WRAP-UP switches it on or off. When on, if you press ANSWER
RELEASE you will hear a broken dial, but you can still make calls.
40DHB0002UKAJ Issue 3 (04/03/2002) IP Office - 20CC Turret Phone
Page 16
Page 16 – Contents
Displaying an Absence Message
You can select an absence message to display on your phone. The
absence message then also displays on suitable display phones that call
you even if they are then diverted to another extension or voicemail.
To select an absence message
:
1. Press PROGRAM and then
ABSENT.
2. Enter the phone's passcode (see page 26).
3. Press CHANGE to select a message (or CLEAR to cancel an
existing message). For just personal text, select CUSTOM. Then press
DONE.
4. PERSONAL TEXT? appears. To have no personal text, press
NONE.
To add some text press
EDIT.
• To add personal text press the key with the letter or number you want
to add and then press ROTATE to go through the letters and
numbers associated with that key.
• Use the and keys at either end of the text you input to move left
or right. When completed press
DONE.
5. When complete, press
SET then PROGRAM to finish.
To clear an absence message
:
1. Press PROGRAM and then
ABSENT.
2. Enter the phone's passcode (see page 26).
3. Press
CLEAR to cancel the existing message then PROGRAM to
finish.
Follow Me
You can re-route your calls to another extension. Note that, if you do not
answer calls at the temporary extension, they are forwarded to your own
voicemail or call forwarding number.
• to re-route your calls to the extension you are temporarily using:
*12*N# (N being your own extension number)
• to re-direct the calls back to your own extension from the temporary
extension:
*13*N# (N being your own extension number).
• from your own extension re-route calls to a temporary extension:
*14*N# (N being the temporary extension number)
• to cancel either feature from your own extension:
*14*#
Remote Forwarding
Forward allows you to remotely set your phone to divert.
To set a forward
:
1. Press PROGRAM and then
FORWARD.
2. The display shows FORWARD FROM ?. Enter the phone from which to
forward calls and press
DONE.
3. Enter that
phone's passcode (see page 26).
4. The display shows FORWARD TO ? and the phone's current Divert All
number (if set).
5. To change the forward, press
CANCEL and enter the new number for
diverting all calls.
6. Press
DONE and then press PROGRAM to finish.
IP Office - 20CC Turret Phone 40DHB0002UKAJ Issue 3 (04/03/2002)
Page 17

DSS Keys – Page 17
DSS Keys
Setting Up a DSS Key
The 20CC has eight DSS keys along its right-hand edge. Each of these
keys can store an extension number (or group number for paging). They
then allow you to dial those numbers in a single key press.
You can also use DSS keys to dial your personal speed dial numbers (see
page 7).
To set a DSS/BLF key directory number
:
1. Press PROGRAM and then the DSS key to use.
2. Enter the phone's passcode (see page 26).
3. The display shows the current stored number (if set).
4. Press
CANCEL and dial the number to store.
5. Select another DSS key and enter the required details.
6. Press
DONE then PROGRAM to finish.
Using DSS Keys
Once setup, you can use the DSS key for the following actions. You can
also use DSS keys to dial personal speed dial numbers (see page 7).
To make internal calls
:
Press the DSS key storing the extension or group number.
To pickup calls
:
Press the DSS key storing the ringing number (this will be giving a fast red
flashing for an extension or fast green flash for a group), the call details are
shown. Press ANSWER RELEASE to answer the call.
To make a page call
:
Press
PAGE and then the DSS key storing the extension or group
number.
BLF Status Lamps
The DSS keys on the 20CC incorporate dual-colour BLF lamps. These
show the status of the number stored under the DSS key.
Red BLF Lamp Signals
: Calls to/from other extensions.
• Fast Flash: Extension ringing.
• Solid: Extension or line busy.
Green BLF Lamp Signals
:
• Fast Flash: Calls to a group.
40DHB0002UKAJ Issue 3 (04/03/2002) IP Office - 20CC Turret Phone
Page 18

Page 18 – Contents
DSS Key Label
Next to the DSS keys is a label. You can remove the label cover to write on
the card below. You can also remove the label cover under the handset
using the same method (it has a single pin hole on the bottom edge).
To remove the label cover
:
1. Insert a fine but not sharp point (e.g. end of a paper-clip) into one pin
hole. Squeeze the label to the right.
2. Repeat with the other pin hole.
3. Lift the label cover clear and remove the card insert.
To replace the label cover
:
1. Replace the card insert.
2. Slide the tabs on the right-hand edge of the label cover into their slots.
3. Bow the label cover to slip the tabs on the left-hand edge of the label
cover into their slots.
IP Office - 20CC Turret Phone 40DHB0002UKAJ Issue 3 (04/03/2002)
Page 19

ACD Working – Page 19
ACD Working
Introduction
As an ACD agent, you have a log on number. Once logged on to a 20CC
you can receive call for your group.
The ACD records information about calls and agents. It displays this on
Supervisor PC's, wallboards and reports.
Logging On
When logging on, you may be asked to enter your turret's passcode (see
page 26).
To Log on:
1. Press
LOG ON/OFF.
2. Press
INDEX and enter the first letter of your name.
3. Press
SKIP until you see you name.
4. Press
SELECT.
Logging Off
Logging off stops you receiving ACD calls. To log off press LOG
ON/OFF.
Busy Not Available
This is used to temporarily stop receiving ACD group calls when you are
away from your desk for breaks, lunch, etc. To enter this mode:
1. Press the BUSY N/A button.
2. The
-symbol above the key flashes. Anyone who tries to call you will
hear the busy tone.
3. To return to receiving ACD calls again press the key below the flashing
-symbol.
40DHB0002UKAJ Issue 3 (04/03/2002) IP Office - 20CC Turret Phone
Page 20
Page 20 – Contents
Manager-Secretary Working
Using Soft DSS Keys
The system supports a range of functions for users who work together, i.e.
regularly call and transfer calls between each other. This is called
"Manager-Secretary working".
Soft DSS displays the name of another extension. The adjacent display key
allows you to make calls to that extension plus other features. The display
key's
-symbol acts as a busy lamp to show the extension's status.
Soft DSS has two modes. In half-line mode you can set 4 Soft DSS keys. In
full-line mode you can only set 2 keys but these can display more details
and functions.
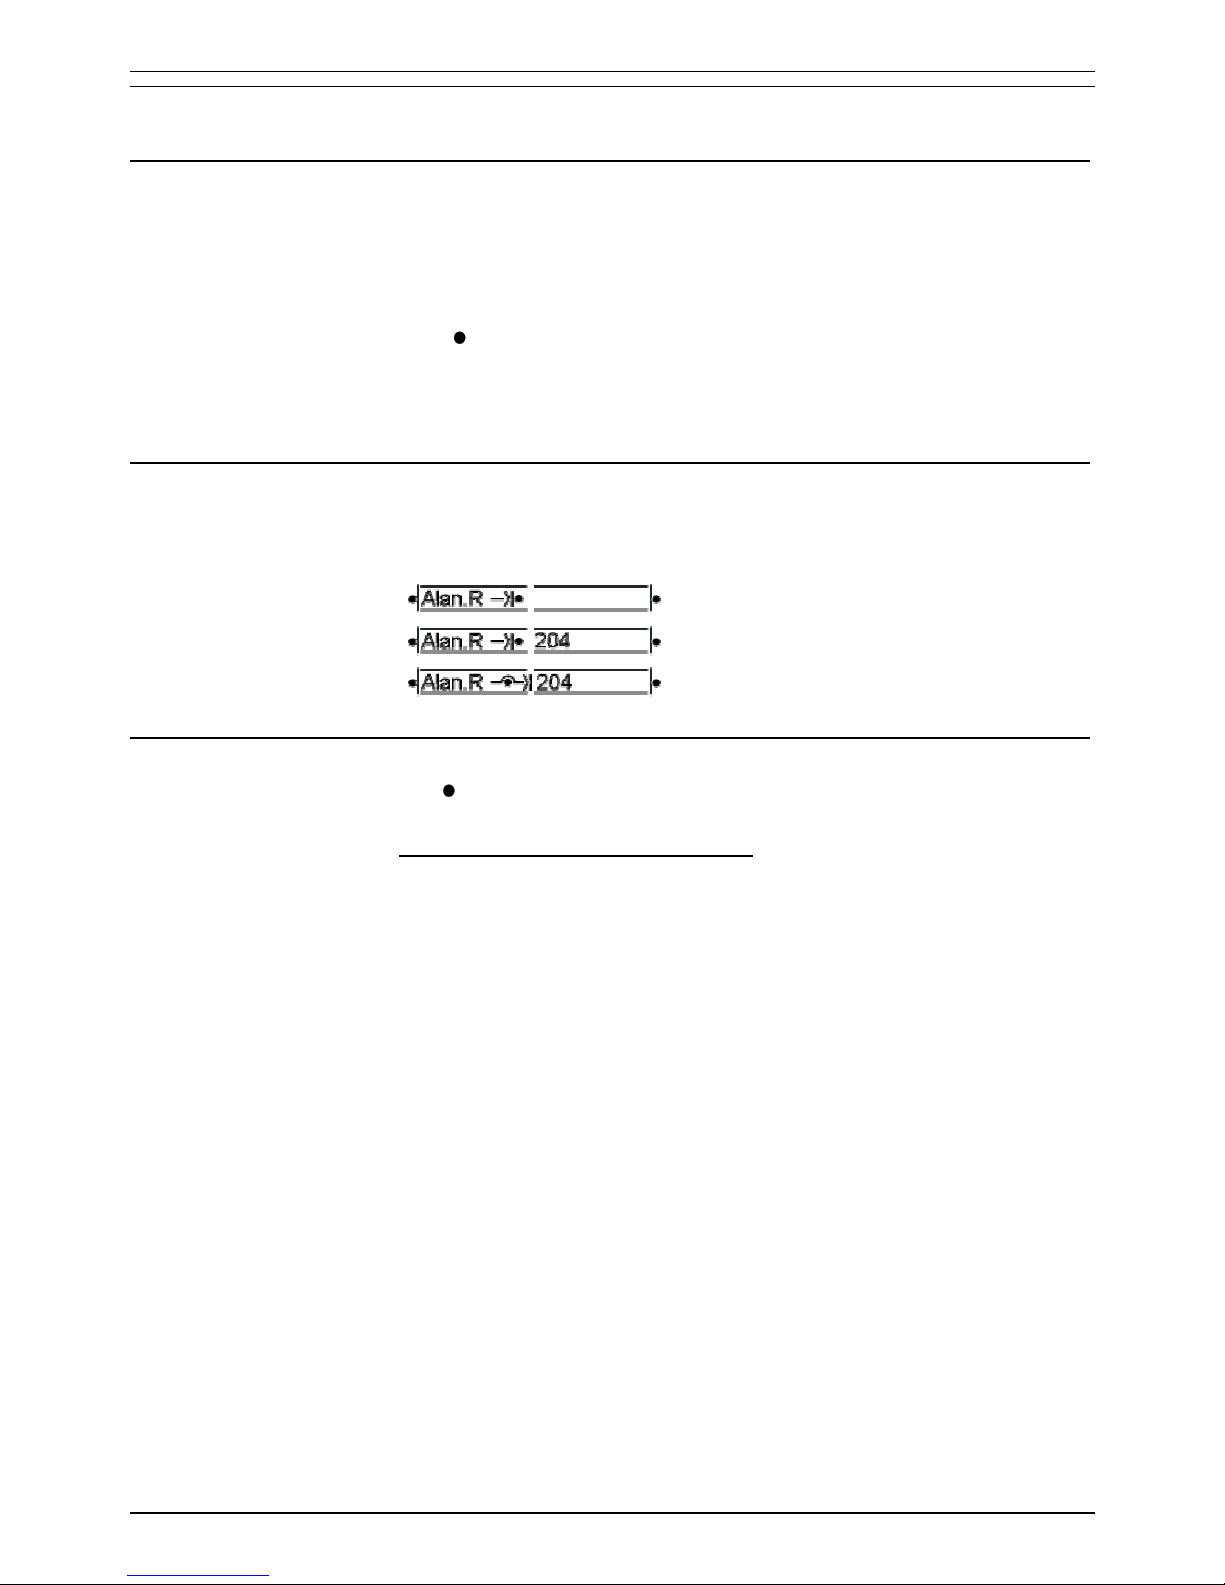
Soft DSS Key Display
In full-line mode, the display also shows when an extension is on LOG
ON/OFF or WRAP-UP. Note however that this display is only updated
when you call the extension.
Set to No Calls, no divert all set.
Set to No Calls, diverting to 204.
Set to Divert All, diverting to 204.
Making Calls
The -symbol next to the Soft DSS extension name is solid when busy,
flashes when ringing and not shown if free.
To make a call using a Soft DSS key
:
1. Press the display key next to the extension name. The Soft DSS usage
setting of your phone and the phone called determine what type of call
occurs (see page 22).
2. If the extension is busy, the phone displays the same options as for
normal calls (see page 9).
IP Office - 20CC Turret Phone 40DHB0002UKAJ Issue 3 (04/03/2002)
Page 21

Manager-Secretary Setup – Page 21
Manager-Secretary Setup
Planning Soft DSS Keys
When setting up Soft DSS keys you must decide:
• How many Soft DSS keys do you want
?
Half-line mode supports up to 4 keys. Full-line mode supports up to 2
keys but shows more information.
• What Soft DSS key features do you want to have
?
You can use half-line mode to make calls only. You can use full-line
mode to make calls, send alerts, etc.
• What type of calls do you want to make/receive
?
When using Soft DSS keys to make a call, the usage setting of your
phone and the phone called determines the type of call. The possibilities
are:
• Standard Call
: The same as a normally dialled call.
• Page Call
: The extension called hears a single tone and can then
hear you (you cannot hear them).
• Direct Call: The extension called hears a single tone and then you
can hear each other.
There are 4 usage settings (Normal, Auto Answer, Voice and Intercom).
See "Changing the Soft DSS Usage" on page 22 for how the different
usage settings interact.
Setting Up Soft DSS Keys
To clear the Soft DSS keys after setup, cancel all the set extensions (see
"Changing the Soft DSS Extensions").
To setup Soft DSS keys
:
1. Press PROGRAM, SCROLL and then
SOFT DSS.
2. Enter the phone's passcode (see page 26).
3. The phone shows NO SOFT DSS KEYS. Press CHANGE until the
display mode required appears, then press
DONE.
4. Enter the first extension number and then press
NEXT. If the righthand display is blank, you can enter another. If you have entered all the
extensions, press
DONE.
5. Press
USAGE. Press CHANGE until the setting required appears
and then press
DONE.
6. Press
DONE and then PROGRAM to finish.
40DHB0002UKAJ Issue 3 (04/03/2002) IP Office - 20CC Turret Phone
Page 22
Page 22 – Contents
Changing the Soft DSS Display Mode
The display mode sets how many Soft DSS keys you can have; 4 in halfline mode or 2 in full-line mode. Note that if you change mode from half-line
to full-line, you lose the last two extensions entered.
To set the Soft DSS key display mode
:
1. Press PROGRAM and SCROLL. Press
SOFT DSS.
2. Enter the phone's passcode (see page 26).
3. Press MODE. The display shows the current mode.
4. To change mode, press
CHANGE.
5. Press
DONE. The display goes to extension entry.
6. Press PROGRAM twice to finish.
Changing the Soft DSS Extensions
The Soft DSS features only work correctly with extension numbers. Do not
set lines or groups as Soft DSS keys.
To set a Soft DSS key extension
:
1. Press PROGRAM and SCROLL. Press
SOFT DSS.
2. Enter the phone's passcode (see page 26).
3. Press
EXTNS. to display the first number set.
• To cancel the number, press
CANCEL.
• To display the next number, press
NEXT.
• To enter a new number, press
NEXT until the top-right display goes
blank, then enter the number.
4. Press
DONE and then PROGRAM to finish
Changing the Soft DSS Usage
When using Soft DSS Keys to make a call, the usage setting of the two
phones determines the type of call that occurs. The phone's usage setting
affects all of its Soft DSS keys. The system treats extensions with no Soft
DSS Keys as set to NORMAL CALL.
Extension A
Usage Setting
Call Type
(< B calls A/A calls B>)
Extension B
Usage Setting
Normal or Auto Answer < Standard / Standard > Normal or Auto Answer
Normal < Page / Standard > Voice or Intercom
Auto Answer < Direct / Standard > Voice or Intercom
Voice < Page / Page > Voice
Voice < Direct / Page > Intercom
Intercom < Direct / Direct > Intercom
To set the Soft DSS key usage
:
1. Press PROGRAM and SCROLL. Press
SOFT DSS.
2. Enter the phone's passcode (see page 26).
3. Press
USAGE. The display shows the current setting.
4. To change the current usage, press
CHANGE.
5. Press PROGRAM to finish.
IP Office - 20CC Turret Phone 40DHB0002UKAJ Issue 3 (04/03/2002)
Page 23
Ringer Controls – Page 23
Ringer Controls
Changing the Ringer Volume
While altering the volume, the phone rings.
To change the ringer volume
:
1. Press PROGRAM and then
RINGER.
2. Enter the phone's passcode (see page 26).
3. Press
VOLUME. The display shows a slider. Adjust this using the -
keys on its left (softer) or right (louder).
4. Press PROGRAM to finish.
Changing the Ringer Sound
The ringer sound contains three tones. You can adjust the 'mix' of these to
achieve your own distinctive ring. While doing this the phone rings.
To change the ringer sound
:
1. Press PROGRAM and then
RINGER.
2. Enter the phone's passcode (see page 26).
3. Press
SOUND. The display shows a slider. Adjust this using the -
keys on its left and right.
4. To select another part of the sound to adjust, press
TONE. This
changes the slider to a different tone.
5. Press PROGRAM to finish.
Switching the Ringer On/Off
You can switch the ringer on or off for internal and/or external calls. This
does not affect the information displayed.
For internal calls you can also select AUTO ANSWER to connect internal
calls after giving just a single ring.
To switch the internal or external ring on/off
:
1. Press PROGRAM and then
RINGER.
2. Enter the phone's passcode (see page 26).
3. Press
SCROLL and then press EXTERNAL or INTERNAL. The
display shows the current setting.
4. To change the ringer mode, press
CHANGE to select ON, OFF or
AUTO ANSWER (internal only).
5. Press PROGRAM to finish.
40DHB0002UKAJ Issue 3 (04/03/2002) IP Office - 20CC Turret Phone
Page 24
Page 24 – Contents
Setting a Ringer Step
If a call rings unanswered, the phone can increase the volume on each ring
until it reaches its maximum. You can select several sizes of increase step.
To set the ringer volume step size
:
1. Press PROGRAM and then
RINGER.
2. Enter the phone's passcode (see page 26).
3. Press STEPS. The display shows the current setting; LARGE STEP,
SMALL STEP or NO STEP (no increase).
4. To select another step size, press
CHANGE.
5. Press
DONE and then PROGRAM to finish.
Setting the Ringer Timeout
The ringer timeout control several actions at your phone though chiefly how
long a callback rings before cancelling.
To set the ringer timeout
:
1. Press PROGRAM and then
RINGER.
2. Enter the phone's passcode (see page 26).
3. Press
TIMEOUT. The display shows the current setting. Note that 0
indicates that it is using the systems setting (which in default is 15
seconds).
4. Press
CANCEL and enter the new timeout in seconds.
5. Press
DONE and then PROGRAM twice to finish
IP Office - 20CC Turret Phone 40DHB0002UKAJ Issue 3 (04/03/2002)
Page 25

Other Features – Page 25
Other Features
Group
Your phone can be included in a group of phones. When 'in group', you
receive calls made to the group number.
The group's type sets the order in which members ring. The types are:
• Group
All free members of the group ring at the same time
• Hunt
Calls go to the first free member of the group starting from the first
member.
• Rotary
Calls go to the next free member of the group in sequence from the
previous member rung.
• Idle
New calls go to the member who has been free longest.
When in a group where each member rings in turn, your phone rings for the
time set by its ringer timeout (see page 24). Going into group switches
divert all or no calls off.
To join/leave group
:
1. Pressing the BUSY N/A key takes your phone in or out of group.
2. When 'in group' (shown by a
-symbol above the BUSY N/A key) you
can receive calls made to the group.
3. Your System Administrator can stop use of the BUSY N/A key.
Hot Desking
In some situations a phone may be shared by more than one person, with
each person having a different extension number. This is called "hot
desking".
Warning:
Phones being used for ACD also have log on and log off controls and
should not be confused with phones being used for hot desking.
To log on
:
1. If the phone is displaying NOT LOGGED ON, press either •LOG ON and
enter your number or •INDeX and select your name.
• If the phone is displaying LOG OFF, press that key first and then
perform step 1 as above.
2. Enter your passcode.
40DHB0002UKAJ Issue 3 (04/03/2002) IP Office - 20CC Turret Phone
Page 26

Page 26 – Contents
Phone Settings
The Phone Passcode
If the phone displays ENTER PASSCODE, it expects you to dial its fourdigit passcode. The default passcode is 0000.
Wrong passcode entry can result in the phone becoming barred. Barred
phones cannot access features requiring passcode entry. They can still
make internal and emergency calls.
To enter the phone's passcode
:
1. Dial the 4-digit passcode. If you make a mistake, press
CANCEL and
restart entry.
2. If you enter the wrong number, the phone displays REENTER. Enter the
passcode again or press PROGRAM to end programming.
3. If you enter the wrong passcode 5 times, the phone displays THIS
TERMINAL IS BARRED. To unbar your phone use the change
passcode process below to set a new passcode.
To change the phone's passcode
:
1. Press PROGRAM and then SCROLL twice. Press
PASS.
2. Enter the current passcode.
3. The display shows ENTER NEW CODE. Enter the new passcode (all
passcodes must be four digits).
• To restart after a mistake, press
CANCEL.
Displaying Phone Details
You can view the details of the phone's type, number and directory name
on the display.
To display the phone's details
:
1. Press ANSWER RELEASE and then press PROGRAM.
2. The display shows the phone's type, number and on the bottom line the
phone's directory name.
3. Press ANSWER RELEASE to return to normal use.
Language Controls
The system allows you to select which language to use for the phone's
display.
To change the phone's display language
:
1. Press PROGRAM and then SCROLL twice.
2. Press
LANGUAGE.
3. Press
CHANGE to select the language required or your system's
DEFAULT language.
4. Then press
DONE and then press PROGRAM to finish.
Do Not Disturb
You may choose to receive no calls at all or only those from particular
callers on your exceptions list. Callers, other than your exceptions, either
hear busy tone or are re-directed to your voicemail.
To switch Do Not Disturb on (with or without exceptions) dial *08, to
switch it off dial *09.
•
•
•
*10*N# to add a number to the exception list.
*11*N# to delete a number from the exception list.
IP Office - 20CC Turret Phone 40DHB0002UKAJ Issue 3 (04/03/2002)
Page 27
Voicemail – Page 27
Voicemail
Voicemail & Visual Voice
The 2050 and 2030 telephones display a VOICE option if your system
has an IP Office voicemail installed
• Voicemail Pro or Voicemail Lite:
IP Office supports two voicemail systems. If, when you press
VOICE,
you see
LISTEN and MESSAGE only, you are on Voicemail Lite.
• Note:
The
VOICE option is not displayed when off-hook. To use VOICE,
press,
VOICE and select the required option before picking up the
handset.
Listening to Messages
This section describes accessing your voicemail from your own extension.
Contact your System Administrator for details if you want to access your
mailbox from other locations.
• Automatic Message Deletion
Each message is automatically deleted 24 hours after being played
unless you set it to as 'saved' via your mailbox.
1. Press
VOICE and then LISTEN.
• Voicemail Lite:
You will hear a prompt about the messages in your mailbox and if you
have any new messages they will start playing. Press 8 for help about
the controls you can use, see "Voicemail Lite Controls" on page 29.
• Voicemail Pro:
You will see a display of the new, old and saved messages in your
mailbox. Press the display key adjacent to a category to play messages
in that category. Whist playing messages you can access a number of
displayed options (you will need to press SCROLL to see some options):
•
PREVIOUS/ NEXT – Select the message that plays.
•
REWIND/ FFWD – Move within a message.
•
DELETE – Delete the current message.
•
SAVE – Change the current message's category to 'saved'.
•
COPY – Copy the message to another mailbox or mailboxes. You
can pre-record an introduction to add to the message. If selecting
more than one target mailbox, separate the entries with a #.
•
WHEN?/ FROM? – Display when the message when recorded
and (if available) who it was from. These two controls toggle.
40DHB0002UKAJ Issue 3 (04/03/2002) IP Office - 20CC Turret Phone
Page 28
Page 28 – Contents
Leaving a Message
You can use voicemail to leave a message directly in a mailbox.
1. Press
VOICE and then MESSAGE.
2. Dial the extension or group required and press
MESSAGE again.
• Voicemail Lite:
You should hear ringing and then the greeting message of the extension
or groups mailbox. When you hear the tone, start speaking and then
either replace your handset or press ANSWER RELEASE.
• Voicemail Pro:
To start recording your message press
RECORD and when finished
press
STOP. After recording your message you have several options:
•
RECORD – Re-record your message.
•
LISTEN – Listen to the message you just recorded.
•
SUBMIT – Submit (send) the message to the target mailbox(es).
•
OTHERS – Add other mailboxes to which you want the message
copied when you press
SUBMIT. Separate each entry with a #.
Changing Your Greeting
You can record your own mailbox greeting to replace the default greeting. If
the System Administrator has set up a voicemail reception number for you,
remember to tell callers that they can press 0 to call that number if they
don't want to leave a message.
Voicemail Lite
:
1. Press
VOICE and then LISTEN.
2. Press 3 and follow the prompts for changing your greeting.
Voicemail Pro
:
1. Press
VOICE and then GREETING.
2. Use
LISTEN to hear your current greeting.
3. Press
RECORD to start recording and STOP when finished.
4. When happy with the new greeting, press
SUBMIT.
Changing Your Mailbox PIN Code
When accessing voicemail from your own extension you do not normally
need to enter your mailbox code. (Your System Administrator can arrange it
if required, for example, if your extension is in a public area.)
If your System Administrator has setup methods for you to access your
mailbox from other locations then you may need to enter your access code
to access your mailbox.
Voicemail Lite
:
1. Press
VOICE and then LISTEN.
2. Press *04 and follow the prompts for changing your greeting.
Voicemail Pro
:
1. Press
VOICE and then PASSWORD.
2. Enter your current access code and press
NEXT.
3. Enter the new code and press
DONE. The display will confirm if the
change was accepted.
IP Office - 20CC Turret Phone 40DHB0002UKAJ Issue 3 (04/03/2002)
Page 29

Voicemail – Page 29
Voicemail Controls
As well as displayed controls, you can use a number of control available to
all IP Office voicemail users. These are:
• To switch voicemail on, dial *18. To switch it off, dial *19.
• To switch voicemail ringback on, dial *48. To switch it off, dial *49.
Voicemail ringback calls your extension after you use it if you have any
new messages.
• To access your mailbox from your extension, dial *17.
Voicemail Lite Controls
Within Voicemail Lite you can press 8 at any time to listen to the Help
Menu. Note: Email must be setup by your System Administrator for the
functions to be accessible.
• 1 - Play old messages.
• 2 - Play saved messages.
• 3 - Edit your greeting.
• 4 - Delete the message you are currently listening to.
• 5 - Save the message you are currently listening to.
• 6 - Forwarding options.
• 7 - Repeat the last Message.
• 8 – Help.
• 9 - Skip the message.
• ** - Call back the sender (while listening to the message internally only).
• *01 - Direct all messages to email.
• *02 - Send email notification.
• *03 - Turn off email functions.
• *04 - Change your access code.
Additional features (not announced)
• # - Rewind message.
• * - Forward message.
• 0 - Pause message or call voicemail reception (if setup).
40DHB0002UKAJ Issue 3 (04/03/2002) IP Office - 20CC Turret Phone
Page 30

Page 30 – Contents
System Features
Short Codes
You can dial a number of short codes to access system features. The table
below shows the list of default short codes normally available. Contact your
System Administrator for details of the short codes available on your
system.
In the examples below, N represents dialling a number such as an
extension or group number.
*01 Forward Unconditionally On
*02 Forward Unconditionally Off
*03 Forward on Busy On
*04 Forward on Busy Off
*05 Forward on No Answer On
*06 Forward on No Answer Off
*07*N# Forward to the specified number
*08 Do Not Disturb On
*09 Do Not Disturb Off
*10*N# Do Not Disturb Exception Add
*11*N# Do Not Disturb Exception Delete
*12*N# Follow Me Here
*13*N# Follow Me Here Cancel
*14*N# Follow Me To
*15 Call Waiting On
*16 Call Waiting Off
*17 Voicemail Collect
*18 Voicemail On
*19 Voicemail Off
*26 Clear Call Waiting
*27*N# Hold Call Waiting
*30 Call Pick Up Any
*31 Call Pick Up Group
*32*N# Call Pick Up Extension
*33*N# Call Queue
*48 Voicemail Ringback On
*49 Voicemail Ringback Off
*57*N# Forward on Busy Number
IP Office - 20CC Turret Phone 40DHB0002UKAJ Issue 3 (04/03/2002)
Page 31

Index – Page 31
40DHB0002UKAJ Issue 3 (04/03/2002) IP Office - 20CC Turret Phone
Abbreviated dialling ........ 7
Index
ABSENT ....................... 16
ACCOUNT...................... 8
Account codes
Forced ..................... 8
Voluntary ................. 8
ACD Working................ 19
Agent numbers ............. 19
Answer
CALL WAITING ..... 12
Messages .............. 11
Normal calls........... 11
Page ...................... 11
Auto answer.................. 23
Auto Answer (Soft DSS) 22
Barred phone................ 26
BLF Lamps ................... 17
Broadcast .......... See Page
Busy not available ........ 19
Busy transfer ................ 13
CALL............................. 11
Forward ................. 16
Hold ....................... 13
Make internal ........... 5
Park ....................... 14
Pickup.................... 12
Transfer ................. 13
Unpark ................... 14
Using Soft DSS...... 20
Volume .................. 10
Call distribution ............. 19
CALL FOR MESSAGE . 11
CALL WAITING
Answer................... 12
CALLBACK..................... 9
Ring timeout .......... 24
CALLFREE.................... 14
CAMP ON
Answer................... 12
CANCEL
Message................ 11
Change
Passcode............... 26
CONFER ....................... 10
Conference.................... 10
Dial ahead ..................... 14
DIALLED ......................... 6
Directory ......... See INDeX
Display
Language............... 26
Name..................... 26
Number.................. 26
Soft DSS................ 20
Soft DSS mode...... 22
Software release.... 10
DIVERT
Divert all on/off....... 15
No answer time...... 24
Remote set ............ 16
Set numbers .......... 15
DSS Keys ...................... 17
BLF Lamps ............ 17
Setup ..................... 17
Enquiry call.................... 13
ENTER ACCOUNT ......... 8
ENTER PASSCODE ..... 26
Exclusive hold ............... 13
Extension number ......... 26
EXTERNAL ................... 23
Ring on/off ............. 23
EXTNS .......................... 22
Finishing work ............... 19
Follow me...................... 16
Forced
Account ................... 8
FORWARD.................... 16
GROUP ......................... 25
Page ........................ 5
Ringing timeout ..... 24
Groups........................... 25
Help............................... 29
HOLD ...................... 13, 14
Common hold ........ 14
Hot desking ................... 25
INDeX.............................. 6
Intercom (Soft DSS) ...... 22
INTERNAL..................... 23
Make call ................. 5
Ring on/off ............. 23
Key label........................ 18
Lamp ............................... 4
Language
Dutch..................... 26
English................... 26
French ................... 26
Swedish................. 26
Language: ..................... 26
Leave message............... 9
Letter keys....................... 6
Log on ........................... 19
Log on/off ...................... 25
Logging off..................... 19
Make call
Internal .................... 5
Soft DSS................ 20
MESSAGE
Answer .................. 11
Leave....................... 9
Microphone On/Off........ 10
MODE ........................... 22
MUTE ............................ 10
Name............................. 26
NEXT............................. 11
NO CALLS
Absence messages 16
Normal call (Soft DSS).. 22
Not logged on................ 25
PAGE
Answer .................. 11
Make........................ 5
PARK ................ 10, 13, 14
Conference............ 10
PASS............................. 26
Passcode
Phone.................... 26
Personal speed dials....... 7
Persuasive ringing......... 24
Phone lamp ..................... 4
Phone passcode ........... 26
PICKUP......................... 12
Pickup group ................. 12
Receiving calls .............. 19
REDIAL ........................... 6
Release (software)........ 10
Remote forward............. 16
RING IF FREE .............. 14
Ring inward transfer ...... 13
Ringback ......................... 9
RINGER .......................... 4
AUTO ANSWER ... 23
On/off..................... 23
Sound.................... 23
STEP size ............. 24
TIMEOUT .............. 24
VOLUME............... 23
Scroll ............................... 3
SHOW FREE ................ 14
SOFT DSS .................... 21
Display .................. 20
Display mode ........ 22
Extensions............. 22
Make call............... 20
Set usage.............. 22
Software release ........... 10
SOUND ......................... 23
SPEAKER ..................... 26
SPEED DIAL................... 7
Splash calls................... 23
Starting work ................. 19
STEPS .......................... 24
Stopping work ............... 19
Supervisor..................... 19
System speed dials......... 7
THIS TERMINAL IS
BARRED ....................... 26
TIMEOUT...................... 24
Tones ........................ 4, 23
Transfer calls................. 13
Unpark calls .................. 14
USAGE.......................... 22
Version.......................... 10
Voice call (Soft DSS) .... 22
Voicemail Help .............. 29
VOLUME
Call........................ 10
Ringer.................... 23
Ringer step............ 24
Voluntary account codes. 8
Wallboards .................... 19
Page 32

Performance figures and data quoted in this document are typical, and
must be specifically confirmed in writing by Avaya before they become
applicable to any particular order or contract. The company reserves the
right to make alterations or amendments to the detailed specifications at its
discretion. The publication of information in this document does not imply
freedom from patent or other protective rights of Avaya, or others.
Intellectual property related to this product (including trademarks) and
registered to Lucent Technologies has been transferred or licensed to
Avaya.
This document contains propriety information of Avaya and is not to be
disclosed or used except in accordance with applicable agreements.
Any comments or suggestions regarding this document should be sent to
© Copyright 2002 Avaya ECS Ltd.
All rights reserved.
Avaya Global SME Solutions
Sterling Court
15 - 21 Mundells
Welwyn Garden City
Hertfordshire
AL7 1LZ
England
Tel: +44 (0) 1707 392200
Fax: +44 (0) 1707 376933
Email: [email protected]
Web: http://www.avaya.com
IP Office - 20CC Turret Phone 40DHB0002UKAJ Issue 3 (04/03/2002)
 Loading...