

Page 1

Avaya 2050 IP Softphone User Guide
Avaya Business Communications Manager
Document Status: Standard
Document Number: NN40050-100
Document Version: 03.03
Date: October 2010
Page 2

© 2010 Avaya Inc.
All Rights Reserved.
Notices
While reasonable efforts have been made to ensure that the information in this document is complete and accurate at the time of printing,
Avaya assumes no liability for any errors. Avaya reserves the right to make changes and corrections to the information in this document
without the obligation to notify any person or organization of such changes.
Documentation disclaimer
Avaya shall not be responsible for any modifications, additions, or deletions to the original published version of this documentation
unless such modifications, additions, or deletions were performed by Avaya. End User agree to indemnify and hold harmless Avaya,
Avaya’s agents, servants and employees against all claims, lawsuits, demands and judgments arising out of, or in connection with,
subsequent modifications, additions or deletions to this documentation, to the extent made by End User.
Link disclaimer
Avaya is not responsible for the contents or reliability of any linked Web sites referenced within this site or documentation(s) provided by
Avaya. Avaya is not responsible for the accuracy of any information, statement or content provided on these sites and does not
necessarily endorse the products, services, or information described or offered within them. Avaya does not guarantee that these links
will work all the time and has no control over the availability of the linked pages.
Warranty
Avaya provides a limited warranty on this product. Refer to your sales agreement to establish the terms of the limited warranty. In
addition, Avaya’s standard warranty language, as well as information regarding support for this product, while under warranty, is
available to Avaya customers and other parties through the Avaya Support Web site: http://www.avaya.com/support
Please note that if you acquired the product from an authorized reseller, the warranty is provided to you by said reseller and not by Avaya.
Licenses
THE SOFTWARE LICENSE TERMS AVAILABLE ON THE AVAYA WEBSITE, HTTP://SUPPORT.AVAYA.COM/
LICENSEINFO/ ARE APPLICABLE TO ANYONE WHO DOWNLOADS, USES AND/OR INSTALLS AVAYA SOFTWARE,
PURCHASED FROM AVAYA INC., ANY AVAYA AFFILIATE, OR AN AUTHORIZED AVAYA RESELLER (AS APPLICABLE)
UNDER A COMMERCIAL AGREEMENT WITH AVAYA OR AN AUTHORIZED AVA YA RESELLER. UNLESS OTHERWISE
AGREED TO BY AVAYA IN WRITING, AVAYA DOES NOT EXTEND THIS LICENSE IF THE SOFTWARE WAS OBTAINED
FROM ANYONE OTHER THAN AVAYA, AN AVAYA AFFILIATE OR AN AVAYA AUTHORIZED RESELLER, AND AVAYA
RESERVES THE RIGHT TO TAKE LEGAL ACTION AGAINST YOU AND ANYONE ELSE USING OR SELLING THE
SOFTWARE WITHOUT A LICENSE. BY INSTALLING, DOWNLOADING OR USING THE SOFTWARE, OR AUTHORIZING
OTHERS TO DO SO, YOU, ON BEHALF OF YOURSELF AND THE ENTITY FOR WHOM YOU ARE INSTALLING,
DOWNLOADING OR USING THE SOFTWARE (HEREINAFTER REFERRED TO INTERCHANGEABLY AS "YOU" AND "END
USER"), AGREE TO THESE TERMS AND CONDITIONS AND CREATE A BINDING CONTRACT BETWEEN YOU AND
AVAYA INC. OR THE AP PL IC AB LE AVAYA AF FILIATE ("AVAYA ").
Copyright
Except where expressly stated otherwise, no use should be made of the Documentation(s) and Pr oduct( s) p rovided by Avaya. All content
in this documentation(s) and the product(s) pr ov id ed by Avaya including the selection, arrangement and design of the content is owned
either by Avaya or its licensors and is protected b y copyright and other intellectual property laws including the sui generis rights relating
to the protection of databases. You may not modify, copy, reproduce, republish, upload, post, transmit or distribute in any way any
content, in whole or in part, including any code and software. Unauthorized reproduction, transmission, dissemination, storage, and or
use without the express written consent of Avaya can be a criminal, as well as a civil offense under the applicable law.
Third Party Components
Certain software programs or portions thereof included in the Product may contain software distributed under third party agreements
("Third Party Components"), which may contain terms that expand or limit rights to use certain portions of the Product ("Third Party
Terms" ). Information regarding distributed Linux OS source code (for those Products that have distributed the Linux OS source code),
and identifying the copyright holders of the Third Party Components and the Third Party Terms that apply to them is available on the
Avaya Support Web site: http://support.avaya.com/Copyright.
Trademarks
The trademarks, logos and service marks ("Marks") displayed in this site, the documentation(s) and product(s) pr ovided by Avaya are the
registered or unregistered Marks of Avaya, its affiliates, or other third parties. Users are not permitted to use such Marks without prior
written consent from A vaya or such third party which may own the Mark. Nothing contained in this site, the documentation(s) and
product(s) should be construed as granting, by implication, estoppel, or otherwise, any license or right in and to the Marks without the
express written permission of Avaya or the applicable third party. Avaya is a registered trademark of Avaya Inc. All non-Avaya
trademarks are the property of their respective owners.
Downloading documents
For the most current versions of documentation, see the Avaya Support. Web site: http://www.avaya.com/support
Contact Avaya Support
Avaya provides a telephone number for you to use to report problems or to ask questions about your product. The support telephone
number is 1-800-242-2121 in the United States. For additional support telephone numbers, see the Avaya Web site: http://
www.avaya.com/support
Page 3

Contents
Chapter 1
Avaya 2050 IP Softphone overview . . . . . . . . . . . . . . . . . . . . . . . . . . . . . . . . 7
Features . . . . . . . . . . . . . . . . . . . . . . . . . . . . . . . . . . . . . . . . . . . . . . . . . . . . . . . . . . . . 7
Components . . . . . . . . . . . . . . . . . . . . . . . . . . . . . . . . . . . . . . . . . . . . . . . . . . . . . . . . . 9
Call Control window . . . . . . . . . . . . . . . . . . . . . . . . . . . . . . . . . . . . . . . . . . . . . . . . 9
Local Directory window . . . . . . . . . . . . . . . . . . . . . . . . . . . . . . . . . . . . . . . . . . . . . . 9
Settings window . . . . . . . . . . . . . . . . . . . . . . . . . . . . . . . . . . . . . . . . . . . . . . . . . . 10
System tray icon and menu . . . . . . . . . . . . . . . . . . . . . . . . . . . . . . . . . . . . . . . . . . 10
i2050.exe application . . . . . . . . . . . . . . . . . . . . . . . . . . . . . . . . . . . . . . . . . . . . . . 10
Chapter 2
Avaya 2050 IP Softphone Call Control window. . . . . . . . . . . . . . . . . . . . . . 11
Enhanced Accessibility Interface . . . . . . . . . . . . . . . . . . . . . . . . . . . . . . . . . . . . . 11
Call Control window . . . . . . . . . . . . . . . . . . . . . . . . . . . . . . . . . . . . . . . . . . . . . . . 11
Accessibility Interface . . . . . . . . . . . . . . . . . . . . . . . . . . . . . . . . . . . . . . . . . . . . . . 13
Call Control window elements and functions . . . . . . . . . . . . . . . . . . . . . . . . . . . . 13
Hot keys . . . . . . . . . . . . . . . . . . . . . . . . . . . . . . . . . . . . . . . . . . . . . . . . . . . . . . . . . . . . 15
Adding a hot key . . . . . . . . . . . . . . . . . . . . . . . . . . . . . . . . . . . . . . . . . . . . . . . . . . 15
Removing a Hot Key . . . . . . . . . . . . . . . . . . . . . . . . . . . . . . . . . . . . . . . . . . . . . . . 16
System tray icon and menu . . . . . . . . . . . . . . . . . . . . . . . . . . . . . . . . . . . . . . . . . . . . . 16
3
Chapter 3
Installing and setting up the Avaya 2050 IP Softphone . . . . . . . . . . . . . . . 17
System requirements . . . . . . . . . . . . . . . . . . . . . . . . . . . . . . . . . . . . . . . . . . . . . . . . . . 17
Supported operating systems . . . . . . . . . . . . . . . . . . . . . . . . . . . . . . . . . . . . . . . . 17
Avaya USB Audio Kit . . . . . . . . . . . . . . . . . . . . . . . . . . . . . . . . . . . . . . . . . . . . . . 17
Installing the Avaya 2050 IP Softphone . . . . . . . . . . . . . . . . . . . . . . . . . . . . . . . . . . . . 18
Installing the USB Headset Kit . . . . . . . . . . . . . . . . . . . . . . . . . . . . . . . . . . . . . . . . . . 18
Chapter 4
Managing contacts from the Local Directory . . . . . . . . . . . . . . . . . . . . . . . 21
Adding contacts to a Local Directory . . . . . . . . . . . . . . . . . . . . . . . . . . . . . . . . . . . . . . 21
Editing contacts in the Local Directory . . . . . . . . . . . . . . . . . . . . . . . . . . . . . . . . . . . . 22
Deleting contacts from the Local Directory . . . . . . . . . . . . . . . . . . . . . . . . . . . . . . . . . 22
Finding contacts in the Local Directory . . . . . . . . . . . . . . . . . . . . . . . . . . . . . . . . . . . . 23
Filtering a Local Directory . . . . . . . . . . . . . . . . . . . . . . . . . . . . . . . . . . . . . . . . . . . . . . 24
Dialing from the Local Directory . . . . . . . . . . . . . . . . . . . . . . . . . . . . . . . . . . . . . . . . . 24
Dialing from the Redial List in the Local Directory . . . . . . . . . . . . . . . . . . . . . . . . . . . . 24
Dialing from the Callers List in the Local Directory . . . . . . . . . . . . . . . . . . . . . . . . . . . 25
Avaya 2050 IP Softphone User Guide
Page 4

4 Contents
Managing Groups in the Shortcut Bar . . . . . . . . . . . . . . . . . . . . . . . . . . . . . . . . . . . . . 25
Using the Properties dialog box . . . . . . . . . . . . . . . . . . . . . . . . . . . . . . . . . . . . . . . . . . 26
Chapter 5
Managing Avaya 2050 IP Softphone calls . . . . . . . . . . . . . . . . . . . . . . . . . . 31
Making telephone calls . . . . . . . . . . . . . . . . . . . . . . . . . . . . . . . . . . . . . . . . . . . . . . . . 31
Answering telephone calls . . . . . . . . . . . . . . . . . . . . . . . . . . . . . . . . . . . . . . . . . . . . . . 31
Holding and retrieving telephone calls . . . . . . . . . . . . . . . . . . . . . . . . . . . . . . . . . . . . . 34
Hanging up telephone calls . . . . . . . . . . . . . . . . . . . . . . . . . . . . . . . . . . . . . . . . . . . . . 34
Properties—General tab . . . . . . . . . . . . . . . . . . . . . . . . . . . . . . . . . . . . . . . . . . . . 27
Properties—Details tab . . . . . . . . . . . . . . . . . . . . . . . . . . . . . . . . . . . . . . . . . . . . . 27
Properties—Notes tab . . . . . . . . . . . . . . . . . . . . . . . . . . . . . . . . . . . . . . . . . . . . . . 27
Properties—Settings tab . . . . . . . . . . . . . . . . . . . . . . . . . . . . . . . . . . . . . . . . . . . . 27
Linking to external directories . . . . . . . . . . . . . . . . . . . . . . . . . . . . . . . . . . . . . . . . 28
Linking to the LDAP directory . . . . . . . . . . . . . . . . . . . . . . . . . . . . . . . . . . . . . . . . 28
Linking to Outlook . . . . . . . . . . . . . . . . . . . . . . . . . . . . . . . . . . . . . . . . . . . . . . . . . 29
Linking to Windows Address Book directory . . . . . . . . . . . . . . . . . . . . . . . . . . . . . 29
Adding external contacts to the Local Directory . . . . . . . . . . . . . . . . . . . . . . . . . . 30
Incoming and disconnected call pop-up notifications . . . . . . . . . . . . . . . . . . . . . . 32
Chapter 6
Avaya 2050 IP Softphone USB Headset Adapter . . . . . . . . . . . . . . . . . . . . 35
Overview . . . . . . . . . . . . . . . . . . . . . . . . . . . . . . . . . . . . . . . . . . . . . . . . . . . . . . . . . . . 35
Answering calls with the USB Headset Adapter . . . . . . . . . . . . . . . . . . . . . . . . . . . . . 36
Hanging up calls with the USB Headset Adapter . . . . . . . . . . . . . . . . . . . . . . . . . . . . 37
Adjusting the volume with the USB Headset Adapter . . . . . . . . . . . . . . . . . . . . . . . . . 37
Muting a call . . . . . . . . . . . . . . . . . . . . . . . . . . . . . . . . . . . . . . . . . . . . . . . . . . . . . . . . 37
Using the Smart Functions menu . . . . . . . . . . . . . . . . . . . . . . . . . . . . . . . . . . . . . . . . 37
Customizing the Smart Functions menu . . . . . . . . . . . . . . . . . . . . . . . . . . . . . . . . . . . 38
Custom Functions for Smart Functions menu . . . . . . . . . . . . . . . . . . . . . . . . . . . . . . . 39
Chapter 7
Avaya 2050 IP Softphone macros. . . . . . . . . . . . . . . . . . . . . . . . . . . . . . . . . 41
About macros with the Avaya 2050 IP Softphone . . . . . . . . . . . . . . . . . . . . . . . . . . . . 41
Entering a macro . . . . . . . . . . . . . . . . . . . . . . . . . . . . . . . . . . . . . . . . . . . . . . . . . . . . . 41
Deleting a macro . . . . . . . . . . . . . . . . . . . . . . . . . . . . . . . . . . . . . . . . . . . . . . . . . . . . . 42
Playing a macro . . . . . . . . . . . . . . . . . . . . . . . . . . . . . . . . . . . . . . . . . . . . . . . . . . . . . . 42
Chapter 8
Avaya 2050 IP Softphone menu commands . . . . . . . . . . . . . . . . . . . . . . . . 43
Call Control window menu command . . . . . . . . . . . . . . . . . . . . . . . . . . . . . . . . . . . . . 43
Using the File menu . . . . . . . . . . . . . . . . . . . . . . . . . . . . . . . . . . . . . . . . . . . . . . . 43
Using the Edit menu . . . . . . . . . . . . . . . . . . . . . . . . . . . . . . . . . . . . . . . . . . . . . . . 43
NN40050-100NN40050-100
Page 5

Contents 5
Using the Keys menu . . . . . . . . . . . . . . . . . . . . . . . . . . . . . . . . . . . . . . . . . . . . . . 44
Using the View menu . . . . . . . . . . . . . . . . . . . . . . . . . . . . . . . . . . . . . . . . . . . . . . 44
Using the Help menu . . . . . . . . . . . . . . . . . . . . . . . . . . . . . . . . . . . . . . . . . . . . . . . 45
Chapter 9
Avaya 2050 IP Softphone Settings . . . . . . . . . . . . . . . . . . . . . . . . . . . . . . . . 47
Opening the Settings window . . . . . . . . . . . . . . . . . . . . . . . . . . . . . . . . . . . . . . . . 47
Using the Settings window . . . . . . . . . . . . . . . . . . . . . . . . . . . . . . . . . . . . . . . . . . 48
Profiles . . . . . . . . . . . . . . . . . . . . . . . . . . . . . . . . . . . . . . . . . . . . . . . . . . . . . . . . . . . . . 48
Creating new profiles . . . . . . . . . . . . . . . . . . . . . . . . . . . . . . . . . . . . . . . . . . . . . . 49
Removing profiles . . . . . . . . . . . . . . . . . . . . . . . . . . . . . . . . . . . . . . . . . . . . . . . . . 49
Modifying profile names . . . . . . . . . . . . . . . . . . . . . . . . . . . . . . . . . . . . . . . . . . . . 49
Selecting profiles . . . . . . . . . . . . . . . . . . . . . . . . . . . . . . . . . . . . . . . . . . . . . . . . . . 50
Exporting profiles . . . . . . . . . . . . . . . . . . . . . . . . . . . . . . . . . . . . . . . . . . . . . . . . . 50
Importing Profiles . . . . . . . . . . . . . . . . . . . . . . . . . . . . . . . . . . . . . . . . . . . . . . . . . 50
Server . . . . . . . . . . . . . . . . . . . . . . . . . . . . . . . . . . . . . . . . . . . . . . . . . . . . . . . . . . . . . 51
Using DHCP . . . . . . . . . . . . . . . . . . . . . . . . . . . . . . . . . . . . . . . . . . . . . . . . . . . . . 51
Using IP addresses and DNS names . . . . . . . . . . . . . . . . . . . . . . . . . . . . . . . . . . 51
Restoring defaults . . . . . . . . . . . . . . . . . . . . . . . . . . . . . . . . . . . . . . . . . . . . . . . . . 52
Resetting the connection . . . . . . . . . . . . . . . . . . . . . . . . . . . . . . . . . . . . . . . . . . . . 52
Licensing Server . . . . . . . . . . . . . . . . . . . . . . . . . . . . . . . . . . . . . . . . . . . . . . . . . . . . . 52
Theme . . . . . . . . . . . . . . . . . . . . . . . . . . . . . . . . . . . . . . . . . . . . . . . . . . . . . . . . . . . . . 53
Features . . . . . . . . . . . . . . . . . . . . . . . . . . . . . . . . . . . . . . . . . . . . . . . . . . . . . . . . . . . 53
Macros . . . . . . . . . . . . . . . . . . . . . . . . . . . . . . . . . . . . . . . . . . . . . . . . . . . . . . . . . . . . . 54
Audio . . . . . . . . . . . . . . . . . . . . . . . . . . . . . . . . . . . . . . . . . . . . . . . . . . . . . . . . . . . . . . 54
Sound Devices . . . . . . . . . . . . . . . . . . . . . . . . . . . . . . . . . . . . . . . . . . . . . . . . . . . . . . 54
Headset or handset device . . . . . . . . . . . . . . . . . . . . . . . . . . . . . . . . . . . . . . . . . . 54
Handsfree/Ringing/Paging Device . . . . . . . . . . . . . . . . . . . . . . . . . . . . . . . . . . . . 55
Hardware ID . . . . . . . . . . . . . . . . . . . . . . . . . . . . . . . . . . . . . . . . . . . . . . . . . . . . . . . . 55
MAC addresses . . . . . . . . . . . . . . . . . . . . . . . . . . . . . . . . . . . . . . . . . . . . . . . . . . . 56
Selecting MAC addresses . . . . . . . . . . . . . . . . . . . . . . . . . . . . . . . . . . . . . . . . . . . 56
Advanced Audio . . . . . . . . . . . . . . . . . . . . . . . . . . . . . . . . . . . . . . . . . . . . . . . . . . . . . 56
Overriding communications server values . . . . . . . . . . . . . . . . . . . . . . . . . . . . . . 56
Listener IP . . . . . . . . . . . . . . . . . . . . . . . . . . . . . . . . . . . . . . . . . . . . . . . . . . . . . . . . . . 57
Notifications . . . . . . . . . . . . . . . . . . . . . . . . . . . . . . . . . . . . . . . . . . . . . . . . . . . . . . . . . 58
Hot Keys . . . . . . . . . . . . . . . . . . . . . . . . . . . . . . . . . . . . . . . . . . . . . . . . . . . . . . . . . . . 58
Text Replacements . . . . . . . . . . . . . . . . . . . . . . . . . . . . . . . . . . . . . . . . . . . . . . . . . . . 59
Lamp Sounds . . . . . . . . . . . . . . . . . . . . . . . . . . . . . . . . . . . . . . . . . . . . . . . . . . . . . . . 60
Key Type . . . . . . . . . . . . . . . . . . . . . . . . . . . . . . . . . . . . . . . . . . . . . . . . . . . . . . . . . . . 60
Phone number dialog box . . . . . . . . . . . . . . . . . . . . . . . . . . . . . . . . . . . . . . . . . . . 60
Accessibility Interface . . . . . . . . . . . . . . . . . . . . . . . . . . . . . . . . . . . . . . . . . . . . . . 60
About . . . . . . . . . . . . . . . . . . . . . . . . . . . . . . . . . . . . . . . . . . . . . . . . . . . . . . . . . . . . . . 61
Avaya 2050 IP Softphone User Guide
Page 6

6 Contents
Language . . . . . . . . . . . . . . . . . . . . . . . . . . . . . . . . . . . . . . . . . . . . . . . . . . . . . . . . . . . 61
Software Expansion Module interface . . . . . . . . . . . . . . . . . . . . . . . . . . . . . . . . . . . . . 61
Personal Call Recording . . . . . . . . . . . . . . . . . . . . . . . . . . . . . . . . . . . . . . . . . . . . . . . 63
USB Headset . . . . . . . . . . . . . . . . . . . . . . . . . . . . . . . . . . . . . . . . . . . . . . . . . . . . . . . . 64
Chapter 10
Accessibility Interface . . . . . . . . . . . . . . . . . . . . . . . . . . . . . . . . . . . . . . . . . . 67
Enhanced Accessibility Interface . . . . . . . . . . . . . . . . . . . . . . . . . . . . . . . . . . . . . . . . . 67
Using hot keys . . . . . . . . . . . . . . . . . . . . . . . . . . . . . . . . . . . . . . . . . . . . . . . . . . . . . . . 70
Chapter 11
Troubleshooting the Avaya 2050 IP Softphone. . . . . . . . . . . . . . . . . . . . . . 71
Selecting the headset . . . . . . . . . . . . . . . . . . . . . . . . . . . . . . . . . . . . . . . . . . . . . . 64
Setting external lamp controls . . . . . . . . . . . . . . . . . . . . . . . . . . . . . . . . . . . . . . . . 65
Using the backlight . . . . . . . . . . . . . . . . . . . . . . . . . . . . . . . . . . . . . . . . . . . . . . . . 66
Configuring Smart Functions . . . . . . . . . . . . . . . . . . . . . . . . . . . . . . . . . . . . . . . . . 66
Additional configuration options . . . . . . . . . . . . . . . . . . . . . . . . . . . . . . . . . . . . . . 70
Active call status in Window title . . . . . . . . . . . . . . . . . . . . . . . . . . . . . . . . . . . . . . 70
Limitations . . . . . . . . . . . . . . . . . . . . . . . . . . . . . . . . . . . . . . . . . . . . . . . . . . . . . . . 70
Connectivity problems . . . . . . . . . . . . . . . . . . . . . . . . . . . . . . . . . . . . . . . . . . . . . . . . . 71
Communications server is unreachable . . . . . . . . . . . . . . . . . . . . . . . . . . . . . . . . 71
Connection is reinitializing . . . . . . . . . . . . . . . . . . . . . . . . . . . . . . . . . . . . . . . . . . . 72
Authorization failed . . . . . . . . . . . . . . . . . . . . . . . . . . . . . . . . . . . . . . . . . . . . . . . . 73
Unable to retrieve communications server parameters from DHCP server . . . . . 73
Service denied . . . . . . . . . . . . . . . . . . . . . . . . . . . . . . . . . . . . . . . . . . . . . . . . . . . 74
Audio problems . . . . . . . . . . . . . . . . . . . . . . . . . . . . . . . . . . . . . . . . . . . . . . . . . . . . . . 74
Basic audio operation . . . . . . . . . . . . . . . . . . . . . . . . . . . . . . . . . . . . . . . . . . . . . . 74
One-way audio . . . . . . . . . . . . . . . . . . . . . . . . . . . . . . . . . . . . . . . . . . . . . . . . . . . 74
Broken or choppy speech . . . . . . . . . . . . . . . . . . . . . . . . . . . . . . . . . . . . . . . . . . . 75
Windows sound plays from the headset . . . . . . . . . . . . . . . . . . . . . . . . . . . . . . . . 76
Advanced audio problems due to network performance . . . . . . . . . . . . . . . . . . . . 76
Reset conditions . . . . . . . . . . . . . . . . . . . . . . . . . . . . . . . . . . . . . . . . . . . . . . . . . . . . . 76
USB Headset problems . . . . . . . . . . . . . . . . . . . . . . . . . . . . . . . . . . . . . . . . . . . . . . . . 77
Headset not functioning . . . . . . . . . . . . . . . . . . . . . . . . . . . . . . . . . . . . . . . . . . . . 77
USB Headset Adapter features appear dimmed . . . . . . . . . . . . . . . . . . . . . . . . . . 78
Cannot hear audio through headset . . . . . . . . . . . . . . . . . . . . . . . . . . . . . . . . . . . 78
Sound still comes out of my computer speakers . . . . . . . . . . . . . . . . . . . . . . . . . . 79
Directory problems . . . . . . . . . . . . . . . . . . . . . . . . . . . . . . . . . . . . . . . . . . . . . . . . . . . 79
NN40050-100NN40050-100
Page 7

Chapter 1
Avaya 2050 IP Softphone overview
The Avaya 2050 IP Softphone is a business telephone application that you can use to make and
take calls over your computer. Using a headset or handset connected to your PC, you control calls
with a click of the mouse pointer, from your PC keyboard, or from the USB Audio Adapter.
Designed to work with IP-based phone systems, the Avaya 2050 IP Softphone provides Voice
over IP (VoIP) services using a telephony server and your Local Area Network (LAN) or Wide
Area Network (WAN).
The server that supports your Avaya 2050 IP Softphone determines the features you can access,
such as Call Conference, Call Transfer, and Call Forward.
Features
The Avaya 2050 IP Softphone supports the following features:
7
• Twelve user-defined feature keys: six Programmable Line
• (DN)/Feature Keys (self-labeled) and six lines/features accessed by pressing the shift key
• Four soft keys that provide access to a maximum of 10 features
• Four-line display
• Directory capabilities stored locally on your PC or linked to external directories, such as
Lightweight Directory Access Protocol (LDAP), Microsoft Outlook, and Windows Address
Book (WAB) contact management software
• One-click direct dialing from various windows and applications
• Five specialized fixed keys:
—Directory
— Inbox (Message)
— Shift (Outbox)
—Services
—Expand
• Dedicated call processing keys:
—Hold
— Goodbye
—Answer
—Volume
—Mute
—Navigation
— Message Waiting
Avaya 2050 IP Softphone User Guide
Page 8

8 Chapter 1 Avaya 2050 IP Softphone overview
• User-selected ringer that lets the PC speakers or the headset ring for incoming calls
• Choice of the following interfaces:
— 1140 theme (1100 series IP deskphones)
— Compact black and silver themes
— Accessibility Interface for the visually impaired
• Programmable hot keys that allow single key access to user-definable features
• Supported languages including: English, French, Swedish, Danish, Norwegian, German,
Dutch, Portuguese, Czech, Finnish, Hungarian, Italian, Polish, Spanish, Japanese, Russian,
Latvian, and Turkish.
• Three input modes: Digit, Alpha, and Native
• Macro functions available for programming long dialing patterns
The following new features have been added for Avaya 2050 IP Softphone Release 4.0.
• Audio Quality Enhancements: Global IP Sound (GIPS) Full Voice Engine embedded within
client provides:
— State-of-the-art audio voice engine
— Addresses packet loss concealment up to 30 percent
— Invoked as required - no user interaction needed
— Embedded echo cancellation
— Increased flexibility
— Eliminates need for Avaya Enhanced Desktop/Mobile USB Headset Adapter to
address audio QoS
— Expands range of compatible headsets
• USB/Wireless Headset support: offers the ability for users to “untether” their desktops,
expanding their mobility with standard Bluetooth headset profiles (Bluetooth Power Class 2)
support within the client.
The following Plantronics headset models are supported:
— Plantronics Audio 910 Bluetooth Headset
— Plantronics Voyager 510 Bluetooth Headset
— Plantronics CS55-USB Digital Wireless Headset
— Plantronics CS60-USB Digital Wireless Headset (EMEA DECT version)
NN40050-100NN40050-100
Page 9

Chapter 1 Avaya 2050 IP Softphone overview 9
• Server-based licensing: the license software runs on your PC. Server-based licensing supports
license pooling between users. Consult your system administrator for more information.
• Accessibility improvements: series of options in compliance with US Rehabilitation Act Section 508. Includes a new Enhanced Accessibility Interface with configurable font size,
visual and audio notification, and more.
• TAPI call control: support for TAPI 3 call control – basic call handling only (make call,
answer, release).
• Soft Expansion Module (Avaya Business Communications Manager (Avaya BCM) 6.0 only)
for added scalability. Includes 18 user-programmable line/feature appearances per module and
10 character fields per line for entry.
• Call Pop-up (Avaya BCM 6.0 only): this provides a small pop-up window that displays CLID
information and can be clicked to answer an incoming call. The pop-up window information
can also be provided to the user through a speech engine.
• The following features do not apply to Avaya BCM:
— Signaling and Media Path Encryption
— Expanded Language: Avaya 2050 IP Softphone for Windows PC: Simplified and
Traditional Chinese, Traditional Japanese (Kanji), Greek, Hebrew, Arabic, Korean
Components
• “Call Control window” on page 9.
• “Local Directory window” on page 9.
• “Settings window” on page 10.
• “System tray icon and menu” on page 10.
• “i2050.exe application” on page 10.
Call Control window
The Avaya 2050 IP Softphone Call Control window displays the line keys, feature buttons, and
call display. Use this window to make and manage your telephone calls. You also use this window
to access both your Local Directory and Avaya Communications Server 1000 Directory features
(Personal Directory, Redial List, Callers List, Application Server Administration, and Password
Administration).
For more information about the Call Control window, refer to “Call Control window” on page 11.
Local Directory window
Use the Local Directory window to create, manage, and use a telephone directory stored on your
local computer and to access external directories, such as LDAP, Outlook, and WAB.
Avaya 2050 IP Softphone User Guide
Page 10

10 Chapter 1 Avaya 2050 IP Softphone overview
Settings window
Use the Settings window—a series of dialog boxes—to set up the various Avaya 2050 IP
Softphone features.
For information about opening the Settings window, refer to “Avaya 2050 IP Softphone Settings”
on page 47.
System tray icon and menu
You can right-click the Avaya 2050 IP Softphone system tray icon—located at the right side of the
Windows taskbar at the bottom of your screen—to make and manage calls.
i2050.exe application
The i2050.exe application lets the Avaya 2050 IP Softphone communicate with the server. It
launches when you start the Avaya 2050 IP Softphone but remains hidden in the background. To
verify that the i2050.exe is running, open the Windows Task Manager.
To view the i2050.exe process
Select Processes from the Task Manager window.
The process appears as long as the Avaya 2050 IP Softphone icon appears in the system tray.
NN40050-100NN40050-100
Page 11

Chapter 2
Avaya 2050 IP Softphone Call Control window
The Avaya 2050 IP Softphone Call Control window supports the Avaya 1140 IP Deskphone —
designed to look and feel like the desktop Avaya 1140 IP Deskphone — as well as an additional
two compact themes, available in black and silver. The Avaya 2050 IP Softphone also supports an
Accessibility Interface for visually impaired users. The Avaya 2050 IP Softphone version 4
supports the Software Expansion Module, which offers an additional 54 programmable keys.
To open the Avaya 2050 IP Softphone Call Control window
1 From your desktop PC, select Start.
2 Select All Programs.
3 Select Avaya > Avaya 2050 IP Softphone > Avaya 2050 IP Softphone.
Enhanced Accessibility Interface
11
The Enhanced Accessibility Interface can be enabled from the Call Control window, or
alternatively, during the installation process as an option in the installation GUI. For more
information about the Enhanced Accessibility Interface, see “Accessibility Interface” on page 67.
To open the Avaya 2050 IP Softphone Accessibility Interface from the Call
Control window
1 From your desktop PC, select Start > All Programs > Avaya > Avaya 2050 IP Softphone >
Avaya 2050 IP Softphone.
The Call Control window appears.
2 Select File > Settings > Theme.
3 Select the Accessibility Interface check box.
Note: If the Avaya 2050 IP Softphone is running, you must exit and
restart for the change to the Accessibility Interface to take effect.
Call Control window
The Call Control window (see Figure 1 below and Figure 2 on page 12) includes the standard
features that let you make and manage telephone calls.
For information on the elements of the Call Control window, see Table 1.
Avaya 2050 IP Softphone User Guide
Page 12

12 Chapter 2 Avaya 2050 IP Softphone Call Control window
Figure 1 Call Control window—1140
Line keys
Navigation
arrows
Quit
Services
Copy
Volume up
Volume down
Mute
Speaker
Figure 2 Call Control window—compact theme (silver)
Display
Soft keys
Line keys
Volume keys
Mute
Directory
Inbox/
Messages
Outbox/Shift
Navigation arrows
Quit
Line keys
Display
Soft keys
Inbox/Messages
Outbox/Shift
Directory
Release
Expand
Answer
Hold
Dialpad
Answer
Hold
Release
Dialpad
Speaker
Expand
Services
Copy
NN40050-100NN40050-100
Page 13

Chapter 2 Avaya 2050 IP Softphone Call Control window 13
Accessibility Interface
The Accessibility Interface works with JAWS for Windows from Freedom Scientific—screen
reading software that lets visually impaired users access the full range of Avaya 2050 IP Softphone
features. The screen is divided into four groups of controls: Display, Line and Feature, Date and
Time, and Indicators.
Menu Command options in the Accessibility Interface match those in the standard Call Control
window.
For more information about navigating the Accessibility control groups and Menu Command
options, see “Accessibility Interface” on page 67.
Call Control window elements and functions
Table 1 describes the elements and functions of the Call Control window
Avaya 2050 IP Softphone User Guide
Page 14

14 Chapter 2 Avaya 2050 IP Softphone Call Control window
Table 1
Avaya 2050 IP Softphone components and functions
Element Function
Primary display To provide call information (such as Caller ID) and
instructions for using certain soft key features.
When idling, the telephone displays only the date and
time.
Soft keys To access server-definable features, such as Transfer
(for connecting calls to other people), Conference (for
group calls), and so on.
To select a feature, click one of the four available
soft-labelled soft keys, and then follow the instructions
on the display.
Available soft key features vary, depending on:
Your current task: the features available at any time
depend on your current call activity.
Server support: Avaya 2050 IP Softphone functionality
depends on communications server configuration.
To view additional features, click the More soft key.
Copy* Programmable button on Avaya Business
Communications Manager (Avaya BCM) 6.0.
Quit* Programmable button on Avaya BCM.
To scroll through menus and lists in the display area.
Use the Send/Enter key at the center of the navigation
Navigation arrows
Volume
decrease
increase
Mute To listen to the receiving party without transmitting.
Answer To answer and make calls.
Hold To place an active call on hold.
Release To terminate an active call.
Line keys To access one of six programmable Line keys. These
Dialpad To dial a telephone number. Use your mouse pointer to
Directory* Programmable button on Avaya BCM
Services To access feature list and network services.
Expand Feature reserved for future use.
cluster to confirm menu selection (1140 theme only).
To increase or decrease the headset volume.
To return to a two-way conversation, click the Mute
button again.
The mute button mutes the headset microphone.
The feature key label for the line on hold displays a
flashing icon to indicate that the call is on hold.
Return to the call by clicking the Line button of the call
on hold.
keys can represent line appearances, DNs, or features.
The communications server provides the labels that
appear on these keys.
click the numbers you want to enter.
NN40050-100NN40050-100
Page 15
Hot keys
You can assign keyboard hot keys to access the full range of Call Control window functions and
menu options.
Chapter 2 Avaya 2050 IP Softphone Call Control window 15
Element Function
To access your messages or return a call.
Inbox/Messages
Outbox* Dial mailbox in voicemail registry. Programmable button
on Avaya BCM.
Speaker To answer and make calls using the handsfree speaker
*For more information on programming memory buttons, refer to the Avaya 2004 IP
Deskphone User Guide (NN40050-108) or Avaya 1140E IP Deskphone User Guide
(NN40050-105).
Adding a hot key
To add a new hot key
1 Open the Settings window. For information about opening the Settings window, refer to
“Opening the Settings window” on page 47.
2 Select Hot Keys.
3 Choose the feature group that you want to access: Buttons, Menu, or Select Fields
(Accessibility Interface only).
4 From the Items list, select the feature to which you want to assign a hot key.
5 Under Press a new shortcut key, enter the key combination—“Alt + Ctrl + V”, for example—
that you want as your hot key.
6 Click Assign.
Note: If the key combination is already taken, the previously assigned
feature appears in the Shortcut Key Currently Used By text box.
To assign a hot key, you can enter any keyboard key combination except for the following:
Avaya 2050 IP Softphone User Guide
Page 16

16 Chapter 2 Avaya 2050 IP Softphone Call Control window
•A to Z
• Shift-A to Shift-Z
• Alt-A to Alt-Z
•0 to 9
• Alt+0 to Alt+9
• Asterisk (*)
• Number sign (#)
• Up, down, left, and right arrow keys
• Shift+Up, Shift+Down
• PageUp, PageDn
• Alt+F1 to Alt+F12
• F1, Shift+F1,Ctrl+F1, Ctrl+Alt+F1, Ctrl+Alt+Shift+F1
• Space bar
Removing a Hot Key
To remove a hot key
1 Open the Settings window.
For information on opening the Settings window, refer to “Opening the Settings window” on
page 47.
2 Select Hot Keys.
3 Choose the feature group that you want to access: Buttons, Menu, or Fields (Accessibility
Interface only).
4 From the Items list, select the feature from which you want to remove a hot key.
5 Click Remove.
System tray icon and menu
Use the Avaya 2050 IP Softphone system tray icon menu to manage phone calls and messages
without opening the Call Control window.
To access the menu, right-click the Avaya 2050 IP Softphone icon in the Windows taskbar system
tray. From this menu, you can make, answer, and manage your calls, as well as access macros and
features.
NN40050-100NN40050-100
Page 17

Chapter 3
Installing and setting up the Avaya 2050 IP Softphone
System requirements
To use the Avaya 2050 IP Softphone, you require:
• Pentium-compatible CPU (200 MHz or higher)
• 256 Mbytes RAM or higher
• 55 Mbytes or higher free hard drive space (all languages)
• 800X600 or higher resolution monitor (16-bit color)
• Universal Serial Bus (USB) port (version 1.1 or 2.0)
• Avaya Enhanced USB Adapter (desktop) or Avaya Mobile USB Adapter (mobile)
Supported operating systems
17
To use the Avaya 2050 IP Softphone, you must have one of the following operating systems:
• Microsoft Windows XP Service Pack 3
• Microsoft Windows Vista Service Pack 2 (32-bit)
• Microsoft Windows 7 (32-bit)
Avaya USB Audio Kit
The USB Audio Kit lets you hear and speak with your callers. To ensure proper Avaya 2050 IP
Softphone functionality, use only the following Avaya-supported (or compatible) USB audio kits:
• Avaya Enhanced USB Adapter (desktop)
• Avaya Mobile USB Adapter (mobile)
• Algo Analog Terminal Adapter (compatible)
Avaya Enhanced USB Adapter (desktop) and Avaya Mobile USB Adapter (mobile) comply with
TIA 810 standards and are recommended where you require optimal quality audio. Alternatively,
you can use standard Bluetooth headset profiles (Bluetooth Power Class 2).
Avaya 2050 IP Softphone User Guide
Page 18

18 Chapter 3 Installing and setting up the Avaya 2050 IP Softphone
The Avaya USB Audio Kit includes:
• USB Headset Adapter (desktop or mobile)
• Installation Guide (English and French)
•USB cord
Some kits also include a headset.
The Algo Analog Terminal Adapter (ATA) is a USB adapter that lets you use analog terminals
instead of headsets. With an Algo ATA users can, for example, use a cordless handset with their
Avaya 2050 IP Softphone.
Note: The Avaya 2050 IP Softphone is compatible with the Algo ATA.
For support, see www.algosolutions.com.
Installing the Avaya 2050 IP Softphone
Refer to the IP Deskphones: Description, Installation, and Operation (553-3001-368) or consult
your system administrator.
Installing the USB Headset Kit
The Avaya 2050 IP Softphone supports a desktop USB headset adapter, as well as a mobile
adapter.
To install the USB Headset Kit
1 Ensure that you have the proper system requirements as listed in “Avaya USB Audio Kit” on
page 17.
2 Ask your system administrator to change settings, if necessary, to allow you to connect the
Avaya 2050 IP Softphone to the communications server.
3 If using the mobile adapter, connect the headset to the adapter. If using the desktop adapter,
you must:
• Connect the coiled lower cord to the headset cord with the Quick Disconnect connecto r
(make sure it is securely fastened).
• Connect the headset cord to the RJ9 jack on the adapter.
4 Connect the USB cable to the headset adapter and to one of the USB jacks on your computer
or USB hub.
The first time the headset adapter is plugged in, a delay occurs while the Windows operating
system configures the device and locates appropriate driver software. If the installation
software asks for the original Windows CD-ROM, insert the CD-ROM so that the Windows
operating system can locate drivers.
NN40050-100NN40050-100
Page 19

Chapter 3 Installing and setting up the Avaya 2050 IP Softphone 19
For more information about installing the Avaya 2050 IP Softphone software, contact your
system administrator.
Avaya 2050 IP Softphone User Guide
Page 20

20 Chapter 3 Installing and setting up the Avaya 2050 IP Softphone
NN40050-100NN40050-100
Page 21

Chapter 4
Managing contacts from the Local Directory
You can use the following options to manage contacts in the Local Directory:
• “Adding contacts to a Local Directory” on page 21.
• “Editing contacts in the Local Directory” on page 22.
• “Deleting contacts from the Local Directory” on page 22.
• “Finding contacts in the Local Directory” on page 23.
• “Filtering a Local Directory” on page 24.
• “Dialing from the Local Directory” on page 24.
• “Dialing from the Redial List in the Local Directory” on page 24.
• “Dialing from the Callers List in the Local Directory” on page 25.
• “Managing Groups in the Shortcut Bar” on page 25.
• “Using the Properties dialog box” on page 26.
21
Adding contacts to a Local Directory
You can add contacts to a Local Directory list, or insert contacts into any group of shortcut links in
the Shortcut Bar.
To add a contact to the Local Directory list
1 Open the Local Directory.
2 Select Edit > New Contact, or click New Contact on the toolbar.
The Properties dialog box appears.
3 Under the General tab (selected by default), enter the contact’s name, address, telephone
numbers, and other personal information.
4 Select the Details tab to enter any of the following contact details: Department, Office, or
Assistant.
5 To enter miscellaneous information, select the Notes tab.
6 Select the Settings tab to define the default dialing number as Business, Home, or Mobile.
7 Click OK.
Note: For more information on entering information in the property
fields, see “Using the Properties dialog box” on page 26.
Avaya 2050 IP Softphone User Guide
Page 22

22 Chapter 4 Managing contacts from the Local Directory
To add a contact to a group
1 In the Shortcut Bar, select the group of shortcut links to which you want to add a contact.
2 Select the contact you want to add, drag it to the Shortcut Bar, and then drop it under the
selected group button.
Note: You cannot directly add contacts to an external directory from
within the Local Directory.
Note: If the contents of an external directory change, you must first
update that directory for the changes to show in the Local Directory. To
update, right-click the imported directory and click Refresh.
Editing contacts in the Local Directory
To edit contacts in the Local Directory
1 Open the Local Directory.
2 Using your mouse pointer, highlight the contact you want to edit.
3 Open Properties using one of the following methods:
• Select Edit > Properties
• Click Properties on the toolbar.
• Right-click the selection and choose Properties from the menu.
4 Select the tab you need and edit the information.
5 Click OK.
Deleting contacts from the Local Directory
You can delete contacts from the Local Directory or remove contacts from a group of shortcut
links.
NN40050-100NN40050-100
Page 23

Chapter 4 Managing contacts from the Local Directory 23
To delete a contact from the Local Directory
1 Open the Local Directory.
2 Using your mouse pointer, select the contact you want to delete.
Note: To delete a range of contacts, click the first contact in the range,
and then shift-click the last contact in the range. The entire range
highlights. You can also CTRL-click to select a number of contacts in
different places.
3 Delete the contact by doing one of the following:
• Select Edit > Delete
• Click Delete on the toolbar.
• Right-click your selection and choose Delete from the menu.
4 To confirm the deletion, click Yes.
To remove a contact from a group of shortcut links
1 On the Shortcut Bar, select the group of shortcut links from which you want to delete a
contact.
2 Right-click the contact, and choose Remove Item from the menu.
Finding contacts in the Local Directory
You can search for contacts in a Local Directory by name.
To find a contact in one of your directories
1 Open the Local Directory.
2 Select or click either of the following:
— Select Edit > Find Contact
— Click Find Contact on the toolbar.
The Find Contact window appears.
3 Enter the name of the contact you want to find.
Note: Names in the directory are formatted as last name, first name. Use
this format when searching for a contact.
4 Click Find Now.
Search results display in the Find Contact window.
5 To stop a search, click Stop.
Avaya 2050 IP Softphone User Guide
Page 24

24 Chapter 4 Managing contacts from the Local Directory
Filtering a Local Directory
The Avaya 2050 IP Softphone lets you filter a Local Directory, making it smaller and easier to
manage. This feature is useful for dealing with large directories. By filtering a directory, you can
reduce the number of names through which you must search.
To filter a directory
1 Click Filter on the toolbar, or Directory > Filter from the menu.
The Filter dialog box appears.
2 From the Field and Condition lists, choose your filter criteria.
3 Enter the values you want included in the filtered list. For example, if under the filter criteria
Field: Last Name, Condition: Starts With, you enter Value: C, only contacts with a last name
starting with C appear in the Local Directory.
4 To apply the filter, click Add.
Dialing from the Local Directory
To call a contact stored in the Local Directory
1 Open the Local Directory.
2 Find the contact you want to call. You can dial using any of the following options:
• Double-click the phone number you want to dial.
• Double-click the contact's name.
• Right-click the contact's entry, and then click the desired telephone number in the me nu.
• To dial the default telephone number, click Dial on the toolbar.
• Click the arrow beside the Dial toolbar button, and then click the desired telephone
number from the list.
Dialing from the Redial List in the Local Directory
To dial from the Redial List
1 Open the Redial List using one of the following methods:
• Select Redial List in the Shortcut Bar of the Local Directory window.
• Select Keys > Features > Redial List
2 Find the contact using one of the following methods:
• Scroll to the desired contact.
• Search for the contact by name or number.
NN40050-100NN40050-100
Page 25

Chapter 4 Managing contacts from the Local Directory 25
• Enter the number of the contact to find it.
3 To dial the selected entry, double-click the contact.
Dialing from the Callers List in the Local Directory
To dial from the Callers List
1 Open the Callers List using one of the following methods:
• Select Callers List in the Shortcut Bar of the Local Directory window.
• Select Keys > Features > Inbox
2 Find the contact using one of the following methods:
• Scroll to the desired contact.
• Search for the contact by name or number.
• Enter the number of the contact to find it.
3 To dial the selected entry, double-click the contact.
Managing Groups in the Shortcut Bar
You can add, remove, or rename groups in the Shortcut Bar of your Local Directory.
To open a group of shortcut links and view its list of contacts, click the desired group from the
Shortcut Bar.
To add a group to a Local Directory
1 Right-click a blank area on the Shortcut Bar.
2 Select Add New Group.
A blank group button with a blinking cursor appears at the bottom of the Shortcut Bar.
3 Enter the name you want for the group and press Enter.
To remove a group in a Local Directory
1 Click open the group you want.
2 Right-click anywhere on or under the Group button and its list of contacts.
3 Select Remove Group.
4 At the “Delete? Are you sure?” prompt, click Yes.
Avaya 2050 IP Softphone User Guide
Page 26

26 Chapter 4 Managing contacts from the Local Directory
To rename a group in the Local Directory
1 Click open the group you want.
2 Right-click anywhere on or under the Group button and list of contacts.
3 Select Rename Group.
A cursor appears in the Group button.
4 Enter the new name you want the group to be called.
5 Press Enter.
Note: To view the list of contacts within a group, click the desired group
in the Shortcut Bar.
Using the Properties dialog box
Use the Properties dialog box to enter or change contact information.
To open the Properties dialog box
1 Open the Local Directory.
2 Do one of the following:
• Select Edit > New Contact.
• Click New Contact on the toolbar.
• Select a contact.
• Select Edit > Properties
• Click Properties.
NN40050-100NN40050-100
Page 27

Chapter 4 Managing contacts from the Local Directory 27
The Properties dialog box contains four tabs:
• “Properties—General tab” on page 27.
• “Properties—Details tab” on page 27.
• “Properties—Notes tab” on page 27.
• “Properties—Settings tab” on page 27.
All four tabs offer an Export button. Use this button to export contact information to a *.vcf file.
You can import this file into e-mail or contact manager applications, or any other software
applications that use the *.vcf file format.
Properties—General tab
Use this tab to store a contact’s name, address, e-mail address, company information, and
telephone numbers. To create a contact record, enter the contact’s name and at least one telephone
number. All other information is optional.
Note: To add a half-second delay in the dialing pattern, insert a comma
in the telephone number, wherever you want the pause to occur. You can
add as many pauses as required by inserting an equal number of commas.
Properties—Details tab
Use the Details tab to enter any of the following contact details:
• Department
•Office
•Assistant
Properties—Notes tab
Use this tab to record miscellaneous information about a contact. You can enter significant dates,
recent orders, meeting locations, or any information you require when you call the contact.
Properties—Settings tab
Use this tab to set the default dialling number for the contact.
To set the Default Dial, click the desired option button: Business, Home, or Mobile.
To dial a contact’s non-default telephone number, right-click the contact and select any other
telephone number that appears in the menu.
Avaya 2050 IP Softphone User Guide
Page 28

28 Chapter 4 Managing contacts from the Local Directory
Linking to external directories
You can access the following external directories from the Local Directory window:
• Lightweight Directory Access Protocol (LDAP) directory
• Outlook directory
• Windows Address Book directory (WAB)
To access these external directories, you must create a link to the desired directory in the Shortcut
Bar. After you add the directory, an icon appears in the Shortcut Bar. You can then click the icon
to view or dial contacts in that directory.
Linking to the LDAP directory
To add a link to the LDAP directory in the Shortcut Bar
1 From the Local Directory menu, select Directory > Add Link To > LDAP Directory
A Properties dialog box appears. From the Properties dialog box, you can access the following
three tabs: General, Security, and Schema.
2 In the General tab, enter the following required information into the corresponding field:
• Directory Name: the name of the directory as you want it to appear in the Shortcut Bar.
• LDAP Path: the path to the LDAP directory stored on your hard drive.
• User Name and Password: if applicable, enter your LDAP user name and password.
3 In the Security tab, select from the following security protocols:
• Use Secure Authentication
• Use Encryption
• Use SSL Encryption
•Use Signing
• Use Sealing
4 In the Schema tab, select the desired LDAP schema from the Schema list. You can use this tab
to add, remove, or modify an LDAP.
To add a new schema to the list
1 From the Schema tab, click Add.
A Dialog box opens. The Dialog box lists all current names and fields used by the LDAP
directory.
2 In the Schema Name field, enter the name you want to use for your new LDAP schema.
3 Click OK.
NN40050-100NN40050-100
Page 29

Chapter 4 Managing contacts from the Local Directory 29
To remove a schema from the list
1 In the Schema tab, select the schema you want to remove from the list.
2 Click Remove.
The LDAP Directory dialog box appears with the message “Remove the schema? Are you
sure?”
3 Click Yes.
To modify an existing schema
1 In the Schema tab, select the schema you want to modify from the list.
A Dialog box opens. The Dialog box lists all current names and fields used by the LDAP
directory.
2 Modify the Schema Name.
3 Click OK.
Linking to Outlook
To add a link to your Outlook directory in the Shortcut Bar
1 From the menu, select Directory > Add Link To > Outlook Directory
A Properties dialog box appears.
2 In the Directory Name field, enter the name of your Outlook directory, as you want it to appear
in the Shortcut Bar.
3 Click OK.
Linking to Windows Address Book directory
To add a link to a WAB directory in the Shortcut Bar
1 From the menu, select Directory > Add Link To > Windows Address Book
A Properties dialog box appears.
2 In the Directory Name field, enter the name of your Windows Address Book directory, as you
want it to appear in the Shortcut Bar.
3 In the WAB Name field, enter the name of the WAB file you want to link to from the Shortcut
Bar.
Note: If you do not know the name of the WAB file, click the browse
button to the right of the WAB Name field. A Windows Open dialog box
appears. Use this dialog box to navigate and select the file you need from
your file system.
Avaya 2050 IP Softphone User Guide
Page 30

30 Chapter 4 Managing contacts from the Local Directory
4 From the Properties dialog box, click OK.
Adding external contacts to the Local Directory
You can add contacts from any of the external directories to your Local Directory.
To add an external contact to the Local Directory
1 From the Shortcut Bar, click the external directory icon you want to access.
A list of contacts from the selected external directory appears.
2 Right-click the contact that you want to add to the Local Directory.
3 From the menu, select Add to Local Directory.
The Properties dialog box appears.
4 If no phone numbers appear in the Phone Numbers field, you must input at least one valid
phone number. If the telephone numbers in the Phone Numbers field look correct, then click
OK.
The contact is added to the Local Directory.
5 To access the added contact, click the Local Directory icon in the Shortcut Bar.
Note: You cannot directly add contacts to an external directory from
within the Local Directory.
Note: If the contents of an external directory change, you must first
update that directory for the changes to show in the Local Directory. To
update, right-click the imported directory and click Refresh.
NN40050-100NN40050-100
Page 31

Chapter 5
Managing Avaya 2050 IP Softphone calls
Making telephone calls
Before making a call, ensure that you are wearing your headset.
To make a call
1 Open a Line using one of the following methods:
• On the Call Control window, click Answer/Headset.
Your main telephone line appears.
• Select Keys > Answer
• From the Call Control window, select a Line key.
2 Enter the phone number using one of the following methods:
31
• Dial from the number pad of your computer keyboard.
• Dial from the Call Control window Dialpad, using the mouse pointer.
• Select Keys > Macros, and then choose the desired macro.
• Select View > Local Directory, and then:
a Open a directory feature: Local Directory, Redial List, or Callers List.
b Scroll through the directory to find the contact you want.
c Select Dial > and choose Business, Home, or Mobile.
Answering telephone calls
Before answering a call, ensure that you are wearing your headset. When you receive a call, the
speaker to which you set your phone rings, and Caller ID (if available) shows in the display area.
Optionally, a call pop-up appears when a call is presented, and can be clicked to answer the call. If
the Avaya 2050 IP Softphone is connected to an Avaya Business Communications Manager
(Avaya BCM) 6.0 system, the pop-up includes CLID information.
Note: To select the speaker you want to ring, click File > Settings >
Sound Devices > Handsfree/Ringing/Paging device > Speaker. Choose
the desired speaker from the list.
Avaya 2050 IP Softphone User Guide
Page 32

32 Chapter 5 Managing Avaya 2050 IP Softphone calls
You can answer a call using one of the following methods:
• On the Call Control window, click Answer/Headset.
• Click the Line key of whichever line is ringing.
Note: Answering a new call automatically puts any active calls on hold.
To switch between active callers, click the appropriate Line key to resume
your call.
Incoming and disconnected call pop-up notifications
BCM 6.0 supports both incoming call pop-up notification and call disconnect pop-up notification
on the Avaya 2050 IP Softphone (version 4.0 only). This feature is especially useful if the Avaya
2050 IP Softphone is minimized or operational in the System Tray.
Incoming call pop-up notification identifies the call by its DN, Calling Part Name, and Calling
Party Number. When either party (caller or receiver) disconnects either an incoming or outgoing
call, the Avaya 2050 IP Softphone displays a disconnect call pop-up notification identifying only
its own DN. The pop-up window behaviour is determined in the Notifications area of the Avaya
2050 IP Softphone Settings options.
NN40050-100NN40050-100
Page 33
Chapter 5 Managing Avaya 2050 IP Softphone calls 33
Figure 3 Call pop-up notification configuration settings
Avaya 2050 IP Softphone User Guide
Page 34
34 Chapter 5 Managing Avaya 2050 IP Softphone calls
Incoming calls generate a call pop-up window in the lower right corner of the windows desktop.
Users can answer a call from the pop-up window, or can launch the Avaya 2050 IP Softphone by
clicking the Open button.
Figure 4 Incoming call pop-up notification on desktop
When the call is ended by either party, the Call Disconnected display appears. This pop-up
window appears if the Avaya 2050 IP Softphone is minimized or operating in the System Tray.
Figure 5 Disconnected call pop-up notification on desktop
Holding and retrieving telephone calls
Before using the phone, ensure that you are wearing your headset.
To put a call on Hold or retrieve a call from Hold
1 Click the Line key for the active call.
2 From the Call Control window, click Hold.
Hanging up telephone calls
When your call ends, you must manually terminate the active line.
To terminate a telephone call
1 Click the appropriate Line key to ensure it is selected.
2 From the Call Control window, click Goodbye/Release.
NN40050-100NN40050-100
Page 35

Chapter 6
Avaya 2050 IP Softphone USB Headset Adapter
You must install an Avaya USB Audio kit before using the Avaya 2050 IP Softphone. See
“Installing the USB Headset Kit” on page 18.
Overview
The features of the USB Headset Adapter are described in Table 2.
35
Avaya 2050 IP Softphone User Guide
Page 36

36 Chapter 6 Avaya 2050 IP Softphone USB Headset Adapter
Table 2
USB Headset Adapter elements and functions
Element Function
Message Waiting light The red Message Waiting light is located at the top of
the USB Headset Adapter.
The light illuminates when you have voicemail
messages waiting.
The light flashes when a call is ringing on the Avaya
2050 IP Softphone.
Maximize button Press the Maximize button to maximize or minimize the
Avaya 2050 IP Softphone.
If the Avaya 2050 IP Softphone is minimized, press this
button to maximize the Avaya 2050 IP Softphone
window.
If the Avaya 2050 IP Softphone is maximized but behind
another window, press this button to bring the Avaya
2050 IP Softphone to the foreground.
If the Avaya 2050 IP Softphone is maximized, press this
button to minimize the Avaya 2050 IP Softphone.
Smart Function
buttons
Answer button To answer an incoming call, press Answer.
Release button Press the Release button to terminate the current call.
Mute button Press the Mute button to mute a call. When you mute a
Mute light You can find the Mute light beside the Mute button. With
Volume button Use the Volume button to control the volume of the
Backlight The backlight illuminates when your headset is
Available on the desktop adapter only. Press this button
to access the Smart Functions menu. For more
information, refer to “Using the Smart Functions menu”
on page 37.
If you have no incoming call when you press this button,
the Avaya 2050 IP Softphone selects a line and you
hear a dial tone.
call, you can still hear your caller, but your caller cannot
hear you. Press the Mute button a second time to
resume your conversation.
a call on mute, the Mute light illuminates. With a call off
mute, the Mute light remains off.
headset.
When the Smart Functions Menu appears, use these
buttons to move up and down in the menu.
connected to the Avaya 2050 IP Softphone application.
To activate or deactivate the backlight feature, click on
File > Settings > USB Headset, and select or clear the
Use backlight check box.
Answering calls with the USB Headset Adapter
You can use the USB Headset Adapter to answer calls whenever the Avaya 2050 IP Softphone is
running—even if minimized or running in the background.
NN40050-100NN40050-100
Page 37

Chapter 6 Avaya 2050 IP Softphone USB Headset Adapter 37
To answer a call using the USB Headset Adapter
1 Ensure that you are wearing your headset.
2 Press Answer.
Note: If you want to view Caller ID before answering while the Avaya
2050 IP Softphone is minimized or running in the background, click the
Maximize button. This brings up the IP Softphone Call Control window.
Hanging up calls with the USB Headset Adapter
You can use the USB Headset Adapter to hang up calls whenever the Avaya 2050 IP Softphone is
running—even if minimized or running in the background.
To hang up a telephone call using the USB Headset Adapter, press the Release button.
Adjusting the volume with the USB Headset Adapter
You can adjust the volume of your telephone calls using the USB Headset Adapter. Ensure that
you are wearing your headset so you can hear the changes as you make them.
To increase the volume, press the right up arrow on the Volume button.
To decrease the volume, press the left down arrow on the Volume button.
Muting a call
When you mute a call, you can still hear your caller, but your caller cannot hear you.
To mute a call using the Headset adapter, press the Mute button.
Using the Smart Functions menu
The Smart Functions menu provides quick access to Avaya 2050 IP Softphone features. You can
customize what appears on this menu using the Configuration Utility.
To access the Smart Functions menu
1 Press the Smart Functions button on the USB Headset Adapter.
2 Highlight the feature you want using one of the following:
• Mouse pointer
• Keyboard arrow keys
• Volume button on the USB Headset Adapter
Avaya 2050 IP Softphone User Guide
Page 38
38 Chapter 6 Avaya 2050 IP Softphone USB Headset Adapter
3 To select the feature, click OK.
Note: If only one feature shows up in the menu, the Don't display this
dialog again check box appears. Select this check box to map the Smart
Function button directly to that one available feature. You can then press
the Smart Function button to execute the feature directly, bypassing the
menu.
Note: The Smart Functions button is available only on the desktop
version of the USB Headset Adapter.
Customizing the Smart Functions menu
You can customize the features that appear on the Smart Functions menu using the Configuration
Utility.
To customize the Smart Functions menu
1 From the Call Control window, select File > Settings > USB Headset
The USB Headset Settings window opens.
2 Click Configure Smart Functions.
The Configure Smart Functions dialog box opens.
3 From the dialog box, you can Add, Remove, or Rearrange functions from the Smart Function
menu.
— To add a function, select the function you want from the Available functions list, and then
click Add.
— To remove a function, select the function you want to remove from the list, and then click
Remove.
— To rearrange a function, click the function you want to move either up or down in the
menu, and then click the appropriate button: Move Up or Move down.
4 To close the Configure Smart Functions dialog box, click OK.
5 To close the USB Headset dialog box, click OK.
You can also add special functions to the Smart Functions menu.
NN40050-100NN40050-100
Page 39

Chapter 6 Avaya 2050 IP Softphone USB Headset Adapter 39
Custom Functions for Smart Functions menu
From the Configure Smart Functions dialog box, you can add, delete, and modify custom
functions on the Smart Functions menu.
To add a custom function
1 Click New.
2 In the Name box, enter the name you want to appear on the Smart Functions menu.
3 In the Command box, enter the pathname and file name of the function you want to add.
Note: If you do not know the pathname or file name of the function, click
Browse beside the Command box. You can then navigate to the correct
file, select it, and click Open.
4 In the Arguments box, enter any arguments that are required for this function.
Note: If you want the Avaya 2050 IP Softphone to prompt you for the
argument when you select this special function, select Prompt for
arguments.
5 In the Initial directory box, enter the pathname of the directory you want this function to use.
Note: As with the Command box in step 3, if you are unsure of the
pathname or filename, click Browse next to the Initial directory box. You
can then navigate to the correct directory, make your selection, and click
OK to finish.
6 To change the icon that appears beside this function on the Smart Functions menu, click
Change, then go through steps 7 to 9. If you do not want to change the icon, go to step 10.
7 Click Browse.
8 Navigate to the file you entered in the Command box and select it.
9 Click Open.
10 Select one of the icons that appears.
11 Click OK.
12 To add the new function to the Smart Functions menu, click OK.
To modify a custom function
1 Select the custom function you want to modify.
2 Click Modify.
Avaya 2050 IP Softphone User Guide
Page 40

40 Chapter 6 Avaya 2050 IP Softphone USB Headset Adapter
3 Make the required changes.
4 Click OK.
To remove a custom function
1 Select the custom function you want to remove.
2 Click Delete.
3 To confirm the deletion, click Yes.
NN40050-100NN40050-100
Page 41

Chapter 7
Avaya 2050 IP Softphone macros
About macros with the Avaya 2050 IP Softphone
Use the Avaya 2050 IP Softphone to enter macros. A macro is a sequence of keystrokes that you
can use to automate repetitive actions. For example, you can program a macro that selects a
particular telephone line and then dials a telephone number automatically, or a macro that ensures
a certain number is always dialed out on a particular telephone line.
To access the Avaya 2050 IP Softphone Macro Settings menu from the Call Control window, click
File > Settings > Macros
All macros are listed in the Macros Settings window. You can also access macros by selecting
Keys > Macros.
41
Entering a macro
You can enter a macro to automate a procedure or repetitive action.
To enter a macro
1 Open the Settings window. For details, refer to“Opening the Settings window” on page 47.
2 Select Macros.
The Macros settings dialog box opens.
3 Click
The New Macros dialog box opens.
4 Enter the name of your new macro.
5 Create the macro using a combination of the following:
• To enter numbers, click the dialpad.
• Select the actions you want from the Keys menu, and then click Add.
6 To add the new macro to the list, click Apply.
7 To exit the Macros dialog box, click OK.
Note: Use the Pause action to introduce a half-second delay in the
macro—a requirement for some Interactive Voice Response applications
and voicemail systems.
Avaya 2050 IP Softphone User Guide
Page 42

42 Chapter 7 Avaya 2050 IP Softphone macros
Deleting a macro
To delete a macro
1 From the Macro menu, select the macro you want to delete.
2 Click Delete Macro. This clears the macro.
3 To finalize the change, press Apply.
Playing a macro
You can play macros to dial telephone numbers or access your voicemail.
To play a macro
1 From the Call Control window, select Keys > Macros
2 Select the desired Macro by name.
NN40050-100NN40050-100
Page 43

Chapter 8
Avaya 2050 IP Softphone menu commands
Call Control window menu command
The Avaya 2050 IP Softphone supports a Windows-style menu command system, with File, Edit,
Keys, View, and Help menus all available. With Show Menu Bar selected, the menu bar appears
above the Call Control window.
To show the menu, select View > Menu Bar Options > Show Menu Bar
To hide the menu, select View > Menu Bar Options > Autohide Menu Bar. To access the menu
when set to Autohide, move your cursor over the top part of the Call Control window. The menu
appears.
Note: The Avaya 2050 IP Softphone must be in focus for the Autohide
Menu Bar function to work. To bring the Avaya 2050 IP Softphone into
focus, click anywhere on the Call Control window.
43
Using the File menu
From the File menu, you can choose from any of the following:
• Run in background—Sends the Call Control window to the background, but leaves the
application running to receive calls.
• Record this call—Begins recording all incoming or outgoing calls.
• Settings—Opens the Settings window and the various tabs.
• Exit—Closes the Avaya 2050 IP Softphone application.
Using the Edit menu
From the Edit menu, you can choose from any of the following:
• Copy—Copies the contents in the display window for use in other applications.
• Paste—Pastes phone numbers or other dialable strings copied from other applications.
• Input Mode—Selects method that the application uses to interpret input from the keyboard.
The three methods are:
— Numeric—Select Numeric and the Avaya 2050 IP Softphone interprets keyboard
characters (a 1-800 number, for example) as single numbers for dialing.
Avaya 2050 IP Softphone User Guide
Page 44

44 Chapter 8 Avaya 2050 IP Softphone menu commands
— Alphabetic—Select Alphabetic and the Avaya 2050 IP Softphone interprets each
keyboard character as a multiple number. For example, use this option when entering a
name in a network directory, where the algorithm interprets the character B, for example,
as 2 2. With alphabetic mode selected, the application interprets the name Bob as 2 2
pause 6 6 6 pause 2 2 pause.
— Native—Select Native and the Avaya 2050 IP Softphone interprets alphabetic keys as
ASCII characters. Requires server support (the item normally appears dimmed).
Using the Keys menu
From the Keys menu, you can choose from any of the following:
• Headset/Handset—Select to answer an incoming call, or obtain a dial tone to make a call.
• Handsfree—Select to answer or make a call using the handsfree speaker. To set the desired
speaker, select File > Settings > Sound Devices. From Handsfree/Ringing/Paging device,
select your Speaker from the speakers list.
• Answer—Select to answer an incoming call or obtain a dial tone.
• Goodbye—Select to end a call.
• Hold—Select to put an active call on hold.
• Mute—Select to place your call on mute. You can hear the caller, but the caller cannot hear
you.
• Send—Select to confirm menu selections and terminate input sequences.
• Features—Select to view a list of available, server-supported features.
• Macros—From the macros menu, select the macro you want to dial.
Using the View menu
From the View menu, you can choose from any of the following:
• Local Directory—Select to access the Local Directory window.
• Menu Bar Options—Select to show or hide the menu bar. Select Autohide Menu Bar to hide
the menu bar when not in use.
• Always on Top—Select to keep the phone on top at all times.
• Software Expansion Module (Avaya Business Communications Manager (Avaya BCM) 6.0
only)—Select to show the Soft Expansion Module buttons and interface elements.
• GXAS—Select to show the GXAS window.
NN40050-100NN40050-100
Page 45

Chapter 8 Avaya 2050 IP Softphone menu commands 45
Using the Help menu
From the Help menu, you can choose from any of the following:
• Quickstart—Select to view basic information on operating the Call Control window and the
USB headset.
• Hot Keys—Select to view a list of both Buttons and Menus hot keys.
• License Agreement—Select to view Avaya’s software license agreement.
• Contents—Select to open the contents section of the Avaya 2050 IP Softphone Help system.
• Search—Select to search for a specific item in the Avaya 2050 IP Softphone Help system.
• Index—Select to open the index section of the Avaya 2050 IP Softphone Help system.
• About Avaya 2050 IP Softphone—Select to view information about the Avaya 2050 IP
Softphone, such as the version number or copyright information.
• Diagnostics—Select to show problem diagnostics information for system administrator use.
Avaya 2050 IP Softphone User Guide
Page 46

46 Chapter 8 Avaya 2050 IP Softphone menu commands
NN40050-100NN40050-100
Page 47

Chapter 9
Avaya 2050 IP Softphone Settings
Use the Settings window (shown in Figure 6 on page 47) to access and configure the many Avaya
2050 IP Softphone features and functions. You can open the Settings window from the Windows
Start Menu or from the Avaya 2050 IP Softphone Call Control window.
Figure 6 The Settings window
47
Opening the Settings window
Use one of the following options to open the Settings window:
• From the Windows operating system:
— Select Start > Programs > Avaya > Avaya 2050 IP Softphone > Avaya 2050 IP
Softphone Settings
— Select Start > Control Panel > Avaya 2050 IP Softphone. (In Windows XP, select
Switch to Classic View to view the list of settings.)
Avaya 2050 IP Softphone User Guide
Page 48

48 Chapter 9 Avaya 2050 IP Softphone Settings
• From the Avaya 2050 IP Softphone Call Control window:
— Select File > Settings.
Using the Settings window
The following sections describe how to configure the various Avaya 2050 IP Softphone features
and functions:
• “Profiles” on page 48.
• “Server” on page 51.
• “Licensing Server” on page 52
• “Theme” on page 53.
• “Features” on page 53.
• “Macros” on page 54.
• “Audio” on page 54.
• “Sound Devices” on page 54.
• “Hardware ID” on page 55.
• “Advanced Audio” on page 56.
• “Listener IP” on page 57.
• “Notifications” on page 58.
• “Hot Keys” on page 58.
• “Text Replacements” on page 59.
• “Lamp Sounds” on page 60.
• “Key Type” on page 60.
• “About” on page 61.
• “Language” on page 61.
• “Software Expansion Module interface” on page 61
• “Personal Call Recording” on page 63.
• “USB Headset” on page 64.
Features and functions are listed in the left pane of the Avaya 2050 IP Softphone Settings window
(see Figure 6 on page 47). Select the desired feature to open the corresponding dialog box.
Profiles
Use profiles to configure the Avaya 2050 IP Softphone. Using profiles, you can keep multiple
Avaya 2050 IP Softphone configurations on the same computer. When you make changes to any
feature or function, the changes affect only the current profile.
NN40050-100NN40050-100
Note: The name of the current profile appears at the lower right corner of
all Avaya 2050 IP Softphone Settings dialog boxes, above the Apply
button (see Figure 6 on page 47).
Page 49

Chapter 9 Avaya 2050 IP Softphone Settings 49
To open the Profiles dialog box, select Profiles from the list in the left pane of the Settings
window.
Creating new profiles
A text box at the top of the Profiles dialog box displays the current profile.
To create a new profile
1 Click New.
An empty text box called Profile Name opens.
2 Enter the name of the new profile.
3 Click OK.
Removing profiles
To remove a profile
1 From the list of profiles, select the profile that you want to remove.
2 Click Remove.
A “Remove profile? Are you sure?” message appears.
3 Click Yes.
The profile is deleted from the list.
Note: My Server is a built-in profile name and cannot be deleted.
Modifying profile names
To modify a profile name
1 From the list of profiles, select the profile that you want to modify.
2 Click Modify Name.
The Profile Name text box opens, with the name of the profile highlighted.
3 Enter the new profile name.
4 Click OK.
The new name shows in the list.
Avaya 2050 IP Softphone User Guide
Page 50
50 Chapter 9 Avaya 2050 IP Softphone Settings
Selecting profiles
To choose which profile the Avaya 2050 IP Softphone uses for
your current session
1 From the list of profiles, select the desired profile.
2 Click Reset.
If the Avaya 2050 IP Softphone is currently running, it tries to reestablish communication with the
server (as defined by the profile). The Main Application screen opens.
If the Avaya 2050 IP Softphone is not currently running, the Settings window closes. The next
time you start the Avaya 2050 IP Softphone, it attempts to connect to the server (as defined by the
profile).
Note: Check the server dialog box in Avaya 2050 IP Softphone Settings
to see which server your current profile uses.
Exporting profiles
You can export your Avaya 2050 IP Softphone profiles to your computer hard drive, either to back
up the configuration or for use in other applications.
To export your profiles
1 Click Export.
A Save As dialog box opens.
2 Save your profiles using the file name and directory of your choice.
Your current Avaya 2050 IP Softphone profiles are now saved as “Config Backup Files” (*cfx).
Importing Profiles
Use import to restore backed-up configuration files for current use.
To import saved profiles
1 Click Import.
An Open dialog box opens.
2 Locate and select the profile you want to use.
The Import Profiles text box opens.
3 Select the profile or profiles that you want to import.
4 Click OK.
NN40050-100NN40050-100
Page 51
Server
Use the Server dialog box to configure the connection between the Avaya 2050 IP Softphone and
your communications server. You can either use the default method (DHCP) or manually specify
an IP address.
To open the Server dialog box, select Server from the list in the left pane of the Settings window.
Using DHCP
With Automatic (DHCP) enabled, the Avaya 2050 IP Softphone reads server addresses from a
Dynamic Host Configuration Protocol (DHCP) server.
To use the Automatic (DHCP) method
Chapter 9 Avaya 2050 IP Softphone Settings 51
Note: To use DHCP, your Local Area Network (LAN) must include a
DCHP server. Contact your System Administrator to set up the server
with the correct IP address values.
1 Select the Automatic (DHCP) check box.
2 From the Server list, select your server. You can choose from the Primary, Secondary, or
Application (XAS) servers.
Note: Primary and Secondary servers are assigned by DHCP.
Note: XAS support is reserved for future use.
Using IP addresses and DNS names
If your communications server does not support DHCP, then you must assign an IP address or
DNS name manually.
Avaya 2050 IP Softphone User Guide
Page 52
52 Chapter 9 Avaya 2050 IP Softphone Settings
To assign a manual IP address or DNS name, you must have the
following information about your call server
• IP address or DNS name
• Port number
• Server type
To assign an IP address or DNS name
1 From the Server list, select the server you want to configure: Primary or Secondary.
2 Select IP and enter the IP address, or select Name and enter the DNS name.
3 From the Type list, select your server type.
The default port number shows in the Port text box.
4 If your server port number is different from the default number, enter the correct number in the
Port text box.
Note: Symposium call center agents must select the Symposium check
box.
Restoring defaults
To restore the settings dialog to its default settings, click Restore Defaults.
Resetting the connection
To reset the server connection while the Avaya 2050 IP Softphone is running, click Reset.
Licensing Server
Use the License Server dialog box to add new license servers to the Server Address list and to
specify the order in which they are contacted by the 2050 IP Softphone client. The server at the top
of the list is contacted first, followed by the second, and so on.
To add a new license server
1 Enter the new server IP address (or DNS name) in the New server field.
2 Click Add.
The new server is added to the Server Address list.
3 Click OK.
NN40050-100NN40050-100
Page 53

To change the license server priority
1 Select the server from the Server Address list.
2 Use the Increase Priority and Decrease Priority buttons to move the server up or down in
3 Click Apply.
Theme
Use the Theme dialog box to select the 1140 theme or one of two available compact theme colors
(black or silver). You can also use this dialog box to switch to select the Enhanced Accessibility
Interface by selecting the Accessibility mode check box.
To choose the Theme
1 From the Theme menu, select 1140, black, or silver.
2 Click OK.
Chapter 9 Avaya 2050 IP Softphone Settings 53
the list.
If the default path was overwritten during installation, then you must designate the correct path to
the Avaya 2050 IP Softphone file.
To select the path to the IP Softphone file
1 Click Browse.
A Browse for folders dialog box opens.
2 Locate and select the Avaya 2050 IP Softphone folder in your file system.
3 Click OK.
Features
Use the Features dialog box to rearrange the features found under Keys > Features on the Call
Control window.
Note: You can also use the theme dialog box to set the Avaya 2050 IP
Softphone to the Accessibility Interface. For information about opening
or using the Accessibility Interface, refer to “Accessibility Interface” on
page 67.
The Feature Menu lists all available server-supported features. Use the arrow keys to move
individual items up and down in the list. The list includes:
Avaya 2050 IP Softphone User Guide
Page 54
54 Chapter 9 Avaya 2050 IP Softphone Settings
•Directory
•Services
•Expand
•Copy
•Quit
• Inbox
•Outbox
Note: In Avaya Communications Server 1000 systems, the Available
Features list remains empty.
You can access any item on the Available Features list from the Keys > Features list.
Macros
For information on setting macros, refer to “Avaya 2050 IP Softphone macros” on page 41.
Audio
Use the Audio dialog box to adjust the level of buffering between your audio hardware and the
Avaya 2050 IP Softphone.
Use the Quality slider to increase or decrease the amount of delay. Less delay speeds up buffering,
but reduces audio quality. Higher quality improves audio quality, but slows down buffering.
Note: If your Avaya 2050 IP Softphone audio sounds choppy or broken,
move the slider toward Higher Quality.
Sound Devices
Use the Sound Devices dialog box to select and set the various IP Softphone sound devices.
The dialog box is separated into two areas:
• Headset or Handset device
• Handsfree/Ringing/Paging device
Headset or handset device
When using a headset or handset, use this area to:
NN40050-100NN40050-100
Page 55

Chapter 9 Avaya 2050 IP Softphone Settings 55
• Select the microphone and speaker
• Adjust volume
• Select or clear mute status
The Microphone text box displays the currently selected microphone. To change the microphone,
select the microphone you want to use from the microphone list.
The Speaker text box displays the currently selected speaker. To change the speaker, select the
speaker you want to use from the speaker list.
To adjust the volume of the microphone and speaker, use the volume slider bar.
To mute both devices, select Mute.
Handsfree/Ringing/Paging Device
When using a handsfree/ringing/paging device, use this area to:
• Select the microphone and speaker
• Adjust volume
• Select or clear mute status
The Microphone text box displays the currently selected microphone. To change the microphone,
select the microphone you want to use from the microphone list.
The Speaker text box displays the currently selected speaker. To change the speaker, select the
speaker you want to use from the speaker list.
To adjust the volume of the microphone and speaker, use the volume slider bar.
To mute both devices, select Mute.
To return the settings to installation defaults, click Restore Original Values.
Hardware ID
Use the Hardware ID dialog box to select the hardware address reported to your communications
server. The Hardware ID text box displays the current hardware address.
Note: This dialog box is intended for expert users only.
Avaya 2050 IP Softphone User Guide
Page 56
56 Chapter 9 Avaya 2050 IP Softphone Settings
MAC addresses
The Avaya 2050 IP Softphone default IP address comes from your Ethernet hardware, as a
Medium Access Control (MAC) address. If several Ethernet interfaces are installed, then the
Avaya 2050 IP Softphone chooses the first MAC address it detects and uses that address in all
subsequent re-connections.
Note: Some Virtual Private Network (VPN) clients hide their MAC
addresses. In this case, you must override the default value to prevent
problems communicating with the server.
Selecting MAC addresses
To select a MAC address
1 Click Auto-Create. The Hardware ID text box displays the next address in a range of
addresses.
2 Continue clicking Auto-Create to move through the range of available addresses, until you
find the one you need.
After you click through all available MAC addresses, Auto-Create generates random hardware ID
numbers. Select one of these numbers if your Ethernet hardware address is not unique to the
server.
To return the settings to their installation defaults, click Restore Defaults.
To reset the Hardware ID while the Avaya 2050 IP Softphone is running, click Reset.
Note: The Firmware Version field displays the latest Avaya 2050 IP
Softphone firmware version reported by the server.
Advanced Audio
Note: This dialog box is intended for expert users only.
Use the Advanced Audio dialog box to override the audio values defined by your communications
server.
Overriding communications server values
In cases where network performance causes audio difficulties, adjusting the values in this area can
help achieve a workable audio quality balance.
Select the Override communications server values to adjust the following values:
NN40050-100NN40050-100
Page 57

Chapter 9 Avaya 2050 IP Softphone Settings 57
• Microphone Automatic Gain Control
• Echo Cancellation
• Noise Reduction
Automatic Gain Control
Selecting the Microphone Automatic Gain Control box allows the system to automatically
determine the appropriate level of gain for your microphone. This ensures a comfortable speech
level for both parties.
Echo Cancellation
Use the Echo Cancellation slidebar control if an echo is detected on the line during a call. Certain
types of headsets or PC audio speakers can cause echo to appear on the line.
The slider has three settings:
• Off disables the echo cancellation controls.
• Always On enables echo cancellation for all calls.
• Auto allows the system to enable and disable echo cancellation as required.
Noise Reduction
Use the Noise Reduction slidebar to increase or reduce any unwanted sounds from your
environment. Move the slidebar between Off and Max to find the desired level of noise reduction.
Listener IP
Use the Listener IP dialog box to override port assignments when the Avaya 2050 IP Softphone
application conflicts with another application on your computer.
Under normal operation, the Avaya 2050 IP Softphone listens for UNIStim traffic on all IP
addresses and IP ports. You can set the Avaya 2050 IP Softphone to listen to only one specific IP
address or port.
To use a specific address
1 Select Use a specific address.
The dimmed text box activates.
Note: This dialog box is intended for expert users only.
2 Enter the address to which you want the Avaya 2050 IP Softphone to listen. The format of the
IP address is 99.99.99.99.
Avaya 2050 IP Softphone User Guide
Page 58

58 Chapter 9 Avaya 2050 IP Softphone Settings
To use a specific port
1 Select Use a specific port.
The dimmed text box activates.
2 Enter the port to which you want the Avaya 2050 IP Softphone to listen.
To return the settings to their installation defaults, click Restore Defaults.
Notifications
Use the Notifications dialog box to select sound effects for when the Avaya 2050 IP Softphone
connects to, or disconnects from, a call server. These notifications can be sounds or pop-up
window functions. You can assign a notification to any of the following three events:
• Server connected
• Server unreachable
• Server unresponsive
To configure pop-up window notifications
1 Select Show pop-up window in System Tray.
2 Select the Voice Notifications check box.
3 Click OK.
To assign a sound to an event
1 From the Select an event list, select the event to which you want to assign a sound.
2 Select Play sound.
3 Enter the path and file name of the audio file you want to use. You can also search for the file
by clicking browse.
The selected file name appears in the text box.
To test the selected sound, press the play arrow button. To stop the sound while playing, click the
square stop button.
Hot Keys
Note: The Avaya 2050 IP Softphone currently supports only .wav files
You can assign keyboard hot keys to access the full range of Call Control window functions and
menu options.
NN40050-100NN40050-100
Page 59

For information on adding or removing hot keys from the Avaya 2050 IP Softphone, refer to “Hot
keys” on page 15.
Text Replacements
Note: This dialog box is available from the Accessibility Interface only
Use the Text Replacements dialog box to modify the server-supplied text in the Accessibility
Interface. Modification lets you shorten or eliminate superfluous language picked up by the
screen-reading software.
The text replacement table lists all the text replacement rules that are currently assigned. Both the
original text and the replaced text appear in the list.
To add a new text replacement rule, or to modify an existing rule
1 Click New or Modify.
A Find and Replace dialog box opens.
Chapter 9 Avaya 2050 IP Softphone Settings 59
2 Enter the text that you want to change in the Find what text box. You can assign parameters to
the search by selecting any of the following:
• Whole word searches for the entire word.
• Display searches the display area.
• Context searches the context area.
• Softkeys searches the softkeys area.
• Line/Feature Key text searches the Line/Features area.
• Date and Time searches the date and time area.
3 Enter the new text in the Replace with text box.
4 Click OK.
The Find what dialog box closes.
5 Click Apply.
To remove an existing text replacement rule
1 Select the rule you want to remove from the list.
2 Click Remove.
The text rule disappears. The affected text returns to its original form.
Avaya 2050 IP Softphone User Guide
Page 60

60 Chapter 9 Avaya 2050 IP Softphone Settings
Lamp Sounds
Use the Lamp Sounds dialog box to select sound effects that let you know when the message lamp
or mute lamp is on.
To assign a sound for either the message or mute lamp
1 From the Select a condition list, select Message Lamp On or Mute Lamp On.
2 Select Play sound.
3 Enter the path and file name of the audio file you want to use. You can also search for the file
by clicking the browse button.
When selected, the file name appears in the text box.
4 Enter how often you want the sound repeated in the minutes and seconds fields (found in the
Repeat every area).
Note: The Avaya 2050 IP Softphone currently supports only .wav files
Key Type
The IP Softphone Call Control window supports six line/feature keys (Figure 2 on page 12). Use
the Key Type dialog box to select which keys the Avaya 2050 IP Softphone uses to place calls
(line keys).
To assign a line key
1 Select the check box next to the key or keys that you want to use. Key layout corresponds to
the layout on the Call Control window.
2 Click Apply.
To return the settings to their installation defaults, click Restore Defaults.
Phone number dialog box
When you make a call from the Local Directory, or select Make Call from the system tray menu, a
Phone number dialog box opens. A Select a line key menu in the dialog box lists all selected lines.
Use the Key Type dialog box to add or remove items from this list.
Accessibility Interface
In the Accessibility Interface, selected keys show as Idle or Active. Keys not selected (feature
keys) show as Feature Inactive or Feature Active.
NN40050-100NN40050-100
Page 61

About
The About dialog box displays current information about the Avaya 2050 IP Softphone, including
the following:
• Current version number
• Copyright information
• Avaya logo
• Global IP Sound logo
Language
Use the Language dialog box to select the language for the Avaya 2050 IP Softphone Settings
window, Local Directory, and all menus and dialogs associated with the main application.
Chapter 9 Avaya 2050 IP Softphone Settings 61
Note: Some language that you encounter in operating the Avaya 2050 IP
Softphone comes from your communications server, or from your
computer operating system (OS). Setting the language from the Language
dialog box does not affect either server-supplied or OS-supplied
language.
To change the currently set language
1 From the language list, select the language you want.
2 Click OK.
Supported languages include: English, French, Swedish, Danish, Norwegian, German, Dutch,
Portuguese, Czech, Finnish, Hungarian, Italian, Polish, Spanish, Japanese, Russian, Latvian, and
Turkish.
Software Expansion Module interface
The Software Expansion Module provides additional line appearances and feature keys to the 2050
IP Softphone. The Software Expansion Module is similar to the Key Expansion Module (KEM)
device available for hardware IP Phones. Up to three Software Expansion Modules can be added
to the 2050 IP Softphone Call Control Window, with the additional Software Expansion Modules
cascading vertically beneath the original window. A scrollbar allows access to additional keys.
Note: Calls arriving on keys on the Software Expansion Module do not
support incoming and disconnect pop-ups.
Avaya 2050 IP Softphone User Guide
Page 62

62 Chapter 9 Avaya 2050 IP Softphone Settings
Figure 7 on page 62 shows the Software Expansion Module general view.
You can configure the expansion module buttons using the usual button programming features
through the interface.
The Software Expansion Module loads, and displays the buttons functions and features as
programmed. Use the scroll bar on the right-hand side of the expansion module window to view
and locate all the buttons.
Figure 7 Avaya 2050 IP Softphone with Expansion Module
You can move the EM window so that it docks to the left or right side of the Call Control window
or leave it open as a separate window. Calls are retrieved by pressing the appropriate line key.
Use the Expansion Module dialog box to configure options for the Expansion Module. Use the
Expansion Module dialog box to:
• Change the View Style.
NN40050-100NN40050-100
— “Group” features one column of 54 keys. Users can move buttons when using this
view.
— “Default” features three columns of 18 keys. Users cannot move buttons when using
this view.
Page 63

Chapter 9 Avaya 2050 IP Softphone Settings 63
• Add annotations to keys.
— By default, keys display the number assigned by the BCM and cannot be changed.
— Keys can be annotated to show user-defined information, such as a particular name or
department.
• Restore settings back to defaults.
To launch the Expansion Module
1 Click the Menu button.
2 Select View > Expansion Module.
The Expansion Module window appears.
Figure 8 Avaya 2050 IP Softphone Expansion Module navigation
Personal Call Recording
To use Personal Call Recording, a Avaya-certified third-party application must be installed. Use
the Personal Call Recording dialog box to:
• Let the Avaya 2050 IP Softphone record calls.
• Launch the Personal Call Recording application.
• Display a warning message when call recording is enabled.
Information about the third party application shows in the following fields:
Avaya 2050 IP Softphone User Guide
Page 64

64 Chapter 9 Avaya 2050 IP Softphone Settings
• Application displays the name of the third party application.
• Version displays the current version number of the application.
• Vendor displays the vendor name of the application.
• Path displays the directory and file name where the third party application resides on your
computer.
To allow the Avaya 2050 IP Softphone to record calls
1 Select Allow this application to record calls.
2 Click OK or Apply.
To launch the call recording application on startup
1 Select Launch the Personal Call Recorder application.
2 Click OK or Apply.
To display warning messages when call recording is enabled
1 Select Display a warning message when call recording is enabled.
2 Click OK or Apply.
USB Headset
Use the USB Headset dialog box to:
• Select the type of headset you want to use.
• Set controls for the external lamp (if applicable).
• Activate the backlight on the USB Headset Adapter.
• Access the Configure Smart Functions dialog box.
Selecting the headset
For optimal performance, select the headset from the list that matches the headset currently
connected to your USB Headset Adapter.
To choose a headset
1 From the list, select the headset you are using.
2 Click Apply.
NN40050-100NN40050-100
Page 65

Chapter 9 Avaya 2050 IP Softphone Settings 65
Setting external lamp controls
Note: The external lamp is available on the desktop adapter only.
The Avaya 2050 IP Softphone supports an optional external LED lamp (also known as an in-use
lamp). The lamp provides visual indication of call status, headset connection, and messages
waiting.
You can set the lamp to illuminate under the following conditions:
• Manual Override
• Headset Disconnect
• Active Call
• Message Waiting
Select the cadence (how the lamp illuminates) that you want to use for each of the above
conditions. Available cadences include:
•None
•On
• Flash
• Flicker
• Blink
Manual Override
With Manual Override enabled, you can turn on the external lamp by pressing the Smart Functions
button on your USB Headset Adapter.
To enable Manual Override, select the cadence you want from the list. To disable Manual
Override, select None.
Headset Disconnect
With Headset Disconnect enabled, the external lamp activates when the headset registers as
disconnected from the USB Headset Adapter.
To enable Headset Disconnect, select the cadence you want from the list. To disable Headset
Disconnect, select None.
Active Call
With Active Call enabled, the external lamp activates when the Avaya 2050 IP Softphone registers
an active call.
To enable Active Call, select the cadence you want from the list. To disable Active Call, select
None.
Avaya 2050 IP Softphone User Guide
Page 66

66 Chapter 9 Avaya 2050 IP Softphone Settings
If you enable Active Call when the USB Headset Adapter is selected as the Ringing Speaker, then
the external lamp also activates on incoming calls.
Note: Any other application using the same audio channel as the USB
Headset Adapter also activates the external lamp.
Message Waiting
With Message Waiting enabled, the external lamp activates when the Avaya 2050 IP Softphone
registers a message waiting.
To enable Message Waiting, select the cadence you want from the list. To disable Message
Waiting, select None.
Priority
If more than one condition is enabled, then the external lamp activates according to the condition
with the highest priority. The priority of the conditions, from highest to lowest, is as follows:
• Manual Override
• Headset Disconnect
• Active Call
• Message Waiting
Using the backlight
The USB Headset Adapter uses a backlight to illuminate the buttons, letting you know when the
Avaya 2050 IP Softphone is running.
To enable the backlight, select Use backlight.
Configuring Smart Functions
The Smart Functions button on the desktop USB Headset Adapter provides quick access to Avaya
2050 IP Softphone features.
For information on configuring the Smart Functions button, refer to “Customizing the Smart
Functions menu” on page 38.
Note: The Smart Functions button is available on the desktop version of
the USB Headset Adapter only.
NN40050-100NN40050-100
Page 67
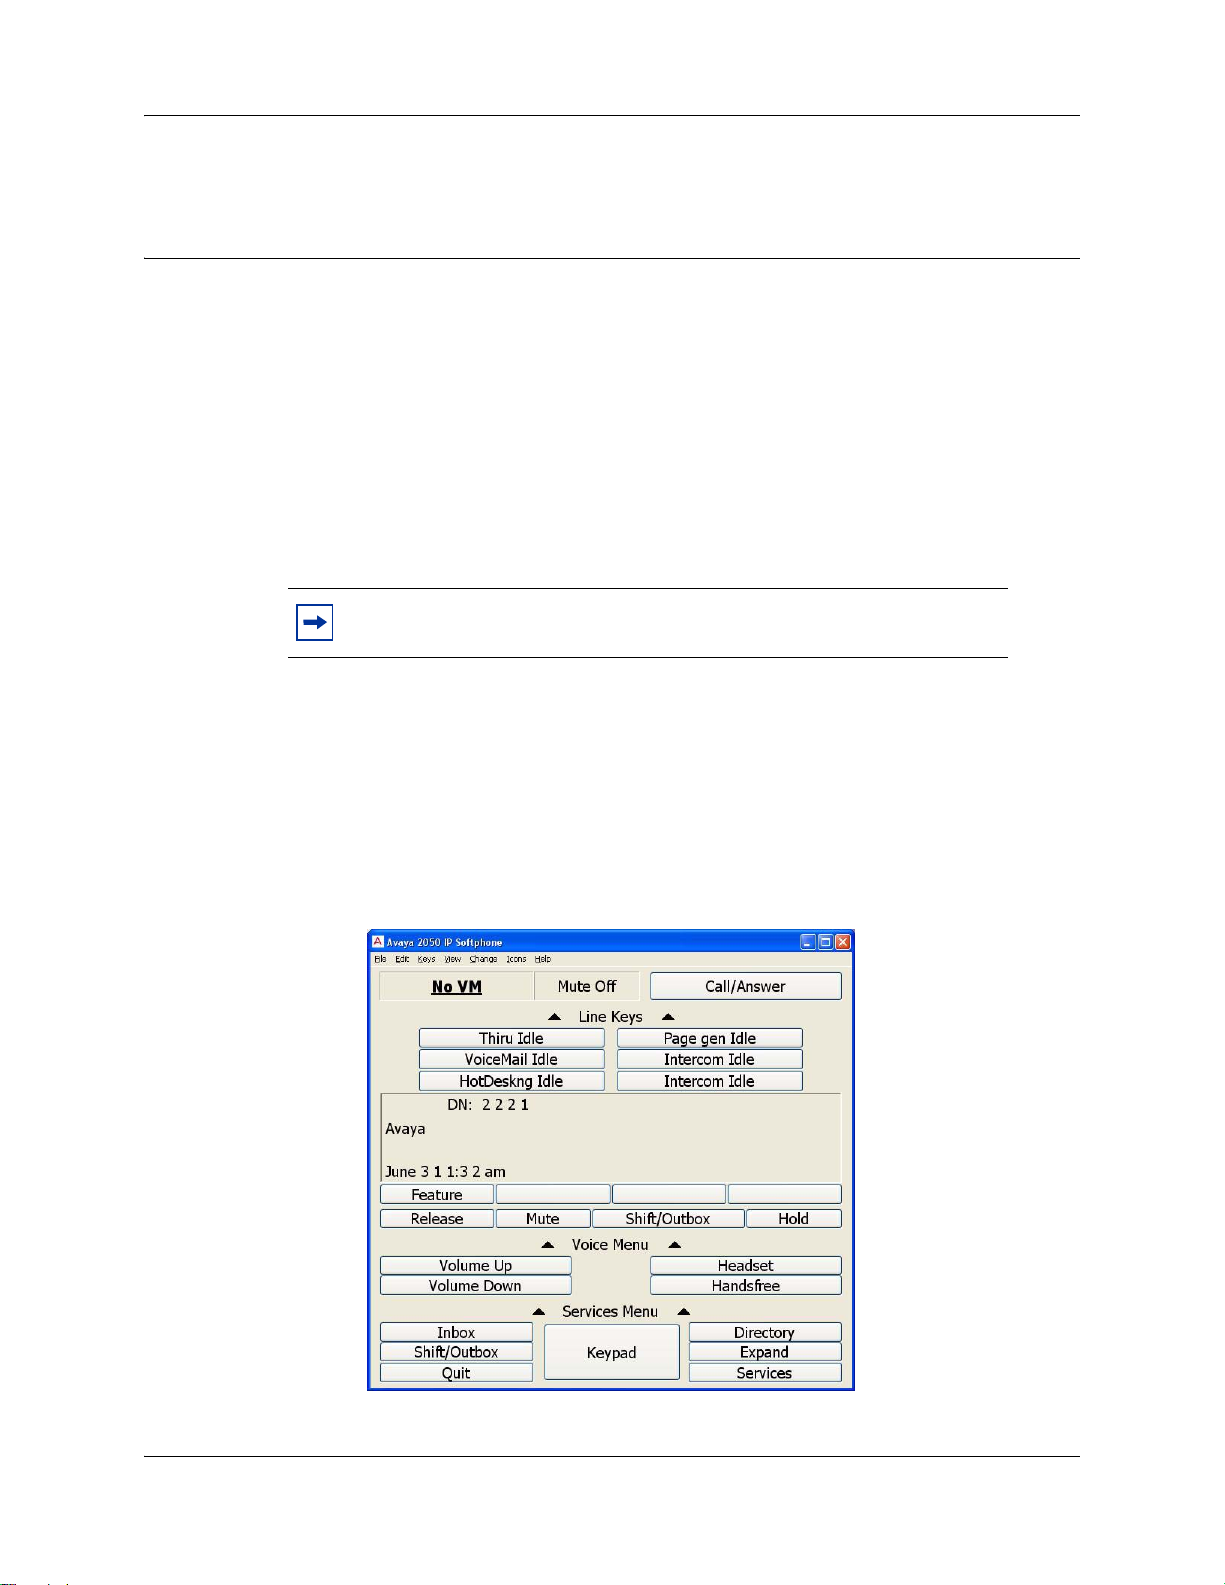
Chapter 10
Accessibility Interface
The Accessibility Interface works with screen reading software—such as JAWS for Windows
from Freedom Scientific—that lets visually-impaired users access the full range of Avaya 2050 IP
Softphone features.
To open the Avaya 2050 IP Softphone Accessibility Interface
from the Call Control window
1 Select File > Settings > Theme
2 Select Accessibility Interface.
Note: You must exit and restart the Avaya 2050 IP Softphone for the
change to Accessibility Interface to take effect.
67
Enhanced Accessibility Interface
The Enhanced Accessibility interface provides information grouped into 5 major sections. Three
of the sections, Line Keys, Voice Menu and Services Menu may be either expanded or collapsed
depending on the need for the additional information and functions to be revealed. In addition, The
font size, style, and color of interface is customizable.
Figure 9 Enhanced Accessibility Interface
Avaya 2050 IP Softphone User Guide
Page 68

68 Chapter 10 Accessibility Interface
The following table describes the elements of the Enhanced Accessibility Interface
Table 3 Enhanced Accessibility Interface elements
Element Description
Indicators Includes two UI elements.
Line keys Includes 6 buttons where you can program lines
Display Provides server information, including current
Messages indicates if you have a voice mail
message. Values are No VM or VOICE
MESSAGE.
Mute indicates if the active call is muted. Values
are Mute On and Mute Off.
and features. An individual button can be
programmed as either a line key or a feature key
(subject to server restrictions).
By default the Line keys group is expanded. It can
be collapsed by clicking on Line keys group name.
A line key represents a directory number, a line
appearance or a dedicated external line. Pressing
a line key will give a dial tone. You can then make
a call, or answer an incoming call.
A directory number, sometimes called a primary
line, is a system wide, uniquely identified line key.
When your directory number is dialed the server
routes calls to your directory number on your set.
This is the simplest variant of a line key and is very
similar in concept to a residential phone number.
All active sets have an associated directory
number.
A line appearance is a server feature which allows
users to have virtual appearances of each others
directory numbers. For example, co-workers who
have been given line appearances of your directory
number may pick up your calls if you are
unavailable.
display contents, comprised of up to four lines of
text containing the CLID information for incoming
calls if available. If using a directory application this
area can present a callers list or directory entries
depending on the application features.
NN40050-100NN40050-100
Page 69

Table 3 Enhanced Accessibility Interface elements
Element Description
Voice menu Includes 4 buttons for call processing.
Volume Up and Volume Down changes the
volume level of speech path during the call and
volume level of ringing tone during incoming call.
Headset and Handsfree buttons make or answer
calls using appropriate audio paths.
By default Voice menu is expanded on the screen.
It can be collapsed by clicking on Voice menu
group name.
Services menu Includes 7 buttons that provide call server features:
Msg/Inbox - accesses the voice mail application
to listen to messages.
Shift/Outbox - provides access to voice mail
application to compose an outgoing message or
switch between line keys pages.
Quit - exits from the current display menu if one is
in active.
Directory - accesses the network directory
application.
Expand - accesses GXAS server applications.
Services - Selects a feature. Specific features
depend on how the call server administrator has
configured your set. Examples of features which
can be made available here include: Hot Desking,
Do Not Disturb, Page, Call Park, Call Pickup
Directed, Call Pickup Group, Voice Call, Speed
Dial, Message Send, Link, Ring Again, Voice Call
Deny, Call Forward, Conference, Transfer,
Background Music, Last Number Redial.
The same functionalities can be called from
Keys->Features menu.
The Keypad button displays the new dialog with
digit keys.
By default the services menu is expanded. It can
be collapsed by clicking on Services menu group
name.
Chapter 10 Accessibility Interface 69
You can navigate the Enhanced Accessibility Interface using mouse clicks or by using the
following keyboard shortcuts:
• Tab - Move to the next field
• Shift + Tab - Move to the previous field
• Space bar - Execute the operation at the current cursor location, if available. For example, if
the current cursor location is on a line key or a softkey, that function is executed. If the current
cursor location is on a display line or the time or date field, nothing will be executed.
• Up arrow - In a call server menu, move the cursor up to the previous selection.
• Down arrow - In a call server menu, move the cursor down to the next selection.
Avaya 2050 IP Softphone User Guide
Page 70

70 Chapter 10 Accessibility Interface
Additional configuration options
The following options can be configured according to your needs or preferences.
• Numeric/Alphabetic feature - you can choose whether numeric or alphabetic character display
on the keypad by selecting Edit > Input mode. Note that Dragon users can dictate the number
without the keypad as long as there is dial tone.
• Font - You can change the font type, size, style, and color of both the interface elements and
the focus font to meet individual needs by selecting Change > Change Font.
• Color - You can change the color of indicators (for example Mute on, or Voice message
indicators) by selecting Change > Change Color.
• Style - You can change the style of the Enhanced Accessibility Interface to meet visual needs
or preferences by selecting Change > Change Style.
• Icons - You can choose to view the Enhanced Accessibility Interface with text and icons, icons
only, or text only by selecting the appropriate option from the Icons menu.
Active call status in Window title
The accessibility interface window title indicates the current call status. You will see "Incoming
call" during ringing for an incoming call, "On Call" during an active call and "On Hold" when you
have a call on hold.
If your Avaya 2050 IP Softphone is in background, you can quickly check the call state from the
Windows Task Bar. JAWS users can simply hit a JAWS keystroke to read the title of the window
to view the status.
The feature is implemented for the Accessibility mode only.
Limitations
The following limitations apply to the Avaya 2050 IP Softphone for Windows Release 4.0.
-The Graphical External Application Server (GXAS) interface (added in Release 3.1) is not
compliant with the accessibility feature;
-KEM is not supported for accessibility mode.
Using hot keys
You can assign keyboard hot keys to access the full range of Call Control window functions and
menu options—necessary for using all of the Avaya 2050 IP Softphone features from the
Accessibility Interface.
For more information on adding or removing hot keys, see “Hot keys” on page 15.
NN40050-100NN40050-100
Page 71

Chapter 11
Troubleshooting the Avaya 2050 IP Softphone
The following sections describe various troubleshooting issues and suggested remedy actions:
• “Connectivity problems” on page 71.
• “Audio problems” on page 74.
• “Reset conditions” on page 76.
• “USB Headset problems” on page 77.
• “Directory problems” on page 79.
Connectivity problems
Communications server is unreachable
71
Symptom:
One of the following messages appears:
• Connecting...
• Server unreachable. Reconnecting in xx seconds.
• 802.1 QoS is not supported on your network.
Description:
These messages indicate that the connection with the communications server cannot be
established. The Avaya 2050 IP Softphone sets a random retry time, after which it attempts to
reconnect. This process repeats until the Avaya 2050 IP Softphone successfully connects.
The “Connecting...” message appears briefly (or not at all) under the following conditions:
• The communications server is running and reachable.
• The Avaya 2050 IP Softphone is directed to the correct IP address.
The “Server unreachable” message appears when the Avaya 2050 IP Softphone encounters a
problem contacting the communications server.
Avaya 2050 IP Softphone User Guide
Page 72

72 Chapter 11 Troubleshooting the Avaya 2050 IP Softphone
Potential causes:
•Network down
• Computer not connected to the network
• Invalid communications server settings in the Configuration Utility
• Invalid communications server settings in DHCP configuration
• Communications server down
Action:
• Ping another station on the network.
• Ping the communications server.
• Use the Server dialog box in the Settings window to verify the communications server IP
address and port number. (for more information, see “Server” on page 51)
• Verify correct configuration of the communications server. Check for the following: an
available port, an available license, and for correct security.
Connection is reinitializing
Symptom:
The following message appears: “Connection Established. Reinitializing...”
Description:
This message appears after the Avaya 2050 IP Softphone establishes a connection and sends a
request to the communications server to resume connection. The communications server is
expected to reply to this request. Some communications servers direct the Avaya 2050 IP
Softphone to various subcomponents, causing this message to appear two or three times in rapid
succession during a normal startup.
Note: Under normal setup, the “Connection Established.
Reinitializing...” message appears briefly, then disappears after successful
connection.
Potential causes:
• A “Connection Established. Reinitializing...” message indicates a programming error in the
communications server.
Action:
Wait a moment. Under normal operation, the message disappears after successful connection. If
the message continues, check for correct communications server programming.
NN40050-100NN40050-100
Page 73

Chapter 11 Troubleshooting the Avaya 2050 IP Softphone 73
Authorization failed
Symptom:
The following message appears: “Authorization failed”.
Description:
The Avaya 2050 IP Softphone has no authorization to use the communications server.
Potential causes:
• Your system administrator has not authorized the Avaya 2050 IP Softphone.
• The Hardware ID found in the Settings window (under the Hardware ID dialog box) does not
match the HardwareID provisioned for the communications server.
Action:
Contact your system administrator.
Unable to retrieve communications server parameters from DHCP server
Symptom:
The following message appears: “DHCP server is not available”.
Description:
A connection with the DHCP server cannot be established.
Potential causes:
•Network down
• DHCP server configuration error
Action:
Contact your system administrator.
Avaya 2050 IP Softphone User Guide
Page 74

74 Chapter 11 Troubleshooting the Avaya 2050 IP Softphone
Service denied
Symptom:
The following message appears: “Service Denied. Reason XXXX”.
Description:
You are not authorized to use the communications server.
Potential causes:
• Invalid HardwareID in the Hardware ID dialog box. (see “Hardware ID” on page 55)
• Invalid communications server configuration
Action:
Ensure that your communications server programming is correct.
Contact your system administrator.
Audio problems
Basic audio operation
To verify the physical connection of the USB adapter and
headset, as well as proper Windows audio configuration
1 Record an audio message.
2 Play the message back using the USB headset.
One-way audio
If you experience problems with one-way only audio:
NN40050-100NN40050-100
Page 75

Chapter 11 Troubleshooting the Avaya 2050 IP Softphone 75
• Check that your system administrator has programmed the handsfree option on the
communications server.
• Check that the mute button is disabled. If mute is enabled, the mute button on the Call Control
window appears red.
• If your server uses a Network Address Translation (NAT) device, check for proper NAT
configuration. One-way only audio problems can occur when incorrect NAT configuration
causes the Avaya 2050 IP Softphone to attempt to connect to the wrong IP address.
Broken or choppy speech
Broken or choppy speech can occur due to any of the following:
• Low level of audio buffering
• Windows transition effects
• Other running applications
Windows transition effects
The Windows operating system uses very high process and thread priorities when performing
low-level Windows operations, such as minimizing and maximizing applications. This can cause
brief breaks in the Avaya 2050 IP Softphone audio streams.
To reduce the severity of these breaks, turn off the Windows transition effects for menus and tool
tips.
To turn off the Windows transition effects
1 Select Start > Control Panel > Display
2 Select the Effects tab, (or, in Windows XP, the Effects button on the Appearance tab).
3 Clear Use transition effects for menus and tool tips.
Other applications
Other applications running on your computer, especially CPU-intensive applications or
applications that intercept or delay packets (such as firewalls), can cause broken audio.
Multiple Ethernet interfaces on a single PC can sometimes conflict with each other. For example,
the Avaya 2050 IP Softphone sometimes exhibits intermittent breaks in audio when using docked
notebooks that have a Xircom RealPort Cardbus Ethernet 10/100+Modem 56 PC Card (PCMCIA)
inserted. In the specific case of this PC card, the problem relates to a version of the Xircom driver.
This driver takes CPU cycles even when it is not active and this, in turn, causes Avaya 2050 IP
Softphone audio to become choppy.
Solutions for this example are:
Avaya 2050 IP Softphone User Guide
Page 76

76 Chapter 11 Troubleshooting the Avaya 2050 IP Softphone
• Upgrade your Xircom driver.
• Remove the PC card when the notebook is docked.
To upgrade your Xircom driver
1 Download and install a new PC card driver from the Xircom web site.
2 Follow the installation instructions provided by Xircom.
Note: You require administrator privileges on Windows 2000.
Windows sound plays from the headset
Description:
Windows sounds play from your headset instead of your computer speakers, interfering with
Avaya 2050 IP Softphone audio.
Action:
In some cases, the Windows operating system defaults all the sounds to the new sound device.
To set Windows sounds to play from your computer speakers
1 Select Start > Control Panel > Sounds, Speech, and Audio Devices
2 Select Sounds and Audio Device.
3 Select Audio.
4 From the Sound Playback > Default device list, select your computer sound card.
Note: If you do not want to use the Headset Adapter for playback, select
another device from the Sound playback > Default device list.
Advanced audio problems due to network performance
If network performance causes audio problems, use the Advanced Audio dialog box in the Avaya
2050 IP Softphone Settings window to override your communications server audio values.
For more information on Advanced Audio, see “Advanced Audio” on page 56.
Reset conditions
The Avaya 2050 IP Softphone resets when:
NN40050-100NN40050-100
Page 77

• The communications server causes the Avaya 2050 IP Softphone to perform a hard reset.
• You change the Avaya 2050 IP Softphone theme.
• Firewall applications intercept or delay packets, causing the Avaya 2050 IP Softphone to reset
due to the expiration of the Watchdog timer.
Note: Use care when using firewall applications on the same computer as
the Avaya 2050 IP Softphone.
• Excess delay or loss of communication with the server occurs.
USB Headset problems
Headset not functioning
If you experience any headset problems, try the following actions in the order presented:
1 Verify that you are using a supported operating system. For a list of supported operating
systems, refer to “System requirements” on page 17. To check your operating system:
Chapter 11 Troubleshooting the Avaya 2050 IP Softphone 77
a Select Start.
b Right-click My Computer.
c Select Properties.
A System Properties window appears.
d Select General.
The General tab lists system, registration, and computer information.
2 Verify that Universal Serial Bus controllers appears in the Windows Device Manager. To open
the Device Manager:
a Select Start.
b Right-click My Computer.
c Select Properties.
The System Properties window appears.
d Select Hardware.
The Hardware dialog tab appears.
e Click Device Manager.
3 If Universal Serial Bus controllers does not appear in the Device Manager:
• Ensure that USB is enabled in your computer setup menu.
• Check for a BIOS upgrade.
• Contact your computer supplier.
4 Verify that USB Audio Device appears under Sound, video and game controllers in the
Windows Device Manager. To open the Device Manager, refer to step 2.
Avaya 2050 IP Softphone User Guide
Page 78

78 Chapter 11 Troubleshooting the Avaya 2050 IP Softphone
5 Verify that HID-compliant device and USB Human Interface Device appear under Human
Interface Devices in the Windows Device Manager. To open the Device Manager, refer to step
2.
6 If none of the devices in steps 4 and 5 appear in the Windows Device Manager (and the
conditions in steps 1 and 2 are correct), then consult the USB Troubleshooting section in
Windows Help.
7 Verify that you have selected USB Audio Device as the microphone and speaker for the
Softphone.
USB Headset Adapter features appear dimmed
Symptom:
In the USB Headset dialog box of the Avaya 2050 IP Softphone Settings window, all the features
appear dimmed.
Description:
Either the Avaya 2050 IP Softphone does not recognize the adapter as a supported Avaya adapter,
or the adapter is earlier than 2.0. Supported adapters include: Enhanced USB Adapter (desktop)
and Avaya Mobile USB Adapter (mobile).
Potential causes:
• Your USB Headset Adapter does not support the functions listed on the USB Headset dialog
box.
• The USB Headset Adapter has failed to enumerate properly.
Action:
If you suspect faulty enumeration, do the following:
1 Unplug the USB cable from the USB Headset Adapter.
2 Wait one minute.
3 Plug the USB cable into the USB Headset Adapter. This forces the USB Headset Adapter to
re-enumerate.
Cannot hear audio through headset
Ensure that your headset manufacturer matches that of the USB adapter.
Check all jacks and plugs for a loose connection.
NN40050-100NN40050-100
Page 79

Chapter 11 Troubleshooting the Avaya 2050 IP Softphone 79
Sound still comes out of my computer speakers
Description:
The Avaya 2050 IP Softphone configuration does not direct all call audio to the headset.
Action:
To direct all call audio to your headset, select USB Audio Device as both headset microphone and
headset speaker in the Sound Devices dialog box (see “Sound Devices” on page 54).
Directory problems
To use the Redial List and Callers List
• The communications server must support these features.
• Your system administrator must enable the appropriate class of service.
If you cannot access the Redial List or Callers List, contact your system administrator.
Avaya 2050 IP Softphone User Guide
Page 80

80 Chapter 11 Troubleshooting the Avaya 2050 IP Softphone
NN40050-100NN40050-100
Page 81

Index
Index 81
A
Answer, 14
C
Copy, 14
D
Dialpad, 14
Directory, 14
E
Expand, 14
H
Hold, 14
I
Inbox/Messages, 15
L
Line keys, 14
Local Area Network (LAN), 7
N
V
Voice over IP (VoIP), 7
Volume, 14
W
Wide Area Network (WAN), 7
Navigation arrows, 14
O
Outbox/Shift, 15
P
Primary display, 14
Q
Quit, 14
R
Release, 14
S
Services, 14
Settings 47
Soft keys, 14
Speaker, 15
Avaya 2050 IP Softphone User Guide
Page 82

82 Index
NN40050-100NN40050-100
 Loading...