

Page 1
INSTRUCTION MANUAL
Model Number/Número de Modelo:
WDP75
ELECTRONIC CONTROLLED WATER DISPENSER
ENFRIADOR ELECTRONICO DE AGUA FRIA Y CALIENTE
BEFORE USE, PLEASE READ AND FOLLOW ALL SAFETY RULES AND OPERATING
INSTRUCTIONS.
La sección en español empieza en la página 14.
Avanti has a policy of continuous improvement on its products and reserves the right to change materials and specifications
without notice.
Avanti Products
P.O. Box 520604 - Miami, Florida 33152
www.avantiproducts.com
Page 2

2
Page 3

HELP US HELP YOU
Read this guide carefully.
It is intended to help you operate and maintain
your new water dispenser properly.
Keep it handy to answer your questions.
If you don't understand something or you need
more assistance please call:
Avanti Customer Service
800-220-5570
Keep proof of original purchase date (such as
your sales slip) with this guide to establish th e
warranty period.
IF YOU NEED SERVICE
We're proud of our ser vice and want you to be
pleased. If for some reason you are not happy
with the service you receive, here are some
steps to follow for further assistance.
FIRST, contact the people who serviced your
appliance. Explain why you are not pleased. In
most cases, this will solve the problem.
Write down the model and serial numbers.
You'll find them on a label located on the back
side of the unit.
Please write these numbers here:
____________________________________
Date of Purchase
____________________________________
Model Number
____________________________________
Serial Number
Use these numbers in any correspondence or
service calls concernin g your water dispenser.
If you received a damaged water dispenser,
immediately contact the dealer ( o r builde r ) th a t
sold you the water dispenser.
Save time and money. Before you call for
service, check the Trouble Shooting Guide. It
lists causes of minor operating problems that
you can correct yourself.
NEXT, if you are still not pleased, write all the
details, including your telephone number, and
send it to:
Customer Service
Avanti Products
10880 NW 30 Street
Miami, FL 33172
3
Page 4
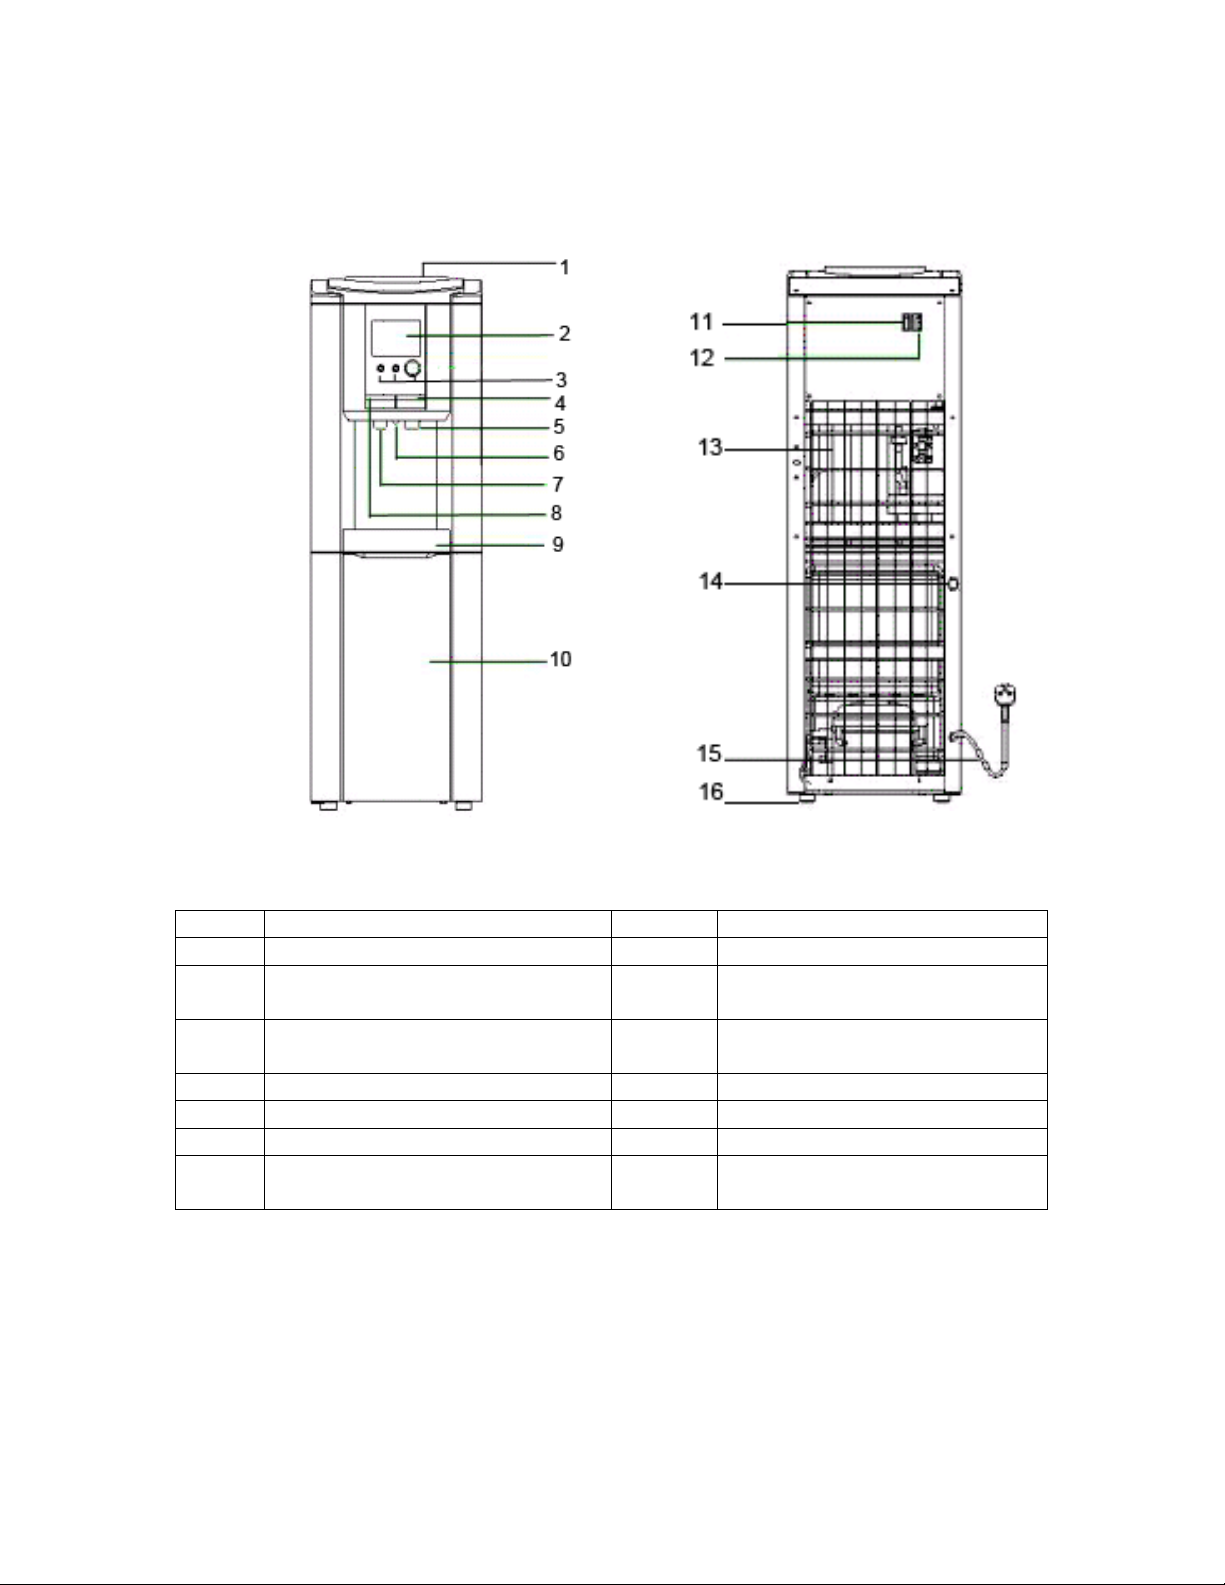
P ARTS AND FEATURES
1 Water Intake 9 Drip Tray
2 Electronic LED Display 10 Storage Compartment
3 Control Panel 11 Cooling Power Switch
(Green)
4 Cold Water Faucet 12 Heating Power Switch
(Red)
5 Cold Water Outlet 13 Condenser
6 Nite-Light 14 Hot Water Drain Valve
7 Hot Water Outlet 15 Power Cord
8
Hot Water Faucet
(with Child Safety Guard)
16 Leveling Legs
4
Page 5

Table of Contents
Help Us Help You 3
Parts and Features 4
Important Safety Instructions 6
Installation Instructions 6
Before Using Your Dispenser 6
Operating Your Water Dispenser 7
Electrical Connection 8
Control and Display Panel 8
Energy Saving Program 8
Normal Program 9
Child Safety Guard on Hot Water Faucet 9
Care and Maintenance 10
Taking Dispenser Out of Service 10
Problems with Your Dispenser 10
Troubleshooting Guide 10
Service for Your Water Dispenser 11
Your Avanti Products Warranty 12
Wiring Diagram 13
Instrucciones en Español 14 – 17
Registration Information and Registration Card 19
5
Page 6

Important Safety Instructions
a WARNINGa
To reduce the risk of fire, electrical shock,
or injury when using your appliance, follow
these basic precautions:
• Read all instructions before using the water dispenser.
• Never clean parts with flammable fluids. The fumes can create a fire hazard or
explosion.
• Do not store or use gasoline or any other flammable vapors and liquids in the vicinity
of this or any other water dispenser. The fumes can create a fire hazard or
explosion.
-Save these instructions-
INSTALLATION GUIDELINES:
• Remove the exterior and interior packing.
• Place your appliance on a floor that is strong enough to support the dispenser when it is fully
loaded. The unit is provided with four plastic feet, if it does not sit level on the floor, adjust the
front feet to level the unit well to the floor.
• Locate the appliance away from direct sunlight and sources of heat (stove, heater, radiator, etc.).
Direct sunlight may affect the acrylic coating and heat sources may increase electrical
consumption. Extreme cold a mbient temperatures may also caus e the appliance not to perform
properly.
• Allow 2 inches of space between the water dispenser and the wall, which allows for proper air
circulation to cool the compressor.
• Plug the appliance into an exclusive properly installed-grounded wall outlet. Do not cut or remove
the third (ground) prong fr om the powe r c ord unde r an y cir cu msta nce s. Any q ues tion s co nc erni ng
power and/or grounding should be directed toward a certified electrician or an authorized Avanti
Products service center.
• This water dispenser is not recommended for outdoor use.
• Do not locate the dispenser in area where the temperature may fall below freezing (32º F).
• Keep area around dispenser free of dust and dirt.
• Keep the reserve supply of water bottles away from excessive heat and light.
• Never unplug the water cooler, except for maint en ance.
OPERATION INSTRUCTIONS:
Before Using Your Water Dispenser
• Check to be sure the following parts are included:
Instruction manual
2 extra cup dispenser cabinet plugs
2 extra drain seals
Accessories order form.
• Before connecting the appliance to the power source, let it stand upright for approximately 2
hours. This will reduce the possib i lity of a malfunction in the cooling system from handling during
transportation.
• The water dispenser is pre-cleaned at the factory but the reserv oir and water lines must be
flushed with fresh water before use as follows:
• Keep the unit unplugged.
6
Page 7

• Fill water tank with tap water full to capacity. Wait for 5 minutes until water settles.
• Slide child safety button then push the hot water faucet until water comes out, then stop.
• Plug the dispenser into the electrical outlet . We are ready to complete the first cycle. In order to
do that, wait for the hot water to reach temperature in approximately 10 minutes, and then wait
for the cold to reach temperature (another 40 minutes, approximately).
• Unplug the dispenser from the electrical outlet. Proceed to dr ain the water from the faucets one at
a time until no more water remains.
(Note: To facilitate this operation, use a large container).
• Then, drain any water left in the tanks by opening the drain plug located on the back, until it drains
completely.
• Proceed to close the drain cap .
• Remove the cap from the 5-gallon bottle and use a clean cloth to wipe off the neck of the bottle.
• Place the 5-gallon bottle of water on the wat er inta ke, allow water to stand for approximately one
minute.
• Push water faucet buttons to insure water flows from both faucets.
• Plug dispenser back into the electrical outlet.
• Now you are ready to use your water dispenser.
NOTE: Your water dispenser has been cleaned and sanitized before lea ving the
factory, but in case a taste problem develops, place two ta blesp oon s of
baking soda and add tap water. Fill water tank again and repeat basic
operations previously outlined, except turn hot water function “OFF” to
avoid leaving residues in hot water tank.
ATTENTION:
If you do not plan to use the water heating function for more than three days, we
recommend that you turn off the hot water function.
IMPROPER USE OF THE GROUNDED PLUG CAN RESULT IN THE RISK OF ELECTRICAL SHOCK. IF
THE POWER CORD IS DAMAGED, HAVE IT REPLACED BY AN AUTHORIZED AVANTI PRODUCTS
SERVICE CENTER.
aWARNINGa
OPERATING YOUR WATER DISPENSER
Steps To Replace Water Bottles
z Remove cap.
z Use a clean cloth to wipe off neck of bottle.
z Carefully lift bottle (appr ox. 40 lbs.) using your legs and not your back. Do not place hands on
opening of bottle while placing in reservoir.
z Insert the water bottle on the water intake over reservoir opening so it settles properly on it.
z Wipe off any water which may have splashed on dispenser top.
z When a new bottle is installed y ou must open the hot water faucet and remove no less than 4 full
cups of water to insure the water flows properly and the water reservoir is at the proper level.
When a new bottle is installed you must open the hot water fa ucet and remove no less than 4 full cups of
water to insure the water flows properly and the water reservoir is at the proper level.
7
Page 8

Electrical Connection
This appliance should be properly grounded for your safety. The power cord of this appliance is
equipped with a three-prong plug which mates with standa rd th ree pron g wall ou tle ts to minimize the
possibility of electrical shock.
Plug the appliance into an exclusive properly installed-grounded wall outlet. Do not under any
circumstances cut or remove the third (ground) prong f rom th e po wer cord. Any questions concerning
power and or grounding should be directed toward a certified electrician or an authorized Avanti
Products service center.
This appliance requires a standard 115/120-volt. 60Hz electrical outlet with three-prong ground.
The cord should be secured behind the appliance and not left exp osed or dang ling to prevent
accidental injury.
Do not use an adapter plug with this appliance.
Do not use an extension cord with this appliance. If the power cord is too short, have a qualified
electrician or service technician install an outlet near the app lian ce.
Control and Display Panel
For operation of unit, please fill water and make sure water settles inside the water tank, and then
switch on both hot and cold switches at back of unit.
Working Programs:
Energy Saving Program:
When the PROGRAM button is pushed down, it’s under Energy Sav ing Pr ogr am; The (green) E-S
indicator will be displayed. During operation the (red) “WARM” cycle indicator will be displayed until
the temperature of the water in the reservoir reaches 60ºC/140ºF. Once the temperature reaches
60ºC/140ºF (approximately 4 minutes) the (red) “WARM” indicator will turn off and will remain off until
the temperature of the water in the reservoir drops to 50ºC/122ºF at which time the (red) “WARM”
cycle indicator will turn on and the cycle will start again.
8
Page 9

During “Energy Saver” Program, when you press t he “HOT WA TER” bu tton, the (red) “HOT” cycle
indicator will be on and water temperature in the reservoir will be heated to 90ºC/194ºF
(approximately 4 minutes). Once the water temperature reaches 90ºC/194ºF the (red) “HOT” cycle
indicator will turn off and will remain off until the “HOT WATER” button in pressed again.
Normal Program:
When the PROGRAM button is released, it’s under Normal operation mod e and the (ora nge ) NORM
indicator light will displayed. During operation the (red) “HOT” cycle indicator will be on until the
temperature of the water in the reservoir reaches 90ºC/194ºF (approximately 9 minutes). The (red)
“HOT” cycle indicator will turn off and will remain off until the temperature of the water in the reservoir
drops to 81ºC/178ºF at which time the (red) “HOT” cycle indicator will turn on and the cycle will start
again.
When the unit is in “NORMAL PROGRAM” the “HOT WATER” button is non-functional.
Cold Temp (Energy Saver / Normal Modes):
The cold water cycle is not affected by either program and continuously runs to maintain a cold water
temperature between 5º C/41ºF and 10ºC/50?ºF. Once the “Cold Switch” at the rear of the unit is
turned ON the (blue) “COLD” cycle indicator will be on until the temperature of the water in the
reservoir drops to 7℃/44ºF or less, the (blue) “COLD” cycle indicator will turn off and the cooling cycle
will stop until the temperature reaches 10/50ºF, at which time the (blue) “COLD” cycle indicator will
turn on again and the cooling cycle will start again.
Light:
When the light button is pushed, the light will turn on. Pushed again, the light will turn off.
NOTE:
THE HOT WATER FAUCET HAS A CHILD-SAFETY GUARD ATTACHMENT.
To get hot water:
♦ Slide red safety button to the righ t and hold while pressing downward on hot water faucet to
dispense hot water.
♦ Safety button will return to its original position when faucet is released.
Cup Dispenser
The cup dispenser may be installed by using the mounting holes (covered with plastic caps) located
near the top of the right side panel of the cooler. The cup dispenser comes equipped with a mounting
bracket and screws and may be ordered by completing the enclosed order form pr ov ided with your
instruction manual.
(OPTIONAL)
CARE AND MAINTENANCE
• Wash the inside of the reservoir with a warm water and baking soda soluti on. The solution should
9
Page 10

be about 2 tablespoons of baking soda to a quart of wat er. (Turn off the hot water function).
• The drip tray and water faucets should be cleaned with mild detergen t and warm water.
• At regular intervals or once a month inspect the coils locate d across th e back of the dispenser.
Vacuum accumulation of dust or clean it with a hard brush.
TAKING DISPENSER OUT OF SERVICE
• If the water dispenser will not be used for a long period of time, unplug the power cord from the
wall outlet.
• Turn off the hot water.
• Drain the water through the faucets.
• Drain the water from the tanks by removing the plug from the back of the dispenser.
WARNING—THE WATER COMING OUT OF THE BACK MAY BE SCOLDING HOT.
z Unit should NOT be transported on the units side. Place it upright if possible and cover it with a
blanket.
PROBLEMS WITH YOUR WATER DISPENSER?
You can solve many common water dispenser problems easily, saving you the cost of a
possible service call. Try the suggestions outlined below to see if you can solve the problem
before calling the servicer.
TROUBLESHOOTING GUIDE
PROBLEM POSSIBLE CAUSE
Water dispenser does not operate.
Water cooler is not cold enough. Check to be sure the cold switch on the back is ON.
Water dispenser hot water is not hot enough. Check to be sure the hot switch on the back is ON.
Compressor turns on and off frequently.
Vibrations. Check to assure that the water dispenser is level.
The water dispenser seems to make too much
noise.
Bottle feels warm.
Water bottle is hot. Water is boiling in the hot tank and bubbling up into the
Not plugged in.
The circuit breaker tripped or a blown fuse.
The water dispenser does not have the correct
clearances.
The room temperature is hot ter than normal.
The temperature control is not set correctly.
The water dispenser does not have the correct
clearances.
The rattling noise may come from the flow of the
refrigerant, which is normal.
As each cycle ends, you may hear gurgling sounds
caused by the flow of refrigerant in your water
dispenser.
Contraction and expansion of the inside walls may
cause popping and crackling noises.
The water dispenser is not level.
The water system is overfilled. Dispense Cold water
until air is released into the bottle.
bottle. Press the hot dispens er button until water flows
to remove air from the hot tank.
SERVICE FOR YOUR WATER DISPE NSER
10
Page 11

We are proud of our customer service organization and the network of professional service
technicians that provide service on your Avanti appliances. With the purchase of your Avanti
appliance, you can be confident that if you ever need additional information or assistance, the Avanti
Products Customer Service Team will be here for you. Just call us toll-free.
AVANTI PRODUCTS CUSTOMER SERVICES
Product Information
800-323-5029
Part Orders
800-220-5570
In-Home Repair Service
800-220-5570
Whatever your questions are about our products,
help is available.
You may order parts and accessories that will be
delivered directly to your home, by personal
check, money order, Master Card, or Visa.
An Avanti Products authorized service center will
provide expert repair service, scheduled at a time
that is convenient for you. Our trained servicers
know your appliance inside and out.
11
Page 12

YOUR Avanti Products WARRANTY Staple your sales receipt here. Proof of
original purchase date is needed to obtain
service under warranty.
WHAT IS COVERED
LIMITED ONE-YEAR
WARRANTY
For one year from the date of
purchase by the orig inal ow ner, Avanti
Products will, at its option, repair or
replace any part of the appliance
which proves to be defective in
material or workmanship under no rm al
use. During this period Avanti
Products will provide all parts and
labor necessary to correct such
defects free of charge, so long as the
appliance has been installed and
operated in accordance with the
written instructions in this manual.
Avanti Products will provide you with a
reasonably similar replacement
product that is either new or factory
refurbished. In rental or commercial
use, the warranty period is 90 days.
WHAT IS NOT COVERED
• Incidental or consequential damages.
• Parts and labor costs for the following will
not be considered as warranty:
• Light bulbs and/or plastic housing.
• Plastic cabinet liners.
• Punctured evaporator that voids t he
warranty on the complete sealed system.
• Replacement of house fuses or resetting
circuit breakers.
• Shipping and handling costs associated
with the replacement of the unit.
LIMITED SECOND THROUGH
FIFTH YEAR WARRANTY
For the second through the fifth year from date
of original purchase, Avanti Products will
provide a replacement compressor free of
charge due to a failure. You are responsible
for the service labor and freight charges. In
rental or commercial use, the limited
compressor warranty is one year and nine
months. Cost to move the appliance to the
servicers’ shop and back to the users’ home,
as may be required, are the users’
responsibility.
• Repairs performed by unauthorized
servicers.
• Surcharges including, but not limited to,
any after hour, weekend, or holiday
service calls, tolls, ferry trip charges, or
mileage expense for service calls to
remote areas, including the State of
Alaska.
• Service calls that do not involve defects in
material or workmanship such as
customer education, or improper
installation.
• Service calls that are related to external
problems, such as abuse, misuse,
inadequate electrical power, accidents,
fire, floods, or acts of God.
• F ailure of the product if it is used for other
than its intended purpose.
• This warranty does not apply outside the
continental U.S.A.
12
Page 13

WIRING DIAGRAM
13
Page 14

INSTRUCCIONES EN ESPAÑOL
ADVERTENCIA
EL USO INCORRECTO DEL CABLE A TIERRA PUEDE OCASIONAR UN CHOQUE ELECTRICO.
SI EL CORDON ESTA DAÑADO, REEMPLACELO EN UN CENTRO DE SERVICIOS
AUTORIZADO POR AVANTI PRODUCTS.
PASOS RECOMENDADOS PARA CAMBIAR EL BOTELLON
z QUITE EL BOTELLON VACIO.
z LIMPIE EL CUELLO DEL BOTELLON NUEVO CON UN TRAPO LIMPIO.
z LEVANTE EL BOTELLON HACIENDO FUERZA CON LAS PIERNAS Y NO LA ESPALDA.
z TOME EL BOTELLON POR LOS LADOS Y DIRIJA EL CUELLO DEL MISMO HACIA LA
APERTURA DEL TANQUE.
z VOLTEE EL BOTELLON COMO SI FUERA A BOTAR AGUA E INSERTE EL CUELLO DEL
BOTELLON EN LA APERTURA DEL TANQUE HASTA QUE SE COLOQUE EN LA POSICION
CORRECTA.
DIRECCIONES BASICAS DE OPERACION:
z COLOQUE EL ENFRIADOR DE PIE POR UN PERIODO DE 2 HORAS ANTES DE ENCHUFAR
LA UNIDAD A LA PARED.
z COLOQUE EL ENFRIADOR EN UN AREA BIEN VENTILADA Y DEJE UN ESPACIO DE UN
POCO MAS DE 2 PULGADAS ENTRE LA UNIDAD Y LA PARED.
z ESCOJA UN LUGAR CON PISO NIVELADO.
z NO COLOQUE EL ENFRIADOR DONDE LA TEMPERATURA AMBIENTAL PUEDA BAJAR DE
32
°F (0°C).
ANTES DE ENCHUFARLO
AUNQUE EL ENFRIADOR SALE LIMPIO DE LA FABRICA, DEBE LIMPIAR Y ESTERILIZAR LOS
CONDUCTOS DEL TANQUE Y LOS GRIFOS DE ACUERDO A LOS SIGUIENTES PASOS:
z LLENE EL TANQUE DE AGUA (HASTA EL TOPE) CON AGUA DE LA PILA.
z DEJE NIVELAR EL AGUA POR 5 MINUTOS.
z ENCHUFE LA UNIDAD A LA PARED.
z ENCIENDA LOS INTERRUPTORES DE AGUA CALIENTE Y FRIA LOCALIZADOS EN LA
PARTE TRASERA DE LA UNIDAD.
z VACIE EL TANQUE COMPLETAMENTE ABRIENDO LAS TAPAS DE DRENAJE SITUADAS
ABAJO DEL GABINETE. CIERRELAS. AHORA SU DISPENSADOR DE AGUA ESTA LIS T O
PARA USAR.
14
Page 15

CONTROLES DE OPERACION
z INDICADOR MARCADO E-S (CONSERVACION DE ENERGIA):
CUANDO UD PRESIONE EL BOTON MARCADO “PROGRAM”, LA UNIDAD OPERARA EN
CONDICIONES DESIGNADAS PARA CONSERVAR ENERGIA.
DURANTE ESTE PERIODO EL INDICADOR VERDE MARCADO “E-S” (CONSERVACION
DE ENERGIA)SE ALUMBRARA EN LA PANTALLA.
DURANTE LA OPERACION E-S, EL INDICADOR ROJO MARCADO “WARM” (TIBIO) SE
ENCENDERA EN LA PANTALLA HASTA QUE EL AGUA ALCANCE LA TEMPERATURA
DE 60ºC/140ºF (APROXIMADAMENTE EN 4 MINUTOS). EN ESE MOMENTO EL
INDICADOR SE APAGARA TAN PRONTO EL AGUA EN EL TANQUE ALCANCE LOS
50ºC/122ºF, Y EL CICLO DE CALENTAMIENTO EMPEZARA DE NUEVO.
DURANTE LA OPERACION E-S, CUANDO UD PRESIONE EL BOTON MARCADO “HOT
WATER” (AGUA CALIENTE), EL INDICADOR “HOT” (CALIENTE) SE ENCENDERA HASTA
QUE EL AGUA ALCANCE LA TEMPERATURA DE 90ºC/144ºF (APROXIMADAMENTE 4
MINUTOS). EN ESE MOMENTO, EL INDICADOR SE APAGARA Y EL CICLO DE
CALENTAMENTO NO VOLVERA EMPEZAR HASTA QUE UD PRESIONE EL BOTON
MARCADO “HOT WATER” (AGUA CALIENTE) DE NUEVO.
z INDICADOR MARCADO “NORM” (SISTEMA NORMAL):
CUANDO UD PRESIONE EL BOTON MARCADO “PROGRAM”, EL INDICADOR COLOR
NARANJA MARCADO “NORM” SE ENCENDERA EN LA PANTALLA Y LA UNIDAD
OPERARA EN EL PROGRAMA NORMAL. EL INDICADOR “HOT” (CALIENTE) DE COLOR
ROJO SE ENCENDERA HASTA QUE EL AGUA ALCANCE LA TEMPERATURA DE
90ºC/194ºF (APROXIMADAMENTE EN 9 MINUTOS). EN ESE MOMENTO, EL INDICADOR
DE COLOR ROJO SE APAGARA TAN PRONTO EL AGUA EN EL TANQUE ALCANZE
81ºC/178ºF Y EL CICLO DE CALENTAMIENTO EMPEZARA DE NUEVO.
15
Page 16

z AGUA FRIA (CONSERVACION DE ENERGIA Y SISTEM A NORMAL):
ESTE CICLO DE ENFRIAMIENTO NO SERA AFECTADO POR ESTOS PROGRAMAS Y
CONTINUARA FUNCIONANDO PARA MANTENER LA TEMPERATURA FRIA ENTRE
7ºC/44ºF Y 10ºC/50ºF. A LA VEZ QUE EL INTERRUPTOR MARCADO “COLD” (FRIO) EN
LA PARTE TRASERA SE ENCIENDA, EL INDICADOR “COLD” DE COLOR AZUL SE
ENCENDERA EN LA PANTALLA Y EL CICLO FRIO CONTINUARA HASTA QUE LA
TEMPERATURA ALCANCE LOS 5ºC/41ºF. EN ESE MOMENTO EL INDICADOR DE
COLOR AZUL SE APAGARA TAN PRONTO EL AGUA EN EL TANQUE ALCANCE
10ºC/50ºF Y EL CICLO COMENZARA DE NUEVO.
z LUZ DE NOCHE:
CUANDO PRESIONE EL BOTON MARCADO (LIGHT ON/OFF) LA LUZ DE NOCHE SE
ENCENDERA.
PRESIONELO DE NUEVO Y LA LUZ SE APAGARA.
AVISO:
ESTE GRIFO DE AGUA CALIENTE TIENE UN ADAPTADOR DE SEGURIDAD PARA
NIÑOS.
PARA OBTENER AGUA CALIENTE:
♦ MUEVA EL BOTON DE SEGURIDAD HACIA LA DERECHA SIN SOLTARLO.
♦ MANTENGA AGARRADO ESE BOTON DE SEGURIDAD MIENTRAS QUE EMPUJE EL GRIFO
HACIA ABAJO PARA DISPENSAR EL AGUA CALIENTE.
♦ CUANDO SUELTE EL GRIFO ASEGURESE DE RETORNARLO A LA POSICION ORIGINAL.
NOTA: SU ENFRIADOR FUE LIMPIADO Y ESTIRILIZADO ANTES DE SALIR DE LA FABRICA. EN
CASO QUE SIENTA ALGUN SABOR EN EL AGUA, ECHE UNA CUCHARADA DE BICARBONATO
DE SODIO Y AÑADA AGUA DE LA PILA. LLENE EL TANQUE Y REPITA LA OPERACION INICIAL.
MANTENIMIENTO
z ANTES DE EFECTUAR LA LIMPIEZA, DESENCHUFE EL ENFRI ADOR.
z PARA LIMPIAR LAS PARTES DE PLASTICO SE REQUIERE JABON LIQUIDO Y AGUA TIBIA.
NO USE LIMPIADORES ABRASIVOS EN LA SUPERFICIE SUPERIOR NI EN LA BANDEJA DE
ESCURRIMIENTO.
16
Page 17

SI NO VA A USAR EL ENFRIADOR POR UN TIEMPO PROLONGADO
z DESENCHUFE LA UNIDAD.
z QUITE EL BOTELLON DE AGUA.
z COLOQUE LOS INTERRUPTORES (10) Y (11) (EN LA PARTE TRASERA) EN LA POSICION
“OFF”. (APAGADO)
z DRENE EL AGUA ABRIE NDO LAS LLA VES.
z DRENE LA APERTURA EN LA PARTE TRASERA QUITANDO EL TAPON (14).
CENTRO DE SERVICIOS
LA MAYORIA DE LOS PROBLEMAS SE RESUELVEN CON UNA SIMPLE LLAMADA
TELEFONICA A NUESTRO NUMERO SIN CARGO.
1-800-220-5570
ANTES DE DEVOLVER EL PRODUCTO O PARA OBTENER LA DIRECCI ON Y NUMERO DE
TELEFONO DEL CENTRO DE SERVICIO MAS CERCANO LLAME AL SIGUIENTE NUMERO.
1-800-220-5570
GUIA PARA RESOLVER PROBLEMAS
POSIBLES PROBLEMAS CAUSAS
DERRAME DE AGUA POR FUERA DEL
ENFRIADOR.
EL AGUA NO ESTA SUFICIENTEMENTE
FRIA.
EL AGUA NO ESTA SUFICIENTEMENTE
CALIENTE.
EL ENFRIADOR NO ENFRIA O CALIENTA EL
AGUA.
VIBRACIONES VERIFIQUE QUE EL ENFRIADOR ESTE EN
LA BOTELLA ESTA PERFORADA –
REEMPLACELA.
VERIFIQUE QUE EL INTERRUPTOR (COLD).
ESTE EN POSICION “ON”.
NO DIO SUFICIENTE TIEMPO PARA QUE
ENFRIE EL AGUA. PARA REPONER DOS O
MAS VASOS DE 8 oz. SE NECESITA
APROXIMADAMENTE UNA HORA.
VERIFIQUE QUE EL INTERRUPTOR (HOT)
ESTE EN POSICION “ON”.
NO DIO SUFICIENTE TIEMPO PARA QUE
CALIENTE EL AGUA. PARA REPONER DOS
O MAS VASOS DE 8 oz. SE NECESITA
APROXIMADAMENTE UNA HORA.
VERIFIQUE LOS CIRCUITOS, FUSIBLES O
DISYUNTORES.
UN PISO FIRME Y NIVELADO.
17
Page 18

18
Page 19

Registration Information
Thank you for purchasing this fine Avanti product. Please fill out this card and return it within 100
days of purchase and receive these
important benefits:
¾ Protect your product:
We will keep the model number and date of purchase of your new Avanti product on file to
help you refer to this information in the event of an insurance claim such as fire or theft.
¾ Promote better products:
We value your input. Your responses will help us develop products desig ned to be st mee t
your future needs.
----------------------------------------------------------(detach here)---------------------------------------------------------
Avanti Registration Card
__________________________________ _____________________________________
Name Model # Serial #
__________________________________ _____________________________________
Address Date Purchased Store/Dealer Name
__________________________________ ______________________________________
City State Zip Occupation
__________________________________ As Your Primary Residence, Do You:
Area Code Phone Number Own Rent
Did You Purchase An Additional Warranty:
Extended None under 18 18-25 26-30
Reason For Choosing This Avanti Product:
Please indicate the most important factors Marital Status:
that influenced your decision to purchase Married Single
this product. Is This Product Used In The:
Price Home Business
Product Features How Did You Learn About This Product:
Avanti Reputation Advertising
Product Quality In Store Demo Personal Demo
Salesperson Recommendation Other______________________________
Friend/Relative Recommendation Comments____________________________
Warranty _____________________________________
Other_______________________ _____________________________________
Your Age:
31-35 36-50 over 50
19
Page 20

PRINTED IN CHINA
20
 Loading...