

Page 1
Actual product appearance may vary
Model Number/Número de Modelo: WDBMC800Q3S
INSTRUCTION MANUAL
MANUAL DE INSTRUCCIONES
MANUEL D’INSTRUCTIONS
Bottle NOT Included
CAUTION:
BEFORE USE, PLEASE READ AND FOLLOW ALL SAFETY RULES AND OPERATING
INSTRUCTIONS.
Avanti has a policy of continuous improvement on its products and reserves the right to change materials and specifications
without notice.
Avanti Products LLC
P.O. Box 520604 - Miami, Florida 33152
www.avantiproducts.com
Page 2
2
TABLE OF CONTENTS
Help Us Help you
3
Parts and Features
4
Important Safety Instructions / Replacing an Empty Water Bottle
5 – 6
Electrical Connection
7
Installation Guidelines
8 – 9
Operation Instructions
9
Before Using Your Water Dispenser
9
Operating Your Water Dispenser
10
Hot / Cold Water Indicator Lights
11
Child Safety Guard (Hot Water Faucet)
11
Dispensing Water
12
Care and Maintenance
12
Taking the dispenser out of service
12
Problems with Your Water Dispenser
13
Troubleshooting Guide
13
Service for Your Water Dispenser
13
Your Avanti Products Warranty
14
Instrucciones en Español
15 – 25
Instructions en Français
26 - 38
Registration Information and Registration Card
Last Page
Page 3

3
HELP US HELP YOU...
Read this guide carefully.
It is intended to help you operate and maintain
your new water dispenser properly.
Keep it handy to answer your questions.
If you don't understand something or you need
more help, please call:
Avanti Customer Service
800-220-5570
Keep proof of original purchase date (such as
your sales slip) with this guide to establish the
warranty period.
IF YOU NEED SERVICE
We're proud of our ser vice and want you to be
pleased. If for som e reason you are not happ y
with the service you receive, here are some
steps to follow for further help.
FIRST, contact the p eople who serviced your
appliance. Explain why you are not pleased. In
most cases, this will solve the problem.
Write down the model and serial numbers.
You'll find them on a label located on the back
side of the unit.
Please write these numbers here:
____________________________________
Date of Purchase
____________________________________
Model Number
____________________________________
Serial Number
Use these numbers in any correspondence or
service calls concerning your water dispenser.
If you received a damaged water dispenser,
immediately contact t he de aler (or bu ilder) that
sold you the water dispenser.
Save time and money. Before you call for
service, check the Problem Solver Guide. It
lists causes of minor operating problems that
you can correct yourself.
NEXT, if you are still not pleased, write all the
details, including your telephone number, and
send to:
Customer Serv ice
Avanti Products
10880 NW 30 Street
Miami, FL 33172
Page 4
4
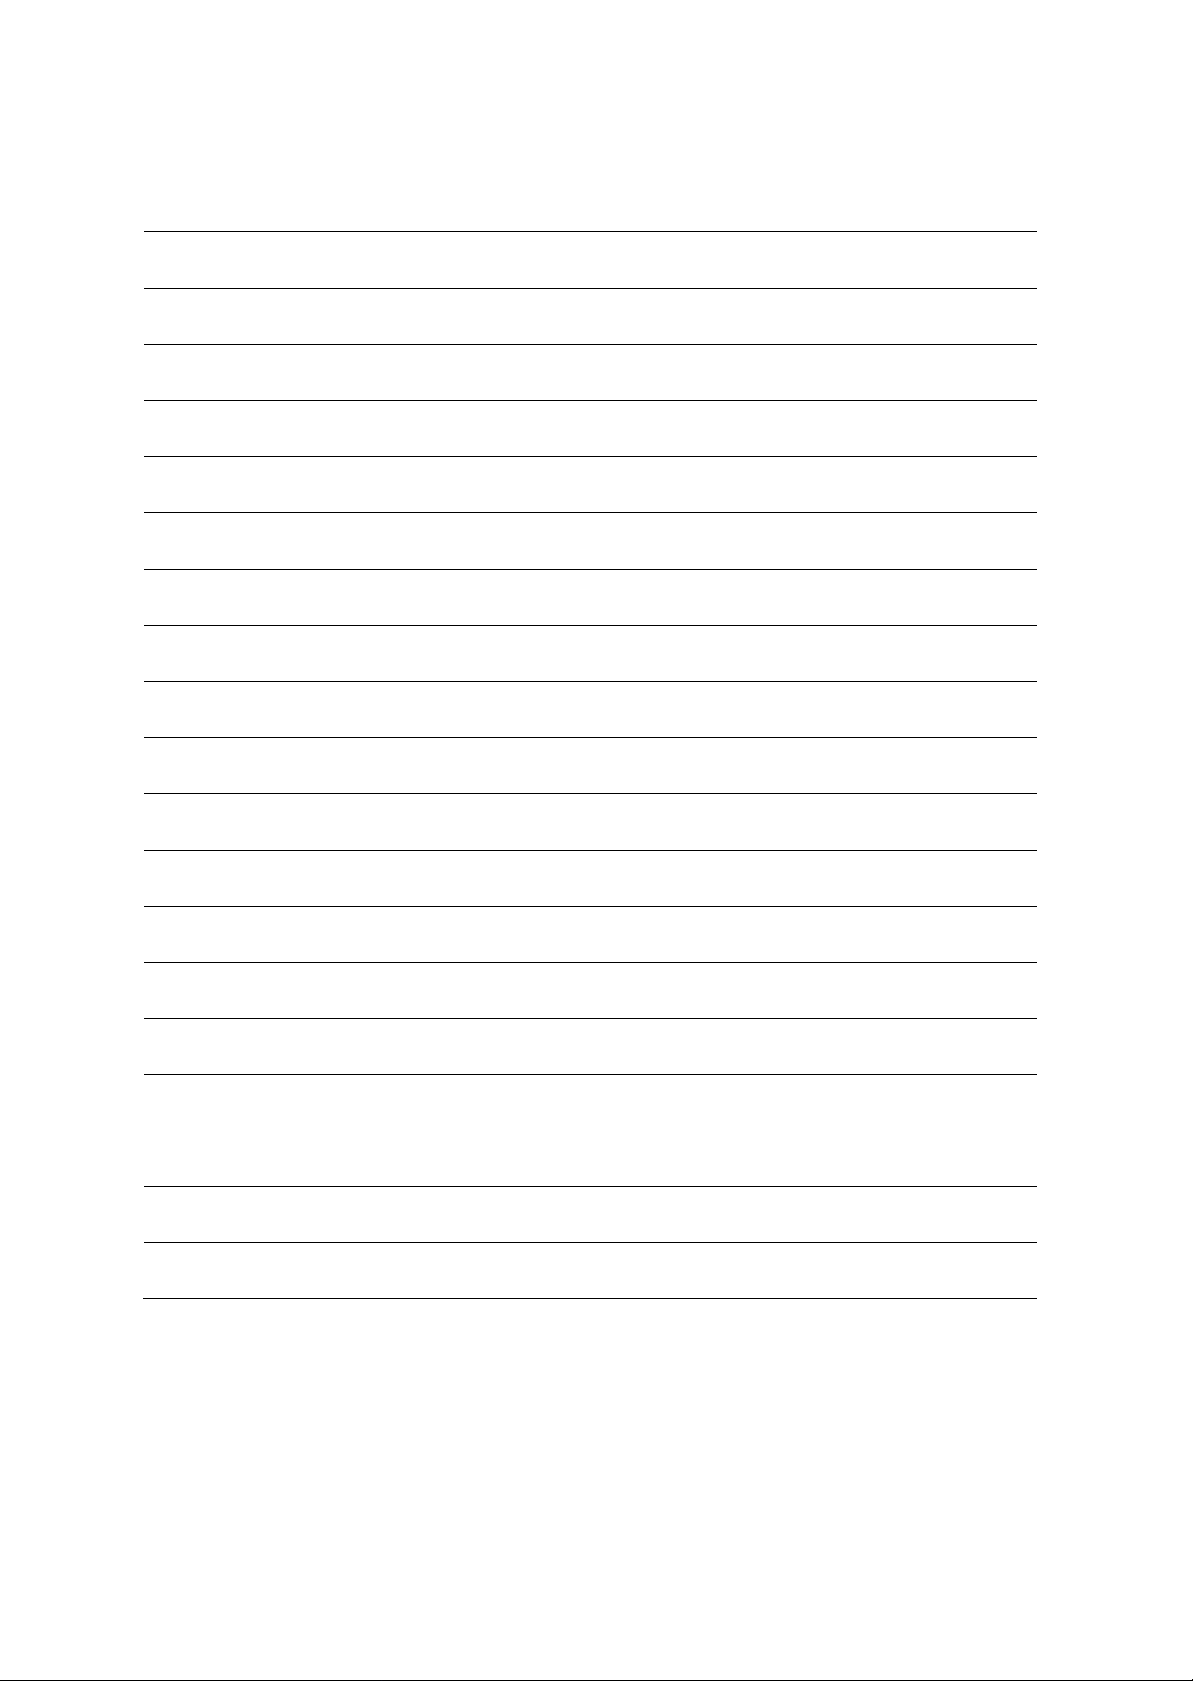
PARTS AND FEATURES
Rear of Unit
Page 5
5
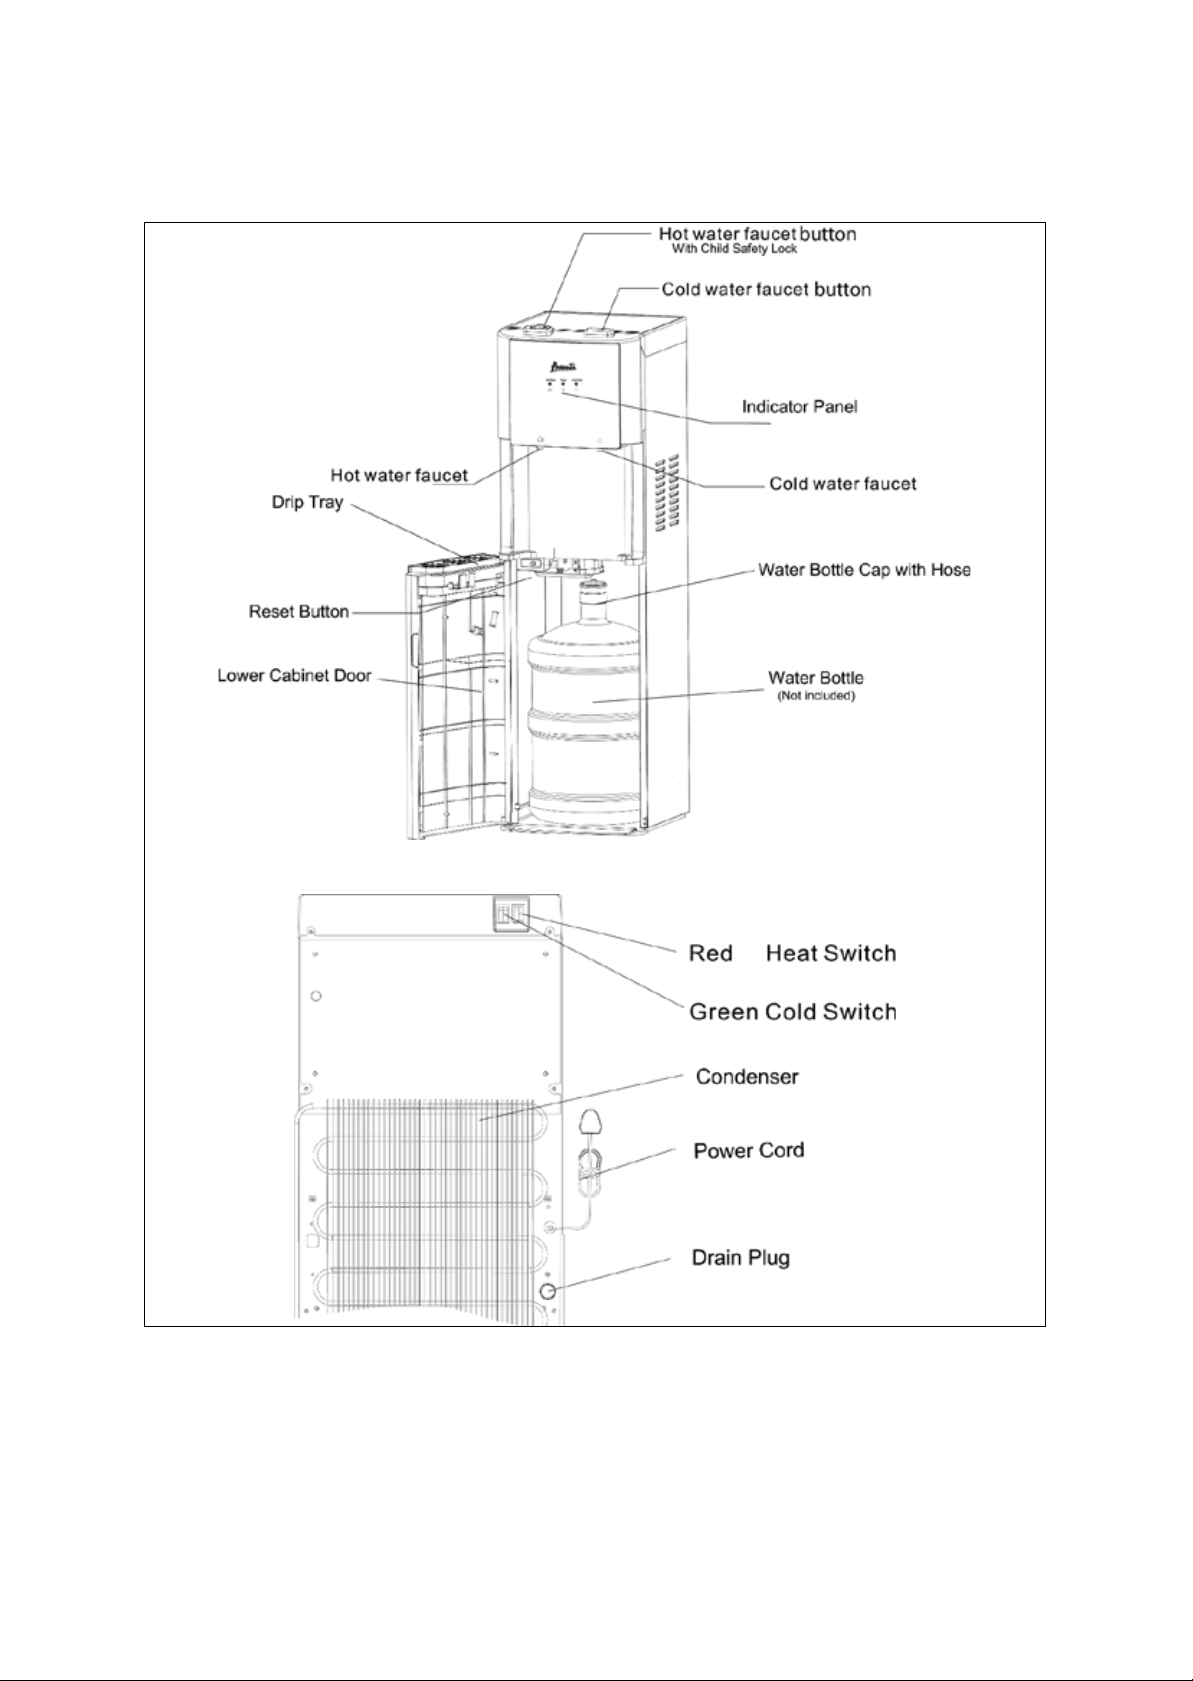
APPLIANCE SAFETY
Your safety and the safety of others are very important.
We have provided many important safety messages in this manual and on your
appliance. Always read and obey all safety messages.
Danger means that failure to heed
severe personal injury or death.
Warning means that fail ur e to
or death.
Caution means that failure to
equipment damage.
All safety messages will alert you to what the potential hazard is, tell you how to
instructions are not foll owed.
This is the Safety Alert Symbol.
This symbol alerts you to potential
hazards that can kill or injure you
and others.
All safety messages will follow the
Safety Alert Symbol and either the
wards” DANGER”, “WARNING” or
“CAUTION”.
this safety statement may result in
heed this safety statement may
result in extensive product
damage, serious personal injury,
heed this safety statement may
result in minor or moderate
personal injury, or property or
reduce the chance of injury, and let you know what can happen if the
PROP. 65 WARNING FOR CALIFORNIA RESIDENTS
WARNING:
Cancer And Reproductive Harm
www.p65warnings.ca.gov
Page 6
6
IMPORTANT SAFEGUARDS
Plug into a grounded 3-prong outlet, do not remove grounding prong, do not use an adapter, and
recommended in this material. All other servicing should be referred to a qualified technician.
• Use two or more people to move and install the appliance. Failure to do so can result in back or
• Do not use this apparatus for other than its intended purpose.
Before the appliance is used, it must be properly positioned and installed
as described in this manual, so read the manual carefully. To reduce the
risk of fire, electrical shock or injury when using the appliance, follow
basic precautions, including the following:
·
do not use an extension cord
• Replace all panels before operating
• It is recommended that a separate circuit, serving only your appliance, be provided. Use
receptacles that cannot be turned off by a switch or pull chain
• Never clean appliance parts with flammable fluids. These fumes can create a fire hazard or
explosion. And do not store or use gasoline or other flammable vapors and liquids in the vicinity
of this or any other appliance. Th e fum es ca n cr eate a fir e hazard or explosion.
• Before proceeding with cleaning and maintenance operations, make sure the power line of the
unit is disconnected.
• Do not connect or disconnect the electric plug when your hands are wet
• Unplug the appliance or disconnect the power before cleaning or servicing. Failure to do so can
result in electrical shock or death.
• Do not attempt to repair or replace any part of your appliance unless it is specifically
other injury.
• To ensure proper ventilation for your appliance, the unit must be completely unobstructed.
Choose a well-ventilated area with temperatures above 550F (130C) and below 900F (32 0C). This
unit must be installed in an area protected from the elements, such as wind, rain, water spray or
sunlight.
• The appliance should not be located next to ovens, grills or other sources of high heat.
• The appliance must be installed with all electrical, water and drain connections in accordance with
state and local codes. A standard electrical supply (115 V AC only, 60 Hz), properly grounded in
accordance with the National Electrical Code and local codes and ordinances is required.
• Do not kink or pinch the power supply cord of the appliance.
• The fuse (or circuit breaker) size should be 15 amperes.
• It is important for the appliance to be leveled in order to work properly. You may need to make
several adjustments to level it.
• All installation must be in accordance with local plumbing code requirements.
• Make certain that the pipes are not pinched or kinked or damaged during installatio n.
• Check for leaks after connecti on.
• Never allow children to operate, play with or crawl inside the appliance
• Do not use solvent-based cleaning agents or abrasives on the interior. These cleaners may
damage or discolor the interior.
Page 7
7
Electrical Connecti on
~Warning~
have it replaced by an authorized Avanti Products service center.
This appliance should be properly grounded for your safety. The power cord of this appliance is
and not left exposed or dangling to prevent
electrician or service technician install an outlet near the appliance.
Ø EXTENSION CORD
Because of potential safety hazards under certain conditions, it is strongly recommended that you
least 10 amperes.
Ø SURGE PROTECTOR
Most electrical appliances use a series of electric control boards to operate. These boards are very
protector needed contact a licensed electrician in your area.
Damages due to power surges are not considered a manufacturer covered defect and will void your
product warranty.
Improper use of the grounded plug can result in the risk of electrical shock. If the power cord is damaged,
equipped with a thr e e-prong plug whic h mat e s with standard three prong w al l out let s t o mi nimize the
possibility of electric al shoc k.
Do not under any circumstances c ut or r e move the third gr oun d pr on g from the pow er cor d s uppli ed .
This appliance requires a standard 115Volts~/60Hz electrical outlet with three-prong ground.
The cord should be secured behind the appliance
accidental injury.
Never unplug the appliance by pulling the power cord. Always grip the plug firmly and pull straight
out from the receptacle.
Do not use an extension cord with this appliance. If the power cord is too short, have a qualified
do not use an extension cord with this unit. However, if you must use an extension cord it is
absolutely necessary that it be a UL/CUL-Listed, 3-wire grounding type appliance extension cord
having a grounding type plug and outlet and that the electrical rating of the cord be 115 volts and at
susceptible to power surges and could be damaged or destroyed.
If the appliance is going to be used in an area or if your city / country is prone to power surges /
outages; it is suggested that you use a power surge protector for all electrical devices / appliances
you use. The surge protector that you select must have a surge block high enough to protect the
appliance it is connected to. If you have any questions regarding the type and size of surge
Page 8

8
BEFORE PLUGGING IN YOUR UNIT
1) Make sure the water dispenser is not plugged into an electrical outlet.
switch off to conserve energy.
ATTENTION / WARNING
in the tanks and allow the unit to cool down.
DO NOT TURN ON THE HOT WATER POWER SWITCH BEFORE FILLING THE HOT WATER
TANK WITH WATER. THIS WILL CAUSE THE UNIT TO OVERHEAT AND SHUTDOWN.
Install the water bottle and allow the tanks to fill with water for approximately 10 – 15 minutes.
Before turning on the HOT water power switch.
Your unit is equipped with an AUTOMATIC SAFETY SHUTOFF SWITCH which will turn the unit
off until the hot water tank cools to a safe temperature.
Usual time to reset is approximately 30 – 45 minutes, once the temperature reaches a safe level,
the unit will reset and begin to operate normally.
If the unit has gone into RESET MODE, turn off the hot water power switch ensure there is water
2) Open the door of the lower cabinet.
3) Place a full bottle of water on the floor.
4) Remove the plastic cover from the mouth of the water bottle.
5) Insert the water supply hose and secure the bottle cap to the mouth of
the water bottle.
6) Slide the bottle into the lower cabinet and close the lower cabinet
door.
7) Plug the water cooler into an electric outlet as indicated previously in
this manual.
8) The motor will begin to pump water up to the water tanks.
9) After the pump stops working (wait approximately 10 minutes), then
dispense water from both the hot and cold faucets.
10) After dispensing water from the faucets for the first time, then turn on
the power to the HOT and COLD power switches at the rear of the unit
to begin the heating and cooling process.
11) If you are not going to be using the HOT function, turn the HOT power
REPLACING AN EMPTY BOTTLE
When the unit is out of water or needs a bottle change the
power indicator light will blink on and off to indicate that a new
water bottle is needed.
You may hear a sucking noise when the bottle is empty and
needs to be changed. This is normal and is another way to know when the bottle is
empty and needs to be changed. Replace the bottle as soon as you notice it is
empty.
Your water dispenser features an adjustable quick connect system. For proper
operation, make sure the connector is sealed tight (fig 1)
The connector can be removed easily for cleaning with warm soapy water (fig 2)
The tube can be adjusted up and down to accommodate both 3 and 5 gallon water
bottles (fig 3).
NOTE: If there is not a secure connection between the hose cap and the connector
on the water cooler the water pump will operate but will not dispense water. Make
sure the hose is connected to the water dispenser correctly.
Page 9

9
~
~
To red uce the r isk of burns, fire, electrical
follow these basic precautions:
• Read all instructions before using the water dispenser.
-Save these instructions-
Important Safety Instructions
WARNING
shock, or injury when using your appliance,
• Never clean parts with flammable fluids. The fumes can create a fire hazard or
explosion.
• Do not store or use gasoline or any other flammable vapors and liquids in the vicinity
of this or any other water dispenser. The fumes can create a fire hazard or explosion
• Do not plug unit into receptacle until you ensure the water tank switches are off.
INSTALLATION GUIDELINES:
• Remove the exterior and interior packing.
• Place your appliance o n a floor that is strong enou gh to support t he dispens er when it is fully
loaded. If it does not sit lev el on th e floor, adjust t he front right f oot to le vel t he un it wel l to th e
floor. Note: Both of the front feet are adjustable.
• Locate the applianc e away from direct s unlight and sources of heat (stove, heat er, radiator,
etc.). Direct sunli ght may affect the acrylic coating and heat sources m ay increase elec trical
consumption. Extreme cold ambient temperatures may also cause the appliance not to perform
properly.
• Allow 5 inches of space between the water dispenser and the wall, which allows for
proper air circulation to cool the compr essor.
• Plug the appliance into an exclusive properly installed-grounded wall outlet. Do not cut or
remove the third (ground) prong from the power cord under any circumstances. Any questions
concerning power and/or grounding should be directed toward a certified electrician or an
authorized Avanti Products service center.
• This water dispenser is not recommended for outdoor use.
• Do not locate the dispenser in area where the temperature may fall below freezing (32
• Keep area around dispenser free of dust and dirt.
• Keep the reserve supply of water bottles away from excessive heat and light.
• Never unplug the water cooler, except for maintenance or transport.
º F).
Page 10

10
~WARNING~
OPERATION INSTRUCTIONS
Before Using Your Water Dispenser
• Check to be sure the following parts are included:
§ Instruction manual
§ 2 extra drain plug seals
• Before connecting the appliance to the power source, let it stand upright for
approximately 2 hours. This will reduce the possibility of a malfunction in the cool ing
system from handling during transportation.
• The water dispenser is pre-cleaned at the factory but the reservoir and water lines
must be flushed with fresh water before use as follows:
• Keep the unit unplugged.
• Fill water tank with tap water full to capacity (more than 3/4 of a gallon). Wait for 5
minutes until water settles.
• Press the hot water faucet until water comes out, then stop.
• Plug the dispenser into the electrical outlet. Both heating and cooling indicator lights
on front will light up at first. We are ready to complete the first cycle. In order to do
that, wait for the hot water indicator light to go off first (approximately 10 minutes),
then wait for the cold water indicator light to go off (another 40 minutes,
approximately).
• Unplug the dispenser from the electrical outlet. Proceed to drain the water from the
faucets one at a time until no more water remains.
(Note: To facilitate this operation, use a large container).
• Then, drain any water left in the tanks by opening the drain plug located on the back,
until it drains completely.
• Proceed to close the drain cap.
Be sure the drain plug seal is in place. If not, replace with one of the spares
included with this manual.
Closing the drain cap without the seal in place will result in leakage and
possible damage to the water dispenser and or its surroundings.
• Place the 5-gallon bottle of water on the water intake, allow water to stand for
approximately one minute.
• Open water faucets to insure water flows from both faucets.
• Check the area around the drain valve at the rear of the unit for leakage.
• Plug dispenser into the electrical outlet.
• Now you are ready to use your water dispenser.
NOTE: Your water dispenser has been cleaned and sanitized before leaving the
factory, but in case a taste problem develops, place two tablespoons of
baking soda and add tap water. Fill water tank again and repeat basic
operations previously outlined, except turn the switch marked HOT “OFF” to
avoid leaving residues in hot water tank.
ATTENTION:
If you do not plan to use the water heating function for more than three days, we
recommend that you turn the HOT switch to the “OFF” position.
IMPROPER USE OF THE GROUNDED PLUG CAN RESULT IN THE RISK OF ELECTRICAL SHOCK. IF
THE POWER CORD IS DAMAGED, HAVE IT REPLACED BY AN AUTHORIZE D AVANTI PRODUCTS
SERVICE CENTER.
Page 11
11
NOTE:
ATTENTION / WARNING
ensure there is water in the tanks and allow the unit to cool down.
Ø Hot and Cold Power ON/OFF Indicator Lights
DO NOT TURN ON THE HOT WATER POWER SWITCH BEFORE FILLING
THE HOT WATER TANK WITH WATER. THIS WILL CAUSE THE UNIT TO
OVERHEAT AND SHUTDOWN.
Install the water bottle and allow the tanks to fill with water for approximately 10
– 15 minutes. Before turning on the HOT water power switch.
Your unit is equipped with an AUTOMATIC SAFETY SHUTOFF SWITCH which
will turn the unit off until the hot water tank cools to a safe temperature.
Usual time to reset is approximately 30 – 45 minutes, once the te mper at ure
reaches a safe level, the unit will reset and begin to operate normally.
If the unit has gone into RESET MODE, turn off the hot water power switch
Once the power switches f or the HO T and C OLD water s ystems ( located on t he rear of the unit) h ave
been turned ON, these lights will illuminate to advise the user that the systems are activated and
operating.
Ø Hot Water Indicator Light
Turn the heating switch on, the red indicator will glow, and the heating process starts. When the water
reaches the right tem perature (185º - 203ºF / 85 º - 95ºC) the red light goes of f autom atically. When
the temperature goes below 176ºF (80ºC), the red indicator will glow again, and another heating
process starts.
Ø Cold Water Indicator Light
Turn the cooling s witch on. The blue ind icator wil l glow, and th e cooling process will begin. W hen the
water reaches the right temperature (41º - 50ºF / 5º - 10ºC) the blue indicator light will turn off
automatically. Once the water temperature reaches above 50ºF (10ºC) the blue indicator light will glow
again indicating another cooling process has started.
Ø Power Indicator Light
The power indicator light will turn on once the unit is plugged into electrical power.
Ø Add Water Indicator Light (Power Light)
The POWER indicator l ight will flash on and of f to indicate that the bottle is empty and a new bottle
needs to be changed.
THE HOT WATER FAUCET HAS A CHILD-SAFETY GUARD ATTACHMENT.
Page 12

12
DISPENSING WATER
To dispense hot water:
♦ Slide red safety button to the right and hold while pressing downward on hot water faucet to
dispense hot water.
♦ Safety button will return to its original position when faucet is released.
♦ Ensure all water has dispensed prior to removing glass from the dispensing area.
To dispense cold water:
♦ Press and hold downward on the cold water faucet to dispense cold water.
♦ When you have dispensed the desired am ount of water, simply release the cold water faucet.
♦ Ensure all water has dispensed prior to removing glass from the dispensing area.
CARE AND MAINTENANCE
• Wash the inside of the reservoir with a warm water and baking soda solution. The solution should
be about 2 tablespoons of baking soda to a quart of water.
• The drip tray and water faucets should be cleaned with mild detergent and warm water.
• At regular intervals or once a month inspect the coils located across the back of the dispenser.
Vacuum accumulation of dust or clean it with a soft bristled brush.
TAKING DISPENSER OUT OF SERVICE
• If the water dispenser will not be used for a long period of time, unplug the power cord from the
wall outlet.
• Drain the water through the faucets.
• Turn the switch market hot to the “OFF” position.
• Drain the water from the tank by removing the plug from the back of the dispenser.
WARNING—THE WATER COMING OUT OF THE BACK SIDE MARKED “HOT” MAY BE SCOLDING.
l Unit should not be transported on the sides. Place it upright if possible and cover it with a
blanket.
Page 13

13
PROBLEM
POSSIBLE CAUSE
Water dispenser does not operate.
Not plugged in.
The circuit breaker tripped or a blown fuse.
Water cooler is not cold enough.
Check to be sure the cold switch on the back is ON.
clearances.
Water dispenser hot water is not hot enough.
Check to be sure the hot switch on the back is ON.
Compressor turns on and off frequently.
clearances.
Vibrations.
Check to assure that the water dispenser is level.
The water dispenser seems to make too much
The water dispenser is not level.
Bottle feels warm.
until air is released into the bottle.
Water bottle is hot.
Water is boiling in the hot tank and bubbling up into the
to remove air from the hot tank.
800-323-5029
help is available.
You may order parts and acc essories that will be
You may order these items by personal check,
money order, Master Card, or Visa.
that is convenient for you. Our trained servicers
know your appliance inside and out.
PROBLEMS WITH YOUR WATER DISPENSER
You can solve many common water dispenser problems easily, saving you the cost
of a possible service call. Try the suggestions outlined below to see if you can solve
the problem before calling the service.
TROUBLESHOOTING GUIDE
The water dispenser does not have the correct
The room temperature is hotter than normal.
The temperature control is not set correctly.
The water dispenser does not have the correct
The rattling noise may come from the flow of the
noise.
refrigerant, which is normal.
As each cycle ends, you may hear gurgling sounds
caused by the flow of refrigerant in your water
dispenser.
Contraction and expansion of the inside walls may
cause popping and crackling noises.
The water system is overfilled. Dispense Cold water
bottle. Press the hot dispenser button until water flows
SERVICE FOR YOUR WATER DISPENSER
We are proud of our customer service organization and the network of professional service technicians
that provide service on your Avanti applianc es. With the purchas e of your Avanti appli ance, you can
have the confidence that if you ever need additional informat ion or assistance, the Avanti Products
Customer Service team will be here for you. Just call us toll-free.
AVANTI PRODUCTS CUSTOMER SERVICES
Product Information
Part Orders
800-220-5570
In-Home Repair Service
800-220-5570
Whatever your questions are about our products,
delivered directly to your home.
An Avanti Products author ized service center wil l
provide expert repa ir serv ice, sched uled a t a tim e
Page 14

14
Staple your sales receipt here. Proof of original
warranty.
WHAT IS COVERED – LIMITED ONE-YEAR WARRANTY
center for repair.
LIMITED SECOND THROUGH FIFTH YEAR WARRANTY
user’s responsibility.
WARRANTY EXCLUSIONS / WHAT IS NOT COVERED:
Products, including without limitation, one or more of the following:
•
lightning, power surges, structural failures surrounding the appliance, and acts of God.
•
• Failure of the product if it is used for other than it
In no event shall Avanti Products have any liability or responsibility whatsoever for damage to surrounding
cabinetry, walls, floors, shelving etc., as well as the resetting of breaker s or fuses.
OUT OF WARRANTY PRODUCT
repairs, pro-rates, or product replacement, once this warranty has expired.
WARRANTY – WATER DISPENSER - COMPRESSOR
YOUR AVANTI PRODUCTS
WARRANTY
Avanti Products warrants that the product is free from defects in materials and/or workmanship for a period of
twelve (12) months from the date of purchase by the original owner. The foregoing timeline begins to run upon
the date of purchase, and shall not be stalled, tolled, extended, or suspended for any reason whatsoever unless
described in detail in the warranty document. For one year from the date of purchase by the original owner,
Avanti products will, at its option, repair or replace any part of the product which proves to be defective in
material or workmanship under normal use. Avanti Products will provide you with a reasonably similar product
that is either new or factory refurbished. During this period Avanti Products will provide all parts and labor
necessary to correct such defects free of charge, so long as the product has been installed and operated in
accordance with the written instructions in this manual. In rental or commercial use, the warranty period is 90
days. All Avanti appliances of 3.5 cubic feet capacity or less must be brought/sent to the appliance service
For the second through the fifth year from the date of original purchase, Avanti Products will provide a
replacement compressor free of charge due to a failure. You are responsible for the service labor and freight
charges. In rental or commercial use, the limited compressor warranty is one year and nine months. Costs
involved to move the product to the service center and back to the user’s home, as maybe required, are the
The warranty coverage described herein excludes all defects or damage that are not the direct fault of Avanti
A failure to comply with any applicable state, local, city, or county electrical, plumbing and/or building codes,
regulations, or laws, including failure to install the product in strict conformity with local fire and building codes
and regulations.
purchase date is needed to obtain service under
• Any external, elemental and/or environmental forces and factors, including without limitation, rain, wind, sand,
floods, fires, mud slides, freezing temperatures, excessive moisture or extended exposure to humidity,
Content losses of food or other content due to
spoilage.
• Incidental or consequential damages
• Parts and labor costs for the following will not be
considered as warranty:
• Shipping and handling costs associated with the
replacement of the unit.
• Repairs performed by unauthorized servicers.
• Service calls that are related to external problems,
such as abuse, misuse, inadequate electrical power,
accidents, fire, floods, or any other acts of God.
property, including cabinetry, floors, ceilings, and other structures and/or objects around the product. Also
excluded from this warranty are scratches, nicks, minor dents, and other cosmetic damages on external surfaces
and exposed parts; Products on which the serial numbers have been altered, defaced or removed; service visits
for customer education, or visits where there is nothing wrong with the product; correction of installation problems
(you are solely responsible for any structure and setting for the product, including all electrical, plumbing and/or
other connecting facilities, for proper foundation/flooring, and for any alterations including without limitation
Avanti Products is under no obligation, at law or otherwise, to provide you with any concessions, including
intended purpose.
• Surcharges including but not limited to, any after
hour, weekend, or holiday service calls, tolls, ferry
trip charges, or mileage expense for service calls to
remote areas.
• The warranty does not apply outside the
Continental USA.
Page 15

15
Seguridad de los aparatos
Su seguridad y la seguridad de los demás son muy importantes.
Hemos proporcionado much os mens aj es i mp or tantes de seguridad en este
de seguridad.
Peligro significa que el
lesiones graves o la muerte.
Advertencia significa que si no se
graves o la muerte.
Precaución significa que el
al equipo.
Todos los mensajes de seguridad que le avise a cuál es el peligro potencial, le
si no se siguen las instrucciones.
manual y en su electrodoméstico. Siempre lea y obedezca todos los mensajes
Éste es el símbolo de alerta de
seguridad. Este símbolo le
advierte sobre peligr os
potenciales que pueden
ocasionar la muerte o lesionar a
usted y otros.
Todos los mensajes de seguridad
seguirán el símbolo de alerta de
seguridad a ”PELIGRO”,
‘ADVERTENCIA’ o
‘PRECAUCIÓN’.
incumplimiento de esta medida de
seguridad podría resultar en
respeta esta medida de seguridad
podría resultar en graves daños al
producto, lesiones personales
incumplimiento de esta medida de
seguridad podría provocar
lesiones leves o moderadas
personal o la propiedad o daños
dirán cómo reducir el riesgo de lesiones, y le hará saber lo que puede suceder
Page 16

16
SAL VAGUARDIAS IMP ORTANTES
Antes de usar el aparato, tiene que estar bien posicionada e instalada
siguientes:
Enchufe en una toma de 3-de conexión a tierra, no retire la conexión a tierra, no utilice un
cualificado.
• Use dos o más personas para mover e instalar el aparato. El no hacerlo puede resultar en
• No utilice este aparato para que no sea su finalidad.
como se describe en este manual, así que lea cuidadosamente el
manual. Para reducir el riesgo de incendio, descarga eléctrica o lesiones
al utilizar el aparato, siga las precauciones básicas, incluyendo las
·
adaptador, ni un cable de extensión
• Vuelva a colocar todos los paneles antes de operación
• Se recomienda un circuito separado que alimente solamente a su aparato. Use recipientes que
no se pueden apagar con un interruptor o cadena.
• Nunca limpie con líquidos inflamables. Estos vapores pueden crear un riesgo de incendio o
explosión. Y no se almacene o use gasolina u otros vapores y líquidos inflamables cerca de este
o cualquier otro electrodoméstico. Los vapores pueden crear un riesgo de incendio o explosión.
• Antes de proceder con las operaciones de limpieza y mantenimiento, asegúrese de que la línea
de alimentación de la unidad se desconecta.
• No conecte o desconecte el enchufe eléctrico si tiene las manos húmedas
• Desenchufe el aparato o desconectar la alimentación antes de la limpieza o el mantenimiento. El
no hacerlo puede provocar una descarga eléctrica o la muerte.
• No intente reparar o reemplazar cualquier parte de su aparato a menos que se recomiende
específicamente en este material. Cualquier otro servicio debe ser realizado por un técnico
lesiones en la espalda o otros lugares.
• Para garantizar una ventilación adecuada para su aparato, la unidad debe estar completamente
despejada. Elija un área bien ventilada con temperaturas superiores a 550F (130C) y por debajo
de 900F (32 0C). Esta unidad debe ser instalada en un área protegida de los elementos, como el
viento, la lluvia, rocío de agua o la luz solar.
• El aparato no debe colocarse cerca de hornos, parrillas u otras fuentes de calor.
• El aparato debe ser instalado con todas las conexiones eléctricas, de agua y de drenaje de
acuerdo con los códigos estatales y locales. Se requiere un suministro estándar eléctrico (sólo
115 V CA, 60 Hz), tierra adecuada de acuerdo con el Código Eléctrico Nacional y los códigos y
reglamentos locales.
• No doble ni apriete el cable de alimentación del aparato.
• El fusible (o disyuntor) tamaño debe ser de 15 amperios.
• Es importante que el aparato se puede nivelar con el fin de funcionar correctamente. Es posible
que tenga que hacer varios ajustes para nivelarlo.
• Toda la instalación debe estar de acuerdo con los requerimientos locales de plomería.
• Asegúrese de que los tubos no están aplastadas ni dañados durante la instalación.
• Compruebe si hay fugas después de la conexión.
• Nunca permita que los niños operen, jueguen o se introduzcan en el aparato
• No utilice productos abrasivos o de limpieza a base de disolvente en el interior. Estos limpiadores
pueden dañar o descolorar el interior.
Page 17

17
Conexión eléctrica
~Advertencia~
Products.
Este aparato debe estar conectado a tierra adecuadamente para su seguridad. El cable de
Bajo ninguna circunstancia corte o quite la tercera clavija de tierra del cable de alimentación
Nunca desenchufe el aparato tirando del cable de alimentación. Siempre sujete firmemente el
haga que un electricista o técnico de servicio calificado instale un tomacorriente cerca del aparato.
Ø CABLE DE EXTENSIÓN
Debido a los peligros potenciales de seguridad bajo ciertas condiciones, se recomienda
capacidad eléctrica del cable de ser de 115 voltios y al menos 10 amperios.
Ø PROTECTOR CONTRA SOBRETENSIONES
La mayoría de los aparatos eléctricos utilizan una serie de cuadros d e con tr ol eléctr ic os para
consulte a un electricista autorizado en su área.
Los daños debidos a sobrecargas de energía no se consideran un fabricante cubierto de fe c to y
anulará la garantía del produc t o.
El uso inapropiado del enchufe a tierra puede resultar en el riesgo de descarga eléctrica. Si el cable de
alimentación está dañado, haga que sea reemplazado por un centro de servicio autorizado de Avanti
alimentación de este aparato está equipado con un enchufe de tres clavijas que se acopla con tres
enchufes de pared standard para minimizar la posibilidad de choque eléctrico.
suministrado.
Este aparato requiere una toma de corriente eléctrica 115Volts ~ / 60Hz estándar con tierra de tres
clavijas.
El cable debe ser asegurado por detrás del aparato y no dejarlo expuesto para prevenir lesiones
accidentales.
enchufe y tire en línea recta desde el receptáculo.
No utilice un cable de extensión con este aparato. Si el cable de alimentación es demasiado corto,
encarecidamente que no se utilize un cable de extensión con esta unidad. Sin embargo, si debe
utilizar un cable de extensión es absolutamente necesario que sea un UL / CUL-Listed, 3 hilos de
conexión a tierra del aparato cable de extensión que tiene un enchufe y la toma de tierra y que la
operar. Estas placas son muy susceptibles a las subidas de tensión y podrían ser dañados o
destruidos.
Si el aparato va a ser usado en un área o si su ciudad / país es propenso a subidas de tensión /
interrupciones; se sugiere que utilice un protector contra sobretensiones de todos los dispositivos /
aparatos eléctricos que utiliza. El estabilizador de tensión que se selecciona debe tener un bloque
aumento suficientemente alto como para proteger el aparato que está conectado. Si tiene alguna
pregunta relacionada con el tipo y tamaño de contacto necesario protector contra sobretensiones
Page 18

18
ANTES DE CONECTAR LA UNIDAD
1) Asegúrese de que el dispensador de agua no está enchufado a una
encendido CALIENTE apaga para ahorrar energía.
ATENCIÓN / ADVERTENCIA
a asegurar que haya agua en los tanques y permita que la unidad se enfríe.
NO encienda el interruptor de energía de agua caliente antes de la presentación del
DEPÓSITO DE AGUA CALIENTE CON AGUA. Esto hará que la unidad se sobrecaliente y
se apague.
Instalar la botella de agua y permitir que los tanques para llenar con agua durante
aproximadamente 10 - 15 minutos. Antes de encender el interruptor de alimentación de agua
caliente.
Su unidad está equipada con un interruptor de seguridad automáticas de cierre que se apague
la unidad hasta que el tanque de agua caliente se enfría a una temperatura segura.
hora habitual para restablecer es de aproximadamente 30 - 45 minutos, una vez que la
temperatura alcanza un nivel seguro, la unidad se reiniciará y comenzará a funcionar
normalmente.
Si la unidad ha entrado en modo RESET, apague el interruptor de alimentación de agua caliente
toma de corriente.
2) Abra la puerta del armario inferior.
3) Coloque una botella llena de agua en el suelo.
4) Retire la tapa de plástico de la boca de la botella de agua.
5) Inserte la manguera de suministro de agua y asegurar la tapa de la
botella a la boca de la botella de agua.
6) Deslice la botella en el armario inferior y cerrar la puerta del armario
inferior.
7) Enchufe el enfriador de agua en una toma de corriente eléctrica como
se ha indicado anteriormente en este manual.
8) La bomba comenzará a bombear el agua hasta los depósitos de
agua.
9) Después de la bomba deja de funcionar (esperar aproximadamente
10 minutos), a continuación, suministrar agua tanto de los grifos de
agua caliente y fría.
10) Después de dispensar el agua de los grifos, por primera vez, a
continuación, conectar la alimentación a la HOT y los interruptores de
alimentación frío en la parte trasera de la unidad para iniciar el
proceso de calentamiento y enfriamiento.
11) Si no se va a utilizar la función CALIENTE, gire el int err uptor de
Sustitución de una botella vacía
Es posible que escuche un ruido de succión cuando la
botella está vacía y necesita ser cambiada. Esto es
normal y es otra manera de saber cuando la botella está
vacía y necesita ser cambiada. Vuelva a colocar la
botella tan pronto como note que está vacía.
El dispensador de agua cuenta con un sistema de conexión rápida ajustable. Para
un funcionamiento adecuado, asegúrese de que el conector está sellado hermético
(figura 1)
Page 19

19
~
~
Para reducir el riesgo de quemaduras, incendio,
aparato, siga estas precauciones básicas:
• Lea todas las instrucciones antes de usar el dispensador de agua.
-Guarda estas instrucciones-
El conector se puede quitar fácilmente para la limpieza con agua jabonosa caliente
(fig 2)
El tubo se puede ajustar hacia arriba y hacia abajo para acomodar las dos botellas
de 3 ó 5 galones de agua (fig 3).
NOTA:
Si no hay una conexión segura entre el tapón de la manguera y el conector en el
agua más fría de la bomba de agua funcionará, pero no dispensará agua.
Asegúrese de que la manguera está conectado al dispensador de agua
correctamente.
Instrucciones de seguridad importantes
ADVERTENCIA
choque eléctrico, o lesiones personales al usar su
• Nunca limpiar las piezas con líquidos inflamables. Los vapores pueden crear un
riesgo de incendio o explosión.
• No almacene o use gasolina u otros vapores y líquidos inflamables cerca de este o
cualquier otro dispensador de agua. Los vapores pueden crear un riesgo de
incendio o explosión
• No lo enchufe en el receptáculo hasta que se asegure de los interruptores de tanque
de agua están apagados.
GUÍA DE INSTALACIÓN:
• Retire la envoltura interna y externa.
• Coloca el aparato sobre un piso que sea lo suficientemente fuerte como para soportar el
dispensador cuando está totalmente cargado. Si no está nivelado contra el piso, ajuste la pata
delantera derecha p ara nivelar la unidad bien a l suelo. Nota: Los dos pies delanteros son
ajustables.
• Ubicar el aparato lejos de luz solar directa y de fuentes de calor (cocina, calefacción, radiador,
etc.). La luz solar directa puede afectar el recubrimiento acrílico y fuentes de calor puede
aumentar el consumo eléctrico. Temperaturas ambiente frías extremas también pueden hacer
que el aparato no funcione correctamente.
• Se requiere 5 pulgadas de espacio entre el dispensador de agua y la pared, que permita
la circulación de aire adecuada para refrigerar el compresor.
• Enchufe el aparato a una tom a de tierra adecuada-instalado exclusiv a. No corte o retire la
tercera pata (tierra) de l cab le de al imentación bajo ninguna c irc u ns tanci a. C u alquier pregunta
relacionada con la energía y / o puesta a tierra deben ser dirigidas a un electricista certificado
o un centro de servicio de Avanti Products.
• Este dispensador de agua no se recomienda para uso en exteriores.
• No situar el dispensador en la zona donde la temperatura puede caer por debajo de cero (32º
F).
• Mantenga el área alrededor del dispensador libre de polvo y suciedad.
• Mantener el suministro de reserva de botellas de agua del exceso de calor y la luz.
• Nunca desconecte el refrigerador de agua, excepto para el mantenimiento o transporte.
Page 20

20
INSTRUCCIONES DE OPERACIÓN
Antes de utilizar el dispensador de agua
• Compruebe que las siguientes piezas se incluyen:
§ Manual de instrucciones
§ 2 juntas tapón de drenaje adicionales
• Antes de conectar el aparato a la fuente de alimentación, se deja reposar en posición
vertical durante aproximadamente 2 horas. Esto reducirá la posibilidad de un mal
funcionamiento en el sistema de refrigeración debido a la manipulación durante el
transporte.
• El dispensador de agua está pre-lim piado en la fábrica , pero las líneas de depós it o y
el agua se debe enjuagar con agua fresca antes de su uso como sigue:
• Mantenga la unidad desenchufada.
• Llenar el depósito de agua con agua del grifo a plena capacidad (más de 3/4 de
galón). Espere 5 minutos hasta que se asiente el agua.
• Pulse el grifo de agua caliente hasta que salga agua, y luego se detiene.
• Enchufe el dispensador en la toma eléctrica. Ambas luces indicadoras de calefacción
y refrigeración en la parte frontal se iluminarán al principio. Estamos listos para
completar el primer ciclo. Con el fin de hacer eso, esperar a que la luz indicadora de
agua caliente que se apague primero (aproximadamente 10 minutos), a
continuación, esperar a que la luz indicadora de agua fría para ir fuera (otros 40
minutos, aproximadamente).
• Desconectar el dispensador de la toma eléctrica. Proceder para drenar el agua de
los grifos de uno en uno hasta que no quede más agua.
(Nota: Para facilitar esta operac i ón, uti lizar un rec ipi ente gr an de) .
• Entonces, drenar cualquier agua que queda en los tanques abriendo el tapón de
drenaje situado en la parte posterior, hasta que se pueda vaciar completamente.
• Procede a cerrar la tapa de drenaje.
Asegúrese de que el sello del tapón de drenaje está en su lugar. Si no es así,
reemplace con uno de los repuestos incluidos en este manual.
El cierre de la tapa de drenaje sin el sello en su lugar dará lugar a daños de
fugas y posible al dispensador de agua y o sus alrededores.
• Coloque la botella de 5 galones de agua en la toma de agua, permita que el agua en
reposo durante aproximadamente un minuto.
• grifos de agua abiertos para asegurar los flujos de agua de los grifos.
• Compruebe el área alrededor de la válvula de drenaje en la parte trasera de la
unidad de fugas.
• Enchufe dispensador en la tom a eléctric a.
• Ahora ya está listo para usar el dispensador de agua.
NOTA: El dispensador de agua ha sido limpiado y desinfectado antes de abandonar la
fábrica, pero en caso de un problema de sabor coloque dos cucharadas de
bicarbonato de sodio y añadir agua del grifo. Llenar el depósito de agua de nuevo y repetir
básica operaciones desc r ib idas anteriormente, excepto que gire el interruptor marcado
CALIENTE “OFF” para evitar dejar residuos en el tanque de agua caliente.
ATENCIÓN:
Si no va a utilizar la función de calentamiento de agua por más de tres días, se
recomienda que se gira el conmutador de emergencia a la posición “OFF”.
Page 21

21
NOTA:
~ADVERTENCIA~
S
ATENCIÓN / ADVERTENCIA
unidad se enfríe.
i el cable eléctrico está dañado, reemplázelo por un PRODUCTOS AUTORIZADOS AVANTI
CENTRO DE SERVICIO.
Ø LUCES INDICADORAS
NO encienda el interruptor de energía del agua caliente antes de la
presentación del DEPÓSITO DE AGUA CALIENTE CON AGUA. Esto hará
que la unidad se sobrecaliente y SE APAGUE.
Instale la botella de agua y permitira que los tanques se llenen con agua durante
aproximadamente 10 - 15 minutos antes de encender el interruptor de
alimentación de agua caliente.
Su unidad está equipada con un interruptor de seguridad automática de cierre
que apague la unidad hasta que el tanque de agua caliente se enfría a una
temperatura segura.
hora habitual para restablecer es de aproximadamente 30 - 45 minutos, una vez
que la temperatura alcanza un nivel seguro, la unidad se reiniciará y comenzará
a funcionar normalmen te.
Si la unidad ha entrado en modo RESET, apague el interruptor de alimentación
de agua caliente a asegúrese que haya agua en los tanques y permite que la
Una vez que los interr uptores de alimentación par a los sistemas de agua frí a (situados en la parte
posterior de la unidad) HOT y se han activado, estas luces se iluminarán para avisar al usuario de que
los sistemas se activan y en funcionamiento.
Ø Luz indicadora de Agua Caliente
Encienda el interruptor de la calefacción. El indicador rojo se ilumina y se inicia el proceso de
calentamiento. Cuando el agua alcanza la temperatura adecuada (185º - 203ºF / 85º - 95ºC) la luz roja
se apaga automáticamente. Cuando la temperatura desciende por debajo de 176ºF (80ºC), el indicador
rojo se encenderá de nuevo y se inicia otro proceso de calentamiento.
Ø Indicador de agua fría luz
Encienda el in terr upt or d e refrigeración suces i vamente. El indica dor a zul s e iluminará y el proces o d e
enfriamiento se iniciará . Cuando el agua alca nza la te mperatur a adecuada (41 º - 50º F / 5 ° - 1 0 ° C)
la luz indicadora azul se apagar á automáticamente. Una vez que la tem peratura del agua sube por
encima de 50ºF (10ºC) la luz indicadora azul se ilumina indicando que de nuevo otro proceso de
enfriamiento se ha iniciado.
EL AGUA CALIENTE LLAVE tiene un accesorio de seguridad para niños
Para dispensar agua caliente:
♦ Deslice el botón rojo de seguridad hacia la derecha y mantenga mientras presiona hacia abajo el
grifo de agua caliente para dispensar agua caliente.
Page 22

22
♦ botón de seguridad volverá a su posición original cuando se libera la llave.
♦ Asegúrese de que toda el agua se ha dispensado antes de retirar el grifo de la zona de
dispensación.
Para dispensar agua fría:
♦ Mantenga presionado hacia abajo el grifo de agua fría para dispensar agua fría.
♦ Cuando haya dispensado la cantidad de agua deseada, basta con soltar el grifo de agua fría.
♦ Asegúrese de que toda el agua ha dispensado antes de retirar el grifo de la zona de
dispensación.
CUIDADO Y MANTENIMIENTO
• Lavar el interior del depósito con una solución de agua caliente y bicarbonato de sodio. La
solución debe ser de aproximadamente 2 cucharadas de bicarbonato de sodio a un litro de agua.
• La bandeja de goteo y grifos de agua deben ser limpiados con un detergente suave y agua tibia.
• A intervalos regulares o una vez al mes inspeccionar las bobinas situadas en la parte posterior
del dispensador. Use aspirador a para acumulación de polvo o limpie con un cepillo de cerdas
suaves.
TOMAR DISPENSADOR FUERA DE SERVICIO
• Si no se utiliza el dispensador de agua durante un largo periodo de tiempo, desconectar el cable
de alimentación de la toma de pared.
• Drenar el agua a través de los grifos.
• Girar el mercado conmutador de emergencia a la posición “OFF”.
• Escurrir el agua del tanque quitando el tapón de la parte posterior del dispensador.
ADVERTENCIA-el agua que sale de la parte trasera MARCADO “HOT” puede quemar.
l La unidad no debe ser transportada en los lados . Coláquela en posición vertical si es posible y
cúbrala con una manta.
Page 23

23
PROBLEMA
CAU SA POSIBLE
El dispensador de agua no funciona.
No enchufado.
El interruptor de circuito disparado o un fusible fundido.
enfriador de agua no es lo suficientemente frío.
Compruebe que el interruptor de frío en la parte
libre.
agua caliente dispe ns ador de agua no es tá lo
suficientemente caliente.
Compruebe que el conmutador de emergencia en la
parte posterior está en ON.
El compresor se enciende y apaga con
libre.
Vibraciones.
Compruebe para asegurarse de que el dispensador de
agua está nivelado.
El dispensador de agua parece hacer demasiado
El ruido de traqueteo puede venir del flujo del
El dispensador de agua no está a nivelado.
Botella se siente caliente.
El sistema de agua se llena en exceso. Suministre agua
fría hasta que se libera el aire en la botella.
botella de agua está caliente.
El agua está hirviendo en el tanque caliente y
el aire del tanque caliente.
PROBLEMAS CON el dispensador de agua
Puede solucionar muchos problemas comunes dispensador de agua con facilidad,
que le ahorra el coste de una posible llamada de servicio. Pruebe las sugerencias
descritas a continuación para ver si puede resolver el problema antes de llamar al
servicio.
GUÍA PARA RESOLV ER PR OB L EMAS
posterior está en ON.
El dispensador de agua no tiene el suficiente espacio
La temperatura ambiente es más caliente de lo normal.
frecuencia.
El control de temperatura no está configurado
correctamente.
El dispensador de agua no tiene el suficiente espacio
ruido.
refrigerante, que es normal.
Al final de cada ciclo, puede oír sonidos de gorgoteo
causado por el flujo de refrigerante en el dispensador
de agua.
La contracción y la expansión de las paredes interiores
pueden causar estallar y crepitantes ruidos.
burbujeante en la botella. Pres ione el botón del
dispensador caliente hasta que el agua fluye y elimine
Page 24

24
800-323-5029
nuestros productos, hay ayuda disponible.
Es posible pedir piezas y accesorios que serán
personal, giro postal, Master Card o Visa.
Un centro de servicio Avanti Products
proporcionará el servicio de reparación experto,
usted. Nuestros técnicos conocen su aparato
dentro y por fuera.
SERVICIO DE despachador de agua
Estamos orgullosos de nuestra organización d e servicio al cliente y la red de técnicos de ser vicios
profesionales que prestan servicio en sus electrodomésticos Avanti. Con la compra del aparato, Avanti,
usted puede tener l a confianza de que, si alguna vez necesita inf ormación o asistencia adicio nal, el
equipo de Servicio al Cliente de Avanti Products estará aquí para usted. Sólo tiene que llamar al
número gratuito.
PRODUCTOS DE CLIENTE AVANTI
Información del Producto
pedidos de piezas
800-220-5570
El servicio a domicilio Reparación
800-220-5570
Sean cuales sean sus preguntas son acerca de
entregados directamente a su casa.
Usted puede ordenar estos artículos por el cheque
programado a una hora que sea conveniente para
Page 25

25
Grapa su recibo de compra aquí. Se requiere
obtener el servicio de garantía.
COBERTURA - GARANTÍA LIMITADA DE UN AÑO
llevados / enviado al centro de servicio del aparato para su reparación.
SEGUNDO limitada a través GARANTÍA QUINTO AÑO
requiere, son responsabilidad del usuar io.
EXCLUSIONES DE LA GARANTÍA / ¿Qué no cubre:
directa de Avanti Products, incluyendo, sin limitación, uno o más de los siguientes:
•
alrededor del aparato y actos de Dios.
•
• Fallas del producto si se utiliza para otra cosa que
En ningún caso Avanti Products tener ninguna obligación o responsabilidad alguna por daños a la propiedad
estanterías etc.,
OUT DE PRODUCTOS GARANTÍA
las reparaciones, pro-tarifas, o el reemplazo del producto, una vez que esta garantía ha expirado.
GARANTÍA - DISPENSADOR DE AGUA - COMPRESOR
SUS PRODUCTOS AVANTI
GARANTÍA
Avanti Products garantiza que el producto está libre de defectos en materiales y / o mano de obra durante un
período de doce (12) meses desde la fecha de compra por el propietario original. El tiempo mencionado arriba
comienza a ejecutarse a partir de la fecha de compra, y no se puede detener, sujeto a derechos, extender o
suspender por cualquier motivo a no ser que se describe en detalle en el documento de garantía. Durante un
año desde la fecha de compra por el propietario original, los productos de Avanti, a su elección, reparará o
reemplazará cualquier parte del producto que resulta ser defectuosa en material o mano de obra bajo
condiciones normales de uso. Avanti Products le proporcionará un producto parecido al original, ya sea nuevo o
restaurado de fábrica. Durante este período de Avanti Products proporcionará todas las piezas y mano de obra
necesarias para corregir dichos defectos de forma gratuita, siempre y cuando el producto ha sido instalado y
operado de acuerdo con las instrucciones escritas en este manual. En el uso de alquiler o comercial, el periodo
de garantía es de 90 días. Todos los aparatos de Avanti de 3.5 pies cúbicos de capacidad o menos deben ser
Para el segundo hasta el quinto año desde la fecha de compra original, Avanti Products proporcionará un
compresor de reemplazo sin costo debido a un fallo. Usted es responsable de las cargas de trabajo y de carga
de servicio. En el uso de alquiler o comercial, la garantía del compresor limitada es de un año y nueve meses.
Costos involucrados para mover el producto al centro de servicio y de vuelta a la casa del usuario, como tal
La cobertura de la garantía se describe aquí excluye todos los defectos o daños que no son la responsabilidad
Un incumplimiento de cualquier estado, locales, municipales o de condado instalaciones eléctricas, hidráulicas
y / o códigos de construcción, reglamentos o leyes, entre ellas la falta de instalar el producto en estricta
conformidad con los códigos y reglamentos contra incendios y de construcción locales.
prueba de la fecha de compra original para
• Cualquier fuerzas y factores, incluyendo, sin limitación, lluvia, viento, arena, inundaciones, incendios,
deslizamientos de lodo, temperaturas de congelación, humedad excesiva o exposición prolongada a la
humedad, rayos externos, elementales y / o ambientales, sobrecargas de energí a, fall as e struc tur a les
las pérdidas de contenido de alimentos o de otros
contenidos debido a su deterioro.
• Los daños incidentales o consecuentes
• Piezas y mano de obra para los siguientes no serán
consideradas como garantía:
• Costes de envío asociados a la sustitución de la
unidad.
• Reparaciones realizadas por servicio sin
autorización.
• Las llamadas de servicio que están relacionados con
los problemas externos, tales como abuso , mal uso,
suministro eléctrico inadecuad o, accidentes,
incendios, inundaciones o cualquier otr o act o de
Dios.
cercana al aparato, incluyendo gabinetes, pisos, techos y otras estructuras y / u objetos alrededor del producto.
También se excluyen de esta garantía los arañazos, golpes, abolladuras menores, y otros daños cosméticos en
superficies externas y partes expuestas; Productos en los que se han alterado los números de serie, desfigurado
o eliminado; visitas de servicio para la educación del cliente, o visitas donde no hay nada mal con el producto;
corrección de problemas de instalación (usted es el único responsable de cualquier estructura y entorno para el
producto, incluyendo todas las instalaciones eléctricas, de fontanería y / u otras facilidades de conexión, para la
fundación / pisos adecuados y para alteraciones incluyendo, sin limitaciones, gabinetes, paredes, pisos,
Avanti Products no tiene ninguna obligación, por ley o de otro modo, para ofrecerle ninguna concesión, incluidas
tenía la intención propósito.
• Recargos incluyendo, pero no limitado a, cualquier
tras hora, llamadas fin de semana, vacaciones o de
servicio, peajes, pasajes de transporte o gastos de
kilometraje para llamadas de servicio a zonas
remotas.
• La garantía no se aplica fuera de los EE.UU.
continental.
Page 26

26
AIDEZ-NOUS À VOUS AIDER ...
Lisez attentivement ce guide.
Il est destiné à vous aider à utiliser et à
maintenir votre nouveau dist ribute ur d'eau
correctement.
Gardez-le à portée de main pour répondre à
vos questions.
Si vous ne comprenez pas quelque chose où
vous avez besoin de plus d'aide, s'il vous plaît
appelez:
Avanti Service à la clientèle
800-220-5570
Gardez preuve de la date d'achat d'origine (tel
que votre bordereau de vente) avec ce guide
pour établir la période de garantie.
SI VOUS AVEZ BESOIN DE SERVICE
Nous sommes fiers de notre service et nous
voulons que vous so yez heureux. Si po ur une
raison quelconque vous n'êtes pas satisf ait du
service que vous recevez, voici quelques
étapes à suivre pour obtenir de l'aide.
FIRST, contacter les gens qui ont r éparé votr e
appareil. Expliquez pourquoi vous n'êtes pas
satisfait. Dans la plupart des cas, cela va
résoudre le problème.
Notez le modèle et le numéro de série.
Vous les trouverez sur une étiquette située sur
le côté arrière de l'appareil.
S'il vous plaît écrire ces chiffres ici:
____________________________________
Date d'achat
____________________________________
Numéro de modèle
____________________________________
Numéro de série
Utilisez ces numéros dans toute
correspondance ou appels de service
concernant votre distributeur d'eau.
Si vous avez reçu un distributeur d'eau
endommagée, contactez immédiatement le
revendeur (ou le constructeur) qui vous a vendu
le distributeur d'eau.
Gagnez du temps et de l'argent. Avant
d'appeler le service, consultez le Guide Solver
problème. Il énumère les causes des
problèmes de fonctionnement mineurs que
vous pouvez vous corriger.
Ensuite, si vous n'êtes toujours pas satisfait,
écrivez tous les détails, y compris votre
numéro de téléphone, et l'envoyer à:
Service Clients
Avanti Products
10880 NW 30 Street
Miami, FL 33172
Page 27

27
PIÈCES ET CARACTÉRISTIQUES
Page 28

28
APPAREIL SÉCURITÉ
Votre sécurité et celle des autres sont très importantes.
Nous avons fourni de nombreux messages de sécurité importants dans ce
manuel et sur votre appareil . To ujour s lir e et obéi r à tout mess ag e d e sécur i tés.
Tout message de sécurités vous alertera à quel est le danger potentiel et vous
qui peut arriver si les instructions ne sont pas suivies.
C'est le symbole d'alerte de
sécurité. Ce symbole vous signale
les dangers potenti el s peut tuer
ou blesser vous et d'autres. Tout
sécurité messages suivra la
sécurité symbole d'alerte et soit
les quartiers"
DANGER","ATTENTION" ou
"PRUDENCE".
respect de cette déclarati on de
sécurité peut entraîner des
blessures ou la mort.
Attention signifie que le nonrespect de cette déclarati on de
Danger signifie que le non-
sécurité peut entraîner des
dommages importants du produit,
des blessures graves ou la mort.
Attention signifie que le nonrespect de cette déclarati on de
sécurité peut entraîner des
mineures ou modérées blessures,
ou des biens ou des dommages
matériels.
disent comment réduire le risque de blessure, et vous permettent de savoir ce
Page 29

29
APPAREIL SÉCURITÉ
•Brancher sur une 3 broches mise à la terre sortie, faire pas enlever la terre broches, faire pas utiliser un
recommandé dans ce matériau. Toutes les autres réparations doivent être confiées à un technicien qualifié.
• Utilisation deux personnes ou plus pour déplacer et installer l’appareil. Ne pas le faire peut entraîner dans le
• Ne pas utiliser cet appareil pour d'autres fins que celles prévues.
Avant le refroidisseur de breuvages est utilisé, il doit être correctement positionné
et installé comme décrit dans ce manuel, afin de lire attentivement le manuel. Pour
réduire le risque d'incendie, choc ou de blessure électrique lors de l'utilisation du
refroidisseur de breuvages, Suivez les précautions de bases, comprenant les
éléments suivants:
adaptateur, et ne pas utiliser une rallonge
• Remplacer tous les panneaux avant exploitation
• Il est recommandé d'utiliser un circuit distinct, qui sert uniquement votre refroidisseur de breuvages, fournir.
Utilisez des récipients cette ne peut pas être désactivé par une chaîne de traction interrupteur où
• ne jamais nettoyer appareil pièces avec des liquides inflammables. Ces vapeurs peuvent créer un risque
d'incendie or explosion. Et ne pas stocker ou utiliser de l'essence ou d'autres vapeurs et liquides inflammables
à proximité de cet appareil ou de tout autre appareil. Les vapeurs peuvent créer un risque d'incendie ou
d'explosion.
• Avant de procéder à des opérations de nettoyage et d'entretien, assurez-vous que la ligne d'alimentation de
l'appareil est débranchée.
• Faire pas brancher ou débrancher la prise électrique lorsque vos mains sont humides
• Débranchez l’appareil où déconnecter l’alimentation avant le nettoyage ou l'entretien. Ne pas le faire peut
entraîner un choc électrique ou la mort.
• Faire pas tenter de réparer ou de remplacer une partie de votre appareil à moins qu'il ne soit spécifiquement
dos ou d'autres blessures.
• Pour assurer une bonne ventilation de votre appareil, l'appareil doit être complètement dégagé. Choisissez un
endroit bien aéré avec des températures supérieures à 55ºF (13ºC) et au-dessous 90ºF (32ºC). Cet appareil
doit être installé dans une zone protégée de l’élément, Comme le vent, la pluie, de l'eau pulvérisée ou lumière
du soleil.
• l’appareil ne doit pas être situé à côté de fours, grilles ou autres sources de chaleur élevée.
• L’appareil doit être installé avec toutes les connexions électriques, d'eau et d'évacuation, conformément à
codes étatiques et locaux. Une alimentation électrique standard (115 V CA seulement, 60 Hz), mise à la terre
conformément au Code national de l'électricité et les codes et règlements locaux est nécessaire.
• Faire pas plier ou pincer le cordon d'alimentation de l’appar e il.
• Le fusible (ou disjoncteur) doit être de 15 ampères.
• Il est important pour l'appareil soit à niveau afin de fonctionner correctement. Vous devrez peut-être faire
plusieurs ajustements à niveler.
• Toute installation doit être conforme aux exigences du code de plomberie locale.
• Assurez-vous que les tuyaux ne sont pas pincés ou pliés ou endommagés au cours installation.
• Vérifier les fuites après connexion.
• Ne jamais laisser les enfants utiliser, jouer avec ou crawl à l'intérieur de l'appareil
• Faire pas utiliser de produits de nettoyage à base de solvants or abrasifs sur l'intérieur. Ces nettoyants peuvent
endommager ou décolorer l'intérieur.
Page 30

30
Connexion électrique
~Attention~
Avanti Products autorisé.
Cet appareil doit être correctement mis à la terre pour votre sécurité. Le cordon
prise près d’appareil.
Ø RALLONGE ÉLECTRIQUE
En raison des risques potentiels pour la sécurité dans certaines conditions, il est
10 ampères.
Ø PARASURTENSEUR
La plupart des appareils électriques utilisent une série de tableaux de commande
nécessaire à un électricien agréé dans votre région.
Les dommages dus à des surtensions ne sont pas considérés comme un fabricant
couvert défaut et annulera la garantie du produit.
Une mauvaise utilisation de la prise de terre peut entraîner un risque de choc électrique.
Si le cordon d'alimentation est endommagé, faites-le remplacer par un centre de service
d'alimentation de cet appareil est équipé d'une fiche à trois broches qui accouple
avec trois standards prises murales broches afin de minimiser le risque de choc
électrique.
Ne pas en aucun cas couper ou enlever la troisième broche de terre du cordon
d'alimentation fourni .
Cet appareil nécessite une prise électrique standard 115Volts ~ / 60Hz avec le sol
à trois broches.
Le cordon doit être fixé derrière l’appareil et non laissés exposés ou qui pendent
pour prévenir les blessures accidentelles.
Ne jamais débranch er l'appareil en tira nt sur le cordon d'al imentation. Toujour s saisir
fermement la fiche et tirez tout droit sorti de la prise.
Ne pas utiliser une rallonge avec cet appareil. Si le cordon d'alimentation est trop
court, demandez à un électricien qualifié ou un technicien de service installer une
fortement recommandé de ne pas utiliser une rallonge avec cet appareil.
Toutefois, si vous devez utiliser une rallonge, il est absolument nécessaire que ce
soit un UL / CUL, 3 fils de terre appareil rallonge ayant une fiche de mise à la terre
et à la sortie et que la puissance électrique du câble est de 115 volts et au moins
électriques pour fonctionner. Ces cartes sont très sensibles aux surtensions et
pourraient être endommagés ou détruits.
Si l'appareil va être utilisé dans une zone ou si votre ville / pays est sujette à des
surtensions / coupures; il est suggéré que vous utilisez un dispositif de protection
contre les surtensions pour tous les dispositifs / appareils électriques que vous
utilisez. Le protecteur de surtension que vous sélectionnez doit avoir un bloc de
poussée suffisamment élevé pour protéger l'appareil, il est connecté. Si vous avez
des questions concernant le type et la taille d'un protecteur de surtension contact
Page 31

31
AVANT DE BRANCHER VOTRE APPAREIL
12) Assurez-vous que le distributeur d'eau ne soit pas branché sur une
d'alimentation hors HOT pour économiser l'énergie.
ATTENTION / AVERTISSEMENT
assurer qu'il y a de l'eau dans les réservoirs et laissez l'appareil refroidir.
NE METTEZ PAS l'interrupteur CHAUD D'ALIMENTATION EN EAU AVANT DÉPÔT DE LA
CHAUFFE EAU AVEC DE L'EAU. CECI AFFECTER LA SURCHAUFFE ET SHUTDOWN.
Installez la bouteille d'eau et permettre aux réservoirs de remplir avec de l'eau pendant environ
10 - 15 minutes. Avant de mettre l'interrupteur à chaud d'alimentation en eau.
Votre appareil est équipé d'un interrupteur de sécurité COUPURE AUTOMATIQUE qui éteindre
l'appareil jusqu'à ce que le réservoir d'eau chaude se refroidit à une température sécuritaire.
heure habituelle de remise à zéro est d'environ 30 - 45 minutes, une fois que la température
atteint un niveau de sécurité, l'appareil se réinitialise et commencer à fonctionner normalement.
Si l'appareil est entré dans MODE RAZ, éte ign e z l'inter r upteur d' al imentation d'eau chaude
prise électrique.
13) Ouvrez la porte de l'armoire inférieure.
14) Placer sur le sol une bouteille d'eau.
15) Retirer le couvercle en plastique de la bouche de la bouteille d'eau.
16) Insérez le tuyau d'alim entat ion en eau et fix er le bouc h on de la
bouteille à la bouche de la bouteille d'eau.
17) Faites glisser la bouteille dans l'armoire inférieure et fermer la porte de
l'armoire inférieure.
18) Brancher le refroidisseur d'eau dans une prise électrique, comme
indiqué précédemment dans ce manuel.
19) La pompe commence à pomper l'eau jusqu'à des réservoirs d'eau.
20) Après la pompe cesse de fonctionner (attendez environ 10 minutes),
puis distribuer de l'eau à la fois les robinets d'eau chaude et froide.
21) Après la distribution d'eau de la robinetterie pour la première fois, puis
mettre en marche l'alimentation du HOT et des commutateurs de
puissance à froid à l'arrière de l'appareil pour commencer le processus
de chauffage et de refroidissement.
22) Si vous n'allez utiliser la fonction HOT, mettez l'interrupteur
Remplacement d'une bouteille vide
Vous pouvez entendre un bruit de succion lorsque la
bouteille est vide et doit être changé. Ceci est normal et
est une autre façon de savoir quand la bouteille est vide
et doit être changé. Remplacez la bouteille dès que vous
remarquez qu'il est vide.
Votre distributeur d'eau dispose d'un système de connexion rapide réglable. Pour un
bon fonctionnement, as sur ez-vous que le connecteur est fermé de manière étanche
(fig 1)
Le connecteur peut être retiré facilement pour le nettoyage avec de l'eau chaude
savonneuse (fig 2)
Le tube peut être réglée de haut en bas pour accueillir les deux 3 et 5 bouteilles
d'eau de gallon (fig 3).
Page 32

32
~
~
Pour réduire les risques de brûlure,
appareil, suivez ces précautions de base:
• Lisez toutes les instructions avant d'utiliser le distributeur d'eau.
-Save ces INSTRUCTIONS-
REMARQUE:
S'il n'y a pas une connexion sécurisée entre le bouchon du tuyau et le connecteur de
l'eau plus froide de la pompe à eau fonctionnera mais ne distribue pas l'eau.
Assurez-vous que le tuyau est relié au distributeur d'eau correctement.
Consignes de sécurité importantes
ATTENTION
d'incendie, de choc électrique ou de
blessures lors de l'utilisation de votre
• Ne jamais nettoyer les pièces avec des liquides inflammables. Les vapeurs peuvent
créer un risque d'incendie ou d'explosion.
• Ne pas entreposer ni utiliser d'essence ou d'autres vapeurs et liquides inflammables
à proximité de ce ou tout autre distributeur d'eau. Les vapeurs peuvent créer un
risque d'incendie ou d'explosion
• Ne branchez pas l'unité dans la prise jusqu'à ce que vous assuriez que les
commutateurs de réservoir d'eau sont éteints.
DIRECTIVES D'INSTALLATION:
• Retirez l'emballage extérieur et intérieur.
• Placez votre appareil s ur un sol qui est asse z solid e p our suppor t er le dis tr ibut e ur lor squ' il es t
entièrement charg é. Si çan e restez pas as sis sur le niveau sol, ajus tez le p ied av ant droit au
niveau de l'unité et au sol. Note: Les deux pieds avant sont réglables.
• Placez l'appareil de l'abri du soleil et des sources de chaleur (poêle, chauffage, radiateur, etc.).
Lumière dir ecte du so leil peut af fecter le re vêtement acr ylique et sources de chale ur peuvent
augmenter la consommation électrique. Les températures ambiantes froides extrêmes peuvent
également causer l'appareil de ne pas fonctionner correctement.
• Attendre 5 pouces d'espace entre le distributeur d'eau et la paroi, ce qui permet une
circulation d'air appropriée pour refroidir le compresseur.
• Branchez l'apparei l sur une prise m urale à la terre install ée exclusive correctem ent. Ne pas
couper ou enlever la troisième broche (terre) du cordon d'alimentation en aucun cas. Pour toute
question concernant le p ouvoir et / ou m ise à la terre doi vent être adressées à u n électricien
certifié ou un centre de service Avanti Les produits autorisés.
• Ce distributeur d'eau n'est pas recommandé pour une utilisation en extérieur.
• Ne pas placer le dis tributeur dans un endro it où la températur e peut tomber en dessous de
zéro (32º F).
• Gardez la zone autour de distributeur exempt de poussière et la saleté.
• Gardez l'alimentation de réserve de bouteilles d'eau loin de la chaleur et de la lumière
excessive.
• Ne jamais débrancher le refroidisseur d'eau, sauf pour l'entretien ou le transport.
INSTRUCTIONS D'UTILISATION
Avant d'utiliser votre distributeur d'eau
• Vérifiez que sont inclus les éléments suivants:
§ Manuel d'instructions
§ 2 joints de bouchon de vidange d'appoint
• Avant de connecter l'appareil à la source d'alimentation, laissez-le tenir debout pendant
Page 33

33
~ATTENTION~
MAUVAISE UTILISATION DE LA FICHE PEUT ENTRAINER LE RISQUE DE CHOC ÉLECTRIQUE. SI
AGREES
environ 2 heures. Cela permettra de réduire la possibilité d'un dysfonctionnement dans
le système de refroidissement de la manipul ation pendant le transport.
• Le distributeur d'eau est pré-nettoyée à l'usine, mais le réservoir et les lignes d'eau
doit être rincé avec de l'eau fraîche avant de l'utiliser de la manière suivante:
• Gardez l'appareil débranché.
• Remplir le réservoir d'eau avec de l'eau du robinet à pleine capacité (plus de 3/4 d'un
gallon). Attendez 5 minutes jusqu'à ce que l'eau se dépose.
• Appuyez sur le robinet d'eau chaude jusqu'à ce que l'eau sorte, puis arrêter.
• Brancher le distributeur dans la prise électrique. Les deux voyants lumineux de
chauffage et de refroidissement à l'avant s'allument au premier abord. Nous sommes
prêts à terminer le premier cycle. Pour ce faire, attendez que le témoin lumineux de
l'eau chaude pour aller de première (environ 10 minutes), puis attendez que le témoin
lumineux de l'eau froide pour partir (40 minutes environ).
• Débrancher le distributeur de la prise électrique. Passez à drainer l'eau des robinets
un à la fois jusqu'à ce qu'il ne reste plus d'eau.
(Note: Pour faciliter cette opération, utiliser un grand récipient).
• Puis, les égoutter de l'eau dans les réservoirs en ouvrant le bouchon de vidange situé
à l'arrière, jusqu'à ce qu'elle se décharge complètement.
• Passez à fermer le bouchon de vidange.
Assurez-vous que le joint d'étanchéité du bouchon de vidange est en place.
Dans le cas contraire, remplacer par une des pièces de rechange fournies avec
ce manuel.
Fermeture du bouchon de vidange sans le joint en place entraînera des
dommages et des fuites possibles au di stributeur d'eau et ou ses environs.
• Placez la bouteille de 5 gallons d'eau sur la prise d'eau, laisser l'eau reposer pendant
environ une minute.
• Ouvrez les robinets d'eau pour assurer des débits d'eau des deux robinets.
• Vérifier la zone autour de la soupape de vidange à l'arrière de l'unité pour les fuites.
• Brancher distributeur dans la prise électrique.
• Maintenant, vous êtes prêt à utiliser votre distributeur d'eau.
REMARQUE: Votre distributeur d'eau a été nettoyé et désinfecté avant de quitter la
usine, mais dans le cas où un problème de goût se développe, placez deux cuillères à
soupe de bicarbonate de soude et ajouter de l'eau du robinet. Remplir à nouveau le
réservoir d'eau et répéter base les opérations décrites précédemment, à l'exception tourner
l'interrupteur marqué HOT « OFF » éviter de laisser des résidus dans le réservoir d'eau
chaude.
ATTENTION:
Si vous ne prévoyez pas d'utiliser la fonction de chauffage de l'eau pendant plus de
trois jours, nous vous recommandons d'activer l'interrupteur à chaud à la position «
OFF ».
LE CORDON D'ALIMENTATION EST ENDOMMAGÉ, ONT REMP LACER PAR UN PRODUITS AVANTI
Page 34

34
REMARQUE:
ATTENTION / AVERTISSEMENT
refroidir.
Ø Bouton marche / arrêt Voyants chaud et froid
NE METTEZ PAS l'interrupteur CHAUD D'ALIMENTATION EN EAU AVANT
DÉPÔT DE LA CHAUFFE EAU AVEC DE L'EAU. CECI AFFECTER LA
SURCHAUFFE ET SHUTDOWN.
Installez la bouteille d'eau et permettre aux réservoirs de remplir avec de l'eau
pendant environ 10 - 15 minutes. Avant de mettre l'interrupteur à chaud
d'alimentation en eau.
Votre appareil est équipé d'un interrupteur de sécurité COUPURE
AUTOMATIQUE qui éteindre l'appareil jusqu'à ce que le réservoir d'eau chaude
se refroidit à une température sécuritaire.
heure habituelle de remise à zéro est d'environ 30 - 45 minutes, une fois que la
température atteint un niveau de sécurité, l'appareil se réinitial is e et c omme nc er
à fonctionner normale men t.
Si l'appareil est entré dans MODE RAZ, éteignez l'interrupteur d'alimentation
d'eau chaude assurer qu'il y a de l'eau dans les réservoirs et laissez l'appareil
Une fois que les interrupteurs de puissance pour les systèmes d'eau chaude et froide (situés à l'arrière
de l'appareil) ont été activés, ces lumières illumineront pour informer l'utilisateur que les systèm es
d'exploitation sont activés et.
Ø Indicateur Eau chaude Lumière
Mettez l'interrupteur de c hauf fage, le vo yant rouge s'a llum e et le processus de chauf fage comm ence.
Lorsque l'eau atteint la bonne température (185º - 203ºF / 85º - 95ºC) la lumière rouge s’éteint
automatiquement. Lor sque la tempér ature descend au -dessous 176ºF ( 80ºC) , le vo yant r ouge bri llera
à nouveau et un autre processus de chauffage commence.
Ø Indicateur d'eau froide Lumière
Mettez l'interrupteur de refroidissement sur. Le voyant bleu s'allume et le processus de refroidissement
commencera. Lorsqu e l'eau atteint la bonne températ ure (41º - 50ºF / 5º - 10ºC) le voyant lumineux
bleu s'éteint autom atiquement. Un e fois que la tem pérature de l'eau atteint a u-des sus de 50 ° F (10 °
C), le voyant lumineux b leu reste allum é indiquant à nouvea u un autre procédé de r efroidissement a
commencé.
L'EAU CHAUDE ROBINET A UN ENFANT-ATTACHEMENT DE SECURITE A.
Pour distribuer de l'eau chaude:
♦ Faire glisser le bouton de sécurité rouge à droite et à retenir tout en appuyant vers le bas sur le
robinet d'eau chaude pour distribuer de l'eau chaude.
♦ Bouton de sécurité retournera à sa position d'origine lorsque le robinet est libéré.
♦ Assurez-vous que toute l'eau a distribué avant de retirer le verre de la zone de distribution.
Page 35

35
réprimandes.
Pour distribuer l'eau froide:
♦ Appuyez et maintenez enfoncé vers le bas sur le robinet d'eau froide pour distribuer de l'eau
froide.
♦ Lorsque vous avez distribué la quantité d'eau souhaitée, relâchez simplement le robinet d'eau
froide.
♦ Assurez-vous que toute l'eau a distribué avant de retirer le verre de la zone de distribution.
ENTRETIEN
• Laver l'intérieur du réservoir avec une solution d'eau chaude et de bicarbonate de soude. La
solution devrait être d'environ 2 cuillères à soupe de bicarbonate de soude à un litre d'eau.
• Le bac de récupération et les robinets d'eau doivent être nettoyés avec un détergent doux et de
l'eau chaude.
• A intervalles réguliers, ou une fois par mois inspecter les bobines situées sur l'arrière du
distributeur. L’accumulation de vide de poussière ou de le nettoyer avec une brosse à poils doux.
PRISE DE SERVICE DE DISTRIBUT ION
• Si le distributeur d'eau ne sera pas utilisé pendant une longue période de temps, débranchez le
cordon d'alimentation de la prise murale.
• Drainer l'eau à travers les robinets.
• Mettez le marché de la commutation à chaud à la position « OFF ».
• Vidanger l'eau du réservoir en retirant le bouchon à l'arrière du distributeur.
AVERTISSEMENT DE L'EAU-SORTIR DE LA FACE ARRIÈRE MARQUÉ « HOT » PEUT ÊTRE
l Unité ne doit pas être transporté sur les côtés. Placez-le en position verticale si possible et le
couvrir avec une couverture.
Page 36

36
PROBLÈME
CAUSE POSSIBLE
Le distributeur d'eau ne fonctionne pas.
Pas branché.
Le disjoncteur est déclenché ou un fusible grillé.
Refroidisseur d'eau n'est pas assez froid.
Vérifiez que l'interrupteur froid à l'arrière est activé.
correctes.
Distributeur d'eau de l'eau chaude est pas assez
chaud.
Vérifiez que l'interrupteur à chaud à l'arrière est activée.
Compresseur allume et éteint fréquemment.
La température ambiante est plus chaude que la
correctes.
Vibrations.
Vérifiez assurer que le distributeur d'eau est de niveau.
Le distributeur d'eau semble faire trop de bruit.
Ce bruit peut provenir de l'écoulement du fluide
Le distributeur d’eau n’ es t pas de nive au.
Bouteille est chaud.
Le système d'eau est trop rempli. Distribuer l'eau froide
jusqu'à l'air est libéré dans la bouteille.
Une bouteille d'eau est chaude.
L'eau est en ébullition dans le réservoir chaud et
éliminer l'air du réservoir d'eau chaude.
PROBLÈMES AVEC VOTRE DISTRIBUTEUR D'EAU
Vous pouvez résoudre de nombreux problèmes de distribution d'eau courante
facilement, vous permettant d'économiser le coût d'un appel de service possible.
Essayez les suggestions présentées ci-dessous pour voir si vous pouvez résoudre le
problème avant d'appeler le service.
GUIDE DE DÉPANNAGE
Le distributeur d'eau ne possède pas les autorisations
normale.
Le contrôle de la température n'est pas réglé
correctement.
Le distributeur d'eau ne possède pas les autorisations
frigorigène, ce qui est normal.
Comme chaque cycle se termine, vous pouvez entendre
des gargouillis causés par le débit de réfrigér ant dans
votre distributeur d'eau.
Contraction et expansion des parois internes peuvent
provoquer des craquements et des.
bouillonne dans la bouteille. Appuyez sur le bouton de
distribution à chaud jusqu'à ce que l'eau coule à
Page 37

37
800-323-5029
produits, l'aide est disponible.
Vous pouvez commander des pièces et
personnel, de l'argent, Mast er Card ou Visa.
t. Nos réparateurs
l'extérieur.
SERVICE DE VOTRE DISTRIBUTEUR D'EAU
Nous sommes fiers de notre organisation de service à la clientèle et le réseau de techniciens de
services professionnels qui offrent des services sur vos appareils Avanti. Avec l'achat de votre appareil
Avanti, vous pouvez avoir la c ertitude que s i vous ave z besoi n d' inform ations ou de l' aide, l'équi pe du
service à la clientèle Produits Avanti sera là pour vous. Il suffit de nous appeler au numéro sans frais.
AVANTI PRODUIT S SER VICES CLIENTS
Information produit
Commande de pièces
800-220-5570
Quels que soient vos questions sont sur nos
accessoires qui seront livrés directement à votre
domicile.
Vous pouvez comm ander ces ar ticles par chèqu e
In-Home Repair Service
800-220-5570
Un centre de service Avanti Les produits autorisés
fournira un servic e d e réparation exper t, prévue à
un moment qui vous convien
formés connaissance de l'appareil à l'intérieur et à
Page 38

38
Agrafez votre reçu de vente ici. Preuve de la date
sous garantie.
CE QUI EST COUVERT - GARANTIE LIMIT ÉE D 'U N AN
doivent être portées / envoyé au centre de service de l'appareil pour la réparation.
DEUXIÈME LIMITÉE PAR LA GARANTIE cinquième année consécutive
l'utilisateur, comme peut-être nécessaire, sont la responsabilité de l'utilis ateur.
EXCLUSIONS DE LA GARANTIE / EXCLUSIONS DE LA GARANTIE:
faute directe de Avanti produits, y compris, sans s'y limiter, un ou plusieurs des éléments suivants:
•
structurelles entourant l’appareil, et les actes de Dieu.
•
• Une panne du produit si elle est utilisée pour autre
En aucun cas Avanti Les produits ont toute responsabilité pour les dommages aux biens environnants, y compris
murs, les planchers, les étagères etc.,
HORS DE PRODUIT GARANTIE
réparations, pro-taux, ou le remplacement du produit, une fois la garantie expirée.
GARANTIE - DISTRIBUTEUR D'EAU - COMPRESSEUR
VOS PRODUITS AVANTI
GARANTIE
Avanti Products garantit que le produit est exempt de tout défaut de matériaux et / ou de fabrication pendant une
période de douze (12) mois à compter de la date d'achat par le propriétaire initial. La période commence à courir
à la date d'achat, et ne sera pas retardée, restreinte, prolongée ou suspendu pour quelque raison que ce soit,
sauf si décrit en détail dans le document de garantie. Penda nt un an à compter de la date d'achat par le
propriétaire initial, les produit s Avanti, à sa discrétion, de réparer ou de remplacer une partie du produit qui se
révèle un défaut matériel ou de fabrication en utilisation normale. Avanti Produits vous fournira un produit
raisonnablement semblable nouveau ou remis à neuf. Au cours de cette période Avanti Products fournira toutes
les pièces et la main-d'œuvre nécessaires pour corriger ces défauts gratuitement, tant que le produit a été
installé et utilisé conformément aux instructions écrites dans ce manuel. En location ou l'utilisation commerciale,
la période de garantie est de 90 jours. Tous les appareils Avanti de capacité de 3,5 pieds cubes ou moins
Pour la deuxième à la cinquième année à compter de la date d'achat, Avanti Products fournira un compresseur
de remplacement sans frais en raison d'une défaillance. Vous êtes responsable des frais de main-d'œuvre de
services et de marchandises. En location ou l'utilisation commerciale, la garantie du compresseur est limitée à un
an et neuf mois. Les coûts impliqués pour déplacer le produit au centre de service et de retour à la maison de
La couverture de la garantie décrite aux présentes exclut tous les défauts ou les dommages qui ne sont pas la
Un non-respect de tout État applicable, local, ville ou comté électricité, plomberie et / ou des codes du
bâtiment, des règlements ou des lois, y compris le défaut d'installer le produit en stricte conformité avec les
codes et les règlements incendie et de construction.
d'achat est nécessaire pour obtenir le service
• Toutes les forces et les facteurs externes, élémentaires et / ou l'environnement, y compris sans s'y limiter, la
pluie, le vent, le sable, les inondations, les incendies, les coulées de boue, des températures glaciales,
l'humidité excessive ou à une exposition prolongée à l'humidité, la foudre, les surtensions, les défaillances
Les pertes de contenu alimentaire ou tout autre
contenu en raison de la détérioration.
• Dommages accidentels ou indirects
• Pièces et coût du travail pour les éléments suivants
ne seront pas considérées comme une garantie:
• Frais d'expédition et de manutention associé s au
remplacement de l'unité.
• Les réparations effectuées par des services de non
autorisées.
• Les appels de service qui sont liés à des problèmes
externes, tels que l'abus, une mauvaise utilisation,
une alimentation électrique inadéquate, les
accidents, les incendies, les inondations, ou tout
autre acte de Dieu.
les armoires, les planchers, les plafonds et autres structures et / ou des objets autour du produit. Sont également
exclus de cette garantie sont des rayures, des entailles, des petites bosses et autres dommages esthétiques sur
les surfaces externes et les parties exposées; Produits sur lesquels les numéros de série ont été modifiés,
illisible ou enlevé; visites de service pour l'éducation à la clientèle, ou des visites où il n'y a rien de mal avec le
produit; correction des problèmes d'installation (vous êtes seul responsable de toute structure et réglage du
produit, y compris tous les systèmes électriques, de plomberie et / ou d'autres installations de raccordement,
pour un plancher / fondation appropriée, et pour toute modification, y compris sans armoires de limitation, les
Avanti Products est pas tenu, par la loi ou autrement, pour vous fournir toutes les concessions, y compris les
que son intention objective.
• Y compris les suppléments, mais sa n s s' y limi te r,
une heure après, le week-end ou des appels de
service, les péages, les vacances frais de voyage
en ferry ou les frais de kilométrage pour les appels
de service dans les régions éloignées.
• La garantie ne couvre pas en dehors des ÉtatsUnis continentaux.
Page 39

39
-------------------------------------------------------(detach here)-----------------------------------------------------------
Name
Model # Serial #
Address
Date Purchased Store / Dealer Name
City State Zip
E-mail Address
Area Code Phone Number
Occupation
Did You Purchase An Additional Warranty
As your Primary Residence, Do You:
£ Extended
£ Own £ Rent
£ None
Your Age:
Reason for Choosing This Avanti Product:
this product:
under 18 £ 18-25 £ 26-30
£ Married £ Single
Price
£ Other: _____________ ______
Comments:
Registration Information
Thank you for purchasing this fine Avanti product. Please fill out this form and return it to the
following address within 100 days from the date of purchase and receive these important benefits:
AVANTI PRODUCTS LLC
P.O.Box 520604 – Miami, Florida 33152
Ø Protect your product:
We will keep the model number and date of purchase of your new Avanti product on file to
help you refer to this information in the event of an insurance claim such as fire or theft.
Ø Promote better products:
We value your input. Your responses will help us develop products designed to best meet
your future needs.
Avanti Registration Card
Please indicate the most important factors
That influenced your decision to purchase
£
£ Product Features
£ Avanti Reputation
£ Product Quality
£ Salesperson Recommendation
£ Other: ___________________
£ Friend / Relative Recommendation
£ Warranty
£
£ 31-35 £ 36-50 £ over 50
Marital Status:
Is This Product Used In The:
£ Home £ Business
How Did You Learn About This Product:
£ Advertising
£ In-Store Demo
£ Personal Demo
Page 40

40
WDBMC800Q3S - 06252019
PRINTED IN CHINA
 Loading...