

Page 1
INSTRUCTIONS.
Avanti has a policy of continuous improvement on its products and reserves
the right to change materials and specifications without notice.
Avanti Products LLC
www.avantiproducts.com
Model / Modelo / Modelé: WDB20Y0W
DRYER STACKING RACK
SOPORTE PARA SECADORA DE ROPA
ÉTAGÈRE D'EMPILEMENT DE SÉCHOIR
INSTRUCTION MANUAL
MANUAL DE INSTRUCCIONES
MANUEL D’INSTRUCTIONS
BEFORE USE, PLEASE READ AND FOLLOW ALL SAFETY RULES AND OPERATING
P.O. Box 520604
Miami, FL 33152
1
Page 2
2
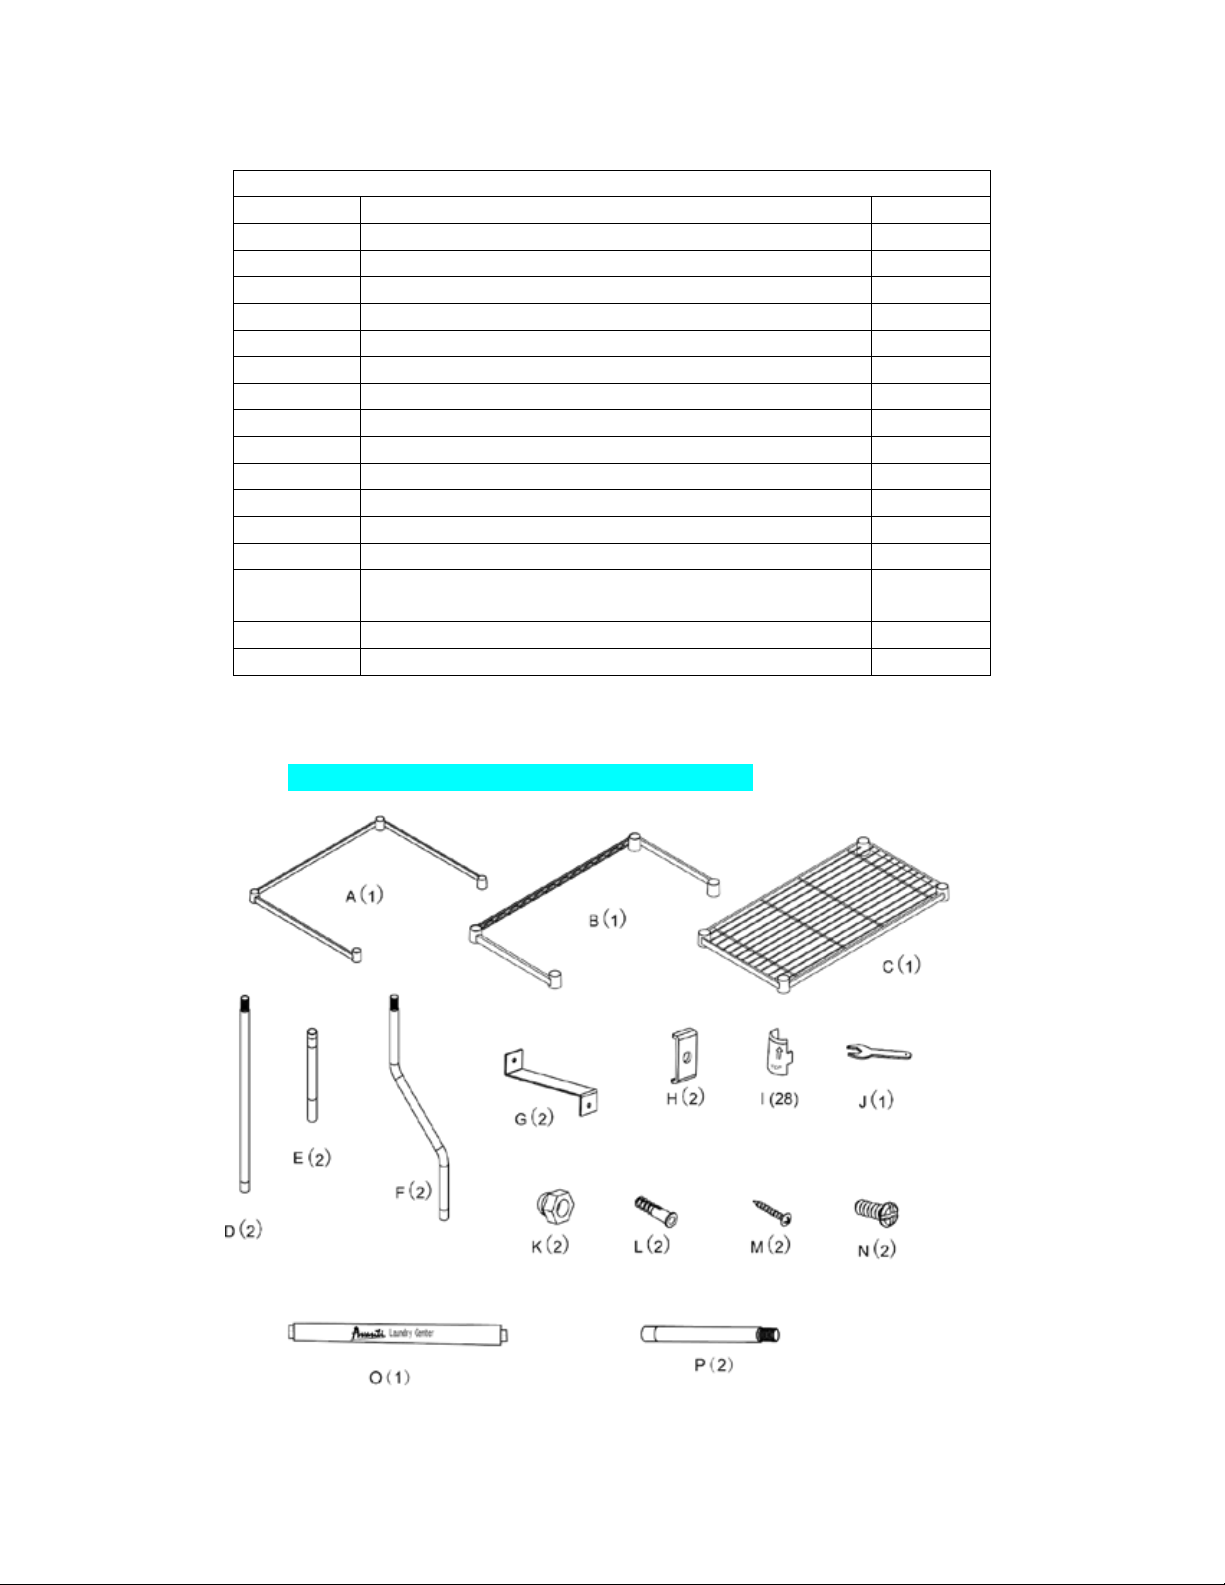
Before beginning to assemble this product, review and ensure that you have received all the parts as
Components Included
Part Code:
Description
Quantity
A
Bottom Support Frame
1
B
Middle Support Frame
1
C
Top Shelf 1 D
Rear Leg (Bottom section)
2
E
Rear Leg (Top section)
2
F
Front Leg (Bottom section)
2
G
Anti-Tip Safety Bracket (Part 1 of 2)
2
H
Anti-Tip Safety Bracket (Part 2 of 2)
2
I
Shelf / Frame Support Clips
30**
J
Spanner Wrench
1
K
Nut (For Anti-Tip Safety Br acket Assembly)
2
L
Wall Anchor
2
M
Phillips Head Self-Tapping Screw
2
N
Phillips Head Metal Screw (For Anti-Tip Safety Bracket
Assembly)
2
O
Logo / Support Bar
1
P
Front Leg (Top section)
2
listed / shown below:
** Part I: 2 additional pieces are supplied as spares.
Page 3
3
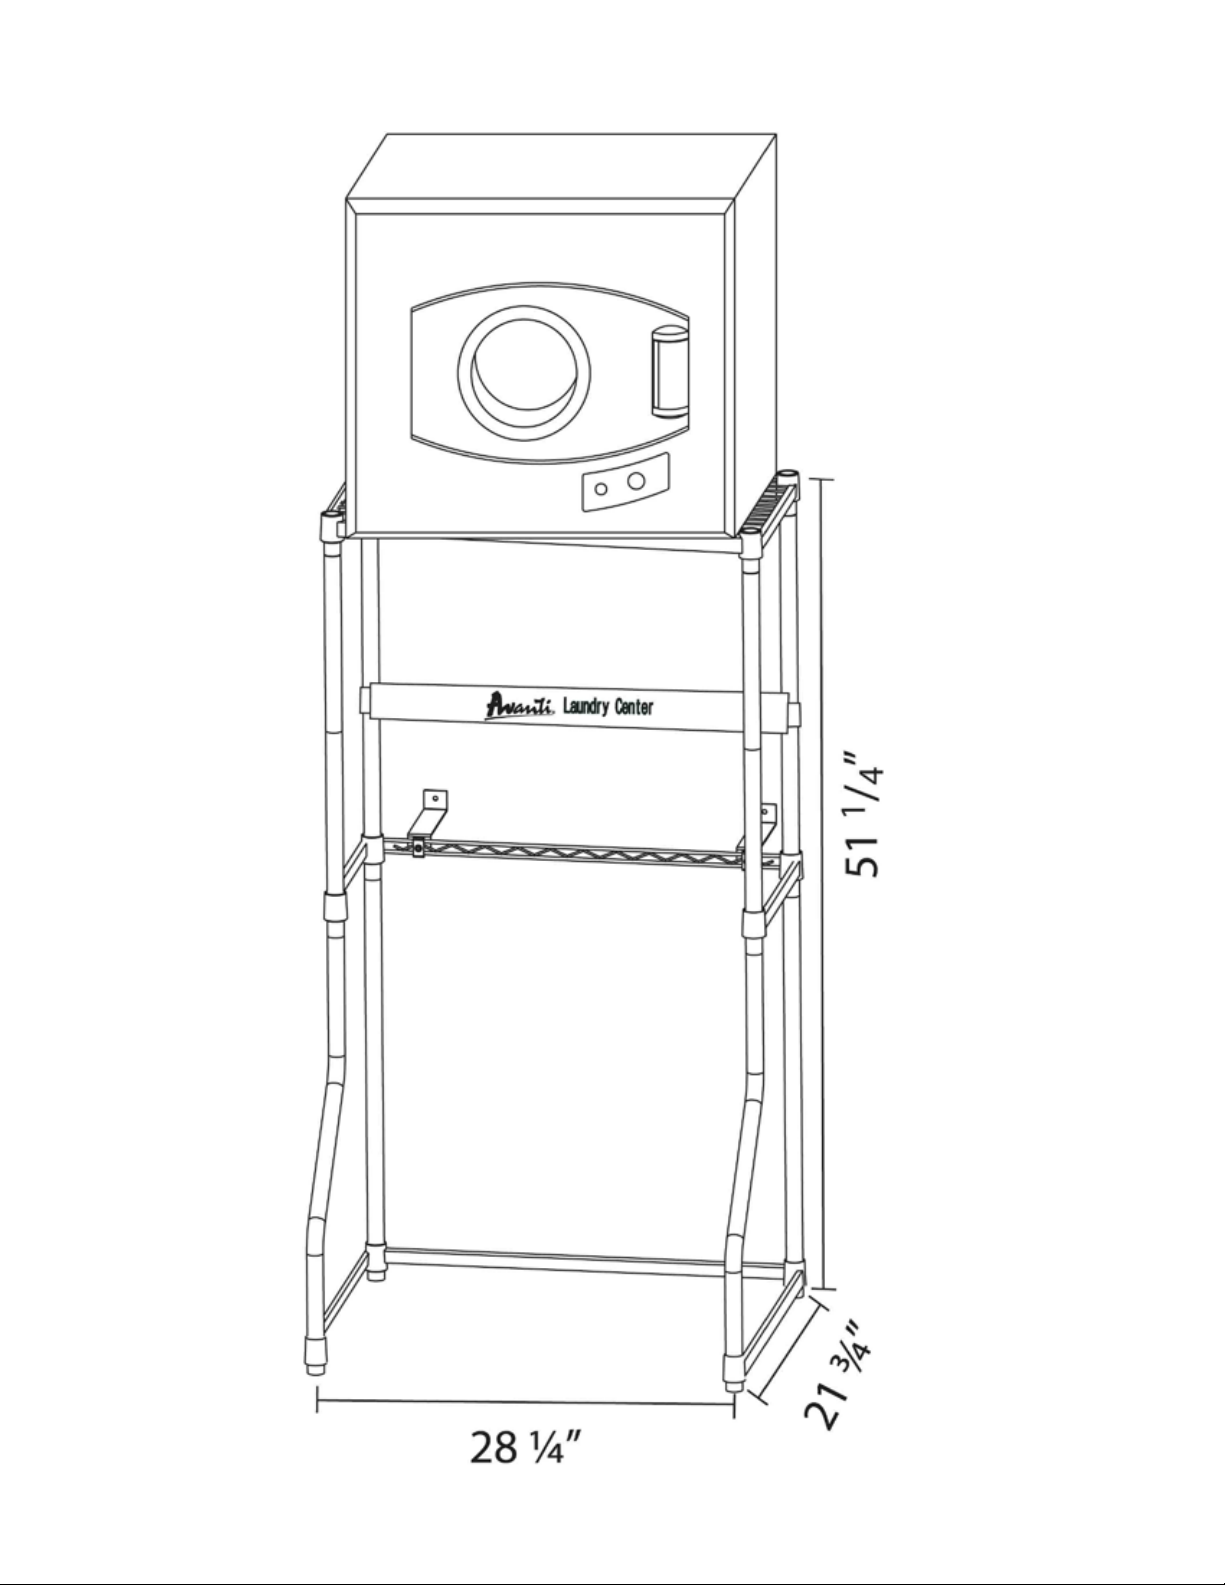
Assembled Dimensions
Page 4
4
Your Washer / Dryer Stacking Rack is designed to accommodate both top loading or front loadi ng
washing machines. Follow the assembly instructions below to assemble the Rack to fit your specific
washing machine type. Images shown in this instruction guide are for assembly for use with a TOP-Load
washer.
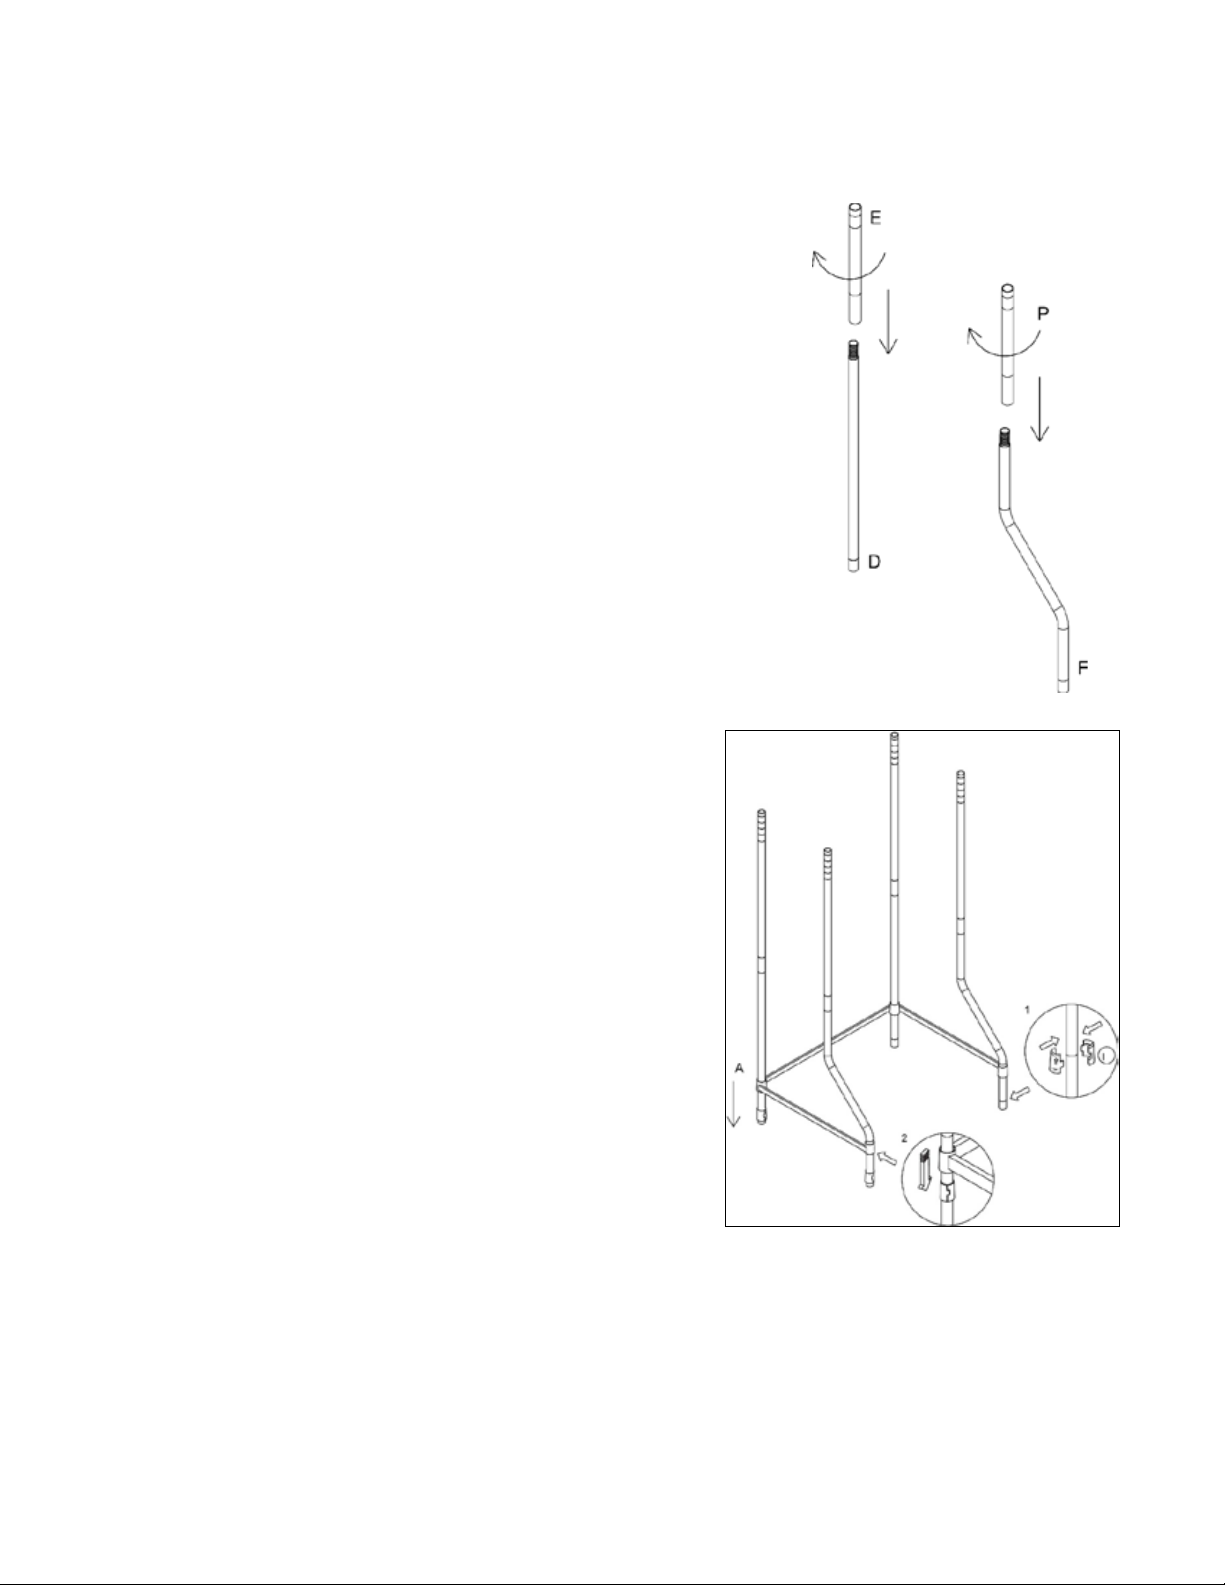
Step 1: Assembling the legs:
When using with a TOP- Load washer.
• Assemble the rear legs by screwing together all two sections of the
rear leg.
Part D – Rear Leg (Bottom section)
Part E –Rear Leg (Top section)
• Assemble the front legs by screwing together all two sections of the
front leg.
Part F – Front Leg (Bottom section)
Part P – Front Leg (Top section)
Step 2: Assembling the Bottom Support Frame.
We suggest that you put the U shaped bottom support frame
(Part A) in a vertical position. As this will allow you to insert
the legs and the Shelf / Frame support clips with ease.
a) Lay the Bottom support frame (Part A) on its back with
each side bar facing upwards.
b) Insert each of the rear legs (assembled in step one)
into the holes at both rear corners of the support
frame.
c) Using the Shelf / Frame support clips (Part I) insert
the plastic tapered clips into the appropriate grooves
on each leg. (See the image).
d) Slightly press the bottom support frame downward on
to the support clips.
e) Insert each of the FRONT legs in the remaining corner
holes of the support frame and repeat Step C.
f) Stand the unit upright to continue the remainder of
this assembly.
g) Press each corner downward firmly to ensure the
support frame is fully locked into position.
Page 5
5
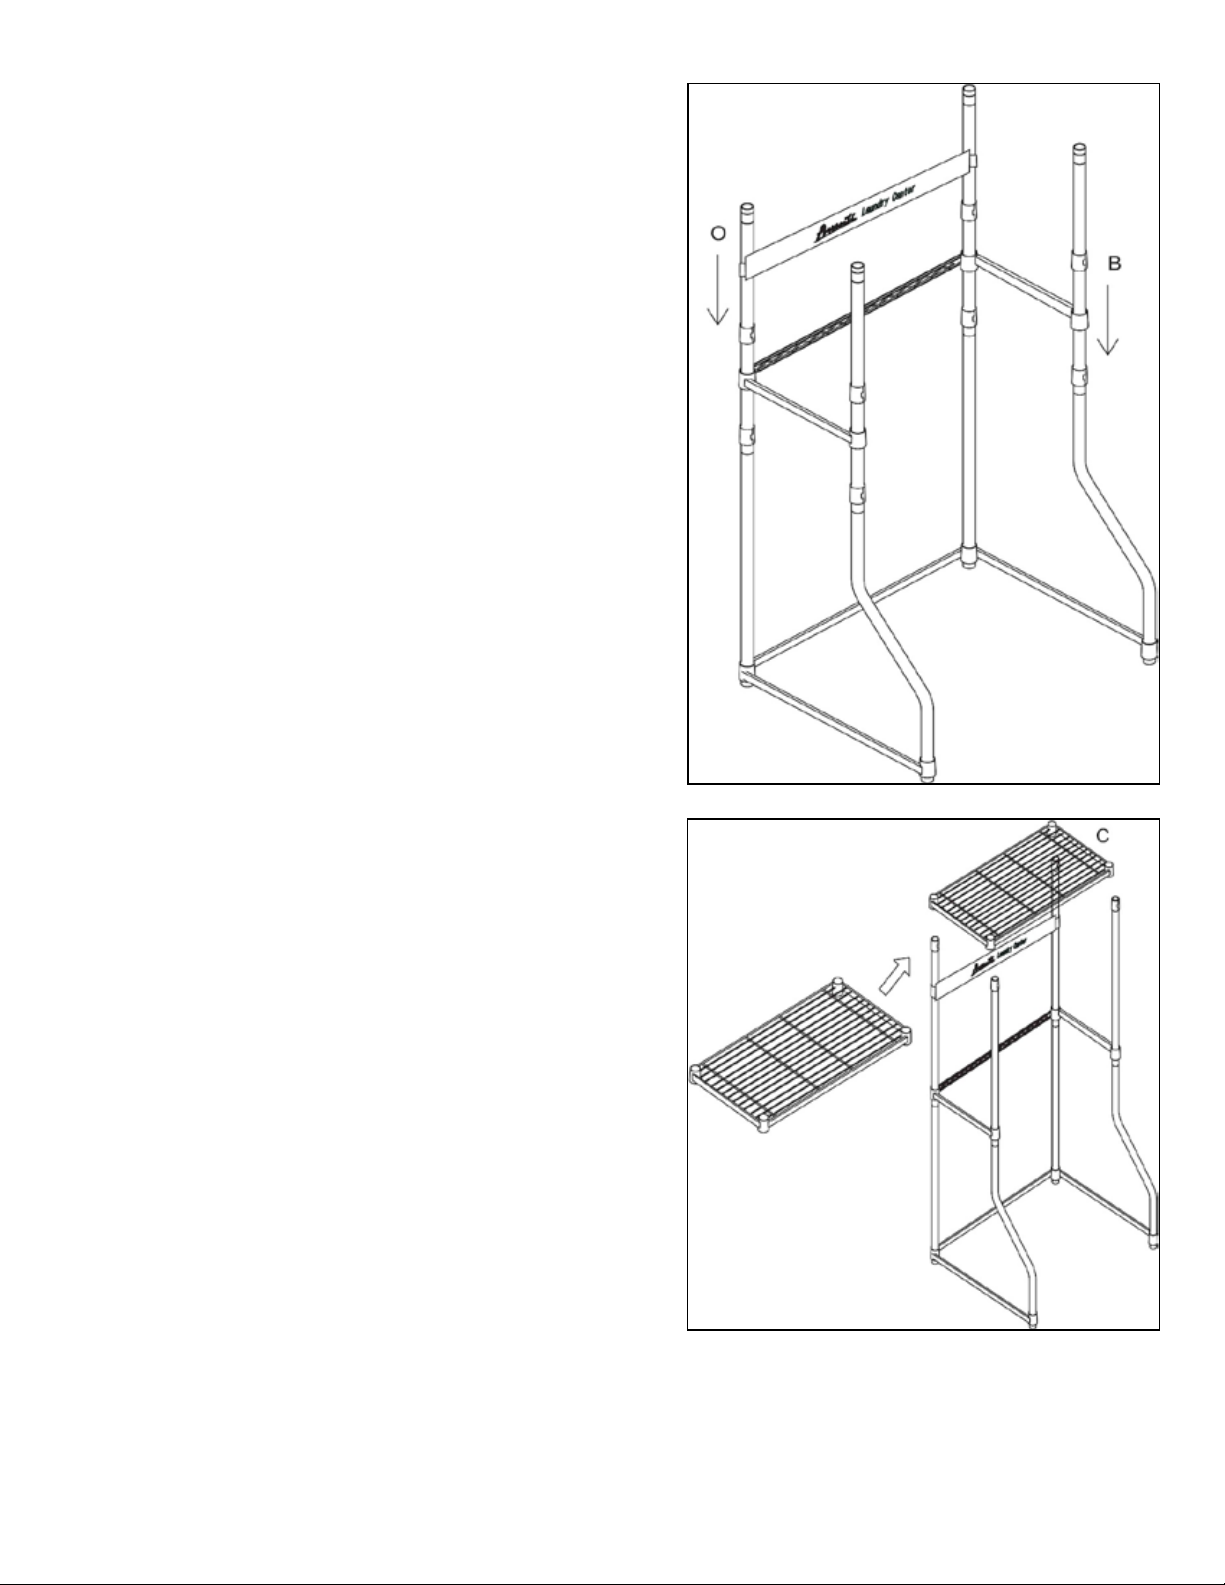
Step 3: Assembling the Middle Support
Frame and Logo / Support Bar.
The Middle support frame (Part B) MUST be installed to
maintain the stacking Rack square and stable .
a) Using the Shelf / Frame support clips (Part I) insert
the plastic tapered clips i n to the appropriate
grooves on each leg. (See the image).
b) Align the corner holes of the Middle support
frame (Part B) with each of the legs and gently
lower onto the support clips. Press each corner
downward firmly to ensure the support frame is
fully locked into position.
c) Using the Shelf / Frame support clips (Part I) insert
the plastic tapered clips into the appropriate
grooves on each of the rear legs. (See the image).
d) Align the holes on each end of the LOGO /
Support Bar (Part O) with each of the rear legs
and slightly lower onto the suppo rt clips.
Step 4: Assembling the Top Shelf:
a) Using the Shelf / Frame support clips (Part I) insert
the plastic tapered clips into the appropriate
grooves on each of the rear legs. (See the image).
b) Align the holes at each corner of the Top Shelf
(Part C) with each of the legs and gently lower
onto the support clips.
Page 6
6
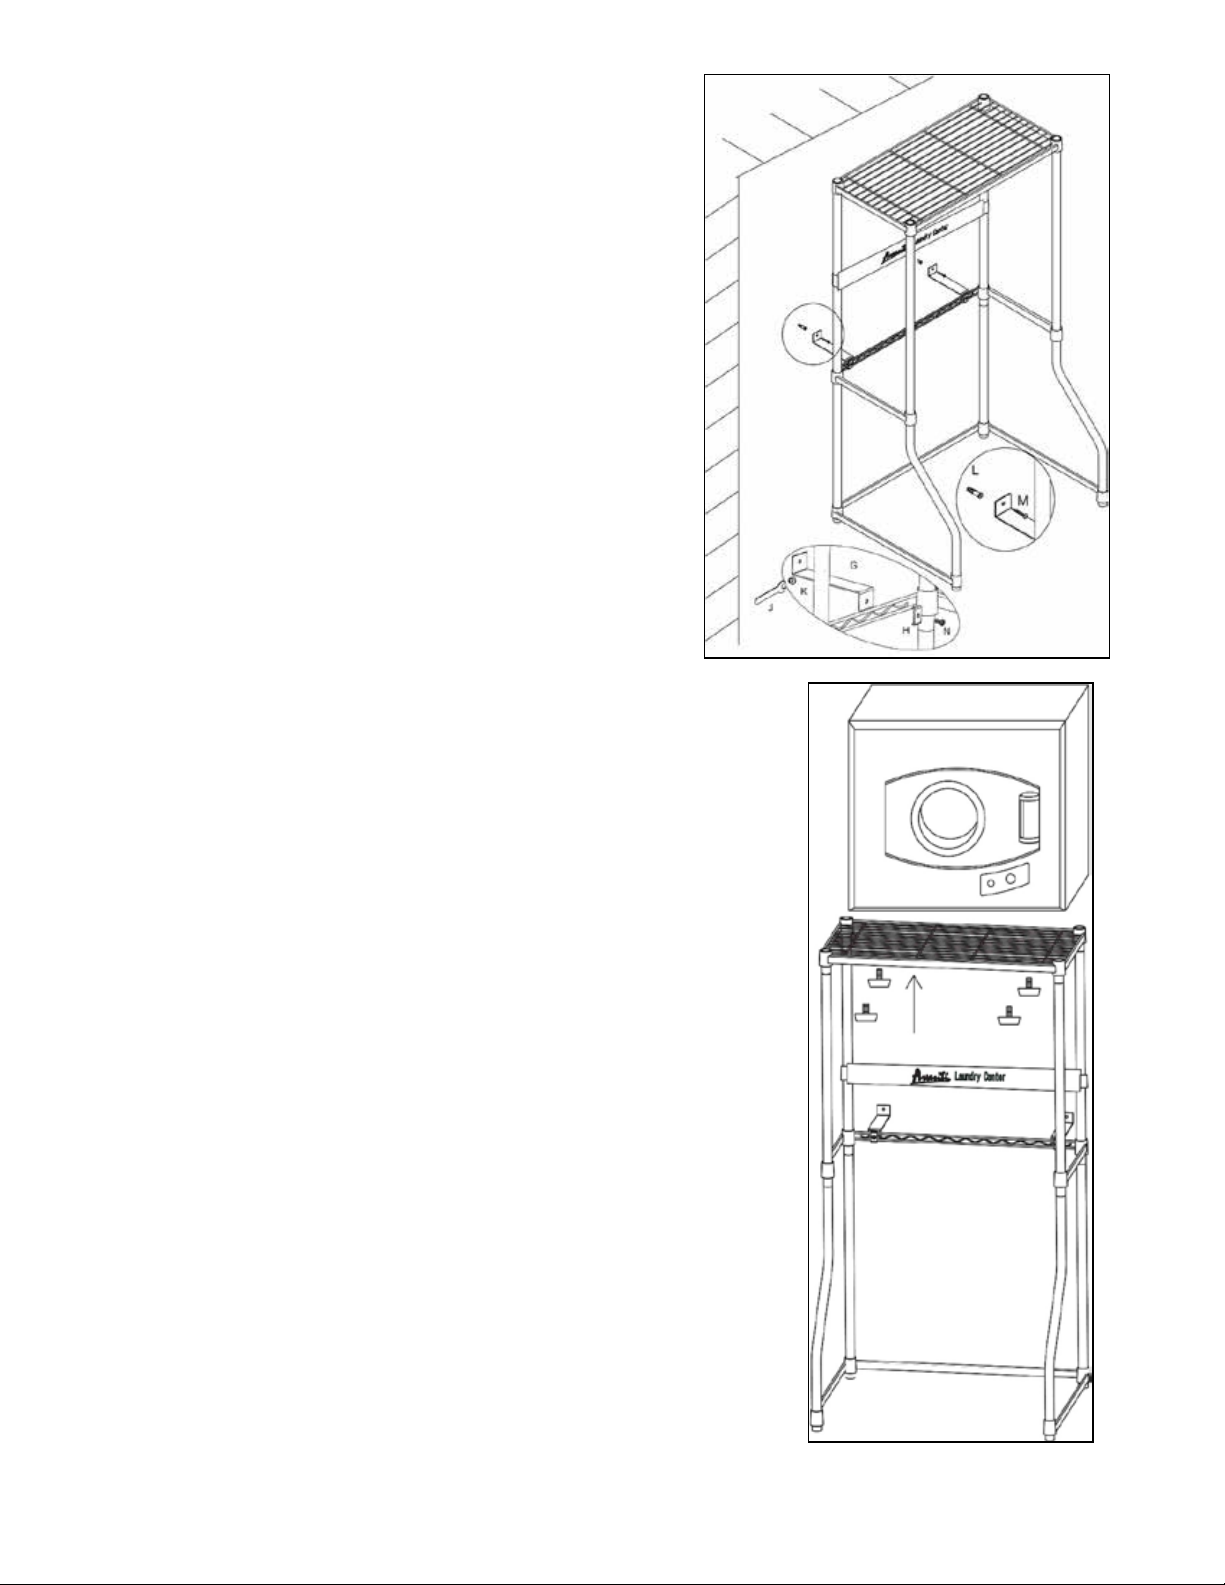
Step 5: Installing the Anti-Tip Safety Rack:
a) Attach the Anti-Tip Safety Rack (Parts G and H) to
the Stacking bracket as shown. By joining the two
(2) parts using the Phillips Head Screw and Nut
(Parts K and N).
b) Align the assembled Stacking bracket in place and
mark where the Anti-Tip Safety Rack is to be
attached to the wall.
c) Using the Wall Anchors and Self Tapping Phillips
head screws (Parts L and M) include d to attach the
assembled Stacking bracket to the wall.
Step 6: Installing Your Avanti Dryer (Model D110) to the
top shelf.
In order to place your Avanti Dryer (Model D110) on the stacking kit
you must first remove the four (4) leveling legs from the bottom of the
dyer.
a) Place the Dryer on the top shelf.
b) Re-install the four (4) leveling legs previously removed through
the underside of the top shelf and tighten until the dryer is
secure.
Page 7

7
INSTRUCCIONES EN ESPAñOL
componentes incluidos
Código de parte:
Descripción
Cantidad
A
Chasis inferior
1
B
Chasis del medio
1
C
Repisa superior
1
D
Sección inferior de las patas traseras
2
E
Sección superior de las (2) dos patas traseras
2
F
Sección inferior de las patas delanteras
2
G
Soporte de seguridad (anti-volteo) (Parte 1 de 2)
2
H
Soporte antivuelco de seguridad (Parte 2 de 2)
2
I
Clips de presión
30 **
J
Llave Inglesa
1
K
Tuerca (Para instalación del soporte de seguri dad)
2
L
Anclas para la pared (Para instalación del soporte de
seguridad) 2 M
Tornillo - Cabeza Phillips
2
N
Tornillo – Cabeza Phillips para el metal (Para sistema de
seguridad anti-volteo)
2
O
Barra de soporte
1
P
Sección del superior de las (2) dos patas delanteras
2
Antes de comenzar a montar este producto, revisar y asegurarse de que ha recibido todas las piezas que
se enumeran / muestra a continuación:
** Parte I: 2 piezas adicionales se suministran como recambio.
Page 8

8
Dimensiones del producto ensamblado
Page 9

9
Su aparato está diseñado para dar cabida tanto a lavadoras de carga superior o lavadoras de carga
frontal. Siga las instrucciones de montaje a continuación para montar el soporte y para adaptarse a su
tipo de máquina de lavado específico. Las imágenes de esta guía de instrucciones son para el montaje
con una lavadora de carga superior.
Paso 1: Asemblaje de las patas:
Cuando se utiliza con una lavadora de carga TOP-.
• Asambleé las patas traseras por atornillado juntos las dos secciones de
las patas traseras.
Parte D - Sección inferior de las patas traseras
Parte E - Sección superior de las (2) patas traseras.
• Montar las patas delanteras atornillando juntas las dos secciones de la
patas delanteras.
Parte F - Sección inferior de las (2) patas delanteras
Parte P - Sección superior de las (2) patas delanteras.
Paso 2: Ensamblaje del bastidor de soporte
inferior.
Sugerimos que coloque el bastidor de soporte inferior en
forma de U (Parte A) en posición vertical. Ya que esto le
permitirá insertar las patas y los clips de presión del estante /
marco con facilidad.
a) Coloque el bastidor de soporte inferior (Parte A) en su
parte posterior con cada barra lateral mirando hacia
arriba.
b) Inserte cada una de las patas traseras (ensamblados
en el paso uno) en los orificios de las dos esquinas
traseras del bastidor de soporte.
c) Uso de los clips de presión del estante (Parte I) para
insertar los clips cónicos de plástico en las ranuras
correspondientes en cada pata. (Véase la imagen).
d) Ligeramente presione el bastidor de soporte inferior
hacia abajo o sobre de los clips de presión.
e) Inserte cada una de las patas delanteras en los
orificios de esquina restante de la trama de soporte y repita el paso C.
f) Coloque la unidad en posición vertical para continuar con el resto de este ensamblaje.
g) Presione cada esquina hacia abajo con firmeza para asegurar que el bastidor de soporte está
completamente asegurado en su posición.
Page 10

10
Paso 3: Ensamblaje de chasis del medio y
barra de soporte.
El bastidor de soporte medio (Parte B) debe estar
instalado para mantener la pieza de soporte de
apilamiento y estable.
a) Usando los clips de soporte del estante / Frame
(Parte I) inserte los clips cónicos de plástico en las
ranuras correspondiente s a cada pata. (Véase la
imagen).
b) Alinee los agujeros de las esquinas del chasis del
medio (Parte B) con cada una de las patas y baje
suavemente sobre los clips de presión. Presione
cada esquina hacia abajo con firmeza para
asegurar el chasis esté completamente asegurado
en su posición.
c) Utilizando de lo s clips de presión (Parte I) insertar
los clips en las ranuras apropiadas en cada una de
las patas traseras. (Véase la imagen).
d) Alinee los orificios en cada extremo de la barra de
soporte (Parte O) con cada una de las patas
traseras y bájelos ligeramente sobre de los clips de presión.
Paso 4: Ensamblaje de la repisa superior:
c) Utilizando los clips de presión (Parte I) insertelos
las ranuras apropiadas en cada una de las patas
traseras. (Véase la imagen).
d) Alinear los agujeros en cada esquina de la repisa
superior (Parte C) con cada una de las patas y baje
suavemente sobre los clips de soporte.
Page 11

11
Paso 5: Instalación del soporte de seguridad
(anti-volteo):
a) Coloque la seguridad soporte anti-vuelco (Partes G
y H) en el soporte de apilamiento, como se muestra,
uniendo a las dos (2) partes utilizando el Phillips
cabeza del tornillo y la tuerca (Partes K y N).
b) Alinee el soporte de apilamiento ensamblado en su
lugar y marque donde el soporte de seguridad anti-
volteo se debe aseguar a la pared.
c) Use los tornillos Anclas de pared y Tornillos de
cabeza Phillips (Partes L y M) incluído para asegurar
el soporte de apilamiento montado a la pared.
Paso 6: Instalación de la secadora Avanti (D110 Modelo)
al estante superior.
Con el fin de colocar su Avanti Secadora (D110 Modelo) en el kit de
apilamiento primero hay que quitar las cuatro patas (4) de nivelación de
la parte inferior del tintorero.
a) Coloque la secadora en la repisa superior.
b) Vuelva a instalar las cuatro (4) patas niveladoras a través de la
parte inferior de la repisa superior y apriete hasta que la
secadora esté segura.
Page 12

12
INSTRUCTION EN FRANÇAIS
Composants inclus
Part Code:
La description
Quantité
A
Cadre de support inférieur
1
B
Cadre intermédiaire du support
1
C
Étagère supérieure
1
D
Pied arrière (section inférieure)
2
E
Arrière jambe (section Top)
2
F
Jambe Avant (section inférieure)
2
G
Anti-Tip Support de sécurité (partie 1 de 2)
2
H
Anti-Tip Support de sécurité (partie 2 de 2)
2
I
Clips Support tablette / Frame
30 **
J
Clé Spanner
1
K
Écrou (pour le montage Support de sécurité anti-Tip)
2
L
Mur d'ancrage
2
M
VIS - Phillips Head auto-taraudeuse
2
N
Vis - Phillips Head métal (pour le montage Support de
sécurité anti-Tip)
2
O
Barre de support
1
P
Avant jambe (section inférieure )
2
Avant de commencer à assembler ce produit, l'examen et veiller à ce que vous avez reçu toutes les
pièces énumérées / ci-dessous:
** Partie I: 2 pièces supplémentaires sont fournis comme pièces de rechange.
Page 13

13
Dimensions assemblées
Page 14

14
L’unité est conçu pour accueillir à la fois chargement par le dessus ou des machines à laver à
chargement frontal. Suivez les instructions de montage ci-dessous pour assembler le support pour
adapter à votre type de machine à laver spécifique. Les images présentées dans ce guide d'instruc tions
sont pour l'assemblage pour une utilisation avec une machine à laver à chargement vertical.
Étape 1: Assemblage des jambes:
Lors de l'utilisation d'une rondelle de charge TOP-.
• Assembler les pieds arrière en vissant ensemble les deux sections de la
jambe arrière.
Partie D - jambe arrière (section inférieure)
Partie E - jambe arrière (section Top)
• Assembler les pattes avant par vissage les trois sections de la jambe
avant.
Partie F - jambe avant (section inférieure)
Partie P - jambe avant (section supéroeire)
Étape 2: Assemblage du cadre de support
inférieur.
Nous vous suggérons de mettre le cadre d e support inférieur
en forme de U (partie A) en position verticale. Comme cela
vous permettra d'insérer les jambes et le support du plateau /
Frame clips avec facilité.
a) Poser le cadre de support inférieur (partie A) sur le
dos de chaque barre latérale vers le haut.
b) Insérer chacun des pieds arrière (assemblées dans la
première étape) dans les trous aux deux coins arrière
du cadre de support.
c) Utilisation des clips de soutien du plateau / de la
monture (Partie I) insérer les séquences coniques en
plastique dans les rainures appropriées sur chaque
jambe. (Voir l'image).
d) presser légèrement le châssis de support inférieur vers
le bas sur les attaches de support .
e) Insérer chacune des pattes avant dans les trous de
coin restantes du cadre de support et répéter l'étape C.
f) Tenez l'unité verticale pour continuer le reste de cette assemblée.
g) Appuyez sur chaque coin vers l e bas fermement pour assurer le cadre de support est
complètement verrouill é e n positi on .
Page 15

15
Étape 3: Assemblage du cadre central de
soutien et Logo / Barre de support.
Le cadre de support intermédiaire (partie B) doit être
installé pour maintenir la place du support d'empilage et
stable.
a) Utilisation des clips de soutien du plateau / de la
monture (Partie I) insérer les séquences coniques
en plastique dans les rainures appropriées sur
chaque jambe. (Voir l'image).
b) Aligner les trous d'angle du cadre de support
intermédiaire (Partie B) avec chacune des jambes
et doucement inférieure sur les clips de soutien.
Appuyez sur chaque coin vers le bas fermement
pour assurer le cadre de support est
complètement verrouill é e n positi on .
c) Utilisation des clips de soutien du plateau / de la
monture (Partie I) insérer les séquences coniques
en plastique dans les rainures appropriées sur
chacune des pattes arrière. (Voir l'image).
d) Aligner les trous sur chaque extrémité du LOGO /
barre de support (Part O) avec chacune des pattes arrière et légèrement plus bas sur les
attaches de support.
Étape 4: Assemblage du plateau supérieur:
a) Utilisation des clips de soutien du plateau / de la
monture (Partie I) insérer les séquences coniques
en plastique dans les rainures appropriées sur
chacune des pattes arrière. (Voir l'image).
b) Aligner les trous à chaque coin du plateau
supérieur (Partie C) à chacune des branches et
doucement inférieure sur les c lips de soutien.
Page 16

16
Étape 5: Installation du support de sécurité
anti-Tip:
a) Fixez le support de sécurité anti-Tip (parties G et H)
sur le support Stacking comme indiqué. En
rejoignant les deux (2) pièces à l'aide de la tête
Phillips vis et écrou (parties K et N).
b) Aligner le support d'empilage assemblé en place et
marquer l'endroit où le support de sécurité anti-Tip
doit être fixé au mur.
c) À l'aide des vis à tête et ancrages muraux
Autotaraudeuse Phillips (Pièces L et M) inclus pour
fixer le support d'empilage assemblé sur le mur.
Étape 6: Installation Séchoir à linge Avanti
(Modèles : D110) sur l'étagère supérieure.
Afin de placer votre séchoir à linge Avanti (Modèle D110) sur le kit
d'empilage vous devez d'abord enl ever les quatre (4) pieds de
nivellement par le bas du teinturier.
a) Placez la sécheuse sur l'étagère du haut.
b) Remettre en place les quatre (4) pieds de nivellement
précédemment enlevés à travers la face inférieure du plateau
supérieur et serrer jusqu'à ce que le sécheur est sécurisé.
Page 17

17
Page 18

18
Page 19

19
REGISTRATION INFORMATION
-------------------------------------------------------(detach here)------------------------------------------------------------
Name
Model # Serial #
Address
Date Purchased Store / Dealer Name
City State Zip
E-mail Address
Area Code Phone Number
Occupation
Did You Purchase An Additional Warranty
As your Primary Residence, Do You:
£ Extended
£ Own £ Rent
£ None
Your Age:
Reason for Choosing This Avanti Product:
product:
under 18 £ 18-25 £ 26-30
£ Married £ Single
Price
£ Other: _____________ ______
Comments:
Thank you for purchasing this fine Avanti product. Please fill out this form and return it to the following
address within 100 days from the date of purchase and receive these important benefits:
Avanti Products LLC.
P.O.Box 520604 – Miami, Florida 33152
Ø Protect your product:
We will keep the model number and date of purchase of your new Avanti product on file to help
you refer to this information in the event of an insurance claim such as fire or theft.
Ø Promote better products:
We value your input. Your responses will help us develop prod ucts desig ned to bes t m eet your
future needs.
Avanti Registration Card
Please indicate the most important factors
That influenced your decision to purchase this
£
£ Product Features
£ Avanti Reputation
£ Product Quality
£ Salesperson Recommendation
£ Other: ___________________
£ Friend / Relative Recommendation
£ Warranty
£
£ 31-35 £ 36-50 £ over 50
Marital Status:
Is This Product Used In The:
£ Home £ Business
How Did You Learn About This Product:
£ Advertising
£ In-Store Demo
£ Personal Demo
Page 20

20
WDB20Y0W - 07242018
PRINTED IN CHINA
 Loading...