

Page 1
WATER DISPENSER
DISPENSATEUR D’EAU
INSTRUCTION MANUAL
MANUEL D’INSTRUCTIONS
INSTRUCTIONS.
Avanti has a policy of continuous improveme nt on its products and reserves
the right to change materials and specifications without notice.
Avanti Products LLC
www.avantiproducts.com
Model / Modelo / Modelé: WD361 / WD363P
DISPENSADOR DE AGUA
MANUAL DE INSTRUCCIONES
BEFORE USE, PLEASE READ AND FOLLOW ALL SAFETY RULES AND OPERATING
P.O. Box 520604
Miami, FL 33152
Page 2

2
TABLE OF CONTENTS
Help Us Help you
3
Parts and Features
4
Important Safety Instructions
5 – 6
Electrical Connection
7
Installation Guidelines
8 – 10
Operation Instructions
11
Before Using Your Water Dispenser
11
Operating Your Water Dispenser
12
Replacing the Water Bottle
12
Cold Water Control
12
Hot Water Control
12
Child Safety Guard (Hot Water Faucet)
12
Cup Dispenser (Optional)
12
Care and Maintenance
13
Taking the dispenser out of service
13
Problems with Your Water Dispenser
13
Troubleshooting Guide
13
Service for Your Water Dispenser
14
Your Avanti Products Warranty
15
Instrucciones en Español
16 – 19
Instructions en Français
20 – 32
Registration Information and Registration Card
Last Page
Page 3

3
HELP US HELP YOU...
Read this guide carefully.
It is intended to help you operate and maintain
your new water dispenser properly.
Keep it handy to answer your questions.
If you don't understand something or you need
more help, please call:
Avanti Customer Service
800-220-5570
Keep proof of original purchase date (such as
your sales slip) with this guide to establish the
warranty period.
IF YOU NEED SERVICE
We're proud of our ser vice and w ant you to be
pleased. If for some reaso n you are not happ y
with the service you receive, here are some
steps to follow for further help.
FIRST, contact the p eople who serviced your
appliance. Explain why you are not pleased. In
most cases, this will solve the problem.
Write down the model and serial numbers.
You'll find them on a label located on the back
side of the unit.
Please write these numbers here:
____________________________________
Date of Purchase
____________________________________
Model Number
____________________________________
Serial Number
Use these numbers in any corresponden ce or
service calls concerning your water di spens er .
If you received a damaged water dispenser,
immediately contact t he de aler (or bu ilder) that
sold you the water dispenser.
Save time and money. Before you call for
service, check the Problem Solver Guide. It
lists causes of minor operating problems that
you can corr e ct yourse lf.
NEXT, if you are still not pleased, write all the
details, including your telephone number, and
send to:
Customer Serv ice
Avanti Products
10880 NW 30 Street
Miami, FL 33172
Page 4
4
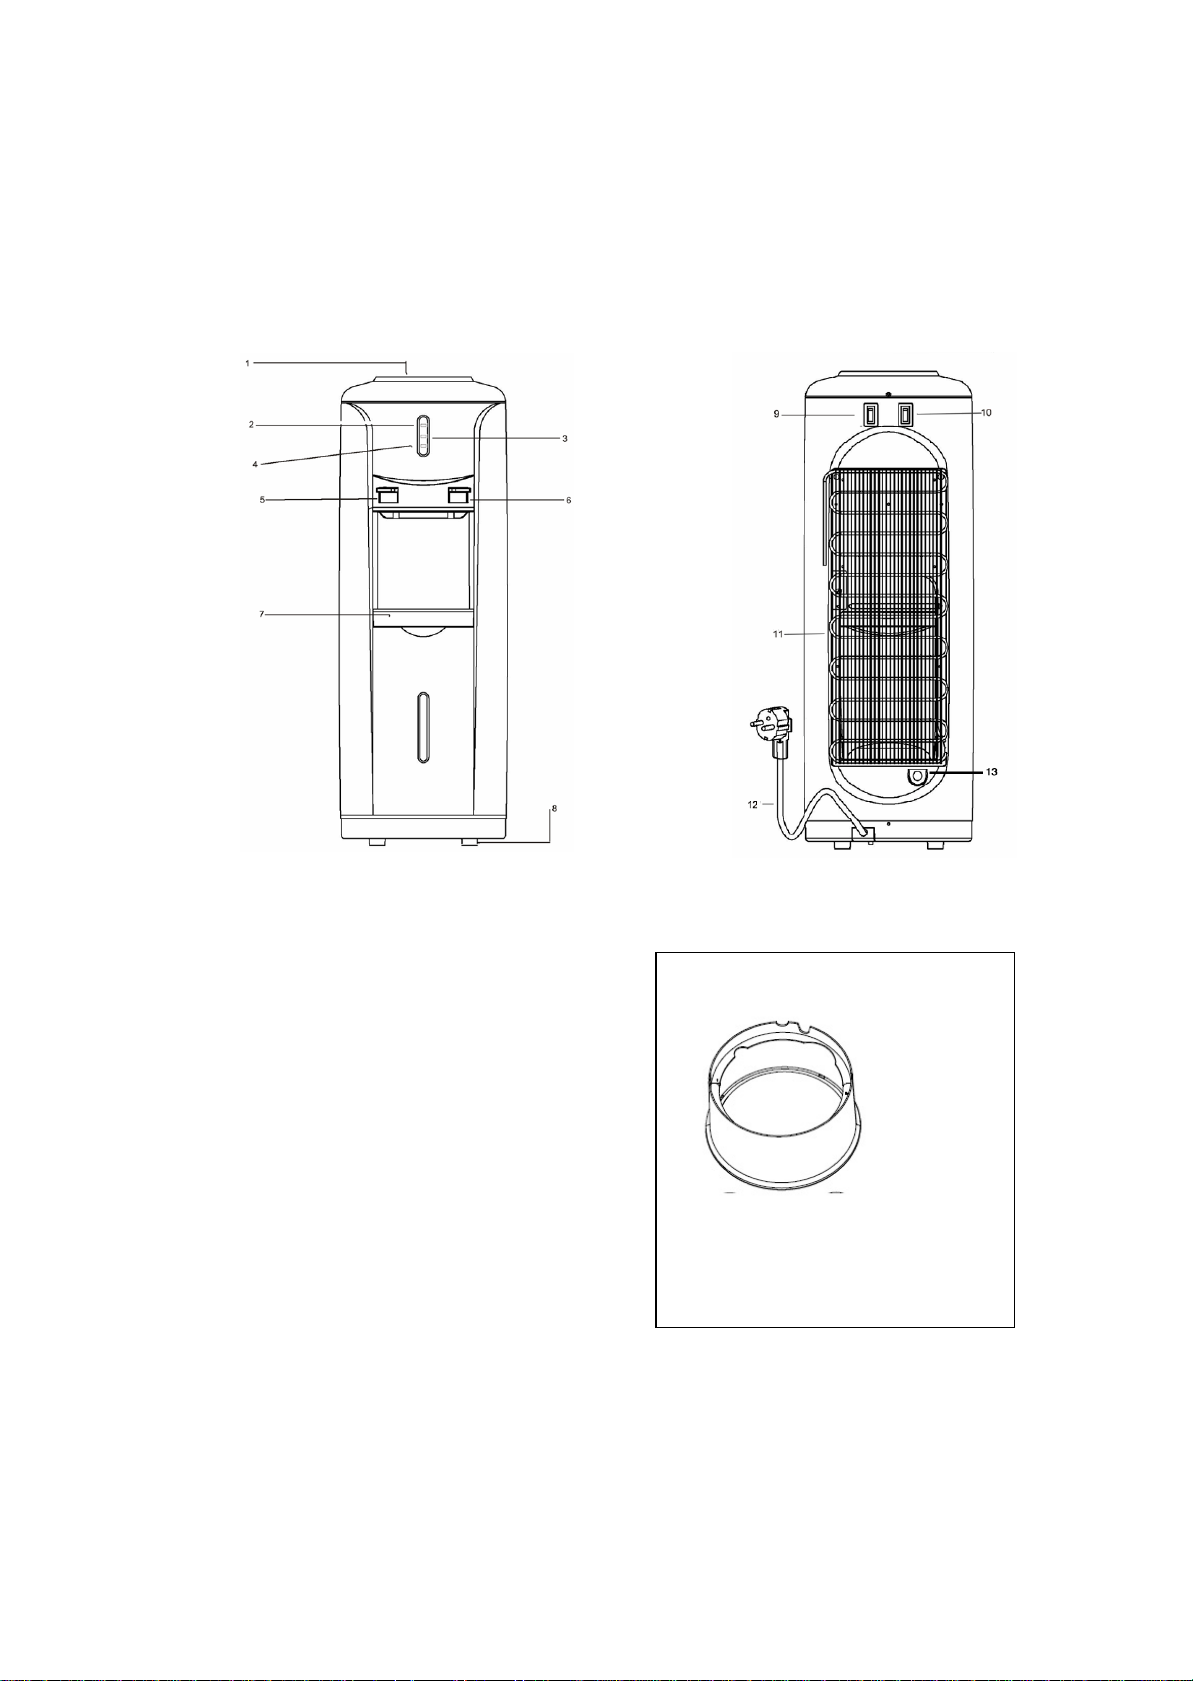
1. WATER INTAK E
Model WD363P ONLY
PARTS AND FEATURES
2. HOT WATER LIGHT (RED)
3. POWER INDICA TOR (YELLOW)
4. COLD INDICATOR LIGHT (GREEN )
5. HOT WATER FAUCET (PINK)
6. COLD WATER FAUCET (GREY)
7. REMOVABLE DRIP TRAY
8. ADJUSTABLE FOOT
9. COOLING SWIT C H
10. HEATING SWITCH
11. CONDENSER COIL
12. POWER SUPPLY CORD
13. WATER DRAIN
HEIGHT ADJUSTMENT
PLATFORM
Page 5
5
APPLIANCE SAFETY
Your safety and the safety of others are very important.
We have provided many important safety messages in this manual and on your
appliance. Always read and obey all safety messages.
This is the Safety Alert Symbol. This
Warning means that failure to heed
personal injury, or death.
Caution means that failure to heed
or property or equipment damage.
All safety messages will alert you to what the potential hazard is, tell you how to
are not followed.
symbol alerts you to potential
hazards that can kill or injure you
and others.
All safety messages will follow the
Safety Alert Symbol and either the
wards” DANGER”, “WARNING” or
“CAUTION”.
Danger means that failure to heed
this safety statement may result in
severe personal injury or death.
this safety statement may result in
extensive product damage, serious
this safety statement may result in
minor or moderate personal injur y,
reduce the chance of injury, and let you know what can happen if the instructions
Page 6
6
IMPORTANT SAFEGUARDS
Before the beverage cooler is used, it must be properly positioned and installed
Plug into a grounded 3-prong outlet, do not remove grounding prong, do not use an adapter, and do
in this material. All other servicing should be referred to a qualified technician.
• Use two or more people to move and install the appliance. Failure to do so can result in back or
• Do not use this apparatus for other than its intended purpose.
as described in this manual, so read the manual carefully. To reduce the risk of
fire, electrical shock or injury when using the beverage cooler, follow basic
precautions, including the following:
•
not use an extension cord
• Replace all panels before operatin g
• It is recommended that a separate circuit, serving only your beverage cooler, be provided. Use
receptacles that cannot be turned off b y a switch or pul l chain
• Never clean appliance parts with flammable fluids. These fumes can create a fire hazard or
explosion. And do not store or use gasoline or other flammable vapors and liquids in the vicinity of
this or any other appliance. The fumes can create a fire hazard or explosion.
• Before proceeding with cleaning and maintenance oper ations, make sure the power line of the unit
is disconnected.
• Do not connect or disconnect the electric pl ug when your hand s are wet
• Unplug the appliance or disconnect the power before cleaning or servicing. Failure to do so can
result in electrical shock or death.
• Do not attempt to repair or replace any part of your appliance unless it is specifically recommended
other injury.
• To ensure proper ventilation for your appliance, the unit must be completely unobstructed. Choose a
well-ventilated area with temperatures above 55
be installed in an area protected from the elements, such as wind, rain, water spray or sunlight.
• The appliance should not be located next to ovens, grills or other sources of high heat.
• The appliance must be installed with all electrical, water and drain connections in accordance with
state and local codes. A standard electrical supply (115 V AC only, 60 Hz), properly grounded in
accordance with the National Electrical Code and local codes and ordinances is required.
• Do not kink or pinch the power supply cord of the appliance.
• The fuse (or circuit breaker) size should be 15 amperes.
• It is important for the appliance to be leveled in order to work properly. You may need to make
several adjustments to level it.
• All installation must be in accordance with local plumbing code requirements.
• Make certain that the pipes are not pinched or kinked or damaged during installation.
• Check for leaks after connection.
• Never allow children to operate, play with or crawl inside the applian ce
• Do not use solvent-based cleaning agents or abrasives on the interior. These cleaners may damage
or discolor the interior.
0
F (130C) and below 900F (32 0C). This unit must
Page 7

7
Electrical Connection
Warning
Improper use of the grounded plug can result in the risk of electrical shock. If the power cord is
damaged, have it replaced by an authorized Avanti Products service center.
This appliance should be properly grounded for your safety. The power cord of this appliance is
and not left exposed or dangling to prevent
electrician or service technician install an outlet near the appliance.
EXTENSION CORD
Because of potential safet y hazard s under certa in co n dit ion s, it is strong l y recom mend ed that you do
amperes.
SURGE PROTECTOR
needed contact a licensed electrician in your area.
Damages due to power surges are not considered a manufacturer covered defect and will void your
product warranty.
equipped with a t hree-prong p lug which mates with standard t hree prong wall outlets to minimize the
possibility of electrical shoc k.
Do not under any circumstances cut or remove the third ground prong from the power cord supplied.
This appliance requires a standard 115Volts~/60Hz electrical outlet with three-prong ground.
The cord should be secured behind the appliance
accidental injury.
Never unplug the appli ance by pullin g the pow er cord. Alwa ys grip th e plug f irml y and pull stra ight ou t
from the receptacle.
Do not use an extension cord with this appliance. If the power cord is too short, have a qualified
not use an extension cord with this unit. Howe ver, if you must use an ext en sion c ord it is absolu tely
necessary that it be a UL/CUL-Listed, 3-wire grounding type applian ce exten si on cord ha vi ng a
grounding type plug and outlet and that the electrical rating of the cord be 115 volts and at least 10
Most electrical appliances use a series of electric control boards to operate. These boards are very
susceptible to power surges and could be damaged or destroyed.
If the appliance is going to be used in an area or if your city / country is prone to power surges /
outages; it is suggested that you use a power surge protector for all electrical devices / appliances
you use. The surge protector that you select must have a surge block high enough to protect the
appliance it is connected to. If you have any questions regarding the type and size of surge protector
Page 8

8
INSTALLATION GUIDELINES:
• Remove the exterior and interior packing.
• Place your appliance o n a floor that i s strong enou gh to support the dispen ser when it is fully
loaded. If it doe s no t sit le vel on th e floor, adjust t he front right foot to le vel t he un it wel l to th e
floor. Note: Only the front right foot is adjustable.
• Locate the applian ce away from direct sunlight and source s of heat (stove, heat er, radiator,
etc.). Direct sunlight ma y affect the acrylic coating and heat sourc es may increase electrical
consumption. Extreme cold ambient temperatures may also cause the appliance not to
perform properly.
• ALLO W 5 INCHES OF SPACE BETWEEN THE WATER DISPENSER AND THE WALL,
WHICH ALLOWS FOR PROPER AIR CIRCULATION TO COOL THE COMPRESSOR.
• Plug the appliance into an exclusive properly installed-grounded wall outlet. Do not cut or
remove the third (ground) prong from the power cord under any circumstances. Any
questions concerning power and/or grounding should be directed toward a certified
electrician or an authorized Avanti Products service center.
• This water dispenser is not recommende d for outd oor use.
• Do not locate the dispenser in area where the temperature may fall below freezing (32
• Keep area around dispenser free of dust and dirt.
• Keep the reserve supply of water bottles away from excessive heat and light.
• Never unplug the water cooler, except for maintenance.
º F).
Page 9

9
Height Adjustment Platform (Model WD363P – ONLY)
Front Panel
Back Panel
Bottom Ring
To make the water dispenser faucet s more acce s sible your uni t has bee n sup pl ied with a
height adjustment platform. The platform requires assembly as shown below.
Parts Provided:
1 Front Panel 1 Back Panel 1 Stability Ring (located on the top foam cover)
2 Short Screws 2 Long Self-tapping Screws (located in the bag with instruction manual)
Remove all parts from the box and remove the packing materials.
a) Align both the front and back panels of the platform and assemble as shown in
figure 1.
Fig. 1
b) Align the assembled platform to the bottom stability ring as shown in figure 2a.
Align the areas marked “1” and “2” on the platform with same areas marked “1”
and “2” on the stability ring.
(NOTE: These areas must be aligned correctly for the unit to be assembled. If the
platform is not aligned correctly to the stability ring, the retaining clips could be
permanently damaged and cause the platform to be unstable).
Fig 2a
Page 10
10
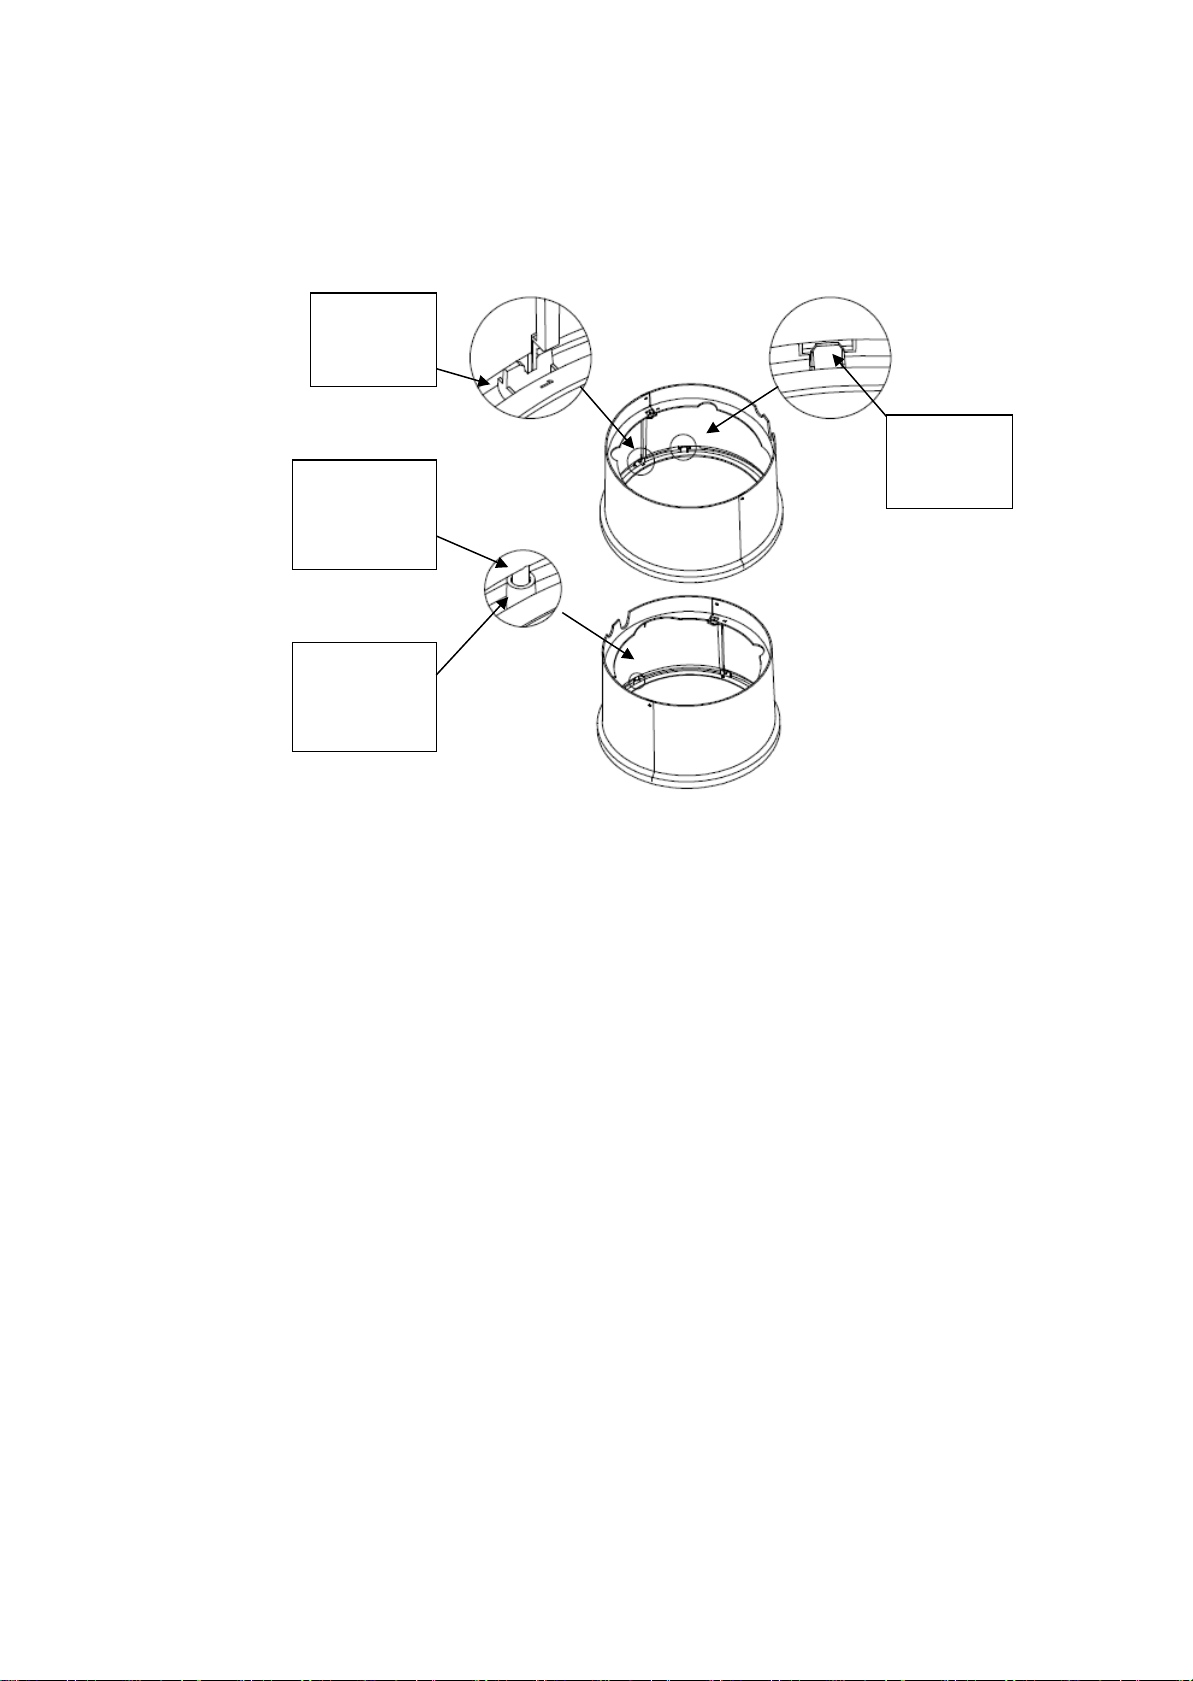
b) Be sure that both the clips on each side of the platform and the screw holes align
Clip slot on
Clip foot on
Recessed screw
Fixing scre w
correctly before inserting the clips in their respective slots on the stability ring as
shown in Fig 2b.
the ring
stud on the
back piece
hole on the
bottom ring
Fig 2b
c) Once you have assembled both the platform and stability ring together, using the
screws (2 short) provided firmly secure the stability ring to the platform as shown
in Fig 2b and Fig 2c.
d) Place the water dispenser on the assembled platform and firmly secure the water
dispenser and platform together using the screws provided (2 long self-tapping).
Be sure the power cord fits securely over the cutout in the back panel.
the ring
Page 11

11
OPERATION INSTRUCTIONS
WARNING
Before Using Your Water Dispenser
• Check to be sure the following parts are included:
Instruction manual
4 extra cup dispenser cabinet plug s
Accessories order form.
1 height adjustment platform assembly (2 panels, 1 stability ring, 4 screws) (WD363P)
• Before connecting the appliance to the power source, let it stand upright for approximately 2
hours. This will reduce the possibility of a malfunction in the cooling system from handling
during transportation.
• The water dispenser is pre-cleaned at the factory but the reservoir and water lines
must be flushed with fresh water before use as follows:
• Keep the unit unplugged.
• Fill water tank with tap water full to capacity (more than 3/4 of a gallon). Wait for 5
minutes until water settles.
• Press the hot water faucet until water comes out, then stop.
• Plug the dispenser into the electrical outlet. Both heating and cooling indicator lights
on front will light up at first. We are ready to complete the first cycle. In order to do
that, wait for the hot water indicator light to go off first (approximately 10 minutes),
then wait for the cold water indicator light to go off (another 40 minutes,
approximately).
• Unplug the dispenser from the electrical outlet. Proceed to drain the water from the
faucets one at a time until no more water remains.
(Note: To facilitate this operation, use a large container).
• Then, drain any water left in the tanks by opening the drain plug located on the back,
until it drains completely.
• Proceed to close the drain cap.
• Place the 5-gallon bottle of water on the water intake, allow water to stand for
approximately one minute.
• Open water faucets to insure water flows from both faucets.
• Plug dispenser into the electrical outlet.
• Now you are ready to use your water dispenser.
NOTE: Your water dispenser has been cleaned and sanitized before leaving the
factory, but in case a taste problem develops, place two tablespoons of
baking soda and add tap water. Fill water tank again and repeat basic
operations previously outlined, except turn the switch mar ked HOT “OFF” to
avoid leaving residues in hot water tank.
ATTENTION:
If you do not plan to use the water heating function for more than three days, we
recommend that you turn the HOT switch to the “OFF” position.
IMPROPER USE OF THE GROUNDED PLUG CAN RESULT IN THE RISK OF ELECTRICAL SHOCK. IF
THE POWER CORD IS DAMAGED, HAVE IT REPLACED BY AN AUTHORIZED AVANTI PRODUCTS
SERVICE CENTER.
Page 12

12
OPERATING YOUR WATER DISPENSER
NOTE:
Steps to replace water bottles
• Use a clean cloth to wipe off neck of bottle.
• Remove cap.
• Carefully lift bottle (approx. 40 lbs.) usin g your legs and not your back. Do not place hands on
opening of bottle while placing in reservoir.
• Insert the water bottle on the water intake over reservoir opening so it settles properly on it.
• Wipe off any water which may have splashed on dispenser top.
• When a new bottle is installed you must open the hot water faucet and remove no less than 4 full
cups of water to insure the water flows properly and the water reservoir is at the proper level.
Cold Water Control
Turn the cooling sw itch on. The green indicator will be lit on a nd the pr ocess be gins. W hen the wat er
reaches the right temperature the green light goes off automatica ll y.
Hot Water Control
Turn the heating switch on, the red indicator will be l it on and the heat ing process start s. When the
water reaches the right tem peratur e the red l ight goe s off aut omati call y. When the temp erature g oes
down to approx. 80º C (176º F), the red indicator will glow again and another heating process starts.
THE HOT WATER FAUCET HAS A CHILD-SAFETY GUARD ATTACHMENT.
To dispense hot water:
♦ Slide red safety button to the left and hold while pressing downward on hot water faucet to
dispense hot water.
♦ Safety button will return to its original position when faucet is released.
Cup Dispenser (Optional)
A cup dispenser may be installed by using the mounting holes (covered with plastic caps) located
near the top of the right side panel of the cooler. The cup dispenser comes equipped with a mounting
bracket and screws and may be ordered by completing the enclosed order form provided with your
instruction manual.
Page 13

13
CARE AND MAINT ENANCE
PROBLEM
POSSIBLE CAUSE
Water dispenser does not operate.
The circuit breaker tripped or a blown fuse.
Water cooler is not cold enough.
Check to be sure the cold switch on the back is ON.
clearances.
Water dispenser hot water is not hot enough.
Check to be sure the hot switch on the back is ON.
Compressor turns on and off frequent l y.
The room temperature is hotter than normal.
clearances.
Vibrations.
Check to assure that the water dispenser is level.
The water dispenser seems to make too much
The rattling noise may come from the flow of the
The water dispenser is not level.
Bottle feels warm.
The water system is overfilled. Dispense Cold water
until air is released into the bottle.
Water bottle is hot.
Water is boiling in the hot tank and bubbling up into the
to remove air from the hot tank.
• Wash the inside of the reservoir with a warm water and baking soda solution. The so lut ion sh ou ld
be about 2 tablespoons of baking soda to a quart of water.
• The drip tray and water faucets should be cleaned with mild detergent and warm water.
• At regular intervals or once a month inspect the coils located across the back of the dispenser.
Vacuum accumulation of dust or clean it with a hard brush.
TAKING DISPENSER OUT OF SERVICE
• If the water dispenser will not be used for a long period of time, unplug the power cord from the
wall outlet.
• Drain the water through the faucets.
• Turn the switch market hot to the “OFF” position.
• Drain the water from the tank by removing the plug from the back of the dispenser.
WARNING—THE WATER COMING OUT OF THE BACK SIDE MARKED “HOT” MAY BE SCOLDING.
Unit should not be transported on the sides. Place it upright if possible and cover it with a
blanket.
PROBLEMS WITH YOUR WATER DISPENSER
You can solve many common water dispenser problems easily, saving you the cost
of a possible service call. Try the suggestions outlined below to see if you can solve
the problem before calling the service.
TROUBLESHOOTING GUIDE
noise.
Not plugged in.
The water dispenser does not have the correct
The temperature control is not set corre ct ly.
The water dispenser does not have the correct
refrigerant, which is normal.
As each cycle ends, you may hear gurgling sounds
caused by the flow of refrigerant in your water
dispenser.
Contraction and expansion of the inside walls may
cause popping and crackling noises.
bottle. Press the hot dispenser button until water flows
Page 14

14
SERVICE FOR YOUR WATER DISPENSER
800-323-5029
help is available.
You may order parts and a ccessories that will be
money order, Master Card, or Visa.
know your appliance inside and out.
We are proud of our customer service organization and the network of professional service
technicians that provide service on your Avanti appliances. With the purchase of your Avanti
appliance, you can have th e confi dence t hat if you ever need addit iona l informat io n or assista nce, th e
Avanti Products Customer Serv ice team wi ll be here for you. Just cal l us toll-free.
AVANTI PRODUCTS CUSTOMER SERVICES
Product Information
Part Orders
800-220-5570
Whatever your questions are about our products,
delivered directly to your home.
You may order these items by personal check,
In-Home Repair Service
800-220-5570
An Avanti Products authori zed service center will
provide expert repa ir servi ce, sch edule d at a ti me
that is convenient for you. Our trained servicers
Page 15

15
YOUR AVANTI PRODUCTS
Staple your sales receipt here. Proof of original
warranty.
WHAT IS COVERED – LIMITED ONE-YEAR WARRANTY
center for repair.
LIMITED SECON D T H ROUGH FIFTH YEAR WARRANTY
user’s responsibility.
WARRANTY EXCL U SIONS / WHAT IS NOT COVERED:
Products, including without limitation, one or more of the following:
•
lightning, power surges, structural failures surrounding the appliance, and acts of God.
•
the complete sealed system.
• Shipping and handling costs associated with the
In no event shall Avanti Products have any liability or responsibility whatsoever for damage to surrounding
cabinetry, walls, floors, shelving etc., as well as the resetting of breakers or fuses.
OUT OF WARRANTY PRODUCT
repairs, pro-rates, or product replacement, once this warranty has expired.
WARRANTY – REFRIGERATION - COMPRESSOR
WARRANTY
Avanti Products warrants that the product is free from defects in materials and/or workmanship for a period of
twelve (12) months from the date of purchase by the original owner. The foregoing timeline begins to run upon
the date of purchase, and shall not be stalled, tolled, extended, or suspended for any reason whatsoever unless
described in detail in the warranty document. For one year from the date of purchase by the original owner,
Avanti products will, at its option, repair or replace any part of the product which proves to be defective in
material or workmanship under normal use. Avanti Products will provide you with a reasonably similar product
that is either new or factory refurbished. During this period Avanti Products will provide all parts and labor
necessary to correct such defects free of charge, so long as the product has been installed and operated in
accordance with the written instructions in this manual. In rental or commercial use, the warranty period is 90
days. All Avanti appliances of 3.5 cubic feet capacity or less must be brought/sent to the appliance service
For the second through the fifth year from the date of original purchase, Avanti Products will provide a
replacement compressor free of charge due to a failure. You are responsible for the service labor and freight
charges. In rental or commercial use, the limited compressor warranty is one year and nine months. Costs
involved to move the product to the service center and back to the user’s home, as maybe required, are the
The warranty coverage described herein excludes all defects or damage that are not the direct fault of Avanti
A failure to comply with any applicable state, local, city, or county electrical, plumbing and/or building codes,
regulations, or laws, including failure to install the product in strict conformity with local fire and building codes
and regulations.
purchase date is needed to obtain service under
• Any external, elemental and/or environmental forces and factors, including without limitation, rain, wind, sand,
floods, fires, mud slides, freezing temperatures, excessive moisture or extended exposure to humidity,
Content losses of food or othe r content due to
spoilage.
• Incidental or consequential damages
• Parts and labor costs for the following will not be
considered as warranty:
• Evaporator doors, door springs, and/or frames.
• Inner door panels, door shelves, door rails,
and/or door supports.
• Chest freezer lid liners.
• Vegetable crispers.
• Light bulbs and/or plastic housing.
• Plastic cabinet liners.
• Punctured evaporator that voids the warranty on
property, including cabinetry, floors, ceilings, and other structures and/or objects around the product. Also
excluded from this warranty are scratches, nicks, minor dents, and other cosmetic damages on external surfaces
and exposed parts; Products on which the serial numbers have been altered, defaced or removed; service visits
for customer education, or visits where there is nothing wrong with the product; correction of installation problems
(you are solely responsible for any structure and setting for the product, including all electrical, plumbing and/or
other connecting facilities, for proper foundation/flooring, and for any alterations including without limitation
Avanti Products is under no obligation, at law or otherwise, to provide you with any concessions, including
replacement of the unit.
• Repairs performed by unauthorized servicers.
• Service calls that are related to external problems,
such as abuse, misuse, inadequate electrical
power, accidents, fire, floods, or any other acts of
God.
• Failure of the product if it is used for other than it
intended purpose.
• The warranty does not apply outside the
Continental USA.
• Surcharges including but not limited to, any after
hour, weekend, or holiday service calls, tolls, ferry
trip charges, or mileage expense for service calls to
remote areas.
Page 16

16
INSTRUCCIONES EN ESPAÑOL
PIEZA
PIEZA
ARO
PLATAFORMA PARA AJUSTE DE ALTURA (MODELO WD363P SOLAMENTE)
PARA PERMITI R Q U E EL GRIFO DE SU DISPENSADOR DE AGUA SEA MAS ACC ESIBL E,
SU UNIDAD CUENTA CON UNA PLATAFORMA PARA AJUSTE DE ALTURA. LA
PLATAFORMA REQUIERE ENSAMBL A JE T AL CO M O SE ENSEÑA ABAJO.
RETIRE TODAS LAS PARTES Y LOS MATERIALES DE EMPAQUE DE LA CAJA.
A) ALINEE LA SECCION FRONTAL Y POSTE RIOR DE LA PLATAFORMA Y
ENSAMBLE COMO S E MUESTRA EN LA FIGURA 1.
FRONTAL
LATERAL
Fig. 1
C) ALINEE LA PLATAFORMA ENSAMBLADA CO N LA P A RTE INFERIOR DEL ARO DE
ESTABILIDA D COMO S E MUESTRA EN LA FIGURA 2A.
ALINEE LAS AREAS MARCADAS “1” Y “2” EN LA PLATAFORMA CON LAS MISMAS
AREAS MARCADAS “1” Y “2” DEL ARO DE ESTABILIDAD.
(NOTA: ESTAS AREA S DE BEN SER ALINEADAS CORR ECTAMENTE PARA EL
ENSAMBLAJE DE LA UN I D A D. SI LA PLA TAFORMA NO ESTA ALINEADA
CORRECTAMENTE AL ARO DE ESTABILIDAD, LOS CLIPS DE RETENCION
PODRÍAN SUFRIR DAÑO PERMANENTE Y CAUSAR QUE LA PLATAFORMA SEA
INESTABLE.
INFERIOR
Fig 2a
D) ASEGURESE QUE AMBOS CLIPS EN LOS LADOS DE LA PLATAFORMA Y LOS
ORIFICIOS PARA LO S TORNILLOS SE ALINEEN CORRECTAMENTE ANTES DE
Page 17

17
INSERTAR LOS CLIPS EN SU LUGAR RESPECTIVO DEL ARO DE ESTABILIDAD
AVISO:
ORIFICIO
SUJETADOR
ORIFICIO PARA
ARO
TORNILLO
COMO SE MUESTRA E N LA FIG 2B.
PARA EL
CLIP
ASEGURADOR
EN LA PIEZA
POSTERIOR
DEL CLIP
EL TORNILLO EN
LA PARTE
INFERIOR DEL
Fig 2b
E) UNA VEZ QUE HAYA ENSAMBLADO Y ASEGURA DO LA PL A TAFORMA Y EL ARO
DE ESTABILIDA D JU NTOS, USE LOS TORNILLO S INCLUIDOS CON L A U N IDAD Y
ASEGURE FIRMEMENTE EL ARO DE ESTABILIDAD COMO SE MUESTRA EN LA FIG
2B.
COLOQUE EL DISPE N SA DOR DE AGUA EN LA PLATAFORMA ENSAMBLADA Y ASEGURELOS
FIRMEMENTE USANDO LOS TORNILLOS QUE VIENEN INCLUIDOS
ESTE GRIFO DE AGUA CALIENTE TIENE UN ADAPTADOR DE SEGURIDAD PARA
NIÑOS.
PARA OBTENER AG UA C ALIENTE:
♦ MUEVA HACIA LA IZQUIERDA Y NO S UE L TE EL BOTON DE SEGURIDAD .
♦ MANTENGA AGARRADO ESE BOTON DE SEGURIDAD MIENTRAS QUE EMPUJE EL GRIFO
♦ CUANDO SUELTE EL GRIFO ASEGURESE DE RETORNARLO A LA POSICION ORIGINAL.
HACIA ABAJO PARA DISPENSAR EL AGUA CALIENTE.
Page 18

18
PASOS RECOMENDADOS PARA CAMBIAR EL BOTELLON
QUITE EL BOTELLON VACIO.
LIMPIE EL CUELLO DEL BOTELLON NUEVO CO N UN TRAPO LI MPIO.
LEVANTE EL BOTELLON HACI E NDO FU E RZA CO N LAS PIE R NA S Y NO LA ESPALDA.
TOME EL BOTELLON POR LOS LADO S Y DIRI J A EL C UELLO D EL MISMO HACIA LA
APERTURA DEL TANQUE.
VOLTEE EL BOTELLON COMO SI FU E RA A SOL T A R AG U A E INSE R T E EL CUELLO DE L
BOTELLON EN LA APE R T URA D EL T A NQ U E HAS T A Q UE SE COLO QUE EN LA POSICIO N
CORRECTA.
DIRECCIONES BA SICAS DE OPERACION:
COLOQUE EL ENFRIA DOR DE PIE POR UN PER I O DO DE 2 HORAS ANTES DE ENCHUFAR
LA UNIDAD A LA PARED.
COLOQUE EL ENFRIA DOR EN UN AR EA BIEN VENTILADA Y DEJE UN ESPACIO DE UN
POCO MAS DE 2 PULGADAS E N T RE LA U NI DA D Y LA PAR E D.
ESCOJA UN LUGAR CON PI S O N I VELADO .
NO COLOQUE EL ENFRIADOR DONDE LA TEMPERATURA AMBIENTAL PUEDA BAJAR DE
32
°F (0°C).
ANTES DE ENCHUFARLO
AUNQUE ENFRIADOR SALE LIMPIO DE LA FABRICA, DEBE LIMPIAR Y ESTERILIZAR L OS
CONDUCTOS DEL TANQUE Y LOS GRIFOS DE ACUE R DO A LO S SIGUIENTES PASOS:
LLENE EL TANQUE DE AGUA (HASTA EL TO P E) C O N AG UA DE LA PILA.
DEJE NIVELAR EL AGUA POR 5 MINUTO S.
ABRA LA LLAVE DE AGUA CALIENTE HA S TA Q UE SA L GA AGUA Y CIERRELA
INMEDIATAMENTE.
ENCHUFE LA UNIDAD A LA PARED.ENCRENDA LOS DOS INTERRUPTORES SITUADOS
EN LA PARTE TRASERA. LOS DOS INDICADORES DE LUZ SE ALUMBRARAN. ESPERE
HASTA QUE EL INDI CADO R DE AGUA CALIENTE SE APAGUE (APROX. 10 MINUTOS).
ENTONCES ESPERE HASTA QUE EL INDI CA DO R DE AG U A FRI A SE A PAGUE (APROX. 5
MINUTOS).
DESCONECTE LA UNIDAD DE LA PARED.
EMPIEZE A DRENAR LAS LLAVES UN A A LA VEZ HASTA QUE SALGA EL UL TIMO
CHORRO DE AGUA.
EN LA PARTE TRASERA DE LA UNIDA D ENCONTRARA UNA TAPA PLASTICA. GIRE HA CI A
LA IZQUIERDA LA TAPA HASTA QUE SALGA EL ULTIMO CHORRO.
CUANDO NO SALGA MAS AGUA DE LA APE RT UR A, CIE RR E LA T AP A PL AS TI C A.
TOME EL BOTELLON DE AGUA Y SIGA LA S IN S TR UC CI O NE S PA RA C AM BIAR EL
BOTELLON.
ENCHUFE LA UNIDAD. AHORA SU ENFRIADOR ESTA LISTO PARA SU USO .
CONTROLES DE OPERACION
CONTROL DE AGUA FRIA:
ABRA LA LLAVE DE AGUA F RI A (10) . EL IN DICADOR DE LUZ VERDE SE ENCENDERA Y
EL PROCESO DE ENFRIAMIENTO COMENZARA. CUANDO LA TEMPERATURA
ALCANCE APROXIMADAMENTE 5-7°C LA LUZ VERDE SE APAGARA
AUTOMATICAMENTE.
CONTROL DE AGUA CALIENTE:
ABRA LA LLAVE DE AGUA C ALI E N TE (11 ). EL IN DI C A DO R DE LUZ RO JA SE
ENCENDERA Y EL PROCESO DE CALENTAMIENTO DEL AGUA COMENZARA.
CUANDO LA TEMPERATURA ALCANCE APROXIMADAMENTE 80°C LA LUZ ROJA SE
APAGARA AUTOMATICAMENTE Y OTRO CICLO DE CALENTA MI E NTO EMPEZARA.
Page 19

19
MANTENIMIENTO
DERRAME DE AGUA POR FUERA DEL
ENFRIADOR
LA BOTELLA ESTA PER FORADA –
REEMPLACELA
EL AGUA NO ESTA SUFICIENTEMENTE
SU TEMPERATURA DEBERIA SER DE 5° A
PODRIA ESTAR DEFECTUOSO.
EL AGUA NO ESTA SUFICIENTE CALIENTE
SU TEMPERATURA DEBERIA SER DE 80° A
PODRIA ESTAR DEFECTUOSO.
EL ENFRIADOR NO E NFRIA O CAL IENTA E L
AGUA
VERIFIQUE LOS CIRCUITOS, FUSIBLES O
DISYUNTORES.
A INTERVALOS REGUL AR ES (U NA VEZ AL MES), INSPE CCI ON E EL CONDE NSADOR O
REJILLA DE ALAMBRE LOCALIZADA EN LA PARTE TRASERA DE LA UNIDAD.
ANTES DE EFECTUAR LA LIMPIEZA, DESENCHUFE EL ENFRIADOR. USE UNA
ASPIRADORA O UN CEPILLO DURO PARA QUITAR EL POLVO.
PARA LIMPIAR LAS PARTES DE PLASTICO SE REQUIERE JABON LIQUIDO Y AGUA TIBIA.
NO USE LIMPIADO RES ABRASIVOS EN LA SUPERFICIE SU P ERIOR NI EN LA BANDEJA DE
ESCURRIMIENTO.
SI NO VA A USAR EL ENFRIADOR POR UN TIEMPO PROLONGADO
DESENCHUFE LA UNIDAD.
QUITE EL BOTELLON DE AGUA.
COLOQUE LOS INTERRUPTORES MARCADOS CALIENTE Y FRIO (EN LA PARTE
TRASERA) EN LA POSICION “OFF”.
DRENE EL AGUA ABRIENDO LAS LLAVES.
DRENE LA APERTURA EN LA PARTE TRASERA QUITANDO EL TAPON.
EL ENFRIADOR DEBE TRANSPORTARSE PARADO Y CUBIERTO CON UNA FRAZADA PARA
EVITAR QUE SE RAYE.
POSIBLES PROBLEMAS CAUSA
FRIA.
7° C CON UNA TEMPERATURA AMBIENTE
DE 20°
C. SI NO ES ASI, LLAME AL
CENTRO DE SERVICIO, EL TERMOSTATO
90° C CON UNA TEMPERATURA AMBIENTE
DE 20°
C. SI NO ES ASI, LLAME AL
CENTRO DE SERVICIO, EL TERMOSTATO
Page 20

20
APPAREIL SÉCURITÉ
Votre sécurité et celle des autres sont très importantes.
Nous avons fourni de nombreux messages de sécurité importants dans ce manuel et sur votre
appareil. Toujours lire et obéir à tout message de sécurités.
C'est le symbole d'alerte de sécurité. Ce
Tout message de sécurités vous alertera à quel est le danger potentiel et vous disent comment
sont pas suivies.
symbole vous signale les dangers
potentiels peut tuer ou blesser vous et
d'autres. Tout sécurité mes sages sui vra la
sécurité symbole d'alerte et soit les
quartiers" DANGER","ATTENTION" ou
"PRUDENCE".
Danger signifie que le non-respect de cette
déclaration de sécurité peut entraîner des
blessures ou la mort.
Attention signifie que le non-respect de
cette déclaration de sécurité peut entraîner
des dommages importants du produit, des
blessures graves ou la mort.
Attention signifie que le non-respect de
cette déclaration de sécurité peut entraîner
des mineures ou modérées blessures, ou
des biens ou des dommages matériels.
réduire le risque de blessure, et vous permettent de savoir ce qui peut arriver si les instructions ne
Page 21

21
APPAREIL SÉCURITÉ
Avant le refroidisseur de breuvages est utilisé, il doit être correctement
•Brancher sur une 3 broches mise à la terre sortie, faire pas enlever la terre broches, faire pas utiliser
à un technicien qualifié.
• Utilisation deux personnes ou plus pour déplacer et installer l’appareil. Ne pas le faire peut entraîner
• Ne pas utiliser cet appareil pour d'autres fins que celles prévues.
positionné et installé comme décrit dan s ce ma nue l, afin de lire attentivement
le manuel. Pour réduire le risque d'incendie, choc ou de blessure électrique
lors de l'utilisation du refroidisseur de breuvages, Suivez les précautions de
un adaptateur, et ne pas utiliser une rallonge
• Remplacer tous les panneaux avant exploitation
• Il est recommandé d'utiliser un circuit distinct, qui sert uniquement votre refroidisseur de breuvages,
fournir. Utilisez des récipients cette ne peut pas être désactivé par une chaîne de traction
interrupteur ou
• ne jamais nettoyer appareil pièces avec des liquides inflammables. Ces vapeurs peuvent créer un
risque d'incendie or explosion. Et ne pas stocker ou utiliser de l'essence ou d'autres vapeurs et
liquides inflammables à proximité de cet appareil ou de tout autre appareil. Les vapeurs peuvent
créer un risque d'incendie ou d'explosion.
• Avant de procéder à des opérations de nettoyage et d'entretien, assure z-vous que la ligne
d'alimentation de l'appareil est débranchée.
• Faire pas brancher ou débrancher la prise électrique lorsque vos mains sont humides
• Débranchez le appareil ou déconnecter la alimentation avant le nettoyage ou l'entretien. Ne pas le
faire peut entraîner un choc électrique ou la mort.
• Faire pas tenter de réparer ou de remplacer une partie de votre appareil à moins qu'il ne soit
spécifiquement recommandé dans ce matériau. Toutes les autres réparations doivent être confiées
bases, comprenant les éléments suivants:
dans le dos ou d'autres blessures.
• Pour assurer une bonne ventilation de votre appareil, l'appareil doit être complètement dégagé.
Choisissez un endroit bien aéré avec des températures supérieures à 55ºF (13ºC) et au-dessous
90ºF (32ºC). Cet appareil doit être installé dans une zone protégée de l’élément, Comme le vent, la
pluie, de l'eau pulvérisée ou lumière du soleil.
• l’appareil ne doit pas être situé à côté de fours, grilles ou autres sources de chaleur élevée.
• L’appareil doit être installé avec toutes les connexions électriques, d'eau et d'évacuation,
conformément à codes étatiques et locau x. Une al iment at ion électrique standard (115 V CA
seulement, 60 Hz), mise à la terre conformé me nt au Code national de l'électricité et les codes et
règlements locaux est néce ssaire.
• Faire pas plier ou pincer le cordon d'alimentation du appareil.
• Le fusible (ou disjoncteur) doit être de 15 ampères.
• Il est important pour l'appareil soit à niveau afin de fo nct ionner corr e ctem ent. Vo us de vre z peut -être
faire plusieurs ajustements à niveler.
• Toute installation doit être conforme aux exigences du code de plomb er ie lo cale.
• Assurez-vous que les tuyaux ne sont pas pincés ou pliés ou endommagés au cours installation.
• Vérifier les fuites après connexion.
• Ne jamais laisser les enfants utiliser, jouer ave c ou crawl à l'int érieur de l'ap pare il
• Faire pas utiliser de produits de nettoyage à base de solvants or abrasifs sur l'intérieur. Ces
nettoyants peuvent endommager ou dé col orer l'int érie ur .
Page 22

22
AIDEZ NOUS À VOUS AIDER ...
Lisez attentivement ce guide.
Il est destiné à vous aider à utiliser et à
maintenir votre nouveau distrib ute ur d'eau
correctement.
Gardez-le à portée de main pour répondre à
vos questions.
Si vous ne comprenez pas quelque chose ou
vous avez besoin de plus d'aide, s'il vous plaît
appelez:
Avanti Service à la clientèle
800-220-5570
Gardez preuve de la date d'achat d'orig ine (tel
que votre bordereau de vente) avec ce guide
pour établir la période de garantie.
SI VOUS AVEZ BESOIN DE SERVICE
Nous sommes fiers de notre service et nous
voulons que vous soyez heureu x. Si pour une
raison quelconque vous n'êtes pas satisfait du
service que vous recevez, voici quelques
étapes à suivre pour obtenir de l'aide.
FIRST, contacter les gens qui ont réparé votre
appareil. Expliquez pourquoi vous n'êtes pas
satisfait. Dans la plupart des cas, cela va
résoudre le problème.
Notez le modèle et le numéro de série.
Vous les trouverez sur une étiquette située sur
le côté arrière de l'appareil.
S'il vous plaît écrire ces chiffres ici:
____________________________________
Date d'achat
____________________________________
Numéro de modèle
____________________________________
Numéro de série
Utilisez ces numéros dans toute
correspondance ou appels de service
concernant votre distributeur d'eau.
Si vous avez reçu un distributeur d'eau
endommagée, contactez immédiatement le
revendeur (ou le constructeur) qui vous a
vendu le distributeur d'eau.
Gagnez du temps et de l'argent. Avant
d'appeler le service, consultez le Guide Solver
problème. Il énumère les causes des
problèmes de fonctionnement mineurs que
vous pouvez vous corriger.
Ensuite, si vous n'êtes toujours pas satisfait,
écrivez tous les détails, y compris votre
numéro de téléphone, et l'envoyer à:
Service Clients
Avanti Produits
10880 NW 30 Street
Miami, FL 33172
Page 23

23
1. ADMISSION DE L'EAU
Modele WD363P seulemont
PIÈCES ET CARACTÉRISTIQUES
2. HOT LUMIERE D E L'EAU (RED)
3. VOYANT (JAUNE)
4. COLD VOYANT (VERT)
5. EAU CHAUDE ROBINET (ROSE)
6. EAU FROIDE ROBINET (GRIS)
7. AMOVIBLE LÈCHEFRITE
8. PIED RÉGLABLE
9. FROID COMMUTATEUR
10. CHAUFFAGE COMMUTATEUR
11. CONDENSEUR COIL
12. CORDON D'ALIMENTATION
13. ÉVACUATION DE L'EAU
PLATEFORME – AJUSTEMENT
DE LA HAUTEUR
Page 24

24
Connexion électrique
Attention
d'alimentation est endommagé, faites-le remplacer par un centre de service Avanti Products autorisé.
Cet appareil doit être corre ctement mis à la ter re pour votre sécur ité. Le cordon d'al imentation de cet
ne fiche à trois broches qui accouple avec trois standards prises murales
un électricien qualifié ou un technicien de service installer une prise près d’appareil.
RALLONGE ÉLECTRIQUE
En raison des risques potentiels pour la sécurité dans certaines conditions, il est fortement
au moins 10 ampères.
PARASURTENSEUR
La plupart des appareils électriques utilisent une série de tableaux de commande électriques pour
contact nécessaire à un électricien agréé dans votre région.
Les dommages dus à des surtensions ne sont pas considérés comme un fabricant couvert défaut et
annulera la garantie du produit.
Une mauvaise utilisation de la prise de terre peut entraîner un risque de choc élec tr ique. Si le cordon
appareil est équipé d'u
broches afin de minimiser le risque de choc électrique.
Ne pas en aucun cas couper ou enlever la troisième broche de terre du cordon d'alimentation fourni.
Cet appareil nécessite une prise électrique standard 115Volts ~ / 60Hz avec le sol à trois broches.
Le cordon doit être fixé derrière le appareil et no n laissés exposés ou qui pendent pour prévenir le s
blessures accidentelles.
Ne jamais débrancher l'appareil en tirant sur le cordon d'a limentation. Toujours saisir ferm ement la
fiche et tirez tout droit sorti de la prise.
Ne pas utiliser une rallon ge avec cet appareil. Si le cordon d' alimentation e st trop court, de mandez à
recommandé de ne pas utiliser une rallonge avec cet appareil. Toutefois, si vous devez utiliser une
rallonge, il est absolument nécessaire que ce soit un UL / CUL, 3 fils de terre appareil rallonge ayant
une fiche de mise à la terre et à la sortie et que la puissance électrique du câble est de 115 volts et
fonctionner. Ces cartes sont très sensibles aux surtensions et pourraient être endommagés ou
détruits.
Si l'appareil va être utilisé dans une zone ou si votre ville / pays est sujette à des surtensions /
coupures; il est suggéré que vous utilisez un dispositif de protection contre les surtensions pour tous
les dispositifs / appareils électriques que vous utilisez. Le protecteur de surtension que vous
sélectionnez doit avoir un bloc de poussée suffisamment élevé pour protéger l'appareil, il est
connecté. Si vous avez des questions concernant le type et la taille d'un protecteur de surtension
Page 25

25
Plate-forme d'ajustement Hauteur (Modele WD363P – Seulemont)
Panneau
Panneau
Anneau de
Pour les robinets de distribution d'e au pl us acce ssi ble de votre app ar ei l a été fourni ave c une
plate-forme de réglage de la hauteur. La plate-forme nécessite l'assemblage comme indiqué
ci-dessous.
Les pièces fournies:
1 panneau avant
1 panneau arrière
1 Stabilité Ring (situé sur le couvercle de la mousse supérieure)
2 Vis courtes et 2 longues vis autotaraudeuses (situé dans le sac avec manuel d'instructions)
Retirez toutes les pièces de la boîte et enlever les matériaux d'emballage.
une) Aligner les deux panneaux arrière de la plate-forme avant et assembler comme
le montre la figure 1.
avant
arrière
Figure. 1
a) Alignez la plate-forme assemblé à l'anneau de stabilité dans le bas comme indiqué
sur la figure 2a.
Alignez les zones marquées "1" et "2 " sur la plate-forme avec les mêmes zones
marquées "1" et "2 " sur la bague de stabilité.
(REMARQUE:. Ces zones doivent être correctement aligné pour l'unité à
assembler Si la plate-forme ne soit pas aligné correctement à l'anneau de stabilité,
les clips de rétention pourraient être endommagés de façon permanente et
provoquent la plate-forme pour être instable).
figure 2a
Page 26

26
b) Assurez-vous que les deux clips de chaque côté de la plate-forme et les trous de
fente Clip
Clip pied sur
trou de vis
Vis de fixation
vis alignent correctement avant d'insérer les clips dans leurs fentes respectives sur
l'anneau de stabilité, comme illustré sur la figure 2b.
sur l'anneau
goujon sur la
pièce arrière
d'encastrement
sur l'anneau
inférieur
La figure 2b
c) Une fois que vous avez assemblé à la fois la plate-forme et de l'anneau de stabilité
ensemble, en utilisant les vis (2 courts) fournies fixer solidement la bague de la
stabilité à la plate-forme comme le montre la figure 2b et la figure 2c.
d) Placez le distributeur d'eau sur la plate-forme assemblé et fixer solidement le
distributeur d'eau et de la plate-forme ensemble à l'aide des vis fournies (2 longues
auto-taraudage). Ass urez-vous que le cordon d'alimentation soit bien fixée sur la
découpe dans le panneau arrière.
le ring
Page 27

27
DIRECTIVES D'INSTALLATION:
• Retirez l'emballage extérieur et intérieur.
• Placez votre appareil sur un sol qui est assez solide pour supporter le distr ibuteur lorsqu'il est
complètement chargé. S i çane siège pas au niveau de lasol, ajuste z le pied avant dro it au
niveau de l'unité et à l'étage. Remarque: Seu l le pie d avant dro it est réglab le.
• Repérez l'appareil loi n de la lumière du soleil directe et des sources de chaleur (cuisini ère,
chauffage, radiateur , etc.). La lumière solaire directe peut affecter le r evêtement acr ylique et
sources de chaleur peuvent augmenter la consommation électrique. Les températures
ambiantes froides extrêmes peuvent aussi causer l'appareil de ne pas fonctionner
correctement.
• Prévoir 5 pouces d' espace entre le distrib uteur d' eau et l e mur, ce qui p ermet u ne circ ulation
de l'air pour refroidir le compresseur.
• Branchez l'appareil dan s une prise mura le correct ement installé e à la terre exclu sive. Ne pa s
couper ou enlever la troisième (terre) du cordon d'alimentation en toutes circonstances.
Toute question concernant le pouvoir et / ou mise à la terre doivent être adressées à un
électricien certifié ou un centre de service Avanti Produits autorisé.
• Ce distributeur d'eau est pas recommandé pour une utilisation en extérieur.
• Ne pas placer le distributeur dans un endro it où la température peut tomber en dessous de
zéro (32º F).
• Garder la zone autour de distributeur exempt de poussière et de la saleté.
• Gardez l'alimentation de réserve de bouteilles d'eau loin de la chaleur excessive et de la
lumière.
• Ne jamais débrancher le refroidisseur d'eau, sauf pour l'entretien.
Page 28

28
INSTRUCTIONS D'UTILISATION
ATTENTION
MAUVAISE UTILISATION DE LA PRISE AVEC TERRE PEUT E NTRAINER DANS LE RISQUE DE CHOC
ÉLECTRIQUE. SI
NTI
Avant d'utiliser votre distributeur d'eau
• Vérifiez que les éléments suivants sont inclus:
Manuel d'instructions
4 bouchons d'armoire tasse de distribution supplémentaires
Accessoires formulaire de com ma nde.
• Avant de raccorder l'appareil à la source d'alimentation, laissez-le tenir debout pendant
environ 2 heures. Cela permettra de réduire la possibilité d'un mauvais fonctionnement du
système de refroidissement lors de la manip ul ation durant le transport.
• Le distributeur d'eau est pré-nettoyée à l'usine, ma is les lignes de réservoir et de
l'eau doit être rincé à l'eau douce avant de l'util iser comme su it:
• Gardez l'appareil débranché.
• Remplir le réservoir d'eau avec de l'eau du robinet à pleine capacité (plus de 3/4 d'un
gallon). Attendez 5 minutes jusqu'à ce que l'eau se dépose.
• Appuyez sur le robinet d'eau chaude jusqu'à ce que l'eau sort, puis arrêter.
• Branchez le distributeur dans la prise électrique. Les deux indicateurs de chauffage
et de refroidissement des lumières sur le devant s'allument au premier abord. Nous
sommes prêts à compléter le premier cycle. Pour ce faire, attendez que le chaud
indicateur de l'eau se éteigne premières (environ 10 minutes), puis attendez que le
froid indicateur de l'eau légère pour se déclencher (40 minutes environ).
• Débranchez le distributeur de la prise électrique. Passez à drainer l'eau des robinets,
un à la fois jusqu'à ce que plus d'eau reste.
(Remarque: Po ur faciliter cett e opéra tio n, uti li ser un gra nd réci pient ).
• Ensuite, égoutter l'eau dans les réservoirs en ouvrant le bouchon de vidange situé à
l'arrière, jusqu'à ce qu'elle se déch ar ge compl ète ment.
• Passez à fermer le bouchon de vidange.
• Placez la bouteille d'eau de 5 gallons sur la prise d'eau, laisser l'eau reposer pendant
environ une minute.
• robinets d'eau ouverts pour assurer des débits d'eau des deux robinets.
• Branchez distributeur dans la prise électrique.
• Maintenant, vous êtes prêt à utiliser votre distributeur d'eau.
REMARQUE: Votre distributeur d'eau a été nettoyé et désinfecté avant de quitter le
usine, mais dans le cas où un problème de goût se développe, placez deux cuillères à soupe de
bicarbonate de soude et ajouter de l'eau du robinet. Remplir à nouveau le réservoir d'eau et
répéter base les opérations précédemment décrite s, s auf tour ner le co mmu tate ur marqué HOT
"OFF" pour éviter de laisser des résidus dans le réservoir d'eau chaude.
ATTENTION:
Si vous ne prévoyez pas d'utiliser la fonction de cha uff age de l'eau pendant plus de trois
jours, nous vous recomma ndon s d'activer le interrupteur HOT à la position «OFF ».
LE CORDON D'ALIMENTATION EST ENDOMMAGÉ, FAIRE REMPLACER PAR UNE PRODUITS AVA
Page 29

29
UTILISATION DE VOTRE DISTRIBUTEUR D'EAU
REMARQUE:
Étapes pour remplacer les bouteilles d'eau
• Utilisez un chiffon propre pour essuyer goulot de la bouteille.
• Retirer le bouchon.
• Soulevez délicatement la bouteille (env. 40 lbs.) À l'aide de vos jambes et non votre dos. Ne pas
mettre les mains sur l'ouverture de la bouteille tout en plaçant dans le réservoir.
• Insérez la bouteille d'eau sur la prise d'eau sur l'ouverture du réservoir de sorte qu' il se mette en
place sur elle.
• Essuyez toute l'eau qui peut avoir éclaboussé sur le dessus du distributeur.
• Quand une nouvelle bouteille est installé, vous devez ouvrir le robinet d'eau chaude et retirez pas
moins de 4 tasses pleines d'eau pour assurer l'eau circule correctement et le réservoir d'eau est
au niveau approprié.
Contrôle de l' eau froide
Tournez le commutateur de refroidissement sur. Le voyant vert est allumé et que le processus
commence. Lorsque l'eau atteint la bonne température le feu vert se déclenche automatiquem ent.
Contrôle de l' eau chaude
Tournez le commutateur de chauffage, le voyant rouge sera allumé et le processus de chauffage
commence. Lorsque l'eau atteint la bonne température la lumière rouge se déclenche
automatiquement. Lorsque la température descend jusqu'à env. 80º C (176º F), le voyant rouge
brillera à nouveau et un autre processus de cha uffa ge com me nce.
L'EAU CHAUDE ROBINET A UN ACCESSOIRE ENFANTSAFETY GUARD.
Pour distribuer l'eau chaude:
♦ Faites glisser le bouton de sécurité rou ge à gauc he et mai nten e z tout en appuyant vers le bas sur
le robinet d'eau chaude pour distribuer l'eau chaude.
♦ Bouton de sécurité va revenir à sa position init ia le lor sque le ro bi net est libér é .
Coupe du distributeur (Facultatif)
Un distributeur de gobelets peut être installé en utilisant les trous de montage (recouverts de
bouchons en plastique) situ és près de la parti e supér ie ure du panneau latéral droit du refroidisseur.
Le distributeur de gobelets est équipé d'un support de montage et les vis et peut être commandé en
remplissant le formulaire de commande ci-joint fourni avec votre manuel d'instruction.
SOINS ET ENTRETIEN
• Laver l'intérieur du réservoir avec une solution d'eau et de bicarbonate de soude chaude. La
solution devrait être d'environ 2 cuillères à soupe de bicarbonate de soude à un litre d'eau.
• Le bac d'égouttage et les robinets d'eau doivent être nettoyées avec un détergent doux et de
l'eau chaude.
• A intervalles réguliers, ou une fois par mois inspecter les bobines situées dans le dos du
distributeur. l'accumulation de vide de poussière ou de le nettoyer avec une brosse dure.
Page 30

30
PRENANT DISTRIBUTEUR DE SERVICE
PROBLÈME
CAUSE POSSIBLE
Le distributeur d'eau ne fonctionne pas.
Non branché.
Le disjoncteur est déclenché ou un fusible grillé.
refroidisseur d'eau est pa s asse z froid.
Vérifiez que le commutateur de froid sur le dos est ON.
correctes.
Distributeur d'eau de l'eau chaude est pas assez
chaud.
Vérifiez que l'interrupteur à cha ud sur le do s est ON.
Compresseur allume et éteint fréquemment.
La température ambiante est plu s chaud que la
correctes.
Vibrations.
Vérifiez pour assurer que le distributeur d'eau est de
niveau.
Le distributeur d'eau semble faire trop de bruit.
Le bruit de cliquetis peut provenir de l'écoulement du
Le distributeur d'eau est pas de niveau.
Bouteille est chaud.
jusqu'à ce que l'air est libéré dans la bouteille.
Bouteille d'eau est chaude.
L'eau est en ébullition dans le réservoir chaud et
éliminer l'air du réservoir d'eau chaude.
• Si le distributeur d'eau ne sera pas utilisé pendant une longue période de temps, débranchez le
cordon d'alimentation de la prise murale.
• Videz l'eau à travers les robinets.
• Tournez le marché de la commutation à chaud à la position «OFF».
• Videz l'eau du réservoir en retirant le bouchon à l'arrière du distributeur.
AVERTISSEMENT l'eau sortant de la SIDE BACK MARQUÉ "HOT" PEUT ETRE grondant.
Unité ne doit pas être transporté sur les côtés. Placez-le en position verticale si possible et le
couvrir avec une couverture.
PROBLÈMES AVEC VOTRE DISTRIBUTEUR D'EAU
Vous pouvez résoudre de nombreux problèmes de distribution d'eau courante
facilement, vous permet d'économiser le coût d'un appel de service possible.
Essayez les suggestions présentées ci-dessous pour voir si vous pouvez résoudre le
problème avant d'appeler le service.
GUIDE DE DÉPANNAGE
Le distributeur d'eau ne possède pas les autorisations
normale.
Le contrôle de la température ne soit pas corre ct e.
Le distributeur d'eau ne possède pas les autorisations
fluide frigorigène, ce qui est normal.
Comme chaque cycle se termine, vous pouvez entendre
des gargouillis causés par l'écoulement du réfrigérant
dans votre distributeur d'ea u.
Contraction et expansion des parois internes peuvent
provoquer des craquements et des.
Le système d'eau est trop plein. Distribuer l'eau froide
bouillonnant dans la bouteille. Appuyez sur le bouton du
distributeur chaud jusqu'à ce que l'eau coule pour
Page 31

31
SERVICE POUR VOTRE DISTRIBUTEUR D'EAU
800-323-5029
produits, l'aide est disponible.
Vous pouvez commander des pièces et
personnel, mandat, Master Card ou Visa.
Un centre de service Avanti Produits autorisé
à l'extérieur.
Nous sommes fiers de notre organisation de service à la clientèle et le réseau de techniciens de
services professionnels qui offrent des services sur vos appareils Avanti. Avec l'achat de votre
appareil Avanti, vou s pouvez avoir la certitude que si vous avez besoin d'inf ormations ou de l'aide,
l'équipe du service à la clientèle Avanti Products sera là pour vous. Appelez-nous sans frais.
AVANTI PRODUITS SERVICES CLIENTS
Information produit
Les commandes de la pièce
800-220-5570
In-Home Repair Service
800-220-5570
Quelles que soient vos questions sont sur nos
accessoires qui seront li vrés directement à votre
domicile.
Vous pouvez comma nder c es artic les par chèq ue
fournira un service de r ép a r ation e xp ert, prévue à
un moment qui vous convient. Nos réparateurs
formés connaissent votre appareil à l'intérieur et
Page 32

32
VOS PRODUITS AVANTI
Staple votre reçu de vente ici. Preuve de la date
service sous garantie.
CE QUI EST COUVERT - GARANTIE LIMITÉE D'UN AN
moins doivent être traduits / envoyé au centre de servic e de l'appare il pour la ré parat ion .
DEUXIÈME LIMITÉE À LA CINQUIÈME ANNÉE GARANTIE
peut-être nécessaire, sont à la charge de l'utilisateur.
EXCLUSIONS DE LA GARANTIE / NON COUVERTS:
de Avanti Products, y compris, sans limitation, un ou plusieurs des éléments suivants:
•
entourant l'appareil , et les actes de Dieu.
•
• Les frais de transport et de manutention associés
appels de service dans les régions éloignées.
En aucun cas, Avanti Products toute responsabilité ou responsabilité pour les dommag es a ux biens
fusibles.
HORS DE LA GARANTIE DU PRODUIT
compris les réparations, les pro-taux, ou le remplacement du produit, une fois la garantie expirée.
GARANTIE - REFRIGERATION - COMPRESSEUR
GARANTIE
Avanti Products garantit que le produit est exempt de défauts de matériaux et / ou de fabrication pour une
période de douze (12) mois à compter de la date d'achat par le propriétaire initial. La durée commence à courir à
la date d'achat, et ne sera pas retardée, restreinte, prolongée ou suspendu pour quelque raison que ce soit, sauf
si décrit en détail dans le document de garantie. Pendant un an à compter de la date d'achat par le propriétaire
d'origine, les produits Avanti seront, à sa discrétion, réparer ou remplacer toute partie du produit qui se révèle
être un défaut de matériau ou de fabrication dans une utilisation normale. Avanti Products vous fournira un
produit raisonnablement semblable nouveau ou remis à neuf. Au cours de cette période Avanti Products fournira
toutes les pièces et la main-d'œuvre nécessaires pour corriger ces défauts gratuitement, aussi longtemps que le
produit a été installé et utilisé conformément aux instructions écrites dans ce manuel. En usage locatif ou
commercial, la période de garantie est de 90 jours. Tous les appareils Avanti de 3,5 pieds cubes la capacité ou
Pour la deuxième à la cinquième année à partir de la date d'achat originale, Avanti Products fournira un
compresseur de remplacement gratuit en raison d'un échec. Vous êtes responsable de la main-d'œuvre et de
fret de service. En usage locatif ou commercial, la garantie du compresseur est limitée à un an et neuf mois. Les
coûts impliqués pour déplacer le produit au centre de service et de retour à la maison de l'utilisateur, comme
La couverture de la garantie décrite ici exclut tous les défauts ou les dommages qui ne sont pas la faute directe
Un non-respect de tout État applicable, local, ville, ou du comté électricité, plomberie et / ou des codes du
bâtiment, des règlements ou des lois, y compris le défaut d'installer le produit en stricte conformité avec le feu
et les codes du bâtiment et les règlements locaux.
d'achat originale est nécessaire pour obtenir un
• Les forces externes, élémentaires et / ou l'environnement et les facteurs, y compris, sans s'y limiter, la pluie, le
vent, le sable, les inondations, les incendies, les coulées de boue, des températures de congélation, l'humidité
excessive ou à une exposition prolongée à l'humidité, la foudre, les surtensions, les défaillances structurelles
les pertes de contenu de la nourriture ou d'autres
contenus en raison de la détérioration.
• Les dommages accessoires ou consécutifs
• Pièces et coûts de main-d'œuvre pour les éléments
suivants ne seront pas considérés comme garantie:
• portes évaporateurs, ressorts de la porte, et / ou
des cadres.
• panneaux intérieurs de portes, des étagères de
porte, rails de porte, et / ou supports de porte.
• Chest liners de couvercle du congélateur.
• crispers végétales.
• Les ampoules et / ou boîtier en plastique.
• doublures d'armoires en plastique.
• Punctured évaporateur annule la garantie sur le
système scellé complet.
environnants, y compris les armoires, les planchers, les plafonds, et d'autres structures et / ou des objets autour
du produit. Sont également exclus de cette garantie sont les égratignures, les entailles, les bosses mineures, et
d'autres dommages esthétiques sur les surfaces externes et les parties exposées; Produits dont les numéros de
série ont été modifiés, effacés ou supprimés; visites de service pour l'éducation à la clientèle, ou des visites où il
n'y a rien de mal avec le produit; correction des problèmes d'installation (vous êtes seul responsable de toute
structure et réglage pour le produit, y compris tous les systèmes électriques, de plomberie et / ou d'autres
installations de raccordement, pour le bon plancher / fondation, et pour toute modification, y compris sans s'y
limiter les armoires, les murs, les planchers, les étagères etc., ainsi que la remise à zéro des disjoncteurs ou
au remplacement de l'unité.
• Les réparations effectuées par réparateurs non
autorisés.
• Les appels de service qui sont liés à des problèm es
externes, tels que l'abus, l'alimentation électrique
inadéquate, les accidents, les incendies, les
inondations, ou tout autre acte de Dieu.
• Une panne du produit si elle est utilisée pour autre
chose que son intention but.
• La garantie ne couvre pas en dehors de la
Continental USA.
• Surtaxes, y compris mais sans s'y limiter, toute
après heure, les appels week-end, ou de services
de vacances, les péages, les frais de voyage de
convoyage ou les frais de kilométrage pour les
Avanti Products est soumis à aucune obligation, en droit ou autrement, de vous fournir toutes les concessions, y
Page 33

33
Page 34

34
Page 35

35
Registration Information
-------------------------------------------------------(detach here)--------------------------------------------------------------
---
Name
Model # Serial #
Address
Date Purchased Store / Dealer Name
City State Zip
E-mail Address
Area Code Phone Number
Occupation
Did You Purchase An Additional Warranty
As your Primary Residence, Do You:
Extended
Own Rent
None
Your Age:
Reason for Choosing This Avant i Produ ct:
this product:
under 18 18-25 26-30
Married Single
Price
Other: _____________ ______
Comments:
Thank you for purchasing this fine Avanti product. Please fill out this form and return it to the
following address within 100 days from the date of purchase and receive these important benefits:
Avanti Products LLC.
P.O.Box 520604 – Miami, Florida 33152
Protect your product:
We will keep the model number and date of purchase of your new Avanti product on file to
help you refer to this information in the event of an insurance claim such as fire or theft.
Promote better products:
We value your input. Your responses will help us deve lop prod uct s de signed to b est meet
your future needs.
Avanti Registration Card
Please indicate the most important factor s
That influenced your decision to purchase
Product Features
Avanti Reputation
Product Quality
Salesperson Recommendation
Other: ___________________
Friend / Relative Recommendati on
Warranty
31-35 36-50 over 50
Marital Status:
Is This Product Used In The:
Home Business
How Did You Learn About This Product:
Advertising
In-Store Demo
Personal Demo
Page 36

36
WD361 - 10062016
PRINTED IN CHINA
 Loading...