

Page 1

Model Number:
CAUTION:
INSTRUCTION MANUAL
WD31
BEFORE USE, PLEASE READ AND FOLLOW ALL SAFETY RULES AND OPERATING
INSTRUCTIONS.
Avanti has a policy of continuous improvement on its products and reserves the right to change materiais and specifications
without notice.
Avanti Products
P.O. Box 520604 - Miami, Florida 33152
www.avantiproducts.com
Page 2

ORDER FORM
Avanti Products, P.O.Box 520604, Miami florida 33152
For your convenience, you may use a major credit card (Master Card, or Visa) to order accessories over the phone by calling (800) 220-5570.
To order by mail, please fill out the following form and send it in with your payment (check,money order or credit card)using the above address.
NAME (please print)
ADDRESS
(
5ty
Item
CD-5
NSV-1
Description
CUP
DISPENSER
NO SPILL
VALVE
SHIPPING AND HANDLING
Price
SUBTOTAL
TOTAL
12.99
9.99
$ 6.25
$
Total
CITY
DAYTIME PHONE
( )
STATE ZIP
ENCLOSED IS
[] CHECK [] MONEY ORDER [JmaSTERD CARD |] VISA
CREDIT CARD NUMBER
EXPIRATION DATE
NAME (AS ITAPPEARS ON CREDIT CARD)
SIGNATURE
(OF CREDIT CARD HOLDER)
PLEASE MAKE CHECKS PAYABLE TO: AVANTI PRODUCTS
Avanti has a policy of continuous improvement on its products and reserves the right to change materials and specilications \vithout notice.
Prices and availability of items are subject to change without notice.
Page 3
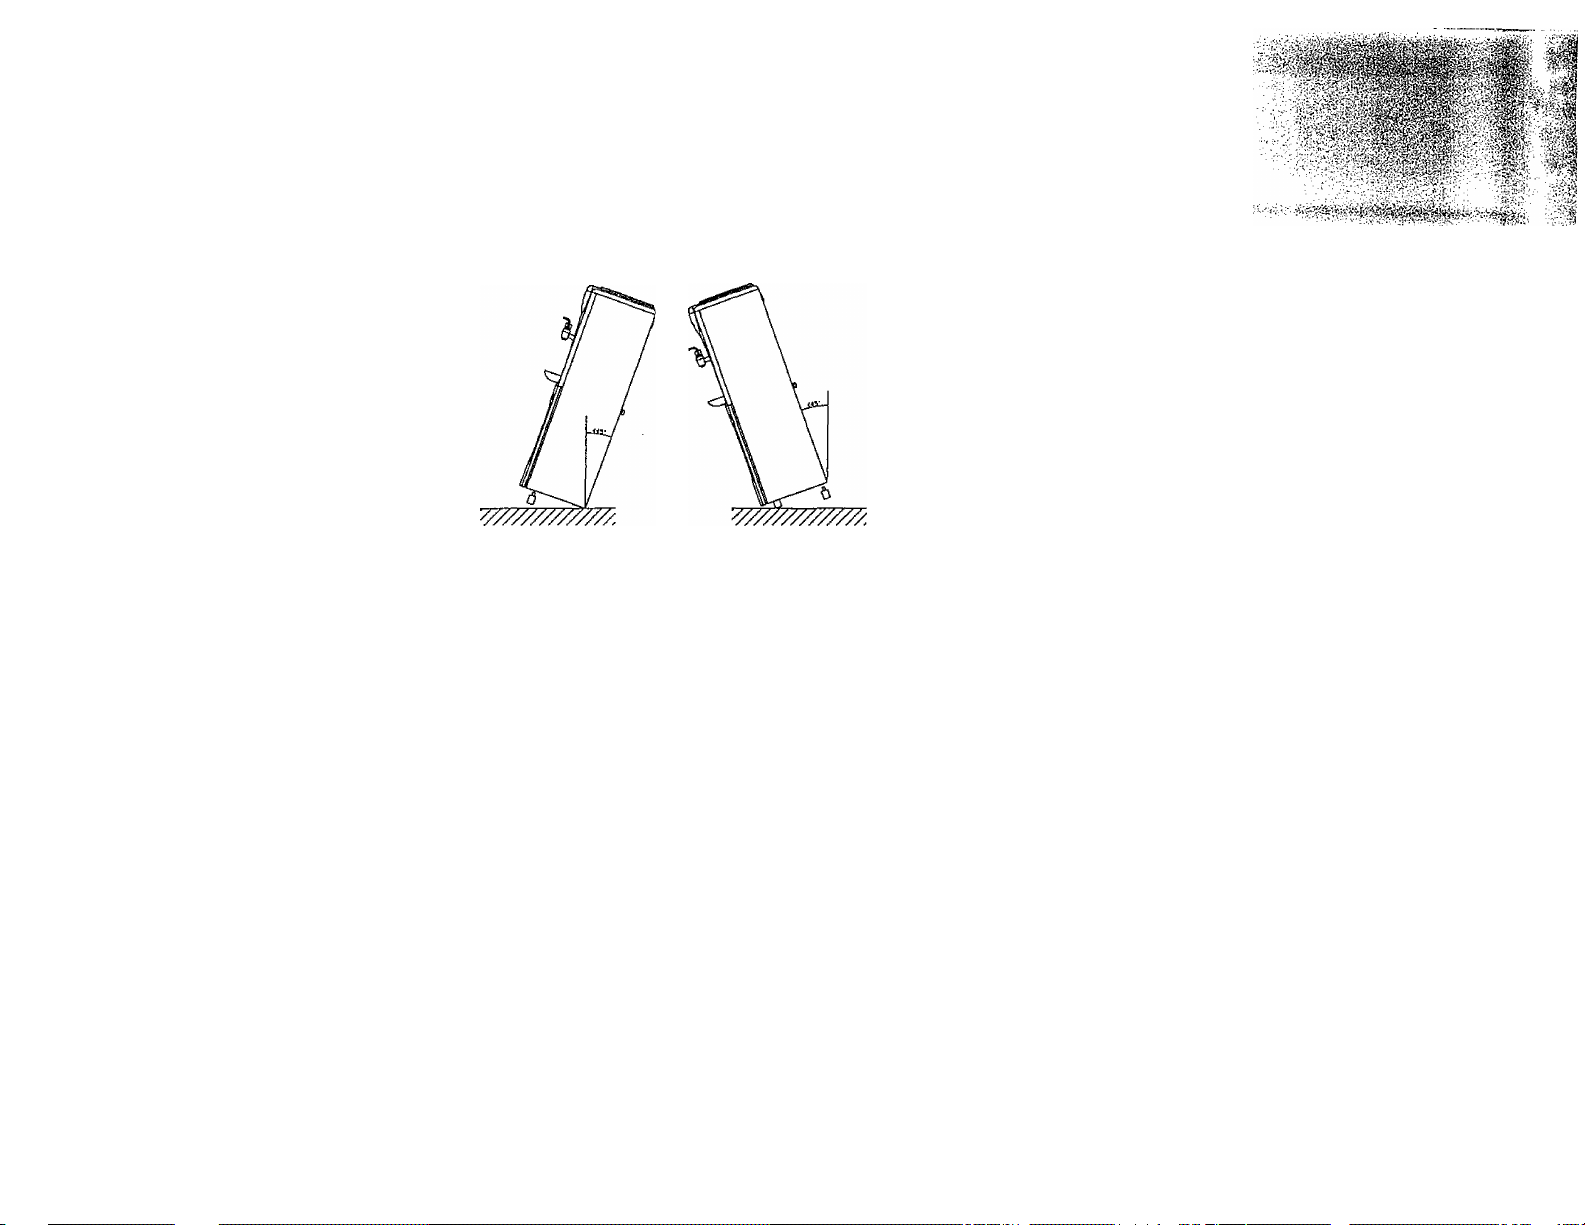
Water Dispenser Legs
These legs are provided to level your water dispenser. All four are packed in plastic bag.
Install prior to connecting unit to electrical outlet and inserting water bottle (see sketch
above).
To install tilt the unit 45 degrees and insert legs provided into designated holes, turn
clockwise until they lock. If floor is uneven then adjust each leg individually as needed.
Patas Niveladoras
Las patas para nivelar el dispensador de agua deben ser colocadas antes de conectar la unidad
al enchufe eléctrico e insertar el botellón de agua. Para instalarlas, incline la unidad unos 45^
e inserte las patas en los agujeros señalados, enrósquelas hasta el tope. Si el piso está
desnivelado, ajuste cada pata individualmente hasta que la unidad quede nivelada.
Vea ilustración arriba.
:5=í í-^
Page 4

Registration Information
Thank you for purchasing this fine Avanti product. Please fill out this card and return it within 100
days of purchase and receive these
important benefits:
> Protect your product:
We will keep the model number and date of purchase of your new Avanti product on file to
help you refer to this information in the event of an insurance claim such as fire or theft.
> Promote better products:
We value your input. Your responses will help us develop products designed to best meet
your future needs.
-(detach here)—
Avant) Registration Card
Name
Address
City
Area Code
Did You Purchase An Additional Warranty:
□Extended OFood Loss GNone
Reason For Choosing This Avanti Product:
Please indicate the most important factors
that influenced your decision to purchase
this product.
□Price
□Product Features
□Avanti Reputation
□Product Quality
□Salesperson Recommendation
□Friend/Relative Recommendation
□Warranty
□Other
State Zip
Phone Number
................
Model #
Date Purchased Store/Dealer Name
Occupation
As Your Primary Residence, Do You:
□Own GRent
Your Age:
□under 18 G18-25 □26-30
□31-35 G36-50 GoverSO
Marital Status:
□Married GSingle
Is This Product Used In The:
□Home GBusiness
How Did You Learn About This Product:
□Advertising
□In Store Demo
□Other
________
Comments
Serial #
□Product Features
□Personal Demo
Page 5

Read this guide carefully.
HELP US HELP YOU...
Write down the model and serial numbers.
It is intended to help you operate and maintain
your new water dispenser properly.
Keep it handy to answer your questions.
If you don't understand something or you need
more help, please call;
Avanti Customer Service 800-220-5570
Keep proof of original purchase date (such as
your sales slip) with this guide to establish the
warranty period.
You'll find them on a label located on the back
side of the unit.
Please write these numbers here;
Date of Purchase
Model Number
Serial Number
Use these numbers in any correspondence or
service calls concerning your water dispenser.
if you received a damaged water dispenser,
immediately contact the dealer (or builder) that
sold you the water dispenser.
Save time and money. Before you call for
service, check the Problem Solver Guide. It
lists causes of minor operating problems that
you can correct yourself.
IF YOU NEED SERVICE
We're proud of our service and want you to be
pleased. If for some reason you are not happy
with the service you receive, here are some
steps to follow for further help.
FIRST, contact the people who serviced your
appliance. Explain why you are not pleased. In
most cases, this will solve the problem.
NEXT, if you are still not pleased, write all the
details, including your telephone number, and
send to;
Customer Service
Avanti Products
10880 NW30 Street
Miami, FL 33172
Page 6

PARTS AND FEATURES
1. WATER fNTAKE
2. COLD WATER FAUCET (BLUE)
3. ROOM TEMPERATURE WATER FAUCET (WHITE)
4. REMOVABLE DRIP TRAY
5. FRONT PANEL
6. DETACHABLE/ADJUSTABLE FEET
7. COOLING THERMOSTAT
8. CONDENSER COIL
9. POWER SUPPLY CORD
Water Dispenser Legs
These legs are provided to level your water dispenser. All four are packed in plastic bag.
Install prior to connecting unit to electrical outlet and inserting water bottle (see sketch
above).
To install tilt the unit 45 degrees and insert legs provided into designated holes, turn
clockwise until they lock. If floor is uneven then adjust each leg individually as needed.
■i
1'
Patas Niveladoras
Las patas para nivelar el dispensador de agua deben ser colocadas antes de conectar la unidad
al enchufe eléctrico e insertar el botellón de agua. Para instalarlas, incline la unidad unos 45°
e inserte las patas en los agujeros señalados, enrósquelas hasta el tope. Si el piso está
desnivelado, ajuste cada pata individualmente hasta que la unidad quede nivelada.
Vea ilustración nrriha.
-------------------------------------------------------------
______________
Page 7

Table of Contents
Registration Information Card
Help Us Help You
___________
Parts and Features
Important Safety Instructions
Installation Guidelines
______
Before Using Your Water dispenser_
Installation of Your Water dispenser
Operating Your Water dispenser
Care and Maintenance
Troubleshooting Guide
_________
__________
____
__
Service For Your Water dispenser
Your Avanti Products Warranty
Wiring Diagram
Spanish Section
________________
________________
___
10
11
12,13
TlTrtlWSr-iVieiIPniW
Page 8

Important Safety Instructions
y WARNINOy
Read all instructions before using the water dispenser.
Never clean parts with flammable fluids. The fumes can create a fire hazard or
explosion.
Do not store or use gasoline or any other flammable vapors and liquids in the vicinity
of this or any other water dispenser. The fumes can create a fire hazard or
explosion
Do not plug unit into receptacle until you ensure the water tank switches are off.
-Save these instructions-
INSTALLATION GUIDELINES:
• Remove the exterior and interior packing.
• Place your appliance on a floor that is strong enough to support the dispenser when It
is fully loaded. The unit is provided with four rubber feet, if it does not sit level on the
floor, adjust the front feet ta level the unit well to the floor,
• Locate the appliance away from direct sunlight and sources of heat (stove, heater,
radiator, etc.). Direct sunlight may affect the acrylic coating and heat sources may
increase electrical consumption. Extreme cold ambient temperatures may also cause
the appliance not to perform properly.
• Allow 2 inches of space between the water dispenser and the wall, which allows the
proper air circulation to cool the compressor.
• Plug the appliance into an exclusive properly installed-grounded wall outlet. Do not
under any circumstances cut or remove the third (ground) prong from the power cord.
Any questions concerning power and or grounding should be directed toward a
certified electrician or an authorized Avanti Products service center.
• This water dispenser is not recommended for outdoor use.
• Do not locate the dispenser in area where the temperature may fall below freezing
(32°F).
• Keep area around dispenser free of dust and dirt.
• Keep the reserve supply of water bottles away from excessive heat and light.
• Never unplug the water cooler, except for maintenance.
To reduce the risk of fire, electrical shock,
or injury when using your appliance, follow
these basic precautions:
L
NOTE; Remove drip tray provided from plastic bag. Connect both locking tabs into the holes ^
located under the water faucets. Make sure tray locks-in properly and it is held firmly in place.
OPERATION INSTRUCTIONS:
Before Using Your Water Dispenser
• Check to be sure the following parts are included;
“ Instruction manual
z extra cup dispenser cabinet plugs
Accessories order form.
Page 9

• Before connecting the appliance to the power source, let it stand upright for
approximately 2 hours. This will reduce the possibility of a malfunction In the cooling
system from handling during transportation.
• The water dispenser is pre-deaned at the factory but the reservoir and water lines
must be flushed with fresh water before use as follows:
• Keep the unit unplugged.
• Fill water tank with tap water full to capacity (almost 3/4 of a gallon). Wait for 5
minutes until water settles.
• Press both room temperature and cold-water faucets until water comes out, then
stop.
• Plug the dispenser into the electrical outlet. We are ready to complete the first
cycle. In order to do that, wait for the cold water thermostat to cut-off and the
compressor stop working (approximately 40 minutes for first cycle),
• Place the 5-galIon bottle of water on the water intake, allow water to stand for
approximately one minute.
• Turn on water faucets to insure water flows from both faucets.
• Plug dispenser into the electrical outlet.
• Now you are ready to use your water dispenser.
NOTE: Your water dispenser has been cleaned and sanitized before leaving the
factory, but in case a taste problem develops, place one tablespoon of
baking soda and add tap water. Fill water tank again and repeat basic
operations previously outlined.
yWARNINOy
IMPROPER USE OF THE GROUNDED PLUG CAN RESULT IN THE RISK OF ELECTRICAL SHOCK. IF
THE POWER CORD IS DAMAGED, HAVE IT REPLACED BY AN AUTHORIZED AVANTI PRODUCTS
SERVICE CENTER.
OPERATING YOUR WATER DISPENSER
> Steps to replace water bottles
• Use a clean cloth to wipe off neck of bottle.
• Remove cap.
• Carefully lift bottle (approx. 40 lbs.) using your legs and not your back. Do not place hands in
opening of bottle while placing in reservoir.
• Insert the water bottle on the water intake over reservoir opening so it settles properly on it.
• Wipe off any water which may have splashed on dispenser top.
> Cold Water Control
Once the unit is plugged into power supply outlet, compressor will start working and the cooling cycle
begins. When the water reaches the right temperature the cooling thermostat will cut-off automatically
and compressor will stop working.
> Cold Water Faucet
This faucet (blue finish) provides cold water.
> Room Temperature Faucet
This faucet (white finish) provides room temperature water.
> Cup Dispenser (Optional)
A cup dispenser may be installed by using the mounting holes (covered with plastic caps) located
near the top of the right side panel of the cooler. The cup dispenser comes equipped with a mounting
Page 10

bracket and screws and may be ordered by completing the enclosed order form provided with your
instruction manual.
CARE AND MAINTENANCE
Wash the inside of the reservoir with a warm water and baking soda solution. The solution should
be about 2 tablespoons of baking soda to a quart of water.
The drip tray and water faucets should be cleaned with mild detergent and warm water.
At regular intervals or once a month inspect the coils located across the back of the dispenser.
Vacuum accumulation of dust or clean it with a hard brush.
TAKING DISPENSER OUT OF SERVICE
• If the water dispenser will not be used for a long period of time, unplug the power cord from the
wall outlet.
• Drain the water through the faucets.
• Unit should not be transported on the sides. Place it upright if possible and cover if with a blanket.
PROBLEMS WITH YOUR WATER DISPENSER?
You can solve many common water dispenser problems easily, saving you the cost of a
possible service call. Try the suggestions outlined below to see if you can solve the problem
before calling the servicer.
I.
8
Page 11

TROUBLESHOOTING GUIDE
PROBLEM
Water dispenser does not operate.
Not plugged In.
POSSIBLE CAUSE
The circuit breaker tripped or blown fuse.
Water cooler is not cold enough.
The water dispenser does not have the correct
clearances.
Compressor turns on and off frequently.
The room temperature is hotter than normal.
The temperature control is not set correctly.
The water dispenser does not have the correct
clearances.
Vibrations.
The water dispenser seems to make too much
noise.
Check to assure that the water dispenser is level.
The rattling noise may come from the flow of the
refrigerant, which is normal.
As each cycle ends, you may hear gurgling
sounds caused by the flow of refrigerant in your
water dispenser.
Contraction and expansion of the inside walls
may cause popping and crackling noises.
The water dispenser is not level.
SERVICE FOR YOUR WATER DISPENSER
We are proud of our customer service organization and the network of professional service
technicians that provide service on your Avanti appliances. With the purchase of your Avanti
appliance, you can have the confidence that if you ever need additional information or assistance, the
Avanti Products Customer Service team will be here for you. Just call us toll-free.
AVANTI PRODUCTS CUSTOMER SERVICES
Product Information
800-323-5029
Part Orders
800-220-5570
In-Home Repair Service
800-220-5570
Whatever your questions are about our products,
help is available.
You may order parts and accessories that will be
delivered directly to your home.
You may order these items by personal check,
money order, Master Card, or Visa.
An Avanti Products authorized service center will
provide expert repair service, scheduled at a time
that is convenient for you. Our trained servicers
know your appliance inside and out.
Page 12

YOUR Avant) Products WARRANT/
WHAT IS COVERED
LIIVIITED ONE-YEAR
WARRANTY
For one year from the date of
purchase by the original owner, Avanti
Products will, at its option, repair or
replace any part of the appliance
which proves to be defective in
material or workmanship under normal
use. During this period Avanti
Products will provide all parts and
labor necessary to correct such
defects free of charge, so long as the
appliance has been installed and
operated in accordance with the
written instructions in this manual. In
rental or commercial use, the warranty
period is 90 days.
Staple your sales receipt here. Proof of
original purchase date is needed to obtain
service under warranty.______________________
LIMITED SECOND THROUGH FIFTH YEAR WARRANTY
For the second through the fifth year from date
of original purchase, Avanti Products will
provide a replacement compressor free of
charge due to a failure. You are responsible
for the service labor and freight charges. In
rental or commercial use, the limited
compressor warranty is one year and nine
months. Cost to move the appliance to the
servicers shop and back to the user's home,
as may be required, are the user's
responsibility.
_
WHAT IS NOT COVERED
Incidental or consequential damages.
Parts and labor costs for the following will
not be considered as warranty:
inner door panels, door shelves, door rails,
and/or door supports.
Light bulbs and/or plastic housing.
Plastic cabinet liners.
Punctured evaporator that voids the
warranty on the complete sealed system.
Replacement of house fuses or resetting
circuit breakers.
Repairs performed by unauthorized
servicers.
Service calls that do not involve defects in
material or workmanship such as
customer education, door reversal, or
proper installation.
Service calls that are related to external
problems, such as abuse, misuse,
inadequate electrical power, accidents,
fire, floods, or acts of God.
Failure of the product if it is used for other
than its intended purpose.
This warranty does not apply outside the
continental U.S.A.
10
Page 13

WIRING DIAGRAM
If
Page 14

PASOS RECOMENDADOS PARA CAMBIAR EL BOTELLON
• quíte el BOTELLON VACIO.
• limpíe EL CUELLO DEL BOTELLON NUEVO CON UN TRAPO LíMPIO.
• LEVANTE EL BOTELLON HACIENDO FUERZA CON LAS PIERNAS Y NO LA ESPALDA.
• TOME EL BOTELLON POR LOS LADOS Y DIRÍJA EL CUELLO DEL MISMO HACIA LA
APERTURA DEL TANQUE.
• VOLTEE EL BOTELLON COMO SI FUERA A SOLTAR AGUA E INSERTE EL CUELLO DEL
BOTELLON EN LA APERTURA DEL TANQUE HASTA QUE SE COLOQUE EN LA POSICION
CORRECTA.
DIRECCIONES BASICAS DE OPERACION:
• COLOQUE EL ENFRIADOR DE PIE POR UN PERIODO DE 2 HORAS ANTES DE ENCHUFAR
LA UNIDAD A LA PARED.
• COLOQUE EL ENFRIADOR EN UN AREA BIEN VENTILADA Y DEJE UN ESPACIO DE UN
POCO MAS DE 2 PULGADAS ENTRE LA UNIDAD Y LA PARED.
• ESCOJA UN LUGAR CON PISO NIVELADO.
• NO COLOQUE EL ENFRIADOR DONDE LA TEMPERATURA AMBIENTAL PUEDA BAJAR DE
32 °F (O^'C).
LLAVE DE AGUA FRIA
LA LLAVE AZUL ES PARA DISPENSAR AGUA FRIA.
LLAVE DE AGUA A TEMPERATURA AMBIENTAL
LA LLAVE BLANCA ES PARA DISPENSAR AGUA A TEMPERATURA AMBIENTAL AL MOMENTO
DESEADO.
ANTES DE ENCHUFARLO
AUNQUE EL ENFRIADOR SALE LIMPIO DE LA FABRICA, DEBE LIMPIAR Y ESTERILIZAR LOS
CONDUCTOS DEL TANQUE Y LOS GRIFOS DE ACUERDO A LOS SIGUIENTES PASOS:
MANTENGA LA UNIDAD DESENCHUFADA.
LLENE EL TANQUE DE AGUA (HASTA EL TOPE) CON AGUA DE LA PILA.
DEJE NIVELAR EL AGUA POR 5 MINUTOS.
ABRAS LAS LLAVES HASTA QUE SALGA AGUA Y CIERRELAS INMEDIATAMENTE.
ENCHUFE LA UNIDAD A LA PARED.
TOME EL BOTELLON DE AGUA Y SIGA LAS INSTRUCCIONES PARA CAMBIAR EL
BOTELLON.
AHORA SU ENFRIADOR ESTA LISTO PARA SU USO.
MANTENIMIENTO
A INTERVALOS REGULARES (UNA VEZ AL MES), INSPECCIONE EL CONDENSADOR O
REJILLA DE ALAMBRE LOCALIZADA EN LA PARTE TRASERA DE LA UNIDAD.
ANTES DE EFECTUAR LA LIMPIEZA, DESENCHUFE EL ENFRIADOR. USE UNA
ASPIRADORA O UN CEPILLO DURO PARA QUITAR EL POLVO.
PARA LIMPIAR LAS PARTES DE PLASTICO SE REQUIERE JABON LIQUIDO Y AGUA TIBIA.
NO USE LIMPIADORES ABRASIVOS EN LA SUPERFICIE SUPERIOR NI EN U BANDEJA DE
ESCURRIMIENTO.
SI NO VA A USAR EL ENFRIADOR POR UN TIEMPO PROLONGADO
DESENCHUFE LA UNIDAD.
QUITE EL BOTELLON DE AGUA.
DRENE EL AGUA ABRIENDO LAS LLAVES.
EL ENFRIADOR DEBE TRANSPORTARSE PARADO Y CUBIERTO CON UNA FRAZADA PARA
EVITAR QUE SE RAYE.
12
Page 15

CENTRO DE SERVICIOS
LA MAYORIA DE LOS PROBLEMAS SE RESUELVEN CON UNA SIMPLE LLAMADA
TELEFONICA A NUESTRO NUMERO SIN CARGO.
1-800-220-5570
ANTES DE DEVOLVER EL PRODUCTO O PARA OBTENER LA DIRECCION Y NUMERO DE
TELEFONO DEL CENTRO DE SERVICIO MAS CERCANO LLAME AL SIGUIENTE NUMERO.
1-800-220-5570
POSIBLES PROBLEMAS
DERRAME DE AGUA POR FUERA DEL
ENFRIADOR
EL AGUA NO ESTA SUFICIENTEMENTE
FRIA.
EL ENFRIADOR NO ENFRIA EL AGUA
CAUSA
LA BOTELLA ESTA PERFORADA.
REEMPLACELA.
SU TEMPERATURA DEBERÍA SER DE S'’ A
T C CON UNA TEMPERATURA AMBIENTE
DE 20° C. SI NO ES ASI, LLAME AL
CENTRO DE SERVICIO, EL TERMOSTATO
PODRIA ESTAR DEFECTUOSO.
VERIFIQUE LOS CIRCUITOS, FUSIBLES O
DISYUNTORES.
13
PRINTED IN CHINA
 Loading...