

Page 1
WINE COOLER
INSTRUCTION MANUAL
: W'f *
w\
'J, - t
Model Number:
WC600CL/WC601CL
CAUTION:
BEFORE USE, PLEASE READ AND FOLLOW ALL SAFETY RULES AND OPERATING
INSTRUCTIONS.
Avanti has a policy of continuous improvement on its products and reserves the right to change
materials and specifications without notice.
Avanti Products, A Division of The Mackle Co., Inc.
P.O. Box 520604 - Miami, Florida 33152
www.avantiproducts.com
Page 2
Registration information
Thank you for purchasing this fine Avanti product. Please fill out this card and return it within 100
days of purchase and receive these
important benefits:
Protect your product:
We will keep the model number and date of purchase of your new Avanti product on file to
help you refer to this information in the event of an insurance claim such as fire or theft.
Promote better products:
We value your input. Your responses will help us develop products designed to best meet
your future needs.
-{detach here)—
Avanti Registration Card
Name
Model #
Serial #
Address Date Purchased Store/Dealer Name
City
Area Code
Did You Purchase An Additional Warranty:
□ Extended □Food Loss DNone
Reason For Choosing This Avanti Product:
Please indicate the most important factors
that influenced your decision to purchase
this product.
□ Price
□ Product Features
□Avanti Reputation
□ Product Quality
□Salesperson Recommendation
□ Friend/Reiative Recommendation
□Warranty
□ Other__________________________
State Zip
Phone Number
Occupation
As Your Primary Residence, Do You:
□Own GRent
Your Age:
□under 18 □ 18-25 □26-30
□31-35 036-50 Dover 50
Marital Status:
□Married □ Single
Is This Product Used In The:
□ Home GBusiness
How Did You Learn About This Product:
□Advertising □ Product Features
□In Store Demo GPersonal Demo
□Other_________________________________
Comments
_______
Page 3

HELP US HELP YOU...
Read this guide carefully.
It is intended to help you operate and maintain
your new wine cooler properly.
Keep it handy to answer your questions,
if you don't understand something or you need
nnore help, please call;
Avanti Customer Service
800-220-5570
Keep proof of original purchase date (such as
your sales slip) with this guide to establish the
warranty period.
CAUTION:
THIS WINE COOLER IS NOT
DESIGNED FOR THE STORAGE OF
MEDICINE OR OTHER MEDICAL
PRODUCTS.
Write down the model and serial numbers.
You'll find them on a label located on the left
back side of the unit.
Please write these numbers here:
Date of Purchase
Model Number
Serial Number
Use these numbers in any correspondence or
service calls concerning your wine cooler.
If you received a damaged wine cooler,
immediately contact the dealer (or builder) that
sold you the wine cooler.
Save time and money. Before you call for
service, check the Problem Solver Guide, it
lists causes of minor operating problems that
you can correct yourself.
IF YOU NEED SERVICE
We're proud of our service and want you to be
pleased. If for some reason you are not happy
with the service you receive, here are some
steps to follow for further help.
FIRST, contact the people who serviced your
appliance. Explain why you are not pleased. In
most cases, this will solve the problem.
NEXT, if you are still not pleased, write all the
details, including your telephone number, and
send to:
Customer Service
Avanti Products
10880 NW 30 Street
Miami, FL 33172
. 3
-
Page 4

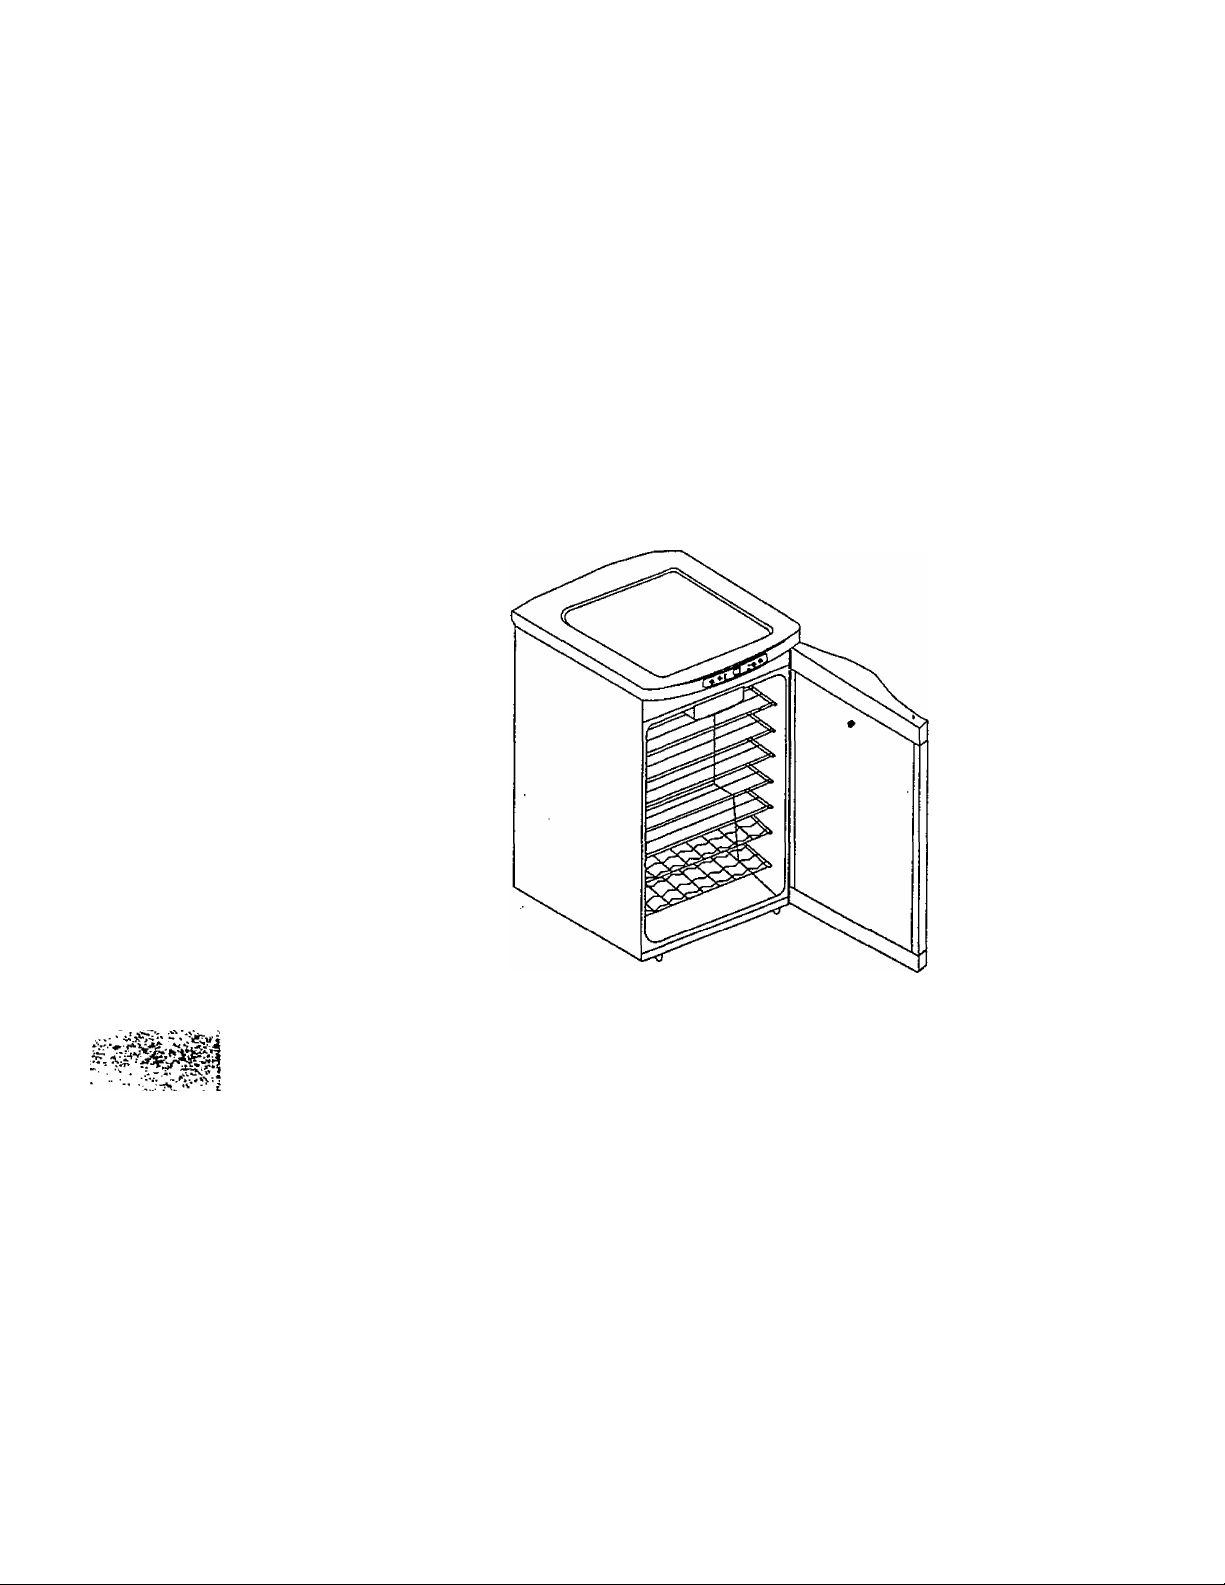
PARTS AND FEATURES
REVERSIBLE DOOR
1. DIGITAL READOUT
2. FLUSH BACK DESIGN
3. LEVELING LEGS
4. INTERIOR LIGHT
5. LOCK ASSEMBLY
6. CHROME SHELVES
7. GLASS DOOR
Page 5

Table of Contents
Registration Information
Help Us Help You_______
Parts and Features__________
Important Safety Instructions
Installation Instructions
Before Using Your Wine Cooler .
Installation of Your Wine Cooler
Reversing the Door Swing of Your Wine Cooler
Operating Your Wine Cooler^
________________
7.8
Using Your Buttons on the Display Panel
Care and Maintenance
_________________
Changing Your Light Bulb________
Cleaning Your Wine Cooler
_______
Maintenance of Your Wine Cooler
Vacation Time
__________________
Moving Your Wine Cooler
Troubleshooting Guide
___
Service For Your Wine Cooler
Your Avanti Products Warranty
Wiring Diagram_______________
Spanish Section
_____________
_
.10
,10
.15,16
9
Г-г
10
10
11
11
11
12
13
14
Page 6

Important Safety Instructions
yWARNINCy
Read all instructions before using the appliance.
DANGER or WARNING: Risk of child entrapment.
Child entrapment and suffocation are not problems of the past. Junked or
abandoned appliances are still dangerous... even if they wilt “just sit in the garage
a few days, ’
Before you throw away your old refrigerator or freezer; Take off the doors.
Leave the shelves in place so that children may not easily climb inside.
Never allow children to operate, play with, or crawl inside the appliance.
Never clean appliance parts with flammable fluids. The fumes can create a fire
hazard or explosion.
Do not store or use gasoline or any other flammable vapors and liquids in the vicinity
of this or any other appliance. The fumes can create a fire hazard or explosion.
-Save these instructions-
INSTALLATiON INSTRUCTIONS
> Before Using Your Wine Cooler
• Remove the exterior and interior packing, including protective fiim on door panels and
digital display,
• Check to be sure the following parts are included;
• 7 slide out shelves (5 hold eight bottles and 2 hold six bottles)
■ 2 Keys
■ Instruction manual
• Before connecting the appliance to the power source, let it stand upright for
approximately 2 hours. This will reduce the possibility of a malfunction in the cooling
system from handling during transportation.
• Clean the interior surface with lukewarm water using a soft cloth.
To reduce the risk of fire, electrical shock,
or injury when using your appliance, follow
these basic precautions:
* •
____________________
> Installation of Your Wine Cooler
• Place your appliance on a floor that is strong enough to support the appliance when it
is fully loaded. To level your appliance, adjust the legs at the front of the appliance.
• For recessed installation allow Vг inch of space between the sides of the appliance as
well as the back and top. This will allow proper air circulation.
• Locate the appliance away from direct sunlight and sources of heat (stove, heater,
radiator, etc.). Direct sunlight may affect the acrylic coating and heat sources may
increase electrical consumption. Extreme cold ambient temperatures may also cause
the appliance not to perform properly.
• Avoid locating the appliance in moist areas. Too much moisture in the air will cause
frost to form quickly on the evaporator,
• Plug the appliance into an exclusive properly installed-grounded wall outlet. Do not
under any circumstances cut or remove the third (ground) prong from the power cord.
Any questions concerning power and or grounding should be directed toward a
certified electrician or an authorized Avanti Products service center.
Page 7

Warning yV'
Improper use of the grounded plug can result in the risk of electrical shock. If the power
cord is damaged, have it replaced by an authorized Avanti Products service center.
Reversing the Door Swing of Vour Wine Cooler
This wine cooler has the capability of either opening the door from the left or right side. The unit is
delivered to you with the door opening from the left side. Should you desire to reverse the
opening direction, please follow these instructions.
NOTE: Before reversing the door, the power must be shut off.
All parts removed must be saved to do the reinstallation of the door.
1.
Remove the two plugs (16) located in the back of top cover.
2.
Remove the two screws (15) holding the top cover (12).
3.
Lift the top cover up slightly from the back and then push it forward in order to unhook the
front of the top cover so it can be detached from the lock plate.
Hold the top cover and keep it from dropping to the ground because the v/ires are (14)
connected to the controller box underneath the top cover.
5,
Remove the two screws (11) holding the controller box cover (17),
6.
Remove the controller box cover (17) and unplug the connector (13) from the socket (18) on
the PCS board (10).
7.
Place the top cover (12) on a padded surface to prevent scratching it.
8.
Remove the upper right hinge (8), holding the door in place.
9.
Lift the door and place it on a padded surface to prevent scratching it.
10. Lay the unit on its back against a solid surface at an angle of no less than 45 degrees.
11. Remove the upper hinge pin (9) from the hinge (8).
12. Replace the right upper hinge (8) to its original location.
13. Remove the two bolts (2) that hold the lower right hinge (5).
14. Remove the front leg (3) and the lower hinge pin (4) from the lower hinge (5).
15. Save the lower hinge assembly for later use.
16. Remove the lower left hinge (1) and transfer it to the opposite side, reversing the direction
180 degrees, where the lower right hinge (5) was previously located.
17. Transfer the lower hinge previously removed to the opposite side, where the left lower hinge
(1) was located, reversing the direction 180 degrees. Then insert the front leg (3), the two
bolts and the pin (4).
18. While holding the door in the closed position, secure the lower hinge on the left side of the
frame, fay screwing the bolts (2) in. Do not tighten until door is level.
19. Remove the upper left hinge (7) and insert the top hinge pin (9).
20. Replace the upper left hinge (7) with pin (9) to secure the door.
21. Plug the connector (13) to the socket (18) on the PCB (10) board.
22. Replace the controller box cover (12) by inserting the two screws previously removed in step
5.
23. Place the top cover by inserting all two screws previously removed in step 2.
24. Insert alt the plugs previously removed in step 1.
Page 8

FIGURE I
Position prior to door reversai
1.
Lower left hinge
2. Bolt
3.
Front leg
4.
Lower hinge pin •
5.
Lower right hinge
6.
Lock plate
7.
Upper left hinge
8.
Upper right hinge
9.
Upper hinge pin
FIGURE II
sition after door rev
10.
PCB
11.
Screw
12.
Top cover
13.
Connector
14.
Wiring
15.
Screw
16.
Plugs
17.
Controller box cover
18.
Socket
III I I '
Page 9

IMPORTANT SAFEGUARDS
Do not store food in wine cooler, as interior temperature may not get cool enough to prevent spoilage.
As a natural result of condensation, in summer months or areas of high humidity, the glass door may
cuiid up moisture on the outside. Just wipe it av/ay.
- OPERATING YOUR WINE COOLER
It is recommended you install the wine cooler in a place where the ambient temperature is bet-ween
72-78 degrees Fahrenheit, If the ambient temperature is above or below recommended temperatures,
the performance of the unit may be affected. For example, placing your unit in extreme cold or hot
conditions may cause interior temperatures to fluctuate. The range of 45-65 degrees Fahrenheit may
not be reached.
If the interior light is ieft on. the temperature inside the wine cooler will be higher.
Recommended Temperatures for Chilling Wine
Red Wines:
Dry/White Wines
Sparkling Wines
Rose Wines
The above temperatures may fluctuate depending on whether or not the interior bulb is on or off or
whether the bottles are located on the upper/middie or lower section.
HOW ТО USE the buttons on the display PANEL:
You can set the temperature as you desire by pushing the button or When you push the two
buttons for the first time, the LED readout will show the original temperature set at previous time (the
temperature preset at the factory is 50® F). The temperature that you desire to set will increase 1= F or
1 ’C if you push the once, on the contrary the temperature will decrease 1° F or 1 'C if you push
the once.
When you store mostly red wines, the temperature which you control by pushing the above two
buttons need to be set at between 60 to 65° F and the LED lamp beside “RED" will be lit red.
When you store mostly white wines, the temperature need to be set at between 50 to 59° F and the
LED lamp beside “WHITE” will be lit green.
When you store mostly sparkling wines, the temperature need to be set at between 45 to 49° F and
the LED lamp beside “SPARKLING" will be lit amber.
You can select temperature display setting from Fahrenheit to Celsius degrees by pushing the button
marked F/C. Fahrenheit degrees indicator will appear in red color In the display marked F° and the
Celsius degrees indicator will appear in yellow color in the display marked C".
You can turn the interior light on or off by pushing the button marked "bulb" symbol.
60-65^ F
50-59^ F
45-49= F
49-51= F
WHITC ^
SPARKL ING ~
NOTE:
When you use the wine cooler for the first time or restart the wine cooler after having been
shut off for a long time, there could be a few degrees variance between the temperature you
select and the one indicated on the LED readout. This is normal and it is due to the length of
the activation time. Once the wine cooler is running for a few hours everything will be back to
normal.
Also, there is a 6 to 8-' F variance between the top and bottom shelves of the wine chiller. Therefore,
if you have set the wine chiller for red wine only and the temperature reads 60° F and you want to
place a mix of white and red wines, you may want to place the white wine bottles on the bottom
shelves and the red wines on the top shelves.
Page 10

' SHELVES:
Shelving is chrome plated. To accommodate different size bottles, they can be moved up or down by
sliding them out the tracks first. Shelves are designed to accommodate maximum amount of bottles.
(See page 6)
^ DOOR LOCK:
For safety and security, your unit is equipped with a door lock and key. Door will not lock until the key
is removed. This eliminates the risk of accidental child entrapment. Two keys are included with your
lock.
CARE AND MAINTENANCE
CHANGING THE LIGHT BULB
NOTE:
All parts removed must be saved to do the replacement of the light bulb.
Before removing the light bulb, either unplug the refrigerator or disconnect the electricity
leading into the refrigerator at the main power supply. Failure to do so could result in
electrical shock or personal injury.
Push the light switch ’‘OFF".
Remove the light bulb cover (1) by pulling the bottom end of the light bulb cover gently.
Unscrew the bulb (2).
Replace with a 10 watt-refrigerator bulb that is the same shape and size.
Replace the light bulb cover and tighten screw (1).
Note: Light bulb should not exceed 15 watts.
> Cleaning Your Wine Cooler
• Unplug the wine cooler and remove the bottles.
• Wash the inside with a warm water and baking soda solution. The solution should be about 2
tablespoons of baking soda to a quart of water.
• Wash the shelves with a mild detergent solution.
^ The outside of the wine cooler should be cleaned with mild detergent and warm water.
• it may also be necessary to periodically wipe the bottom part of the storage area, as the wine
cooler is designed to retain humidity, and condensation may collect there.
> Maintenance of Your Wine Cooler
• Power Failure
Most power failures are corrected within a few hours and should not affect the
temperature of your wine cooler if you minimize the number of times the door is opened.
If the power is going to be off for a longer period of time, you need to take the proper
steps to protect your contents.
> Vacation Time
10
Page 11

SERVICE FOR YOUR WINE COOLER
We are proud of our customer service organization and the network of professional service
technicians that provide service on your Avanti appliances. With the purchase of your Avanli
appliance, you can have the confidence that if you ever need additional information or assistance, the
Avanti Products Customer Service team will be here for you. Just call us toll-free.
AVANTI PRODUCTS CUSTOMER SERVICES
Product information
800-323-5029
Part Orders
800-220-5570
In-Home Repair Service
800-220-5570
i Whatever your questions are about our products. |
1 help is available. i
j You may order parts and accessories that will be |
delivered directly to your home. |
1 You may order these items by personal check, ;
I money order, Master Card, or Visa. ;
1 An Avanti Products authorized service center will i
! provide expert repair service, scheduled at a time |
j that is convenient for you. Our trained servicers |
i know your appliance inside and out. |
IT
Page 12

SERVICE FOR YOUR WINE COOLER
We are proud of our customer service organization and the network of professional service
technicians that provide service on your Avanti appliances. With the purchase of your Avanti
appliance, you can have the confidence that if you ever need additional information or assistance, the
Avanti Products Customer Service team will be here for you. Just call us toll-free.
Product Information
800-323-5029
Part Orders
800-220-5570
in-Home Repair Service
800-220-5570
AVANTI PRODUCTS CUSTOMER SERVICES
!
----
j Whatever your questions are about our products,
{ help is available.
j You may order parts and accessories that will be
delivered directly to your home.
1 You may order these items by personal check,
! money order. Master Card, or Visa.
1 An Avanti Products authorized service center will
! provide expert repair service, scheduled at a time
j that is convenient for you. Our trained servicers
1 know your appliance inside and out.
12
Page 13

YOUR Avanti Products WARRANTY
WHAT IS COVERED
LIMITED ONE-YEAR
WARRANTY
For one year from the date of
purchase by the original owner, Avanti
Products will, at its option, repair or
replace any part of the wine cooler
which proves to be defective in
material or workmanship under normal
use. During this period Avanti
Products will provide all parts and
labor necessary to correct such
defects free of charge, so long as the
appliance has been installed and
operated in accordance with the
written instructions in this manual. In
rental or commercial use, the warranty
period is 90 days. All Avanti
Appliances of 3.5 cubic foot capacity
or less must be brought/sent to the
appliance service shop for repair.
{ Staple your sales receipt here. Proof of
■ original purchase date is needed to obtain
' service under warranty.
__________________
LIMITED SECOND THROUGH FIFTH YEAR WARRANTY
For the second through the fifth year from date
of original purchase, Avanti Products will
provide a replacement compressor free of
charge due to a failure. You are responsible
for the serj'ice labor and freight charges. In
rental or commercial use, the limited
compressor warranty is one year and nine
months. Cost to move the appliance to the
servicers' shop and back to the user's home,
as may be required, are the user's
responsibility.
WHAT IS NOT COVERED
Content losses of food or other, due to
spoilage.
Incidental or consequential damages.
Parts and labor costs for the following will
not be considered as warranty:
Evaporator doors, door springs, and/or
frames.
Inner door panels, door shelves, door rails,
and/or door supports.
Chest freezer lid liners.
Vegetable crispers.
Light bulbs and/or plastic housing.
Plastic cabinet liners.
Punctured evaporator that voids the
warranty on the complete sealed system.
Repairs performed by unauthorized
servicers.
Sen/ice calls that do not involve defects in
material or workmanship such as
customer education, door reversal, or
proper installation.
Service calls that are related to'external
problems, such as abuse, misuse,
inadequate electrical power, accidents, fire,
floods, or acts of God.
Replacement of house fuses or resetting
circuit breakers.
Failure of the product if it is used for other
than its intended purpose.
This warranty does not apply outside the
continental U.S.A.
13
Page 14

WIRING DIAGRAM
BOARD L^'jg
U* y:oj
■MAiN CCMirtCL 5CARD
<:07 rO! I
COOLING SYSTEM
I.Compressor 2.Condenser S.RIterand Drier 4.CapiI!ary
S.Evaporator 6.Accumulator
14
Page 15

PRECAUaONES
No guarde alimentos en el refrigerador de \inus ya que la temperatura no es lo
sutlcieniemer.te baja para que ios alimentos se preserven en buen estado.
La parte externa de la puerta de '.idrio puede mostrar signos de humedad durante ios meses
de '.erano o en áreas de alta humedad, esto es el resultado natural de ia condensación.
INSTRLCIONES PARA LA INSTALACION
Seleccione un lugar donde el piso sea fuerte y esté nivelado. Si la unidad no está
nivelada, ajuste las patas niveladoras delanteras.
Esta unidad puede ser empotrada, .^segúrese que quede media pulgada fl centímetro) de
distancia a cada lado en la parte trasera y superior entre la unidad y ia pared.
No instale la unidad donde !a temperatura sea menor a 65T (18 C ).
4.
No instale la unidad cerca de una fuente de calor. Evite ios ravos directos del sol.
>t'^- j
Después de colocar la unidad en el lugar deseado y cada vez que la cambie de lugar, espere
por lo menos 30 minutos antes de enchufar la unidad al tomacorriente. El refrigerante interno
debe de asentarse después que ía unidad ha sido movida.
USANDO SL REFR1GER.ADOR DE VINOS
Le recomendamos que instale su refrigerador de vinos en un lugar donde la temperatura esté
entre los 11' a 78 Fahrenheit. Si la temperatura ambiental es mayor o menor que la
temperarnra recomendada, el funcionamiento de la unidad podría ser afectado. Por ejemplo si
mantiene la unidad en condiciones de calor o frío extremo, puede ocasionar que la
temperatura interna fluctúe y que no se alcance el rango de 45“ a 65“ Fahrenheit.
La luz interior se controla manualmente y no funciona al abrir ni cerrar la puerta. Para encender la luz presione el botón que enseña un “bombillo”. Si deja encendida la luz interior, ia temperatura será más alta.
TEMPER.ATURA RECOMENDADA PARA ENFRIAR EL VINO
Vino tinto: 59-65"F
Vino blanco / seco 49-56T
Vino blanco ■' espumante 45-49T
Vino rosé / Zinfandel 49-51T
Estas temperaturas pueden fluctuar dependiendo sí la luz interna está encendida o si las
botellas son colocadas en la sección superior, media o inferior.
RED
WH I 7É
SPARKL JNG
 Loading...