

Page 1
l Number / No. de Modelo / Modéle:
WBC27W3S
Wine and Beverage Center
Cellier / Refroidisser de Breuvages
Mode
Vinera / Enfriador de Bebidas
INSTRUCTION MANUAL
MANUAL DE INSTRUCCIONES
MANUEL D’INSTRUCTIONS
BEFORE USE, PLEASE READ AND FOLLOW ALL SAFETY RULES AND OPERATING
INSTRUCTIONS.
Avanti Products has a policy of continuous improvement on its products and reserves the right to change materials and
specifications without notice.
P.O. Box 520604 - Miami, Florida 33152
www.avantiproducts.com
Avanti Products LLC
Page 2
2
TABLE OF CONTENTS
Appliance Safety
3
Important Safeguides
4
Help us Help You
5
Parts and Features
6
Important Safety Instructions
7
Electrical Connection / Extension Cord
7
Installation Instructions
8
Before Using Your Appliance
8
Installation of Your Appliance
8
Built-in Cabinet Instructions
8
Installing the Stainless Steel Handles
9
Operating Your Appliance
ON / OFF Power
Light Setting
Temperature Setting
Warning System
Care and Maintenance
Cleaning Your Appliance
Power Failure
Moving Your Appliance
Energy Saving Tips
Charcoal Filtration System
Troubleshooting Guide
13
Service for Your Appliance
14
Wiring Diagram
14
Your Avanti Products Warranty
15
Instrucciones en Español
16 – 25
Instructions en Français
26 - 38
Page
10 – 11
12
Registration Form Last
Page 3
3
APPLIANCE SAFETY
DANGER - Risk of fire or explosion. Flammable refrigerant used.
Your safety and the safety of others are very important.
We have provided many important safety messages in this manual and on your appliance. Always
read and obey all safety messages.
This is the Safety Alert Symbol. This symbol alerts you to potential hazards that
can kill or injure you and others. All safety messages will follow the Safety
Alert Symbol and either the words “DANGER”, “WARNING” or “CAUTION”.
Da
nger means that failure to heed this
safety statement may result in severe
personal injury or death.
Warning means that failure to heed this
safety statement may result in extensive
product damage, serious personal injury, or
death.
Caution means that failure to heed this
safety statement may result in minor or
moderate personal injury, or property or
equipment damage.
All safety messages will alert you do what the potential hazard is, tell you how to reduce the chance of
injury, and let you know what can happen if the instructions are not followed.
REFRIGERANT GAS WARNINGS / AVERTISSEMENTS GAZ REFRIGERANT
DO NOT use mechanical devices to defrost wine chiller. DO NOT puncture refrigerant tubing.
DA
NGER - Risk of fire or explosion. Flammable refrigerant used.
To be repaired only by trained service personnel. DO NOT puncture refrigerant tubing.
CAUTION - Risk of fire or explosion. Flammable refrigerant u sed.
Consult repair manual / owner’s guide before attempting to service
this product. All safety precautions must be followed.
UTION - Risk of fire or explosion. Dispose of property in accordance
CA
with federal or local regulations. Flammable refrigerant used.
CAUTION - Risk of fire or explosion due to puncture of refrigerant tubing;
Follow handling instructions carefully. Flammable refrigerant used.
CAUTION-To Prevent A Child From Being Entrapped, Keep Out Of Reach Of Children And Not
In The Vicinity Of Wine Chiller.
CAUTION-Risk of Fire
Page 4
4
IMPORTANT SAFEGUIDES
Before the appliance is used, it must be properly positioned and installed as
described in this manual, so read the manual carefully. To reduce the risk of fire,
electrical shock or injury when using the appliance, follow basic precaution,
including the following:
•
Plug into a grounded 3-prong outlet, do not remove grounding prong, do not use an adapter, and
do not use an exten
•
Replace all panels before operating.
•
It is recommended that a separate circuit, serving only your appliance be provided. Use
receptacles tha
•
Never clean appliance parts with flammable fluids. These fumes can create a fire hazard or
explosion. And do not store or use gasoline or other flammable vapors and liquids in the vicinity of
this or any other appliance. The fumes can create a fire hazard or explosion.
•
Before proceeding with cleaning and maintenance operations, make sure the power line of the
unit is disc
•
Do not connect or disconnect the electric plug when your hands are wet.
•
Unplug the appliance or disconnect power before cleaning or servicing. Failure to do so can result
in electrical shock or death.
•
Do not attempt to repair or replace any part of your appliance unless it is specifically
recommende
onnected.
sion cord.
t cannot be turned off by a switch or pull chain.
d in this material. All other servicing should be referred to a qualified technician.
FOLLOW WARNING CALL OUTS BELOW ONLY WHEN APPLICABLE TO YOUR MODEL
•
Use two or more people to move and install appliance. Failure to do so can result in back or other
injury.
•
To ensure proper ventilation for your appliance, the front of the unit must be completely
unobstructed. Choos
90°F (32°C)
water spray or drips
•
The appliance should not be located next to ovens, grills or other sources of high heat.
•
The appliance must be installed with all electrical, water and drain connections in accordance with
and local codes. A standard electrical supply (115 V AC only, 60 Hz), properly grounded in
state
rdance with the National Electrical Code and local codes and ordinances is required.
acco
•
Do not kink or pinch the power supply cord of appliance.
•
The fuse (or circuit breaker) size should be 15 amperes.
•
It is important for the appliance to be leveled in order to work properly. You may need to make
several adj
•
Never allow children to operate, play with or crawl inside the appliance.
•
Do not use solvent-based cleaning agents of abrasives on the interior. These cleaners may
damage
•
Do not use this apparatus for other than its intended purpose.
. This unit must be installed in an area protected from the element, such as wind, rain,
ustments to level it.
or discolor the interior.
e a well-ventilated area with temperatures above 60°F (16°C) and below
.
Page 5

5
HELP US HELP YOU...
Read this guide carefully.
It is intended to help you operate and maintain
your new unit properly.
Keep it handy to answer your questions.
If you don't understand something or you
need more assistance, please call:
Avanti Customer Service 800-220-5570
Keep proof of original purchase date (such as
your sales slip) with this guide to establish the
warranty period.
CAUTION:
THESE UNITS ARE NOT DESIGNED FOR THE STORAGE OF MEDICINE OR OTHER MEDICAL PRODUCTS.
Write down the model and serial numbers.
You'll find them on a plate located on the rear
outside wall of unit.
Please write these numbers here:
Date of Purchase
Model Number
Serial Number
Use these numbers in any correspondence or
service calls concerning your unit.
If you received a damaged unit, immediately
contact the dealer (or builder) that sold you the
unit.
_
_
_
IF YOU NEED SERVICE
We're proud of our service and want you to be
pleased. If for some reason you are not happy
with the service you receive, here are some
steps to follow for further assistance.
FIRST, contact the people
unit. Explain why you are not pleased. In most
cases, this will solve the problem.
who serviced your
Save time and money. Before you call for
service, check the Troubleshooting Guide. It
lists causes of minor operating problems that
you can correct yourself.
NEXT, if you are still not pleased, write all the
details, including your telephone number, and
send it to:
Customer Service Avanti Products 10880 NW 30 Street Miami, FL 33172 USA
Page 6
6
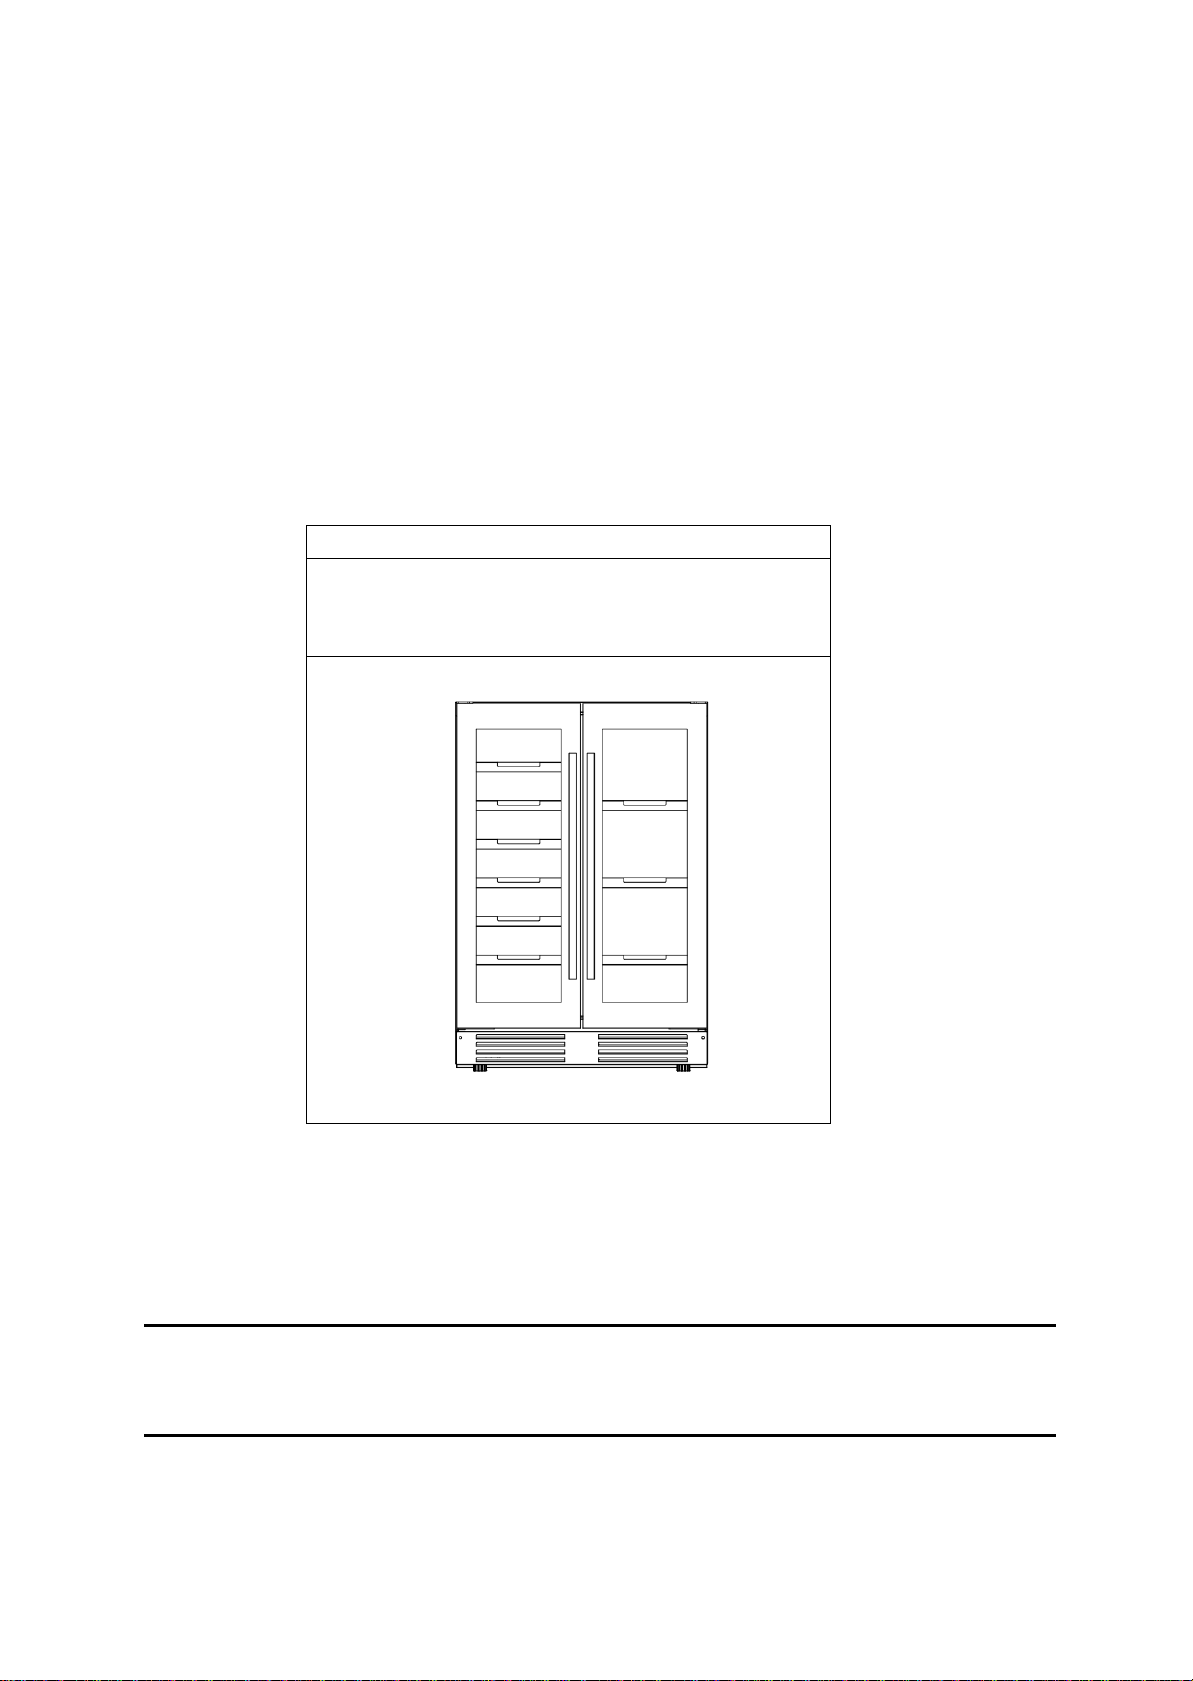
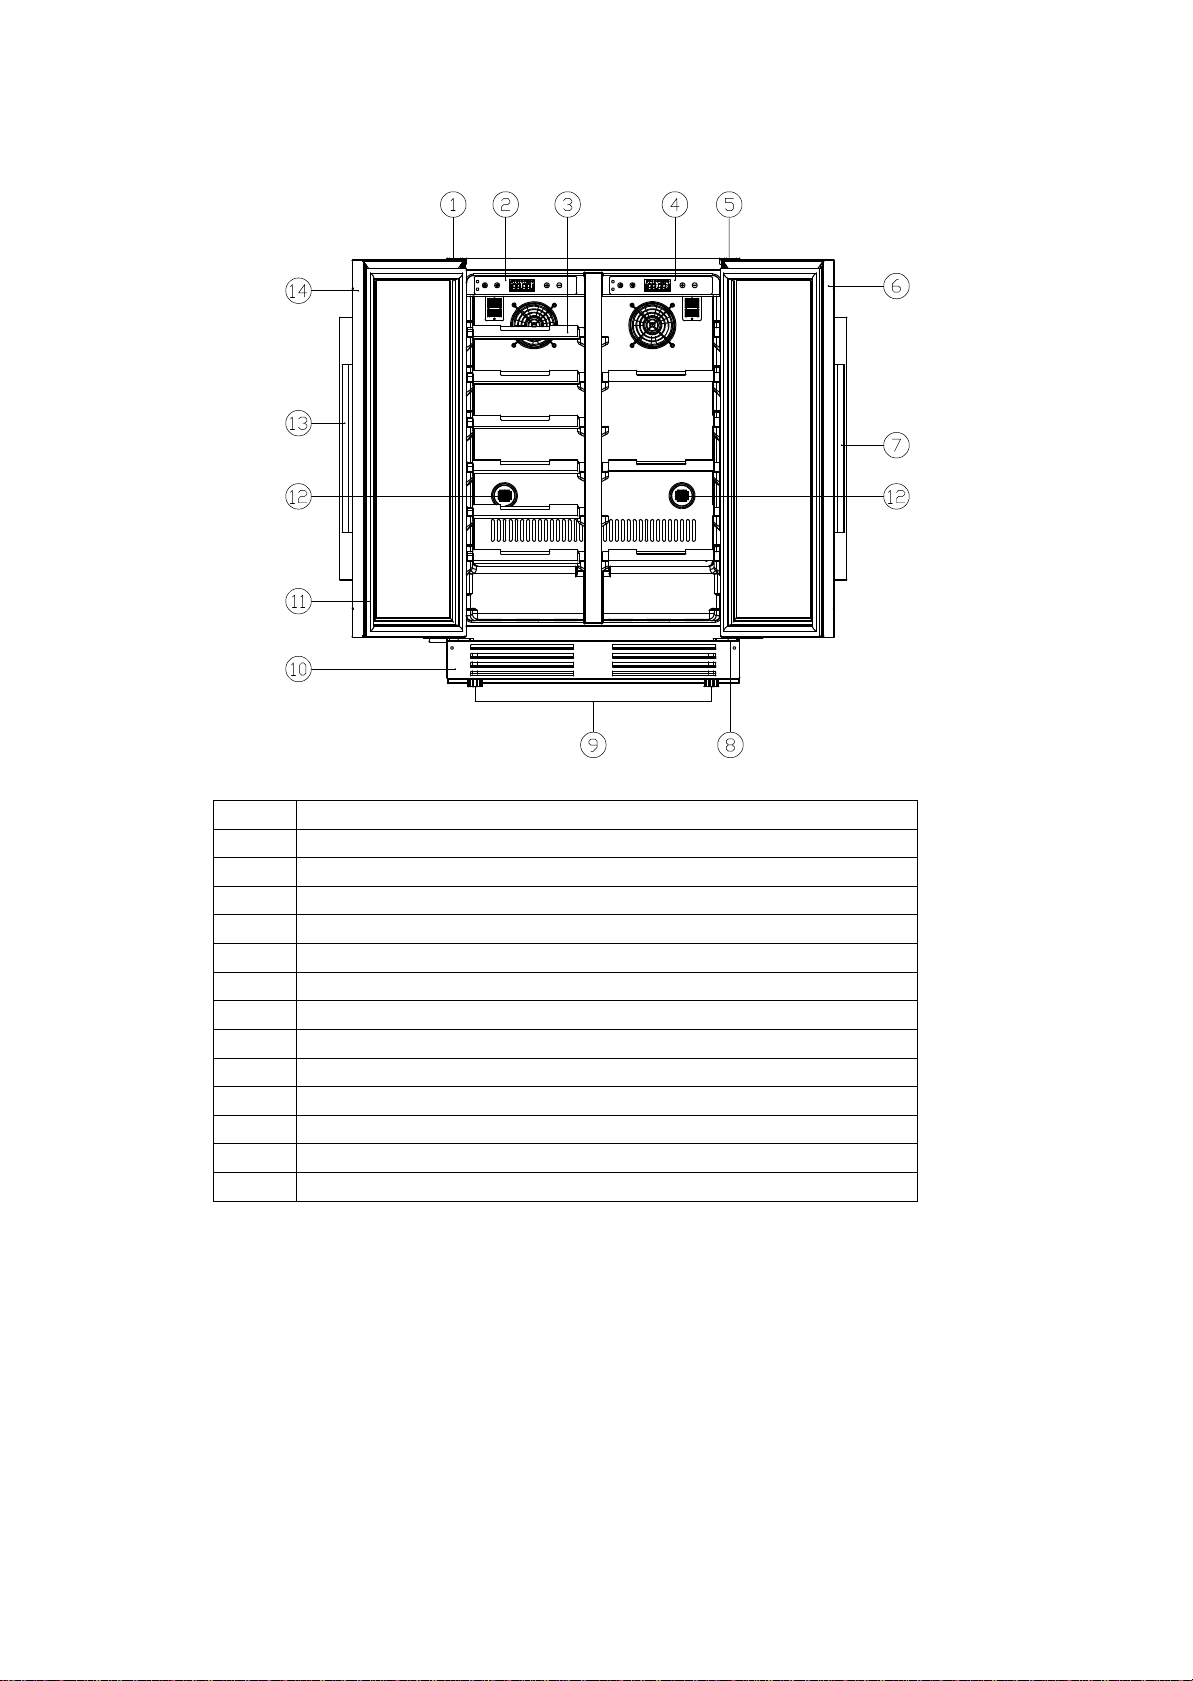
PARTS & FEATURES
1
Left Upper hinge
2
Left Zone Control Panel
3
Shelves (6)
4
Right Zone Control Panel
5
Right Upper hinge
6
Right Door
7
Right Door handle
8
Right Lower hinge
9
Adjustable feet
10
Kick Plate
11
Door Seal
12
13
14
Carbon Filter Assembly(2)
Left Door Handle
Left Door
Page 7
7
IMPORTANT SAFETY INSTRUCTIONS
To reduce the risk of fire, electrical shock,
these basic precautions:
•
Read all instructions before using the appliance.
-Save these instructions-
WARNING
•
DANGER or WARNING: Risk of child entrapment.
Child entrapm
ent and suffocation are not problems of the past. Junked or abandoned
or injury when using your appliance, follow
appliances are still dangerous . . . even if they will “just sit in the garage a few days”.
•
Before you throw away your old appliance: Take off the door. Leave the shelves
in place so that children may not easily climb inside.
•
Never allow children to operate, play with, or crawl inside the appliance.
•
Never clean appliance parts with flammable fluids. The fumes can create a fire
hazard or explosion.
•
Do not store or use gasoline or any other flammable vapors and liquids in the vicinity
of this or any other appliance. The fumes can create a fire hazard or explosion.
ELECTRICAL CONNECTION
Warning
Improper use of the grounded plug can result in the risk of electrical shock. If the power cord is
damaged, have it replaced by an authorized Avanti Products service center.
This appliance should be properly grounded for your safety. The power cord of this appliance is
equipped with a three-prong plug which mates with standard three prong wall outlets to minimize the
possibility of electrical shock.
Do not under any circumstances cut or remove the third ground prong from the power cord supplied.
For personal safety, this appliance must be properly grounded.
This appliance requires a standard 115/120 Volt AC ~/60Hz electrical ground outlet with three-prong.
Have the wall outlet and circuit checked by a qualified electrician to make sure the outlet is properly
grounded. When a standard 2-prong wall outlet is encountered, it is your responsibility and obligation
to have it replaced with a properly grounded 3-prong wall outlet.
The cord should be secured behind the appliance and not left exposed or dangling to prevent
accidental injury.
The appliance should always be plugged into its own individual electrical outlet which has a voltage
rating that matches the rating label on the appliance. This provides the best performance and also
prevent overloading house wiring circuits that could cause a fire hazard from overheated. Never
unplug the appliance by pulling the power cord. Always grip the plug firmly and pull straight out from
the receptacle. Repair or replace immediately all power cords that have become frayed or otherwise
damaged. Do not use a cord that shows cracks or abrasion damage along its length or at either end.
When moving the appliance, be careful not to damage the power cord.
EXTENSION CORD
Because of potential safety hazards under certain conditions, it is strongly recommended that you do
not use an extension cord with this appliance. However, if you must use an extension cord it is
absolutely necessary that it be a UL/CUL-Listed, 3-wire grounding type appliance extension cord
having a grounding type plug and outlet and that the electrical rating of the cord be 115 volts and at
least 10 amperes.
Page 8
8
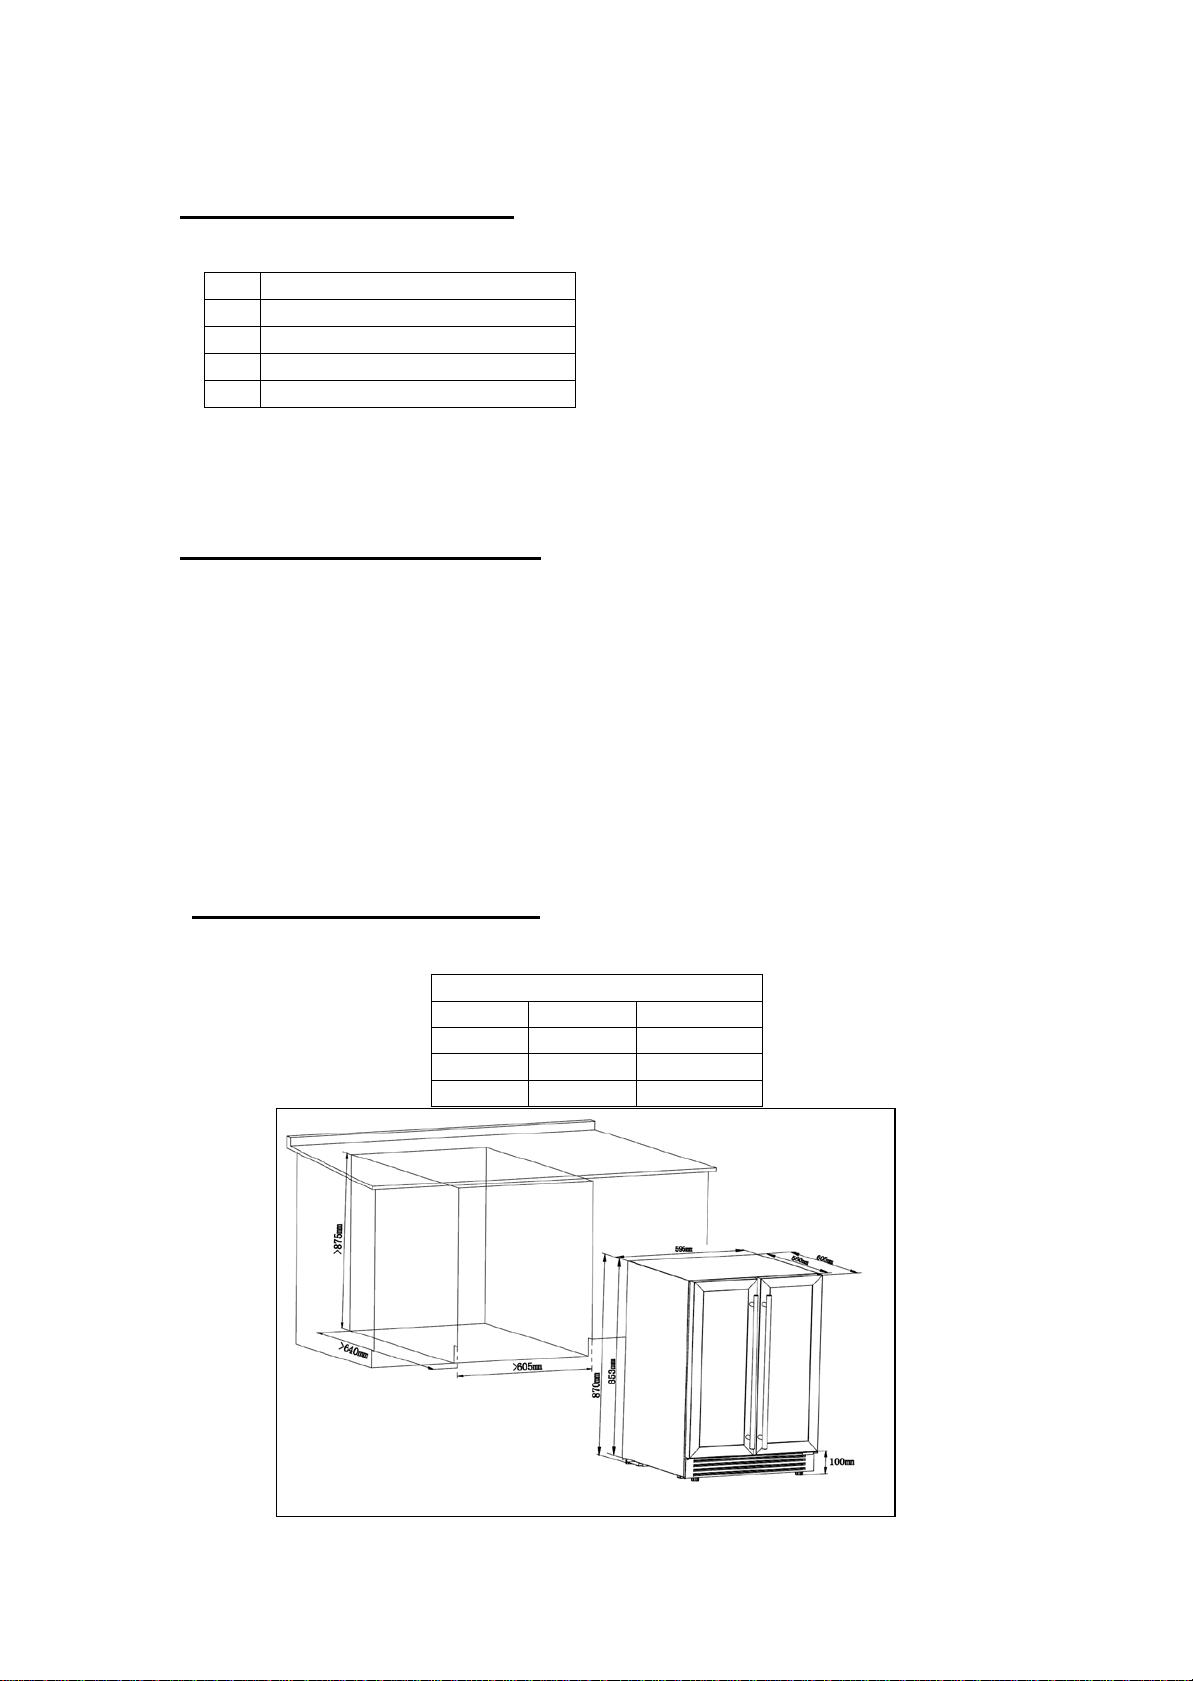
INSTALLATION INSTRUCTIONS
1
Instruction Manual
6
Wooden Shelves
1
Wire Shelf
2
Glass Shelves
2
Handles
Cabinet Opening Dimensions
IN (min)
CM (min)
Width
24
61
Depth
24
61
Height
34 ½
87.6
BEFORE USING YOUR APPLIANCE
•
Remove the exterior and interior packing.
•
Check to be sure you have all of the following parts:
•
Before connecting this appliance to the power source, let it stand upright for approximately 2
hours. This will reduce the
during transportation.
•
Clean the interior surface with lukewarm water using a soft cloth.
INSTALLATION OF YOUR APPLIANCE
•
This appliance is designed to be for free standing installation or built-in (fully recessed).
•
Place your appliance on a floor that is strong enough to support it when it is fully loaded. To
level your appliance,
•
Locate the appliance away from direct sunlight and sources of heat (stove, heater, radiator,
etc.). Direct sunlight m
consumption. Extreme cold amb
properly.
•
Avoid locating the unit in moist areas.
•
Plug the appliance into an exclusive, properly installed-grounded wall outlet. Do not under
any circumstances cut or remove the third (ground) prong from the power cord. Any questions
concerning power and/
authorized Avanti
adjust the front leveling legs at the bottom of the appliance.
ay affect the acrylic coating and heat sources may increase electrical
or grounding should be directed toward a certified electrician or an
Products service center.
possibility of a malfunction in the cooling system from handling
ient temperatures may also cause the unit not to perform
BUILT – IN CABINET INSTRUCTIONS
This unit is designed for both built-in or free standing installation. If you plan to use this unit in a builtin application please follow the requirements shown to the right.
Page 9

9
INSTALLING STAINLESS STEEL HANDLE
This beverage cooler includes a stainless steel handle that is not required to operate this unit. To install
handle please follow the below instructions:
the
1.
Pull away the door gasket in the area where the handle is to be installed as shown below in
Illustration # 1. The gasket is ea
2.
Align the handle with the screws pre-installed on the backside of the door. Tighten the
screws using a Phillips head
against the door
assembly).
3.
Replace the door gasket to its original position.
frame. (DO NOT overtighten as this will cause damage to the handle
sily displaced by hand, no tools are necessary.
screwdriver until the handle sets both flush and secured tightly
① Gasket ② Screwdriver ③ Handle
Page 10
10
OPERATING YOUR APPLIANCE
Temperature Ranges by Side / Zone
WINE Chiller (LEFT SIDE)
37º - 65º F
4º - 18º C
BEVERAGE COOLER (RIGHT SIDE)
40º - 65º F
3º - 18º C
Red Wines
58 - 65 ºF
15 - 18 ºC
Dry / White Wines
48 - 57 ºF
10 - 14 ºC
Rose Wines
49 - 51 ºF
9 – 11 ºC
Sparkling Wines
40 - 47 ºF
5 - 8 ºC
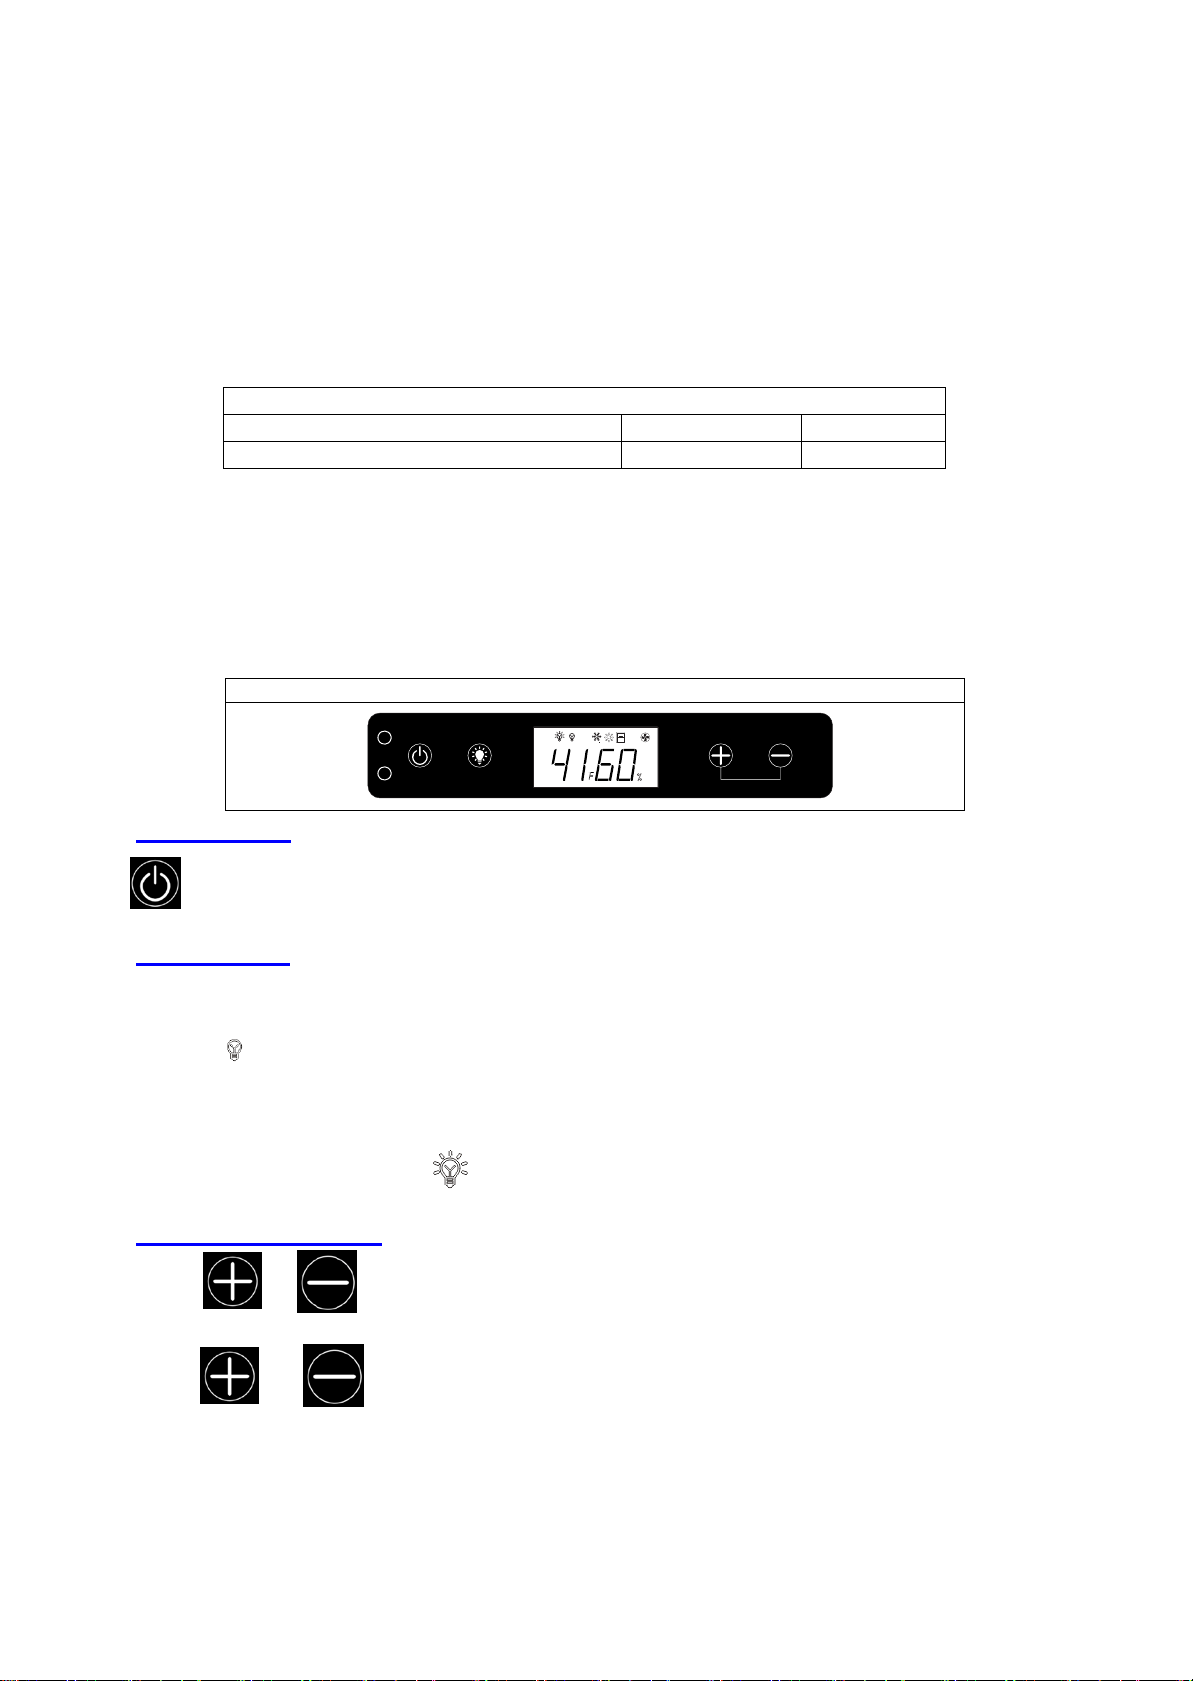
Wine Chiller &Beverage Cooler Control Panel
It is recommended you install the appliance in a place where the ambient temperature is between 72- 78
degrees Fahrenheit. If the ambient temperature is above or below recommended temperatures,
performance of the unit may be affected. For example, placing your unit in extreme cold or hot
conditions may cause interior temperatures to fluctuate. The average temperature range of 40-65 degrees
Fahrenheit may
not be reached.
Recommended Temperatures for Chilling Wine.
the
°C/°F
ON/OFF POWER
- Press
and hold for 2 seconds on control panel to turn on or turn off the cooler, when cooler is
turned off, the appliance will stop working.
LIGHT SETTING
- There are t
wo light modes, press and hold for 3 seconds to select light mode.
1. Light on and off mode: The default setting of light will be controlled by sensor and LCD screen
will show , when door is opened, the light will turn on automatically, when door is closed the light will
be turned off.
2. Light on model: Press and hold for 3 seconds to enter light on mode, when in this mode,
LCD scr
een will display and light will always be on.
TEMPERATURE SETTING
- Press
alter t
or to adjust the temperature of the appliance, and each press on the button will
he temperature by 1°F。
- Press
Celsius
and together and hold for 3 seconds to change temperature display from
to Fahrenheit
Page 11

11
WARNING SYSTEM
1. Door
LCD screen display and beep 3 times every 5 seconds, press any key or close the door to stop the
alarm .
2. Low
alarm
3. High
Press any key to stop the beeping alarm.
open alarm: When door has been opened for over 5 minutes, door open alarm will be on and
temperature alarm: When inside temperature is below 2°C for over 3 hours, it will beep to
; Press any key to stop the beeping alarm.
temperature alarm: When inside temperature is above 25°C for over 6 hours, it will beep to alarm;
Page 12
12
CARE AND MAINTENANCE
1
Remove the bottles / cans stored on the two (2)
shelves in front of the filter.
2
Remove the shelves and set aside to be replaced
once you have changed the filter
3
Hold the filter and turn it at 90 degrees in the counter-
clockwise direction and then pull it out.
4
Remove the existing filter and replace with a new
one.
5
Put the new filter into the hole and then turn the filter
CLEANING YOUR APPLIANCE
•
Turn off the power, unplug the appliance, and remove all items including shelves.
•
Wash the inside surfaces with a warm water and baking soda solution. The solution should be
about 2 tablespoons
•
Wash the shelves with a mild detergent solution.
•
Wring excess water out of the sponge or cloth when cleaning area of the controls, or any
electrical parts.
•
Wash the outside cabinet with warm water and mild liquid detergent. Rinse well and wipe dry with
a clean soft cloth.
•
Do not use steel wool or steel brush on the stainless steel. These will contaminate the stainless
steel with steel
POWER FAILURE
•
Most power failures are corrected within a few hours and should not affect the temperature of
your applian
off for a longe
MOVING YOUR APPLIANCE
•
Remove all items.
•
Securely tape down all loose items (shelves) inside your appliance.
•
Tape the door shut.
•
Be sure the appliance stays secure in the upright position during transportation. Also protect
outside of appliance
ce if you minimize the number of times the door is opened. If the power is going to be
r period of time, you need to take the proper steps to protect your contents.
of baking soda to a quart of water.
particles and rusting may occur.
with a blanket, or similar item.
ENERGY SAVING TIPS
•
The appliance should be located in the coolest area of the room, away from heat producing
appliances, and out of the direct sunlight.
CHARCOAL FILTRATION SYSTEM
Your wine is a living object that breathes through the cork of its bottle. In order to preserve the quality
and taste of your fine wines, they must be stored at the ideal temperature and ambient conditions.
Your cellar is equipped with an active charcoal filtration system to ensure air purity, cooling
and to maintain an odor free cabinet for the storage of your good wine. The filter assembly
at the rear panel inside your cooler.
Keep in mind, that this filter must be changed every 12 months.
To replace your filter:
at 90 degrees in clockwise direction..
efficiency,
is located
Page 13

13
PROBLEMS WITH YOUR APPLIANCE?
PROBLEM
POSSIBLE CAUSE
Appliance does not operate.
Not plugged in.
The circuit breaker tripped or a blown fuse.
Appliance is not cold enough.
Check the temperature control setting.
The door gasket does not seal properly.
Turns on and off frequently.
The room temperature is hotter than normal.
The door gasket does not seal properly.
The light does not work.
Not plugged in.
The light button is “OFF”.
Vibrations.
Check to assure that the appliance is level.
The appliance seems to make too much noise.
The rattling noise may come from the flow of the
The appliance is not level.
The door will not close properly.
The appliance is not level.
Temperature sensor failure.
You can solve many common problems easily, saving you the cost of a possible service call. Try the
suggestions below to see if you can solve the problem before calling the servicer.
TROUBLESHOOTING GUIDE
The appliance is turned off.
External environment may require a higher
setting.
The door is opened too often.
The door is not closed completely.
A large amount of contents has been added to
the unit.
The door is opened too often.
The door is not closed completely.
The temperature control is not set correctly.
The circuit breaker tripped or a blown fuse.
Display flashes Error message “H1 or H2”
Display flashes Error message “L1 or L2”
Display flashes Error message “F1 or F2”
refrigerant, which is normal.
As each cycle ends, you may hear gurgling
sounds caused by the flow of refrigerant in your
appliance.
Contraction and expansion of the inside walls
may cause popping and crackling noises.
The gasket is dirty.
The shelves are out of position.
Temperature sensor failure.
Contact the Avanti Service Department
1 - 800 – 220 - 5570
Contact the Avanti Service Department
1 - 800 – 220 - 5570
Inner Fan Failure.
Contact the Avanti Service Department
1 - 800 – 220 - 5570
Page 14

14
SERVICE FOR YOUR APPLIANCE
800-323-5029
help is available.
check, money order, Master Card, or Visa.
know your appliance inside and out.
We are proud of our customer service organization and the network of professional service
technicians that provide service on your Avanti appliances. W ith the purchase of your Avanti
appliance, you can have the confidence that if you ever need additional information or assistance, the
Avanti Products Customer Service team will be here for you. Just call us toll-free.
AVANTI PRODUCTS
Product Information
Part Orders
800-220-5570
In-Home Repair Service 800-2205570
CUSTOMER SERVICES
Whatever your questions are about our products,
You may order parts and accessories that will be
delivered directly to your home by personal
An Avanti Products authorized service center will
provide expert repair service, scheduled at a time
that is convenient for you. Our trained servicers
WIRING DIAGRAM
Electrocircuit Line Diagram
Page 15

15
YOUR AVANTI PRODUCTS
Staple your sales receipt here. Proof of original
warranty.
WHAT IS COVERED – LIMITED ONE-YEAR W ARRANTY
center for repair.
LIMITED SECOND THROUGH FIFTH YEAR W ARRANTY
user’s responsibility.
WARRANTY EXCLUSIONS / WHAT IS NOT COVERED:
Products, including without limitation, one or more of the following:
•
lightning, power surges, structural failures surrounding the appliance, and acts of God.
•
•
Shipping and handling costs associated with the
In no event shall Avanti Products have any liability or responsibility whatsoever for damage to surrounding
cabinetry, walls, floors, shelving etc., as well as the resetting of breakers or fuses.
OUT OF W ARRANTY PRODUCT
repairs, pro-rates, or product replacement, once this warranty has expired.
WARRANTY – REFRIGERATION - COMPRESSOR
WARRANTY
Avanti Products warrants that the product is free from defects in materials and/or workmanship for a period of
twelve (12) months from the date of purchase by the original owner. The foregoing timeline begins to run upon
the date of purchase, and shall not be stalled, tolled, extended, or suspended for any reason whatsoever unless
described in detail in the warranty document. For one year from the date of purchase by the original owner,
Avanti products will, at its option, repair or replace any part of the product which proves to be defective in
material or workmanship under normal use. Avanti Products will
that is either new or factory refurbished. During this period Avanti Products will provide all parts and labor
necessary to correct such defects free of charge, so long as the product has been installed and operated in
accordance with the written instructions in this manual. In rental or commercial use, the warranty period is 90
days. All Avanti appliances of 4.2 cubic feet capacity or less must be brought/sent to the appliance service
For the second through the fifth year from the date of original purchase, Avanti Products will provide a
replacement compressor free of charge due to a failure. You are responsible for the service labor and freight
charges. In rental or commercial use, the limited compressor warranty is one year and nine months. Costs
involved to move the product to the service center and back to the user’s home, as maybe required, are the
The warranty coverage described herein excludes all defects or damage that are not the direct fault of Avanti
A failure to comply with any applicable state, local, city, or county electrical, plumbing and/or building codes,
regulations, or laws, including failure to install the product in strict conformity with local fire and building codes
and regulations.
•
Any external, elemental and/or environmental forces and factors, including without limitation, rain, wind, sand,
floods, fires, mud slides, freezing temperatures, excessive moisture or extended exposure to humidity,
purchase date is needed to obtain service under
provide you
with a reasonably similar product
Content losses of food or other content due to
spoilage.
•
Incidental or consequential damages
•
Parts and labor costs for the following will not be
considered as warranty:
•
Evaporator doors, door springs, and/or frames.
•
Inner door panels, door shelves, door rails,
and/or door supports.
•
Light bulbs and/or plastic housing.
•
Plastic cabinet liners.
•
Punctured evaporator that voids the warranty on
the complete sealed system.
property, including cabinetry, floors, ceilings, and other structures and/or objects around the product. Also
excluded from this warranty are scratches, nicks, minor dents, and other cosmetic damages on external surfaces
and exposed parts; Products on which the serial numbers have been altered, defaced or removed; service visits
for customer education, or visits where there is nothing wrong with the product; correction of installation problems
(you are solely responsible for any structure and setting for the product, including all electrical, plumbing and/or
other connecting facilities, for proper foundation/flooring, and for any alterations including without limitation
Avanti Products is under no obligation, at law or otherwise, to provide you with any concessions, including
replacement of the unit.
•
Repairs performed by unauthorized servicers.
•
Service calls that are related to external problems,
such as abuse, misuse, inadequate electrical
power, accidents, fire, floods, or any other acts of
God.
•
Failure of the product if it is used for other than it
intended purpose.
•
The warranty does not apply outside the
Continental USA.
•
Surcharges including but not limited to, any after
hour, weekend, or holiday service calls, tolls, ferry
trip charges, or mileage expense for service calls to
remote areas.
Page 16

16
MEDIDAS DE SEGURIDAD IMPORTANTES
Antes
•Enchufe en unas 3 clavijas con conexión a tierra toma de corriente, hacer No retire de puesta a tierra
técnico cualificado.
• Se recomienda utilizar dos o más personas para mover e instalar el electrodoméstico. El aparato es
• Do not use this apparatus for other than its intended purpose.
de enfriador de bebidas se utiliza, debe ser colocado correctamente e
instalado como descrito en este manual, así que lea cuidadosamente el manual.
Para reducir el riesgo de incendio, descarga eléctrica o lesiones al utilizar el
enfriador de bebidas, Siga las precauciones básicas, incluyendo las siguientes
púa, hacer No utilice un adaptador, y no utilice un cable de extensión
• Reemplazar todos los paneles antes operativos
• Eso se recomienda usar un circuito separado, que sólo sirve a su enfriador de bebidas, ser
proporcionado. Use recipientes ese no poder ser desactivado por un interruptor o cadena
• Nunca limpia electrodoméstico piezas con líquidos inflamables. Estos vapores pueden crear un riesgo
de incendio o explosión. Y no almacene ni use gasolina u otros vapores y líquidos inflamables en la
proximidad de este o cualquier otro electrodoméstico. Los vapores pueden crear un riesgo de
incendio o explosión.
• Antes de proceder con las operaciones de limpieza y mantenimiento, asegúrese de que la línea de
alimentación de la unidad se desconecta.
• hacer No conecte o desconecte el enchufe eléctrico con las manos mojadas
• Desenchufe el electrodoméstico o desconectar la alimentación antes de la limpieza o el
mantenimiento. El no hacerlo puede provocar una descarga eléctrica o la muerte.
• hacer No intente reparar o reemplazar cualquier parte de su electrodoméstico a menos que se
recomiende específicamente en este material. Cualquier otro servicio debe ser realizado por un
pesado y puede resultar en daños de la espalda u otras lesiones.
• Para garantizar una ventilación adecuada para su electrodoméstico, la unidad debe estar
completamente despejada. Elija un área bien ventilada con temperaturas superiores a 55ºF (13ºC) y
por debajo de 90ºF (32ºC). Esta unidad debe ser instalada en un área protegida de los elementos,
tales como el viento, la lluvia, rocío de agua o luz de sol.
• El electrodoméstico no debe colocarse cerca de hornos, parrillas u otras fuentes de calor.
• El electrodoméstico debe ser instalado con todas las conexiones eléctricas, de agua y de desagüe
según los códigos estatales y locales. Hace falta un suministro eléctrico estándar (sólo 115 V CA, 60
Hz), debidamente conectada a tierra de acuerdo con el Código Eléctrico Nacional y los códigos y
ordenanzas locales.
• Hacer No doble ni apriete el cable de alimentación del electrodoméstico.
• Los fusibles (o disyuntor) tamaño debe ser de 15 amperios.
• Eso Es importante que el electrodoméstico a nivelarse con el fin de funcionar correctamente. Puede
que tenga que hacer varios ajustes para nivelarla.
• Toda la instalación debe realizarse de acuerdo con los requerimientos locales de plomería.
• Asegúrese de que los tubos no están aplastar ni dañado durante instalación.
• Compruebe si hay fugas después de la conexión.
• Nunca permita que los niños operen, jueguen o gatear el interior del electrodoméstico
• Hacer No utilice productos de limpieza a base de disolvente-abrasivos en el interior. Estos limpiadores
pueden dañar o decolorar el interior.
• No utilice este electrodoméstico para que no sea su finalidad.
Page 17

17
Ayúdenos a ayudarte...
Lea detenidamente esta guía.
Si necesita servicio
Estamos orgullosos de nuestro servicio y
A continuación, si usted todavía no está contento,
PRECAUCIÓN:
Se pretende que ayudan a utilizar y mantener su
nuevo electrodoméstico correctamente.
Mantenga a la mano para responder a sus
preguntas.
Escribir se establece el modelo y número de
serie.
Los encontr
exterior trasera del electrodoméstico.
Por fav
ará en una placa situada en la pared
or, escriba estos números aquí:
Si no entiende algo o si necesita más ayuda, por
favor llame a:
Avanti Servicio al Cliente
800-220-5570
Mantenga prueba de la fecha original de compra
(como el recibo de venta) con esta guía para
establecer el período de garantía.
ESTE ELECTRODOMÉSTICO NO
ESTÁ DISEÑADO PARA EL
ALMACENAMIENTO DE
MEDICINA U OTROS
PRODUCTOS MÉDICOS.
_________________________________
Fecha de compra
_________________________________
Número de modelo
_________________________________
Número de serie
ce estos números en cualquier
Utili
correspondencia o llamadas de servicio con
respecto a su electrodoméstico.
Si ha rec
póngase inmediatamente en contacto con el
distribuidor (o constructor) que le vendió el
electrodoméstico.
Ahorrar
servicio técnico, consulte la Guía de solución de
problemas. En él se enumeran las causas de los
problemas de funcionamiento de menor
importancia que se pueden corregir a sí mismo.
ibido un electrodoméstico dañado,
tiempo y dinero. Antes de llamar al
queremos que usted esté satisfecho. Si por
alguna razón usted no está satisfecho con el
servicio que recibe, aquí hay algunos pasos a
seguir para obtener más ayuda.
PRIMERA, póngase en contacto con las personas
que servicio de reparación del electrodoméstico.
Explicar por qué usted no está satisfecho. En la
mayoría de los casos, esto va a resolver el
problema.
escribir todos los detalles, incluyendo su número
de teléfono, y enviarlo a:
Servicio al cliente
Avanti Products
10880 NW 30 Street
Miami, FL 33172 EE.UU.
Page 18

18
PARTES Y CARACTERÍSTICAS
1
Bisagra superior
2
Control de temperatura
3
Repisas (6)
4
Control de temperature
5
Bisagra
6
Puerta
7
Manija
8
Bisagra inferior
9
Pata niveladora
10
Parilla
11
Sello de l a P u e rta
12
13
14
Filtro de Carbón
Manija
Puerta
Page 19
19
INSTRUCCIONES DE INSTALACIÓN
1
Manual de instrucciones
6
Repisas de madera
1
Repisa de alambre
2
Repisas de vidrio
2
Manijas
Dimensiones de la apertura
Pulgadas(min)
CM (min)
Ancho
24
61
Profundidad
24”
61
Altura
34 ½
87.6
ANTES DE UTILIZACIÓN DEL APARATO
•
Retire la envoltura interna y externa.
•
Compruebe para asegurarse de que tiene todas las siguientes partes:
•
Ante de conectar el aparato a la fuente de alimentación, se deja reposar en posición vertical
durante aproximadamente 2 horas. Esto reducirá la posibilidad de un mal funcionamiento en
el sistema de refrigeración de la manipulación durante el transporte.
•
Limpiar la superficie interior con agua tibia con un paño suave.
INSTALACIÓN DEL APARATO
•
El aparato está diseñado para ser para la instalación de pie o incorporado (totalmente
empotrado).
•
Coloque el aparato sobre un piso que sea lo suficientemente fuerte como para soportar su
peso cuando está totalmente cargado. Para nivelar el aparato, ajuste las patas niveladoras
delanteras en la parte inferior del aparato.
•
Coloque el aparato lejos de luz solar directa y de fuentes de calor (cocina, calefacción,
radiador, etc.). La luz solar directa puede afectar el recubrimiento acrílico y fuentes de calor
puede aumentar el consumo eléctrico. Temperaturas ambiente extremas de frío también
pueden hacer que la unidad no funcione correctamente.
•
Evite colocar la unidad en áreas húmedas.
•
Conecte el aparato a una toma de pared exclusivo, tierra adecuada-instalado. Bajo ninguna
circunstancia corte o retire la tercera pata (tierra) del cable de alimentación. Cualquier
pregunta relacionada con la energía y / o puesta a tierra deben ser dirigidas a un electricista
certificado o un centro de servicio de Avanti Products.
INSTRUCCIONES PARA EMPOTRAR LA UNIDAD
La unidad está diseñada tanto para ser empotrada o para instalación independiente. Si va a utilizar
esta unidad en una aplicación empotrada por favor, siga los requisitos que se muestran a la derecha.
Page 20

20
INSTALACIÓN DE LAS MANIJAS
El aparato incluye dos manijas de acero inoxidable que no se requiere para operar esta unidad. Para
instalar las manijas por favor, siga las siguientes instrucciones:
1.
Jale la junta de la puerta en la zona donde el mango debe ser instalado como se muestra
a continuación en la ilustración # 1. La junta está fácilmente desplazada a mano, no
herramientas son necesarias.
2.
Alinea la manija con los tornillos pre-instalados en la parte trasera de la puerta. Apretar los
tornillos con un destornillador de cabeza Phillips hasta que el mango quede asegurado
firmemente contra el marco de la puerta. (No apriete demasiado ya que esto puede causar
daños en el conjunto del mango).
3.
Vuelva a colocar la junta de la puerta a su posición original.
Page 21

21
Conexión eléctrica
Advertencia
El uso inapropiado del enchufe a tierra puede resultar en el riesgo de descarga eléctrica. Si el cable de
Products.
Este electrodoméstico debe estar conectado a tierra adecuadamente para su seguridad. El cable
corto, haga que un electricista o técnico calificado instale un tomacorriente cerca del electrodoméstico.
CABLE EXTENSIÓN
Debido a los peligros potenciales de seguridad bajo ciertas condiciones, se recomienda
clasificación eléctrica del cable sea de 115 voltios y al menos 10 amperios.
PROTECTOR CONTRA SOBRETENSIONES
La mayoría de los electrodomésticos utilizan una serie de paneles de control eléctricos para operar.
sobretensiones a un electricista autorizado en su área.
anulará la garantía del producto.
alimentación está dañado, haga que sea reemplazado por un centro de servicio autorizado de Avanti
eléctrico de este electrodoméstico está equipado con un enchufe de tres puntas que encajan con tres
enchufes de pared standard para reducir al mínimo la posibilidad de una descarga eléctrica.
Bajo ninguna circunstancia corte o remueva la punta de tierra del cable de alimentación suministrado.
Est
e electrodoméstico requiere una toma de corriente eléctrica 115Volts ~ / 60 Hz estándar con tierra
de tres clavijas.
El cable debe ser asegurado detrás del electrodoméstico y no déjelo expuesto para evitar lesiones
accidentales.
Nunca
el enchufe y tire en línea recta desde el receptáculo.
No utilice un cable de extensión con este electrodoméstico. Si el cable de alimentación es demasiado
encarecidamente que no se utilice un cable de extensión con esta unidad. Sin embargo, si debe utilizar
un cable de extensión es absolutamente necesario que se trate de un UL / CUL, 3 hilos con toma de
tierra del electrodoméstico cable de extensión que tiene un enchufe y la toma a tierra y que la
Estas placas son muy susceptibles a las subidas de tensión y podrían ser dañados o destruidos.
Si el electrodoméstico va a ser usado en un área o si su ciudad / país es propenso a subidas de tensión
/ interrupciones; se sugiere que utilice un protector contra sobretensiones alimentación de todos los
dispositivos / electrodomésticos que utiliza. El estabilizador de tensión que se selecciona debe tener un
bloque oleada suficientemente alto como para proteger el electrodoméstico está conectado a. Si usted
tiene alguna pregunta relacionada con el tipo y tamaño de contacto necesario protector contra
desenchufe el electrodoméstico tirando del cable de alimentación. Siempre sostenga firmemente
Los daños debidos a sobrecargas de energía no se consideran un defecto cubierto por el fabricante y
Page 22

22
FUNCIONAMIENTO DEL APARATO
Rangos de Temperaturas
Vinera (lado izquierdo)
37º- 65º F
4º- 18º C
Enfriador (lado derecho)
40º- 65º F
3º- 18º C
Vinos tintos
58- 65 ºF
15- 18 ºC
Vinos blancos
48- 57 ºF
10 - 14 ºC
Vinos rosados
49- 51 ºF
9-11 ºC
Vinos espumantes
40 - 47 ºF
5- 8 ºC
Control de temperatura
Se recomienda instalar el aparato en un lugar donde la temperatura ambiente es de entre 72- 78
grados Fahrenheit. Si la temperatura ambiente es la temperatura recomendada por encima o por
debajo, el rendimiento de la unidad puede verse afectado. Por ejemplo, la colocación de la unidad en
condiciones frías o calientes extremas puede causar temperaturas interiores que fluctúan y no se
pudiera alcanzar el rango de 40-65 grados Fahrenheit.
Las temperaturas recomendadas para el vino enfriándose.
°C/°F
ON / APAGADO
- Mantenga pulsado durante 2 segundos en el panel de control para encender o apagar el
aparato. Cuando el aparato está apagado, dejará de funcionar.
LUZ INTERIOR
- Hay
dos modos de luz, mantenga pulsado durante 3 segundos para seleccionar el modo de
luz.
encendida y el modo de apagado: La configuración por defecto de la luz será controlada
1. Luz
por la pantalla del sensor, al abrir la puerta, la luz se encenderá automáticamente, cuando la
puerta está cerrada, la luz será desactivada.
2. Luz en el modelo: Mantenga pulsado durante 3 segundos para entrar en el modo de luz, en
este modo,
la pantall
a LCD mostrará y la luz siempre estará encendida.
AJUSTE DE TEMPERATURA
- Pulse o p
ara ajustar la temperatura del aparato, y cada pulsación del botón se
la temperatura por 1°.
altera
- Pulse
visu
alización de la temperatura de Celsius a Fahrenheit
y simultáneamente y mantenga pulsado durante 3 segundos para cambiar la
Page 23

23
SISTEMA DE ALARMA
1. Puert
abierta estará encendida y sonará 3 veces cada 5 segundos. Pulse cualquier tecla o cierre la puerta
para detener la alarma.
3. Alar
a abierta (alarma): Cuando la puerta ha sido abierta por más de 5 minutos, alarma de puerta
2. Alar
ma de baja temperatura: Cuando la temperatura interior es inferior a 2°C / 35ºF durante más
de 3 horas, se emitirá un sonido de alarma. Pulse cualquier tecla para detener el sonido de alarma.
ma de alta temperatura: Cuando dentro de temperatura es superior a 25°C / 77ºF durante más
de 6 horas, se emitirá un sonido de alarma. Pulse cualquier tecla para detener el sonido de alarma.
Page 24

24
CUIDADO Y MANTENIMI ENTO
1
Remueva las botellas de las (2) repisas que cubren el
filtro.
2
Remueva las repisas y guárdelas hacia un lado para
reponerlas después de reemplazar el filtro.
3
Sujete el filtro y gírelo aproximadamente 90 grados
hacia la izquierda. Retire el filtro hacia fuera.
4
Remueva el filtro existente y reemplácelo con uno
nuevo.
5
Coloque el filtro en posición y gírelo aproximadamente
90 grados hacia la derecha.
LIMPIEZA DEL APARATO
•
desenchufe el aparato y retire todos los artículos incluyendo los estantes.
•
Limpia las superficies interiores con una solución de agua y bicarbonato de sodio caliente. La
solución debe ser de aproximadamente 2 cucharadas de bicarbonato de sodio a un litro de agua.
•
Limpia los estantes con una solución de detergente suave.
•
Esprima exceso de agua de la esponja o paño para limpiar el área de los controles, o cualquier
partes eléctricas.
•
Limpia el armario exterior con agua caliente y detergente líquido suave. Enjuague bien y seque
con un paño suave y limpio.
•
No utilice lana de acero o un cepillo de acero sobre el acero inoxidable. Estos contaminarán el
acero inoxidable con partículas de acero y se puede producir la oxidación.
FALLAS DE ELECTRICIDAD
•
Las fallas de energía t se corrigen en unas pocas horas y no deben afectar a la temperatura de
su electrodoméstico si se minimiza el número de veces que se abre la puerta. Si el poder va a
estar fuera por un período de tiempo más largo, es necesario tomar las medidas adecuadas para
proteger sus contenidos.
SI UD SE MUDA
•
Eliminar todos las botellas.
•
Segure con cinta adhesiva todos los artículos sueltos (estantes) en el interior de su aparato.
•
Cierre la puerta y segure con cinta adhesiva
•
Mantiene de que el aparato este seguro en la posición vertical durante el transporte. También
proteja el exterior del aparato con una manta, o un elemento similar.
CON SEJOS PARA AHO RRAR ENERGÍA
•
El aparato debe estar situado en la zona más fría de la habitación, lejos de aparatos que
producen calor, y fuera de la luz directa del sol.
SISTEMA DE FILTRACIÓN DE CARBON
El vino es un objeto vivo que respira a través del corcho de la botella. Con el fin de preservar la
calidad y el sabor de sus vinos finos, deben ser almacenados a las condiciones ideales de
temperatura y ambiente. Su aparato está equipado con un sistema de filtración de carbón activo
para asegurar la pureza del aire, la eficiencia de enfriamiento, y para mantener un gabinete libre de
olor para el almacenamiento de su buen vino. El filtro se encuentra en el panel trasero dentro de su
aparato.
Toma en cuenta, que este filtro se debe cambiar cada 12 meses.
Para reemplazar el filtro:
Page 25

25
SERVICIO DE APARATO
Estamos orgullosos de nuestra organización de servicio al cliente y la red de técnicos de servicios
profesionales que prestan servicio en sus electrodomésticos Avanti. Con la compra del aparato,
número gratuito.
PRODUCTOS DE CLIENTE AVANTI
800-323 5029
productos, hay ayuda disponible.
Usted puede pedir piezas y accesorios que serán
cheque personal, giro postal, Master Card o Visa.
aparato dentro y por fuera.
Avanti, usted puede tener la confianza de que si alguna vez necesita información o asistencia
adicional con el Customer Service Avanti Products estará aquí para usted. Sólo tiene que llamar al
Información del Producto
Pedidos de piezas
800-220 5570
Servicio de reparación a domicilio
800-220 5570
WIRING DIAGRAM
Lo que sus preguntas son acerca de nuestros
entregados directamente a su casa.
Usted puede ordenar estos artículos por el
Un centro de servicio Avanti Products
proporcionará el servicio de reparación experto,
programado a una hora que sea conveniente
para usted. Nuestros técnicos conocen su
Electrocircuit Line Diagram
Page 26

26
SÉCURITÉ APPLI ANCE
Votre sécurité et celle des autres sont très importantes.
Nous avons fourni de nombreux messages de sécurité importants dans ce manuel et sur
votre appareil. Toujours lire et respecter les consignes de sécurité.
C'est le symbole d'alerte de sécurité.
Ce symbole vous signale les dangers
"PRUDENCE".
Attention signifie que le non-respect
mort.
Attention signifie que le non-respect
dommages matériels.
Tous les messages de sécurité vous alerter sur ce danger potentiel et vous disent comment
suivies.
GAZ REFRIGERANT INFLAMMABLE
potentiels peut tuer ou blesser vous
et d'autres. Tout sécurité messages
suivra la sécurité symbole d'alerte et
soit les quartiers"
DANGER","ATTENTION" ou
Danger signifie que le non-respect de
cette déclaration de sécurité peut
entraîner des blessures ou la mort.
de cette déclaration de sécurité peut
entraîner des dommages importants
du produit, des blessures graves ou la
de cette déclaration de sécurité peut
entraîner des mineures ou modérées
blessures, ou des biens ou des
réduire le risque de blessure, et vous savez ce qui peut arriver si les instructions ne sont pas
DANGER - Risque d'incendie ou d'explosion. Réfrigérant inflammable utilisé.
NE
PAS utiliser des dispositifs mécaniques pour dégivre r le réfrigérateur. NE PAS percer
un tube réfrigérant.
DANGE
que par du personnel qualifié. NE PAS percer un tube réfrigérant.
MI
le guide de réparation manuelle / propriétaire avant de tenter de réparer ce produit. Toutes les
mesures de sécurité doivent être suivies.
MISE EN GARDE- Risque d'incendie ou d'explosion. Éliminer des biens conformément aux
règlements fédéraux ou locaux. Réfrigérant inflammable utilisé.
MI
réfrigérant. Suivez les instructions de manipulation avec soin. Réfrigérant inflammable utilisé.
MISE EN GARDE - Pour éviter qu'un enfant ne soit piégé, garder hors de portée des enfants et
non à proximité du refroidisseur.
R - Risque d'incendie ou d'explosion. Réfrigérant inflammable utilisé. Pour être réparé
SE EN GARDE - Risque d'incendie ou d'explosion. Réfrigérant inflammable utilisé. Consultez
SE EN GARDE - Risque d'incendie ou d'explosion due à la perforation du tuyau de
Page 27

27
APPAREIL SÉCURITÉ
Avant
•Brancher sur une 3 broches mise à la terre sortie, faire pas enlever la terre broches, faire pas
confiées à un technicien qualifié.
• Utilisation deux personnes ou plus pour déplacer et installer l’appareil. Ne pas le faire peut
• Ne pas utiliser cet appareil pour d'autres fins que celles prévues.
le refroidisseur de breuvages est utilisé, il doit être correctement
positionné et installé comme décrit dans ce manuel, afin de lire
attentivement le manuel. Pour réduire le risque d'incendie, choc ou de
blessure électrique lors de l'utilisation du refroidisseur de breuvages,
Suivez les précautions de bases, comprenant les éléments suivants:
utiliser un adaptateur, et ne pas utiliser une rallonge
• Remplacer tous les panneaux avant exploitation
• Il est recommandé d'utiliser un circuit distinct, qui sert uniquement votre refroidisseur de
breuvages, fournir. Utilisez des récipients cette ne peut pas être désactivé par une chaîne de
traction interrupteur ou
• ne jamais nettoyer appareil pièces avec des liquides inflammables. Ces vapeurs peuvent créer
un risque d'incendie or explosion. Et ne pas stocker ou utiliser de l'essence ou d'autres
vapeurs et liquides inflammables à proximité de cet appareil ou de tout autre appareil. Les
vapeurs peuvent créer un risque d'incendie ou d'explosion.
• Avant de procéder à des opérations de nettoyage et d'entretien, assurez-vous que la ligne
d'alimentation de l'appareil est débranchée.
• Faire pas brancher ou débrancher la prise électrique lorsque vos mains sont humides
• Débranchez le appareil ou déconnecter la alimentation avant le nettoyage ou l'entretien. Ne
pas le faire peut entraîner un choc électrique ou la mort.
• Faire pas tenter de réparer ou de remplacer une partie de votre appareil à moins qu'il ne soit
spécifiquement recommandé dans ce matériau. Toutes les autres réparations doivent être
entraîner dans le dos ou d'autres blessures.
• Pour assurer une bonne ventilation de votre appareil, l'appareil doit être complètement dégagé.
Choisissez un endroit bien aéré avec des températures supérieures à 55ºF (13ºC) et audessous 90ºF (32ºC). Cet appareil doit être installé dans une zone protégée de l’élément,
Comme le vent, la pluie, de l'eau pulvérisée ou lumière du soleil.
• l’appareil ne doit pas être situé à côté de fours, grilles ou autres sources de chaleur élevée.
• L’appareil doit être installé avec toutes les connexions électriques, d'eau et d'évacuation,
conformément à codes étatiques et locaux. Une alimentation électrique standard (115 V CA
seulement, 60 Hz), mise à la terre conformément au Code national de l'électricité et les codes
et règlements locaux est nécessaire.
• Faire pas plier ou pincer le cordon d'alimentation du appareil.
• Le fusible (ou disjoncteur) doit être de 15 ampères.
• Il est important pour l'appareil soit à niveau afin de fonctionner correctement. Vous devrez
peut-être faire plusieurs ajustements à niveler.
• Toute installation doit être conforme aux exigences du code de plomberie locale.
• Assurez-vous que les tuyaux ne sont pas pincés ou pliés ou endommagés au cours
installation.
• Vérifier les fuites après connexion.
• Ne jamais laisser les enfants utiliser, jouer avec ou crawl à l'intérieur de l'appareil
• Faire pas utiliser de produits de nettoyage à base de solvants or abrasifs sur l'intérieur. Ces
nettoyants peuvent endommager ou décolorer l'intérieur.
Page 28

28
AIDEZ-NOUS À VOUS AIDER ...
Lisez attentivement ce guide.
SI VOUS AVEZ BESOIN DE SERVICE
Nous sommes fiers de notre service et nous
Ensuite, si vous n'êtes toujours pas satisfait, écrivez tous
MISE EN GARDE:
Il est destiné à vous aider à utiliser et à
maintenir votre nouvel appareil correctement.
Gardez
Si vous ne comprenez pas quelque chose où
vous avez besoin de plus d'aide, s'il vous
plaît appelez:
Avant
i Service à la clientèle
800-220-5570
Gardez
(tel que votre bordereau de vente) avec ce
guide pour établir la période de garantie.
preuve de la date d'achat d'origine
CET APPAREIL EST PAS
CONÇU POUR LE STOCKAGE
DE MÉDECINE OU D'AUTRES
PRODUITS MÉDICAUX.
Notez le modèle et le numéro de série.
es trouverez sur une plaque située sur la paroi
Vous l
extérieure arrière de l'appareil.
vous plaît écrire ces chiffres ici:
S'il
_____________________________________
Date d'achat
_____________________________________
Numéro de modèle
_____________________________________
Numéro de série
isez ces numéros dans toute correspondance ou
Util
appels de service concernant votre appareil.
ous avez reçu un appareil endommagé, contactez
Si v
immédiatement le revendeur (ou le constructeur) qui
vous a vendu l'appareil.
Gagnez
service, consultez le Guide de dépannage. Il énumère
les causes des problèmes de fonctionnement mineurs
que vous pouvez vous corriger.
du temps et de l'argent. Avant d'appeler le
voulons que vous soyez heureux. Si pour
une raison quelconque vous n'êtes pas
satisfait du service que vous recevez, voici
quelques étapes à suivre pour obtenir de
l'aide.
FIRST, contacter les gens qui ont réparé
votre appareil. Expliquez pourquoi vous
n'êtes pas satisfait. Dans la plupart des cas,
cela va résoudre le problème.
les détails, y compris votre numéro de téléphone, et
l'envoyer à:
Service Clients
Avanti Produits
10880 NW 30 Street
Miami, FL 33172 USA
Page 29

29
PIÈCES ET CARACTÉRISTIQUES
1
Charnière supérieur gauche
2
Panneau de configuration Zone gauche
3
Étagères (6)
4
Panneau de droite zone de contrôle
5
Charnière supérieure droite
6
Porte droite
7
Poignée de porte droite
8
Charnière inférieur droit
9
Pieds réglables
di
Plaque de protection
11
Joint de porte
12
13
14
Filtre au charbon
Poignée de porte gauche
Porte gauche
Page 30

30
Connexion électrique
Attention
Une mauvaise utilisation de la prise de terre peut entraîner un risque de choc électrique. Si le
cordon d'alimentation est endommagé, faites
Cet appareil doit être correctement mis à la terre pour votre sécurité. Le cordon
de terre du cordon
Ne pas utiliser une rallonge avec cet appareil. Si le cordon d'alimentation est trop
n technicien électricien ou technicien qualifié d'installer une prise près de
l'appareil.
RALLONGE ÉLECTRIQUE
En raison des risques potentiels pour la sécurité dans certaines conditions, il est
puissance électrique du câble est de 115 volts et au moins 10 ampères.
PARASURTENSEUR
La plupart des appareils électriques utilisent une série de tableaux de commande
nécessaire à un électricien agréé dans votre région.
Les dommages dus à des surtensions ne sont pas considérés comme un fabricant
couvert défaut et annulera la garantie du produit.
d'alimentation de cet appareil est équipé d'une fiche à trois broches qui accouple avec
trois standards prises murales broches afin de minimiser le risque de choc électrique.
Ne pas en aucun cas couper ou enlever la troisième broche
d'alimentation fourni.
Cet appareil nécessite une prise électrique standard 115Volts ~ / 60Hz avec le sol à
trois broches.
Le cordon doit être fixé derrière l'appareil et non laissés exposés ou qui pendent pour
prévenir les blessures accidentelles.
Ne jamais débrancher l'appareil en tirant sur le cordon d'alimentation. Toujours saisir
fermement la fiche et tirez tout droit sorti de la prise.
court, u
fortement recommandé de ne pas utiliser une rallonge avec cet appareil. Toutefois, si
vous devez utiliser une rallonge, il est absolument nécessaire que ce soit un UL / CUL,
3 fils de terre appareil rallonge ayant une fiche de mise à la terre et à la sortie et que la
électriques pour fonctionner. Ces cartes sont très sensibles aux surtensions et
pourraient être endommagés ou détruits.
Si l'appareil va être utilisé dans une zone ou si votre ville / pays est sujette à des
surtensions / coupures; il est suggéré que vous utilisez un dispositif de protection
contre les surtensions pour tous les dispositifs / appareils électriques que vous utilisez.
Le protecteur de surtension que vous sélectionnez doit avoir un bloc de poussée
suffisamment élevé pour protéger l'appareil, il est connecté. Si vous avez des
questions concernant le type et la taille d'un protecteur de surtension contact
Page 31

31
INSTRUCTIONS D'INSTALLATION
1
Manuel
6
Etagères en bois
1
Etagère en fil
2
Etagères en verre
2
Poigneés
Dimensions d'ouverture
IN (min)
CM (min)
Largeur
24½
61
Profondeur
24
61
Hauteur
34 ½
87.6
AVANT D'UTILISER VOTRE APPAREIL
•
Retirez l'emballage extérieur et intérieur.
•
Vérifiez que vous avez toutes les pièces suivantes:
• Avant de connecter cet appareil à la source d'alimentation, laissez-le tenir debout pendant
environ 2 heures. Cela permettra de réduire la possibilité d'un mauvais fonctionnement du
système de refroidissement lors de la manipulation durant le transport.
• Nettoyer la surface intérieure à l'eau tiède avec un chiffon doux.
INSTALLATION DE VOTRE CELLIER
• Ce Cet appareil est conçu pour Be pour la pose libre ou built-in (entièrement encastré).
• Placez votre cellier sur un plancher qui est assez solide pour supporter quand elle est
complètement chargée. Pour mettre à niveau votre cellier, régler le nivellement avant jambes au
niveau du fond du cellier.
• Localisez le cellier abri du soleil et des sources de chaleur (cuisinière, chauffage, radiateur,
etc.). La lumière solaire directe peut affecter le revêtement acrylique et sources de chaleur
peuvent augmenter la consommation électrique. Les températures ambiantes froides extrêmes
peuvent aussi causer l'unité de ne pas fonctionner correctement.
• Éviter de placer l'appareil dans les zones humides.
• Branchez le cellier dans une prise murale exclusive, bien installé à la terre. Ne pas en aucun
cas réduire ou supprimer la troisième (terre) du cordon d'alimentation. Toute question
concernant le pouvoir et / ou mise à la terre doivent être adressées à un électricien certifié ou
un centre de service Avanti Produits autorisé.
BUILT - IN INSTRUCTIONS - DE CABINET (Encastrable)
Cet appareil est conçu pour les deux dans la construction ou la pose libre. Si vous prévoyez d'utiliser
cet appareil dans une application intégrée s'il vous plaît suivre les exigences indiquées ci-dessous.
Page 32

32
INSTALLATION D’ POIGNÉE EN ACIE R
This refroidisseur de boisson comprend une poignée en acier inoxydable qui ne soit pas nécessaire
pour faire fonctionner cet appareil. Pour installer la poignée s'il vous plaît suivez les instructions cidessous:
1.
Pull écart du joint de la porte dans la zone où la poignée doit être installé comme indiqué
ci-dessous Illustration # 1. Le joint est facilement déplacé à la main, sans outils sont
nécessaires.
2.
Align la poignée avec les vis pré-installé sur la face arrière de la porte. Serrer les vis à
l'aide d'un tournevis à tête Phillips jusqu'à ce que la poignée définit à la fois de rinçage et
fermement fixé contre le cadre de porte. (NE PAS trop serrer car cela causera des
dommages à l'ensemble de la poignée).
3.
Remplacer le joint de la porte à sa position initiale.
② Gask
et ② Entraînement par vis ③ Poignée
Page 33

33
MODÈLE WBC27W3S
Temperatures de côté zone
WINE Chiller (GAUCHE)
37º- 65º F
4º- 18º C
BEVERAGE COOLER (côté droit)
40º- 65º F
3º- 18º C
Vins rouges
58- 65 ° F
15- 18 ° C
Vins secs / Blanc
48- 57 ºF
10 - 14 ° C
Vins Rose
49- 51 ºF
9 - 11 ° C
Sparkling Vins
40 - 47 ºF
5- 8 ° C
Rafraîchisseur à vin et Beverage Panneau de configuration Cooler
UTILISATION DE VOTRE APPAREIL
Il est recommandé que vous installiez l'appareil dans un endroit où la température ambiante se situe
entre 72- 78 degrés Fahrenheit. Si la température ambiante est supérieure ou inférieure à des
températures recommandées, la performance de l'unité peut être affectée. Par exemple, en plaçant
l'appareil dans des conditions extrêmes froides ou chaudes peut entraîner des températures
intérieures fluctuer. La gamme de Fahrenheit 40-65 degrés Les ne peut pas être atteint.
Températures recommandées pour le vin Chilling.
°C/°F
ON / HORS TENSION
- Appuy
ez et maintenez pendant 2 secondes sur le panneau de commande pour activer ou
désactiver le refroidisseur, lorsque refroidisseur est désactivé,
eil cessera de fonctionner et le total arrêté.
l'appar
Réglage d e l a lu m i è r e
- Il ex
iste deux modes d'éclairage, maintenez la touche enfoncée pendant 3 secondes pour
sélectionner le mode lumière.
1. La lumi
ère sur et le mode: Le réglage par défaut de la lumière sera contrôlée par le
capteur et l'écran LCD sera spectacle, lorsque la porte est ouverte, la lumière se met en
marche automatiquement, lorsque la porte est fermée, la lumière sera désactivé.
2. La lumière sur le modèle: Maintenez la touche enfoncée pendant 3 secondes pour entrer dans la
lumière en mode, dans ce mode, l’écran LCD affiche et la lumière sera toujours.
Page 34

34
RÉGLAGE DE LA TEMPÉRATURE
- Appuyez sur u pour régler la température de l'appareil, et chaque pression sur la
touche per
- Appuyez
de la température de Celsius à Fahrenheit
SYSTÈME D'AL ARME
1. Alarme de porte ouverte: Lorsque la porte est ouverte pour plus de 5 minutes, alarme de porte
ouverte sera allumé et LCD affichage de l'écran et bip 3 fois toutes les 5 secondes, appuyez sur une
touche ou fermer la porte pour arrêter l'alarme.
2. Alarme de basse température: Lorsque la température intérieure est inférieure à 2°C pendant plus
de 3 heures, il émet un signal sonore alarme et l'écran LCD affiche; Appuyez sur une touche pour
arrêter l'alarme de bip sonore.
3. Alarm
6 heures, il émet un signal sonore d'alarme et l'écran LCD affiche. Appuyez sur une touche pour
arrêter l'alarme de bip sonore.
met modifier la température de 1°C.
simultanément sur et pendant 3 secondes pour changer l'affichage
e de haute température: lorsque la température interne est supérieure à 25°C pendant plus de
Page 35

35
SOINS ET ENTRETIEN
1
Retirer les bouteilles de vin stockées sur les deux (2)
étagères devant le filtre.
2
Retirez les étagères et mis de côté pour être remplacé
une fois que vous avez changé le filtre
3
Tenez le filtre et le tourner à 45 degrés dans le sens
inverse des aiguilles d'une montre, puis retirez-le.
4
Retirer le filtre existant et le remplacer par un nouveau.
5
Mettez le nouveau filtre dans le trou, puis tourner le
filtre à 45 degrés dans le sens horaire.
NETTOYAGE DE VOTRE CELLIER
• Coupez l'alimentation, débranchez l'appareil, et supprimer tous les éléments, y compris les tablettes.
• Laver les surfaces intérieures avec une solution d'eau et de bicarbonate de soude chaude. La solution
devrait être d'environ 2 cuillères à soupe de bicarbonate de soude à un litre d'eau.
• Laver les étagères avec une solution de détergent doux.
• Essorez l'excès d'eau de l'éponge ou d'un chiffon lorsque la zone des commandes ou des pièces
électriques de nettoyage.
• Lavez l’extérieur avec de l'eau chaude et un détergent liquide doux. Rincez bien et séchez avec un
chiffon doux et propre.
• Ne pas utiliser de laine d'acier ou d'une brosse en acier sur l'acier inoxydable. Ceux-ci contaminé
l'acier inoxydable avec des particules d'acier et la rouille peuvent se produire.
PANNEAU ÉLECTRONIQUE
• La plupart des pannes de courant sont corrigées en quelques heures et ne devraient pas affecter la
température de votre appareil si vous réduisez le nombre de fois que la porte est ouverte. Si la
puissance va être hors service pendant une longue période de temps, vous devez prendre les
mesures appropriées pour protéger vos contenus.
Déplacer votre Cellier
• Reti
• Solidement ruban adhésif vers le bas tous les articles en vrac (tablettes) à l'intérieur de votre appareil.
• Collez la porte fermée.
• Assurez-vous que l'appareil reste bloqué en position verticale pendant le transport. Protégez
rez tous les éléments.
également l'extérieur de l'appareil avec une couverture, ou un objet similaire.
ÉCONOMISER DE L'ÉNERGIE
• Le Chiller vin doit être situé dans la zone la plus froide de la salle, loin des appareils produisant de la
chaleur et de la lumière directe du soleil.
SYSTÈME DE FILTRATION À CHARBON
Votre vin est un objet vivant qui respire à travers le bouchon de sa bouteille. Afin de préserver la qualité et
le goût de vos vins fins, ils doivent être entreposés dans les conditions de température et ambiantes
idéales. Votre cave est équipée d'un système de filtration de charbon actif pour assurer la pureté de l'air,
l'efficacité de refroidissement, et de maintenir une armoire sans odeur pour le stockage de vos vins fins.
L'ensemble de filtre est situé sur le panneau arrière à l'intérieur de votre cave.
Gardez à l'esprit, que ce filtre doit être changé tous les 12 mois.
Pour acheter des filtres de remplacement, appelez nos pièces / Service au 1 - 800 - 220-5570.
Pour remplacer votre filtre:
Page 36

36
PROBLÈMES AVEC VOTRE CELLIER?
PROBLÈME
CAUSE POSSIBLE
Cellier ne fonctionne pas.
Non branché.
Le disjoncteur est déclenché ou un fusible grillé.
Cellier n’est pas assez froid.
Vérifiez le réglage du contrôle de la température.
Le joint de la porte ne se referme pas correctement.
Active et désactive fréquemment.
La température ambiante est plus chaude que la
Le joint de la porte ne se referme pas correctement.
La lumière ne fonctionne pas.
Non branché.
Le bouton d'éclairage est éteint.
Vibrations.
Vérifiez pour assurer que le vin Chiller est de niveau.
Le Cellier semble faire trop de bruit.
Le bruit de cliquetis peut provenir de l'écoulement du
Le Cellier n’est pas à niveau.
La porte ne se ferme pas correctement.
Les étagères sont hors de position.
Vous pouvez résoudre de nombreux problèmes de cellier commun facilement, vous permet d'économiser
le coût d'un appel de service possible. Essayez les suggestions ci-dessous pour voir si vous pouvez
résoudre le problème avant d'appeler le réparateur.
GUIDE DE DÉPANNAGE
L'appareil est éteint.
La porte est ouverte trop souvent.
La porte ne se ferme pas complètement.
normale.
Une grande quantité de son contenu a été ajouté au
refroidisseur à vin.
La porte est ouverte trop souvent.
La porte ne se ferme pas complètement.
Le contrôle de la température ne soit pas correct.
Le disjoncteur est déclenché ou un fusible grillé.
fluide frigorigène, ce qui est normal.
Comme chaque cycle se termine, vous pouvez
entendre des gargouillis causés par l'écoulement du
fluide frigorigène dans votre Cellier.
Contraction et expansion des parois internes
peuvent provoquer des craquements et des.
La porte est désalignée.
Le Cellier n’est pas à niveau.
Le joint est sale.
Page 37

37
SERVICE POUR VOTRE CELLIER
800-323-5029
produits, l'aide est disponible.
Card ou Visa.
à l'extérieur.
Nous sommes fiers de notre organisation de service à la clientèle et le réseau de techniciens de services
professionnels qui offrent des services sur vos appareils Avanti. Avec l'achat de votre appareil Avanti, vous
pouvez avoir la certitude que si vous avez besoin d'informations ou de l'aide, l'équipe du service à la
clientèle Avanti Products sera là pour vous. Appelez-nous sans frais.
AVANTI PRODUITS SERVICES CLIENTS
Information produit
Quelles que soient vos questions sont sur nos
Les commandes de la pièce
800-220-5570
In-Home Repair Service
800-220-5570
Vous pouvez commander des pièces et
accessoires qui seront livrés directement à votre
domicile par chèque personnel, mandat, Master
Un centre de service Avanti Produits autorisé
fournira un service de réparation expert, prévue à
un moment qui vous convient. Nos réparateurs
formés connaissent votre appareil à l'intérieur et
SCHÉMA
Electrocircuit Line Diagram
Page 38

38
VOS PRODUITS AVANTI
Staple votre reçu de vente ici. Preuve de la date
service sous garantie.
CE QUI EST COUVERT - GARANTIE LIMITÉE D'UN AN
moins doivent être traduits / envoyé au centre de service de l'appareil pour la réparation.
DEUXIÈME LIMITÉE À LA CINQUIÈME ANNÉE GARANTIE
peut-être nécessaire, sont à la charge de l'utilisateur.
EXCLUSIONS DE LA GARANTIE / NON COUVERTS:
de Avanti Products, y compris, sans limitation, un ou plusieurs des éléments suivants:
•
entourant l’appareil, et les actes de Dieu.
•
• Les appels de service qui sont liés à des problèmes
En aucun cas, Avanti Products toute responsabilité ou responsabilité pour les dommages aux biens
fusibles.
HORS DE LA GARANTIE DU PRODUIT
compris les réparations, les pro-taux, ou le remplacement du produit, une fois la garantie expirée.
GARANTIE
Avanti Products garantit que le produit est exempt de défauts de matériaux et / ou de fabrication pour une
période de douze (12) mois à compter de la date d'achat par le propriétaire initial. La durée commence à courir à
la date d'achat, et ne sera pas retardée, restreinte, prolongée ou suspendu pour quelque raison que ce soit, sauf
si décrit en détail dans le document de garantie. Pendant un an à compter de la date d'achat par le propriétaire
d'origine, les produits Avanti seront, à sa discrétion, réparer ou remplacer toute partie du produit qui se révèle
être un défaut de matériau ou de fabrication dans une utilisation normale. Avanti Products vous fournira un
produit raisonnablement semblable nouveau ou remis à neuf. Au cours de cette période Avanti Products fournira
toutes les pièces et la main-d'œuvre nécessaires pour corriger ces défauts gratuitement, aussi longtemps que le
produit a été installé et utilisé conformément aux instructions écrites dans ce manuel. En usage locatif ou
commercial, la période de garantie est de 90 jours. Tous les appareils Avanti de 3,5 pieds cubes la capacité ou
Pour la deuxième à la cinquième année à partir de la date d'achat originale, Avanti Products fournira un
compresseur de remplacement gratuit en raison d'un échec. Vous êtes responsable de la main-d'œuvre et de
fret de service. En usage locatif ou commercial, la garantie du compresseur est limitée à un an et neuf mois. Les
coûts impliqués pour déplacer le produit au centre de service et de retour à la maison de l'utilisateur, comme
La couverture de la garantie décrite ici exclut tous les défauts ou les dommages qui ne sont pas la faute directe
Un non-respect de tout État applicable, local, ville, ou du comté électricité, plomberie et / ou des codes du
bâtiment, des règlements ou des lois, y compris le défaut d'installer le produit en stricte conformité avec le feu
et les codes du bâtiment et les règlements locaux.
d'achat originale est nécessaire pour obtenir un
• Les forces externes, élémentaires et / ou l'environnement et les facteurs, y compris, sans s'y limiter, la pluie, le
vent, le sable, les inondations, les incendies, les coulées de boue, des températures de congélation, l'humidité
excessive ou à une exposition prolongée à l'humidité, la foudre, les surtensions, les défaillances structurelles
les pertes de contenu de la nourriture ou d'autres
contenus en raison de la détérioration.
• Les dommages accessoires ou consécutifs
• Pièces et coûts de main-d'œuvre pour les éléments
suivants ne seront pas considérés comme garantie:
• Les ampoules et / ou boîtier en plastique.
• doublures d'armoires en plastique.
• Poncture évaporateur annule la garantie sur le
système scellé complet.
• Les frais de transport et de manutention associés
au remplacement de l'unité.
• Les réparations effectuées par réparateurs non
autor
isés
environnants, y compris les armoires, les planchers, les plafonds, et d'autres structures et / ou des objets autour
du produit. Sont également exclus de cette garantie sont les égratignures, les entailles, les bosses mineures, et
d'autres dommages esthétiques sur les surfaces externes et les parties exposées; Produits dont les numéros de
série ont été modifiés, effacés ou supprimés; visites de service pour l'éducation à la clientèle, ou des visites où il
n'y a rien de mal avec le produit; correction des problèmes d'installation (vous êtes seul responsable de toute
structure et réglage pour le produit, y compris tous les systèmes électriques, de plomberie et / ou d'autres
installations de raccordement, pour le bon plancher / fondation, et pour toute modification, y compris sans s'y
limiter les armoires, les murs, les planchers, les étagères etc., ainsi que la remise à zéro des disjoncteurs ou
Avanti Products est soumis à aucune obligation, en droit ou autrement, de vous fournir toutes les concessions, y
externes, tels que l'abus, l'alimentation électrique
inadéquate, les accidents, les incendies, les
inondations, ou tout autre acte de Dieu.
• Une panne du produit si elle est utilisée pour autre
chose que son intention but.
• La garantie ne couvre pas en dehors de la
Continental USA.
• Surtaxes, y compris mais sans s'y limiter, toute
après heure, les appels week-end, ou de services
de vacances, les péages, les frais de voyage de
convoyage ou les frais de kilométrage pour les
appels de service dans les régions éloignées.
GARANTIE - REFRIGERATION - COMPRESSEUR
Page 39

39
Registration Information
Thank you for purchasing this fine Avanti product. Please fill out this form and return it to the
following address within 100 days from the date of purchase and receive these important benefits:
Avanti Products LLC
P.O.Box 520604 – Miami, Florida 33152
Protect your product:
We will keep the model number and date of purchase of your new Avanti product on file to
help you refer to this information in the event of an insurance claim such as fire or theft.
Promote better products:
We value your input. Your responses will help us develop products designed to best meet
your future needs.
-------------------------------------------------------(detach here)-------------------------------------------------------------
Avanti Registration Card
Name Model # Serial #
Address Date Purchased Store / Dealer Name
City State Zip E-mail Address
Area Code Pho
Did You Purchase An Additional Warranty As your Primary Residence, Do You:
Extended Own Rent
None
Reason for Choosing This Avanti Product:
Please indicate the most important factors
That influenced your decision to purchase
this product:
Price
Product Features
Avanti Reputation
Product Quality
Salesperson Recommendation
Other: _
Friend / Relative Recommendation
Warranty
Other: _
Comments:
ne Number Occupation
Your Age:
under 18 18-25 26-30
31-35 36-50 over 50
Marital Status:
Married Single
Is This Product Used In The:
Home Business
How Did You Learn About This Product:
Advertising
In-Store Demo
Personal Demo
Page 40

40
WBC27W3S – 12222017 PRINTED IN CHINA
 Loading...