

Page 1
MODEL / MODELO / MODELÉ : PPO12X3S
COUNTERTOP PIZZA MAKER
HORNO PARA PIZZA
FOUR PORTABLE DU PIZZA
INSTRUCTION MANUAL
MANUAL DE INSTRUCCIONES
MANUEL D’INSTRUCTIONS
BEFORE USE, PLEASE READ AND FOLLOW ALL SAFETY RULES AND OPERATING
INSTRUCTIONS.
Avanti has a policy of continuous improvement on its products and reserves the right to change materials and specifications without
notice.
Avanti Products LLC
P.O. Box 520604 - Miami, Florida 33152
www.avantiproducts.com
Page 2

2
TABLE OF CONTENTS
Important Safety Instructions
3
Help Us Help You
4
Parts and Features
5
Installation Instructions
6
Before Using Your Appliance
6
Installation of Your Appliance
6
Electrical Connection
6
Operating Your Appliance
7
Care and Maintenance
7
Cleaning Your Appliance
7
Storing Your Appliance
7
Troubleshooting Guide
8
Service for Your Appliance
8
Your Avanti Products Warranty
9
Instrucciones en Español
10 – 11
Instructions aux Français
12 - 19
Registration Information
Last
Page
Page 3

3
IMPORTANT SAFETY INSTRUCTIONS
~
~
To reduce the risk of fire, electrical shock, or injury when using
your appliance, follow these basic precautions:
When using electrical appliances, basic safety precautions should always be followed including
READ ALL INSTRUCTIONS, PRODUCT LABELS AND WARNINGS BEFORE USING THE
Do not touch hot surfaces, use handles or knobs. Always use oven mitts when handling hot materials
- SAVE THESE INSTRUCTIONS -
WARNING
the following:
APPLIANCE.
•
and allow metal parts to cool before cleaning. Allow the unit to cool thoroughly before putting in or
taking off parts.
• When the unit is not in use and before cleaning, unplug the appliance from the wall outlet. Make sure
the appliance is turned off before unplugging.
• To protect against risk of electrical shock, do not immerse the appliance in water or any other liquids.
• Don’t leave children alone or unattended where the appliance is hot or in operation. This appliance is
not designed to be used by children.
• Never use your appliance for heating the room. Your oven is not designed to heat your kitchen.
• Do not operate this or any appliance with a frayed or damaged cord or plug, after the appliance
malfunctions, is dropped or has been damaged in any manner.
• Do not use attachments not recommended by the manufacturer; they may cause fire, electric shock
or personal injury.
• Do not use outdoors or for commercial purposes.
• Do not use this appliance for other than its intended use.
• Do not let the cord dangle over the edge of a tabletop, countertop or to touch hot surfaces.
• Do not place the appliance near a hot gas, electric burner or in a heated oven.
• Extreme caution should be used when using containers constructed of other than metal or glass.
• A fire may occur if the appliance is covered or touching flammable materials, including curtains,
draperies, walls, etc., when in operation. Do not store any items on top of the appliance when in
operation.
• Do not store any materials, other than manufacturer’s recommended accessories in this unit when
not in use.
• Do not place any flammable materials in the appliance, such as paper, cardboard, plastic or any
materials that may catch fire or melt.
• Never clean the appliance with flammable liquids. The fumes can create a fire hazard or explosion.
• Do not cover the appliance with metal foil. This will cause overheating of the appliance.
• Oversized foods or metal utensils must not be inserted in the appliance as they may create a fire or
risk of electrical shock.
• Do not clean with metal scouring pads. Pieces can break off the pad and touch electrical parts
involving a risk of electrical shock.
• When broiling, use extreme caution when removing tray or disposing of hot grease.
• To turn this appliance off, return control to the “0” position, then remove the plug from wall outlet.
• Cooked food can be very hot, especially pastry filling. Handle with care.
• Never pick up a flaming pan. Turns the controls off. Smother a flaming pan on a surface unit by
covering the pan completely with a well-fitting lid.
• Do not use water on grease fires. Flaming grease outside a pan can be put out by covering it with
baking soda, multipurpose dry chemical, or fire extinguisher. Flame in the oven can be smothered
completely by closing the oven door and turning the oven off or by using baking soda, multipurpose
dry chemical, or fire extinguisher.
This Unit Is For Household Use Only
Page 4

4
HELP US HELP YOU...
Read this guide carefully.
It is intended to help you operate and maintain
your new appliance properly.
Keep it handy to answer your questions.
If you don't understand something or you need
more assistance, please call:
Avanti Customer Service
800-220-5570
Keep proof of original purchase date (such as
your sales slip) with this guide to establish the
warranty period.
IF YOU NEED SERVICE
We're proud of our service and want you to be
pleased. If for s ome reason, you are not happy
with the service you receive, here are some steps
to follow for further assistance.
FIRST, contact the people who serviced your
appliance. Explain why you are not pl eased. In
most cases, this will solve the problem.
Write down the model and serial numbers.
You'll find them on a label located on the back
side of the unit.
Please write these numbers here:
____________________________________
Date of Purchase
____________________________________
Model Number
____________________________________
Serial Number
Use these numbers in any correspondence or
service calls concerning your appliance.
If you received a damaged appliance,
immediately contact the dealer (or builder) that
sold you the appliance.
Save time and money. Before you call for
service, check the Problem Solver Guide. It lists
causes of minor operating problems that you
can correct yourself.
NEXT, if you are still not pleased, write all the
details, including your telephone number, and
send it to:
Customer Serv ice
Avanti Products
10880 NW 30 Street
Miami, FL 33172 USA
Page 5
5
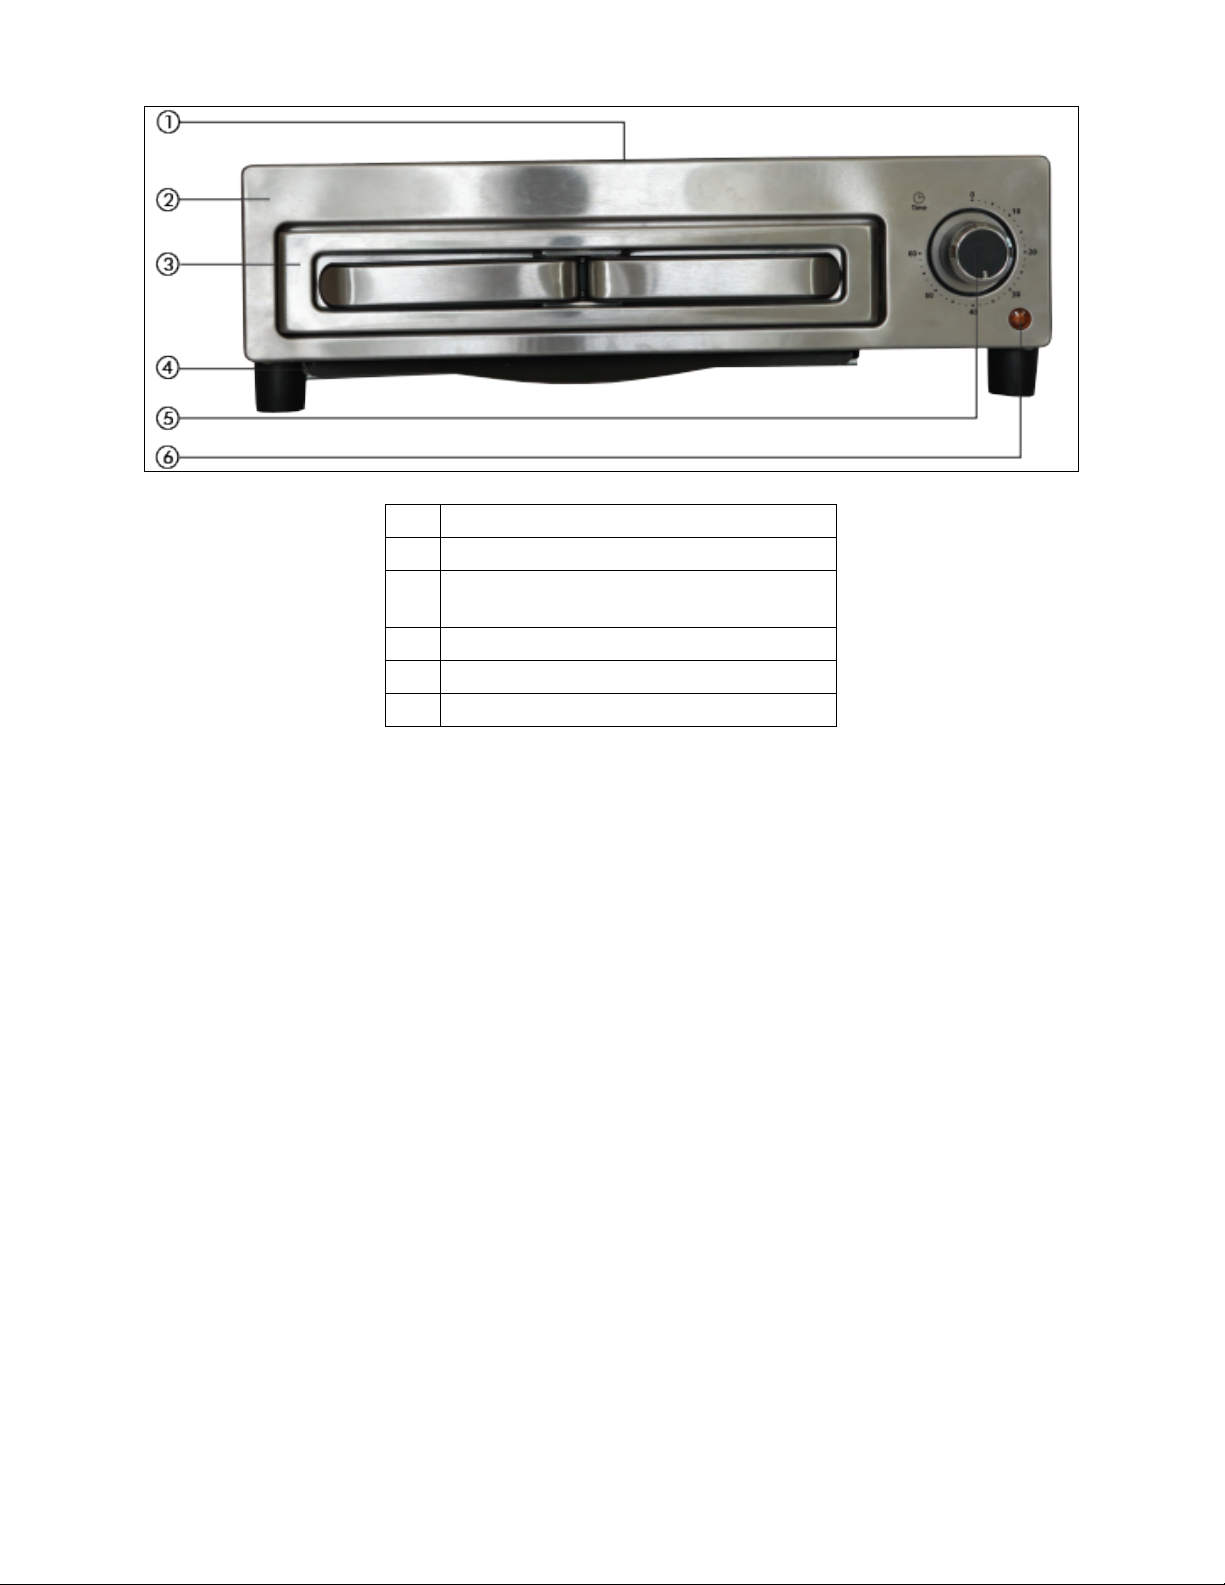
PARTS AND FEATURES
1
See-Through Window
2
Cabinet
3
Pizza Tray with
Integrated Handles
4
Crumb Tray
5
Timer Knob
6
Indicator Light
Page 6

6
INSTALLATION INSTRUCTIONS
NOTICE
DURING THIS PROCESS.
Ø Before Using Your Appliance
• Remove the exterior and interior packing.
• Check to be sure you have all of the following parts:
• 1 Pizza Tray
• 1 Crumb Tray
• 1 Instruction Manual
• Remove all the items inside your oven and clean the interior surface with lukewarm water using a soft
cloth.
• Do not attempt to repair or replace any part of your oven unless it is specially recommended in this
manual.
• This appliance requires 1000W and should be the only appliance operating on the circuit.
BEFORE YOU USE THIS OVEN FOR THE FIRST TIME: THE HEATING ELEMENTS H AV E A
PROTECTIVE COATING, WHICH MUST BE BURNED OFF BEFORE USE. TO DO THIS, OPEN
THE OVEN DOOR AND SET THE TEMPERATURE TO MAX. LEAVE THE APPLIANCE
SWITCHED ON FOR APPROXIMATELY 30 MINUTES. IT IS IMPORTANT TO ENSURE
ADEQUATE VENTILATION DURING THIS PERIOD AS A BURNING SMELL IS NORMAL
Installation of Your Appliance
THIS PRODUCT IS NOT DESIGNED FOR ANYTYPE OF BUILT-IN INSTALLATION
Select a location for the appliance. The location should be in an open area on a flat counter where the
plug will reach an outlet.
• When positioning the appliance, it should be set on a flat, steady surface.
• Do not block air vents. If they are blocked during operation, the oven may overheat and eventually
cause the appliance failure.
• Keep the appliance away from hot air, steam or splashing liquids when choosing a place to locate it,
otherwise, the unit’s operation may be adversely affected, causing it to break down.
• Direct sunlight may affect the acrylic coating and heat sources may increase electrical consumption.
• Plug the appliance into an exclusive properly installed grounded wall outlet. Any questions
concerning power should be directed toward a certified electrician or an authorized Avanti Products
service center.
• Do not place anything on the top of the broiler oven and automatic toaster.
• Keep the appliance at least 5 inches away from rear wall to ensure the proper ventil ati on.
Ø Electrical Connection
• The appliance has a polarized plug (One blade is wider than the other), to reduce the risk of electric
shock, this plug is intended to fit into the polarized outlet only one way. If the plug does not fit fully
into the outlet, reserve the plug. If it still does not fit, contact a qualified electrician. Do not attempt to
modify the plug in any way.
• A short power cord is provided to reduce the hazards resulting from entanglement or tripping over a
longer cord. An extension cord may be used with care, however, be sure the marked electrical rating
is at least as great as the rating of this appliance. The extension cord should be positioned such that
it does not drape over the counter or tabletop where it can be pulled on by children or tripped over.
The electrical rating of this appliance is listed on the back panel of the appliance.
Page 7

7
OPERATING YOUR
APPLIANCE
TIMER SELECTOR KNOB
You can set cooking time up to 60 minutes. It will
automatically turn the oven
cooking time selected with the sound of a bell
signal.
To switch off the oven turn the timer selector to
the “0” setting position.
CAUTION:
DO NOT LEAVE THE UNIT ATTENDED
FOOD AND/OR BAKING TRAY WILL BE VERY
HOT, HANDLE WITH CARE
PIZZA OVEN INDICATOR LIGHT
The indicator will come
use.
The RED indicator light located at the bottom right of the unit will turn on and stay on while the PIZZA
oven section is being used.
The light will turn off automatically once the timer knob is returned to the “0” position.
To Use the PIZZA OVEN Function
As the pizza oven operates by direct heat; baking times will vary, follow the instructions from the pizza
manufacturer and check the pizza during cooking to avoid burning or overdone pizza.
For a crispier crust place the pizza directly on the pizza tray, if you prefer a softer crust you can place the
pizza on a sheet of aluminum foil.
Extend the integrated handles of the pizza tray and keep them extended during use to prevent any
accidents or possible burns as the tra y will be hot.
Place the pizza on the in the center of the pizza tray.
Turn the timer knob to the desired cooking time (max 60 minutes).
At the end of the cooking time a bell signal sounds and the oven will turn
at the end of the
when the oven is in
automatically
CARE AND MAINTENANCE
Ø Cleaning Your Appliance
Before cleaning your appliance, unplug it and allow it to cool.
Remove the crumb tray, wire rack and drip/baking pan.
Use a damp cloth to wash the inside with warm water and a mild detergent. Do not Immerse in Water!
Abrasive cleaners, scrubbing brushes and chemical cleaners may damage the continuous clean coating
on this unit.
Wash the crumb tray, wire rack, drip/baking pan and metal handling tool with a mild detergent solution.
The glass oven door should be cleaned regularly with a non-abrasive liquid cleaner.
Rinse with a damp cloth and then a dry one.
The outside of the appliance should be cleaned with mild detergent and warm water.
CAUTION
Failure to unplug the appliance could resul t in electrical shock or personal injury.
Ø Storing Your Appliance
Allow the appliance to cool completely before storing. If storing the appliance for long periods of time,
make certain that the appliance is clean and free of food particles. Store the appliance in a dry location
such as on a table or countertop or in a cupboard shelf. Other than the recommended cleaning, no further
user maintenance should be necessary.
Page 8

8
PROBLEMS WITH YOUR APPLIANCE?
PROBLEMS
POSSIBLE CAUSES/SOLUTIONS
• Appliance does not operate.
• Unit not plugged in. Plug the unit into a 120V AC
• Heating elements are not heating up.
• Heating elements will cycle and to maintain
• Burnt Smell
• Food build-up inside appliance, on heating elements
Appliance”
800-323-5029
help is available.
money order, Master Card, or Visa.
know your appliance inside and out.
You can solve many common appliance problems easily, saving you the cost of a possible service call. Try
the suggestions below to see if you can solve the problem before calling the servicer.
TROUBLESHOOTING GUIDE
electrical outlet.
• The circuit breaker tripped or a blown fuse.
• Be sure that the temperature, function and timer
selectors are set.
proper heat. Make sure function selector is
positioned to the desired cooking setting.
or in drip/baking pan. Refer to “Cleaning Your
SERVICE FOR YOUR APPLIANCE
We are proud of our customer service organization and the network of professional service technicians
that provide service on your Avanti appliances. With the purchase of your Avanti appliance, you can be
confident that if you ever need additiona l inf ormation or assistance, the Avanti Produc ts Customer
Service team will be here for you. Just call us toll-free.
AVANTI PRODUCTS CUSTOMER SERVICES
Product Information
Whatever your questions a re about our product s,
Part Orders
800-220-5570
In-Home Repair Service
800-220-5570
You may order parts and a ccessories that will be
delivered directly to your home by personal check,
An Avanti Products authorized ser vice center will
provide expert repa ir servic e, sc hedule d at a tim e
that is convenient for you. Our trained servicers
Page 9

9
YO UR AVANTI WARRANTY
FULL ONE YEAR WARRANTY FROM
EXCEPT GLASS PARTS, AND/OR PARTS
OR LACK OF REASONABLE CARE.
REPLACEMENT PARTS AND REPAIR
AUTHORIZED SERVICE COMPANY.
FULL 30-DAY WARRANTY FROM DATE
PARTS
REPLACEMENT PARTS AND REPAIR
AUTHORIZED SERVICE COMPANY.
LENGTH OF WARRANTY WE WILL PAY FOR
DATE OF PURCHASE ON ALL PARTS
DAMAGED AS A RESULT OF MISUSE
OF PURCHASE ON GLASS PARTS AND
FINISH OF PORCELAIN ENAMEL,
PAINTED OR BRIGHT METAL FINISHED
CARRY IN SERVICE ONLY.
CUSTOMER WILL BE RESPONSIBLE FOR ALL TRANSPORTATION CHARGES TO
AND FROM THE AUTHORIZED SERVICE COMPANY, ALSO MAKE SURE TO SEND
A COPY OF PROOF OF PURCHASE WHEN SENDING THE UNIT FOR SERVICE
REPAIRS.
AVANTI PRODUCTS SHALL NOT BE LI ABLE FO R INCIDENTAL OR
CONSEQUENTIAL DAMAGES.
Some states do not allow the exclusion or limitation of incidental or consequential damages, so
this exclusion or limitation may not apply to you. This warranty gives you specific legal rights,
and you may also have other rights that vary from state to state.
This warranty is not valid outside the Continental United States.
LABOR TO CORRECT DEFECTS IN
MATERIALS OR WORKMANSHIP.
SERVICE MUST BE PROVIDED BY AN
LABOR TO CORRECT DEFECTS IN
MATERIAL OR WORKMANSHIP.
SERVICE MUST BE PROVIDED BY AN
Page 10

10
INSTRUCCIONES EN ESPAÑOL
PARA REDUCIR EL RIESGO DE
HORNO SIGA ESTAS INDICACIONES.
CUANDO USE APARATOS ELECTRICOS, SIEMPRE DEBEN TOMARSE ALG UNAS
11
PRECAUCIONES IMPORTANTES
INCENDIO, DESCARGA ELECTRICA,
O DAÑO CUANDO ESTE USANDO SU
PRECAUCIONES BASICAS DE SEGURIDAD, INCLUYENDO LAS SIGUIENTES:
• Lea todas las instrucciones, las etiquetas en el producto y las advertencias, antes de usar el
horno tostador.
• No recomendamos el uso extensiones de cordón eléctrico para operar esta unidad.
• No toque las superficies calientes. Siempre use guantes cuando maneje materiales calientes y
permita que las partes metálicas se enfríen antes de limpiar. Permita que la unidad se enfríe
completamente antes de poner o quitar partes.
• Desconecte el horno tostador de la toma de corriente cuando la unidad no esté en uso y antes de
limpiarla. Nota: Verifique que el horno tostador esté apagado antes de desconectarlo.
• Para protegerse contra una descarga eléctrica, no sumerja el aparato en agua o en otros líquidos.
• Supervisión continua es necesaria cuando este o cualquier otro aparato sea usado cerca de niños.
Este aparato no debe ser usado por niños.
• No opere este ni ningún otro aparato con un cordón dañado o quemado o después de que el
aparato ha funcionado inadecuadamente o ha sido dañado en cualquier forma.
• No utilice accesorios o aditamentos no recomendados por el fabricante, ya que pueden causar
incendios, descargas eléctricas o lesiones personales.
• No se use en exteriores o con propósitos comerciales.
• No use este aparato más que para lo que ha sido diseñado.
• No permita que el cordón cuelgue sobre la orilla de la mesa o del mostrador o toque superficies
calientes.
• No lo coloque sobre o cerca de quemadores de estufas de gas o eléctricas, tampoco dentro de un
horno caliente.
• Tenga extremo cuidado cuando use recipientes de vidrio o metal.
• Puede ocurrir un incendio si el horno tostador está en operación y en contacto o cubierto con
materiales inflamables, incluyendo cortinas, tapicería, paredes, etc. No coloque ningún objeto sobre
el aparato cuando esté en operación.
• Cuando esta unidad no esté en operación, no almacene ningún material que no sea un accesorio
recomendado por el fabricante.
• No coloque dentro del horno ningún material inflamable como papel, cartón, plástico o cualquier
material que se pueda incendiar o derretir.
• No cubra la bandeja para migajas o ninguna parte del horno con papel aluminio o metálico. Esto
puede causar el sobrecalentamiento del aparato.
• Los alimentos grandes o utensilios metálicos no deben ser introducidos en el horno tostador ya que
pueden causar incendios o descargas eléctricas.
• No limpie con esponjas o fibras metálicas. Se pueden desprender piezas de la esponja o fibra y
tocar partes eléctricas creando el riesgo de descargas eléctricas.
• Cuando prepare alimentos, tenga cuidado extremo al remover la bandeja o al desechar la grasa
caliente.
• Para apagar este aparato, coloque el control en la pos ición
-Esta Unidad Es Sólo Para Uso Doméstico-
Para reducir los riesgos de descarga eléctrica, este equipo posee una instalación polarizada, lo cual requiere que
la persona que instale esta unidad la conecte apropiadamente a tierra sin invertir la posición de los cables.
“0””.
Page 11

PREPARANDO SU HORNO
AVISO
Si usted está usando su horno tostador por primera vez, por favor asegúrese de:
Quitar todas las etiquetas de la superficie de su tostador.
Abra la puerta del tostador y saque los documentos impresos y papeles del interior del horno tostador.
Limpie la rejilla, charola y bandeja con agua caliente y una pequeña cantidad de detergente líquido para
lavar platos, utilice una esponja suave y no abrasiva. No sumerja el horno tostador en el agua.
Seque completamente la unidad antes de utilizarla.
ANTES DE USAR LA UNIDAD POR PRIMERA VEZ. LOS ELEMENTOS
CALENTADORES TIENEN UNA CAPA PROTECTIVA QUE NECESITA SER QUEM ADA
ANTES DE USAR EL HORNO.
PARA QUITAR LA CAPA PROTECT ORA:
ABRA LA PUE RTA.
GIRE LA PERILLA DE CONTROL DE TIEMPO A 30 MINUTOS.
USTED SENTIRA UN OLOR A QUEMADO, ESTO ES NORMAL.
ASEGURESE TENER VENTILACION ADECUADA MIENTRAS HAGA ESTE PROCESO.
Seleccione un lugar para colocar el horno tostador. El lugar debe ser un área abierta sobre un mostrador
con superficie plana donde el enchufe tenga alc ance a una toma de corriente.
Enchufe el cable en un tomacorriente de 120 voltios / 60 ciclos.
PARA USAR S U HORNO PARA PIZ ZAS
NOTA – No es necesario un período de calentamiento previo antes de cocinar. El horno utiliza
calefacción directa para cocinar.
Coloque los alimentos en la parrilla metálica.
Selecciona el tiempo de cocción deseado girando la perrilla hasta por 60 minutos. Al final del ciclo de
cocción, emitirá una señal auditiva y el horno se apagará automáticamente, usted puede repetir el ciclo
de tiempo si fuera necesario.
NOTA – Los elementos calentadores superiores e inferiores se encenderán y apagarán alternadamente
para mantener una temperatura apropiada.
Cuando se haya completado saque los alimentos.
LIMPIEZA DE SU HORNO
Antes de limpiar su Horno, desconéctelo y permita que se enfríe. Limpie con un paño suave y húmedo.
¡No lo sumerja en agua! Asegúrese de usar solamente jabón suave y agua. Los limpiadores abrasivos,
cepillos y limpiadores químicos pueden dañar el acabado de esta unidad. Vacíe la bandeja para migas
frecuentemente para evitar la acumulación de residuos.
ALMACENANDO O GUARDANDO SU HORNO
Deje que el aparato se enfríe completamente antes de almacenarlo. Si va a almacenar el horno tostador
por períodos prolongados, asegúrese de que no contenga partículas o residuos de alimentos. Almacene
el horno tostador en un lugar seco como encima de una mesa, mostrador, o sobre una repisa. Enrolle el
cordón eléctrico. No es necesario otro tipo de mantenimiento que no sea la limpieza recomendada en
este manual.
Page 12

12
~ATTENTION~
Pour réduire le risque d'incendie, d'électrocution ou de blessure lors
de l'utilisation de votre appareil, suivre ces précautions de base:
Lors de l'utilisat ion d'appareils électriqu es, d es précautions de base do iv ent toujours être respectées, y compr is c e q ui
LIRE TOUTES LES INSTRUCTIONS, ÉTIQUETTES DU PRODUIT ET AVERTISSEMENTS AVANT D'UTILISER
Ne jamais nettoyer l'appareil avec des liquides inflammables. Les vapeurs peuvent créer un risque d'incendie ou
surdimensionnés ou des ustensiles en métal ne doivent pas être insérés dans l'appareil, car ils peuvent
Ne pas nettoyer avec des tampons à récurer en métal. Les pièces peuvent se détacher du tampon et toucher les
e, poudre
- CONSERVER CES INSTRUCTIONS -
CONSIGNES DE SÉCURITÉ IMPORTANTES
suit:
L'APPAREIL.
• Ne pas toucher les surfaces chaudes, utiliser les poignées ou les boutons. Toujours utiliser des mitaines de four
lors de la manipulation des matériaux chauds et permettent des pièces métalliques refroidir avant de le nettoyer.
Laissez l'appareil refroidir com plète men t avant de mettre ou de retirer des pièces.
• Lorsque l’appareil n’est pas utilisé et avant le nettoyage, débranchez l'appareil de la prise murale. Assurez-vous
que l'appareil est mis hors tension avant de le débrancher.
• Pour protéger contre le risque de choc électrique, ne pas immerger l'appareil dans l'eau ou tout autre liquide.
• Ne pas laisser les enfants seuls ou sans surveillance lorsque l'appareil est chaud ou en fonctionnement. Cet
appareil n'a pas été conçu pour être utilisé par des enfants.
• Ne jamais utiliser votre appareil pour chauffer la pièce. Votre four n'a pas été conçu pour chauffer votre cuisine.
• Ne pas utiliser ce ou tout autre appareil avec un cordon ou une fiche effiloché ou endommagé, après un
mauvais fonctionnement de l'appareil, est tombé ou a été endommagé de quelque façon.
• Ne pas utiliser d'accessoires non recommandés par le fabricant; ils peuvent provoquer un incendie, un choc
électrique ou des blessures.
• Ne pas utiliser à l'extérieur ou à des fins commerciales.
• Ne pas utiliser cet appareil que pour son utilisation prévue.
• Ne laissez pas pendre le cordon sur le bord d'une table, comptoir ou toucher des surfaces chaudes.
• Ne pas placer l'appareil à proximité d'un gaz chaud, brûleur électrique ou dans un four chauffé.
• Une extrême prudence doit être utilisé lors de l'utilisation des conteneurs construits d'autres que le métal ou le
verre.
• Un incendie peut se produire si l'appareil est couvert ou de toucher des matériaux inflammables, y compris
rideaux, tentures, murs, etc., lorsqu'il est en fonctionnement. Ne pas entreposer les articles sur le dessus de
l'appareil lorsqu'il est en fonctionne ment.
• Ne pas stocker de matériaux autres que recommandés accessoires du fabricant dans cet appareil lorsqu'ils ne
sont pas en cours d'utilisation.
• Ne placez pas de matériaux inflammables dans l'appareil, tel que du papier, du carton, du plastique ou des
matériaux qui peuvent prendre feu ou fondre.
•
d'explosion.
• Ne pas couvrir l'appareil avec une feuille de métal. Ceci provoquera une surchauffe de l'appareil.
• Aliments
créer un risque d'incendie ou de choc électrique.
•
pièces électriques comportant un risque de choc électrique.
• Lorsque le grillage, une extrême prudence lors du retrait de plateau ou de l'élimination de la graisse chaude.
• Pour activer cet appareil, retournez tous les contrôles à la "0 ", puis retirez la fiche de la prise murale.
• Les aliments cuits peuvent être très chaud, en particul ier le rempl is sag e de la pâtiss erie. Manipuler avec soin.
• Ne jamais ramasser un pan flamboyant. Active les commandes off. Étouffer une casserole en flammes sur une
unité de surface en recouvrant complètement la casserole avec un couvercle bien ajusté.
• Ne pas utiliser d'eau sur les feux de graisse. Graisse flambant en dehors d'un pan peut être mis en couvrant
avec du bicarbonate de soude, poudre chimique polyvalente, ou un extincteur. Flamme dans le four peut être
étouffé complètement en fermant la porte du four et éteint le four ou en utilisant le bicarbonate de soud
chimique polyvalente, ou un extincteur.
Cette unité est à usage domestique uniquement
Page 13

13
AIDEZ-NOUS À VOUS AIDER ...
Lisez attentivement ce guide.
Il est destiné à vous aider à utiliser et à
maintenir votre nouvel appareil correctement.
Gardez-le à portée de main pour répondre à vos
questions.
Si vous ne comprenez pas quelque chose où
vous avez besoin de plus d'aide, s'il vous plaît
appelez:
Avanti Service à la clientèle
800-220-5570
Gardez preuve de la date d'achat d'origine (tel
que votre bordereau de vente) avec ce guide
pour établir la période de garantie.
SI VOUS AVEZ BESOIN DE SERVICE
Nous sommes fiers de notre service et nous
voulons que vous soyez heureux. Si pour une
raison quelconque vous n'êtes pas satisfait du
service que vous receve z, voici quelq ues étap es
à suivre pour obtenir de l'aide.
FIRST, contacter les gens qui ont réparé votre
appareil. Expliquez pourquoi vous n'êtes pas
satisfait. Dans la plupart des cas, cela va
résoudre le problème.
Notez le modèle et le numéro de série.
Vous les trouverez sur une étiquette située sur
le côté arrière de l'appareil.
S'il vous plaît écrire ces chiffres ici:
____________________________________
Date d'achat
____________________________________
Numéro de modèle
____________________________________
Numéro de série
Utilisez ces numéros dans toute
correspondance ou appels de service
concernant votre appareil.
Si vous avez reçu un appareil endommagé,
contactez immédiatement le revendeur (ou le
constructeur) qui vous a vendu l'appareil.
Gagnez du temps et de l'argent. Avant d'appeler
le service, consultez le Guide Solver problème.
Il énumère les causes des problèmes de
fonctionnement mineurs que vous pouvez vous
corriger.
Ensuite, si vous n'êtes toujours pas satisfait,
écrivez tous les détails, y compris votre numéro
de téléphone, et l'envoyer à:
Service Clients
Avanti Produits
10880 NW 30 Street
Miami, FL 33172 Etats-Unis
Page 14

14
PIÈCES ET CARACTÉRISTIQUES
1
Fenêtre transparente
2
Cabinet
3
Plateau d’pizza
4
Plateau à miettes
5
Minuteur
6
Voyant d’alimentation
Page 15

15
INSTRUCTIONS D'INSTALLATION
REMARQUER
NORMAL PENDANT CE PROCESSUS.
Ø Avant d'utiliser votre appareil
• Retirez l'emballage extérieur et intérieur.
• Vérifiez que vous avez toutes les pièces suivantes:
• 1 Plateau d’pizza
• 1 Plateau à miettes
• 1 Mode d'emploi
• Retirez tous les éléments à l'intérieur de votre four et nettoyer la surface intérieure à l'eau tiède av ec
un chiffon doux.
• Ne tentez pas de réparer ou de remplacer une partie de votre four à moins qu'il soit spécialement
recommandé dans ce manuel.
• Cet appareil nécessite 1000W et devrait être le seul appareil fonctionnant sur le circuit.
AVANT D'UTILISER CE FOUR POUR LA PREMIÈRE FOISLES ÉLÉMENTS CHAUFFANTS ONT
UN REVÊTEMENT PROTECTEUR, QUI DOIT ÊTRE BRÛLÉ AVANT UTILISATION. POUR CE
FAIRE, OUVREZ LA PO RTE DU FOUR ET RÉGLEZ LA TEMPÉRATURE MAX. LAISSEZ
L'APPAREIL ALLUMÉ PENDANT ENVIRON 15 MINUTES. IL EST IMPORTANT D'ASSURER UNE
VENTILATION ADÉQUATE PENDANT CETTE PÉRIODE COMME UNE ODEUR DE BRÛ LÉ EST
Installation de votre appareil
Sélectionnez un emplacem ent pour l’appareil. L'emplacement doit être dans une zone ouverte sur un
comptoir plat où la fiche atteindra une sortie.
• Lors du positionnement de l'appareil, il doit être réglé sur une surface plane et stable.
• Ne pas bloquer les évents d'air. Si elles sont bloquées pendant le fonctionnement, le four peut
surchauffer et éventuellement causer la défaillance de l'appareil.
• Gardez l'appareil loin de l'air chaud, de vapeur ou de liquides éclaboussures au moment de choisir
un endroit pour le localiser, sinon, le fonctionnement de l'appareil peut être affecté, l'amenant à se
décomposer.
• La lumière solaire directe peut affecter le revêtement acrylique et sources de chaleur peuvent
augmenter la consommation électrique.
• Branchez l'appareil dans u ne prise murale exclusive installé correctement mise à la terre. Toute
question concernant le pouvoir doit être adressées à un électricien certifié ou un centre de service
Avanti Produits autorisé.
• Ne placez rien sur le dessus du four à griller et grille-p ain aut omatique.
• Gardez l'appareil au moins 5 pouces de paroi arrière pour assurer la bonne ventilation.
Ø Connexion électrique
• L'appareil est équipé d'une fiche polarisée (une lame est plus large que l'autre), pour réduire le risque
de choc électrique, cette fiche est destinée à insérer dans la prise polarisée d'une seule façon. Si la
fiche ne rentre pas complètement dans la prise, réserver le bouchon. Si elle ne rentre toujours pas,
contactez un électricien qualifié. Ne pas tenter de modifier la fiche en aucune façon.
• Un cordon d'alimentation court est fourni pour réduire les risques résultant de l'enchevêtrement ou
trébucher sur un cordon plus long. Une rallonge peut être utilisé avec précaution, cependant,
assurez-vous de la tension nominale est au moins aussi grande que la cote de cet appareil. La
rallonge doit être positionné de telle sorte qu'il ne traverse pas le comptoir ou de la table où il peut
être tiré par un enfant ou faire trébucher. La puissance électrique de cet appareil est cotée sur le
panneau arrière de l'appareil.
Page 16

16
VOTRE APPAREIL D'EXPLOITATION
Minuteur
Vous pouvez régler le temps de cuisson jusqu'à 60 minutes. Il sera
automatiquement éteint le four
par le bruit d'un signal de sonnerie.
Pour éteindre le four tourner le sélecteur de minuterie à la position «0» de
réglage.
MISE EN GARDE: NE LAISSEZ PAS L'UNITÉ ATTENDED
ALIMENTAIRES, BARRES ET / OU CUISSON PLATEAU sera très chaud, FRAGILE
VOYANT D'ALIMENTATION
L'indicateur viendra
Le voyant ROUGE situé en bas à droite de l'appareil sous tension et restera allumé pendant que la
section de four est utilisée.
La lumière se met automatiquement hors tension une fois que le bouton de la minuterie est renvoyé à la
position « 0 ».
Pour utiliser la PIZZA OVEN
Comme le four à pizza fonctionne par la chaleur directe; temps de cuisson varient, suivez les instructions
du fabricant de pizza et vérifier la pizza pendant la cuisson pour éviter de brûler ou de la pizza exagérée.
lorsque le four est en cours d'utilisation.
« 0 » à la fin de la durée de cuisson sélectionnée
Pour une croûte plus croustillante placer la pizza directement sur le plateau de pizza, si vous préférez
une croûte plus douce, vous pouvez placer la pizza sur une feuille de papier d'aluminium.
Étendre les poignées intégr ées du plateau à pizza et les garder étendues lors de l'utilisation pour
prévenir tout accident ou des brûlures possibles que le plateau sera chaud.
Placer la pizza sur le au centre du plateau de pizza.
Tournez le bouton de la minuterie pour le temps de cuisson désiré (max 60 minutes).
A la fin du temps de cuisson un signal de sonnerie retentit et le four se
automatiquement
Page 17

17
NETTOYAGE ET ENTRETIEN
Ø Nettoyage de votre appareil
Avant de nettoyer votre appareil, débranchez-le et laissez-le refroidir.
Retirez le plateau ramass e-miettes, grille et pan goutte à goutte / cuisson.
Utilisez un chiffon humide pour laver l'intérieur avec de l'eau chaude et un détergent doux. Ne pas
plonger dans l'eau! Les nettoyants abrasifs, brosses à récurer et les nettoyants chimiques peuvent
endommager le revêtement propre en continu sur cet appareil.
Laver l'outil plateau ramasse-miettes, grille, goutte à goutte / plaque de cuisson et la manipulation de
métal avec une solution de détergent doux.
Le verre porte du four doit être nettoyé régulièrement avec un nettoyant liquide non abrasif.
Rincer avec un chiffon humide et un sec.
L'extérieur de l'appareil doit être nettoyé avec un détergent doux et de l'eau chaude.
MISE EN GARDE
Ne pas débrancher l'appareil pourrait entraîner un choc électrique ou de blessure.
Ø Rangement de votre appareil
Laissez l'appareil refroidir complètement avant de le ranger. Si le stockage de l'appareil pendant de
longues périodes de temps assurez-vous que l'appareil est propre et exempt de particules alimentaires.
Rangez l 'appareil dans un endroit sec comme sur une table ou un comptoir ou une étagère de
rangement. Autre que le nettoyage recommandé, aucun autre entretien de l'utilisateur devrait être
nécessaire.
Page 18

18
PROBLÈMES AVEC VOTRE APPAREIL?
PROBLÈMES
CAUSES / SOLUTIO NS P O SSIB LES
• L'appareil ne fonctionne pas.
• Unité non branchée. Branchez l'appareil dans une
• Les éléments de chauffage ne sont pas
pour
• Les aliments cuits / insuffisamment
• Placement en rack. Rack peut avoir besoin d'être
• Odeur Burnt
• Alimentation accumulation à l'intérieur de l'appareil,
«Nettoyage de votre appareil"
800-323-5029
Quelles que soient vos questions sont sur nos
produits, l'aide est disponible.
Vous pouvez commander des pièces et
par chèque personnel, mandat, Master
Card ou Visa.
Un centre de service Avanti Produits autorisé
un moment qui vous convient. Nos réparateurs
l'extérieur.
Vous pouvez résoudre de nombreux problèmes de l'appareil commun facilement, vous permet
d'économiser le coût d'un appel de service possible. Essayez les suggestions ci-dessous pour voir si vous
pouvez résoudre le problème avant d'appeler le réparateur.
GUIDE DE DÉPANNAGE
prise de courant de 120V AC.
• Le disjoncteur est déclenché ou un fusible grillé.
et
chauffés.
cuits
• Éléments de chauffage du cycle
maintenir la chaleur.
ajustée pour tenir compte des différents aliments.
sur des éléments de chauffage ou dans la poêle
goutte à goutte / cuisson. Reportez-vous à
SERVICE POUR VOTRE APPAREIL
Nous sommes fiers de notre organisation de service à la clientèle et le réseau de techniciens de services
professionnels qui offrent des services sur vos appareils Avant i. A vec l'ac hat de v otre appar e il Avan ti,
vous pouvez être sûr que si vous avez besoin d'informations ou de l'aide, l'équipe du service à la
clientèle Avanti Products sera là pour vous. Appelez-nous sans frais.
AVANTI PRODUIT S SER V I CE S CLIENTS
Information produit
Les commandes de la pièce
800-220-5570
accessoires qui seront li vrés directement à votre
domicile
In-Home Repair Service
800-220-5570
fournira un service de r ép a r ation exp er t, prévue à
formés connaissent votre appareil à l'intérieur et à
Page 19

19
VO TRE G A RANT IE AVANT I
GARANTIE COMPLÈTE D'UN AN DATE
PIÈCES ENDOMMAGÉES A LA SUITE DE
SOINS RAISONNABLE.
PIÈCES DE RECHANGE ET
SERVICE COMPANY AUTORISÉ.
GARANTIE TOTALE DE 30 JOURS LA
PIÈCES DE RECHANGE ET
SERVICE COMPANY AUTORISÉ.
DURÉE DE LA GARANTIE NOUS PAYER
DE L'ACHAT SUR TOUTES LES PIÈCES
SAUF PIÈCES DE VERRE, ET / OU DES
REPARATION DU TRAVAIL POUR
CORRIGER LES DEFAUTS matériels ou
de fabrication.
DETOURNEMENT OU MANQUE DE
DATE D'ACHAT SUR LES PIÈCES DE
VERRE ET FINITION DE PORCELAINE
ENAMEL, PEINT OU MÉTAL FINI PIÈCES
BRIGHT
SERVICE DOIT ÊTRE FOURNI PAR UN
REPARATION DU TRAVAIL POUR
CORRIGER LES DEFAUTS matériel ou
de fabrication.
SERVICE DOIT ÊTRE FOURNI PAR UN
EFFECTUER EN SERVICE SEULEMENT.
CLIENT SERA RESPONSABLE DE TOUS LES FRAIS DE TRANSPORT DE ET LA
SOCIÉTÉ DE SERVICE AUTORISÉ, AUSSI ASSURER POUR ENVOYER UNE
COPIE DE LA PREUVE D'ACHAT LORSQUE ENVOI DE L'UNITÉ POUR LA
RÉFECTION DE SERVICE.
AVANTI PRODUCTS NE SERA PAS RESPONSABLE DES DOMMAGES DIRECTS
OU INDIRECTS.
Certains états ne permettent pas l'exclusion ou la limitation des dommages indirects ou
consécutifs, de sorte que cette exclusion ou limitation peut ne pas vous. Cette garantie vous
donne des droits spécifiques, et vous pouvez également av oir d'autres droits qui v arient d'un État
à État.
Cette garantie est non valable en dehors de la Continental États Unis.
Page 20

20
REGISTRATION INFORMATION
-------------------------------------------------------(detach here)----------------------------------------------------------------
-
Name
Model # Serial #
Address
Date Purchased Store / Dealer Name
City State Zip
E-mail Address
Area Code Phone Number
Occupation
Did You Purchase An Additional Warranty
As your Primary Residence, Do You:
£ Extended
£ Own £ Rent
£ None
Your Age:
Reason for Choosing This Avanti Product:
under 18 £ 18-25 £ 26-30
£ Married £ Single
Price
£ Other: _____________ ______
£ Personal Demo
Comments:
Thank you for purchasing this fine Avanti product. Please fill out this form and return it to the following
address within 100 days from the date of purchase and receive these important benefits:
Avanti Products, LLC.
P.O.Box 520604 – Miami, Florida 33152
Ø Protect your product:
We will keep the model number and date of purchase of your new Avanti product on file to help
you refer to this information in the event of an insurance claim such as fire or theft.
Ø Promote better products:
We value your input. Your responses will help us develop prod uc ts designed to bes t m eet your
future needs.
Avanti Registration Card
£
Please indicate the most important factors
That influenced your decision to purchase this
product:
£
£ Product Features
£ Avanti Reputation
£ Product Quality
£ Salesperson Recommendation
£ Friend / Relative Recommendation
£ Warranty
£ 31-35 £ 36-50 £ over 50
Marital Status:
Is This Product Used In The:
£ Home £ Business
How Did You Learn About This Product:
£ Advertising
£ In-Store Demo
Page 21

21
PPO12X3S - 11012017 PRINTED IN CHINA
 Loading...