

Page 1
INSTRUCTION MANUAL
MANUAL DE INSTRUCCIONES
Model Numbers/ No. de Modelos:
PORTABLE WASHER
LAVADORA PORTATIL
BEFORE USE, PLEASE READ AND FOLLOW ALL SAFETY RULES AND OPERATING
INSTRUCTIONS.
La sección en español empieza en la página 18.
Avanti has a policy of continuous improvement on its products and reserves the right to change materials and specifications
without notice.
Avanti Products, A Division of the Mackle Co., Inc.
P.O. Box 520604 - Miami, Florida 33152
W798SS-1
www.avantiproducts.com
Page 2

TABLE OF CONTENTS
Help Us Help You 3
Parts and Features 4
Important Safety Instructions 5
Installation Instructions 5
Before Using Your Appliance
Selecting a Location
Adjusting the Adjustable Foot
Installing the Noise Proof Plate
Connecting the Water Supply
Water Connection
Disconne c t ing the Water I nl e t H ose
Positioning the Drain Hose
Electric al Connection 9
Control Panel 10
Operating Your Appliance
Preparation
Before Washing
Operation Instructions
Automatic Wash Programs
Manual Functions
Functions
Delay Start Instructions
Children-Proof Setting
Care and Maintenance 15
Cleaning Your Appliance 15
Troubleshooting Guide 16
Service for Your Appliance 16
Wiring Diagram 16
Your Avanti Products Warranty 17
Instrucciones en Español 18 - 26
Registration Information and Registration Card 27
5 – 8
10 – 15
2
Page 3

HELP US HELP YOU...
Read this guide carefully.
It is intended to help you operate and maintain
your new portable washer properly.
Keep it handy to answer your questions.
If you don't understand something or you need
more assistance, please call:
Avanti Customer Service
800-220-5570
Keep proof of original purchase date (such as
your sales slip) with this guide to establish the
warranty period.
IF YOU NEED SERVICE
We're proud of our service and want you to be
pleased. If for some reason you are not happy
with the service you receive, here are some
steps to follow for further assistance.
FIRST, co ntact the people who s erviced your
portable washer. Explain why you are not
pleased. In most cases, this will solve the
problem.
Write down the model and serial numbers.
You'll find them on a plate located on the rear
outside wall of the portable washer.
Please write these numbers here:
____________________________________
Date of Purchase
____________________________________
Model Number
____________________________________
Serial Number
Use these numbers in any correspondence or
service calls concerning your portable washer.
If you received a damaged portable washer,
immediately contact the dealer (or builder) that
sold you the portable washer.
Save time and money. Before you call for
service, check the Troubleshooting Gui de. It
lists caus es of minor oper a ting problem s that
you can correct yourself.
NEXT, if you are still not pleased, write all the
details, including your telephone number, and
send it to:
Customer Service
Avanti Products
10880 NW 30 Street
Miami, FL 33172 USA
3
Page 4
INLET HOSE
2 PIECES
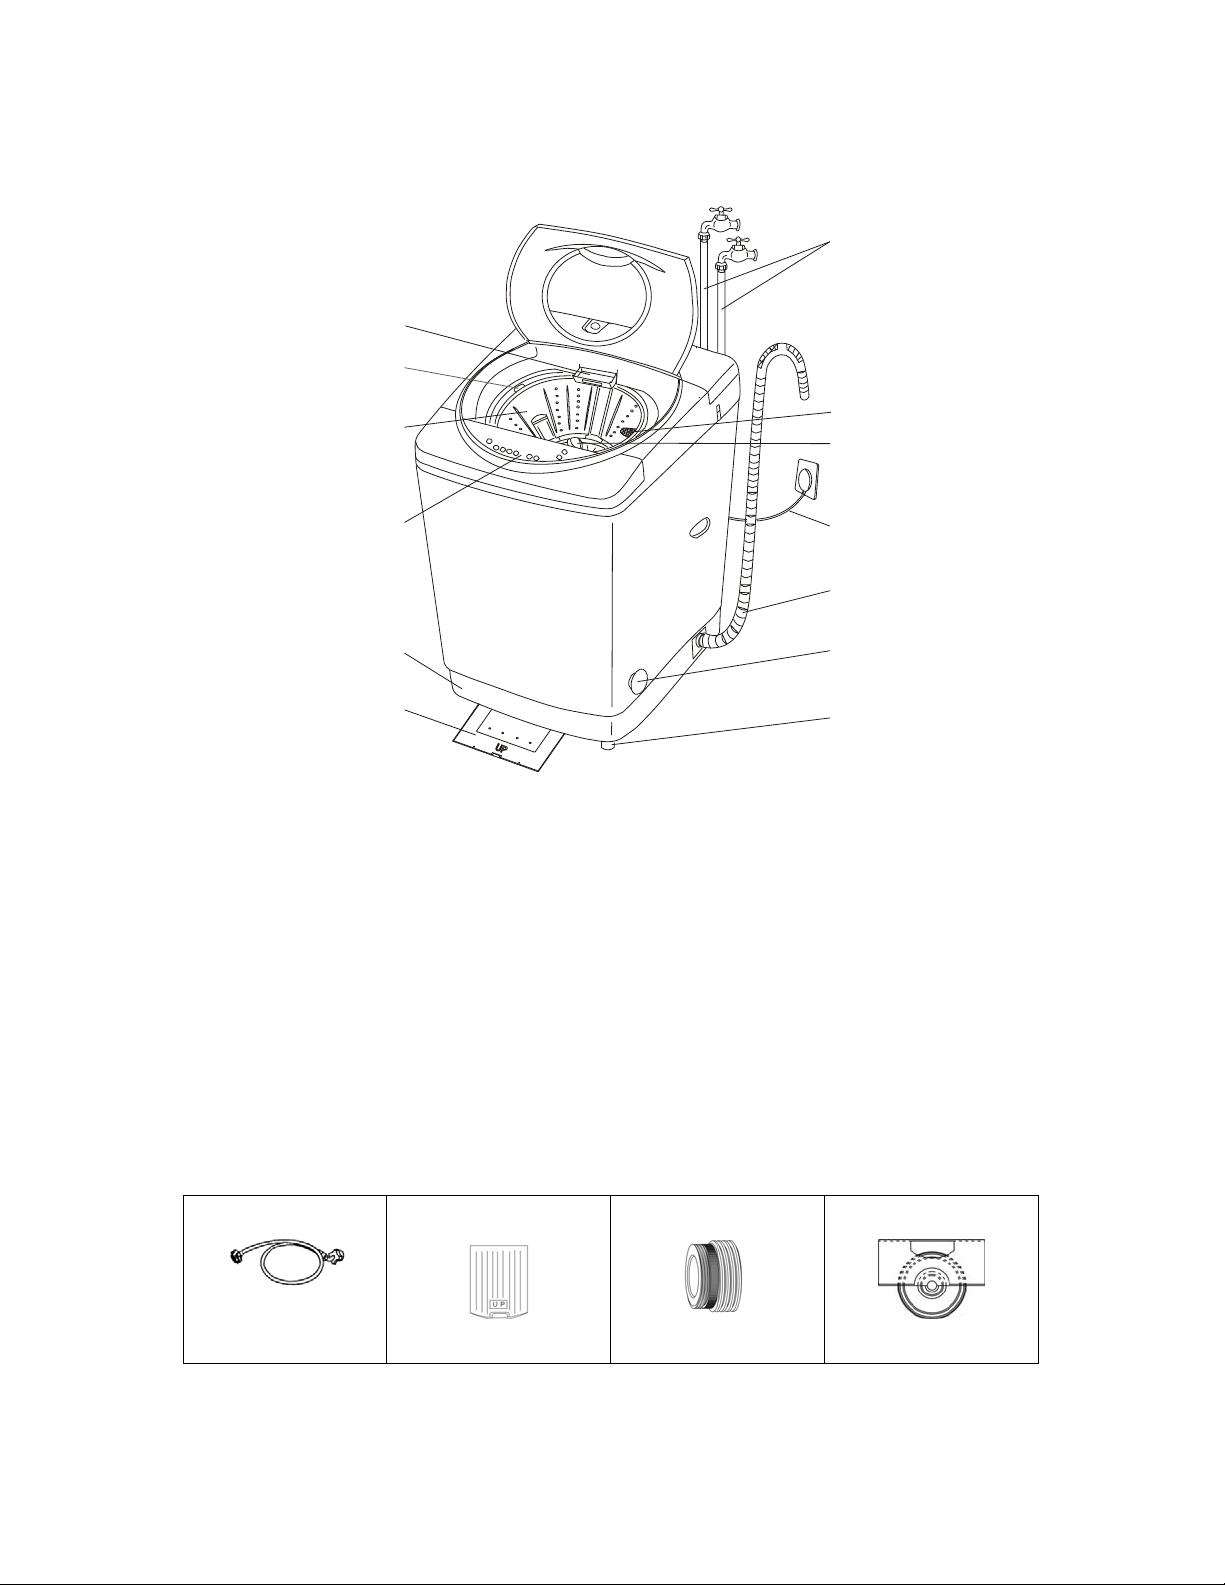
PARTS & FEATURES
1
2
3
4
5
6
1. DETERGENT CASE
2. SOFTENER DISPENSER
3. INNER TUB
4. CONTROL PANEL
5. BASE
6. NOISE PROOF PLATE
7. INLET HOSE (2 PCS)
8. LINT FILTER
9. PULSATOR
10. POWER SUPPLY CORD
11. DRAIN HOSE (1 PC)
12. LEVEL ADJUSTABLE KNOB
13. ADJUSTABLE FOOT
ACCESSORIES
NOISE PROOF PLATE
FAUCET ADAPTER
1 PIECE
2 PIECES
7
8
9
10
11
12
13
CASTER
4 PIECES
4
Page 5

IMPORTANT SAFETY INSTRUCTIONS
WARNING
To reduce the risk of fire, electrical shock, or
injury when using your portable washer, follow
these basic precautions:
Read all instructions before using the portable washer.
Do not wash articles that have been previously c leaned in, washed in, soaked in, or spotted with
gasoline, dry-cleaning solvents, or other flammable or explos ive substances, as they give off
vapors that could ignite or explode.
Do not add gasoline, dry-cleaning solvents, or other flammable or explosive substances to the
wash water. These substances give off vapours that could ig nite or explode.
Under certain conditions, hydrogen gas may be produc ed in a hot-water system that has not been
used for 2 we eks or more. HYDROGEN GAS IS EXPLOSIVE. If the hot-water system has not
been used for such a period, before using a washing machine, turn on all hot-water faucets and let
water flow fr om each for several minute s. This will release any accumulated hy d r o g e n gas. As the
gas is flammable, do not smoke or use an open flame during this time.
DANGER or WARNING: Risk of child entrapment.
Child entrapment and suffocation are not problems of the past. Junked or abandoned appliances
are still dangerous . . . even if they will “just sit in the garage a few days.”
Before you throw away your old portable washer: Take off the lid.
Never allow children to operate, play with, or crawl ins ide the portable washer. Close supervision
of children is necessary when the washer is used near children.
Do not reach into the washer if the agitator or inner tub is moving.
Do not tamper with controls.
Do not repair or replace any part of the washer or attempt any servicing unless spec ifically
recommended in the user-maintenance instructions or in published user-repair instructions.
Never clean portable washer parts with flammable fluids. The fumes can create a fire hazard or
explosion.
Do not place the washer in steamy rooms or where the washer is directly exposed to rain.
Moisture may destroy the electrical insulation causing an electrical shock hazard.
Do not store, use gasoline, or any other flammable vapors and liquids in the vicinity of this or any
other portable washer. The fumes can create a fire hazard or explosion.
If the power cord is damaged, it must be replaced by the manufacturer or its service agent or a
similar qualified person in order to avoid a hazard.
-Save these instructions-
INSTALLATION INSTRUCTIONS
BEFORE USING YOUR PORTABLE WASHER
Remove the exterior and interior packing.
You will need the following tools:
Wrench
Pliers
Screwdriver
Check to be sure you have all of the following parts:
2 Inlet Hoses
2 Faucet Adapters
1 Noise Proof Plate With Screws
4 Casters
Remove shipping brace. Note - It should be saved and used (to pr event damage to washer
components) whenever washer is moved or transported t o a new location.
Clean the interior surface with lukewarm water using a soft cloth.
Allow 2 inches of space between the back and sides of the appliance.
WRENCH
SCREWDRIVER
PLIERS
5
Page 6
Put your laundry into the washer evenly. Uneven lau ndry may cause noise or vibration.
A
Don’t use excessively hot water (50°C or more). Plastic parts may be deformed or damaged.
Also, clothing may be deformed or bleached.
Before washing, check all pockets. If nails or pins remain in pockets, they may damage the
washer or clothes.
Never splash water on the control panel.
Plug the washer into an exclusive properly installed-grounded wall outlet. Do not under any
circumstances cut or remove the third (ground) pr ong from the power cord. Any questions
concerning power and/or grounding should be directed toward a certified electrician or an
authorized Avanti Products service center.
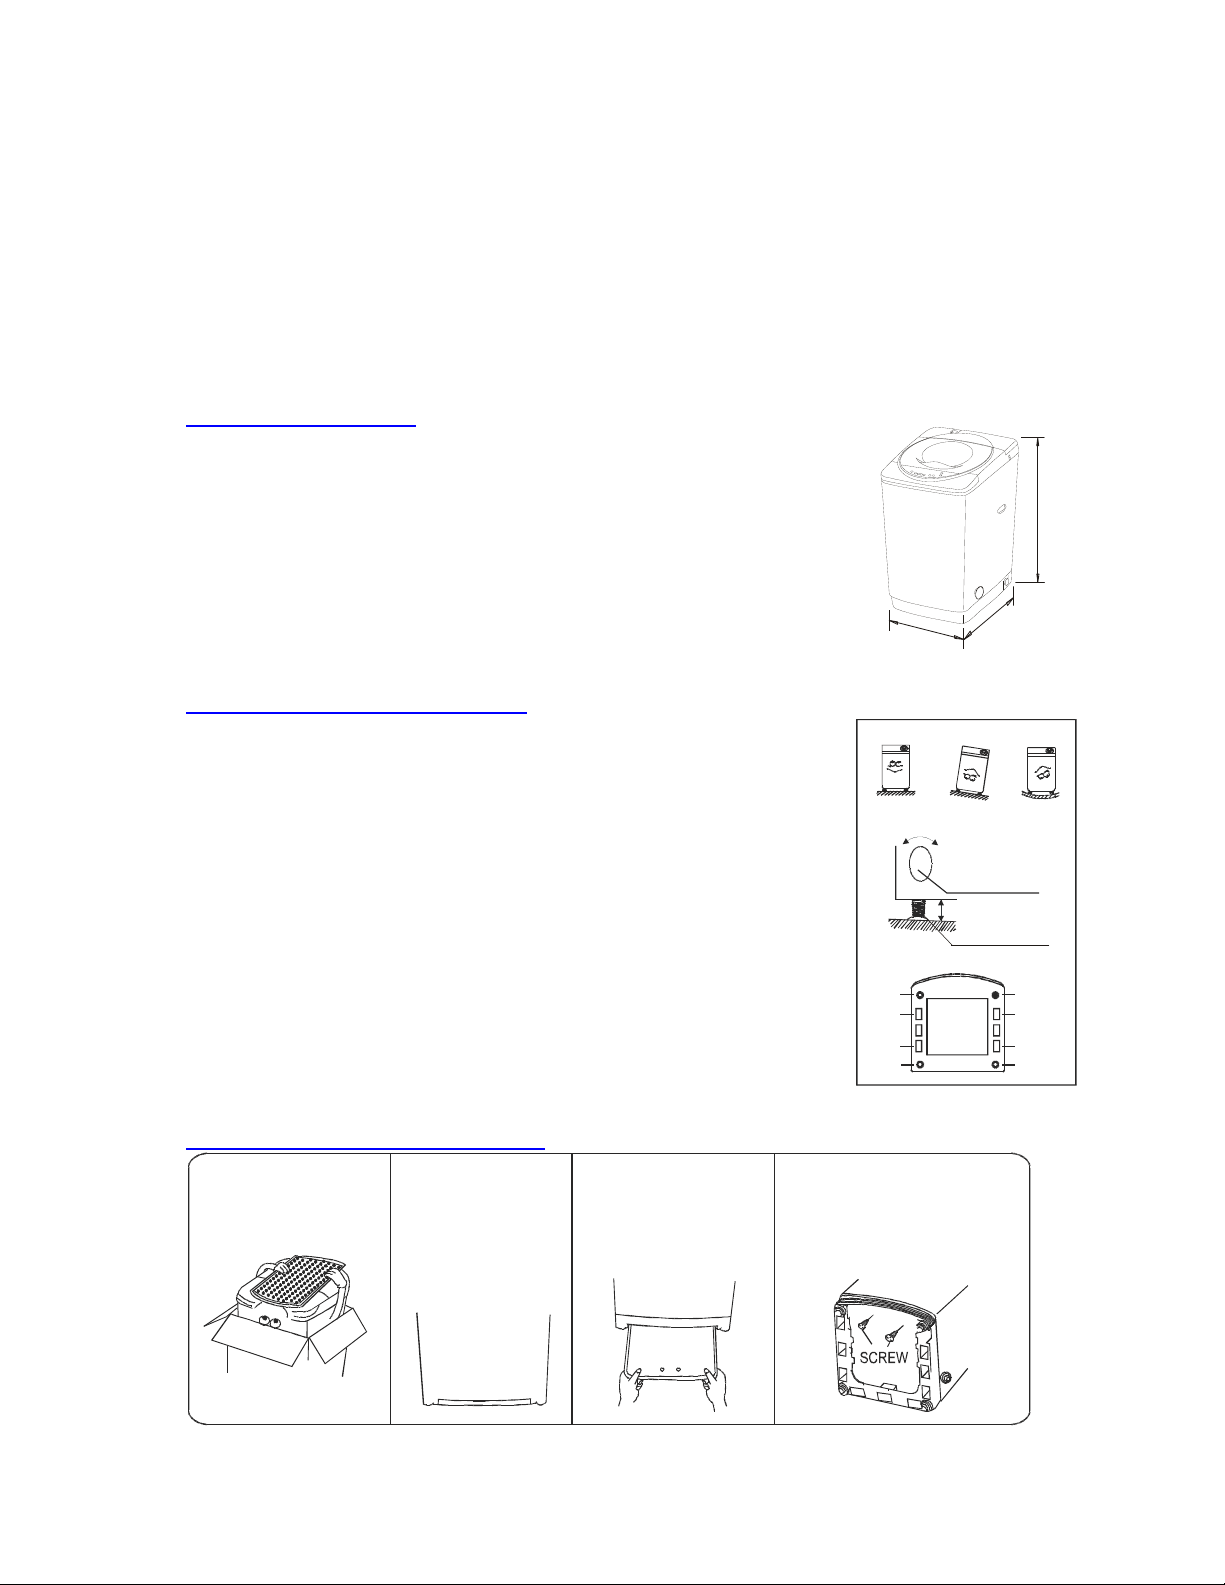
SELECTING A LOCATION
Before you install the portable washer, select a location with the following
characteristics:
A hard level surface (if the surface is uneven, see Adjusting The Adjustable
Foot).
Away from direct sunlight. Direct sunlight may affect the acrylic coating,
plastic and electrical components.
Adequate ventilation.
Away from sources of heat such as coal or gas. Make sure that the
washing machine does not stand on its power cord. Ventilation openings
must not be obstructed by carpeting when the portable washer is installed
5
3
8
54
m
m
on a carpeted floor.
ADJUSTING THE ADJUSTABLE FOOT
If the floor is uneven adjust the adjustable foot (do not insert pieces of wood,
or any other objects under the feet).
CORRECT
INCORR E CT
Loosen the adjustable foot by turning the level adjustable knob with your
hand until it is at the desired height.
Tighten the adjustable foot by turning the level adjustable knob in the
reverse direction.
Place the washer on a sturdy flat surface.
If the washer is placed on an uneven or weak surf ace, noise or vibration
LOOSEN
TIGHTEN
LEVEL
ADJUSTAB LE KNOB
occurs (Allowable is 1°).
For portable applications, the washing machine comes equipped with four
north/south casters that can easily be installed to assist in the mov ement of
ADJUSTABLE FOOT
the machine to and from the sink. Lay the unit on its back. Install t he casters
into the bottom of the base as indicated.
Return the machine to the upright position. When the machine is positioned
for operation set the height of the adjustment foot s lightly higher than the
front caster to prevent movement of the machine during wash and spin
operation.
Fixed foot
Caster
Caster
Fixed foot
NOTE: Not all movement will be totally eliminated, this is normal.
INSTALLING THE NOISE PROOF PLATE
Take the noise proof
plate out of the
package .
The opening of the
noise proof plate is
at the bottom of
the machine.
Insert the noise proof
plate into the washing
machine base.
Lay down the machine
and secure the noise proof
plate by fastening the two
set screws.
4m
m
939mm
INCO RR ECT
djus table foo t
Caster
Caster
Fixed foot
6
Page 7
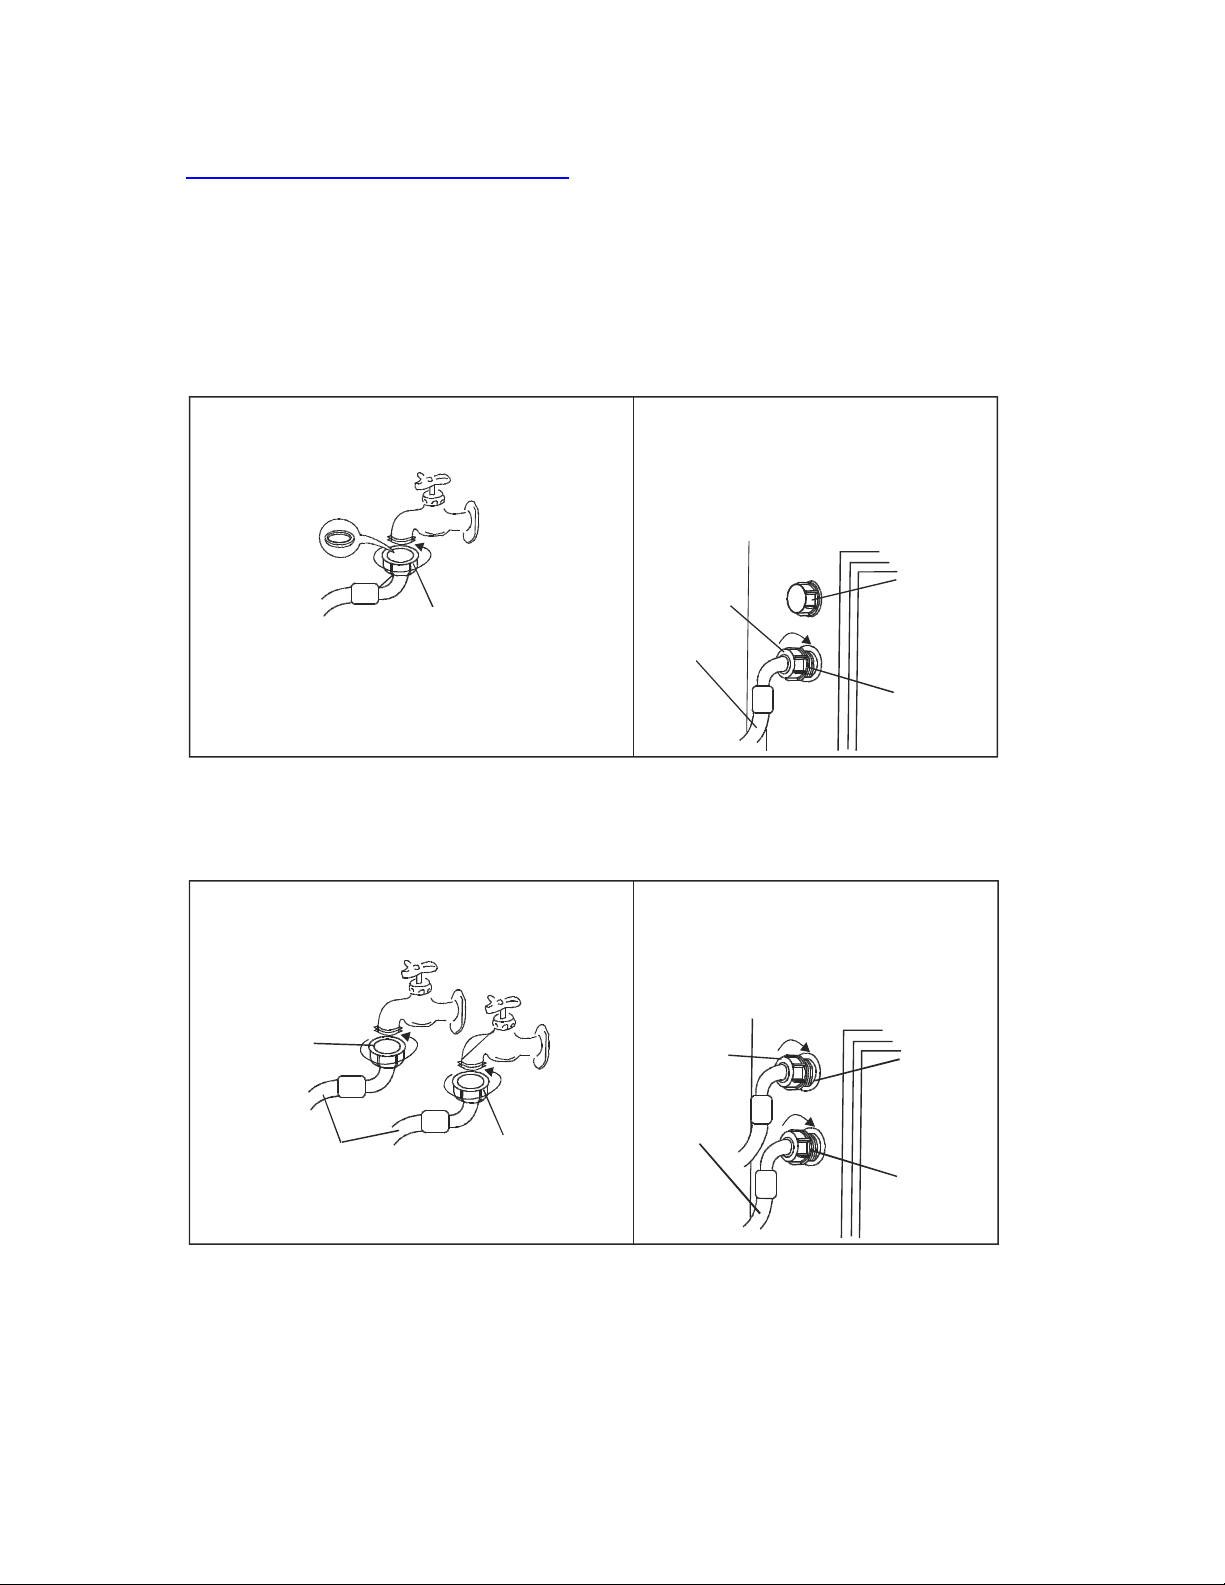
CONNECTING THE WATER SUPPLY HOSE
The water supply hose must be connected to the washing machine at one end and to the water faucet
at the other. Do not stretch the wate r supply hose. If the hose is too short and you do no t wish to
move the water faucet, replace the hose with a longer, high-p ressure hose.
Select appropriate faucet as shown in the figures below. If none of these f aucets are available, use
the faucet adapter provided.
The end of faucet spout should be longer than 10mm (0.4”), or the connector cannot be fixed pr ope rly.
Water leakage could develop.
1. Connect the water inlet hose to the
faucet by turning the connecting nut.
2. Then connect the other end of water
inlet hose to the cold connector in
water mixing valve by turning the
connecting nut.
Rubber ring seal
LID OF
HOT WAT E R
CONNECTING
NUT
CONNECTING
NUT
WATER
INLET HOSE
CONNECTOR
Be sure a rubber ring is inside the connecting nut.
COLD W ATER
CONNECTOR
If you have both cold and hot water supplied, connect the inlet hoses by matching cold to cold and
hot to hot.
1. Connect the water in let hoses to the faucets
by turning the connecting nuts.
2. Unscrew the lid of hot water connector
in water mixing valve , and then connect
the other end of water inlet hoses to the
connectors in water mixing valve by
turning the connecting nuts.
CONNECTING
NUT
WATER INL ET HOSE
Be sure the rubber rings are inside the connecting nuts.
CONNECTING
NUT
CONNECTING
NUT
WATER
INLET HOSE
HOT WATER
CONNECTOR
COLD WATER
CONNECTOR
7
Page 8
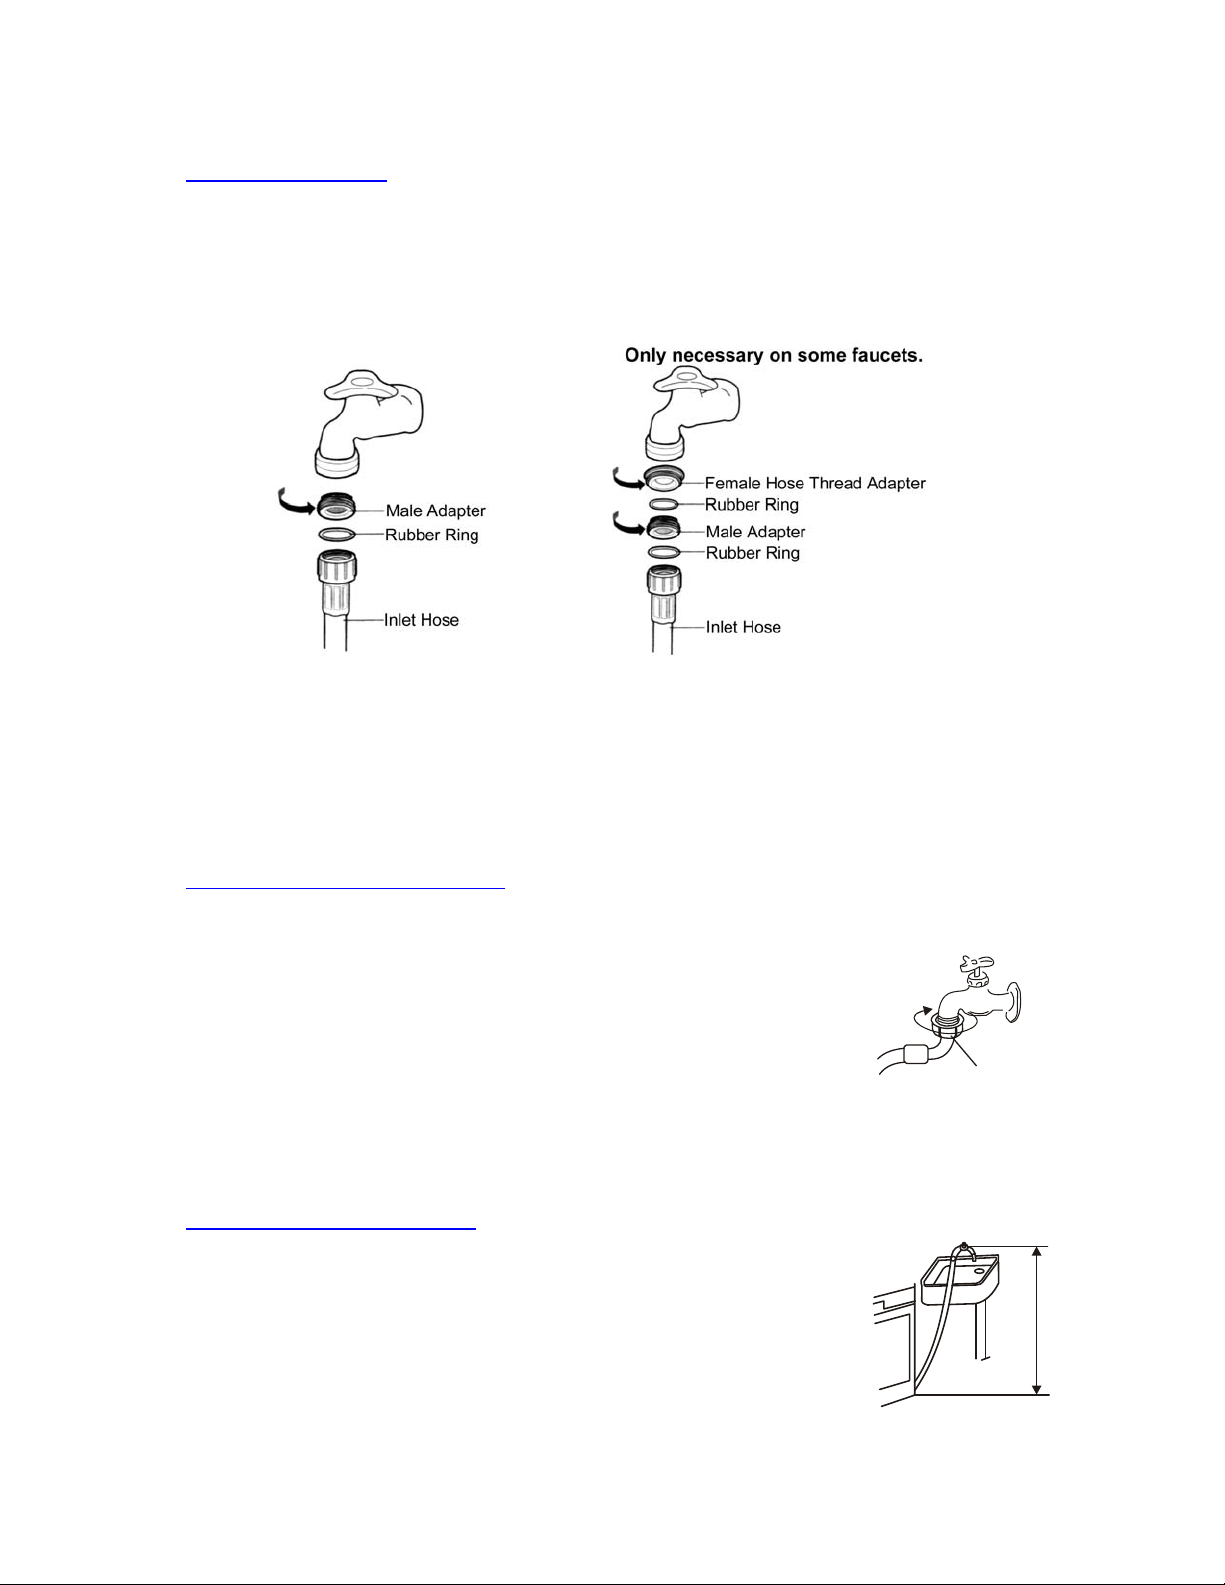
U
WATER CONNECTION
For normal kitchen-sink tap only use the inlet hose with cold water inlet.
Connect the inlet hose to the male hose thread adapter by turning it clockwise to be fixed tightly.
Make sure to insert the rubber ring enclosed. Then connect tightly to your sink.
Note: Some faucets may require you to also use the female hose thread a dapter between the male
adapter and your sink faucet as shown below. Make sure the rubber ring is inserted and
connect to your sink.
If water leaks from faucet connection or washer connection, turn off water and
tighten fully using a wrench. Be careful not to over tighten and damage water
connection. Turn on water supply and make sure no leaks are present
DISCONNECTING THE INLET HOSE
Dismantling the hose directly may cause water to splash due to the possible high water pressure in
the hose, even after the faucet has been turned off. Please take off the hose as per following steps,
even if the faucet is closed:
Turn off the faucet.
Turn on the power and let the machine run for about 5 seconds then turn
it off.
Remove the connecting nuts from the faucet and washing machine.
Note: If the washing machine is frequently used, it is not necessary to dis mantl e
the inlet hose to avoid possible damage to the screws.
POSITIONING THE DRAIN HOSE
Connect the drain hose to the water outlet of the washing machine then fasten it
with
a pinchcork. Sinc e only up drainage is available, drain hose can be hung i n
the basin or bathtub.
NOTE: The highest point of the drain hose must be in the height of 0.7-1.2m
above floor level, otherwise, the washer cannot work normally.
.
CONNECTING
N
T
0.7-1.2m
8
Page 9

ELECTRICAL CONNECTION
Improper use of the grounded plug can result in the risk of electrical shock. If the power cord is
damaged, have it replaced by an authorized Avanti Products service center.
Warning
This appliance should be properly grounded for your safety. The power cord of this appliance is
equipped with a three-prong plug which mates with standard three prong wall outlets to minimize the
possibility of electrical shock.
Do not under any circumstances cut or remove the third ground prong f rom the power cord supplied.
For personal safety, this appliance must be properly grounded.
This appliance requires a standard 115/120 Volt AC ~/60Hz electrical ground outlet with three-prong.
Have the wall outlet and circuit checked by a qualified electrician to make sure the outlet is properly
grounded. When a standard 2-prong wall outlet is encountered, it is your responsibility and obligation
to have it replaced with a properly grounded 3-prong wall outlet.
The cord should be secured behind the appliance and not left exposed or dangling to prevent
accidental injury.
The appliance should always be plugged into its own individual electrical outlet which has a voltage
rating that matches the rating label on the appliance. This provides the best performanc e and also
prevent overloading house wiring circuits that could cause a fire hazard from overheated. Never
unplug the appliance by pulling the power cord. Always grip the plug firmly and pull straight out from
the receptacle. Repair or replace immediately all power cords that have become frayed or otherwise
damaged. Do not use a cord that shows cracks or abrasion dama ge along its length or at either end.
When moving the appliance, be careful not to damage the power cord.
EXTENSION CORD
Because of potential safety hazards under certain conditions, it is strongly recommended that you do
not use an extension cord with this appliance. However, if you must use an extension cord it is
absolutely necessary that it be a UL/CUL-Listed, 3-wire grounding type appliance ext ension cord
having a grounding type plug and outlet and that the electrical rating of the cord be 115 volts and at
least 10 amperes.
SURGE PROTECTOR
Most electrical appliances use a series of electric control boards to operate. These boards are very
susceptible to power surges and could be damaged or destroyed.
If the appliance is going to be used in an area or if your city / country is prone t o power surges /
outages; it is suggested that you use a power surge protector for all electrical devices / appliances you
use. The surge protector that you select must have a s urge block high enough to protect the
appliance it is connected to. If you have any quest ions regarding the type and size of surge protector
needed contact a licensed electrician in your are a.
Damages due to power surges are not considered a manufacture r covered defect and will void your
product warranty.
9
Page 10

)
CONTROL PANEL
1. Water Temperature Indicator
2. Water Level Indicator
3. Wash Time Indicator
4. Rinse Time I n di c a tor
5. Spin Time Indicator
6. LED Display
7. Children-proof Indicator
8. Function Indicator
9. Power Button
OPERATING YOUR PORTABLE WASHER
PREPARATION
1. Connect the water inlet hose
to the water faucet. Don’t
switch on the power if the
water pressure is lower than
0.05MPa and higher than
0.5MPa.
2. Open the water faucet.
5. Put the wash load into the
tub evenly.
10. START/HOLD Button
11. Function Selection Button
12. Preset Button
13. Spin Time Selection Button
14. Rinse Time Selection Button
15. Wash Time Selection Button
16. Water Lev el Selection Button
17. Water Temperature Selection Button
3. Insert the plug into the
socket. For safety the plug
should have ground
connection.
6. Add the suitable quantity
detergent into the detergent
case.
HEAVY
4. Insert the end of drain hose
into the hook shelf, and hang
the drain hose over a drain
outlet.
~
0.7m 1.2m
7. Close the lid. Otherwise the
washer wil l n o t op erate.
10
Page 11

BEFORE WASHING
WATER LEVEL
Prepare the wash load. Mix large and small articles in a load to get the best washing result s.
Drop articles loosely into the inner tub. Do not pack articles in or wrap them. Articles should move
freely through the wash water for best cleaning results. Articles should rollover, sink and then
reappear.
When washing very large articles, do not fill inner tub as full as with other loads. The water level in
your washer should fit the size of your wash load. Small load will use lower water levels. There must
be enough water in the inner tub to allow articles to move and turn over freely. Overloading the inner
tub can result in poor washing and rinsing. Overloading may also cause wrinkling and tearing of
articles.
OPERATION INSTRUCTIONS
PRESS DOWN POWER BUTTON.
PRESS DOWN WATER LEVEL BUTTON.
Choose appropriate water level according to wash load quantity.
WATER TEMPERATURE CHOICE.
Press down the water temperature selection button, you can choose to inlet cold water or hot water.
When the cold-water indicator and the hot-water indicator turn on simultaneously, which means you
chose the warm water.
NOTE: The washer will provide a cold rinse in all TEMPERATURE settings.
IMPORTANT: A single cold hose system does not allow the washing machine t o automatically
(select) regulate incoming water temperatures to match those listed on the control panel such as
WARM or HOT.
PRESS DOWN WASH TIME SELECTION BUTTON.
Press down wash time selection button to select the wash time. You can also press the button to
select soak.
NOTE: When all indicators are OFF, the wash cycle is finished.
PRESS DOWN RINSE TIMES SELECT BUTTON.
Press this button to select the times of rinse. When SPRAY RINSE is selected, the washing machine
will spray water to rinse firstly during rinse course.
NOTE: When all indicators are OFF, the rinse cycle is finished.
PRESS DOWN SPIN TIME SELECT BUTTON.
Press this button to select the time of spin.
NOTE: When all indicators are OFF, the spin cycle is finished.
IMPORTANT NOTE: You can select different WASH, RINSE and SPIN combinations according to
your needs.
WATER LEVEL
Right Wrong
11
Page 12

PRESS DOWN PRESET BUTTON.
Press this button for delay start setting and children-p roof setting.
PRESS DOWN FUNCTIONS SELECTION BUTTON.
Choose the desired function and then the corresponding indicator blink.
PRESS DOWN START/HOLD BUTTON ONCE AND THE MACHI NE WILL BEGIN OPERATION.
Please press this button to stop the normal operation, if it continues to work, press it again.
Water level can be reset during the normal operation. If the higher water lev el is selected, the machine
will operate after refilling the water level selected.
AUTOMATIC WASH PROGRAMS
NORMAL – For normal laundry
Press down the power button.
The NORMAL indicator will be ON. (NORMAL is the default program)
Press the water supply button to select the water temperature.
Press the water level button to select the appropriate water level setting. (The default water level
is HIGH)
Press the START/HOLD to start the course. And the LED display will show the remaining time of
the entire course.
SOAK – For dirty laundry
Press down the power button.
Press the func tions button to s e le c t th e SOA K f u nction until t he SO A K i ndi cator is ON.
Press the water supply button to select the water temperature.
Press the water level button to select the appropriate water level setting.
Press the START/HOLD to start the course. And the LED display will show the remaining time of
the entire course.
SPEEDY – For light dirty laundry
Press down the power button.
Press the functions button to select the SPEEDY function until the SPEEDY indicator is ON.
Press the water supply button to select the water temperature.
Press the water level button to select the appropriate water level setting. Press the START/HOLD
to start the course. And the LED display will show the remaining time of the entire course.
JEANS – For massive laundry
Press down the power button.
Press the functions button to select the JEANS function until the JEANS indicator is ON.
Press the water supply button to select the water temperature.
Press the water level button to select the appropriate water level setting.
Press the START/HOLD to start the course. And the LED display will show the remaining time of
the entire course.
GENTLE – For elaborate laundry
Press down the power button.
Press the functions button to select the GENTLE function until the GENTLE indicator is ON.
Press the water supply button to select the water temperature.
Press the water level button to select the appropriate water level setting.
Press the START/HOLD to start the course. And the LED display will show the remaining time of
the entire course.
HEAVY – For big laundry
Press down the power button.
Press the functions button to select the HEAVY function until the HEAVY indicator is ON.
12
Page 13

Press the water supply button to select the water temperature.
Press the water level button to select the appropriate water level setting.
Press the START/HOLD to start the course. And the LED display will show the remaining time of
the entire course.
DELICATES – For small laundry
Press down the power button.
Press the functions button to select the DELICATES functi on until the DE LI CAT ES indicato r is ON.
Press the water supply button to select the water temperature.
Press the water level button to select the appropriate water level setting. (The default water level
is LOW-LEV2)
Press the START/HOLD to start the course. And the LED display will show the remaining time of
the entire course.
SPRAY RINSE – For children laundry
Press down the power button.
Press the functions button to select the SPRAY RINSE functi on until the SPRAY RINSE indicator
is ON.
Press the water supply button to select the water temperature.
Press the water level button to select the appropriate water level setting.
Press the START/HOLD to start the course. And the LED display will show the remaining time of
the entire course.
MANUAL FUNCTIONS
WASH ONLY
Press down the power button.
Press the functions button to select the appropriate program.
Press the water supply button to select the water temperature.
Press the water level button to select the appropriate water level setting.
Press the wash button to select the wash time.
Press the rinse button until all rinse indicators are OFF.
Press the spin button until all spin indicators are OFF.
Press the START/HOLD to start the course. And the LED display will show the remaining time of
the entire course.
WASH AND RINSE
Press down the power button.
Press the functions button to select the appropriate program.
Press the water supply button to select the water temperature.
Press the water level button to select the appropriate water level setting.
Press the wash button to select the wash time.
Press the rinse button to select the rinse ti mes.
Press the spin button until all spin indicators are OFF.
Press the START/HOLD to start the course. And the LED display will show the remaining time of
the entire course.
RINSE AND SPIN
Press down the power button.
Press the water level button to select the appropriate water level setting.
Press the wash button until all wash indicators are OFF.
Press the rinse button to select the rinse ti mes.
Press the spin button to select the spin time.
Press the START/HOLD to start the course. And the LED display will show the remaining time of
the entire course.
13
Page 14

SPIN ONLY
Press down the power button.
Press the wash button until all wash indicators are OF F.
Press the rinse button until all rinse indicators are OFF.
Press the spin button to select the spin time.
Press the START/HOLD to start the course. And the LED display will show the remaining time of
the entire course.
FUNCTIONS
Each wash set is programmed in the computer; see the details in the wash program chart .
FUNCTION
NORMAL 12 Min. 1 Cycle 5 Min. 35 Min.
SOAK 20 Min. 12 Min. 2 Cycles 5 Min. 66 Min.
SPEEDY 6 Min. Spray Rinse + 1 Cycle 3 Min. 33 Min.
JEANS 12 Min. Spray Rinse + 2 Cycles 5 Min. 52 Min.
GENTLE 12 Min. 2 Cycles 3 Min. 44 Min.
HEAVY 12 Min. Spray Rinse + 2 Cycles 5 Min. 58 Min.
DELICATES 6 Min. 2 Cycles 3 Min. 38 Min.
SPRAY RINSE 12 Min. Spray Rinse + 2 Cycles 5 Min. 58 Min.
Press down each button within 5 minutes since the program will reset the process group. Then press
down STRAT/HOLD button to re-start the washing machine. If not, the washing machine will shut
down automatically.
Close the lid, or the washing machine will not operate.
In case the unbalance of load triggers the safety switch when spinning, the washing machine will
automatically refill water to adjust the balance.
Note:
Clothes easily discolored should be washed separately so as t o prevent inter-dyeing.
If you want to change a selected program, please pre ss the START/HOLD button first, then press
the Program button before pushing START/HOLD butt on.
When Rinse & Drain program is ON, do not use detergent.
If you want to drain water during washing, press the START/HOLD butt on, then select Rinse and
Drain program. Press START/HOLD button again to restart.
DELAY START SETTING
Select this course when you have to go out or do something else.
Press down the power button.
Load the washing machine and select the appropriate wash program.
Press PRESET button continuously to select the delay start time. (From 1 hour to 24 hours)
Close the lid com p l e t e ly .
Press START/HOLD button to start the course.
CHILDREN-PROOF SETTING
Select the function, the program will hold the washing machine and give out alert voice once the lid is
opened when washing. And the washing machine will automatically drain water and give alarm if the
lid is not closed in 10 seconds. In case a child falls into the washing machine when he plays around,
he will be in safe status.
Press down the power button.
Select the appropriate program and press START/HOLD butt on to start the washing machine.
The washing machine buzzer will give out music and the digital indicator show
must decide whether to select the function or not.
SOAK WASH RINSE SPIN TOTAL TIME
(Approx.)
. This time you
14
Page 15

y
Press the PRESET button to select the function and the dot indicator will be ON. If no, don’t do
anything.
NOTE: If you open the lid while the machine in running, all operations will be stopped within 7
seconds.
To resume operation, close the lid.
CARE AND MAINTENANCE
CLEANING YOUR PORTABLE WASHER
Clean the surface of your portable washer regularly with soft fabric.
Clean the inner tub regularly, especially immediately after starch or bleach operation.
Clean the filter in the inlet valve or inlet hose regularly in order to prevent it from clogging.
Unplug the pow er cord.
Clean the lint filter.
Pull upw ard to rem ove the
lint filter.
Vacation time
Rem ove the inlet hose and clean
the filter with a brush.
Clean and rinse it thoroughly.
Clean the surface of
the w ashing machine
with a soft cloth
regularl
.
Clean the inner tub
regularly, especially after
washing starched or
bleached laundry.
15
Page 16

PROBLEMS WITH YOUR PORTABLE WASHER?
You can solve many common portable washer problems easily, saving you the cost of a possible
service call. Try the suggestions below to see if you can solve the problem before calling the servicer.
TROUBLESHOOTING GUIDE
PROBLEM POSSIBLE CAUSE
Washer does not operate.
Not plugged in.
The circuit breaker tripped or a blown fuse.
The lid is not c l o s ed .
Make sure the water source is turned on.
No water or insufficient water supply. The water source faucet is not turned on.
The water source hose is frozen.
The water intake hose is bent.
The filter on the water intake hose is clogged.
The washing machine does not drain. The drain hose is squashed or bent.
The water hose mesh filter is clogged.
Washing machine vibrates or is too noisy. Check to assure that the washer is level.
The washing machine is touching another object.
The laundry load is not balanced.
Washing machine does not spin. The lid is not closed.
The washer is not on a level surface.
SERVICE FOR YOUR PORTABLE WASHER
We are proud of our customer service organization and the network of professional service
technicians that provide service on your Avanti portable washe rs. With the purchase of your Avanti
portable washer, you can be confident that if you ever need additional information or assi stance, the
Avanti Products Customer Service Team will be here for you. Just call us toll-free.
AVANTI PRODUCTS CUSTOMER SERVICES
Product Information
800-323-5029
Part Orders
800-220-5570
Whatever your questions are about our products,
help is available.
You may order parts and accessories that will be
delivered directly to your home by personal
check, money order, Master Card, or Visa.
In-Home Repair Service
800-220-5570
An Avanti Products authorized service center will
provide expert repair service, scheduled at a time
that is convenient for you. Our trained servicers
know your portable washer inside and out.
WIRING DIAGRAM
Microcomputer Controlled Board Assembly
BR WH WH B
Plug
GGO
Water level
sensor
BR
BL
G
WH
Y/G
GR
Y
P
YY
Safety
switch
B
C
B
Motor
WH
IV
IV
Hot
Cold
Y
Y
R
BL
B-BLUE
BL-BLACK
RR
R
L
R
Y
M
Pump
WH
BR-BROWN
G-GREEN
GR-GRAY
R-RED
WH-WHITE
Y-YELLOW
O-ORANGE
Y
P-PURPLE
Ms
Y
16
Page 17

YOUR AVANTI PRODUCTS WARRANTY Staple your sales receipt here. Proof of
original purchase date is needed to obtain
service under warranty.
WHAT IS COVERED
LIMITED ONE-YEAR
WARRANTY
For one year from the date of purchase by
the original owner, Avanti Products will, at
its option, repair or replace any part of the
appliance that proves to be defective in
material or workmanship under normal
use. During this period Avanti Products
will provide all parts and labor necessary
to correct such defects free of c harge, so
long as the appliance has been installed
and operated in accordance with the
written instructions in this manual. In
rental or commercial use, the warranty
period is 90 days.
WHAT IS NOT COVERED
LIMITED 5 YEAR WARRANTY ON PLASTIC TUB
After one year and until five years from date of
purchase, Avanti will furnish a replacement plastic
tub, for one which is defective in material or
workmanship. You will be responsible for labor.
LIMITED 7 YEAR WARRANTY ON STAINLESS
STEEL TUB
After one year and until seven years from date of
purchase, Avanti will furnish a replacement stainless
steel tub, for one which is defective in material or
workmanship. You will be responsible for labor.
Incidental or consequential damages.
Service calls to:
Correct the installation of your washer.
Instruction on how to use your washer.
Replace house fuses or incorrect house
wiring or plumbing.
Repairs performed by unauthorized
servicers.
Repairs when your washer is used in other
than normal, single-family household use.
Service calls that are related to external
problems, such as abuse, misuse,
inadequate electrical power, accidents, fire,
floods, or acts of God.
Failure of the product if it is used for other
than its intended purpose.
Pickup and delivery.
Repairs caused by unauthorized
modifications made to the appliance.
This warranty does not apply outside the
Continental U.S.A.
17
Page 18

INSTRUCCIONES EN ESPAÑOL
LAVADORA AUTOMATICA DE ROPA
LEA TODAS LAS INSTRUCCIONES ANTES DE USAR ESTA LAVADORA Y GUARDE ESTE
MANUAL EN UN LUGAR SEGURO PARA REFERENCIA FUTURA.
CONOCIENDO LAS PARTES DE SU LAVADORA AUTOMATICA
1. DISPENSADOR DEL DETERGENTE
2. DISPENSADOR DEL SUAVIZANTE DE ROPA
3. CILINDRO INTERNO DE LAVADO
4. PANEL DE CONTROL
5. BASE
6. PLATAFORMA A PRUEBA DE RUIDO. SE INSERTA EN LA
1
2
BASE PARA REDUCIR EL NIVEL DE RUIDO Y ALEJA
MALOS OLORES Y PLAGAS
3
7. MANGUERA DE SUMINISTRO DE AGUA /
CIERRE LA LLAVE DESPUES DE LLENAR EL CILINDRO
8. FILTRO PARA PELUSAS
4
9. PROPULSOR
10. ENCHUF E Y CABLE DE EL ECTR I CIDAD
11. MANGUERA DE DRENAJE. TOME EN CUENTA QUE
DURANTE EL FUNCIONAMIENTO DE LA LAVADORA,
EL PUNTO MAS ALTO DE LA MANGUERA DE DRENAJE
5
6
DEBE ESTAR ENTRE 70 Y 120CM SOBRE EL NIVEL DEL
PISO
12. BOTON DE AJUSTE DE NIVEL
13. PATA DE AJUSTE
ACCESORIOS
MANGUERA DE
SUMINISTRO DE AGUA
2 PIEZAS
PLATAFORMA A
PRUEBA DE RUIDO
1 PIEZA
ADAPTADOR
2 PIEZAS
RUEDA
4 PIEZAS
ADVERTENCIA
SIGA ESTAS PRECAUCIONES BASICAS PARA REDUCIR EL RIESGO DE FUEGO, CORTO
CIRCUITO O DAÑOS AL USAR SU LAVADORA PORTATIL.
NO LIMPIE LA LAVADORA PORTATIL CON LIQUIDOS INFLAMABLES. EL VAPOR
PUEDE CREAR FUEGO O UNA EXPLOSION
LEA TODAS LAS INSTRUCCIONES ANTES DE USAR SU LAVADORA PORTATIL.
RIESGOS DE QUE LOS NIÑOS QUEDEN ATRAPADOS DENTRO DE LOS EQUIPOS NO
SON PROBLEMAS DEL PASADO, NO PERMITA QUE OPEREN, JUEGUEN O ENTREN
DENTRO DE LA LAVADORA. ANTES DE BOTAR O RETIRAR SU LAVADORA
ASEGURESE DE QUITARLE LA PUERTA.
NO COLOQUE LA LAVADORA EN LUGARES HUMEDOS O EXPUESTA AL VAPOR O A
LA LLUVIA. LA HUMEDAD PUEDE DESTRUIR EL AISLAMIENTO ELECTRICO,
PUDIENDO CAUSAR UN CHOQUE ELECTRICO.
NO ALMACENE, US E GASOLINA U OTRO LIQUIDO GAS INFLAMABLE CERCA DE ESTA
U OTRA LAVADORA PORTATIL. EL VAPOR PUEDE CREAR FUEGO O UNA
EXPLOSION.
7
8
9
10
11
12
13
18
Page 19

INSTRUCCIONES DE INSTALACION
ANTES DE USAR SU LAVADORA
REMUEVA EL EMPAQUE EXTERIOR E INTERIOR.
NECESITARA LAS SIGUIENTES HERRAMIENTAS:
LLAVE INGLESA (O AJUSTABLE)
PINZAS (ALICATE)
DESTORNILLADOR
ASEGURESE QUE TI ENE LAS SIGUIENTES PIEZAS
2 MANGUERAS CON ADAPTADORES PARA EL GRIFO
1 PLACA PARA REDUCIR RUIDO (CON TORNILLOS)
REMUEVA EL PROTECTOR.
NOTA: DEBE GUARDAR Y USARLO CUANDO TENGA QUE MOVER O TRANSPORTAR
LA LAVADORA A OTRO LUGAR.
LIMPIE EL INTERIOR CON UN TRAPO SUAVE Y AGUA TIBIA.
DEJE 2 PULGADAS DE ESPACIO ENTRE LA PARED Y LA LAVADORA.
COLOQUE SU ROPA EN LA LAVADORA UNIFORMEMENTE. ROPA DESNIVELADA EN
LA LAVADORA, PODRIA CAUSAR RUIDO O VIBRACION.
NO USE AGUA DEMASIADO CALIENTE (50ºC Ó MAS) YA QUE LAS PARTES PLASTICAS
PODRIAN DEFORMARSE O DAÑAR SE Y LA ROPA PODRIA DEFORMARSE O
DESTEÑIRSE.
ANTES DE LAVAR, REVISE Y VACIE TODOS LOS BOLSILLOS. CLAVOS, ALFILERES,
ETC. ESTOS OBJETOS PUEDEN DAÑAR LA LAVADORA O SU ROPA.
NO SALPIQUE AGUA AL PANEL DE CONTROL.
CONECTE LA LAVADORA A UN ENCHUFE DE PARED EXCLUSIVO, CON CONEXION A
TIERRA. BAJO NINGUNA CIRCUNSTANCIA REMUEVA O CORTE LA TERCERA PUNTA
DEL ENCHUFE (CONEXION A TIERRA). DIRIJA CUALQUIER PREGUNTA
RELACIONADA CON LA ELECTRICIDAD O CONEXION A TIERRA A UN ELECTRICISTA
CERTIFICADO O A UN CENTRO DE SERVICIO AUTORIZADO POR AVANTI.
SELECCIONE UN LUGAR
ANTES DE INSTALAR SU LAVADORA, SELECCIONE UN LUGAR CON LAS SIGUIENTES
CARACTERISTICAS:
SUPERFICIE PLANA Y DURA (SI LA SUPERFICIE ES IRREGULAR, VEA "AJUSTE DE
PATAS NIVELADORAS").
LEJOS DE LA LUZ SOLAR DIRECTA. LA LUZ SOLAR DIRECTA PUEDE AFECTAR LA
CAPA ACRILICA, COMPONENTES PLASTICOS Y ELECTRICOS.
VENTILACION ADECUADA.
LEJOS DE LAS FUENTES DE CALOR TALES COMO CARBON O GAS.
ASEGURESE QUE LA LAVADORA NO ESTE APLASTANDO EL CORDON ELECTRICO.
LAS APERTURAS DE VENTILACION DEBEN ESTAR LIBRES DE OBSTRUCCIONES
TALES COMO ALFOMBRA.
AJUSTE DE PATAS NIVELADORAS
SI EL PISO ES IRREGULAR, AJUST E LAS PATAS (NO INSERTE PEDAZOS DE MADERA U
OTROS OBJETOS BAJO LAS PATAS).
DESENROSQUE EL TORNILLO GIRANDOLO CON LA MA NO HASTA QUE LLEGUE A LA ALTURA
DESEADA.
AJUSTE LA TUERCA CON LA LLAVE INGLESA.
COLOQUE LA LAVADORA EN UNA SUPERFICIE PLANA Y FIRME.
SI COLOCA LA LAVADORA EN UNA SUPERFICIE IRREGULAR O BLANDA, PODRIA CAUS AR
DAÑO O VIBRACION.
PARA PORTABILIDAD, LA LA VADORA VIENE CON CUATRO RUEDAS FACILES DE INSTALAR,
PARA AYUDAR AL MOVIMIENTO DE LA LAVADORA HACIA Y DESDE EL LAVADERO, ACUESTE
LA UNIDAD SOBRE LA PARTE TRASERA E INSTALE LAS RUEDAS EN LA PARTE DE ABAJO DE
LA BASE COMO MUESTRAN LAS FIGURAS, (DEBAJO EN ESTA PAGINA.)
REGRESE LA UNIDAD A LA POSICION VERTICAL. CUANDO LA MAQUINA ESTE
COLOCADA PARA FUNCIONAMIENTO, AJUSTE LA PATAS A UNA ALTURA UN POCO MAYOR A
LAS RUEDAS PARA EVITAR QUE LA LAVADORA SE MUEVA DURANTE EL LAVADO.
19
Page 20

NOTA: AUN HACIENDO LO ANTERIOR, LA LAVADORA PODRIA MOVERSE. ESTO ES
NORMAL.
INSERTE LA BANDEJA A PRUEBA DE RUIDO EN LA BASE DE LA LAVADORA
1. REMOVER LA PLATAFORMA A
PRUEBA DE RUIDO DE LA CAJA.
4. RECUESTE LA LAVADORA PARA
COLOCAR LA PLATAFORMA A PRUEBA
DE RUIDOS, FIJANDOLA CON DOS
TORNILLOS.
SCREW
3. LA APERTURA PARA LA PLATAFORMA
A PRUEBA DE RUIDOS ESTA EN LA
PARTE INFERIOR DE LA LAVADORA.
2. RECUESTE LA LAVADORA DE
MANERA QUE LE SEA FACIL AJUSTAR
LOS DOS TORNILLOS DE SEGURIDAD
PARA EVITAR QUE LA BANDEJA SE
SALGA DEL LUGAR.
REMOVIENDO EL PROTECTOR
PARA PREVENIR QUE LA LAVADORA SE DAÑE, RECOMENDAMOS QUE GUARDE EL
PROTECTOR Y LO USE CUANDO NECESITE MOVER O TRANSPORTAR SU LAVADORA,
20
Page 21

Conexión Eléctrica
EL USO INAPROPIADO DEL ENCHUFE A TIERRA PUEDE OCASIONAR RIESGO DE UN
CHOQUE ELECTRICO. SI EL CORDON SE DAÑASE, LLEVELO A UN CENTRO DE
SERVICIO AUTORIZADO POR AVANTI PRODUCTS PARA QUE SE REEMPLACE.
ADVERTENCIA
Para su seguridad, esta máquina de hacer hielo debe estar apropiadamente conectada a tierra.
El cordón eléctrico de esta máquina de hacer hielo esta equipado con un enchufe de tres puntas,
el cual encaja perfectamente en los receptáculos/enchufes de pared de tres puntas estándar,
para minimizar la posibilidad de un choque eléctrico.
Bajo ninguna circunstancia corte o retire la tercera punta (cable a tierra) del enchufe del cordón
eléctrico.
Nunca use un cable de extensión para conectar la unidad a la electricidad.
Nunca use un adaptado con enchufe de solo 2 puntas.
Si solo puede conectar la máquina de hacer hielo a un receptáculo/enchufe de pared de 2
puntas, comuníquese con un electricista calificado para que reemplace ese receptáculo/enchufe
de pared por uno de 3 puntas, de acuerdo con los códigos de electricidad aplicables.
Esta máquina de hacer hielo requiere un receptáculo/enchufe de pared de tres puntas estándar
de 115/120 voltios a.c.~/60hz.
Para prevenir cualquier daño físico o lesión, el cordón debe ser asegurado detrás de la máquina
de hacer hielo y no estar expuesto o colgando.
Cable de Extensión
Debido al posible riesgo de seguridad causado bajo ciertas circunstancias, se recomienda
firmemente q ue no use un cable de ext ensión para es te electrod oméstico. Sin emba rgo, si no tiene
otra opción mas que usar un cable de extensión, asegúrese que este sea un cable de extensión para
electrodomésticos que este listado bajo UL/CUL, que tenga enchufe y receptáculo para enchufe de
tres puntas (cable a tierra) y que la capacidad del cordón eléctrico sea de 115 voltios y no menos de
10 amperios.
1 INDICADOR DE TEMPERATURA DEL
AGUA
2 INDICADOR DEL NIVEL DE AGUA 11 BOTON DE FUNCIONES/MODOS DE
3 INDICADOR DEL MODO DE LAVADO 12 BOTO DE PREPROGRAMADO
4 INDICADOR DE FUNCION O PROCESO 13 BOTON DE CENTRIFUGADO
5 INICIO/PAUSA INICIA, DETIENE O
REINICIA EL CICLO DE LAVADO
6 PANTALLA ELECTRONICA 15 BOTON DE LAVADO
7 INDICADOR A PRUEBA DE NIÑOS 16 BOTON DE NIVEL DE AGUA
8 INDICADOR DE FUNCIONES 17 BOTON DE SUMINISTRO DE AGUA
9 BOTON DE PRENDER / APAGAR
PANEL DE CONTROL
HEAVY
10 BOTON DE COMENZAR / PARAR LAVADO
LAVADO
14 BOTON EN ENJUAGAR
21
Page 22

A
CONECTANDO LA MANGUERA DE SUMINISTRO DE AGUA
UN EXTREMO DE LA MANGUERA PARA SUMINISTRO DE AGUA DEBE SER CONECTADO A LA
LAVADORA Y EL OTRO EXTREMO AL GRIFO. NO ESTIRE LA MANGUERA DE SUMINISTRO DE
AGUA. SI LA MANGUERA ES MUY CORTA Y NO DESEA MOVER EL GRIFO, REEMPLAC E LA
MANGUERA CON UNA MAS LARGA, DE ALTA PRESION.
SELECCIONE EL GRIFO ADECUADO TAL COMO SE MUESTRA EN LAS FIGURA S ABAJO. SI
NINGUNO DE ESTOS GRIFOS ESTA DISPONIBLE, USE EL ADAPTADOR INCLUIDO.
EL LARGO DEL GRIFO DEBE SER DE MAS DE 10 MM (0.4”), DE OTRA MANERA EL CONECTOR
NO PODRA SER AJUSTADO APROPIADAMENT E Y PODRIA PROD UCI R GOT EO.
IMPORTANTE: EN ESTA SITUACION, NO PROGRAME LA OPCION CALIENTE (HOT) COMO
TEMPERATURA DE LAVADO.
1. CONECTE LA MANGUERA AL GRIFO DE
SUMINISTRO DE AGUA A LA LLAVE
GIRANDO LA TUERCA DEL CONECTOR
DE LA MANGUERA HACIA LA DERECHA.
2. REMUEVA LA TAPA DEL CONECTOR DE
AGUA FRIA Y CONECTE EL OTRO
EXTREMO DE LA MANGUERA DE
SUMINISTRO DE AGUA CONECTOR DE
AGUA A EL FRIA EN LA VALVULA
MEZCLADORA DE AGUA.
ANILLO SELLADOR
GIRANDO LA TUERCA DEL CONECTOR
HACIA LA DERECHA.
TUERCA DEL
CONECTOR
ASEGURESE QUE EL ANILLO SELLADOR
DE GOMA ESTE DENTRO DE LA TUERCA
DEL CONECTOR DE LA MANGUERA.
TUERCA DEL
CONECTOR
MANG UE RA DE
SUMINISTRO
TAPA DEL
CONECTOR DE
AGUA CALIENTE
CONECTOR DE
AGUA FRIA
SI USTED TIENE LAS LLAVES DE S UMI NI STRO DE AGUA P OR SEPA RAD O (CALIENT E Y FRIA ),
CONECTE LA MANGUERA A LA LLAVE DE AGUA FRIA Y AL CONECTOR DE AGUA FRIA EN LA
VALVULA MEZCLADORA DE AGUA. HAGA LO MISMO CON EL AGUA CALIENTE Y LA SEGUNDA
MANGUERA.
1. CONECTE LAS MANGUERAS DE
SUMINISTRO DE AGUA A LOS GRIFOS
GIRANDO LAS TUERCAS DE LOS
CONECTORES DE LAS MANGUERAS
HACIA LA DERECHA.
TUERCA DEL
TUERCA DEL
CONECTOR
CONETOR
MANGUERA DE
SUMINISTRO
TUERCA DEL
CONECTOR
ASEGURESE DE COLOCAR EL ANILLO
SELLADOR DENTRO DE LAS TUERCAS
DE LOS CONECTORES DE LAS
MANGUERAS.
2. REMUEVA LAS TAPAS DE LOS
CONECTORES DE AGUA FRIA Y
CALIENTE DE LA UNIDAD Y CONECTE
LOS OTROS EXTREMOS DE LAS
MANGUERAS DE SUMINISTRO DE
AGUA A LOS CONECTORES DE AGUA
RESPECTIVOS EN LA VALVULA
MEZCLADORA DE AGUA GIRANDO LAS
TUERCAS DE LOS CONECTORES
HACIA LA DERECHA.
TUERCA DEL
CONECTOR
MANGUERA DE
SUMINISTRO
CONECTOR DE
GUA CALIENTE
CONECTOR DE
AGUA FRIA
22
Page 23

DESCONECTANDO LA MANGUERA DE SUMINISTRO DE AGUA
DEBIDO A LA ALTA PRESION DE LA LLAVE AUN CUANDO ESTA CERRADA, RECOMENDAMOS
DESCONECTAR LA MANGUE RA, YA QUE PODRIA CAUSAR GOTEO O SALP ICADURA. PARA
EVITARLO SIGA ESTAS INSTRUCCIONES:
1. CIERRE LA LLAVE DEL AGUA
2. ENCIENDA LA LAVADORA
3. APAGUELA LUEGO DE 5 SEGUNDOS (APROXIMA DA ME NTE)
4. RETIRE LAS MANGUERAS GIRANDO LAS TUERCAS DEL CONECTOR HACIA LA
IZQUIERDA
SI LA LAVADORA ES USADA FRECUENTEMENTE, NO RETIRE LAS CONEXIONES PARA
EVITAR POSIBLES DAÑOS.
COLOCANDO LA MANGUERA DE DRENAJE
CONECTE LA MANGUERA DE DRENAJE A LA SALIDA DE AGUA DE LA LAVADORA Y
AJUSTELA CON UNA GRAMPA AJUSTABLE. COMO PUEDE DRENAR HACIA ARRIBA O HACIA
ABAJO, LA MANGUERA DE DRENAJE PUEDE SER COLOCADA EN EL PISO, EL BAÑO O LA
BAÑERA, SIEMPRE QUE LA ALTURA NO SEA M AYOR A 70 CM.
EL PUNTO MAS ALTO DE LA MANGUERA DE DRENAJE DEBE SER 70 – 120 CM SOBRE EL
NIVEL DEL PISO, DE LO CONTRARIO LA LAVADORA NO PODRA FUNCIONAR
CORRECTAMENTE.
MODO DE EMPLEO
PREPARACION
1. CONECTE LA MANGUERA AL GRIFO DE SUMINISTRO DE AGUA.
2. ABRA EL GRIFO DE SUMINISTRO DE AGUA. NO ENCI ENDA LA LAVADORA SI LA
PRESION ES MENOR A 0.02MPA O MAYOR A 0.5MPA.
3. CONECTE EL CABLE DE ELECTRICIDAD EN EL TOMACORRIENTE. POR SU
SEGURIDAD EL TOMACORRIENTE DEBE TENER UNA CONEXION PARA EL CABLE DE
TIERRA.
4. INSERTE EL EXTREMO DE LA MANGUERA DE DRENAJE EN LA PLATAFORMA DE
CONEXION. CUELGUE EL OTRO EXTREMO DE LA MANGUERA EN UN RECIPIENTE DE
DRENAJE (TINA DEL BAÑO, LAVADERO, ETC.)
5. COLOQUE LA CARGA DE ROPA A LAVAR DENTRO DEL CILINDRO Y CIERRE LA TAPA.
LA FUNCION DE LAVADO PUEDE CONTINUAR CON LA TAPA ABIERTA, PERO ES
MEJOR CERRARLA ANTES QUE EMPIECE LA FUNCION DE SECADO (CENTRIFUGA).
6. AÑADA UNA CANTIDAD ADECUADA DE DETERGENTE EN EL DISPENSADOR
COLOQUE LOS ARTICULOS A LAVAR EN EL CILINDRO INTERNO Y CIERRE LA TAPA DE LA
LAVADORA. EL CICLO DE LAVADO SE PUEDE REALI ZAR CON LA PUERTA ABIERTA, A
DIFERENCIA DEL CICLO DE SECADO (CENTRIFUGA) EN QUE LA PUERTA DEBE ESTAR
CERRADA.
INSTRUCCIONES PARA OPERAR LA LAVADORA
AVISO: Si Ud. abra la tapa mientras que la lavadora está funcionando, la lavadora parará de
funcionar en 7 segundos.
En cuanto Ud. cierre la tapa, la lavadora volverá a funcionar normalmente.
ENCENDIDO (POWER).
NIVEL DE AGUA (WATER LEVEL):
PRESIONE EL BOTON HASTA QUE SE ILUMINE EL NIVEL DE AGUA APROPIADO PARA LA
CANTIDAD DE ROPA QUE VA A LAVAR.
TEMPERATURA DEL AGUA:
PRESIONE EL BOTON COLD PARA AGUA F R IA O HOT PARA CALIENTE. SI AMBAS LUCES SE
ILUMINAN, SIGNIFICA QUE ESCOGIO AGUA TIBIA.
23
Page 24

NOTA: EL ENJUAGUE ES SIEMPRE CON AGUA FRIA.
IMPORTANTE: PARA PODER SELECCIONAR LA TEMPERATURA, UD. DEBE CONTAR CON
DOS ENTRADAS DE AGUA, UNA PARA AGUA FRIA Y OTRA PARA CALIENTE.
PROGRAMAS DE LAVADO (PROGRAM):
PRESIONE HASTA QUE SE ILUMINE EL PROGRAMA DESEADO, DE ACUERDO A LA CARGA DE
ROPA QUE VAYA A LAVAR.
FUNCION (FUNCTION):
PRESIONE EL BOTON FUNCTION HASTA QUE SE ILUMINE LA FUNCION DESEADA.
INICIAR / DETENER (START/STOP):
PRESIONE EL BOTON START/STOP UNA VEZ PARA INICIAR EL FUNCIONAMI ENTO.
PARA DETENERLO, PRESIONE START/STOP NUEVAMENTE. SI CONTINUA FUNCIONANDO,
PRESIONELO OTRA VEZ.
EL NIVEL DE AGUA PUEDE SER MODIFICADO DURANTE LA OPERACIÓN. SI DESEA UN NIVEL
MAS ALTO DE AGUA, LA LAVADORA EMPEZARA A FUNCIONAR UNA VEZ QUE HAYA
LLEGADO AL NIVEL DE AGUA DESEADO.
ANTES DE LAVAR
PREPARE LA CARGA DE ROPA A LAVAR. MEZCLE PIEZAS PEQUEÑAS Y GRANDES PARA
OBTENER MEJORES RESULTADOS. DEPOSITE LAS PIEZAS DENTRO DEL CILINDRO. NO
EMPAQUE LAS PIEZAS NI LAS ENVUELVA. LAS PIEZAS DEBEN MOVERSE LIBREMENTE
DENTRO DEL AGUA PARA OBTENER MEJORES RESULTADOS.
LAS PIEZAS DEBEN RODAR, HUNDIRSE Y REAPARECER.
CUANDO LAVE PIEZAS MUY GRANDES, NO LLENE MUCHO EL CILINDRO DE AGUA. EL NIVEL
DEL AGUA EN LA LAVADORA NO DEBE SOBREPASAR EL NIVEL DE LA ROPA. CARGAS DE
ROPA PEQUEÑAS NECESITAN MENOS AGUA. DEBE HABER SUFICIENTE AGUA EN EL
CILINDRO COMO PARA QUE LAS PIEZAS SE MUEVAN LIBREMENTE.
SOBRECARGAR LA LAVA DORA PUEDE RESULTAR EN UN MAL LAVADO Y ENJUAGUE. LA
SOBRECARGA PUEDE CAUSAR QUE LA ROPA SE ARRUGUE O QUE SE HALE.
DIBUJO:
NIVEL DE AGUA
CORRECTO
INCORRECTO)
FUNCIONES
LAS SIGUIENTES FUNCIONES DE LAVADO ESTAN PROGRAMADAS EN LA COMPUTADORA
FUNCIONE REMOJO LAVADO ENJUAGUE CENTRIFUGADO FINALIZAR
NORMAL 12 MIN 1 CICLO 5 MIN 39 MIN
REMOJO 20 MIN 12 MIN 2 CICLOS 5 MIN 66 MIN
RAPIDO 6 MIN 1 CICLO 3 MIN 33 MIN
JEANS 12 MIN 2 CICLOS 5 MIN 52 MIN
SUAVE 12 MIN 2 CICLOS 3 MIN 44 MIN
FORZUDO 12 MIN 2 CICLOS 5 MIN 58 MIN
SEDAS 6 MIN 2 CICLOS 3 MIN 38 MIN
ENJUAGUE 12 MIN 2 CICLOS 5 MIN 58 MIN
CUENTA CON 5 MINUTOS PARA ELEGIR Y PRESIONAR EL(LOS) BOTON(ES) PARA
PROGRAMAR EL MODO DE LAVADO.
LUEGO PRESIONE “START/PAUSE” PARA REINICIAR LA LAVADORA. DE LO CONTRARIO, LA
LAVADORA SE APAGARA AUTOMATICAMA NTE.
24
Page 25

PARA EVITAR RUIDOS MOLESTOS DURANTE EL SECADO, CIERRE LA TAPA DE LA
LAVADORA.
NOTA
LAS PIEZAS DE ROPA DE COLORES QUE DESTIÑ EN DEBEN SER LAVADAS POR SEPARADO
PARA EVITAR QUE MANCHEN OTRAS PIEZAS.
SI DESEA CAMBIAR EL PROGRAMA SELECCIONADO, PRESIONE EL BOTON
“START/STOP”, LUEGO PRESIONE EL BOTON DEL PROGRAMA DESEADO.
NUEVAMENTE PRESIONE EL BOTON “STA RT/STOP”.
NO AÑADA DETERGENTE PARA EL CICLO DE ENJUAGUE Y DESAGÜE.
SI DESEA BOTAR EL AGUA DURANTE EL CICLO DE LAVADO, PRESIONE EL BOTON
“START/STOP”, LUEGO PRESIONE EL BOTON DE “RINSE”. NUEVA MENTE PRESIONE
EL BOTON “START/STOP”.
MANTENIMIENTO
LIMPIE REGULARMENTE LA SUPERFICIE DE SU LAVADORA CON UN PAÑO SUAVE.
LIMPIE EL CILINDRO INTERNO DE LAVADO CON UN PAÑO SUAVE, ESPECIALMENTE
DESPUES DE LAVAR CON ALMIDON O CLORO.
LIMPIE EL FILTRO QUE SE ENCUENTRA EN LA VALVULA DE SUMINISTRO DE AGUA PARA
PREVENIR POSIBLES OBSTRUCCIONES.
1. DESCONECTE EL ENCHUFE.
2. RETIRE LA MANGUERA DE SUMINISTRO DE AGUA Y LIMPIE EL FILTRO CON UN
CEPILLO.
LIMPIANDO EL FILTRO DE PELUSAS
1. SAQUE EL FILTRO HALANDOLO HACIA A RRIBA. LAVE Y ENJUAGUE EL FILTRO
CUIDADOSAMENTE. REINSTALE EL FILTRO NUEVAMENTE.
MANTENIMIENTO DE INVIERNO
1. CIERRE LA LLAVE DEL AGUA, DESCONECTE LAS MANGUERAS DE SUMINISTRO DE
AGUA Y DEJELA DRENAR POR COMPLETO.
2. ACTIVE EL CICLO DE SECADO POR UN MINUTO.
3. APAGUE LA LAVADORA Y DESCONECTELA DE LA ELECTRICIDAD.
25
Page 26

SI TIENE PROBLEMAS CON SU LAVADORA PORTATIL
UD. PUEDE RESOLVER MUCHOS PROBLEMAS FACILMENTE, AHORRANDOSE EL COSTO DEL
SERVICIO TECNICO. PRUEBE LAS SIGUIENTES SUGERENCIAS PARA VER SI PUEDE
RESOLVER LOS PROBLEMAS, ANTES DE LLAMAR AL SERVICIO TECNICO.
GUIA PARA LA SOLUCION DE PROBLEMAS
PROBLEMA REVISAR
LA LAVADORA NO FUNCIONA VERIFIQUE QUE ESTE CONECTADA A LA
ELECTRICIDAD.
REVISE LA CAJA DE FUSIBLES EN SU CASA.
LA LLAVE DE AGUA PUEDE ESTAR CERRADA.
NO ENTRA AGUA O EL NIVEL ES MUY BAJO LA LLAVE DE AGUA PUEDE ESTAR CERRADA.
LA MANGUERA DE ENTRADA DEL AGUA ESTA
CONGELADA O PUEDE ESTAR DOBLADA.
EL FILTRO EN EL CONECTOR DE LA LLAVE O LA
VALVULA DE SUMINISTRO PUEDEN ESTAR
OBSTRUIDOS.
LA LAVADORA NO DESAGUA LA MANGUERA DE DESAGÜE ESTA OBSTRUIDA
O APLASTADA.
EL FILTRO DE LA MANGUERA DE DESAGÜE
PUEDE ESTAR OBSTRUIDO.
LA LAVADORA VIBRA O HACE MUCHO
RUIDO
VERIFIQUE QUE LA LAVADORA ESTE NIVELADA.
LA LAVADORA ESTA TOCANDO OTRO OBJETO,
SEPARELA.
LA CARGA DE ROPA NO ESTA BIEN DISTRIBUIDA.
ADVERTENCIA
EL CABLE DE ELECTRICIDAD DEBE SER DESCONECTADO DESPUES DE USAR LA LAVADORA
USE DETERGENTE EN POLVO DE POCA ESPUMA
NO PERMITA QUE LOS NIÑOS JUEGUEN CON LA LAVADORA
26
Page 27

Registration Information
Thank you for purchasing this fine Avanti product. Please fill out this form and return it to the following
address within 100 days from the date of purchase and receive these important benefits:
Avanti Products, A Division of The Mackle Co., Inc.
P.O.Box 520604 – Miami, Florida 33152
Protect your product:
We will keep the model number and date of purchase of your new Avanti product on file to
help you refer to this information in the event of an insurance claim such as fire or theft.
Promote better products:
We value your input. Your responses will help us develop products designed to best meet
your future needs.
------------------------------------------------------ -(detach here)---------- ---- ---------- ---- ---- ---------- ---- ------- ------ --Avanti Registration Card
Name Model # Serial #
Address Date Purchased Store / Dealer Name
City State Zip E-mail Address
Area Code Phone Number Occupation
Did You Purchase An Additional Warranty As your Primary Residence, Do You:
Extended Own Rent
None
Your Age:
Reason for Choosing This Avanti Product:
Please indicate the most important factors
That influenced your decision to purchase
this product:
Price
Product Features
Avanti Reputation
Product Quality
Salesperson Recommendation
Other: ___________________
Friend / Relative Recommendation
Warranty
Other: ___________________
Comments:
under 18 18-25 26-30
31-35 36-50 over 50
Marital Status:
Married Single
Is This Product Used In The:
Home Business
How Did You Learn About This Product:
Advertising
In-Store Demo
Personal Demo
27
Page 28

VER-W798SS-1 – 2.0 03282011 PRINTED IN CHINA
28
 Loading...