

Page 1
/
WASHING MACHINE
OWNER S manual
MODEL NUMBER: W1092F
. .«.< II..
CAimON:
BEFORE USE, PLEASE READ AND FOLLOW ALL SAFETY RULES AND OPERATING
INSTRUCTIONS. SAVE THIS INSTRUCTIONS.
Avanti has a policy of continuous improvenent on :ts p'oc jets ard reserves the right to change
matefials and specifications without notice.
Avanti Products
P.O. Box 520604 * Miami. Florca 33152
www.avantiproducts com
''j-
Page 2

Warranty Information
Thank you for purchasing this fine Avanti product Please fill out/his card and return it within 100
days of purchase arxi receive thèse
importani benefits:
Confirm your warranty;
Your prompt product registration confirms your right to the protection availabie under the terms arvj
conditions of your Avanti warranty.
Protect your product:
We will keep the rrxxJel number and date of purchase of your new Avanti product on file to
help you refer to this information in the event of an insurarice claim such as fire or theft.
Promote better products:
We value your inpcft. Your responses win help us develop products designed to best meet
your future rteeds.
---------------
Name Model #
Address Date Purchased
City
Area Code Phone Number
E?M You Purchase An Additional Wafrantv:
C Extended ” None
State Zip Occupation
Beeson For Choosing This Avanti_Pnxluct;
Please irxficate the rrxjst important factors
that influenced your decision to purchase
this product.
Z Price
Z ProdLx:t Features
Z Avanti Reputation
Z Product Quality
Z Salesperson Recommendation
Z Frienc№etative Recommerxlation
Z Warranty
Z Other
______________________
(detach here)
Avarrti Registration Card
Z Home Z Business
How Did You Learn About Thb Product:
Z Advertising Z Product Features
Z in Store Derrx) Z Personal Denx)
Z Other_____________________________
Comments
--------------
As Your Primarv ResiderK*. Do You:
Z Own
Your Age:
ZunderlS z 16-25 Z 26-30
Z 31-35 Z 36-50 Z over 50
Marital Status:
Z Married Z Single
Is This Product Used In The:
________________
Serial #
Store/Dealer Name
Z Rent
i
Page 3

HELP US HELP YOU...
Read this guide carefuliy.
It is intended to help you operate arxi maintain your new
appliance property.
Keep it handy to answer your questkx^.
If you don't urxJefstand something or your need more
help, please call:
Avanti Customer Service
800-220-5570
Keep proof of original purchase date (such as your
sates slip) with this guide to establish the warranty
period.
Write down tiM model and serial numbers.
You'll find them on a plate located on the back wall of
the appliance.
Please write these numbers here:
Date of Purchase
Model Number
Serial Number
Use these numbers in any correspondence or service
calls concerning your appTiance.
If you received a damaged appTiance. immediately
contact the dealer (or builder) that sold you the
appliance.
Save time and money. Before you call for service,
check the Troubleshooting Gui^. IHists causes of
minor operating problems that you can correct yourself.
IF YOU NEED SERVICE
We're proud of our service and want you to be pleased.
If for some reason you are not happy with the service
you receive, here are some steps to follow for further
help.
RRST, contact the people wtx) serviced your appliance.
Explain why you are not pleased. In nrx)st cases, this will
solve the problem.
NEXT, if you are still not pleased, write all the details,
irduding your telephone number, and send to:
Customer Service
Avanti Products
10880 MW 30 Street
Miami, FL 33172
Page 4
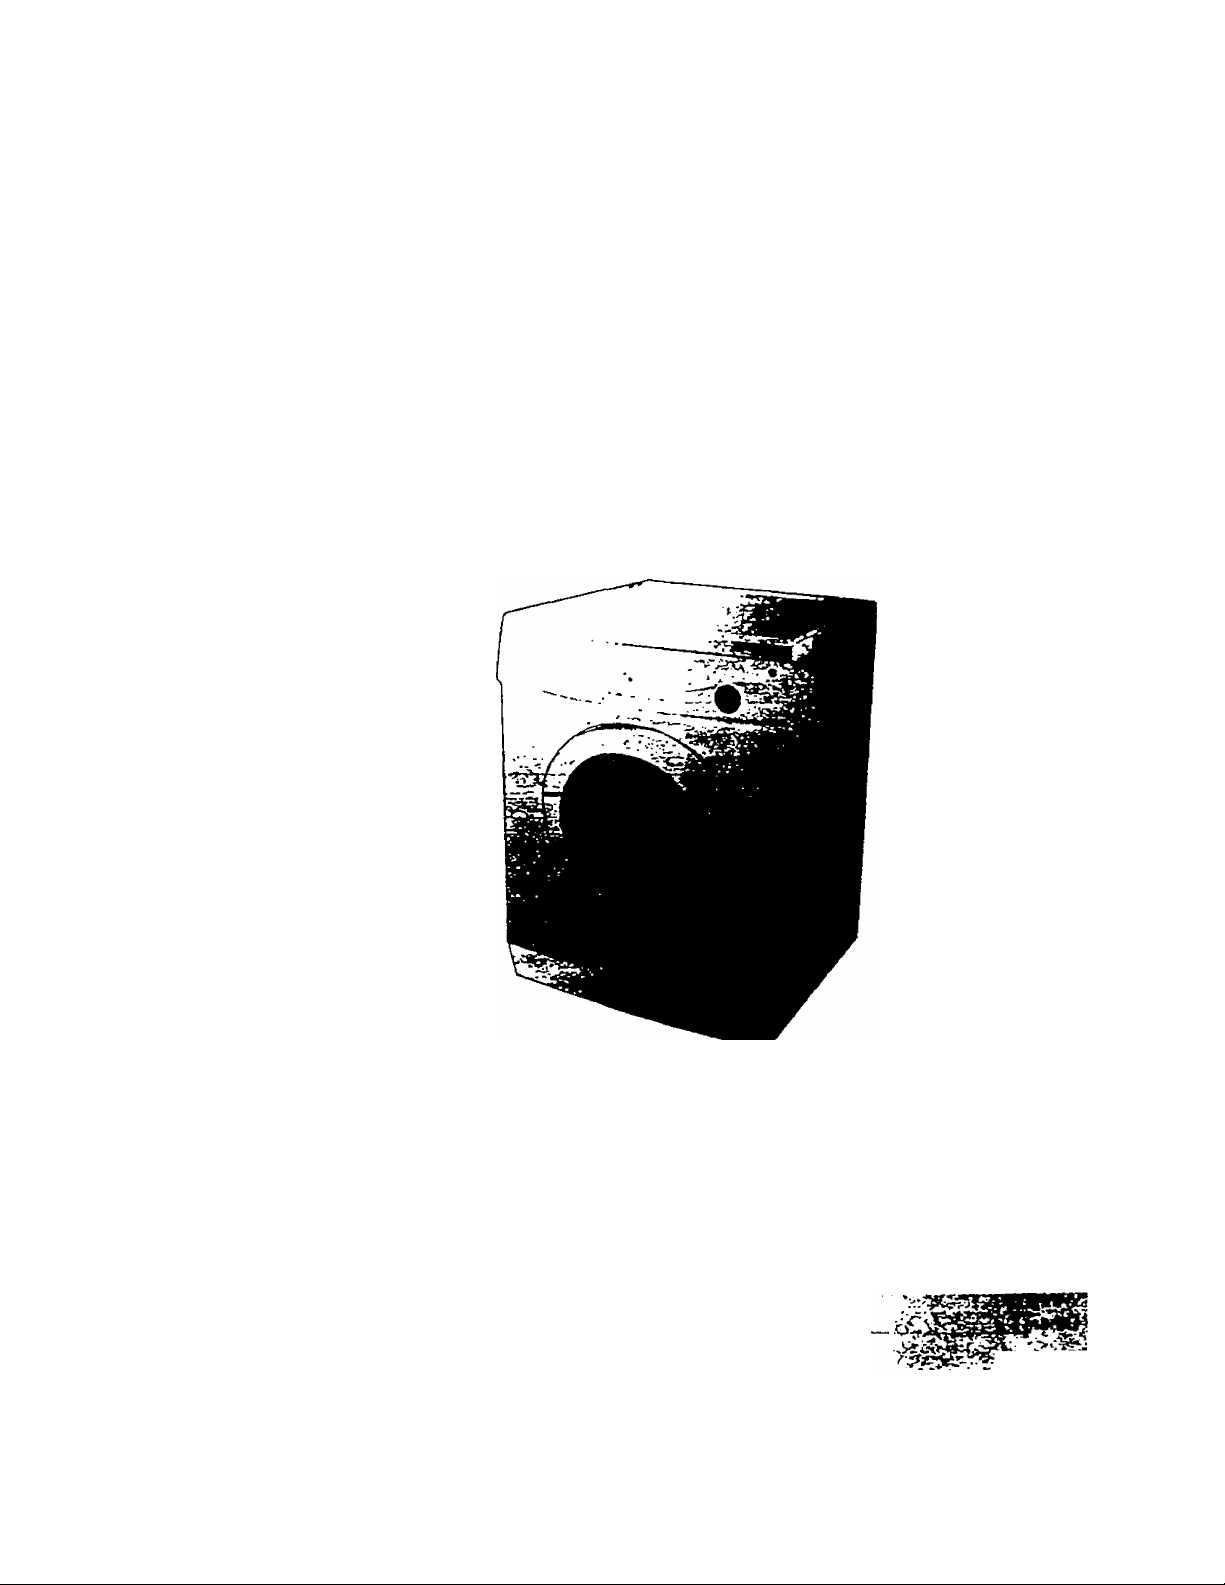
PARTS AND FEATURES
Worktop
Control panel
Detergent ]
drawer ^
Door
Base cover
Adjustable feet
.i.V''
CTaijB->-
Debris filter
Discharge Hose
Wrench
X.
supply
hose(Red)
Cold
Water
supply
hosa(Blue)
Bolt hole
covers
Page 5

TABLE OF CONTENTS
Warranty Information And Registration Card
Help Us Help You
Parts And Features
Important Safety Instructions
...........
3
4
6
installation Instructions
Before Using Your Appliance
Selecting A Location
Adjusting The Leveling Legs
Removing The Shipping Bolts
Connecting The Water Supply Hose
Positioning The Drain Hose
Electrical Connection .............................................
Control Panel
Operation Instructions
Washing For The First Time
Washing With Fuzzy Logic.......................................
Setting Prewash ......................................................
Washing Clothes Manually
Using Delay Start ............................
Washing Tps And Hints .........................................
Care And Maintenance
Troubleshooting Guide
Your Avanti Products Warranty....................................
Service For Your Washer
Parts Breakdown
Parts List
Wiring Diagram
................................................
...............................................
................................................
.......................................
...........................
...................................
............................
......................
..........................
....................................
.....
............
.........7
..........
.......
.......
..........
12
13. 14
.......
.......
17-22
17-22
6
6
6
7
7
8
8
9
10
10
10
11
11
11
15
16
16
23
Page 6

Important Safety Instructions
A WARNING M
• Read all insiructjons before using the appliance. '
• DANGER or WARNING: Risk of child entrapment.
• Child entrapment anc suffocation are not problems of the past. Junked or abandoned appftances are still
dangerous... even If they will 'just sit in the garage a few days/
• Before you throw away your old appliance: Take off the door so that children may not easily dimb inside.
• Never allow children to operate, play with, or crawl inside the appliance.
• Never dean appliance parts with flammable fluids. * The fumes can create a fire hazard or explosion.
• Do not place the washer in steamy rooms or where the washer is directly exposed to rain. Moisture may
destroy the eiectncai insulation causing an electrical shock hazard.
• During spinning, dort pot your hand in the spin basket; Because the spin basket is rotating at high speed,
rotating parts may injure your hand,
i#
• Do not store or use gasoline or any other flammable vapors and liquids in the vkanity of this or any other
appliance. The fumes can create a fire hazard or explosion.
-Save these instaictions-
To reduce the risk of fire, electrical shock, or injury when
using your appiiahce, follow these basic precautkyis:
INSTALLATION INSTRUCTIONS
> Before Using Your Appliance
• RerrxDve the exterior and interior packing.
• Check to be sure you have all of the following parts:
• Hot Water Supply Hose (Red)
• Cold Water Supply Hose (Blue)
• Drain Hose (Pump)
• Hose Guide
• Clean the interior surface with lukewarm water using a soft doth.
• Allow 5 inches of space between the back and sides of the appliance.
• Put your laundry into ir.e washer evenly. Uneven laundry may cause noise or vibration.
• Dont use excessively not water (50*C or more). Plastic parts may be deformed or damaged. Also, clothing
may be deformed or bleached.
• Before washing, check aJi pockets. If nails or pins remain in pockets, they may damage the washer or Rothes.
• Never splash water on the control panel.
• Plug the washer into an exdusrve properly instaJied-grourxled wall outiet Do not under any circumstances cut
or remove the third (ground) prong from the power cord. Any questions concerning power and or grounding
should be directed towa.": a certified elecinctan.
• 5 Plastic covers
• 1 wrench
• Instruction Manual
Selecting a Location
Before you install the wasnmg machine, select a location with the following characteristics:
• A hand level surface (if the surface is uneven, see Adjusting the leveling legs/ below.
• Away from direct sunlight. Direct sunlight may affect the acryitc coating, plastic and electrical components.
• Adequate ventilation
• Room temperature Lhai will not fall below O'C.
• Away from sources of neat sucn as coal or gas. Make sure that the washing machine does not stand on its
power cord. Ventilation ooenings .must not be. obstructed by carpeting when the washing machine is installed on
a carpeted floor.
Page 7
INSTALLATION INSTRUCTIONS
Adjusting The Leveling Legs
if the floor IS uneven adjust the legs (dc not insert pieces of wood, or any other objects under the legs).
• Loosen the leg bolt by turning it with your hand until it is at the desired height.
•Tighten the locking nut by turning it with the supplied wrench.
Place the washer on a sturdy flat surface.
If the washer is placed on an uneven or weak surface, noise or vibration occurs. (Allowable is 1 *)
Removing The Shipping Bolts
Before using the washing machine, you must remove the five shipping bolts from the back of the unit.
To remove the bolts:
• Loosen all bolts with the supplied wrench before removing them.
• Take each bolt head and pull it through the wide part of the hole. Repeat for each hole.
• Fill the holes with the supplied plastic covers.
• Keep the shipping bolts for future use.
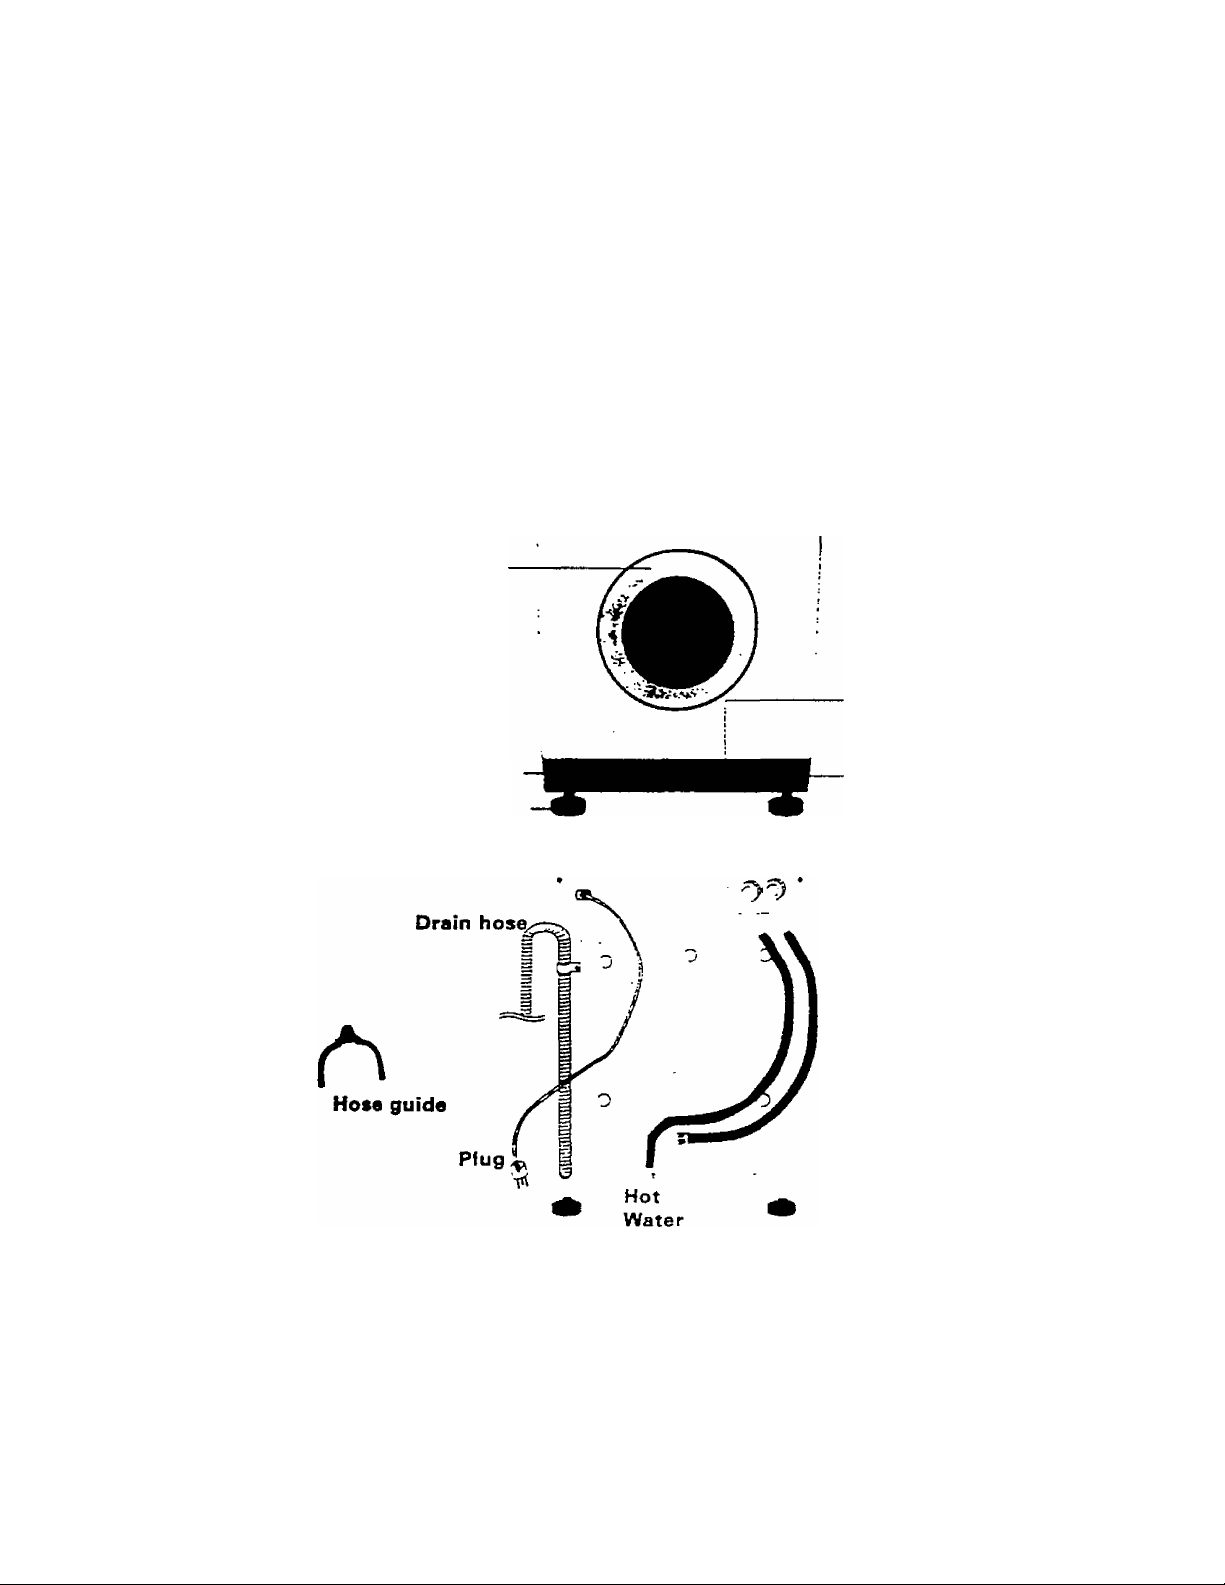
> Connecting The Water Supply Hose
The water supply hose must be connected to the washing machine at one end and to the water
faucet at the other. Do not stretch the water supply hose. If the hose is too short and you do not
wish to move the water faucet, replace the hose with a longer, high-pressure hose.
1. Connect the cold water supply hose (Blue) fitting with the L-shaped arm to the cold water .
supply intake (Blue) on the back of the washing machine and tighten manually.
2. Connect the other, end of the cold water supply hose at the washing machine end by
loosening the fitting, rotating the hose, and retightening the fitting.
3. Connect the hot water supply hose (Red) fitting with the L-shaped arm to the hot water supply
intake (Red) on the back of the washing machine and tighten manually.
4. Connect the other end of the hot water supply hose to your sink's hot water faucet and tighten
manually.
Page 8

> Positioning the Drain Hose
The end of the drain hose may be positioned in three ways:
Over The Edge of A Sink. ^
The drain hose must be placed at a height of between 2 ft. and 3 ft. To keep the drain hose spout bent,
use the supplied plastic hose guide. Secure the guide to the wall with a hook or to the faucet with a piece
of string to prevent the drain hose from moving.
In A Sink Drain Pipe Branch
The drain pipe branch must be above the sink siphon so that the end of the hose is at least 2 ft above the
ground.
in A Drain Pipe - ■
We recommend you use a 2 1/2 ft high vertical pipe; it must be no shorter than 2 ft and no longer than 3 ft.
The inside of the drain pipe must be wider than the diameter of the drain hose.
Warning
Improper use of the grounded plug can result in the risk of electrical shock. If the power cord is
damaged, have it replaced by an authorized Avand Products service center.
This appliance should be property grounded for your safety. The power cord of this appRance is equipped with a
three-prong plug which mates with standard three prong wall outlets to minimize the possiJiTrty of electrical shock.
Do iwt under any circumstances cut or remove the third ground prortg from the power cord supplied.
Use of extension cords is ret recommerxJed.
This appliance requires a standard 1 lS'l20vott, 60Hz electncaJ outlet with three-prong ground.
The cord should be secured behind the appliance and not left exposed or danglirtg to prevent accidentcii injury.
Page 9

CONTROL PANEL
1) Detergent Dispenser
Automatic dispenser holds detergent (J fabric softener and bleach 0.
2) Display Pane)
Indicates the remaining wash time and selected washing options.
3) Delay Start Button
Press this button repeatedly to cycle through lhe available delayed start options.
(From 1 hour to 24 hours in one hour increments).
4) Extra Rinse Button
Press the button when Extra Rinse is needed.
When you choose Extra Rinse, you will see the indicator lights up on the control panel.
5) Wash/Rinse Temperature Selection Button
Press the button repeatedly to cycle through the available water temperature options.
(WARM/COLD-WARM:WARM-HOT/COLD-COLD/COLD)
6) Cycle Button
Press the button repeatedly to cycle through the available partial wash options.
Wash-^Rinse-fSpin-*Prewash+Wash+Rinse'Spin-*Spin-'Rinse(1 time)+ Spin-»
Rinse(2 times)+Spin-*Rinse(3 times)+Spin
Note: prewash is or>ly available when washing Cotton, Perm Press or Délicates.
7) Fabrics Button
Press the button repeatedly to select one of the right available programs.
(Cotton-Perm Press-Oelicates-KniLWooO
8) Start/Pause Button
Press to pause ana restart programs.
9} Power Button
Press once to turn the washing machine on, press again to turn the washing machine off.
If the washing machine power is left on for longer than 10 minutes without any buttons being touched,
the power automatically turns off.
©
Page 10

OPERATION INSTRUCTIONS
> Washing For The First Time
Before washing clothes for the first time, you must run a complete cycle wi^out clothes. To do this:
1- Press the Power button.
2. Put a little detergent mic concartment II in the detergent drawer,
3. Turn on the water supply to tne washing machine.
4. Press the Start/Pause button.
This will remove any water remaining in the machine from the manufacture's test run.
Putting detergent in the washing machine:
1. Puli out the detergent drawer.
2. Add laundry detergent into compartment tl.
3. Add softener into compartment (if you desire).
4. Add liquid chlorine bleach into compartment i (if you desire).
Do not fill the softener and liquid bleach compartment above the MAX Fill line.
If using the 'Prewash* setting, measure 1 1/2 times the amount of detergent used for a normal
wash setting.
To add liquid detergent:
1. Remove the divider from its slot and insert it into compartment li.
2. Pour in the liquid detergent.
Liquid detergents and aelay star, (please see ‘Delay Start*.)
With delay start use a dosage container for liquid detergents, e.g. ball, otherwise the liquid detergent will run
slowly out of the soap dispenser and congeal. If this happens and there is a nasty smell, take dosage container
out of the drum at the end of the program.
With liquid detergents use the liquid insert in the soap dispenser. Also you can use dosage aids, e.g. dosage
or bags which are provided with the detergent.
> Washing With Fuzzy Logic
Your new washing machine makes washing clothes easy, using 'fuzzy logic* automatic control system.
When you select an automatic wasn program, the machine will automatically set the correct washing time
and rinse speed according to the weight of the clothes.
• To wash clothes using the fuzzy logic programs:
• Connect the power supply cord ic the outlet.
• Turn on your sink's water faucet.
• Press the Power button.
• Open the door and put the laundry into the washer.
•Add the detergent, softener, and cniorine bleach (if necessary) into the appropriate compartment.
NOTE: Prewash is only available when washing Cotton, Perm Press and Delicate garments.
It is only necessary jf your cotton clothing is heavily soiled, if you wish to use prewash,
please see 'Setting Prewasr,'.
Page 11

• Choose the Fabrics program to the type of clothes you are washing: Cotton, Perm Press, Délicates, KnrtAVool.
You will see the indicators light up on the control panel.
• At this time, you can control the water temperature of wash and rinse by .pressing the WASH/RINSE
Temperature button.
• Press the Starf'Pause button and the wash cycle will begin.
If you want to pause, press the Start/Pause button again.
When The Cycle Is Finished:
When 10 minutes passed after total cycle is finished, then power will turn off automatically.
• Press the Power button
• Open the door and remove the laundry.
> Setting Prewash
Prewash is only available when washing Cotton, Perm Press or Delicate dothes.
To use prewash.
• Load 1-1/2 times the amount of detergent into compartment II of the detergent drawer.
• Select the wash program (Cotton, Perm Press or Délicates).
• Press the Cycle button until the “Prewash" indicator lights up on the control panel.
• Press Start'Pause to begin the cycle.
> Washing Clothes Manually
You can wash clothes manually without using the fuzzy logic feature.
To do so:
• Turn on the water at the water source.
• Press the PowST button on the washing machine.
• Open the door and put the laundry into the washer.
• Put the detergent and. if necessary, softener or chlorine bleach in the appropriate compartments.
• Press the WASH/RINSE Temperature button to select the water temperature.
• Press the Extra Rinse button to select the Extra Rinse feature.
• Repeatedly press the Cycle button to select the'cycle you prefer,
• Press the Start'Pause bution and the machine will begin the cycle.
iYhen the cycle is finished:
• Press the Power button.
• Open the door and remove the laundry.
Note: The door will not open until 3 minutes after the machine stops or the power turns off.
The Door Locked indicator lights whenever the door of the washer is locked and unable to open.
- Using Delay Start
You can set the washing machine to start your wash from 1 to a 24 hours delay. To do this:
• Manually or automatically set your washing machine for the type of clothes you are washing.
• Press the Delay Start button repeatedly until the delay time is set.
• Press the Stari'Pause button. The delay start indicator wiii light, and the dock will begin counting down
until it reaches your start lime. (In hour increments)
• To cancel Delay Start, press the Power button, then turn the washing machíne on again.
Page 12

> Washing T7ds And Hints
Sort your laundry according to the following characteristics:
• Types of fabric care label symbol; Sort laundry into cottons, mixed ftbers. synthetics, silks, wools and rayon.
• Color: Divide whites and colors. Wash new, colored items separately.
• Size: Placing items of different sizes in the same load will improve ilje washing action.
• Sensitivity: Wash delicate items separately, using the Delicate wash program for pure new wool,
curtains, and silk articles. Check the labels on the items you are washing or refer to the fabric care chart.
Emptying pockets: Coins, safety pins and similar items can damage linen, the washing machine drum,
and the water tank.
Securing Fasteners: Close zippers and fasten buttons or hooks: loose belts or ribbons should be tied together.
Prewashing Cotton: Cotton. Perm Press. Delicate prewash are not normally necessary. Your new washing
machine, combined with modern detergents, will give perfect washing results, thus saving energy, time, water
and detergent. However, if your cotton is particularly dirty, use a prewash with a protein-based detergent.
Determining Load Capacity; Do not overload the washing machine or your laundry may not wash properly.
Detergent Tips: The type of detergent you use is based on the type of fabric (cotton, Perm Press, delicate
items, wool), color, wash temperature, degree and type of soiling. Always use 'low suds' laundry soap, which is
designed for automatic washing machines.
Follow the detergent manufacturers recommendations based upon the weight of the laundry, the degree of
soiling, and the darkness of the water in your area. If you do not know how hard your water is, ask you water
authority. ^^
Note: Keep detergents and additives in a safe dry place out of the reach of children.
'21?
WARNING:
To reduce the risk of fire, electric shock, or injury to persons, read the IMPORTANT SAFETY INSTRUCTIONS
before operating this appliance. •“
Fabric Care Chart
C/ Rasiitsni
u D« licit • fabric
Vii/ ttim miy b« wi«h*d at 95*C
Ram may ba watbad at 60*C
flam may ba *a*had at *C*C
/ tiam may ba .»ijhaO at 30*C
Ram may ba nanb wajhad
e/
Dry elaan only
^ Cn
ba blaacRad in cold watar
©
/FJ Dry oaan >aiTr aviation fual.
rzi
f ' Dry flat
|lll ! Can ba hung to dry
Can ba ironac a: 1D0*C max
Oo not iron
Can ba dry ciaanad using any
^ oaan wftTi parchtorida. tightar
tual. burs aiconot or R113 oobr
pura itconot or Ri‘3 only
Do not aiy eiaan
u Dry on dotbas nangar
Do net btaacn
A
Tgmbia dry, normal ftaai
' f * * * \ Can ba iforae a: lOO'C mu
ba <rona<] at 150*C ma*
Tum№a dry. raOucad bait
□
Do not tumtM dry
Page 13

CARE AND MAINTENANCE
Draining The Washing Machine In An Emergency
Unplug the washing machine from the power supply.
Remove the base cover by using a screwdriver to pry it off and unscrew Hie discharge hose by
turning It counterclockwise '
• Grip the cap on the end of the discharge hose
and slowly Dull it out about 3 inches and allow all the water to flow into a bowl.
• Reinsert the discharge hose cap and turn it clockwise.
• Replace the base cover.
> Repairing A Frozen Washing Machine .
If the temperature drops below freezing and the water in your washing machine is frozen.
• Unplug the washing machine.
• Pour warm water on the source faucet to loosen the water supply hose.
• Remove the water supply hose and soak it in warm water.
• Pour warm water into the washing machine drum and let it sit for 10 minxes.
• Reconnect the water supply hose to the water faucet and check if the water supply and drain
operations are normal.
___________
> Cleaning the Exterior
•Wipe the washing machine surfaces, including the control panel, with a soft cloth and non-abrasive
household detergents.
• Use a soft cloth to dry the surfaces.
• Do not pour water on the washing machine.
Cleaning The Detergent Drawer
■ Press the release lever on the inside of the detergent drawer and pul! it out.
Remove the caps from compartment ®and 0.
Wash all of the parts under running water.
Clean the drawer film with an old toothbrush.
Reinsert the caps (pushing them firmly into place) and replace the liquid detergent divider into the drawer.
Push the drawer back into place.
Run a rinse program without any laundry in the drum.
Page 14

Cleaning The Debris Filter
Clean the debris filter 2 or 3 times a year.
• Remove the base cover from the front of the washing machine.
• There may be water remaining in the tub overflow. Unplug the discharge hose to eliminate any excess
water. Be sure to place a pan under the hose to prevent water from spilling on your floor.
• After the water has been drained plug the discharge hose and put It back it into its place.
• Unscrew the filter cap and take it out.
• Wash any dirt or other material from the filter. Make sure the drain pump propeller behind the filter is not
blocked. Replace the filter cap.
• Replace the base cover.
i t
3:=
> Cleaning The Water Hose Mesh Filter
You should clean the water hose mesh filter once per year, or when you see the following error message
on the display:
To do this: _
• Turn off the water source to the washing machine.
• Unscrew the hose from the back of the washing machine.
• With a pair of pliers, gently pul! out the mesh fitter from the end of the hose and rinse it un^er water until
clean. Also dean the inside and outside of the threaded connector.
• Push the filter back into place.
• Screw the hose back onto the washing machine.
• Turn on the faucet and make sure the connections are watertight.
Page 15

ёштг^-
PROBLEMS WITH YOUR WASHER?
You can solve many common appliance problems easily, saving you the cost of a possible service call Try the
suggestions below to see if you can solve the problem before calling the servicer.
TROUBLESHOOTING GUIDE
PROBLEM
Washer does not operate.
No water or insuffident water supply.
'■ ■■ * ■—■“
Detergent remains in the detergent drawer
after the wash program is complete.
The washing machine does not drain and/or spin.
------------------------------------------------------------
! POSSIBLE CAUSE
1 Not plugged in.
The circuit breaker tripped or blown fuse.
Door is not dosed.
, Make sure the water source is turned on.
1
The water source faucet is not turned on.
The water source hose Is frozen.
The water intake hose is bent.
The filter on the water intake hose is clogged.
The washing machine is running without
sufficient water pressure.
The drain hose is squashed or bent
The water hose mesh filter is clogged.
1
Washing machine vibrates or is too noisy.
Check to assure that the washer is level.
1
j
The shipping bolts were not removed.
1
The washing machine is touching another object.
The laundry load is not balanced.
Understanding error messages
Error displayed Solution
•Close the door.
• Make sure the source water faucet is turned on.
• Check the water pressure.
• Clean the debris filter.
KE2
KE4
• Make sure the drainage hose is installed correctly.
Laundry load is unbalanced; loosen any tangled laundry.
/
Only if one bathrobe or jean needs washing at one time,
final spin result might not be good and 'E4" error message
will be show in the dispjay window.
Й5)
Page 16

YOUR Avanti Products WARRANTY
WHAT IS COVERED
LIMITED ONE-YEAR
WARRANTY
Staple your sates receipt here. Proof of original
purchase date is needed to obtain service under!
warranty. j
LIMITED 5 YEAR WARRANTY ON
PLASTIC TUB
For one year from tne date of purchase by the
onginal Owner, AvanD Products will, at rts option,
repair or replace any part of the appliance that
proves to oe defecrve in material or wohunanship
under norma! use. During this period Avanti
Producs will provide ail pars and labor necessary
to correc such défera free of charge, so tong as
the appliance has been installed and operated in
accordance with the written instructions in this
manual. In rental or commerciaJ use, the warranty
period is 90 days.
Incidental or consequential damages.
• Sendee calls to;
• Correct the installation of your washer.
• instruction on how to use your washer,
• Replace house fuses or incorrect house wiring
or plumbing.
• Repairs performed by unauthorized servicers.
• Repairs when your washer is used in other than
normal, single-family household use.
After one year and until five years from dale of
purchase, Avanti will furnish a replacement plastc
tub. wnicn :s defective ;n matenal or worVmanship,
You will oe c-arged for labor.
LIMITED 7 YEAR WARRANTY ON
STAINLESS STEEL TUB
After one year and untfl seven years from date of
purchase, Avanti will furnish a replacement
stainless steel tub. which is defective in material or
wortomanship. You will be charged for labor.
WHAT IS NOT COVERED
• Service calls that are related to external problems,
such as abuse, misuse, inadequate electrical power,
accidents, fire, floods, or acts of God.
• Failure of ihejiroduct if it is used for other than its
intended purpose.
• Pickup, and delivery. Your washer is designed to be
repaired in the .home.
• Repairs caused by unauthorized modifications made
to the appliance.
• This warranty does nc* apply outside the Continental
U.S.A..
SERVICE FOR YOUR WASHER
We are proud of our customer service organization and the network of professional service technicians that
provide service on your Avanti appliances. With the purchase of your Avanti washer, you can have the
confidence that if you ever need additional information or assistance, the Avanti Products Customer Service
team will be here for you. Just call us toll-free.
AVANTI PRODUCTS CUSTOMER SERVICES
i Produa ¡nforrnation
j 800-323-5029
!
j Part Orders
1 800-220-5570
!
1
f
f
In-Hcme Repair Service’
80O22C-5570
; I
Whatever your questions are about rur prooucs. help .s available.
I
You may order parts and accessories mat will be |
1 delivered directiy to your home. j
I You may order these items by personal check, !
: money order. Master Card, or Visa. |
An Avanti Products authorized service cente.*' will provice expert 1
j repair service, scheduled at a time that is convenient for you. j
Our trained servicers know your washer inside and out. j
0
I
i ■
Page 17

Parts Breakdown
Page 18

(PartCodft CobeNo
NO
1
I
WC001
211 WCCC2I! DC6:-3G348A
3 j WCD03 j OC61-60496A 1
4
j WC005
i WC006
1 5
t
; WC001
6
j
WZ001 : 6002-000445
7
WB001
8
WZ001
9
j DC97-00691K
1
I DC61-1C6S7A
t (X97^1160A
(
i CX:S7^1091G
1
MF-P1092HMD1
CX:80-20049A 3
“i :—,
jOly
1 uescnpoon
[ 1
j
ASSY-PANEL FROf'TT
1
i 1
j
BODY-ORAWER
GUIDE-UOUID
1
CAP-RINSE
1
1
; 1
! ^
1 1
ASSY-COVER DRAWER
I
assy-panel CO^П7íOL
SCREW TAPPING
1
ASSY PCS PARTS
SCREW TAPPING
Parts List
[ A ^ ^
1 Specnicaoon
PANEL-DRAWER^ INLAY
PP.WHT-
ABS
PP.WHT
PI092.PP/BLEACHOASE
ENG. W1092F/A VANTI
TH.-2S.M4.Ll a,NTRSTS304
W10S2F
PH.+2.D4112
Remarti ^
UGKT-GRY
—1
!
1
i
WC004 DC97-00417A 1
10
11
12
13
14
15
16
17
18
19
20
WC006
W2D01
WCO07
wcooe
WC009
VVCOlO-
VVC011
W2008
WZ016
WC012
1
i
!
i
1
DC9M20eSA 1 ASSY-HOUSiNG DRAWER
DCe0-,2004GA 1
DC61-00055A
DC6KXX)13A
0C8HX057A 1
OC66-00016A 1
DC97-00100A 1 ASSY-HINGE
DC6C-60G25C
D060500iaA
DC97<Xj7C2A
)
i
1
I
i
1
ASSY-FRA^E PLATE(U)
SCREW TAPPING
1
COVER-OOOR
1
DOOR-GLASS
HOLJDe=l-GLASS
LEVEROOOR
WASHER-PLAIN
2
j
i
1
\
t
i
j
1
NUT-FLANGE
2 1
ASSY-FRAME FRONT
1
1
!
1
1
FRAME-PLATE(U)
PH.-2D4,L12
ABS.WHT.DANBY
GLASS.NTR
ASSìHG-0760).WHT;3ANBY
POM,NrTRDANBY
NV+CR
PVC.tD6.S.OOlO,Tl
M5XP0.8.FZY.MSWR10
ROUND-TYPE
j
i
1
1
i
T
i
I
1
1
i
!
1
t
Page 19

*S
Parts Breakdown
4
Page 20

Parts List
; NO j Part Code Code No \ Q'ty '
X9M 207SA; 1
■DCci-20219A . 1
GC97-00850A ' 1
E t
\ DC6O40138A
; DC6C-60040A
DC66-60154A
DCcS-60i 25A
: DC62-;0305A
DC6ÌM0140A
DC6&-*0132e
DC62-10303A 1
0C66-601S3A
OC6M01768
0C6CF60049A j 1
DC6C-501488
DC66-10139B
DC61-00041A
DC31-00002D
DC6C-50156A
DC65-50118F
DC52-10304A
DCS 1-60497A
DC52^184A
DC6M 0676A
DC61-00140A
0C61-303468
DC6l^iC3488
DC62-2C311A j
DCS:-’2231A j
DC62-40133A I
DCc1-50499B
DC97-C0214G
DC6l^C520A
25
26
27
28
¡29
Ì30
i
|31
'32
33
34
; 2
Ì3
i 6
: 7
; 8
9
10
11
12
13
14
15
16
17
18
19
20
21
22
23
24
WD001
WDD02
WOD03
4
WD004
5
W2008 : DC60Ó00448I 6
WZ009
1 WDD05
1 WZ010
WD006
WZ011
W2012
WD007
WD007
WD006
WZ014
WZ013
WD008
W0008
WDD09
WZ013
W2010
WDO10
WZ015
WDOll :
WD009
WDD22
WD013
WDD14
WDD17
WD018 ;
WD019 1
WD020
- WDD21
WD020
I
j
Description
1 i ASSY-WIRE DIAPHRAGM ■ FRAWE-^OT
1 ; door-diaphragm j epom.gry
ASSY-CLAMP DIAPHGRAM ; TUB
I
; 3
I BOLT-W.MOTOR
I WASHER-PIAJN
1 3
! WASHER-NYLON
1
' WEIGKT-BALANCER(L)
1
• BAND RING
j
' HOSE-DRAWER TUB
BOLT-HEX
2
1
BOLT-FLANGE
1
HOSE-AJR
WEIGHT-eAlANCER(U)
'
PULLEY
WASHER-SPRING
NUT-HEX -
>
BELT-TRANSMISSION
1
1
CUSHION-MOTOR
1 _
MOTOR-DRUM
NLTT-HEX
1
1
SAND RING
1
HOSE-RLTERTUB
1
CLAMP-HOSE
1
PACKING-TRAP
1
CAP-TRAP
1
CAP-TUB
TUB-FRONT
1
8RACKET-NLfT
5
1
VANE-CHECK
ASSY-DRUM
1
PACKING-TUB
1
CUP-TUB
8
ASSY-TUB BACK
1
CUP-TUB
1
! SM1X.HEX.M8.L52
i
! S3C.1D8 4.0030,13
; lDi0.5.OC32.T2.-.PSSP-1y2H
CONCHE I ¿.LOWER
. HSWR.YELW38.5.T2.4
I
' EPDMJ03S.3UCL158
WEIGHT-UUSM1XJHEXJW8.L147
M8.L2102PC2iYa).SS4lC
EP0M.ID24.BLXJ.1»
CONCRETEUPPER
ALDC.-.D297.I012.5
ID10.5.0018.T2.5.-.SIR
SM2X(NYLON).M1 2.-.-2PC3(YEL)
RUBBEaPOLY-VJ5,
BUTYUD1&OO20
100-120V.5(V60HZ.61MM
SM1X.-.M8.-2PC2(YELV28X18^.
PW1.YEL-.P133 •
EPDM.1D€5.3LK,L151
HSWR.lD7CraC75.3(TUB)
EPDM.3LK
PPfTB53)
EPDM,BU<.SQ1291
FRPP(GR30“'<.).rvORY
I SBHG-R.T3.
! E?DM,3L<
\
! 1000“=11'XRFMST3
I EPOM.SIA
HSWR
BACK/LOW-RPM
P'ATE-TYPE
Spedflcatkxi
Remarti
Page 21

Parts List
Ino
.[ PartCoòe
! .
WAÛ06 ■ X96^173A
WA007
1 2
i Code No
, X96-00174A
1 3 WCD12 j X97-007Cf2A
1
WE005 j X6Î-60142A
i ^
t
WADOl
; 5
6
(
WCD04
1 WE004
! X61-2C205B
DC97-00417A
X6M03nA
a WA002 DC32‘30006P^
W2015 X61-603S90
9
10 WED05
11
WED06
W20n
12
W2011
i 13
WED07 X66-6C149A
1
15 WEOOà I
X61-40345A 1
OC6M0672A
X6ÌM0144A
ocecMtùiA
X6M 0673A
j n 1 f
1 Descnpoon
jCtty
(
i ASSY-M.WIRE HAflNESS
! 1
i 1
j ASSY-WIRE harness SUB
1
I 1
I 1
1 1
! 1
ASSY-FRAME FRONT
GUIDE-LEVER
OOOR-LXK SW
ASSY-FRAME PLATE(U) FRAME-PLATE(U)
1
! HOSE-PRESSURE
SENSOR PRESSURE
1.
CLAMP-HOSE
BRACKET-PRESSURE
1
COVER-FRONT{L)
SOLT-HEX M10.L41.2PC2iYEL).DAMPER
2
BOLT-HEX
2
1 OAMPER-SHXK
2
1 CAP-DRAIN
HOT*COLD "
ROUND-TYPE
POM.WHT
1 EPDM,1D13.5.BLK
DN-S 14.TERMINAL-TYPE(0C5V)
HSWfl
GlwGATl
PP(BJ-730).WHT
M1XÆ) AMPER.HEX.M8.L66
SON
PPfTBS3).WHT
SpedAcation
Remark
-
16 WD108 j
17
WA003 1 X96-001490
X62-103C2A
IS WE005 1 X9M2292A
19 WED09
i 20
W2010 ' X65-601253
21 ! W2005
WA001
22
23 WAD02 1
24
VVED10 1 DC6U70217C 2
X99-0006tA
X97-00139B
X90-00038Ê
X29-90001A
25 WEDIO 1 X61-70216C
! 26
WEDi 1
X61-60180A 1
WA009 X62-3C309J ;
WAOOS XS2-3C31CR 1
i^'i
28 1 W2015 ; X61-600638
29 WED12 !
WED12
29
j
1
i 30
31
31
WCD13 ;
W2007 ,
W2007 I
_1
X62-10068A 3
X62-10287A
X97-00a5!A Î
X97H31296A
X97-012988
Ì
1 HOSE-ORAIN
EP0M.t05.5.BLK.L220.009.5
1 ASSY-PUMP DRAIN "*120V/60H2
4
ASSY-LEG
1 ASSY-PAINT FRAME
BAND RING
’
1 ASSY-HOSE ORAIN(O)
1
ASSY-POWER CORD
1 RLTER-EMI
SPRING-HANGER
FkC/P->-HOLE-LOWER
HSWR.YELPI25.T2.4
PP(BB110)2200
125V/13A/EP3
FA-215T2-D^50V15A.50/60H2
HSWR.C03^.-.L175
1 SPRING-HANGER SWR.C03.5.-.L175
SLEEVE-PLUG
3
!
, i
1 i
1
1
VALVE-WATER
CLAMP-HOSE
6
HOSE-DRAWER
1 HOSE-DRAWER
1
)
"1
ASSY-HOSE WATER
ASSY-COVER TOP 1
ASSY-HOSE WATER
valve-water j
NYLON#6..NTH
#187.EAT0N{C0LD)
#l87.(HOTi
SK5.-.YEL
SOFr-PVC.IDlO.NTR,L3SO
PVC,1010.NTR
j
WOOD/Vmr*GRAY-XT
W751 SC, 1.5MT<METEiVCOUD
W7S1 SC. 1.5MT/METERM3T
f
OPTION
OPTION
Page 22

Parts Breakdown
Page 23

Wiring Diagram
i
 Loading...