

Page 1
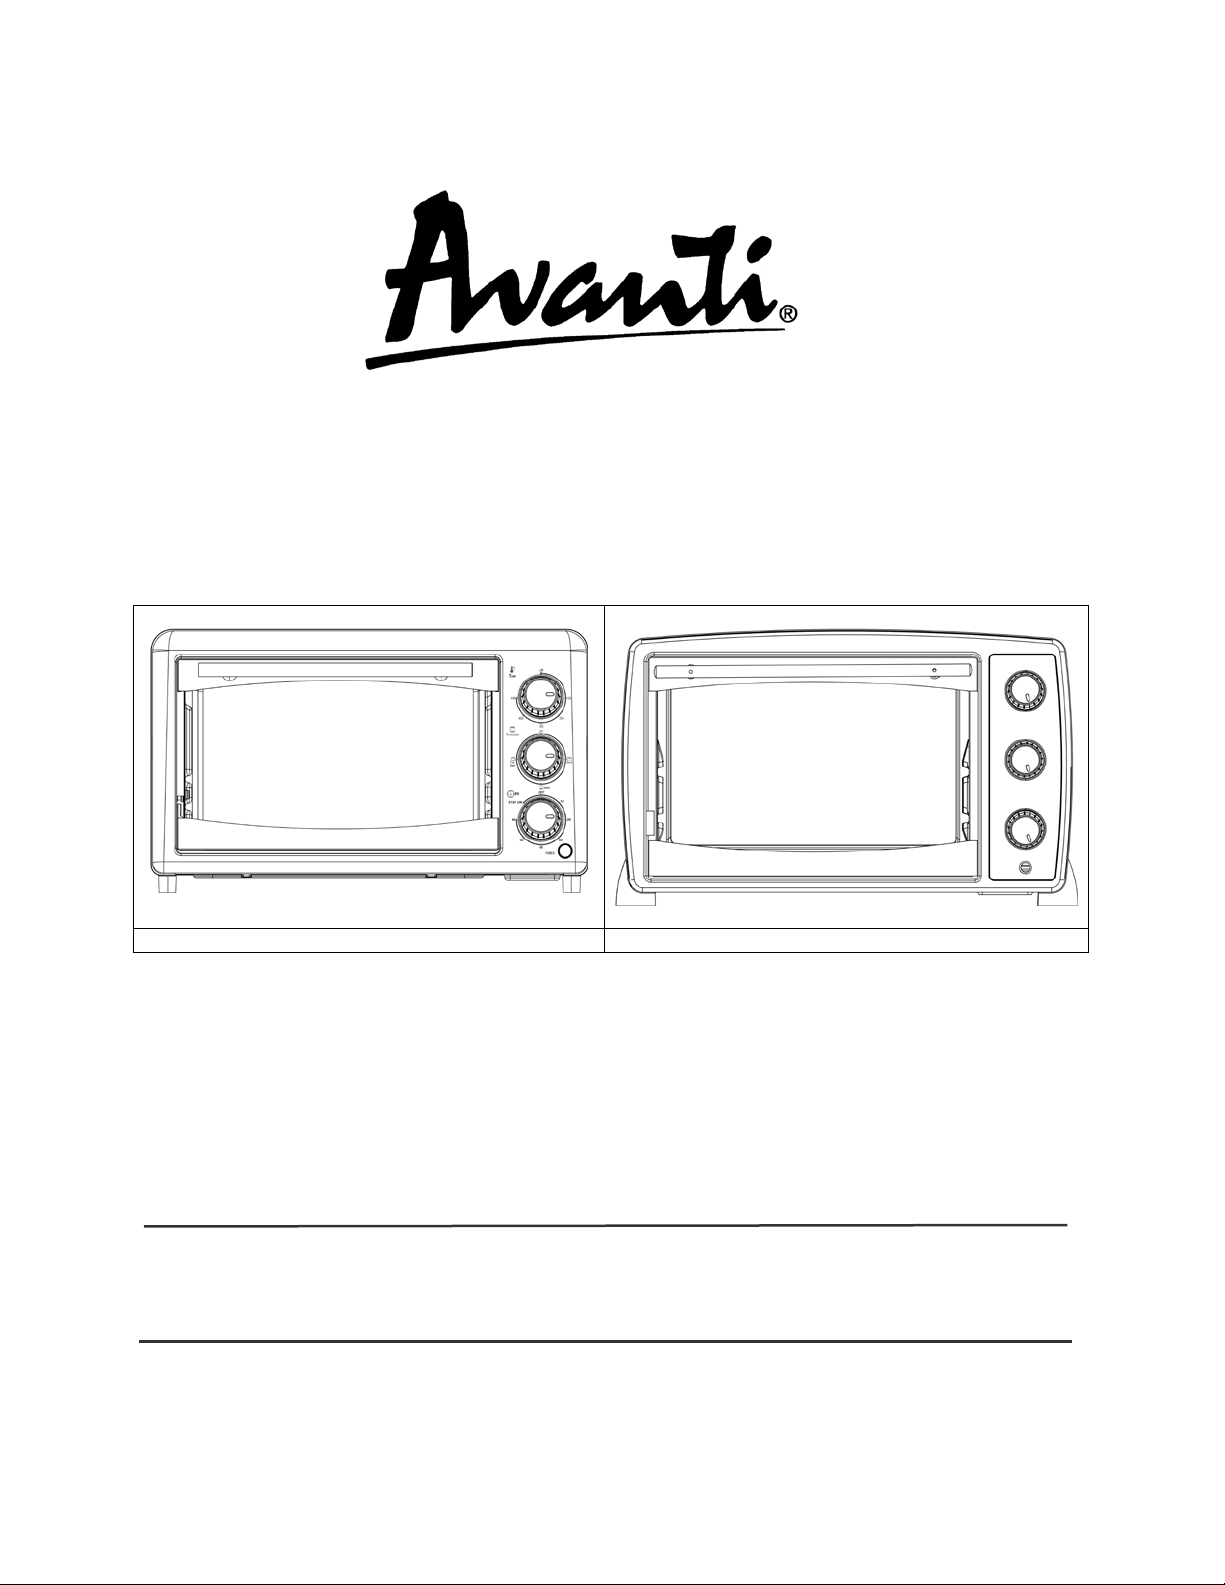
MODEL: PO61BA
MODEL: PO81BA
TOASTER OVEN / BROILER
TOSTADOR-ASADOR / HORNEADOR
INSTRUCTION MANUAL
MANUAL DE INSTRUCCIONES
Model Numbers / Nos. de Modelos:
BEFORE USE, PLEASE READ AND FOLLOW ALL SAFETY RULES AND OPERATING
INSTRUCTIONS.
Avanti has a policy of continuous improvement on its products and reserves the right to change materials and specifications without
notice.
La sección en español empieza en la página 14.
P.O. Box 520604 - Miami, Florida 33152
Avanti Products LLC
www.avantiproducts.com
Page 2

2
Page 3

TABLE OF CONTENTS
Important Safety Instructions
4
Help Us Help You
5
Parts and Features
6
Installation Instructions
7
Before Using Your Appliance
7
Installation of Your Appliance
7
Electrical Connection
7
Operating Your Appliance
8
Control Panel
8
Using Your Oven
9 – 10
Care and Maintenance
11
Cleaning Your Appliance
11
Storing Your Appliance
11
Troubleshooting Guide
12
Service for Your Appliance
12
Your Avanti Products Warranty
13
Instrucciones en Español
14 - 17
Registration Information
19
3
Page 4

IMPORTANT SAFETY INSTRUCTIONS
To reduce the risk of fire, electrical shock, or
basic precautions:
When using electrical appliances, basic safety precautions should always be followed including
READ ALL INSTRUCTIONS, PRODUCT LABELS AND WARNINGS BEFORE USING THE
- SAVE THESE INSTRUCTIONS -
WARNING
injury when using your appliance, follow these
the following:
APPLIANCE.
• Do not touch hot surfaces, use handles or knobs. Always use oven mitts when handling hot materials
and allow metal parts to cool before cleaning. Allow the unit to cool thoroughly before putting in or
taking off parts.
• When the unit is not in use and before cleaning, unplug the appliance from the wall outlet. Make sure
the appliance is turned off before unplugging.
• To protect against risk of electrical shock, do not immerse the appliance in water or any other liquids.
• Don’t leave children alone or unattended where the appliance is hot or in operation. This appliance is
not designed to be used by children.
• Never use your appliance for heating the room. Your oven is not designed to heat your kitchen.
• Do not operate this or any appliance with a frayed or damaged cord or plug, after the appliance
malfunctions, is dropped or has been damaged in any manner.
• Do not use attachments not recommended by the manufacturer; they may cause fire, electric shock
or personal injury.
• Do not use outdoors or for commercial purposes.
• Do not use this appliance for other than its intended use.
• Do not let the cord dangle over the edge of a tabletop, countertop or to touch hot surfaces.
• Do not place the appliance near a hot gas, electric burner or in a heated oven.
• Extreme caution should be used when using containers constructed of other than metal or glass.
• A fire may occur if the appliance is covered or touching flammable materials, including curtains,
draperies, walls, etc., when in operat ion. Do not store an y items on top of the appliance when in
operation.
• Do not store any materials, other than manufacturer’s recommended accessories in this unit when
not in use.
• Do not place any flammable materials in the appliance, such as paper, cardboard, plastic or any
materials that may catch fire or melt.
• Never clean the appliance with flammable liquids. The fumes can create a fire hazard or explosion.
• Do not cover the appliance with metal foil. This will cause overheating of the appliance.
• Oversized foods or metal utensils must not be inserted in the appliance as they may create a fire or
risk of electrical shock.
• Do not clean with metal scouring pads. Pieces can break off the pad and touch electrical parts
involving a risk of electrical shock.
• When broiling, use extreme caution when removing tray or disposing of hot grease.
• To turn this appliance off, return all controls to the “0” / “OFF” position, then remove the plug from
wall outlet.
• Cooked food can be very hot, especially pastry filling. Handle with care.
• Never pick up a flaming pan. Turns the controls off. Smother a flaming pan on a surface unit by
covering the pan completely with a well fitt ing lid.
• Do not use water on grease fires. Flaming grease outside a pan can be put out by covering it with
baking soda, multipurpose dry chemical, or fire extinguisher. Flame in the oven can be smothered
completely by closing the oven door and turning the oven off or by using baking soda, multipurpose
dry chemical, or fire extinguisher.
This Unit Is For Household Use Only
4
Page 5

HELP US HELP YOU...
Read this guide carefully.
It is intended to help you operate and maintain
your new appliance properly.
Keep it handy to answer your questions.
If you don't understand something or you need
more assistance, please call:
Avanti Customer Service
800-220-5570
Keep proof of original purchase date (such as
your sales slip) with this guide to establish the
warranty period.
IF YOU NEED SERVICE
We're proud of our ser vice and want you to be
pleased. If for som e reason you are not happy
with the service you receive, here are some
steps to follow for further assistance.
FIRST, contact the people who serviced your
appliance. Explain why you are not pleased. In
most cases, this will solve the problem.
Write down the model and serial numbers.
You'll find them on a label located on the back
side of the unit.
Please write these numbers here:
____________________________________
Date of Purchase
____________________________________
Model Number
____________________________________
Serial Number
Use these numbers in any correspondence or
service calls concerning your appliance.
If you received a damaged appliance,
immediately contact the dealer (or builder) that
sold you the appliance.
Save time and money. Before you call for
service, check the Problem Solver Guide. It lists
causes of minor operating problems that you
can correct yourself.
NEXT, if you are still not pleased, write all the
details, including your telephone number, and
send it to:
Customer Servic e
Avanti Products
10880 NW 30 Street
Miami, FL 33172 USA
5
Page 6
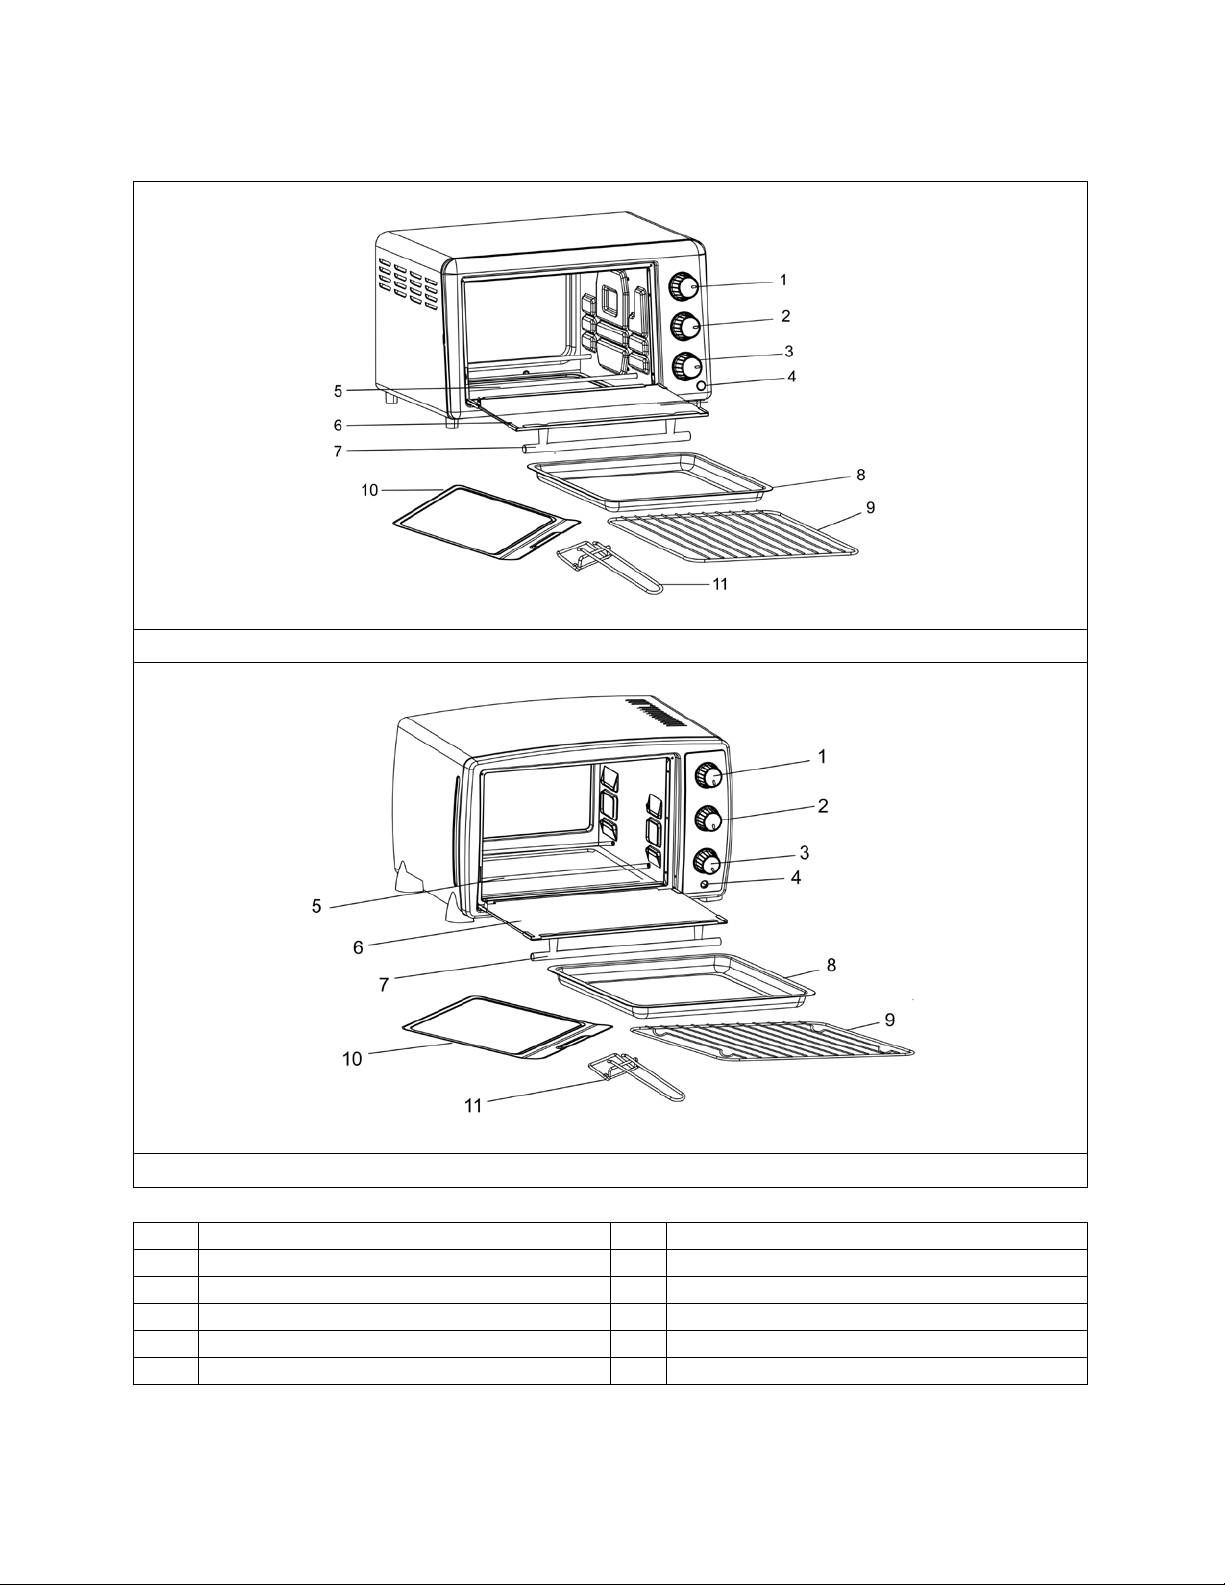
MODEL PO61BA
MODEL PO81BA
1
Temperature Control Knob
7
Handle
2
Function Control Knob
8
Broiling Pan
3
Timer Control Knob
9
Wire Rack
4
Power Indicator Light
10
Crumb Tray
5
Lower Heating Elements
11
Tray Removal Handle
6
Glass Door
PARTS AND FEATURES
6
Page 7

INSTALLATION INSTRUCTIONS
NOTICE
°
THIS PROCESS.
Before Using Your Appliance
• Remove the exterior and interior packing.
• Check to be sure you have all of the following parts:
• 1 Bake/Broil/Drip Pan
• 1 Oven Rack
• 1 Crumb Tray
• 1 Tray Handle
• 1 Instruction Manual
• Remove all the items inside your oven and clean the interior surface with lukewarm water using a soft
cloth.
• Do not attempt to repair or replace any part of your oven unless it is specially recommended in this
manual.
• This appliance requires 1200W (Model PO61BA) or 1500W (Model PO81BA) and should be the only
appliance operating on the circuit.
BEFORE YOU USE THIS OVEN FOR THE FIRST TIME: THE HEATING ELEMENTS HAVE A
PROTECTIVE COATING, WHICH MUST BE BURNED OFF BEFORE USE. TO DO THIS, OPEN
THE OVEN DOOR AND SET THE TEMPERATURE TO 465
SWITCHED ON FOR APPROXIMATELY 15 MINUTES. IT IS IMPORTANT TO ENSURE
ADEQUATE VENTILATION DURING PERIOD AS A BURNING SMELL IS NORMAL DURING
F. LEAVE THE APPLIANCE
Installation of Your Appliance
Select a location for the appliance. The location should be in an open area on a flat counter where the
plug will reach an outlet.
• When positioning the appliance, it should be set on a flat, steady surface.
• Do not block air vents. If they are blocked during operation, the oven may overheat and eventually
cause the appliance failure.
• Keep the appliance away from hot air, steam or splashing liquids when choosing a place to locate it,
otherwise, the unit’s operation may be adversely affected, causing it to break down.
• Direct sunlight may affect the acrylic coating and heat sources may increase electrical consumption.
• Plug the appliance into an exclusive properl y insta lled gr ound ed wal l outl et. Any questions
concerning power should be directed toward a certified electrician or an authorized Avanti Products
service center.
• Do not place anything on the top of the broiler oven and automatic toaster.
• Keep the appliance at least 5 inches away from rear wall to ensure the proper ventilation.
Electrical Connection
• The appliance has a polarized plug (One blade is wider than the other), to reduce the risk of electric
shock, this plug is intended to fit into the polarized outlet only one way. If the plug does not fit fully
into the outlet, reserve the plug. If it still does not fit, contact a qualified electrician. Do not attempt to
modify the plug in any way.
• A short power cord is provided to reduce the hazards resulting from entanglement or tripping over a
longer cord. An extension cord may be used with care, however, be sure the marked electrical rating
is at least as great as the rating of this appliance. The extension cord should be positioned such that
it does not drape over the counter or tabletop where it can be pulled on by children or tripped over.
The electrical rating of this appliance is listed on the bottom panel of the appliance.
7
Page 8
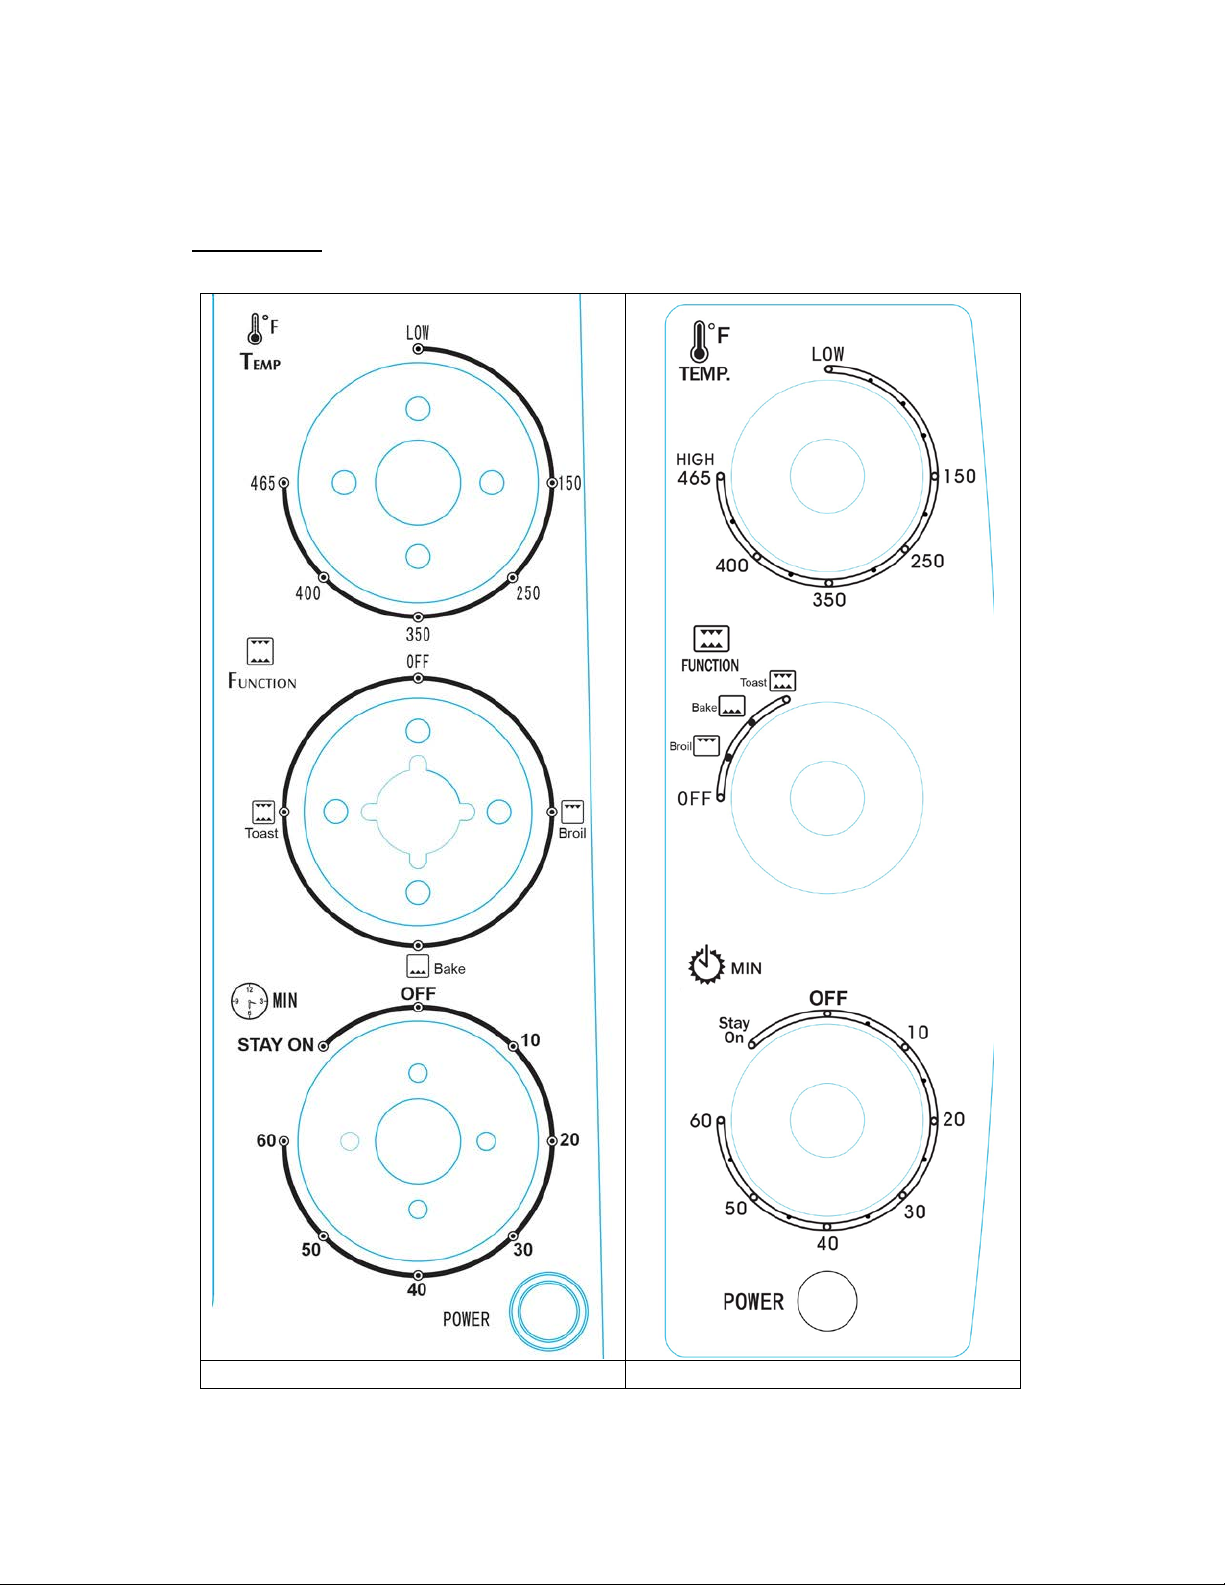
Model: PO61BA
Model: PO81BA
Control Panel
OPERATING YOUR APPLIANCE
8
Page 9
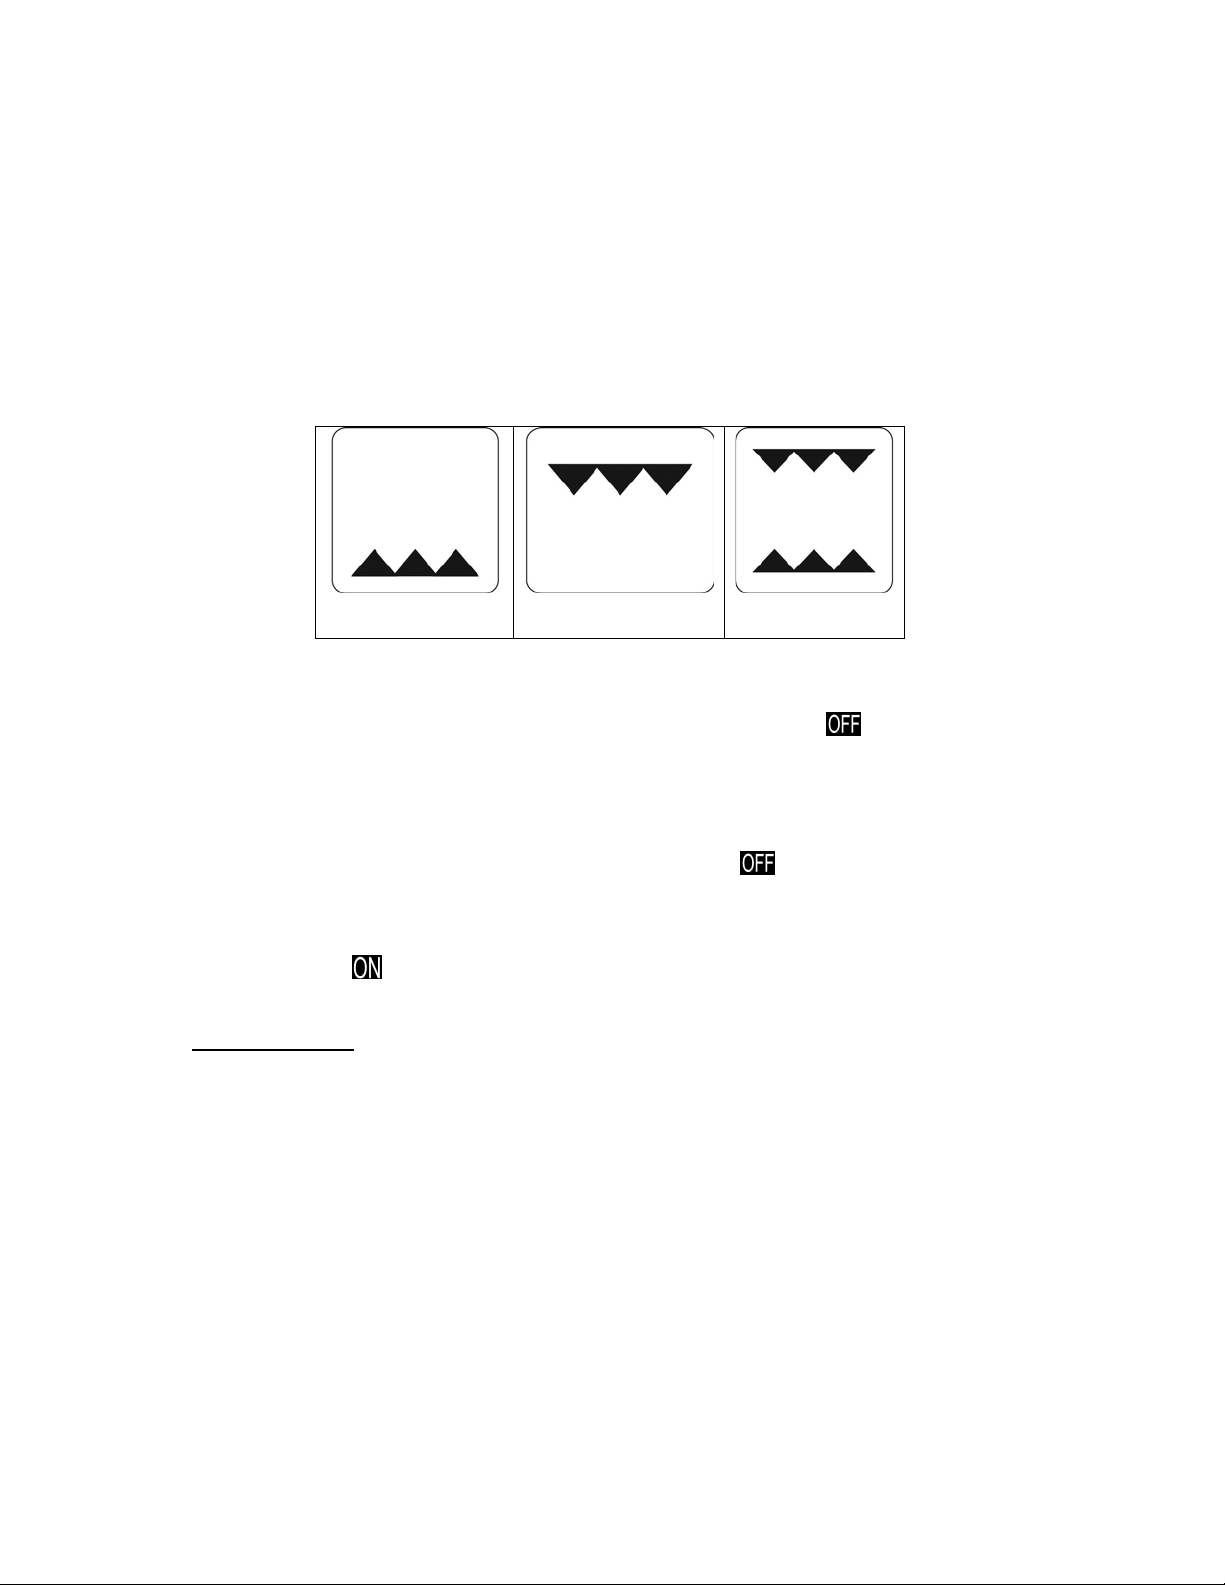
BAKE
BROIL
TOAST
TEMPERATURE CONTROL KNOB
Turn the knob clockwise to select the desired temperature up to MAX (465ºF). To switch off the heating
elements of oven turn the temperature control to the “
FUNCTION SELECTOR KNOB
Select the appropriate function for your use.
There are six (3) functions:
●” setting position.
TIMER SELECTOR KNOB
You can set cooking time up to 60 minutes. It will automatically turn the oven at the end of the
cooking time selected with the sound of a bell signal.
To switch off the oven turn the timer selector to the “OFF” setting position.
For cooking times greater than 60 minutes you can use the “STAY ON” position, the oven will operate in
the selected function until you turn the TIMER selector knob to the “
POWER INDICATOR LIGHT
The indicator will come
when the oven is in use.
” position.
Using Your Oven
Be sure that the temperature is in the “●” position and the timer control knob is in the “OFF” position
before plugging the cord into the outlet for use and when unplugging the appliance after use.
Preheating The Oven
Turn the function selector control knob to the desired function either BAKE or BROIL.
Turn the temperature control knob to the desired temperature.
Turn the timer selector knob to the “20 minutes marking” for the oven to preheat.
9
Page 10

To Use The BAKE Function
Turn the function selector knob to the BAKE position, turn the temperature control knob to the desired
oven temperature.
Turn the timer knob to the desired cooking time (max 60 minutes). At the end of the cooking time a bell
signal sounds and the oven will turn
For cooking times greater than 60 minutes, you can turn the timer control knob counter-clockwise to the
“STAY ON” position. When using the “STAY ON” position, the oven will continue to operate in the
selected function until the timer control knob is turned clock-wise to the “OFF” position.
Only the bottom heating element will cycle and to maintain the selected temperature.
automatically
Arrange food on the wire rack or in the Bake/Broil/Drip pan.
When BAKING is completed, open door fully and remove food carefully.
To Use The BROIL Function
Arrange food on broiler pan. Place broiler pan on oven rack. Close the door to the first notch, leaving
approximately a 2 inch gap at the top. This will ensure adequate airflow during broiling.
Turn the function selector to the BROIL setting.
Turn the temperature control knob to the desired oven temperature.
Turn the timer knob to the desired cooking time (max 60 minutes). At the end of the cooking time a bell
signal sounds and the oven will turn
For cooking times greater than 60 minutes, you can turn the timer control knob counter-clockwise to the
“STAY ON” position. When using the “STAY ON” position, the oven will continue to operate in the
automatically.
selected function until the timer control knob is turned clockwise to the “OFF” position.
Only the top heater elements will operate. For best results the oven should be preheated 20 minutes
before adding the food to be broiled.
Turn food over about halfway through the broiling time.
When BROILING is completed, open door fully and remove food carefully,
To Use the TOAST Function
No preheat period is required before toasting.
Place the bread to be toasted directly on the rack in the center of the oven, close the door.
Turn the function selector to the TOAST setting, then turn the temperature control knob to the desired
oven temperature and turn timer selector knob to your selected cooking time (max 60 minutes). At the
end of the cooking time a bell signal sounds and the oven will turn off automatically. Both the top and
bottom elements will operate when TOAST function is used.
Both the upper and bottom heating elements
temperature.
When toasting is completed, open door fully and remove food carefully.
Different types of bread require different toasting times. Lighter breads and waffles require a shorter
toasting time. Darker breads, muffins, and English muffins require a longer toasting time.
will cycle and to maintain the selected
10
Page 11

CARE AND MAINTENANCE
Cleaning Your Appliance
Before cleaning your appliance, unplug it and allow it to cool.
Remove the crumb tray, wire rack and drip/baking pan.
Use a damp cloth to wash the inside with warm water and a mild detergent. Do not Immerse in Water!
Abrasive cleaners, scrubbing brushes and chemical cleaners may damage the continuous clean coating
on this unit.
Wash the crumb tray, wire rack, drip/baking pan and metal handling tool with a mild detergent solution.
The glass oven door should be cleaned regularly with a non-abrasive liquid cleaner.
Rinse with a damp cloth and then a dry one.
The outside of the appliance should be cleaned with mild detergent and warm water.
CAUTION
Failure to unplug the appliance could resul t in electrical shock or personal injury.
Storing Your Appliance
Allow the appliance to cool completely before storing. If storing the appliance for long periods of time
make certain that the appliance is clean and free of food particles. Store the appliance in a dry location
such as on a table or countertop or in a cupboard shelf. Other than the recommended cleaning, no
further user maintenance should be necessary.
11
Page 12
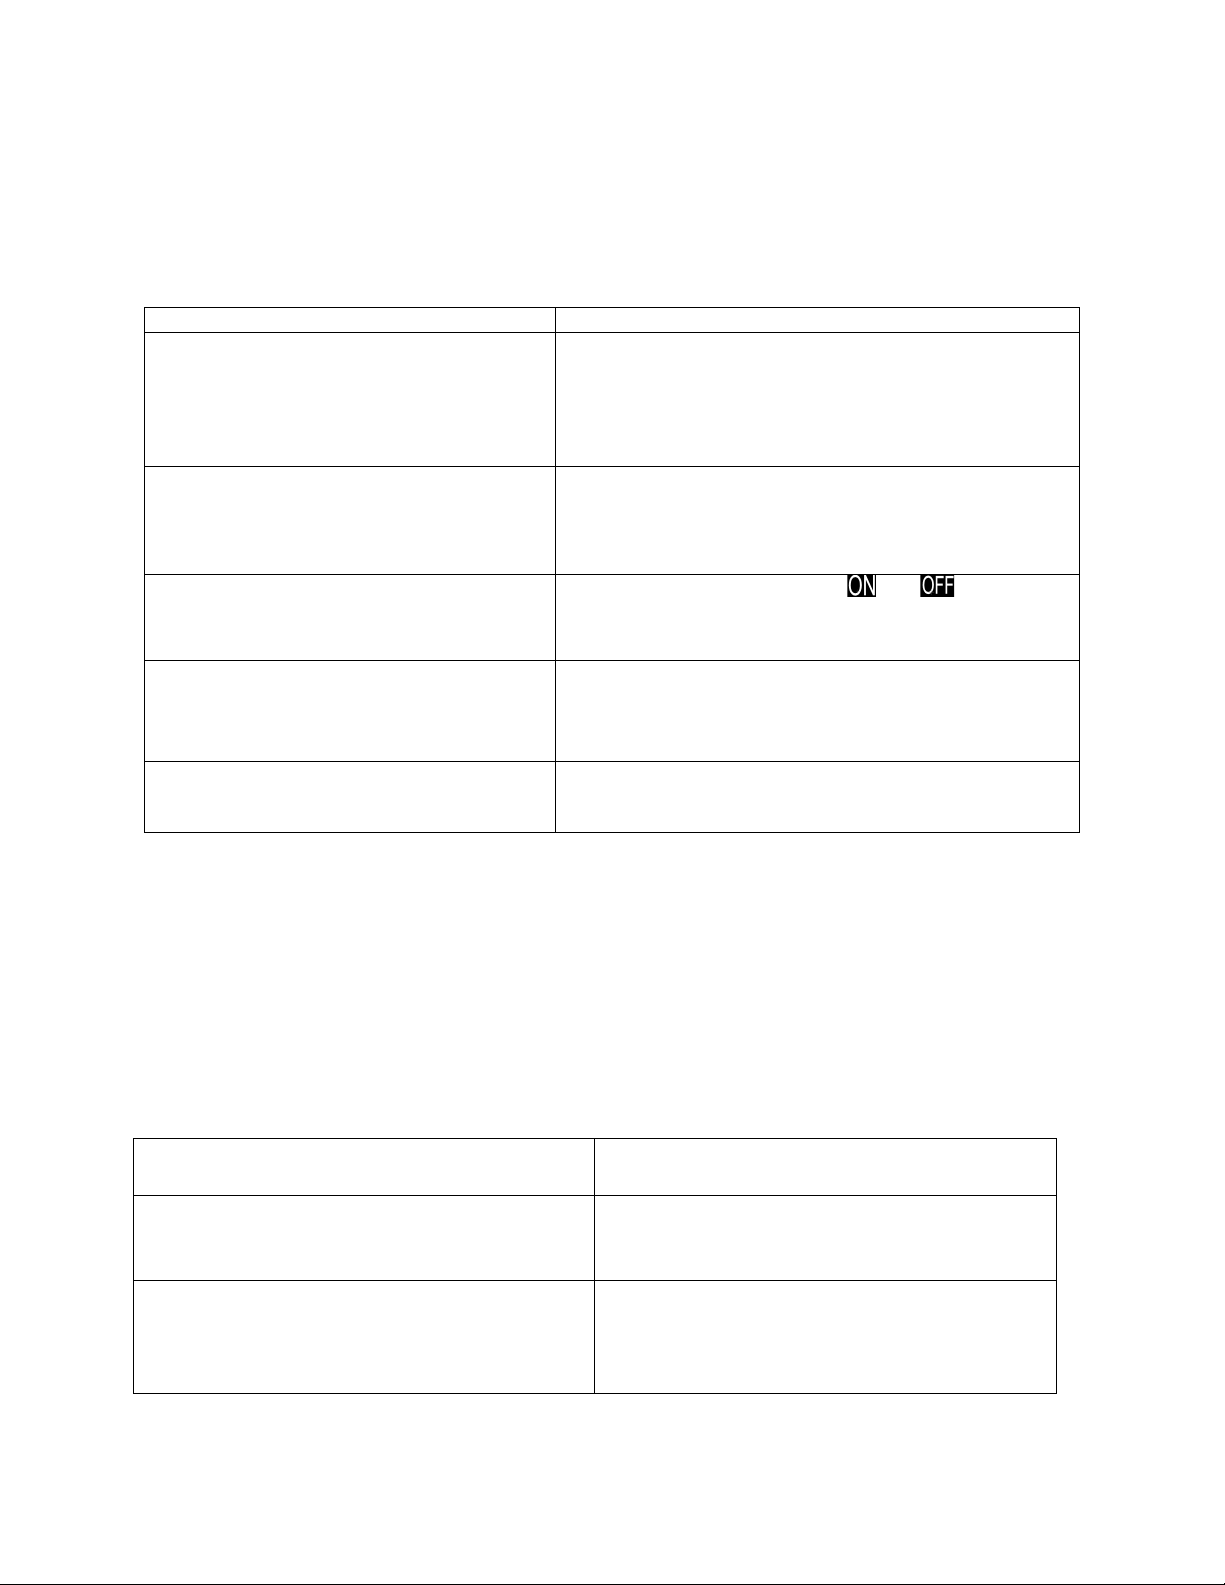
PROBLEMS WITH YOUR APPLIANCE?
PROBLEMS
POSSIBLE CAUSES/SOLUTIONS
• Appliance does not operate.
• Unit not plugged in. Plug the unit into a 120V AC
• Only one heating element is heating up.
• Heating elements are not heating up.
• Overcooked/undercooked Foods
• Incorrect temperature setting. You may have to
• Burnt Smell
• Food build-up inside appliance, on heating elements
Appliance”
800-323-5029
help is available.
delivered directly to your home by personal
check, money order, Master Card, or Visa.
know your appliance inside and out.
You can solve many com mon appliance problems easily, saving you the cost of a possible service call.
Try the suggestions below to see if you can solve the problem before calling the servicer.
TROUBLESHOOTING GUIDE
electrical outlet.
• The circuit breaker tripped or a blown fuse.
• Be sure that the temperature, function and timer
selectors are set.
• Function setting selection determines which heating
element will operate.
• When toasting, make sure the oven is not set to
BROIL or BAKE setting.
• Heating elements will cycle and
proper heat. Make sure function selector is
positioned to the desired cooking setting.
adjust the temperature to desired position.
• Rack placement. Rack may need to be adjusted to
accommodate different foods.
to maintain
or in drip/baking pan. Refer to “Cleaning Your
SERVICE FOR YOUR APPLIANCE
We are proud of our customer service organization and the network of professional service technicians
that provide service on your Avanti appliances. With the purchase of your Avanti appliance, you can be
confident that if you ever need additional information or assistance, the Avanti Products Customer
Service team will be here for you. Just call us toll-free.
AVANTI PRODUCTS CUSTOMER SERVICES
Product Information
Part Orders
800-220-5570
In-Home Repair Service
800-220-5570
Whatever your questions are about our products ,
You may order parts and a ccessories that will be
An Avanti Products authorized ser vice center will
provide expert repair s ervic e, sc hedule d at a t im e
that is convenient for you. Our trained servicers
12
Page 13

FULL ONE YEAR WARRANTY FROM
EXCEPT GLASS PARTS, AND/OR PARTS
OR LACK OF REASONABLE CARE.
REPLACEMENT PARTS AND REPAIR
AUTHORIZED SERVICE COMPANY.
FULL 30-DAY WARRANTY FROM DATE
PARTS
REPLACEMENT PARTS AND REPAIR
AUTHORIZED SERVICE COMPANY.
YO UR AVANTI W ARR ANT Y
LENGTH OF WARRANTY WE WILL PAY FOR
DATE OF PURCHASE ON ALL PARTS
DAMAGED AS A RESULT OF MISUSE
OF PURCHASE ON GLASS PARTS AND
FINISH OF PORCELAIN ENAMEL,
PAINTED OR BRIGHT METAL FINISHED
CARRY IN SERVICE ONLY.
CUSTOMER WILL BE RESPONSIBLE FOR ALL TRANSPORTATION CHARGES TO
AND FROM THE AUTHORIZED SERVICE COMPANY, ALSO MAKE SURE TO SEND
A COPY OF PROOF OF PURCHASE WHEN SENDING THE UNIT FOR SERVICE
REPAIRS.
AVANTI PRODUCTS SHALL NOT BE LI ABLE FO R INCIDENTAL OR
CONSEQUENTIAL DAMAGES.
Some states do not allow the exclusion or limitation of incidental or consequential damages, so
this exclusion or limitation may not apply to you. This warranty gives you specific legal rights,
and you may also have other rights that vary from state to state.
This warranty is not valid outside the Continental United States.
LABOR TO CORRECT DEFECTS IN
MATERIALS OR WORKMANSHIP.
SERVICE MUST BE PROVIDED BY AN
LABOR TO CORRECT DEFECTS IN
MATERIAL OR WORKMANSHIP.
SERVICE MUST BE PROVIDED BY AN
13
Page 14

INSTRUCCIONES EN ESPAÑOL
PARA REDUCIR EL RIESGO DE
HORNO SIGA ESTAS INDICACIONES.
CUANDO USE APARATOS ELECTRICOS, SIEMPRE DEBEN TOMARSE ALGUNAS
PRECAUCIONES IMPORTANTES
INCENDIO, DESCARGA ELECTRICA,
O DAÑO CUANDO ESTE USANDO SU
PRECAUCIONES BASICAS DE SEGURIDAD, INCLUYENDO LAS SIGUIENTES:
• Lea todas las instrucciones, las etiquetas en el producto y las advertencias, antes de usar el
horno tostador.
• No recomendamos el uso extensiones de cordón eléctrico para operar esta unidad.
• No toque las superficies calientes. Siempre use guantes cuando maneje materiales calientes y
permita que las partes metálicas se enfríen antes de limpiar. Permita que la unidad se enfríe
completamente antes de poner o quitar partes.
• Desconecte el horno tostador de la toma de corriente cuando la unidad no esté en uso y antes de
limpiarla. Nota: Verifique que el horno tostador esté apagado antes de desconectarlo.
• Para protegerse contra una descarga eléctrica, no sumerja el aparato en agua o en otros líquidos.
• Supervisión continua es necesaria cuando este o cualquier otro aparato sea usado cerca de niños.
Este aparato no debe ser usado por niños.
• No opere este ni ningún otro aparato con un cordón dañado o quemado o después de que el
aparato ha funcionado inadecuadamente o ha sido dañado en cualquier forma.
• No utilice accesorios o aditamentos no recomendados por el fabricante, ya que pueden causar
incendios, descargas eléctricas o lesiones personales.
• No se use en exteriores o con propósitos comerciales.
• No use este aparato más que para lo que ha sido diseñado.
• No permita que el cordón cuelgue sobre la orilla de la mesa o del mostrador o toque superficies
calientes.
• No lo coloque sobre o cerca de quemadores de estufas de gas o eléctricas, tampoco dentro de un
horno caliente.
• Tenga extremo cuidado cuando use recipientes de vidrio o metal.
• Puede ocurrir un incendio si el horno tostador está en operación y en contacto o cubierto con
materiales inflamables, incluyendo cortinas, tapicería, paredes, etc. No coloque ningún objeto sobre
el aparato cuando esté en operación.
• Cuando esta unidad no esté en operación, no almacene ningún material que no sea un accesorio
recomendado por el fabricante.
• No coloque dentro del horno ningún material inflamable como papel, cartón, plástico o cualquier
material que se pueda incendiar o derretir.
• No cubra la bandeja para migajas o ninguna parte del horno con papel aluminio o metálico. Esto
puede causar el sobrecalentamiento del aparato.
• Los alimentos grandes o utensilios metálicos no deben ser introducidos en el horno tostador ya que
pueden causar incendios o descargas eléctricas.
• No limpie con esponjas o fibras metálicas. Se pueden desprender piezas de la esponja o fibra y
tocar partes eléctricas creando el riesgo de descargas eléctricas.
• Cuando prepare alimentos, tenga cuidado extremo al remover la bandeja o al desechar la grasa
caliente.
• Para apagar este aparato, coloque todos los controles en las posiciones “0” or “OFF”.
-Esta Unidad Es Sólo Para Uso Doméstico-
Para reducir el riesgos de descarga eléctrica, este equipo posee una instalación polarizada, lo cual requiere que la
persona que instale esta unidad la conecte apropiadamente a tierra sin invertir la posición de los cables.
14
Page 15

PREPARANDO SU HORNO TOSTADOR
AVISO
Si usted está usando su horno tostador por primera vez, por favor asegúrese de:
Quitar todas las etiquetas de la superficie de su tostador.
Abra la puerta del tostador y saque los documentos impresos y papeles del interior del horno tostador.
Limpie la rejilla, charola y bandeja con agua caliente y una pequeña cantidad de detergente líquido para
lavar platos, utilice una esponja suave y no abrasiva. No sumerja el horno tostador en el agua.
Seque completamente la unidad antes de utilizarla.
ANTES DE USAR LA UNIDAD POR PRIMERA VEZ. LOS ELEMENTOS
CALENTADORES TIENEN UNA CAPA PROTECTIVA QUE NECESITA SER QUEM ADA
ANTES DE USAR EL HORNO.
PARA REMOVER LA CAPA PROTECTIVA:
ABRA LA P UERTA.
GIRE LA PERILLA DE CONTROL DE TEMPERATURA A 465ºF.
GIRE LA PERILLA DE CONTROL DE TIEMPO A 15 MINUTOS.
USTED SENTIRA UN OLOR A QUEMADO, ESTO ES NORMAL.
ASEGURESE TENER VENTILACION ADECUADA MIENTRAS HAGA ESTE PROCESO.
Seleccione un lugar para colocar el horno tostador. El lugar debe ser una área abierta sobre un mostrador con superficie plana donde el enchufe tenga alcance a una toma de corriente.
Enchufe el cable en un tomacorriente de 120 voltios / 60 ciclos.
CALENTAMIENTO PREVIO DEL HORNO
Coloque la parrilla en la posición deseada antes de calentar el horno tostador.
Gire la perilla de control de temperatura y colóquela en la temperatura deseada.
Gire la perilla selectora en la función deseada.
Gire la perilla del reloj a la posición que aproxima 15 MINUTOS.
PARA USAR LA FUNCION DE ASADO (BROIL)
Seleccione la posición deseada de la parrilla. Coloque los alimentos y cierre la puerta colocándola en la
primera parada, dejando aproximadamente un espacio de 2 pulgadas en la parte superior. Esto
asegurará que el aire fluya de manera adecuada durante este proceso.
Gire la perilla de control de temperatura y colòquela en el nivel de temperatura más alto.
Gire la perilla selectora de función en la posición de asar o “BROIL”. Gire la perilla del reloj hacia el
tiempo deseado. Solamente el elemento calentador de la parte superior estará en funcionamiento.
Coloque la parrilla para asar, encima de la bandeja para hornear. Luego coloque los alimentos. Sobre la
parrilla para asar.
El reloj puede seleccionarse para que esté operando hasta por 60 minutos. Al final del ciclo de cocción,
emitirá una señal auditiva y el horno se apagará automáticamente. Si la cocción requiere más tiempo
repita el ciclo.
Es recomendable siempre voltear los aumentos a la mitad del ciclo de cocción.
Cuando se haya completado la cocción, abra la puerta completamente y saque los alimentos
cuidadosamente.
15
Page 16

PARA USAR LA FUNCION DE HORNEADO (BAKE)
Seleccione la posición deseada de la parrilla (consulte la sección de colocación de la parrilla).
Gire la perilla de control de temperatura al nivel deseado.
Gire la perilla selectora de función en la posición de hornear o “BAKE”. Ambos elementos calentadores,
el superior y el inferior estarán en funcionamiento.
Coloque los alimentos en la parrilla metálica o dentro de la bandeja para hornear.
El reloj puede seleccionarse para que esté operando hasta por 60 minutos. Al final del ciclo de cocción,
emitirá una señal auditiva y el horno se apagara automáticamente, usted puede repetir el ciclo de tiempo
si fuera necesario.
Cuando se haya completado el horneado, abra la puerta completamente y saque los alimentos. Cuando
esté descongelando alimentos, no caliente el horno previamente. Gire el control de temperatura y
colóquelo en 250ºF (120ºC).
Permita que cada lado de las carnes o pescados se descongele de 15 a 20 minutos. Siempre cocine los
alimentos inmediatamente después de descongelar.
PARA USAR LA FUNCION DE TOSTAR (TOAST)
NOTA – No es necesario un período de calentamiento previo antes de tostar.
Diferentes tipos de pan requieren diferentes niveles de tostado. Los panes más ligeros y wafles
requieren tostado más ligero. Los panes más oscuros, panqués y muffins o panecillos ingleses requieren
un tostado más oscuro.
Seleccione la posición deseada de la parrilla.
Gire la perilla selectora de función en la posición de tostar o “TOAST”. Gire la perilla del reloj al tiempo
deseado. Ambos elementos calentadores superior y el inferior estarán en funcionamiento.
Coloque los alimentos en la parrilla metálica.
NOTA – Los elementos calentadores superiores e inferiores se encenderán y apagarán alternadamente
para mantener una temperatura moderada.
Cuando se haya completado el tostado, abra la puerta completamente y saque los alimentos.
LIMPIEZA DE SU HORNO TOSTADOR
Antes de limpiar su Horno Tostador, desconéctelo y permita que se enfríe. Limpie con un paño suave y
húmedo. No lo sumerja en agua! Asegúrese de usar solamente jabón suave y agua. Los limpiadores
abrasivos, cepillos y limpiadores químicos pueden dañar el acabado de esta unidad. Vacíe la bandeja
para migas frecuentemente para evitar la acumulación de residuos.
16
Page 17

ALMACENANDO O GUARDANDO SU HORNO TOSTADOR
PROBLEMAS
POSIBLES CAUSAS/SOLUCIONES
Cocción excesiva o insuficiente de los alimentos.
Temperatura o tiempo incorrectos.
en períodos de tiempo más cortos.
Olor a quemado.
• Si el olor se ocurre en cuando Ud. usa el horno
Tostador”
El horno no inicia su operación
La unidad está desconectada.
la función que desea utilizar.
Deje que el aparato se enfríe completamente antes de almacenarlo. Si va a almacenar el horno tostador
por períodos prolongados, asegúrese de que no contenga partículas o residuos de alimentos. Almacene
el horno tostador en un lugar seco como encima de una mesa, mostrador, o sobre una repisa. Enrolle el
cordón eléctrico. No es necesario otro tipo de mantenimiento que no sea la limpieza recomendada en
este manual.
• Usted debe asegurarse que el botón de
temperatura esté posicionado a la temperatura
deseada.
• Debido a que su horno tostador es más
pequeño que los hornos regulares este se
calentará más pronto y generalmente cocinará
por primera vez, esto es normal (Consulte la
sección “Preparando su horno tostador”
Acumulación de residuos de alimentos en el
interior del horno, en los elementos calentadores o
en la parrilla para migas.
• Consulte la Sección “Limpieza de Su Horno
Solamente un elemento calentador se calienta.
El elemento calentador no se mantiene encendido.
• Enchufe el horno tostador en una toma de
corriente eléctrica 120V / 60Hz.
• Coloque la perilla de la temperatura en la
posición deseada. Todos los demás controles
deberán estar encendidos.
La selección de la función determina cual elemento
calentador operará.
• Cuando tueste alimentos, asegúrese de que el
horno no se encuentre en la función de asado.
Los elementos calentadores se encenderán y se
apagarán para mantener la temperatura adecuada.
• Asegúrese de que la función seleccionada es
17
Page 18

18
Page 19

REGISTRATION INFORMATION
-------------------------------------------------------(detach here)-----------------------------------------------------------------
Name
Model # Serial #
Address
Date Purchased Store / Dealer Name
City State Zip
E-mail Address
Area Code Phone Number
Occupation
Did You Purchase An Additional Warranty
As your Primary Residence, Do You:
Extended
Own Rent
None
Your Age:
Reason for Choosing This Avanti Product:
under 18 18-25 26-30
Married Single
Price
Other: _____________ ______
Personal Demo
Comments:
Thank you for purchasing this fine Avanti product. Please fill out this form and return it to the following
address within 100 days from the date of purchase and receive these important benefits:
Avanti Products, LLC.
P.O.Box 520604 – Miami, Florida 33152
Protect your product:
We will keep the model number and date of purchase of your new Avanti product on file to help
you refer to this information in the event of an insurance claim such as fire or theft.
Promote better products:
We value your input. Your responses will help us deve lop produc ts desig ned to bes t m eet your
future needs.
Avanti Registration Card
Please indicate the most important factors
That influenced your decision to purchase this
product:
Product Features
Avanti Reputation
Product Quality
Salesperson Recommendation
Friend / Relative Recommendation
Warranty
31-35 36-50 over 50
Marital Status:
Is This Product Used In The:
Home Business
How Did You Learn About This Product:
Advertising
In-Store Demo
19
Page 20

PO61BA/PO81BA - 04112014 PRINTED IN CHINA
20
 Loading...