

Avanti DWT18V3S Instruction Manual
Model Number
Numéro de modèle
DISHWASHER / LAVAPLATOS / LAVE-VAISSELLE
INSTRUCTION MANUAL / MANUAL DE INSTRUCCIONES
MANUEL D’INSTRUCTIONS
Número de modelo
DWT18V3S
BEFORE USE, PLEASE READ AND FOLLOW ALL SAFETY RULES AND OPERATING
INSTRUCTIONS.
Avanti has a policy of continuous improvement on its products and reserves the right to change materials and
specifications without notice.
Avanti Products LLC
P.O. Box 520604 - Miami, Florida 33152
www.avantiproducts.com

2
TABLE OF CONTENTS
Help Us Help You
3
Before Using Your Dishwasher
4
Important Safety Instructions
5
Electrical Connection
5
Water Heater Safety
6
Before Using Your Dishwasher
6
Control Panel
7
Wash Cycle Descriptions
7 - 8
How to Use Your Dishwasher
8 - 9
Overflow Protection 9
Water Cut-Off Protection
9
Using the Detergent Dispenser
9
Using the Rinse Aid Dispenser
10 – 11
How to Efficiently Load Your Dishwasher
11
Caring and Maintenance
12 - 13
Problems with your Dishwasher?
14
Troubleshooting Guide
14 - 15
Service for your Dishwasher
16
Your Avanti Products Warranty
17
Instrucciones en Español
18 – 32
Instructions en Francais
33 - 48
Registration Information / Registration Card
Last Page
Parts and Features
4

3
Read this guide carefully.
HELP US HELP YOU...
It is intended to help you operate and maintain
your new dishwasher properly.
Keep it handy to answer your questions.
If you don't understand something or you need
more assistance, please call:
Avanti Customer Service
1-800-220-5570
Keep proof of original purchase date (such as
your sales slip) with this guide to establish the
warranty period.
IF YOU NEED SERVICE
We're proud of our service and want you to be
pleased. If for some reason you are not happy
with the service you receive, here are some
steps to follow for further help.
FIRST, contact the people who serviced your
dishwasher. Explain why you are not pleased.
In most cases, this will solve the problem.
Write down the model and serial numbers.
You'll find them on a plate located on the rear
of the dishwasher.
Please write these numbers here:
____________________________________
Date of Purchase
____________________________________
Model Number
____________________________________
Serial Number
Use these numbers in any correspondence or
service calls concerning your dishwasher.
If you received a damaged dishwasher,
immediately contact the dealer (or builder) that
sold you the dishwasher.
Save time and money. Before you call for
service, check the Troubleshooting Guide. It
lists causes of minor operating problems that
you can correct yourself.
NEXT, if you are still not pleased, write all the
details, including your telephone number, and
send it to:
Customer Service
Avanti Products
10880 NW 30
Miami, FL 33172
th
Street
4
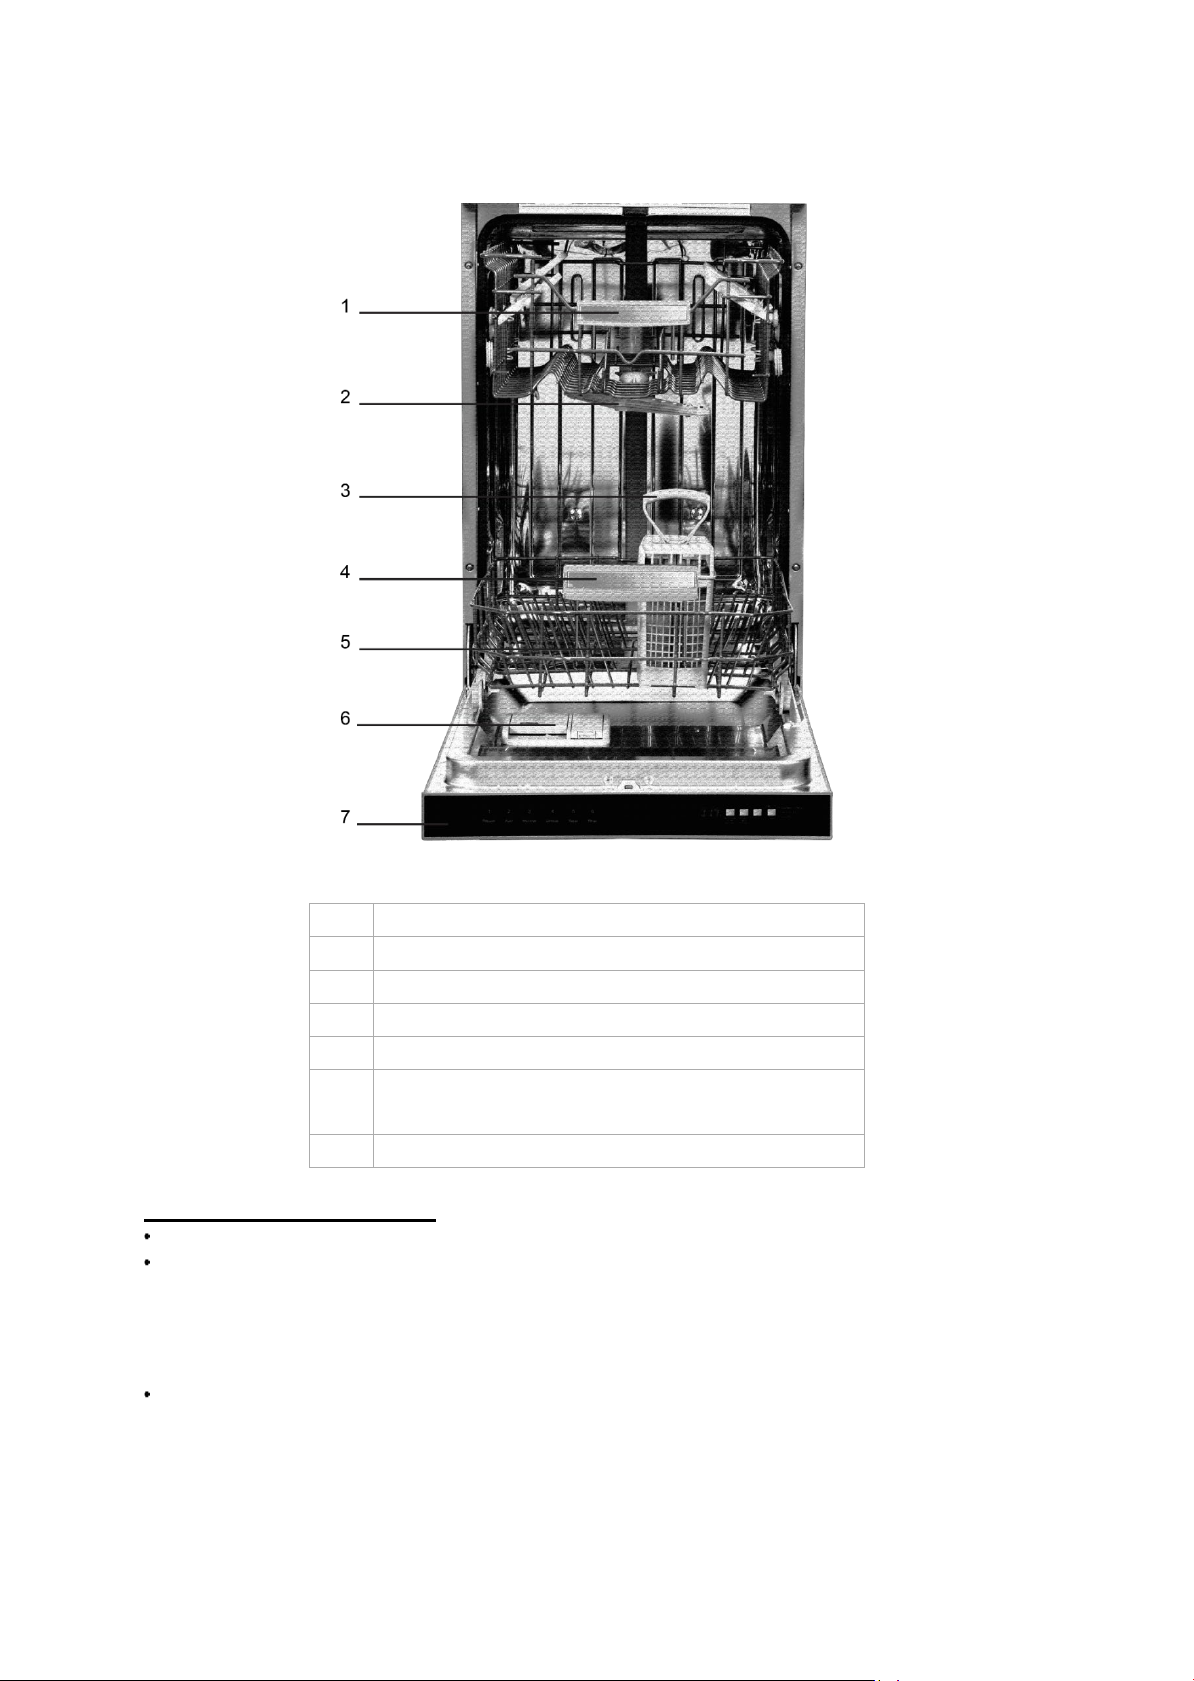
PARTS AND FEATURES
1
Upper Rack
2
Upper Spray Arm
3
Silverware / Cutlery Basket
4
Lower Rack
5
Lower Spray Arm / Filter Assembly
6
Detergent Dispenser
Rinse Aid Dispenser
7
Control Panel
Before Using Your Dishwasher
Remove the exterior and interior packing.
Check to be sure you have all of the following
parts:
2 Wash Racks (1 Upper / 1 Lower)
1 Silverware Basket
1 Instruction Manual
1 Installation Manual
Clean the interior surface with lukewarm water using a soft cloth.

5
Important Safety Instructions
WARNING
To reduce the risk of fire, electrical shock, or injury when
using your dishwasher, follow these basic precautions:
Read all instructions before using the dishwasher.
DANGER or WARNING: Risk of child entrapment.
Child entrapment and suffocation are not problems of the past. Junked or abandoned
dishwashers are still dangerous. . . even if they will “just sit in the garage a few days.”
Before you throw away your old appliance: Take off the doors. Leave the shelves in
place so that children may not easily climb inside.
Never allow children to operate, play with, or crawl inside the dishwasher.
Never clean dishwasher parts with flammable fluids.
Do not store or use gasoline or any other flammable vapors and liquids in the vicinity of
this or any other dishwasher.
Plug the dishwasher into an exclusive properly installed-grounded wall outlet. Do not
under any circumstances cut or remove the third (ground) prong from the power cord.
Any questions concerning power and or grounding should be directed toward a certified
electrician or an authorized Avanti Products service center
-Save these instructions-
Electrical Connection
Improper use of the grounded plug can result in the risk of electrical shock. If the power cord is
damaged, have it replaced by an authorized Avanti Products service center.
Check with a qualified electrician or service representative if you are in doubt whether the
appliance is properly grounded. Do not modify the plug provided with the appliance, if it will
not fit the outlet, have a proper outlet installed by a qualified electrician.
This appliance must be grounded. In the event of a malfunction or breakdown, grounding will
reduce the risk of electric shock by providing a path of least resistance for electric current. This
appliance is equipped with a cord having an equipment-grounding conductor and a grounding plug.
The plug must be plugged into an appropriate outlet that is installed and grounded in accordance
with all local codes and ordinances.
Do not under any circumstances cut or remove the third ground prong from the power cord
supplied.
Never use an extension cord to connect power to the unit.
Never use a two-prong grounding adapter.
Where a two-prong wall receptacle is encountered, contact a qualified electrician to have it replaced
with a 3-prong receptacle in accordance with applicable electrical codes.
This dishwasher requires a standard 110/120 volts A.C.~/60hz electrical outlet with three-prong
ground.
The cord should be secured behind the dishwasher and not left exposed or dangling to prevent
accidental injury.
Connect to a grounded metal, permanent wiring system: or run an equipment grounding terminal or
lead of the appliance.
Improper connection of the equipment grounding conductor can result in a risk of electric shock.
Check with a qualified electrician or service representative if you are in doubt whether the appliance
is properly grounded.
Do not attempt to repair or replace any part of your dishwasher unless it is specifically
recommended in this manual. All other servicing should be referred to a qualified technician.
To minimize the possibility of electric shock, disconnect this appliance form the power supply before
attempting any maintenance. Note: Turning the dishwasher off does not disconnect the appliance
from the power supply. We recommend having a qualified technician service your appliance.
Warning

6
Water Heater Safety
Under certain conditions hydrogen may be produced in a water heater that has not been used for two
weeks or more. Hydrogen gas is explosive.
If the hot water has not been used for two weeks or more, prevent the possibility of damage or injury by
turning on all hot water faucets and allow them to run for several minutes. Do this before using any
electrical appliance which is connected to the hot water system. This simple procedure will allow any
built-up hydrogen gas to escape. Since the gas is flammable, do not smoke or use an open flame or
appliance during this process.
Use this appliance only for its intended purpose as described in this Owner’s Manual.
WARNING
READ FOR PROPER USE
Do not abuse, sit on, or stand on the door or dish rack of the dishwasher.
Do not touch the heating element during or immediately after use.
Do not wash plastic items unless they are marked dishwasher safe or the equivalent. For plastic
items not so marked, check the manufacturer recommendations.
Use only detergent and rinse additives designed for an automatic dishwasher. Using detergent that
is not specifically designed for dishwashers will cause the dishwasher to fill with suds.
Keep children away from detergent and rinse aid, keep children away from the open door of the
dishwasher, there could still be some detergent left inside.
The door should not be left in the open position since this could present a tripping hazard.
During installation, the power supply must not be excessively bent or flattened.
To reduce the risk of injury, do not allow children to play in or on a dishwasher.
Do not operate your dishwasher unless all enclosure panels are properly in place. Open the door
very carefully if the dishwasher is operating, there is a risk of water squirting out.
Do not place any heavy objects or stand on the door when it is open. The appliance could tip
forward.
When loading items to be washed:
1)
Locate sharp items so that they are not likely to damage the door seal;
2)
Load sharp knives with the handles up to reduce the risk of cut-type injuries.
When using your dishwasher, you should prevent plastic items from contacting with heating
element.
If the supply cord is damaged, it must be replaced by the manufacturer or its service agent or
similarly qualified person in order to avoid a hazard.
Please dispose of packing materials properly.
Use the dishwasher only for its intended function.
Remove the door when removing an old dishwasher from service or discarding it.
Do not tamper with controls.
Do not touch the heating element during or immediately after use.
Before Using Your Dishwasher
Remove the exterior and interior packing.
Check to be sure you have all of the following parts:
2 Wash Racks (1 Upper / 1 Lower)
1 Silverware Basket
1 Instruction Manual
1 Installation Manual
Clean the interior surface with lukewarm water using a soft cloth.
7
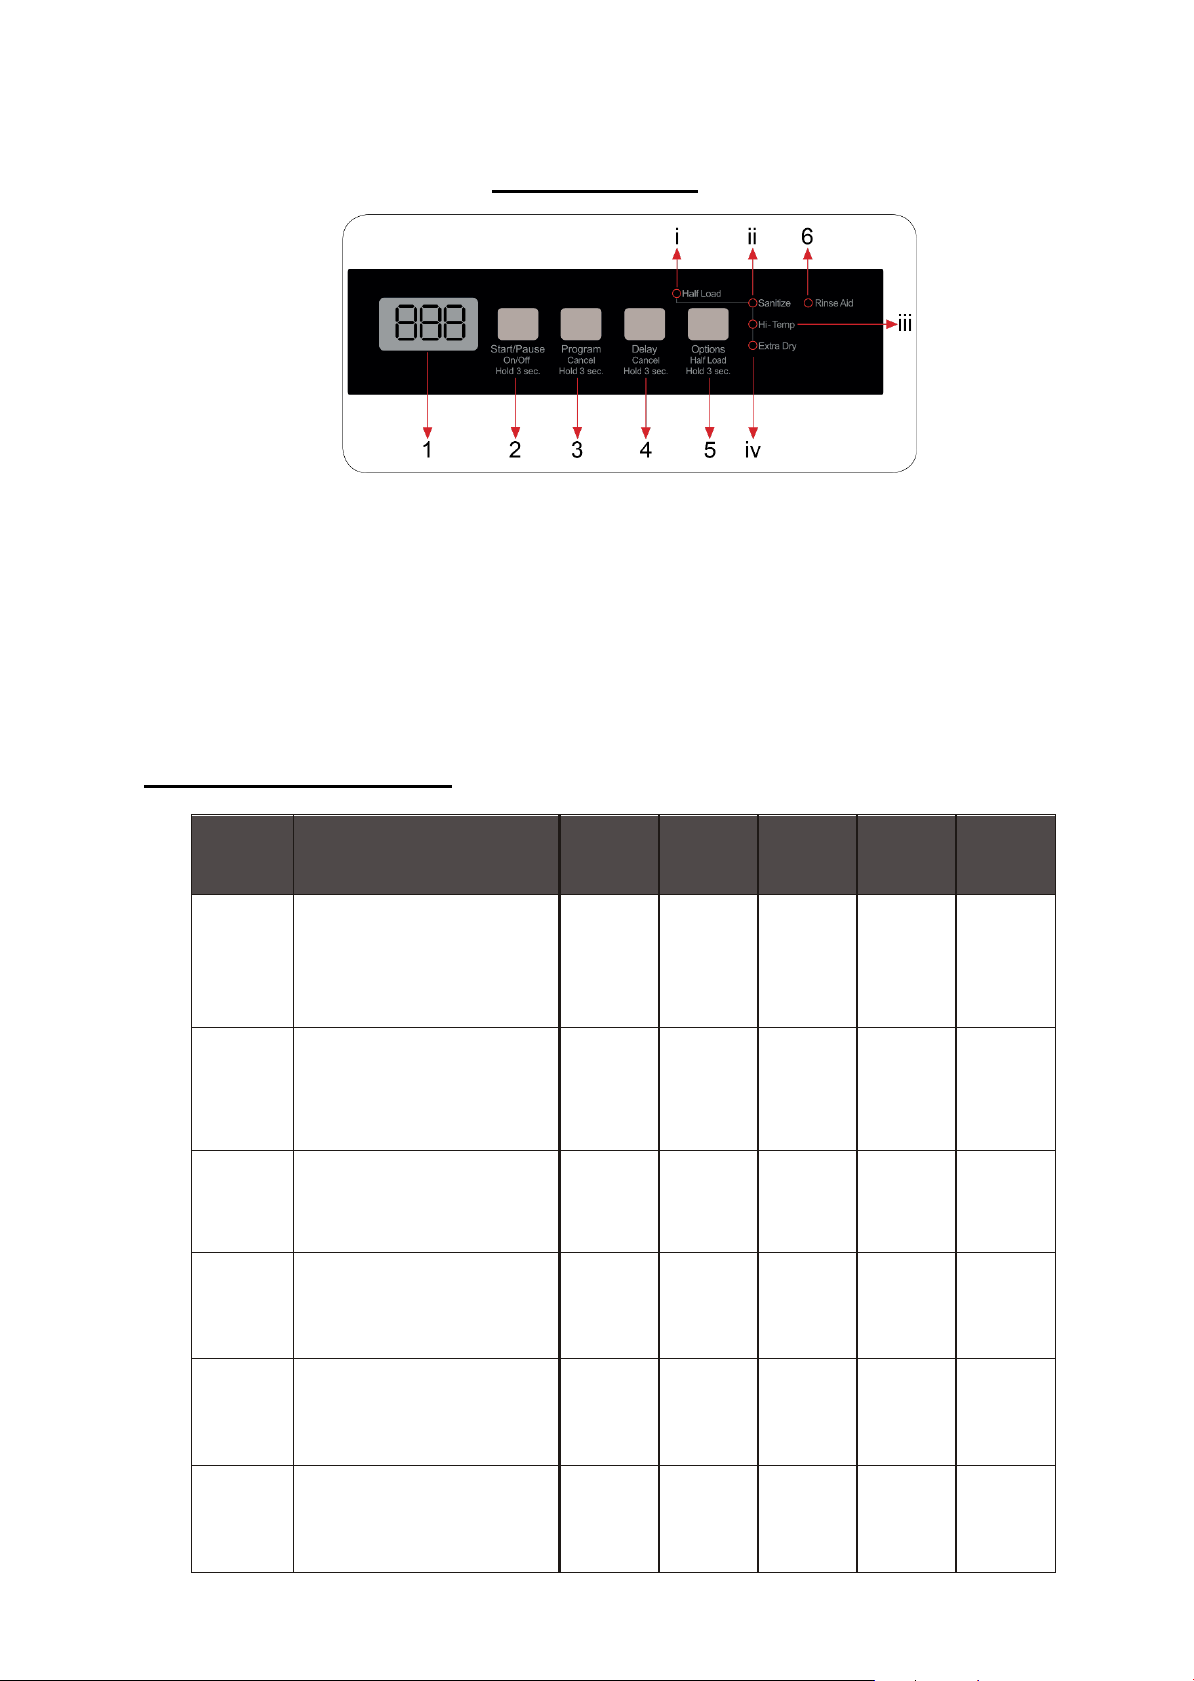
CONTROL PANEL
Load
Dry
This program automatically
Suitable for heavily soiled
Suitable for lightly soiled
Suitable for normally soiled daily
dishes with faster cycle time.
Suitable to rinse dishes that you plan
to wash later.
1
Digital Display Window
5
Options Selection Button
2
Power ON/OFF – Start/Pause Button
6
Rinse Aid Indicator Light
3
Program Selection Button
I
Half Load Indicator Light
4 Delay Selector Button II
Sanitize Indicator Light
III
HI-Temp Indicator Light
IV
Extra Dry Indicator Light
Once the program has been selected, the appropriate indicator light will flash/blink
intermittently.
Pre-Programmed Wash Program
Program
Cycle Selection
Information
Running
time
Option
Half
Option
Extra
(Mins)
Standard program for daily,
Regular
Auto
Intensive
regular or typical use to
completely wash a load of
normally soiled dishes.
adjusts the temperature and the
quantity of water, the energy
consumption and the program
duration.
dishes.
140
155
130 √ √ √ √
√ √ √ √
√ √ √ √
Option
Sanitize
Option
Hi-Temp
Delicate
Super
Rinse
delicate dishes
90 √ √ X X
50 √ √ √ √
15 √ X X X

8
Using Your Appliance:
SELECTING A WASH PROGRAM:
1) Press and hold the “START/PAUSE” button for approximately 3 seconds to turn on your machine. (Noted
that the door of the dishwasher must be in the OPEN position to access the control panel.)
2) Refer to the Pre-Programmed Wash Cycles table on the previous page, to select a wash program suitable
for your needs.
3) Press the “PROGRAM SELECTION” button until the number of the program you selected appears in the
display.
4) Press the “START / PAUSE” button and close the door of your appliance within approximately 4 seconds
to activate the wash program.
If the door is not closed within approximately 4 seconds, the unit will not start the wash program.
In this case, you must open the door press the “START/PAUSE” button again and close the door within 4
seconds to activate the wash program.
CANCELLING A WASH PROGRAM:
1) Press and hold the “PROGRAM SELECTION” button for approximately 3 seconds.
2) The display will show “1” to confirm cancellation of the wash program.
Note: If the door is opened during a wash cycle, the door must be closed within 4 seconds to continue the
current wash cycle.
If the door is not closed during the 4 seconds, simply press the “START/PAUSE” button again and close the
door within 4 seconds to activate the wash program.
SELECTING AN OPTIONAL WASH OPTION:
1) Select the desired Pre-Programmed Wash Program as directed above.
2) Before pressing the “START/PAUSE” BUTTON, press the “OPTIONS” button.
3) Continue to press until the indicator light of the option you desire is illuminated.
Note: In order to select the “HALF LOAD” option, press and hold the “OPTIONS” button for approximately
3 sections.
4) Press the “START / PAUSE” button and close the door of your appliance within approximately 4 seconds
to activate the wash program.
5) If the door is not closed within approximately 4 seconds, the unit will not start the wash program.
6) In this case, you must open the door press the “START/PAUSE” button again and close the door within 4
seconds to activate the wash program.
Wash Options:
HALF LOAD:
This option allows you to save energy and wash a smaller load. This option should be used when washing
less than a full load or in the event you do not want to load the washer and run later when completely loaded.
SANITIZE:
When the Sanitize option is selected, the water temperature will be maintained at 156ºF/69ºC (maximum). The
maximum temperature may not be reached if the incoming water temperature is not adequate.
Residential dishwashers are not intended for licensed food establishments or Commercial applications.
HI-TEMP:
When the HI-Temp option is selected, the water temperature will be maintained at 140ºF/60ºC (maximum).
The maximum temperature may not be reached if the incoming water temperature is not adequate.
Residential dishwashers are not intended for licensed food establishments or Commercial applications.

9
EXTRA DRY:
When the EXTRA DRY option is selected, the machine changes the water temperature for each program and
the extra dry is performed.
DELAY:
To delay the start of a selected cycle, press the Delay Start button until the desired delay time shows in the
LED display. You can delay the start time for 1 to 24 hours. To cancel the delay start option before the set
delay period is over, simply press and hold the DELAY button for approximately 3 seconds.
1) Select the desired Pre-Programmed Wash Program as directed above.
2) Before pressing the “START/PAUSE” BUTTON, press the “DELAY” button.
3) Once the “DELAY” button is pressed the display will alternately show 1H and will also show the program
number selected, wash program duration time and the delay time for 2 seconds.
4) Set the “delay” time by pressing the “DELAY” timer button. Time will increase in increments of 1 hour with
each press of the button.
5) Press the “START / PAUSE” button and close the door of your appliance within approximately 4 seconds
to activate the wash program.
If the door is not closed within approximately 4 seconds, the unit will not start the wash program.
Note: If you open and close the door of the machine during the delay timer mode, or there has been a
loss of electric power, the machine will continue in delay timer mode until the timer has run out and will
start the wash program as selected.
CANCELLING A DELAY TIME SET:
To cancel the delay timer function once set.
1) Open the door of the unit.
2) Press and hold the “DELAY” button for approximately 3 seconds.
3) After 3 seconds, the display will show “0h” confirming the cancellation of the delay timer program.
4) You can now select a new wash program as previously directed above.
Note: You cannot set a delay time mode once a wash program has begun.
END OF CYCLE
At the end of the wash cycle, “0” will be shown in the display.
Open the door of the machine, press and hold the “START/PAUSE” button for approximately 3 seconds to turn
the unit off.
OVERFLOW PROTECTIONS
Our Avanti dishwasher has an overfill protection device which could automatically shut off the inlet valve and start
the drain pump if the water overflows. In the event of an overflow, the system display will flash “F1” and will
attempt to drain the water. If the overflow stops and the system drains the water the “F1” will disappear.
If the system cannot stop the overflow condition, turn off the main water supply before calling a servicer. If there
is water in the base pan because of an overfill or small leak, the water should be removed using a a sponge
before restarting the dishwasher.
WATER CUT OFF - WARNING
If during a wash cycle the water main is cut-off or turned off and the machine cannot take in water the display
will flash “FF”. As long as the condition or lack of water remains the display will continue to flash “FF”, once
the water is returned to the unit, it will return to normal working mode.
LOSS OF ELECTRIC POWER - WARNING
If during a wash cyle the electricity is lost or turned off or the door of the machine has been opened, the
machine cannot operate normally, the machine will return to normal working mode after 8 seconds once the

10
power has returned and if the internal temperature of the unit is above 113ºF.
DETERGENT DISPENSER
TO PREVENT THE FORMATION OF DETERGENT DEPOSITS DO NOT ADD EXCESS AMOUNT OF
DETERGENT AS YOUR DISHWASHER HAS A SPECIALLY DESIGNED WATER SOFTNER.
The dispenser must be refilled before the start of each wash cycle following the instructions provided in the
“Wash Cycle Table”. Your dishwasher uses less detergent and rinse aid than conventional dishwashers.
Generally, only one teaspoon of detergent is needed for a normal wash load, heavily soiled items may need
more detergent. Always add the detergent just before starting the dishwasher, otherwise it could become damp
and not dissolve properly.
Amount of Detergent to Use
IF THE WATER IN YOUR AREA IS NOT TOO HARD, YOU MAY ALSO PREVENT THE FORMATION OF
DEPOSITS BY DETERGENT
The amount of detergent needed can vary due to differences in the water hardness of your area. To determine
the water hardness in your area, contact your local water utility or area water softening company. The harder
the water, the more detergent you may need. Remember, you should adjust the amount of detergent you use
by small amounts until you find the correct amount.
Proper Use Of Detergent
Use only detergent specifically made for use in dishwasher. Keep your detergent fresh and dry. Don’t put
powder detergent into the dispenser until you’re ready to wash dishes.
Rinse Aid Dispenser
•
Your dishwasher is designed to use liquid rinse aids. The rinse-aid dispenser is located on the door next to the
detergent dispenser. Fill the rinse-aid dispenser until the level indicator turns completely black (approximately
100ml of liquid rinse-aid). Be sure not to overfill the dispenser as this will cause over-sudsing. Wipe away any
spills with a damp cloth. Keep in mind that if you have soft water, you may not need to use a rinse-aid as it may
cause a white film to develop on your dishes.
•
To open the dispenser, lift up the Rinse Aid reservoir cover as shown below.
•
Pour the rinse-aid into the dispenser, being careful not to overfill.
•
Replace the cover after filling.
•
The rinse-aid is released during the final rinse to prevent water from forming droplets on your dishes that can
leave spots and streaks. It also improves drying by allowing the water to “sheet” off the dishes.

11
Adjusting Rinse Aid Dispenser
A measured amount of rinse aid is released during the final rinse. As with detergent, the amount of rinse aid
needed for your dishes depends on the hardness of the water in your area. Too much rinse aid can result in
lather of foaming and cause cloudiness or streaks on your dishes. If the water in your area is very soft, you may
not need rinse aid. If you do, you can dilute the rinse aid with an equal amount of water.
When To Refill The Rinse Aid Dispenser
Refill the Rinse Aid reservoir when the Rinse Aid indicator light on the control panel is illuminated.
How to load your dishwasher
For best results, follow these loading guidelines.
Recommendations : Remove any coarse residue on dishes before placing the dishes in the machine. Start the
machine with full load.
Do not overload the drawers or place dishes in the wrong basket.
WARNING: Always place sharp utensils with the sharp point down and open utensils with their openings down.
How to Use the Upper Rack
The upper rack is designed to hold more delicate and lighter dishware such as glasses, coffee and teacups and
saucers, as well as plates, small bowls and shallow pans (as long as they are not too dirty). Position the dishes and
cookware so that they do not get moved by the spray of water.
The upper rack can be adjusted for height by putting wheels at different height into the rails.
Caution: Make sure that the rack is empty. Changing the height setting while the rack contains tableware could
cause the contents to dislodge, causing personal injury or damage to the tableware.
1) Release the latches on both the right and left tracks of the upper rack by turning them toward the outside
(illustration A).
2) Pull out the rack completely. (illustration B).
3) Place the rack into the track again at the desired height (illustration C).
4) Push the latches back into the correct position.
How To Use The Lower Rack
We recommend that you place large items which are most difficult to clean into the lower rack: pots, pans, lids,
serving dishes and bowls, as shown in the figure below.
It is preferable to place serving dishes and lids on the side of the racks in order to avoid blocking the rotation of the
top spray arm.
Pots, serving bowls, etc, must always be placed top down. Deep pots should be slanted to allow water to flow out.
The bottom rack features fold down tine rows so that larger or more pots and pans can be loaded.
12
Silverware Basket
Silverware should be placed in the silverware basket with handles at the bottom: if the rack has side baskets, the
spoon should be loaded individually into the appropriate slots, especially long utensils should be placed in the
horizontal position at the front of the upper rack.
Caring And Maintenance
To clean the control panel use a lightly dampened cloth then dry thoroughly. To clean the exterior use a good
appliance polish wax.
Never use sharp objects, scouring pads or harsh cleaners on any part of the dishwasher.
Protect against freezing
If your dishwasher is to be left in an unheated place during the winter, ask a service technician to:
1.
Cut off electrical power to the dishwasher. Remove fuses or tip circuit breaker.
2.
Turn off the water supply and disconnect the water inlet pipe from the water valve.
3.
Drain water from the inlet pipe and water valve. (Use a pan to catch the water.)
4.
Reconnect the water inlet pipe to the water valve.
5.
Remove the plastic sump cover in the tub at the bottom and use a sponge to soak up water in the rubber
boot.
Cleaning The Spray Arms
It is necessary to clean the spray arms regularly or hard water chemicals will clog the spray arm
jets and bearings. To remove the spray arm, screw off the nut by hand in a counter-clockwise
direction to take out the washer on top of the spray arm and remove the arm. Wash the arms in
soapy and warm water and use a soft brush to clean the jets. Replace them after rinsing them
thoroughly.
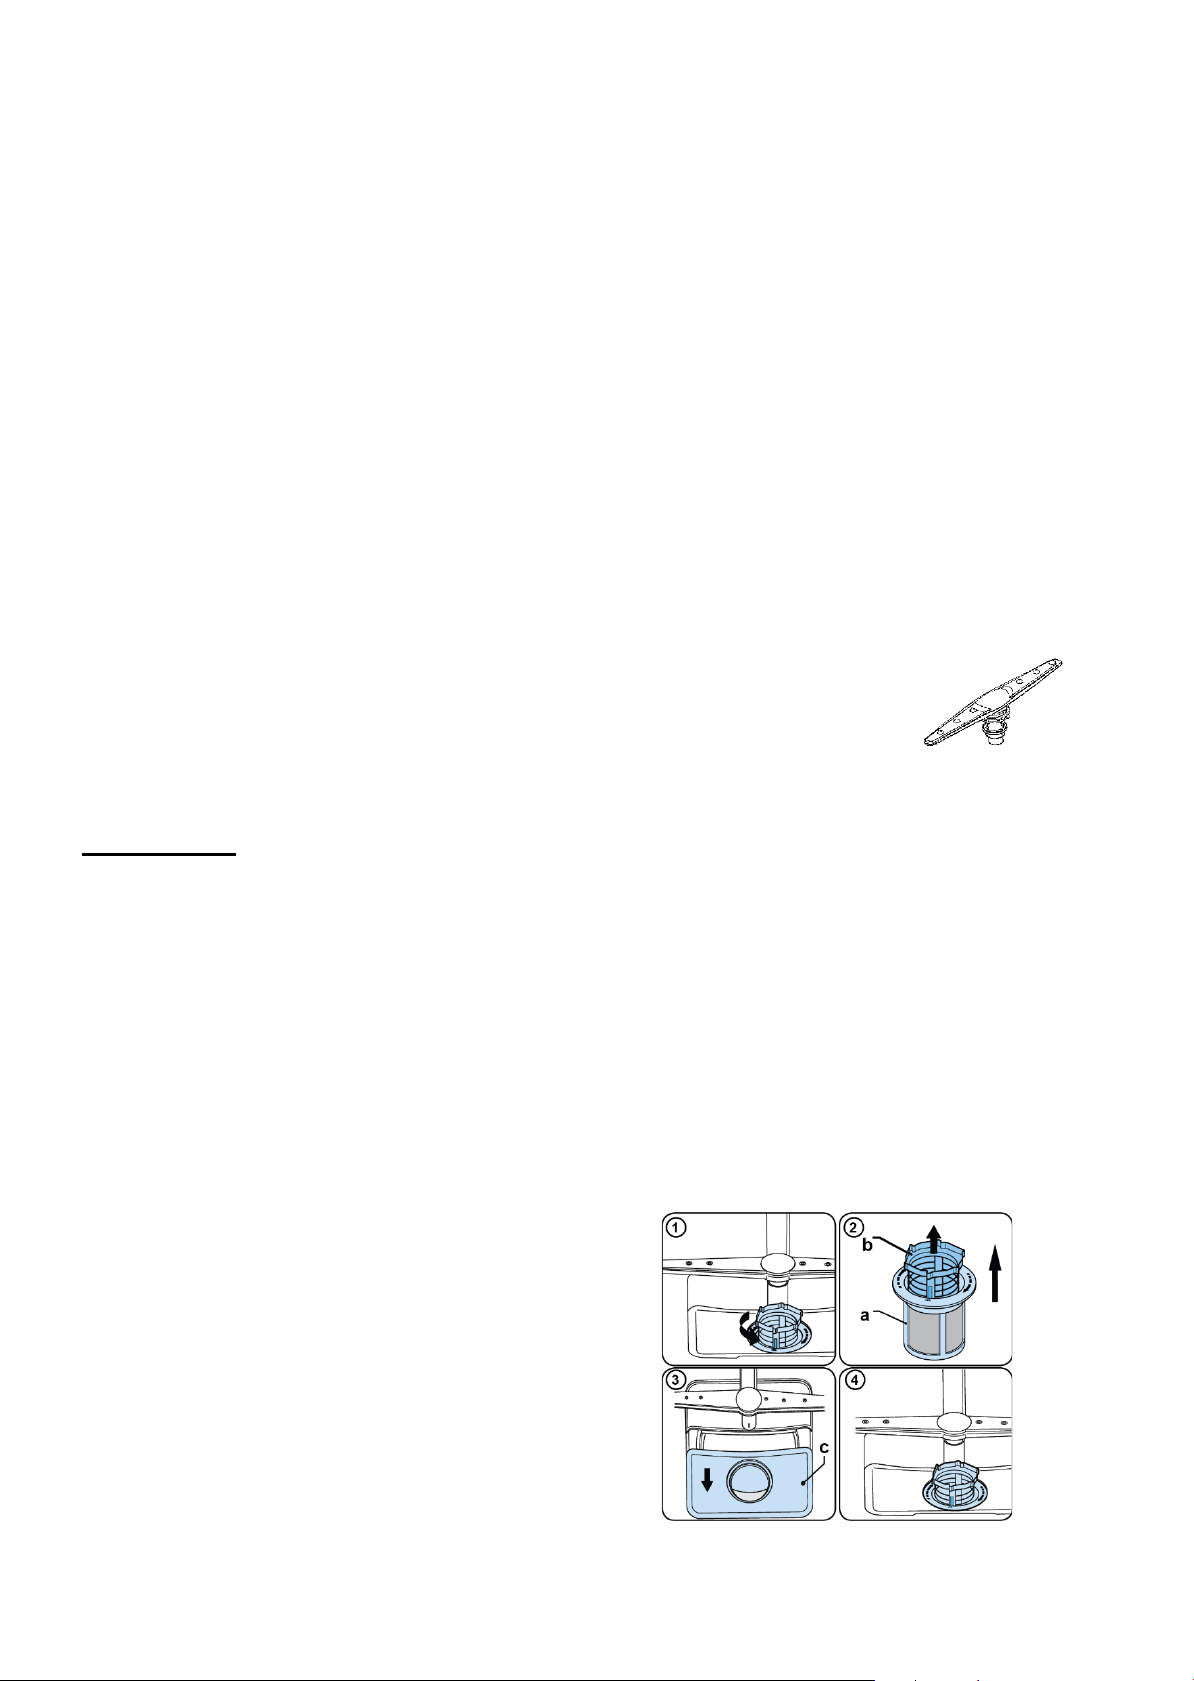
Filtering System
For your convenience, we have placed the drain pump and filtering system within easy reach inside the tub. There
are three components of the filtering system: the coarse filter, the fine filter, and the main filter.
1.
Coarse Filter
Larger items, such as pieces of bone or glass, that could clog the drain are trapped in the coarse filter. To remove
an item caught in this filter, gently turn the top of the Coarse filter in a counter-clockwise direction and lift it out.
2.
Fine Filter
This filter holds soil and food residue in the sump area and prevents it from being re-deposited on the dishes
during a cycle.
3.
Main Filter
Food and soil particles trapped by this filter are pulverized by a special jet on the lower spray arm
and washed down the drain.
Cleaning The Filter assembly
Turn the Coarse filter in a counter-clockwise direction.
1.
Lift the Coarse filter (b) together with the Fine Filter(a)
2.
Separate the Fine filter by lifting it out from the Course
Filter (b).
3.
Lift out the out the Main filter (c).
To replace the filter assembly follow the same steps in reverse.
For best performance and results, the filter assembly must be
cleaned.
The dishwasher must never be used without the filters.
Improper replacement of the filter may reduce the performance
level of the appliance and damage dishes and utensils.
WARNIING – Never run the dishwasher without the filters in
place.

13
Cleaning The Door
To clean the edge around the door, you should use only a soft warm, damp rag. To prevent
penetration of water into the door lock and electrical components, do not use a spray cleaner
of any kind.
Also, never use abrasive cleaners or scouring pads on the outer surfaces because they will
scratch the finish. Some paper towels can also scratch or leave marks on the surface.
WARNING - Never use a spray cleaner to clean the door panel for it could damage the door lock and
electrical components. It is not allowed to use the abrasive agent or some paper towel because of the
risk of scratching or leaving spots on the stainless steel surface.
How To Keep You Dishwasher In Shape
After every wash
After every wash, turn off the water supply to the appliance and leave the door slightly ajar so that
moisture and odors are not trapped inside.
No solvents or abrasive cleaning products
To clean the exterior and rubber parts of the dishwasher, do not use solvents or abrasive cleaning
products. Rather, use only a cloth and warm soapy water. To remove spots or stains from the surface of
the interior, use a cloth dampened with water and a little white vinegar, or a cleaning product made
specifically for dishwashers.
When you go on Holiday
When you go on holiday, it is recommended that you run a wash cycle with the dishwasher empty and
them remove the plug from the AC socket, turn off the water supply and leave the door of the appliance
slightly ajar. This will help the seals last longer and prevent odors from forming within the appliance.
Seals
One of the factors that cause odors to form in the dishwasher is food that remains trapped in the seals.
Periodic cleaning with a damp sponge will prevent this from occurring.

14
PROBLEMS WITH YOUR DISHWASHER?
PROBLEM
POSSIBLE CAUSE
WHAT TO DO
Dishwasher does not
The circuit breaker tripped or
Replace fuse or reset circuit breaker. Remove any
Drain pump doesn’t stop
Overflow
The system is designed to detect an overflow. When
Noise
Some audible sounds are
Sound from soft food shredding action and
Suds in the tub
Improper detergent.
Use only the special dishwasher detergent to avoid
Stained tub interior
Detergent with colorant was
Used.
Make sure that the detergent is the one without colorant.
Dishes are not dried
Rinse agent dispenser is
Make sure the rinse agent dispenser is filled.
Dishes and flatware not
Improper program.
Select a stronger program.
Cloudiness on glassware.
Combination of soft water
Use less detergent if you have soft water and select a
Yellow or brown film on
Tea or coffee stains.
Using a solution of ½ cup bleach and 3 cups warm
You can solve many common dishwasher problems easily, saving you the cost of a possible service
call. Try the suggestions below to see if you can solve the problem before calling the servicer.
TROUBLESHOOTING GUIDE
operate.
blown fuse.
Power supply is not turned
on.
Water pressure is low.
normal.
Utensils are not secured in
the baskets or something
small has dropped into the
basket.
Motor hums.
Spilled rinse agent.
other appliances sharing the same circuit with the
dishwasher
Make sure the dishwasher is turned on and the door
is closed securely.
Make sure the power cord is properly connected.
Check that the water supply is connected properly and
the water is turned on.
it doesn’t it shuts off the circulation pump and turns
on the drain pump. See Over Flow
detergent cup opening.
Ensure everything is secured in the dishwasher.
Dishwasher has not been used regularly. If you do not
use it often, remember to set it to fill and pump out
every week, which will help keep the seal moist.
suds.
If this occurs, open the dishwasher and let suds
evaporate.
Add 1 gallon of cold water to the tub. Close and latch
the dishwasher, then drain out the water by slowly
turning the dial until a drain period is reached. Repeat
if necessary.
Always wipe-up rinse agent spills immediately.
empty.
clean.
inside surfaces.
Improper rack loading.
and too much detergent.
Iron deposits in water can
cause an overall film.
Make sure that the action for the detergent dispenser
and spray arms are not blocked by large dishware.
shorter cycle to wash the glassware to get them clean.
water to remove the stains by hand.
Warning
You have to wait for 20 minutes after a cycle to let the
heating elements cool down before cleaning interior:
otherwise, burns will happen.
You have to call a water softener company for a
special filter.
15
White film on inside surface.
Hard water minerals
To clean the interior, use a damp sponge with
dishwasher detergent and wear rubber gloves.
Detergent left in dispenser
Dishes block detergent
Steam
Normal phenomenon
There is some steam coming through the vent by the
Black or gray marks on
Aluminum utensils have
Water standing in the bottom of
This is normal.
A small amount of clean water around the outlet on the
Water doesn’t pump out of
Dishwasher leaks.
Overfill dispenser or rinse
Be careful not to overfill the rinse aid dispenser. Spilled
ERROR
CODE
CONDITION
WHAT TO DO
FF
Water Inlet System Failure
Make sure the water inlet tap is open and water is flowing
hose. Contact service if the error continues.
F5
Pressure System Failure
Contact customer service.
F3
Continuous Water Input
Close the tap and contact customer service.
F2
Inability to Discharge Water
Water discharge hose and filters may be clogged.
Cancel the program, if error continues contact service.
F8
Heater Error
Contact customer service
F1
Overflow
Unplug the machine and close the tap, contact customer service.
FE
Faulty Electronic Card
Contact customer service
F7
Overheating
Contact customer service
F9
Diverter Position Error
Contact customer service
F6
Faulty Heater Sensor
Contact customer service
HI
High Voltage Failure
Contact customer service
Never use any other cleaner than dishwasher
detergent for the risk of foaming or suds.
cups.
dishes.
the tub.
the tub.
cups.
rubbed against dishes.
Drain is clogged.
aid spills.
Dishwasher isn’t level.
ERROR CODE WARNINGS - DESCRIPTIONS
Re-load the dishes properly.
door latch during drying and water draining.
Use a mild abrasive cleaner to eliminate those
marks.
tub bottom at the back of the tub keeps the water seal
lubricated.
Make sure the kitchen sink is draining well. If the
dishwasher drains into a disposer, run it clear.
rinse aid could cause oversudsing and lead to
overflowing. Wipe away any spills with a damp cloth.
Make sure the dishwasher is level.
Separate the inlet hose from the tap and clean the filter of the

16
SERVICE FOR YOUR DISHWASHER
800-323-5029
help is available.
check, money order, Master Card, or Visa.
know your dishwasher inside and out.
We are proud of our customer service organization and the network of professional service technicians
that provide service on your Avanti dishwashers. With the purchase of your Avanti dishwasher, you can
have the confidence that if you ever need additional information or assistance, the Avanti Products
Customer Service team will be here for you. Just call us toll-free.
AVANTI PRODUCTS CUSTOMER SERVICES
Product Information
Whatever your questions are about our products,
Part Orders
800-220-5570
In-Home Repair Service
800-220-5570
You may order parts and accessories that will be
delivered directly to your home, by personal
An Avanti Products authorized service center will
provide expert repair service, scheduled at a time
that is convenient for you. Our trained servicers
 Loading...