


Musical Masterpieces
Serial Numbers ____________________
Handcrafted by:
_________________________________
_________________________________
_________________________________
_________________________________
This product is certified to meet the requirements of the European Union (EU) Electromagnetic Compatibility (EMC) Directive (89/336/EEC). Because the permanent magnets attached to the loudspeaker drivers produce magnetic fields, it is recommended that the product not be positioned in very close proximity to computer monitors or television sets.
|
|
Table of Contents |
|
1 |
Introduction................................................................................................................... |
5 |
|
2 Unpacking Instructions ................................................................................................. |
6 |
||
|
|
Introduction .............................................................................................. |
6 |
|
|
Contents................................................................................................... |
6 |
|
2.1 Opening the Crate ........................................................................................ |
7 |
|
|
2.2 |
Installing the Grilles......................................................................................... |
8 |
|
|
Orientation of the Felt Anti-Diffraction Mask ............................................ |
8 |
|
2.3 Replacing Grille Pins........................................................................................ |
8 |
|
3 |
Wiring Instructions ......................................................................................................... |
11 |
|
|
|
Introduction .............................................................................................. |
11 |
|
|
Connecting the Speaker to the Amplifier ................................................ |
11 |
4 Break-in Period ............................................................................................................. |
13 |
||
5 |
Maximizing Performance............................................................................................. |
14 |
|
|
|
Break-in..................................................................................................... |
14 |
|
|
Grille Assemblies ....................................................................................... |
14 |
|
|
Speaker Placement and Symmetry.......................................................... |
14 |
|
|
Toe-In ........................................................................................................ |
15 |
|
|
Apex™ Couplers....................................................................................... |
15 |
|
|
First Reflection Points................................................................................. |
16 |
|
|
Corner Treatment ..................................................................................... |
16 |
6 Care of Your Loudspeakers .......................................................................................... |
17 |
||
|
|
Cabinet (Hardwood Finish)....................................................................... |
17 |
|
|
Grille Assembly.......................................................................................... |
17 |
|
|
Drivers ....................................................................................................... |
17 |
7 Warranty |
....................................................................................................................... |
18 |
|
|
|
In the Event of a Problem......................................................................... |
18 |
|
|
Warranty Statement ................................................................................. |
19 |
8 Room Acoustics and Speaker Position ......................................................................... |
21 |
||
|
|
Introduction .............................................................................................. |
21 |
|
|
An Optical Analogy.................................................................................. |
22 |
|
|
Basic Room Acoustics............................................................................... |
22 |
|
8.1 Standing Waves ............................................................................................. |
23 |
|
|
8.2 |
Flutter Echo .................................................................................................... |
24 |
|
8.3 |
Early Reflections ............................................................................................. |
25 |
|
|
Avoiding Early Reflections ........................................................................ |
26 |
|
8.4 Bass reinforcement......................................................................................... |
28 |
|
|
8.5 Summary of Recommendations .................................................................... |
31 |
|
|
|
Flutter Echo and Standing Waves ............................................................ |
31 |
|
|
Speaker Placement.................................................................................. |
32 |
|
|
Early Reflections........................................................................................ |
32 |
|
8.6 A Listening Room Example............................................................................. |
33 |
|
9 Accuracy of Bass Reproduction ................................................................................... |
34 |
|
|
Introduction .............................................................................................. |
34 |
9.1 |
Sensitivity to Time-Related Information........................................................... |
35 |
|
"Fast Bass".................................................................................................. |
35 |
9.2 |
Rationale........................................................................................................ |
36 |
|
Anechoic vs. In-Room Frequency Response............................................ |
36 |
9.3 |
Measurements of Audio Equipment .............................................................. |
37 |
|
A Correlation with Amplifier Measurements............................................. |
37 |
|
Loudspeaker Measurements .................................................................... |
38 |
|
Designing for Accurate Bass Reproduction.............................................. |
39 |
|
Frequency Response Effects..................................................................... |
40 |
|
Listening for Size Distortions....................................................................... |
40 |
|
Transient Response Effects........................................................................ |
41 |
9.4 |
Conclusion ..................................................................................................... |
42 |
10 Features ...................................................................................................................... |
43 |
|
11 Specifications.............................................................................................................. |
44 |
|
12 Notes........................................................................................................................... |
|
45 |

1 Introduction


 , from the Platonic conception of idealized forms; the embodiment of perfection that exists beyond our plane of perception. It is an ideal of aesthetics, form, and musical truth that we attempt to discover and explore, but may only glimpse as “through a glass darkly.” We have attempted to create such a window through the careful balancing of elemental components into a harmonious form. Bringing to bear the most powerful tools of modern technology and the master craftsmanship of the finest artisans, we have created an unsurpassed precision instrument.
Meticulous engineering employing proprietary electronic and acoustic measurements and the extensive use of CAD modeling has provided us with the ability to predict and manipulate the most ubiquitous of variables. The result is a wide bandwidth with minimal passband ripple and the fastest settling times of any dynamic transducer. The Diamond possesses a transient speed and resolution that redefines the state of the transducer art. Dynamic testing has yielded unsurpassed octave-to-octave energy balance, without compression, under the most demanding program conditions. Most importantly, the achievement of low noise floor ambiance retrieval, and soundstage focus, reveals the most subtle details of the recording site and the artists performance.
Built entirely by hand, our craftsmanship demands comparisons not with the audio industry, but with the finest cabinet makers of the 18th and 19th centuries. Modern materials, assembled to the most stringent tolerances, have created a “classic” that will endure the test of time. Individually crafted, we treat each pair of loudspeakers as a unique work of art unto itself.
A final caveat: The Diamond will remain unyieldingly critical of electronics, cables, and source material. As improvements are made in other areas of the audio chain it will endure as a reference, revealing the subtleties of superlative components and musical performances. From our many combined years of experience at Avalon Acoustics, the Diamond simply represents the finest example of our execution and vision.
Neil Patel
President
5

2 Unpacking Instructions
Introduction
Your Avalon Acoustics loudspeakers were shipped in two heavy-duty crates to ensure their safe arrival. It is recommended to save these crates for possible future use. Due to the weight of the speakers, it will require two persons to un-crate them and position them for listening. Please arrange for your dealer or other friend to assist in this project.
Contents
The two shipping crates contain the following items:
•two loudspeaker cabinets
•two grille assemblies
•the owner’s manual
•one set of six Apex™ Couplers
•an accessory bag
Each shipping crate contains one loudspeaker unit. The grille assemblies and owner’s manual are contained in an outer compartment on the top of the shipping crates. The Apex™ Couplers and accessory bag are packed together on the bottom of one of the loudspeaker cabinets.
The accessory bag contains replacement grille pins, a small bottle of furniture polish, and two lint-free polishing cloths.
IMPORTANT: It is imperative that the Apex™ Couplers are utilized, in order to insure that the bottoms of the loudspeakers are not blocked. This is especially important on thick carpeting.
6

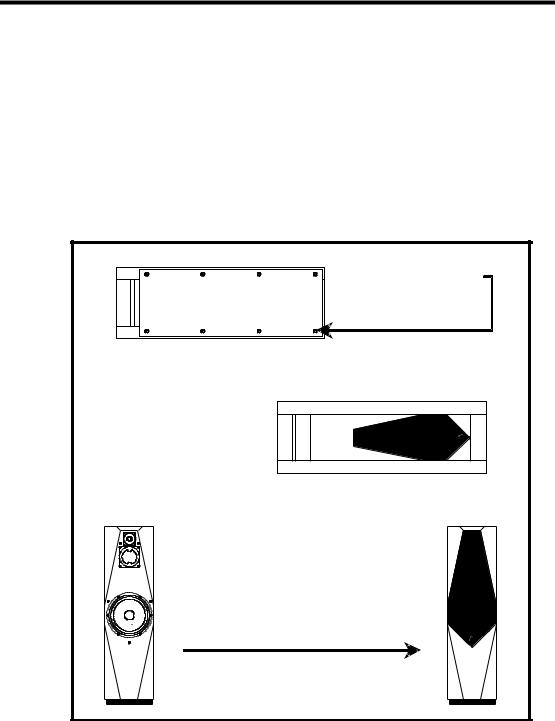
2.1 Opening the Crate
The crate features a one-piece top assembly which is fastened to the crate bottom with screws around the lower perimeter. To unpack, remove the screws and lift the upper portion of the crate straight up (this will require two people).
Next, slide each speaker part way off of the crate base so that the plastic bag can be unfastened from the enclosure bottom. Stand the speaker up and the bag can be slid off the top. Please refer to Figure 2.1.
` |
1. Remove screws.
2. Lift case. |
` |
3. Slide speaker, then undo bag.
4. Stand speaker up, then remove bag.
Figure 2.1 - To unpack the loudspeakers.
7
2.2 Installing the Grilles
The grille assemblies are behind a panel on the outside of the speaker crate. Remove the screws securing the panel, and then carefully pull the grilles straight out. The grilles are installed with friction fasteners and press into place on the speaker cabinets. Please see Figure 2.2.
Orientation of the Felt Anti-Diffraction Mask
The grille assembly includes a felt anti-diffraction mask. Should the felt mask be removed, be sure to note the correct inside-outside orientation when re-installing it. The tweeter and midrange openings are beveled on the side that faces the listener (away from the speaker).
1. Removescrews
2. Pull grille straightout.
3. Push grillepinsstraight into grillepin sockets.
Figure 2.2 - To install the grille assemblies.
8
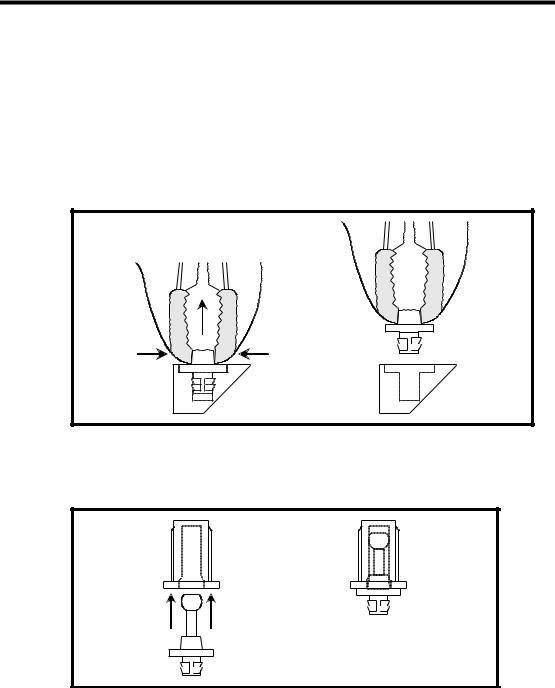
2.3 Replacing Grille Pins
The grille pins installed on the grille assemblies are fragile and can be easily damaged. Should any of the pins break, you may replace them using the following procedure.
1.Place the grille assembly face-down on a padded surface (a towel or carpeting).
2.Remove the damaged grille pin by pulling it straight out with a small pliers or similar tool. Please refer to figure 2.4. Make sure that the complete pin is removed and that there are no pin fragments left in the mounting hole.
Figure 2.4 - Removal of broken grille pin. Check for pin fragments in the mounting hole.
3. Insert the new grille pin in the grille pin installation tool (see figure 2.5).
Figure 2.5 - Insertion of new grille pin into installation tool.
9
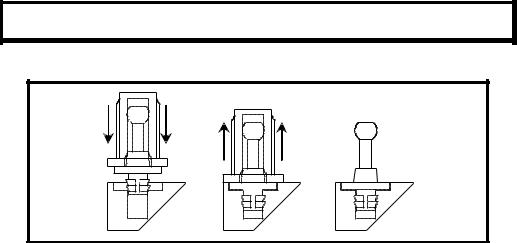
4.Carefully pull the grille cloth away from the frame mounting hole. The mounting hole must be clear of all obstacles during pin installation.
5.Place the exposed end of the grille pin in the open mounting hole. Check to insure that the grille cloth is not trapped between the pin and frame. Use a small hammer and gently tap the new grille pin in place. Then, pull the insertion tool off the new pin and verify that the pin flange is flush with the surface of the grille. Please refer to Figure 2.6.
WARNING: Grille pin breakage may result if the grille cloth becomes trapped between the pin and frame during installation.
Figure 2.6 - Installing grille pin into The Diamond grille frame. Note that after installation, the grille pin flange is flush with the surface of the grille.
6. Reposition the grille cloth that was pulled away from the frame mounting hole in step 4. The cloth should lay flat and wrinkle-free.
10
3 Wiring Instructions
Introduction
The crossover is housed in a sealed, non-accessible chamber in the bottom of the speaker cabinet, to minimize the effect of vibration on the components. The Diamond is equipped with high-quality barrier terminals for connecting the speaker cables. Ring terminals or spade lugs designed for #10 screws are recommended for cable termination.
Connecting the Speaker to the Amplifier
1.Place the speaker in its approximate location, then lay the speaker on its side, using a soft surface to avoid scratching the finish.
2.Connect the speaker wires to the terminal block on the speaker bottom (see Figure 3.1). Check to insure the correct polarity (positive lead connected to the (+) terminal and negative lead connected to the (-) terminal.
Do NOT over-tighten the screws.
3. Stand the speakers up.
11
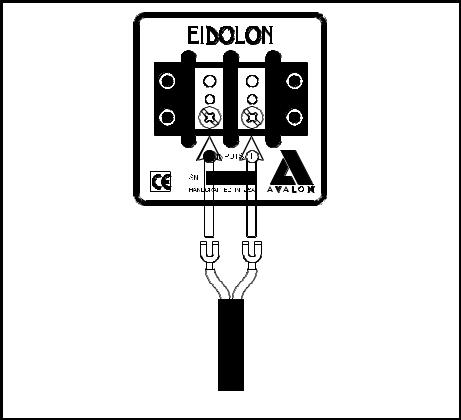
From Amplifier
Figure 3.1 - Bottom view of the speakers showing the connections from the amplifier to the loudspeaker. Check to insure the correct polarity (positive lead connected to the (+) terminal and negative lead connected to the (-) terminal).
12

4 Break-in Period
Your new Avalon Acoustics loudspeakers have an initial break-in period. They will not perform to their full sonic potential when first installed in your system. This is partially due to a residual polarization of the dielectric materials used in
the crossover capacitors and internal wiring.1 As music is played through the loudspeakers, the electrical signal will gradually anneal these materials. Similarly, the suspensions of the drivers will reach their optimal mechanical properties as the speakers are played. Only after the break-in period will the full performance of your Avalon Acoustics loudspeakers be realized.
The break-in process will occur naturally as music is played through the system. To reduce the time required, it is recommended that the system be played continuously, using either a digital source in the repeat mode or an FM broadcast signal. The recommended break-in procedure is as follows:
•Initial warm-up: three to six hours of quiet music.
•Extended break-in: 200 to 300 hours of loud and dynamic source material (e.g. Tangerine Dream, Optical Race, RCA 2042-2-P).
During the break-in period, the sonic properties of your loudspeakers may undergo several gradual shifts as the various components break-in at different rates. It is therefore suggested that the fine-tuning of the system be delayed until after the break-in period is completed. However, during the final phases of the break-in period, the sonic image will open up, the sound-stage will gain specificity, the bass control and impact will increase, and the overall sound will have a more relaxed, involving presentation.
1A high-voltage test is applied to wiring and capacitors during their manufacture. This results in a residual polarization of the dielectric materials.
13

5 Maximizing Performance
These details are imperative to obtaining optimum results from your Avalon Acoustics loudspeakers.
Break-in
The break-in period is critical to maximizing sonic performance and should take place before other adjustments (see the discussion on page 13). The break-in should begin with three to six hours of quiet music, followed by 200 to 300 hours of loud and dynamic source material.
Grille Assemblies
The grille assemblies, with their felt anti-diffraction masks, are integral elements of the loudspeakers' design. Unlike many other products, Avalon Acoustics loudspeakers are designed to be used with the grilles in place while listening, and removing them will degrade the system's performance. It is extremely important that the felt anti-diffraction masks make physical contact with the face of the loudspeakers, as air space between the felt and the speaker face will adversely affect sound quality.
Speaker Placement and Symmetry
Selecting the proper room position for your Avalon Acoustics loudspeakers can dramatically improve their performance. The following points highlight the fundamental concepts in loudspeaker positioning from the in-depth discussion in Chapter 8, Room Acoustics and Speaker Position (beginning on page 21):
•Left to right room symmetry aids in producing a balanced sound stage.
•Image depth is enhanced when the distance to the rear wall is increased.
•The most even bass response will be attained when the distances to the side and rear walls are not overly similar.
14
 Loading...