

Page 1

AUTOMATIC TRANSMISSION MULTI-CHANNEL
TWO-WAY LCD REMOTE STARTER
SYSTEM
AS-2510 TW
User Guide
Transmitter Part Number and Module Serial
Number .......................................................2
Introduction.................................................2
What is “eSH” Technology?........................2
Basic Remote Operation ............................2
LCD Remote Functions ..............................3
Basic Vehicle Operation .............................3
Alarm Clock ................................................4
Time Adjust Mode....................................... 4
Countdown Timer .......................................4
Parking Countdown ....................................4
Melody Selection ........................................4
Vibration Mode............................................4
Power Saving Mode ...................................4
Remote Control Finder ...............................4
LCD Remote Operation ..............................4
Basic Vehicle Operations.......................5
Transmitter Mode Selection...................5
Alarm and Countdown Adjustments ......5
Cold Weather Mode...............................5
Home Valet
LCD Transmitter Operation and
Confirmations..............................................7
Timing and Alarm Adjustment................8
Transmitter Finder .................................8
Remote-starting Your Vehicle.....................8
Vehicle Presets......................................8
Driving Off..............................................8
TM
.........................................6
Using the AS-2510 TW: Advanced Features9
Idle Mode...............................................9
Turbo Mode ...........................................9
“Home Valet” ™ Mode...........................9
Remote Valet Mode...............................9
Valet Mode ..........................................10
Panic Mode (this option must be
programmed) .......................................10
Quick Lockout
Remote Door Locks Option .................10
Cold Weather Mode.............................11
Priority Door Access............................11
The user-selectable options are as
follows:.................................................11
Remote Door Locks Option .................11
Safe Start.............................................11
Starter Kill Option ................................11
Passive or Active Arming ....................11
Ignition-controlled Door Locks Option.12
Ignition Relock .....................................12
Secure Lock Option.............................12
Remote Trunk Release Option............12
Engine Run Time.................................12
Multi-car Operation ..............................12
Diagnostics – Parking Lights Flash Rate
(Normal Operation)................................... 12
TM
..................................10
H.1.50.S.2.00 Rev: 1.05 October 16, 2003 – Fb CA Manufactured in Canada by Autostart
Page 2
FCC USER NOTICE (U.S.A.):
This device complies with Part 15 of the FCC Rules. Operation is subject to the
following two conditions: (1) this device may not cause harmful interference, and
(2) this device must accept any interference received, including interference that
may cause undesired operation.
NOTE: The manufacturer is not responsible for any radio or TV interference
caused by unauthorized modifications to this equipment. Such modifications
could void the user's authority to operate the equipment.
Transmitter Part Number and Module Serial Number
The box below contains important information concerning your Transmitter and your Module. We
have entered your Transmitter Part Number. Should you need to order a new Transmitter, you will
need to provide Autostart with the Part Number written below.
Transmitter Part Number:
CAR : AS5000TW-FM IVU
REMOTE : AS5000TW-FM HHU
Transmitter (companion) Part Number:
ASTR-2144
The installer is to write in the following box the Module’s serial number.
Module Serial Number:
Introduction
The AS-2510 TW is a state-of-the-art remote car starter system with command confirmation. It represents a major breakthrough in vehicle convenience technology and remote starter systems.
What is “eSH” Technology?
"eSH" technology uses Manchester decoding along with advanced custom data filters to help
reduce data-bit transfer errors. This filtering mechanism minimizes dropped commands by the
transceiver and develops more reliable range. By using narrow band filtering and unique software
driven noise filters, the radio set is able to achieve much better input sensitivity resulting in up to
2000 feet of operating range.
Basic Remote Operation
Your AS-2510 TW is equipped with a multi-channel 5-button LCD remote transmitter. It can
operate two independent Autostart-equipped vehicles (see Multi-car Operation for 2
functions).
P.2 User Guide AS-2510 TW
nd
car
Page 3
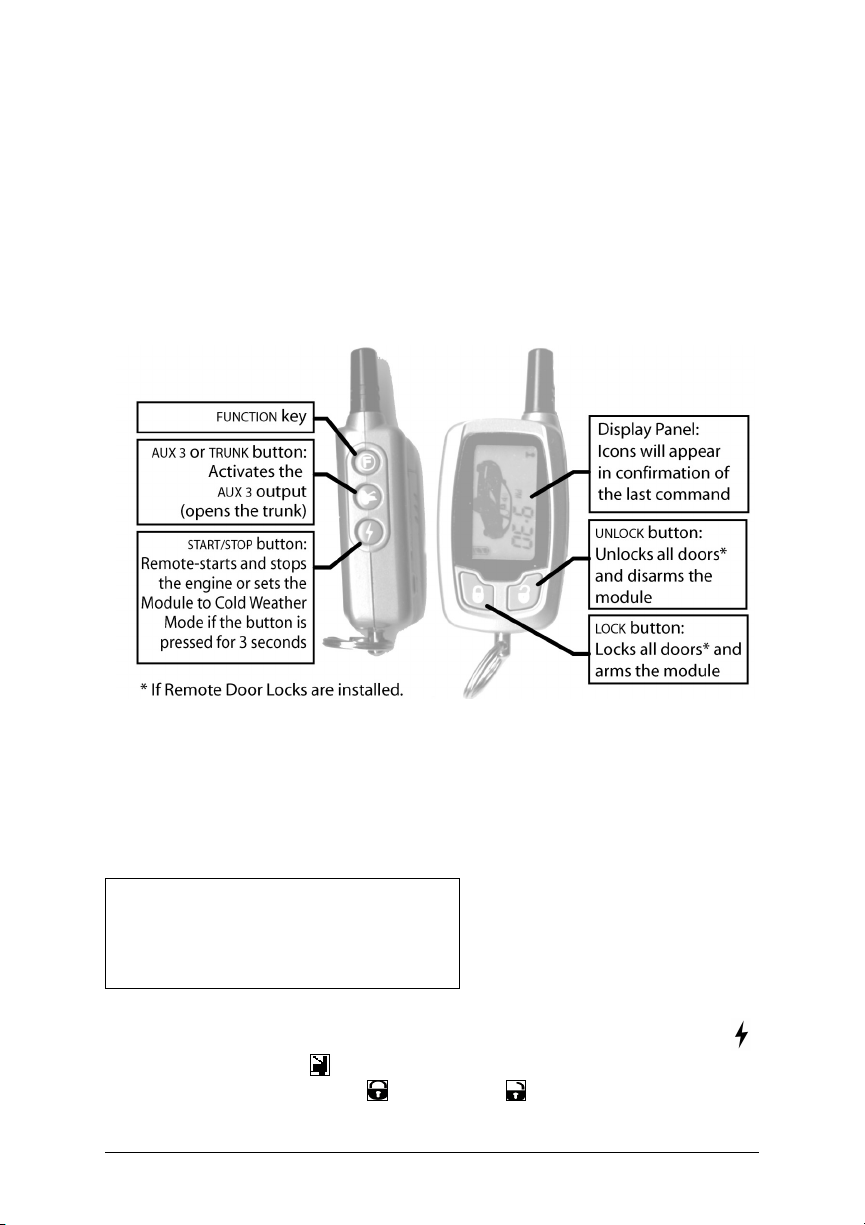
The functions of the transmitter are as follows:
Note: Pressing the
LCD Remote Functions
LOCK and UNLOCK buttons simultaneously will activate the AUX 2 output.
The Transmitter offers several command-confirmation and timer
features. This section explains some of the key functions available
on the Remote Control. Next section gives a summary of the button
combinations used to access the functions (see LCD Remote
Operation Tables).
Note:
If you wish to exit a function while still in the
process of accessing it, simply stop and wait for at
least 10 seconds: the Remote Control will return to
its normal state.
Basic Vehicle Operation
The vehicle can be remote-started and stopped using the START/STOP ( )
button. The
on the vehicle). The
the Doors of the vehicle (if the Remote Door Lock feature is installed on the
vehicle) and arm or disarm the Starter Kill (if installed). The
AS-2510 TW User Guide P.3
TRUNK ( ) button will open the Trunk (if this feature is installed
LOCK ( ) and UNLOCK ( ) buttons will lock and unlock
FUNCTION
Page 4
( ) button is used to access all advanced functions of the Remote Control.
(Refer to the LCD Operation and Confirmations tables.)
Alarm Clock
The LCD Remote Control has a built-in Alarm Clock which can be set up
using the button. Use the and buttons to switch the Alarm Clock
on and off (refer to the tables).
Time Adjust Mode
Use Time Adjust Mode to set the current time on your Remote Control
using the
button (refer to the tables).
Countdown Timer
This feature allows set up a countdown of a duration entered by the user in
hours and minutes using the button (refer to the tables).
Parking Countdown
This version of the Countdown feature is particularly useful for keeping
track of parking meter time: the user may quickly set up the countdown in
slices of 10 or 30 minutes using the
and buttons (refer to the tables).
Melody Selection
The Remote Control allows the user to select which melodies are to be
used upon the following events: remote starting of the vehicle, the Alarm,
ending of the countdown, entering Cold Weather Mode. Melodies for these
various events can be selected using the
button (refer to the tables).
Vibration Mode
Use this feature to replace audible signals with a vibration signal. Use
the and buttons to switch Vibration Mode ON and OFF (refer to the
tables).
Power Saving Mode
When set to Power Saving Mode, the Remote Control will cease polling the
Remote Starter Module on a regular basis for status information. This will
extend battery life. Use the
Mode ON and OFF (refer to the tables).
and buttons to switch Power Saving
Remote Control Finder
This function allows the user to locate the Remote Control when it has been
accidentally dropped near the vehicle. Pressing the Valet Button and
holding it down for 3 seconds (or until the Parking Lights flash five times)
will cause the Remote Control to start beeping for one minute. The beeping
will stop by itself after one minute, or it can be switched off by pressing the
Lock (
LCD Remote Operation
(First Car Control)
NOTE:
The following section explains the functions the Transmitter
can provide. If you wish to exit a function while you are
accessing it, simply stop and wait at least 10 seconds, the
Transmitter will return to normal.
) or the Unlock ( ) button on the Remote Control.
P.4 User Guide AS-2510 TW
Page 5

Basic Vehicle Operations
FUNCTION BUTTON PRESSED ICON BUZZER INSTRUCTIONS /DESCRIPTION
LOCK
UNLOCK
TRUNK OR AUX 3
START *
(See Runtime
Options below)
STOP
Light ON
+
None MELODY STOP THE ENGINE
ON for 10 seconds
1 Beep
2 Beep
1 Beep TRUNK OUTPUT
MELODY START THE ENGINE
LOCK AND ARM THE STARTER
UNLOCK AND DISARM THE
KILL
STARTER KILL
Press
once
Transmitter Mode Selection
FUNCTION BUTTON PRESSED ICON BUZZER INSTRUCTIONS /DESCRIPTION
POWER-SAVING
MODE
VIBRATION MODE
ALARM CLOCK
MODE ON/OFF
+ ( + )
PRESS AND HOLD
AND THEN PRESS
+
MELODY
VIBRATES 4X
MELODY
Press UNLOCK first and
then press the Function
button and the Lock button
simultaneously.
z Press once to have
ALARM CLOCK ON
z Press twice to have
ALARM CLOCK OFF
Alarm and Countdown Adjustments
On Press
Number
1 TIMING ADJUST MODE (HOUR)
2 TIMING ADJUST MODE (MIN)
3
4
5
6
7
8*
9
10
11
FUNCTION
ALARM CLOCK ADJUST MODE
(HOUR)
ALARM CLOCK ADJUST MODE
(MIN)
ALARM CLOCK MUSIC OR
POWER ON MUSIC SELECTION
ALARM CLOCK ADJUST MODE
(ON/OFF)
TIMING COUNT DOWN ADJUST
MODE (HOUR)
TIMING COUNT DOWN ADJUST
MODE (MIN)
TIMING COUNT DOWN ENDING
MELODY SELECTION 1
TIMING COUNT DOWN MODE
(ON/OFF)
START COMMAND
CONFIRMATION
BUTTON
PRESSED
Press and hold
for 5 sec
nd
2
Press of
rd
press of
3
th
press of
4
5th press of
th
press of
6
7th press of
8th press of
th
9
press of
10th press of
th
11
press of
ICON BUZZER
2 BEEPS
/
/
SELECTIONS
1,2,3,4,5
SELECTIONS
1,2,3,4,5
SELECTIONS
1,2,3,4,5
5
5
5
INSTRUCTIONS
/DESCRIPTION
z
upward adjustment
or choice ON mode.
z
press for
downward
adjustment or choice
OFF mode.
z
next options
press for
To cycle to the
Cold Weather Mode
FUNCTION BUTTON PRESSED ICON BUZZER INSTRUCTIONS /DESCRIPTION
AS-2510 TW User Guide P.5
Page 6

TO ENTER COLD
WEATHER MODE
TO EXIT COLD
WEATHER MODE
TO ENTER COLD
WEATHER MODE
IN SAFE START
MODE
TO EXIT COLD
WEATHER MODE
IN SAFE START
MODE
X 2
X 2
None None
None None
BEEP
BEEP
Press and hold
seconds.
Press and hold
Press
Press and hold for 1 sec-BEEP-
then press and hold for 3sec.
Press twice within 3 seconds.
Press and hold for 1 sec-BEEP-
then press and hold for 3sec.
for 3 seconds
twice within 3 seconds.
Home ValetTM
FUNCTION BY PRESSING ICON BUZZER INSTRUCTIONS / DESCRIPTION
Press or
Within 5 seconds, press
: the Transmitter will
and you will hear 1
display
SWITCH AND TURN TO THE ON
POSITION. THE ICON WILL
beep.
INSERT KEY IN INGNITION
DISAPPEAR.
TO ENTER HOME
VALET™ MODE
TO EXIT HOME
VALET ™ MODE
Step 1 :
Step 2 :
or
+
Simultaneously within 5 sec.
NONE NONE NONE
1 BEEP
for 3
+
P.6 User Guide AS-2510 TW
Page 7

T
iming Countdown Adjustment
(see “ON PRESS NUMBER” 8 of Alarm and Countdown Adjustment)
FUNCTION BY PRESSING ICON BUZZER
FOR PARKING
COUNT DOWN
PRESS AND HOLD
THEN PRESS
1st time
2nd time
3rd time
4th time
5th time
6th time
7th time
Once the Countdown is activated it will continue counting
down until reaching 0:00. If the Timer has not reached 0:00
and you are starting the vehicle, you should reset your
Countdown Timer to 0:00 before starting your vehicle as to
avoid being startled.
Please NOTE:
Safe Start Mode
FUNCTION BY PRESSING ICON BUZZER
MELODY
MELODY
MELODY
MELODY
MELODY
MELODY
MELODY
INSTRUCTIONS /
DESCRIPTION
10 MIN PARKING COUNT
DOWN MODE
20 MIN PARKING COUNT
DOWN MODE
30 MIN PARKING COUNT
DOWN MODE
60 MIN PARKING COUNT
DOWN MODE
90 MIN PARKING COUNT
DOWN MODE
120 MIN PARKING COUNT
DOWN MODE
PARKING COUNT DOWN OFF
MODE
INSTRUCTIONS /
DESCRIPTION
START ON SAFE
START MODE
STOP ON SAFE
START MODE
X 2
+
None MELODY
MELODY
Press twice within 3 seconds.
Press for 1 sec-melody-then
press 1sec.
*Runtime Status (Indicational purpose only)
FUNCTION BY PRESSING ICON Gasoline Diesel
ENGINE RUNTIME
4 minutes 9 minutes
15 minutes 20 minutes
25 minutes 30 minutes
LCD Transmitter Operation and Confirmations
(Second Car Control)
Basic Operations
FUNCTION BUTTON PRESS ICON BUZZER DESCRIPTION
LOCK
UNLOCK
START
STOP
TRUNK
+
+
+
+
+ +
+
None MELODY
TRUNK on vehicle
will pop up
AS-2510 TW User Guide P.7
1 Beep
2 Beep
MELODY
BEEP
Page 8
Start/Stop While in Safe Start Mode
FUNCTION BUTTON PRESS ICON BUZZER DESCRIPTION
Press
START ON
SAFE START
MODE
STOP ON SAFE
START MODE
+ X 2
+
+
None MELODY
MELODY
+
simultaneously twice
within 3 seconds. Press for
1 sec- a BEEP will be
heard- then press 1sec
and a melody will be heard
again.
Timing and Alarm Adjustment
To apply changes to the hours, minutes melody, etc. you must press and hold the Function button
for three (3) seconds after which the hour position will start to flash. To navigate through the
options, simply press the Function button until you reach the desired position.
Transmitter Finder
If the remote is misplaced, the user can locate it by calling it. In order to do so, press and hold the
Valet switch for three (3) seconds or until the Parking Lights flash five (5) times. The Transmitter
will start beeping. It will beep for a maximum of 60 seconds and then it will stop. If the user
retrieves the Transmitter before the 60 seconds are up, he can press the
stop the beeping.
Remote-starting Your Vehicle
Press the START/STOP button for approx. 1 second The melody will play then stop, once the vehicle
starts the melody will play again and the icon “run” will flash for confirmation. The icon will stop
flashing when the key is inserted and turned to the “ON” position or when the entire preprogrammed engine run time has elapsed.
If the vehicle doesn’t start the first time, the system will shut off, wait a few seconds and try to start
the engine again. It will make three start attempts before giving up.
Vehicle Presets
Heater and Heated Seat: When leaving the vehicle it is recommended to preset the accessory
controls in preparation for the next remote start. Settings for the blower motor (fan), front and rear,
as well as heated seats (if equipped) should not be left on
settings on
LOW or MEDIUM instead.
HIGH. It is recommended to leave the
Windshield Wipers, Radio and Headlights: Certain vehicles require the radio and / or windshield
wiper and / or headlight circuits to become energized while running under remote start. When
leaving the vehicle you must ensure that the windshield wiper and headlight switches are
Leaving the headlight switch
ON on certain types of vehicles could cause them to remain ON even
after remote starter shut down, resulting in a dead battery.
Driving Off
With the vehicle running under remote control, press the
UNLOCK button to disarm the system (and
unlock the doors if Remote Door Locks are installed). Enter the vehicle and do the following:
1. Turn the ignition key to the IGNITION ON (RUN) position.
(Do not turn the key to the CRANK position while the engine is running. This will cause the
starter motor to re-engage unless the Anti-Grind option has been installed.)
2. Press the brake pedal to disengage the remote starter unit.
You are now ready to drive off.
LOCK or UNLOCK button to
OFF.
P.8 User Guide AS-2510 TW
Page 9

Using the AS-2510 TW: Advanced Features
Idle Mode
This feature allows you to remove the ignition key from the ignition switch and leave the vehicle
running for its pre-programmed run time while you are away from your vehicle, or until it is shut
down. (To set the run time see Engine Run Time)
To enable the Idle Mode:
1. Press and hold the LOCK, UNLOCK or START/STOP button on your remote transmitter while the
engine is running.
• Pressing LOCK or UNLOCK will unlock the doors.
• Pressing START/STOP will leave the doors unaffected.
2. The parking lights will come ON.
3. Remove the ignition key, exit the vehicle and lock the doors.
The engine will go on running. It will shut down when the pre-programmed run time expires.
Caution: Do not leave children or pets unattended in a car running
in Idle Mode.
Note: When enabling Idle Mode, pressing LOCK or UNLOCK will
unlock the doors (if Remote Door Locks are installed).
Turbo Mode
When programmed (at the time of installation), this Option allows turbochargers to idle down: after
the user leaves the vehicle, the Engine will keep running for 60 sec. And shut down.
Proceed as follows to activate Turbo Mode:
1. With the Engine already running press LOCK on the Transmitter Until the Parking Lights come
on.
2. Remove the key: the Engine will go on running.
3. Exit the vehicle and close the Door.
4. Press the TRUNK button to lock the Doors and shut down the Engine after 60 sec. running
in Turbo Mode.
“Home Valet” ™ Mode
This safety feature will remotely place the vehicle into a no-remote-start mode: if the vehicle is
parked indoors there is no danger it will start accidentally by remote control or external trigger.
To e n t e r Home Valet Mode:
• Press LOCK or UNLOCK on the Transmitter.
• Within 5 seconds, press LOCK + START: the Transmitter will display the “Valet” icon
and you will hear a beep.
To e x i t Home Valet Mode, turn the ignition key to the IGNITION ON (RUN) position.
Note: Once Home Valet is activated, the vehicle will not start by remote control or external
trigger until the ignition key is turned to the IGNITION ON (RUN) position.
Remote Valet Mode
This feature will allow you to remotely put your system into Valet Mode by using the transmitter
instead of the Valet button as above.
Getting i n t o Valet Mode
• Hold the UNLOCK and START/STOP buttons simultaneously for 3 seconds.
• The Parking Lights will flash 3 times.
The Transmitter will BEEP once and will display the icon; the LED will remain on solid.
Getting o u t of Valet Mode
• Hold the UNLOCK and START/STOP buttons simultaneously for 3 seconds.
• The Parking Lights will flash 2 times.
The Transmitter will BEEP once and the icon will disappear; the LED will turn off.
Note:
AS-2510 TW User Guide P.9
Page 10
With the Remote Valet activated, the
remote starter function will be disabled.
Valet Mode
The system can be placed in Valet Mode to disable the remote starting capabilities. If the vehicle
needs to be serviced, or if you park it indoors, the Valet Mode will prevent the engine from being
accidentally started by remote control.
To put the system i n t o Valet Mode:
1. Turn the ignition key to the IGNITION ON (RUN) position.
2. Within 3 sec. press and hold the valet button for approx. 1 sec. The L.E.D. will turn ON and
remain lit.
3. The Transmitter will display the Valet icon .
To take the system o u t o f Valet Mode:
1. Turn the ignition key to the IGNITION ON (RUN) position.
2. Within 3 sec. press and hold the valet button for approx. 1 sec. The L.E.D. will go OFF. The
Valet Icon will disappear from the Transmitter screen.
The valet button can only be used if the ignition key is in the
IGNITION ON (RUN) position.
Panic Mode (this option must be programmed)
In an emergency situation, you can activate Panic Mode using the
• Shut down the engine,
• Unlock the doors (if
UNLOCK is pressed)
• or lock the doors (if LOCK is pressed),
• Disarm the Starter Kill and
• Activate the horn for 30 seconds.
LOCK or UNLOCK button. This will:
(See page 4 for a description of the Starter Kill option.)
To trigger Panic Mode:
• Press and hold the UNLOCK button for approximately 3 seconds until the horn starts to sound
and the parking lights flash: this will unlock the doors before the horn starts.
• Or press and hold the LOCK button for approximately 3 seconds until the horn starts to sound
and the parking lights flash: this will lock the doors before the horn starts.
Panic Mode will automatically shut off after 30 seconds.
Note: If you want to stop Panic Mode before the 30-second delay, press the
LOCK or UNLOCK
button.
Caution: Panic Mode will be available only if Horn Confirmation was configured at installation.
Quick LockoutTM
(Also called Secure Panic.) For fast protection, the system will LOCK all doors when you press
the brake pedal while the horn is activated and the system is in Panic Mode. (Quick Lockout
is only available when Panic Mode has been activated.)
Remote Door Locks Option
If your AS-2510 TW was installed with the Remote Door Locks option, you will have the
convenience of remote keyless entry.
To u n l o c k your doors and d i s a r m the system:
1. Press and hold the UNLOCK button for approx. 1 sec.
2. The parking lights will flash twice and the LED will turn off to confirm that the doors have been
unlocked and that the Starter Kill feature is disarmed if it was installed.
To l o c k your doors and a r m the system:
1. Press and hold the LOCK button for approx. 1 sec.
2. The parking lights will flash once and the LED will flash slowly to confirm that the doors have
been locked and that the Starter Kill feature is enabled if it was installed.
The horn will give one signal if configured at installation.
P.10 User Guide AS-2510 TW
Page 11

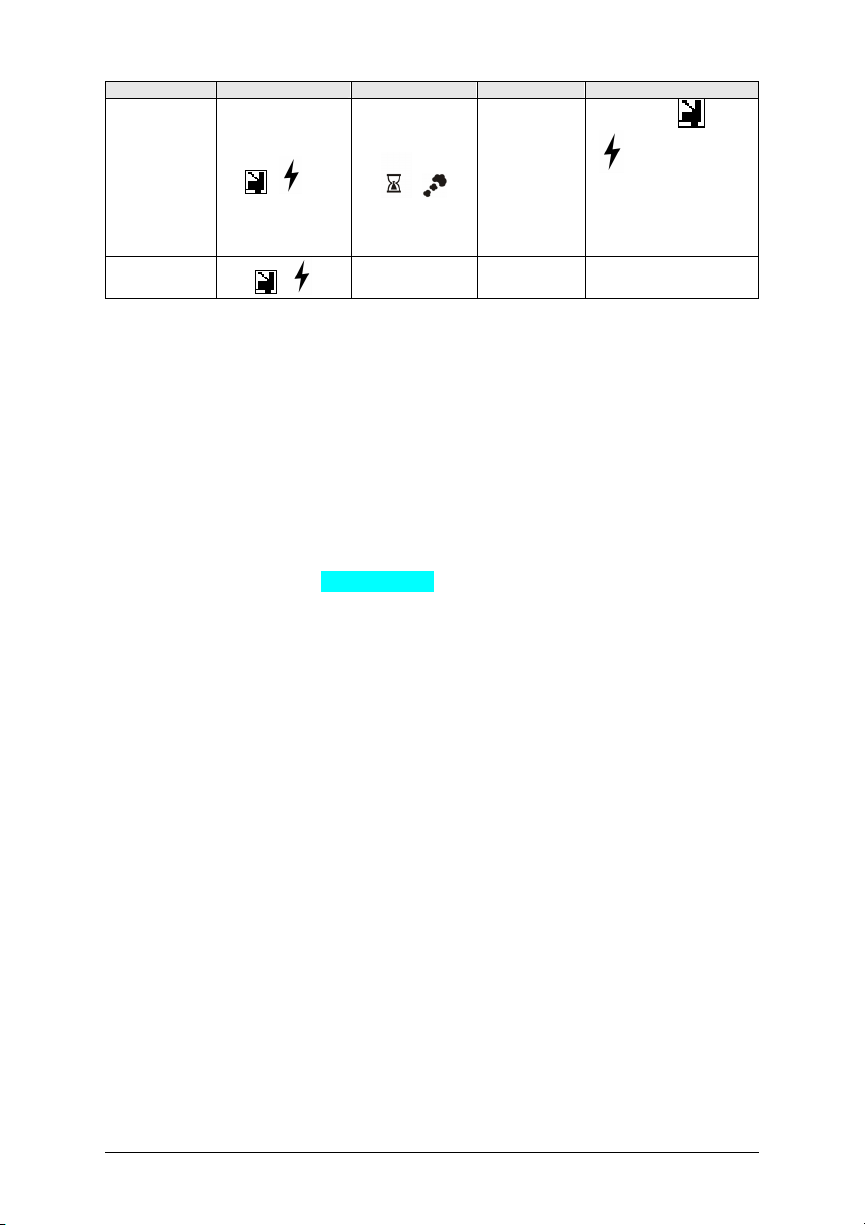
Cold Weather Mode
When the Cold Weather Mode is active, the engine starts every 2 hours and runs for 4 minutes (or
for 9 or 20 minutes with Diesel engines); this routine will go for a period of 24 hours.
To activate Cold weather Mode:
Press and hold start/stop button for three seconds. The parking lights will flash 3 times. There will
be one (1) beep as a confirmation and the
icon will be displayed.
If in safe start Mode, to activate Cold Weather:
Press and hold start/stop for 1second, the parking lights will flash once. Press and hold start/stop
again for 3 seconds, the parking light will flash 3 more times.
To exit Cold Weather Mode, do any of the following:
a) Open the Hood.
b) Start the Engine by remote.
c) Turn the Ignition Key to the
d) Place the vehicle into Valet Mode.
Press and hold START/STOP buttons for 3 seconds the icon will disappear.
IGNITION ON (RUN) position.
To exit Cold Weather in Safe Start Mode:
Press and hold START/STOP for 3 seconds, the parking light will flash 3 more times.
You can also exit Safe Start Mode by using steps “a” to “d” from the above description.
Priority Door Access
When programmed, this safety feature lets you unlock solely the driver’s door with a single press of
UNLOCK button on the transmitter; upon a second press of the UNLOCK button, all the other
the
doors will unlock.
The user-selectable options are as follows:
• Remote Door Locks
• Safe Start
• Starter Kill/ Anti-Grind
• Passive or Active Arming Starter Kill
• Ignition-controlled Door Locks
• Horn Honk on Lock
Remote Door Locks Option
If your AS-2510 TW was installed with the Remote Door Locks option, you will have the
convenience of remote keyless entry.
Safe Start
If this feature is enabled, it will require the user to press the
seconds to start the vehicle. This will eliminate accidental remote starts (for example: if there are
children playing with the Transmitter). To stop the vehicle, the user must press START/STOP once.
Starter Kill Option
With this added security feature, the system will prevent your vehicle from starting with the Ignition
Key when the Starter Kill is armed. If your Autostart was installed with the Starter Kill option, you
will not be able to start your vehicle with the Key unless the system has been unlocked first.
Passive or Active Arming
The Starter Kill option can be programmed to be active (will not arm automatically) or passive (will
arm automatically). In Passive Mode, the system can be configured to arm automatically either
after 1 minutes or after 3 minutes. If installed, the Starter Kill of your AS-2510 TW is configured by
default to a 1-minute Passive Arming Mode: the countdown starts when the Ignition is turned off.
• To disarm the Starter Kill option in Active or Passive Mode, press the UNLOCK button on the
transmitter. The parking lights will flash twice. (If Remote Door Locks were installed, this will
also unlock the doors.) In Passive Mode, the system will automatically re-arm 1 or 3 minutes
after the doors were unlocked unless the ignition key has meanwhile been inserted in the
ignition switch.
• Ignition Re-lock
• Secure Lock
• Remote Trunk Release
• Engine Run Time
• Multi-car Operation
• Turbo Mode (Turbo Cars)
START/STOP button twice within 3
AS-2510 TW User Guide P.11
Page 12

• To arm the Starter Kill option in Active or Passive Mode, press and hold the LOCK button on
the transmitter. The parking lights will flash once. (If Remote Door Locks were installed, this
will also lock the doors). In Passive Mode, the system will automatically arm 1 or 3 minutes
after the engine has been turned off.
Important note: When the system re-arms automatically, you can disarm the system again by
pressing the UNLOCK button.
Ignition-controlled Door Locks Option
This is an added security feature. If your system was installed with the Ignition-controlled Door
Locks option, the doors will automatically be locked as soon as the brake pedal is pressed after the
ignition key has been turned to the
OFF position, the doors will automatically be unlocked.
IGNITION ON (RUN) position. When the ignition key is turned to the
Ignition Relock
On the AS-2510 TW, whenever the Ignition-controlled Door Locks are enabled and the ignition key
IGNITION ON (RUN) position, when the brake pedal is pressed the system will automatically
is in the
LOCK any door that has been unlocked, opened and closed.
Secure Lock Option
Before it can remote-start your vehicle, the module must first disarm the factory security system.
The Secure Lock feature may be required on certain vehicle models with factory security systems
that automatically unlock the doors when the security system is disarmed.
To keep your vehicle protected when the factory security system is disarmed for a remote start,
Secure Lock will relock your doors as soon as the vehicle has started.
Once the engine run cycle ends, Secure Lock will rearm your factory security system.
Remote Trunk Release Option
If your system was installed with the Remote Trunk Release, you can open your trunk by pressing
TRUNK button for 3 sec. on the remote transmitter. Note that the Trunk Release option will only
the
operate when ignition is
OFF or if the vehicle is running under remote control.
Engine Run Time
If you have a gas engine, your AS-2510 TW can be programmed to run the engine for 4, 15, or
25 minutes (15 minutes by default). If you have a diesel engine, the module can be programmed to
run the engine for 9, 20, or 30 minutes (20 minutes by default).
Multi-car Operation
This option allows the owner of two vehicles both equipped with AS-2510 TW systems to control
both systems with only one remote transmitter. To control the 2
TRUNK button and the button of the function you wish to use:
nd
vehicle, simultaneously press the
• Press TRUNK + LOCK button simultaneously: ...........LOCK
• Press TRUNK + UNLOCK:............................................UNLOCK
• Press TRUNK + START/STOP:......................................START/STOP
• Press TRUNK + UNLOCK + LOCK:.................................TRUNK
Starting the vehicle in Safe Start Mode:
♦ Press TRUNK + START/STOP…
♦ Within 3 seconds press TRUNK + START/STOP again
Stopping the vehicle in Safe Start Mode:
♦ Press TRUNK + START/STOP once.
Diagnostics – Parking Lights Flash Rate (Normal Operation)
Flashes Description
• Doors locked, Starter Kill armed.
• End of Run Time.
•
1
TRUNK button pressed
• Start signal received by the Module.
• Cold Weather Mode cancelled.
• Cannot start after maximum number of attempts is reached.
P.12 User Guide AS-2510 TW
Page 13

2
3
4
5
6
8
10
1 – pause – 2–
pause – 2
1 – pause – 2
2 – pause – 3
2 – pause – 1
ON solid
ON 2 sec.
ON 3 sec.
ON 4 sec.
ON 25 sec.
Irregular
Constant flashes
up to 30 sec.
• Remote start attempt cancelled by remote.
• Run Time cancelled.
• Doors unlocked, Starter Kill disarmed.
• Exit Remote Valet
• Entering Cold Weather Mode.
• Entering Remote Valet.
• +12 V where detected on the brake line and cranking was cancelled.
• Entering Tach-learning Mode
• New Transmitter learnt.
• Tach learnt.
• A remote start was attempted while a Tach or a vacuum signal was detected
before cranking.
• Unit reset: occurs when the Unit is reset to the factory defaults.
• The Hood Switch line went to ground during cranking or Run Time.
• There was an attempt to start the vehicle while the Module was in Home Valet™.
• There was an attempt to start the vehicle while the latter was in Valet Mode.
• Get into Cold Weather Mode when in Safe Start Mode.
• Exit Cold Weather Mode when in Safe Start Mode.
• Cold Weather Mode: the Brake Pedal is being held down (automatic-transmission
models only). Entering Idle Mode and Turbo Mode.
• The Hood is up and the Hood Switch line went to ground. This is step one of the
Programming Modes.
• First press of the START button under Safe Start.
• Locking or unlocking a Door (with Door pulses configured to 4 sec.)
• If the Hood Pin-switch has been pressed twice (down-up / down, up): the Unit
went into step 1 of the Programming cycle and no Transmitter activity was
detected for 20 seconds
• Or the Unit went into step 1 of the Transmitter Code Learning procedure and no
activity was detected for a few seconds. The Unit has exited the Transmitter Code
Learning procedure.
• If the unit gives irregular signals (1 to 10 flashes followed by a pause, followed by
further flashes), the system is playing back event-logging codes. This occurs when
the Hood Pin-switch is pressed three times (down-up / down-up / down-up)
• Panic Mode.
AS-2510 TW User Guide P.13
 Loading...