

Page 1
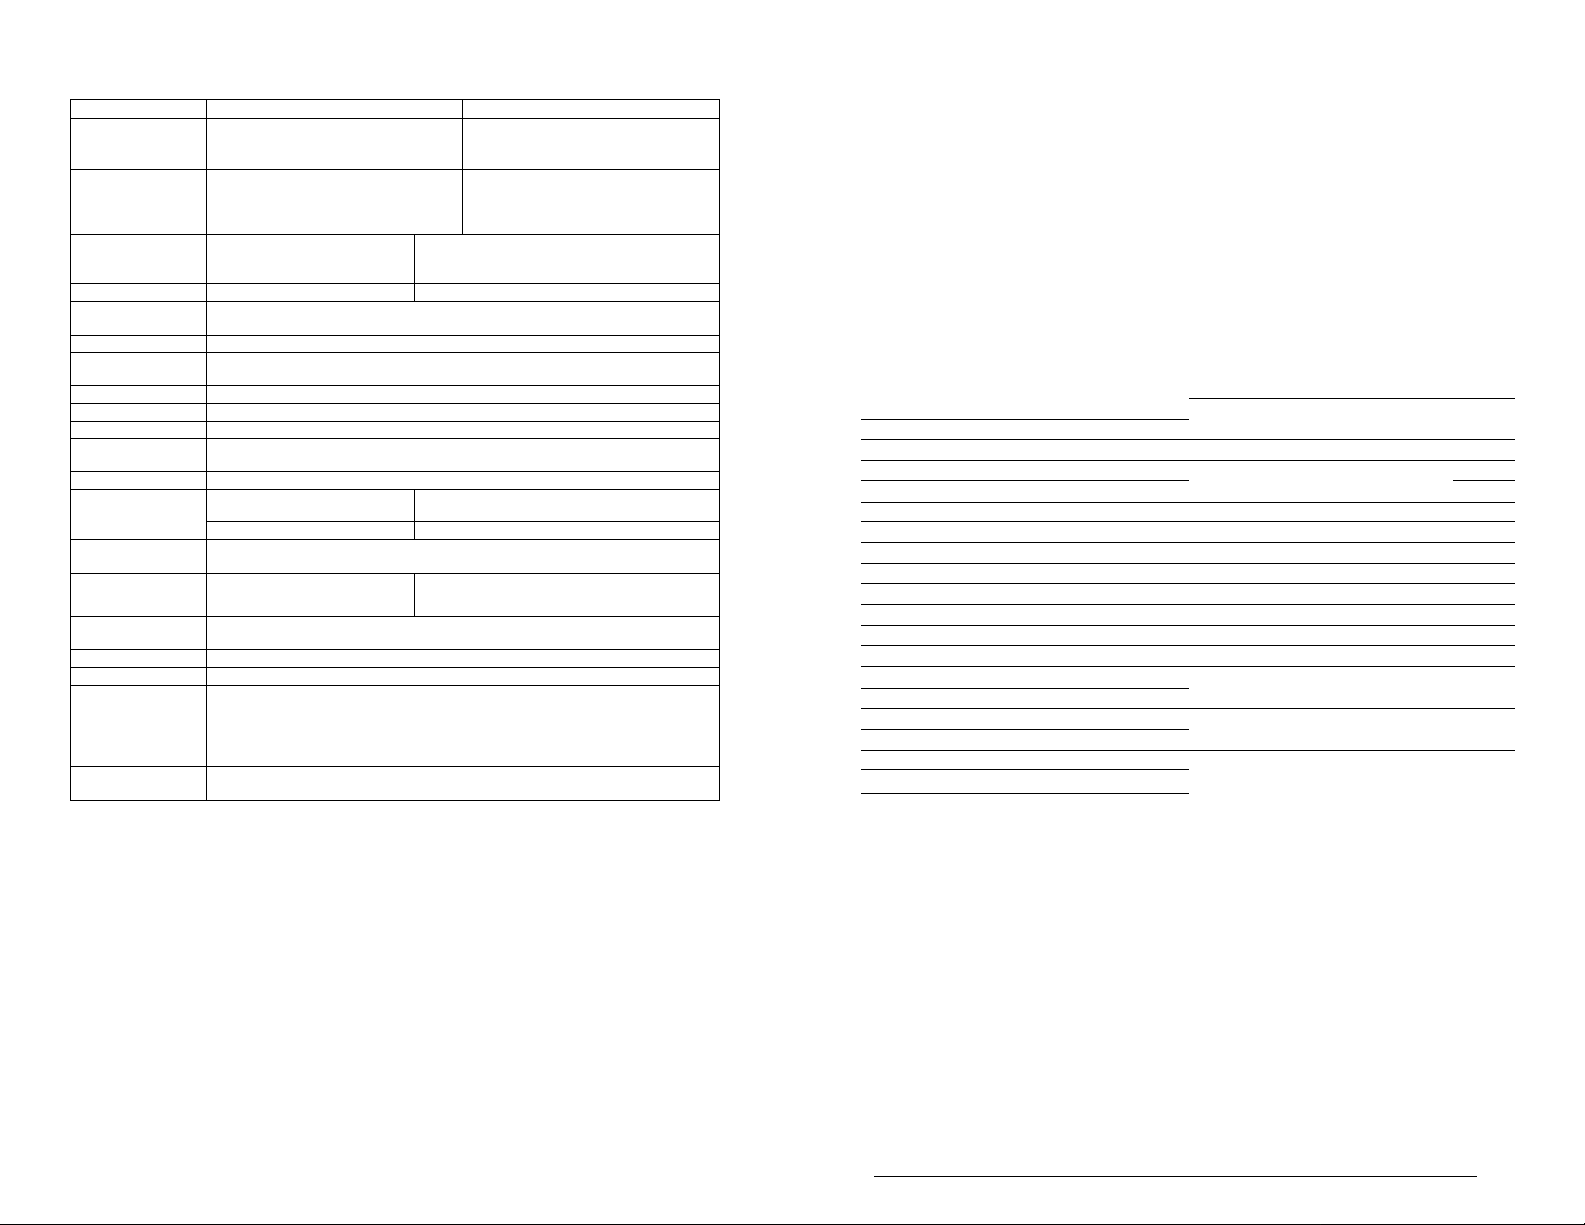
Parking Lights Flash Rate (Normal Operation)
Flashes Description
1
2
3
• Doors locked, Alarm and starter kill armed.
• Run time has expired.
• TRUNK button pressed.
• Remote start attempt cancelled by remote.
• Doors unlocked, starter kill disarmed.
• Exiting ignition valet
• Entering cold weather mode
• Entering ignition valet
• Entering or exiting Ready Mode
♦ Start signal received by the module.
• Cold weather mode cancelled.
♦ Exiting remote valet
• Entering remote valet.
• Entering extended run time.
3 slow flashes^ >after a failed start attempt The module did not detect a tach signal.
4
• +12 V detected on the brake input wire either while cranking or during run time.
♦ Entering multi-speed tach programming.
5 Slow • Start attempt failed because no tach signal has been programmed.
5 Fast
• Tach signal programmed.
• New transmitter programmed.
6 • A remote start was attempted while a tach-before-crank signal was detected before cranking.
8 • Unit reset see “Resetting the Module” (p.Error! Bookmark not defined.)
10 • A ground (-) signal was detected on the hood pin input wire.
1 - pause - 2
♦ There was a remote start attempt while the vehicle was in valet mode.
• Failed start: vehicle’s low battery voltage.
2 - pause - 2 • There was an attempt to start the vehicle while the module was in valet mode.
ON SOLID for 3
seconds^.
ON continuously • Idle mode: Idle mode is engaged
^followed by 1 flash Exiting cold weather mode
^followed by 3 flashes Entering cold weather mode
• Run time: The vehicle has been remote started and is in run time.
ON continuously While the brake pedal is pressed. • Confirms that cold weather mode is engaged
ON 2 seconds
• The hood has been opened and a ground {-) signal has been detected on the hood pin input
wire.
ON 4 seconds • Locking or unlocking a door (with Door pulses configured to 4 sec.)
ON 20 seconds • The hood pin has been flashed and you now have access to the programming options.
• The Hood Pin-switch has been pressed twice: the Unit went into step 1 of the Programming
ON 25 SEC.
CONSTANT FLASHES
UP TO 60 SEC.
Centre procedure, and no Transmitter activity was detected for 20 seconds.
• Or the Unit went into step 1 of the Transmitter Programming procedure and no activity was
detected for a few seconds. The Unit has exited the Transmitter Programming procedure.
• Panic Mode is activated.
♦ In Siren or Horn Mode: Alarm condition generated by an intrusion, or when the System is
powered up.
O NE
ST A R T E R
WAY
MANUAL TRANSMISSION REMOTE
AND
FULL-FEATURED ALARM SYSTEM
AS-62651SH
User Guide
Transmitter Part Number and Module Serial Disarmed Notification
Number........................................
Introduction
Basic Remote Operation
.................................
.............
Remote-starting Your Vehicle
Remote-starting
Vehicle Presets
Driving Off
Idle Mode
....................................
....................
.....................
.............................
“Home Valet” TM Mode.................
Panic Mode
.................................
Quick LockoutTM..........................
Cold Weather Mode
....................
Priority Door Access....................
Chirp Delete
Shock Delete
................................
...............................
User-selectable Options..............
Safe Start
Remote Door Locks
..............................
..............
Passive or Active Arming
.....
......
.........
2 Shock Sense And Warn-Away Sense .8
.........
2 Siren Chirps
.........
2 Open Zone Notification:
.........
3 Ignition-Controlled Door Locks
.........
4 Ignition Re-Lock...................
.........
4 Secure Lock
.........
4 Remote Trunk Release........
.........
4 Starter Kill
.........
6 Turbo Mode
.........
6 Engine Run Time
.........
6 Extended Run Time
.........
7 Multi-Car Operation
.........
7 Car Finder
.........
7 Diagnostics - Chirps Diagnostics -Parking
.........
7 Lights
.........
7 Parking Lights Flash Rate (Normal
.........
8 Operation)..................................
.........
8
.........
8
.........................................
.........................
.........................
............................
.........................
.................
..................................
..........
.......
.............
.............
..........
..........
..........
..........
..........
..........
..........
..........
........
........
........
........
........
........
........
8
9
9
9
9
9
9
9
10
10
10
11
11
11
12
User Guide P- 12
H.4.30.S.1.00 DOC.1.00 CATL - December 14, 2006 Manufactured in Canada by Autostart
Page 2

Transmitter Part Number and Module Serial Number
Transmitter Part Number:
The installer is to write in the boxes below the Module’s serial number and the location of
the Valet Switch.
Module Serial Number:
Valet Switch is located (if installed):
Introduction
This Module is a state-of-the-art combination of an Alarm system and a remote car
starter. It represents a major breakthrough in vehicle security technology and remote
starter systems. This unit is distributed with a super-heterodyne antenna with range of up
to 1500 feet / 450 m.
Basic Remote Operation
This system is equipped with a 5-button multi-channel transmitter. It can operate two in
dependent identically-equipped vehicles (see Multi-Car Operation for second-car
transmitter functions).
Intrusion Codes via LED light
If there has been an intrusion in the vehicle while it was locked and armed, the LED will
provide an intrusion code corresponding to the type of the intrusion which took place. The
LED intrusion codes are flashed in continuous loops. They are the same codes as those
provided during Events Playback:
1 x = Power-up Reset: Battery disconnected / reconnected or dead>
2 x = Doors intrusion
3 x = Shock Sense
4 x = Hood
5 x = Panic
6 x = Ignition
Multi-Car Operation
This option allows the owner of two vehicles, both equipped with identical systems, to
control both systems with only one remote transmitter. To control the second vehicle,
simultaneously press the
Press trunk + lock button simultaneously:
Press trunk + unlock:
Press trunk + start: ...............................................
Press trunk + stop:..................................................
Press trunk + lock + unlock:
Press trunk + stop for 3 sec:...................................
trunk button and the button of the function you wish to use:
.............
.............................................
.................................
.............
.............
.............
.............
.............
.............
lock
unlock
start
stop
aux 3 (trunk)
cold weather mode
Car Finder
When enabled, the Car Finder option will help you locate your vehicle by sending a
pulsating signal through the horn or the siren. To hear the signal, press the lock and
unlock buttons simultaneously. This will produce a pulsating signal for the time you keep
the buttons pressed.
Diagnostics - Chirps Diagnostics - Parking Lights
Chirps Description
• Lock and arm the system.
1
• lock confirmation.
• Entering Mode 1 in the programming options.
• Start attempt when engine is already running under remote control.
• Unlock and disarm.
2
• Transmitter learnt.
• Entering Remote Valet.
• Entering Mode 2 in programming options.
3
• Lock and arm - a zone is unprotected.
• Entering Mode 3 in the programming options.
• Unlock and disarm - an intrusion occurred.
4
• Entering Tach Learning procedure.
• Entering Mode 4 in the programming options.
5
Constant up to
60 seconds
Constant up to
30 seconds
• Siren or Horn Chirp Timing adjustment.
• In Siren Mode: alarm condition generated by an intrusion, by Panic Mode or when the
Module is powered up. The Siren will sound for 60 sec.
• In Horn Mode: alarm condition generated by an intrusion, by Panic Mode or when the
Module is powered up. The Horn will sound for 30 sec.
User Guide P. 2
P. 11 User Guide
Page 3

In passive Mode, the Starter Kill can be set to arm automatically in 30 seconds either
with or without Siren chirps.
To disarm the Starter Kill, press and hold the unlock button on the transmitter. The
parking lights will flash twice. (If door locks were installed, this will also unlock the doors.)
In passive Mode, the system will automatically re-arm itself 30 seconds after unlocking
the doors if the key has not been inserted in the ignition by then.
To arm the Starter Kill, press and hold the lock button on the transmitter. The parking
lights will flash once. (If the door locks were installed, this will also lock the doors.)
Turbo Mode
If Turbo Mode is configured at installation, it will allow a turbocharger to idle down after
the user leaves the vehicle: the unit will take over the vehicle and keep it running for 60
seconds (or until it is shut down by remote control), then shut down the engine and set
the Remote Car Starter to Ready Mode.
Follow all steps of the Ready Mode routine, to activate Turbo Mode:
1. Ensure that all the doors are closed and that the shifter is in the neutral position.
2. With the engine already running, apply the parking brake and release the brake
Pedal.
Make sure to release the brake pedal.
3. Within 20 sec. Press lock, unlock or start on the transmitter.
The parking lights will flash 3 times quickly and remain lit.
4. Remove the key: the engine will go on running.
5. Exit the vehicle and close the door.
6. Press and hold either:
a. lock to lock the doors and shut down the engine after 60 sec.;
b. unlock to unlock the doors and shut down the engine after 60 sec.;
c. stop to shut down the engine immediately, without affecting the doors
(this will by-pass Turbo Mode).
d. trunk to set the vehicle into idle mode
Engine Run Time
If you have a gas engine, your system can be programmed to run the engine for 3, 15, or
25 minutes (15 min default). If you have a diesel engine, it can be programmed to run the
engine for 8, 20, or 30 minutes (20 min default).
Extended Run Time
With the vehicle running under a remote start, bressinfl and holding the start button foil
more than 1 second^ will reset the run time counter to zero and restart the run time cycle
from the beginning.
To stop the vehicle, at any moment, simply press the stop button. This procedure can
only be carried out once per remote start.
Example: if your Module is programmed for a run time of 3 minutes and your vehicle has
been running for 2 minutes already, pressing the start button will reset the counter to
zero and the Engine will run for another cycle (in this case, 3 minutes).
The functions of the transmitter are as follows:
LOCK: LùC\i\. LhÉ ÌXtùtì and ar№
ThP STARTER Klli.
e
UNLOCK^ Untodis.W hxn jnO
Uunm me STaKTEK KILL.
AjCLhuiles [he AUX 2 auCjxii IF
s
o
Note: Pressing the lock and unlock buttons at the same time will activate the aux 2 output.
Remote-starting Your Vehicle
Setting Your Vehicle Into Ready Mode
In order to start the vehicle by remote, the unit must first be set to Ready Mode. If the
unit is not set to Ready Mode, it cannot remote-start the vehicle.
Once the system is set to Ready Mode, the vehicle can be remote-started and stopped at
wish.
To set the system to Ready Mode:
1. Ensure that all the doors are closed and that the shifter is in the neutral
position.
2. With the engine already running, apply the parking brake and release the brake
pedal.
Make sure to release the brake pedal.
3. Within 20 sec. press lock, unlock or start on the transmitter.
The parking lights will flash 3 times quickly and remain lit.
4. Remove the key: the engine will go on running.
5. Exit the vehicle and close the door.
6. Press and hold either:
a. lock to lock the doors and shut down the engine;
b. unlock to unlock the doors and shut down the engine;
c. stop to shut down the engine without affecting the doors.
Remaining In Ready Mode
Once the vehicle is in Ready Mode you can start and stop the vehicle at wish. However,
should any of the following occur, the vehicle will exit Ready Mode - thus eliminating the
remote start option until Ready Mode is restored:
1. Door opened;
2. Hood opened;
3. Brake pedal pressed;
4. Parking brake disengaged;
5. Ignition key turned to the ignition on (run) position.
Note: The unit will notify the user that it has exited Ready Mode by giving 3 slow flashes
(parking lights).
Di»r'L
ItUhK: me miNK «
■utivjtn die AJX J oulptft.
RiHvi«« uiru ihe EiyJrie
iTO^l
5[0[K [hi enelne Of Ì4Q dii k\o>
Cc4d 'WtailM' MiHJif IT prfadiiJ fpr
3
User Guide P. 10
P. 3 User Guide
Page 4

Remote-Starting
Press the start button for approx. 1 second. The parking lights will come on, informing
you that the unit has received your signal. The engine will start approx. 5 seconds later.
The parking lights will remain
on during the pre-programmed run time.
If the vehicle doesn’t start at the first attempt, the system will shut down. If your vehicle is
equipped with an automatic transmission, there will be 3 start attempts before the system
gives up.
Vehicle Presets
Heater & Heated Seat
When leaving the vehicle it is recommended to preset the accessory controls in
preparation for the next remote start. Settings for the blower motor (fan), front and rear,
as well as heated seats (if equipped) should not be left on high. It is recommended to
leave the settings on low or medium instead.
Windshield Wipers & Radio & Headlights
Certain vehicles require the radio and / or windshield wiper and / or headlight circuits to
become energized while running under remote start. When leaving the vehicle you must
ensure that the windshield wiper and headlight switches are off. Leaving the headlight
switch on on certain vehicles could cause them to remain on even after remote starter
shut down, resulting in a dead battery.
Driving Off
With the vehicle running under remote control, press the unlock button to disarm and
unlock the doors. Enter the vehicle and do the following:
Turn the ignition key to the ignition on (run) position. (Do not turn the key to the Start
position while the engine is running. This will cause the starter motor to re-engage.)
Press the brakes to disengage the remote starter unit.
You are now ready to drive off.
Idle Mode
Convenience feature: Idle Mode allows you to keep the engine running and the doors
locked while you stop, for example, at a convenience store or for a short delivery.
This feature allows you to let the remote starter take over control of the vehicle (i.e. no
Key in the Ignition Switch) while the engine is running. For example, if you stop for a
delivery or at a convenience store, lock your vehicle and leave it running for the length of
a run cycle while you are away.
Idle Mode can be activated through the same routine as that used for Ready Mode; at
the last step, the trunk button is pressed instead of the other buttons:
1. Ensure that all the Doors are closed and that the Shifter is in the Neutral
position.
2. With the Engine already running, apply the Parking Brake and release the
Brake Pedal.
Make sure to release the brake pedal.
3. Within 20 sec. Push lock, unlock or start on the Transmitter.
The parking lights will flash 3 times quickly and remain lit.
4. Remove the key: the Engine will go on running.
5. Exit the vehicle and close the Door.
Siren Chirps
(On by default.) The siren will chirp to confirm the system's basic operations:
By default, when the doors are being locked the siren will give one chirp if none of the
zones are active.
If a zone is active as the doors are being locked, the siren will give three chirps.
When the doors are being unlocked, the siren will give two chirps if no intrusion was
detected.
If an intrusion was detected, as the doors are being unlocked the siren will give four
chirps.
The system can alternatively be set to:
Warning Mode (no chirp during lock/unlock - unless a zone is active when locking, in
which case there will be 3 chirp upon locking - or unless the alarm was triggered, in
which case there will be 4 chirps when unlocking);
Open Zone Notification (the system will warn for doors opened up to 10 seconds after
arming).
No Chirp (the vehicle will not chirp under any circumstance).
Open Zone Notification:
(Off by default.) This feature will warn the user when a Door is left open: upon the
arming of the Module, a 10-sec. notification delay will take place, after which the Siren
will chirp 3 times if an open door is detected.
Ignition-Controlled Door Locks
This is an added security feature. If your system was installed with the Ignition-Controlled
Door Locks option, the doors will automatically be locked as soon as the key is turned to
the ignition on (run) position while the brakes are pressed. When the key us turned to the
off position, the doors will automatically be unlocked.
Ignition Re-Lock
When the Ignition-Controlled Door Locks option is enabled and the ignition is on, should
any door be unlocked and opened, all the doors will be re-locked next time the brake
pedal is pressed.
Secure Lock
This is an added security feature. If your system was installed with the Secure Lock
option, it will automatically lock your doors and arm the system 4 seconds after your start
your car by remote. The system will automatically lock the doors again after shut-down.
Remote Trunk Release
If your system was installed with the Remote Trunk Release, you can open your trunk by
pressing the trunk button for 3 sec. on the transmitter, or by pressing the trunk button
twice within 3 sec.
Starter Kill
This added security feature will immobilize your vehicle when the system is armed. If
your system was installed with the Starter Kill option, you will not be able to start your
vehicle with the key unless the system has been disarmed first.
The Starter Kill option follows the Alarm arming function, and can therefore be
programmed to be active (will not arm automatically) or passive (will arm automatically).
User Guide P. 4
P. 9 User Guide
Page 5

The user-selectable options are as follows:
Safe Start Ignition Re-Lock
Remote Door Locks Secure Lock
Passive or Active Arming Remote Trunk Release
Disarm Notification Starter Kill
Shock Sense and Warn-Away Sense Engine Run Time
Siren Chirps
Multi-Car Operation
Ignition-Controlled Door Locks
Safe Start
Safety feature: Safe Start features will prevent accidental remote starts.
If this feature Is enabled, the user must press the start button 2 times within 3 seconds
to remote-start the vehicle.
If Swap Start Mode has been configured by your Installer, to remote-start your vehicle
press LOCK and unlock simultaneously. (Press start to trigger the aux 2 output.)
Safe Start features will eliminate accidental remote starts, e.g. when there are children
playing with the transmitter.
Remote Door Locks
If your system was Installed with the Remote Door Locks option, you will have the
convenience of remote keyless entry.
To unlock your doors and disarm the system:
1. Press and hold the unlock button for approx. 1 sec.
2. The parking lights will flash twice and the LED will go out to confirm that the doors
have been unlocked, that the Starter Kill feature Is disarmed (If It was Installed) and
that the Alarm Is disabled.
To LOCK your doors and arm the system:
1. Press and hold the lock button for approx. 1 sec.
2. The parking lights will flash once and the LED will flash slowly to confirm that the
doors have been locked, that the Starter Kill feature Is enabled (If It was Installed)
and that the Alarm Is armed.
Passive or Active Arming
By default, the system is configured to Passive Arming Mode. In Passive Arming Mode,
the Starter Kill and the Alarm will automatically arm 30 seconds after the last door is
closed. The system will not arm itself if a door is left open.
Important note: When the system re-arms automatically or if there is an Alarm condition, you
can disarm the system by simply pressing the unlock button.
Disarmed Notification
(off by default.) This feature will notify the user when the vehicle was left disarmed: after
the Engine has been shut down and all doors have been closed, after 10 seconds the
horn will honk once if the doors have been left unlocked.
Shock Sense And Warn-Away Sense
(Both enabled by default.) This system can react to a full shock by triggering the Alarm; it
can also respond to a lighter shock (30 % of the strength of a full shock) by giving a
warn-away (without triggering an Alarm condition). When the Engine is running after a
remote start, however, the system will prevent any Alarm condition to be triggered ;
it will still give a warning sound if warn-away is enabled._____________________________
User Guide P. 8
6. Press the trunk button until the system is armed (the doors will be locked if
remote door lock is installed).
If the pre-programmed run-time expires or if the user shuts down the engine by remote
control, the vehicle will get in Ready Mode.
Caution: Do not leave children or pets unattended in a car running in Idle Mode.
Valet Mode
The system can be placed in Valet Mode to disable the remote starting capabilities. If the
vehicle needs to be serviced, or if you park it indoors, the Valet Mode will prevent the
engine from being remote-started accidentally.
To put the system into Valet Mode:
1. Turn the key to the ignition on (run) position.
2. Within 3 sec. press the Valet button and release it, the Parking lights will flash 3
times. Turn the ignition off, the LED will come on. (The system is in Valet Mode.)
To take the system out of Valet Mode:
1. Turn the key to the ignition on (run) position.
2. Within 3 sec. press and release the Valet button, the Parking Lights will flash tiwce.
The LED will go out. (The system is out of Valet Mode.)
The Valet button can only be used if the ignition key is in the ignition on (run) position.
Ignition Valet
The system can be placed in Valet Mode to disable the remote starting capabilities. If the
vehicle needs to be serviced, or if you park it indoors, Valet Mode will prevent the engine
from being accidentally started by remote control.
To enter Valet Mode
1. With the key in the Ignition switch, turn the key to the on (run/ignition) and then off
positions 5 times within 10 seconds.
2. The Parking Light will flash 3 times indicating the Module is now in Valet Mode. The
LED will turn on solid.
To exit Valet Mode
1. With the key in the Ignition switch, turn the key to the on (run/ignition) and then off
positions 5 times within 10 seconds.
2. The Parking Light will flash twice indicating the Module is now out of Valet Mode.
The LED will turn off.
Remote Valet
This feature will put your vehicle into Valet Mode using the remote transmitter instead of
the Valet button as above.
Note: Once the Electronic Valet is activated, the remote starter and Alarm features are
disabled.
To put the system into Valet Mode:
1. Hold down the unlock and start buttons simultaneously for 3 seconds.
2. The Parking Lights will flash 3 times. The siren will chirp twice and the LED will come on.
P. 5 User Guide
Page 6

To take the system out of Valet Mode:
1. Hold down the unlock and start buttons simultaneously for 3 seconds.
2. The Parking Lights will flash 2 times.
The siren will chirp twice, then pause, then chirp twice again, and the LED will go out.
"Home Valet" Mode
This safety feature will remotely place the vehicle into a no-remote-start mode: if the
vehicle is parked indoors there is no danger of the vehicle starting by accident with the
remote control.
Note: Once the Home Valet Mode is activated, the vehicle will not start by remote.
To activate the Home Valet Mode:
Press the lock or unlock button.
Within 3 seconds, press the stop button until the parking lights go out.
To disable the Home Valet Mode:
Turn the ignition key to the ignition on (run) position.
The system will warn you if someone attempts to start your vehicle while it stands in
Home Valet Mode. The parking lights will:
Go on then off; then
Flash twice, pause; then
Flash twice again.
Panic Mode
Safety feature: Activate Panic Mode in an emergency situation.
In an emergency situation, you can activate Panic Mode using the lock or unlock button.
This will:
Shut down the engine, Disarm the Starter Kill and
Unlock the doors (if unlock is Activate the siren for 1 minute.
pressed) (See below for a description of the Starter
Or lock the door (if lock is pressed), Kill.)
To activate Panic Mode
Press and hold the unlock button for approximately 3 seconds until the siren starts to
sound and the parking lights flash: this will unlock the doors before the siren sounds.
Or press and hold the lock button for approximately 3 seconds until the siren starts to
sound and the parking lights flash: this will lock the doors before the siren sounds.
Panic Mode will automatically shut down after 1 minute.
Note: To stop Panic Mode before the 1-minute delay, press the lock or unlock button until
the siren stops.
Quick Lockout^
M
(Also called Secure Panic.) For fast protection, the system will lock all doors when you
press the brake pedal while the siren is sounding. (Quick Lockout is only available
when Panic has been activated.)
Cold Weather Mode
Ready mode should be set before entering Cold Weather. When the Cold Weather
Mode is active, the engine starts every 2 hours and runs for 3 minutes (or for 8 or 20
minutes with Diesel engines); the routine will go on for a period of 24 hours.
To enter Cold Weather Mode:
Press and hold the stop button for 3 seconds until the parking lights flash 3 times.
(If Safe Start is enabled, the start button must be pressed beforehand - see below.)
To enter Cold Weather Mode if Safe Start has been activated:
Press and hold the stop button for 3 seconds until the parking lights flash 3 times.
To exit Cold Weather Mode, do any one of the following:
Open the hood.
Start the engine using the remote control.
Turn the ignition key to the ignition on (run) position.
Press and hold the stop button for 3 seconds. (The parking lights will flash once.)
To check whether Cold Weather Mode is active, press and release the brake pedal: the
parking lights should stay on while your foot is on the brake pedal.
Priority Door Access
This safety feature lets you unlock only the driver’s door when you press the unlock
button on the transmitter, and then unlock the rest of the vehicle doors if the unlock
button is pressed for a second time within 3 seconds.
Chirp Delete
To temporarily disable the siren’s chirp confirmations upon arming and disarming (e.g. in
a quiet neighbourhood):
1. Press the trunk button, the Parking Light will flash once
2. Within 3 seconds, press the lock or unlock button to arm or disarm without any
chirps.
Note: Your installer can program the Chirps Disabled feature if you want the chirps to be
permanently disabled.
Shock Delete
The shock sensor can be temporarily disabled. To temporarily disable shock and warn-
away sense:
Press the trunk button and, within 3 seconds,
Press the stop button.
Shock senses will now be ignored until the next disarming of the system.
User-selectable Options
The system was designed with flexibility and OEM integration in mind. With its
programmable options, this unit can single-handedly control nearly any electrical system
in your vehicle.
Note: The programming of your system should be left to a professional. Changing any one
of the settings may affect the operation of your system.
User Guide P. 6
P. 7 User Guide
 Loading...