

DRW190188AC
Autonics
100mm Hybrid Recorder
KRN100 SERIES
I N S T R U C T I O N M A N U A L
Please read the following safety considerations before use.
Safety Considerations
Please observe all safety considerations for safe and proper product operation to avoid hazards.
※
symbol represents caution due to special circumstances in which hazards may occur.
※
Failure to follow these instructions may result in serious injury or death.
Warning
Caution
Failure to follow these instructions may result in personal injury or product damage.
Warning
1. Fail-safe device must be installed when using the unit with machinery that may cause serious injury or substantial
economic loss. (e.g. nuclear power control, medical equipment, ships, vehicles, railways, aircraft, combustion
apparatus, safety equipment, crime/disaster prevention devices, etc.)
Failure to follow this instruction may result in personal injury, economic loss or re.
2. Do not connect, repair, or inspect the unit while connected to a power source.
Failure to follow this instruction may result in re or electric shock.
3. Check ‘Connections’ before wiring.
Failure to follow this instruction may result in re.
4. Do not touch the product during operation or for a certain period of time after stopping.
Failure to follow this instruction may result in burn or re.
5. Do not use the unit in the place where ammable/explosive/corrosive gas, high humidity, direct sunlight, radiant heat,
vibration, impact, or salinity may be present.
Failure to follow this instruction may result in explosion or re.
6. Install on the device panel or DIN rail, and ground to the F.G. terminal separately.
When connecting the F.G. terminal, use AWG16 (1.25mm
Failure to follow this instruction may result in re or electric shock.
7. Do not disassemble or modify the unit.
Failure to follow this instruction may result in re or electric shock.
8. Since Lithium battery is embedded in the product, do not disassemble or burn the unit.
Failure to follow this instruction may result in re.
Caution
1. Use the unit within the rated specications.
Failure to follow this instruction may result in re or product damage.
2. Use a dry cloth to clean the unit, and do not use water or organic solvent.
Failure to follow this instruction may result in re or electric shock.
3. Keep the product away from metal chip, dust, and wire residue which ow into the unit.
Failure to follow this instruction may result in re or product damage.
4. When connecting the power input or measurement input, use AWG20 (0.50mm²) cable or over and tighten the terminal
screw with a tightening torque of 0.74 to 0.9N.m.
Failure to follow this instruction may result in re or malfunction due to contact failure.
5. Do not use the load beyond rated switching capacity contact.
Failure to follow this instruction may result in re, relay broken, contact melt, insulation failure or contact failure.
6. Do not disassemble or assemble input/output card, when power is supplied.
Failure to follow this instruction may result in product damage.
7. Use the transmitter output terminals only as the power for the transmitter.
Failure to follow this instruction may result in product damage.
8. When connecting the temperature sensor(TC, RTD) or analogue input (voltage, current) as input to the universal
input card, set the jumper pin to the correct place for the connected input method.
If the jumper pin is placed improperly, it may result in product damage or malfunc ion.
Specications
Series KRN100
Power voltage 100-240VAC
Allowable voltage range 85 to 110% of rated voltage
Power consumption Max. 55VA
LCD type STN Graphic LCD
Screen
Input channels 2 / 4 / 6 / 8 / 10 / 12-channel (2-channel/card)
Universal input Temperature sensor (RTD, thermocouple), analog (voltage, current)
Sampling cycle
Recording speed in graph mode 10, 20, 40, 60, 120, 240mm/H
Recording speed accuracy F.S. ±0.5%
Storage cycle 1 to 3600 seconds (storage interval time to inner log le is 1 seconds)
Inner memory 512MB
USB memory
Dielectric voltage 2500VAC 50/60Hz for 1 minute (power terminal and case) ※Excepts USB Device and Ethernet
Vibration strength
(for convey and storage) and
operating vibration
Insulated resistance Over 20MΩ (at 500VDC megger)
Noise immunity ±2kV the square wave noise (pulse width 1㎲) by the noise simulator
Time accuracy Within ±2 min/year (enables to use up to 2100 year)
Mechanism
Protection IP40 (front panel, IEC Standard)
Recording paper 113mm×9m
Environment
Approval
Weight
※
※
※
Resolution 320×120 Pixel
Adjusting brightness 4-level (OFF/Min/Standard/Max)
Backlight White LED, 2-level (Temp/Always)
※
1
Ink cartridge
I
Ink dry time Max. 15 minutes
I
Ambient temperature 0 to 50℃, storage : -20 to 60℃ (without ink cartridge)
I
Ambient humidity 35 to 85% RH, storage : 35 to 85% RH
I
※
2
1: USB memory is included in the box. If you use USB memory you purchased separately, it could not be recognized.
2: The weight includes packaging. The weight in parentheses is for unit only.
Environment resistance is rated at no freezing or condensation.
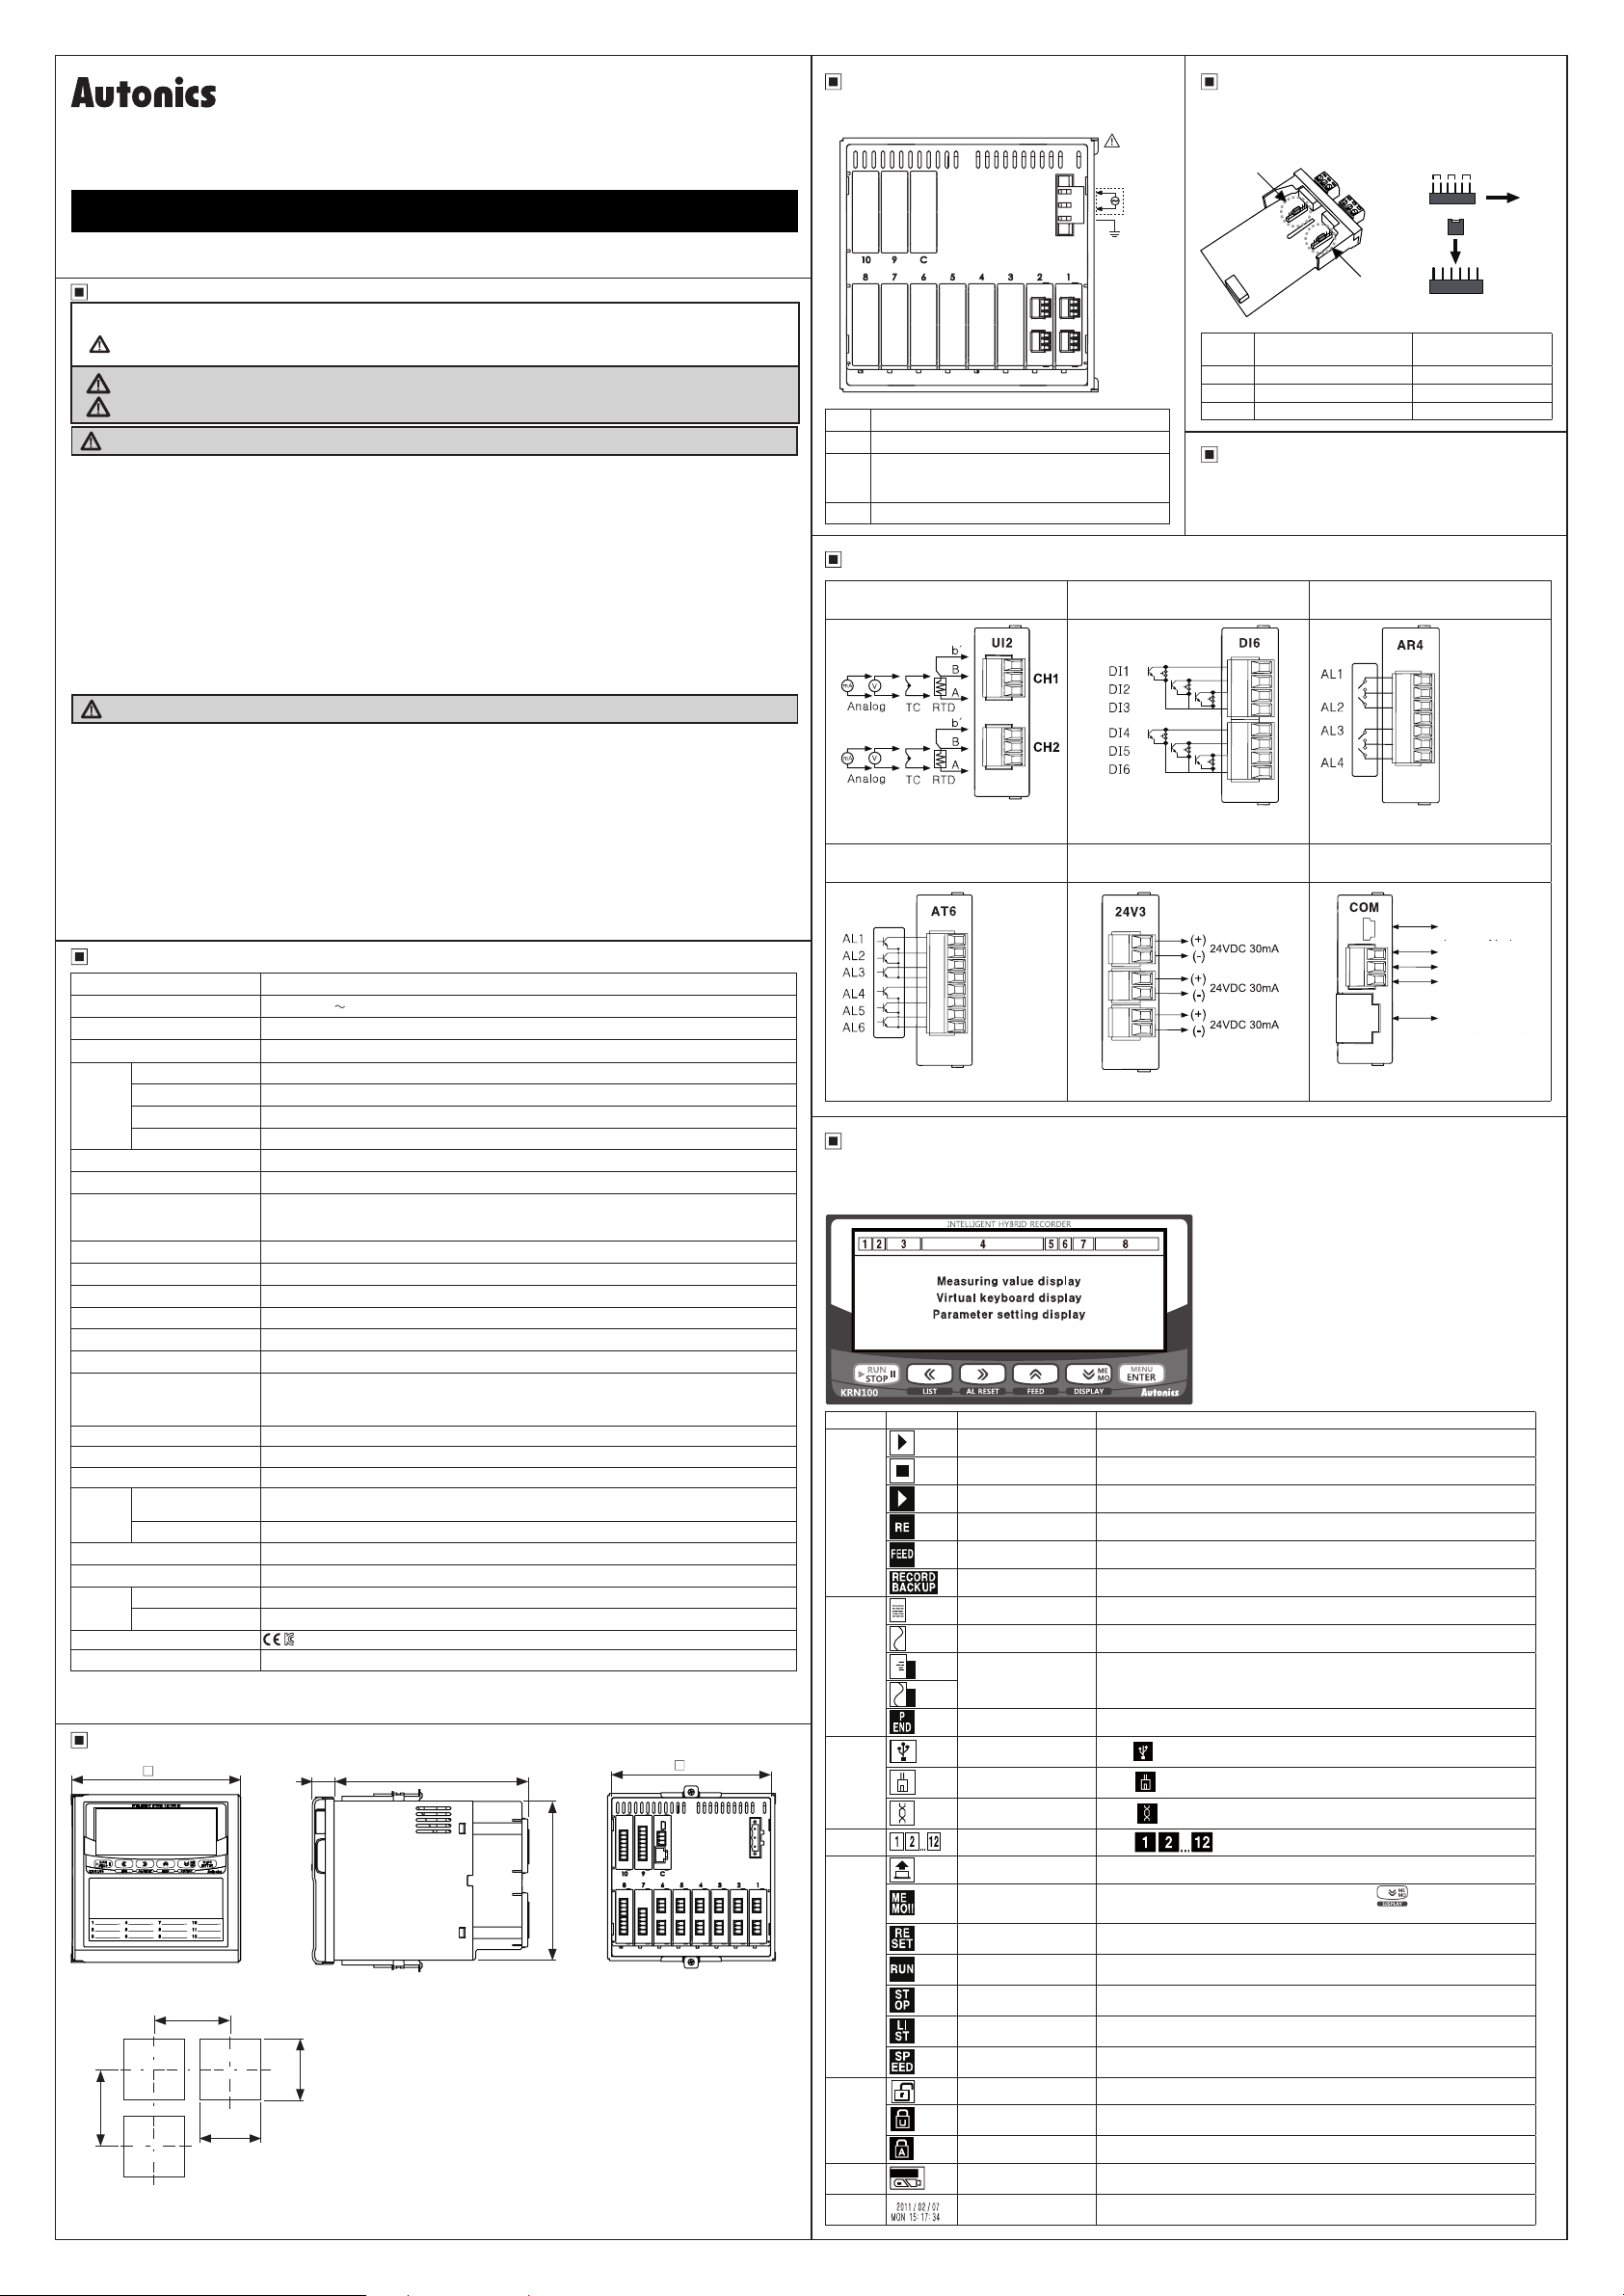
Dimensions
144
□
● Panel cut-out
Min.175
Min.175
※
Use a steel plate which is 2 to 8mm thickness.
※
The above specications are subject to change and some models may be discontinued without notice.
※
Be sure to follow cautions written in the instruction manual and the technical descriptions (catalog, website).
Thank you for choosing our Autonics product.
2
) or over.
50/60Hz
~
1 to 4-channel: 25ms/125ms/250ms, 5 to 12-channel: 125ms/250ms
(inner sampling cycle is operation unit time for average movement lter and alarm output function.)
※
Min. sampling cycle for TC-R, U, S, T sensor is 50ms.
Recognizes max. 32GB, enables to use cable up to 1.5m
Vibration strength: 10 to 60Hz 4.9m/s
Opera ing vibration: 10 to 60Hz 1m/s2 (each X, Y, Z axis for 10 minutes)
Enables to normal print with going and returning printing max. 5 times within 7 days after
opening he unit
2
(each X, Y, Z axis for 1 hour)
cm
Approx. 2.4 to 2.7kg (approx. 1.7 to 2.0kg)
137
□
le'-
~
I D D
, C
a1,1,4121
El
El El
11
El
El El
This rear side dimension is with
installed I/O cards to every slot.
138
18.6
168
~
llJI'"
137
1.0
0
138
1.0
0
~
※
(unit: mm)
~
"'"'""'"
El El
El El
,
El
El
•
Connections
This gure is he rear side of KRN100-04000-00-0S.
nnno
ooooomo~;
~:
7.-
10
9 C
8 7 6 S 4 3
2 1
SOURCE
100-240VAC
50/60Hz, 55VA
F.G.
Input Type Setting
Before setting the parameters, set the jumper pin channel 1/2 of
universal input card (KRN-UI2) depending on input specification
as below figure.
Ch1 Jumper
Ch2 Jumper
② ①
③
Terminal
direction
[]I []I
Jumper
[]I []I
n
Slot Description
1 to 6 Connects universal input card(KRN-UI2).
Connects digital input card(KRN-DI6), alarm output
7 to 10
card(KRN-AR4, KRN-AT6), transmitter power output
card(KRN-24V3).
C Connects communication output card(KRN-COM).
I I
l/O Card
Universal input card
[KRN-UI2]
Ul2
b'
-
CCC~
+
Analog
-
CCC~
+
Analog
※
Each channel is isolated and dielectric
strength is 500V.
AL1
AL2
AL3
AL4
AL5
AL6
※
AL1,2,3 and AL4,5,6 are isolated.
TC RTD
TC RTD
Alarm output card
[KRN-AT6(transistor output)]
Inner
AT6
Alarm Output
NPN Open
Collector
12-24VDC/
30mA Max.
RESISTIVE
LOAD
[I
[I
CH1
CH2
※Each 24V output
Screen Layout and Status Display
Screen layout is divided as two; upper screen for status display, lower screen for measuring value display, virtual keyboard display,
parameter setting display.
Upper screen displays recorder status and informa ion of recorder as icon.
INTELLIGENT
HYBRID
RECORDER
[I]211
3
Measuring value display
Virtual keyboard display
Parameter setting display
Section Icon Name Description
[f]
~
1
IJ
II
E
!Im
-
~
[2]
2
~
[2a
Ml
Ct]
3
[illi]
[]]
4 Alarm ON icon
mm
~
HI
5
~
m
m
m
~
~
6
7
8
lml
1"11
ffll
2011/02/07
MON
Record start icon Marks if for starting recording measuring value of recordable channels.
Record stop icon Stops recording measuring value.
List record icon Flashes during list recording.
Reservation record icon Flashes during reserva ion recording.
FEED icon Flashes during feeding recording paper.
Backup data print icon Flashes during backup data printing.
Digital mode icon Marks it for digital record mode.
Graph mode icon Marks it for graph record mode.
Record memory status
icon
No recording paper icon Marks it for no recording paper. Please replace new recording paper.
USB
communication icon
Ethernet communication
icon
RS485 communica ion
icon
...
~
Digital input(DI) icon Marks the below icon according to input function setting during digital input (DI).
Digital input(DI)memo icon
Digital input(DI)alarm reset icon
Digital input(DI)start record icon
Digital input(DI)stop record icon
Digital input(DI)LIST output icon
Digital input(DI)record speed icon
Unlock icon Marks it for unlock status.
User(general user)
lock icon
Administrator lock icon Marks it for administrator and general user lock status.
Inner and external (USB)
memory capacity icon
Date/Time display
15:
17
34
1
®11
Digital input card
[KRN-DI6]
DI1
DI2
DI3
DI4
DI5
DI6
Transmitter power output card
[KRN-24V3]
24V3
\~j
(+)
(-)
(+)
(-)
is isolated individually.
11
s 1
Marks it storage capacity of record memory in digital mode or graph mode.
Marks icon during Modbus RTU communication using USB.
n
Marks
Marks icon during Modbus RTU communication using RS485.
Marks channel icon which alarm occurs.
Marks it when digital memo of digital input or front is input in recording
status.
Marks it when alarm reset signal of digital input (DI) is input.
Marks it when start record signal of digital input (DI) is input.
Marks it when stop record signal of digital input (DI) is input.
Marks it when LIST output signal of digital input (DI) is input.
Marks it when changing record speed signal of digital input (DI) is input.
Marks it for user (general user) lock status.
Displays data capacity of internal memory as bar graph.
Displays current date and time. In summer time season, (S) mark is also
displayed at front of year.
icon during Modbus TCP communication using Ethernet.
11!!1
1:1
Dfl
...
lE
Input
pin
specication
0 to 20mA, 4 to 20mA Enables only 4 to 20mA
①
TC, RTD, ±60mV, ±200mV Enables
②
±2V, 1 to 5V, ±5V, -1 to 10V Disables
③
Input break alarm
User Manual
For the detail informa ion and instructions, please refer to user
manual and user manual for communication.
Alarm output card
[KRN-AR4(relay output)]
D16
AL1
AL2
AL3
AL4
24VDC 30mA
24VDC 30mA
24VDC 30mA
AR4
Inner
Alarm Output
Relay Contact
250VAC 3A 1a
RESISTIVE LOAD
Communication output card
[KRN-COM]
USB 2 0
(Mini B type)
RS485 A(+)
RS485 B(-)
RS485 S.G
10/100 Base-T
RJ45(Ethernet)
@
~
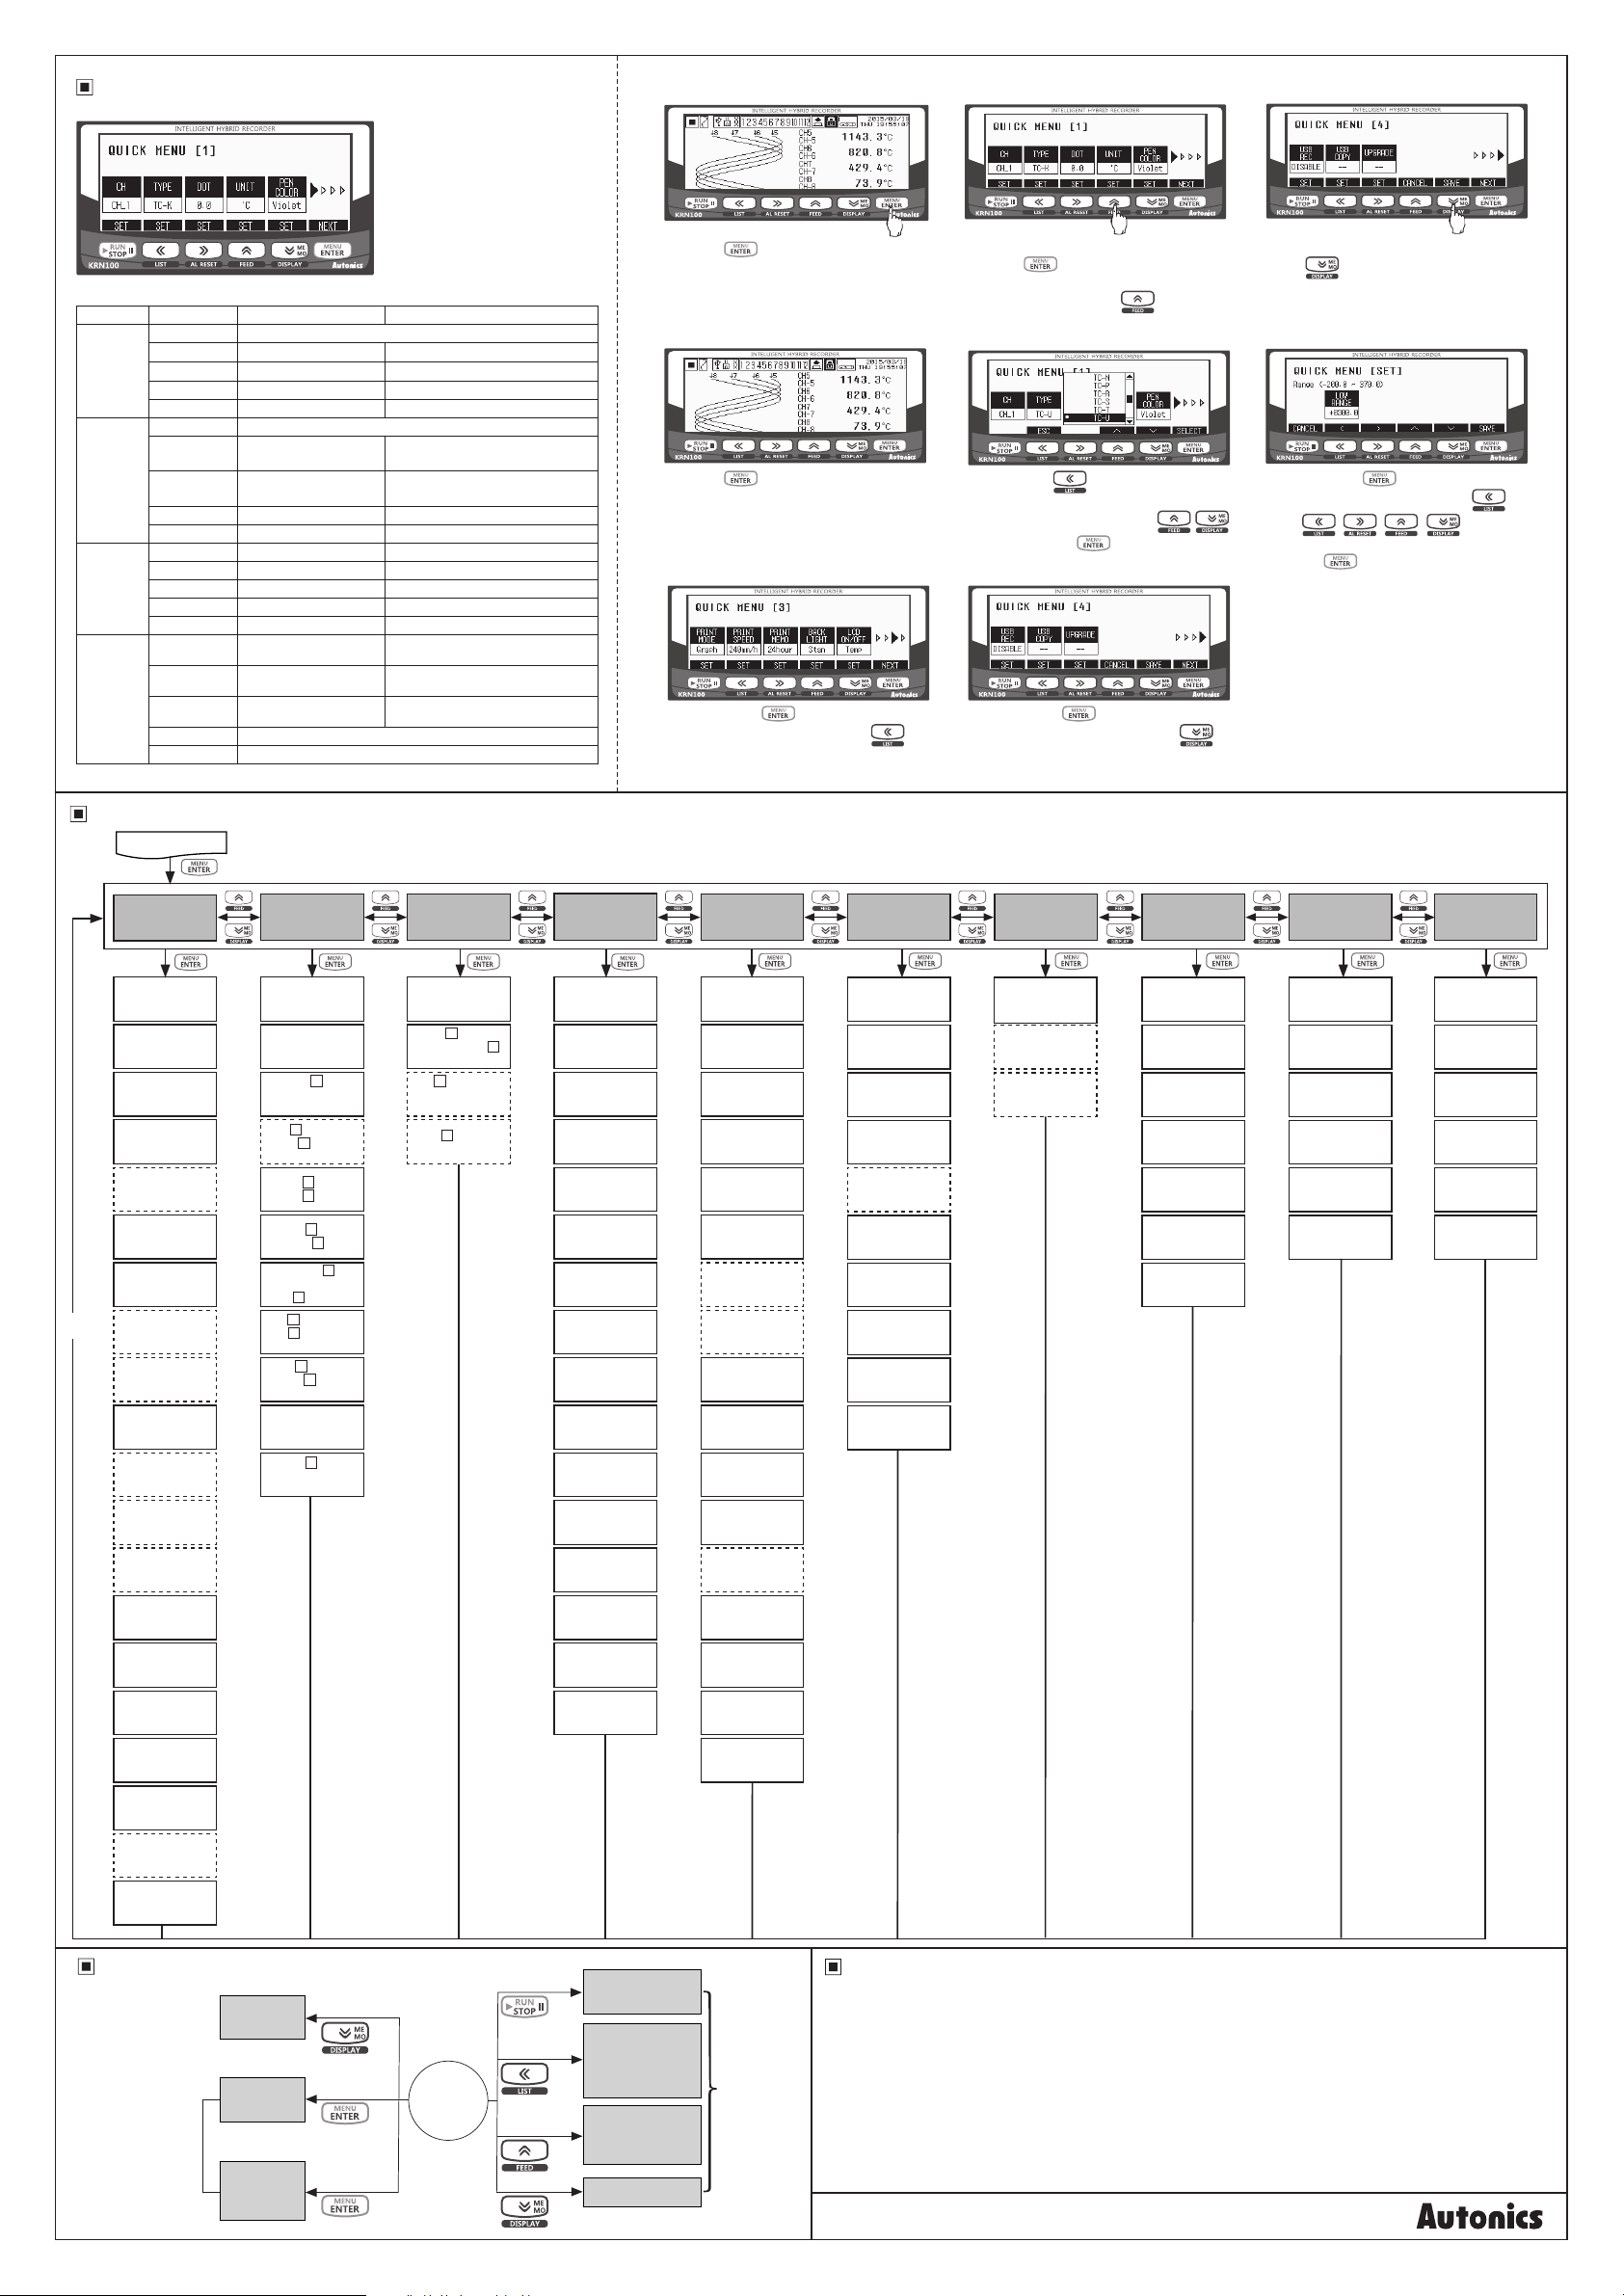
QUICK MENU
QUICK MENU consists of usually used parameters for quickly parameter setting.
QUI
CK
HENU
[1 l
2) QUICK MENU Setting
① ② ③
=~•=====•-~9=-THU
2015/03/1
19:5510
3
°C
UU I CK
~~~~~~~le~I►
------
►
:~":-11■
INTELLIGENT HYBRID RECORDER
[1
l
HENU
«
■
»•~
·
~~
~~
~
-
Eri
':flu
R
OU I CK
HENU
[4]
1) Parameters of QUICK MENU
Page Parameter Description Linked parameters
QUICK
MENU [1]
QUICK
MENU [2]
QUICK
MENU [3]
QUICK
MENU [4]
※
Refer to “KRN100 user manual”.
CH Select channel for the QUICK MENU[1] setting.
TYPE Input type [INPUT SETUP]-[Input Type]
DOT Decimal point [INPUT SETUP]-[Range/Scale Point]
UNIT Display/Temperature unit [INPUT SETUP]-[Display/Temp Unit]
PEN COLOR Pen color [INPUT SETUP]-[Pen Color]
CH Select channel for the QUICK MENU[2] setting.
LOW RANGE
HIGH RANGE
LOW SCALE Low-limit scale value [INPUT SETUP]-[Low Scale]
HIGH SCALE High-limit scale value [INPUT SETUP]-[High Scale]
PRINT MODE Record mode [RECORD SETUP]-[Record Mode]
PRINT SPEED Standard record speed [RECORD SETUP]-[Standard Speed]
PRINT MEMO Digital memo period [RECORD SETUP]-[Memo Period]
BACK LIGHT LCD backlight [SYSTEM SETUP]-[Backlight]
LCD ON/OFF
USB REC Memory save
USB COPY Call USB COPY window
UPGRADE Call upgrade window
CANCEL Cancel the settings
SAVE Save the setting of QUICK MENU[1] to [4].
Low-limit input value or
graph scale value
High-limit input value or
graph scale value
LCD backlight On/O
[INPUT SETUP]-[Low Range] or
[INPUT SETUP]-[Low Graph Scale]
[INPUT SETUP]-[High Range] or
[INPUT SETUP]-[High Graph Scale]
[SYSTEM SETUP]-[Backlight On/O]
[FILE/MEMORY SETUP][USB LogData Save]
[FILE/MEMORY SETUP][USB Memory Copy/Move]
[USER/INFORMATION SETUP][Firmware Upgrade]
Press the key once in RUN mode and it
enters to QUICK MENU.
QUICK MENU consists of usually used
parameters for quickly parameter setting.
Set the keys following the each parameter. Press
the NEXT(
E.g ) When changing the temperature unit (℃→℉)
of CH1, press the SET(
) key and it moves to next page.
) key.
After completing the set ing, press the
SAVE(
the settings. It returns to RUN mode.
ᆞE.g.) In case of CH1, recording as input type=TC-U, low-limit input value=300, standrad record speed= 240mm/h
① ② ③
④ ⑤
~cc,c=~=
Press the key in RUN mode to enter
QUICK MENU.
UU
I CK HENU
!!!!!~1
►:
y~~
..
.
------
"
Press the NEXT( ) key once and it moves
to QUICK MENU [3]. Press the SET(
and set standard record speed [PRINT SPEED]
as 240mm/h.
=-"ce
INTELLIGENT
HYBRID
[3]
~!~~~
» • A
«
■
r:a;;;i[1
~
201'5/03/1
~~-•~~TI-IU 19:'5'5:0
43. 3°C
RECORDER.
~ ~►~
■
~=~
• E~i"EUR
CD
-
) key
T
C-N
~
TC-P
TC-R
TC-S
--►>
~
> >
,
)
TC-T
Press the SET(
and below screen is displayed. Set input type
[TYPE] as TC-U by pressing SET(
keys and press the
OU I CK
Press the NEXT(
to QUICK MENU [4]. Press the SAVE(
key to save the set ings of QUICK MENU [1] to
[4] and it returns to RUN mode.
) key at QUICK MENU [1]
CD
-
key.
HENU
[41
) key once and it moves
OU I CK
Range
Press he NEXT(
to QUICK MENU [2]. Press the SET(
)
using
low-limit input range [LOW RANGE] as 300 and
press the
) key at QUICK MENU[4] and save
HENU
[SETJ
(-200. 0 N 370.
0)
~t'!
«
»
) key once and it moves
CD
-
, ,
MENU
key.
ENTER
,
keys to set
) key
Parameters
RUN mode
INPUT SETUP
(input setting)
Select UI Card
(universal input
card select )
Input Set Copy
(input parameter
LCD/Paper Record
(display and record
measuring value)
Pen Color
(record color)
Record Zone
(record zone)
------------
Tag Name
(channel name)
Input Type
specications)
OK,
Range/Scale Point
Cancel
(decimal point)
' '
·------------·
·------------·
Display/Temp Unit
' '
' '
(display/temp.
' '
High/Low Range
& Graph Scale
(high/low input v alue
and graph scale)
I I
·------------·
Low Scale/
' '
High Scale
(high/low scale value)
Special Func
(special function)
·------------·
------------
Two Unit
(display vacuum,
static pressure)
------------
Ref Channel
(reference
channel)
Input Bias
(error correction)
(gradient
adjustment)
Record Method
(data storage
Filter Type
(input digital lter)
Filter Counter
(number of digital
·------------·
Burnout Action
(display setting
for break)
I I
copy)
(input
unit)
Span
method)
lters)
I
3 sec.
ALARM SETUP
(alarm setting)
Select UI Channel
(universal input
Alarm Set Copy
(copy alarm
Alarm type
(alarm operation
Alarm Ref Channel
(alarm reference
------------
Alarm Option
(alarm
Alarm Value
(alarm
(alarm hysteresis)
Alarm ON/OFF Delay
(alarm output ON/ OFF
Alarm Alarm No
(alarm
alarm number)
Selection Alarm Card
(Alarm output card
Alarm- Status
(relay and transistor
I
select)
parameter)
□
mode)
□
□
channel)
□
option)
□
□
SV)
□
Alarm
□
Hysteresis
□
□
□
delay time)
□
output
□
select)
□
output method
※
Dot parameters may or may not appear, depending on the other parameter setting.
COMMUNICATION
SETUP
(com. setting)
Modbus Address
(com. address)
RS485 Port
(RS485 com. use)
Baud Rate
(com. speed)
Parity Bit
(com. parity bit)
Stop Bit
(com. stop bit)
Termination Set
(terminating
resistance)
Response Wait Time
(com. response
waiting time)
Protocol
(com. protocol)
RS485 Com/Write
(RS485 com.
write)
Ethernet Port
(Ethernet com.
use)
IP Address
(IP address)
Subnet Mask
(subnet mask)
Default Gateway
(default gateway)
Ethernet Com
Write
(Ethernet com. write)
USB Device Port
(USB com. use )
USB Com Write
(USB com. write)
I I
RECORD SETUP
(record setting)
Record Mode
(record mode)
Digital Print type
(1 line record CH during
numeric recording)
Standard Speed
(standard record
speed)
Option Speed
(option record
speed)
Memo Period
(digital memo
cycle)
Divide Zone
(record zone
division)
Standard Period
(standard record
cycle)
Option Period
(option record
cycle)
------------
Listing Language
(language for list
printing)
Alarm Speed
(alarm record
speed)
Power On Status
(record status
when power ON)
Run Status
(list printing at
start recording)
List Out Option
(list record option
------------
Zone Dot Line
Distance
(dot line for zone division)
CH Print Distance
(record interval for
each channel graph
Start Line Print
(start line when
starting record)
Range Print Time
(input range
record period)
I
I
SYSTEM SETUP
(system setting)
(summer time period)
------------
(sampling cycle)
(LCD backlight ON
I
(digital input card
·------------·
·------------·
(operation status)
I
DIGITAL INPUT
SETUP
(digital input setting)
Select DI Card
select )
DI- Type
(digital input
select)
DI- Reset No
(reset alarm
number)
DI- Status
□
Device Name
(device name)
Date/Time
(date/time)
Date Type
(date type)
Summer Time
(summer time)
Summer Time
Period
Alarm Sound
(alarm sound)
Sampling Rate
Log Speed
(save cycle)
Backlight
(LCD backlight
brightness)
Baklight On/O
method)
(reservation setting)
(reservation record)
Reservation Period
·------------·
·------------·
Reservation Time
I
RESERVATION
SETUP
Reservation
Type
(reservation
record period)
(reservation
record time)
FILE/MEMORY
SETUP
(le/memory setting)
Load Set File
(parameter setting
le open)
Save Set File
(parameter setting
le save)
Memory Status
(memory capacity)
Memory Clear
(memory delete)
USB LogData
Save
(USB save function)
Memory Save Option
(memory save
option)
USB Memory
Copy/Move
(data move/copy)
I I
USER/INFORMATION
SETUP
(user/info. setting)
Password
(password mode)
Login Admin
(admin. log in)
Change Admin
Password
(password change by admin.)
User Lock
(user authority
change)
Information
(system info.
check)
Firmware Upgrade
(rmware
upgrade)
l'--------r-----1
RECORD BACKUP
DATA
backup data record setting
Record Backup
(backup data
record)
Backup Data List
(backup data list)
Start Date and Time
(start time for data
save)
End Date and
Time
(end time for data save)
Backup Print Mode
(backup data print
mode)
Selection Print Mode
(backup data recording
mode setting)
l'-------r-----'
Usually used
parameters of
parameter setting group
are reorganize as
QUICK MENU.
Each parameter setting
is linked.
Operation
Trend graph
→ Bar graph
→ Digital number
Screen
display
QUICK
MENU
Parameter
setting
group
3 sec.
RUN mode
3 sec.
3 sec.
3 sec.
Start/Stop
recording
Parameter
setting
information
output
Manual feed
(when stop
recording)
Digital memo
Special
function for
record
Cautions during Use
00
1. Follow instructions in 'Cautions during Use'. Otherwise, it may cause unexpected accidents.
2. Install a surge absorber at each end of inductive load coil when controlling high-capacity power relay or inductive
load (e.g. magnet).
3. Check the polarity of the terminals before wiring the temperature sensor.
For RTD temperature sensor, wire it as 3-wire type, using cables in same thickness and length.
For thermocouple (CT) temperature sensor, use the designated compensation wire for extending wire.
4. Keep away from high voltage lines or power lines to prevent inductive noise.
In case installing power line and input signal line closely, use line lter or varistor at power line and shielded wire
at input signal line.
Do not use near the equipment which generates strong magnetic force or high frequency noise.
5. This unit may be used in the following environments.
①Indoors (in the environment condition rated in 'Specications') ②Altitude max. 2,000m
③Pollution degree 2 ④Installation category II
Autonics
 Loading...