

Page 1

MTI Form OP
-
0005 Rev.
002 7/98
Model MTI-5
Operator's Manual
A Patented Product of
Motion Technology, Inc.
6 Huron Drive
Natick, MA 01760
Telephone: (508) 653-0082
Technical Support: 888-664-6640
E167653
Page 2

AUTOFRY Models MTI-5 Rev. 2 Operator's Manual
AUTOFRY Model MTI-5 Specifications
Electrical Specifications:
Consult wiring diagram at the end of this document for specific ratings.
240V ac single-phase grounded 50/60HZ
4200 Watt
16.67AMPS
NEMA 6-20 Plug Configuration
INTERNATIONAL ONLY
NO PLUG ATTACHMENT
230V ac single-phase grounded 50/60Hz
2950 Watt
13.00 AMPS
US Replace cord set with Motion Technology, Inc. cord set ONLY part number 52097
Physical Specifications:
Materials: 304 Stainless Steel
Dimensions: 21"x21"x21"
Clearances: Left side = 2" Min.
Right side = 12" (for heat lamp)
Rear = 3" Min.
Top = 24" Min.
Oil capacity: 2.5 US Gallons
Approvals and Listings
UL cUL NSF CE CSA
AUTOFRY and NO HOODS! NO VENTS! NO PROBLEM? are registered
trademarks of Motion Technology, Inc.
MTI Form OP-0005 Rev. 002 7/98
E167654
1
Page 3

AUTOFRY Models MTI-5 Rev. 2 Operator's Manual
Table of Contents
Prepare electrical service
Prepare counter top
Set-up and Installation
Remove components
Re-set high limit
Leg installation
Initial cleaning
Install charcoal filter
Install oil pot
Install heater box
Install food basket clip
Install food basket
Add liquid shortening
Install food exit chute
Power
Let's get cooking
Starting the AUTOFRY
Begin cooking
During cooking
Shut off procedure
Additional keypad functions
Count button
Stand-by button
Programming cook times
Recommended Cleaning Schedule
Daily cleaning
Weekly cleaning
Quarterly cleaning
Charcoal filter
Semi-annual
Fire system
Safety system test
3
4
3
4
4
5
6
7
8
8
9
9
10
10
11
12
12
13
14
14
15
15
16
18
20
21
22
23
24
24
25
26
MTI Form OP-0005 Rev. 002 7/98
E167654
2
Page 4

AUTOFRY Models MTI-5 Rev. 2 Operator's Manual
AUTOFRY MTI-5 Rev. 2 Set-up and Installation
The AUTOFRY comes from the factory complete with everything you will need to
start cooking with the exception of food and oil. By following these simple
instructions you can have your AUTOFRY installed and ready to earn profits for
you in as little as 30 minutes.
Prepare electrical service.
A licensed electrician in accordance with the National Electrical Code (NEC) and
all local codes must install electrical service. Do not alter the factory supplied
power cord or plug. Never attach the AUTOFRY to an extension cord. Consult the
Identification Tag for equipment wattage and voltage.
Motion Technology, Inc. will not assume responsibility for
any injuries or equipment malfunctions resulting from
non-conforming electrical installations.
Prepare counter top.
Choose a counter top location that is sturdy, level, easily cleanable and fire
resistant. Stainless steel, fire resistant plastic laminate or solid surface materials
are acceptable. Never use a porous material to prepare food as bacterial
contamination could result.
MTI Form OP-0005 Rev. 002 7/98
E167654
3
Page 5
AUTOFRY Models MTI-5 Rev. 2 Operator's Manual
AUTOFRY Installation.
You will need assistance to position and install the AUTOFRY. The
approximate weight of the unit is 130 pounds
1. Remove and save the packing materials.
Be sure to inspect the AUTOFRY. Your AUTOFRY has left the factory in
perfect condition and has been packaged to withstand rugged travel.
However, in the event that you observe damage to the AUTOFRY, you should
contact the carrier immediately and report any damages. Be sure that you
have your signed bill of lading.
2. Take out the removable components from inside the AUTOFRY.
• 4 adjustable legs
• Food exit chute
• Wire food basket
• * Heater box assembly
• Oil pot
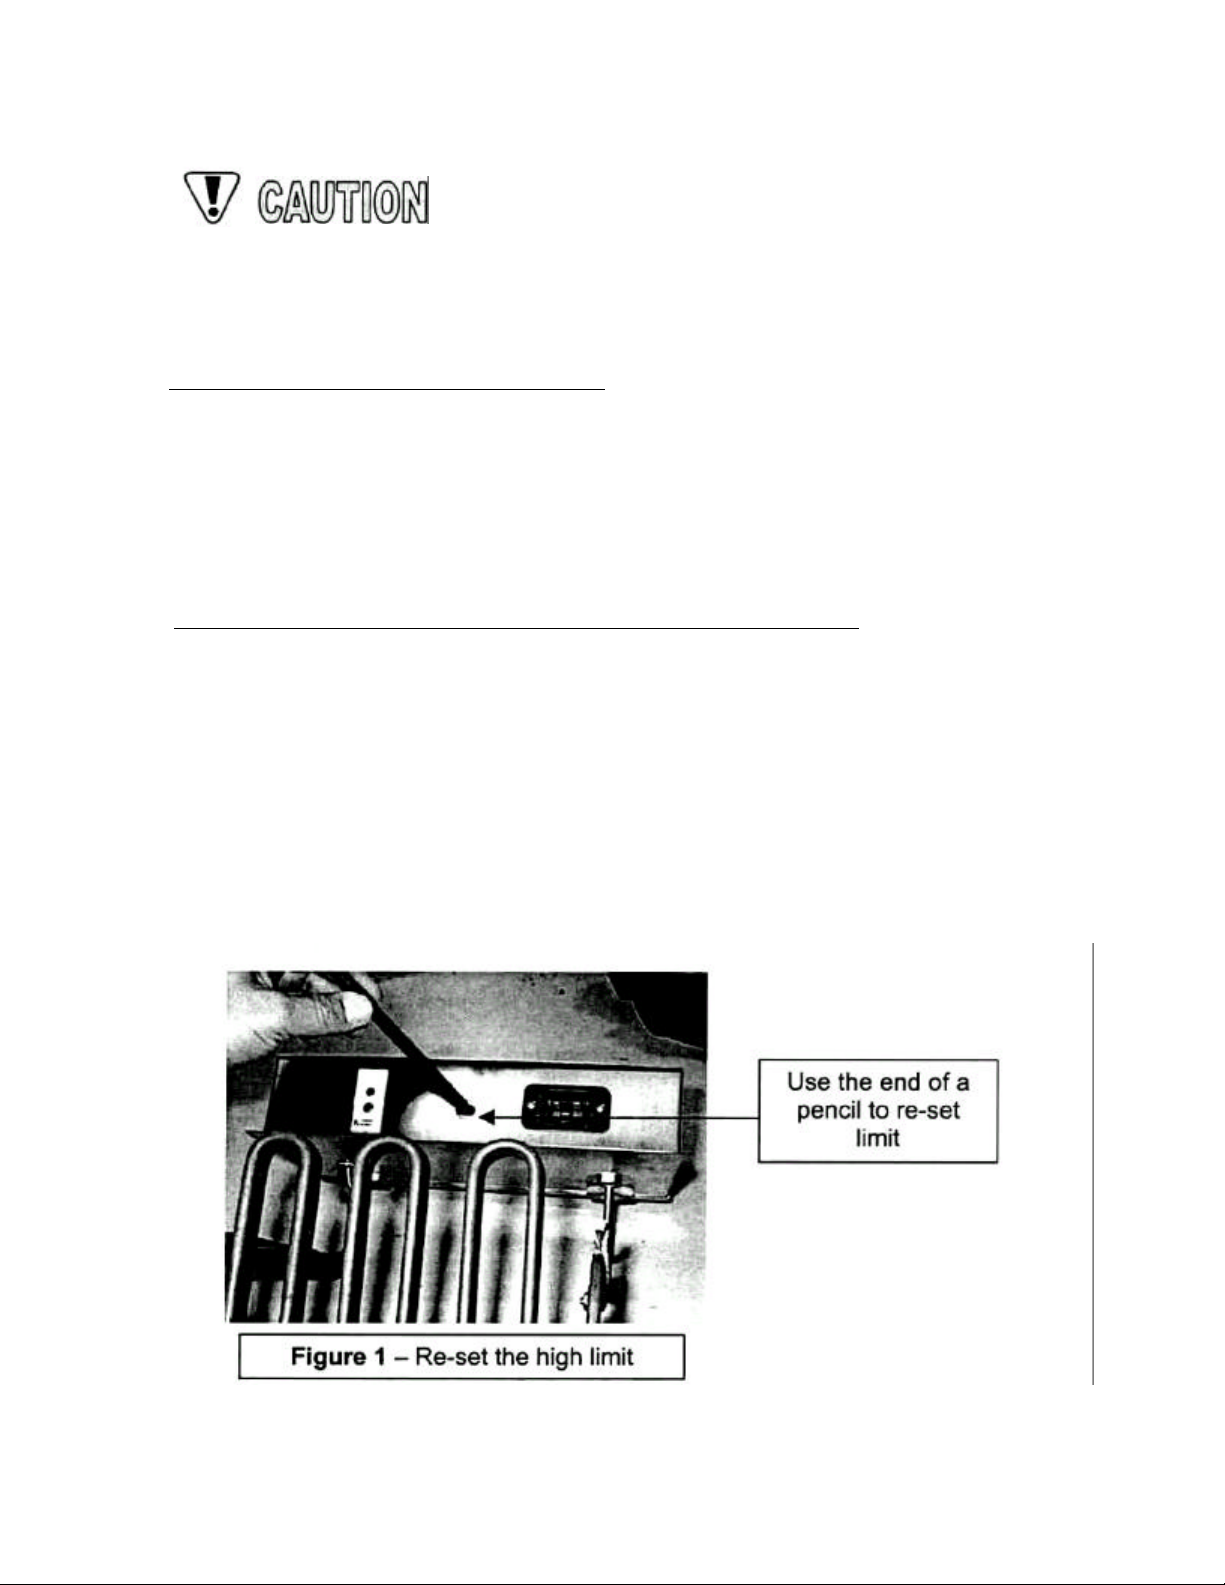
* Check the red high limit re-set button on the bottom of the heater box
assembly by fully depressing it with the eraser end of a pencil. If the limit has
been tripped you will hear a "click" (see Figure 1).
MTI Form OP-0005 Rev. 002 7/98
E167654
4
Page 6
AUTOFRY Models MTI-5 Rev. 2 Operator's Manual
3. Charcoal filter removal and leg installation.
• With the AUTOFRY still on its shipping pallet, tilt the unit backward and remove the
charcoal filter from the food exit cutout.
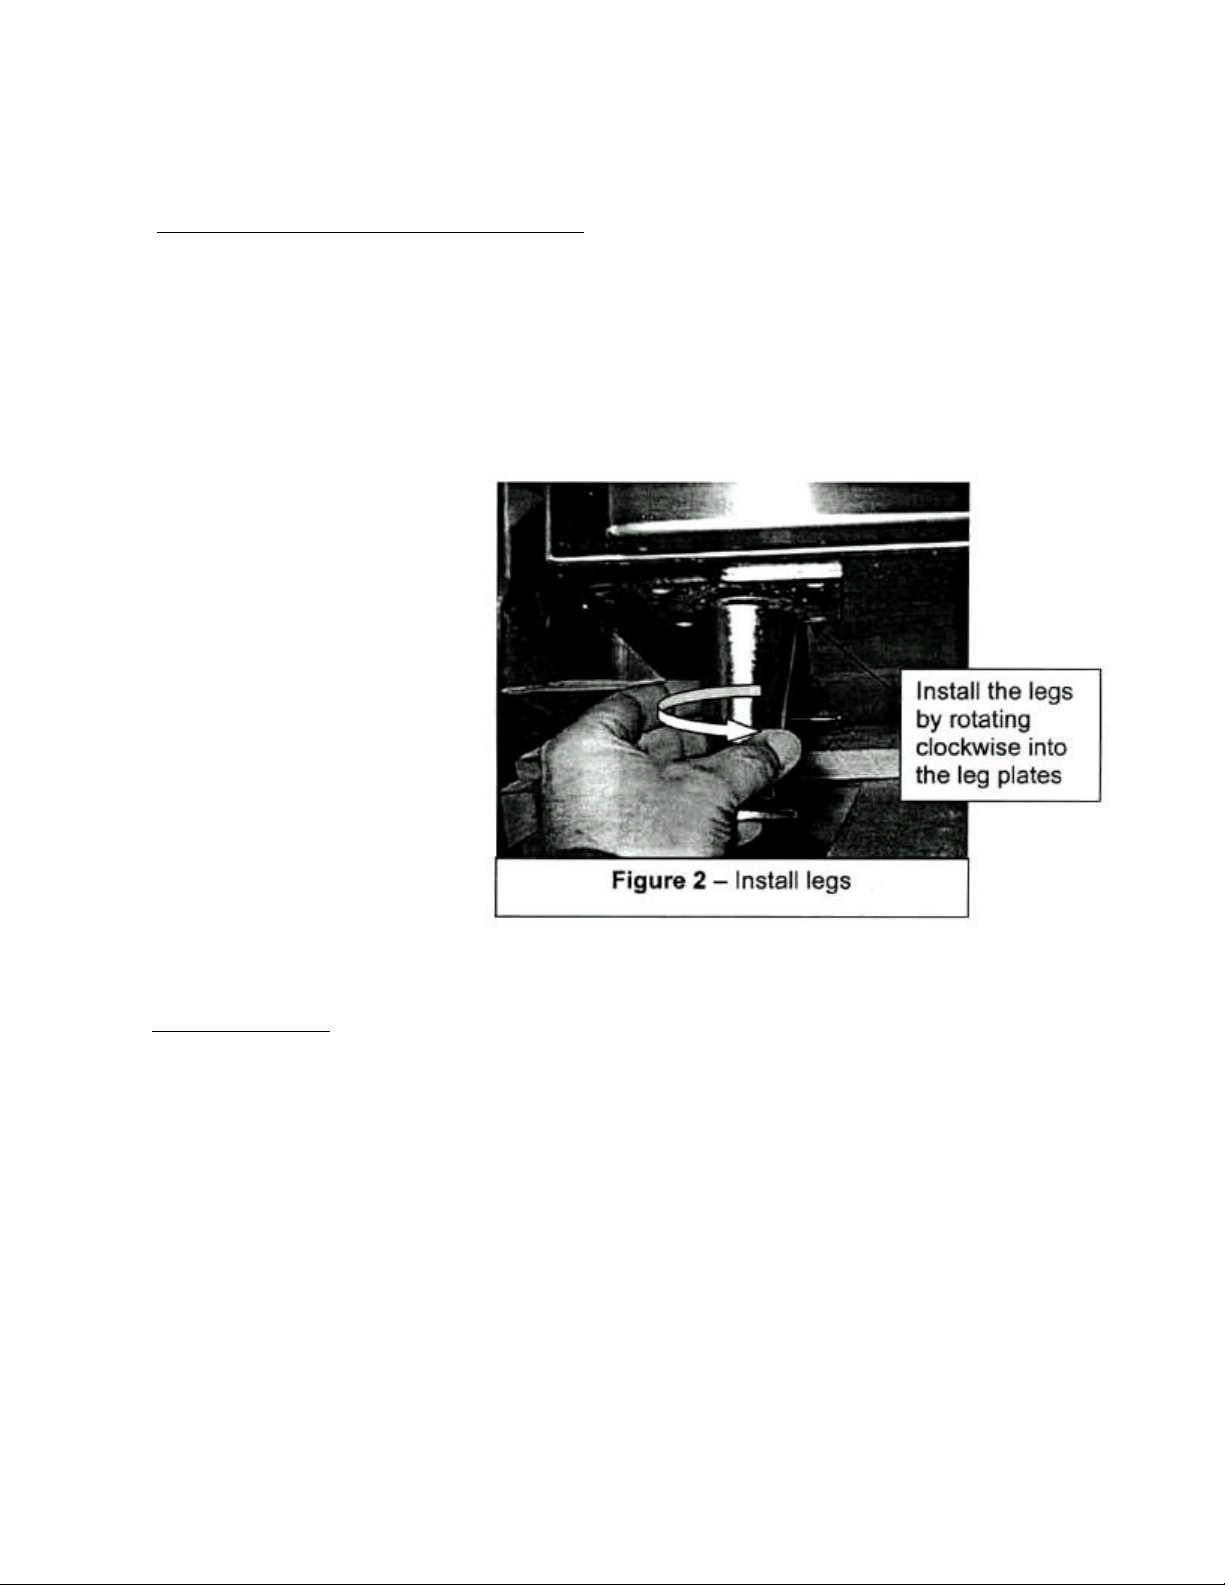
• Install two of the adjustable legs by rotating them clockwise to a hand tight fit into
the front two leg plates located on the underside of the AUTOFRY.
• Tilt the AUTOFRY forward and repeat the leg installation for the rear two legs (see
Figure 2).
4. Place on counter.
• Carefully place the AUTOFRY on the counter
• Adjust the legs (as needed) to level the AUTOFRY.
• Make sure that nothing is placed on top of the AUTOFRY Which could
obstruct the exhaust system.
MTI Form OP-0005 Rev. 002 7/98
E 167654
5
Page 7
AUTOFRY Models MTI-5 Rev. 2 Operator's Manual
5. Initial Cleaning.
• Wash the oil pot, wire food basket and food exit chute in warm
soapy water followed with a clear water rinse.
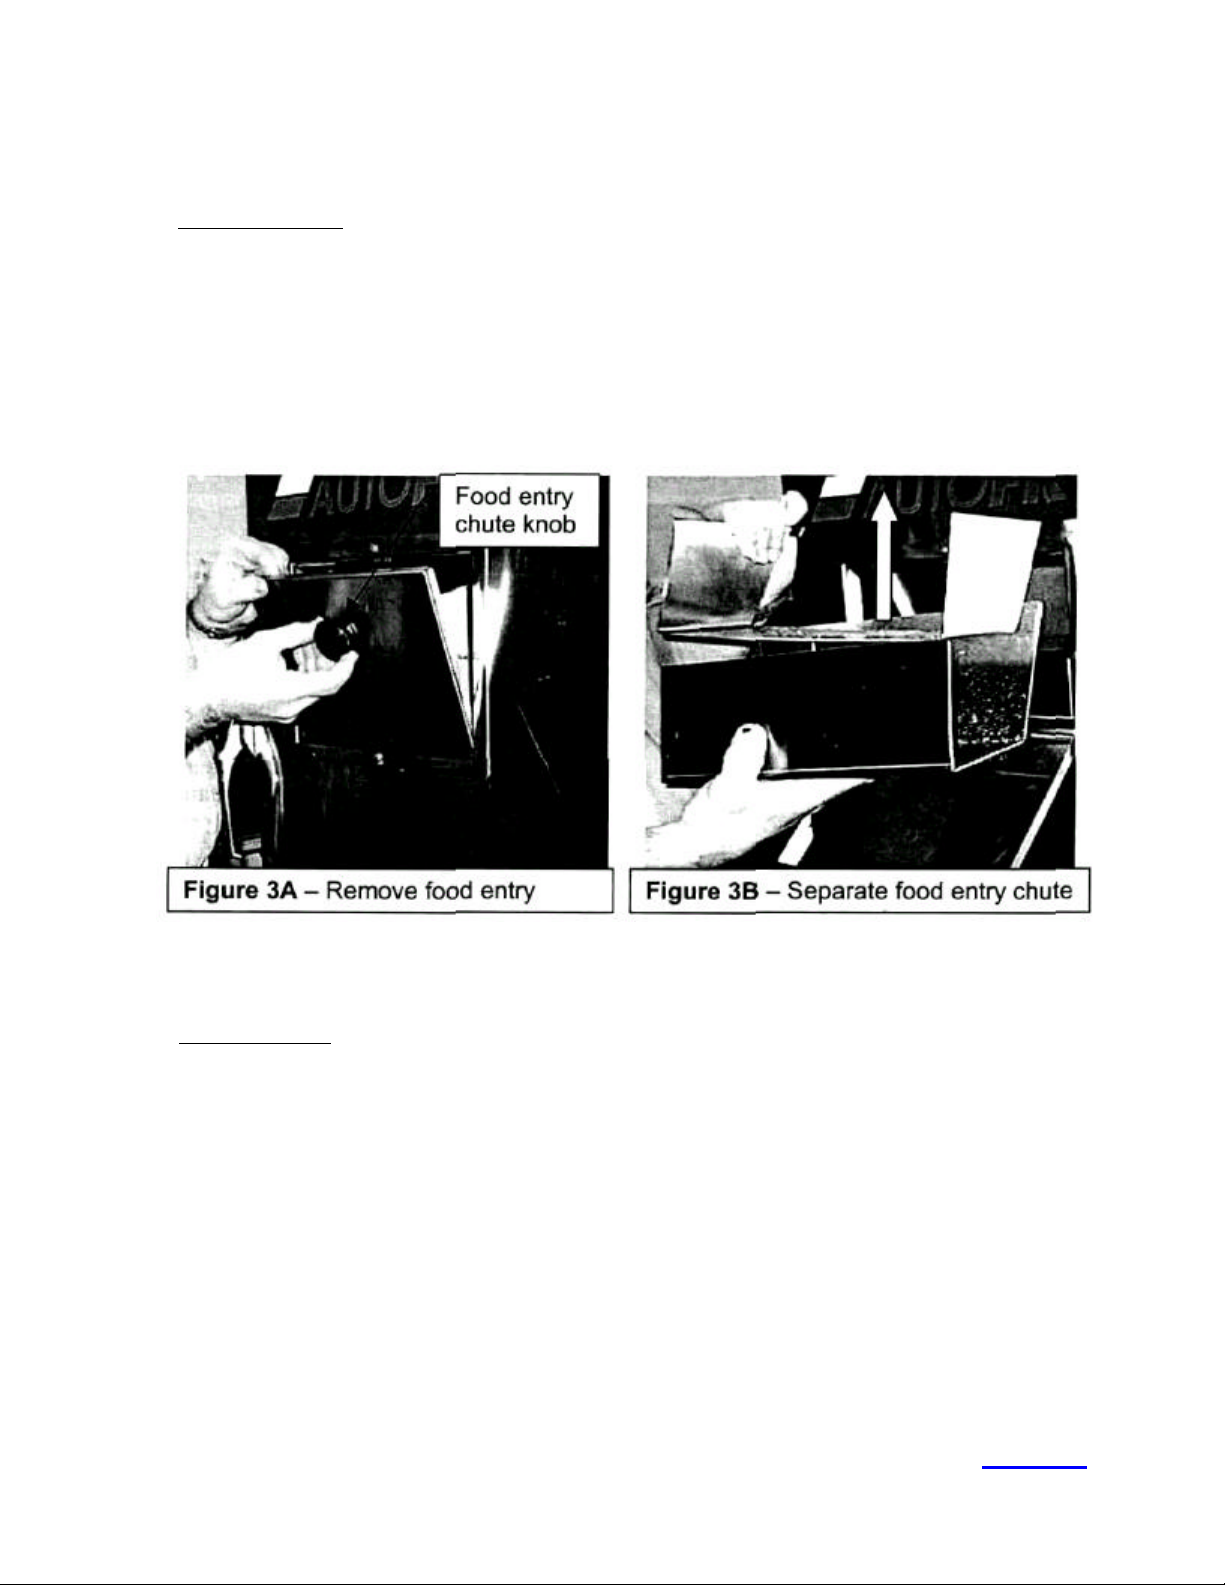
• Remove the food exit chute by turning the food chute knob
counterclockwise (see Figure 3A).
• Separate the two-piece food entry chute and wash in warm soapy
water followed with a clear water rinse (see Figure 3B).
6. Sanitize parts.
• All parts must be sanitized in a quaternary ammonia or iodine solution at a
temperature of at least 75° F following the manufacturers label instructions.
• Re-assemble and re-install the clean dry parts.
MTI Form OP-0005 Rev. 002 7/98
E167654
Next Page
6
Page 8
AUTOFRY Models MTI-5 Rev. 2 Operator's Manual
. Install Charcoal Filter
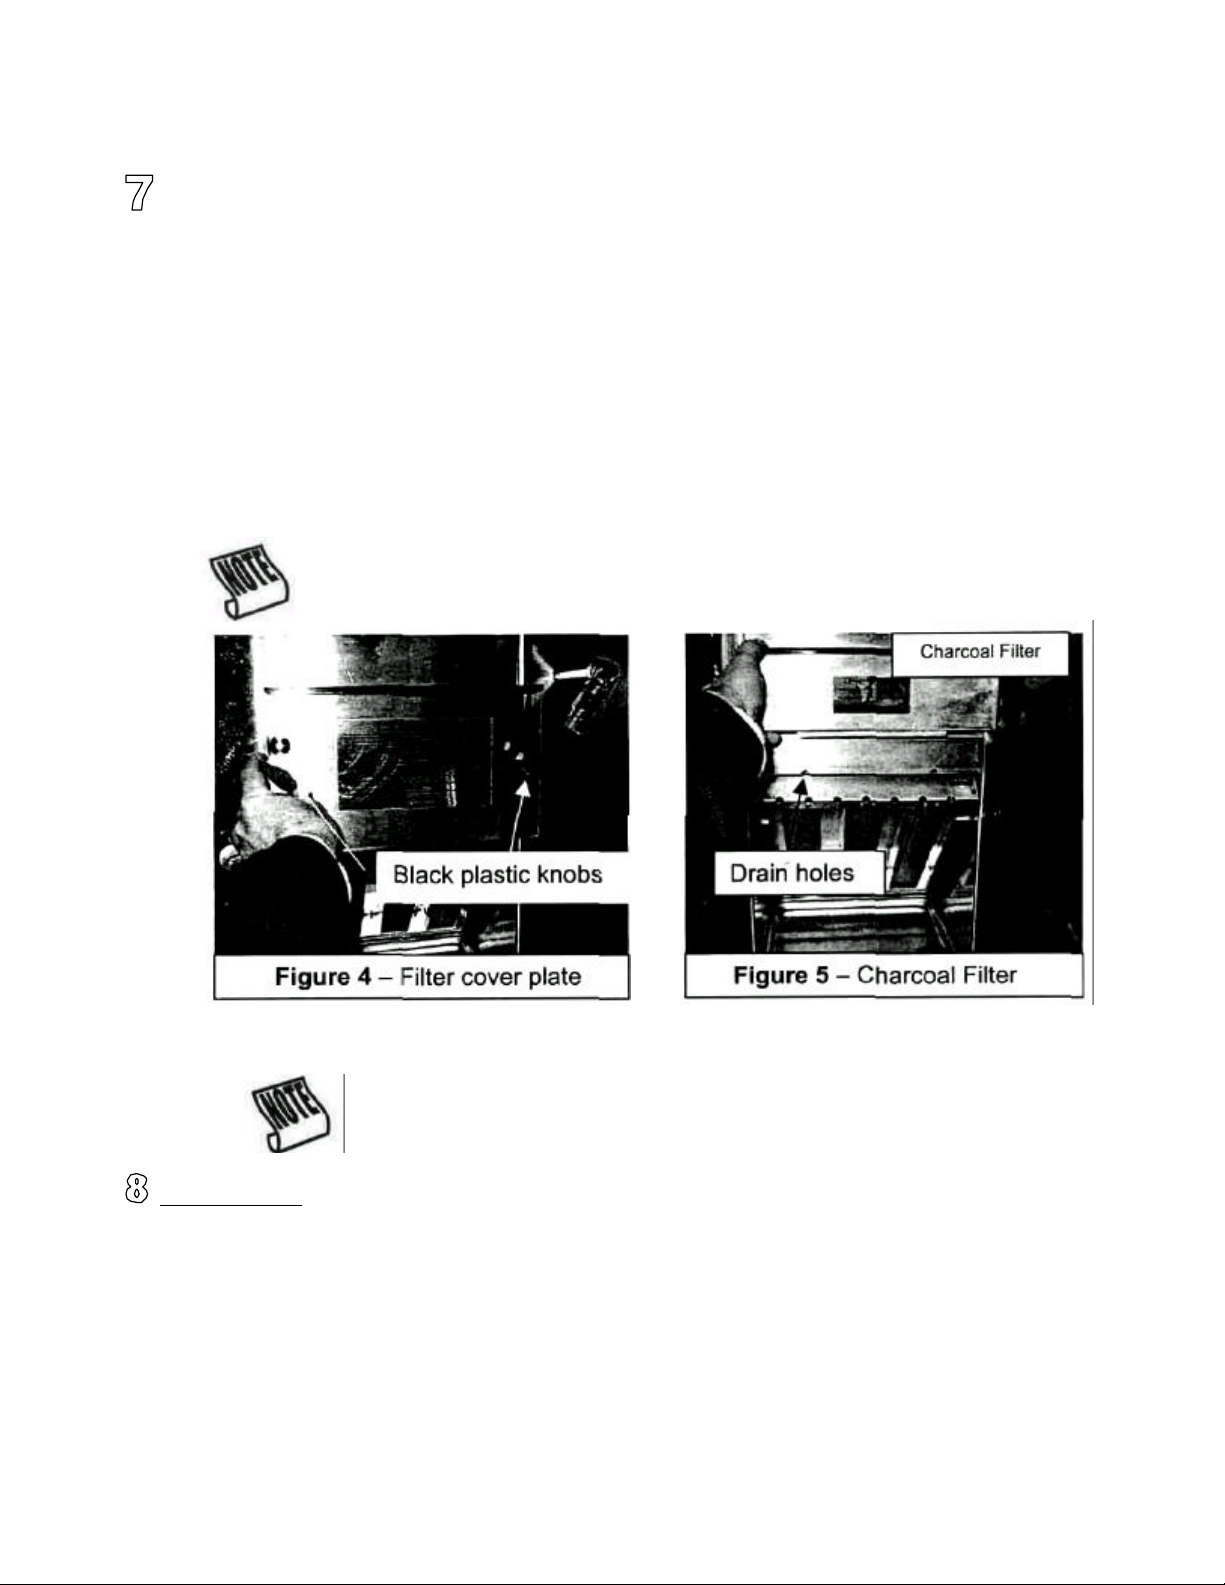
• Remove the filter cover plate from the back interior wall of the
cooking chamber by removing the two black plastic knobs securing
the cover plate (see Figure 4). " Remove the charcoal filter from the plastic
bag with the flange facing
down and facing you insert it into the tracks above the second filter
(see Figure 5).
• Re-install the filter cover plate by turning the black plastic knobs clockwise
to a hand tight fit. Verify that the word "TOP" on the filter cover plate is in the
upper left-hand corner (see Figure 4).
If the filters or the filter cover plate are not installed or installed
incorrectly the AUTOFRY will display Sft at start-up.
Both the grease baffle and the second filter have small holes
along the one side of the frame. These drain holes must be
facing down in order for the filters to efficiently drain and clean
the air (see Figure 5).
. Sanitize interior.
All interior surfaces must be sanitized in a quaternary ammonia or iodine
solution at a temperature of at least 75° F following the manufacturer's label
instructions.
MTI Form OP-0005 Rev. 002 7/98
E167654
7
Page 9
AUTOFRY Models MTI-5 Rev. 2 Operator's Manual
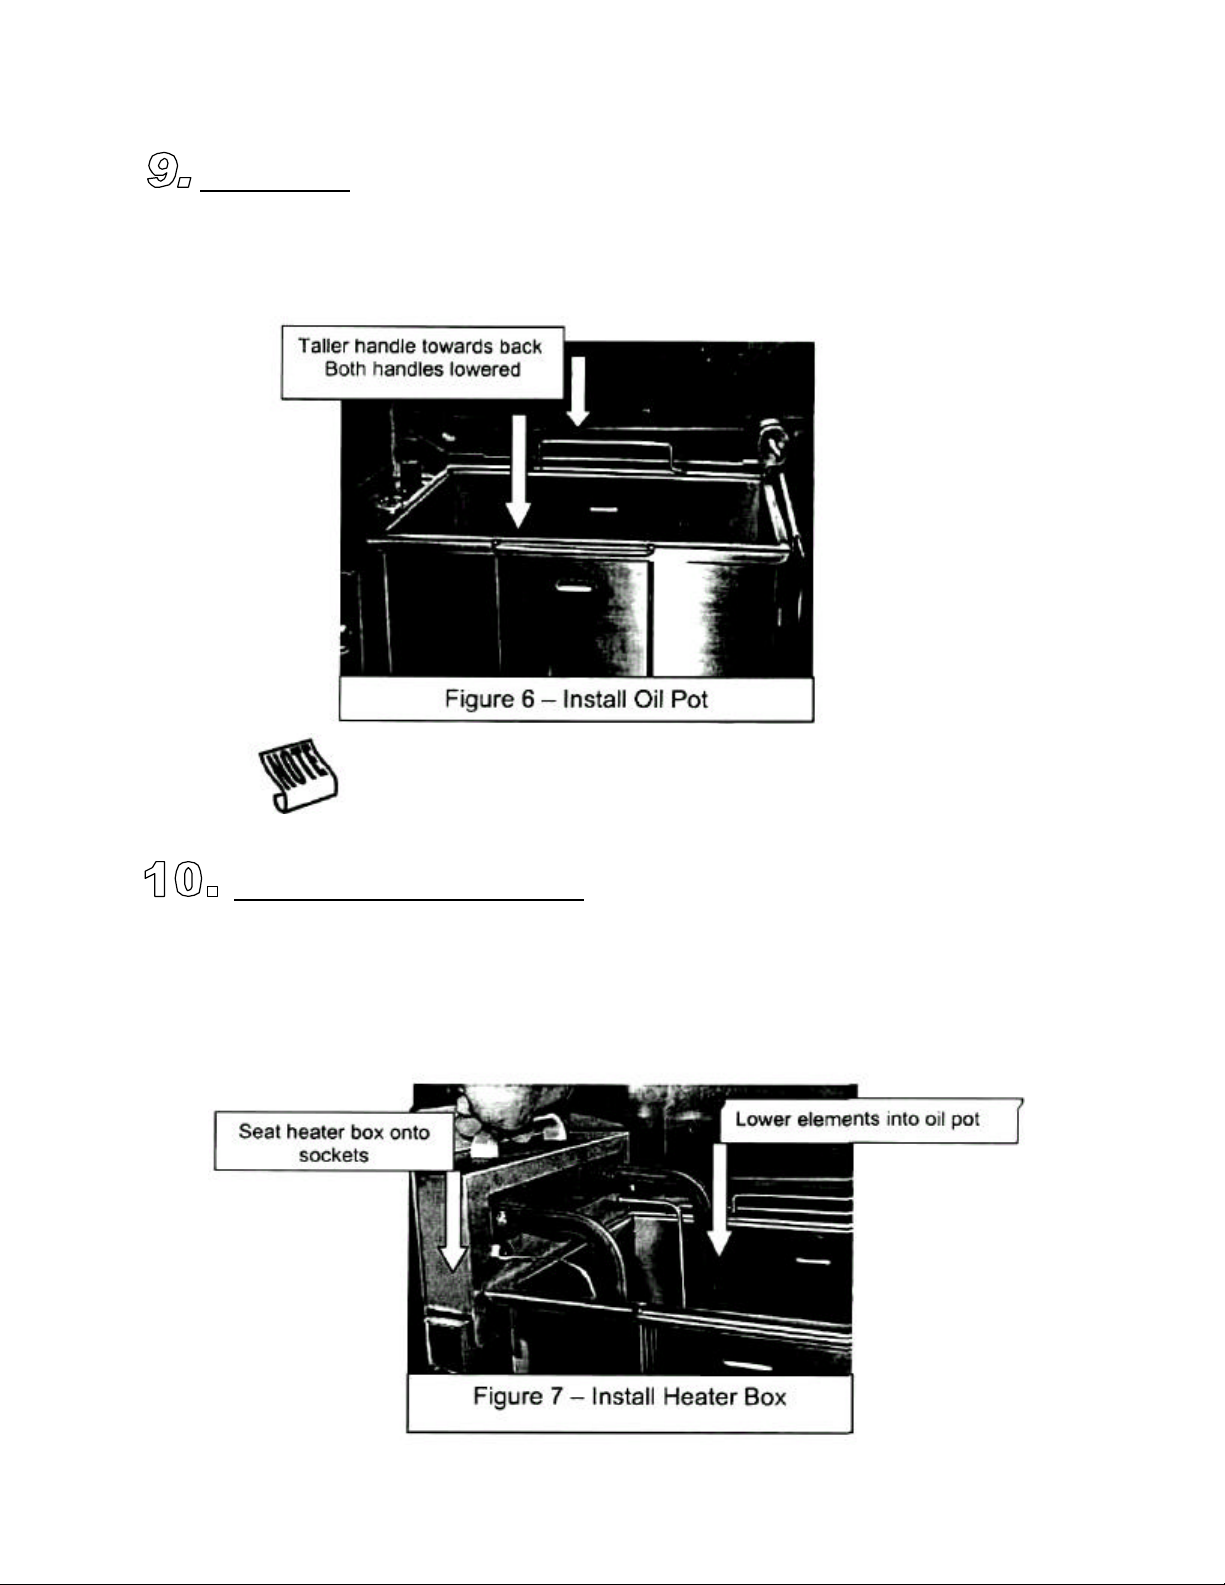
Install oil pot.
• Place the oil pot into the cooking chamber. Ensure that the taller of the
two oil pot handles is towards the rear of the cook chamber and that both
handles are fully lowered (see Figure 6).
Experience has shown that a light application of Kote® brand soil
shield or Pam® on the exterior surfaces of the oil pot will prove
helpful when it is time to clean the oil pot.
Install the heater box assembly.
? Install the heater box assembly onto the heater box deck located to the
left of the oil pot. Ensure that the heater box assembly seats firmly onto
the sockets (see Figure 7).
MTI Form OP-0005 Rev. 002 7/98
E167654
8
Page 10
AUTOFRY Models MTI-5 Rev. 2 Operator's Manual
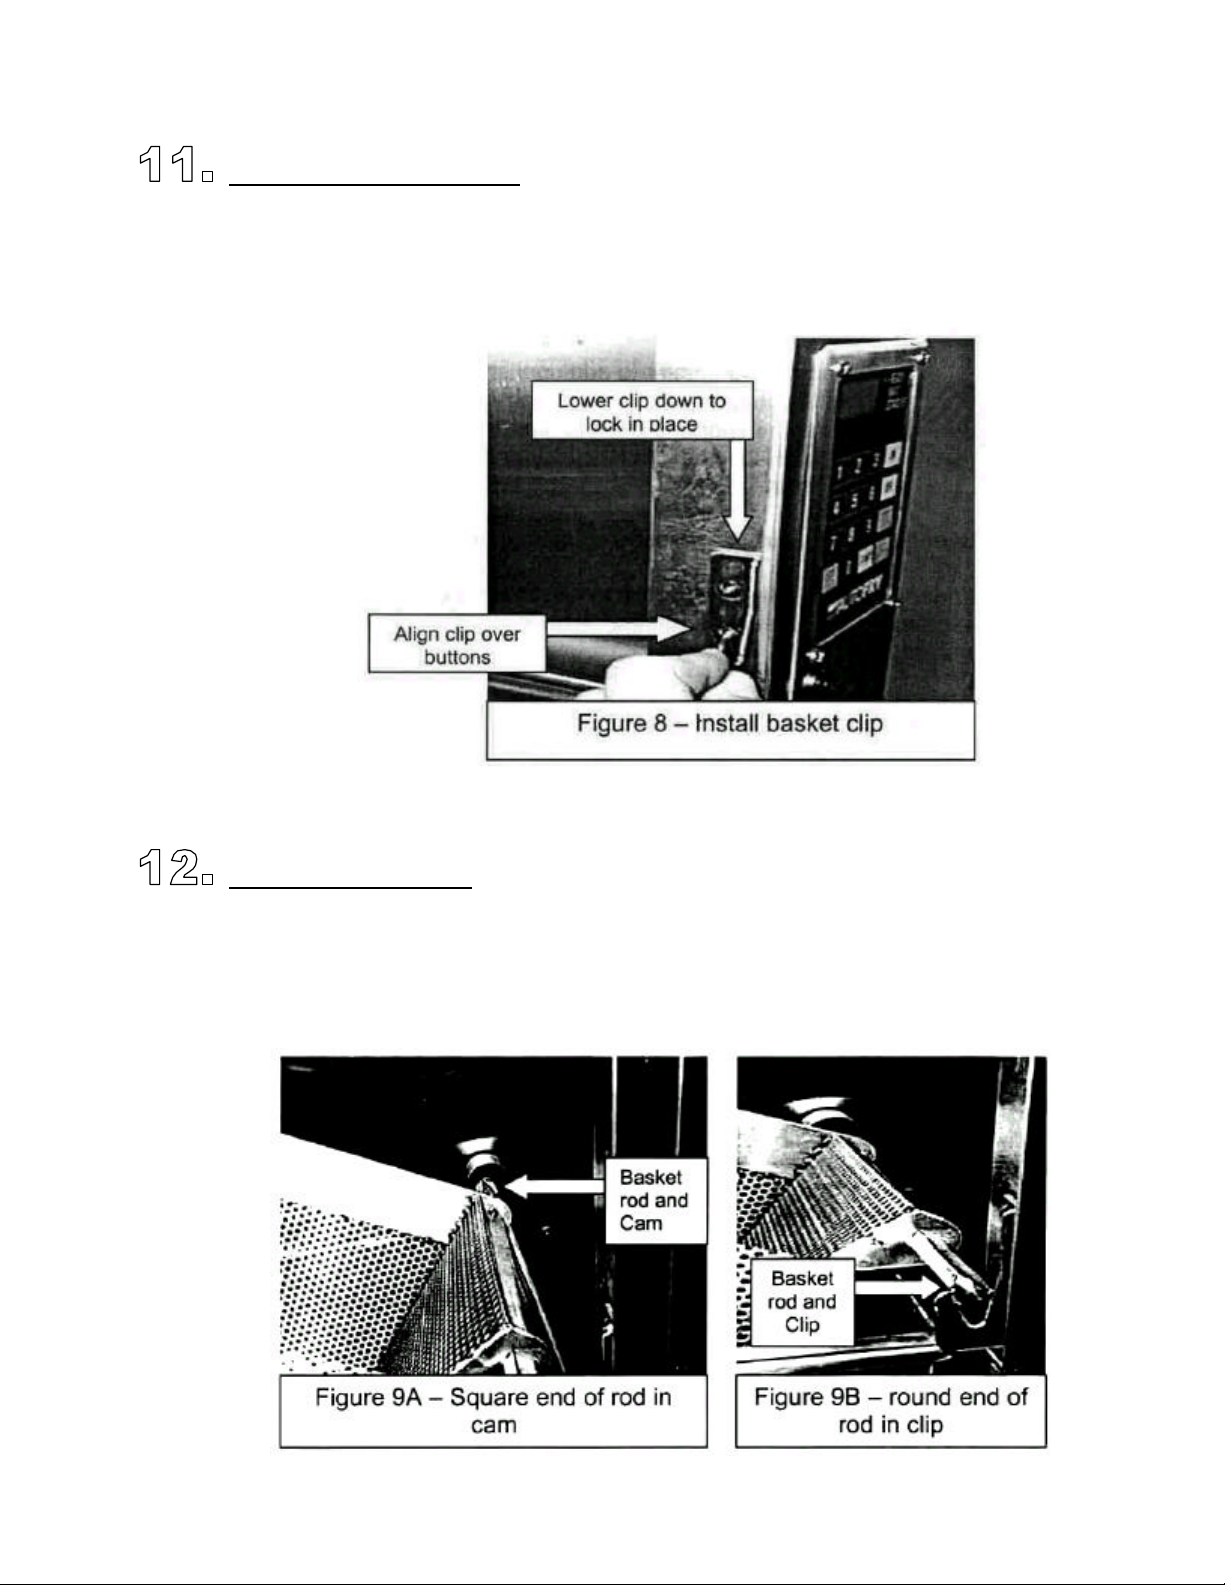
Install the food basket clip.
• Install the food basket clip onto the two mounting buttons located to the
right of the door opening by aligning the holes in the clip over the buttons
(see Figure 8).
Install the food basket
• Install the square end of the basket rod into the cam located on the rear
wall of the AUTOFRY (see Figure 9A).
• Lower the round end of the basket rod into the basket clip. (see Figure
9B).
MTI Form OP-0005 Rev. 002 7/98
E167654
9
Page 11
AUTOFRY Models MTI-5 Rev. 2 Operator's Manual
Add liquid shortening (2.5- 2.75 Gallons).
• Add liquid shortening to the oil pot. Ensure that the oil level is
approximately 1/2" – 3/4" below the upper fill line stamped on the interior
of the oil pot. Oil level should be maintained between the upper and
lower fill levels at all times.
It is simpler and safer to add cool shortening to the oil pot than
it is to remove hot shortening. Once the AUTOFRY has heated
the shortening will expand. Only after this expansion has
finished should the oil level be increased to the upper FILL
level.
Over filling will result in excessive splashing; never over fill the oil pot.
Under-filling the oil pot will result in under-cooked food product or poor
and erratic temperature readings. Extreme low oil levels will cause
smoking.
NEVER operate the AUTOFRYin a low or no oil condition, there is risk of fire due
to extreme low oil levels.
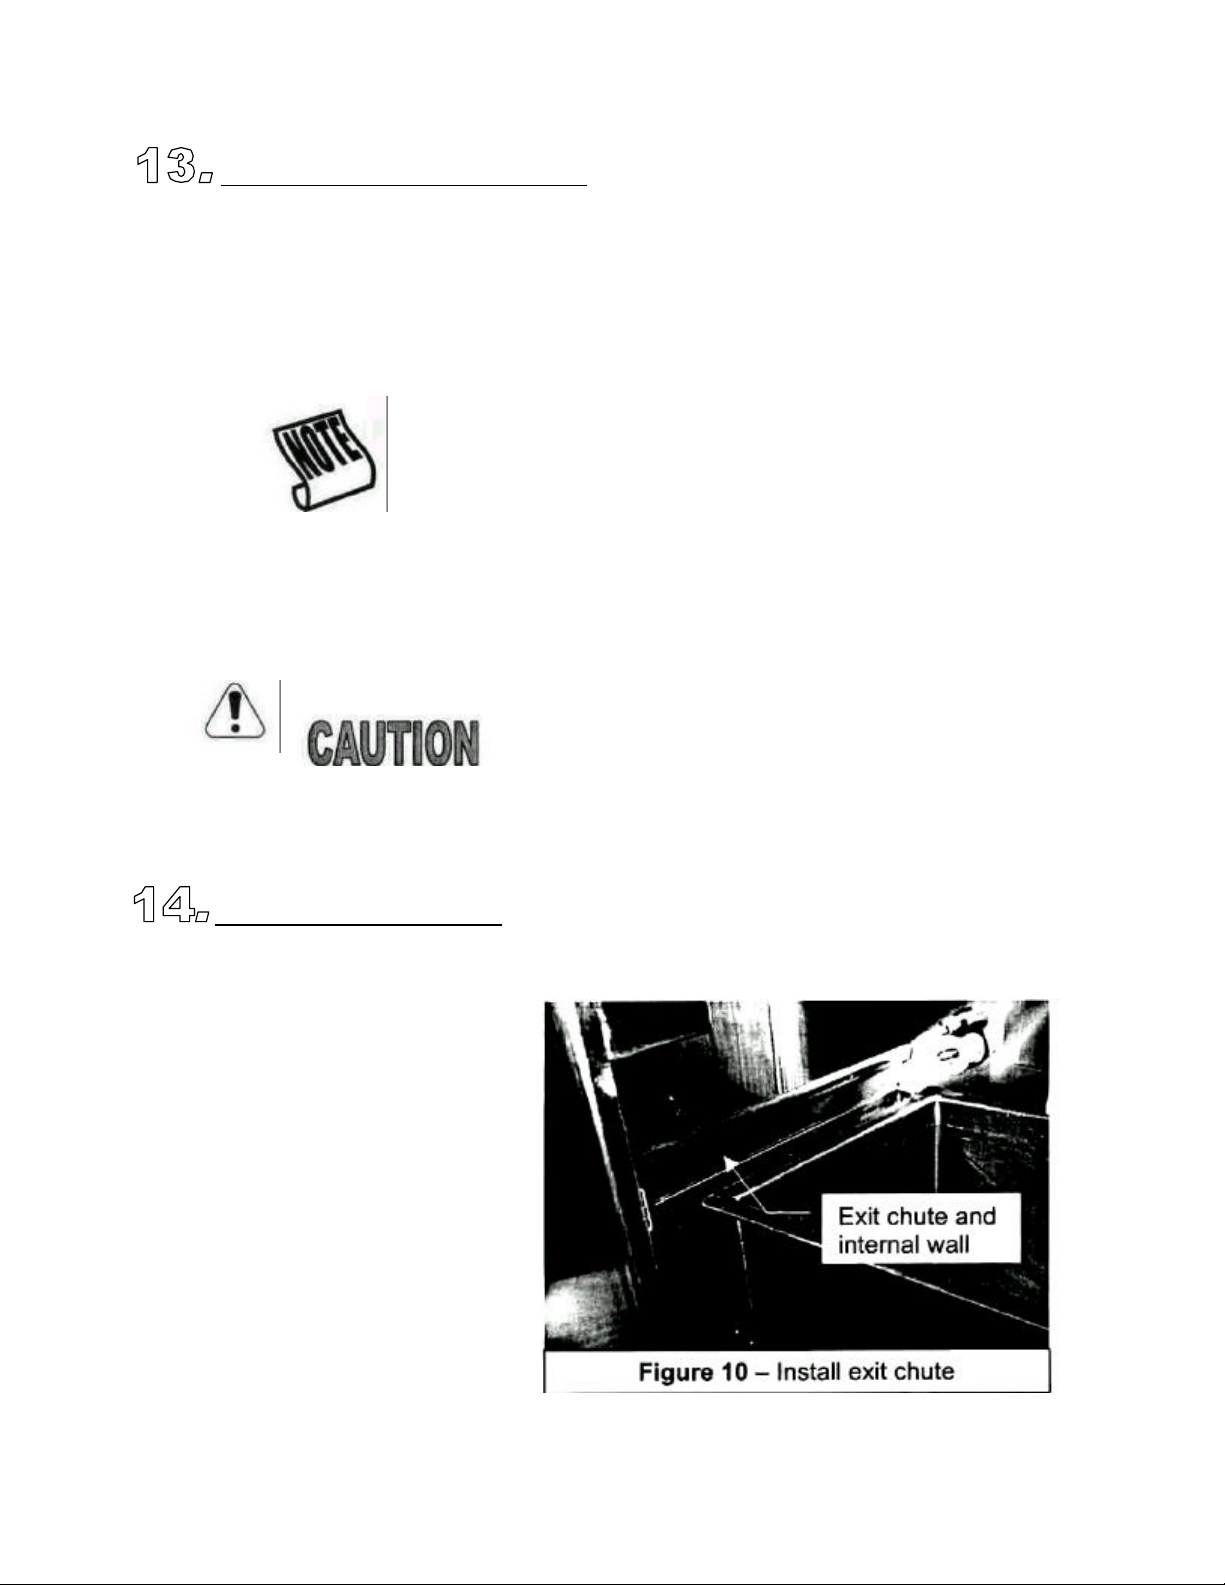
Install the food exit chute.
• Secure the food exit chute, flange side up, into the cut-out on the
right hand side of the
AUTOFRY inserting
the food exit chute
into the cut-out
space and lifting up
into the cavity until
the flange can be
placed over the
raised edge of the
internal wall (see
Figure 9).
MTI Form OP-0005 Rev. 002 7/98
E167654
10
Page 12
11
AUTOFRY Models MTI-5 Rev. 2 Operator's Manual
Power.
• Close and lock the main door of the AUTOFRY.
• Attach the power cord into its socket at the rear of the AUTOFRY
• Plug the AUTOFRY into the properly rated, single phase, grounded
outlet.
• Move the power switch located at the right side of the AUTOFRY to the
ON possition.
• Press the ON button at the keypad. The display will show current oil
temperature (see start-up notes bellow).
• The AUTOFRY will take between 15-20 minutes to reach the ready
temperature. It is important to allow the AUTOFRY to reach the ready
temoerature prior entering food.
If the display reads Sft. check the following...
1. All three filters are installed firmly into their filter tracks.
2. The filter cover plate is installed and the two black knobs are seated
firmly.
3. That the front door is closed tightly and locked.
4. There is nothing blocking the air exhaust vent at the top of the AUTOFRY.
5. That the fire system pressure gauge is in the Green charged area.
If the display reads Prb. check the following...
1. That the heater box assembly is installed.
2. That the heater box assembly is firmly seated onto its sockets.
If the display reads A07 or A08. check the following...
1. That the heater box is firmly installed onto its sockets
2. That there is oil in the oil pot to 1/2" - 3/4" bellow the fill line.
Press the OFF button to clear the display of any error message
You are now ready to start cooking. Please turn to Let's Get Cooking!
MTI Form OP-0005 Rev. 002 7/98
E167654
Page 13
AUTOFRY Models MTI-5 Rev. 2 Operator's Manual
Let's Get Cooking !
Starting the AUTOFRY
• With the main door closed and locked, press the ON button to begin
heating the oil.
• The O WAIT light will illuminate on the keypad and the exhaust fan will
start to run.
• The current oil temperature will appear on the keypad.
• When the oil temperature reading is between 190°F - 220°F the wire
food basket will complete one test cycle. At this time you will hear the
basket hitting the sidewall of the AUTOFRY. This is a normal condition.
When the oil temperature at the display reaches 300°F
press the OFF button at the keypad. Open the main door to
check the oil level. Add oil, if necessary, to fill the
oil pot to the upper "FILL" line. Close the main door and press the
ON button to re-start the AUTOFRY.
The AUTOFRY will be ready at 340°F. It takes the AUTOFRY between 1220 minutes to heat the oil to 350°F.
Although the heating element is programmed to stop heating at
350°- 354°F, the oil temperature can go as high as 365°F due to
the circulation of the oil in the oil pot. This is a normal condition.
MTI Form OP-0005 Rev. 002 7/98
E167654
12
Page 14

AUTOFRY Models MTI-5 Rev. 2 Operator's Manual
Begin Cooking
Cooking with the AUTOFRY is as simple as 1, 2, 3,
1. Enter a cook time by pushing buttons 0-9 on the keypad
For example, to cook for 2 minutes and 30 seconds:
Push 2,3, and 0
The display will read 2:30
If you enter the wrong time press CLEAR and re-enter your cook
time. Most food products will have recommended cook times
printed on their packaging; use these cook times as a base line
starting point
2. Open the food entry door and place the food product to prepare in the
food chute (Never over fill the food entry chute).
3. Close the food chute and push the START button.
Never overload the food entry chute. Over loading will result in splashing.
The AUTOFRY can cook a maximum load of 1 1/2 Pounds (.68 kg) of french
fries.
Never place ice into the AUTOFRY. Ice will cause boil over. Never entry
an order until the GREEN READY light is on.
MTI Form OP-0005 Rev. 002 7/98
E167654
13
Page 15

.
AUTOFRY Models MTI-5 Rev. 2 Operator's Manual
During Cooking
• The O READY light has gone out and the O WAIT light will illuminate. " The
display will count down the selected cook time.
• The wire food basket now contains your food product. It will automatically be
lowered into the oil pot.
• At the end of the COOK CYCLE oil temperature replaces time at the display.
The wire food basket will be raised out of the oil pot and drain the food
product for 12 seconds.
• At the conclusion of the DRAIN CYCLE the basket will dispense the food
down the food exit chute. You may hear the sound of the basket hitting the
sidewall. This is a normal condition.
• The DISPENSE CYCLE is repeated once to ensure that all the food has been
emptied from the wire food basket.
? The wire food basket will return to the ready position, the O WAIT light will
go out and the O READY light will illuminate. A quick "beeping" sound will
occur to signal that the AUTOFRY is ready for the next order.
AUTOFRY Shutoff Procedure
Push OFF.
• The keypad display will shut off immediately and the oil will begin to cool.
? The AUTOFRY is safely shut off.
The oil will remain hot for a long period. To assure continuous air
cleaning, the fan will continue to run for about 2 hours or until the oil
temperature falls below 190° F.
MTI Form OP-0005 Rev. 002 7/98
E167654
14
Page 16

AUTOFRY Models MTI-5 Rev. 2 Operator's Manual
Additional KEYPAD Functions The Count
Button
The COUNT button tracks equipment cycles and this function can be utilized to
record sales and control inventory. To use COUNT follow this procedure:
The AUTOFRY has two count features. A re-settable count and a
total cumulative count.
To access these count features simply press the COUNT button once
to view the re-settable count. While the count is on the display press
the CLEAR button to clear the count. By pressing the COUNT button
twice you can view the total non-resettable count.
• From 0-999 total COOK CYCLES, the keypad will
display ONE set of THREE numbers.
examples:
1. 030 = 30 total cook cycles
2. 302 = 302 total cook cycles
3. 999 = 999 total cook cycles
• At 1,000 total cook cycles and up to 6,999 the keypad will
display TWO sets of THREE numbers.
examples:
1. 001 followed by 002 = 1,002 total cook cycles
2. 006 followed by 001 = 6,001 Total cook cycles
• After 6,999 total cook cycles the counter will return to 000.
MTI Form OP-0005 Rev. 002 7/98
E167654
15
Page 17

AUTOFRY Models MTI-5 Rev. 2 Operator's Manual
The Stand-By Button
The Button is used during off peak hours to conserve energy and
maximize oil life.
To Activate Stand-By Mode
For all AUTOFRY models, press the button and the O STAND BY
light will illuminate.
The heating element shuts off until the oil temperature drops below 300° F
and then maintains this temperature.
To Exit Stand-Bv Mode
Press the CLEAR button
The O STAND BY light will go out and the oil will begin to heat up until it
reaches the ready temperature.
Never shut off the AUTOFRY while in the Stand-By mode as
the keypad may remain locked in the Stand-By mode! If this
should happen when you re-start the AUTOFRY simply press
the CLEAR button.
Repeat Cook Time
Use the following procedure to repeat the last entered cook time:
• Simply press the START and your last cook time will be repeated.
This may be useful if you have a single product menu or multi-product menu
with identical cook times.
Maximum Cook Time
The AUTOFRY has maximum cook time of 15 minute and 59 seconds.
MTI Form OP-0005 Rev. 002 7/98
E167654
16
Page 18

AUTOFRY Models MTI-5 Rev. 2 Operator's Manual
Programming Cook Times
The AUTOFRY offers you the ability to program the 1 - 6 keys for your most
common cook times.
It is a good idea to write down your six most commonly used cook times prior to
programming the AUTOFRY. Instructions for programming are as follows,
Entering the programming mode.
1. Press the OFF Button.
2. Simultaneously press the 2 and 0 buttons.
• The display will read P =
3. Press 2 then 2 then 2 then START.
• The display will read 001.
Key # 1
1. Press the 1 key to view or edit the pre-set cook time.
• The display will read 1:00.
2. Press the 2 key to increase the cook time or press the 3 key to decrease the
cook time.
3. Press the 1 key to save the changes.
• The display will return to 001.
If you do not wish to continue re-programming the other 5 buttons simply press the
OFF button. Otherwise, with the display reading 001 follow these instructions:
Key # 2
1. Press the 2 button.
• The display will read 002.
2. Press the 1 button to view or edit the pre-set cook time.
• The display will read 2:00.
3. Press the 2 key to increase the cook time or press the 3 key to decrease the
cook time.
4. Press the 1 button to save the changes.
• The display will return to 002.
If you do not wish to continue re-programming the other 4 buttons simply press the
OFF button. Otherwise, with the display reading 002 follow these instructions:
Next Page
MTI Form OP-0005 Rev. 002 7/98
E167654
Page 19

AUTOFRY Models MTI-5 Rev. 2 Operator's Manual
Programming Cook Times (cont.)
Key # 3
1. Press the 2 button.
• The display will read 003.
2. Press the 1 button to view or edit the pre-set cook time.
• The display will read 3:00.
3. Press the 2 key to increase the cook time or press the 3 key to decrease the
cook time.
4. Press the 1 button to save the changes.
• The display will read 003.
If you do not wish to continue re-programming the other 3 buttons simply press the
OFF button. Otherwise, with the display reading 003 follow these instructions:
Key # 4
1. Press the 2 button.
• The display will read 004.
2. Press the 1 button to view or edit the pre-set cook time.
• The display will read 4:00.
3. Press the 2 key to increase the cook time or press the 3 key to decrease the
cook time.
4. Press the 1 button to save the changes.
• The display will read 004.
If you do not wish to continue re-programming the other 2 buttons simply press the
OFF button. Otherwise, with the display reading 004 follow these instructions:
Key # 5
1. Press the 2 button.
• The display will read 005.
2. Press the 1 button to view or edit the pre-set cook time.
• The display will read 5:00.
3. Press the 2 key to increase the cook time or press the 3 key to decrease the
cook time.
4. Press the 1 button to save the changes.
• The display will read 005.
If you do not wish to continue re-programming the last button simply press the
OFF button. Otherwise, with the display reading 005 follow these instructions:
MTI Form OP-0005 Rev. 002 7/98
E167654
18
Page 20

2.
Press the
1 button to view or edit the pre
-
set coo
k time.
cook time.
AUTOFRY Models MTI-5 Rev. 2 Operator's Manual
Programming Cook Times (cont.)
Key # 6
1.
Press the 2 button.
• The display will read 006.
• The display will read 6:00.
3.
Press the 2 key to increase the cook time or press the 3 key to decrease the
4.
Press the 1 button to save the changes.
• The display will read 006.
Exit programming mode
To exit the programming mode press the OFF key. You have now preprogrammed your AUTOFRY for optimum convenience.
Using the pre-programmed times
To use the pre-programmed keys simply press the 1- 6 key. The display will show
001-006. Place the selected food into the food entry chute, close the entry chute
door and press the START key. The display will count down the pre-programmed
time.
MTI Form OP-0005 Rev. 002 7/98
E167654
19
Page 21

AUTOFRY Models MTI-5 Rev. 2 Operator's Manual
Recommended Cleaning Schedule
In order to ensure compliance with State, local and
VERY IMPORTANT
National health and safety standards regular
maintenance must be performed.
Regular maintenance is extremely important for the health and safety of your
customers.
Proper maintenance is very important in order for your AUTOFRY to continue to
operate without the need for a hood and duct system.
Regular oil changing, as an important part of your regular maintenance, will
enhance the taste of your food product and reduce the risk of smoke. Oil changing
will vary widely depending on the use of the AUTOFRY. However, the use of a
shortening monitor kit is the most accurate means of determining the status of the
oil.
DO NOT use jets to clean the AUTOFRY. There is risk of electric shock.
NEVER immerse the heater box assembly.
Daily Cleaning
Remove and wash the following in warm soapy water followed by a
clear water rinse:
• The wire food basket
• The food entry chute
• The food exit chute
• The filter cover plate
• The grease baffle
• The second filter
Thoroughly dry all parts
Remove the charcoal filter and wipe down the exterior surfaces with a
clean damp cloth or paper towels.
Never soak the charcoal filter as permanent damage to the charcoal medium will
result!
MTI Form OP-0005 Rev. 002 7/98
E167654
20
Page 22
AUTOFRY Models MTI-5 Rev. 2 Operator's Manual
Daily Cleaning (cont.)
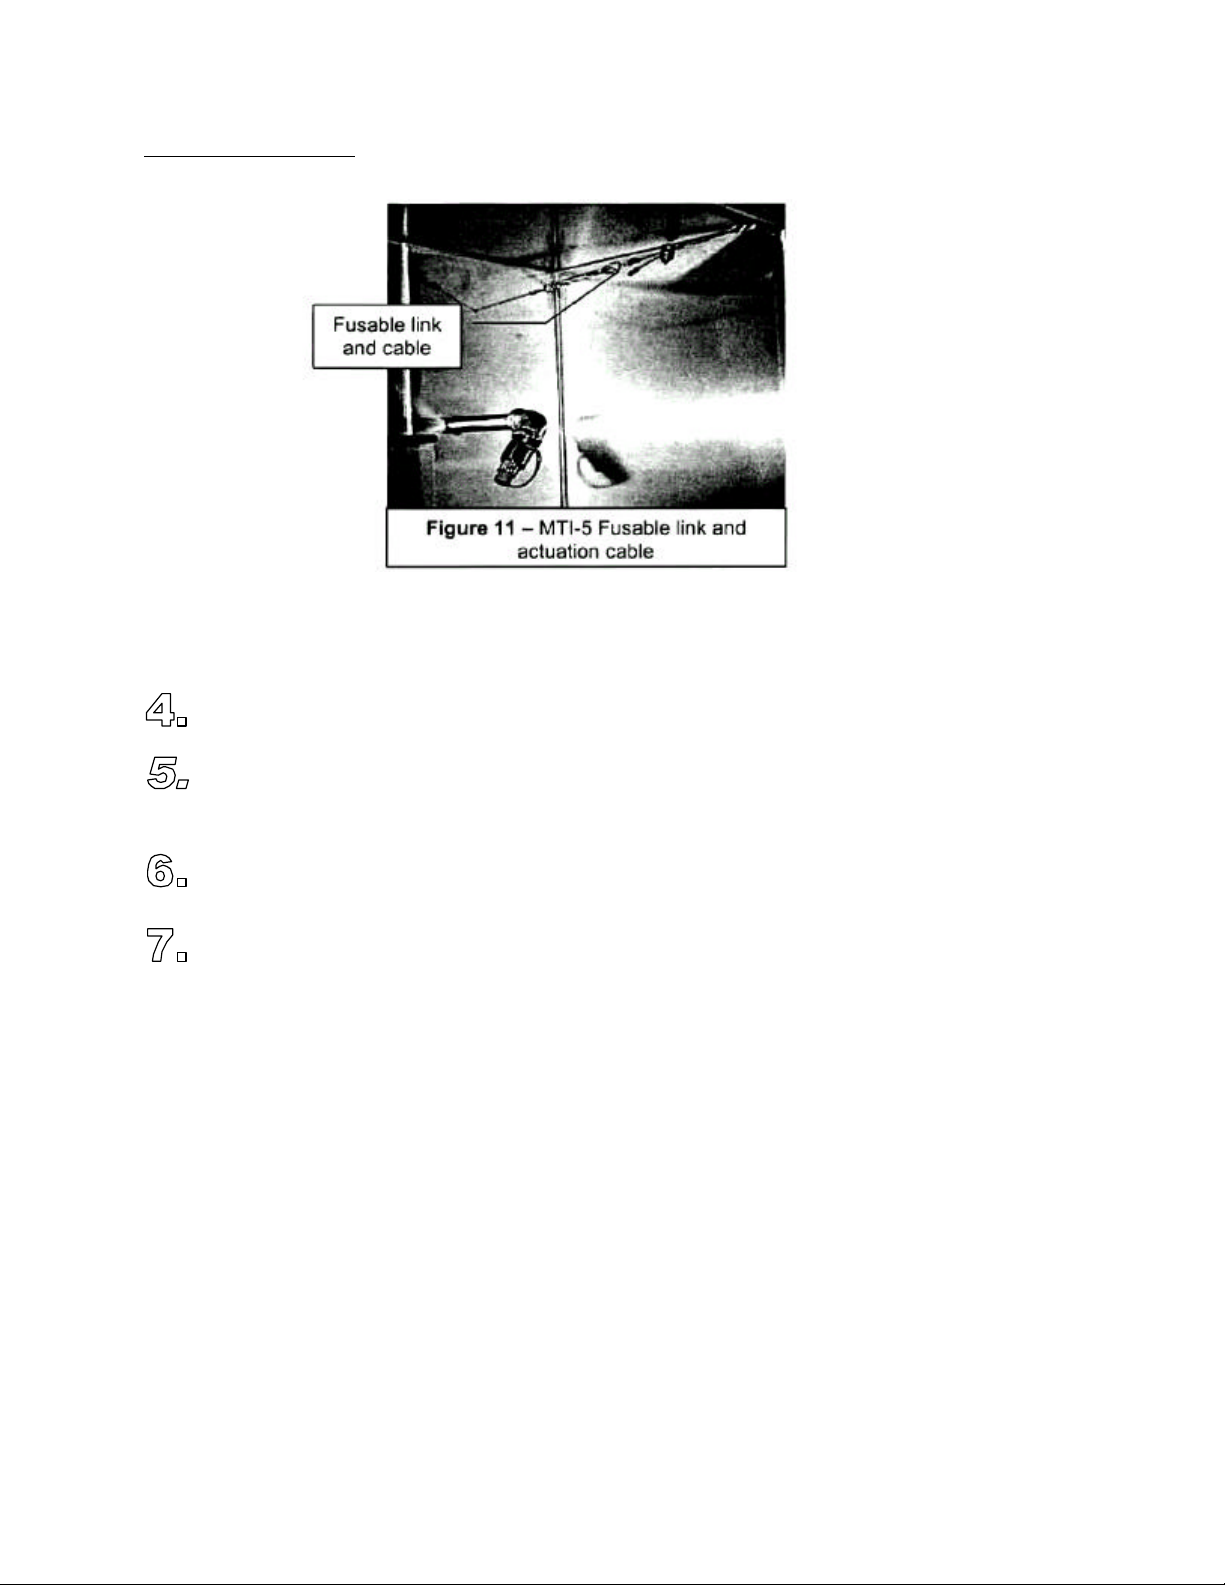
Use extreme caution when cleaning around the fire system actuation cables and
fusible link in the interior cabinet. Accidental discharge of the fire system could
result, (see Figure 12).
Clean all interior surfaces to bare metal.
Sanitize all part and interior surfaces in a quaternary ammonia or iodine
solution at a room temperature of at least 75° F following the
manufacturer's label instructions.
Polish the exterior surfaces using a commercial grade stainless steel
polish and a soft cloth.
Replace all the clean dry components and add oil or shortening as
needed.
MTI Form OP-0005 Rev. 002 7/98
E167654
21
Page 23

AUTOFRY Models MTI-5 Rev. 2 Operator's Manual
22
Weekly Cleaning
Repeat daily cleaning.
Remove the heater box assembly.
Never immerse the heater box. Permanent damage
and or electric shock will result. Use caution when
cleaning around the temperature probes.
Remove the oil pot.
• Discard the oil or shortening in an environmentally safe manner.
• Clean all surfaces to bare metal
• Re-apply a thin even coating of Kote ® brand soil shield to the exterior
surfaces of the oil pot.
Clean all interior surfaces to bare metal
Sanitize all part and interior surfaces in a quaternary ammonia or iodine
solution at a room temperature of at least 75° F following the manufacturer's
label instructions.
MTI Form OP-0005 Rev. 002 7/98
E167654
Use extreme caution when cleaning around the fire
system actuation cables and fusable link in the
interior cabinet. Accidental discharge of the fire
system could result, (see figures 1).
Page 24
AUTOFRY Models MTI-5 Rev. 2 Operator's Manual
Quarterly Cleaning and Maintenance
Disconnect (un-plug) the AUTOFRY from main power
Perform weekly cleaning routine.
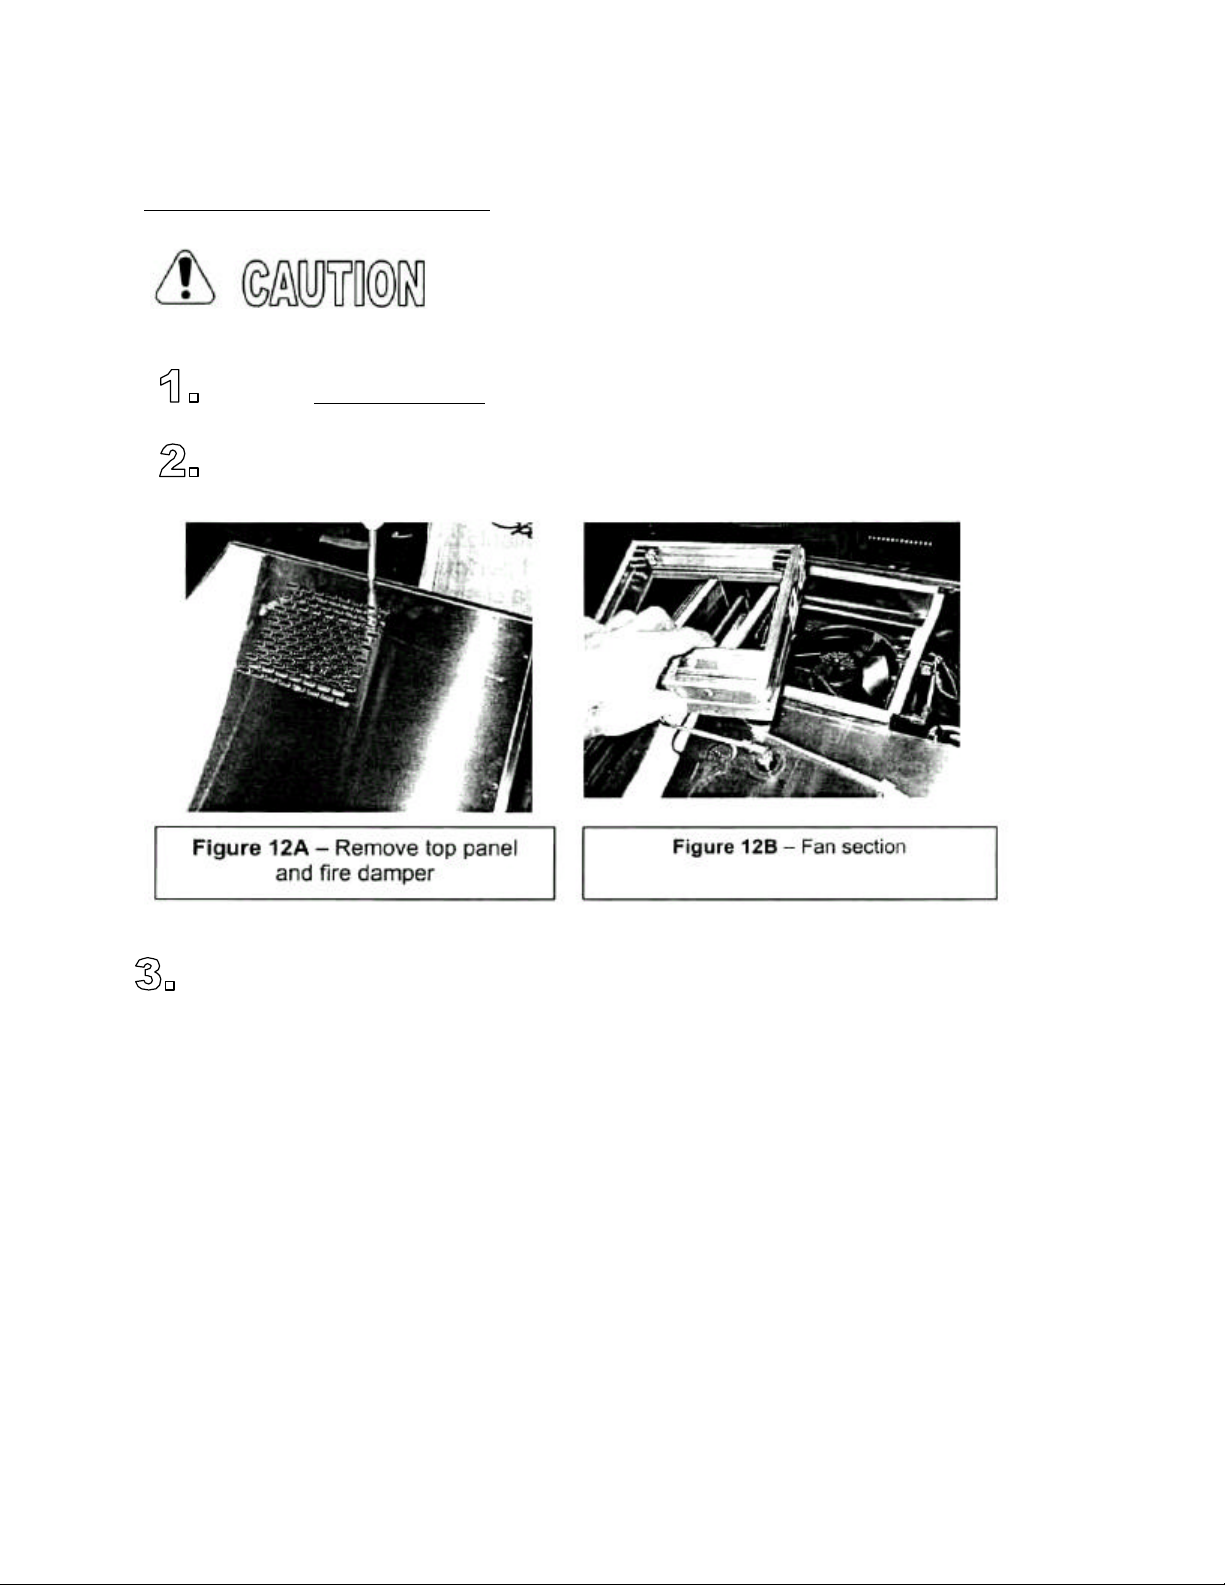
Remove the top panel and clean to bare metal the fire damper and fan
section with a clean dry cloth or absorbent paper towels (see Figure 12A
and 12B).
Re-install the clean dry fire damper and re-install the top panel.
MTI Form OP-0005 Rev. 002 7/98 E
167654
23
Page 25
AUTOFRY Models MTI-5 Rev. 2 Operator's Manual
VERY IMPORTANT
Charcoal Filter
In order for the AUTOFRY to continue to perform as a
ventless cooking appliance the charcoal filter medium or
activated charcoal must be changed a minimum of every three months. This
maintenance is required by your equipment warranty.
While replacing the charcoal medium is easy, there will be some charcoal dust present.
Replacing the charcoal medium should be performed away from your food preparation
areas.
Remove the charcoal filter.
Remove the four screws holding the perforated cover.
• Pour the used charcoal into a suitable container.
• Clean the re-usable housing and perforated screen to bare metal in
warm soapy water followed by a clear water rinse.
• Thoroughly dry the housing and cover.
Pour the new charcoal into the housing and re-seat the cover and
screws.
Replace the charcoal filter and all the filter components.
All activated carbons do not have the same performance
characteristics. Use replacement charcoal supplied by AUTOFRY
which can be ordered by calling 1-800-348-2976.
Second Filter
The second filter must be replaced a minimum of once every 6 months. Heavy
usage may require that the second filter be changed more frequently; however, if it
appears the second filter can no longer be cleaned effectively then it should be
replaced!
Second filters can be ordered by calling 1-800-348-2976.
MTI Form OP-0005 Rev. 002 7/98
E167654
24
Page 26

AUTOFRY Models MTI-5 Rev. 2 Operator's Manual
Semi-Annual Cleaning and Maintenance Fire
Suppression System
An inspection report / insurance certificate of installation will be forwarded to you by
mail shortly after shipment of your AUTOFRY. This document must be filed in a safe
place for future reference.
An inspection of the fire suppression system must be performed every six months
in order to comply with NFPA 96, NFPA 17A and UL 197. A certified fire equipment
maintenance company must perform this inspection.
Consult your fire suppression system manual that has been supplied with this
document for details on the inspection and re-charge instructions.
Safety System Test
The safety system must be tested a minimum of once every six months. A qualified
equipment repair technician following these instructions should perform this
inspection.
This test must be started with a full oil pot of clean cool liquid shortening.
Open the main door of the AUTOFRY and press the ON button.
• The fan will operate for approximately 10-12 seconds then shut off.
• The display will read Sft.
Individually remove each of the components listed below.
Close the main door and press the ON button.
• The fan will operate for approximately 10-12 seconds then shut off.
• The display will read Sft.
1. The filter cover plate.
2. The grease baffle.
3. The second filter.
4. The charcoal filter.
5. The removable fire damper / stack cover.
MTI Form OP-0005 Rev. 002 7/98
E167654
25
Page 27

AUTOFRY Models MTI-5 Rev. 2 Operator's Manual
Safety System Test (cont.)
The AUTOFRY is equipped with an air-flow switch. To test this switch follow these
instructions.
1. With all the filter components installed and the main door closed press
the ON button at the keypad.
2. Using a flat piece of cardboard or 1/4" plywood completely block the
exhaust flow at the fire damper / stack cover.
• The fan will begin to operate.
It can take upwards of 45 minutes for the air flow switch to react to
the blockage; However, after the air switch has closed, the display
will read Sft.
If the oil has heated above 151° F the fan will continue to operate until it
cools to 120° F.
Included with this manual is a maintenance log that must be signed and
dated after the completion of the daily, weekly and quarterly maintenance
and testing. Your local or State health and safety inspectors may require this
log to be posted in a conspicuous location.
MTI Form OP-0005 Rev. 002 7/98
E167654
26
 Loading...