

Page 1

Autodesk Navisworks Manage 2012
User Guide
April 2011
Page 2

©
2011 Autodesk, Inc. All Rights Reserved. Except as otherwise permitted by Autodesk, Inc., this publication, or parts thereof, may not
be reproduced in any form, by any method, for any purpose.
Certain materials included in this publication are reprinted with the permission of the copyright holder.
Trademarks
The following are registered trademarks or trademarks of Autodesk, Inc., and/or its subsidiaries and/or affiliates in the USA and other countries:
3DEC (design/logo), 3December, 3December.com, 3ds Max, Algor, Alias, Alias (swirl design/logo), AliasStudio, Alias|Wavefront (design/logo),
ATC, AUGI, AutoCAD, AutoCAD Learning Assistance, AutoCAD LT, AutoCAD Simulator, AutoCAD SQL Extension, AutoCAD SQL Interface,
Autodesk, Autodesk Envision, Autodesk Intent, Autodesk Inventor, Autodesk Map, Autodesk MapGuide, Autodesk Streamline, AutoLISP, AutoSnap,
AutoSketch, AutoTrack, Backburner, Backdraft, Built with ObjectARX (logo), Burn, Buzzsaw, CAiCE, Civil 3D, Cleaner, Cleaner Central, ClearScale,
Colour Warper, Combustion, Communication Specification, Constructware, Content Explorer, Dancing Baby (image), DesignCenter, Design
Doctor, Designer's Toolkit, DesignKids, DesignProf, DesignServer, DesignStudio, Design Web Format, Discreet, DWF, DWG, DWG (logo), DWG
Extreme, DWG TrueConvert, DWG TrueView, DXF, Ecotect, Exposure, Extending the Design Team, Face Robot, FBX, Fempro, Fire, Flame, Flare,
Flint, FMDesktop, Freewheel, GDX Driver, Green Building Studio, Heads-up Design, Heidi, HumanIK, IDEA Server, i-drop, ImageModeler, iMOUT,
Incinerator, Inferno, Inventor, Inventor LT, Kaydara, Kaydara (design/logo), Kynapse, Kynogon, LandXplorer, Lustre, MatchMover, Maya,
Mechanical Desktop, Moldflow, Moonbox, MotionBuilder, Movimento, MPA, MPA (design/logo), Moldflow Plastics Advisers, MPI, Moldflow
Plastics Insight, MPX, MPX (design/logo), Moldflow Plastics Xpert, Mudbox, Multi-Master Editing, Navisworks, ObjectARX, ObjectDBX, Open
Reality, Opticore, Opticore Opus, Pipeplus, PolarSnap, PortfolioWall, Powered with Autodesk Technology, Productstream, ProjectPoint, ProMaterials,
RasterDWG, RealDWG, Real-time Roto, Recognize, Render Queue, Retimer,Reveal, Revit, Showcase, ShowMotion, SketchBook, Smoke, Softimage,
Softimage|XSI (design/logo), Sparks, SteeringWheels, Stitcher, Stone, StudioTools, ToolClip, Topobase, Toxik, TrustedDWG, ViewCube, Visual,
Visual LISP, Volo, Vtour, Wire, Wiretap, WiretapCentral, XSI, and XSI (design/logo).
LightWorks, the LightWorks logo, LWA and LWA-Enabled are registered trademarks of LightWork Design Ltd. The LWA-Enabled logo, Interactive
Image Regeneration, IIR, A-Cubed, Feature-Following Anti-Aliasing and FFAA are all trademarks of LightWork Design Ltd. All other trademarks,
images and logos remain the property of their respective owners. Copyright of LightWork Design Ltd. 1990-2007, 2008.
This software is based in part on the work of the Independent JPEG Group.
Disclaimer
THIS PUBLICATION AND THE INFORMATION CONTAINED HEREIN IS MADE AVAILABLE BY AUTODESK, INC. "AS IS." AUTODESK, INC. DISCLAIMS
ALL WARRANTIES, EITHER EXPRESS OR IMPLIED, INCLUDING BUT NOT LIMITED TO ANY IMPLIED WARRANTIES OF MERCHANTABILITY OR
FITNESS FOR A PARTICULAR PURPOSE REGARDING THESE MATERIALS.
This User Guide was last updated on 11 April 2011.
Page 3

Contents
Chapter 1 Welcome to Autodesk Navisworks Manage 2012 . . . . . . . . . 1
What Is New in This Release? . . . . . . . . . . . . . . . . . . . . . . . 1
How to Get Assistance . . . . . . . . . . . . . . . . . . . . . . . . . . . 11
Find Information Using InfoCenter . . . . . . . . . . . . . . . . 11
Overview of InfoCenter . . . . . . . . . . . . . . . . . . . . 11
Search for Information . . . . . . . . . . . . . . . . . . . . 12
Access Subscription Center . . . . . . . . . . . . . . . . . . 13
Use Communication Center . . . . . . . . . . . . . . . . . 15
Save and Access Favorite Topics . . . . . . . . . . . . . . . . 17
Use the Help System . . . . . . . . . . . . . . . . . . . . . 18
Specify InfoCenter Settings . . . . . . . . . . . . . . . . . . 23
Get More Help . . . . . . . . . . . . . . . . . . . . . . . . . . . . 25
Learn the Product . . . . . . . . . . . . . . . . . . . . . . . . . . 26
View the Product Readme . . . . . . . . . . . . . . . . . . . . . . 27
Join the Customer Involvement Program . . . . . . . . . . . . . 28
Chapter 2 Installation . . . . . . . . . . . . . . . . . . . . . . . . . . . . . 29
Quick Start to Stand-Alone Installation . . . . . . . . . . . . . . . . . . 29
Prepare for Installation . . . . . . . . . . . . . . . . . . . . . . . 29
System Requirements for Stand-Alone Installation . . . . . . 30
Install Microsoft .Net Framework 4.0 . . . . . . . . . . . . . 31
Understand Administrative Permission
Requirements . . . . . . . . . . . . . . . . . . . . . . . . 32
iii
Page 4

Locate Your Autodesk Navisworks Serial Number and
Product Key . . . . . . . . . . . . . . . . . . . . . . . . . 32
Avoid Data Loss During Installation . . . . . . . . . . . . . 33
Choose a Language . . . . . . . . . . . . . . . . . . . . . . 33
Configuration . . . . . . . . . . . . . . . . . . . . . . . . . 34
Install Multiple or Bundled Products . . . . . . . . . . . . . 36
Install and Run Autodesk Navisworks Manage 2012 . . . . . . . . 36
Install Autodesk Navisworks . . . . . . . . . . . . . . . . . 37
Launch Autodesk Navisworks . . . . . . . . . . . . . . . . . 39
How to Launch Autodesk Navisworks in Another
Language . . . . . . . . . . . . . . . . . . . . . . . . . . 40
Add or Remove Features . . . . . . . . . . . . . . . . . . . 41
Repair Autodesk Navisworks Manage 2012 . . . . . . . . . . 42
Uninstall Autodesk Navisworks Manage 2012 . . . . . . . . 42
Move to Autodesk Navisworks from a Previous Release . . . . . . 43
Install Autodesk Navisworks for Multiple Users . . . . . . . . . . . . . 44
Quick Start to Network Administration and Deployment . . . . . 44
Deployment Preparation . . . . . . . . . . . . . . . . . . . 44
Set Up Network Tools and Your License Server . . . . . . . . 50
Distribute the Program . . . . . . . . . . . . . . . . . . . . 52
Distribute an Autodesk Navisworks Product . . . . . . . . . 54
Set Up a Deployment . . . . . . . . . . . . . . . . . . . . . . . . 54
Preliminary Tasks for a Network Deployment . . . . . . . . 55
Choose a Language . . . . . . . . . . . . . . . . . . . . . . 56
Your Deployment Choices . . . . . . . . . . . . . . . . . . 57
Create a Deployment . . . . . . . . . . . . . . . . . . . . . 65
Modify a Deployment (optional) . . . . . . . . . . . . . . . 69
Point Users to the Administrative Image . . . . . . . . . . . 70
Uninstall an Autodesk Product . . . . . . . . . . . . . . . . 70
Installation Troubleshooting . . . . . . . . . . . . . . . . . . . . . . . 71
General Installation Issues . . . . . . . . . . . . . . . . . . . . . 71
How can I check my graphics card driver to see if it needs
to be updated? . . . . . . . . . . . . . . . . . . . . . . . . 71
How do I switch my license from stand-alone to network
or network to stand-alone? . . . . . . . . . . . . . . . . . 72
When performing a Typical installation, what gets
installed? . . . . . . . . . . . . . . . . . . . . . . . . . . 72
Why should I specify the Project Folder and Site
Folder? . . . . . . . . . . . . . . . . . . . . . . . . . . . . 73
How do I share the Autodesk Navisworks settings on a
site and project basis? . . . . . . . . . . . . . . . . . . . . 73
How do I change which exporter plugins are
installed? . . . . . . . . . . . . . . . . . . . . . . . . . . 75
How do I register and activate Autodesk Navisworks? . . . . 75
When should I reinstall the product instead of repairing
it? . . . . . . . . . . . . . . . . . . . . . . . . . . . . . . 76
iv | Contents
Page 5

When I uninstall my software, what files are left on my
system? . . . . . . . . . . . . . . . . . . . . . . . . . . . 77
Deployment Issues . . . . . . . . . . . . . . . . . . . . . . . . . 77
Is there a checklist I can refer to when performing a
deployment? . . . . . . . . . . . . . . . . . . . . . . . . 77
Where should deployments be located? . . . . . . . . . . . 77
Where can I check if service packs are available for my
software? . . . . . . . . . . . . . . . . . . . . . . . . . . . 78
How do I choose between 32-bit and 64-bit
deployments? . . . . . . . . . . . . . . . . . . . . . . . . 78
What are information channels? . . . . . . . . . . . . . . . 78
What are additional deployment configuration
options? . . . . . . . . . . . . . . . . . . . . . . . . . . . 79
Licensing Issues . . . . . . . . . . . . . . . . . . . . . . . . . . . 80
What is the difference between a stand-alone license and
a network license? . . . . . . . . . . . . . . . . . . . . . . 80
What is the benefit to using a network licensed version
of the software? . . . . . . . . . . . . . . . . . . . . . . . 81
What is Internet Explorer used for? . . . . . . . . . . . . . . 81
Networking Issues . . . . . . . . . . . . . . . . . . . . . . . . . . 81
Where do I find my server name? . . . . . . . . . . . . . . 81
If I choose to create a log file, what kind of information
does the log file contain? . . . . . . . . . . . . . . . . . . 82
What is an administrative image (MSI) file? . . . . . . . . . 82
What is the impact of selecting all products to be included
in the administrative image? . . . . . . . . . . . . . . . . 82
How should I configure a network license server for a
firewall . . . . . . . . . . . . . . . . . . . . . . . . . . . . 83
Uninstall and Maintenance Issues . . . . . . . . . . . . . . . . . 83
When adding or removing features, how can I tell what
features get installed by default? . . . . . . . . . . . . . . 83
Is it possible to change the installation folder when adding
or removing features? . . . . . . . . . . . . . . . . . . . . 83
When should I reinstall the product instead of a
repair? . . . . . . . . . . . . . . . . . . . . . . . . . . . . 84
When I uninstall my software, what files are left on my
system? . . . . . . . . . . . . . . . . . . . . . . . . . . . 84
Chapter 3 Quick Start . . . . . . . . . . . . . . . . . . . . . . . . . . . . . 85
Start and Quit Autodesk Navisworks . . . . . . . . . . . . . . . . . . . 85
Automatically Save and Recover Autodesk Navisworks Files . . . . . . . 86
Command Line Options . . . . . . . . . . . . . . . . . . . . . . . . . 88
The User Interface . . . . . . . . . . . . . . . . . . . . . . . . . . . . . 91
Parts of Autodesk Navisworks Interface . . . . . . . . . . . . . . . 91
Application Button and Menu . . . . . . . . . . . . . . . . 93
Quick Access Toolbar . . . . . . . . . . . . . . . . . . . . . 96
Contents | v
Page 6

Ribbon . . . . . . . . . . . . . . . . . . . . . . . . . . . . . 98
Tooltips . . . . . . . . . . . . . . . . . . . . . . . . . . . . 107
Keytips . . . . . . . . . . . . . . . . . . . . . . . . . . . . 107
Navigation Tools . . . . . . . . . . . . . . . . . . . . . . . 108
The Classic User Interface . . . . . . . . . . . . . . . . . . 108
Scene View . . . . . . . . . . . . . . . . . . . . . . . . . . 129
Dockable Windows . . . . . . . . . . . . . . . . . . . . . 132
Status Bar . . . . . . . . . . . . . . . . . . . . . . . . . . . 138
Undo/Redo Commands . . . . . . . . . . . . . . . . . . . . . . 139
Autodesk Navisworks Workspaces . . . . . . . . . . . . . . . . . 140
Default Keyboard Shortcuts . . . . . . . . . . . . . . . . . . . . 142
Navigation with the Wheel Button . . . . . . . . . . . . . . . . . . . 147
Autodesk Navisworks Options . . . . . . . . . . . . . . . . . . . . . . 150
Location Options . . . . . . . . . . . . . . . . . . . . . . . . . . . . . 154
Graphics System . . . . . . . . . . . . . . . . . . . . . . . . . . . . . 155
Display Units . . . . . . . . . . . . . . . . . . . . . . . . . . . . . . . 157
Profiles . . . . . . . . . . . . . . . . . . . . . . . . . . . . . . . . . . 158
Search Directories . . . . . . . . . . . . . . . . . . . . . . . . . . . . 159
Gizmos . . . . . . . . . . . . . . . . . . . . . . . . . . . . . . . . . . 160
Chapter 4 Work with Files . . . . . . . . . . . . . . . . . . . . . . . . . . 163
Native File Formats . . . . . . . . . . . . . . . . . . . . . . . . . . . . 163
Compatible CAD Applications . . . . . . . . . . . . . . . . . . . . . . 164
Supported CAD File Formats . . . . . . . . . . . . . . . . . . . . 168
Supported Laser Scan File Formats . . . . . . . . . . . . . . . . . 169
Use File Readers . . . . . . . . . . . . . . . . . . . . . . . . . . . . . 170
3DS File Reader . . . . . . . . . . . . . . . . . . . . . . . . . . . 170
ASCII Laser Scan File Reader . . . . . . . . . . . . . . . . . . . . 171
Bentley AutoPLANT File Reader . . . . . . . . . . . . . . . . . . 172
CIS/2 File Reader . . . . . . . . . . . . . . . . . . . . . . . . . . 172
DWG/DXF File Reader . . . . . . . . . . . . . . . . . . . . . . . 175
Overview of Object Enablers . . . . . . . . . . . . . . . . 177
DWF/DWFx File Reader . . . . . . . . . . . . . . . . . . . . . . 179
DGN File Reader . . . . . . . . . . . . . . . . . . . . . . . . . . 180
Faro Scan File Reader . . . . . . . . . . . . . . . . . . . . . . . . 181
FBX File Reader . . . . . . . . . . . . . . . . . . . . . . . . . . . 181
IFC File Reader . . . . . . . . . . . . . . . . . . . . . . . . . . . 182
IGES File Reader . . . . . . . . . . . . . . . . . . . . . . . . . . 183
Inventor File Reader . . . . . . . . . . . . . . . . . . . . . . . . 183
JTOpen File Reader . . . . . . . . . . . . . . . . . . . . . . . . . 184
Leica Scan File Reader . . . . . . . . . . . . . . . . . . . . . . . 185
MAN File Reader . . . . . . . . . . . . . . . . . . . . . . . . . . 185
Parasolid File Reader . . . . . . . . . . . . . . . . . . . . . . . . 187
PDS File Reader . . . . . . . . . . . . . . . . . . . . . . . . . . . 187
Pro/ENGINEER File Reader . . . . . . . . . . . . . . . . . . . . . 187
Riegl Scan File Reader . . . . . . . . . . . . . . . . . . . . . . . 188
vi | Contents
Page 7

RVM File Reader . . . . . . . . . . . . . . . . . . . . . . . . . . 188
SAT File Reader . . . . . . . . . . . . . . . . . . . . . . . . . . . 189
SketchUp SKP File Reader . . . . . . . . . . . . . . . . . . . . . 189
STEP File Reader . . . . . . . . . . . . . . . . . . . . . . . . . . 190
STL File Reader . . . . . . . . . . . . . . . . . . . . . . . . . . . 190
VRML File Reader . . . . . . . . . . . . . . . . . . . . . . . . . 191
Z+F Scan File Reader . . . . . . . . . . . . . . . . . . . . . . . . 192
Use File Exporters . . . . . . . . . . . . . . . . . . . . . . . . . . . . 192
AutoCAD File Exporter . . . . . . . . . . . . . . . . . . . . . . . 192
Add the ARX Plugin . . . . . . . . . . . . . . . . . . . . . 193
Use the ARX Plugin . . . . . . . . . . . . . . . . . . . . . 194
CAD Preview . . . . . . . . . . . . . . . . . . . . . . . . . 195
Revit File Exporter . . . . . . . . . . . . . . . . . . . . . . . . . 200
MicroStation File Exporter . . . . . . . . . . . . . . . . . . . . . 201
Load the MDL Plugin . . . . . . . . . . . . . . . . . . . . 202
Export Files from the Key-In Command Line . . . . . . . . 202
Export Files from the Command Line . . . . . . . . . . . . 203
Customize the DGN File Exporter Options . . . . . . . . . 204
Viz and Max File Exporter . . . . . . . . . . . . . . . . . . . . . 205
ArchiCAD File Exporter . . . . . . . . . . . . . . . . . . . . . . 206
Manage Files . . . . . . . . . . . . . . . . . . . . . . . . . . . . . . . 209
Open Files . . . . . . . . . . . . . . . . . . . . . . . . . . . . . 209
Create Files . . . . . . . . . . . . . . . . . . . . . . . . . . . . . 210
Save and Rename Files . . . . . . . . . . . . . . . . . . . . . . . 210
2D and Multi-Sheet Files . . . . . . . . . . . . . . . . . . . . . . 213
Add Sheets/Models to the Currently Opened File . . . . . . 214
Project Browser Window . . . . . . . . . . . . . . . . . . . 214
Work with 2D and Multi-Sheet Files . . . . . . . . . . . . 218
Add Geometry and Metadata to the Current
Sheet/Model . . . . . . . . . . . . . . . . . . . . . . . . 219
Complex Datasets . . . . . . . . . . . . . . . . . . . . . . . . . 221
Append Geometry and Metadata to the Current
Scene . . . . . . . . . . . . . . . . . . . . . . . . . . . . 222
Delete Files . . . . . . . . . . . . . . . . . . . . . . . . . . 222
Adjust Units and Transform . . . . . . . . . . . . . . . . . 223
Refresh Files . . . . . . . . . . . . . . . . . . . . . . . . . . . . 225
Merge Files . . . . . . . . . . . . . . . . . . . . . . . . . . . . . 225
Email Files . . . . . . . . . . . . . . . . . . . . . . . . . . . . . 227
Receive Files . . . . . . . . . . . . . . . . . . . . . . . . . . . . 227
Batch Utility . . . . . . . . . . . . . . . . . . . . . . . . . . . . 228
Use Batch Utility . . . . . . . . . . . . . . . . . . . . . . . 228
Command Line Options for Batch Utility . . . . . . . . . . 236
View Scene Statistics . . . . . . . . . . . . . . . . . . . . . . . . . . . 238
Chapter 5 Explore Your Model . . . . . . . . . . . . . . . . . . . . . . . 239
Navigate a Scene . . . . . . . . . . . . . . . . . . . . . . . . . . . . . 239
Contents | vii
Page 8

Orientation in a 3D Workspace . . . . . . . . . . . . . . . . . . 240
Product-Specific Navigation Tools . . . . . . . . . . . . . . . . . 241
Navigation Bar Tools . . . . . . . . . . . . . . . . . . . . . 242
SteeringWheels Tools . . . . . . . . . . . . . . . . . . . . 247
Classic Navigation Modes and Tools . . . . . . . . . . . . 264
ViewCube . . . . . . . . . . . . . . . . . . . . . . . . . . . . . 273
Overview of ViewCube . . . . . . . . . . . . . . . . . . . 273
ViewCube Menu . . . . . . . . . . . . . . . . . . . . . . . 276
Reorient the View of a Model with ViewCube . . . . . . . 277
Set the View Projection Mode . . . . . . . . . . . . . . . . 281
Home View . . . . . . . . . . . . . . . . . . . . . . . . . . 282
Examine Individual Objects with ViewCube . . . . . . . . 283
Navigation Bar . . . . . . . . . . . . . . . . . . . . . . . . . . . 283
Overview of Navigation Bar . . . . . . . . . . . . . . . . . 284
Reposition and Reorient the Navigation Bar . . . . . . . . 285
Control the Display of Navigation Tools on the Navigation
Bar . . . . . . . . . . . . . . . . . . . . . . . . . . . . . 286
SteeringWheels . . . . . . . . . . . . . . . . . . . . . . . . . . . 287
Overview of SteeringWheels . . . . . . . . . . . . . . . . . 287
Wheel Menu . . . . . . . . . . . . . . . . . . . . . . . . . 291
View Object Wheels . . . . . . . . . . . . . . . . . . . . . 292
Tour Building Wheels . . . . . . . . . . . . . . . . . . . . 294
Full Navigation Wheels . . . . . . . . . . . . . . . . . . . 296
2D Navigation Wheel . . . . . . . . . . . . . . . . . . . . 298
3Dconnexion 3D Mouse . . . . . . . . . . . . . . . . . . . . . . 298
Camera . . . . . . . . . . . . . . . . . . . . . . . . . . . . . . . 301
Set Camera Projection . . . . . . . . . . . . . . . . . . . . 301
Control the Field of View . . . . . . . . . . . . . . . . . . 302
Position and Focus Camera . . . . . . . . . . . . . . . . . 302
Navigation Aids . . . . . . . . . . . . . . . . . . . . . . . . . . 306
Head-Up Display . . . . . . . . . . . . . . . . . . . . . . . 306
Reference Views . . . . . . . . . . . . . . . . . . . . . . . 307
Focus . . . . . . . . . . . . . . . . . . . . . . . . . . . . . . . . 310
Hold . . . . . . . . . . . . . . . . . . . . . . . . . . . . . . . . 310
Control the Realism of Your Navigation . . . . . . . . . . . . . . . . . 311
Gravity . . . . . . . . . . . . . . . . . . . . . . . . . . . . . . . 311
Crouching . . . . . . . . . . . . . . . . . . . . . . . . . . . . . 311
Collision . . . . . . . . . . . . . . . . . . . . . . . . . . . . . . 312
Third Person View . . . . . . . . . . . . . . . . . . . . . . . . . 313
Chapter 6 Control Model Appearance and Render Quality . . . . . . . . 317
Control Model Appearance . . . . . . . . . . . . . . . . . . . . . . . 317
Select Render Mode . . . . . . . . . . . . . . . . . . . . . . . . 317
Full Render . . . . . . . . . . . . . . . . . . . . . . . . . . 318
Shaded . . . . . . . . . . . . . . . . . . . . . . . . . . . . 318
Wireframe . . . . . . . . . . . . . . . . . . . . . . . . . . 319
viii | Contents
Page 9

Hidden Line . . . . . . . . . . . . . . . . . . . . . . . . . 319
Add Lighting . . . . . . . . . . . . . . . . . . . . . . . . . . . . 319
Full Lights . . . . . . . . . . . . . . . . . . . . . . . . . . 320
Scene Lights . . . . . . . . . . . . . . . . . . . . . . . . . 320
Head Light . . . . . . . . . . . . . . . . . . . . . . . . . . 321
No Lights . . . . . . . . . . . . . . . . . . . . . . . . . . . 322
Select Background Effect . . . . . . . . . . . . . . . . . . . . . . 323
Adjust Displaying of Primitives . . . . . . . . . . . . . . . . . . 325
Surfaces . . . . . . . . . . . . . . . . . . . . . . . . . . . 325
Lines . . . . . . . . . . . . . . . . . . . . . . . . . . . . . 325
Points . . . . . . . . . . . . . . . . . . . . . . . . . . . . 326
Snap Points . . . . . . . . . . . . . . . . . . . . . . . . . 326
Text . . . . . . . . . . . . . . . . . . . . . . . . . . . . . . 327
Control Render Quality . . . . . . . . . . . . . . . . . . . . . . . . . 327
Use Culling . . . . . . . . . . . . . . . . . . . . . . . . . . . . . 327
Make Objects Required . . . . . . . . . . . . . . . . . . . 330
Control Rendering of Objects . . . . . . . . . . . . . . . . . . . 331
Adjust Scene Rendering During Navigation . . . . . . . . . 331
Accelerate Display Performance . . . . . . . . . . . . . . . 333
Adjust Presenter Materials . . . . . . . . . . . . . . . . . . . . . 334
Stereo Rendering . . . . . . . . . . . . . . . . . . . . . . . . . . 334
Chapter 7 Review Your Model . . . . . . . . . . . . . . . . . . . . . . . 337
Select Objects . . . . . . . . . . . . . . . . . . . . . . . . . . . . . . . 337
Interactive Geometry Selection . . . . . . . . . . . . . . . . . . 337
Selection Tree Window . . . . . . . . . . . . . . . . . . . 338
Selection Tools . . . . . . . . . . . . . . . . . . . . . . . . 341
Selection Commands . . . . . . . . . . . . . . . . . . . . 343
Set Selection Resolution . . . . . . . . . . . . . . . . . . . . . . 345
Set Highlighting Method . . . . . . . . . . . . . . . . . . . . . 346
Hide Objects . . . . . . . . . . . . . . . . . . . . . . . . . . . . 348
Find Objects . . . . . . . . . . . . . . . . . . . . . . . . . . . . . . . 349
Find Items Window . . . . . . . . . . . . . . . . . . . . . . . . 349
Quick Find . . . . . . . . . . . . . . . . . . . . . . . . . . . . . 355
Find All Sheets and Models Containing the Selected Object . . . . . . 356
Find Items in Other Sheets and Models Window . . . . . . . . . 357
Create and Use Sets of Objects . . . . . . . . . . . . . . . . . . . . . 360
Sets Window . . . . . . . . . . . . . . . . . . . . . . . . . . . . 360
Create and Manage Selection and Search Sets . . . . . . . . . . . 362
Compare Objects . . . . . . . . . . . . . . . . . . . . . . . . . . . . . 365
Object Properties . . . . . . . . . . . . . . . . . . . . . . . . . . . . . 367
Properties Window . . . . . . . . . . . . . . . . . . . . . . . . . 367
Custom Properties . . . . . . . . . . . . . . . . . . . . . . . . . 369
External Database Links . . . . . . . . . . . . . . . . . . . . . . 371
Manipulate Object Attributes . . . . . . . . . . . . . . . . . . . . . . 382
Transform Objects . . . . . . . . . . . . . . . . . . . . . . . . . 383
Contents | ix
Page 10

Change Object Appearance . . . . . . . . . . . . . . . . . . . . 388
Snapping . . . . . . . . . . . . . . . . . . . . . . . . . . . . . . 389
Reset to Original Values . . . . . . . . . . . . . . . . . . . . . . 390
Measure Tools . . . . . . . . . . . . . . . . . . . . . . . . . . . . . . 391
Measure Tools Window . . . . . . . . . . . . . . . . . . . . . . 391
Measuring . . . . . . . . . . . . . . . . . . . . . . . . . . . . . 393
Comments, Redlines, and Tags . . . . . . . . . . . . . . . . . . . . . 399
Use Comments, Redlines, and Tags . . . . . . . . . . . . . . . . 399
Comments Window . . . . . . . . . . . . . . . . . . . . . 400
Redline Tools Panel . . . . . . . . . . . . . . . . . . . . . 403
View Redlines and Tags . . . . . . . . . . . . . . . . . . . 410
Tags Panel . . . . . . . . . . . . . . . . . . . . . . . . . . 411
Edit Comments and Tags . . . . . . . . . . . . . . . . . . 412
Edit Redlines . . . . . . . . . . . . . . . . . . . . . . . . . 413
Find Comments and Tags . . . . . . . . . . . . . . . . . . . . . 414
Find Comments Window . . . . . . . . . . . . . . . . . . 414
Quick Find Comments . . . . . . . . . . . . . . . . . . . . 418
Find Tags . . . . . . . . . . . . . . . . . . . . . . . . . . . 419
Manage Comment and Tag IDs . . . . . . . . . . . . . . . . . . 420
Links . . . . . . . . . . . . . . . . . . . . . . . . . . . . . . . . . . . 421
Link Categories . . . . . . . . . . . . . . . . . . . . . . . . . . . 421
Display Links . . . . . . . . . . . . . . . . . . . . . . . . . . . . 422
Customize Links . . . . . . . . . . . . . . . . . . . . . . . . . . 423
Add Links . . . . . . . . . . . . . . . . . . . . . . . . . . . . . 427
Find and Follow Links . . . . . . . . . . . . . . . . . . . . . . . 428
Manage Links . . . . . . . . . . . . . . . . . . . . . . . . . . . 430
Quick Properties . . . . . . . . . . . . . . . . . . . . . . . . . . . . . 432
SwitchBack . . . . . . . . . . . . . . . . . . . . . . . . . . . . . . . . 434
Appearance Profiler . . . . . . . . . . . . . . . . . . . . . . . . . . . 437
Chapter 8 Use Viewpoints and Sectioning Modes . . . . . . . . . . . . . 441
Create and Modify Viewpoints . . . . . . . . . . . . . . . . . . . . . 441
Overview of Viewpoints . . . . . . . . . . . . . . . . . . . . . . 441
Saved Viewpoints Window . . . . . . . . . . . . . . . . . . . . 442
Save Viewpoints . . . . . . . . . . . . . . . . . . . . . . . . . . 447
Recall Viewpoints . . . . . . . . . . . . . . . . . . . . . . . . . 448
Organize Viewpoints . . . . . . . . . . . . . . . . . . . . . . . . 448
Edit Viewpoints . . . . . . . . . . . . . . . . . . . . . . . . . . 449
Default Viewpoint Options . . . . . . . . . . . . . . . . . . . . 451
Share Viewpoints . . . . . . . . . . . . . . . . . . . . . . . . . . 454
Sectioning . . . . . . . . . . . . . . . . . . . . . . . . . . . . . . . . 455
Enable and Use Section Planes . . . . . . . . . . . . . . . . . . . 456
Customize Section Plane Alignment . . . . . . . . . . . . 459
Move and Rotate Section Planes . . . . . . . . . . . . . . . 461
Link Section Planes . . . . . . . . . . . . . . . . . . . . . 464
Enable and Use Section Box . . . . . . . . . . . . . . . . . . . . 465
x | Contents
Page 11

Chapter 9 Record and Play Animations . . . . . . . . . . . . . . . . . . 471
Create and Edit Viewpoint Animations . . . . . . . . . . . . . . . . . 471
Play Animations and Scripts . . . . . . . . . . . . . . . . . . . . . . . 475
Share Animations . . . . . . . . . . . . . . . . . . . . . . . . . . . . 477
Chapter 10 Work Within a Team . . . . . . . . . . . . . . . . . . . . . . . 479
Collaborate Panel . . . . . . . . . . . . . . . . . . . . . . . . . . . . 479
Collaboration Session . . . . . . . . . . . . . . . . . . . . . . . . . . 479
Chapter 11 Share Data . . . . . . . . . . . . . . . . . . . . . . . . . . . . 483
Print . . . . . . . . . . . . . . . . . . . . . . . . . . . . . . . . . . . 483
Print Preview . . . . . . . . . . . . . . . . . . . . . . . . . . . . 483
Print Setup . . . . . . . . . . . . . . . . . . . . . . . . . . . . . 483
Print Current Viewpoint . . . . . . . . . . . . . . . . . . . . . . 484
Import Files . . . . . . . . . . . . . . . . . . . . . . . . . . . . . . . 484
Search Criteria Files . . . . . . . . . . . . . . . . . . . . . . . . 485
Search Set Files . . . . . . . . . . . . . . . . . . . . . . . . . . . 485
PDS Display Set Files . . . . . . . . . . . . . . . . . . . . . . . 486
PDS Tag Files . . . . . . . . . . . . . . . . . . . . . . . . . . . . 487
Viewpoints Files . . . . . . . . . . . . . . . . . . . . . . . . . . 488
Clash Test Files . . . . . . . . . . . . . . . . . . . . . . . . . . . 489
Export Files . . . . . . . . . . . . . . . . . . . . . . . . . . . . . . . . 489
3D DWF/DWFx Format . . . . . . . . . . . . . . . . . . . . . . 489
Google Earth KML Format . . . . . . . . . . . . . . . . . . . . . 490
Autodesk FBX Format . . . . . . . . . . . . . . . . . . . . . . . 492
Export Images and Animations . . . . . . . . . . . . . . . . . . 494
Export an Image . . . . . . . . . . . . . . . . . . . . . . . 494
Export a Rendered Image . . . . . . . . . . . . . . . . . . 496
Export an Animation . . . . . . . . . . . . . . . . . . . . 496
Piranesi EPix Format . . . . . . . . . . . . . . . . . . . . . 497
Current Search Criteria . . . . . . . . . . . . . . . . . . . . . . 498
Search Set Files . . . . . . . . . . . . . . . . . . . . . . . . . . . 498
Viewpoints Files . . . . . . . . . . . . . . . . . . . . . . . . . . 498
Viewpoints Report . . . . . . . . . . . . . . . . . . . . . . . . . 499
TimeLiner CSV . . . . . . . . . . . . . . . . . . . . . . . . . . . 500
Clash Test Files . . . . . . . . . . . . . . . . . . . . . . . . . . . 500
PDS Tag Files . . . . . . . . . . . . . . . . . . . . . . . . . . . . 500
Chapter 12 Animate Objects . . . . . . . . . . . . . . . . . . . . . . . . . 501
Overview of the Animator Tool . . . . . . . . . . . . . . . . . . . . . 502
Animator Window . . . . . . . . . . . . . . . . . . . . . . . . . 502
The Animator Toolbar . . . . . . . . . . . . . . . . . . . . 502
The Animator Tree View . . . . . . . . . . . . . . . . . . . 505
The Animator Timeline View . . . . . . . . . . . . . . . . 508
Contents | xi
Page 12

The Manual Entry Bar . . . . . . . . . . . . . . . . . . . . 512
Scripter Window . . . . . . . . . . . . . . . . . . . . . . . . . . 513
The Scripter Tree View . . . . . . . . . . . . . . . . . . . . 513
The Events View . . . . . . . . . . . . . . . . . . . . . . . 515
The Actions View . . . . . . . . . . . . . . . . . . . . . . 517
The Properties View . . . . . . . . . . . . . . . . . . . . . 519
Create Object Animations . . . . . . . . . . . . . . . . . . . . . . . . 526
Work with Animation Scenes . . . . . . . . . . . . . . . . . . . 527
Work with Animation Sets . . . . . . . . . . . . . . . . . . . . . 529
Add Animation Sets . . . . . . . . . . . . . . . . . . . . . 529
Update Animation Sets . . . . . . . . . . . . . . . . . . . 530
Manipulate Geometry Objects . . . . . . . . . . . . . . . . 531
Work with Cameras . . . . . . . . . . . . . . . . . . . . . . . . 534
Work with Section Plane Sets . . . . . . . . . . . . . . . . . . . 536
Work with Keyframes . . . . . . . . . . . . . . . . . . . . . . . 538
Capture Keyframes . . . . . . . . . . . . . . . . . . . . . . 538
Edit Keyframes . . . . . . . . . . . . . . . . . . . . . . . . 538
Play Animation Scenes . . . . . . . . . . . . . . . . . . . . . . . 539
Add Interactivity . . . . . . . . . . . . . . . . . . . . . . . . . . . . . 540
Work with Animation Scripts . . . . . . . . . . . . . . . . . . . 541
Work with Events . . . . . . . . . . . . . . . . . . . . . . . . . 543
Work with Actions . . . . . . . . . . . . . . . . . . . . . . . . . 545
Enable Scripting . . . . . . . . . . . . . . . . . . . . . . . . . . 547
Chapter 13 Create Photorealistic Visualizations . . . . . . . . . . . . . . . 549
Overview of the Presenter Tool . . . . . . . . . . . . . . . . . . . . . 549
Presenter Window . . . . . . . . . . . . . . . . . . . . . . . . . 549
Use the Presenter Archives . . . . . . . . . . . . . . . . . . . . . 551
Photo-Realistic Scene Rendering . . . . . . . . . . . . . . . . . . . . . 553
Use Presenter Materials . . . . . . . . . . . . . . . . . . . . . . . . . 556
Materials Tab . . . . . . . . . . . . . . . . . . . . . . . . . . . . 556
Apply and Remove Presenter Materials . . . . . . . . . . . . . . 556
Organize and Manage Materials . . . . . . . . . . . . . . . . . . 559
Edit Presenter Materials . . . . . . . . . . . . . . . . . . . . . . 561
Advanced Materials . . . . . . . . . . . . . . . . . . . . . . . . 565
Use Presenter Lights . . . . . . . . . . . . . . . . . . . . . . . . . . . 568
Lighting Tab . . . . . . . . . . . . . . . . . . . . . . . . . . . . 568
Add and Position Lights . . . . . . . . . . . . . . . . . . . . . . 569
Organize and Manage Lights . . . . . . . . . . . . . . . . . . . 571
Edit Lights . . . . . . . . . . . . . . . . . . . . . . . . . . . . . 573
Shadow Casting . . . . . . . . . . . . . . . . . . . . . . . . . . 576
Advanced Lighting . . . . . . . . . . . . . . . . . . . . . . . . . 577
Soft Shadows . . . . . . . . . . . . . . . . . . . . . . . . . 578
Physically Accurate Lights . . . . . . . . . . . . . . . . . . 578
Volumetric Lights . . . . . . . . . . . . . . . . . . . . . . 579
Image-based Lighting . . . . . . . . . . . . . . . . . . . . 580
xii | Contents
Page 13

Use Presenter RPCs . . . . . . . . . . . . . . . . . . . . . . . . . . . . 583
RPC Tab . . . . . . . . . . . . . . . . . . . . . . . . . . . . . . 583
Use Presenter Rendering Effects . . . . . . . . . . . . . . . . . . . . . 587
Effects Tab . . . . . . . . . . . . . . . . . . . . . . . . . . . . . 587
Background Effects . . . . . . . . . . . . . . . . . . . . . . . . . 588
Foreground Effects . . . . . . . . . . . . . . . . . . . . . . . . . 593
Use Presenter Rendering Styles . . . . . . . . . . . . . . . . . . . . . 594
Rendering Tab . . . . . . . . . . . . . . . . . . . . . . . . . . . 594
Rendering Styles . . . . . . . . . . . . . . . . . . . . . . . . . . 595
Predefined Rendering Styles . . . . . . . . . . . . . . . . . . . . 596
Auto Exposure . . . . . . . . . . . . . . . . . . . . . . . . . . . 598
Use Presenter Texture Space . . . . . . . . . . . . . . . . . . . . . . . 598
Use Presenter Rules . . . . . . . . . . . . . . . . . . . . . . . . . . . . 600
Rules Tab . . . . . . . . . . . . . . . . . . . . . . . . . . . . . . 600
Predefined Rules . . . . . . . . . . . . . . . . . . . . . . . . . . 601
Custom Rules . . . . . . . . . . . . . . . . . . . . . . . . . . . 602
The Presenter Rules Example . . . . . . . . . . . . . . . . . . . 604
Chapter 14 Simulate Construction Scheduling . . . . . . . . . . . . . . . 607
Overview of TimeLiner Tool . . . . . . . . . . . . . . . . . . . . . . . 607
TimeLiner Window . . . . . . . . . . . . . . . . . . . . . . . . 608
Tasks Tab . . . . . . . . . . . . . . . . . . . . . . . . . . . 609
Data Sources Tab . . . . . . . . . . . . . . . . . . . . . . . 613
Configure Tab . . . . . . . . . . . . . . . . . . . . . . . . 615
Simulate Tab . . . . . . . . . . . . . . . . . . . . . . . . . 617
Choose TimeLiner Columns Dialog Box . . . . . . . . . . . . . 619
TimeLiner Rules Dialog Box . . . . . . . . . . . . . . . . . . . . 619
Field Selector Dialog Box . . . . . . . . . . . . . . . . . . . . . 620
Refresh from Data Source Dialog Box . . . . . . . . . . . . . . . 624
Simulation Settings Dialog Box . . . . . . . . . . . . . . . . . . 624
Overlay Text Dialog Box . . . . . . . . . . . . . . . . . . . . . . 630
Appearance Definitions Dialog Box . . . . . . . . . . . . . . . . 632
Get Started . . . . . . . . . . . . . . . . . . . . . . . . . . . . . 633
TimeLiner Tasks . . . . . . . . . . . . . . . . . . . . . . . . . . . . . 637
Create Tasks . . . . . . . . . . . . . . . . . . . . . . . . . . . . 639
Edit Tasks . . . . . . . . . . . . . . . . . . . . . . . . . . . . . . 641
Use Gantt Charts . . . . . . . . . . . . . . . . . . . . . . . . . . 643
Attach Tasks to Geometry . . . . . . . . . . . . . . . . . . . . . 644
Attach Tasks Manually . . . . . . . . . . . . . . . . . . . . 645
Use Rules to Attach Tasks . . . . . . . . . . . . . . . . . . 646
Validate Project Schedule . . . . . . . . . . . . . . . . . . . . . 649
Link to External Project Files . . . . . . . . . . . . . . . . . . . . . . 650
Supported Scheduling Software . . . . . . . . . . . . . . . . . . 651
CSV Support . . . . . . . . . . . . . . . . . . . . . . . . . . . . 654
Add and Manage Data Sources . . . . . . . . . . . . . . . . . . . 654
Import Data from an External Project Schedule . . . . . . 654
Contents | xiii
Page 14

Edit a Data Source . . . . . . . . . . . . . . . . . . . . . . 658
Delete a Data Source . . . . . . . . . . . . . . . . . . . . . 658
Build Tasks from Data Sources . . . . . . . . . . . . . . . . 659
Synchronize Tasks with Project Changes . . . . . . . . . . . . . 659
4D Simulation . . . . . . . . . . . . . . . . . . . . . . . . . . . . . . 660
Play Simulations . . . . . . . . . . . . . . . . . . . . . . . . . . 660
Configure Simulations . . . . . . . . . . . . . . . . . . . . . . . 661
Simulation Playback . . . . . . . . . . . . . . . . . . . . . 661
Simulation Appearance . . . . . . . . . . . . . . . . . . . 661
Export . . . . . . . . . . . . . . . . . . . . . . . . . . . . . . . . . . 664
Add Animation . . . . . . . . . . . . . . . . . . . . . . . . . . . . . . 664
Overview . . . . . . . . . . . . . . . . . . . . . . . . . . . . . . 664
Add Animation to an Entire Schedule . . . . . . . . . . . . . . . 665
Add Animation to Tasks . . . . . . . . . . . . . . . . . . . . . . 667
Add Scripts to Tasks . . . . . . . . . . . . . . . . . . . . . . . . 668
Chapter 15 Locate and Manage Interferences . . . . . . . . . . . . . . . . 669
Overview of Clash Detective Tool . . . . . . . . . . . . . . . . . . . . 669
Clash Detective Window . . . . . . . . . . . . . . . . . . . . . 670
Batch Tab . . . . . . . . . . . . . . . . . . . . . . . . . . . 672
Rules Tab . . . . . . . . . . . . . . . . . . . . . . . . . . . 673
Select Tab . . . . . . . . . . . . . . . . . . . . . . . . . . . 674
Results Tab . . . . . . . . . . . . . . . . . . . . . . . . . . 677
Report Tab . . . . . . . . . . . . . . . . . . . . . . . . . . 684
Set Up and Run a Clash Test . . . . . . . . . . . . . . . . . . . . 686
Clash Batches . . . . . . . . . . . . . . . . . . . . . . . . . . . . . . 686
Run Clash Tests . . . . . . . . . . . . . . . . . . . . . . . . . . 686
Manage Batches of Clash Tests . . . . . . . . . . . . . . . . . . 687
Merge Clash Tests from Multiple Files . . . . . . . . . . . . . . . 687
Import Clash Tests . . . . . . . . . . . . . . . . . . . . . . . . . 688
Export Clash Tests . . . . . . . . . . . . . . . . . . . . . . . . . 689
Create Custom Clash Tests . . . . . . . . . . . . . . . . . . . . . 690
Clash Rules . . . . . . . . . . . . . . . . . . . . . . . . . . . . . . . . 691
Select Items for Testing . . . . . . . . . . . . . . . . . . . . . . . . . . 696
Select Items for a Clash Test . . . . . . . . . . . . . . . . . . . . 696
Select Clash Test Options . . . . . . . . . . . . . . . . . . . . . 697
Time-Based and Soft Clash Testing . . . . . . . . . . . . . . . . 698
Time-Based Clashing . . . . . . . . . . . . . . . . . . . . . 699
Soft Clashing . . . . . . . . . . . . . . . . . . . . . . . . . 700
Time-Based Soft Clashing . . . . . . . . . . . . . . . . . . 701
Run an Individual Clash Test . . . . . . . . . . . . . . . . . . . 703
Clash Results . . . . . . . . . . . . . . . . . . . . . . . . . . . . . . . 703
Understand Clash Results . . . . . . . . . . . . . . . . . . . . . 704
Manage Clash Results . . . . . . . . . . . . . . . . . . . . . . . 705
Review Clash Results . . . . . . . . . . . . . . . . . . . . . . . . 708
Visually Identify Clashes in a Model . . . . . . . . . . . . 708
xiv | Contents
Page 15

Add Review Comments and Redlines . . . . . . . . . . . . 713
Time-Based and Soft Clash Test Results . . . . . . . . . . . . . . 714
Report Clash Results . . . . . . . . . . . . . . . . . . . . . . . . . . . 717
Chapter 16 Use the Autodesk Vault Add-In . . . . . . . . . . . . . . . . . 723
About the Autodesk Vault Add-In . . . . . . . . . . . . . . . . . . . . 723
Launching the Vault Application . . . . . . . . . . . . . . . . . . . . 724
Log into a Vault . . . . . . . . . . . . . . . . . . . . . . . . . . . . . 724
Log out of a Vault . . . . . . . . . . . . . . . . . . . . . . . . . . . . 725
Understanding the Working Folder . . . . . . . . . . . . . . . . . . . 725
Check Out a File . . . . . . . . . . . . . . . . . . . . . . . . . . . . . 727
Get Files from a Vault . . . . . . . . . . . . . . . . . . . . . . . . . . 728
Refresh a Vaulted File . . . . . . . . . . . . . . . . . . . . . . . . . . 729
Check a File into a Vault . . . . . . . . . . . . . . . . . . . . . . . . . 729
Undo File Check Out . . . . . . . . . . . . . . . . . . . . . . . . . . . 730
Vault Settings . . . . . . . . . . . . . . . . . . . . . . . . . . . . . . . 731
Log In Dialog Box . . . . . . . . . . . . . . . . . . . . . . . . . 731
Check In Dialog Box . . . . . . . . . . . . . . . . . . . . . . . . 732
Settings Dialog Box . . . . . . . . . . . . . . . . . . . . . . . . 733
Select Vault Location Dialog Box . . . . . . . . . . . . . . . . . 733
Create Folder Dialog Box . . . . . . . . . . . . . . . . . . . . . 734
Select File Dialog Box . . . . . . . . . . . . . . . . . . . . . . . 734
Chapter 17 Reference . . . . . . . . . . . . . . . . . . . . . . . . . . . . . 737
Animation Export Dialog Box . . . . . . . . . . . . . . . . . . . . . . 737
Appearance Profiler Dialog Box . . . . . . . . . . . . . . . . . . . . . 739
Assign Clash Dialog Box . . . . . . . . . . . . . . . . . . . . . . . . . 741
Background Settings Dialog Box . . . . . . . . . . . . . . . . . . . . . 741
Collision Dialog Box . . . . . . . . . . . . . . . . . . . . . . . . . . . 742
Convert Object Properties Dialog Box . . . . . . . . . . . . . . . . . . 743
Culling Options Dialog Box . . . . . . . . . . . . . . . . . . . . . . . 743
Customize Dialog Box . . . . . . . . . . . . . . . . . . . . . . . . . . 745
Toolbars Tab . . . . . . . . . . . . . . . . . . . . . . . . . . . . 745
Commands Tab . . . . . . . . . . . . . . . . . . . . . . . . . . 745
Options Tab . . . . . . . . . . . . . . . . . . . . . . . . . . . . 746
Default Collision Dialog Box . . . . . . . . . . . . . . . . . . . . . . 747
Edit Key Frame Dialog Box . . . . . . . . . . . . . . . . . . . . . . . . 748
Edit Link Dialog Box . . . . . . . . . . . . . . . . . . . . . . . . . . . 751
Edit Viewpoint Dialog Box . . . . . . . . . . . . . . . . . . . . . . . . 751
Export Rendered Image Dialog Box . . . . . . . . . . . . . . . . . . . 753
File Options Dialog Box . . . . . . . . . . . . . . . . . . . . . . . . . 754
Culling Tab . . . . . . . . . . . . . . . . . . . . . . . . . . . . . 755
Orientation Tab . . . . . . . . . . . . . . . . . . . . . . . . . . 756
Speed Tab . . . . . . . . . . . . . . . . . . . . . . . . . . . . . . 757
Headlight Tab . . . . . . . . . . . . . . . . . . . . . . . . . . . 757
Contents | xv
Page 16

Scene Lights Tab . . . . . . . . . . . . . . . . . . . . . . . . . . 758
DataTools Tab . . . . . . . . . . . . . . . . . . . . . . . . . . . 758
Units and Transform Dialog Box . . . . . . . . . . . . . . . . . . . . 759
Image Export Dialog Box . . . . . . . . . . . . . . . . . . . . . . . . 760
InfoCenter Settings Dialog Box . . . . . . . . . . . . . . . . . . . . . 761
General Node . . . . . . . . . . . . . . . . . . . . . . . . . . . 761
Communication Center Node . . . . . . . . . . . . . . . . . . . 762
Autodesk Channels Page . . . . . . . . . . . . . . . . . . . 762
Balloon Notification Page . . . . . . . . . . . . . . . . . . 762
RSS Feeds Page . . . . . . . . . . . . . . . . . . . . . . . . 763
New Link Dialog Box . . . . . . . . . . . . . . . . . . . . . . . . . . 763
Options Editor Dialog Box . . . . . . . . . . . . . . . . . . . . . . . . 764
General Node . . . . . . . . . . . . . . . . . . . . . . . . . . . 765
Undo Page . . . . . . . . . . . . . . . . . . . . . . . . . . 765
Locations Page . . . . . . . . . . . . . . . . . . . . . . . . 766
Environment Page . . . . . . . . . . . . . . . . . . . . . . 766
Auto-Save Page . . . . . . . . . . . . . . . . . . . . . . . . 766
Interface Node . . . . . . . . . . . . . . . . . . . . . . . . . . . 767
Display Units Page . . . . . . . . . . . . . . . . . . . . . . 768
Selection Page . . . . . . . . . . . . . . . . . . . . . . . . 768
Measure Page . . . . . . . . . . . . . . . . . . . . . . . . . 769
Snapping Page . . . . . . . . . . . . . . . . . . . . . . . . 770
Viewpoint Defaults Page . . . . . . . . . . . . . . . . . . . 770
Links Page . . . . . . . . . . . . . . . . . . . . . . . . . . 771
Quick Properties Page . . . . . . . . . . . . . . . . . . . . 775
Developer Page . . . . . . . . . . . . . . . . . . . . . . . . 776
Display Page . . . . . . . . . . . . . . . . . . . . . . . . . 777
3Dconnexion Page . . . . . . . . . . . . . . . . . . . . . . 781
Navigation Bar Page . . . . . . . . . . . . . . . . . . . . . 782
ViewCube Page . . . . . . . . . . . . . . . . . . . . . . . . 783
SteeringWheels . . . . . . . . . . . . . . . . . . . . . . . . 784
User Interface Page . . . . . . . . . . . . . . . . . . . . . . 787
Model Node . . . . . . . . . . . . . . . . . . . . . . . . . . . . 787
Performance Page . . . . . . . . . . . . . . . . . . . . . . 787
NWD Page . . . . . . . . . . . . . . . . . . . . . . . . . . 790
NWC Page . . . . . . . . . . . . . . . . . . . . . . . . . . 790
File Readers Node . . . . . . . . . . . . . . . . . . . . . . . . . 792
3DS Page . . . . . . . . . . . . . . . . . . . . . . . . . . . 792
ASCII Laser Page . . . . . . . . . . . . . . . . . . . . . . . 792
CIS/2 Page . . . . . . . . . . . . . . . . . . . . . . . . . . 793
DGN Page . . . . . . . . . . . . . . . . . . . . . . . . . . 793
DWF Page . . . . . . . . . . . . . . . . . . . . . . . . . . 796
DWG/DXF Page . . . . . . . . . . . . . . . . . . . . . . . 797
Faro Page . . . . . . . . . . . . . . . . . . . . . . . . . . . 801
FBX Page . . . . . . . . . . . . . . . . . . . . . . . . . . . 801
IFC Page . . . . . . . . . . . . . . . . . . . . . . . . . . . 802
xvi | Contents
Page 17

Inventor Page . . . . . . . . . . . . . . . . . . . . . . . . 803
Leica Page . . . . . . . . . . . . . . . . . . . . . . . . . . 804
JTOpen Page . . . . . . . . . . . . . . . . . . . . . . . . . 805
MAN Page . . . . . . . . . . . . . . . . . . . . . . . . . . 805
Parasolid Page . . . . . . . . . . . . . . . . . . . . . . . . 806
PDS Page . . . . . . . . . . . . . . . . . . . . . . . . . . . 806
Riegl Page . . . . . . . . . . . . . . . . . . . . . . . . . . 807
RVM Page . . . . . . . . . . . . . . . . . . . . . . . . . . 808
SAT Page . . . . . . . . . . . . . . . . . . . . . . . . . . . 809
SKP Page . . . . . . . . . . . . . . . . . . . . . . . . . . . 810
STL Page . . . . . . . . . . . . . . . . . . . . . . . . . . . 811
VRML Page . . . . . . . . . . . . . . . . . . . . . . . . . . 811
Z+F Page . . . . . . . . . . . . . . . . . . . . . . . . . . . 812
File Exporters Node . . . . . . . . . . . . . . . . . . . . . . . . 813
DWG Page . . . . . . . . . . . . . . . . . . . . . . . . . . 813
Revit Page . . . . . . . . . . . . . . . . . . . . . . . . . . 817
DGN Page . . . . . . . . . . . . . . . . . . . . . . . . . . 819
Viz/Max Page . . . . . . . . . . . . . . . . . . . . . . . . . 821
Tools Node . . . . . . . . . . . . . . . . . . . . . . . . . . . . . 822
Clash Detective Page . . . . . . . . . . . . . . . . . . . . . 822
TimeLiner Page . . . . . . . . . . . . . . . . . . . . . . . . 823
Presenter Page . . . . . . . . . . . . . . . . . . . . . . . . 824
Vault Page . . . . . . . . . . . . . . . . . . . . . . . . . . 826
Scripter Page . . . . . . . . . . . . . . . . . . . . . . . . . 826
Animator Page . . . . . . . . . . . . . . . . . . . . . . . . 827
Publish Dialog Box . . . . . . . . . . . . . . . . . . . . . . . . . . . . 827
Piranesi EPix Dialog Box . . . . . . . . . . . . . . . . . . . . . . . . . 829
QTVR Object Movie Settings Dialog Box . . . . . . . . . . . . . . . . 829
Section Plane Settings Dialog Box . . . . . . . . . . . . . . . . . . . . 830
Chapter 18 Glossary . . . . . . . . . . . . . . . . . . . . . . . . . . . . . 833
Index . . . . . . . . . . . . . . . . . . . . . . . . . . . . . . . 841
Contents | xvii
Page 18

xviii
Page 19

Welcome to Autodesk
Navisworks Manage
1
2012
Autodesk Navisworks Manage 2012 software is a comprehensive project review
solution for analysis, simulation, and communication of design intent and
constructability. Multidisciplinary design data created in Building Information
Modeling (BIM), digital prototype, and process plant design applications can be
combined into a single integrated project model. Interference management and
clash detection tools help design and construction professionals anticipate and avoid
potential problems before construction begins, minimizing expensive delays and
rework. Navisworks Manage combines spatial coordination with the project schedule
to deliver 4D simulation and analysis. Entire project models can be published and
freely viewed in NWD and DWF™ file formats.
What Is New in This Release?
Autodesk Navisworks Manage 2012 contains many new features and
enhancements.
Installation
The installation screen provides links to the installation options, deployment
options, installation tools and utilities. You also have the option of selecting
the DWG file readers that require installation, plus the exporter plugins that
you require and the Autodesk Navisworks Freedom viewer.
1
Page 20
User Interface
Easy access to commonly used review and navigation tools to increase review
productivity.
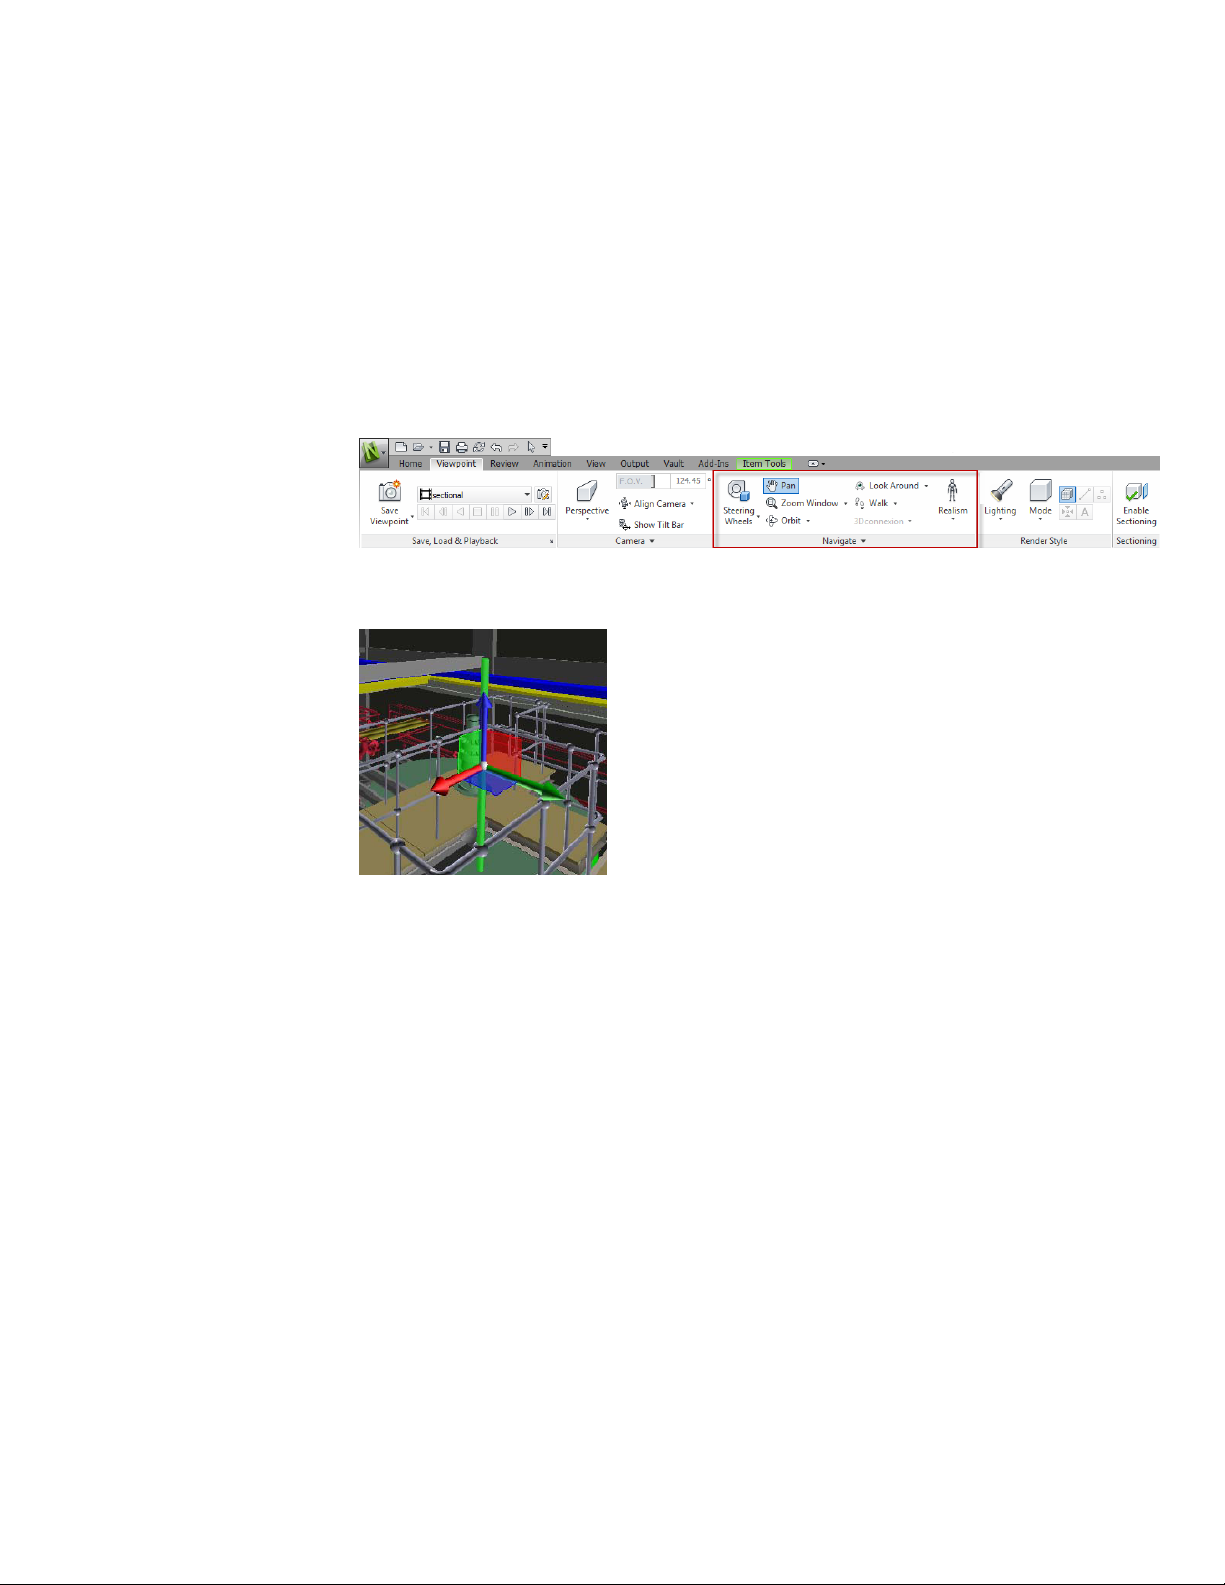
■ The Viewpoint tab now includes the Navigate pane, providing access
to tools such as walk, pan, zoom, and orbit; SteeringWheels tracking
menus, 3Dconnexion 3D mouse, and the realism settings.
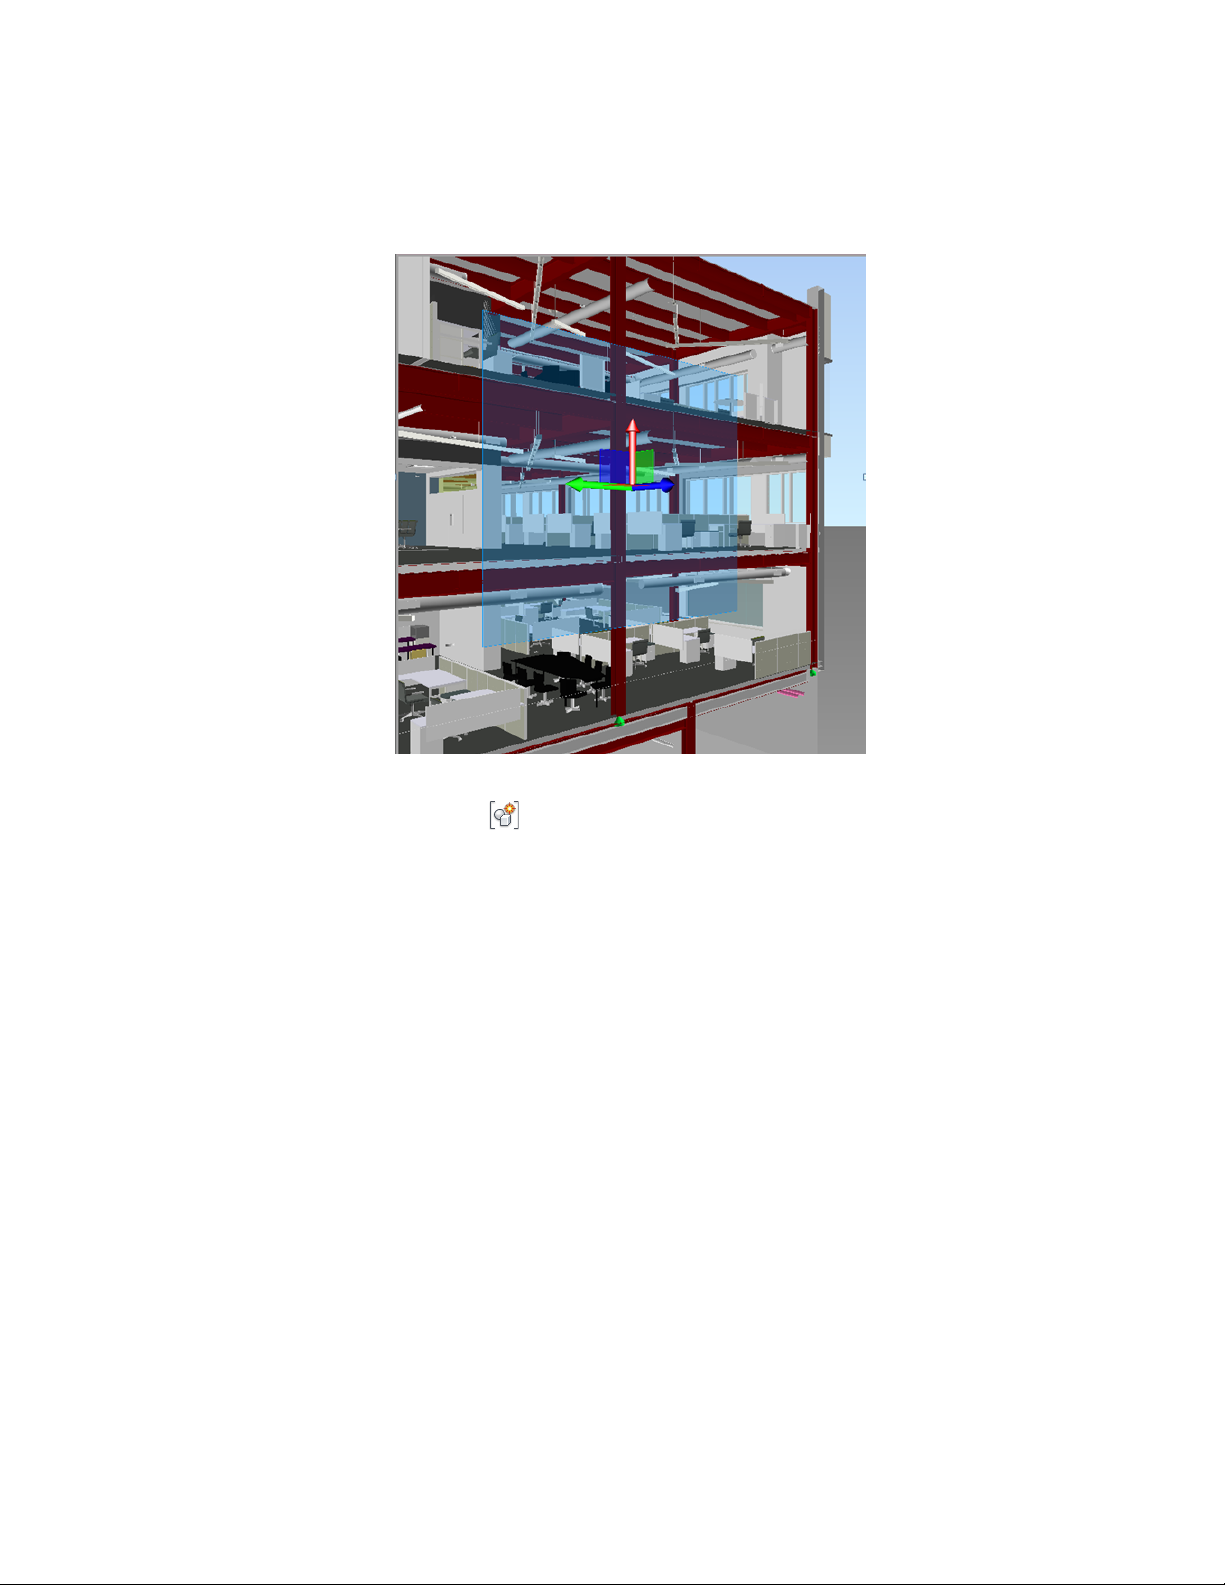
■ The gizmos have been updated, making it easier to manipulate objects and
section planes.
■ Section planes have also been enhanced to provide greater visual feedback
of their position and orientation.
2 | Chapter 1 Welcome to Autodesk Navisworks Manage 2012
Page 21
■ Selection sets can now be created faster with the addition of the Save
Selection option (Home tab ➤ Select & Search panel).
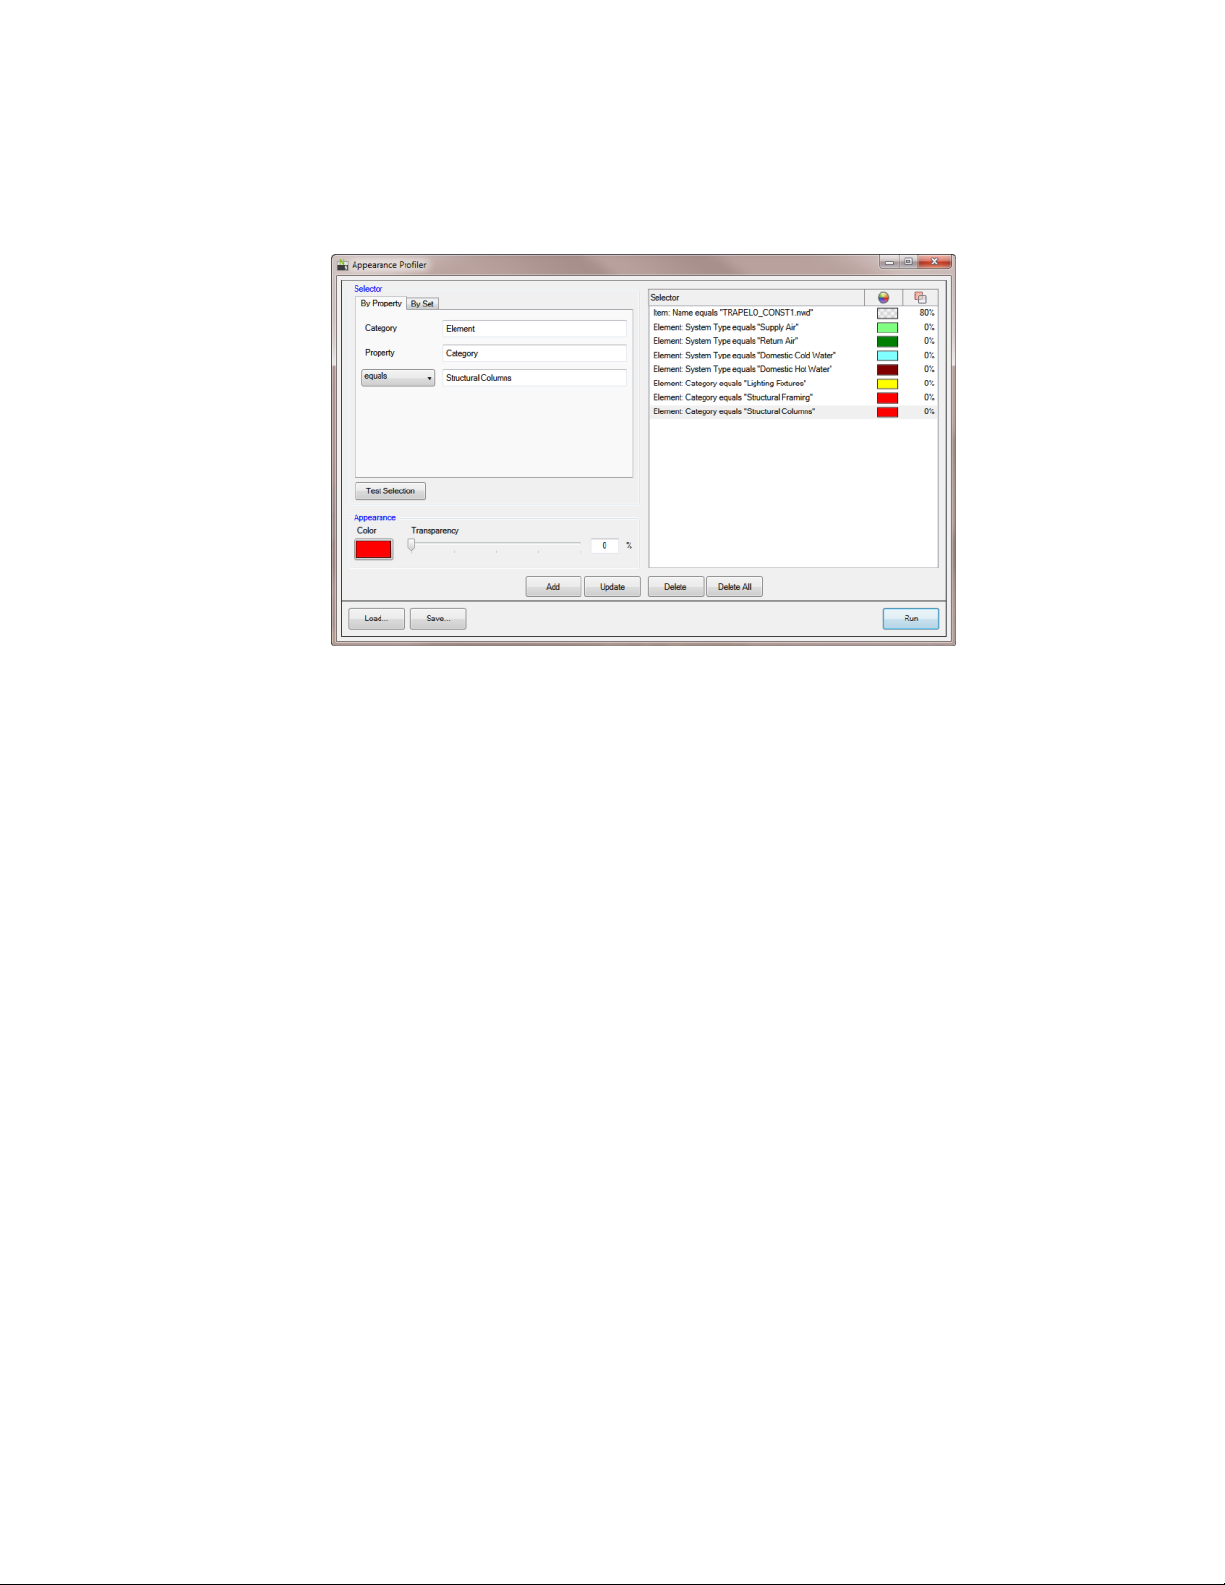
Appearance Profiler
The Appearance Profiler allows you to set up custom appearance profiles
based on sets (search and selection) and property values, and use them to
color-code objects in the model to differentiate system types and visually
identify their status. Appearance profiles can be saved and used on other
projects, or shared between other Autodesk Navisworks users.
See Appearance Profiler (page 437).
What Is New in This Release? | 3
Page 22
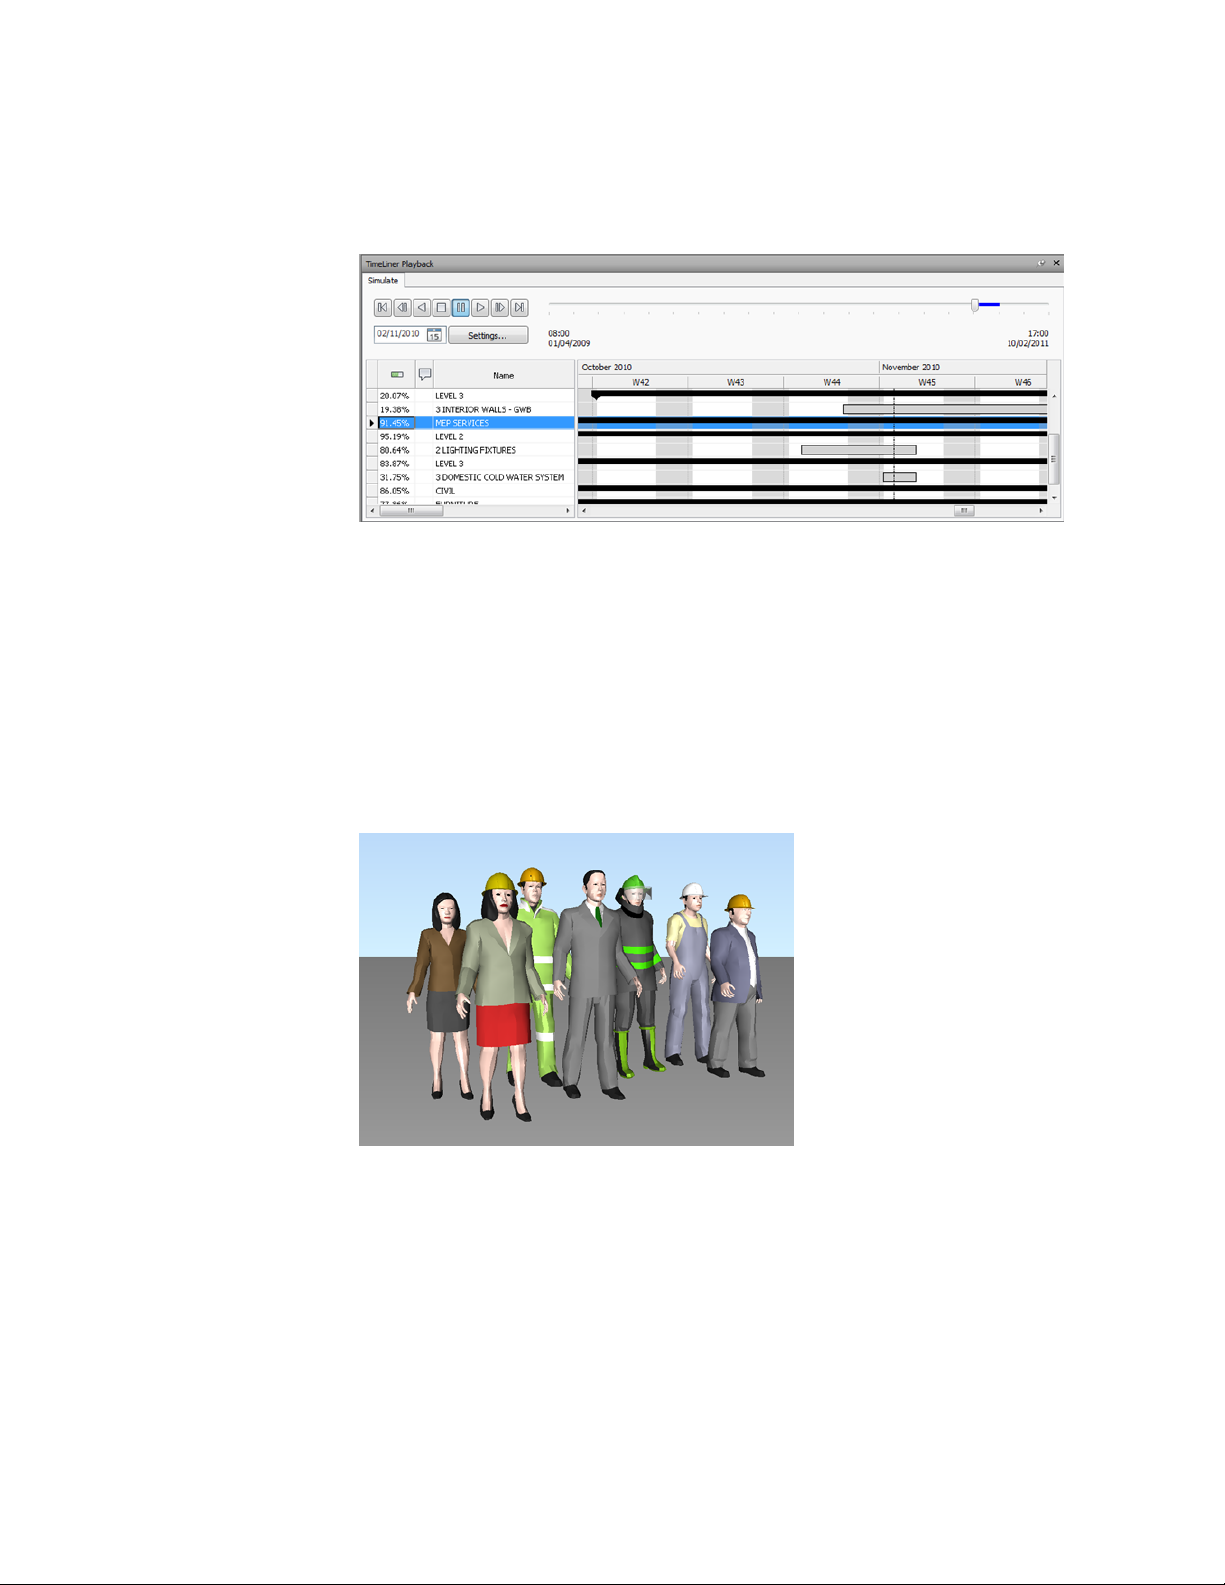
TimeLiner
The TimeLiner tool has been enhanced to provide you with greater control
and flexibility when working with 4D simulations. A new interface and
integrated, editable Gantt chart allow you to create, edit and communicate
your construction schedule more effectively. The new TimeLiner API allows
you to extend and tailor the 4D toolset to meet your project and business
requirements.
4 | Chapter 1 Welcome to Autodesk Navisworks Manage 2012
Page 23
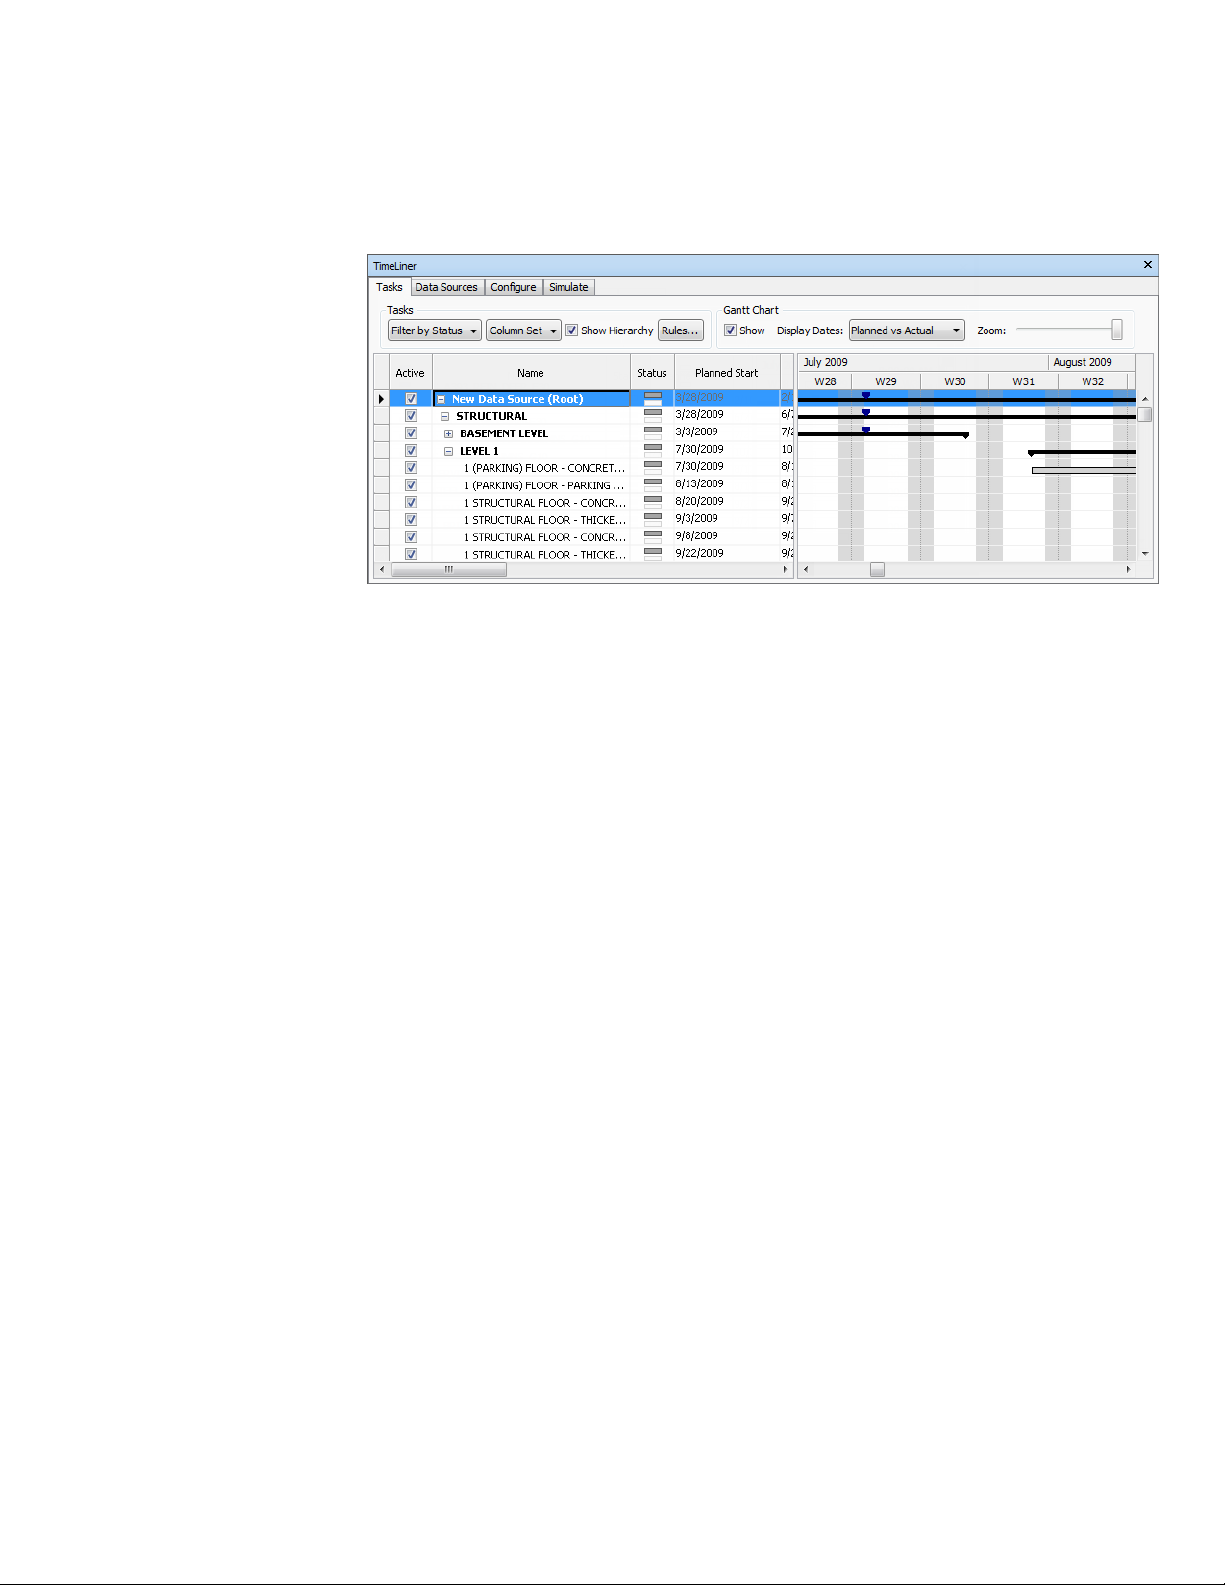
■ The Tasks, Gantt View and Rules tab are now consolidated into a single
Tasks tab.
■ A column chooser allows you to select your preferred grid layout from
three default options or by choosing your own columns.
■ The interactive Gantt Chart lets you manipulate dates in the schedule
by dragging and positioning tasks, start and end dates.
■ A Gantt View is now available during 4D simulations on the Simulate
tab.
■ An ability to quickly add and edit tasks in a project schedule.
■ An ability to filter tasks by their status.
■ An ability to import / export TimeLiner rules for re-use.
■ New TimeLiner .NET API. Using the API you can now obtain a list of
tasks, task types, simulation types and data sources; add, edit and delete
tasks, task types, simulation types and data sources and modify their
properties; subscribe to events that will be triggered when the GUI or other
API users make changes to tasks, task types, simulation types and data
sources.
See Overview of the TimeLiner Tool (page 607).
Clash Detective
The Clash Detective tool has a number of improvements to offer better
management of your clashes through to resolution. Workflow tools allow you
to assign ownership of clashes and improved report tools provide you with a
What Is New in This Release? | 5
Page 24
batch summary of the status of your clashes and the ability to export a
formatted report for direct use in Microsoft® Excel. Better visualization of
clashes is supported by a new wireframe view and the Focus on Clash feature.
■ New Assigned To clash attribute, enabling you to assign clashes and clash
groups to an individual or trade, and keep track of the clashes through the
Results list and Clash Reports.
■ Summary information of the result statuses for each of the clash tests is
now displayed on the Batch tab.
■ Summary information for the current clash test is now displayed at the
top of the Clash Detective tabs.
■ Automatic notification of any model changes that may invalidate your
clash results.
■ New tabular HTML clash report that opens directly in Microsoft Excel.
■ The option to view clash results using wireframe mode.
■ The ability to reset a viewpoint to focus on the clash results again.
See Overview of Clash Detective Tool (page 669).
Autodesk File Format Support
Autodesk Navisworks now offers 2D DWF and multi-sheet DWF support,
allowing you to open, review and explore your 2D datasets alongside your 3D
6 | Chapter 1 Welcome to Autodesk Navisworks Manage 2012
Page 25

models. Importantly, the 2D view is integrated with the 3D environment this enables you to select a component in the 3D model and then to find and
review the same component in a 2D representation (such as a floor plan or
section) providing you with the most appropriate view of the data for the task
that you are undertaking. When working with the FBX visualization file format
you can now achieve an accurate transfer of materials, textures and lights
when importing or exporting data between Autodesk Navisworks and other
FBX compatible applications.
■ Support for opening 2D/3D DWF and DWFx files. See DWF File Reader
(page 179).
■ Support for exporting 3D DWF and DWFx files. See Export 3D DWF/DWFx
Files (page 489).
■ Multi-sheet file support. See 2D and Multi-Sheet Files (page 213).
■ 2D/3D Object Association support. See Find All Sheets and Models Con-
taining the Selected Object (page 356).
■ FBX consistent material support for lights, materials, and textures. See FBX
File Reader (page 801).
Extended Support for Revit
A number of interoperability improvements to Revit / Autodesk Navisworks
workflows increases your productivity when working with both applications.
■ Revit SwitchBack allows you to quickly transition between views in
Autodesk Navisworks and Revit for easy navigation and location of
elements. See Revit SwitchBack (page 436).
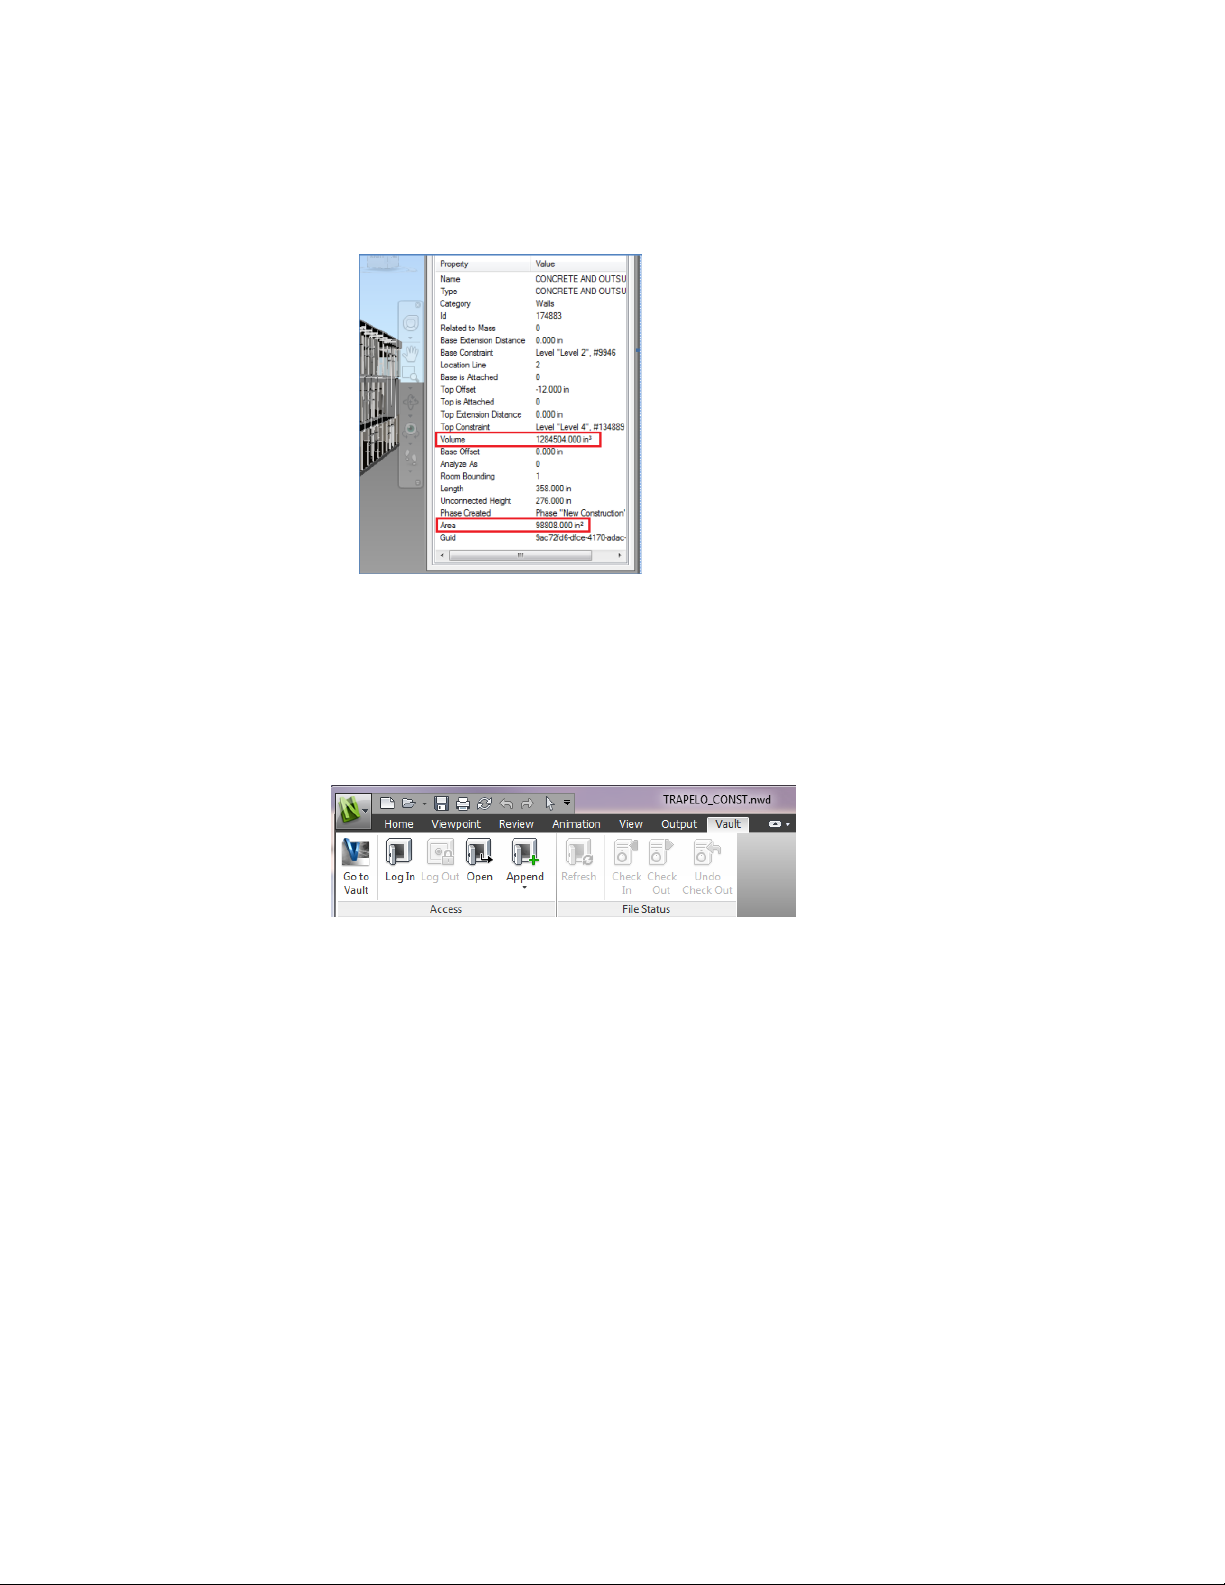
■ Support for Revit Construction modelling enables you to pass your
construction parts into Autodesk Navisworks for 4D simulation.
■ Support for Revit linked files.
■ Support for Revit split regions.
■ Support for Revit properties including areas, volumes and points.
What Is New in This Release? | 7
Page 26
See Revit File Exporter (page 200).
Vault Integration
Autodesk Navisworks now offers integration with the Autodesk Vault data
management toolset. Autodesk Vault offers a comprehensive environment
for managing the large volume of data that is generated on your projects.
■ Retrieve/save data.
■ Check in/check-out data.
■ Manage file versioning and the relationship between NWF files and design
data.
See Use the Autodesk Vault Add-In (page 723).
General Integration Enhancements
■ Support for Google Sketchup v7 .skp files with backwards compatibility.
■ TimeLiner now offers support for Primavera P6 v7 web services.
■ Support for Pro/Engineer .prt, .asm, .g and .neu file formats.
8 | Chapter 1 Welcome to Autodesk Navisworks Manage 2012
Page 27
■ Point cloud server support. Autodesk Navisworks now supports the retrieval
of data from external point cloud engines for display within your Autodesk
Navisworks model. The tool is implemented as an extension to the existing
NWCreate API. A simple generic example and a customized example
demonstrating connection to Z+F LFM server are available within the
NWCreate API resources.
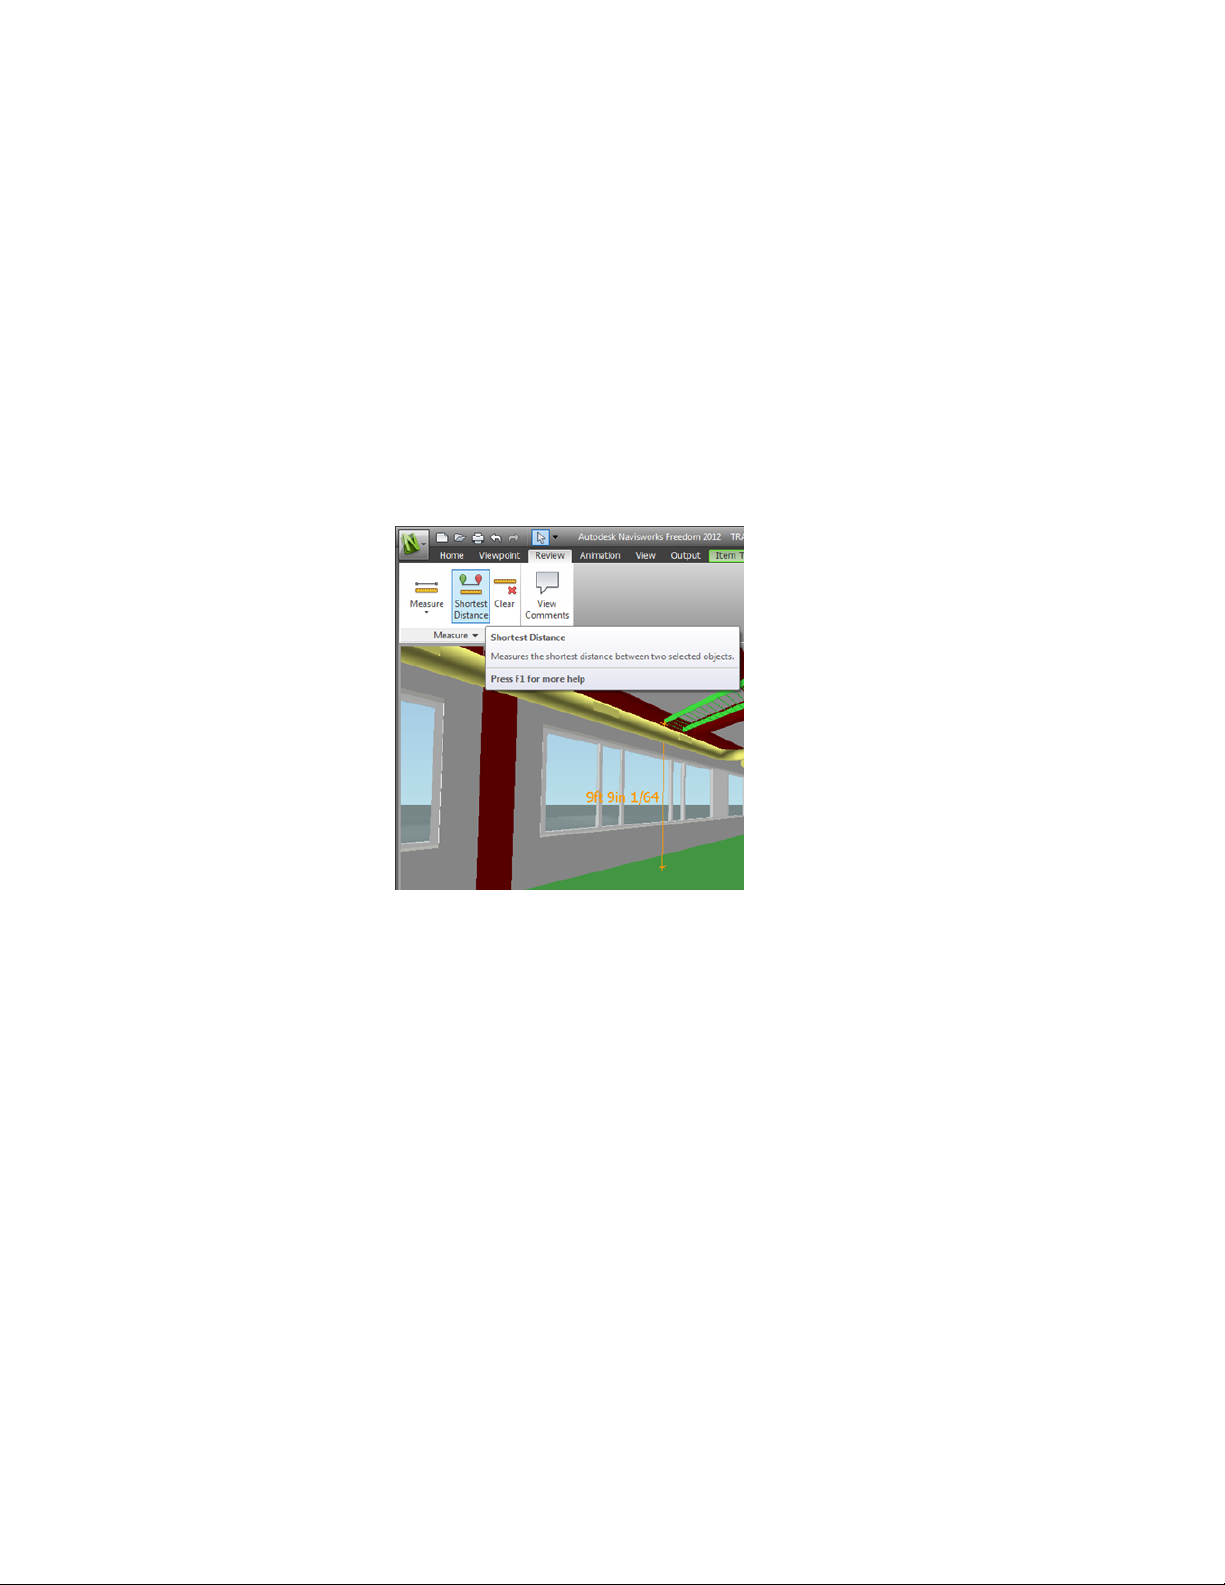
Autodesk Navisworks Freedom 2012 Enhancements
■ The Review tab now contains Measure tools supporting field access to
dimensioning and area calculation.
■ You can now open 2D DWF, and multi-sheet DWF files, as well as NWD
files.
■ A Gantt View is now available during 4D TimeLiner simulations.
What Is New in This Release? | 9
Page 28
Miscellaneous Enhancements
■ Enhanced support for the
■ 3D mouse through an extended interface. See 3Dconnexion 3D Mouse
(page 298).
■ Communication Centre now supports live updates.
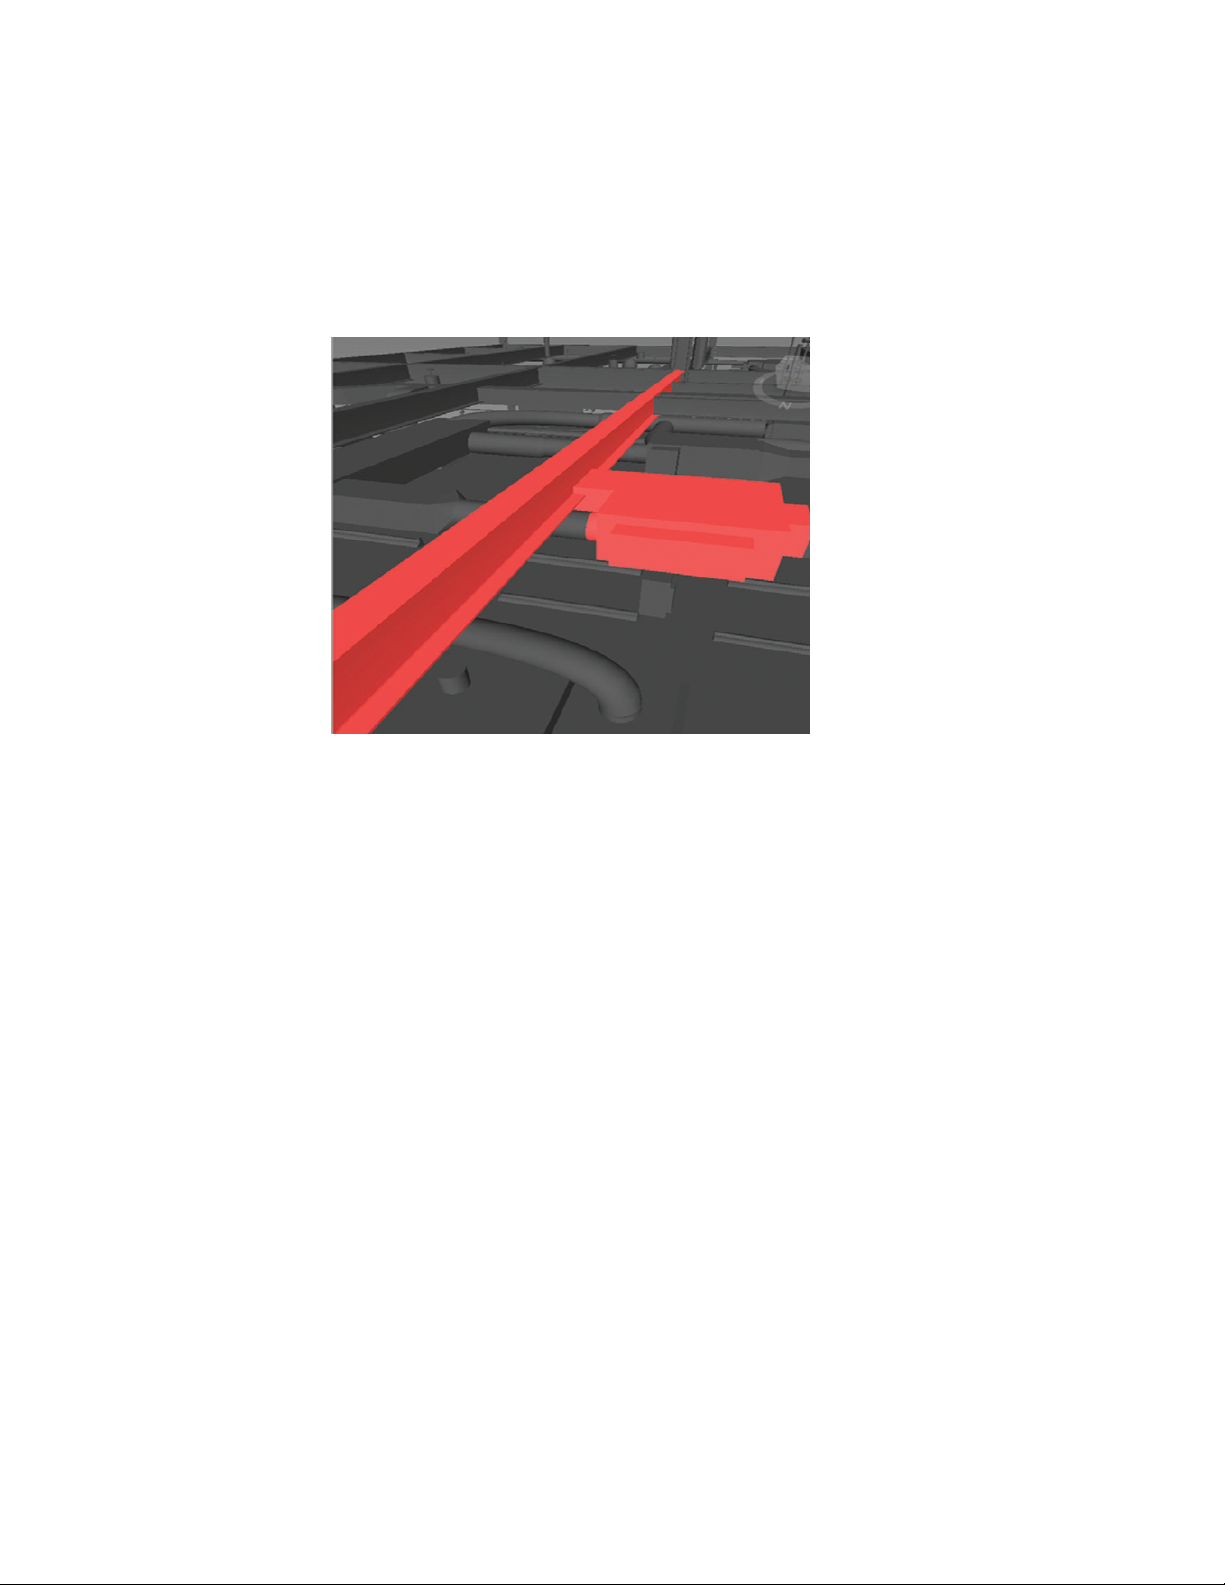
■ New avatars to be used in a variety of roles ranging from construction
workers and safety professionals, to office workers. Since avatars can vary
per viewpoint, you can easily show how project stakeholders will interact
with a specific phase of the project in the relevant context.
■ Ongoing implementation of Autodesk Navisworks .NET API.
10 | Chapter 1 Welcome to Autodesk Navisworks Manage 2012
Page 29
How to Get Assistance
There are various ways to find information about how to use this program,
and multiple resources are available.
Find Information Using InfoCenter
You can use InfoCenter to search Autodesk Navisworks help file for
information. You can also easily access product updates and announcements.
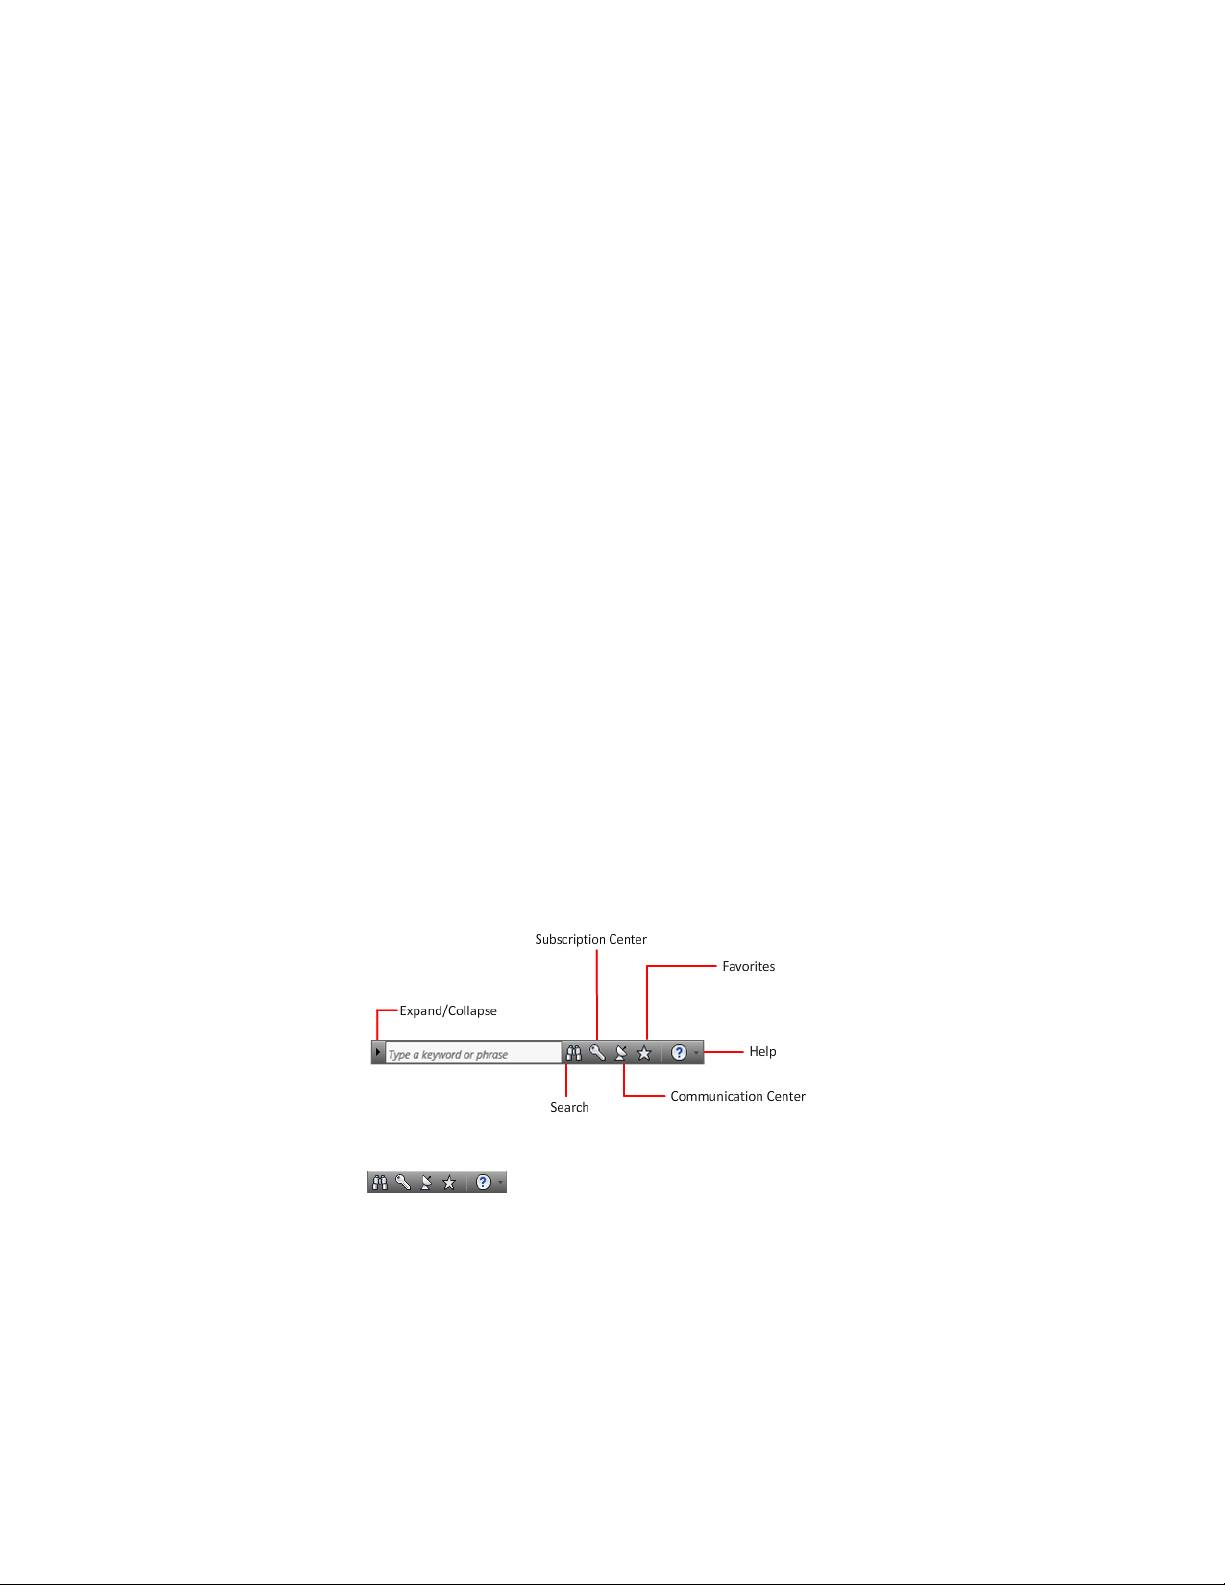
Overview of InfoCenter
You can use InfoCenter to search for product-related help, display the
Subscription Center panel for subscription services, display the Communication
Center panel for product updates and announcements, and display the
Favorites panel to access saved topics.
You can use InfoCenter to:
■ Search for information in the main product Help through keywords (or
by entering a phrase)
■ Access subscription services through Subscription Center panel
■ Access to product-related updates and announcements through
Communication Center panel
■ Access saved topics through Favorites panel
To display the InfoCenter box in a collapsed state, click the arrow to its left.
How to Get Assistance | 11
Page 30
To rearrange the topics displayed on a panel
1 Display a panel by doing one of the following:
■ In the InfoCenter box, click the Subscription Center button.
■ In the InfoCenter box, click the Communication Center button.
■ In the InfoCenter box, click the Favorites button.
2 Click and drag a category or group header to the desired position.
TIP To keep the Subscription Center, Communication Center, and the
Favorites panel expanded, click the push pin icon in the bottom-right corner
of the panel.
NOTE You can rearrange categories within a group, but you cannot move them
into other groups.
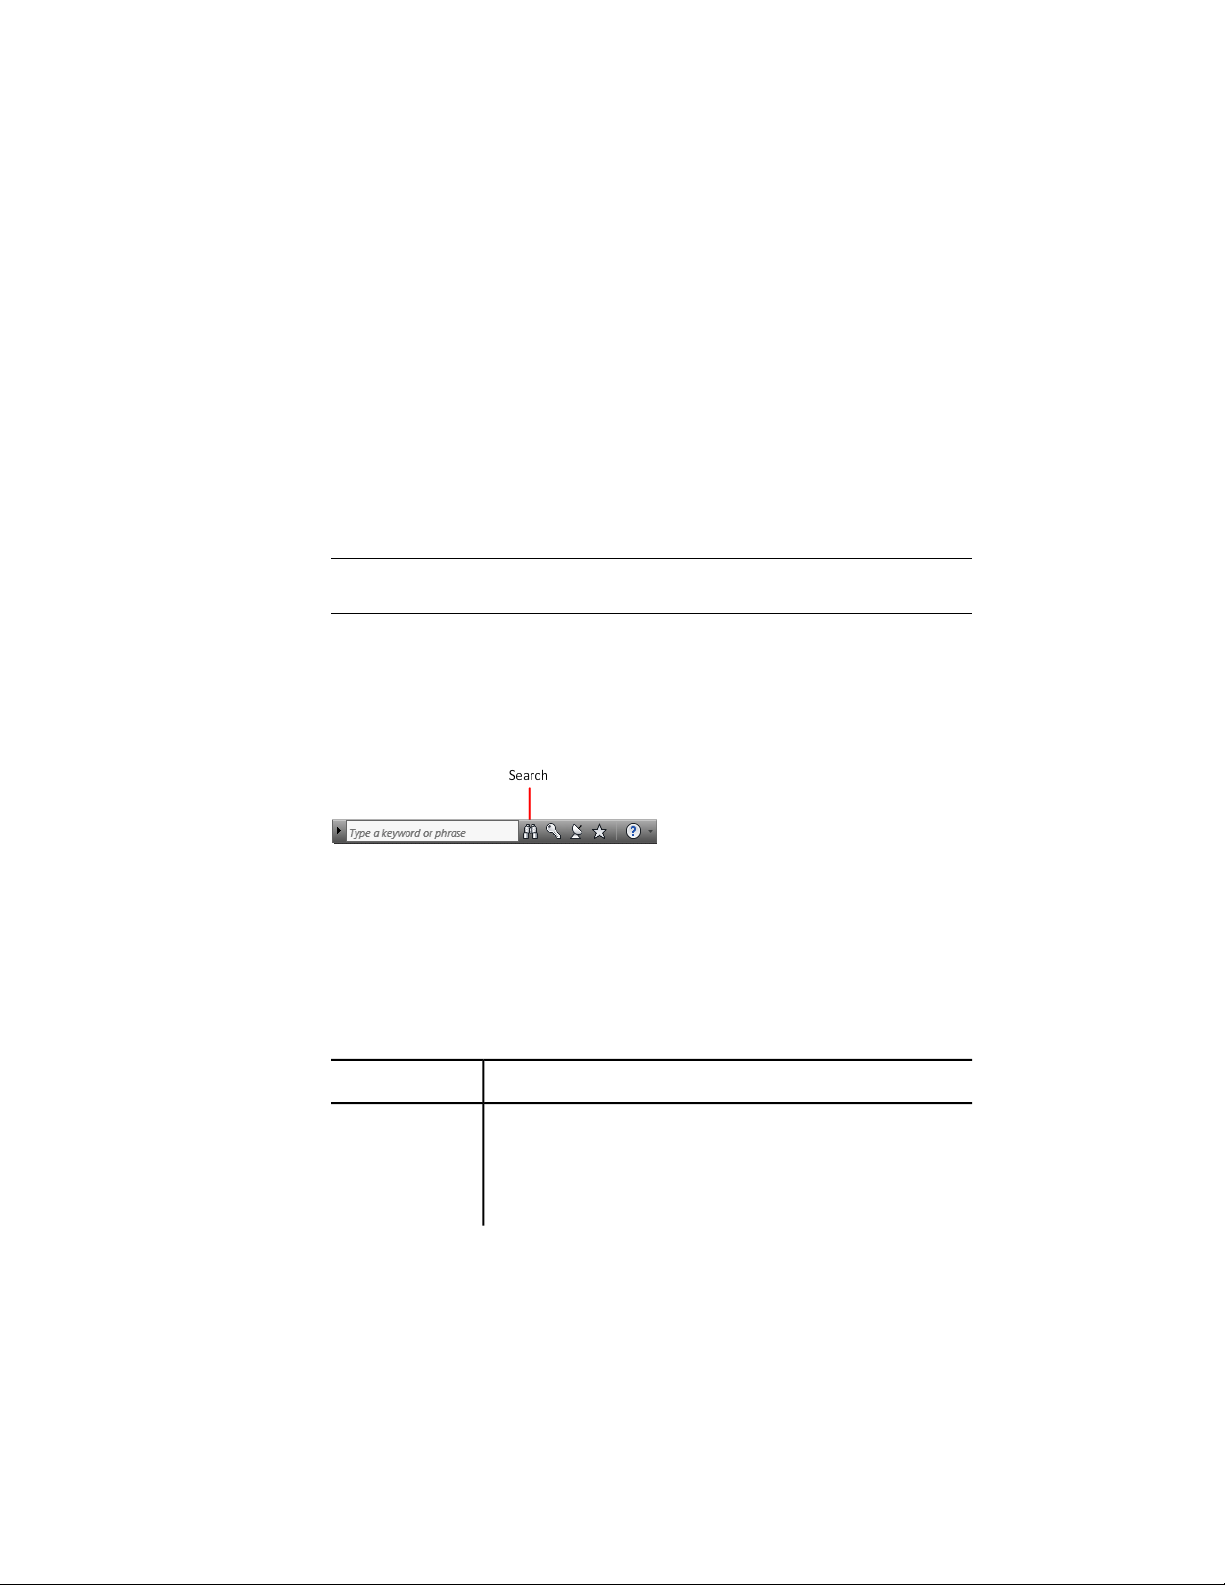
Search for Information
You can enter keywords or a phrase in the InfoCenter box to search for
information.
When you enter keywords or a phrase in the InfoCenter box, you search the
contents of the main Autodesk Navisworks Help file.
Keyword searches produce better results. The results are listed on the Help
Search tab. Click a topic to display it in help.
When you use InfoCenter to search for information, you can use the following
special symbols in your query to refine or expand it. These symbols can be
used alone or can be combined.
DescriptionSymbol
*
Replaces one or more characters when used at the beginning,
middle, or end of a word. For example, “*lish”, “p*lish”, and “pub*”
will find “publish”. Also, “anno*” will find “annotative”, “annotation”, “annoupdate”, “annoreset”, and so on.
12 | Chapter 1 Welcome to Autodesk Navisworks Manage 2012
Page 31

DescriptionSymbol
?
~
When performing the exact phrase search, use double quotation marks (" ")
to enclose words that must appear next to each other in the specified text
string. For example, enter "specify units of measurement" to find only
topics with all those words in that order. You can also use the previously
mentioned symbols in a text string that is enclosed in double quotation marks.
To search the main Help file for information
1 In the InfoCenter box, enter a keyword or phrase.
2 Click the Search button.
The main Help file opens, and the search results are listed on the Help Search
tab.
Replaces a single character. For example, “cop?” will find “copy”,
but not “copybase”.
Adds grammatical form variations to a keyword when added at the
beginning or end of a word. For example, “plotting~” will find
“plots”, “plotted”, and so on. Also, “~plot” will find “preplot”,
“replot”, and so on.
Access Subscription Center
Subscription Center displays links to information about subscription services
such as product enhancements, personalized web support from Autodesk
technical experts, and self-paced e-Learning.
If you are a subscription member, you can access subscription services by
clicking the Communication Center button in the InfoCenter box,
and then clicking a Subscription Center link. To learn more about Autodesk
subscription membership, visit http://www.autodesk.com/subscriptioncenter.
About Subscription Center
With Autodesk Subscription, you get the latest releases of Autodesk software,
incremental product enhancements, personalized web support from Autodesk
How to Get Assistance | 13
Page 32

technical experts, and self paced e-Learning. Subscription services are available
to subscription members only.
By clicking the Communication Center button in the InfoCenter box,
members have access to the following options (under Subscription Center):
■ Subscription status. Checks your subscription status.
■ Create support request. Provides direct one-to-one communication
with Autodesk support technicians. You receive fast, complete answers to
your installation, configuration, and troubleshooting questions.
■ View support requests. Tracks and manages your questions and
responses through Autodesk's state-of-the-art support system.
■ Edit Subscription Center profile. Sets up and maintains your
subscription account.
■ View e-Learning catalog. Features interactive lessons organized into
product catalogs.
■ e-Learning Lessons. (For subscription members only.) Each lesson is
15-30 minutes and features hands-on exercises, with an option to use a
simulation instead of the software application. You can use an online
evaluation tool that identifies gaps in skills, determines what lessons will
be most helpful, and gauges learning progress.
Subscription Resources and Privacy
Subscription resources provide interactive product features over the Internet.
Each time you access subscription resources (such as e-Learning or Create
Support Request) from Communication Center in an Autodesk product,
product information (such as the serial number, version, language, and the
subscription contract ID) is sent to Autodesk for verification that your product
is on subscription.
Autodesk compiles statistics using the information sent to subscription
resources to monitor how they are being used and how they can be improved.
Autodesk maintains the information provided by or collected from you in
accordance with Autodesk's published privacy policy, which is available at
http://www.autodesk.com/privacy.
To open the Subscription Center
1 Click the Communication Center button in the InfoCenter box.
2 On the Communication Center panel, under Subscription Center,
click the subscription resource you want to access.
14 | Chapter 1 Welcome to Autodesk Navisworks Manage 2012
Page 33

NOTE Subscription Center is not available to all product users. If subscription
resources are not available in your product, your product is not entitled to
subscription benefits.
Manage Files with Autodesk Vault
If you are a subscription customer, you have access to Autodesk Vault, a file
management tool that provides a repository where documents and files are
stored and managed.
Autodesk Vault gives you more power to manage files and track changes.
Versioned copies of master files are maintained, allowing you to easily revert
to earlier versions of files. You can check files out for editing and later check
them back in. The master copy is never directly edited.
Autodesk Vault consists of two required components: the Autodesk Data
Management Server and the Vault Client. Optionally, you can also install the
Vault Office Add-in.
For information about using the Vault, refer to the Vault Help system.
TIP The main components for the Autodesk Vault can be downloaded from the
Autodesk Subscription site.
Use Communication Center
Communication Center provides up-to-date product information, software
updates, product support announcements, and other product-related
announcements.
Overview of Communication Center
You can click the Communication Center button to display links to
information about product updates and announcements, and may include
links to RSS feeds.
Whenever new information is available, Communication Center notifies
you by displaying a balloon message below the Communication Center
button in the InfoCenter box.
How to Get Assistance | 15
Page 34

Communication Center provides the following types of announcements:
■ Autodesk Channels: Receive support information, product updates, and
other announcements (including articles and tips).
■ RSS Feeds. Receive information from RSS feeds to which you subscribe.
RSS feeds generally notify you when new content is posted. You are
automatically subscribed to several default RSS feeds when you install the
program.
■ Product Support Information. Get breaking news from the Product
Support team at Autodesk, including when Live Update maintenance
patches are released.
■ Subscription Announcements. Receive subscription announcements
and subscription program news, as well as links to e-Learning Lessons, if
you are an Autodesk subscription member (available in countries/regions
where Autodesk subscriptions are offered).
For more information about Autodesk Subscription, see Access Subscription
Center (page 13).
■ Articles and Tips. Be notified when new articles and tips are available
on Autodesk websites.
■ Live Update Maintenance Patches. Receive automatic notifications
whenever new maintenance patches are released from Autodesk.
■ Featured Technologies and Content. Learn more about third-party
developer applications and content.
You can customize the items that display on the Communication Center
panel. For more information, see Specify InfoCenter Settings (page 23).
Communication Center Online Policy
Communication Center is an interactive feature that must be connected to
the Internet in order to deliver content and information. Each time
Communication Center is connected, it sends your information to Autodesk
so that you receive the correct information. All information is sent
anonymously to Autodesk to maintain your privacy.
Communication Center sends the following information to Autodesk:
■ Product name (in which you are using Communication Center)
■ Product release number
■ Product language
■ Country/region (specified in the Communication Center settings)
16 | Chapter 1 Welcome to Autodesk Navisworks Manage 2012
Page 35

■ Your unique Customer Involvement Program (CIP) ID if you are
participating in the CIP program
Autodesk compiles statistics using the information sent from
Communication Center to monitor how it is being used and how it can
be improved. Autodesk maintains information provided by or collected from
you in accordance with the company's published privacy policy, which is
available at http://www.autodesk.com/privacy.
To open Communication Center
■ In the InfoCenter box, click the Communication Center button.
To receive new information notifications
■ Click the link in the balloon message to open the article or announcement.
Save and Access Favorite Topics
You can click the Favorites button to display saved links to topics or web
locations.
Any link that displays on the Subscription Center or Communication
Center panel can be marked as a favorite.
A link marked as a favorite displays a star icon on the Subscription Center
panel or the Communication Center panel.
To display the InfoCenter Favorites panel
■ In the InfoCenter box, click the Favorites button.
NOTE The links displayed on the Favorites panel are organized into the same
groups or categories from which they were added.
To save a link in InfoCenter as a favorite
1 Display a panel by doing one of the following:
■ In the InfoCenter box, click the Subscription Center button.
How to Get Assistance | 17
Page 36

■ In the InfoCenter box, click the Communication Center button.
2 Click the star icon that is displayed next to the link that you want to
save as a favorite.
To remove a favorite link from the InfoCenter Favorites panel
1 In the InfoCenter box, click the Favorites button to display the Favorites
panel.
2 Click the star icon that is displayed next to the link that you want to
remove from the Favorites panel.
Use the Help System
You can click the Help button to display topics in Help.
You can get much more benefit from the Help system when you learn how
to use it efficiently. You can quickly find general descriptions, procedures,
details about dialog boxes and palettes, or definitions of terms.
The Help system contains complete information about using this program.
In the Help window, you use the left pane to locate information. The tabs
above the left pane give you several ways for finding the topics you want to
view. The right pane displays the topics you select.
To display topics in Help
■ In the InfoCenter box, click the Help button.
How Help Topics Are Organized
Most topics in this Help system have three tabs above the right pane of the
Help window. The tabs display different types of information.
■ Concept tab. Describes a feature or function. When you click the
Concept tab, the Help Contents list in the left pane of the Help window
expands and highlights the current topic. The Contents tab displays the
18 | Chapter 1 Welcome to Autodesk Navisworks Manage 2012
Page 37

structure of the Help on that topic. You can easily display nearby topics
by clicking them in the list.
■ Procedure tab. Provides step-by-step instructions for common procedures
related to the current topic. After displaying a procedure, you can click the
Procedure tab to redisplay the current list of procedures.
■ Quick Reference tab. Lists reference information related to the current
topic.
When you click a different tab, the topic remains the same. Only the type of
information displayed—concept, procedures, or quick reference links—is
different.
Search in Help
Use the Help Search tab to find relevant topics based on keywords that you
enter.
The basic search rules are as follows:
■ Type your keywords in uppercase or lowercase characters; searches are not
case-sensitive.
■ Search for any combination of letters (a-z) and numbers (0-9).
■ Do not use punctuation marks such as a period, colon, semicolon, comma,
hyphen, and single quotation marks; they are ignored during a search.
■ Group the elements of your search using double quotation marks or
parentheses to set each element apart.
Use Wild Card Characters
You can use the following wild card characters in any keyword:
DescriptionSymbol
*
Replaces one or more characters when used
at the beginning, middle, or end of a word.
For example, “*lish”, “p*lish”, and “pub*”
will all find “publish”. Also, “anno*” will
find “annotative”, “annotation”, “annoupdate”, “annoreset”, and so on.
How to Get Assistance | 19
Page 38

DescriptionSymbol
?
~
Replaces a single character. For example,
“cop?” will find “copy”, but not “copybase”.
Expands the tense of the word at the beginning or end of a word. For example, “plotting~” will find “plots”, “plotted”, and so
on. Also, “~plot” will find “preplot”,
“replot”, and so on.
Search for Phrases
When searching for a phrase, use double quotation marks (“ ”) to enclose
words that must appear next to each other in the specified sequence. For
example, enter “specifying units of measurement” to find only topics with all
those words in that order. If you don’t use the quotation marks around that
text, Help finds all topics containing any one of the listed words, that is, all
topics containing “specifying”, all topics containing “units”, all topics
containing “of”, and all topics containing “measurement”.
TIP If you can’t find the information you need through a search, try using the
Contents tab.
Use Boolean Operators
With the AND, OR, NOT, and NEAR operators, you can precisely define your
search by creating a relationship between search terms. The following table
shows how you can use each of these operators. If no operator is specified,
AND is used. For example, the query spacing border printing is equivalent to
spacing AND border AND printing.
ResultsExampleSearch for
“tree view” AND “palette”Both terms in the same
topic
viewpoint OR animationEither term in a topic
Topics containing both the words
“tree view” and “palette”
Topics containing either the word
“viewpoint” or the word “animation” or both
20 | Chapter 1 Welcome to Autodesk Navisworks Manage 2012
Page 39

ResultsExampleSearch for
nwd NOT nwcThe first term without
the second term
user NEAR menuBoth terms in the same
topic, close together
Topics containing the word
“NWD”, but not the word
“NWC”
Topics containing the word
“user” within eight words of the
word “menu”
NOTE The |, &, and ! characters do not work as Boolean operators. You must use
AND (also +), OR, and NOT (also -).
Find Information in Help Topics
The tabs on the left side of the Help window provide different methods for
finding information.
Contents Tab
■ Presents an overview of the available documentation in a list of topics and
subtopics.
■ Allows you to browse by selecting and expanding topics.
■ Provides a structure so you can always see where you are in Help and
quickly jump to other topics.
Index Tab
■ Displays an alphabetical list of keywords related to the topics listed on the
Contents tab.
■ Accesses information quickly when you already know the name of a feature,
command, or operation, or when you know what action you want the
program to perform.
Search Tab
■ Provides a keyword search of all the topics listed on the Contents tab.
■ Accepts the Boolean operators AND (+), OR, NOT (-), and NEAR.
How to Get Assistance | 21
Page 40

■ Accepts the wild cards *, ?, and ~.
■ Allows you to perform a search for a phrase when the phrase is enclosed
in double quotes.
■ Displays a ranked list of topics that contain the word or words entered in
the keyword field.
■ Arranges the results alphabetically by title or by location if you click on
the Title and Location column headings.
To find a specific word or phrase in the currently displayed Help topic
1 Click in the topic text and press CTRL+F.
2 In the Find text box, enter a keyword or phrase.
3 Click Next. If the keyword or phrase is located, the topic scrolls to display
the result.
Print Help Topics
The quickest way to print the current topic is to right-click within the topic
and click Print.
The Print button on the Help toolbar provides these print options:
■ Print the selected topic (recommended)
■ Print the selected heading and all subtopics
NOTE When you select the second option, you may get numerous printed pages,
depending on how many subtopics the currently selected topic contains.
To print a Help topic
1 Display the topic you want to print.
2 Right-click in the topic pane. Click Print.
3 In the Print dialog box, click Print.
To print a selected heading and all subtopics
1 Display the topic you want to print and make sure that the Contents
tab is displayed.
2 On the Help toolbar, click Print.
22 | Chapter 1 Welcome to Autodesk Navisworks Manage 2012
Page 41

3 In the Print Topics dialog box, click Print the Selected Heading
and All Subtopics.
4 Click OK.
Show and Hide the Contents Pane
You can control the size of the Help window.
Use the Hide button on the Help toolbar to shrink the Help window
to a compact size by hiding the pane that contains the Contents, Index,
and Search tabs. The compact window size is best for displaying procedures
while you work.
Use the Show button to expand the Help window to display the pane
that contains Contents, Index, and Search tabs. The expanded window
size is best for locating and displaying conceptual and reference information.
Specify InfoCenter Settings
You can specify general and Communication Center settings in the
InfoCenter Settings dialog box.
In the InfoCenter Settings dialog box, you can specify the following settings:
■ General. Your current location, frequency for checking new online content
and option to turn on or off animated transition effects for the InfoCenter
panels.
■ Communication Center. Set the maximum age of the articles displayed
on the Communication Center panel.
■ Autodesk Channels. Channels to display in the Communication Center
panel as well as the number of articles to display for each channel.
■ Balloon Notification. Notifications for new product information,
software updates, and product support announcements. Also, you can
customize the transparency and the display time of the balloon.
■ RSS Feeds. RSS feed subscriptions. You can add or remove RSS feeds. RSS
feeds generally notify you when new content is posted.
How to Get Assistance | 23
Page 42

To specify the channels to display in the Communication Center panel
1 Display a panel by doing one of the following:
■ In the InfoCenter box, click the Subscription Center button.
■ In the InfoCenter box, click the Communication Center button.
■ In the InfoCenter box, click the Favorites button.
2 Click the InfoCenter Settings button.
3 In the InfoCenter Settings dialog box, in the left pane, click Autodesk
Channels.
4 In the right pane, select or clear the channels you want to display in the
Communication Center panel.
5 Click OK.
To specify InfoCenter balloon notification settings
1 Display a panel by doing one of the following:
■ In the InfoCenter box, click the Subscription Center button.
■ In the InfoCenter box, click the Communication Center button.
■ In the InfoCenter box, click the Favorites button.
2 Click the InfoCenter Settings button.
3 In the InfoCenter Settings dialog box, in the left pane, click Balloon
Notification.
4 In the right pane, select or clear the options to turn balloon notification
on or off.
5 Enter the number of seconds to set the length of time for balloon
notifications to display.
6 Enter the transparency value of the balloon or set the value using the
slider.
7 Click OK.
To add an RSS feed to Communication Center
1 Display a panel by doing one of the following:
■ In the InfoCenter box, click the Subscription Center button.
■ In the InfoCenter box, click the Communication Center button.
2 Click the InfoCenter Settings button .
3 In the InfoCenter Settings dialog box, in the left pane, click RSS Feeds.
24 | Chapter 1 Welcome to Autodesk Navisworks Manage 2012
Page 43

4 In the right pane, do one of the following:
■ Click Add.
■ Right-click anywhere in the right pane. Click Add.
5 In the Add RSS Feed dialog box, enter the location of the RSS feed you
want to add. Click Add.
6 In the InfoCenter - RSS Feed Confirmation dialog box, click Close.
7 Click OK.
To remove an RSS feed from Communication Center
1 Display a panel by doing one of the following:
■ In the InfoCenter box, click the Subscription Center button.
■ In the InfoCenter box, click the Communication Center button.
■ In the InfoCenter box, click the Favorites button.
2 Click the InfoCenter Settings button.
3 In the InfoCenter Settings dialog box, in the left pane, click RSS Feeds.
4 In the right pane, do one of the following:
■ Click Remove.
■ Right-click an RSS feed. Click Remove.
5 In the InfoCenter - Remove RSS Feed dialog box, click Yes.
6 Click OK.
Get More Help
You can access several additional sources of help.
■ Use Communication Center. Display the Communication Center
panel for product updates and announcements.
■ Press F1. Displays context-sensitive reference information.
■ Click the Help button in many dialog boxes. Displays reference
information for the dialog box.
■ View the product Readme. Displays late-breaking information about
this product.
How to Get Assistance | 25
Page 44

Other resources help you get information about Autodesk products and
assistance with your questions about this program.
■ Autodesk website. Access http://www.autodesk.com.
■ Local support. Check with your dealer or Autodesk country/region office.
Learn the Product
Training programs and products from Autodesk help you learn the key
technical features and improve your productivity.
For the latest information about Autodesk training, visit ht-
tp://www.autodesk.com/training or contact your local Autodesk office.
Autodesk Authorized Training Centers
The Autodesk® Authorized Training Center (ATC®) network delivers
Autodesk-authorized, instructor-led training to design professionals who use
Autodesk software. Autodesk Authorized Training Centers use experienced
and knowledgeable instructors. More than 1,200 ATC sites are available
worldwide to meet your needs for discipline-specific, locally based training.
To find a training center near you, contact your local Autodesk office or visit
http://www.autodesk.com/atc.
Autodesk Official Training Courseware
Autodesk Official Training Courseware (AOTC) is technical training material
developed by Autodesk. Designed for traditional 1/2-day to 5-day, instructor-led
classroom training and used by Authorized Training Centers and other
Autodesk partners, AOTC is well-suited for self-paced, stand-alone learning.
The manuals cover key concepts and software functionality with hands-on,
step-by-step, real-world exercises. You can purchase AOTC from your local
reseller or distributor, or you can order it online from the Autodesk Store at
http://www.autodesk.com/aotc.
e-Learning
Autodesk e-Learning for Autodesk Subscription customers features interactive
lessons organized into product catalogs. Each lesson is 20-40 minutes in length
and features hands-on exercises, with an option to use a simulation of the
product or the actual application. You can also use an online evaluation tool
26 | Chapter 1 Welcome to Autodesk Navisworks Manage 2012
Page 45

that identifies gaps in skills, determines what lessons will be most helpful,
and gauges learning progress.
If you are a member of Autodesk subscription, you can access e-Learning and
other subscription services from within your Autodesk product.
For more information about how to access e-Learning in the product, see Access
Subscription Center (page 13).
For more information about Autodesk subscription resources, visit ht-
tp://www.autodesk.com/subscriptioncenter.
Autodesk Developer Network
The Autodesk Developer (ADN) program for ADN members provides support
for full-time, professional developers who want to build software based on
Autodesk products. As an ADN member, you will receive the business, software,
support, and training you need to be successful. If you are a developer, visit
http://www.autodesk.com/adn.
Autodesk Consulting
Autodesk Consulting provides services that help set up processes and provide
critical training that will help increase productivity so you can capitalize on
the power of your products. For more information on general consulting,
systems integration, or custom training services, visit ht-
tp://www.autodesk.com/consulting.
Partner Products and Services
Autodesk works together with thousands of software partners around the
world. These partners provide products and services that enhance Autodesk
products for design professionals. Visit the Partner Products & Services page
at http://www.autodesk.com/partnerproducts for a list of resources available for
your Autodesk product and your industry.
View the Product Readme
You can find late-breaking information about this software in the Readme.
It is suggested that you read through the Autodesk Navisworks Readme for
information about recommended hardware, updated installation instructions,
and known software problems. The Readme file is available from the product’s
program group on the Windows Start menu.
How to Get Assistance | 27
Page 46

Join the Customer Involvement Program
You are invited to help guide the direction of Autodesk design software.
If you participate in the Customer Involvement Program (CIP), specific
information about how you use Autodesk Navisworks is forwarded to Autodesk.
This information includes what features you use the most, problems that you
encounter, and other information helpful to the future direction of the
product.
See the following links for more information.
■ Learn more about the Autodesk Customer Involvement Program: ht-
tp://www.autodesk.com/cip
■ Read the Autodesk Privacy Statement: http://www.autodesk.com/cipprivacy
When you join, you will be able to view reports that can help you optimize
your use of Autodesk Navisworks.
To turn the CIP on or off
1 On the InfoCenter toolbar, to the right of the Help button, click the
drop-down arrow.
2 Click Customer Involvement Program.
3 In the Customer Involvement Program dialog box, select to start or stop
participating.
4 Click OK.
28 | Chapter 1 Welcome to Autodesk Navisworks Manage 2012
Page 47

Installation
Quick Start to Stand-Alone Installation
This section provides step-by-step instructions about how to prepare, and then
install Autodesk Navisworks.
Stand-alone installation is recommended for individual users or small groups.
The key point is that you will repeat the installation process on each computer.
For a stand-alone license this is the only valid installation type, but it can also
be used with a multi-seat stand-alone or network license.
If you have never installed the product before, you should familiarize yourself
with the entire installation process and options before beginning.
For information about installing network-licensed or multi-seat stand-alone
versions of the program, see Install Autodesk Navisworks for Multiple Users
(page 44).
2
Prepare for Installation
To prepare for installation, you should review the system requirements,
understand administrative permission requirements, locate your Autodesk
Navisworks Manage 2012 serial number and product key, and close all running
applications.
Complete these tasks, and you are ready to begin installing Autodesk Navisworks
Manage 2012.
NOTE It is also recommended that you install Microsoft .Net Framework 4.0 before
installing the product. See Install Microsoft .Net Framework 4.0 (page 31).
29
Page 48

System Requirements for Stand-Alone Installation
The first task you need to complete is to make sure that your computer meets
the minimum system requirements. If your system does not meet these
requirements, problems can occur, both within Autodesk Navisworks and at
the operating system level.
Whether your Windows operating system is the 32-bit or the 64-bit version,
the version is automatically detected during installation.
See the following table for hardware and software requirements.
Hardware and software requirements for client machine
RequirementHardware/Software
Operating System
Web browser
Processor
Microsoft® Windows 7 (32-bit or 64-bit) Home Ba-
sic, Home Premium, Professional, Enterprise, or Ultimate (recommended)
Microsoft® Windows Vista® SP2 (32-bit or 64-bit)
Home Premium, Business, Enterprise, or Ultimate
Microsoft® Windows XP SP3 (32-bit) Home, or
Professional
Microsoft® Windows XP SP2 (64-bit) Professional
Microsoft® Internet Explorer® 7.0 or later
AMD Athlon™, 3.0 GHz or faster (minimum); Intel
Pentium® 4, 3.0 GHz or faster (recommended) -
with SSE2 technology
512 MB (minimum); 2 GB or more (recommended)Memory (RAM)
1024 x 768 with true color (minimum)VGA Display
®
30 | Chapter 2 Installation
1280 x 1024 32-bit color video display adapter with
true color (recommended)
Page 49

Hardware and software requirements for client machine
Graphics Card
Pointing device
Direct3D 9® and OpenGL® capable graphics card
with Shader Model 2 (minimum)
11 GB free disk space for installationHard disk
Microsoft® Mouse-compliant pointing device
Any speed (for installation only)DVD-ROM
Printer or plotterOptional hardware
Modem or access to an Internet connection
Network interface card
Install Microsoft .Net Framework 4.0
Autodesk Navisworks Manage 2012 requires Microsoft .Net 4.0 to be installed
prior to product installation.
Most Windows updates should include Microsoft .NET Framework 4, however,
for old versions of Windows, you can download and install Microsoft .NET
Framework 4 redistributables from: http://www.microsoft.com/downloads/en/de-
tails.aspx?FamilyID=0a391abd-25c1-4fc0-919f-b21f31ab88b7 or install Microsoft
.Net Framework 4 from the following directory in the installation media:
\3rdParty\NET\4\wcu\dotNetFramework\.
The Installation wizard will install Microsoft .Net Framework 4 if it detects
that required updates have not been installed.
Quick Start to Stand-Alone Installation | 31
Page 50

NOTE If the Installation wizard prompts you to install the Microsoft .NET 4.0
Framework, the .NET 4.0 Framework installer may prompt you to first install the
Windows Imaging Component (WIC). This can occur if you do not have the latest
Microsoft Windows updates or service packs. You are most likely to need WIC if
you are running Windows XP SP2 without certain Windows Updates installed. If
required, the Microsoft WIC installers are available at the following locations:
■ 32-bit installer: http://www.microsoft.com/downloads/en/details.aspx?Family-
ID=8e011506-6307-445b-b950-215def45ddd8&displaylang=en
■ 64-bit installer: http://www.microsoft.com/downloads/en/details.aspx?Family-
ID=f64654ac-6e26-41d9-a90a-0e7783b864ee
Understand Administrative Permission
Requirements
To install Autodesk Navisworks, you must have administrator permissions.
You do not need to have domain administrative permissions. See your system
administrator for information about administrative permissions.
To run Autodesk Navisworks, you do not need administrator permissions. You
can run the program as a limited user.
Locate Your Autodesk Navisworks Serial Number
and Product Key
When you install Autodesk Navisworks, you are prompted for your serial
number and product key in the User and Product Information page.
The serial number must contain a three-digit prefix followed by an eight-digit
number. The product key consists of five digits.
The serial number and product key are located on the outside of the product
packaging, or in the email you received if you downloaded your product. Make
sure to have these available before you install the program so that you don't
have to stop in the middle of the installation. Also make sure to have these
available before you activate the program.
The information you enter is permanently retained with the product. Because
you can’t change this information later without uninstalling, take care when
32 | Chapter 2 Installation
Page 51

entering the information. To review this product information later, in the
InfoCenter box, click the down arrow next to the Help button ➤ About
Autodesk Navisworks Manage 2012.
NOTE If you have lost your serial number or product key, contact your local
Autodesk office for assistance.
Avoid Data Loss During Installation
The Autodesk Navisworks installation process may stop if some applications
(such as Microsoft® Outlook® or virus-checking programs) are running.
Close all running applications to avoid possible data loss.
Choose a Language
You can select a different language for installation instructions, and a language
for individual product installations in the same install process.
When you start the installation process, the installer automatically determines
your operating system language. If a supported language is detected, your
install pages are displayed in that language. If you want to change that
language, you select a different one from the Installer Language list on the
first page of the Installation wizard.
NOTE Some products may not have multi-language support at the time of product
release. Additional language support may be available later. Check http://sup-
port.autodesk.com for the availability of additional language packs.
Using Language Packs
Language packs support use of different languages in each Autodesk Navisworks
product, including exporters. Pack names start with NAVFREE_, NAVSIM_,
NAVMAN_, and exporters_ respectively.
NOTE You must install at least one language pack for each product.
Quick Start to Stand-Alone Installation | 33
Page 52

It is possible to install additional language packs to Autodesk Navisworks
products later. You can manually install the required language packs by
double-clicking on the language pack MSI file.
Language packs are located on the installation DVD and unpacked downloaded
media under the x86 folder for 32-bit products and under the x64 folder for
64-bit products.
■ Language packs for specific products are included in the NAVFREE,
NAVSIM, NAVMAN, and NWEXPORT subfolders of x86 and x64 folders.
■ Language packs for specific languages are included in the en-US (English),
de-DE (German), es-ES (Spanish), fr-FR (French), it-IT (Italian), ja-JP
(Japanese), ko-KR (Korean), pt-BR (Brazilian Portuguese), ru-RU (Russian)
and zh-CN (Chinese PRC) subfolders of the product folders.
So, for example, to install the 32-bit French language pack for Autodesk
Navisworks Manage, double-click x86/NAVMAN/fr-FR/NAVMAN_LP.msi.
Configuration
During the installation process, you choose either a typical installation (install
the product with default settings), or a customized installation. On the Install
➤ Configure Installation page, for any product you have selected to install,
you will see a triangular control for access to a configuration panel.
Click anywhere in the product box to open the configuration panel:
■ Installation Type. If you choose a Typical installation (default settings)
the product installs the most common application features. A Custom
installation installs only the application features that you select from the
Select Features To Install list. The available features will depend upon
the product you are installing:
Redistributable ActiveX Control
34 | Chapter 2 Installation
Contains Autodesk Navisworks Redistributable ActiveX control.
Page 53

API
Contains the Component Object Model
interface for customizing and extending
the Autodesk Navisworks functionality.
Contains various feature sample files.Example NWD files
Batch Utility
Program
Sample RPCs
Contains an add-in to run and schedule
commands.
Contains full set of Autodesk Navisworks
files.
Contains several Rich Photorealistic Content
files.
NOTE For Autodesk Navisworks exporter plugins, you can change which
plugins are installed.
Indicates the third-party software already installed on your computer.
Indicates plugins for the third-party software, that are either not installed
or have not been detected by the Installation wizard.
Select the check boxes next to all required plugins. If the third-party
software has not been detected by the wizard, you can manually enable
the plugins for it. Selecting the check box automatically opens the dialog
box, which enables you to browse for the correct software installation
directory.
■ Create the Desktop Shortcut. Select the check box to create the desktop
shortcut for Autodesk Navisworks.
■ Project and Site Folders. Use the Browse buttons to select the
directories that will contain Autodesk Navisworks settings that can be
shared across an entire project site, or across a specific project group (see
Select the Project and Site Folders (page 64)).
■ Service Packs. If a service pack is available for your installation, you can
include it in the installation.
After you have configured the settings as required, click the product name to
close the configuration panel.
Quick Start to Stand-Alone Installation | 35
Page 54

Install Multiple or Bundled Products
Some Autodesk packages are comprised of multiple products or are part of
multi-product bundles.
The Installation wizard for packages that are comprised of multiple products
gives you the option to choose which products you want to install.
In the Installation wizard, for packages containing multiple products, you can
choose which products and languages you want to install. During the install
process, you are informed whether a copy of the software is already installed.
You are also warned if your system does not meet the minimum system
requirements for the product. Each product name is displayed on its own
tabbed panel; you can configure them individually.
If you purchased a package that is a multi-product bundle, such as an
educational or institutional package, you may have a package that includes
several Autodesk products. For these bundled packages, an Installer disc
contains information for all the products in the package. The Installer disc
helps you install all of the products.
Install and Run Autodesk Navisworks Manage 2012
To use the product, you must install the product, register and activate it, and
then launch it.
You must have administrative permissions to install Autodesk Navisworks.
This section provides instructions for installing and activating Autodesk
Navisworks for an individual user on a stand-alone computer.
For information about installing network-licensed or multi-seat stand-alone
versions of the program, see Install Autodesk Navisworks for Multiple Users
(page 44).
When you have successfully installed Autodesk Navisworks Manage 2012, you
are ready to register your product and start using the program. To register the
product, start Autodesk Navisworks Manage 2012 and follow the on-screen
instructions. For more information, see How do I register and activate Autodesk
Navisworks? (page 75)
NOTE Autodesk does not recommend or support the distribution of an Autodesk
product using imaging software.
36 | Chapter 2 Installation
Page 55

Install Autodesk Navisworks
The Autodesk NavisworksInstallation wizard contains all installation-related
material in one place.
From the Installation wizard, you can access user documentation, change
the installer language, select a language-specific product, install supplemental
tools, view support solutions, and learn about deploying your product on a
network.
NOTE The 32-bit and 64-bit versions of Autodesk Navisworks Manage 2012 are
on separate DVDs. Insert the appropriate Autodesk Navisworks DVD in the DVD
drive to start the installation process. Follow the prompts to complete the
installation. As long as the DVD is in the drive, you can access user documentation
by clicking the Installation Help link.
■ Review installation documentation before you install. It is
recommended that you take the time to familiarize yourself with the
complete installation process before you install Autodesk Navisworks.
Documentation is accessible from links on the lower left corner of the
installer.
■ Install Autodesk Navisworks Manage 2012. From the Installation
wizard, click Install. Follow the on-screen instructions to complete the
installation.
Install Autodesk Navisworks Using Default Values
This is the fastest means of installing Autodesk Navisworks on your system.
Only default values are used which means it is a typical installation being
installed to C:\Program Files\Autodesk\Navisworks Manage 2012.
To install Autodesk Navisworks using default values on a stand-alone computer
1 Close all running applications on your computer and start the
Installation wizard.
Quick Start to Stand-Alone Installation | 37
Page 56

2 On the Installation wizard, if required, select an alternate language
for the Installation wizard from the Installation Instructions
drop-down, and then click Install.
3 Review the Autodesk software license agreement for your country or
region. You must accept this agreement to proceed with the installation.
Choose your country or region, click I Accept, and then click Next.
NOTE If you do not agree to the terms of the license and want to terminate
the installation, click Cancel.
4 On the Product Information page, select Stand-Alone and enter
your serial number and product key, then click Next.
5 On the Configure Installation page, select the products to install,
and if required add a language pack(s) from the Product Language
drop-down (see Choose a Language (page 33)).
6 If required, use the Installation PathBrowse button to select the
drive and location where product will be installed.
7 Click Install. The wizard installs the products you selected using a
Typical installation, which installs the most common application
features. To see which features are included in a Typical installation,
refer to Typically Installed Features (page 72).
NOTE By default, the Installation wizard automatically enables the exporter
plugins for all third-party products already installed on your computer.
8 Click Finish.
Install Autodesk Navisworks Using Configured
Values
With this installation method, you can fine-tune exactly what gets installed.
You can alter the license type, the installation type, the install path, and
specify the location of the Project and Site folders.
To install Autodesk Navisworks using configured values on a stand-alone
computer
1 Close all running applications on your computer and start the
Installation wizard.
38 | Chapter 2 Installation
Page 57

2 On the Installation wizard, if required, select an alternate language
for the Installation wizard from the Installation Instructions
drop-down, and then click Install.
3 Review the Autodesk software license agreement for your country or
region. You must accept this agreement to proceed with the installation.
Choose your country or region, click I Accept, and then click Next.
NOTE If you do not agree to the terms of the license and want to terminate
the installation, click Cancel.
4 On the Product Information page, select the License Type
(Stand-Alone or Network) and enter your serial number and product
key, then click Next.
5 On the Configure Installation page, select the products to install,
and if required add a language pack(s) from the Product Language
drop-down (see Choose a Language (page 33)).
6 Click the product name to open the configuration panel where you can
review and change settings. See Configuration (page 34). After you have
configured the settings as required, click the product name to close the
configuration panel.
7 If required, use the Installation PathBrowse button to select the
drive and location where product will be installed.
8 Click Install. The wizard installs the products you selected using your
Custom installation settings.
9 Click Finish.
Launch Autodesk Navisworks
Assuming that you’ve followed all of the previous steps outlined in this Quick
Start section, you can launch Autodesk Navisworks and start taking advantage
of its new and updated features.
You can start Autodesk Navisworks in the following ways:
■ Desktop shortcut icon. When you install Autodesk Navisworks, a
shortcut icon is placed on your desktop. Double-click the Autodesk
Navisworks icon to start the program.
■ Start button. Click Start ➤ All Programs ➤ Autodesk ➤ Navisworks
Manage 2012 ➤ Autodesk Navisworks Manage 2012.
■ Location where Autodesk Navisworks is installed. If you have
administrative permissions, you can run Autodesk Navisworks in the
Quick Start to Stand-Alone Installation | 39
Page 58

location where you installed it. If you are a limited-rights user, you must
run Autodesk Navisworks from the Start button or from the desktop
shortcut icon. If you want to create a custom shortcut, make sure that the
Start In directory for the shortcut points to a directory where you have
write permissions.
NOTE When the product is started, by default, it uses the language that best
matches the settings on your computer. You can also launch Autodesk Navisworks
in another of the supported languages.
How to Launch Autodesk Navisworks in Another
Language
To run Autodesk Navisworks in another of the installed languages, you need
to add one of the language selector arguments to the desktop shortcut.
To run Autodesk Navisworks in another language
1 Right-click the Autodesk Navisworks desktop shortcut, and click
Properties on the shortcut menu to open the Autodesk
NavisworksProperties dialog box.
2 On the Shortcut tab, enter a space in the Target field after
..\roamer.exe, and then enter one of the following arguments:
■ -lang en-US for English localization
■ -lang de-DE for German localization
■ -lang es-ES for Spanish localization
■ -lang fr-FR for French localization
■ -lang it-IT for Italian localization
■ -lang ja-JP for Japanese localization
■ -lang ko-KR for Korean localization
■ -lang pt-BR for Brazilian Portuguese localization
■ -lang ru-RU for Russian localization
■ -lang zh-CN for Chinese (PRC) localization
3 Click OK to save the changes.
40 | Chapter 2 Installation
Page 59

Add or Remove Features
You can add or remove Autodesk Navisworks Manage 2012 features at any
time. For example, you may have chosen a Custom installation option when
you first installed Autodesk Navisworks, but now you want to add features
that you did not install originally. Or you may no longer need to use all of
the features that were installed originally.
You can add or remove features by using the Control Panel.
To add or remove features
1 Do one of the following:
■ (Windows XP) Click Start ➤ Settings ➤ Control Panel ➤ Add
or Remove Programs.
■ (Windows Vista and Windows 7) Click Start ➤ Control
Panel ➤ Programs and Features.
2 From the list of programs, click Autodesk Navisworks Manage 2012, and
then click Change/Remove (Windows XP) or Uninstall/Change
(Windows Vista and Windows 7).
The Autodesk Navisworks Manage 2012Installation wizard re-opens
in Maintenance Mode.
3 Click Add or Remove Features. On the Add/Remove Features
page, select a feature to install or uninstall. The icons to the left of the
selections give you an indication of the action that will be taken.
Indicates a feature that was marked for installation will be in a typical
installation.
Indicates a feature that is not currently scheduled for installation.
Indicates a feature that was not originally marked for installation,
but was added to the installed feature list.
Indicates an installed feature that is chosen for removal.
NOTE If you need to revert to the Autodesk Navisworks Manage 2012
features that you selected in your original installation, click Cancel.
Click Update.
4 On the Update Complete page, you are informed when the updates
have been performed. Click Finish.
Quick Start to Stand-Alone Installation | 41
Page 60

Repair Autodesk Navisworks Manage 2012
If you accidentally delete or alter files that are required by Autodesk Navisworks
Manage 2012, Autodesk Navisworks might not perform correctly, and you
might receive error messages when you try to execute a command or find a
file. You can attempt to fix this problem by repairing Autodesk Navisworks
Manage 2012.
Repairing uses the features that were part of the installation type you chose
when you initially installed the program.
To repair Autodesk Navisworks Manage 2012
1 Do one of the following:
■ (Windows XP) Click Start ➤ Settings ➤ Control Panel ➤ Add
or Remove Programs.
■ (Windows Vista and Windows 7) Click Start ➤ Control
Panel ➤ Programs and Features.
2 From the list of programs, click Autodesk Navisworks Manage 2012, and
then click Change/Remove (Windows XP) or Uninstall/Change
(Windows Vista and Windows 7).
The Autodesk Navisworks Manage 2012Installation wizard re-opens
in Maintenance Mode.
3 Click Repair or Reinstall.
4 On the Repair or Reinstall page, click RepairAutodesk Navisworks
Manage 2012. This option replaces all registry entries that Autodesk
Navisworks initially installed and restores Autodesk Navisworks Manage
2012 to its default state. Click Repair.
NOTE ReinstallAutodesk Navisworks Manage 2012 repairs the registry and
reinstalls all files from the original installation. Use this option if the
RepairAutodesk Navisworks Manage 2012 option does not solve the
problem.
5 On the Repair Complete page, click Finish.
Uninstall Autodesk Navisworks Manage 2012
When you uninstall Autodesk Navisworks Manage 2012, all components are
removed. This means that even if you've previously added or removed
42 | Chapter 2 Installation
Page 61

components, or if you've reinstalled or repaired Autodesk Navisworks Manage
2012, the uninstall removes all Autodesk Navisworks installation files from
your system.
IMPORTANT Do not use registry cleaning programs or attempt to modify the
registry entries yourself to uninstall Autodesk Navisworks Manage 2012. Failure
to follow the official uninstall procedure will result in the inability to re-install the
software .
To uninstall Autodesk Navisworks Manage 2012
1 Do one of the following:
■ (Windows XP) Click Start ➤ Settings ➤ Control Panel ➤ Add
or Remove Programs.
■ (Windows Vista and Windows 7) Click Start ➤ Control
Panel ➤ Programs and Features.
2 From the list of programs, click Autodesk Navisworks Manage 2012, and
then click Change/Remove (Windows XP) or Uninstall/Change
(Windows Vista and Windows 7).
The Autodesk Navisworks Manage 2012Installation wizard re-opens
in Maintenance Mode.
3 Click Uninstall.
4 When informed that the product has been successfully uninstalled, click
Finish.
NOTE Even though Autodesk Navisworks Manage 2012 is removed from
your system, the software license remains. If you reinstall Autodesk Navisworks
Manage 2012 at some future time, you will not have to register and
re-activate the program.
Move to Autodesk Navisworks from a Previous Release
If you have a previous version of Autodesk Navisworks installed on your
system, you can install Autodesk Navisworks Manage 2012 and keep other
versions of the program on the same system. This is called a side-by-side
installation.
If you’ve purchased an upgrade version of Autodesk Navisworks Manage 2012,
you are required to uninstall the previous version within 120 days of installing
Quick Start to Stand-Alone Installation | 43
Page 62

Autodesk Navisworks Manage 2012. See your license agreement for more
information.
Install Autodesk Navisworks for Multiple Users
This section provides step-by-step instructions for installing network-licensed
or multi-seat stand-alone versions of the Autodesk Navisworks Manage 2012.
Quick Start to Network Administration and Deployment
Network deployment of this program requires careful planning and execution.
Deployment installation is recommended for network administrators, using
either a multi-seat stand-alone or network license. In the deployment process,
the installation is configured once, stored on the network, and then distributed
efficiently to users' computers.
If you are not familiar with network administration and deployment, you
should familiarize yourself with the following topics before you attempt to
deploy and administer the program over a network.
Deployment Preparation
To prepare for a deployment, you should take the time to review the following
requirements and options.
System Requirements for a Deployment
This section contains the system requirements for the location of the
administrative image that you create, the network license server, and the client
workstation.
Before you begin installing the program on a network, make sure that your
servers and client workstations meet the minimum recommended hardware
and software requirements for a deployment.
44 | Chapter 2 Installation
Page 63

Whether the Windows operating system is the 32-bit or the 64-bit version is
automatically detected when installing Autodesk Navisworks. You can choose
which versions of Autodesk Navisworks will be installed.
See the following tables for administrative image, license server, and client
workstation system requirements.
Hardware and software requirements for the location of the administrative
image
RequirementHardware/Software
6 GBHard disk
Hardware and software requirements for client machine
RequirementHardware/Software
Operating System
Web browser
Processor
Microsoft® Windows 7 (32-bit or 64-bit) Home Basic,
Home Premium, Professional, Enterprise, or Ultimate (recommended)
Microsoft® Windows Vista® SP2 (32-bit or 64-bit) Home
Premium, Business, Enterprise, or Ultimate
Microsoft® Windows XP SP3 (32-bit) Home, or Profession-
al
Microsoft® Windows XP SP2 (64-bit) Professional
Microsoft® Internet Explorer® 7.0 or later
AMD Athlon™, 3.0 GHz or faster (minimum); Intel
Pentium® 4, 3.0 GHz or faster (recommended) - with
SSE2 technology
512 MB (minimum); 2 GB or more (recommended)Memory (RAM)
1024 x 768 VGA with true color (minimum)VGA Display
®
Install Autodesk Navisworks for Multiple Users | 45
Page 64

Hardware and software requirements for client machine
1280 x 1024 32-bit color video display adapter with true
color (recommended)
Graphics Card
Pointing device
Direct3D 9® and OpenGL® capable graphics card with
Shader Model 2 (minimum)
11 GB free disk space for installationHard disk
Microsoft® Mouse-compliant pointing device
Any speed (for installation only)DVD-ROM
Printer or plotterOptional hardware
Modem or access to an Internet connection
Network interface card
Hardware and software requirements for the network license server (Windows)
RequirementHardware/Software
Operating System
Microsoft® Windows 7 (32-bit or 64-bit)
■ Windows 7 Enterprise
■ Windows 7 Ultimate
■ Windows 7 Professional
■ Windows 7 Home Premium
Microsoft® Windows Vista® SP2 or later (32-bit or 64-bit)
■ Windows Vista Enterprise
■ Windows Vista Ultimate
■ Windows Vista Business
■ Windows Vista Home Premium and Basic (32-bit)
46 | Chapter 2 Installation
Page 65

Hardware and software requirements for the network license server (Windows)
RequirementHardware/Software
■ Windows Vista Home Premium (64-bit)
Microsoft® Windows XP SP2 or later (32-bit or 64-bit)
■ Windows XP Professional
■ Windows XP Home
Windows Server SP1 or later (32-bit or 64-bit)
■ Windows 2008 Server R2
■ Windows 2008 Server
■ Windows 2003 Server R2
■ Windows 2003 Server
Computer/processor
Browsers
Intel® Pentium® III or higher
450 Mhz (minimum)
Compatible with existing Ethernet network infrastructureNetwork interface card
NOTE The Network License Manager supports multiple network interface
cards, but at least one must be an Ethernet card.
TCP/IPCommunication protocol
NOTE The Network License Manager uses TCP packet types.
Internet Explorer® 6.1
Internet Explorer 7
Internet Explorer 8
11.9.0.0FLEXnet
Install Autodesk Navisworks for Multiple Users | 47
Page 66

Determine the Installation Type
When you set up your deployment, you specify the installation type by target
platform and license type.
Target Platform
Specify either a 32-bit or 64-bit platform, depending on the operating system
of the computers that will use the deployment. For some Autodesk products,
you can install a 32-bit version on a 64-bit operating system.
License Type
Specify one of the following license types, based on the type of license you
purchased:
■ Network License installation. With this type of installation, you install
the program to workstations with the files and registry entries that allow
the program to communicate with the Network License Manager. You
also define the configuration of the Network License Manager so that
the licenses can be accessed. Workstations running the program based on
a network installation do not require individual activation. Licensing of
this program is managed by at least one license server.
The main advantage is that you can install Autodesk Navisworks Manage
2012 on more systems than the number of licenses you have purchased
(for example, purchasing 25 licenses but installing on 40 workstations).
At any one time, Autodesk Navisworks Manage 2012 runs on the maximum
number of systems for which you have licenses. This means you get a true
floating license.
■ Multi-Seat Stand-Alone installation (Stand-Alone option). Choose
this type of installation for stand-alone installations where a single serial
number and product key are used for multiple seats. Multi-seat stand-alone
installations do not rely upon a Network License Manager to manage
product licenses; however, you can still use the Autodesk Navisworks
Manage 2012Installation wizard to create administrative images and
create deployments. Registration and activation is more automated for
multi-seat stand-alone installations. After the first activation using the
multi-seat stand-alone serial number, activation occurs automatically for
all workstations based on this deployment, as long as your systems are
connected to the Internet.
■ Stand-Alone installation (Stand-Alone option). Choose this type
of installation for stand-alone installations where a single serial number
48 | Chapter 2 Installation
Page 67

and product key are used for a single seat. Like a multi-seat stand-alone
installation, you do not use the Network License Manager to manage
product licensing, but installation, registration, and activation occurs on
each workstation.
If you choose one of the stand-alone installation types, you can proceed to
the section Distribute the Program (page 52).
Choose a License Server Model
If you chose the Network License option, you need to decide which license
server model to use to distribute the product licenses.
TIP If you are deploying a stand-alone or multi-seat stand-alone installation type,
you do not use a license server model. Proceed to the section Distribute the Pro-
gram (page 52).
For the network installation, use one of the following license server models:
■ Single license server model. The Network License Manager is
installed on a single server, so license management and activity is restricted
to this server. A single license file represents the total number of licenses
available on the server.
■ Distributed license server model. Licenses are distributed across more
than one server. A unique license file is required for each server. To create
a distributed license server, you must run the Network License Manager
on each server that is part of the distributed server pool.
■ Redundant license server model. You use three servers to authenticate
a single license file. One server acts as the master, while the other two
provide backup if the master server fails. With this configuration, licenses
continue to be monitored and issued as long as at least two servers are still
functional. The license file on all three servers is the same. You must install
the Network License Manager on each server.
Each of these license server models is described in detail in the Autodesk
Licensing Guide. It is strongly recommended that you read that guide before
you deploy the program. You can find the Autodesk Licensing Guide by clicking
the Installation Help link at the lower left corner of the Autodesk
Navisworks Manage 2012Deployment wizard.
Install Autodesk Navisworks for Multiple Users | 49
Page 68

Set Up Network Tools and Your License Server
If you are planning to have users run the program using network licenses, you
need to use the Network License Manager.
The Network License Manager helps you configure and manage license
servers.
Install the Network License Manager
The Network License Manager is used to configure and manage the license
servers.
To install your Network License Manager
1 In the Autodesk Navisworks Manage 2012Installation wizard, click
Install Tools and Utilities.
2 On the Configure Installation page, select Network License
Manager and click Install.
NOTE You can accept the default installation path (C:\Program Files\Autodesk)
or Browse to specify a different path. If you enter a path that does not exist,
a new folder is created using the name and location you provide.
WARNING Do not install the Network License Manager on a remote
drive. When you install the Network License Manager files, you must
provide a path to a local drive. You must specify the drive letter; the universal
naming convention (UNC) is not supported.
3 Review the Autodesk software license agreement for your country or
region. You must accept this agreement to proceed with the installation.
Choose your country or region, click I Accept, and then click Next.
4 When the Installation Complete page displays, click Finish.
To Activate a Network License Through
Autodesk.com
If your product does not include the Network License Activation Utility, you
can activate your license by going to https://registeronce.autodesk.com, and
following the on-screen instructions.
50 | Chapter 2 Installation
Page 69

Configure Your License Server
You configure a license server so that you can manage the Autodesk Navisworks
product licenses.
You can configure the license server with the lmtools.exe utility.
You should be logged in with Administrator rights when working with the
LMTOOLS utility.
To configure your license server
1 Do one of the following:
■ (Windows XP) Click Start ➤ All
Programs ➤ Autodesk ➤ Network License
Manager ➤ LMTOOLS.
■ (Windows Vista and Windows 7) Double-click the LMTOOLS icon
on the desktop.
2 In the Lmtools program, on the Service/License File tab, select the
Configure Using Services option.
3 Click the Config Services tab.
4 In the Service Name list, select the service name you want to use to
manage licenses.
By default, the service name is FLEXnet Service 1. If FLEXnet® is managing
other software on your computer in addition to Autodesk, you can change
the service name to avoid confusion, for example, you can rename
FLEXnet Service 1 to Autodesk Server1.
NOTE If you have more than one software vendor using FLEXnet for license
management, the Service Name list contains more than one option. Make
sure that only one Autodesk service is listed.
5 In the Path to Lmgrd.exe File field, enter the path to the Network
License Manager daemon (lmgrd.exe), or click Browse to locate the file.
By default, this daemon is installed in the C:\Program Files\Autodesk
Network License Manager folder.
6 In the Path to the License File box, enter the path to your license
file, or click Browse to locate the file.
7 In the Path to the Debug Log File box, enter a path to create a debug
log, or click Browse to locate an existing log file.
Install Autodesk Navisworks for Multiple Users | 51
Page 70

It is recommended that you save to the \Program Files\Autodesk Network
License Manager folder. The log file must have a .log file extension. For
new log files, you must enter the .log extension manually.
8 To run lmgrd.exe as a service, select Use Services.
9 To automatically start lmgrd.exe when the system starts, select Start
Server at Power Up.
10 Click Save Service to save the new configuration under the service
name you selected in step 4. Click Yes when prompted if you would like
to save the settings to the service.
11 Click the Start/Stop/Reread tab and do one of the following:
■ If a service has not yet been defined for Autodesk, click Start Server
to start the license server.
■ If a service for Autodesk is already defined and running, click ReRead
License File to refresh the Network License Manager with any
changes made to the license file or Options file.
The license server starts running and is ready to respond to client
requests.
12 Close lmtools.exe.
Distribute the Program
Once you have fully prepared for creating a deployment, you are ready to set
up and distribute Autodesk Navisworks by using the Deployment wizard
and choosing a deployment method.
Create a Network Share
A network share is an installation folder that you make available to users'
computers on a network. You point users to this location to install the program.
Create a network share that will be used by the Autodesk Navisworks
Deployment wizard during the creation of a client deployment.
A shared folder is required for network license and multi-seat stand-alone
methods of installation.
It is recommended that you name the network share folder Deployments on
the desktop of the system where you want deployments stored. You can then
add subfolders inside the shared Deployments folder that clearly convey the
52 | Chapter 2 Installation
Page 71

name of product you plan to deploy. This is also beneficial if you plan to
deploy multiple products.
Any subfolders that are placed inside a shared folder are automatically shared.
TIP You must have Full Control permissions set for your shared folder when you
are creating your deployment images. Read permissions are necessary to access
the network share and administrative permissions on the workstation where the
program is deployed.
To create your network share
1 On the desktop of a network server, create a folder named Deployments.
2 Right-click the Deployments folder and click Share and Security (or
Sharing).
3 In the [folder name]Properties dialog box, Sharing tab, select Share
This Folder.
4 Specify a Share Name, such as Deployments, if necessary.
5 Click the Permissions button. In the Permissions dialog box make
sure Full Control is active. Click OK.
In Windows Vista and Windows 7, right-click the Deployments folder
and then click Share. In the Properties dialog box select Sharing and
then Advanced Sharing to share the folder. Click the Permissions
button to make sure Full Control is active. Click OK.
These steps are important when creating your deployment images.
6 Click OK or Close to close the Properties dialog box.
7 For each product you plan to install, create a subfolder in the Deployments
folder. Name each folder with the pertinent product name.
Minimize the Chances of Installation Failure
The Autodesk Navisworks installation process may stop if some applications,
such as Microsoft Outlook or virus checking programs, are running when you
Install Autodesk Navisworks for Multiple Users | 53
Page 72

are creating a deployment. Close all running applications and temporarily
disable virus checking utilities.
Distribute an Autodesk Navisworks Product
You can choose from several methods of distributing an Autodesk program.
Network sharing is the default method.
■ Network Share. Users launch the program with the shortcut icon that
you created with the Deployment wizard. The program is installed on users'
local computers, and a product icon appears on their desktop.
NOTE Users must have Read permissions to access the network share and
administrative permissions on the workstation where this program is installed.
■ Scripting. A script executes a command or a set of commands. Scripts
are similar to batch files but are more flexible. Installation scripts are most
useful for stand-alone installation of programs on computers that are
connected to a network. Scripts are also useful for installing service packs,
extensions, and object enablers on a network.
■ Imaging Software. You can use imaging software, such as Norton Ghost,
to create a master image to distribute Autodesk products. Once created,
the master image is then replicated to other computers throughout your
facility.
Care needs to be taken since the use of imaging software can result in
conflicts with the product licensing, incomplete installations, and problems
with activation.
Set Up a Deployment
The deployment process provides you with numerous options for creating,
and customizing your deployments, so you should set aside ample time to
complete the process in one sitting.
To be successful it is recommended that your review the following checklist
and information before you begin. The deployment process is initiated from
the Deployment wizard. Once a deployment is created, users then access the
deployment to install products to their computers.
54 | Chapter 2 Installation
Page 73

Preliminary Tasks for a Network Deployment
This checklist identifies preliminary tasks to complete, information to gather,
and decisions to make before creating a network deployment.
TIP To review deployment settings, including details of product configuration,
you can create a test deployment. After the learning process, you can delete the
test deployment.
Deployment Checklist
Review the system requirements by clicking the System
Requirements link in the installer. Confirm that your
network, servers, and client workstations meet these
system requirements.
You understand the type of license you’ve purchased. If
you plan a network license deployment, you should also
be familiar with the type of license server model you
want to use and the license server names.
You have installed and activated any supporting tools
and utilities. For example, if you are using a network license, install the Network License Manager from the installer.
You have located your product serial number and
product key. The serial number and product key are
located on the outside of the product packaging, or in
the email you received if you downloaded your product
or upgrade from Autodesk.
You have identified the location (such as a shared folder)
where deployments will reside for each program you
plan to deploy.
You have closed all other programs and disabled antivirus software.
Install Autodesk Navisworks for Multiple Users | 55
Page 74

Deployment Checklist
You have decided what languages you will include in
your administrative image, and what languages you will
use for your deployment package.
NOTE Languages can be included when you initially
create a deployment, or when you create a new deployment configuration, but not when you modify a deployment.
Determine whether to create log files on individual
computers, in the deployment folder, or both.
Determine whether to run installations in silent mode.
NOTE When products are installed in silent mode, the
user's system can automatically reboot without warning
when the installation is complete.
Identify other applicable configuration settings such as
locations of support files, and whether to automatically
install service packs.
You have decided if you want to include centralized
product settings with your deployment, such as global
options, workspaces, datatools, avatars, Clash Detective
rules and custom tests, Presenter archives, object animation scripts, and so on.
Choose a Language
You can select a different language for deployment instructions, and a language
for product installations in the same deployment process.
For example, if you need to provide Autodesk Navisworks to users in one or
more languages different than your own, you can download language packs
from the installer that will allow you to deploy the product in the languages
you need to support.
56 | Chapter 2 Installation
Page 75

NOTE Language packs can only be included in an administrative image during
the creation of the deployment and not during modification.
When you start the deployment process, the installer automatically determines
your operating system language. If a supported language is detected, your
deployment pages are displayed in that language. If you want to change that
language, you can choose a different one from the installer language list on
the opening page of the Installation wizard.
NOTE Some products may not have multi-language support at the time of product
release. Additional language support may be available later. Check http://sup-
port.autodesk.com for the availability of additional language packs.
Using Language Packs
Language packs support use of different languages in each Autodesk Navisworks
product, including exporters. Pack names start with NAVFREE_, , NAVSIM_,
NAVMAN_, and exporters_ respectively.
NOTE You can only select one language pack for each product for deployment.
It is possible to manually install additional language packs to Autodesk
Navisworks products later by double-clicking on the language pack MSI file.
Alternatively, you can set up and run scripts to install additional language
packs.
Language packs are located on the installation DVD and unpacked downloaded
media under the x86 folder for 32-bit products and under the x64 folder for
64-bit products.
■ Language packs for specific products are included in the NAVFREE, ,
NAVSIM, NAVMAN, and NWEXPORT subfolders of x86 and x64 folders.
■ Language packs for specific languages are included in the en-US (English),
de-DE (German), es-ES (Spanish), fr-FR (French), it-IT (Italian), ja-JP
(Japanese), ko-KR (Korean), pt-BR (Brazilian Portuguese), ru-RU (Russian)
and zh-CN (Chinese PRC) subfolders of the product folders.
Your Deployment Choices
When you create a deployment, you will make several choices during the
process to create various client deployment images and deployment types.
The following sections outline your choices in more detail.
Install Autodesk Navisworks for Multiple Users | 57
Page 76

What Is Silent Mode?
When silent mode is active and a user initiates the deployment, the installation
proceeds without any explicit user input.
No dialog boxes are presented that require interaction from the user. This
includes all error and warning dialog boxes. Check the log file for errors that
may occur in the event of installation problems.
Enable silent mode by clicking the Run installations in silent mode check
box in the Configure page.
To prevent a silent install from failing on client computers:
■ Install Microsoft .Net Framework 4.0 on the client computers
■ Reboot client computers before installing Autodesk Navisworks Manage
2012
Specify Log File Locations
On the Create Deployment ➤ Configure page of the deployment process,
you can choose whether or not to create a log file by selecting the appropriate
check box in the Installation Settings area. The program has two types of
log files with which you can monitor information about deployments and
installations.
■ Network log. The network log file keeps a record of all workstations that
run the deployment. The log lists the user name, workstation name, and
the status of the installation. Refer to this file for status information and
details about problems that users encountered during installation (for
example, low disc space or inadequate permissions).
The network log is named with the same name you chose for your
deployment. You can specify where the log file is created by entering either
58 | Chapter 2 Installation
Page 77

a valid UNC (universal naming convention) path or hard-coded path on
your network, for example \\MyComputer\Autodesk\<Autodesk product>.
Users should use their actual computer name in place of MyComputer.
NOTE The folder where the network log resides must be a shared folder where
users who install the program have Change permissions. Otherwise, successes
or failures for user installations cannot be written to the log file.
■ Client log. The client log contains detailed installation information for
each workstation. This information may be useful in diagnosing installation
problems. The client log is located in the "Temp" directory of each client
workstation.
To specify a log file location
1 While creating a deployment, on the Configure Deployment page,
select the Create a Network Log File check box. Enter the name of
the folder where you want the network log to be located.
2 If you want to create a client log, select the Create a Log File in Each
Workstation's Temp Folder option.
3 Click Next.
Select a License Type
When you set up your deployment, you choose the type of installation to
deploy based on the type of software license you purchased: stand-alone or
network. You also select the network license server model you want to use to
distribute product licenses.
IMPORTANT Depending on the type of option you choose, network or stand-alone
license, note that you must use the same type of installation for all those products
in your deployment session. If you select products that do not support the type
of license you purchased, you will not be able to activate those products.
Specify the license type to use during deployment
■ Stand-Alone License (a single serial number for a single seat). For a
Stand-Alone License, you install, register, and activate the program on
each workstation.
■ Network License. With this type of installation, you install the program
to workstations with the files and registry entries that allow the program
Install Autodesk Navisworks for Multiple Users | 59
Page 78

to communicate with the Network License Manager. You also define
the configuration of the Network License Manager so that the licenses
can be accessed. Workstations running the program based on a network
installation do not require individual activation. Licensing of this program
is managed by at least one license server.
Specify the license server model during deployment
If you choose the Network license option, you need to decide which license
server model to use to distribute your product licenses - single, distributed or
redundant license server model.
If you are deploying a stand-alone or multi-seat stand-alone installation type,
you do not use a license server model. For more information on server models,
see Choose a License Server Model (page 49).
To deploy a Stand-Alone License
1 While creating a deployment, on the Product Information page,
select Stand-Alone.
2 Click Next.
To deploy a network license using a single license server model
1 While creating a deployment, on the Product Information page,
select the Network option.
2 Select Single License Server as the license server model you want to
use with the Network License Manager.
If you have already used the Network License Manager to create a
license server model, you must select the same license server model in
this step. If you have not yet used the Network License Manager to
create a license server model, make sure that you select the same settings
in the Network License Manager that you choose here.
3 Enter the server name of the server that will run the Network License
Manager, or click the Browse button to locate the server. Click Next.
60 | Chapter 2 Installation
Page 79

For more information about license server models and setting up your license
server, see Choose a License Server Model (page 49) or Configure Your License
Server (page 51).
To deploy a network license using a distributed license server model
1 While creating a deployment, on the Product Information page,
select the Network option.
2 Select Distributed License Server as the license server model you
want to use with the Network License Manager.
If you have already used the Network License Manager to create a
license server model, you must select the same license server model in
this step. If you have not yet used the Network License Manager to
create a license server model, make sure that you select the same settings
in the Network License Manager that you choose here.
3 Enter the name of one of the servers that will run the Network License
Manager, or click the Browse button to locate the server. Click Add
to add the server to the Server Pool. Once all the servers are added to
the Server Pool list, use the Move Up and Move Down buttons to
arrange the servers in the order you want them to be searched by a user's
workstation. You must enter at least two servers. Click Next.
For more information about license server models and setting up your license
server, see Choose a License Server Model (page 49) or Configure Your License
Server (page 51).
To deploy a network license using a redundant license server model
1 While creating a deployment, on the Product Information page,
select the Network option.
2 Select Redundant License Server as the license server model you
want to use with the Network License Manager.
If you have already used the Network License Manager to create a
license server model, you must select the same license server model in
this step. If you have not yet used the Network License Manager to
create a license server model, make sure that you select the same settings
in the Network License Manager that you choose here.
3 In the First Server Name field, enter a server name of one server that
will run the Network License Manager, or click the Browse button
to locate the server. Enter the server names for the remaining two servers
that you will use in the redundant server pool. Click Next.
Install Autodesk Navisworks for Multiple Users | 61
Page 80

NOTE If you are not sure how to obtain the server host name, see Plan
Your License Server Configuration in the Autodesk Licensing Guide by
clicking the Installation Help link at the lower left corner of the
Deployment wizard.
For more information about license server models and setting up your license
server, see Choose a License Server Model (page 49) or Configure Your License
Server (page 51).
Customize Deployment
When you create a deployment, you can accept the default settings for any
product you choose to install, or you can configure these settings to create a
custom deployment. To configure product settings, on the Create
Deployment page of the installer, ensure that the product is selected for
installation, and then click the product in the scrolling list. The configuration
panel opens. Most products allow you to choose an installation type, either
Typical to select the most common options, or Custom to review options
in more detail. You can also select the Project and Site Folders and
configure additional deployment settings.
After you have configured the settings as required, click the product name to
close the configuration panel.
NOTE The configuration settings you choose apply to every instance of the product
installed from the deployment. After the deployment is created, these settings can
be changed only by modifying the deployment. For more information, see Modify
a Deployment (page 69).
Configure Individual Products
As part of making your deployment choices, you can accept the default settings
for any product you choose to install, or you can configure these settings to
create a custom deployment.
■ Typical. Installs the most common application features. This option is
recommended for most users.
■ Custom. Installs only the application features that you select.
62 | Chapter 2 Installation
Page 81

To deploy a typical installation, and specify a product location
1 During the deployment, Typical is the default installation type. You
can confirm this on the Configure Deployment page, by clicking a
product name to open the configuration panel where you can view the
installation type.
2 Enter the path on the client workstation where you want to install the
program, for example C:\Program Files\<Autodesk product>.
3 Click the product name again to close the configuration panel.
To deploy a custom installation, choose optional features, and specify a
product location
1 During the deployment, on the Configure Deployment page, click a
product name to open the configuration panel.
2 Select the Custom option as the type of installation that you want.
3 From the Select Features to Install list, select the features that you
want to install.
Your choices are as follows:
Redistributable ActiveX Control
API
Batch Utility
Program
Sample RPCs
Contains Autodesk Navisworks Redistributable ActiveX control.
Contains the Component Object Model
interface for customizing and extending
the Autodesk Navisworks functionality.
Contains various feature sample files.Example NWD files
Contains an add-in to run and schedule
commands.
Contains full set of Autodesk Navisworks
files.
Contains several Rich Photorealistic Content
files.
Install Autodesk Navisworks for Multiple Users | 63
Page 82

NOTE For Autodesk Navisworks exporter plugins, currently you cannot
change which plugins are installed. By default, the exporter plugins for all
third-party products installed on a client computer will be automatically
enabled.
If, after making feature changes, you decide you want the original
selections, click the Restore Defaults.
4 Click the product name to close the configuration panel.
5 Enter the path on the client workstation where you want to install the
program, for example C:\Program Files\<Autodesk product>.
Select the Project and Site Folders (optional)
When you set up your deployment, you can share various Autodesk Navisworks
settings across entire project site, or across a specific project group depending
on the required level of granularity.
See also:
How do I share the Autodesk Navisworks settings on a site and project
basis? (page 73)
To select the Project and Site folders
1 On the Configure Installation page, click the product name to open
the configuration panel where you can review and change settings.
2 In the Project Folder box, click the Browse button to select the
directory that contains the Autodesk Navisworks settings specific to a
project group.
3 In the Site Folder box, click the Browse button to select the directory
that contains the Autodesk Navisworks settings standard across the entire
project site.
Select Additional Configuration Options
You can customize user preferences, include additional files and service packs,
and specify Communication Center options and access to online resources
for each of the products you choose to install. See Additional Deployment
Configuration Options (page 79).
64 | Chapter 2 Installation
Page 83

Create a Deployment
A deployment contains a Microsoft Transform (MST) file that modifies the
default behavior of the installation program.
As you begin a deployment, you need to select the location of your
administrative image, a deployment name, and if your target systems are 32or 64-bit operating systems.
Create a Deployment Using Default Values
This is the fastest means of creating client deployment images.
To create a default deployment using default values
1 Close all running applications on your computer and start the
Installation wizard.
2 On the Installation wizard, if required, select an alternate language
for the Installation wizard from the Installation Instructions
drop-down, and then click Create Deployment.
3 On the Configure Deployment page, Administrative Image
section, specify the following data:
a In the Deployment Configuration Name field, enter a
descriptive name for the deployment that identifies the user group,
platform, or other attribute to differentiate this deployment from
others. The name you enter here is the name of the shortcut users
will access to install the product.
b In the Administrative Image Path field, enter the path to your
existing shared network location, or use the Browse button to
navigate to that location. This area is where you create and store
your administrative image. Users install the program from this
location.
NOTE If you do not know how to create a network share, see Create
a Network Share (page 52).
c Under Target Platform select either 32-bit or 64-bit for your
target operating system. This selection does not identify the system
your deployment was created on; it identifies your target system.
Install Autodesk Navisworks for Multiple Users | 65
Page 84

d Choose whether to Include Only the Products Required by
this Configuration.
■ If selected, the deployment cannot be modified in future to
include additional products.
■ If unselected, the administrative image will include all possible
products, so the current deployment can be modified in any
way.
TIP It is recommended that you include all available products if you plan
to create multiple deployments from this administrative image with different
product mixes, and prefer not to use the installation media again. If there
are products you will never use, or if you do not expect to create additional
deployments, you should select a subset of products.
4 In the Installation Settings section, select one or more of these
options:
■ Silent Mode. The installation runs in background, without
prompting the user for any input.
NOTE Silent mode can automatically restart the user's computer without
warning after installation.
■ Workstation Log. Log file on each workstation can enable users
to review and troubleshoot their own installations.
■ Network Log. Log file in a central location supports the network
administrator in reviewing data for all installations.
NOTE The network log file must be in a shared folder where users of the
deployment have read-write access. Otherwise, log data for user
installations cannot be written to the log file. For more information
regarding log files, refer to Specify Log File Locations (page 58).
5 Click Next.
6 Review the Autodesk software license agreement for your country or
region. You must accept this agreement to proceed with the installation.
Choose your country or region, click I Accept, and then click Next.
NOTE If you do not agree to the terms of the license and want to terminate
the installation, click Cancel.
7 On the Product Information page, select a License Type (page 59)
and enter your Serial Number and Product Key. If the data is valid,
green check marks appear. Click Next.
66 | Chapter 2 Installation
Page 85

8 On the Configure Deployment page, select the products to include
in the deployment, and if required add language pack(s) from the
Product Language drop-down (see Choose a Language (page 33)).
9 Click Create.
After the deployment is created, the Deployment Configuration
Complete page opens, presenting useful paths to the new deployment
and a link for registering products online.
10 After you have finished using this screen, click Finish.
Create a Deployment Using Configured or
Customized Values
If you plan on altering your deployment by removing features or restricting
access to online resources you can create a configured or customized
deployment.
To create a custom deployment
1 Close all running applications on your computer and start the
Installation wizard.
2 On the Installation wizard, if required, select an alternate language
for the Installation wizard from the Installation Instructions
drop-down, and then click Create Deployment.
3 On the Configure Deployment page, Administrative Image
section, specify the following data:
a In the Deployment Configuration Name field, enter a
descriptive name for the deployment that identifies the user group,
platform, or other attribute to differentiate this deployment from
others. The name you enter here is the name of the shortcut users
will access to install the product.
b In the Administrative Image Path field, enter the path to your
existing shared network location, or use the Browse button to
navigate to that location. This area is where you create and store
your administrative image. Users install the program from this
location.
NOTE If you do not know how to create a network share, see Create
a Network Share (page 52).
Install Autodesk Navisworks for Multiple Users | 67
Page 86

c Under Target Platform: select either 32-bit or 64-bit for your
target operating system. This selection does not identify the system
your deployment was created on; it identifies your target system.
d Choose whether to Include Only the Products Required by
this Configuration.
■ If selected, the deployment cannot be modified in future to
include additional products.
■ If unselected, the administrative image will include all possible
products, so the current deployment can be modified in any
way.
TIP It is recommended that you include all available products if you plan
to create multiple deployments from this administrative image with different
product mixes, and prefer not to use the installation media again. If there
are products you will never use, or if you do not expect to create additional
deployments, you should select a subset of products.
4 In the Installation Settings section, select one or more of these
options:
■ Silent Mode. The installation runs in background, without
prompting the user for any input.
NOTE Silent mode can automatically restart the user's computer without
warning after installation.
■ Workstation Log. Log file on each workstation can enable users
to review and troubleshoot their own installations.
■ Network Log. log file in a central location supports the network
administrator in reviewing data for all installations.
NOTE The network log file must be in a shared folder where users of the
deployment have read-write access. Otherwise, log data for user
installations cannot be written to the log file. For more information
regarding log files, refer to Specify Log File Locations (page 58).
5 Click Next.
6 Review the Autodesk software license agreement for your country or
region. You must accept this agreement to proceed with the installation.
Choose your country or region, click I Accept, and then click Next.
NOTE If you do not agree to the terms of the license and want to terminate
the installation, click Cancel.
68 | Chapter 2 Installation
Page 87

7 On the Product Information page, select a License Type (page 59)
and enter your Serial Number and Product Key. If the data is valid,
green check marks appear. Click Next.
8 On the Configure Deployment page, select the products to deploy,
and if required add a language pack(s) from the Product Language
drop-down (see Choose a Language (page 33)).
9 If you need to configure settings for a product, click the product name
to open the configuration panel, where you can review and change
settings. See Customize Deployment (page 62).
NOTE The configuration settings you choose apply to every instance of the
product installed from the deployment. After the deployment is created,
these settings can be changed only by modifying the deployment.
10 Click the product name to close the configuration panel.
11 Click Create.
After the deployment is created, the Deployment Configuration
Complete page opens, presenting useful paths to the new deployment
and a link for registering products online.
12 After you have finished using this screen, click Finish.
Modify a Deployment (optional)
After a deployment is created, it may be necessary to modify the deployment
for some client workstations.
You can apply a patch or select various custom files that are not part of the
base administrative image. You can also perform modifications such as
changing the installation directory from drive C to drive D.
To modify a deployment
1 Open the shared network folder where you originally chose to place your
product deployment.
2 In the Tools folder, double-click the Create and Modify a
Deployment shortcut.
This re-opens the Deployment wizard.
3 Click through the deployment pages and make the necessary changes.
4 After all the modifications have been made, click Create Deployment.
Install Autodesk Navisworks for Multiple Users | 69
Page 88

Point Users to the Administrative Image
When you have completed the deployment process, you are ready to have
users install the newly created or modified deployment.
You need to notify your users of the shortcut that was created in the
administrative image. The shortcut is the same name that you chose when
you created a deployment (page 65).
To point users to the administrative image
■ The simplest method of notifying users how to install the deployment is
to email them with instructions about using the shortcut. At a minimum,
the instructions need to include the location of the deployment and
instructions about double-clicking the shortcut to the deployment.
Uninstall an Autodesk Product
When you uninstall an Autodesk product, all components are removed in the
process.
This means that even if you have previously added or removed components,
or if you have reinstalled or repaired an Autodesk product, uninstalling removes
all Autodesk product installation files from your system.
IMPORTANT Do not use registry cleaning programs or attempt to modify the
registry entries yourself to uninstall an Autodesk product. Failure to follow the
official uninstall procedure will result in the inability to re-install the software.
To uninstall the program
1 Do one of the following:
■ (Windows XP) Click Start ➤ Settings ➤ Control Panel ➤ Add
or Remove Programs.
■ (Windows Vista and Windows 7) Click Start ➤ Control
Panel ➤ Programs and Features.
2 From the list of programs, click Autodesk Navisworks Manage 2012, and
then click Change/Remove (Windows XP) or Uninstall/Change
(Windows Vista and Windows 7).
The Autodesk Navisworks Manage 2012Installation wizard re-opens
in Maintenance Mode.
70 | Chapter 2 Installation
Page 89

3 Click Uninstall.
4 On the UninstallAutodesk Navisworks Manage 2012 page, click Next
to remove Autodesk Navisworks from the system.
5 When informed that the product has been successfully uninstalled, click
Finish.
NOTE Even though Autodesk Navisworks is removed from your system, the
software license remains. If you reinstall Autodesk Navisworks at some future time,
you will not have to register and re-activate the program.
Installation Troubleshooting
This section provides solutions to installation issues and answers to commonly
asked questions that may arise while installing your products.
Additional troubleshooting information and support is also available at ht-
tp://support.autodesk.com.
General Installation Issues
This section provides solutions to installation issues and answers to commonly
asked questions that may arise while installing your products.
How can I check my graphics card driver to see if
it needs to be updated?
It is recommended that you ensure your computer has the most current
graphics card driver for the best possible display performance.
To identify your graphics card driver
1 Start Autodesk Navisworks Manage 2012.
2 In the InfoCenter box, click the down arrow next to the Help button
➤ System Info.
The Autodesk Navisworks Manage 2012 information dialog box opens.
3 Review the information about your system including the graphics card
driver and driver version, and click OK to close the dialog.
Installation Troubleshooting | 71
Page 90

To check the Web for an updated graphics card driver
■ Use Windows Update. If a more recent graphics card driver is available,
select it to have Windows Update download and install it.
■ Search the graphics card manufacturer’s website for the type of installed
graphics card. If a more recent graphics card driver is available, install it
following the instructions provided by the manufacturer.
To install an updated graphics card driver
1 Check the Web for to see if an updated driver is available.
■ Use Windows Update.
■ Search the graphics card manufacturer’s website for the type of
installed graphics card.
2 If a more recent graphics card driver is available, follow the instructions
from the website to download and install it.
How do I switch my license from stand-alone to
network or network to stand-alone?
If you simply entered the wrong license type by mistake, and are still running
the installer, use the Back button to return to the Product Information
page, and change the License Type.
If you want to change the license type for an installed product, contact your
Autodesk reseller or license supplier to obtain the new license and serial
number. Then uninstall your product and run a new install to change the
license type and enter the new serial number.
When performing a Typical installation, what gets
installed?
A Typical installation includes the following features:
Redistributable ActiveX Control
72 | Chapter 2 Installation
Contains Autodesk Navisworks Redistributable ActiveX control.
Page 91

API
Contains the Component Object Model interface for customizing and extending the
Autodesk Navisworks functionality.
Contains various feature sample files.Example NWD files
Batch Utility
Program
Sample RPCs
Contains an add-in to run and schedule
commands.
Contains full set of Autodesk Navisworks
files.
Contains several Rich Photorealistic Content
files.
Why should I specify the Project Folder and Site
Folder?
You can share global Autodesk Navisworks settings, workspaces, datatools,
avatars, Clash Detective rules and custom tests, Presenter archives, object
animation scripts, and so on, with other users.
These settings can be shared across an entire project site, or across a specific
project group depending on the required level of granularity.
Autodesk Navisworks examines the current user profile and the all users profile
on the local machine, and then checks the settings in the Project Directory
and the Site Directory. The files in the Project Directory take precedence.
How do I share the Autodesk Navisworks settings
on a site and project basis?
Sharing Autodesk Navisworks settings requires you to export the desired
settings as an XML file to the appropriate Site or Project directory’s
global_options folder. The name of the XML file is not significant. However it
must be stored in the global_options folder.
Installation Troubleshooting | 73
Page 92

TIP When you configure global options, you can lock some of the options to
prevent users from editing them later on local machines. To create a locked global
options file, run the stand-alone Options Editor from the command line by
typing “drive:pathname\OptionsEditor.exe” -l. The Options Editor opens
with the locking facility.
To share settings on a site and project basis
1 Create appropriate Site and Project directories and subfolders in a central
location to be accessed by other Navisworks users.
2 In Autodesk Navisworks, click the application button ➤ Options
Editor.
3 Click Export.
4 In the Select Options to Export dialog box, check all options you
want to export and click OK.
5 In the Save As dialog box, name the XML file as desired and save it to
the global_options folder in the appropriate Site or Project directory.
See also:
Location Options (page 154)
Autodesk Navisworks Options (page 150)
Select the Project and Site Folders (optional) (page 64)
74 | Chapter 2 Installation
Page 93

How do I change which exporter plugins are
installed?
For Autodesk Navisworks exporter plugins, you can change which plugins are
installed by clicking on an exporter plugin to open the configuration panel
on the Configure Deployment page of the Installation wizard.
Indicates the third-party software already installed on your computer.
Indicates plugins for the third-party software, that are either not installed
or have not been detected by the Installation wizard.
Select the check boxes next to all required plugins. If the third-party software
has not been detected by the wizard, you can manually enable the plugins
for it. Selecting the check box automatically opens the dialog box, which
enables you to browse for the correct software installation directory.
How do I register and activate Autodesk
Navisworks?
The first time you start Autodesk Navisworks Manage 2012, the Product
Activation wizard is displayed. You can either activate Autodesk Navisworks
at that time or run Autodesk Navisworks and activate it later.
Until you register and enter a valid activation code for Autodesk Navisworks
Manage 2012, you are operating the program in trial mode and the Product
Activation wizard is displayed for 30 days from the first time that you run
the program. If after 30 days of running Autodesk Navisworks Manage 2012
in trial mode you have not registered and provided a valid activation code,
your only option is to register and activate Autodesk Navisworks Manage 2012.
You will not be able to run in trial mode after the 30 days expires. Once you
register and activate Autodesk Navisworks Manage 2012, the Product
Activation wizard is no longer displayed.
TIP The fastest and most reliable way to register and activate your product is by
using the Internet. Simply enter your registration information and send it to
Autodesk over the Internet. Once you submit your information, registration and
activation occur almost instantly.
If you installed Autodesk Navisworks as part of a suite, a single trial period,
usually 30 days, applies to all Autodesk products in the suite. When the first
product is started, the trial period countdown begins for all products. If you
Installation Troubleshooting | 75
Page 94

do not activate one of the products before the trial period ends, access to all
of the products is denied. After the trial period ends, you can restore access
to the products by entering an activation code.
To register and activate Autodesk Navisworks Manage 2012
1 Click Start ➤ All Programs ➤ Autodesk ➤ Autodesk Navisworks
Manage 2012 ➤ Autodesk Navisworks Manage 2012.
2 In the Autodesk Navisworks Manage 2012Product Activation wizard,
select Activate the Product, and then click Next.
This starts the Register Today process.
3 Click Register and Activate (Get an Activation Code).
4 Click Next and follow the on-screen instructions.
If you do not have Internet access, or if you want to use another method
of registration, you can register and activate Autodesk Navisworks Manage
2012 in one of the following ways:
■ Email. Create an email message with your registration information
and send it to Autodesk.
■ Fax or Post/Mail. Enter your registration information, and fax or
mail the information to Autodesk.
Run the installer again from the original media, and click Install Tools &
Utilities on the first screen. The installer guides you through the process of
selection, configuration and installation of tools and utilities.
When should I reinstall the product instead of
repairing it?
Reinstall your product if you accidentally delete or alter files that are required
by the program.
Missing or altered files adversely affect the performance of your product and
cause error messages when you try to execute a command or find a file.
If an attempt to repair an installation fails, reinstalling is the next best option.
76 | Chapter 2 Installation
Page 95

When I uninstall my software, what files are left
on my system?
If you uninstall the product, some files remain on your computer such as files
you created or edited (for example, drawings or custom menus).
Your license file also stays on your computer when you uninstall your product.
If you reinstall on the same computer, the license information remains valid;
you do not have to reactivate the product.
Deployment Issues
This section outlines common issues and their solutions with regards to
software deployments.
Is there a checklist I can refer to when performing
a deployment?
The Installation chapter contains a complete section that describes preliminary
actions and the entire deployment process. See Preliminary Tasks for a Network
Deployment (page 55).
Where should deployments be located?
Shared folders are required for both network license and multi-seat stand-alone
methods of installation.
The shared folder (network share) is created before you run the Installation
wizard and is where product deployments are stored. It is recommended that
you name the network share folder Deployments on the desktop of the system
where you want deployments stored. You can then add subfolders inside the
shared Deployments folder that clearly convey the names of products you plan
to deploy. For example:
Installation Troubleshooting | 77
Page 96

Any subfolders that are placed inside a shared folder are automatically shared.
NOTE You must have Full Control permissions set for your shared folder when
you are creating your deployment images. Read permissions are necessary to
access the network share and administrative permissions on the workstation where
the program is deployed.
Where can I check if service packs are available
for my software?
To find out if a patch or Service Pack is available for your product, visit the
Autodesk Product Support page at http://support.autodesk.com.
How do I choose between 32-bit and 64-bit
deployments?
You have a choice of selecting 32-bit or 64-bit deployment. This choice controls
which operating system the deployment is targeted at, NOT what sort of
products to include in the deployment.
■ Selecting 32-bit deployment gives you a choice of 32-bit products, and will
only install on 32-bit operating systems.
■ Selecting 64-bit deployment gives you a choice of 32-bit and 64-bit
products, and will only install on 64-bit operating systems.
So, for example, if you want to install available 32-bit products on a 64-bit
operating system, you need to choose 64-bit deployment.
NOTE You can make either type of deployment from either type of operating
system.
What are information channels?
The Communication Center allows you to receive announcements from
various information channels. Through information channels, you can receive
the following:
■ Product Support information, including maintenance patch notifications.
78 | Chapter 2 Installation
Page 97

■ Subscription Center announcements and subscription program news,
as well as links to e-Learning Lessons, if you are an Autodesk subscription
member.
■ Notifications of new articles and tips posted on Autodesk websites.
What are additional deployment configuration
options?
The following options are available in the configuration panel in the
Configure Deployment page of the Installation wizard.
User Preferences
■ Require Internet Explorer for Installation (does not apply to
Autodesk Navisworks)
■ Set DWFx as the Default Publishing Format (does not apply to
Autodesk Navisworks)
■ Set the Default Profile Name (does not apply to Autodesk Navisworks)
■ Create a Desktop Shortcut for Autodesk Navisworks Manage
2012
Service Packs
■ Include Service Pack(s) from Local Drive or Local Network
■ Do Not Include Service Pack(s)
TIP See Where can I check if service packs are available for my software (page
78).
Communication Center Options
■ Enable Live Updates
■ Enable CAD Manager Channel (does not apply to Autodesk Navisworks)
■ Enable RSS Feeds
■ Allow User to Add RSS Feed
Installation Troubleshooting | 79
Page 98

Access to Online Resources
■ Specify the Ability to Access Online Tools (does not apply to
Autodesk Navisworks)
■ Specify the Customer Error (CER) Settings
■ Specify the InfoCenter Search Settings (does not apply to Autodesk
Navisworks)
Licensing Issues
This section outlines common issues and their solutions with regards to
software licenses and licensing your products.
What is the difference between a stand-alone
license and a network license?
Stand-alone licensed products are registered and activated to an individual
workstation. While the software can be installed on multiple systems in your
facility, the license only allows one system to be operational. The Portable
License Utility can be used if a license needs to be transferred to another
system. If you need to run more systems, you need to purchase more
stand-alone licensed products, or consider converting to network licenses.
Network licensed products rely on the Network License Manager to keep
track of software licenses. The software can be installed and run on multiple
systems, up to the maximum number of licenses you’ve purchased. The
Network License Manager “checks out” licenses until they are all in use.
No further systems can run the program until a license is “checked in”. One
main advantage of a network license is that you can install products on more
computers than the number of licenses you have purchased. For example, you
can purchase 25 licenses but install them on 40 computers for ease of access.
At any one time, products can run on the maximum number of computers
for which you have licenses. This means you get a true floating license. A
network licensing system can also be configured to allow users to borrow a
license for a limited time to use on a computer disconnected from the network.
80 | Chapter 2 Installation
Page 99

What is the benefit to using a network licensed
version of the software?
Network licensed products are recommended for large drafting/design facilities,
classrooms, and lab environments.
The main advantage is that you can install products on more systems than
the number of licenses you have purchased (for example, purchasing 25
licenses but installing on 40 workstations). At any one time, products will run
on the maximum number of systems for which you have licenses. This means
you get a true floating license. If software needs to be run on more systems,
additional licenses can be purchased.
Registration and activation occurs only once and the licenses are maintained
on your Network License Server.
What is Internet Explorer used for?
When you choose to activate the software, Internet Explorer makes this process
much faster.
After installing your product, you can operate in trial mode for a given number
of days. Whenever you launch the program, you are prompted to activate the
software.
Once you entered your registration data and submit it to Autodesk, an
activation code is returned and you are not prompted again during startup.
Networking Issues
This section outlines common issues and their solutions with regards to
performing a network installation or configuring your network license servers.
Where do I find my server name?
When installing a network licensed product, you must specify the name of
the server that will run the Network License Manager.
If you don’t know the server name, you can quickly find it by opening a
Windows command prompt on the system that will be the Network License
Installation Troubleshooting | 81
Page 100

Manager. At the prompt, enter ipconfig /all and note the Host Name
entry.
If I choose to create a log file, what kind of
information does the log file contain?
There are two types of log files that can be generated that monitor information
about deployments and installations.
■ The Network log file keeps a record of all workstations that run the
deployment. The log lists the user name, workstation name, and the status
of the installation. Refer to this file for status information and details about
problems that users may have encountered during installation.
■ The Client log file contains detailed installation information for each
workstation. This information may be useful in diagnosing installation
problems. The client log is located in the \Temp directory of each client
workstation.
What is an administrative image (MSI) file?
An administrative image is a collection of shared file resources created during
the deployment process and is used by deployments to install the program to
networked workstations. An MSI file is a Microsoft Installer file.
What is the impact of selecting all products to be
included in the administrative image?
If you elect to include all products in your deployment, the administrative
image will be larger.
You should select all products only when you create multiple deployments
from this image and prefer not to use the installation DVD. If there are products
you rarely or never use, and you do not expect to create additional
deployments, you should only select a subset of products.
You can still create a deployment at a later date, and include additional
products, but you need to create a new administrative image. You need the
installation media to do so.
82 | Chapter 2 Installation
 Loading...