

Page 1

NavisWorks JetStream v5
User Manual
Autodesk, Inc.
Page 2

NavisWorks JetStream v5 : User Manual
Autodesk, Inc.
Copyright © 2007 Autodesk, Inc.
Revision 5.5.38796
JetStream is a revolutionary technology and software product range for the real time design review of the
largest 3D models. JetStream products enhance 3D CAD navigation, collaboration and coordination to
liberate the benefit of designing in 3D. This book includes documentation on the entire NavisWorks
JetStream v5 product range, including :
• License Manager
• Roamer
• Publisher
• Presenter
• Clash Detective
• TimeLiner
Autodesk, Inc. reserves the right to make changes in specification at any time and without notice. The information furnished by
Autodesk, Inc. in this publication is believed to be accurate; however, no responsibility is assumed for its use, nor for any
infringement ofpatents or other rights of third parties resulting from its use.
JetStream and the JetStream logo are registered trademarks of Autodesk, Inc. All other trademarks and copyrights are property of
their respective owners. All rights reserved.
Contains Autodesk(R) RealDWG by Autodesk, Inc., Copyright (C) 1998-2007 Autodesk, Inc. All rights reserved.
This software is based in part on the work of the Independent JPEG Group.
Contains a modified version of Open CASCADE libraries. See the license file "OpenCascadeLicense.txt" in the JetStream
installation directory. Source code is available from www.navisworks.com/files/OpenCascade.zip.
LightWorks and the LightWorks logo are registered trademarks of LightWork Design Ltd. LWA, LWA-Enabled and the LWA-Enabled
logo, Interactive Image Regeneration, IIR, A-cubed, Feature-Following Anti-Aliasing and FFAA are all trademarks of LightWork
Design Ltd. All other trademarks, images and logos remain the property of their respective owners. Copyright of LightWork Design
Ltd. 1990-2005, 2006.
Page 3

Page 4

Table of Contents
I.NavisWorksLicense Manager ....................................................................................................1
1.Introduction .....................................................................................................................3
2.EssentialReading ............................................................................................................4
2.1.InstallingJetStream ...............................................................................................4
2.2.FirstSteps ............................................................................................................4
2.3. Requesting andinstalling aJetStream license .........................................................8
2.4.Recoveringa license .............................................................................................12
2.5.Returninga license ................................................................................................12
2.6.LicenseTypes.......................................................................................................13
2.7.Servedlicenses.....................................................................................................13
2.7.1.Servedlicenses overview ............................................................................13
2.7.2.Setting up theserver ...................................................................................14
2.7.3.Setting up aclient .......................................................................................15
3.UsefulReading ................................................................................................................17
3.1.The LicenseManager tabs explained .....................................................................17
3.1.1.CurrentLicenses ........................................................................................17
3.1.2.LocalModules ............................................................................................19
3.1.3.NetworkModules........................................................................................19
3.1.4.Advanced ..................................................................................................20
3.1.5.StartupPreferences ....................................................................................21
3.2. Reassigning networkedlicenses toother clients ...................................................... 21
3.3.Restricting useof floating licenses .......................................................................... 22
3.4.Combining fixedand networked licenses ................................................................22
3.5.Refreshing the licensemanager .............................................................................22
4.InterestingReading ..........................................................................................................24
4.1.Setting thenetworker server port ............................................................................24
4.2. Situations when Connectionwith LicenseServer isLost .......................................... 24
4.3.Advancedtab ........................................................................................................25
4.3.1.MachineInformation ...................................................................................25
4.3.2.LicenseState .............................................................................................25
4.3.3.Options ......................................................................................................25
4.4. Situations when Recovering and Returning Licenses Fails .......................................26
4.5.EmergencyLicensing ............................................................................................26
II.JetStreamRoamer ...................................................................................................................27
5.Overview .........................................................................................................................33
6.FileManagement .............................................................................................................34
6.1.FileMenu .............................................................................................................34
6.2.NewFiles .............................................................................................................34
6.3.RefreshingFiles ....................................................................................................35
6.4.OpeningFiles........................................................................................................35
6.5.Opening Files viaURL ...........................................................................................36
6.6.AppendingFiles ....................................................................................................36
6.7.MergingFiles ........................................................................................................37
6.8.SavingFiles ..........................................................................................................37
6.9.Saving and RenamingFiles ...................................................................................38
6.10.PublishingFiles ...................................................................................................38
6.11.Printing ...............................................................................................................38
6.11.1.Printing the CurrentViewpoint ...................................................................39
6.11.2.PreviewingPrintouts .................................................................................39
6.11.3.Settingup printouts ...................................................................................40
6.12.DeletingFiles ......................................................................................................40
iv
Page 5

NavisWorks JetStream v5
6.13.EmailingFiles .....................................................................................................40
6.14.ImportingFiles ....................................................................................................41
6.14.1.ImportingPDS Tags .................................................................................41
6.14.2.Importing PDS DisplaySets ......................................................................42
6.14.3.ImportingViewpoints XML .........................................................................43
6.14.4.ImportingSearch XML ..............................................................................44
6.14.5.Importing Search SetsXML .......................................................................45
6.15.ExportingFiles ....................................................................................................46
6.15.1. Exporting toa PiranesiEPix format ............................................................47
6.15.2.Exportingan image ...................................................................................48
6.15.3.Exportingan animation .............................................................................49
6.15.4. Controlling thesize ofan image .................................................................51
6.16.ExportingPDS Tags ............................................................................................52
6.17.ExportingViewpoints ...........................................................................................52
6.18.ExportingCurrent Search .....................................................................................53
6.19.ExportingSearch Sets .........................................................................................53
6.20.ExportingViewpoints Report ................................................................................53
6.21.Exporting to AutodeskDWF .................................................................................54
6.22.Exporting toGoogle Earth KML ............................................................................54
6.23.QuittingJetStream...............................................................................................56
7.ConvertingFiles ...............................................................................................................57
7.1.FileReaders .........................................................................................................57
7.1.1.NWFFiles ..................................................................................................58
7.1.2.NWDFiles .................................................................................................58
7.1.3.NWCFiles .................................................................................................60
7.1.4.DWG and DXFFiles ...................................................................................62
7.1.5.DWFFiles ..................................................................................................67
7.1.6.BentleyAutoPLANT Files ............................................................................69
7.1.7.3DSFiles ...................................................................................................71
7.1.8.DGN and PRPFiles ....................................................................................73
7.1.9.MANFiles ..................................................................................................77
7.1.10.IGESFiles................................................................................................80
7.1.11.STEPFiles ...............................................................................................82
7.1.12.InventorFiles ...........................................................................................84
7.1.13.VRMLworld files ......................................................................................86
7.1.14.RieglScan Files .......................................................................................88
7.1.15.FaroScan Files ........................................................................................90
7.1.16.LeicaScan Files .......................................................................................92
7.1.17.Z+FScan Files .........................................................................................94
7.1.18.ASCII Laser ScanFiles .............................................................................96
7.1.19.STLStereolithography files .......................................................................98
7.1.20. AVEVA ReviewRVM andRVS files ........................................................... 100
7.1.21.IFCfiles ...................................................................................................103
7.1.22.SketchupSKP files ...................................................................................105
7.2.FileExporters........................................................................................................108
7.2.1.AutoCAD.nwc Exporter ..............................................................................108
7.2.2.Revit.nwc Exporter ....................................................................................110
7.2.3.MicroStation.nwc Exporter .........................................................................113
7.2.4.Viz andMax .nwc Exporter ..........................................................................115
7.2.5.ArchiCAD.nwc Exporter .............................................................................119
7.3.CADPreviewing ....................................................................................................121
7.3.1.NavisWorks Navigator forAutoCAD .............................................................121
7.3.2. NavisWorks Previewfor Vizand Max ........................................................... 122
8.Navigating .......................................................................................................................125
8.1.NavigationModes .................................................................................................125
8.1.1.Walking .....................................................................................................126
8.1.2.LookingAround ..........................................................................................126
v
Page 6

NavisWorks JetStream v5
8.1.3.Zooming ....................................................................................................127
8.1.4.Zooming to aBox .......................................................................................127
8.1.5.Panning .....................................................................................................128
8.1.6.Orbiting ......................................................................................................128
8.1.7.Examining ..................................................................................................128
8.1.8.Flying ........................................................................................................129
8.1.9.Spinning on aTurntable ..............................................................................129
8.2.NavigationTools ...................................................................................................130
8.3.ViewingEverything ................................................................................................131
8.4.ViewingSelected Items .........................................................................................131
8.5.Focusing ...............................................................................................................132
8.6.PerspectiveCamera ..............................................................................................132
8.7.OrthographicCamera ............................................................................................132
8.8.CollisionDetection ................................................................................................133
8.9.Gravity..................................................................................................................134
8.10.Crouching ...........................................................................................................135
8.11.ThirdPerson View ...............................................................................................135
8.12.Straighten ...........................................................................................................136
8.13.SetWorld Up ......................................................................................................136
8.14.PresetViewpoints................................................................................................137
8.14.1.Aligning With TheX-Axis ...........................................................................137
8.14.2.Aligning With TheY-Axis ...........................................................................137
8.14.3.Aligning With TheZ-Axis ...........................................................................138
8.14.4.Looking Froma Preset Viewpoint ..............................................................138
8.15.Tilt ......................................................................................................................138
8.16.ThumbnailViews .................................................................................................139
8.17.Usinga SpaceBall ...............................................................................................141
9.SelectingItems ................................................................................................................143
9.1.SelectionTrees .....................................................................................................143
9.2.InteractiveSelection ..............................................................................................146
9.2.1.SelectMode ...............................................................................................146
9.2.2.SelectBox Mode ........................................................................................146
9.2.3.SelectionCommands..................................................................................147
9.3.Selection and SearchSets .....................................................................................148
9.3.1.Saving Selectionand Search Sets ...............................................................148
9.3.2.Recalling Selectionand Search Sets ........................................................... 149
9.3.3.ManagingSelection Sets ............................................................................149
9.4.SelectionResolution ..............................................................................................151
9.5.SelectionOptions ..................................................................................................152
10.Finding ..........................................................................................................................155
10.1.Properties ...........................................................................................................155
10.2.FindingItems ......................................................................................................156
10.3.QuickFind ..........................................................................................................158
10.4.FindingComments ..............................................................................................159
11.Editing ...........................................................................................................................162
11.1.Holding and releasingobjects ...............................................................................162
11.2.Undo/Redo .........................................................................................................163
11.3.HidingItems ........................................................................................................166
11.4.ItemRequired .....................................................................................................166
11.5.HidingUnselected Items ......................................................................................167
11.6.OverridingItem Properties ...................................................................................167
11.6.1.OverridingColor .......................................................................................167
11.6.2.OverridingTransparency ...........................................................................168
11.6.3.OverridingTransforms ..............................................................................168
11.6.4.OverridingHyperlinks................................................................................169
11.7.ResettingOverriden Properties ............................................................................169
11.7.1.ResettingMaterials ...................................................................................170
vi
Page 7

NavisWorks JetStream v5
11.7.2.ResettingHyperlinks .................................................................................170
11.7.3.ResettingItems' Positions .........................................................................170
11.8.Resetting All OverridenProperties ........................................................................170
11.8.1.Resetting AllColors and Transparencies ....................................................170
11.8.2.Resetting All Items'Hyperlinks ...................................................................171
11.8.3.RevealingAll Items ...................................................................................171
11.8.4.Making All ItemsUnrequired ......................................................................171
11.8.5.Resetting All Items'Positions .....................................................................171
11.9.CustomProperties...............................................................................................171
11.9.1.Add User DataTab ...................................................................................172
11.9.2.Rename User DataTab ............................................................................172
11.9.3.AddNew Property ....................................................................................172
11.9.4.EditProperty Value ...................................................................................173
11.9.5.RenameProperty .....................................................................................173
11.9.6.DeleteProperty ........................................................................................174
11.9.7.Delete User DataTab ...............................................................................174
11.10. Setting aFile's Unitsand Transform.................................................................... 174
12.DisplayModes ...............................................................................................................177
12.1.RenderingStyles .................................................................................................177
12.1.1.Lighting ....................................................................................................177
12.1.2.RenderModes..........................................................................................182
12.1.3.DisplayPrimitives .....................................................................................183
12.1.4.BackgroundColor .....................................................................................184
12.2.CullingOptions....................................................................................................185
12.3.OrientationOptions..............................................................................................187
12.4.SpeedOptions ....................................................................................................187
12.5.DisplayOptions ...................................................................................................189
12.6.PerformanceOptions ...........................................................................................191
12.7.PresenterOptions ...............................................................................................193
13.Viewpoints .....................................................................................................................196
13.1.SavingViewpoints ...............................................................................................196
13.2.RecallingViewpoints ...........................................................................................196
13.3.The Viewpoints ControlBar ..................................................................................197
13.4.The Viewpoint ContextMenus ..............................................................................198
13.4.1. The ViewpointsControl BarContext Menu .................................................198
13.4.2.Viewpoints ...............................................................................................199
13.4.3.Animations ...............................................................................................199
13.4.4.Folders ....................................................................................................200
13.5.EditingViewpoints ...............................................................................................200
13.6.ViewpointsOptions ..............................................................................................203
14.Sectioning .....................................................................................................................207
14.1.Sectioninga model ..............................................................................................207
14.2.LinkingSections ..................................................................................................209
15.Animating ......................................................................................................................210
15.1.CreatingAnimations ............................................................................................210
15.2.EditingAnimations...............................................................................................211
15.3.AnimationCuts....................................................................................................212
15.4.PlayingBack Animations ......................................................................................213
16.Reviewing ......................................................................................................................215
16.1.Commenting .......................................................................................................215
16.2.Redlining ............................................................................................................219
16.2.1.AddingRedlines .......................................................................................219
16.2.2.AddingRedline Tags .................................................................................221
16.2.3.FindingRedline Tags ................................................................................222
16.2.4.EditingRedline Tags .................................................................................223
16.3.Measuring ...........................................................................................................223
16.3.1.MeasuringTools .......................................................................................224
vii
Page 8

NavisWorks JetStream v5
16.3.2.TransformingObjects................................................................................226
16.3.3.MeasureOptions ......................................................................................228
16.4.Hyperlinks ...........................................................................................................230
16.4.1.AddingHyperlinks.....................................................................................230
16.4.2.DisplayingHyperlinks................................................................................232
16.4.3.FollowingHyperlinks .................................................................................233
16.4.4.EditingHyperlinks .....................................................................................233
16.4.5.DeletingHyperlinks ...................................................................................235
16.4.6.HyperlinksOptions ...................................................................................236
16.5.SmartTags .........................................................................................................238
16.5.1.SmartTags Options ..................................................................................238
16.6.Collaboration .......................................................................................................240
16.7.SwitchBack .........................................................................................................243
17.Interface ........................................................................................................................245
17.1.ViewMenu ..........................................................................................................245
17.2.ViewingControl Bars ...........................................................................................246
17.3.Customizingtoolbars ...........................................................................................246
17.4.WorkspaceToolbar .............................................................................................247
17.5.Splitting the mainview .........................................................................................248
17.6.FullScreen Mode ................................................................................................249
17.7.Sizing of NavigationWindow ................................................................................249
17.8.StereoRendering ................................................................................................250
17.9.SceneStatistics...................................................................................................251
17.10.Units .................................................................................................................252
17.11.Profiles .............................................................................................................254
17.12.SearchDirectories .............................................................................................256
18.Tools .............................................................................................................................257
18.1.ComparingModels ..............................................................................................257
19.Options..........................................................................................................................260
19.1.FileOptions ........................................................................................................260
19.2.GlobalOptions ....................................................................................................260
20.DataTools ......................................................................................................................262
20.1.DataToolsLinks ..................................................................................................262
20.2.Creating a DataToolsLink ....................................................................................264
21.GettingHelp ..................................................................................................................268
21.1.HelpTopics.........................................................................................................268
21.2.What'sThis? .......................................................................................................269
21.3.JetStream on theWeb .........................................................................................269
21.4.ClashDetective Help ...........................................................................................270
21.5.PresenterHelp ....................................................................................................270
21.6.TimeLinerHelp....................................................................................................271
21.7.PublisherHelp.....................................................................................................272
21.8.License ...............................................................................................................273
21.9.SystemInfo.........................................................................................................273
21.10.AboutJetStream................................................................................................274
III.JetStreamPublisher ................................................................................................................276
22.Publishing ......................................................................................................................278
22.1.Publishingfrom Roamer ......................................................................................278
22.2.Publishingfrom AutoCAD ....................................................................................280
22.3.Publishingfrom MicroStation ................................................................................281
22.4.Freedom .............................................................................................................283
IV.JetStreamPresenter ...............................................................................................................288
23.Overviewof Presenter ....................................................................................................290
23.1.TheUser Archive ................................................................................................290
23.2.AdditionalArchives ..............................................................................................291
24.RenderingScenes..........................................................................................................293
24.1. Setting UpAnd RenderingA Scene ...................................................................... 293
viii
Page 9

NavisWorks JetStream v5
24.2.ExportingRendered Output ..................................................................................293
25.PresenterMaterials ........................................................................................................297
25.1.MaterialsTab ......................................................................................................297
25.2.ApplyingPresenter Materials ................................................................................297
25.3.RemovingPresenter Materials .............................................................................298
25.4.ManagingMaterials .............................................................................................299
25.5.EditingPresenter Materials ..................................................................................300
25.6.AdvancedMaterials .............................................................................................304
26.PresenterLighting ..........................................................................................................307
26.1.LightingTab ........................................................................................................307
26.2.Adding And PositioningLights ..............................................................................307
26.3.ManagingLights ..................................................................................................309
26.4.EditingLights ......................................................................................................310
26.5.ShadowCasting ..................................................................................................311
26.6.AdvancedLighting ...............................................................................................312
26.6.1.SoftShadows ...........................................................................................313
26.6.2.PhysicallyAccurate Lights .........................................................................313
26.6.3.VolumetricLights ......................................................................................313
26.6.4.Image-basedLighting ...............................................................................314
27.PresenterRPCs .............................................................................................................317
27.1.RPCTab.............................................................................................................317
28.RenderingEffects...........................................................................................................321
28.1.EffectsTab .........................................................................................................321
28.2.BackgroundEffects .............................................................................................321
28.3.ForegroundEffects ..............................................................................................323
29.RenderingStyles............................................................................................................325
29.1.RenderingTab ....................................................................................................325
29.2.RenderingStyles .................................................................................................325
29.3.PredefinedRendering Styles ................................................................................326
29.4.AutoExposure ....................................................................................................327
30.TextureSpace ...............................................................................................................329
31.PresenterRules .............................................................................................................333
V.JetStreamClash Detective .......................................................................................................338
32.Overview of ClashDetective ...........................................................................................340
33.ClashBatches................................................................................................................341
34.ClashRules ...................................................................................................................346
35.Selecting Itemsfor Clash Testing ....................................................................................351
36.ClashResults ................................................................................................................355
37.ClashReports ................................................................................................................358
VI.JetStreamTimeLiner...............................................................................................................360
38.Overviewof TimeLiner ....................................................................................................362
39.Tasks ............................................................................................................................368
39.1.TheTasks Tab ....................................................................................................368
39.2.SelectLink Dialog ................................................................................................373
40.Links .............................................................................................................................375
40.1.TheLinks Tab .....................................................................................................375
40.2.FieldSelector Dialog ...........................................................................................377
40.3.StandardLinks ....................................................................................................378
40.3.1.MicrosoftProject 2000 ..............................................................................378
40.3.2.MicrosoftProject.......................................................................................378
40.3.3.MicrosoftProject MPX ..............................................................................379
40.3.4.PrimaveraProject Planner .........................................................................379
40.3.5. Primavera ProjectManagement 4and 5..................................................... 379
40.3.6.AstaPower Project ...................................................................................380
41.Configure .......................................................................................................................381
41.1.TheConfigure Tab ..............................................................................................381
42.Rules ............................................................................................................................384
ix
Page 10

NavisWorks JetStream v5
42.1.TheRules Tab ....................................................................................................384
43.Simulate ........................................................................................................................388
43.1.TheSimulate Tab ................................................................................................388
43.2.SimulationSettings ..............................................................................................390
43.3.OverlayText Dialog .............................................................................................395
44.Export ...........................................................................................................................399
44.1. Exporting a TimeLiner simulation as an AVI ..........................................................399
45.Options..........................................................................................................................400
45.1.TimeLinerOptions ...............................................................................................400
Glossary .....................................................................................................................................403
Index ..........................................................................................................................................410
x
Page 11

Part I. NavisWorks License Manager
User Manual
Page 12

Table of Contents
1.Introduction .............................................................................................................................3
2.EssentialReading ....................................................................................................................4
2.1.InstallingJetStream ...............................................................................................4
2.2.FirstSteps ............................................................................................................4
2.3. Requesting andinstalling aJetStream license .........................................................8
2.4.Recoveringa license .............................................................................................12
2.5.Returninga license ................................................................................................12
2.6.LicenseTypes.......................................................................................................13
2.7.Servedlicenses.....................................................................................................13
2.7.1.Servedlicenses overview ....................................................................................13
2.7.2.Setting up theserver ...........................................................................................14
2.7.3.Setting up aclient ...............................................................................................15
3.UsefulReading ........................................................................................................................17
3.1.The LicenseManager tabs explained .....................................................................17
3.1.1.CurrentLicenses ................................................................................................17
3.1.2.LocalModules ....................................................................................................19
3.1.3.NetworkModules................................................................................................19
3.1.4.Advanced ..........................................................................................................20
3.1.5.StartupPreferences ............................................................................................21
3.2. Reassigning networkedlicenses toother clients ...................................................... 21
3.3.Restricting useof floating licenses .......................................................................... 22
3.4.Combining fixedand networked licenses ................................................................22
3.5.Refreshing the licensemanager .............................................................................22
4.InterestingReading ..................................................................................................................24
4.1.Setting thenetworker server port ............................................................................24
4.2. Situations when Connectionwith LicenseServer isLost .......................................... 24
4.3.Advancedtab ........................................................................................................25
4.3.1.MachineInformation ...........................................................................................25
4.3.2.LicenseState .....................................................................................................25
4.3.3.Options ..............................................................................................................25
4.4. Situations when Recovering and Returning Licenses Fails .......................................26
4.5.EmergencyLicensing ............................................................................................26
ii
Page 13

Chapter 1. Introduction
The NavisWorks License Manager User Manual is divided into 3 chapters: Essential, Useful and
Interesting Reading.
Essential reading explains the installation and licensing of fixed, networked and floating NavisWorks
licenses. It covers the registration process, and how to recover or transfer licenses. If you read nothing
else in these user manuals, read this section! Systems administrators and power users are recommended
to read all sections.
Useful reading describes the tabs of the License Manager in more detail. This will be useful should you
wish to know more information on your NavisWorks setup and for alternative ways of working with your
NavisWorks licenses..
Interesting reading covers more advanced topics. This will be useful for more advanced network setups,
increased understanding of the licensing system and may be of further assistance when troubleshooting.
3
Page 14

Chapter 2. Essential Reading
This section describes the most essential aspects of the NavisWorks License Manager. Standard users
are recommended to read this chapter, if nothing else. System Administrators are recommended to read
all chapters of the License Manager book, to fully understand the licensing system and its available
features.
2.1. Installing JetStream
Insert the JetStream CD into your computer's CD-ROM drive. The JetStream Installation Menu should
start automatically. If the Menu does not launch automatically, double click on Menubox.exe at the root
of the JetStream CD. Follow the instructions on the menu to install and license JetStream.
The installer will load all supported languages and then automatically run in the language that best
matches the settings on your computer. To run JetStream in another of the supported languages, you
simply need to add one of the following arguments to the desktop shortcut. To do this, right click on the
JetStream desktop shortcut and choose Properties from the context menu. In the Target field, after
..\roamer.exe" enter a space, then one of the following:
Language selector
-lang enu Enter this for English localization
-lang deu Enter this for German localization
-lang jpn Enter this for Japanese localization
-lang rus Enter this for Russian localization
-lang chs Enter this for Chinese (PRC) localization
2.2. First Steps
The JetStream License Manager is a separate application used to manage everything concerning your
JetStream licenses. It is installed along with JetStream, or you can install it on its own for setting up
License Servers (for more details on this, see Section 2.7, “ Served licenses ”). You can access the
License Manager from Start, Programs, JetStream JetStream, License Manager, but for your
convenience, on first installing JetStream, it will open automatically and start the license wizard, which
looks like this:
4
Page 15
Essential Reading
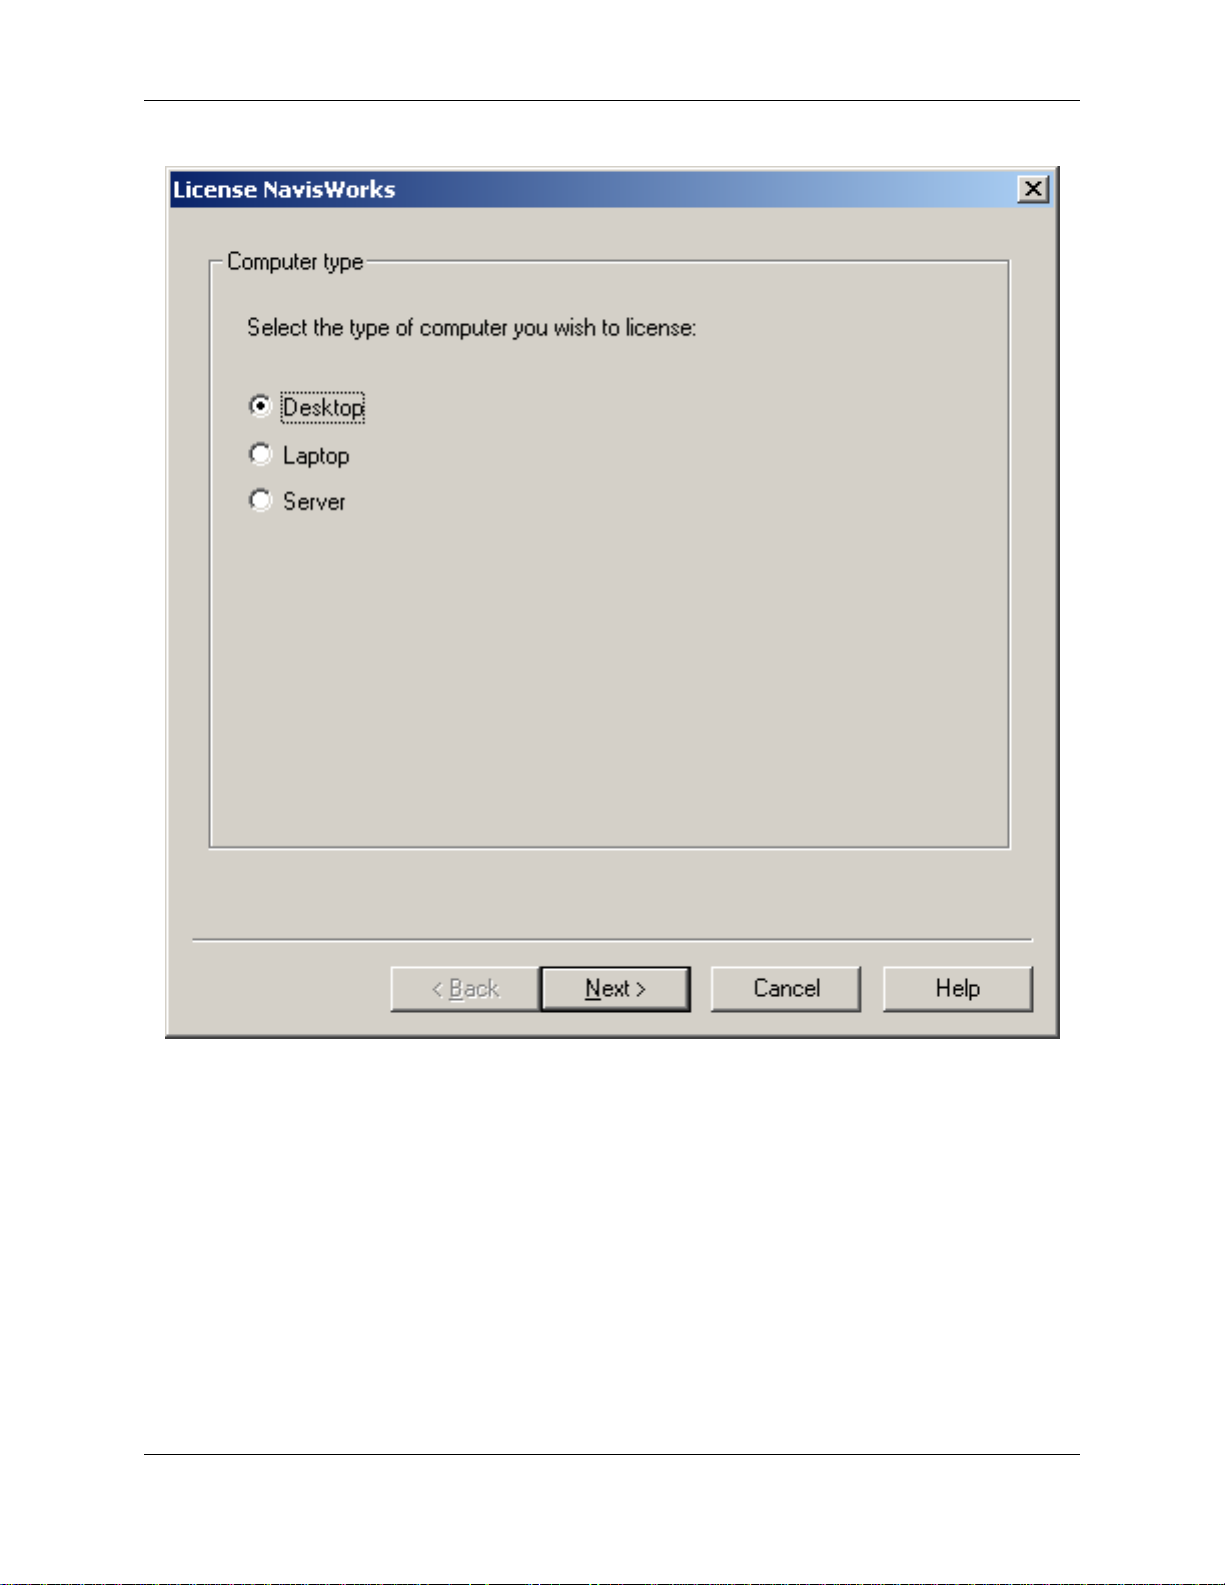
You must first select the type of computer you are running the license wizard on. Here you have three
options:
• "Desktop". Select this if you have a normal desktop computer or workstation.
• "Laptop". Select this option if you use a portable computer such as a laptop or notepad machine.
• "Server". Select this option if you are installing on a server machine, or if your computer does not fall
into any of the above catagories.
If you check the "Laptop" option, you will be taken to another screen asking you about the ethernet card in
your laptop computer.
5
Page 16
Essential Reading
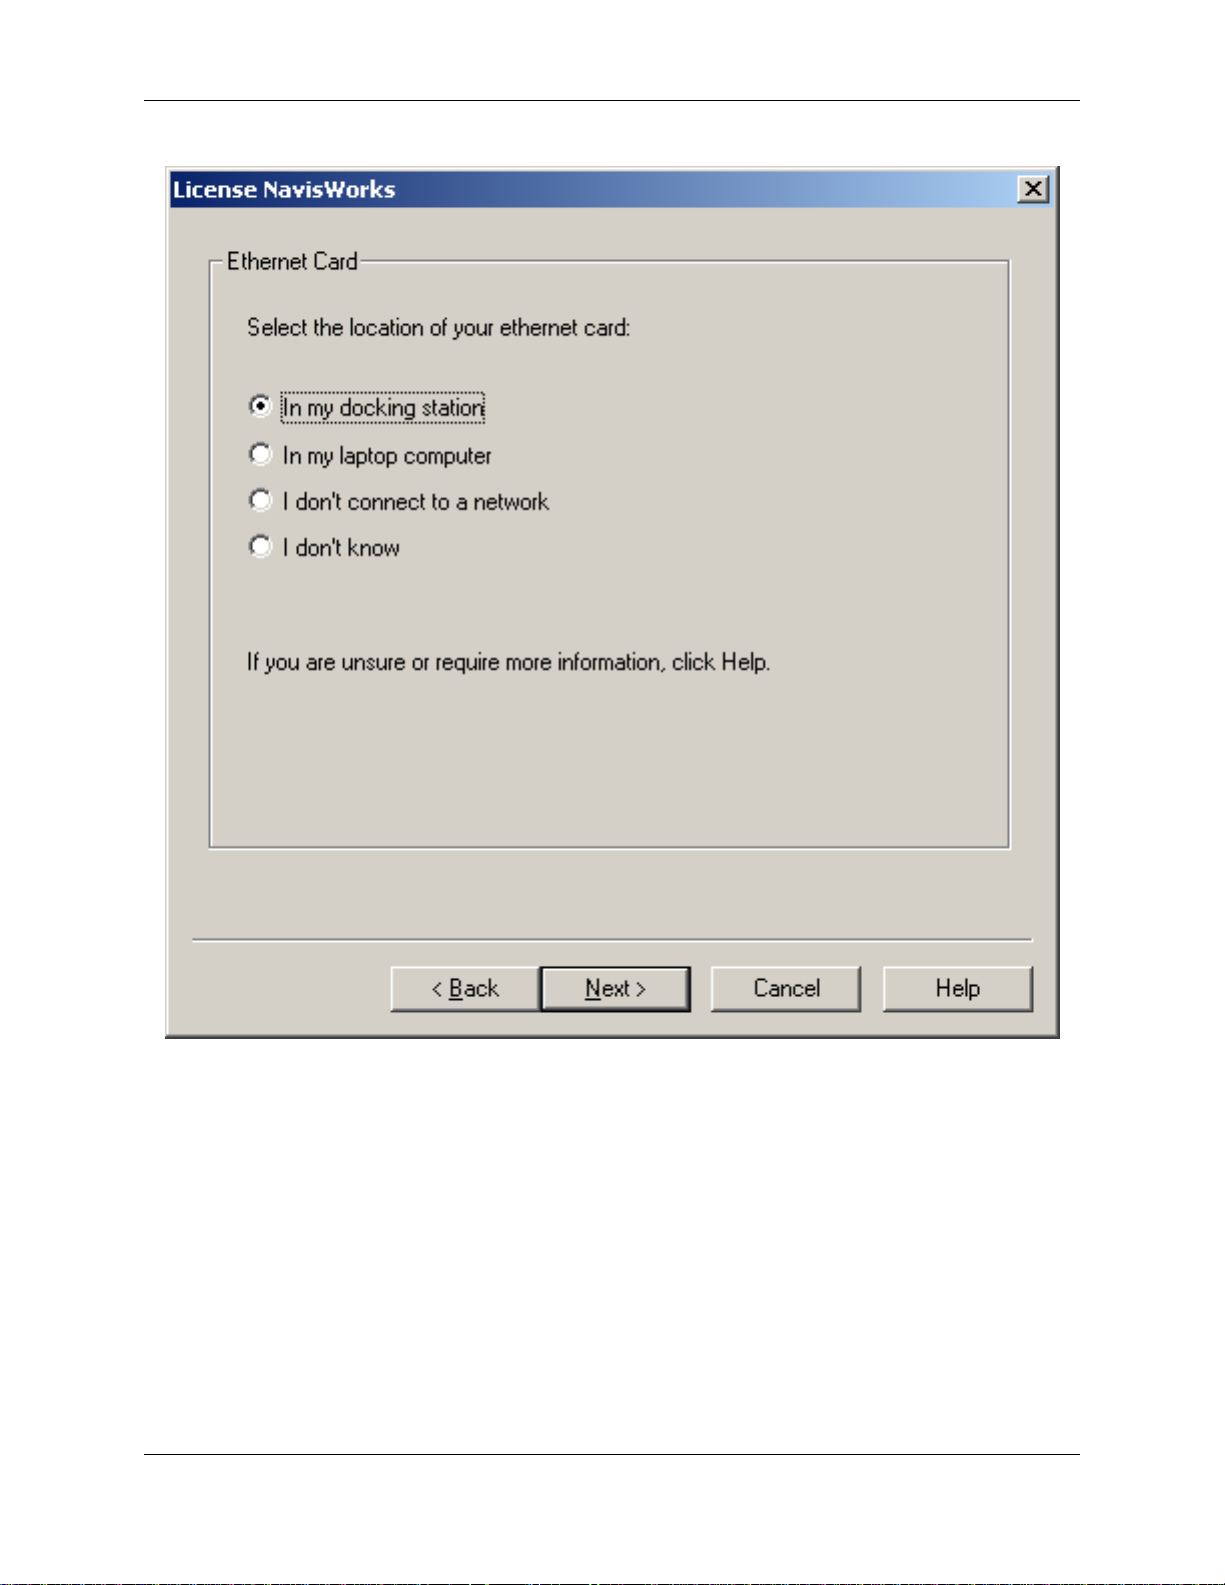
Note
In order for your JetStream product to work correctly when you are both in and out of the office, it
is important that you select the correct option on this screen.
• "In my docking station". Select this option if you connect your network cable into a docking station.
• "In my laptop computer". Select this option if you plug your network cable directly into your laptop
computer.
• "I don't connect to a network". Select this option if you do not connect your computer to a network.
• "I don't know". Select this option if you are not sure where your ethernet card is located.
If you use multiple cards (e.g. a standard LAN card at work and a wireless card at home) select the "I
6
Page 17
Essential Reading
don't connect to a network" option, as you will need to disable Ethernet ID locking to ensure JetStream
JetStream works when using either card.
The license wizard uses this information to set up the options related to Ethernet card ID locking (see
Section 4.3.3, “ Options ”).
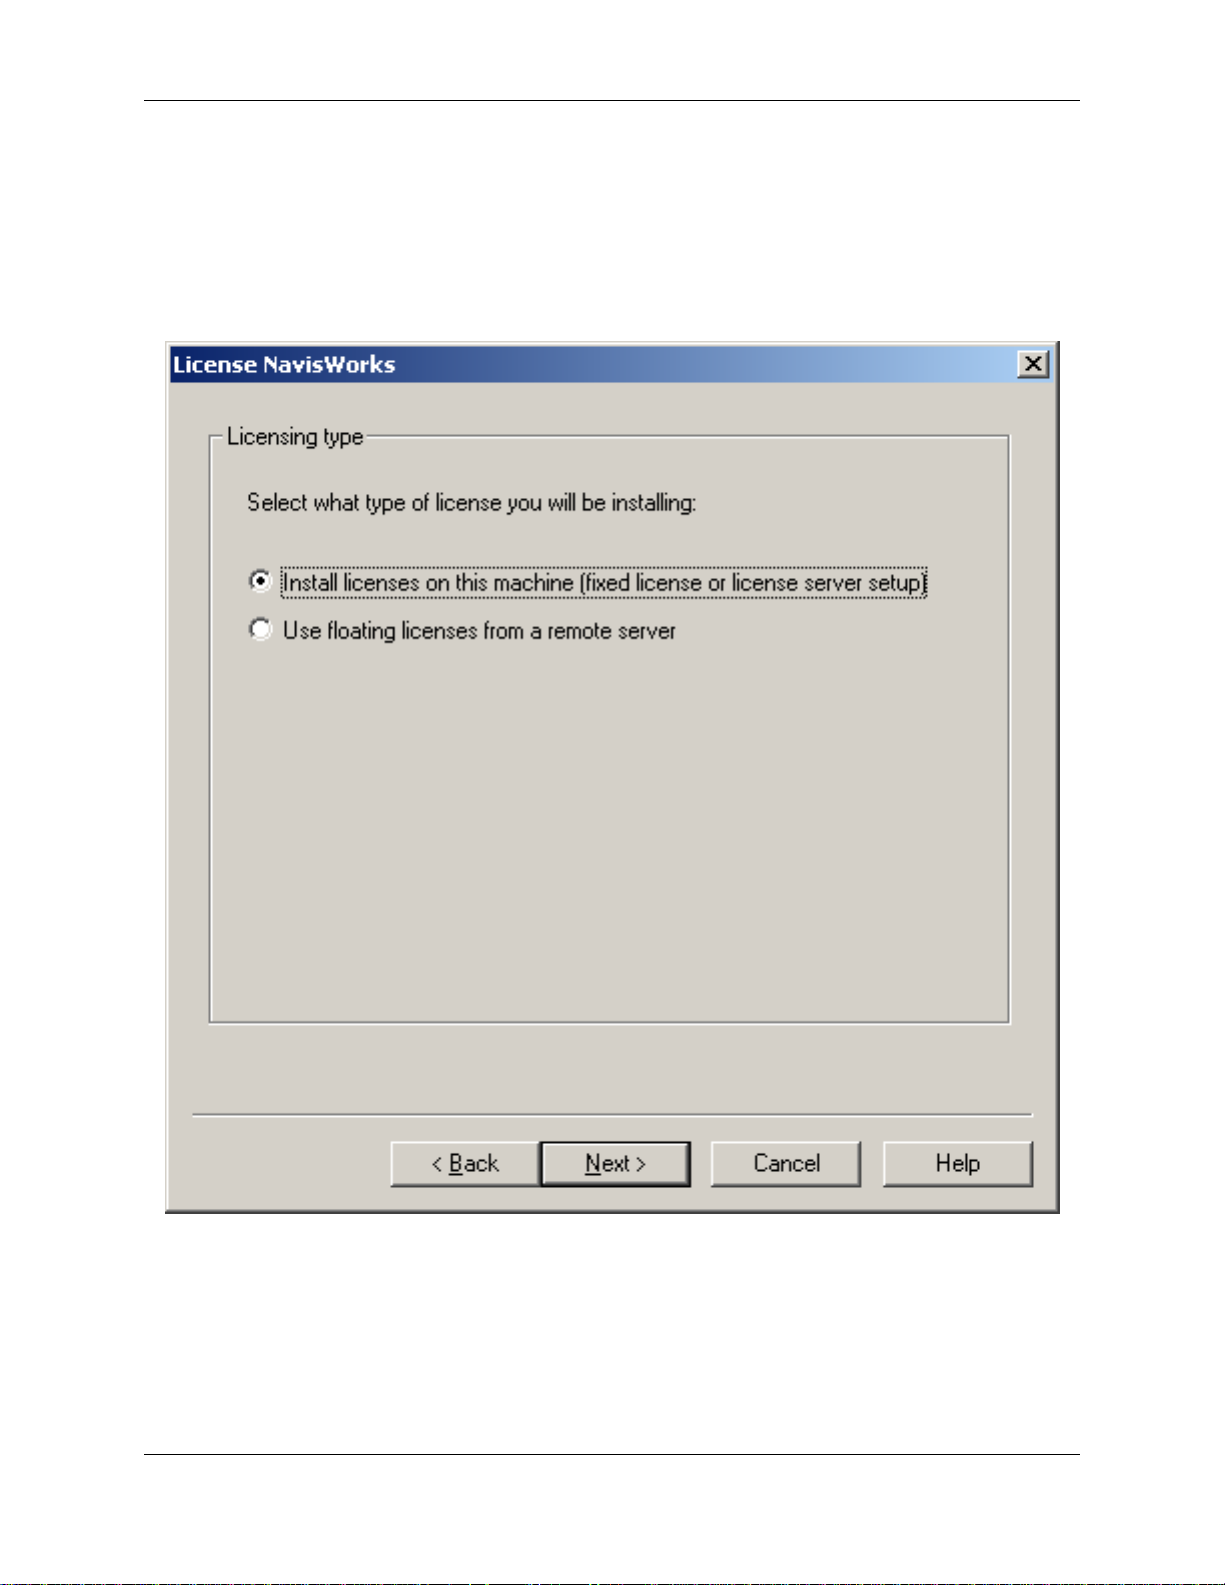
After the pages to determine your computer type, you will be asked what sort of license you want to install
on your machine.
To install a fixed license on a stand-alone machine, or floating licenses on a server, choose the first
option, "Install licenses on this machine" and follow the instructions in Section 2.3, “ Requesting and
installing a JetStream license ” or Section 2.7.2, “ Setting up the server ” respectively.
Otherwise, if you are setting up a client to take its licenses from a server, then choose the second option,
"Use floating licenses from a remote server" and follow the instructions in Section 2.7.3, “ Setting up a
client ”.
Requesting, Recovering and Returning licenses work the same way, whether you're installing them on a
7
Page 18
Essential Reading
stand-alone PC or for licenses to be served from a server.
Note
As with most software, you need to have administrator privileges on the PC that you are installing
JetStream.
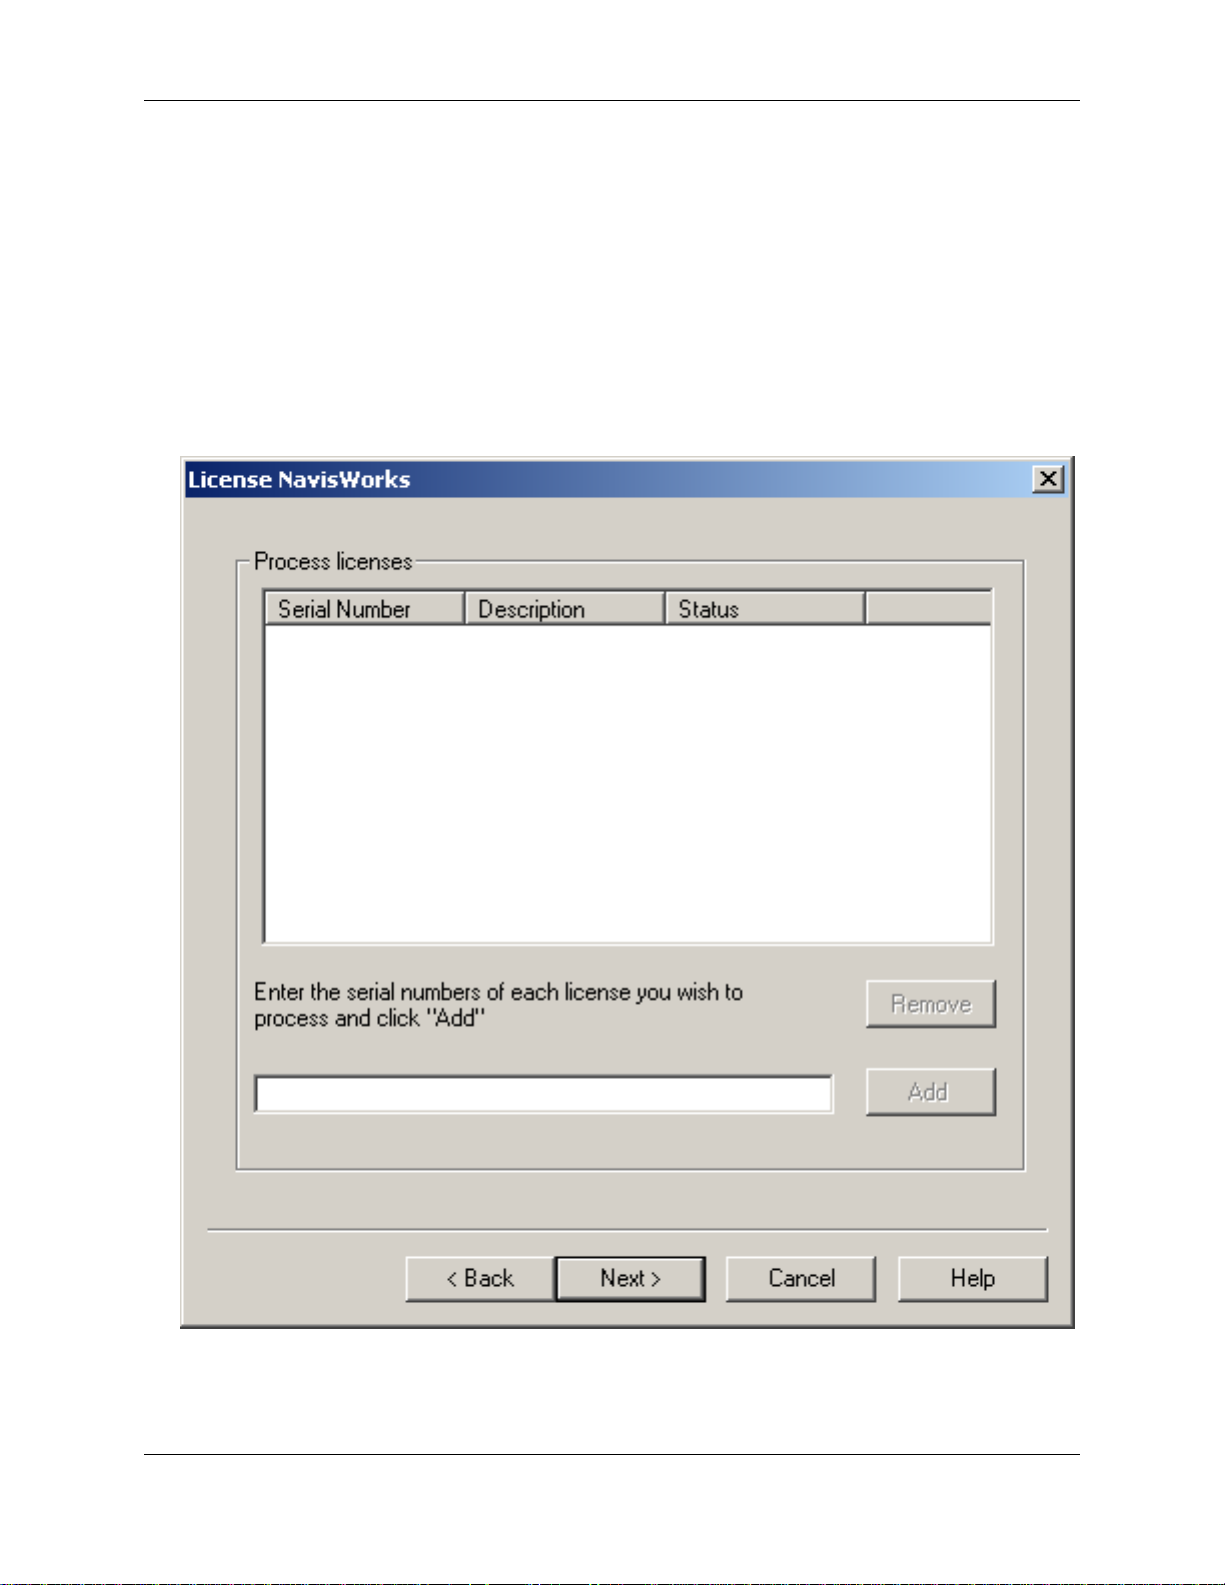
2.3. Requesting and installing a JetStream license
• To install a new license, or to add more modules to your existing licenses, select Request License
from the License Wizard menu. The Request License Wizard will be displayed:
• One by one, enter the serial numbers of your JetStream modules and click Add after each. This will
add the products to the list box. Once all of your products are entered, click Next.
8
Page 19
Essential Reading
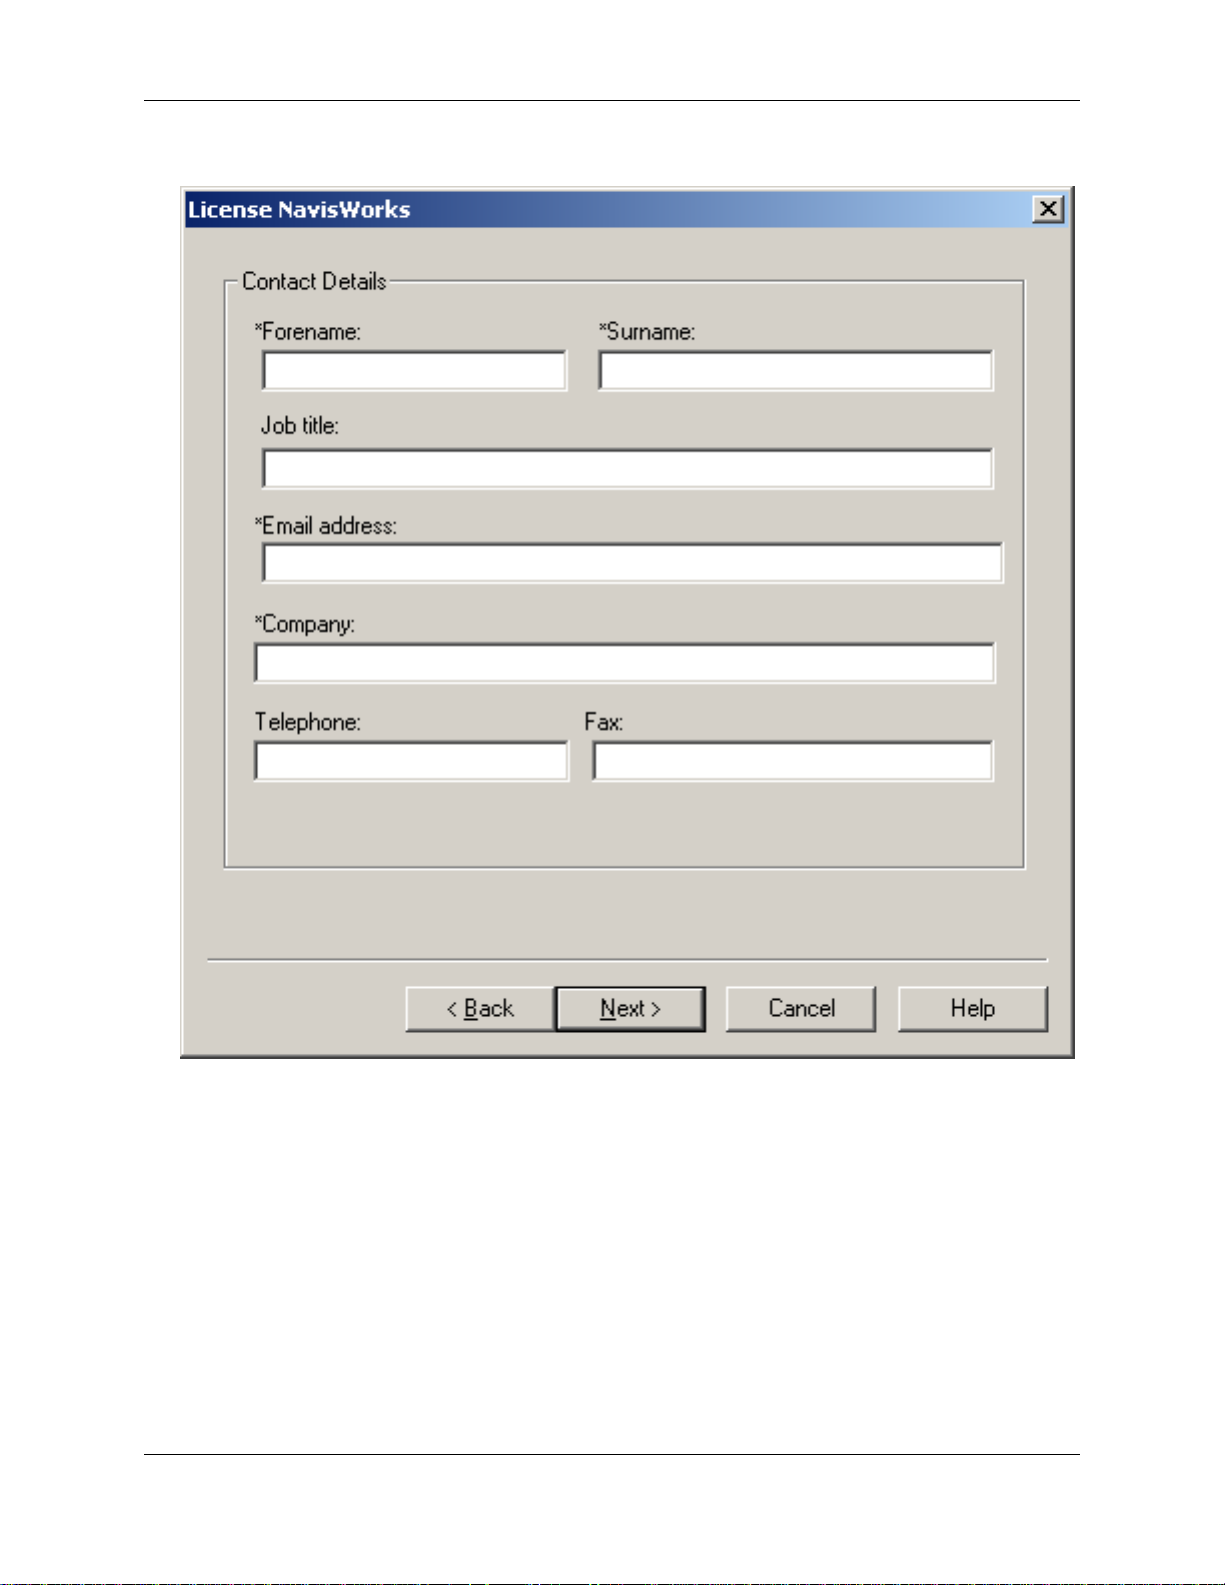
• Enter your personal contact details, then click Next.
Note
The starred items (*) are required, whereas the others are optional.
9
Page 20
Essential Reading
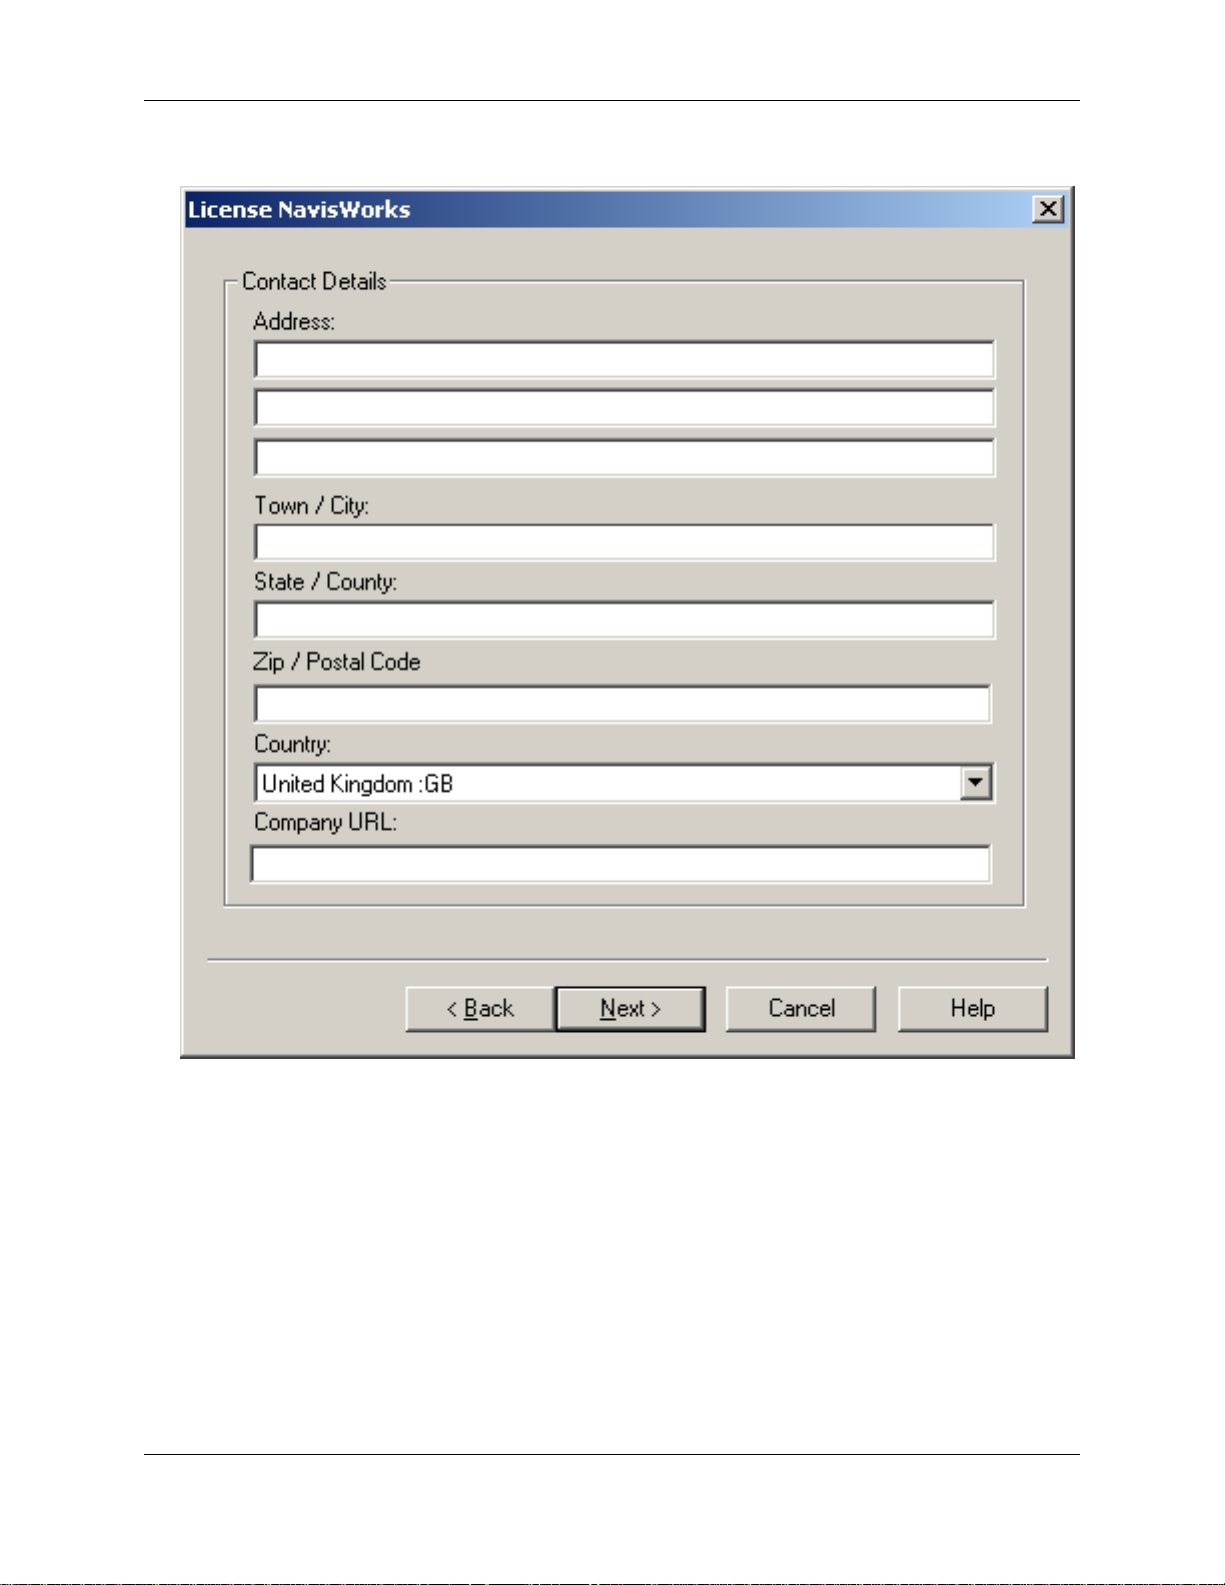
• Enter your company's contact details, then click Next.
10
Page 21
Essential Reading
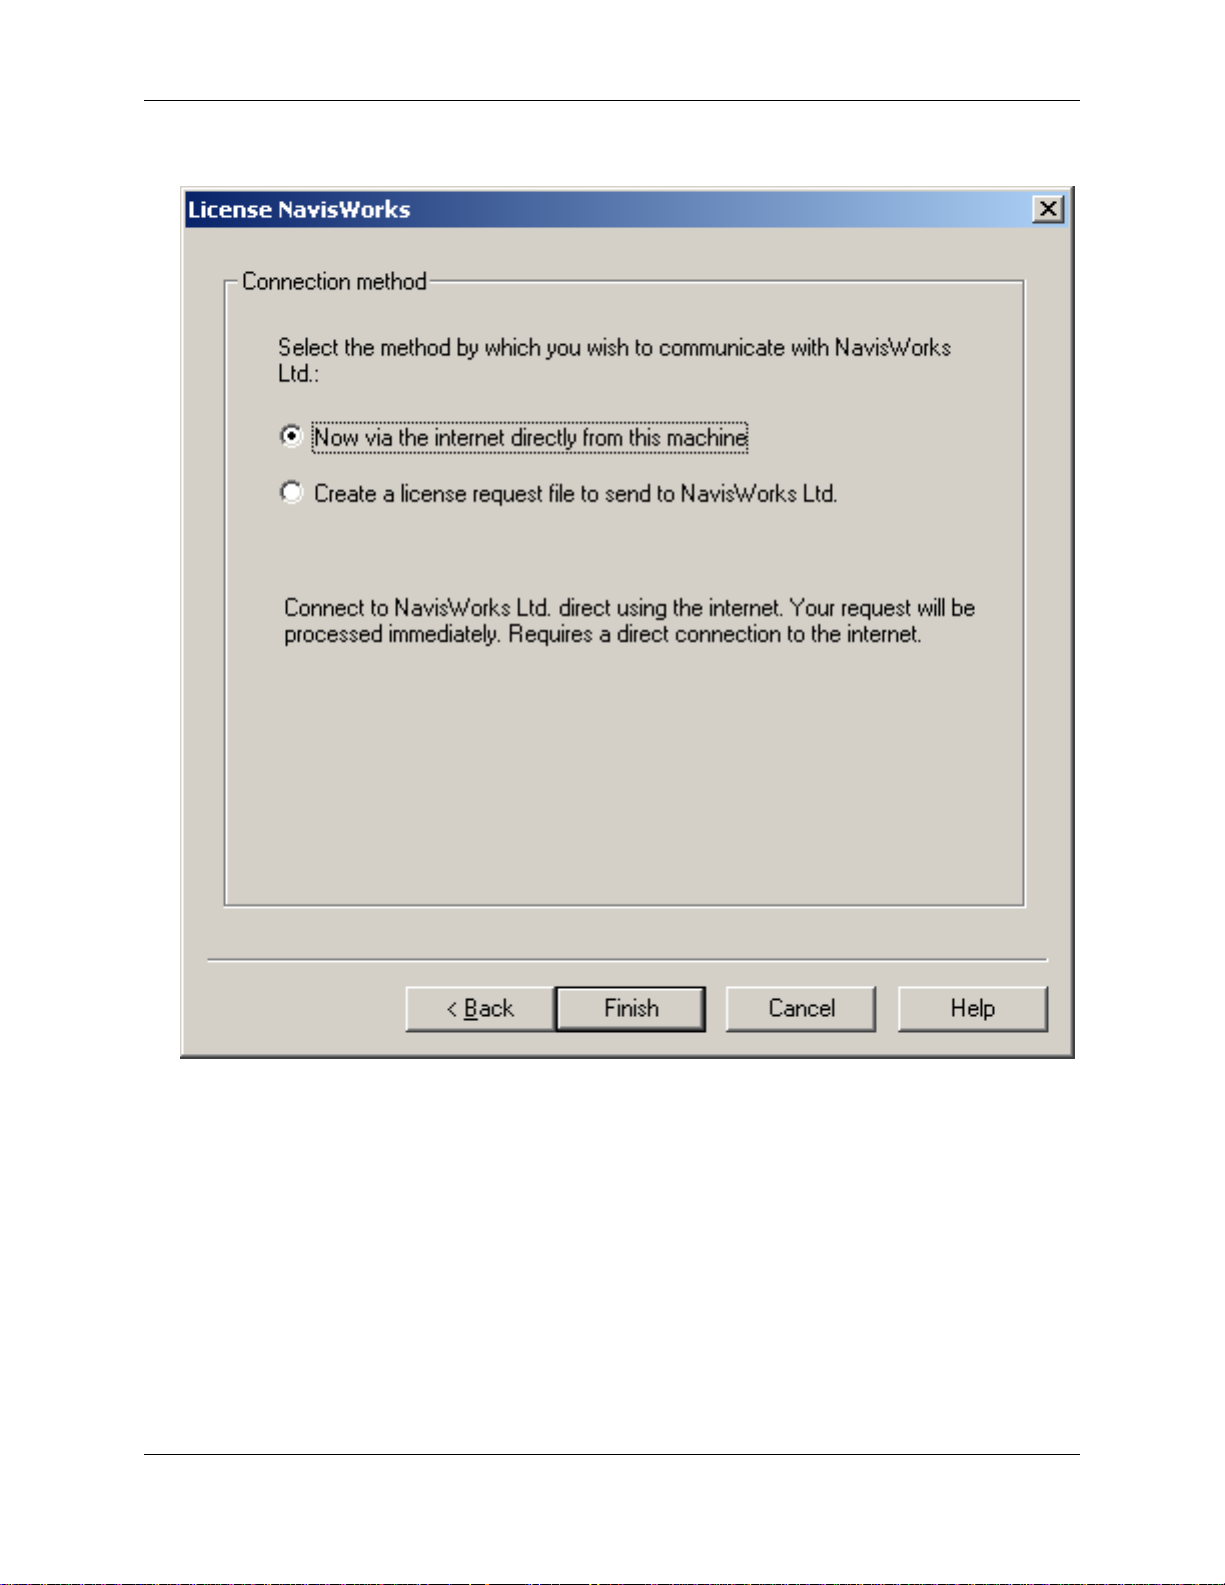
• The final wizard dialog offers you two options to register your product:
1. Now via the Internet directly from this machine. This option is recommended if you have a
direct Internet connection.
Click Finish and the License Manager will link to NavisWorks Ltd.'s system, register your
products and install your license file. When the License Manager informs you of success, your
products are licensed and you can use NavisWorks.
2. Create a license request file to send to NavisWorks Ltd.. If you have no internet connection
from your machine, or your firewall does not permit connection, then you will need to select this
option and manually process the license.
Click Finish and the license request file will be created. You will be advised in a message box
where this file is located, (by default C:\Program Files\NavisWorks
11
Page 22

Essential Reading
Licensing\Transfer\send_to_navisworks.txt).
Note
Once the license request file is created, it can be sent to NavisWorks Ltd. from any machine,
either by email or uploaded on the NavisWorks website. If you do not have email on your
machine therefore, copy the file and take it to any machine that does have email or Internet
access.
Whilst manually processing this request, your existing licenses will be killed. This will prevent
JetStream from functioning until the new license has been accepted.
Attach the send_to_navisworks.txt file to an email and send it to
<autolicense@navisworks.com>. A license file will be sent by return email.
(This email address is an automated address and should not be emailed with anything other than
the send_to_navisworks.txt file.)
or
Upload it to the website https://register.navisworks.com/autolic.htm
[https://register.navisworks.com/autolic.htm]. Once processed (this should only take a few
seconds), you will be prompted to download a license file.
Save the license file to a temporary location on the machine that created the license request file,
preferably the original Transfer directory. The file should be named accept_new_license.lic
when saved. If the file is named differently, JetStream may not recognise it.
Start the License Manager (Start, Programs, JetStream JetStream, License Manager), then go to
License Wizard, Accept License. Browse to the license file in the temporary location, then
choose Open and then Finish. This will install the license on your machine.
2.4. Recovering a license
If you lose your JetStream license for whatever reason, there is a good chance you can recover it by
doing the following:
• Go to Recover License from the License Wizard menu and check the Confirm box before clicking
on Next.
• Your serial numbers and contact details should have been remembered by the License Manager, but
if not, complete the next two forms again and click Next.
• You have two methods by which to recover your license, which are the same as the registration
methods. See Connection Methods for more information on these options in order to choose how you
would like to recover your license.
There are certain situations where recovering may not work. These are outlined in Section 4.4, “
Situations when Recovering and Returning Licenses Fails ”.
2.5. Returning a license
12
Page 23

Essential Reading
You cannot directly transfer a license from one PC to another, but you can return your licenses to
NavisWorks Ltd. in order to Request them from another PC. Returning a license effectively kills it on one
PC and gives you a credit in NavisWorks Ltd.'s system so that you can request the same license from
another PC. Please note that you cannot return just some modules and leave others on the PC. If you
wish to transfer just some of your JetStream modules, then you have to return them all and request them
individually again from the PC's on which you want to use them.
To return your license:
• Go to Return License from the License Wizard menu and check the Confirm box before clicking on
Next.
• Your serial numbers and contact details should have been remembered by the License Manager, but
if not, complete the next two forms again and click Next.
• You have two methods by which to return your license, which are the same as the registration
methods. See Connection Methods for more information on these options in order to choose how you
would like to return your license.
Note
If you return your licenses via a license request file, the license file returned to you (by email or
download) will need to be Accepted (see the section called Accepting a License) on the machine
returning the licenses, to complete the return license process. If successful, you will receive a
message advising "License Returned".
Once your licenses have been returned, JetStream will no longer run on your PC, but you will be able to
Request them again from any other PC in your organisation (note that the JetStream End User License
Agreement forbids you to "loan, rent, sell, sublicense or otherwise transfer the Software Product and/or
documentation to third parties"). To install your licenses again, follow the steps in Section 2.3, “
Requesting and installing a JetStream license ”.
2.6. License Types
There are two types of JetStream license: Fixed and Floating.
1. Fixed licenses. These are licenses locked to a single machine and sometimes called stand-alone
licenses. Each client PC must be individually licensed.
2. Floating licenses. These are concurrent licenses served from a server. A license is needed for each
client PC that will access a floating license at the same time. For example, if you have 10 floating
licenses installed on the server, then any 10 client PCs can be running JetStream at the same time.
2.7. Served licenses
2.7.1. Served licenses overview
JetStream served (floating) licensing allows you to set up and manage all or some of your licenses on a
server and access them from client PCs, giving you simpler, more central management of NavisWorks
licenses. Setting up NavisWorks served licenses is a two stage process - first you have to install the
licenses on the server and then you have to connect to the server from the client PCs that will be using
13
Page 24
Essential Reading
JetStream.
Note
The JetStream License Server will only run on Windows NT, Windows 2000, Windows XP or
Windows Server 2003.
It is not possible to float Fixed licenses on a network server.
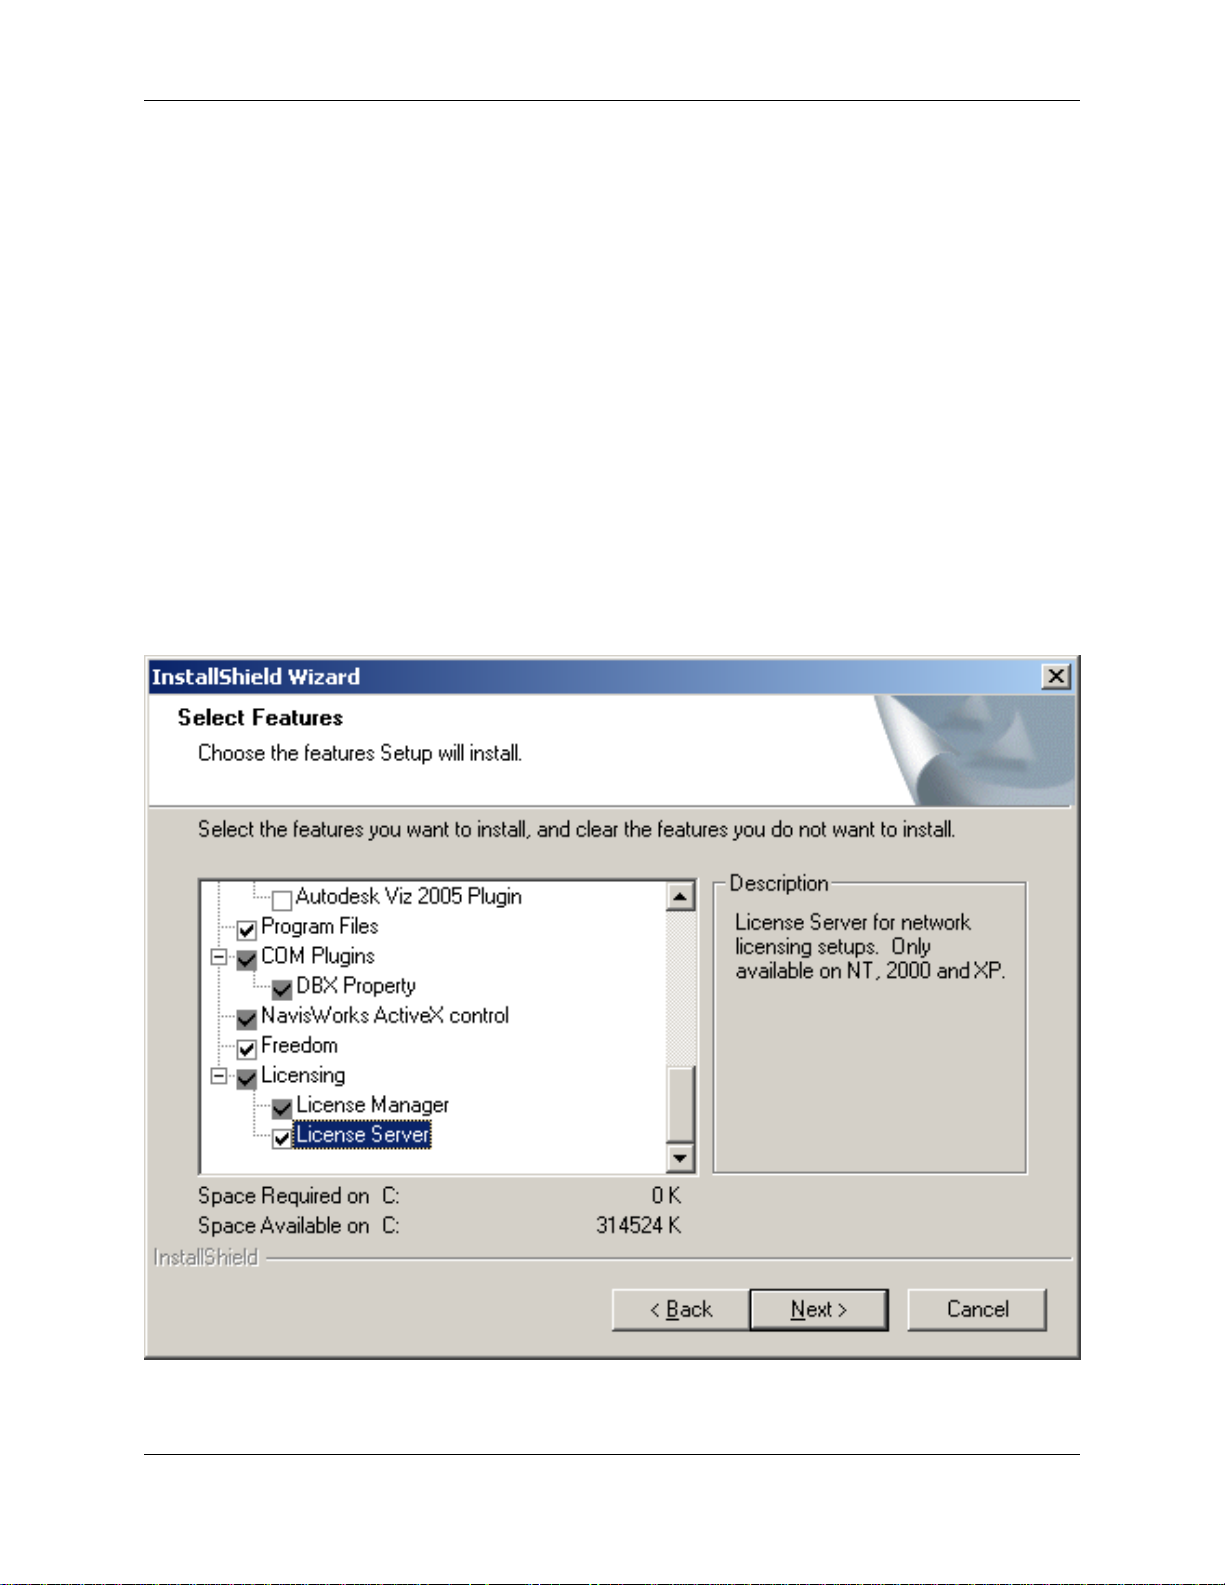
2.7.2. Setting up the server
The server installation works in the same way as a fixed installation, except that it installs a service that
constantly runs in the background to serve the licenses from the server. Make sure that you use either the
Server or Custom install method to install the JetStream License Server for server installations - served
licenses will not work without this service.
Note
The Server install option will not install the JetStream program files. If you wish to run JetStream
itself on the server machine(and not just the License Server), select the Custom install and
ensure the License Server option is selected.
You can install the License Manager independently of the full NavisWorks program for minimal installs on
the server. The minimum you need to install is the JetStream License Server and the NavisWorks License
14
Page 25

Manager. Once running, you should see a JetStream Licensing service in the Services section of your
administration tools in Windows.
If JetStream has just been installed on the machine, the Installation Wizard will automatically run. When
asked for what type of license you wish to set up, choose "Install licenses on this machine". If you are
returning to this machine to set up the license, you can choose Request License from the License
Wizard menu.
Finally, use the License Manager in exactly the same way as for a stand-alone installation to enter the
serial numbers of all the products you have purchased and register them with NavisWorks Ltd. See
Section 2.3, “ Requesting and installing a JetStream license ” for full details on how to do this. When your
licenses are installed on the server, start the JetStream licensing service from the Services section of
your administration tools in Windows. You can then set up the client machines.
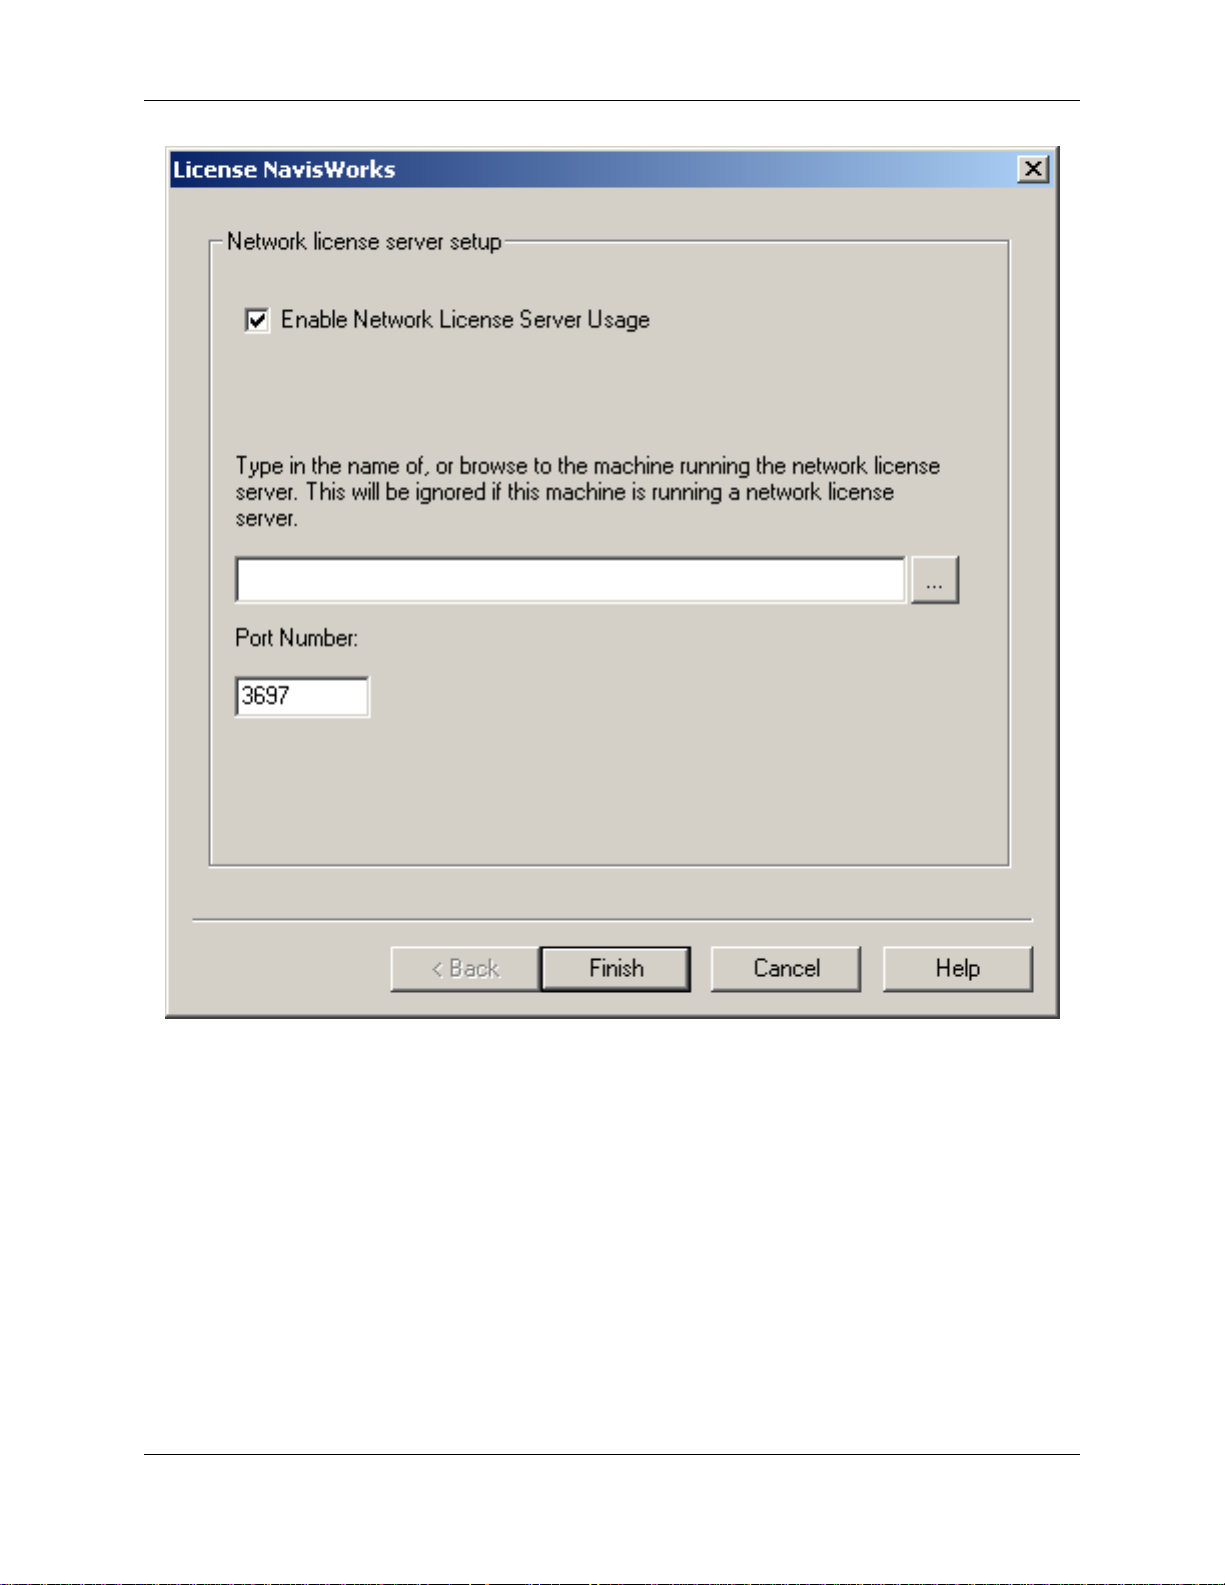
2.7.3. Setting up a client
On the client PC, install JetStream as if installing a fixed license (you do NOT install the License Server
option for the clients). If JetStream has just been installed on the machine, the License Wizard will
automatically run. When asked for what type of license you wish to set up, choose "Use licenses from a
remote server". If you are returning to this machine to set up the client license, you can choose Network
Server from the License Wizard menu. The following dialog is displayed:
Essential Reading
15
Page 26
Essential Reading
If active, check the "Enable Network License Server Usage" check box. In the upper text box type in, or
browse to, the server where your JetStream Licenses are installed and being served from. This should be
the fully qualified domain name (FQDN) or IP address of the server. If only the name of the server is
supplied, the default domain for the client PC will be used to create a fully qualified domain name. The
Server FQDN is displayed in the Machine Name field of the Advanced tab on the Server machine.
The lower text box shows the port number that will be used to communicate with the server. You should
only change this if instructed to do so by your server administrator. See the section called "Setting the
Network Server Port" for more information.
Click Finish to complete the process. The Network Modules tab will be displayed, listing all licenses
being served from the Server you're connected to and identifying those licenses Accessible from your
client machine. See the section called "Network Modules" for more information.
When JetStream now starts, it should get its licenses from the Server.
16
Page 27

Chapter 3. Useful Reading
This section describes in more detail the operation of the NavisWorks License Manager.
3.1. The License Manager tabs explained
The five tabs on the License Manager allow you to view and manage your licenses.
3.1.1. Current Licenses
This tab shows all the products that are installed on the PC by serial number and product description.
To the left of each serial number is an icon, signifying the current status of the license:
• A Green tick signifies that the license is valid and working correctly.
• An Exclamation mark signifies that a module within the license has expired. For full licenses this
is most likely to be Bond, in which case the license is still valid, (however you will need to renew your
Bond subscription to continue to receive support and upgrades. See the JetStream website,
http://www.navisworks.com/bond.htm [http://www.navisworks.com/bond.htm]). See License Properties
for more information on finding out which module has expired.
• A Red cross signifies that the license is invalid and not working. If this license has been valid and
working on this machine previously, it may have been invalidated by a change to the machine. See
License Properties for more information on invalid licenses.
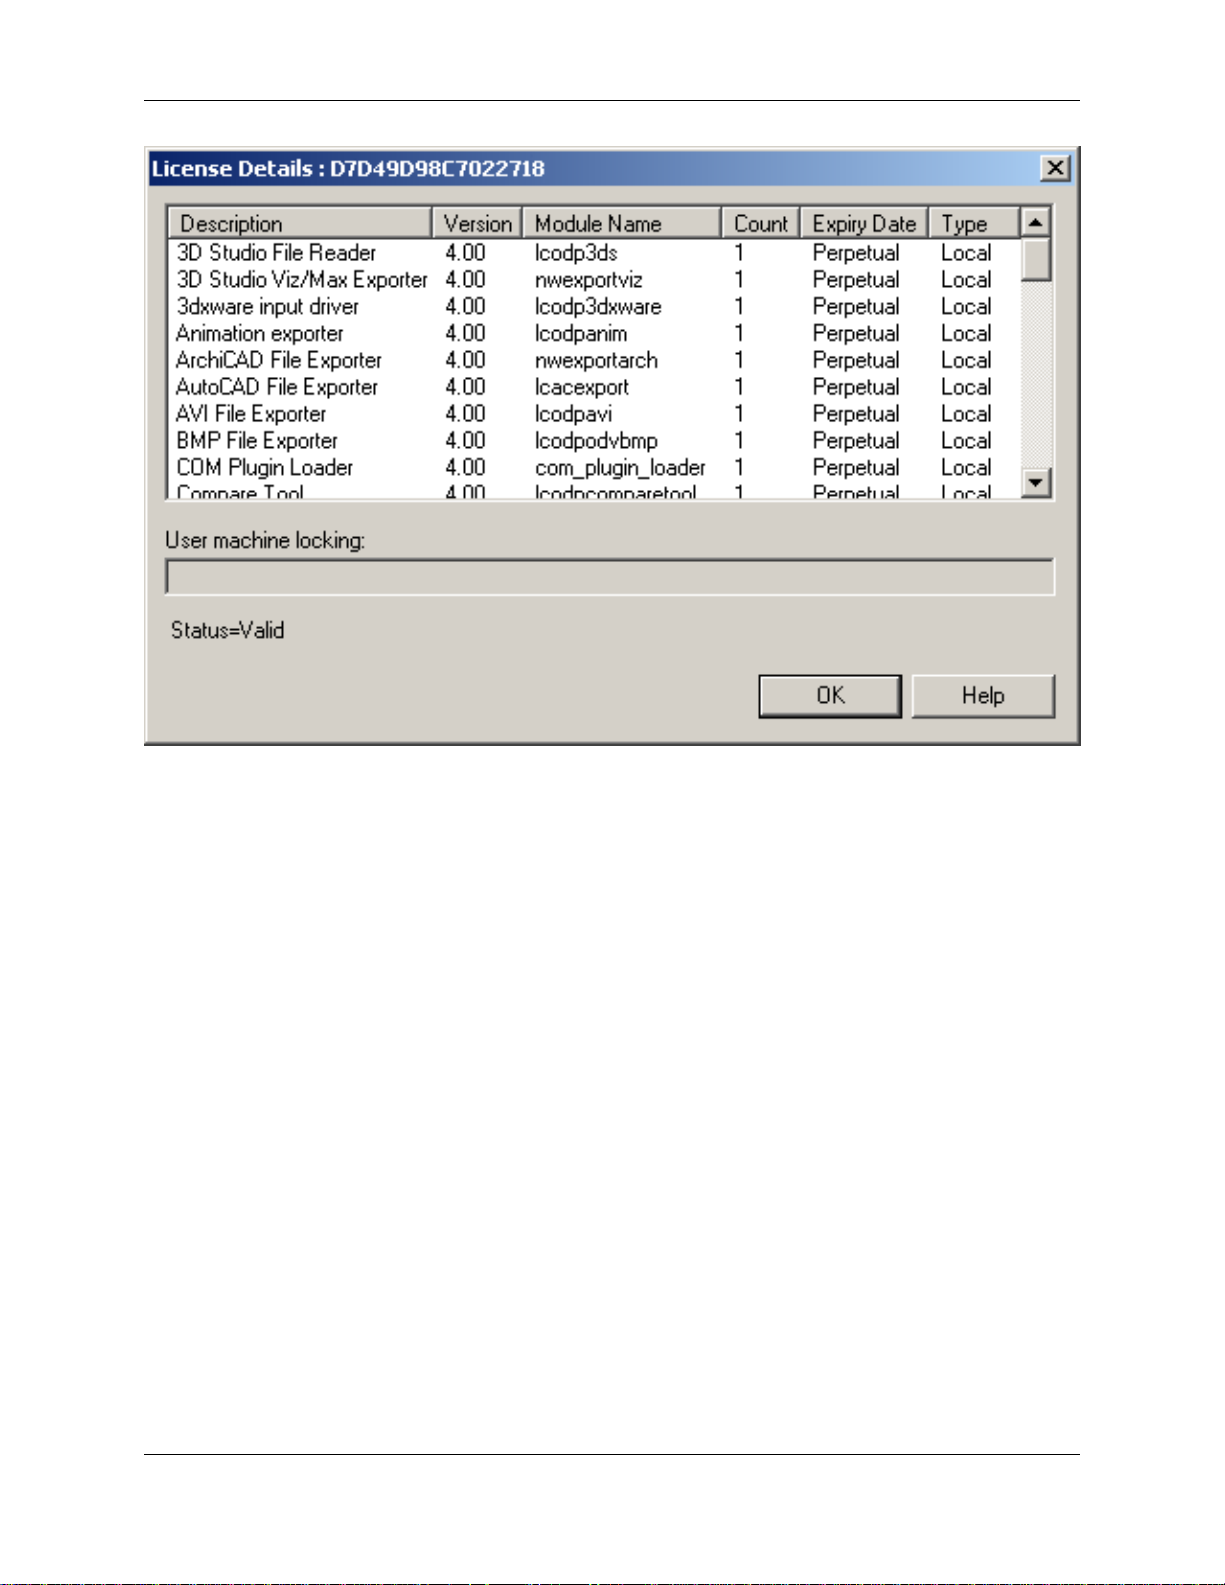
If you click on a serial number in the Current Licenses tab and then click on the Properties button, the
License Details dialog will be displayed:
17
Page 28
Useful Reading
The License Details dialog shows all of the internal modules that come with the selected product license.
This provides a description of the module; the version number; the Module name; the count (number of
licenses); the expiry date (when the module expires); and the license type. The license type will either be
Local, if it is a fixed license, or Float, if it's a floating license. Evaluation licenses are time limited and they
will have an expiry date, shown in this dialog. Full JetStream licenses do not expire and will therefore be
identified as Perpetual.
Note
JetStream Bond is an annual subscription and therefore has an expiry date. The Bond module in
the License Details dialog displays this expiry date. This is read by the NavisWorks License
Manager and you will be prompted from 30 days prior to expiry, that your subscription needs
renewing. If you choose not to renew your Bond subscription, your license will continue to
work as normal, though you will no longer be eligible for support and upgrades. See the
JetStream website, http://www.navisworks.com/bond.htm [http://www.navisworks.com/bond.htm]
for more information on the JetStream Bond.
If you have renewed your Bond subscription, the NavisWorks Ltd. system will be updated accordingly.
You will then need to Request your licenses again in order to update them on your machine, with this
new information. As you are already using the licenses, you should not need to enter any of your details
or serial numbers again, simply go to License Wizard, Request License, (provided your details are
listed) click Next three times to get to the connection screen. Connect to NavisWorks Ltd. via your chosen
method (see the section called license connection methods for more information).
The User machine locking text box on the License Details dialog is enabled if the product is a
networked or floating product. It shows a semi-colon (;) separated list of machines that are allowed to use
these licenses. If the product is networked, new machines are automatically added to the list on first
connection, up to the maximum number of licenses available. It can also be used to restrict the use of
floating licenses.
18
Page 29

Finally, at the bottom of the License Details dialog there is a status for the selected license. If your
license is invalid, there will be a reason for this stated here, which may provide an idea as to what is
causing the problem. For example, Invalid Block Machine ID : ID:123ABC+ET123456ABCDEF. The ID:
value is the CrypKey ID in the license file and the ET: value is the Ethernet ID in the license file (Note:
CrypKey is the security software used by the NavisWorks License Manager). Both of these values (from
the license file) must correspond to the Machine ID on the Advanced tab. If the CrypKey ID has changed
on your machine (possibly due to reinstalling JetStream), then you may be able to Recover your license.
If the Ethernet ID has changed, then the network card being used/detected now is different from that
when first licensed. If you can use the original card again, the license should be validated. Once valid,
you will then be able to Return your license, then Request it again with the new network card (or, if using
multiple cards, disable Ethernet ID Locking before requesting the license. See License Manager Options).
3.1.2. Local Modules
Displays a list of modules that are installed and available locally on the PC, along with their version
number, and expiry date (if any). Note that JetStream Bond is treated as a module and will have the Bond
renewal date as the expiry date (see JetStream Bond).
Each module has an icon to the left, signifying the status of that module. These statuses are the same as
those on the Current Licenses tab.
Useful Reading
3.1.3. Network Modules
Similar to Local Modules, this tab displays a list of modules that are being served from the server that the
PC is pointing to (see the section called Client set up). The Description column advises which modules
are being served; the Version column advises which version the licenses are; the Total column shows
the total number of licenses that are installed on the server; the Accessible Total shows the total number
of licenses that are available to you from your PC (this is not necessarilly the number of licenses available
to you now); The Used Elsewhere column shows the number of licenses that are currently in use by
other users; and the Used Here column shows the number of licenses that are currently in use on your
PC. The number of licenses currently available for you to use is the Accessible Total less the Used
Elsewhere total.
Each network module has an icon to the left, signifying the status of that module. These statuses are the
same as those on the Current Licenses tab.
If you click on a network module and then click the Usage button, the Module Usage dialog is displayed:
19
Page 30
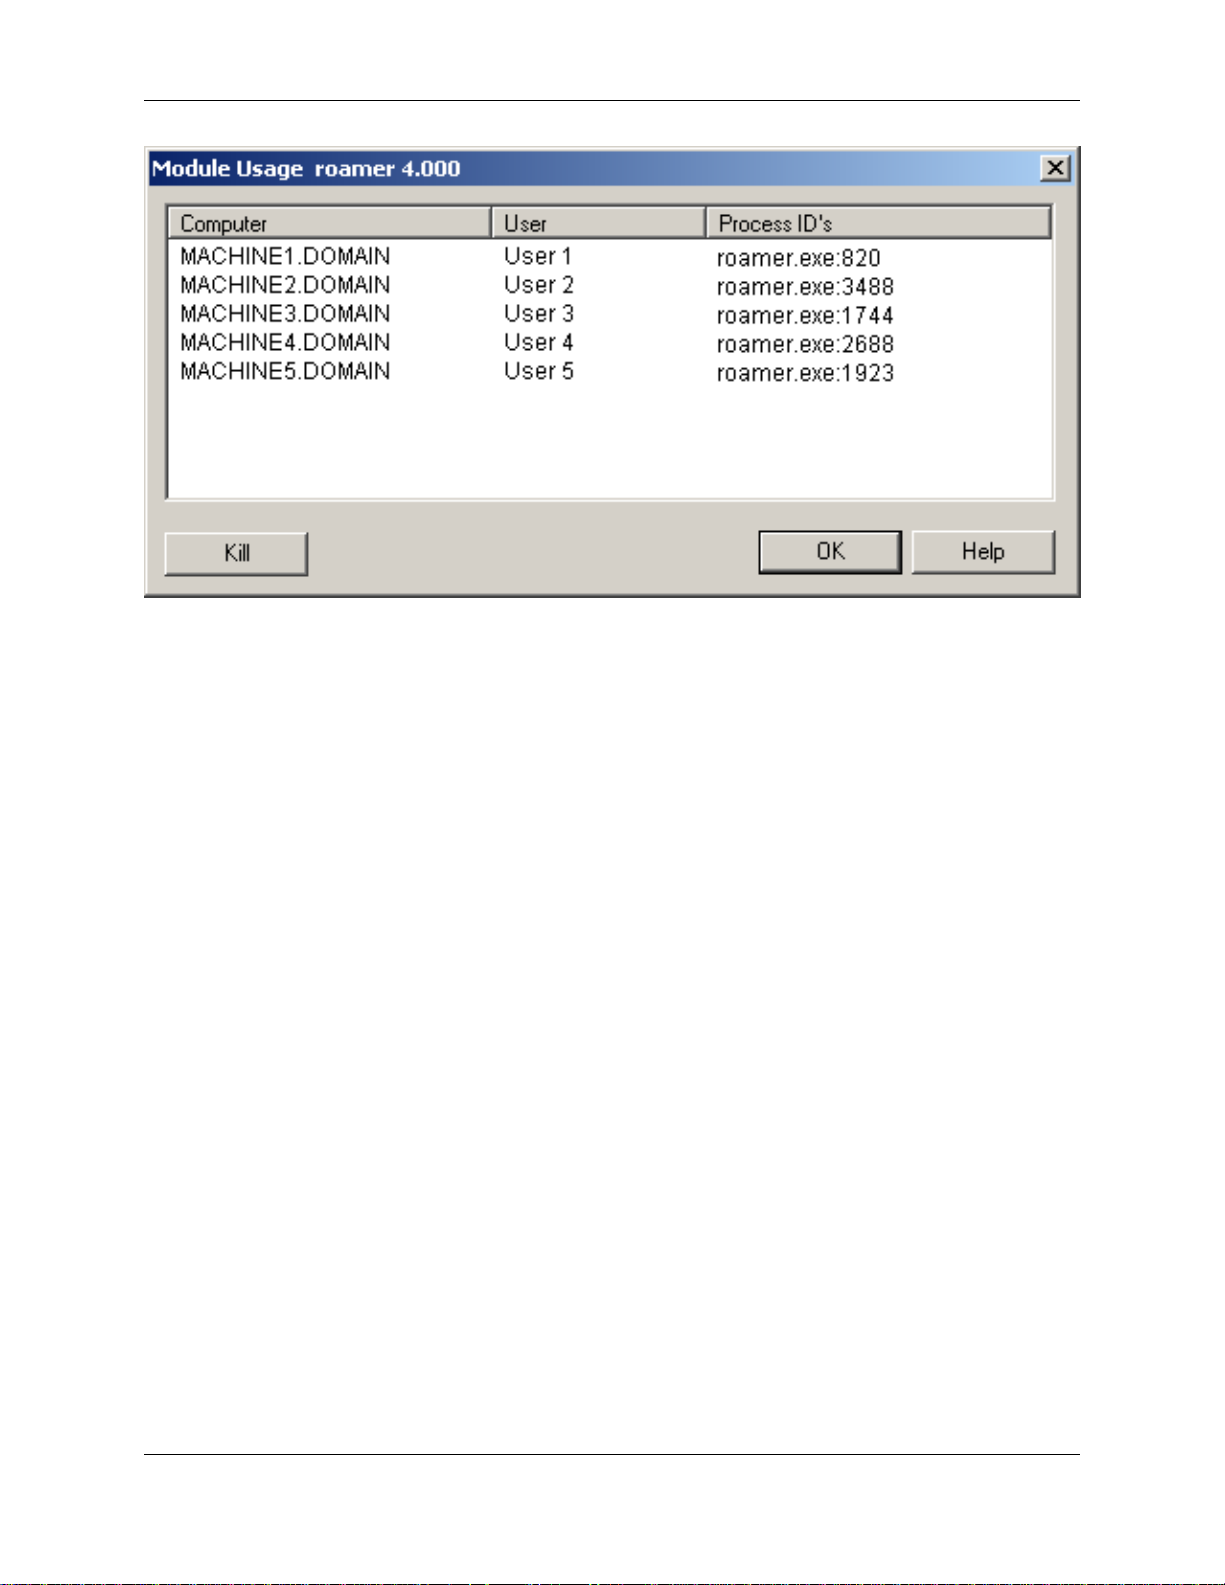
Useful Reading
This shows which PCs and users are currently using the selected module. This information can be seen
from any PC that is connected to the License Server (see the section called Client set up). This is useful if
you have run out of licenses and wish to tell somebody that you wish to take their license to use.
Killing a user's session
Administrators on the Server machine can use the Module Usage dialog to kill a users session and take
back the licenses they were using.
To Kill a user's session:
1. As an Administrator on the server machine, go to the Network Modules tab of the License Manager.
2. Click on the Description of the license you require, then click the Usage button.
3. Click on the Computer whose licenses you wish to kill, then click the Kill button.
4. You will receive a warning message, advising that this will kill all licenses for this computer/user.
Click OK to kill the licenses or Cancel to return to the License Manager
Note
If the user (whose session has just been killed) is still using JetStream at the time the licenses
were killed, they will be advised that their connection to the server has been lost. See Lost
connection with License Server for more information.
3.1.4. Advanced
This tab provides Advanced details an options, which should not be necessary for most users. Please
see Section 4.3, “ Advanced tab ” for more details on this.
20
Page 31

3.1.5. Startup Preferences
This tab shows which licenses will be collected when JetStream starts. For each module that is checked,
JetStream will attempt to collect a license, looking first on the local machine for the license and then to
any server that the PC is pointed to. If JetStream can't find a Roamer license either locally or from a
server, then it will warn you of this when the program starts. You will not be advised if any of the plugin
licenses cannot be collected.
This tab is most useful when collecting licenses from the server. If you want to use JetStream but not take
a specific plugin license from the server, simply uncheck the modules you wish to leave for other users.
For example, uncheck the Clash Detective module if you wish to leave this for others. The results of
unchecking boxes in the startup tab don't become apparent until the JetStream application itself is
restarted.
Alternatively, you can create desktop shortcuts that define your startup preferences, thereby enabling you
to collect any combination of JetStream licenses.
If you look at the Properties of the standard JetStream desktop shortcut, the Target by default is pointing
to "C:\Program Files\NavisWorks 5\roamer.exe".
The startup preferences are defined in the shortcut target as a combination of exclusion arguments. For
example, the default (above) has no arguments and therefore excludes no license modules. To exclude a
Clash Detective license (i.e. start JetStream, trying to collect all licenses except Clash Detective), the
shortcut target would be "C:\Program Files\NavisWorks 5\roamer.exe" -nomodule lcodpclash.
Useful Reading
The exclusion arguments for each license module are as follows:
• No Publisher license, -nomodule nw_publish
• No Presenter license, -nomodule lcodplw
• No Clash Detective license, -nomodule lcodpclash
• No TimeLiner license, -nomodule lcodptimeliner
Note
Roamer cannot be excluded as this is the base license required to start JetStream and any
combination of its plugins.
Any combination of the above can be added as arguments to the default JetStream shortcut target. You
can copy the default shortcut on your desktop (as many times as necessary), rename it and add
arguments accordingly.
Below is an example of the shortcut for only Roamer:
Target = "C:\Program Files\NavisWorks 5\roamer.exe" -nomodule lcodpclash -nomodule
nw_publish -nomodule lcodplw -nomodule lcodptimeliner
3.2. Reassigning networked licenses to other
clients
If you have run out of networked licenses for all the client PCs that want to claim them from the server,
then you need to delete one or more PC names from the list. To do this:
21
Page 32

Useful Reading
1. First, as the NavisWorks License server will need to be restarted, get everybody who is accessing
the server to close JetStream and go to the Services dialog (from Administration Tools) and stop the
NavisWorks Licensing service.
2. In the License Manager, go to the Current Licenses tab, click on the serial number of the networked
product and click Properties.
3. There should be a semi-colon (;) seperated list of all the PCs that have access to the networked
licenses in the text box called User machine locking. Delete the PC name that you want to prevent
from accessing networked license.
4. Click OK on the dialog to close it and close the License Manager.
5. Restart the NavisWorks Licensing service in the Windows Services panel, on the server.
6. Before any other JetStream client requests licenses from the server, set up the client that couldn't
previously access a license from the server, as described in Setting up a client.
3.3. Restricting use of floating licenses
If you have a small number of floating licenses for a particular product and a large number of JetStream
users, you may want to restrict use of these floating licenses to a small group of users. To do this:
1. First, as the NavisWorks License server will need to be restarted, get everybody who is accessing
the server to close JetStream and go to the Services dialog (from Administration Tools) and stop the
NavisWorks Licensing service.
2. In the License Manager, go to the Current Licenses tab, click on the serial number of the floating
product and click Properties.
3. There should be a a semi-colon (;) seperated list of all the PCs that have access to the floating
licenses in the text box called User machine locking. If no names are listed, then the floating
licenses are available to all users. If any names are listed, the floating licenses are only available to
the listed PCs. You can list more PC names than you have floating licenses.
4. Click OK on the dialog to close it and close the License Manager.
5. Restart the NavisWorks Licensing service in the Windows Services panel, on the server.
3.4. Combining fixed and networked licenses
It is possible to combine fixed licenses and networked licenses if, for example, you have a docked laptop
that needs to be taken on-site and still have access to your JetStream Roamer license. To achieve this,
simply install and license those JetStream products that you need to be accessible at all times as fixed
licenses. Then, to get access to any plugins from the server when the laptop is docked on the network,
simply point the laptop to the server as described in Setting up a client. NavisWorks License Manager will
collect the local fixed licenses first and try to collact any other licenses available from the server, as
shown in the Network Modules tab and based on your Startup Preferences.
3.5. Refreshing the license manager
22
Page 33

Useful Reading
Most useful if working in a networked and floating license environment. Occasionally, the License
Manager needs to be refreshed in order to get a snapshot of current license usage. To achieve the latest
view of the licenses, simply click on Refresh from the View menu.
23
Page 34

Chapter 4. Interesting Reading
This section covers some other interesting topics relating to the NavisWorks License Manager.
4.1. Setting the networker server port
You should only change the server port number if the default port number clashes with another port in
use on your server. The default port number (3697) is registered with the Internet Assigned Names
Authority (IANA) for use by the JetStream License Server, so is unlikely to clash with other services.
To change the default port number that the server uses to serve its JetStream licenses, do the following:
1. Make sure that no JetStream clients are connected to the server.
2. Stop the NavisWorks Licensing service from the Services dialog (from Administration Tools) on the
server.
3. Open the NavisWorks License Manager and choose Network server from the License Wizard
menu.
4. You should now be able to change the Port Number.
5. Click Finish to save the new Port number, or Cancel to return to the License Manager.
6. Restart the NavisWorks Licensing service from the Services dialog (from Administration Tools) on
the server.
7. Make sure that any client PCs accessing licenses from the server now have the same port number
that the server is using. This is changed from the client PC, again from the Network Server dialog
under the License Wizard menu in the NavisWorks License Manager.
4.2. Situations when Connection with License
Server is Lost
When using floating and networked licenses, Client machines must maintain a network connection with
the License Server. Once a Client machine has collected a license from the License Server, the Server
will send out a "heartbeat" every two minutes, to check the connection with the Client and whether the
license is still in use.
If a situation arises, whereby the connection is lost, (whether there is a network problem or the license
has been killed by the server) then the following may be expected:
• On the License Server, every two minutes the "heartbeat" will be sent out to the Client. If after eight
minutes the connection has not been re-established, then the License Server will automatically take
back the license.
• On the Client machine, if after two minutes a "heartbeat" has not been received from the License
Server, a message will be displayed advising the connection has been lost and recommend you save
any work. At this time you will continue to have the full functionality of the license. If after eight minutes
24
Page 35

Interesting Reading
the connection has not been re-established, JetStream will be unlicensed and therefore automatically
close.
4.3. Advanced tab
From this tab you can manage your JetStream license in detail.
4.3.1. Machine Information
The text boxes in the Machine Information section may be useful when resolving licensing issues and
communicating licensing information with NavisWorks Ltd.
•
Machine name is the name of the machine the license manager is running on, complete with its
domain or workgroup name - this is its fully qualified domain name (FQDN).
• Machine ID is a series of coded characters used to uniquely identify the machine. The first part of this,
ID:, is the CrypKey ID used for CrypKey ID Locking. The second part of this, ET:, is the Ethernet ID
used for Ethernet ID Locking.
• Crypkey ID expiry is the date that a time-limited license will expire, for example when using
JetStream during an evaluation, or grace period.
• Crypkey site code is the software code required by NavisWorks Ltd. for emergency licensing. See
Emergency Licensing for more information.
4.3.2. License State
You can actually view the license file in Notepad by clicking on the View License File button. This will
show all the licenses and codes that make JetStream work, but be warned that changing this file can
seriously damage and invalidate your JetStream licenses. The View Last Message button is useful in
case you need to re-view the last message information, such as if licensing fails and you need to pass on
the information to your support provider.
4.3.3. Options
The Display server console message window can only be used on a JetStream License Server
machine. Check this option if you wish a DOS window to open each time the NavisWorks Licensing
service is started on the server. This DOS box can give useful information about what is actually
happening in this background service. This may be of particular use when trying to identify a connection
problem between the License Server and a Client machine.
Note
Closing the DOS window will stop the NavisWorks Licensing service (although the Windows
Services panel will still report it to be started). If you don't require the message window any
longer, uncheck the option in the Advanced tab, then manually Restart the NavisWorks
Licensing service.
Crypkey ID locking and Ethernet ID locking are the two methods that JetStream uses to lock a license
to a machine. Crypkey ID locking is the JetStream method of software locking and Ethernet ID locking is
the JetStream method of hardware locking. At least one of these should be checked and by default, both
25
Page 36

Interesting Reading
are and should remain checked.
If there is no Ethernet card inside your PC (or you use multiple cards), you cannot use Ethernet ID locking
and should instead use only Crypkey ID locking. This will mean, though, that you will not be able to use
the Recover license functionality if you were to lose your license later.
Sometimes the CrypKey service can be problematic to run on PCs of certain configurations, particularly
when a RAID disk subsystem is in use. Un-checking this option and relying instead only on Ethernet ID
locking can make it easier to install licenses in these circumstances. However, this will mean that you will
not be able to Return licenses for transferring to another PC.
These options matter if your machine changes configuration for whatever reason between first installing
your licenses and accessing them. Two specific situations are:
1. If you have to recover a license when, for example, a machine crashes, make sure that you have the
same combination of Crypkey/Ethernet ID locking options checked as when you first licensed the
machine.
2. If your laptop PC uses a docking station in the office that contains the Ethernet card and it cannot
access the Ethernet card when undocked, then you should not check the Ethernet ID locking option when
requesting your license, if you want to access the licenses when undocked.
4.4. Situations when Recovering and Returning
Licenses Fails
As explained in the License Manager Options, it is important to use the same combination of Crypkey ID
locking and Ethernet ID locking when first licensing your machine as when recovering or returning
licenses. In addition, the following conditions should be understood:
• If you only use Crypkey ID locking, then you cannot recover a license. Contact
<support@navisworks.com> if you need to recover a license that is locked using only Crypkey ID
locking.
• If you only use Ethernet ID locking, then you cannot return a license. Contact
<support@navisworks.com> if you need to return a license that is locked using only Ethernet ID
locking.
4.5. Emergency Licensing
In certain situations it may not be possible to license your JetStream product by any of the standard
methods. There is therefore, an emergency licensing procedure that can be performed by NavisWorks
Ltd. This method will only be used as a last resort.
Using the CrypKey Site Code from the Advanced tab on your PC, NavisWorks Ltd. will generate and
return a CrypKey Site Key. Enter this into the Emergency licensing box and then click the License
button. This will unlock the licenses on your PC.
26
Page 37

Part II. JetStream Roamer
User Manual
Page 38

Table of Contents
5.Overview .................................................................................................................................33
6.FileManagement .....................................................................................................................34
6.1.FileMenu .............................................................................................................34
6.2.NewFiles .............................................................................................................34
6.3.RefreshingFiles ....................................................................................................35
6.4.OpeningFiles........................................................................................................35
6.5.Opening Files viaURL ...........................................................................................36
6.6.AppendingFiles ....................................................................................................36
6.7.MergingFiles ........................................................................................................37
6.8.SavingFiles ..........................................................................................................37
6.9.Saving and RenamingFiles ...................................................................................38
6.10.PublishingFiles ...................................................................................................38
6.11.Printing ...............................................................................................................38
6.11.1.Printing the CurrentViewpoint ...........................................................................39
6.11.2.PreviewingPrintouts .........................................................................................39
6.11.3.Settingup printouts ...........................................................................................40
6.12.DeletingFiles ......................................................................................................40
6.13.EmailingFiles .....................................................................................................40
6.14.ImportingFiles ....................................................................................................41
6.14.1.ImportingPDS Tags .........................................................................................41
6.14.2.Importing PDS DisplaySets ..............................................................................42
6.14.3.ImportingViewpoints XML .................................................................................43
6.14.4.ImportingSearch XML ......................................................................................44
6.14.5.Importing Search SetsXML ...............................................................................45
6.15.ExportingFiles ....................................................................................................46
6.15.1. Exporting toa PiranesiEPix format ....................................................................47
6.15.2.Exportingan image ...........................................................................................48
6.15.3.Exportingan animation .....................................................................................49
6.15.4. Controlling thesize ofan image ......................................................................... 51
6.16.ExportingPDS Tags ............................................................................................52
6.17.ExportingViewpoints ...........................................................................................52
6.18.ExportingCurrent Search .....................................................................................53
6.19.ExportingSearch Sets .........................................................................................53
6.20.ExportingViewpoints Report ................................................................................53
6.21.Exporting to AutodeskDWF .................................................................................54
6.22.Exporting toGoogle Earth KML ............................................................................54
6.23.QuittingJetStream...............................................................................................56
7.ConvertingFiles .......................................................................................................................57
7.1.FileReaders .........................................................................................................57
7.1.1.NWFFiles ..........................................................................................................58
7.1.2.NWDFiles .........................................................................................................58
7.1.3.NWCFiles .........................................................................................................60
7.1.4.DWG and DXFFiles ...........................................................................................62
7.1.5.DWFFiles ..........................................................................................................67
7.1.6.BentleyAutoPLANT Files ....................................................................................69
7.1.7.3DSFiles ...........................................................................................................71
7.1.8.DGN and PRPFiles ............................................................................................73
7.1.9.MANFiles ..........................................................................................................77
7.1.10.IGESFiles........................................................................................................80
7.1.11.STEPFiles .......................................................................................................82
7.1.12.InventorFiles ...................................................................................................84
xxviii
Page 39

JetStream Roamer
7.1.13.VRMLworld files ..............................................................................................86
7.1.14.RieglScan Files ...............................................................................................88
7.1.15.FaroScan Files ................................................................................................90
7.1.16.LeicaScan Files ...............................................................................................92
7.1.17.Z+FScan Files .................................................................................................94
7.1.18.ASCII Laser ScanFiles .....................................................................................96
7.1.19.STLStereolithography files ...............................................................................98
7.1.20. AVEVA ReviewRVM andRVS files ...................................................................100
7.1.21.IFCfiles ...........................................................................................................103
7.1.22.SketchupSKP files ...........................................................................................105
7.2.FileExporters........................................................................................................108
7.2.1.AutoCAD.nwc Exporter ......................................................................................108
7.2.2.Revit.nwc Exporter ............................................................................................110
7.2.3.MicroStation.nwc Exporter .................................................................................113
7.2.4.Viz andMax .nwc Exporter .................................................................................. 115
7.2.5.ArchiCAD.nwc Exporter .....................................................................................119
7.3.CADPreviewing ....................................................................................................121
7.3.1.NavisWorks Navigator forAutoCAD .....................................................................121
7.3.2. NavisWorks Previewfor Vizand Max ...................................................................122
8.Navigating ...............................................................................................................................125
8.1.NavigationModes .................................................................................................125
8.1.1.Walking .............................................................................................................126
8.1.2.LookingAround ..................................................................................................126
8.1.3.Zooming ............................................................................................................127
8.1.4.Zooming to aBox ...............................................................................................127
8.1.5.Panning .............................................................................................................128
8.1.6.Orbiting ..............................................................................................................128
8.1.7.Examining ..........................................................................................................128
8.1.8.Flying ................................................................................................................129
8.1.9.Spinning on aTurntable ......................................................................................129
8.2.NavigationTools ...................................................................................................130
8.3.ViewingEverything ................................................................................................131
8.4.ViewingSelected Items .........................................................................................131
8.5.Focusing ...............................................................................................................132
8.6.PerspectiveCamera ..............................................................................................132
8.7.OrthographicCamera ............................................................................................132
8.8.CollisionDetection ................................................................................................133
8.9.Gravity..................................................................................................................134
8.10.Crouching ...........................................................................................................135
8.11.ThirdPerson View ...............................................................................................135
8.12.Straighten ...........................................................................................................136
8.13.SetWorld Up ......................................................................................................136
8.14.PresetViewpoints................................................................................................137
8.14.1.Aligning With TheX-Axis ...................................................................................137
8.14.2.Aligning With TheY-Axis ...................................................................................137
8.14.3.Aligning With TheZ-Axis ...................................................................................138
8.14.4.Looking Froma Preset Viewpoint ......................................................................138
8.15.Tilt ......................................................................................................................138
8.16.ThumbnailViews .................................................................................................139
8.17.Usinga SpaceBall ...............................................................................................141
9.SelectingItems ........................................................................................................................143
9.1.SelectionTrees .....................................................................................................143
9.2.InteractiveSelection ..............................................................................................146
9.2.1.SelectMode .......................................................................................................146
9.2.2.SelectBox Mode ................................................................................................146
9.2.3.SelectionCommands..........................................................................................147
9.3.Selection and SearchSets .....................................................................................148
xxix
Page 40

JetStream Roamer
9.3.1.Saving Selectionand Search Sets ....................................................................... 148
9.3.2.Recalling Selectionand Search Sets ...................................................................149
9.3.3.ManagingSelection Sets ....................................................................................149
9.4.SelectionResolution ..............................................................................................151
9.5.SelectionOptions ..................................................................................................152
10.Finding ..................................................................................................................................155
10.1.Properties ...........................................................................................................155
10.2.FindingItems ......................................................................................................156
10.3.QuickFind ..........................................................................................................158
10.4.FindingComments ..............................................................................................159
11.Editing ...................................................................................................................................162
11.1.Holding and releasingobjects ...............................................................................162
11.2.Undo/Redo .........................................................................................................163
11.3.HidingItems ........................................................................................................166
11.4.ItemRequired .....................................................................................................166
11.5.HidingUnselected Items ......................................................................................167
11.6.OverridingItem Properties ...................................................................................167
11.6.1.OverridingColor ...............................................................................................167
11.6.2.OverridingTransparency ...................................................................................168
11.6.3.OverridingTransforms ......................................................................................168
11.6.4.OverridingHyperlinks........................................................................................169
11.7.ResettingOverriden Properties ............................................................................169
11.7.1.ResettingMaterials ...........................................................................................170
11.7.2.ResettingHyperlinks .........................................................................................170
11.7.3.ResettingItems' Positions .................................................................................170
11.8.Resetting All OverridenProperties ........................................................................170
11.8.1.Resetting AllColors and Transparencies ............................................................170
11.8.2.Resetting All Items'Hyperlinks ...........................................................................171
11.8.3.RevealingAll Items ...........................................................................................171
11.8.4.Making All ItemsUnrequired ..............................................................................171
11.8.5.Resetting All Items'Positions .............................................................................171
11.9.CustomProperties...............................................................................................171
11.9.1.Add User DataTab ...........................................................................................172
11.9.2.Rename User DataTab ....................................................................................172
11.9.3.AddNew Property ............................................................................................172
11.9.4.EditProperty Value ...........................................................................................173
11.9.5.RenameProperty .............................................................................................173
11.9.6.DeleteProperty ................................................................................................174
11.9.7.Delete User DataTab .......................................................................................174
11.10. Setting aFile's Unitsand Transform.................................................................... 174
12.DisplayModes .......................................................................................................................177
12.1.RenderingStyles .................................................................................................177
12.1.1.Lighting ............................................................................................................177
12.1.2.RenderModes..................................................................................................182
12.1.3.DisplayPrimitives .............................................................................................183
12.1.4.BackgroundColor .............................................................................................184
12.2.CullingOptions....................................................................................................185
12.3.OrientationOptions..............................................................................................187
12.4.SpeedOptions ....................................................................................................187
12.5.DisplayOptions ...................................................................................................189
12.6.PerformanceOptions ...........................................................................................191
12.7.PresenterOptions ...............................................................................................193
13.Viewpoints .............................................................................................................................196
13.1.SavingViewpoints ...............................................................................................196
13.2.RecallingViewpoints ...........................................................................................196
13.3.The Viewpoints ControlBar ..................................................................................197
13.4.The Viewpoint ContextMenus ..............................................................................198
xxx
Page 41

JetStream Roamer
13.4.1. The ViewpointsControl BarContext Menu .........................................................198
13.4.2.Viewpoints .......................................................................................................199
13.4.3.Animations .......................................................................................................199
13.4.4.Folders ............................................................................................................200
13.5.EditingViewpoints ...............................................................................................200
13.6.ViewpointsOptions ..............................................................................................203
14.Sectioning .............................................................................................................................207
14.1.Sectioninga model ..............................................................................................207
14.2.LinkingSections ..................................................................................................209
15.Animating ..............................................................................................................................210
15.1.CreatingAnimations ............................................................................................210
15.2.EditingAnimations...............................................................................................211
15.3.AnimationCuts....................................................................................................212
15.4.PlayingBack Animations ......................................................................................213
16.Reviewing ..............................................................................................................................215
16.1.Commenting .......................................................................................................215
16.2.Redlining ............................................................................................................219
16.2.1.AddingRedlines ...............................................................................................219
16.2.2.AddingRedline Tags .........................................................................................221
16.2.3.FindingRedline Tags ........................................................................................222
16.2.4.EditingRedline Tags .........................................................................................223
16.3.Measuring ...........................................................................................................223
16.3.1.MeasuringTools ...............................................................................................224
16.3.2.TransformingObjects........................................................................................226
16.3.3.MeasureOptions ..............................................................................................228
16.4.Hyperlinks ...........................................................................................................230
16.4.1.AddingHyperlinks.............................................................................................230
16.4.2.DisplayingHyperlinks........................................................................................232
16.4.3.FollowingHyperlinks .........................................................................................233
16.4.4.EditingHyperlinks .............................................................................................233
16.4.5.DeletingHyperlinks ...........................................................................................235
16.4.6.HyperlinksOptions ...........................................................................................236
16.5.SmartTags .........................................................................................................238
16.5.1.SmartTags Options ..........................................................................................238
16.6.Collaboration .......................................................................................................240
16.7.SwitchBack .........................................................................................................243
17.Interface ................................................................................................................................245
17.1.ViewMenu ..........................................................................................................245
17.2.ViewingControl Bars ...........................................................................................246
17.3.Customizingtoolbars ...........................................................................................246
17.4.WorkspaceToolbar .............................................................................................247
17.5.Splitting the mainview .........................................................................................248
17.6.FullScreen Mode ................................................................................................249
17.7.Sizing of NavigationWindow ................................................................................249
17.8.StereoRendering ................................................................................................250
17.9.SceneStatistics...................................................................................................251
17.10.Units .................................................................................................................252
17.11.Profiles .............................................................................................................254
17.12.SearchDirectories .............................................................................................256
18.Tools .....................................................................................................................................257
18.1.ComparingModels ..............................................................................................257
19.Options..................................................................................................................................260
19.1.FileOptions ........................................................................................................260
19.2.GlobalOptions ....................................................................................................260
20.DataTools ..............................................................................................................................262
20.1.DataToolsLinks ..................................................................................................262
20.2.Creating a DataToolsLink ....................................................................................264
xxxi
Page 42

JetStream Roamer
21.GettingHelp ..........................................................................................................................268
21.1.HelpTopics.........................................................................................................268
21.2.What'sThis? .......................................................................................................269
21.3.JetStream on theWeb .........................................................................................269
21.4.ClashDetective Help ...........................................................................................270
21.5.PresenterHelp ....................................................................................................270
21.6.TimeLinerHelp....................................................................................................271
21.7.PublisherHelp.....................................................................................................272
21.8.License ...............................................................................................................273
21.9.SystemInfo.........................................................................................................273
21.10.AboutJetStream................................................................................................274
xxxii
Page 43

Chapter 5. Overview
The basis of JetStream Roamer is its ability to walk through any size model in real time. JetStream
guarantees a user-defined frame rate using a unique algorithm which automatically calculates which
items to render first during navigation, based on the size of items and distance from the viewpoint. Items
which JetStream does not have time to render are therefore sacrificed or "dropped out" in the name of
interactivity. These items are, of course, rendered when navigation ceases. The amount of drop-out
depends on several factors including: hardware (in particular graphics card and driver performance - for a
list of recommended graphics cards, visit www.navisworks.com [http://www.navisworks.com]), as well as
the size of the JetStream navigation window and the size of the model. If you wish to reduce drop-out
during navigation, you have the option to reduce frame rate and therefore trade it off against drop-out.
When working with truely large "supermodels" in JetStream, you will require a sufficient amount of RAM
to load and review the data. JetStream employs JetStream technology which optimizes the usage of the
available RAM. Before running out of memory, JetStream will page unnecesary data to the hard disk,
freeing up space for loading to continue. JetStream technology also enables the user to commence
navigating the supermodel, before it has completely loaded into memory.
JetStream is large address aware, utilizing any additional memory assignment following the 3GB switch
available on Windows XP systems.
JetStream is sold as a base product, Roamer, and a set of plugins that "plug-in" to it for additional
functionality such as for file publishing, photo-realistic rendering, clash detection and construction
sequencing. This set of user guides is organized by product, so there is a book for base Roamer, and one
for each plugin.
To start Roamer, double click on the Roamer icon on the desktop, or go to Start, Programs, JetStream,
Roamer. The following chapters will describe the interface in more detail.
JetStream contains full context sensitive Help. Click and click over the toolbar button or menu
command to display the appropriate Help topic. Or alternatively go to the Help menu.
For more hints, tips and answers to frequently asked questions, see Chapter 21, Getting Help or
alternatively, go to the JetStream website at www.navisworks.com [http://www.navisworks.com].
33
Page 44

Chapter 6. File Management
With JetStream Roamer you can open a wide variety of native 3D CAD file types without having to have
the CAD application on your machine. See Chapter 7, Converting Files for more detailed information on
these file formats and their options. File management all happens with the File menu and the Standard
toolbar.
6.1. File Menu
The File menu includes the following items:
• New
• Refresh
• Open
• Open URL
• Append
• Merge
• Save
• Save As
• Publish
• Print
• Print Preview
• Print Setup
• Delete File
• Send
• Import
• Export
• Recently opened files
• Exit
6.2. New Files
This option resets JetStream and closes existing files.
34
Page 45

To create a new file
• Go to File, New
or
• Click New on the Standard toolbar.
6.3. Refreshing Files
When working in JetStream, it is possible that others may be working on the CAD files you are currently
reviewing. For example, if you are coordinating various disciplines on a project, then you may have an
overall .nwf file referencing numerous design files. During the iterative stages of the project, any member
of the design team could potentially be modifying their CAD files. To ensure the data you are reviewing is
current, JetStream provides a refresh function to reload any files that have been modified since
commencing the review session. This feature does not reload all of the files you have loaded, merely
those modified since last opening them.
File Management
To refresh your scene with the latest versions of the currently loaded model files
• Go to File, Refresh...
or
• Click Refresh on the Standard toolbar.
6.4. Opening Files
With JetStream Roamer you can open a wide variety of native CAD file types without having to have the
CAD application on your machine. See Chapter 7, Converting Files for more detailed information on these
file formats and their options. To open a model file
• Go to File, Open...
or
• Click Open on the Standard toolbar.
Note
The standard Open dialog use of Shift and Control keys allows multiple files to be selected and
35
Page 46

File Management
appended to the current set of models.
6.5. Opening Files via URL
With JetStream Roamer you can open JetStream published .nwd files via the Internet. Having uploaded
your .nwd file to a web server, this file can then be opened directly from within JetStream. Utilizing
JetStream technology, it will not be necessary for the entire file to be downloaded before navigation can
commence - between 10% and 50% will be sufficient for this, depending on the file structure. (The greater
the hierarchical structure of the model, the closer to 50% will be required for navigation to commence.
Similarly, the lesser the hierarchical structure of the model, the closer to 10% will be required).
To open a file via a URL:
• Go to File, Open URL...
6.6. Appending Files
JetStream enables you to build up a complex scene from smaller models by appending, or uniting,
multiple model files together, which can be of any type that JetStream Roamer supports. (See Chapter 7,
Converting Files for more detailed information on these file formats and their options).
Each file has its own units and when appending more files to the scene, each file is automatically scaled
to match the units of the first file loaded into the scene. Each file type has a default unit associated with it
that it uses when loading files of that type. You can change this associated unit in the Units tab of the
Global Options dialog (see Section 17.10, “ Units Options ” for more detailed information). However,
once a file is loaded, you can change its unit scaling using the Edit, File Units and Transform function.
See Section 11.10, “ Setting a File's Units and Transform ” for more information.
The combined set of models may be published as a single JetStream .nwd file using the JetStream
Publisher plugin. These models can then be viewed with NavisWorks Freedom™ free viewer. See
Section 22.1, “ Publishing from Roamer ” for more information.
You can also save the combined set of models as an .nwf file. No geometry is saved in this format, but a
list of appended files, along with their path relative to the .nwf file is saved, along with any overrides,
comments, redlines, viewpoints or other JetStream specific information. See Section 6.8, “ Saving Files ”
for more information on saving files.
To append a file
• Go to File, Append...
or
• Click Append on the Standard toolbar.
Note
The standard Open dialog use of Shift and Control keys allows multiple files to be selected and
appended to the current set of models.
36
Page 47

6.7. Merging Files
When merging multiple .nwf files, that each comprise the same reference files, JetStream will only load a
single set of the combined models, along with all review markup (such as tags, viewpoints or comments)
from each .nwf file. Any duplicate geometry or markup will be removed when merged. See Section 7.1.1, “
NWF Files ” for more information on .nwf files.
To merge a file:
• Open the first file to be merged, (see Section 6.4, “ Opening Files ” for information on how to do this).
Then
• Go to File, Merge...
or
• Click Merge on the Standard toolbar.
File Management
Finally
• Browse to and select the file, or files, to be merged.
Note
The standard Open dialog use of Shift and Control keys allows multiple files to be selected and
merged with the currently loaded model.
Merging TimeLiner Data
If a TimeLiner license is available, and two or more merged files contain TimeLiner data, limited merging
can be done with this data. Three scenarios are handled.
• If the two TimeLiner data sets are identical, then merging of files can occur without issue.
• If the two TimeLiner data sets are completely unrelated, merging of data in this context will not be
successful
• If the two TimeLiner data sets contain the same Primary link then the data set with the most recent link
(i.e. the newest file date) is chosen over the other. If the Primary links are different, then the data set
with the highest number of tasks will be used, and links will be re-attached wherever possible.
For more information on TimeLiner, see the TimeLiner book.
6.8. Saving Files
37
Page 48

File Management
When you have finished reviewing a model or a set of models and are exiting JetStream, you are
prompted to save. When saving to a JetStream .nwf file, only a list with pointers to the files currently
loaded is saved, along with the scene's environment, the current view, clash results (if available) and
viewpoints. If you want to take a snapshot of the scene, including all geometry, then you need to publish
an .nwd file. See Section 6.10, “ Publishing Files ” for information on how to do this.
Saving a file
1.
• Go to File, Save
or
• Click Save on the Standard toolbar.
2. Enter a name and location for the file, if you wish to change the existing name.
3. Click Save to save the file or Cancel to return to JetStream without saving.
6.9. Saving and Renaming Files
This is exactly the same as the Save function (see Section 6.8, “ Saving Files ”, but it gives you the
opportunity to rename the file that you are saving.
Saving a file with a new name
1. Go to File, Save As...
2. Enter a new name and location to store the file.
3. Click Save to save the file or Cancel to return to JetStream without saving.
6.10. Publishing Files
Publishing a NavisWorks .nwd file takes a snapshot of the current scene that cannot then be changed
(i.e. files cannot be deleted from a published .nwd file). The file can also be used with the NavisWorks
Freedom™ free viewer. This command is only available if you have the JetStream Publisher plugin.
See Section 22.1, “ Publishing from Roamer ” for more information.
6.11. Printing
38
Page 49

File Management
You can print a hard copy of the current viewpoint to any printer or plotter.
6.11.1. Printing the Current Viewpoint
When the print option is selected it prints the current viewpoint scaled to fit and centered on the page.
Note
If you would prefer to export an image for printing, see Section 6.15.2, “ Exporting an image ” for
more information.
Printing the current viewpoint
1.
• Go to File, Print...
or
• Click Print on the Standard toolbar.
2. Check the printer settings are as required and click OK to print the viewpoint or Cancel to return to
JetStream without printing anything.
Note
The maximum image size is 2048x2048 pixels.
The Properties button controls printer-specific ink and paper settings.
6.11.2. Previewing Printouts
Before you print out a copy of the model you are working on, you may wish to see how it will appear.
Previewing a model before printing
1. Go to File, Print Preview....
2. Use Zoom In and Zoom Out to do just that with the preview image.
3. Click Print, OK to confirm and print the image, or click Close to return to JetStream.
39
Page 50

File Management
6.11.3. Setting up printouts
This option enables the setting up of paper size and orientation options.
Changing the print setup
1. Go to File, Print Setup....
The print setup dialog box is displayed.
2. Make changes as required to the paper, orientation and click on Properties to change
printer-specific settings.
3. Click OK to print the image, or click Cancel to return to JetStream.
6.12. Deleting Files
This command deletes the selected files from the scene. It is only available when more than one file is
appended in the scene.
Note
You cannot delete files from within a "published" NavisWorks .nwd file (see Section 6.10, “
Publishing Files ”. You can only delete appended files, whether they were appended manually, or
within an .nwf file.
To delete a file
• Go to File, Delete File
Note
It is not possible to undo this command.
6.13. Emailing Files
JetStream is a communication tool and the Send feature makes it easy for you to send your current
model along with its viewpoints. The Send command uses your current mail exchange service and will
prompt you to set one up if it cannot find one.
Sending a mail will first save the current working file, so you are guaranteed to always send the latest
review.
To send a file by email from within JetStream
• Go to File, Send...
40
Page 51

File Management
or
• Click Send on the standard toolbar.
This accesses your mail package and sends the current file as an email attachment.
Receiving 3D Mail
If an .nwf file is received, JetStream will search for the appended files first using the absolute path that the
sender originally saved the file with. This is useful if a team is on a local network and the files can be
found using the Universal Naming Convention (UNC). Otherwise, a team not sharing a server can
organize a project using the same file hierarchy and drive letter and JetStream can find the files this way.
If JetStream is unable to find the files, then the recipient can save the attached .nwf in a directory where
all the appended files are located. The .nwf can then look for these files relative to its own location.
This way, you are able to move a whole sub-directory from your projects directory to a completely new
location. Save the .nwf file in this new place and it will be able to search for the files from here.
6.14. Importing Files
The import option inputs Intergraph PDS review data, including:
• PDS Tags (.tag)
• PDS Display Sets (.dst)
It is also possible to import data that has been exported from previous JetStream sessions, including:
• Viewpoints XML (.xml)
• Search XML (.xml)
• Search Set XML (.xml)
• Clash Test XML (.xml)
See Section 6.15, “ Exporting Files ” for more information on exporting data from JetStream.
Note
Clash test .xml files can only be imported if you have a valid license for the Clash Detective
plugin. See the Clash Detective user guide for more information on importing clash test criteria.
6.14.1. Importing PDS Tags
Tag information from Intergraph PDS contains a unique ID, saved viewpoint and corresponding
comments. Tag information created in JetStream may also be exported to be used in Intergraph PDS.
See Section 6.15, “ Exporting Files ” for more information.
41
Page 52

File Management
Importing PDS tag files
1. From the File menu, choose Import, PDS Tags...
The Import dialog is displayed:
2. Locate and Open the .tag file to import the PDS tag data, or click Cancel to return to JetStream
without importing a file.
6.14.2. Importing PDS Display Sets
Display sets from Intergraph PDS contain detailed criteria, defining item selections. When imported into
JetStream, .dst files create search sets in the Selection Sets control bar. See Section 9.3, “ Selection and
Search Sets ” for more information on search sets.
Importing PDS display sets to create search sets
1. From the File menu, choose Import, PDS Display Sets...
The Import dialog is displayed:
42
Page 53

File Management
2. Locate and Open the .dst file to import the PDS display sets, or click Cancel to return to JetStream
without importing a file.
6.14.3. Importing Viewpoints XML
Viewpoints can be imported into JetStream via an .xml file, enabling you to bring viewpoints into the
current scene from another model file. For example, if you are working on different versions of the same
model, you can save viewpoints in one version of the file, export them and then import them into the other
version. See Section 13.1, “ Saving Viewpoints ” for more information on saving viewpoints and
Section 6.17, “ Exporting Viewpoints ” for more information on exporting viewpoints to an .xml file.
Importing viewpoints and associated data
1. From the File menu, choose Import, Viewpoints XML...
The Import dialog is displayed:
43
Page 54

File Management
2. Locate and Open the viewpoints .xml file to import the viewpoints, or click Cancel to return to
JetStream without importing a file.
6.14.4. Importing Search XML
Search criteria can be imported into JetStream which populates the Find Items control bar. The search
can then be run on the current model, finding any items that match the specific criteria. See Section 10.2,
“ Finding Items ” for more information on searching the model for items based on their properties.
Importing search criteria into the Find Items control bar
1. From the File menu, choose Import, Search XML...
The Import dialog is displayed:
44
Page 55

File Management
2. Locate and Open the search .xml file to import the search criteria into the Find Items control bar, or
click Cancel to return to JetStream without importing a file.
6.14.5. Importing Search Sets XML
Search sets can be imported into JetStream which populates the Selection Sets control bar with
pre-defined search sets. Selecting an imported search set will define the current Find Items criteria and
search the current model accordingly. See Section 10.2, “ Finding Items ” for more information on
searching the model for items based on their properties.
Importing search sets into the Selection Sets control bar
1. From the File menu, choose Import, Search Sets XML...
The Import dialog is displayed:
45
Page 56

File Management
2. Locate and Open the search sets .xml file to import the search sets into the Selection Sets control
bar, or click Cancel to return to JetStream without importing a file.
6.15. Exporting Files
The export option outputs the current viewpoint in one of four ways:
• Piranesi EPix format (.epx)
• Windows Bitmap (.bmp)
• Portable Network Graphics format (.png)
• JPEG format (.jpg)
• Rendered image formats (various)
Note
Rendered image files can only be exported if you have a valid license for the Presenter plugin.
See the Presenter user guide for more information on exporting rendered images.
It is also possible to export an animation, or a TimeLiner sequence to:
46
Page 57

File Management
• Windows AVI (.avi)
Or, as a sequence of individual frames to:
• JPEG format (.jpg)
• Portable Network Graphics format (.png)
• Windows Bitmap (.bmp)
Note
TimeLiner sequences can only be exported if you have a valid license for the TimeLiner plugin.
See the TimeLiner user guide for more information on exporting TimeLiner sequences.
The export option additionally outputs a variety of review data, including:
• PDS Tags (.tag)
• Viewpoints XML (.xml)
• Current Search XML (.xml)
• Search Sets XML (.xml)
• Clash Test XML (.xml)
• Viewpoint Report HTML (.html)
Note
Clash test .xml files can only be exported if you have a valid license for the Clash Detective
plugin. See the Clash Detective user guide for more information on exporting clash test criteria.
The export option outputs a number of additional review file types:
• Autodesk DWF (.dwf)
• Google Earth KML (.kml)
6.15.1. Exporting to a Piranesi EPix format
Exporting an .epx file for rendering in Informatix’s Piranesi
1. From the File menu, choose Export, Piranesi EPix...
2. Use the Browse... button to locate a destination and enter a new filename to export, if you wish to
change from the existing filename and location.
47
Page 58

3. Select the sizing options for the file to be exported. (See Section 6.15.4, “ Controlling the size of an
image ” for more details).
4. Click Save to export the file, or Cancel to return to JetStream.
6.15.2. Exporting an image
Exporting to a Bitmap, PNG or JPEG
1. With the view to be exported in the main navigation window, from the File menu choose Export,
Image....
The Image Export dialog box is displayed:
File Management
2. Select the format of the image you wish to export:
• Windows Bitmap
• Portable Network Graphics (PNG)
Select Interlacing and Compression options from the PNG Options dialog box:
48
Page 59

File Management
• JPEG
Select Compression and Smoothing options from the JPEG Options dialog box:
3. Select the sizing options for the file to be exported. (See Section 6.15.4, “ Controlling the size of an
image ” for more details).
4. Click OK to continue, or click Cancel to return to JetStream without exporting an image.
5. Enter a new name and location to store the file.
6. Click Save to export the file, or Cancel to return to JetStream.
6.15.3. Exporting an animation
Exporting an animation to an .avi file, or a sequence of image files
49
Page 60

File Management
1. With an animation selected, from the File menu, choose Export, Animation...
The Animation Export dialog box will be displayed:
2. Select the Source from which you wish to export the animation.
Note
This can either be the Roamer default, Current Animation (the currently selected animation), or,
provided that you have a valid license for the TimeLiner plugin, a TimeLiner Simulation.
3. Select the Renderer with which you wish to render the exported animation.
Note
This can either be the Roamer default, OpenGL, or, provided that you have a valid license for the
Presenter plugin, Presenter.
50
Page 61

File Management
4. Select the Format in which you wish the output to be exported in:
• Windows AVI
Click Options... to select the Video Compression you require.
Note
Clicking Compression will open a standard Windows™ dialog box that allows you to choose
which codec to use, as well as its configuration. Only those codecs currently installed will be
shown and the PC that the .avi file will be run on will also need the same codec installed.
• JPEG (sequence of static images, taken from individual frames)
Click Options... to set the Compression and Smoothing levels you require.
• PNG (sequence of static images, taken from individual frames)
Click Options... to set the Interlacing and Compression levels you require.
• Windows Bitmap (sequence of static images, taken from individual frames)
5. Select the sizing options for the file to be exported. See Section 6.15.4, “ Controlling the size of an
image ” for more details.
For animations, you should also enter the number of frames per second (FPS) you require.
6. Click OK to continue, or Cancel to return to JetStream.
7. Enter a new name and location to store the file(s).
Note
For image sequences, the name will contain the first integer of a 'counter', e.g. 001. Subsequent
frames will be automatically incremented by one, e.g. 002, 003, 004 and so on.
8. Click Save to export the file(s), or Cancel to return to JetStream.
6.15.4. Controlling the size of an image
51
Page 62

File Management
The size of the exported image/animation can be set in various ways:
Explicit allows you full control of the width and height (the dimensions are in pixels).
Aspect Ratio allows you to set the height, and the width is automatically calculated from the aspect ratio
of your current view.
Current View takes the width and height of your current view.
Anti-Aliasing smoothes the edges of the exported images. The higher the number, the smoother the
image, but the longer they take to export. 4x should be adequate for most situations.
Note
There is a maximum size of 2048 x 2048 pixels, for Roamer OpenGL output.
6.16. Exporting PDS Tags
1. From the File menu, choose Export, PDS Tags...
2. Enter a new filename and location, if you wish to change from those suggested.
3. Click Save to export the .tag file, or Cancel to return to JetStream.
6.17. Exporting Viewpoints
Viewpoints can be exported from JetStream to an .xml file. These viewpoints contain all associated data,
including camera positions, sections, hidden items and material overrides, redlines, comments, tags and
collision detection settings.
Once the viewpoint data is exported to this text-based file format, it can either be imported into other
JetStream sessions, or it can be accessed and used in other applications. For example, you may want to
set up the same viewpoints in your CAD application.
52
Page 63

File Management
1. From the File menu, choose Export, Viewpoints XML...
2. Enter a new filename and location, if you wish to change from those suggested.
3. Click Save to export the .xml file, or Cancel to return to JetStream.
6.18. Exporting Current Search
The search criteria specified in the Find Items dialog box can be exported to an .xml file. This can then be
imported into other JetStream sessions. For example, if you have specified a complicated search criteria,
containing various logic statements, that relates to all projects you work on, then this feature allows you to
specify it once and use it on all projects.
1. From the File menu, choose Export, Current Search XML...
2. Enter a new filename and location, if you wish to change from those suggested.
3. Click Save to export the .xml file, or Cancel to return to JetStream.
6.19. Exporting Search Sets
Saved search sets can be exported from JetStream as an .xml file. These can then be imported into other
JetStream sessions and re-used. For example, if you have a number of generic searches that you
perform on all of your projects, this feature allows you to specify the searches once and use them on all
projects.
1. From the File menu, choose Export, Search Sets XML...
2. Enter a new filename and location, if you wish to change from those suggested.
3. Click Save to export the .xml file, or Cancel to return to JetStream.
6.20. Exporting Viewpoints Report
An .html file can be exported containing a JPEG of all of the saved viewpoints and associated data,
including camera position and comments.
Note
To customize the appearance or layout of the html file, you will need to edit the
viewpoints_report_lang.xsl file, where lang is a code representing your language. The installed
file is located in the stylesheets subdirectory of the JetStream install directory. You can copy
the edited file to the stylesheets subdirectory of any of the JetStream search directories. See
Section 17.12, “ Search Directories ” for more information.
53
Page 64

File Management
1. From the File menu, choose Export, Viewpoints Report HTML...
2. Enter a new filename and location, if you wish to change from those suggested.
3. Click Save to export the report, or Cancel to return to JetStream.
6.21. Exporting to Autodesk DWF
Autodesk DWF files can be exported from JetStream if a valid Publisher license is available. The exporter
creates a .dwf file containing:
• All geometry
• All materials
• Per-vertex colors
• Properties (where available)
To export a DWF file:
1. From the File menu, choose Export, Autodesk DWF...
2. Enter a new filename and location, if you wish to change from those suggested.
3. Click Save to export the file, or Cancel to return to JetStream.
6.22. Exporting to Google Earth KML
Google Earth KML files can be exported from JetStream. The exporter creates a compressed KML file
with the extension .KMZ and supports the export of:
• Triangles
• Lines
• Materials (colour and flat transparency only)
• Viewpoints (adjustments may occur due to Google Earth limitations)
• Model Hierarchy
• Hyperlinks (currently only URLs work correctly in Google Earth)
1. From the File menu, choose Export, Google Earth KML.... This brings up the following dialog.
54
Page 65

File Management
2. Select Export model relative to terrain height to put Google Earth in a mode where all heights are
measured from the surface of the ground. When this is off all heights are measured from sea-level.
Note
When positioning a model relative to sea level, the height of the Google Earth reference points
must also be measured relative to sea level. When positioning a model relative to the ground, the
Google Earth reference points must be measured relative to the ground.
Google Earth always places new placemarks at an altitude of zero, irrespective of whether that is
relative or absolute.
3. Collapse on export allows different levels of collapsing parts of the model hierarchy in the exported
file.
• None ensures the whole heirarchy is exported
• All objects collapses everything into one node
55
Page 66

File Management
• Files collapses each file into one node
• Layers collapses each layer into one node
4. Limit number of Polygons should be enabled to restrict the amount of geometry exported into the
output file. Geometry is selected on the basis of taking the most obvious objects in preference to the
fine detail. If the exported file is too large for Google Earth to display, try enabling this and reducing
the number of polygons. View, Scene Statistics in JetStream shows the number of triangles and/or
lines in the current project. By setting a polygon limit you are choosing to export only some of these
items.
Note
Google Earth's ability to handle large numbers of polygons is far more limited than JetStream.
Hence it is worth noting that currently Google Earth will consider 1,000,000 polygons as being a
big model.
5. The Origin position values are the first pair of reference points on the Google Earth surface, and
must always be defined. The JetStream reference point will always be positioned to exactly overlay
the Google Earth reference point.
Second and Third reference points can be used, and if enabled then the position and orientation of
the model can be more accurately defined.
6. Use the Import buttons to read-in saved placemark locations from KML files exported from Google
Earth.
The Origin Import button differs slightly from the other two; if the KML file contains multiple
placemarks, this button will offer the user the choice of importing second and third reference points if
available. The other two buttons will only import a single reference point.
7. The Pick buttons allow the reference point locations to be selected in the main 3D view.
These points must be visible in the main 3D view prior to exporting, as once the KML Options dialog
is open you will not be able to navigate before picking.
Note
You may wish to use View, Split to split the main 3D view enabling you to have separate views of
each reference point.
6.23. Quitting JetStream
Quitting JetStream
1. Go to File, Exit
2. If the model has been changed since opening it, JetStream will ask you whether you want to save
any changes. Respond appropriately and JetStream will then close.
56
Page 67

Chapter 7. Converting Files
With JetStream Roamer you can open a wide variety of native CAD file types without having to have the
CAD application on your machine. Files read by JetStream include .dwg, .dgn, .dxf and Inventor. For a full
list of CAD files that JetStream can open, please refer to the web site www.navisworks.com
[http://www.navisworks.com]. This site will also explain which entities are read by JetStream and which
are ignored, as well as any object property information that is converted. It is possible to load multiple files
of different formats into the same scene in JetStream and set their units and origins appropriately. There
are also a number of options to help optimize native CAD file reading.
In addition to these native CAD files, JetStream Roamer also reads its own native .nwc (NavisWorks
Cache), .nwf (NavisWorks File review) and .nwd (published NavisWorks Data) file formats.
Some file formats, such as those from Autodesk's Viz and Graphisoft's ArchiCAD cannot be read directly
by JetStream Roamer but there are exporters available to export to the NavisWorks .nwc file format from
these applications. See Section 7.2, “ File Exporters ” for more details.
7.1. File Readers
As well as the NavisWorks file formats, .nwf, .nwd and .nwc, Roamer can open a variety of native CAD
and scanning applications' formats:
• .dwg
• Bentley AutoPLANT .dwg, .mdb
• .dxf
• .dwf
• .3ds
• .dgn
• .man
• .iges
• .step
• Inventor parts & assemblies
• VRML world files (.wrl;.wrz)
• Riegl Scan data (.3dd)
• Faro Scan data (.fls, .flw, .iQscan;.iQmod;.iQwsp)
• Leica Scan data (.pts;.ptx)
• Z+F Scan data (.zfc;.zfs)
• ASCII Laser Scan data (.asc;.txt)
• STL Stereolithography data (.stl)
57
Page 68

• AVEVA Review (.rvm)
• IFC files (.ifc)
• Sketchup (.skp)
7.1.1. NWF Files
.nwf files can be saved by JetStream Roamer in order to save a current review of the scene. No geometry
is saved in this format, but a list of appended files, along with their path relative to the .nwf file is saved,
along with any overrides, comments, redlines, viewpoints or other JetStream specific information. .nwf
files are useful when the CAD files are still changing throughout the design period, as the latest files are
loaded each time the .nwf file is opened.
7.1.2. NWD Files
.nwd files are files published by JetStream Publisher and are snapshots of the model at a certain time.
See Section 22.1, “ Publishing from Roamer ” for more information on this.
NWD Options
Converting Files
JetStream allows you to enable and disable geometry compression and select whether the precision of
certain options should be reduced when saving (or publishing) .nwd files. Geometry compression results
in less memory being required and therefore smaller .nwd files.
Setting NWD options
1. Go to Tools, Global Options, and select the NWD tab.
The NWD dialog box is displayed.
58
Page 69

Converting Files
2. Uncheck the Enable check box if you wish to have no geometry compression.
3. Check the coordinates check box if you wish to reduce the precision of coordinates.
Enter the value to which you wish coordinates to be precise to. The larger the value, the less precise
coordinates will be and the smaller the .nwd will be.
59
Page 70

4. Check the normals check box to reduce the precision of normals.
5. Check the colors check box to reduce the precision of colors.
6. Check the texture coordinates check box to reduce the precision of texture coordinates.
7. Click OK to set these options or Cancel to exit the dialog without setting them.
7.1.3. NWC Files
Cache files (.nwc) are used when reading native CAD files, such as files from AutoCAD or MicroStation.
By default, when JetStream Roamer opens a native CAD file, it first checks in the same directory whether
there is a JetStream cache file present with the same name as the CAD file but with a .nwc extension. If
there is, and this cache file is newer than the native CAD file, then JetStream will open this file instead as
it has already been converted to JetStream format and therefore will open much quicker. If, however,
there is no cache file present, or the cache file is older than the native CAD file, then JetStream will have
to open the CAD file and convert it. At this point, it will by default write a cache file in the same directory
and with the same name as the CAD file, but with the .nwc extension, for speeding up the opening of this
file in future.
Converting Files
See Section 7.2, “ File Exporters ” for more information on why you might want to use the .nwc file
exporters, which CAD applications you can export from and how.
NWC Options
JetStream allows you to enable and disable the reading and writing of cache files.
This describes the default process. The options here enable you to enable and disable the reading and
writing of cache files. For example, you may want to disable reading cache files to ensure that JetStream
converts every native CAD file each time it is read, even though this is a slower process. Also, you may
want to disable the writing of cache files in order to save on disk space and clutter, even though the
cache files are generally many times smaller than the original native CAD files.
Setting NWC options
1. Go to Tools, Global Options, and select the NWC tab.
The Caching dialog box is displayed.
60
Page 71

Converting Files
2. Uncheck the Read Cache box if you wish to ignore any existing caches when opening a native CAD
file.
3. Uncheck the Write Cache box if you do not wish to write a cache file the next time a native CAD file
is loaded.
61
Page 72

4. Uncheck the Enable box if you wish to have no geometry compression when .nwc files are written.
5. Check the coordinates box if you wish to reduce the coordinate precision.
Enter the value to which you want coordinates to be precise to.
6. Check the normals box...
7. Check the colors box...
8. Check the texture coordinates box...
9. Click OK to set these options or Cancel to exit the dialog without setting them.
7.1.4. DWG and DXF Files
JetStream Roamer's .dwg and .dxf file reader uses Autodesk's ObjectDBX™ technology and so is
guaranteed to read all object geometry and information for those third party applications that utilize the
ObjectDBX Framework.
The reader currently supports all surface (shaded) entities (3D faces, rectangular meshes, polyface
meshes, circles, extruded lines and so on), including Proxy Graphics and custom objects such as ACIS
based entities (3D Solid, Region), lines, points and snap points. Complex entities (shapes, dimensions,
text) are not supported. The structure of the drawing is preserved including xrefs, blocks, inserts,
AutoCAD color index, layers, views and active viewpoint. Entities are colored using the AutoCAD Color
Index (ACI), so will match those in an AutoCAD "shaded" view.
Converting Files
There is also an .nwc file exporter for AutoCAD - see Section 7.2.1, “ AutoCAD .nwc Exporter ” for more
details.
Note
The reader supports files from all products based on AutoCAD 2007 and earlier.
Supported Entities
• All 2D and 3D geometry, including arcs, lines, polylines with non-zero thickness, ACIS objects (regions
and solids), polygon and polyface meshes, 3D faces and surfaces.
• Points and snap points
• Lines, polylines, circles, arcs with zero thickness.
• Named views.
• Layers.
• Colors.
• Blocks, inserts and multiple inserts.
• Groups.
• External references (xrefs).
62
Page 73

Converting Files
• Hyperlinks.
• Entity handles.
• Attributes.
• Textures (requires a valid JetStream Presenter license).
• File properties.
Unsupported Entities
• Lights.
• Splines.
• Multi-lines.
• Linetypes.
• Dimensions and leaders.
• Raster bitmaps.
• Text or multi-line text.
• Construction lines (xlines and rays).
• Hatching.
DWG and DXF File Reader Options
Setting the .dwg and .dxf file reader options
1. Go to Tools, Global Options, DWG/DXF
The DWG/DXF dialog is displayed
63
Page 74

Converting Files
2. Enter the Faceting Factor (the value must be greater than 0). The higher the value, the more
JetStream will facet rounded entities and therefore the smoother they will appear. See Faceting
Factor for more information.
3. Enter the Max Facet Deviation. This will facet entities to within the specified tolerance. See Max
64
Page 75

Converting Files
Facet Deviation for more information.
4. Check the Split by Color check box if you want to be able to select parts of compound entities in
JetStream. For example, a window object from Architectural Desktop may be split into a frame and a
pane. If this check box is not checked, then you will only be able to select the window object as a
whole, whereas if you check this check box, you will be able to select the individual pane and frame.
However, the names of the pane and frame will be based on their color.
5. From the Default Decimal Units drop-down, choose the type of units that JetStream will use when
opening .dwg and .dxf files that were created with decimal drawing units. Note that .dwg and .dxf files
do not specify the units they were created in. If the units turn out to be wrong, they can be easily
changed using the File Units and Transform function (see Section 11.10, “ Setting a File's Units
and Transform ” for more details).
6. Check the Merge 3D Faces check box if you want to reduce the complexity of the model as seen in
the selection tree by interpreting ajoining faces with the same color, layer and parent as a single item.
Leaving unchecked leaves these entities as separate items in JetStream.
7. Check the Merge Lines check box if you want to reduce the complexity of the model as seen in the
selection tree by interpreting ajoining lines with the same color, layer and parent as a single item.
Leaving unchecked leaves these entities as separate items in JetStream.
8. Check the Convert Off check box if you want to read layers that are switched off in .dwg and .dxf
files. They will be converted but hidden in JetStream.
9. Check the Convert Frozen check box if you want to read layers that are frozen in .dwg and .dxf files.
They will be converted but hidden in JetStream.
10. Check the Convert Entity Handles check box if you want to read entity handles as a property
attached to the item in JetStream.
11. Check the Convert Groups check box if you want to retain the groups from .dwg and .dxf files,
adding another selection level to the selection tree. See Chapter 9, Selecting Items for more
information on selecting objects and the selection tree.
12. Check the Convert XRefs check box if you want to convert any external reference files contained
within the .dwg file. Unchecking this will give you more control over which files you append into
JetStream.
13. Check the Merge XRef Layers check box if you wish to merge the layers of external reference files
into those of the main .dwg file. Leaving this unchecked will keep the external reference file separate
within the selection hierachy of JetStream.
14. Check the Convert Views check box if you want to convert the named views from the file into
JetStream viewpoints.
15. Check the Convert Points check box if you want to read any points from .dwg and .dxf files. See
Section 12.5, “ Display Options ” for more information on how to display these in JetStream.
16. Check the Convert Lines check box if you want to read any lines and arcs from .dwg and .dxf files.
See Section 12.5, “ Display Options ” for more information on how to display these in JetStream.
17. Check the Convert Snap Points check box if you want to read any snap points from .dwg and .dxf
files. See Section 12.5, “ Display Options ” for more information on how to display these in
JetStream.
18. The Loader for 2004 dwg combo box allows selection of which version of ObjectDBX is used when
loading AutoCAD 2004 .dwg files. This allows you to select support for the correct version of object
65
Page 76

Converting Files
enablers that may be used within the file. Please note that once any particular version of ObjectDBX
is loaded, which occurs during reading of a .dwg or .dxf file, that the version in use will not change
until JetStream is restarted.
19. Check the Load Material Definitions check box if you want to load material definitions into
JetStream from Autodesk Architectural Desktop .dwg files.
20. Check the Use ADT Standard Configuration check box to force reading of Autodesk Architectural
Desktop .dwg files using the Standard display configuration. If unchecked, geometry and materials
will be read in according to whether they are displayed in the currently saved display configuration.
21. Check the Convert Hidden ADT Spaces check box to perform conversion of space objects that lack
any visible 3D geometry in ADT (for example if they lack floor or ceiling thicknesses). This will result
in corresponding hidden objects appearing in JetStream Roamer. The normal behaviour for space
objects that have visible 3D geometry in ADT is unaffected.
22. The Material Search Paths edit box may contain file paths in a semi-colon separated list that will be
searched for texture files used in Autodesk Architectural Desktop materials. Default Autodesk paths
are automatically searched and need not be entered.
Note
For Autodesk Architectural Desktop materials to be read into JetStream Roamer, a valid
Presenter license is required.
23. Clicking the Advanced button will open a dialog which giving you the option to read object
information from various third party applications that are built on AutoCAD.
66
Page 77

Check those applications you wish to read information from.
24. Click OK to set these options or Cancel to exit the dialog without setting them.
7.1.5. DWF Files
Autodesk's DWF (Design Web Format) was specifically developed by Autodesk as a file format for
architects, engineers, and GIS professionals to share design data. The JetStream file reader reads all 3D
geometry, as well as textures and properties. A full list is given below.
Supported Entities
• All 3D geometry
• Texture maps (Requires a valid JetStream Presenter license)
• Texture coordinates
Converting Files
• Colors (per-vertex, per-face)
• Property fields
• Categories
Unsupported Entities
• 2D lines/plot sections
• Thumbnails
• Marked-up sketches
• More than one 3D section per file (any others are ignored)
• NURBS Surfaces
• Cameras
DWF File Reader Options
Setting the .dwf file reader options
1. Go to Tools, Global Options, DWF
The DWF dialog is displayed
67
Page 78

Converting Files
2. Enter the Faceting Factor (the value must be greater than 0). The higher the value, the more
JetStream will facet rounded entities and therefore the smoother they will appear. See Faceting
Factor for more information.
3. Enter the Max Facet Deviation. This will facet entities to within the specified tolerance. See Max
68
Page 79

Converting Files
Facet Deviation for more information.
4. Check the Extract textures check box to load in textures and environment maps associated with the
file. Environment maps will not automatically be set in the scene, and will need to be manually set up
in Presenter.
Note
For DWF texture maps to be read into JetStream Roamer, a valid Presenter license is required.
5. Click OK to set these options or Cancel to exit the dialog without setting them.
7.1.6. Bentley AutoPLANT Files
Bentley AutoPLANT is based on AutoCAD and as such uses the .dwg file format to store model
geometry. Any settings related to the .dwg file format also affect files from AutoPLANT.
AutoPLANT Object Properties can be stored in external database .mdb files, and JetStream supports
these files through the DataTools functionality. By default JetStream and DataTools are both set up to
support AutoPLANT .dwg and .mdb files, and will be looking for Equipment, Nozzle and Piping Data.
69
Page 80

Converting Files
The settings for these three sets of data can be edited by selecting the appropriate item in the list and
clicking on the Edit button. See Chapter 20, DataTools for more information.
For AutoPLANT properties to be loaded correctly an .mdb file must be located in the same directory as
the .dwg file, with the same filename followed by the .mdb extension. If this file exists, JetStream will
automatically pick it up and use it to show appropriate properties in the Properties window.
70
Page 81

Note
JetStream does not currently support per-project properties.
7.1.7. 3DS Files
3DS is a common file format that is supported by many CAD applications. The JetStream file reader
reads all 2D and 3D geometry as well as texture maps. The hierarchy defined by the keyframe data from
keyframe 0 is preserved, including instancing. Entities are positioned based on keyframe 0.
JetStream Roamer does not read .max files, but instead has exporters for Viz and Max. Entity support is
the same as for the 3ds reader. See Section 7.2.4, “ Viz and Max .nwc Exporter ” for more information.
Textures from .3DS files come through into JetStream Presenter, though you should bear in mind that
.3DS files contain file names in the 8.3 DOS format only and that various formats are not yet supported in
Presenter (see below).
Supported Entities
• All 2D and 3D geometry
Converting Files
• Cameras
• Groups
• Texture maps in the formats: 8-bit color-mapped, 16-bit and 24-bit true color, uncompressed or Run
Length Encoded .tga, .bmp, .jpg, .lwi (LightWork Image). (Requires a valid JetStream Presenter
license).
• Colors (from material color, not wireframe color - ambient, diffuse,shininess, transparency and self
illumination)
Unsupported Entities
• Keyframes (objects are currently taken from keyframe 0)
• Texture maps in the formats: gray-scale .tga, .tif, .gif, .png.
• Other maps (e.g. opacity maps, reflections etc.)
• Wireframe meshes
• Lines, splines
• Points
• Background images
3DS File Reader Options
Setting the .3ds file reader options
71
Page 82

1. Go to Tools, Global Options, 3DS
The 3DS dialog is displayed
Converting Files
2. Check the Convert Hidden check box if you want to read hidden entities from the .3ds file. They will
be converted but hidden in JetStream.
72
Page 83

3. The paths of texture map files are not stored with the texture maps in the model so enter a
semi-colon separated list of paths in Bitmap File Search Paths that the reader will search in when it
finds texture maps in the model.
Note
For 3DS texture maps to be read into JetStream Roamer, a valid Presenter license is required.
4. From the Default Units drop-down, choose the type of units that JetStream will use when opening
.3ds files. If the units turn out to be wrong, the model can be easily rescaled using the File
Transform function (see Section 11.10, “ Setting a File's Units and Transform ” for more details).
5. Click OK to set these options or Cancel to exit the dialog without setting them.
7.1.8. DGN and PRP Files
JetStream Roamer can read 3D .dgn and .prp files from Bentley's MicroStation, but does not support .cel
files or 2D .dgn files. Reference files and instances of cells are respected and the selection tree reflects
this file structure.
Converting Files
There is also an .nwc file exporter for MicroStation - see Section 7.2.3, “ MicroStation .nwc Exporter ” for
more details.
Note
The reader supports files from MicroStation 95, SE and /J. It does not support MicroStation
Modeller and any versions of MicroStation before 95.
The DGN reader additionally does not support auxiliary coordinate systems.
Supported Entities
• All 2D and 3D geometry including shapes, complex shapes, meshes, cones, surfaces, B-spline
boundaries, solids, SmartSolids and Feature Solids, lines, arcs and ellipses.
• Splines and B-spline curves.
• Lights.
• Levels.
• Cells and shared cells and their instancing.
• Colors and ambient, diffuse and shininess properties of materials from .pal and .mat palette and
material files.
• Texture maps (requires a valid JetStream Presenter license).
• Reference files including aliases.
• Text will be converted into hyperlink tags (see Section 16.4, “ Hyperlinks ” for details on hyperlinks).
• Family, Part and Texture information from TriForma, and PDS object information from .drv files.
73
Page 84

Converting Files
• DMRS and database linkage and association ID's.
Unsupported Entities
• Raster bitmaps.
• Dimensions and leaders.
DGN File Reader Options
Setting the .dgn file reader options
1. Go to Tools, Global Options, DGN
The DGN dialog is displayed
74
Page 85

Converting Files
2. Enter the Faceting Factor (the value must be greater than 0). The higher the value, the more
JetStream will facet rounded entities and therefore the smoother they will appear. See Faceting
Factor for more information.
3. Enter the Max Facet Deviation. This will facet entities to within the specified tolerance. See Max
75
Page 86

Converting Files
Facet Deviation for more information.
4. Check the Convert Hidden Items check box if you want to read hidden entities from the .dgn file.
They will be converted but hidden in JetStream.
5. Check the Show Hidden Items check box if you want to show all entities in the .dgn file whether they
are set as hidden or not. This option will only work if Convert Hidden Items is also checked.
6. Check the Convert Lines and Arcs check box if you want to read lines, splines, curves, arcs, circles
or ellipses from the .dgn file.
7. Check the Merge Lines and Arcs check box if you want to reduce the complexity of the model as
seen in the selection tree by interpreting adjoining lines etc. with the same color, level and parent as
a single item. Leaving unchecked leaves these elements as separate items in JetStream.
8. Check the Convert Text check box if you want to read text from the .dgn file. Text will be converted
into smart tags in JetStream.
9. Enter the Shape Merge Threshold into the box. See Shape Merge Threshold for more information
on Shape Merge Threshold.
10. Check the Convert References check box if you want to read reference files from the .dgn file.
11. Check the Ignore Unres. References check box if you want to ignore unresolved reference files
from the .dgn file. If this check box is unchecked, then you will be presented with a dialog to find any
unresolved reference files at run time.
12. Check the Use Level Symbology check box if you want to use the level symbology from
MicroStation so that items in JetStream take their color from level rather than the default element
color in MicroStation.
13. MicroStation has the concept of a “global origin”, which is where (0, 0, 0) is located (assuming there
are no active ACSs). Changing this global origin in MicroStation doesn't actually move anything; it
simply changes the reporting of coordinates. However, when attaching references in MicroStation,
you can tell it to align global origins.
Check the Align Global Origins check box if you want to use this functionality when loading DGN
files into JetStream. When two DGN files are appended together with this check box checked, their
global origins will be in the same place.
14. Check the Use Materials check box if you want to use MicroStation's materials in place of its colors
in JetStream. If you choose not to export materials, JetStream will assign the same colors as in the
MicroStation scene. Assigning materials will assign the same textures, diffuse, ambient and specular
colors to the elements as in the MicroStation scene.
Note
For MicroStation materials to be read into JetStream Roamer, a valid Presenter license is
required.
15. Enter a semi-colon separated list of paths in Material Search Paths that the reader will search in for
MicroStation palette (.pal) and material (.mat) files in order to convert its materials.
16. Check the Convert PDS Data check box if you want to read object information from Intergraph's
Plant Design System™ while reading the .dgn files. PDS information is read from Intergraph's .drv
files. JetStream looks for a .drv file with the same base name as the .dgn file in the same directory.
17. Check the Convert TriCAD Data check box if you want to read object information from Triplan's
76
Page 87

TriCAD™ while reading the .dgn files.
18. Check the Convert TriForma Data check box if you want to read object information from Bentley's
TriForma™ while reading the .dgn files.
19. Enter a semi-colon separated list of paths in TriForma Dataset Search Paths that the reader will
search for Triforma data set files. User defined datasets will need their directories adding to this list.
20. Enter a View Number if you want to use a specific view for loading. The loader will use the level
visibility of this view when converting items. If you want to use the first active view, set this value to 0.
21. Click OK to set these options or Cancel to exit the dialog without setting them.
7.1.9. MAN Files
JetStream Roamer can read .man files from Informatix's MicroGDS™ version 6.0 or later. MicroGDS™
projects are not supported. The workaround is to first export the desired project window as a .man file.
MicroGDS Renderer materials are shown in their flat-shaded colors in JetStream Shaded display. In Full
Render or Presenter rendering, the full shaders are used. Only the standard LightWorks shaders are
available - those which are unique to MicroGDS are not available inside JetStream - a compromise is
made for shaders which are not available inside JetStream.
Converting Files
• height band color shader is treated as plain grey
• wrapped random color shader is treated as a plain color using the flat-shaded color from MicroGDS.
• wrapped stencil transparency is ignored
• undulate, wrapped brick, wrapped grid and wrapped ripple displacement shaders are ignored
• object axis texture space is equivalent to the JetStream Box texture space
• auto axis and object xy axis texture spaces are treated as a Box texture space
• grid background is treated as a plain background using the background color - no grid lines will
show.
• Foreground and Environment shaders are ignored.
• All other shaders, as of MicroGDS 7.2, are correctly imported into JetStream.
• Note that MicroGDS materials are specified in millimetres, and are converted into metres to make
JetStream materials, dividing distance parameters by 1000. Windows with Perspective Views are read
into JetStream as View objects.
Windows with Perspective Views are read into JetStream as Saved Viewpoints.
Supported Entities
• Clump primitives.
• Line primitives. The color of line primitives is determined by the first phase in which they appear in the
77
Page 88

Converting Files
Principal Window. If they are not included in the Principal Window, they will have a color determined
by their style.
• Light styles. Projector lights are treated as a Spot light without the transparent image.
• Material styles, both plain and most LightWorks Renderer materials. Materials using wrapped images
locate their image files using the "Texture Path" specified below.
• Views. Perspective Views are read in as if 3-point Perspective; parallel Views are not read. A Section
Plane in a MicroGDS View is set in the corresponding JetStream View.
• Layers. All layers are read, and made visible according to their status in the Principal Window of the
MAN file.
• Instances.
• Object data structure.
Unsupported Entities
• Text primitives.
• Photo primitives.
MAN File Reader Options
Setting the MAN file reader options
1. Go to Tools, Global Options, MAN file
The MAN file dialog is displayed
78
Page 89

Converting Files
2. Check the box Include line-geometry to include MicroGDS line-primitives into JetStream
3. Set Facet circle. Adjust the number of facets used for arcs - enter the number of straight line
segments to facet a whole circle. (This corresponds to the MicroGDS Set Facet preference.)
4. Texture Path. Enter the path to the folder containing images used in MicroGDS Materials. Materials
79
Page 90

using image files will use this string as the base for relative paths. (This corresponds to the
MicroGDS Renderer Textures preference.)
5. Check the box Define Presenter Materials if you wish MicroGDS material-styles to be defined as
JetStream Presenter materials.
6. Click OK to set these options or Cancel to exit the dialog without setting them.
7.1.10. IGES Files
JetStream Roamer uses the Open CASCADE libraries to read and tessellate .igs and .iges files up to and
including IGES 5.3.
Supported Entities
• Groups.
• Colors.
Converting Files
• Planes.
• Parametric spline, ruled, B-spline, offset, bounded, trimmed and plane surfaces and surfaces of
revolution.
• Tabulated cylinders.
• Solids and manifold solids.
• Shells.
• Faces.
Unsupported Entities
• Points.
• Lines.
• Circular or conic arcs.
• Compsite, parametric spline, B-spline, or offset curves.
• Boundaries.
• Attributes.
IGES File Reader Options
Setting the IGES file reader options
80
Page 91

Converting Files
1. Go to Tools, Global Options, IGES
The IGES dialog is displayed
2. Enter the Faceting Factor (the value must be greater than 0). The higher the value, the more
JetStream will facet rounded entities and therefore the smoother they will appear. See Faceting
81
Page 92

Factor for more information.
3. Enter the Max Facet Deviation. This will facet entities to within the specified tolerance. See Max
Facet Deviation for more information.
4. Click OK to set these options or Cancel to exit the dialog without setting them.
7.1.11. STEP Files
JetStream Roamer uses the Open CASCADE libraries to read and tessellate .stp and .step files up to and
including AP214 CC2 and AP203.
Supported Entities
• Assemblies.
• Colors.
• Planes.
Converting Files
• B-spline and rational B-spline, Bezier, conical, cylindrical, offset, rectangular trimmed, linear extrusion,
bounded, manifold, spherical, toroidal, uniform and quasi-uniform, surfaces.
• Shells.
• Advanced and facetted boundary representations (BReps)
Unsupported Entities
• Points.
• PCurves, B-spline, rational B-spline, Bezier, trimmed, uniform or quasi-uniform curves.
• Circles or ellipses.
• Hyperbola.
STEP File Reader Options
Setting the STEP file reader options
1. Go to Tools, Global Options, STEP
The STEP dialog is displayed
82
Page 93

Converting Files
2. Enter the Faceting Factor (the value must be greater than 0). The higher the value, the more
JetStream will facet rounded entities and therefore the smoother they will appear. See Faceting
Factor for more information.
3. Enter the Max Facet Deviation. This will facet entities to within the specified tolerance. See Max
83
Page 94

Facet Deviation for more information.
4. Click OK to set these options or Cancel to exit the dialog without setting them.
7.1.12. Inventor Files
Autodesk Inventor™ part (.ipt), assembly (.iam) and project (.ipj) files can be read by JetStream Roamer.
Drawing (.idw) files cannot be read.
Note
The reader supports files from Autodesk Inventor 9™ and earlier. Later versions should also
work, but haven't been tested. Autodesk Inventor 5™ (or higher) or Autodesk Inventor Design
Tracking 5™ (or higher) must be installed. Autodesk Inventor Design Tracking™ can be
downloaded from support.autodesk.com [http://support.autodesk.com].
Supported Entities
• All geometry.
Converting Files
• Assembly structure.
• Materials (requires a valid JetStream Presenter license).
Unsupported Entities
• Material names.
Inventor File Reader Options
Setting the Inventor file reader options
1. Go to Tools, Global Options, Inventor
The Inventor dialog is displayed
84
Page 95

Converting Files
2. The Active Project text box displays the path of the current Inventor project. To change project,
open the corresponding project file or enter the path to it here.
3. Click OK to set these options or Cancel to exit the dialog without setting them.
85
Page 96

7.1.13. VRML world files
VRML world files can be read by JetStream Roamer.
Note
The reader supports files in both VRML1 and VRML2 file formats.
Supported Entities
• All 3D geometry including cuboids, cylinders, cones, spheres, elevation grids, extrusions, face and line
sets, and points.
• All grouping nodes - however some limitations exist on certain types of group node (see below).
Partially Supported Entities
• VRML2 Billboard nodes - children will be loaded but no billboarding will take place.
Converting Files
• VRML2 Collision nodes - children will be loaded but no specification of collision detection occurs.
• VRML1 WWWAnchor and VRML2 Anchor nodes - children will be loaded but any referenced VRML
world will not be loaded upon clicking objects.
• VRML1 and VRML2 LOD nodes - the most detailed (i.e. first) child will always be loaded.
Unsupported Entities
• All ROUTE definitions.
• All sensor nodes.
• All interpolator nodes.
• Textures specified within the VRML file (VRML2 PixelTexture nodes and the image component of
VRML1 Texture2 nodes).
• VRML2 Script nodes.
• VRML2 MovieTexture nodes.
• VRML2 Fog nodes.
• VRML2 AudioClip and Sound nodes.
• All text-related nodes (VRML1 AsciiText and VRML2 Text nodes, and FontStyle nodes).
VRML File Reader Options
Setting the VRML file reader options
86
Page 97

Converting Files
1. Go to Tools, Global Options, VRML
The VRML options dialog is displayed
2. Select the Default Units dropdown combo box to alter the default units for any loaded VRML world.
3. Check the Override Normals check box if you want to override any provided normals and force
87
Page 98

auto-generation within JetStream Roamer.
4. Check the Override Orientation check box if you want to override any specified orientation of
vertices and force all to be assumed to be counter-clockwise.
5. Check the Override Switch Statements check box if you want to override the standard behaviour of
switch statements. Often VRML authors will use switch statements to contain geometry selectable by
scripts. Since Navisworks has no support for scripting, this option will allow some aspect of that
geometry to be exposed, although results are unlikely to be precisely as the author intended.
6. Click OK to set these options or Cancel to exit the dialog without setting them.
7.1.14. Riegl Scan Files
Riegl™ scan files can be read by JetStream Roamer.
Note
The reader supports files from all Riegl™ LMS scanners.
Converting Files
Supported Entities
• Points.
• Triangles.
Unsupported Entities
• No other entities are supported.
Riegl Scan File Reader Options
Setting the Riegl Scan file reader options
1. Go to Tools, Global Options, Riegl
The Riegl dialog is displayed
88
Page 99

Converting Files
2. Check the Use point color values check box if you want to extract color values from the input file.
3. Check the Use point intensity values check box if you want to extract intensity values from the
input file.
4. Check the Triangulate point data check box if you want to extract triangles from the input file. The
89
Page 100

file will take much longer to load.
5. Check the Apply scanner transformation check box if you want to display the image in global
coordinates (necessary when the file contains more than one frame) or in local coordinates, relative
to the scanner.
6. Click OK to set these options or Cancel to exit the dialog without setting them.
7.1.15. Faro Scan Files
Faro™ scan files can be read by JetStream Roamer. iQmod and iQwsp files are workspace files that
contain a list of one or more associated iQscan files. The iQscan files must be located in a folder called
'Scans', located in the same directory as the workspace file.
Note
The reader supports files from all Faro™ scanners.
Supported Entities
Converting Files
• Points.
Unsupported Entities
• No other entities are supported.
Faro Scan File Reader Options
Setting the Faro Scan file reader options
1. Go to Tools, Global Options, Faro
The Faro dialog is displayed
90
 Loading...