

Page 1

Autodesk Vault 2011
Implementation Guide
January 2009Part No. 569B1-050001-PM01A
Page 2

©
2010 Autodesk, Inc. All Rights Reserved. Except as otherwise permitted by Autodesk, Inc., this publication, or parts thereof, may not be
reproduced in any form, by any method, for any purpose.
Certain materials included in this publication are reprinted with the permission of the copyright holder.
Trademarks
The following are registered trademarks or trademarks of Autodesk, Inc., and/or its subsidiaries and/or affiliates in the USA and other countries:
3DEC (design/logo), 3December, 3December.com, 3ds Max, Algor, Alias, Alias (swirl design/logo), AliasStudio, Alias|Wavefront (design/logo),
ATC, AUGI, AutoCAD, AutoCAD Learning Assistance, AutoCAD LT, AutoCAD Simulator, AutoCAD SQL Extension, AutoCAD SQL Interface,
Autodesk, Autodesk Envision, Autodesk Intent, Autodesk Inventor, Autodesk Map, Autodesk MapGuide, Autodesk Streamline, AutoLISP, AutoSnap,
AutoSketch, AutoTrack, Backburner, Backdraft, Built with ObjectARX (logo), Burn, Buzzsaw, CAiCE, Civil 3D, Cleaner, Cleaner Central, ClearScale,
Colour Warper, Combustion, Communication Specification, Constructware, Content Explorer, Dancing Baby (image), DesignCenter, Design
Doctor, Designer's Toolkit, DesignKids, DesignProf, DesignServer, DesignStudio, Design Web Format, Discreet, DWF, DWG, DWG (logo), DWG
Extreme, DWG TrueConvert, DWG TrueView, DXF, Ecotect, Exposure, Extending the Design Team, Face Robot, FBX, Fempro, Fire, Flame, Flare,
Flint, FMDesktop, Freewheel, GDX Driver, Green Building Studio, Heads-up Design, Heidi, HumanIK, IDEA Server, i-drop, ImageModeler, iMOUT,
Incinerator, Inferno, Inventor, Inventor LT, Kaydara, Kaydara (design/logo), Kynapse, Kynogon, LandXplorer, Lustre, MatchMover, Maya,
Mechanical Desktop, Moldflow, Moonbox, MotionBuilder, Movimento, MPA, MPA (design/logo), Moldflow Plastics Advisers, MPI, Moldflow
Plastics Insight, MPX, MPX (design/logo), Moldflow Plastics Xpert, Mudbox, Multi-Master Editing, Navisworks, ObjectARX, ObjectDBX, Open
Reality, Opticore, Opticore Opus, Pipeplus, PolarSnap, PortfolioWall, Powered with Autodesk Technology, Productstream, ProjectPoint, ProMaterials,
RasterDWG, RealDWG, Real-time Roto, Recognize, Render Queue, Retimer,Reveal, Revit, Showcase, ShowMotion, SketchBook, Smoke, Softimage,
Softimage|XSI (design/logo), Sparks, SteeringWheels, Stitcher, Stone, StudioTools, ToolClip, Topobase, Toxik, TrustedDWG, ViewCube, Visual,
Visual LISP, Volo, Vtour, Wire, Wiretap, WiretapCentral, XSI, and XSI (design/logo).
All other brand names, product names or trademarks belong to their respective holders.
Disclaimer
THIS PUBLICATION AND THE INFORMATION CONTAINED HEREIN IS MADE AVAILABLE BY AUTODESK, INC. "AS IS." AUTODESK, INC. DISCLAIMS
ALL WARRANTIES, EITHER EXPRESS OR IMPLIED, INCLUDING BUT NOT LIMITED TO ANY IMPLIED WARRANTIES OF MERCHANTABILITY OR
FITNESS FOR A PARTICULAR PURPOSE REGARDING THESE MATERIALS.
Published by:
Autodesk, Inc.
111 McInnis Parkway
San Rafael, CA 94903, USA
Page 3

Contents
Vault Fundamentals . . . . . . . . . . . . . . . . . . . . . 1
Chapter 1 Introduction . . . . . . . . . . . . . . . . . . . . . . . . . . . . 3
Book Organization . . . . . . . . . . . . . . . . . . . . . . . . . . . . . 3
Conventions Used In This Book . . . . . . . . . . . . . . . . . . . . . . 4
Support . . . . . . . . . . . . . . . . . . . . . . . . . . . . . . . . . . . 4
Key Terms . . . . . . . . . . . . . . . . . . . . . . . . . . . . . . . . . . 4
Chapter 2 Understand Autodesk Vault . . . . . . . . . . . . . . . . . . . . 7
Vault Architecture . . . . . . . . . . . . . . . . . . . . . . . . . . . . . 7
Web Server . . . . . . . . . . . . . . . . . . . . . . . . . . . . . . 8
Database Server . . . . . . . . . . . . . . . . . . . . . . . . . . . . 9
File Store . . . . . . . . . . . . . . . . . . . . . . . . . . . . . . . 9
Vault Workgroup . . . . . . . . . . . . . . . . . . . . . . . . . . . . . . 9
Vault Collaboration . . . . . . . . . . . . . . . . . . . . . . . . . . . . . 9
Vault Professional . . . . . . . . . . . . . . . . . . . . . . . . . . . . . 10
How Vault Works . . . . . . . . . . . . . . . . . . . . . . . . . . . . . 10
Autodesk Vault Clients . . . . . . . . . . . . . . . . . . . . . . . . . . 10
Autodesk Vault Client . . . . . . . . . . . . . . . . . . . . . . . . 11
Autodesk Vault Add-ins for Design Applications . . . . . . . . . . 11
Microsoft Office Add-in . . . . . . . . . . . . . . . . . . . . . . . 11
Content Center . . . . . . . . . . . . . . . . . . . . . . . . . . . 11
License Manager Components . . . . . . . . . . . . . . . . . . . . . . 11
iii
Page 4

Network License Manager . . . . . . . . . . . . . . . . . . . . . . 12
FLEXnet Configuration Tools . . . . . . . . . . . . . . . . . . . . 12
SAMreport-Lite . . . . . . . . . . . . . . . . . . . . . . . . . . . 12
Installation Requirements . . . . . . . . . . . . . . . . . . . . . . . . . 12
Operating System Requirements . . . . . . . . . . . . . . . . . . 13
Microsoft SQL Requirements . . . . . . . . . . . . . . . . . . . . 15
Hardware Requirements . . . . . . . . . . . . . . . . . . . . . . . 15
Other Requirements . . . . . . . . . . . . . . . . . . . . . . . . . 16
Chapter 3 Plan the Vault Environment . . . . . . . . . . . . . . . . . . . . 19
Information Check List . . . . . . . . . . . . . . . . . . . . . . . . . . 19
Use the Information . . . . . . . . . . . . . . . . . . . . . . . . . . . . 19
Number of Users . . . . . . . . . . . . . . . . . . . . . . . . . . 20
Number of Servers . . . . . . . . . . . . . . . . . . . . . . . . . . 20
Server Hardware Specifications . . . . . . . . . . . . . . . . . . . 20
Server Operating Systems . . . . . . . . . . . . . . . . . . . . . . 20
Firewalls . . . . . . . . . . . . . . . . . . . . . . . . . . . . . . . 20
Applications on Servers . . . . . . . . . . . . . . . . . . . . . . . 21
Microsoft SQL Version . . . . . . . . . . . . . . . . . . . . . . . 21
Access Frequency . . . . . . . . . . . . . . . . . . . . . . . . . . 21
Network Speed . . . . . . . . . . . . . . . . . . . . . . . . . . . 21
Install Vault . . . . . . . . . . . . . . . . . . . . . . . . . 23
Chapter 4 Build the Vault Environment . . . . . . . . . . . . . . . . . . . 25
Options for Installing Vault . . . . . . . . . . . . . . . . . . . . . . . 25
Install FLEXnet for Vault . . . . . . . . . . . . . . . . . . . . . . . . . 25
How to Install the Network License Manager . . . . . . . . . . . 26
Configure a License Server . . . . . . . . . . . . . . . . . . . . . 27
Install and Use SAMreport-Lite (Optional) . . . . . . . . . . . . . 28
Install Vault Server . . . . . . . . . . . . . . . . . . . . . . . . . . . . 29
Pre-Install Microsoft SQL . . . . . . . . . . . . . . . . . . . . . . 29
Set Up Remote SQL . . . . . . . . . . . . . . . . . . . . . . . . . 30
Windows XP . . . . . . . . . . . . . . . . . . . . . . . . . . . . . 35
Windows Vista . . . . . . . . . . . . . . . . . . . . . . . . . . . 39
Windows 7 . . . . . . . . . . . . . . . . . . . . . . . . . . . . . 44
Windows Server 2003 . . . . . . . . . . . . . . . . . . . . . . . . 47
Windows Server 2008 . . . . . . . . . . . . . . . . . . . . . . . . 49
Upgrading Vault Server . . . . . . . . . . . . . . . . . . . . . . . . . . 55
Testing . . . . . . . . . . . . . . . . . . . . . . . . . . . . . . . . 55
Migration . . . . . . . . . . . . . . . . . . . . . . . . . . . . . . 56
Before You Upgrade . . . . . . . . . . . . . . . . . . . . . . . . . 56
Install Vault Server 2011 . . . . . . . . . . . . . . . . . . . . . . 57
Upgrade Microsoft SQL . . . . . . . . . . . . . . . . . . . . . . . 58
iv | Contents
Page 5

Chapter 5 Install the Vault Client . . . . . . . . . . . . . . . . . . . . . . . 61
Data Management Client Requirements . . . . . . . . . . . . . . . . . 61
Client Installation . . . . . . . . . . . . . . . . . . . . . . . . . . . . . 62
Add-in Integration . . . . . . . . . . . . . . . . . . . . . . . . . 63
Configure and Maintain Vault . . . . . . . . . . . . . . . 65
Chapter 6 Configure Basic Vault Options . . . . . . . . . . . . . . . . . . 67
Log In the First Time . . . . . . . . . . . . . . . . . . . . . . . . . . . 67
Use Vault with a Proxy server . . . . . . . . . . . . . . . . . . . . . . . 68
Manage User Accounts . . . . . . . . . . . . . . . . . . . . . . . . . . 69
Add or Edit User Accounts . . . . . . . . . . . . . . . . . . . . . 69
Assigning Roles to User Accounts . . . . . . . . . . . . . . . . . . 73
Grant Vault Access to Users . . . . . . . . . . . . . . . . . . . . . 73
Disable User Accounts . . . . . . . . . . . . . . . . . . . . . . . . 74
Assign Users to Groups . . . . . . . . . . . . . . . . . . . . . . . . . . 74
Chapter 7 Configure Vault Workgroup . . . . . . . . . . . . . . . . . . . . 77
Revision . . . . . . . . . . . . . . . . . . . . . . . . . . . . . . . . . . 77
Choose the Revision Scheme . . . . . . . . . . . . . . . . . . . . 77
Create a New Revision Scheme . . . . . . . . . . . . . . . . . . . 78
Lifecycles . . . . . . . . . . . . . . . . . . . . . . . . . . . . . . . . . 78
Categories . . . . . . . . . . . . . . . . . . . . . . . . . . . . . . . . . 80
Rules . . . . . . . . . . . . . . . . . . . . . . . . . . . . . . . . . . . . 81
Import and Export Configurations . . . . . . . . . . . . . . . . . . . . 81
Chapter 8 Configure Vault Collaboration and Vault Professional . . . . . . 83
Windows Authentication . . . . . . . . . . . . . . . . . . . . . . . . . 83
Set Up Multiple Site Environments . . . . . . . . . . . . . . . . . . . . 84
What is a Multiple Site Environment . . . . . . . . . . . . . . . . 84
Is Multiple Site Environment Right for You . . . . . . . . . . . . 85
Pre-Install Checklist . . . . . . . . . . . . . . . . . . . . . . . . . 86
Install Vault Server on Additional Sites . . . . . . . . . . . . . . . 86
Manage Sites . . . . . . . . . . . . . . . . . . . . . . . . . . . . . 87
Connected Workgroups . . . . . . . . . . . . . . . . . . . . . . . . . . 89
Replication . . . . . . . . . . . . . . . . . . . . . . . . . . . . . 89
Workgroups Fixing . . . . . . . . . . . . . . . . . . . . . . . . . 89
Setting up Connected Workgroups . . . . . . . . . . . . . . . . . 90
Chapter 9 Data Management Server Maintenance . . . . . . . . . . . . . 97
About Autodesk Data Management Console . . . . . . . . . . . . . . . 97
Perform Vault Maintenance . . . . . . . . . . . . . . . . . . . . . . . . 98
Contents | v
Page 6

Back Up Vault Data . . . . . . . . . . . . . . . . . . . . . . . . . . . . 98
Windows Vista User Account Control . . . . . . . . . . . . . . . 100
Creating Tape Backups . . . . . . . . . . . . . . . . . . . . . . . 101
Restore Vaults from Back Ups . . . . . . . . . . . . . . . . . . . 102
Manage Vaults . . . . . . . . . . . . . . . . . . . . . . . . . . . . . . 103
Delete Vaults . . . . . . . . . . . . . . . . . . . . . . . . . . . . 104
Move File Stores . . . . . . . . . . . . . . . . . . . . . . . . . . 104
Attach and Detach Vaults . . . . . . . . . . . . . . . . . . . . . 104
PurgeVault Data . . . . . . . . . . . . . . . . . . . . . . . . . . 106
Re Index the Server . . . . . . . . . . . . . . . . . . . . . . . . . . . 107
Add New Properties . . . . . . . . . . . . . . . . . . . . . . . . 107
Full Content Indexing . . . . . . . . . . . . . . . . . . . . . . . . . . 108
Enable Full Content Indexing . . . . . . . . . . . . . . . . . . . 108
Microsoft Indexing Service . . . . . . . . . . . . . . . . . . . . 108
Manage Content Center Libraries . . . . . . . . . . . . . . . . . . . . 109
Maintain Libraries in Server Console . . . . . . . . . . . . . . . 110
Learning and Training . . . . . . . . . . . . . . . . . . . . . . . . . . 113
Learn to Use Autodesk Vault . . . . . . . . . . . . . . . . . . . . 114
Get Training . . . . . . . . . . . . . . . . . . . . . . . . . . . . 114
Train Other Users . . . . . . . . . . . . . . . . . . . . . . . . . 114
Appendix A Performance Enhancements . . . . . . . . . . . . . . . . . . . 117
Tune Server Performance . . . . . . . . . . . . . . . . . . . . . . . . 118
Operating System . . . . . . . . . . . . . . . . . . . . . . . . . 118
Server Memory . . . . . . . . . . . . . . . . . . . . . . . . . . . 118
Disk Performance . . . . . . . . . . . . . . . . . . . . . . . . . 121
Aggressive Anti-virus Programs . . . . . . . . . . . . . . . . . . 124
CPU . . . . . . . . . . . . . . . . . . . . . . . . . . . . . . . . 124
Vault Client Performance . . . . . . . . . . . . . . . . . . . . . . . . 125
Client Settings . . . . . . . . . . . . . . . . . . . . . . . . . . . 125
Memory . . . . . . . . . . . . . . . . . . . . . . . . . . . . . . 125
Disk Performance . . . . . . . . . . . . . . . . . . . . . . . . . 125
Troubleshoot . . . . . . . . . . . . . . . . . . . . . . . . . . . . . . . 126
Server Diagnostics Tool . . . . . . . . . . . . . . . . . . . . . . 126
View Diagnostic Log Files . . . . . . . . . . . . . . . . . . 128
Recheck Operating System Environments . . . . . . . . . . 128
Common Installation Solutions . . . . . . . . . . . . . . . . . . 128
Error 404: File Not Found . . . . . . . . . . . . . . . . . . 129
Error: ASPX failed to run... . . . . . . . . . . . . . . . . . . 129
Error: ASPX file failed to run... . . . . . . . . . . . . . . . 130
Error 29001. Performance counter... . . . . . . . . . . . . . 130
ISAPI Filter error while running... . . . . . . . . . . . . . . 131
Advanced Troubleshooting . . . . . . . . . . . . . . . . . . . . . . . 131
Index . . . . . . . . . . . . . . . . . . . . . . . . . . . . . . . 133
vi | Contents
Page 7

Vault Fundamentals
1
Page 8

2
Page 9

Introduction
1
This book is intended to help users who have a basic understanding of Microsoft® Windows
to install and implement Autodesk® Vault successfully in a Microsoft Windows network
environment. We assume that you understand Windows® navigation as well as installing
and uninstalling software in a Windows environment.
In the following chapters, we explain the best practices for implementing Autodesk® Vault,
and the recommended methods for deploying the data management server. Although these
methods are not the only methods for deploying the software, they are the most robust and
easiest to maintain.
Use this guide as a starting point. If your business needs demand it, you can change the
configuration later.
NOTE If you have any questions about this document, contact your reseller to perform
a professional implementation of the Autodesk data management server.
Book Organization
The Autodesk Vault Implementation Guide is divide into three sections. The
first section is intended to help understand the different versions of Vault. This
section presents guidelines for planning a Vault implementation. The second
section explains the steps to install the different components of a Vault
environment. The last section covers topics relevant to configuring and
maintaining all the components in a Vault environment.
®
3
Page 10

Conventions Used In This Book
The following are different formats used in this book to make the text easier
to read and understand.
ExampleConvention
C:\Program Files\Files or Paths
www.autodesk.comWorld Wide Web Links
Support
Important Information
This book addresses the basic implementation of the Vault environment for
most systems. However, there are possible combinations of different software
and /or hardware interactions not listed. For more information, visit the
following sites:
■ www.autodesk.com/vault
■ www.autodesk.com/discussiongroup-vault
■ www.autodesk.com/vault-support
■ www.autodesk.com/vault-whitepapers
If you are an Autodesk Subscription member you can log support requests
through the subscription portal at www.autodesk.com/subscriptionlogin.
NOTE Additional information
@ECHO OFFProgram or Script Code
User NameUser Prompts
Key Terms
Data management server
4 | Chapter 1 Introduction
DefinitionTerm
The server used in conjunction with
Autodesk Vault and Content Center for
storing files and version data.
Page 11

DefinitionTerm
Clients
Data management
Autodesk Vault Explorer
Microsoft® Internet Information Services
(IIS)
Vault
Applications that access the Autodesk data
management server. These include stand
alone applications such as Autodesk Vault
Explorer and integrated application addins such as Autodesk Vault for Inventor,
or Autodesk Vault for Microsoft® Office.
A means to organize and track files and
design modifications through the design
process.
The standalone client for Autodesk Vault
used to organize information in the vault.
This interface can be used to manage any
Microsoft Windows file in Autodesk Vault
A Microsoft® Web server necessary for do-
ing a full implementation of the Autodesk
data management server.
The logical combination of a vault database
and a vault file store that contains all the
information managed by Autodesk Vault.
Each installation of Autodesk Vault can
maintain several independent vaults. A
single client can connect to several different vaults, but not simultaneously.
Server Console
Web Server
Web service
An application that performs vault system
administrative tasks, such as data back up
and restore.
A server process running on the Autodesk
data management server that responds to
requests from vault clients.
An Application Programming Interface for
a client to communicate with a web server
application, such as the Autodesk data
management server.
Key Terms | 5
Page 12

6
Page 13

Understand Autodesk
Vault
This chapter explains the underlying Vault architecture and provides information essential
for implementing Vault successfully.
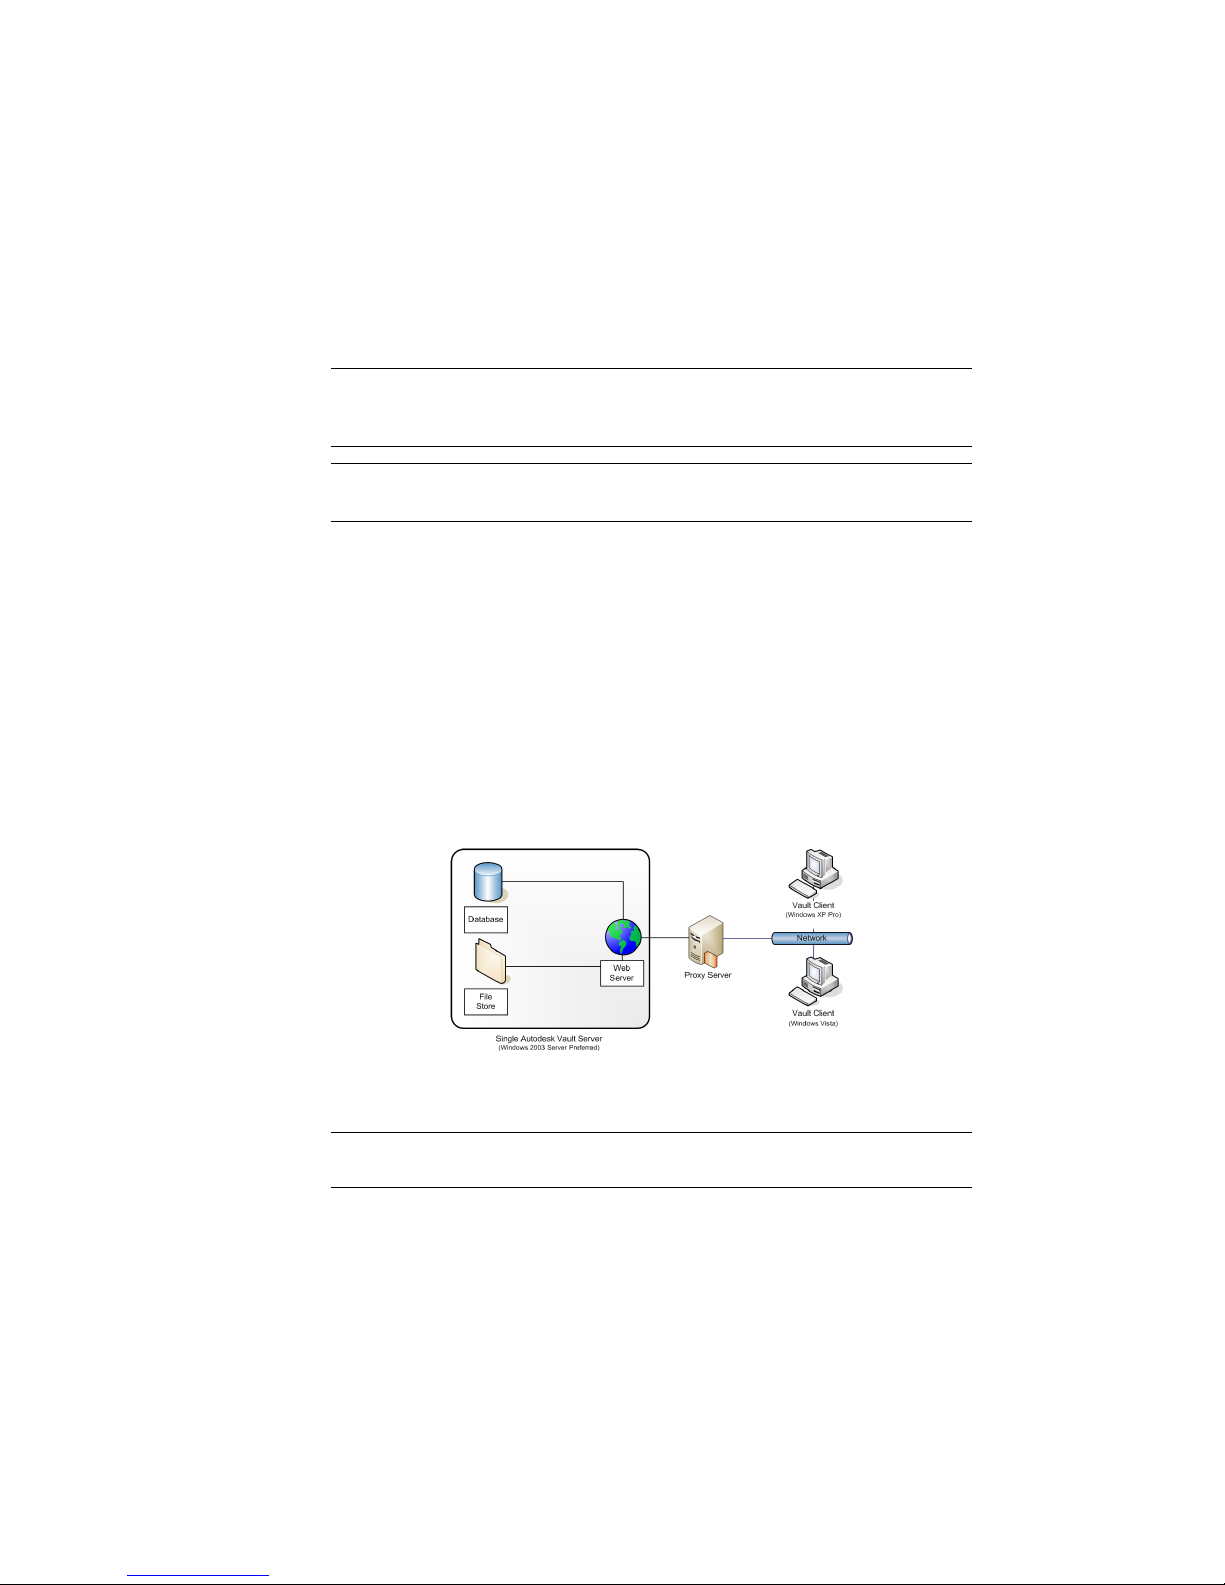
Vault Architecture
Three primary components make up the Vault server; a web server, a database,
and a file store. The following figure illustrates the basic configuration of the
components.
2
7
Page 14
Web Server
Autodesk® data management server requires Windows Intnet Information
Services (IIS) to be installed.
NOTE If IIS is not installed on the computer that hosts the server, and you require
more than a single-user installation, install IIS before you install Autodesk Vault
server.
NOTE The original Microsoft® Windows® installation media might be necessary
to complete the IIS installation.
The Autodesk Vault server is actually a Web application that uses services to
manage the communication between the clients and the server with Web
services. The interaction between the clients and the server resembles the way
a web browser communicates with a site on the Internet. The Web services
use standard HTTP methods, communicating over the Web server port 80 by
default. Microsoft IIS is required for multiple-user configurations.
What Is a Proxy Server
A proxy server forwards requests of client computers to other servers. Some
networks force all client computers to use a proxy server for all web service
requests.
If you your network uses a proxy server, you can configure it to use a host
name or bypass the proxy server of your host clients.
NOTE For more information about configuring a proxy server, see Using Vault
with a Proxy server.
8 | Chapter 2 Understand Autodesk Vault
Page 15

Database Server
The database server tracks all the relationships between data. It acts like a
library card catalog, containing indexes and pointers of where to find related
information. By default, the Autodesk data management server installs
Microsoft® SQL Server 2008 SP1 Express. Microsoft SQL Server 2008 SP1 Express
can be upgraded any time after the Autodesk data management server
components are installed. The SQL server can be upgraded to:
■ Microsoft SQL Server 2008 SP1 Enterprise
■ Microsoft SQL Server 2008 S1 Standard
File Store
The file store and the database server work with each other. The database
provides the index information for the location of files. The file store is the
secure location on the server where the files are located.
Vault Workgroup
Vault Workgroup helps teams create and share, design and engineering
information by securely organizing, managing, and tracking data in a central
location. Ease of administration enables workgroup control of data access and
security, and facilitates team-based design across disciplines. Because they can
quickly manage their designs and track changes over time, users gain
productivity without disruption to their natural design workflows. In addition,
Vault Workgroup delivers lifecycle and revision control processes directly in
the design application, which promotes faster cycle times and better-quality
engineering data.
Vault Collaboration
Vault Collaboration includes all of the functionality in Autodesk Vault
Workgroup and adds an advanced toolset that provides administrators with
the scalability needed to manage large workgroups. Users can share engineering
design data with downstream data consumers using the included web client
and expose design-related information to the extended enterprise by publishing
to Microsoft® SharePoint®. Scalable multi-site functionality enables companies
Database Server | 9
Page 16

to synchronize design data among distributed workgroups, extending the
reach of the digital model to the entire project team.
Vault Professional
Vault Professional , previously known as Autodesk® Vault Manufacturing,
securely stores and manages engineering information, design data, and
documents-shortening the design-to-build and manufacture process. It includes
multisite tools to connect workgroups across discrete locations, helping the
entire design chain collaborate and share project information. Take full
advantage of advanced functionality by giving design departments the tools
they need to track change orders, manage bills of materials (BOMs), and
promote earlier collaboration through integration to expert business systems.
In addition, support for multi-CAD environments means that Vault clients
using non-Autodesk design products can aggregate and manage design data
throughout its lifecycle.
How Vault Works
As the previous diagrams have shown, each component can be configured to
run on its own server. When configuring a server for each component, refer
to the following workflow.
1 Client checks out a file.
2 Client sends a request for the file to the Vault server.
3 Vault server sends a query to the database.
4 Vault server copies the files from the file store to the client.
It is important to notice the client computer does not directly communicate
with another client computer at anytime.
NOTE The option to configure remote SQL is only available with Vault
Collaboration and Professional.
Autodesk Vault Clients
A vault client is any stand-alone application or integrated add-in that connects
to the Autodesk data management server to access files and perform vault
operations.
10 | Chapter 2 Understand Autodesk Vault
Page 17

An example is the Inventor add-in. When data is added to a vault using the
Inventor add-in, the add-in preserves all the complex relationships that are
created by assemblies, drawings, presentations, and other files.
Autodesk Vault Client
The Vault Client is a general-purpose application for interacting with a vault
on the Autodesk data management server. You can browse the complete vault
structure, add any file to the vault, and perform most other file-based
operations, depending on your level of permission.
Autodesk Vault Add-ins for Design Applications
Add-in clients provide basic vault functions within the environment of a
parent application. Add-ins maintain application-specific data relationships
when adding files to a vault.
There are add-ins available for Autodesk and non-Autodesk design applications.
NOTE As a rule, if an integrated client is available for a particular application,
managing files using that client minimizes loss of data, such as the assembly
relationships. We recommend that you use integrated clients whenever possible.
Microsoft Office Add-in
The Microsoft Office add-in performs basic vault functions on documents,
spreadsheets, and other non-CAD data within any of the Microsoft Office
applications: Microsoft® Word, Excel®, and Power Point®.
Content Center
Content Center provides access to Autodesk Inventor Content Center libraries.
Content Center libraries are stored on the Autodesk data management server.
License Manager Components
Autodesk Vault Workgroup, Collaboration, or Professional require a license
for each client connection to the Vault sever. The following section describes
the components used to manage these licenses.
Autodesk Vault Client | 11
Page 18

Network License Manager
The Network License Manager is used to configure and manage the license
servers. When installing Vault server for Vault Workgroup, Collaboration, or
Professional, the Installation wizard prompts you for information about the
license manager, such as license server model and server name.
FLEXnet Configuration Tools
The Network License Manager uses FLEXnet® license management technology
from Acresso Software. FLEXnet provides administrative tools that help to
simplify management of network licenses. You can use FLEXnet tools to:
■ Monitor network license status.
■ Reset licenses lost to a system failure.
■ Troubleshoot license servers.
■ Update existing license files on the fly.
NOTE For more information about FLEXnet configuration tools see the Vault
Network Licensing Guide.
SAMreport-Lite
While not part of the network installation, a version of SAMreport called
SAMreport-Lite is available to help you track network license usage. With
SAMreport-Lite technology from Acresso Software, you can monitor client
usage for Autodesk network licensed products.
SAMreport-Lite generates usage reports in various output formats including
HTML, text, and Report Interchange Format. For more information about the
SAMreport-Lite features, and for instructions on installing SAMreport-Lite,
see the SAMreport-Lite User's Guide.
Installation Requirements
Previous versions of Autodesk data management server installed Microsoft®SQL
2005 Express. Before installing the latest version of Vault, service pack 3 for
Microsoft SQL 2005 Express will need to be installed. If no previous version
12 | Chapter 2 Understand Autodesk Vault
Page 19

of a SQL server is detected, or if you are not connecting to an existing remote
SQL instance, Microsoft® SQL Server 2008 Express service pack 1is installed
by default. When using SQL Express, Autodesk Vault server supports
approximately ten simultaneous vault clients. Additional users can be
supported using the full version of Microsoft SQL Server 2005 SP3or 2008 SP1.
Purchase the full Microsoft SQL Server software separately from Microsoft
or a Microsoft reseller.
For more information about system requirements, visit www.autodesk.com/vault
or the Autodesk® Installation online Help.
If a compatible local SQL database is detected during installation, you are
prompted to migrate the data once the installation is complete.
NOTE If a database is detected that is not compatible with the new version of
Autodesk server, you must remove it before the Autodesk server can be installed.
Operating System Requirements
Autodesk Vault server supports both 32-bit and 64-bit operating systems. All
operating systems listed in the following table are 32-bit. Supported 64-bit
operating systems are also indicated.
®
Operating System
Windows® XP Professional
Operating System
Windows Vista® Ultimate
Windows Vista® Enterprise
Windows Vista® Business
Operating System
Windows® 7 Ultimate
Service
64
bit
IIS32
bit
Pack
•••SP2,SP3
Service
64
bit
IIS32
bit
Pack
•••SP1,SP2
•••SP1,SP2
•••SP1,SP2
Service
64
bit
IIS32
bit
Pack
•••
Operating System Requirements | 13
Page 20

Operating System
Service
Pack
64
bit
IIS32
bit
Windows® 7 Enterprise
Windows® 7 Business
Operating System
Windows server™ 2003 Server Standard
Windows server™ 2003 Server Standard R2
Windows server™ 2003 Enterprise
Windows server™ 2003 Enterprise R2
Windows server™ 2003 Small Business Edition
Windows server™ 2003 Small Business Edition R2
Windows server™ 2008 Server Standard
Windows server™ 2008 Server Enterprise
Windows server™ 2008 Small Business Edition
Service
Pack
64
bit
•••
•••
IIS32
bit
•••SP2
•••SP2
•••SP2
•••SP2
••SP2
••SP2
•••SP2
•••SP2
•••
Windows server™ 2008 R2 Small Business Edition
NOTE For Best performance on servers, we recommend a dedicated member
(non-domain controller) server
For data management client add-ins, the system requirements are that of the
design application.
14 | Chapter 2 Understand Autodesk Vault
••
Page 21

Microsoft SQL Requirements
Vault 2010 installed Microsoft SQL 2005 Express. The minimum requirement
for Vault 2011 is Microsoft SQL 2005 Express service pack 3. Service pack 3for
SQL 2005 must be applied before install Vault 2011.
Microsoft SQL Version
Hardware Requirements
The following are minimum, recommended, and preferred requirements for
running Autodesk Vault server. If possible, meet the Recommended
requirements.
Vault Client Requirements
32
Service
Pack
ProcessorMemoryDisk Space
64
bit
bit
••SP3Microsof SQL Server 2005 Express5
••SP3Microsof SQL Server 2005 Workgroup
••SP3Microsof SQL Server 2005 Standard
••SP3Microsof SQL Server 2005 Enterprise
••SP1Microsof SQL Server 2008 Express5
••SP1Microsof SQL Server 2008 Standard
••SP1Microsof SQL Server 2008 Enterprise
1 GB1 GBMinimum
Intel® Pentium® 4, Intel® Xeon® AMD
Athlon® 64 / Opteron, 1.6GHz
Microsoft SQL Requirements | 15
Page 22

ProcessorMemoryDisk Space
2 GB4 GBRecommended
Intel Pentium 4, Intel Xeon AMD Athlon 64 / Opteron, 2.0GHz
Vault Server Requirements
ProcessorMemoryDisk Space
2 GB100 GBMinimum
4 GB200 GBRecommended
Intel® Pentium® 4, Intel® Xeon® AMD
Athlon® 64 / Opteron, 2.0GHz
Intel Pentium 4, Intel Xeon AMD Athlon 64 / Opteron, 3.0GHz
Vault Server Replication Requirements (Vault Server and SQL Server)
ProcessorMemoryDisk Space
4 GB300 GBMinimum
8 GB500 GBRecommended
Intel® Pentium® 4, Intel® Xeon® AMD
Athlon® 64 / Opteron, 3.0GHz
Intel Pentium 4, Intel Xeon AMD Athlon 64 / Opteron, 3.0GHz
Vault Server Replication Requirements (Vault Server only)
ProcessorMemoryDisk Space
2 GB150 GBMinimum
Intel® Pentium® 4, Intel® Xeon® AMD
Athlon® 64 / Opteron, 3.0GHz
3 GB300 GBRecommended
Other Requirements
■ A DVD drive is required, to install off of disk.
■ Operating Systems installation media.
■ Internet connection for Web downloads and Subscription Aware access.
■ Microsoft Internet Explorer
16 | Chapter 2 Understand Autodesk Vault
®
Intel Pentium 4, Intel Xeon AMD Athlon 64 / Opteron, 3.0GHz
6 SP1 or later.
Page 23

■ We recommend settings that allow Microsoft Windows to manage virtual
memory as needed. Keep at least twice as much free hard disk space as
system memory.
Other Requirements | 17
Page 24

18
Page 25

Plan the Vault Environment
3
A Vault implementation can be as simple as installing all components on a single computer,
or as complex as installing components on several computers in different locations. The more
complex the Implementation, the more information there is to consider. This chapter provides
an outline of information to consider to make the best decisions for your Vault
Implementation.
Information Check List
When Implementing Vault, consider:
■ Number of users.
■ The number of servers.
■ The hardware specifications for all the servers.
■ The Operating Systems for all servers.
■ All firewalls installed on servers.
■ List of other applications running on all servers.
■ The version of Microsoft
■ How frequently do users access information in the Vault?
■ The latency between all servers.
Use the Information
Every Vault implementation is unique, the following sections help you determine
the best configuration for your needs.
®
SQL is going to be used.
19
Page 26

Number of Users
Knowing the number of users helps prevent access problems and slow response
times. For example, if you have more then ten concurrent users, use Windows
Server 2003 or 2008. For more than 25 user, consider upgrading to the full
standard edition or enterprise edition of SQL. Microsoft SQL express allows
only 25 concurrent connections. When implementing Vault for a single user,
you can load all the components on a single computer.
Number of Servers
When determining the number of servers keep in mind how information
flows from the client computer to the Vault server to the SQL server and back.
(See How Vault Works).
Server Hardware Specifications
For the recommended and preferred system requirements see Hardware
Requirements on page 15. Vault is more processor intensive than memory
intensive like some other applications. Avoid loading Vault components on
servers that already have a high CPU usage.
Server Operating Systems
Vault Server can be loaded on several different operating systems. When
deciding to use a non-server operating system, consider the limitations.
®
■ Windows XP has a limit of ten concurrent users.
■ Windows Vista has a limit of ten concurrent users and three concurrent
web service requests.
■ Windows 7 has a limit of ten concurrent users and three concurrent web
service requests.
Firewalls
Firewalls can block incoming requests. During the Vault Server installation,
the server is checked for known firewalls. Firewalls can require that you
configure them to allow the Vault Server to communicate correctly. Some
20 | Chapter 3 Plan the Vault Environment
Page 27

system protection software can include firewalls. Check these tools for the
existence of firewalls.
Applications on Servers
Vault can be processor intensive. Loading the Vault Server on a server with
other processor intensive applications can cause Vault to run slower than
expected.
Microsoft SQL Version
Vault 2011 requires a minimum of Microsoft SQL 2005 Express service pack
3. If necessary, upgrade your previous version of Vault with 2005 Express to
service pack 3. See Installation Requirements on page 12.
SQL Express has a limitation of 25 concurrent users and a 4-GB size restriction.
If your Vault implementation requires more capacity, set up the Vault server
using the Standard or Enterprise versions of SQL.
Access Frequency
How often the Vault Server is accessed affects the server performance. For
example, a Vault implementation with 50 users and one or two users checking
out one or two files a day does not tax the server much. Using the same
configuration with 35 of users accessing the vault every 10 minutes, Vault
Server performance differs, running at the non-recommended requirements.
Network Speed
All though network speed is commonly equated to latency, you also consider
bandwidth and throughput. Network speed is an important factor to consider,
when trying to get the best performance for your Vault implementation.
Without running tests to measure your latency, bandwidth, and throughput
between all the servers, you can gain an idea of how fast the connections are.
Copy a few large files from one server to another. When performing this test,
copy from Server A to Server B and then copy from server B to Server A. Data
traveling from one server to another does not always take the same route when
traveling back.
Applications on Servers | 21
Page 28

22
Page 29

Install Vault
23
Page 30

24
Page 31

Build the Vault
Environment
This chapter discusses installing the Vault server on several different operating systems.
4
Options for Installing Vault
If you are installing the server components for Vault Workgroup, Collaboration,
or Professional, you have several options. Vault Collaboration and Professional
supports Multi-Site replication with a central remote database. Vault
Collaboration and Vault Professional also allow a single site to implement Vault
with a dedicated database server.
NOTE For more information on Vault components see Understand Autodesk Vault
on page 7. For more information on Vault environments see Plan the Vault
Environment on page 19.
Install FLEXnet for Vault
NOTE If you are installing FLEXnet on Windows Vista, Windows Server 2008, or
Windows 7 IPv6 is enabled by default. Refer to Autodesk TS1101507 for information
on using the Autodesk License Manager with IPv6.
Vault Workgroup, collaboration and Professional 2011 have a licensing feature.
The licensing feature uses the Autodesk® Licensing Manager used by other
Autodesk products. The installation and configuration of the license manager
is like other Autodesk products.
25
Page 32

If you are installing Vault server and not Vault Workgroup, collaboration or
Professional server, you do not install or configure the network licensing
manager.
NOTE The license server does not have to be the same server as the Vault server.
If a different server is used, choose the configure button when installing the Vault
server to select the server to use as the license manager.
How to Install the Network License Manager
The Network License Manager is used to configure and manage the license
servers.
Install your Network License Manager
1 In the Autodesk Installation wizard, click Install Tools and Utilities.
2 On the Select the Products to Install page, select Autodesk Network License
Manager and then click Next.
3 Review the Autodesk software license agreement for your country or
region. Accept this agreement to proceed with the installation. Choose
your country or region, click I Accept, and then click Next.
NOTE If you do not agree to the terms of the license and want to terminate
the installation, click Cancel.
4 On the Review - Configure - Install page, review your product selection
and the current settings. If you do not want to change anything, click
Install. If you want to change the install type or installation path, click
Configure.
5 On the Select the Installation Type page, select Typical or Custom. Accept
the default installation path (C:\Program Files\Autodesk Network License
Manager\), or Browse to specify a different path. If you enter a path that
does not exist, a new folder is created using the name and location you
provide. Click Next.
WARNING Do not install the Network License Manager on a remote drive.
When you install the Network License Manager files, provide a path to a local
drive. Specify the drive letter; the universal naming convention (UNC) is not
permitted.
26 | Chapter 4 Build the Vault Environment
Page 33

6 On the Configuration Complete page, click Configuration Complete to
return to the confirmation page.
7 On the Review - Configure - Install page, click Install.
8 When the Installation Complete page displays, click Finish.
Configure a License Server
You configure a license server so that you can manage the Autodesk product
licenses you received when you ran the Network License Activation utility.
Configure the license server with the lmtools.exe utility.
Configure your license server
Log in with Administrator rights when working with the LMTOOLS utility.
1 Do one of the following:
■ (Windows XP / Windows Server 2003) Click Start ➤ Programs ➤
Autodesk ➤ Network License Manager ➤ LMTOOLS.
■ (Windows Vista Windows, Server 2008, or Windows 7) Double-click
the LMTOOLS icon on the desktop.
2 In the LMTOOLS program, on the Service/License File tab, make sure the
Configure Using Services option is active.
3 Click the Config Services tab.
4 In the Service Name list, select the service name you want to use to
manage licenses.
By default, the service name is Flexlm Service 1. If FLEXnet® is managing
other software on your computer in addition to Autodesk, you can change
the service name to avoid confusion. For example, you can rename Flexlm
Service 1 to Autodesk Server1.
NOTE If you have more than one software vendor using FLEXnet® for license
management, the Service Name list contains more than one option. Make
sure that only one Autodesk service is listed.
5 In the Path to Lmgrd.exe File field, enter the path to the Network License
Manager daemon (lmgrd.exe), or click Browse to locate the file.
Configure a License Server | 27
Page 34

By default, this daemon is installed in the C:\Program Files\Autodesk
Network License Manager folder.
6 In the Path to the License File box, enter the path to your license file, or
click Browse to locate the file.
This path is to the license file obtained by the Network License Activation
utility or the location where you placed the license file if you obtained
it offline.
7 In the Path to the Debug Log File box, enter a path to create a debug log,
or click Browse to locate an existing log file.
It is recommended that you save to the C:\Program Files\Autodesk Network
License Manager folder. The log file must have a .log file extension. For
new log files, enter the .log extension manually.
8 To run lmgrd.exe as a service, select Use Services.
9 To start lmgrd.exe automatically when the system starts, select Start Server
at Power Up.
10 Click Save Service to save the new configuration under the service name
you selected in step 4. Click Yes when prompted if you would like to save
the settings to the service.
11 Click the Start/Stop/Reread tab and do one of the following:
■ If a service has not yet been defined for Autodesk, click Start Server
to start the license server.
■ If a service for Autodesk is already defined and running, click Re Read
License File to refresh the Network License Manager with any changes
made to the license file or Options file.
The license server starts running and is ready to respond to client requests.
12 Close lmtools.exe.
Install and Use SAMreport-Lite (Optional)
SAMreport-Lite is a reporting tool that helps you track network license usage.
With SAMreport-Lite technology from Acresso™ Software, you can monitor
client usage for Autodesk network licensed products.
To learn more about installing and using SAMreport-Lite, see the SAMreport-Lite
User's Guide. Click the Documentation link at the lower left corner of the
Installation wizard, or see the Help System in the Autodesk product.
28 | Chapter 4 Build the Vault Environment
Page 35

Install Vault Server
This section gives step by step instructions for setting up the Vault server on
Windows XP, Windows Vista, Windows 7, Windows Server 2003, and Windows
Server 2008.
NOTE ASP .NET v2.0 (32-bit) must be installed and configured properly to use
Vault server on a 64-bit Windows operating system. Refer to TS1078626
Pre-Install Microsoft SQL
If it is unable to find an installed version of Microsoft SQL, Autodesk Vault
Server installs the Microsoft SQL 2008 Express service pack 1. You can install
Microsoft SQL 2005 Standard o Enterprise Edition service pack 3 or Microsoft
SQL 2008 Standard or Enterprise Edition service pack 1 before installing the
Vault server so that you do not have to perform the upgrade at a later time.
NOTE This installation process possibly requires the server to reboot multiple
times. Please be sure that you are able to perform the necessary reboots. Also, if
you use a custom password for the SQL SA account, specify this password during
the installation of the Vault server.
Use the following steps to install Microsoft SQL with an Autodesk Vault
Instance.
1 Start the installation process for Microsoft SQL Server.
2 The installation process installs any necessary prerequisites and begins
running the pre-installation checks. Note any errors and take the necessary
corrective actions before continuing
3 In the Components to Install dialog box, select SQL Server Database
Services. To modify the installation path, click Advanced.
4 In the Feature Selection dialog box, you can expand the Database Services
options and change the location of the data files directory.
5 In the Instance Name dialog box, enter the name of the instances as
AutodeskVault.
NOTE If you install SQL without using this instance name, the ADMS
installation creates its own instance of SQL Server called AutodeskVault.
Install Vault Server | 29
Page 36

In the Service Account dialog box, specify the Local System account. Or,
if you plan to perform backups and restores to remote locations, specify
a Domain User account for the SQL Server.
6 In the Authentication Mode dialog box, select Mixed Mode authentication
and set the SA password. The default password used in during a default
installation is “AutodeskVault@26200”.
Set Up Remote SQL
Vault Collaboraition or Professional allow the Vault environment to be
configured to use a remote SQL database. This database resides on a dedicated
server which a single site can use to increase performance. Alternatively, it
can be used for a multi-site replicated Vault environment.
Configure Microsoft SQL Server for Remote Access
NOTE The following steps are detailed steps for setting up remote access on SQL
2005. Some steps may vary for SQL 2008.
1 On the computer on which SQL is installed, click
Start ➤ Programs ➤ Microsoft® SQL Server 2005 ➤ Configuration
Tools ➤ SQL Server Configuration Manager.
2 In the SQL Server Configuration Manager dialog box, expand SQL Server
2005 Network Configuration and then select Protocols for
AUTODESKVAULT.
3 Right-click TCP/IP in the protocols list and then select Enable.
30 | Chapter 4 Build the Vault Environment
Page 37

4 Close SQL Server Configuration Manager.
5 On the computer on which SQL is installed, click
Start ➤ Programs ➤ Microsoft SQL Server 2005 ➤ Configuration
Tools ➤ SQL Server Surface Area Configuration.
6 In the SQL Server Surface Area Configuration dialog box, select Surface
Area Configuration for Services and Connections.
7 In the Surface Area Configuration for Services and Connections dialog
box, expand AUTODESKVAULT ➤ Database Engine and then select
Remote Connections. Verify that Local and Remote Connections and
Using TCP/IP only are turned on.
Set Up Remote SQL | 31
Page 38

8 Click OK.
9 From the Windows® Start menu, select Settings ➤ Control Panel.
10 In the Control Panel, double-click Administrative Tools.
11 In the Administrative Tools window, double-click Computer Management.
12 In the Computer Management window, expand Services and Applications
and then select Services.
13 Locate the SQL Server (AUTODESKVAULT) service. Right-click the service
and then select Restart.
32 | Chapter 4 Build the Vault Environment
Page 39

14 Locate the SQL Sever Browser service. Right-click the service and then
select Properties.
15 In the SQL Server Browser Properties (Local Computer) dialog box, change
the startup type to be Automatic and then click OK.
16 Right-click SQL Server Browser and then select Start.
Create Shared Network Folders
In a multi-site environment, one site can host the AUTODESKVAULT SQL
instance. The additional sites access that SQL instance remotely, or all sites
can access the same SQL instance remotely. Before configuring the additional
sites to access the SQL instance, a shared network folder must be created.
The shared network folder is required as a transition area between the SQL
instance and the Autodesk Vault server. The shared network folder can be
located on any computer that is accessible by both the data management
server and SQL. The space requirement for the shared folder is equal to the
total of all database files.
Set Up Remote SQL | 33
Page 40

Both the user account under which the Autodesk Vault server is running as
well as the user account under which the SQL instance is operating need full
access to the shared network folder.
1 Choose a network location and create a folder.
2 Right-click the new folder and then select Sharing and Security.
3 In the Properties dialog box, click Share this folder.
4 Enter a name for the shared folder.
5 In the Comment field, enter Shared network folder for Autodesk Vault.
6 Click Permissions.
7 In the Permissions dialog box, click Add. Add the user account under
which ADMS is running. By default, this account is a local administrator
account on the ADMS server called Autodesk Vault.
8 Add the Windows account under which the SQL Server service is running.
The default is Network Service.
9 Give both accounts Full Control.
34 | Chapter 4 Build the Vault Environment
Page 41

10 In the Permissions dialog box, click OK.
11 In the Properties dialog box, click OK.
Windows XP
This section explains the recommended steps to install the Autodesk Vault
server on a Windows XP workstation. The installation can be summarized in
four major steps.
1 Choose the data management server hardware.
2 Load Internet Information Services (IIS)
3 Configure Windows XP Firewall
4 Run the data management server installation.
NOTE If 10 or more users need access to the vault, we recommended that you
install the Autodesk Vault server on Windows Server 2003 or 2008
What You Need
You need the following items before you start.
■ Autodesk Vault installation media
■ Windows XP installation media
■ Administrator rights to the computer your installing the data management
Installation
After choosing the data management server hardware. (see Hardware
Requirements for recommended specifications), load Internet Information
Services on this system
server on.
1 From the Windows Start menu, select Programs ➤ Control Panel
2 From the Control Panel, double-click Add or Remove Programs
Windows XP | 35
Page 42

3 On the left side of the Add or Remove Programs dialog box, select the
option to Add/Remove Windows Components
4 Check Internet Information Services (IIS) and click the Next button. You
can possibly be prompted for your Windows XP CD.
NOTE If IIS is installed and is not being used for any application uninstalling IIS
and reinstalling it ensures that the default settings are set
Now that IIS is installed, configure the firewall that is built into Windows XP.
1 From the Windows Start menu, select Programs ➤ Control Panel
2 From the Control Panel, double click Security Center
3 If the Firewall strip says on then click the firewall icon at the bottom of
the dialog box.
4 In the Windows Firewall dialog box, click the Exceptions tab, and then
click Add Port
36 | Chapter 4 Build the Vault Environment
Page 43

5 In the Add a Port dialog box, Enter the following information.
Name: Vault
Port: 80
Ensure TCP is checked
Windows XP | 37
Page 44

6 Click OK
NOTE If you are not running Windows XP Firewall you can skip this step.
Once the firewall is configured to allow Vault to communicate properly, run
the installation from the Autodesk Vault server media.
1 Insert the Installation media and double-click the setup.exe
2 Choose Install Products.
3 Choose Autodesk Vault 2011 (Server).
4 Accept the License Agreement.
5 Fill in your user information.
6 The configuration screen allows you to change the location of the SQL
installation. You can change the SQL database location, and the location
for the Autodesk Vault server console application.
NOTE We recommend that you take the default locations unless you are
setting up a remote site. For more information on Multi-Site setups see Setting
Up Multiple Site Environments
7 Click Install
8 The installation performs a series of installation pre-checks. If your system
does not pass the installation prechecks a dialog box displays failures and
warnings. Use the installation help and information in Troubleshooting
38 | Chapter 4 Build the Vault Environment
Page 45

Windows Vista
This section explains the recommended steps to install the Autodesk Vault
server on a Windows Vista workstation. The installation can be summarized
in four major steps.
1 Choose the data management server hardware.
2 Load and configure Internet Information Services (IIS).
3 Configure Windows Vista Firewall.
4 Run the data management server installation.
What You Need
You need the following items before you start.
■ Autodesk Vault installation media
■ Windows Vista installation media
■ Administrator rights to the computer your installing the data management
server on.
Installation
After choosing the data management server hardware (see Hardware
Requirements for recommended specifications), check the Internet Information
Services settings on this system. If IIS is not loaded the Vault server installation
will install IIS.
1 From the Windows Start menu, select Control Panel
2 From the Control Panel, double click Programs and Features
3 On the left side of the Programs and Features dialog box, select the option
to Turn Windows Features on or off
4 Check Internet Information Services
5 Expand Internet Information Services ➤ Web Management Tools ➤ IIS
six Management Compatibility.
Windows Vista | 39
Page 46

6 Turn on the check box for IIS Metabase and IIS 6 configuration
compatibility.
7 Expand Internet Information Services ➤ World Wide Web Services
➤ Application Development Features.
8 Turn on the check box for ASP .NET. Three other settings are automatically
turned on: .NET Extensibility, ISAPI Extensions, and ISAPI Filters
NOTE If IIS is installed and is not being used for any application uninstalling IIS
and reinstalling it ensures that the default settings are set. If IIS is not installed you
can allow the Vault server installer to perform this installation.
Now that IIS is installed, configure the firewall that is built into Windows
Vista, if necessary.
40 | Chapter 4 Build the Vault Environment
Page 47

NOTE If you are not running Windows Vista Firewall you can skip this section.
1 On the Windows Start menu, select Programs ➤ Control Panel.
2 On the Control Panel, double click Windows Firewall.
3 If the Firewall strip says that ”Windows Firewall is helping to protect your
computer,” then click Change settings.
4 In the Windows Firewall dialog box, click the Exceptions tab, and then
click Add Port
Windows Vista | 41
Page 48

5 In the Add a Port dialog box, Enter the following information.
Name: Vault
Port: 80
Ensure TCP is checked
42 | Chapter 4 Build the Vault Environment
Page 49

6 Click OK
Once the firewall is configured to allow Vault to communicate properly, run
the installation from the Autodesk Vault server media.
1 Insert the Installation media and double-click the setup.exe.
2 Choose Install Products.
3 Choose Autodesk Vault 2011 (Server).
4 Accept the License Agreement.
5 Fill in your user information.
6 The configuration screen allows you to change the location of the SQL
installation. You can change the SQL database location, and the location
for the Autodesk Vault server console application.
NOTE We recommend that you take the default locations unless you are
setting up a remote site. For more information on Multi-Site setups see Setting
Up Multiple Site Environments.
7 Click Install
8 The installation performs a series of installation pre-checks. If your system
does not pass the installation prechecks a dialog box displays failures and
warnings. Use the installation help and information in Troubleshooting.
Windows Vista | 43
Page 50

Windows 7
This section explains the recommended steps to install the Autodesk Vault
server on a Windows 7 workstation. The installation can be summarized in
four major steps.
1 Choose the data management server hardware.
2 Load and configure Internet Information Services (IIS).
3 Configure Windows 7 Firewall.
4 Run the data management server installation.
What You Need
You need the following items before you start.
■ Autodesk Vault installation media
■ Windows 7 installation media
■ Administrator rights to the computer your installing the data management
server on.
Installation
After choosing the data management server hardware (see Hardware
Requirements for recommended specifications), confirm Internet Information
Services settings on this system. If IIS is not loaded the Vault server installation
will install IIS.
1 From the Windows Start menu, select Control Panel
2 From the Control Panel, click Programs and Features
3 On the left side of the Programs and Features dialog box, select the option
to Turn Windows Features on or off
4 Check Internet Information Services
5 Expand Internet Information Services ➤ Web Management Tools ➤ IIS
six Management Compatibility.
44 | Chapter 4 Build the Vault Environment
Page 51

6 Turn on the check box for IIS Metabase and IIS 6 configuration
compatibility.
7 Expand Internet Information Services ➤ World Wide Web Services
➤ Application Development Features.
8 Turn on the check box for ASP .NET. Three other settings are automatically
turned on: .NET Extensibility, ISAPI Extensions, and ISAPI Filters
NOTE If IIS is installed and is not being used for any application uninstalling IIS
and reinstalling it ensures that the default settings are set. If IIS is not installed you
can allow the Vault server installer to perform this installation.
Now that IIS is installed, configure the firewall that is built into Windows 7,
if necessary.
Windows 7 | 45
Page 52

NOTE If you are not running Windows 7 Firewall you can skip this section.
1 On the Windows Start menu, select Control Panel.
2 On the Control Panel, double click Windows Firewall.
3 If the Firewall strip says that ”Windows Firewall is helping to protect your
computer,” then click Advance settings on the left side of the Windows
Firewall dialog box.
4 In the Windows Firewall with Advanxw security dialog box, click
tInbound Rules, located in the left pane.
5 From the Action pulldown menu select New Rule.
6 Select Port and click Next.
7 In the Protocol and Ports dialog box, Enter the following information.
Specific local ports: 80
8 In the Action dialog box select Allow the connection and click Next.
9 In the Profile dialog box select all the listed profiles and click Next.
10 In the Name dialog box enter the a name for this new rule. To keep things
simple you can call this new rule Vault. Adding a description is optional
11 Click Finish
Once the firewall is configured to allow Vault to communicate properly, run
the installation from the Autodesk Vault Server media.
1 Insert the Installation media and double-click the setup.exe.
2 Choose Install Products.
3 Choose Autodesk Vault 2011 (Server).
4 Accept the License Agreement.
5 Fill in your user information.
6 The configuration screen allows you to change the location of the SQL
installation. You can change the SQL database location, and the location
for the Autodesk Vault server console application.
NOTE We recommend that you take the default locations unless you are
setting up a remote site. For more information on Multi-Site setups see Setting
Up Multiple Site Environments.
46 | Chapter 4 Build the Vault Environment
Page 53

7 Click Install
8 The installation performs a series of installation pre-checks. If your system
does not pass the installation prechecks a dialog box displays failures and
warnings. Use the installation help and information in Troubleshooting.
Windows Server 2003
This section explains the recommended steps to install the Autodesk Vault
server on a Windows server 2003. The installation can be summarized in three
major steps.
1 Choose the data management server hardware.
2 Load Internet Information Services (IIS) and ASP .NET.
3 Run the data management server installation.
What You Need
You need the following items before you start.
■ Autodesk Vault installation media
■ Windows 2003 Server installation media
■ Administrator rights to the computer your installing the data management
server on.
Windows Server 2003 | 47
Page 54

Installation
After choosing the data management server hardware. (see Hardware
Requirements for recommended specifications), load Internet Information
Services on this system
1 From the Windows Start menu, select Programs ➤ Control Panel ➤
Add or Remove Programs
2 On the left side of the Add or Remove Programs dialog box, select the
option to Add/Remove Windows Components
3 Select and check Application Services and click the Details button
4 Check the ASP .NET option. This action causes the boxes for Enable
network COM+ access and Internet Information Services to be checked
as well.
5 Next button. You can possibly be prompted for your Windows server
2003 CD.
NOTE If IIS is installed and is not being used for any application uninstalling IIS
and reinstalling it ensures that the default settings are set
Once the IIS is configured, run the installation from the Autodesk Vault server
media.
1 Insert the Installation media and double-click the setup.exe
48 | Chapter 4 Build the Vault Environment
Page 55

2 Choose Install Products.
3 Choose Autodesk Vault 2011 (Server).
4 Accept the License Agreement.
5 Fill in your user information.
6 The configuration screen allows you to change the location of the SQL
installation. You can change the SQL database location, and the location
for the Autodesk Vault server console application.
NOTE recommend that you take the default locations unless you are setting
up a remote site. For more information on Multi-Site setups see Setting Up
Multiple Site Environments
7 Click Install
8 The installation performs a series of installation pre-checks. If your system
does not pass the installation prechecks, a dialog box displays failures
and warnings. Use the installation help and information in
Troubleshooting
Windows Server 2008
This section explains the recommended steps to install the Autodesk Vault
server on a Windows Server 2008. The installation can be summarized in four
major steps.
Windows Server 2008 | 49
Page 56

1 Choose the data management server hardware.
2 Load and configure Internet Information Services (IIS)
3 Configure Windows 2008 Firewall
4 Run the data management server installation.
What You Need
You need the following items before you start.
■ Autodesk Vault installation media
■ Windows Server 2008 installation media
■ Administrator rights to the computer your installing the data management
server on.
Installation
After choosing the data management server hardware. (see Hardware
Requirements for recommended specifications), load Internet Information
Services on this system
1 On the Windows Start menu, select Programs ➤ Control Panel
2 On the Control Panel, double click Programs and Features
3 On the left side of the Programs and Features dialog box, select the option
to Turn Windows Features on or off
4 Select Roles in the left pane.
5 In the right pane select Add Role Services.
6 Check Internet Information Services
7 Expand Internet Information Services ➤ Web Management Tools ➤ IIS
6 Management Compatibility.
8 Turn on the check box for IIS Metabase and IIS 6 configuration
compatibility.
9 Expand Internet Information Services ➤ World Wide Web Services
➤ Application Development Features.
50 | Chapter 4 Build the Vault Environment
Page 57

10 Turn on the check box for ASP .NET. Three other settings are automatically
turned on: .NET Extensibility, ISAPI Extensions, and ISAPI Filters
NOTE If IIS is installed and is not being used for any application uninstalling IIS
and reinstalling it ensures that the default settings are set
Now that IIS is installed you can configure the firewall that is built into
Windows Server 2008, if necessary.
1 On the Windows Start menu, select Programs ➤ Control Panel
2 On the Control Panel, double click Windows Firewall
3 If the Firewall strip says ”Windows Firewall is helping to protect your
computer,” then click Change settings.
Windows Server 2008 | 51
Page 58

4 In the Windows Firewall dialog box, click the Exceptions tab, and then
click Add Port
52 | Chapter 4 Build the Vault Environment
Page 59

5 In the Add a Port dialog box, enter the following information.
Name: Vault
Port: 80
Ensure TCP is checked
Windows Server 2008 | 53
Page 60

6 Click OK
NOTE If you are not running Windows 2008 Firewall you can skip this step.
Once the firewall is configured to allow Vault to communicate properly, run
the installation from the Autodesk Vault server media.
1 Insert the Installation media and double-click the setup.exe
2 Choose Install Products.
3 Choose Autodesk Vault 2011 (Server).
4 Accept the License Agreement.
5 Fill in your user information.
6 The configuration screen allows you to change the location of the SQL
installation. You can change the SQL database location, and the location
for the Autodesk Vault server console application.
NOTE We recommend that you take the default locations unless you are
setting up a remote site. For more information on Multi-Site setups see Setting
Up Multiple Site Environments
7 Click Install.
8 The installation performs a series of installation pre-checks. If your system
does not pass the installation prechecks, a dialog box displays failures
and warnings. Use the installation help and information in
Troubleshooting
54 | Chapter 4 Build the Vault Environment
Page 61

Upgrading Vault Server
One of the first steps to a successful deployment is to assess the needs of your
your organization and the ability to move to the next version. This section
provides information on some of the major areas to consider before moving
to a new release.
Testing
After assessing the hardware and software, determine whether you need a test
environment. If you have unanswered questions, or determine that the data
management system is critical to your business, consider setting up a test
environment before upgrading to the next release of Autodesk Vault or
Autodesk Productstream.
NOTE Using a second “test environment” is a best practice.
Test Environment
If possible, perform a test upgrade of the Vault server on a machine that is
like the one that is currently hosting the software. A test upgrade provides
confidence that the backup is valid and helps you identify any potential pitfalls
without impacting your production environment. It also helps you to
Upgrading Vault Server | 55
Page 62

determine compatibility with other applications and environment settings
that your company uses.
BenefitsTest Machine Settings
Migration
Similar CPU, memory, disk space
Database
Other applications that are installed on the
production server
and so on.
Microsoft® Windows® Administration set-
tings
Provides an estimate of how long the migration can take. Gives insight into migration settings, such as time-out values to be
changed. Shows other configuration settings that can require changes.
Test machines that need access to a vault
that is 2 GB or more also need a similar
version of full Microsoft® SQL server in-
stalled.
Test for compatibility with various proxy
clients, firewalls, anti-virus programs, and
so on.
Compatibility testing.Operating System, Service Packs, firewalls,
Check for compatibility with Windows
Domain policies, login scripts, permissions,
and other settings.
The Autodesk Vault server console can migrate a vault from Vault 2009 and
Vault 2010 to work with Autodesk Vault server 2011. If you currently have a
vault database earlier than release 2009, migrate it first to release 2009 and
then use the server console to migrate it to work with Autodesk Vault server
2010.
Before You Upgrade
When upgrading from a previous version of Autodesk Vault server 2010 or
2009:
1 Back up all existing Vaults and libraries.
56 | Chapter 4 Build the Vault Environment
Page 63

2 Test the backup by restoring it to another computer.
3 If you have not upgraded your MS SQL database you need to make sure
that the MS SQL is upgraded to 2005 SP3 or 2008 SP1.
4 Run the Vault server 2011 installation and allow it to upgrade your
existing Vault server.
If you are running the Autodesk Vault server 2008, remove the data
management server components before installing the Vault server 2011.
These steps are required to remove Autodesk Vault server 2008. Always create
a backup of your vault data before uninstalling. Be careful to perform the
following steps in the order given.
Uninstall Components
Before uninstalling any components, back up existing vault and library data.
Restore the backed up data on a test environment to verify that it can be
successfully restored before proceeding.
NOTE Depending on your configuration, you may not find some of the following
components. If they do not appear in the Windows Add or Remove Programs
utility, skip the item.
■ Autodesk Vault server 2008 or earlier
■ Autodesk Vault 2008 or earlier (if the server and clients are on the same
computer)
■ Autodesk Office Add-in (if the server and clients are on the same computer)
NOTE Do NOT uninstall the SQL instance AUTODESKVAULT.
Install Vault Server 2011
You can install Autodesk Vault server 2011 after you:
■ Back up the vault and library data.
■ Restore the backup on a test environment to verify it works.
Install Vault Server 2011 | 57
Page 64

■ Remove previous versions of the Autodesk data management server and
clients.
See Install Vault Server on page 29 for instructions on installing the server
During the installation, any existing databases and file stores are detected.
You are prompted to migrate the data following the installation.
NOTE Vaults from Autodesk Vault server versions 1.0 and 1.3 cannot be migrated.
A vault from Autodesk Vault server version 3 ,4, 5, 2008 must be migrated to either
version 2009 or 2010 before being migrated to version 2011 or higher.
When starting the server console the first time, it asks you whether to migrate
any vaults it finds. If you Select no, use the following procedure to migrate
any existing vault.
Migrate existing vault data
1 From the Windows Start menu, select Programs ➤ Autodesk ➤ Autodesk
Vault ➤ Autodesk Data Management Server Console 2011.
2 The unmigrated vault is indicated with a yellow warning sign. Select the
non-migrated vault.
3 Select Actions ➤ Migrate.
4 When the migration is done, click OK.
Upgrade Microsoft SQL
If your existing Microsoft SQL database server is using Microsoft 2005 Express
service pack 3, or one of the supported Microsoft SQL versions.
Upgrade Microsoft SQL Express to Microsoft SQL Standard or
Higher
To upgrade a SQL Express installation to a full version of SQL using a media
which does not include a service pack, or higher, you can use one of the
following methods.
NOTE A server console backup is recommended before performing either of these
methods
58 | Chapter 4 Build the Vault Environment
Page 65

Method One
1 Open a command prompt and navigate to the directory where the full
version of SQL setup is located.
2 Enter “setup.exe SKUUPGRADE=1” (case sensitive).
3 Start the upgrade and select the AutodeskVault instance.
4 After the upgrade is complete, apply the latest SQL service pack since this
upgrade actually does not have on and it is not transferred from SQL
Express.
Method Two
1 Create a full backup of your vault using the server console.
NOTE In later steps, you delete all your vault databases. Validate that you
can restore this backup on a test server before proceeding. Do not continue
if your test restore fails. Correct any problems you have with the backup
before continuing these steps.
2 After the test restore is successful, open the ADMS Console and delete all
vaults and libraries listed. Then select Detach Master Vault from the Tools
menu.
3 Make sure that all users are logged out of the vault.
4 Completely uninstall SQL Express, including the following applications
in this order:
■ Microsoft SQL Server
NOTE If you have more than one instance of SQL Express installed, be
sure to uninstall only the AutodeskVault instance. DO NOT uninstall any
other part of SQL after this step is complete.
■ MS SQL Server Native Client
■ MS SQL Server VSS Writer
■ MS SQL Server 2005 Backward Compatibility
■ MS SQL Server Setup Support Files
Upgrade Microsoft SQL | 59
Page 66

5 Delete the SQL Express folders from Program Files (including data files).
If your Vault databases are located on a different drive, be sure to delete
the files in this location as well.
6 Install the full version of SQL with an AUTODESKVAULT instance as in
the "Install MS SQL Server Prior to Installing ADMS 2008" section.
7 Install Microsoft SQL 2005 SP3 or Microsoft SQL 2008 SP1.
8 Restore the backup that you created in step one using ADMS Console.
60 | Chapter 4 Build the Vault Environment
Page 67

Install the Vault Client
5
The Autodesk® Vault clients include the integrated add-ins for applications such as Autodesk
Inventor® and AutoCAD®, and the stand-alone Vault clients. Add-in clients are available for
Autodesk® and non Autodesk design applications. Once the Autodesk data management
server is installed, the clients can be installed.
Data Management Client Requirements
Autodesk data management clients that integrate with an Autodesk design
application require a licensed installation of the corresponding Autodesk
application. Refer to the hardware and software requirements for each product.
The clients work with the Autodesk data management server. The Autodesk
data management server must be installed and configured before the clients
can access the server.
NOTE The data management clients are not compatible with previous versions of
Autodesk Vault server. If you are upgrading to Autodesk Vault 2011 , all server and
client components must be upgraded.
Operating Systems
■ Windows
■ Windows Vista
■ Windows Vista
■ Windows Vista
■ Windows XP Professional x64 Edition
■ Windows 7 Ultimate (32-bit and 64-bit)
®
XP Professional (SP2, SP3)
®
Ultimate (32-bit and 64-bit)
®
Enterprise (32-bit and 64-bit)
®
Business (32-bit and 64-bit)
61
Page 68

■ Windows 7 Professional (32-bit and 64-bit)
■ Windows 7 Enterprise (32-bit and 64-bit)
Recommended Hardware
■ Intel
■ 2-Gb memory or higher
■ 4-Gb disk space
®
Pentium® 4, Intel®Xeon®, ADM Athlon™ 2 GHz
Before installing
■ Close all Autodesk and Microsoft applications before installation.
■ Disable any virus scanning software before installing.
■ Previous versions of clients are not compatible with Autodesk Vault server
2011. Installing Autodesk Vault server 2011 requires that all clients are
upgraded to version 2011.
■ The recommended screen resolution is 1024x768 or higher. Large font
settings in lower screen resolution settings can affect clarity of dialog boxes.
Client Installation
The Autodesk data management clients are available with the product
installation media as well as on the Autodesk Vault 2011 media.
The Autodesk Vault add-in for Microsoft® Office was shipped with your
software. It can be used with one or more of the following Microsoft products
when installed and registered on your machine.
■ Microsoft
■ Excel
■ PowerPoint
®
NOTE To install the Autodesk Vault clients, you must have either Microsoft
Windows administrator privileges or power user privileges.
62 | Chapter 5 Install the Vault Client
®
Word 2003/2007
2003/2007
®
2003/2007
Page 69

Install the clients for an Autodesk design application
■ Insert the installation media for the Autodesk design application and follow
the instructions for the installation wizard.
Install the clients for a non-Autodesk design application
■ Insert the installation media for the application and follow the instructions
to install the software.
Install clients from the Autodesk Vault 2011 Media
1 Insert the Autodesk Vault 2011 media.
2 Double-click setup.exe.
3 Follow the instructions in the installation wizard.
Add-in Integration
If a design application is on the computer before the clients are installed, the
corresponding add-in clients automatically integrate with the design
applications. However, if an application is installed after the data management
clients, action is required. Go to the Control Panel and modify the data
management application to install the missing add-in.
Add-in Integration | 63
Page 70

64
Page 71

Configure and Maintain
Vault
65
Page 72

66
Page 73

Configure Basic Vault
Options
This chapter describes the basic options you configure to allow users to begin using Vault.
6
Log In the First Time
When Autodesk Vault server is installed, a vault and a user account are created.
The name of the vault is “Vault”. The account name is “administrator”. No
password is assigned to the account and the name is not case sensitive. The
administrator account has full administrator privileges.
NOTE If a user account is already created for you, log in with your user name and
password.
Log into Autodesk Data Management Server the first time
1 Use one of these methods:
■ On the Start menu, click Programs ➤ Autodesk ➤ Autodesk Data
Management ➤ Autodesk Vault.
■ On the Start menu, click Programs ➤ Autodesk ➤ Autodesk Data
■ In an application with an integrated add-in, click the Vault add-in tab
2 In the Log In dialog box, verify the following:
User name The name for the vault account.
Management ➤ Autodesk Vault [Product Name].
➤ Log In.
The password associated with the vault account.Password
67
Page 74

Server
Database
A default user ID, vault server, and database are set up for you to get
started using the vault. If a user account is already created for you, use
your own account information. If a user account has not been created
for you, or the default values are not present, contact your vault
administrator.
Use either the default values or, if an account has been created for you,
use your own account information. The default values are:
User Name: Administrator
Password: empty
Server: Name of the computer on which the vault server is installed.
Use localhost if the server is installed on the same machine as the client.
Database: Vault
3 Click OK.
You are logged into the vault.
NOTE You have the option to save the account information to log into the vault
automatically the next time.
The name of the computer on which the vault
server is installed.
The name of a vault database located on the specified server. The default is “Vault”. Click the
browse button to select from a list of available
databases on the server.
Use Vault with a Proxy server
If a client machine connects to the Web server through a proxy server, all calls
to the Autodesk Data Management Server from any Autodesk client fail. To
have a successful Autodesk Client/Server communication, bypass the proxy
server.
Change the proxy settings in Internet Explorer 6.x and 7.x
1 Open Internet Explorer.
2 On the Tools menu, select Internet Options.
3 Select the Connections tab.
68 | Chapter 6 Configure Basic Vault Options
Page 75

4 Click LAN Settings.
5 If the "Use a proxy server for your LAN" check box is enabled, turn on
the “Bypass proxy server for local addresses” check box.
6 Click the Advanced button next to the Port field.
7 In the Proxy Setting dialog box, add the server name and IP address into
the Exceptions field.
8 Click OK.
9 Click OK.
10 Click OK to close Internet Options.
All addresses without a period, for example: http://webserver, bypass the proxy
and resolve directly.
If Internet Explorer continues to connect to the assigned HTTP proxy server,
then the HTTP proxy address can contain a period. If this situation happens,
configure the proxy server to use a host name.
Configure the proxy server to use a host name
1 Follow steps 1-5 from the previous section for changing the proxy settings
in Internet Explorer.
2 If the “Address” field is “http://webserver.domainname.com” or
“http://10.0.0.1”, then change it to “http://webserver” only.
3 Click OK and close Internet Explorer Options.
Manage User Accounts
The vault is a secure database. Before anyone can use a vault, the administrator
must add accounts for users and grant levels of permission within the vault
using roles.
For more information about users, roles, and managing accounts, see the
server console Help.
Add or Edit User Accounts
You can create user accounts and grant vault access.
Manage User Accounts | 69
Page 76

1 In either the Vault client or server console Click Tools ➤ Administration.
2 In the Administration dialog box, click the Security tab and then click
Users.
3 In the User Management dialog box, click New User.
70 | Chapter 6 Configure Basic Vault Options
Page 77

4 In the New User dialog box, enter the information for the new user:
■ First name
■ Last name
■ User name
■ Email address
Add or Edit User Accounts | 71
Page 78

5 Enter a password and confirm it.
6 Click Roles and assign one or more roles to the account. Roles determine
the level of access to the vault.
7 Click Vaults and select one or more vaults for the account to access.
8 Select the Enable User check box. Until the account is enabled, it is not
available for use and cannot access the vault.
Repeat this process for each new user account needed. Each new user is granted
access to the selected vaults on the server.
Edit a user account
1 Double-click a user profile in the User Management dialog box. Or,
highlight a user profile and then click Edit User.
2 In the User Profile dialog box, edit the information for the current user.
3 To edit the password, enter a new password and then confirm the new
password.
72 | Chapter 6 Configure Basic Vault Options
Page 79

4 Click Roles to edit the user roles.
5 Click Vaults to edit the user access to vaults.
6 Click OK.
NOTE Each user logs into the vault with a unique user name and password. Restrict
access to the administrator account to only the assigned vault administrator.
Assigning Roles to User Accounts
1 Select Tools ➤ Administration.
2 In the Administration dialog box, click Users.
3 To assign roles to a user for the first time, click New User.
4 In the New User dialog box, select Roles.
5 In the Add Roles dialog box, select one or more roles, and then click OK.
6 To edit the role for an existing user, double-click a user profile in the User
Management dialog box.
7 In the User Profile dialog box, click Roles.
8 In the Add Roles dialog box, select or cancel the selection of one or more
roles.
9 Select the Enabled check box. Until the account is enabled, it is not
available for use and cannot access the vault.
10 Click OK.
More than one role can be assigned to a user account. The permissions are a
union of the assigned roles.
NOTE The Content Center Administrator, and Content Center Editor, roles are
specific to Content Center. Do not alter them.
Grant Vault Access to Users
1 Select Tools ➤ Administration.
2 In the Administration dialog box, click Users.
Assigning Roles to User Accounts | 73
Page 80

3 To grant a user access to one or more vaults for the first time, click New
User.
4 In the New User dialog box, click Vaults.
5 In the Add Vaults dialog box, select one or more vaults, and then click
OK.
6 To edit access to a vault, double-click a user profile in the User
Management dialog box.
7 In the User Profile dialog box, click Vaults.
8 In the Add Vaults dialog box, select or cancel the selection of one or more
vaults.
Disable User Accounts
1 Select Tools ➤ Administration.
2 In the Administration dialog box, click Users.
3 In the User Management dialog box, double-click a user profile to disable,
or highlight the user account and click Edit User.
4 In the User Profile dialog box, clear the check box for Enable User.
5 Click OK.
Assign Users to Groups
Groups allow the administrator to create a container to add or remove users
from. Rather than assigning several users permissions and roles, the
administrator can grant the same permissions to several users by adding or
removing them from a group.
1 Select Tools ➤ Administration.
2 Select Groups.
3 In the Group Management dialog box click the New Group button.
4 Enter a name and email address for the group.
5 Add the roles and Vaults to the group.
74 | Chapter 6 Configure Basic Vault Options
Page 81

6 Add the users individually or by selecting another group to include.
Assign Users to Groups | 75
Page 82

76
Page 83

Configure Vault
Workgroup
This section provides steps to configure several options that can be used with Vault Workgroup,
Collaboration and Professional to control document revisions.
7
Revision
A revision is a collection of file versions rolled up into one object that is displayed
to the user. After a revision is created, document edits are contained within that
revision until a new revision is created. So as changes are made and committed
to the system, the user sees no change to the revision label.
Once the revision objects have been created, any revision can be downloaded
or opened. When a revision is downloaded, only one version within that revision
is used to represent the revision. If life cycles (For more information see Life
Cycles) are not used, then that version is always the latest version within that
revision.
Choose the Revision Scheme
Vault Workgroup, Collaboration, and Professional install three default revision
schemes to choose from. To access these schemes, launch your Vault client.
1 On the Start Menu, select All programs ➤ Autodesk ➤ Autodesk Data
Management ➤ Autodesk Vault [Product Name].
2 Log in to the Vault.
3 On the Tools Menu select Administration.
77
Page 84

4 Select the Behaviors tab.
5 Click the Revisions button.
The Revision Scheme Definitions dialog box opens with the three default
options for revision schemes.
The first revision scheme is configured to use the letters A through Z as the
primary revision designator and numbers for all secondary and tertiary. For
example, the first revision is marked as A, and the second is marked as B. If
you had a small change to Revision A and did not want to mark it as a full
Revision bump, you use the secondary, which is A.1.
The second revision scheme is configured the same as the first, except the
primary designator is not alphabetical but numerical starting with one. For
example, the first revision is 1, and the second is marked as 2. A secondary
designation is marked as 1.1.
The last default revision scheme is the Null scheme. Use this scheme if you
do not want to use document revisions with Vault.
Create a New Revision Scheme
If necessary, you can create your own scheme based on your company
standards.
1 On the Start Menu, select All programs ➤ Autodesk ➤ Autodesk Data
Management ➤ Autodesk Vault [Product Name].
2 Log in to the Vault.
3 On the Tools Menu select Administration.
4 Select the Behaviors tab.
5 Click the Revisions button.
Use the New, Copy, and Edit buttons across the top of the Revision Scheme
Definition dialog box to define a revision scheme that matches your company
standards.
Lifecycles
A lifecycle is comprised of various states that can be assigned to a file. One or
more of these states can be identified as a "released state".
78 | Chapter 7 Configure Vault Workgroup
Page 85

NOTE This option is applied to the state, not the name of the state itself.
When a document is in a released state, a new version is created that is marked
internally as released. Newer non-released versions can be created by moving
the document to a different state without creating a revision. You can choose
your life cycle definition using the following steps.
1 On the Start Menu, select All programs ➤ Autodesk ➤ Autodesk Data
Management ➤ Autodesk Vault [Product Name].
2 Log in to the Vault.
3 On the Tools Menu select Administration.
4 Select the Behaviors tab.
5 Click the Lifecycles button.
In the Lifecycle Definition dialog box, you see that Vault Workgroup,
Collaboration, and Professional ships with five predefined lifecycle definitions.
The first Lifecycle definition is the Basic Release process. This process supports
the lifecycle states.
1 Work in progress
2 For Review
3 Released
4 Obsolete
The second Lifecycle definition is the Flexible Release process. This process
supports the lifecycle states.
1 Work in progress
2 For Review
3 Released
4 Quick Change
5 Obsolete
Adding the Quick Change lifecycle state allows you to change a design after
a document has been released. This functionality is useful when finding small
problems during manufacturing.
Lifecycles | 79
Page 86

The third Lifecycle definition is the Long Lead Time Release process. This
process supports the lifecycle states.
1 Work in progress
2 For Review
3 Pre-Release
4 Released
5 Quick Change
6 Obsolete
Adding the Pre-Release lifecycle state allows users to track documents that
must be released earlier for ordering materials with long delivery times.
The fourth Lifecycle definition is the Simple Release process. This process
supports the lifecycle states.
1 Work in progress
2 Released
If all you want to do is control which documents are currently released and
which documents are being worked on this Lifecycle definition can be used.
The last Lifecycle definition is the None definition, which allows Vault to be
used without Lifecycles.
Categories
Category management provides a way to group properties logically. Grouping
by category provides a means for assigning a defined set of behaviors and rules
to one or more files. A category labels a file and also sets the defined behaviors
that can be used on the file.
For example, you can use categories to mark files as engineering documents
or office documents. Once these categories have been assigned, you can use
Vault rules to assign default properties, revision schemes, and lifecycle
definitions.
1 On the Start Menu, select All programs ➤ Autodesk ➤ Autodesk Data
Management ➤ Autodesk Vault [Product Name].
2 Log in to the Vault.
80 | Chapter 7 Configure Vault Workgroup
Page 87

Rules
3 On the Tools Menu select Administration.
4 Select the Behaviors tab.
5 Click the Categories button.
Rules allow you to assign categories to files automatically. You can access the
rules by following these steps:
1 On the Start Menu, select All programs ➤ Autodesk ➤ Autodesk Data
Management ➤ Autodesk Vault [Product Name].
2 Log in to the Vault.
3 On the Tools Menu, select Administration.
4 Select the Behaviors tab.
5 Click the Rules button.
Using rules categories can be assigned without interrupting the workflow of
users. For example, if John is an engineer and works only on engineering
documents, a rule can be added that anytime John checks in a file, the
Engineering category is assigned to it. John can continue working without
having to stop and assign the category to his documents.
Import and Export Configurations
Once you have your Vault configured, you can log into the Vault server console
and save your configuration. The configuration can be used when configuring
a new Vault. The following steps can be used to export your configuration.
Export a Configuration
1 On the Start Menu, select All Programs ➤ Autodesk ➤ Autodesk Data
Management ➤ Autodesk Data Management Server Console.
2 On the left side of the Server Console select the Vault you want to export
the configuration from.
3 From the Action pull down menu select Export Configuration.
4 Select a location and filename for the configuration file and select Save.
Rules | 81
Page 88

Import a Configuration
1 From the Start Menu, select All Programs ➤ Autodesk ➤ Autodesk Data
Management ➤ Autodesk Data Management Server Console.
2 On the left side of the Server Console select the Vault you want to apply
the existing configuration.
3 From the Action pull down menu select Import Configuration.
4 Select the configuration file and select Open.
82 | Chapter 7 Configure Vault Workgroup
Page 89

Configure Vault
Collaboration and Vault
8
Professional
In this chapter, we discuss configuring some of the Vault Collaboration and Vault Professional
advance options. These options are not available in the base level of Vault or Vault Workgroup.
Windows Authentication
Windows Authentication allows an Administrator to use existing Active Directory
domain user accounts. Windows Authentication also allows users to log in with
their Windows credentials once the Administrator has imported their accounts.
To import an Active Directory Domain user account follow these steps.
1 From the pull down menu select Tools ➤ Administration.
2 In the Administration dialog box, select the Security tab.
3 Click Users.
4 In the User Management dialog box, select Actions Import Domain User.
5 In the Select Users dialog box, click Locations to specify the domain
containing the Active Directory accounts to import. In the Locations dialog
box, select the domain to use and then click OK.
6 In the Select Users dialog box, enter the names of the users to add from
the Active Directory domain. Alternatively, click Advanced to search for
the users.
83
Page 90

7 Once the users accounts have been specified, click OK in the Select Users
dialog box. The selected Active Directory domain user accounts are added
to the User Management list.
Set Up Multiple Site Environments
Multiple remote sites can be configured to access the same vault data. A site
is comprised of a dedicated Autodesk® Vault server and a file store. Each site
accesses a shared AUTODESKVAULT SQL instance.
What is a Multiple Site Environment
The multiple site environment allows users to design products across multiple
locations as if all the users were in one location. Autodesk® Vault
Collaborattion and Professional allow two different methods to accommodate
this functionality.
The first method is to centralize the data base for all sites. The database for
Vault can sit on a separate server as illustrated here.
The second method is to set up a main site with the database and main file
store located on the same server. The main site has the most users and is where
the most design work is done.
84 | Chapter 8 Configure Vault Collaboration and Vault Professional
Page 91

In these environments, users open data files such as AutoCAD® drawings
Inventor Assemblies or Microsoft® Office documents from there local file
Store. All metadata is read from and written to a central database so that users
can open large files much faster than if they copy them across the Wide Area
Network (WAN)
NOTE Setting up the main site first and attempting to access the main set remotely
can provide satisfactory performance for some users. We recommend that you set
up the main site and expanding to a multiple site after.
Is Multiple Site Environment Right for You
Setting up a multiple site environment is more complicated than a single
server environment. Consider several factors when deciding if you want to
set up a multiple site environment:
■ Network reliability.
■ Network latency and Bandwidth between sites. (Should be low latency and
high bandwidth.)
■ Number of remote sites.
■ Number of users per site.
■ Size and number of files to replicate per day/per hour.
■ Estimated number of concurrent users.
Is Multiple Site Environment Right for You | 85
Page 92

NOTE For more detailed information see Plan the Vault Environment on page 19
Pre-Install Checklist
If you read the prededing information and decide to set up a multiple site
environment, go through the following check list before you start.
■ Do all remote sites have the software? Is the software copied on the server?
Is there a DVD drive on server?
■ Do you have access to an Administrator for all sites? Do you have remote
login from main site to each remote sites?
■ Do all remote sites have a latest copy of the file store with a backup package
(for existing ADMS customers)?
■ Are all Windows updates current on all servers?
■ Are virus scans turned off?
■ Are firewalls turned off?
■ Are TCP Port 1433 and UDP Port 1434 blocked by firewall?
Install Vault Server on Additional Sites
After installing the remote SQL instance and setting up your main Vault server
site, install additional Vault sites. The additional sites in the multi-site
environment must have the Vault Collaboration or Professional server installed
and configured to access the SQL instance used by the first site. The connection
to the remote SQL instance is configured during the installation of the data
management server. Follow these steps for each additional site.
1 On the remote site, insert the Autodesk Vault Collaboration or Professional
installation media.
2 On the installation screen, select either Autodesk Collaboraion or
Professional data management server.
3 From the Select the Products to Install page, select Autodesk Vault server
2011, and then click Next.
NOTE You can install the data management clients on the server as well, but
it is not a requirement.
86 | Chapter 8 Configure Vault Collaboration and Vault Professional
Page 93

4 Accept the license agreement and then click Next.
5 On the Review - Configure - Install page, select Autodesk Vault server
2011 from the drop-down list and then click Configure.
6 Select the Autodesk Vault server 2011 tab.
7 Select Use remote SQL.
Enter the name of the server containing the SQL instance to which to
connect or click Browse to locate the server on the network.
NOTE Do not include \\ in front of the server name. A SQL instance named
'AUTODESKVAULT' must exist at the specified location.
8 When using a remote SQL instance, a shared network folder is required
as a transition area between the SQL instance and the Autodesk data
management server. The shared network folder can be located anywhere
on the network and must be accessible by both the data management
server and SQL. The space requirement for the shared folder is equal to
the total of all database files. Choose a location with sufficient space and
performance. Enter the UNC path to the shared network folder or click
Browse to locate the shared folder on the network.
NOTE Both the user account under which the Autodesk Vault server runs
and the user account under which the SQL instance operates need full control
access to the shared network folder.
9 Click Configuration Complete.
10 Click Install.
11 The Installation Complete page indicates that Autodesk Vault server has
Manage Sites
Sites are managed and maintained using the server console. For more
information and additional site management features, see the server console
Help.
been installed. Click Finish.
NOTE Once the server is installed, repeat this process for each additional
site.
Manage Sites | 87
Page 94

1 On the Windows Start menu, select Programs ➤ Autodesk ➤ Autodesk
Data Management ➤ Autodesk data management server console.
2 Log into the server console.
3 In the navigation pane, select Workgroups.
4 Select the Site you want to manage.
Each site is listed along with a summary of site statistics including:
■ Server Name
■ Description
■ Location of File Store
■ Vault Name
■ Vault Status
■ Replication Type
■ Last Replication
■ Next Replication
■ Site Status
Change Descriptions of Sites
1 Select a site from the list.
2 Right-click the Description field for the site, and then select Edit
Description.
3 In the Description dialog box, enter a new description for the site and
then click OK.
Replicate Data
Replicating data at a site compares the local file store to the file store at each
other site. It retrieves any missing files from the other sites. Once replicated,
a file and its history are available at the replicated site. Individual vaults can
be replicated, or all the enabled vaults on a site can be replicated. Replication
can also be scheduled.
88 | Chapter 8 Configure Vault Collaboration and Vault Professional
Page 95

NOTE The Replication command synchronizes data only at the site at which it is
initiated. Each site is responsible for its own replication. For more information on
site replication see replication in the following section.
Connected Workgroups
Autodesk Vault Collaboration and Vault Professional allow the configuration
of connected workgroups to impove the performance of Microsoft SQL for
remote sites.
Replication
Replication is the process of copying data from one server to another server
usually located in two different physical locations. This process allows the
setup of a Vault environment which has two different locations and users will
not have to spend time downloading large CAD files across their Wide Area
Network (WAN) connection. Before the added features of Connected
Workgroups in Vault Collaboration and Vault Professional only the files were
replicated.
The connected workgroup feature in Autodesk Vault Collaboration and Vault
Professional supports the use of multiple database servers using Microsoft SQL
Publisher/Subscriber technology. This technology allows the replication of
the SQL database at multiple locations.
Workgroups Fixing
Autodesk Vault Collaboration allows replication of file stores from one site to
another site. This is managed by one Microsoft SQL database. This
configuration is known as a workgroup. The following illustration shows a
typical workgroup configuration. All sites in a single workgroup share the
same Microsoft SQL server.
Connected Workgroups | 89
Page 96

To allow sites to have their own database server to increase SQL performance,
Autodesk Vault Collaboration uses connected workgroups. The following
illustration shows a workgroup with two different sites connected to a second
workgroup with a single site.
Setting up Connected Workgroups
The installation of a Connected Workgroup environment requires each
component to be installed and configured in the correct order. The following
section summarizes the order and then explains the installation of each
component in detail.
Configure the Publisher
Autodesk Vault Collaboration or Vault Porfessional do not support connected
workgroups on Microsoft SQL express. The full version of Microsoft SQL must
be installed with a database instance named "AutodeskVault" before installing
the Vault server. (See Pre-Install Microsoft SQL on page 29for more
information) If you are upgrading an existing Vault server to use connected
90 | Chapter 8 Configure Vault Collaboration and Vault Professional
Page 97

workgroups you can get more information on this topic in the Autodesk Vault
Advance configuration Guide.
1 Install MS SQL
2 Configure a shared folder on the publisher. The security on this folder
must allow access to what ever account is setup as the replication user
account and the the AUTODESK VAULT user.
3 Install Vault server on the computer which will have all the information
replicated from. This computer is known as the Publisher.
4 After the Vault server has been installed start the Vault server console.
5 Fill in the UNC path for the shared folder. For example: \\server\share\.
6 Enter the User Id, which should be the user account configured for
replication and should have full access to the shared folder.
7 Enter and confirm the network password for the User ID entered.
8 Click OK
Setting up Connected Workgroups | 91
Page 98

Configure Firewalls
Before adding a workgroup be sure that the SQL server can communicate with
the Vault server through the firewall. This can be done by allowing an
exception for the SQL executables sqlbrowser.exe and sqlserver.exe.
Configure Subscribers
After the Publishing server is set up and configured the subscribing servers
can be setup. When configuring the subscribing servers the publishing server
will install the Vault server databases to the subscribing server over the
network.
NOTE For subscribing locations with slower network connections it is advantageous
to configure the server at the same location as the publishe r and ship the server.
If shipping a subscribing server to a different location, it should not be disconnected
from the network for more than 14 days to allow a successful replication once
reconnected to the network.
1 Install the same version of SQL that was used on the publisher with a
preconfigured instance named AutodeskVault the same sa password as
the publisher.
2 From the publisher launch the Vault server console.
3 In the left pane of the server console,right-click on the Workgroups node
and select Add Workgroup.
92 | Chapter 8 Configure Vault Collaboration and Vault Professional
Page 99

4 Enter a name for the new workgroup.
5 Enter the name of the computer with the new instance of SQL was
installed.
6 Enter the User ID and Password for the network user setup to run
replication.
7 Click OK
After clicking OK a background process configures the remote SQL server as
a subscriber and starts to replicate the KVM database from the publisher. Once
the secondary server has completed its configuration, it will be added to the
Workgroups tree in the console.
NOTE Though the configuration is complete the replication may not be complete.
Verify the replication is complete before moving to the next step.
Once the publisher finishes installing the databases to the subscriber, the
Vault server console can be installed on the subscribing server.
Setting up Connected Workgroups | 93
Page 100

Enabling Vault Replication
Once a Connected workgroup has been configured the last step is to enable
which vaults are replicated . This can be configured using the Manage
Replication tool.
1 Select the primary Workgroup.
2 In the right pane right-click the Vault to manage and select Manage
Replication.
3 Select the workgroup from the "Not replicated" column, presses the >>
button to add it to the Replicated column.
4 Click OK
Backup and Restore
All backup and restore operations should be done from the publisher site. If
it becomes necessary to restore a subscriber, remove that subscriber from the
94 | Chapter 8 Configure Vault Collaboration and Vault Professional
 Loading...