

Page 1

WinCue LT
User Guide
208 Harbor Drive. Stamford, CT.
06902 USA
(203) 406-1400
(203)323-3394
Page 2

Notice
DISCLAIMER
QTV reserves the right to revise this publication and to make changes
in its content without obligation of QTV to notify any person or persons
of such revision.
COPYRIGHT
Copyright 1996 – 2001 QTV.
All rights reserved.
No part of this publication may be reproduced, stored in a retrieval
system or transmitted, electronic or otherwise, or revealed to a third
party, without prior permission of QTV.
WinCue System Version- WinCue LT
208 Harbor Drive. Stamford, CT.
06902 USA
(203) 406-1400
(203)323-3394
User Guide WinCueLT Content• ii
Page 3

This user-guide was written and last updated by
About this guide
Helen Masson of Autocue Ltd.
7/31/01
QTV version:
6/25/2003
WinCue LT is an easy to use, fully featured, multi-lingual prompting application
utilizing unique software scroll technology. QTV's WinCue LT prompting software
is Windows 95, 98, 2000 and NT compatible and comes complete with a scroll
control hand set. The only other hardware requirement is a VGA to composite
video converter. WinCue LT uses custom routines to provide an extremely smooth
software scroll, with no external hardware required.
This guide has been produced to provide you with a comprehensive
understanding of WinCue LT, what it can do and how to do it.
Audience
This guide is for all users of WinCue LT. From WinCue LT novices to experts, this
guide should be useful to all, providing a quick reference for experts and step-bystep help for novices. The only pre-requisite to using this guide is that you should
be familiar with the Microsoft Windows environment.
Structure of the guide
Below you will find a general overview of what each chapter of this guide contains.
Use the overviews to quickly find out which chapter to read to find out about a
particular aspect of WinCue LT.
Chapter 1
WinCue LT Installation
Chapter 2
WinCue LT Configuration
Chapter 3
Getting Started
Chapter 4
The Script Editor
Chapter 5 This chapter explains everything you
This chapter explains what you need
before and how to install WinCue LT.
This chapter explains how to configure
Windows and WinCue LT for first time
usage.
This chapter explains how to get
started in WinCue LT.
This chapter explains everything you
need to know about the Script Editor.
User Guide WinCueLT Content• iii
Page 4

Working with Runorders
Chapter 6
Prompting Mode
Appendix A
Toolbar buttons and shortcuts
Appendix B
Scroll Controls
Appendix C
Technical Support
need to know about WinCue LT
Runorders
This chapter explains how to prompt a
Rundown or an individual script and
how to use the scroll controls for
WinCue LT
This appendix contains helpful
shortcuts to help you use WinCue LT
quickly and easily
This appendix contains additional
information on the WinCue LT scroll
controls
This appendix contains the contact
details of the Autocue Ltd Technical
Support department
User Guide WinCueLT Content• iv
Page 5

Contents
About this guide ......................................................................................... iii
Audience.................................................................................................... iii
Structure of the guide ................................................................................ iii
Contents v
WinCue LT Installation 1
1 WinCue LT Installation...................................................................2
WinCue LT Configuration 5
2 WinCue LT Configuration................................................................6
1.1 Hardware requirements....................................................................2
1.2 Pre-Installation.................................................................................. 2
1.3 Installation ........................................................................................2
1.4 Installing the Lexicon files ................................................................3
1.5 Un-Installing WinCue LT ..................................................................4
2.1 Configuring WinCue LT for Windows ............................................... 6
2.2 Running WinCue LT ......................................................................... 6
2.3 Starting WinCue LT for the first time ................................................ 7
2.4 Configuring the Scroll Control ..........................................................8
2.5 Configuring the Prompt Engine ...................................................... 10
2.6 Multilingual Support........................................................................11
2.6.1 Adding additional keyboards in Windows............................................. 12
2.7 Setting the Spell check Languages................................................13
2.8 Single Column Editor Preferences ................................................. 14
2.9 Startup Settings..............................................................................15
2.10 Single Column Defaults................................................................16
2.11 Filter Options ................................................................................ 17
2.11.1 Plain Text Files/ Plain Text Paste ...................................................... 18
2.11.2 Rich Text Files/Rich Text Paste ......................................................... 18
2.11.3 Rich Text Files Export........................................................................19
2.11.4 Microsoft Word Files ....................................................................... 19
Getting Started 20
3 Getting Started..............................................................................21
3.1 Creating a new Runorder ............................................................... 21
3.2 Adding Scripts to the Runorder ...................................................... 22
The Script Editor 24
4 The Script Editor ...........................................................................25
User Guide WinCueLT Content• v
Page 6

4.1 Opening Scripts..............................................................................25
4.2 The Script Editor Header................................................................26
4.2.1 Change Layout..................................................................................... 26
4.3 Adding Text ....................................................................................27
4.4 Importing files ................................................................................. 27
4.5 Inserting Presenters .......................................................................28
4.6 Inserting Markers............................................................................ 30
4.7 Inserting Block Markers..................................................................31
4.8 Formatting Text ..............................................................................31
4.8.1 Formatting All Text...............................................................................32
4.8.2 Not Captioned ...................................................................................... 33
4.8.3 Not Prompted.......................................................................................34
4.9 Spell Checking................................................................................ 35
4.10 Saving Scripts............................................................................... 36
4.10 Printing Scripts .............................................................................36
4.11 Closing Scripts.............................................................................. 37
Working with Runorders 39
5 Working with Runorders................................................................40
5.1 WinCue LT Runorder .....................................................................40
5.2 Adding Break Scripts......................................................................41
5.3 Toggle Hold State........................................................................... 42
5.4 Deleting Items................................................................................. 43
5.5 Moving Items in the Runorder ........................................................ 44
5.6 Renumbering Items ........................................................................ 44
5.7 Importing Scripts............................................................................. 45
5.8 Exporting Scripts ............................................................................46
5.9 Saving Runorders to files ............................................................... 49
5.10 Copying prompt files to floppy disk............................................... 50
5.11 Printing Scripts .............................................................................50
5.12 Printing the Runorder ................................................................... 51
5.13 Opening a saved Runorder file..................................................... 52
5.14 Adding a Presenter to the Presenter table ................................... 53
5.15 Switching between the Script and the Runorder..........................55
Prompting Mode 57
6 Prompting Mode............................................................................58
6.1 To begin Prompting ........................................................................ 58
6.2 Scrolling the text.............................................................................59
6.2.1 Using the Two-button Serial Controller ................................................59
6.2.2 Using the Mouse .................................................................................. 59
6.2.3 Using the Keyboard ............................................................................. 59
6.3 Moving the Cue Marker .................................................................. 59
Additional Settings 61
Toolbar buttons and shortcuts 63
Appendix A- Toolbar buttons and shortcuts..............................................64
A1 General ...........................................................................................64
A2 Runorder ......................................................................................... 64
A3 Script Editor..................................................................................... 64
A4 Prompt Mode................................................................................... 66
Scroll Controls 67
Appendix B - Scroll Controls.....................................................................68
User Guide WinCueLT Content• vi
Page 7

B1 Keyboard Scroll............................................................................... 68
B1.1 Speed Control....................................................................................... 68
B1.2 Function Keys.......................................................................................68
B2 Mouse Scroll ...................................................................................69
B3 Two-button Serial Controller ........................................................... 69
B3.1 Stop Scrolling ....................................................................................... 69
B3.2 Button Actions ...................................................................................... 69
B4 Serial Multibutton, Hybrid Multibutton, Two-button IMT Controller . 70
B5 Scroll Control Wiring ...................................................................... 70
B5.1 9 way d Serial port connections............................................................70
B5.2 IMT Hand control .................................................................................. 70
WinCue LT Quick Start-Up Guide 71
Starting WinCue LT ..................................................................................72
WinCue LT Script Editor ...........................................................................72
WinCue LT Runorder................................................................................72
Prompting with WinCue LT .......................................................................73
Technical Support 74
Technical Support.....................................................................................75
User Guide WinCueLT Content• vii
Page 8

Chapter
1
WinCue LT Installation
User Guide WinCueLT WinCue LT Installation • 1
Page 9

1 WinCue LT Installation
1.1 Hardware requirements
• WinCue LT runs on Windows 95, 98, 2000 and NT Workstation.
• The recommended minimum specification is a True Pentium 233MHz chip
with 64MB RAM; the more memory the machine has the better the scroll
output will be.
• A built-in video converter with dual-scanning video card is required in order for
the text to be prompted on screen and on the VGA output monitor.
• A Dongle and a Serial hand scroll control, both supplied by QTV, are
needed to run WinCue LT.
1.2 Pre-Installation
The optimum screen resolution for running WinCue LT is 800 x 600 dpi and 256
colors. If you do not use this screen resolution you may experience a jerky scroll
output. You must have the DONGLE plugged into the parallel port before you
start the installation.
1.3 Installation
The software is supplied on CD-ROM. To install WinCue LT use the following
steps:
What you do Comments/Prompts
1. Insert the CD-ROM into the
CD drive
2. Click Start and select Run
3. Type d:install.exe, click OK
and the install program will
begin
User Guide WinCueLT WinCue LT Installation • 2
Page 10
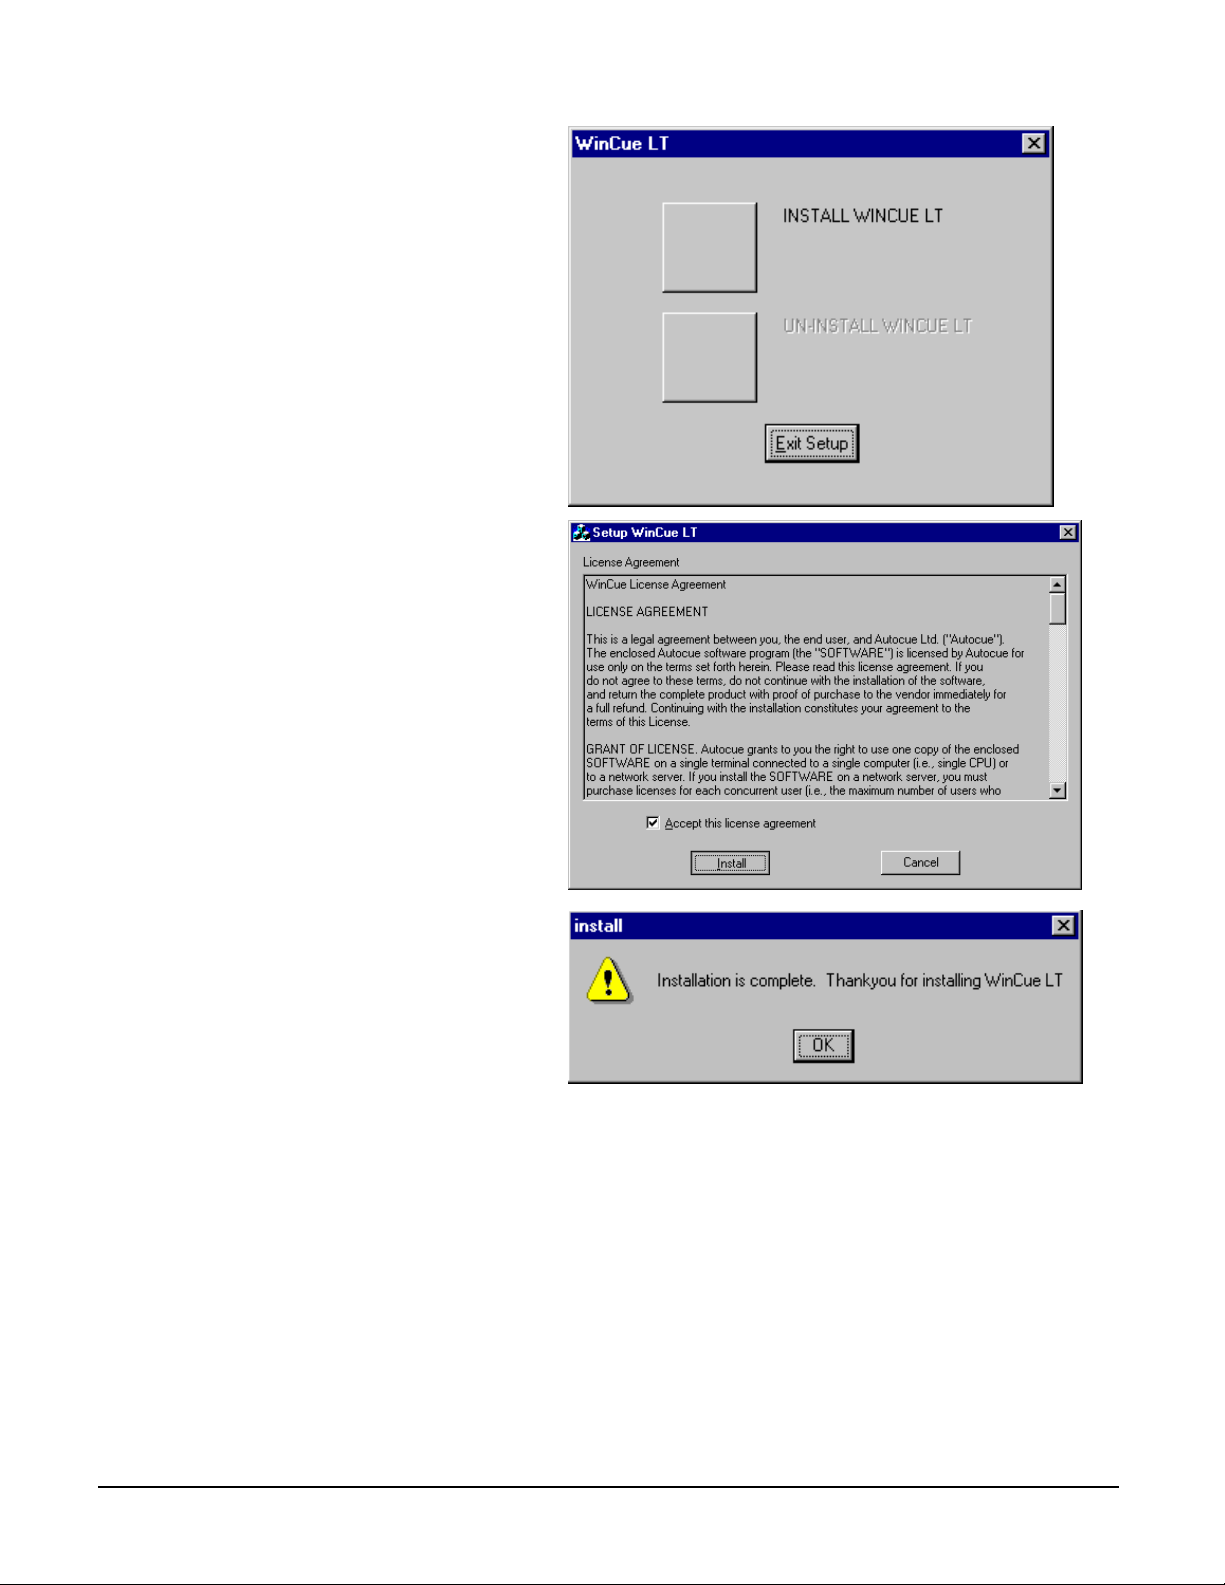
4. An Install/Uninstall box will
appear click on the Install
WinCue LT button
5. A license agreement will
appear, read through it, click
in the checkbox to accept it
and click on Install
6. You will be notified when
Installation is complete
1.4 Installing the Lexicon files
By default the British and American language dictionaries are installed, if you
required other language dictionaries then you will have been provided with the
relevant files on the WinCue LT Installation CD-ROM in the \Lexicography
directory.
Copy all the files in this directory on the CD-ROM to the following directory on the
computer: C:\WinCue\Lexicography
If you require additional Language support please contact QTV, and we will send
you the relevant files. See Appendix C for QTV contact details.
User Guide WinCueLT WinCue LT Installation • 3
Page 11
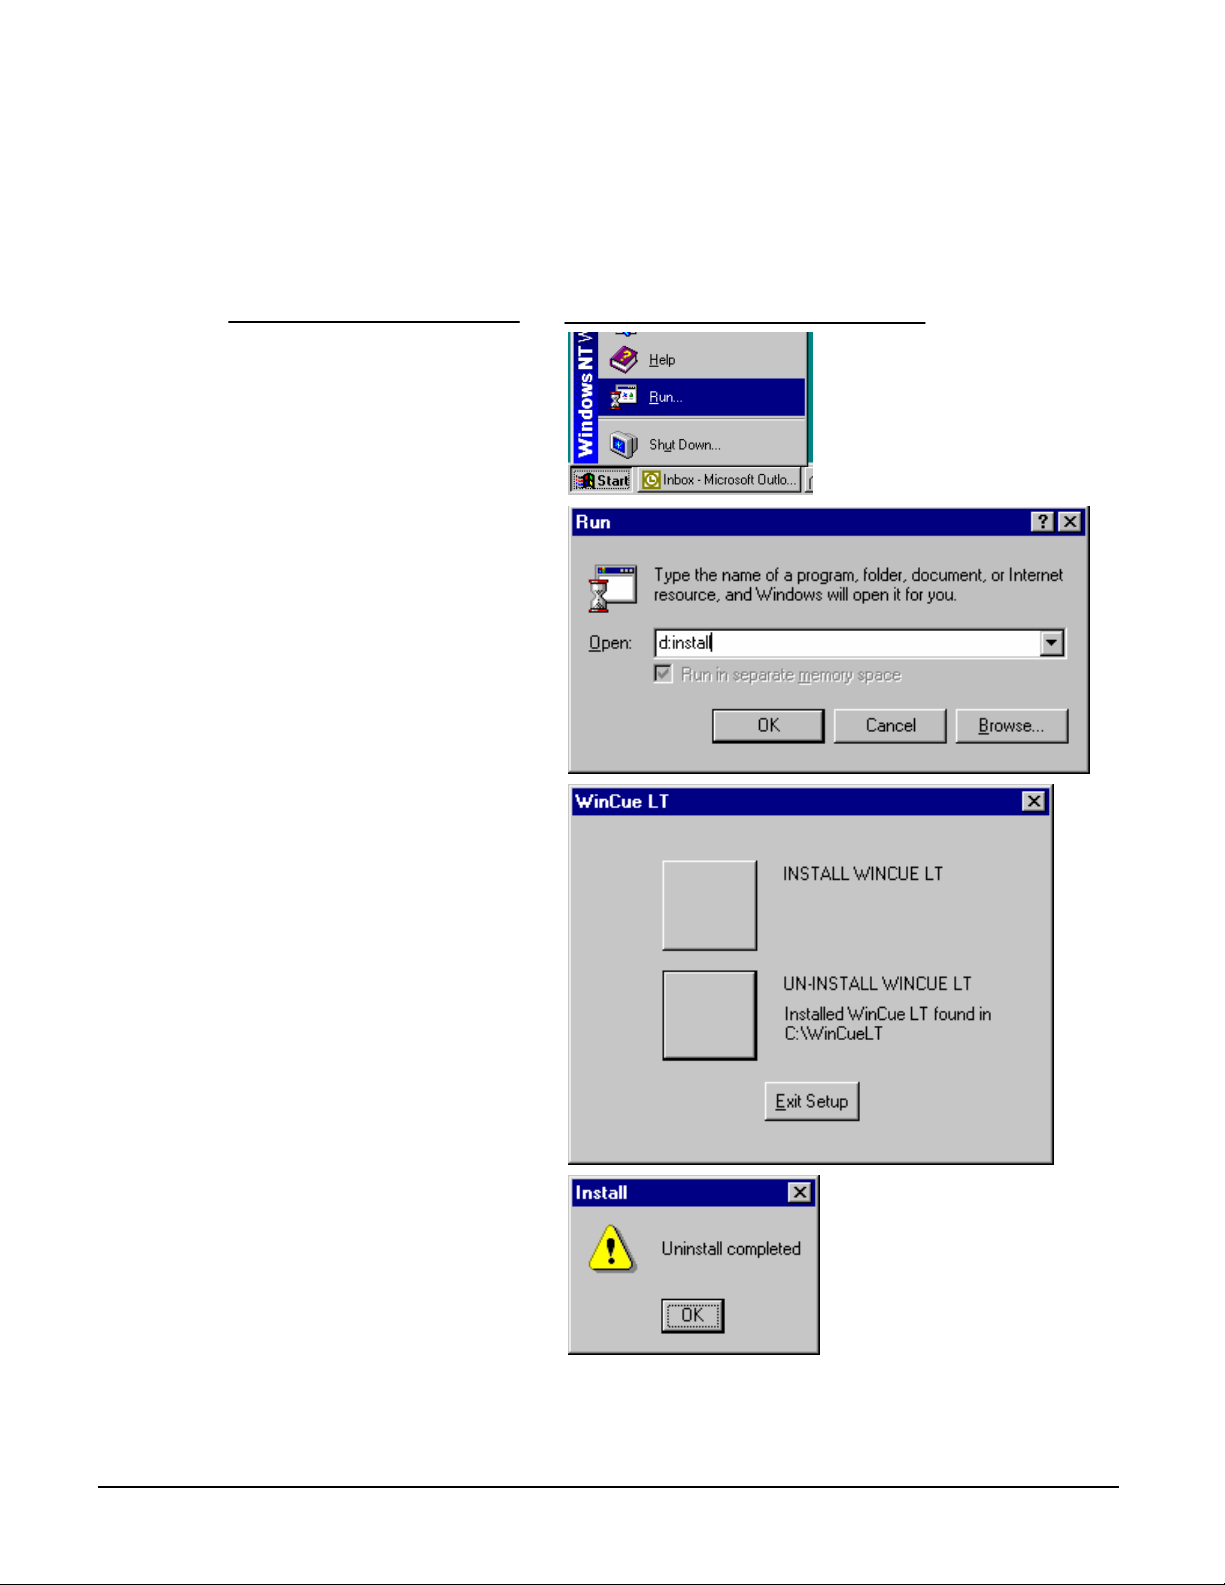
1.5 Un-Installing WinCue LT
To un-install WinCue LT use the following steps, also if you are upgrading
WinCue LT you will have to un-install your current version of WinCue LT before
upgrading.
What you do Comments/Prompts
1. Insert the CD-ROM into the
CD drive
2. Click Start and select Run
3. Type d:install.exe, click on OK
and the install program will
begin
4. An Install/Uninstall box will
appear click on the Un-Install
WinCue LT button and
WinCue LT
5. When the un-install is
complete an Uninstall
completed message will be
displayed
User Guide WinCueLT WinCue LT Installation • 4
Page 12

Chapter
2
WinCue LT Configuration
User Guide WinCueLT WinCue LT Configuration • 5
Page 13
2 WinCue LT Configuration
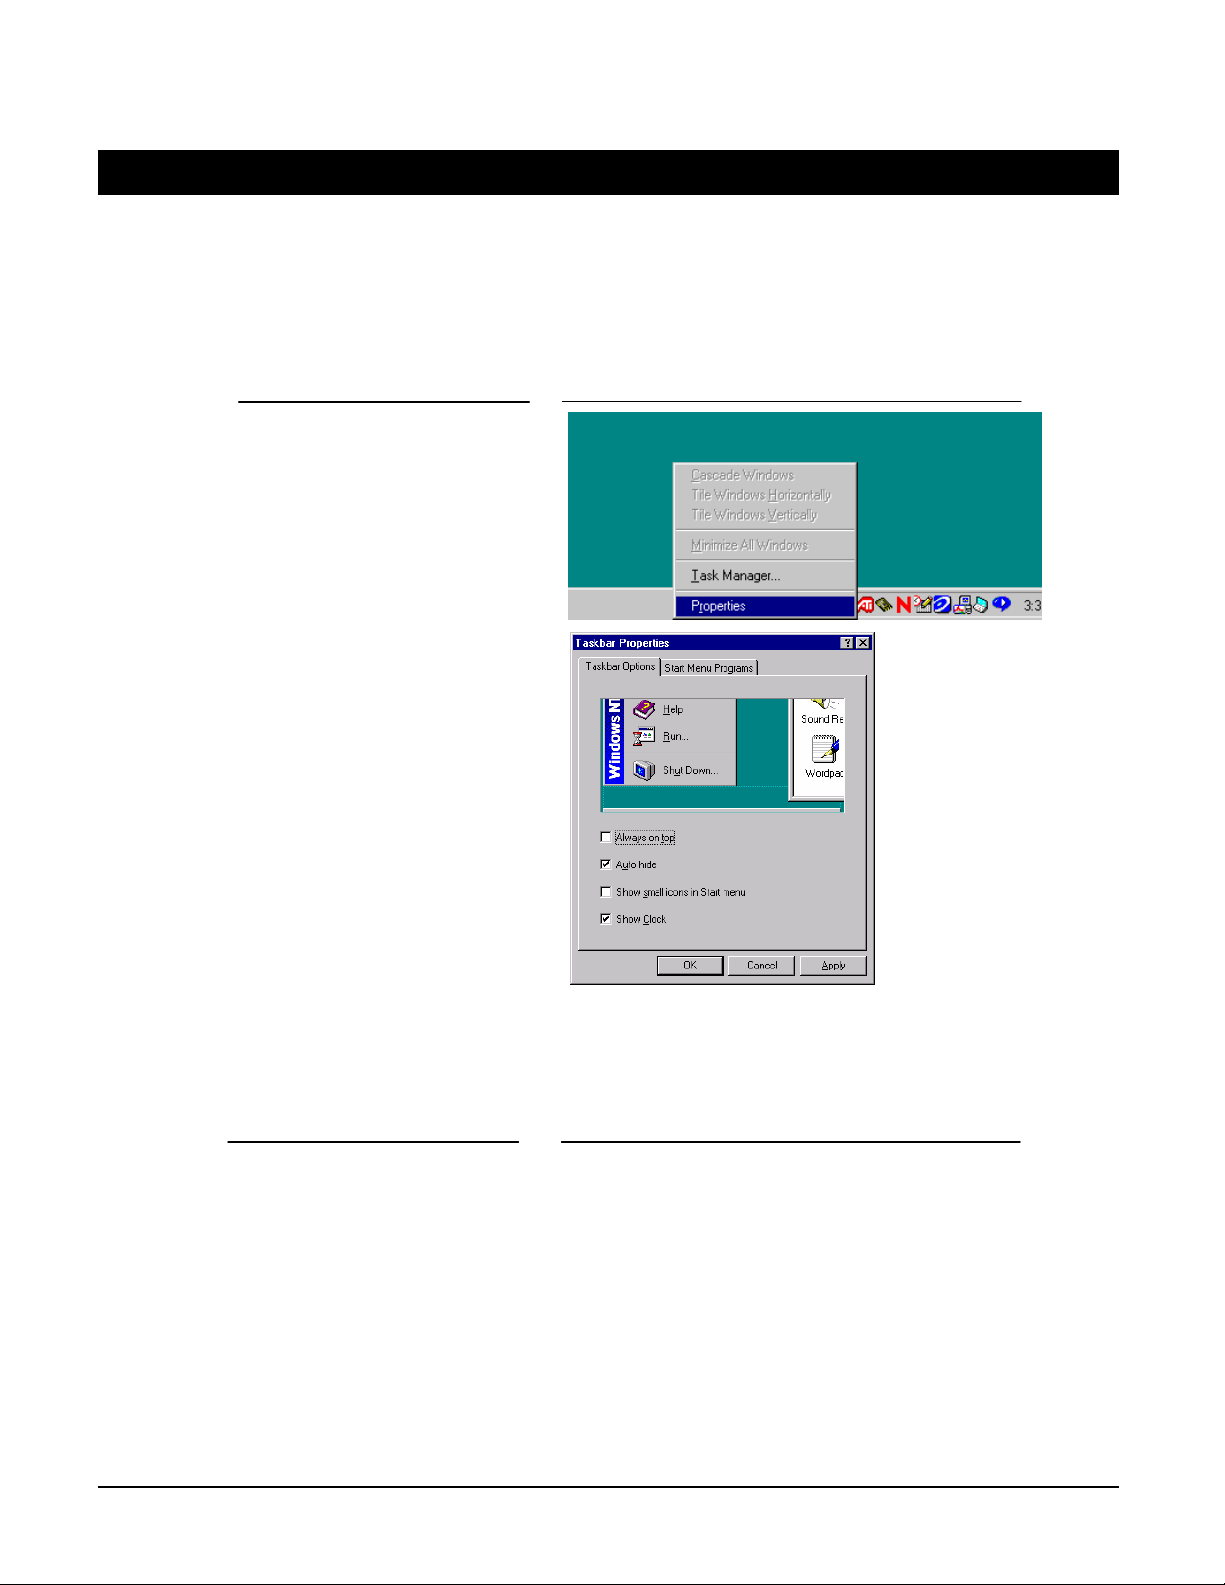
2.1 Configuring WinCue LT for Windows
Once installed you need to configure WinCue LT for Windows.
What you do Comments/Prompts
1. Right click on the taskbar and
select Properties
2. Make sure Autohide is ticked
and make sure Always on Top
is not ticked
2.2 Running WinCue LT
What you do Comments/Prompts
User Guide WinCueLT WinCue LT Configuration • 6
Page 14

Click on Start, select Programs
and then select WinCue LT
Or
Simply double-click on the icon to start
WinCue LT
2.3 Starting WinCue LT for the first time
On startup the Script Editor will
automatically open, see section 2.7 to
change this setting, you can start typing
your Script straight away.
You can learn more about creating
stories in Chapter 4 The Script Editor.
If you now press the Tab key whilst in
the Script Editor a scroll control
calibration screen will appear. You must
run the calibration if you want to prompt
your text.
You can learn more about the Hardware
Setup in section 2.4
You can then press Escape to get to the
Runorder Window.
User Guide WinCueLT WinCue LT Configuration • 7
Page 15

WinCue LT will also make a default
Script item (Script1) in the Runorder
You can learn more about Runorders in
Chapter 5 Working with Runorders
2.4 Configuring the Scroll Control
Note: To find out more about
configuring each individual
scroll control go to Appendix B
There are 6 options for the type of scroll control you can use in WinCue; the ones
most relevant to WinCue LT are listed below:
• Keyboard
• Mouse
• Two-button Serial Controller
To configure WinCue LT so that it is able to use one of these scroll controls use
the following steps:
What you do Comments/Prompts
1. Click on the Tools menu and
select Options
2. A Systems Options dialog box
will appear, click on Scroll
Controls
3. An option to add Scroll
Controls will appear opposite
the System Options menu,
click on the Add button
User Guide WinCueLT WinCue LT Configuration • 8
Page 16
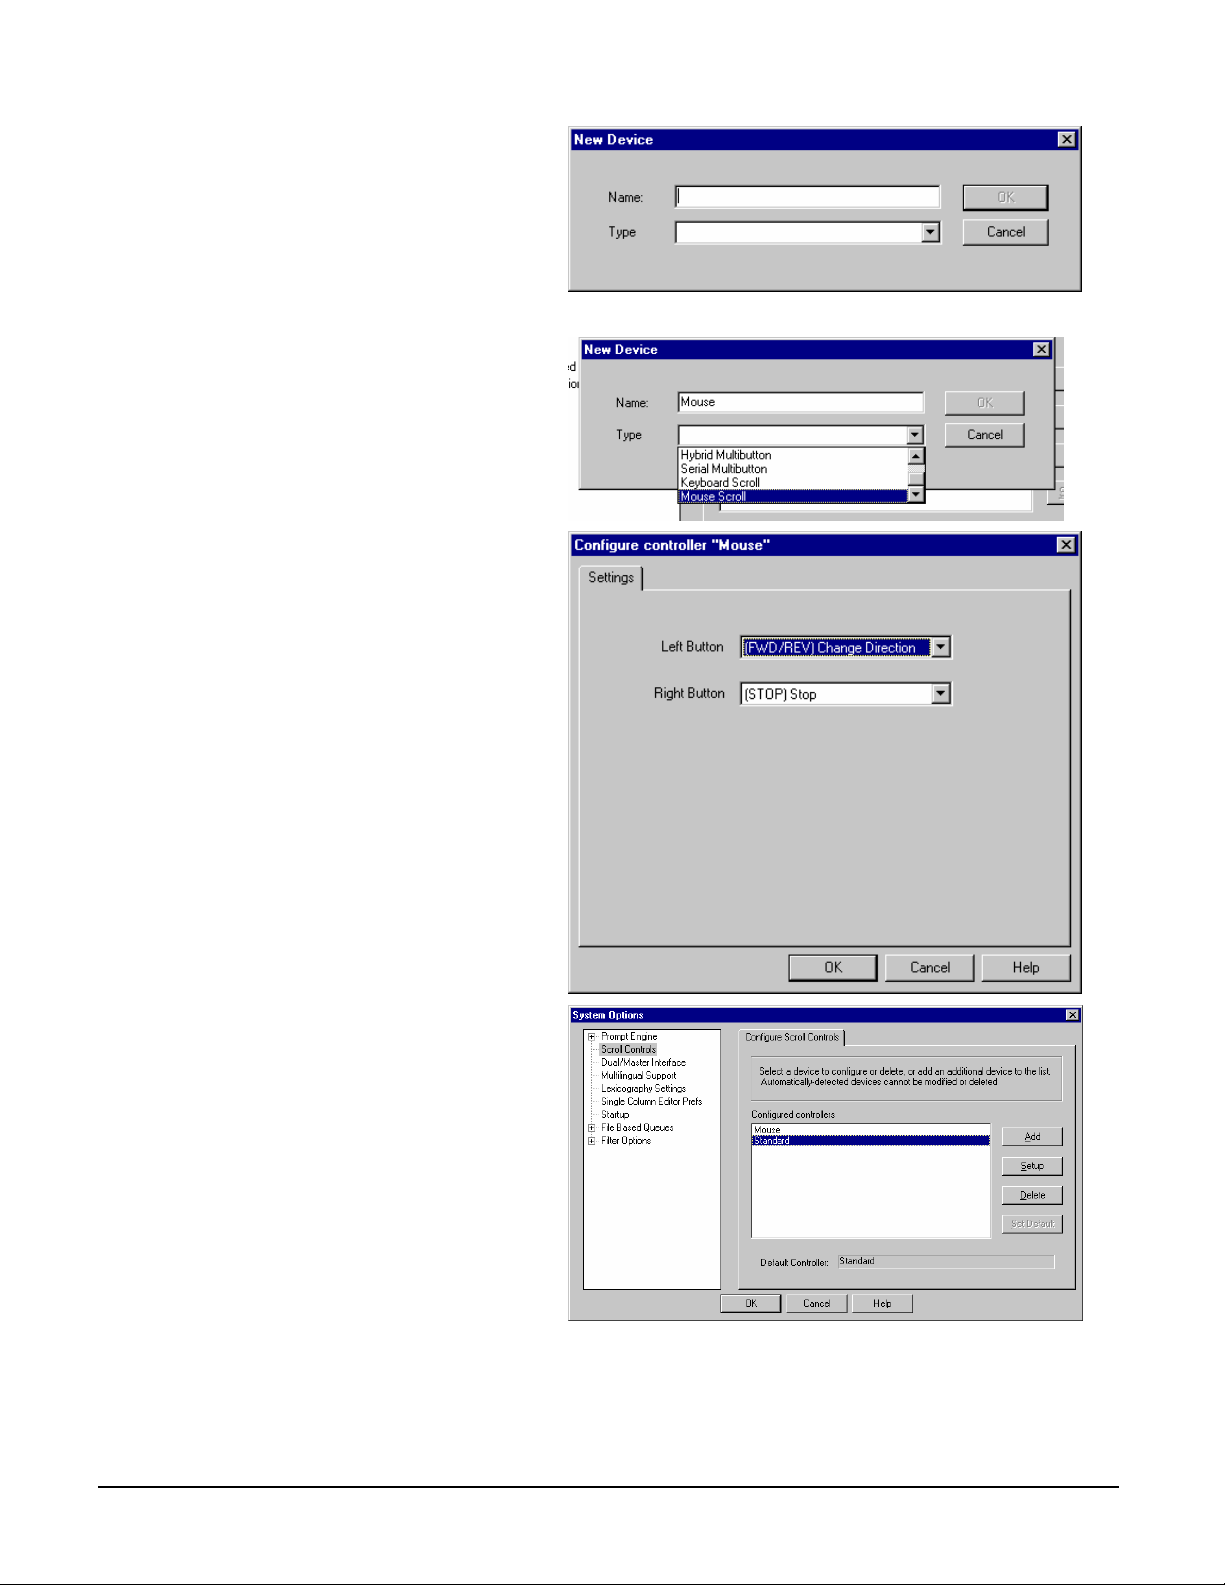
4. A New Device dialog box will
appear for you to specify what
kind of Scroll Control you want
to add. In the Name: box enter
what you want to call the
Scroll Control, in the Type box
click on the arrow and select
the type of Scroll Control you
want to add from the scroll
box, click OK
5. A Configure controller dialog
box will then appear with
options for setting the Scroll
Control, use the arrow buttons
to choose the settings for the
Scroll Control, click OK
6. The Scroll Control will then
appear in the Configured
controllers box and you will be
able to use the Scroll Control
in WinCue LT
User Guide WinCueLT WinCue LT Configuration • 9
Page 17
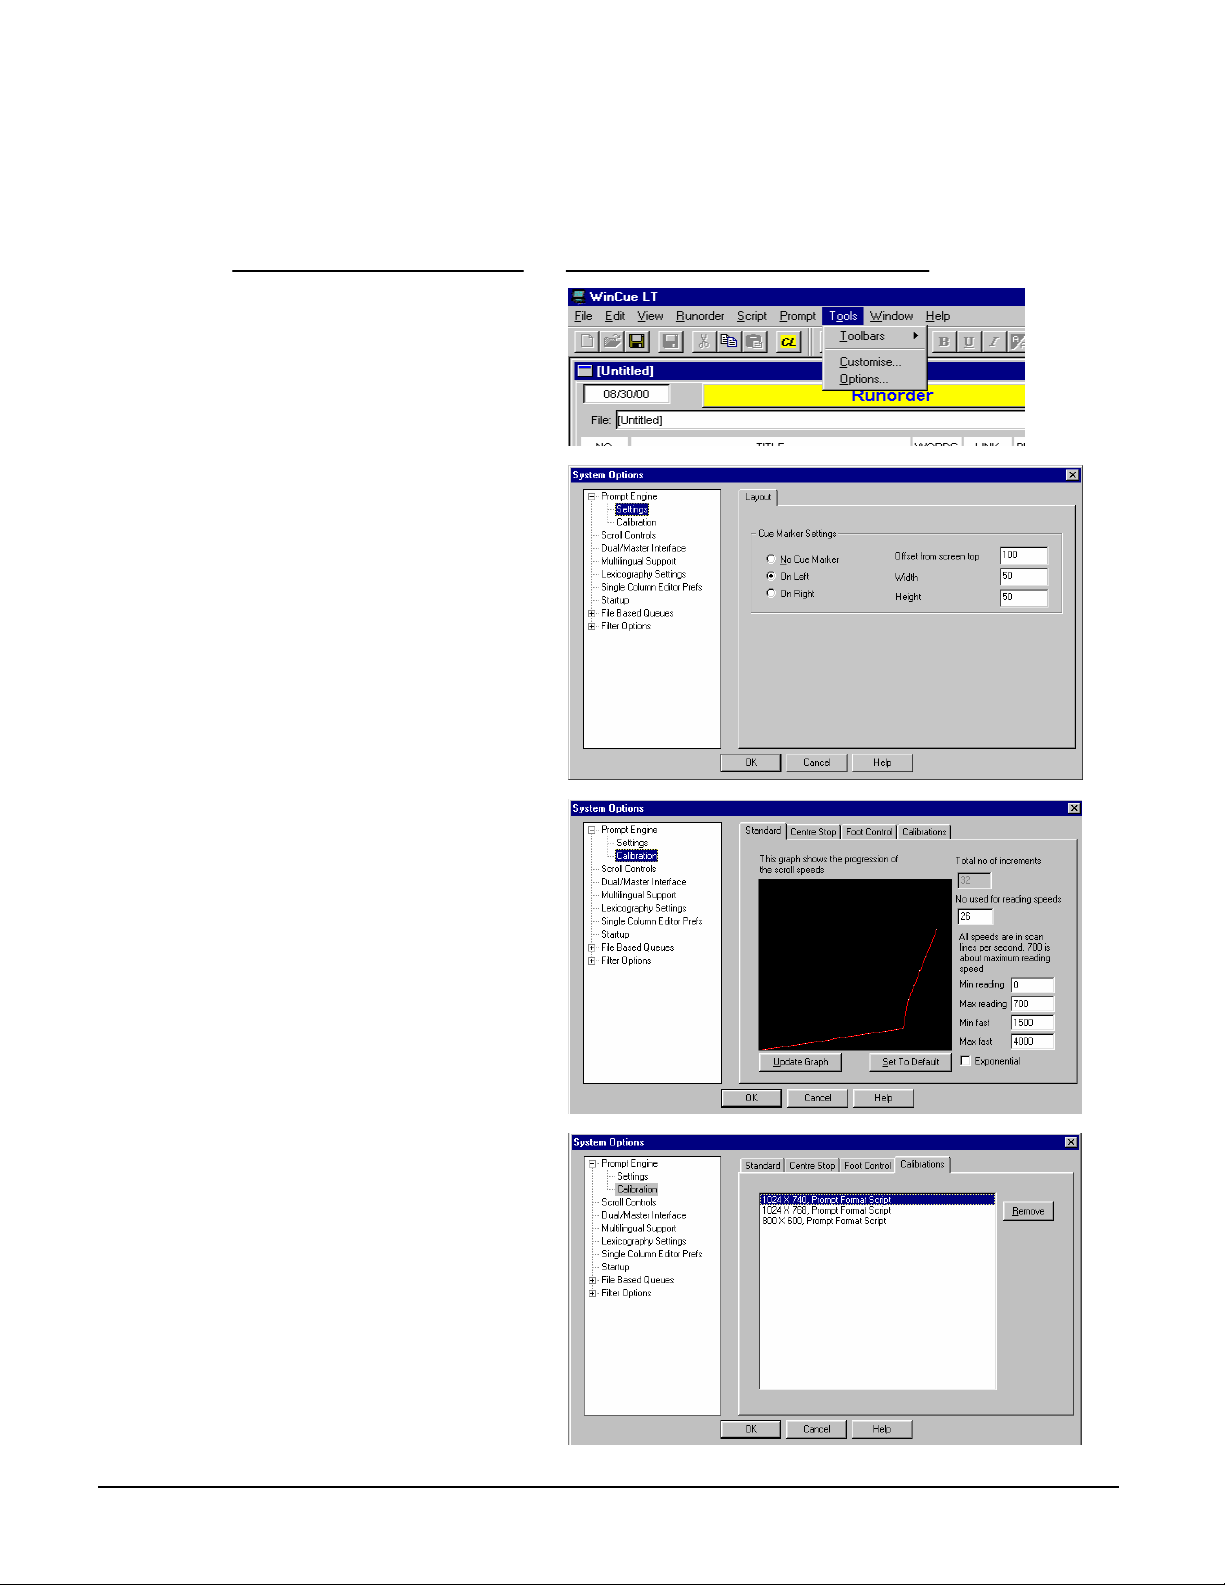
2.5 Configuring the Prompt Engine
You can configure the position, width and height of the cue marker.
What you do Comments/Prompts
1. Click on the Tools menu and
select Options
2. Click on the Prompt Engine
option and select Settings
From the settings displayed,
select the required position and
specify the number of pixels you
want the cue marker to be offset
from the top of the screen and its
width and height.
Click OK when you are happy with
the settings.
3. Calibrations
This is where the performance of
your scroll control is set. The first
2 tabs refer to your scroll control
mode. The 3rd tab is for the
optional foot control.
You should not have to modify
these settings.
4. The Calibrations tab contains
the information about your
screen resolution.
If you have any problems with
your prompted text you can
remove this file, then when you go
into prompt mode WinCue LT will
perform a recalibration.
Note we recommend a resolution
of 640x480 256 colors.
User Guide WinCueLT WinCue LT Configuration • 10
Page 18
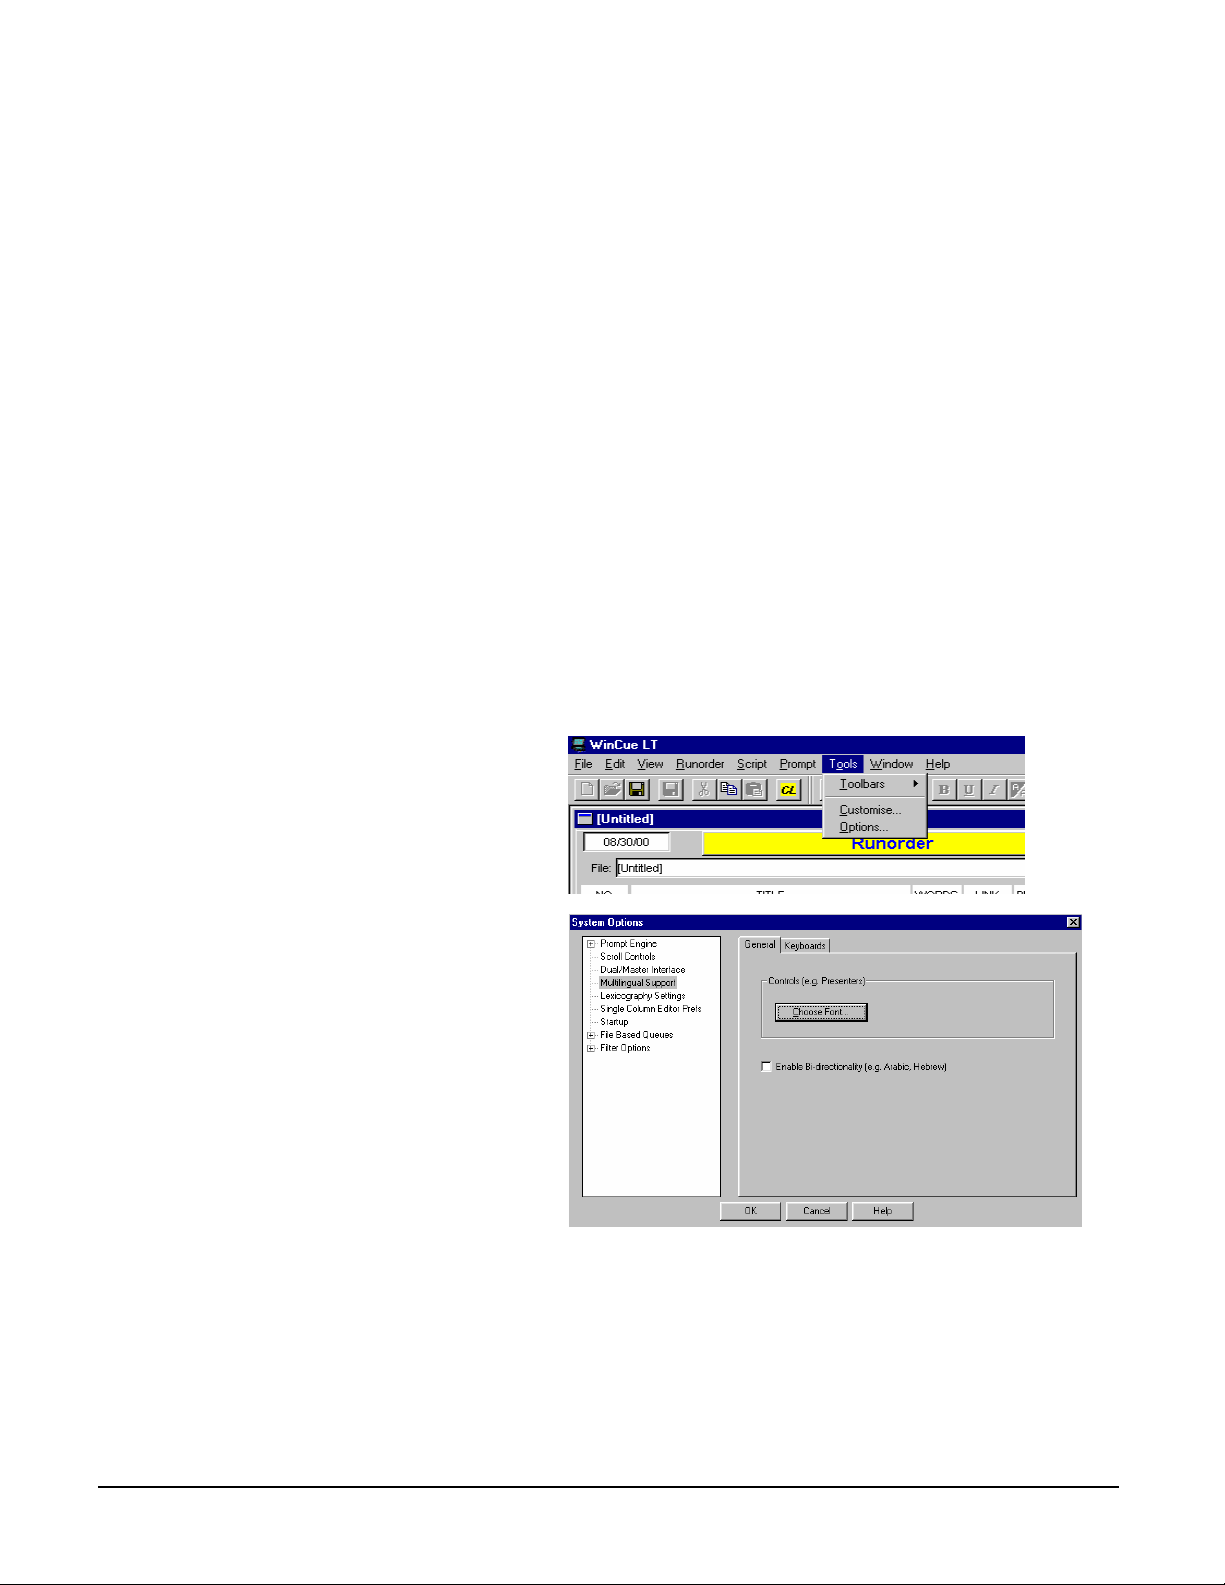
2.6 Multilingual Support
This menu is used to setup alternative languages, fonts and keyboard layouts to
English
Note: WinCue LT is not supplied with any fonts, the fonts that it uses are the ones
installed with Windows or other third party software.
1. Click on the Tools menu and
select Options
2. Click on the Multilingual
Support option and the
settings for this option will
appear opposite.
3. Click on the font button to see
the list of installed fonts and
choose an appropriate font for
the language.
If you want to use WinCue LT in
Arabic, Hebrew, etc you will have
to click on the Enable Bidirectionality box to change the
text justification.
User Guide WinCueLT WinCue LT Configuration • 11
Page 19

4. Click on the Keyboards tab to
change the keyboard layout
used by WinCue LT.
The list of keyboards that you can
see are all of the internal layouts
that are supported by WinCue LT
If you want to use a keyboard
layout that is not listed in WinCue
LT then you will have to install it
from your Microsoft Windows CD
(see section 2.6.1).
2.6.1 Adding additional keyboards in Windows
Make sure you have your Windows CD ready before you begin to add an
additional keyboard layout.
User Guide WinCueLT WinCue LT Configuration • 12
Page 20
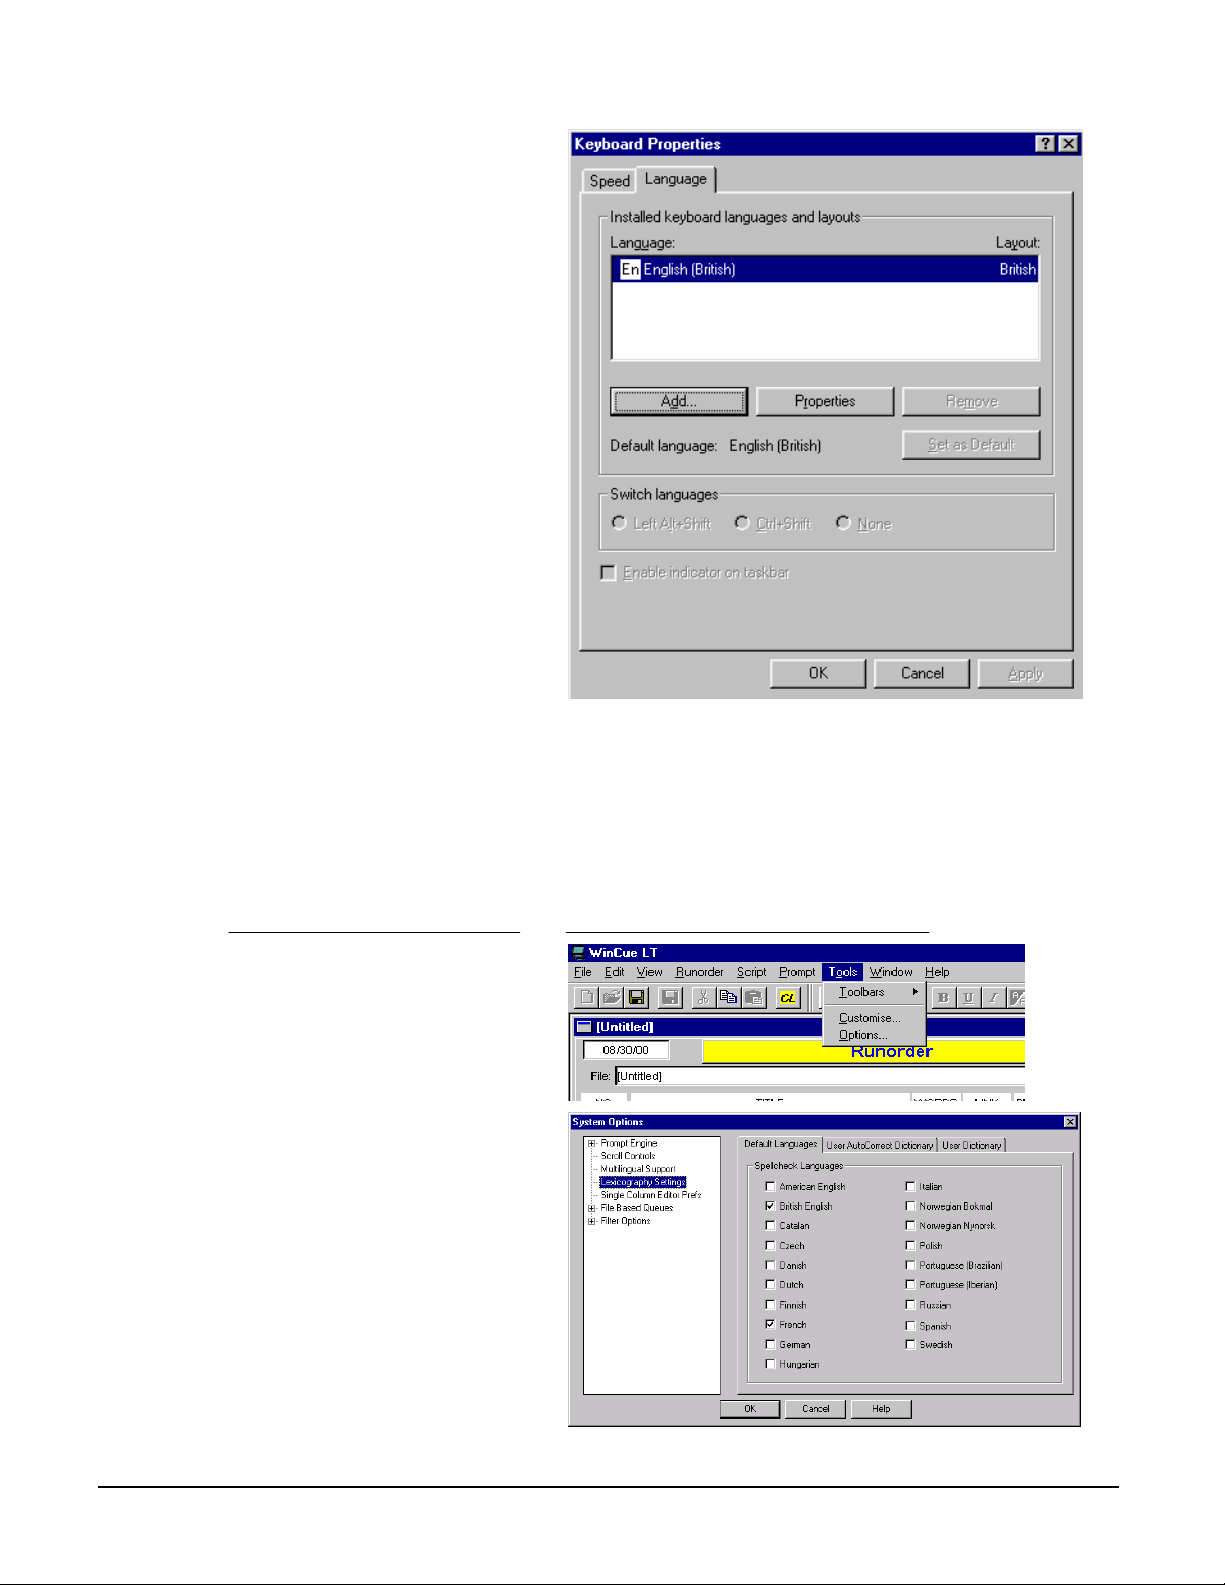
1. In Windows, click on the Start
button, then select Settings
and then Control Panel.
2. From the Control Panel
choose Keyboard and a
Keyboard properties box will
appear.
3. Depending on which operating
system you are using click on:
NT4 – Input Locales
WIN95/98 – Language
Then click on Add and select the
additional languages that you
want to install.
4. You will need your Windows
CD to complete this task.
2.7 Setting the Spell check Languages
To set the spell check to your language use the following steps:
What you do Comments/Prompts
1. Click on the Tools menu,
select Options and a System
Options dialog box
2. Click on Lexicography
Settings, this will open the
Default Languages dialog
box. Choose, from the spell
check languages displayed,
the languages you installed
the Lexicon files for (see
section 1.4 for information on
installing Lexicon files). Click
OK to save the changes
User Guide WinCueLT WinCue LT Configuration • 13
Page 21
If you require additional language support please contact QTV and we will send
you the files direct. See Appendix C for QTV contact details.
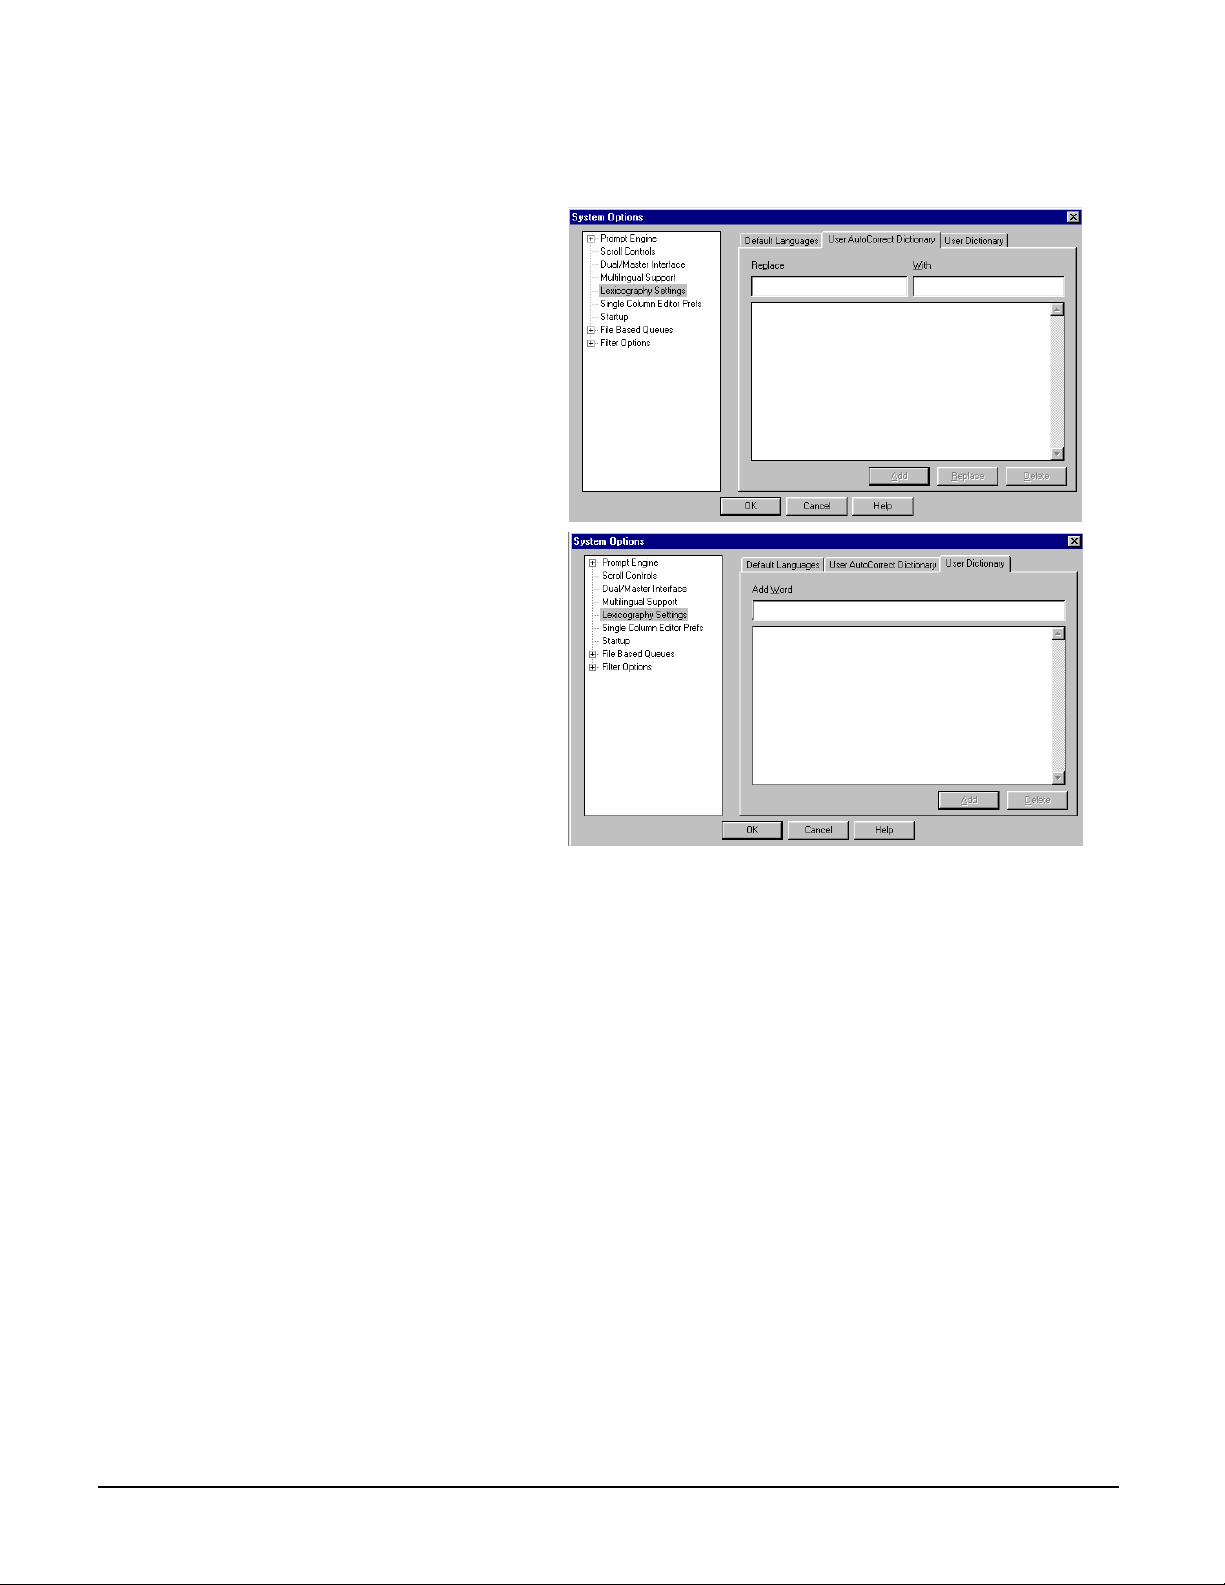
3. Click on the User Autocorrect
Dictionary Tab.
If you want to replace a particular
word with another one then you
can add your new words here.
When you click on Spell Check in
the Editor your replacement word
will be one of the options.
4. Click on the User Dictionary
Tab.
Here you can add more words to
the User Dictionary. Any words
you add here will appear in the
Spell Checker.
2.8 Single Column Editor Preferences
It is also possible to configure the options for the Script Editor.
What you do Comments/Prompts
User Guide WinCueLT WinCue LT Configuration • 14
Page 22
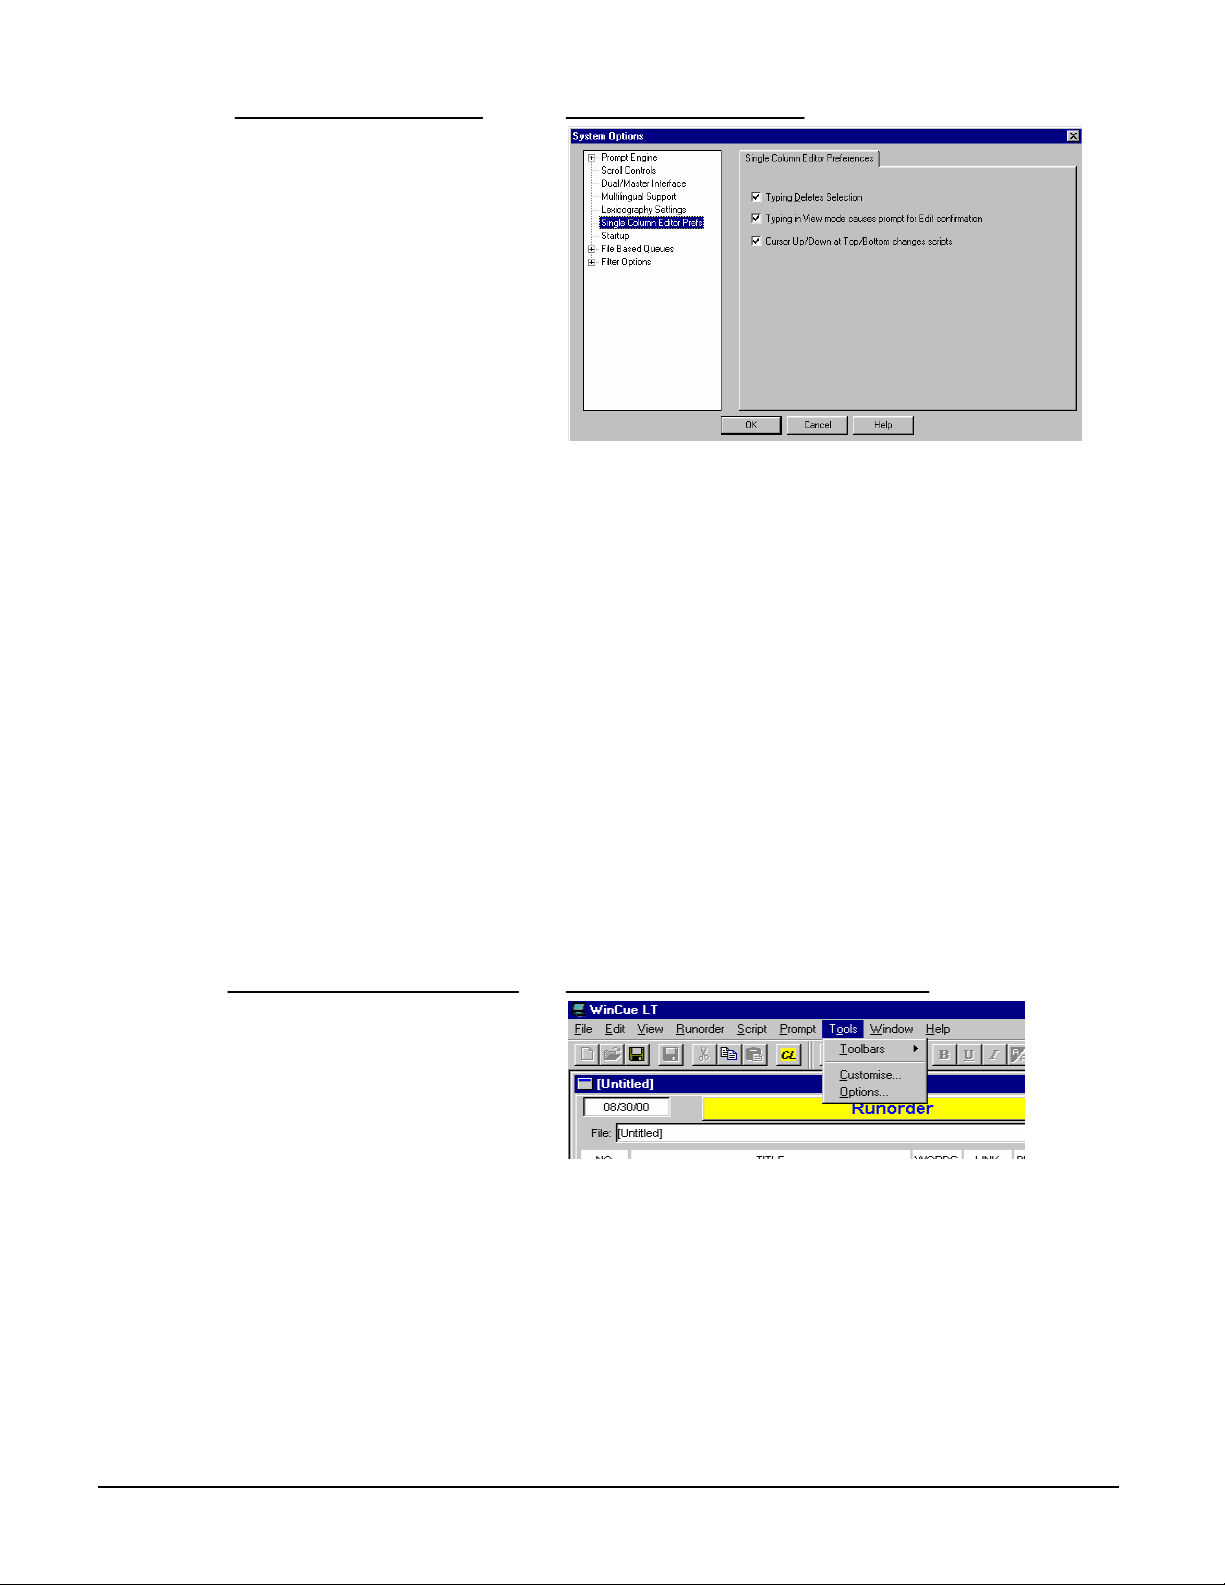
1. Click on Tools and then select
Options
2. A System Option box will
appear, click on Single
Column Editor Prefs and the
configurable options for the
Script Editor will appear.
a. Typing Deletes Selection
If this is ticked – Any text that you have selected will be deleted when you
start typing.
b. Typing in View Mode
If this is ticked – WinCue LT will prompt you to save any changes you have
made before you can move onto the next story.
c. Cursor Up/Down
If this is ticked – WinCue LT will allow you to move onto the next item in the
Runorder by pressing the Up/Down Arrow Keys.
2.9 Startup Settings
When you first open WinCue LT you will see the Script Editor and the Running
order will be hidden behind it. To change the settings for what is shown on Startup
use the following steps:
What you do Comments/Prompts
1. Click on the Tools menu,
select Options and a System
Options dialog box will appear
User Guide WinCueLT WinCue LT Configuration • 15
Page 23
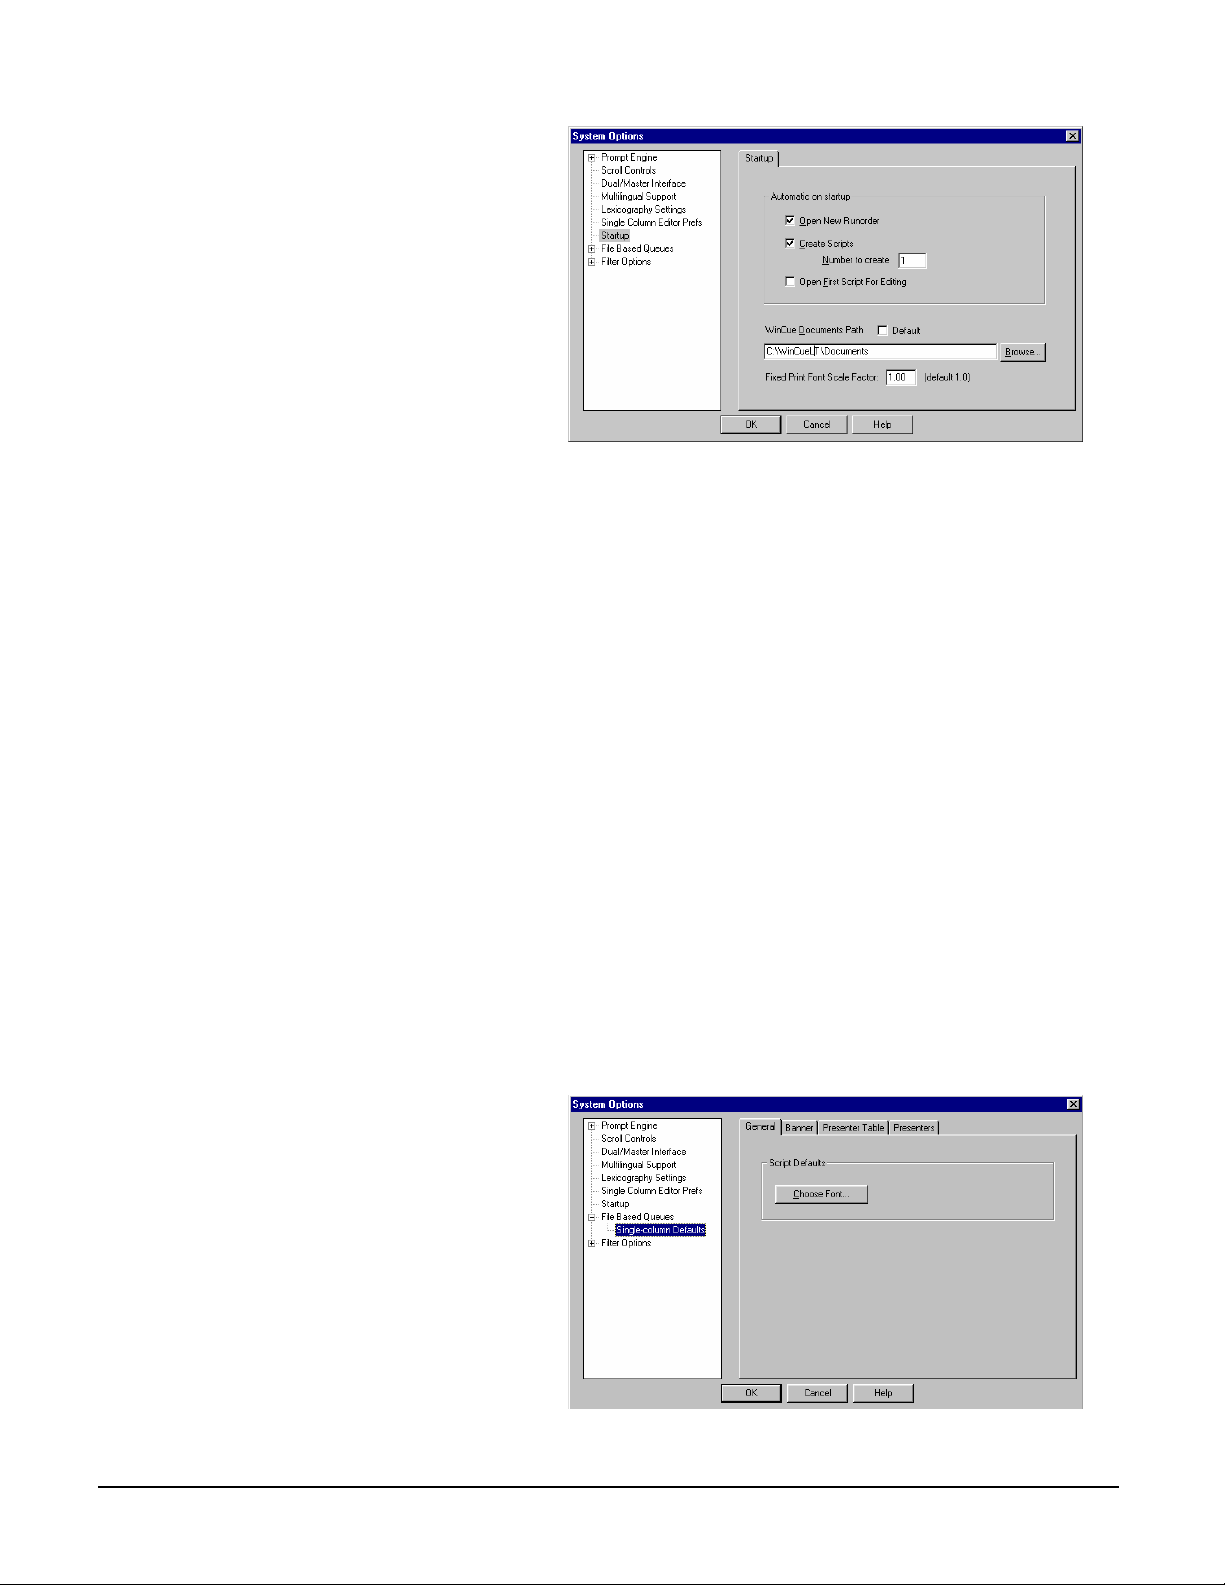
2. Click on the Startup options
and the options for Startup will
appear
3. Choose the options you want
from the Automatic on startup
box and then click on their tick
boxes, click OK to save the
changes
a. Open New Runorder – This option will create a blank Runorder each
time you start-up WinCue LT
b. Create Script – This will create a new script in the new Runorder. You
can also specify how many scripts that are created when WinCue LT
starts up. Note: This option is only available if the Open New Runorder
has been selected.
c. Open First Script for Editing – The first Script in the Runorder will be
opened automatically ready for you to type in your text. Note: This
option is only available if the Create Script option has been selected.
d. WinCue Documents Path – This is where all the WinCue files (*.wsr) will
be saved. You may specify a different location if you wish.
e. Fixed Print Font Scale Factor – This sets the size of your printed
Scripts.
2.10 Single Column Defaults
This menu is used to set the Font type used in your scripts, the set-up for your
prompt out-put Banners and to set-up and configure Presenter settings.
What you do Comments/Prompts
1. Click on the Tools menu,
select Options and a System
Options dialog box will
appear.
2. Double-click on File Based
Queues and select Single
Column Defaults.
3. An option allowing you to set
the font type and size used by
default for all your typed
scripts.
User Guide WinCueLT WinCue LT Configuration • 16
Page 24
4. If you click on the Banner tab
at the top of the dialog box the
available options will change
and you will be able to
customize the prompt banner.
Padding – Increasing this value
will make your banner wider.
Trailing Gap – Increasing this
value will put a larger gap
between the banner and the first
line text.
Fields to Display – Changes the
order of the Item Title and the Item
Number.
See section …. For information on
the Presenter Table and Presenter
tabs.
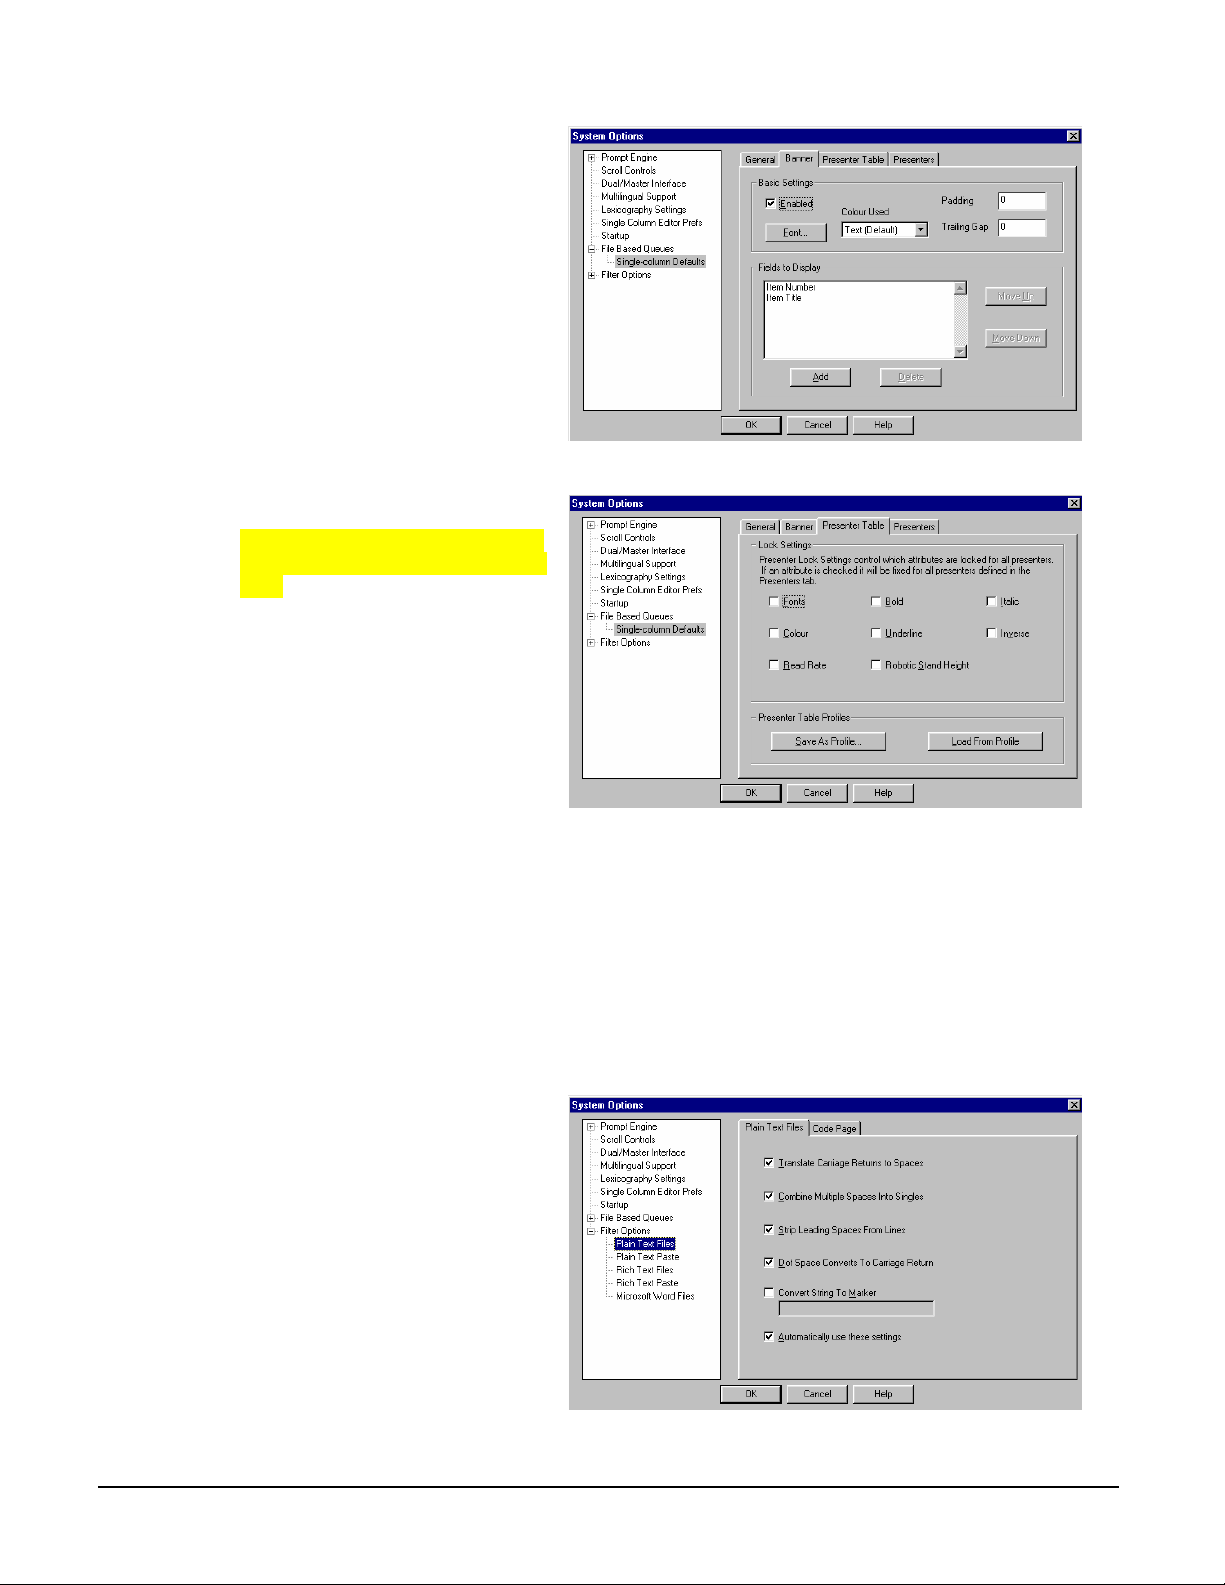
2.11 Filter Options
Later on in this manual you will find out how to import Microsoft Word files and
other text files into WinCue LT, this section ,however, will explain to you how to
configure the settings used when importing files.
What you do Comments/Prompts
1. Click on the Tools menu,
select Options and a System
Options dialog box will
appear.
2. Double-click on File Options
and a list of file types will
appear beneath it.
User Guide WinCueLT WinCue LT Configuration • 17
Page 25

2.11.1 Plain Text Files/ Plain Text Paste
These two options both have the following settings available.
• Translate Carriage Returns to Spaces: If this setting is selected carriage
returns will be converted into spaces. Without this setting being selected
WinCue will convert the single returns into double returns, so it’s a good idea
to select this setting.
• Combine Multiple Spaces into Singles: If this setting is selected large
spaces within the imported text will be reduced to a single space.
• Strip leading Spaces from Lines: If this setting is selected spaces at the
start of lines will be removed.
• Dot Space Converts to Carriage Return: If this setting is selected then
any spaces after a dot will be converted into a new line.
• Convert String to Marker: By entering a word or character in the box below
this setting, any occurrences of this word or character within the imported
text will be converted into a Marker (see section 4.6 for further information
on Markers)
• Automatically use these settings: If this setting is selected then whenever
you import one of these file types it will use the settings that have been
selected without giving you the opportunity to change them.
2.11.2 Rich Text Files/Rich Text Paste
These two options both have the following settings available.
• Translate Carriage Returns to Spaces: Same as section 2.11.1
• Combine Multiple Spaces into Singles: Same as section 2.11.1
• Strip leading Spaces from Lines: Same as section 2.11.1
• Dot Space Converts to Carriage Return: Same as section 2.11.1
• Use Imported Fonts: If this setting is selected then when importing an Rich
Text File then WinCue LT the text will use the font from the Rich Text file
rather than WinCue LT’s default font.
• Convert String to Marker: Same as section 2.11.1
• Automatically use these settings: Same as section 2.11.1
• Select Default Font: This setting is used when you import a file that
contains fonts that are not available on your computer. By selecting a font
from the list and clicking on the tick box, WinCue LT will automatically
replace the non-valid font with the one you selected.
• Import Overrides: This setting allows you to override your computers
character set and locale.
User Guide WinCueLT WinCue LT Configuration • 18
Page 26

2.11.3 Rich Text Files Export
The following settings are used to configure how WinCue LT .wsr files export into
Rich Text files.
• Export Item Title as First Line: This setting adds the item title to the start
of your exported script.
• Automatically use these settings: Same as section 2.11.1
2.11.4 Microsoft Word Files
This option has the following settings available.
• Use Imported Fonts: See section 2.11.2
User Guide WinCueLT WinCue LT Configuration • 19
Page 27

Chapter
3
Getting Started
User Guide WinCueLT Getting Started • 20
Page 28

3 Getting Started
3.1 Creating a new Runorder
To create a Runorder use the following steps:
What you do Comments/Prompts
On the toolbar:
Click the new file button:
OR
Open the File menu and select
New
This will open a new blank
Runorder
User Guide WinCueLT Getting Started • 21
Page 29

Remember: All WinCue LT files have a *.wsr file name extension and are saved
by default to the C:\WinCueLT\Documents folder.
If you attempt to open a non
WinCue LT file you will see this
message
If you click yes then the file will be
automatically imported into a new
runorder.
3.2 Adding Scripts to the Runorder
To add a new script to the Runorder use the following steps:
What you do Comments/Prompts
1. Hit the Insert key on your
keyboard
OR
Open the Script menu and
select New
2. A New Script dialog box will
then appear, enter the title of
the script in the Title box.
Click OK and the new item will
appear in the Runorder
User Guide WinCueLT Getting Started • 22
Page 30

User Guide WinCueLT Getting Started • 23
Page 31

Chapter
4
The Script Editor
User Guide WinCueLT The Script Editor • 24
Page 32

4 The Script Editor
4.1 Opening Scripts
To open a Script from the Runorder use the following steps:
What you do Comments/Prompts
Either
Double click on the item with the
script you want to open
Or
Select the item with the script you
want to open and press Return
This will then open up the script in the Script Item.
User Guide WinCueLT The Script Editor • 25
Page 33

The item
p
number of
the script
4.2 The Script Editor Header
The Script Editor is used to display the details of the script that is being edited.
The Header displays:
The title of
the scri
t
The number
of words in
the script
4.2.1 Change Layout
If you don’t want the Script Editor Header to be displayed you can change the
layout for the Script Editor so that it is not displayed. To change the Script Editor
Layout use the following steps:
What you do Comments/Prompts
The total
link time for
the script
1. Right-click on the Header and
select Change Layout
OR
Click on the Change Layout
button on the Toolbar
2. A Select Display Layout dialog
box will appear. Select Prompt
Runorder File No header, click
OK
User Guide WinCueLT The Script Editor • 26
Page 34

3. This will remove the header
4.3 Adding Text
Adding text to the Script Editor is just a case of typing. When you open a script the
cursor will be ready in place for you to start typing just as with any other word
processor.
4.4 Importing files
If you have already typed out your script, in Word for instance, it is possible for
you to import that script into the script editor. To import a file into WinCue LT use
the following steps:
What you do Comments/Prompts
1. Click on the Insert menu and
select File
User Guide WinCueLT The Script Editor • 27
Page 35

Note: The following types
of files can be imported into
WinCue LT:
Microsoft Word 95/ 97/
2000 Files
Rich Text Format Files
Newsmaker Scripts
QCP Text Files
Unicode Text Files
Plain Text Files
2. A Select File to Import dialog
box will appear. From here
you can search your Folders
and Directories until you find
the file you want to import
3. Once you have found the file
you want to import click Open
4. The text from the imported file
will then appear in the Script
Editor
4.5 Inserting Presenters
To insert a presenter to a script use the following steps:
What you do Comments/Prompts
1. Click on the Insert menu and
select Presenter
User Guide WinCueLT The Script Editor • 28
Page 36

3. A Select Presenter dialog box
will appear with a list of
Presenters, highlight the
presenter you want. Click OK
The Presenter name will then be inserted into the script at the cursor position.
User Guide WinCueLT The Script Editor • 29
Page 37

4.6 Inserting Markers
When prompting, it is sometimes useful to be able to jump to specific parts of a
Script without having to scroll to that point. This problem is overcome by adding
Markers; these are placed at points where the operator may need to jump to. Use
the following steps to add a Marker to your script:
What you do Comments/Prompts
1. Place the cursor where you
want the marker to be
inserted, click on the Insert
menu and select Marker
2. The Marker will then appear in
the script where you placed
the cursor
User Guide WinCueLT The Script Editor • 30
Page 38

4.7 Inserting Block Markers
A Block Marker can be used to move or copy a block of text from one location to
another.
What you do Comments/Prompts
1. Place the cursor where you
want the block to start and
press Alt + B to add a Block
Marker
2. Then move your cursor to
where you want the block to
end and add another Block
Marker.
3. Press Crtl +T and you will be
given 2 options Transfer or
Copy. Click on the option you
want to use.
4. If you selected Transfer then
the text block will disappear,
move your cursor to its new
location and press Ctrl + V to
paste.
5. If you selected Copy then the
Block Markers will disappear,
move your cursor to the
position where the copied text
is to appear and press Ctrl + V
to paste.
4.8 Formatting Text
As with most word processors WinCue LT’s Script Editor provides formatting tools
that allow you to customize your script. WinCue LT allows you to change the size,
color, font, and alignment of the script text, you can also stop the text from being
prompted and captioned. The following sections will explain how to use the
Format All, Not Captioned and Not Prompted options, to find out about the other
formatting tools see Appendix A.
User Guide WinCueLT The Script Editor • 31
Page 39

4.8.1 Formatting All Text
To format all the text in your script use the following instructions:
What you do Comments/Prompts
1. Click on the Format menu and
select All Text
2. A Format All dialog box will
open. Here you can choose
the required formatting tool by
clicking on its button
4. Once you have chosen what
formatting tool you want to
use, click OK and all the text
will be formatted
Note: To format the
size of text click on
the Font button and
choose the size you
want.
User Guide WinCueLT The Script Editor • 32
Page 40

4.8.2 Not Captioned
For any text that you don’t want to go to the Caption Generator, you can use the
Not Captioned option. Use the following steps to learn how to use this formatting
option.
What you do Comments/Prompts
1. Highlight the text that you
don’t wont to go to the Caption
Generator
2. Click on the Format menu and
select Not Captioned
User Guide WinCueLT The Script Editor • 33
Page 41

3. The text will then be
surrounded in color, indicating
that it will not go to the
Caption Generator. The Not
Captioned option will also be
marked with a tick to show
that it is in use.
4.8.3 Not Prompted
For text that you don’t want to be prompted you can use the Not Prompted option.
Use the following steps to learn how to use this formatting option.
What you do Comments/Prompts
1. Highlight the text that you
don’t want to prompted
2. Click on the Format menu and
select Not Prompted
User Guide WinCueLT The Script Editor • 34
Page 42

3. The text will then be
surrounded in color, indicating
that it will not go to the
Prompter. The Not Prompted
option will also be marked with
a tick to show that it is in use.
4.9 Spell Checking
As with most word processors, WinCue LT allows you check your script for any
spelling mistakes that you may have made. To check your script for spelling
mistakes use the following steps:
What you do Comments/Prompts
1. Click on the Script menu and
select Spell Check
2. If there are any spelling
mistakes within the script they
will be displayed in a popup
dialog box. Here you can
replace any misspelled words
with a suggested spelling.
User Guide WinCueLT The Script Editor • 35
Page 43

3. Once the Spell Check is over
you will get a message
4.10 Saving Scripts
It is good practice to save your script regularly, this way you can avoid losing work
through mistakes. The following steps explain the different methods of saving your
scripts:
What you do Comments/Prompts
Either
Click on the red Save Script
Changes button on the toolbar
Or
Press F7
Or
Click on the Script menu and
select Save Changes
Note: This saves your script to
memory NOT
save your script to disk follow the
same steps as section 5.9.
to your disk drive, to
4.10 Printing Scripts
The following steps explain how to print a script in WinCue LT.
What you do Comments/Prompts
User Guide WinCueLT The Script Editor • 36
Page 44

1. Click on the Script menu and
select Print
2. A Print dialog box will appear,
from here you can select the
number of copies of the script
you require and the Print
Layout you want
3. To change the Print Layout
click on the drop down box
and select the layout. Click on
OK
4.11 Closing Scripts
When you are finished with a script, save it and then close it. Use one of the
following methods to close a script:
What you do Comments/Prompts
Either
Click on the close button in the
corner of the window
Or
Press the Escape button on your
keyboard
User Guide WinCueLT The Script Editor • 37
Esc
Page 45

User Guide WinCueLT The Script Editor • 38
Page 46

Chapter
5
Working with Runorders
User Guide WinCueLT Working with Runorders • 39
Page 47

r
5 Working with Runorders
5.1 WinCue LT Runorder
The WinCue LT Runorder is used to store all the scripts of a show in the order
that they will be used. A script contained in a Runorder is called an Item. The
Runorder calculates the length of time each item takes and calculates the overall
length of time for the show. It counts the number of words contained in each script
to create an overall word count.
Item
Number
Item title
User Guide WinCueLT Working with Runorders • 40
Item word
count
Show word
count
Total show
time length
Item time
length
Prompt
button
Show time
so fa
Date last
modified
Time last
modified
Page 48

5.2 Adding Break Scripts
In Section 3.2 you learned how to create a new script item, it is also possible in
WinCue LT to add Break Scripts to your Runorder. To add a Break Scripts to your
Runorder use the following steps:
What you do Comments/Prompts
1.
Either
Click on the script menu and
select New Break
Or
Right-click on the Runorder and
select New Break Script
2. Insert the name of the Break
Script in the dialog box that
will appear. Click OK and a
new Break Script will appear
in the Runorder
User Guide WinCueLT Working with Runorders • 41
Page 49

5.3 Toggle Hold State
Using this option will put an Item on hold so that it will not be prompted unless it is
taken off hold. To put an Item on or off hold use the following steps:
On Hold
What you do Comments/Prompts
1. Highlight the item you want
put on hold
2. Click on the Script menu and
select Toggle Hold State
Or
Right-click on the Runorder and
select
3. The item will then change
color indicating that it is on
hold
Off Hold
What you do Comments/Prompts
User Guide WinCueLT Working with Runorders • 42
Page 50

1. Highlight the item you want to
take off hold
2. Click on the Script menu and
select Toggle Hold State
3. The item will return to its
original color indicating that it
is off hold
5.4 Deleting Items
If you find that you have an Item in your Runorder that you no longer need you
can delete it. To a delete an Item from your Runorder use the following steps:
What you do Comments/Prompts
1. Highlight the Item you want to
delete
Either
2. Click on the Script menu and
select delete
Or
Right-click on the Item and select
delete
3. You will then be asked if you
are sure you want to delete
the Item, click OK and the
Item will be deleted
User Guide WinCueLT Working with Runorders • 43
Page 51

5.5 Moving Items in the Runorder
As WinCue LT is a Windows based application it is possible to Drag and Drop
Items from one position in a Runorder to another. To move Items in your
Runorder use the following instructions:
What you do Comments/Prompts
1. Click on the Item you want to
move, so that it becomes
highlighted
2. Keep the left mouse button
down and drag the Item with
the mouse to its new position
in the Runorder
3. Drop the Item in its new
position by taking your finger
off the left mouse button
5.6 Renumbering Items
Each Item in a Runorder is assigned a number, however the sequence of the
Runorder numbering can become inconsistent through deleting Items or moving
them around. It is possible in WinCue LT to reorganize the Item numbering into a
consistent sequence by using the Renumber Scripts option. To Renumber the
Items in your Runorder use the following steps:
What you do Comments/Prompts
User Guide WinCueLT Working with Runorders • 44
Page 52

Click on the Runorder menu and
select Renumber Scripts
The items will now be numbered
by their place in the Runorder
5.7 Importing Scripts
As well as being able to import scripts into the Script Editor (see section 4.4), it is
also possible in WinCue LT to import scripts into the Runorder to create an Item.
To import a script into the Runorder use the following steps:
Note: The following
types of files can be
imported into WinCue
LT:
Microsoft Word 95/ 97/
2000 Files
Rich Text Format Files
Newsmaker Scripts
QCP Text Files
Unicode Text Files
What you do Comments/Prompts
1. Highlight the Item below
where you want the new
Item to be Imported to
2. Click on the Script menu and
select Import File
3. A Select file to import dialog
box will appear. From here
you can search your Folders
and Directories until you find
the file you want to import
4. Once you have found the file
you want to import click
Open
User Guide WinCueLT Working with Runorders • 45
Page 53

5. The file will import and
appear as a new Item in the
Runorder above the Item
that is highlighted
5.8 Exporting Scripts
WinCue LT prompt files are saved as *.wsr files, if you want to be able to view a
script you created in WinCue LT in another application, Word for instance, you
have to Export the script. Exporting a script allows you to save the file in a format
that can be viewed in other applications. The file formats that you can export
WinCue LT prompt files into are as follows:
• Rich Text Format Files
• QCP Text Files
• Plain Text Files
To export a WinCue LT prompt file(s) to one of the file formats follow the steps
below:
What you do Comments/Prompts
1. Highlight the Script(s) you
want to export
2. Click on the Script menu and
select Export Script(s)
User Guide WinCueLT Working with Runorders • 46
Page 54

3. A Select Export File dialog
box will appear. From here
you are able to choose the
file format you want to export
the WinCue LT file to and
where it will go. Click on the
Save as type drop down box
and choose the file format
you want
4. Click on Save and the file
will be exported
5. When exporting the file into
a Rich Text file format a
Select Export Settings dialog
box will appear so that you
can choose the files settings
before it will export
6. Choose the settings you
want and click on OK
7. You will then be able to open
the file in other applications,
such as Word
To export a WinCue LT Runorder use the following steps:
What you do Comments/Prompts
User Guide WinCueLT Working with Runorders • 47
Page 55

1. Click on the Script menu
2. Select Export All Scripts
3. A Select Export Type box
will appear, choose the file
format you want to export to
and click on OK
Note:
Each script in the Runorder
will be saved separately
unless you click on the
Export all scripts to a single
file checkbox
4. A Browse for Folder dialog
box will appear, from here
you can find where you want
the exported scripts to go
5. Once you have chosen
where you want the files to
go click on OK and your files
will be exported
User Guide WinCueLT Working with Runorders • 48
Page 56

6. If you chose to export your
Rundown to Rich Text
Format you will have to
choose the settings you want
for the export from the Select
Export Settings dialog box
that will appear, then click on
OK
The settings for each script have
to be completed separately, so
this dialog box will appear for
each Script in the Runorder
before it is exported
5.9 Saving Runorders to files
It is good practice to save your Runorder regularly, this way you can avoid losing
work through mistakes. The following steps explain the different methods of
saving your Runorder:
What you do Comments/Prompts
1.
Either
Click on the Save File button on
the Toolbar
Or
Click on the File menu and select
Saves As
User Guide WinCueLT Working with Runorders • 49
Page 57

2. A Save As dialog box will
appear, enter the name of
Runorder and click on Save
5.10 Copying prompt files to floppy disk
WinCue LT provides you with the option to quickly save your prompt files to floppy
disk.
What you do Comments/Prompts
1. Insert floppy disk into the A
drive
2. Click on the File menu and
select Copy to Floppy (A:)
Note:
If you have not already
saved the file, the
Save As dialog box will
appear allowing you to
save the file with a name
5.11 Printing Scripts
To print scripts from a Runorder use the following steps:
What you do Comments/Prompts
User Guide WinCueLT Working with Runorders • 50
Page 58

1. Highlight the Scripts you
want to print
2. Click on the Runorder menu
and select Print Scripts
3. A Print dialog box will
appear, from here you can
choose how many copies
you want and the layout you
want them to be printed in
4. Once you have made your
selections click on OK and
they will print
5.12 Printing the Runorder
To Print a Runorder use the following steps:
What you do Comments/Prompts
User Guide WinCueLT Working with Runorders • 51
Page 59

1. Click on the Runorder menu
and select Print Runorder
2. A Print dialog box will
appear, from here you can
choose how many copies
you want and the layout you
want them to be printed in
3. Once you have made your
selections click on OK and
they will print
5.13 Opening a saved Runorder file
Before you can open a saved Runorder file all other WinCue LT files must be
closed, click on the cross
window you have open to close them. To open a saved Runorder file in WinCue
LT use the following steps:
What you do Comments/Prompts
Either
Click on the Open File button
Or
Open the File Menu and select
Open
in the corner of each of the WinCue LT file
User Guide WinCueLT Working with Runorders • 52
Page 60

Or
You can use the Recently Used
command that displays a list of
the last 10 files used as a quick
access method.
Click on the File menu and select
Recently Used and then the
Runorder you want to open
Note:
Only 1 Runorder can
be opened at a time
5.14 Adding a Presenter to the Presenter table
In section 4.5 you learned how to add a Presenter to a Script, in this section you
will learn how to add a Presenter to the Presenter table so that you are able to
User Guide WinCueLT Working with Runorders • 53
Page 61

add the Presenter to a Script. By adding a Presenter to the Presenter Table you
are able to tailor the prompt output to the presenters needs. To add a Presenter to
the Presenter table use the following:
What you do Comments/Prompts
1. Click on the Runorder menu
and select Edit Presenter
Table
2. A Presenter Table Settings
dialog box will appear. From
here you set what options
are available to presenters
and add presenters
3. The Presenter Table tab
contains all the options
available when adding a
presenter, click on the
settings you want to be
made available to a new
presenter
4. Click on the Presenters tab
and click on Add
Note:
You are able to modify,
delete and set
presenters as default
from this dialog box
User Guide WinCueLT Working with Runorders • 54
Page 62

5. A Presenter Properties
dialog box will appear, here
you add the details of the
Presenter
6. Click OK and the presenter
will be added to the list of
presenters you can add to a
script (See Section 4.5)
5.15 Switching between the Script and the Runorder
To quickly jump between an open Script and the Runorder without having to close
down the script use the following steps:
What you do Comments/Prompts
User Guide WinCueLT Working with Runorders • 55
Page 63

1. Click on the Tools menu,
select Toolbars and then
select Window Bar
2. This will display 2 buttons at
the bottom of the window,
which can be clicked on to
jump between the script and
the Runorder
User Guide WinCueLT Working with Runorders • 56
Page 64

Chapter
6
Prompting Mode
User Guide WinCueLT Prompting Mode • 57
Page 65

p
r
6 Prompting Mode
6.1 To begin Prompting
It is possible to prompt your scripts from the Runorder or the Script Editor. When
you are ready to start prompting use the following instructions:
What you do Comments/Prompts
Either
Click on the Start Prompting
button
Or
Click on the Prompt menu and
select Begin Prompting
Or
Click on the Prompt Here button
on the Runorder
Note:
Each item in a Runorder
has a ‘Prompt Here’ which
when started will begin
prompting from that
osition in the Runorde
This will then take you into Prompt mode, the text will occupy the whole screen
and you can then begin prompting.
User Guide WinCueLT Prompting Mode • 58
Page 66

Note:
Whilst prompting if the taskbar
is visible you need to right-click
on the Taskbar and turn
Autohide on, See section 2.1.
You will then have to restart
WinCue LT for this change to
take effect.
6.2 Scrolling the text
The settings for each of the following scroll controls are the default settings; it is
possible to change these settings to one more suitable to you. See Appendix B for
further information on scroll control settings.
6.2.1 Using the Two-button Serial Controller
To scroll the text, turn the knob at the end of the Scroll Control, clockwise to
speed up and anti-clockwise to slow down. To change the direction of the
prompted text press the Black button. The Red button is configurable, but is
normally used to jump to the next marker in the text or the next Item in the
Runorder. To stop scrolling turn the scroll knob fully anti-clockwise.
6.2.2 Using the Mouse
To scroll the text simply move the Mouse until you get it to suitable speed. To
change direction Left-click on the Mouse. To stop the text scrolling Right-click on
the mouse button.
6.2.3 Using the Keyboard
To scroll the text press one of the number keys from 1-9,the number dictates how
fast the text will be scrolled, 1 being the slowest and 9 the fastest. To change
direction press the Return Key. The 0 number Key stops the text scrolling. To
jump to the next marker in the script or the next Item in the Runorder, press the
Spacebar
6.3 Moving the Cue Marker
You can reposition the cue marker up or down the script by holding the Shift Key
and pressing the Up and Down Arrow Keys. Holding down the Control Key and
User Guide WinCueLT Prompting Mode • 59
Page 67

pressing the Up and Down Arrow Keys allows you to fine tune the Cue Marker
position.
User Guide WinCueLT Prompting Mode • 60
Page 68

Chapter
7
Additional Settings
User Guide WinCueLT Additional Settings • 61
Page 69

User Guide WinCueLT Additional Settings • 62
Page 70

Appendix
A
Toolbar buttons and shortcuts
User Guide WinCueLT Toolbar buttons and shortcuts • 63
Page 71

Appendix A- Toolbar buttons and shortcuts
A1 General
Function Button Shortcut Menu Command
New file
Open File
Save File
Change Layout
Change Language
Help
A2 Runorder
Function Shortcut Menu Command
Insert New Script INSERT Key ALT + SN
Insert New Break Script ALT + INSERT Keys ALT + SB
Delete Item DELETE ALT + SD
Moves selected Item Up/
Down in Rundown
Edit Script ENTER ALT + SE
ALTGR +
F1
ALT +
Alt + FN
Alt + FO
Alt + FS
Alt + VL
Change Script number in
Runorder
F2
A3 Script Editor
Function Button Shortcut Menu Command
Cut
Copy
Copy selected text to
clipboard
Paste
Paste a New Item into
Runorder/ Editor
User Guide WinCueLT Toolbar buttons and shortcuts • 64
CTRL + INSERT
CTRL + X ALT + ET
CTRL + C ALT + EC
CTRL + V ALT + EP
SHIFT +
INSERT
Page 72

Bold
Underline
Italic
Inverse
Font
Change Color White/
Red/ Green/ Blue/
Yellow
CTRL + B ALT + TB
CTRL + U ALT + TU
CTRL + I ALT + TI
CTRL + E ALT + TV
CTRL + F ALT + TF
CTRL + 1/ 2/ 3/
4
ALT + TC +
D, R, G, B, Y
Justify text Left/ Center/
Right
Format all text
Select all text
Selects all text from
cursor position
Set Block Marker
Transfer Block
Insert Presenter
Insert Marker
Go to next Marker
Go to previous Marker
Change selected text to
Caps
Go to start of line
Go to end of line
Search text
CTRL + SHIFT
+ L/ C/ R
CTRL + SHIFT
ALT + TJ + L/ C/ R
+ A
CTRL + A ALT + ES
CTRL + SHIFT
+ END
ALT + B
CTRL + T
ALT + IP
CTRL + M ALT + IM
CTRL + N
CTRL + P
ALT + F3
HOME Key
END Key
CTRL + F3 ALT + E + F
Search text- Find Next
Search text
Search + Replace
Save Changes
F3 ALT + E + N
SHIFT + F3 ALT + E + V
CTRL + H ALT + E + R
F7 ALT + SC
Undo Changes
Go to start of Script
CTRL + HOME
ALT + SU
Key
Go to end of Script
CTRL + END
Key
Scale Script Up
ALT + Pg Up
Key
User Guide WinCueLT Toolbar buttons and shortcuts • 65
Page 73

Scale Script Down
ALT + Pg Dn
Key
Go to next Script
Go to previous Script
Change Script Number
in Editor
Exit Script Editor
Exit Script Editor
F6 ALT + SN
SHIFT + F6 Alt + SV
CTRL + F2
ESCAPE Key
CTRL + F4
A4 Prompt Mode
Function Button Shortcut
Begin Prompting
Inverse the text
Jump to Editor in Prompt Position
Jump to Prompt mode in Editor position
Jump from Prompter to Editor
SHIFT + F11/TAB
TAB
I
TAB
SHIFT + F11
Move the cue marker up/down
Fine tune cue marker position
SHIFT + /
CTRL +
User Guide WinCueLT Toolbar buttons and shortcuts • 66
Page 74

Appendix
B
Scroll Controls
User Guide WinCueLT Scroll Controls • 67
Page 75

Appendix B - Scroll Controls
Section 2.4 explains how to configure a scroll control for WinCue LT; this section
will explain the configuration options for each scroll control available in WinCue
LT.
B1 Keyboard Scroll
To configure the Keyboard Scroll you need to set up the prompting speed and the
function keys.
B1.1 Speed Control
To set up the prompting speed you can choose between:
• 0 (stop) – 9 (fast) option
• 1 (stop) – 0 (fast) option
The keyboard numbers control how fast the text will scroll and when it stops. In
the first option the 0 key will stop the text scrolling and the numbers 1 to 9 will set
the speed, 9 being the fastest. In the second option 1 will stop the text scrolling
and the numbers 2 to 0 will set the speed, 0 being the fastest.
B1.2 Function Keys
The function keys provide you with 2 extra scroll control options when prompting,
such as changing the direction the text is scrolled. To configure the function keys
simply choose the function and then choose the key for the function. By pressing
on the
that you want to use.
button you can then choose the function button by pressing the key
User Guide WinCueLT Scroll Controls • 68
Page 76

B2 Mouse Scroll
In order to set up your mouse as a scroll control all you need to configure is the
action for each button and then click on OK.
B3 Two-button Serial Controller
To configure the Two-button Serial Controller you need to set the Serial Port that
it will be connected to and the actions for the two buttons.
B3.1 Stop Scrolling
By default to stop the text from scrolling you need to turn the knob as far as it will
go in the opposite direction. Another way you can stop the text from scrolling is to
use the Center Stop Mode option, which means that when you turn the knob back
to the center the text will stop scrolling. To set this option simply click on the box
beside the Center Stop Mode option. The Stop Point option sets how far you have
to turn the knob before it will stop, if the Stop Point option is set at 0 then the knob
will have to be fully turned before it will stop. The higher the number the Stop
Point option is set at the less the knob will have to be turned before the text will
stop scrolling.
B3.2 Button Actions
By default you should only be able to set the action for the Red button, the Black
button will be set at (FWD/REV) Change Direction, however if you set the Center
Stop Mode option you will be able to change action for the Black Button.
User Guide WinCueLT Scroll Controls • 69
Page 77

B4 Serial Multibutton, Hybrid Multibutton, Two-button IMT
Controller
These scroll controls are not used in WinCue LT, they are used in WinCue 1.5,
and so you don’t need to configure them for WinCue LT.
B5 Scroll Control Wiring
B5.1 9 way d Serial port connections
2……..rd……..Red
4……..dtr……..Blue
5……..gnd……..Green
7……..rts……..YY
dtr and rts are used to generate the supply voltage
e
l
l
o
ww
Y
e
l
l
o
e
l
l
o
w
B5.2 IMT Hand control
1……..5v……..Red
5……..0v……..Black
6……..pot……..Green
Y
e
l
l
Y
e
8……..marker……..Y
9……..fwd/rev……..Blue
l
e
l
o
w
l
o
w
l
o
w
User Guide WinCueLT Scroll Controls • 70
Page 78

Appendix
C
WinCue LT Quick Start-Up Guide
User Guide WinCueLT WinCue LT Quick Start-Up Guide • 71
Page 79

This guide will provide you with the basic information needed to get started using WinCue LT, it contains
information on how to open WinCue LT, how to use the Script Editor, the Runorder and how to prompt WinCue LT
Scripts. This guide doesn't contain everything you need to know about WinCue LT, to find out more use the
WinCue LT User Guide.
Starting WinCue LT
To start WinCue LT simply double-click on the WinCue LT icon on your desktop.
WinCue LT Script Editor
The Script Editor will automatically open when WinCue LT is
started, just start typing your Script and the text will be added.
The Script can be formatted using the Format toolbar.
the Save As option in the File menu, this will save the Script to your chosen directory. Then you can use the Save
option to keep the script updated.
order to view WinCue LT Scripts in other applications you will have to export them into a file format that can be
viewed in the application you want to use, e.g.: *.doc, *.txt.
on the File menu and select Copy to Floppy (A:). Script saves will from then on be updated to the Floppy Disk.
Escape key on your keyboard.
Inverse
When you have finished typing and formatting a Script it needs to be saved. The first time you save a Script use
WinCue LT Scripts and Runorders are saved as *.wsr files, these files can only be viewed using WinCue LT. In
There is the option in WinCue LT to save a Script or Runorder directly to a Floppy Disk. To use this option click
All the Scripts for a production are stored in a Runorder, to get to the Runorder from the Script Editor hit the
Font
Font Color
Alignment
Underline
WinCue LT Runorder
To add a new Script to the Runorder hit the Insert
Key on your Keyboard, enter the Script name, in the
dialog box that appears and click OK
User Guide WinCueLT WinCue LT Quick Start-Up Guide • 72
Page 80

To open a Script from the Runorder, highlight the Script you want to open and hit the Return Key on your
Keyboard
If you have typed your Script in an application other than WinCue LT you can Import the Script into a WinCue
LT Runorder. To do this use the Import option in the Script menu and then look for the file you want to import.
The types of files that can be imported into WinCue LT are as follows:
Microsoft Word 95/ 97/ 2000 Files
Rich Text Format Files
Newsmaker Scripts
QCP Text Files
Unicode Text Files
Plain Text Files
It is also possible to Export Scripts that have been typed in WinCue LT into other file formats so that they can
be opened in other applications. You can import individual Scripts or entire Runorders by using the Export
Script(s) or Export All Scripts option in the Script menu, then choosing the file format you want to export it/them
to. The file formats that you can export WinCue LT files are as follows:
Rich Text Format Files
QCP Text Files
Plain Text Files
Script items can be moved to different positions in a Runorder by using your mouse to Drag and Drop them.
Simply highlight the item you want to move and use the mouse to move it to its new position.
To save an entire Runorder click on the Save File button on the toolbar this will be saved as a *.wsr file:
Note: Remember that *.wsr files can only be viewed in WinCue LT, refer to Exporting Scripts for information on how to
view scripts in applications other than WinCue LT.
To open a *.wsr file close down any Scripts or current Runorders in use in WinCue LT and click on the yellow
Open File button on the toolbar:
Prompting with WinCue LT
To Prompt a Script from the runorder click on the prompt button on the
toolbar:
To Prompt from the Script Editor use the Tab button on your
Keyboard to jump between prompt and edit mode, to return to the
Runorder from the Script Editor hit the Escape key on your keyboard.
User Guide WinCueLT WinCue LT Quick Start-Up Guide • 73
Page 81

Appendix
D
Technical Support
User Guide WinCueLT Technical Support • 74
Page 82

Technical Support
To receive technical support for WinCue LT, you may call QTV during
normal business hours at:
(203) 406-1400
E-mail technical support is available at:
support@qtv.com
If you feel that there are important details missing from this manual please do not hesitate to email us here
at QTV, with a description of what you think is needed.
Send the details to support@qtv.com
User Guide WinCueLT Technical Support • 75
 Loading...