


WINCUE
USERGUIDE
Autocue House
Unit 3 Puma Trade Park
145 Morden Road
Mitcham, Surrey
CR4 4DG
Tel: +44 (0) 208 665 2992 Fax: +44 (0) 208 687 4869 Email: info@autocue.co.uk www.autocue.com

WINCUE USER GUIDE
Notice
DISCLAIMER
Autocue Ltd. reserves the right to revise this publication and to make changes in it’s content without obligation of Autocue Ltd. to notify any person or persons of such revision.
COPYRIGHT
Copyright 1996 - 2007 Autocue Ltd.
All rights reserved.
No part of this publication may be reproduced, stored in a retrieval system, electronic or otherwise, or revealed to a third party, without prior permission of Autocue Ltd.
WinCue system version 1.5
2 |
AUTOCUE LTD. 2002 |

WINCUE USER GUIDE
This manual was updated by Heather Millar of
Autocue Group Ltd. on 21 May 2007
How to use this guide
This user guide provides detailed information on how to setup, configure and operate the WinCue software.
Audience
This guide is intended for use by operators and users whose familiarity with computers and software ranges from novice to expert. It is also aimed at technical staff who would be responsible for installing, configuring and supporting WinCue.
Structure of this guide
The user-guide is divided into Chapters, which help the reader to locate information about a particular aspect of the system quickly and easily.
3 |
AUTOCUE LTD. 2002 |

WINCUE USER GUIDE
Chapter 1 Installing the Hardware |
This chapter covers the hardware |
|
requirements and installation. |
|
|
Chapter 2 Installing the Software |
This chapter covers the installation of the |
|
software. |
|
|
Chapter 3 Connecting the WinCue |
This chapter covers the connection of the |
peripherals |
peripherals required for prompting. |
|
|
Chapter 4 Configuring WinCue |
This chapter describes the configuration of |
|
WinCue. |
|
|
Chapter 5 Introducing WinCue |
This chapter introduces WinCue, describing |
|
how to use the menu system and toolbars. |
|
Also covers how the window panes can be |
|
arranged and configured to suit the user. |
|
|
Chapter 6 WinCue Basics |
This chapter covers how to Start WinCue and |
|
how to create new multi-column rundown |
|
files. |
|
|
Chapter 7 The Script Editor |
This chapter covers how to create new |
|
scripts and how to use the Script Editor. |
|
|
Chapter 8 Presenter Settings and |
This chapter describes how to change the |
Profiles |
default presenter settings, add new |
|
presenters and modify their settings. Also |
|
covers how presenter profiles can be used to |
|
copy presenter settings to other rundowns. |
|
|
Chapter 9 Working with Rundowns |
This chapter describes the features of a |
|
multicolumn rundown, editing with the |
|
rundown and modifying the columns in the |
|
Script Editor. |
|
Also covers working with multiple rundowns |
|
and Window Settings. |
|
|
Chapter 10 Prompting scripts in a |
Describes how to prompt scripts in rundowns, |
queue |
configuring and using the scroll controllers |
|
and the different prompting options available. |
|
|
Chapter 11 Upgrading WinCue |
Describes the WinCue upgrade procedure. |
|
|
4 |
AUTOCUE LTD. 2002 |

WINCUE USER GUIDE |
TABLE OF CONTENTS |
1Installing the Hardware _______________________________________________9
1.1Minimum Hardware Requirements_________________________________________ 9
1.2The WinCue Package____________________________________________________ 9
1.3Installing the SCSI card_________________________________________________ 10
1.4The I.M.T. Scroll Card __________________________________________________ 10
1.5Installing the I.M.T. Card ________________________________________________ 10
1.6Laptops ______________________________________________________________ 10
2Installing the Software _______________________________________________11
2.1Installing the Software on desktop PCs ___________________________________ 11
2.2Installing the software on Laptops________________________________________ 15
3Connecting the WinCue peripherals ____________________________________16
3.1Desktop PCs__________________________________________________________ 16
3.1.1Connecting a Scroll Control ___________________________________________________ 16
3.1.2Connecting a Composite Video Feed ____________________________________________ 16
3.1.3Connecting a Genlock Feed ___________________________________________________ 16
3.1.4Connecting a Foot Control ____________________________________________________ 16
3.2Laptops ______________________________________________________________ 17
3.2.1Connecting a Scroll Control ___________________________________________________ 17
3.2.2Connecting a Composite Video Feed ____________________________________________ 18
3.2.3Connecting a Genlock Feed ___________________________________________________ 18
3.2.4Connecting a Power Supply ___________________________________________________ 18
4Configuring WinCue _________________________________________________19
4.1Starting WinCue prompter for the first time ________________________________ 19
4.2Configuring the Scroll Controller _________________________________________ 19
4.2.1Configuring the Controller Mode and Port ________________________________________ 20
4.2.2Configuring the buttons_______________________________________________________ 20
4.2.3The End Stop Table _________________________________________________________ 22
4.2.4The Centre Stop Table _______________________________________________________ 22
4.3Configuring the Prompt Engine __________________________________________ 23
5Introducing WinCue _________________________________________________26
5.1Using menus _________________________________________________________ 26
5.2WinCue toolbars and tools ______________________________________________ 27
5.2.1Standard Toolbar ___________________________________________________________ 27
5.2.2Change Layout button________________________________________________________ 27
5.2.3Favourites button ___________________________________________________________ 27
5.2.4Formatting toolbar___________________________________________________________ 27
5.2.5Splitter View toolbar _________________________________________________________ 27
5.2.6Editor View toolbar __________________________________________________________ 27
5.2.7Prompt toolbar and Prompt (Advanced) toolbar ____________________________________ 28
5.2.8Status bar _________________________________________________________________ 28
5.3Selecting options in a dialog box_________________________________________ 28
5.4Using Panes __________________________________________________________ 29
5.4.1To add a horizontal pane _____________________________________________________ 29
5 |
AUTOCUE LTD. 2002 |

WINCUE USER GUIDE |
TABLE OF CONTENTS |
5.4.2To add a vertical pane _______________________________________________________ 30
5.4.3To Zoom a pane ____________________________________________________________ 31
5.4.4Removing panes ____________________________________________________________ 32
5.4.5Resizing panes _____________________________________________________________ 32
5.4.6Pane settings ______________________________________________________________ 33
5.4.7Renaming panes ____________________________________________________________ 34
5.4.8Moving Panes ______________________________________________________________ 34
5.5The Principles of Prompting _____________________________________________ 35
5.5.1Prompters _________________________________________________________________ 35
5.5.2The Script Editor ____________________________________________________________ 35
5.5.3Rundowns _________________________________________________________________ 35
5.5.4The Scroll Controller _________________________________________________________ 35
6WinCue Basics _____________________________________________________36
6.1Starting WinCue _______________________________________________________ 36
6.2The WinCue main window_______________________________________________ 37
6.3Creating a Multi-column Rundown________________________________________ 37
7The Script Editor ____________________________________________________39
7.1Creating a new Script in the Rundown ____________________________________ 39
7.1.1The Script Editor Window _____________________________________________________ 40
7.1.2The Word Count (Link time) Box _______________________________________________ 42
7.1.3The Script Duration Box ______________________________________________________ 42
7.1.4Undo and Redo_____________________________________________________________ 42
7.2Adding a Presenter Name to a Script______________________________________ 42
7.3Adding Markers to a Script ______________________________________________ 44
7.4Saving Your Work _____________________________________________________ 44
7.4.1Saving a Script _____________________________________________________________ 44
7.4.2Saving a Rundown __________________________________________________________ 45
7.5Opening a previously saved rundown _____________________________________ 46
7.6Changing the Script Characteristics ______________________________________ 47
7.6.1Highlighting Text in the Editor __________________________________________________ 47
7.6.2To change the font __________________________________________________________ 47
7.6.3To change the style and colour of text ___________________________________________ 48
7.6.4Justifying the Text ___________________________________________________________ 48
7.6.5Changing the case __________________________________________________________ 48
7.6.6To invert the background colour and the text ______________________________________ 49
7.6.7Captions __________________________________________________________________ 49
7.6.8Format All _________________________________________________________________ 49
7.6.9Not Prompted Text __________________________________________________________ 49
7.6.10Finding Words in a Script _____________________________________________________ 49
7.6.11Replacing Words in a Script ___________________________________________________ 50
7.7Printing ______________________________________________________________ 51
7.7.1Printing Rundowns __________________________________________________________ 51
7.7.2Printing the Show ___________________________________________________________ 51
8Presenter Settings and Profiles________________________________________52
8.1Changing the Default Presenter settings __________________________________ 52
8.1.1 Changing the Default Read Rate _______________________________________________ 52
8.2Adding a New Presenter ________________________________________________ 55
6 |
AUTOCUE LTD. 2002 |

WINCUE USER GUIDE |
TABLE OF CONTENTS |
8.3Changing a Presenter’s Settings _________________________________________ 56
8.4Deleting a Presenter ___________________________________________________ 56
8.5Presenter Profiles _____________________________________________________ 57
8.5.1Saving Presenter Profiles _____________________________________________________ 57
8.5.2Loading Presenter Profiles ____________________________________________________ 57
9Working with Rundowns _____________________________________________58
9.1The WinCue Rundown window___________________________________________ 58
9.1.1Features of a WinCue Rundown________________________________________________ 59
9.2Creating a New Rundown _______________________________________________ 59
9.2.1Adding a New Story to the Rundown ____________________________________________ 59
9.2.2Adding Break Scripts ________________________________________________________ 59
9.2.3Saving Scripts and Rundowns _________________________________________________ 59
9.2.4Moving Stories within the Running Order _________________________________________ 60
9.2.5Renumbering Stories in the Rundown ___________________________________________ 60
9.3Editing within the Rundown _____________________________________________ 60
9.3.1Adding a new script__________________________________________________________ 60
9.3.2Editing a Script _____________________________________________________________ 60
9.3.3View Story _________________________________________________________________ 60
9.3.4Importing files ______________________________________________________________ 61
9.3.5Deleting Stories_____________________________________________________________ 62
9.3.6Editing the fields of an item in the rundown _______________________________________ 63
9.3.7Toggle Hold State ___________________________________________________________ 63
9.3.8Move to Air Next ____________________________________________________________ 63
9.4View Settings _________________________________________________________ 63
9.5Modifying the Columns in the Script Editor ________________________________ 65
9.5.1Modifying a Script Editor Column _______________________________________________ 65
9.6Working with Multiple Rundowns ________________________________________ 66
9.6.1Copying stories between rundowns_____________________________________________ 67
9.7Window Settings ______________________________________________________ 67
10Prompting scripts in a queue ________________________________________69
10.1Opening a Queue_______________________________________________________ 69
10.2To start prompting ___________________________________________________ 69
10.3Scroll Controllers ____________________________________________________ 70
10.3.1Hybrid multi-button scroll controller _____________________________________________ 70
10.3.22-button Hand Scroll Control __________________________________________________ 70
10.4Prompting options ___________________________________________________ 71
10.4.1Prompting with the Script Column displayed ______________________________________ 73
10.5To quit prompting____________________________________________________ 73
11Upgrading WinCue_________________________________________________74 Appendix A - WinCue Installation Help_____________________________________77
WinCue IMT cards and SCSI cards ____________________________________________ 77
Laptop systems (SlimSCSI 1460d) _____________________________________________________ 77 Desktop systems (2906) _____________________________________________________________ 77
SCSI Cards ________________________________________________________________ 79
7 |
AUTOCUE LTD. 2002 |

WINCUE USER GUIDE |
TABLE OF CONTENTS |
Appendix B The I.M.T. Card ______________________________________________80
Contents _________________________________________________________________________ 80
Appendix C Wiring Diagrams ____________________________________________88
Appendix D WinCue Tool Buttons and Keyboard Shortcuts ___________________94
Rundowns: Tools and Shortcuts ____________________________________________ 94
Panes ___________________________________________________________________________ 94 On Highlighted items in Rundown ______________________________________________________ 95
Script Editor: Tools and Shortcuts ____________________________________________ 96
Appendix E Wiring____________________________________________________98
E1 WinCue Multibutton Hand Control ________________________________________ 98
E1.1 WinCue IMT card 9 way d connections __________________________________________ 98 E1.2 9 way d Serial port connections ________________________________________________ 98 E1.3 P4 Multibutton Remote Connector 15 Pin D Male __________________________________ 98
E2 2 button Serial Hand Control ____________________________________________ 98
E2.1 9 way d Serial port connections ________________________________________________ 98
E3 2 button IMT Hand Control ______________________________________________ 98
E3.1 IMT Hand control ___________________________________________________________ 98
Technical Support ____________________________________________________100
8 |
AUTOCUE LTD. 2002 |

WINCUE USER GUIDE |
CHAPTER 1 – INSTALLATION OF HARDWARE |
Chapter
1
Installing the Hardware
This chapter covers the minimum requirements with the recommended specifications and the installation of the hardware required to run the WinCue software.
1Installing the Hardware
1.1Minimum Hardware Requirements
The WinCue prompter will run either on the Windows 2000 or Windows XP Professional operating systems, Windows XP Home or Windows ME are not supported. The minimum hardware requirements and recommended specification for your prompter is as follows. Please note that you will require a SCSI card of the type specified below:
Windows 2000/XP Pro
Pentium II 350 MHz processor (True Pentium chipset is required)
128MB RAM
50Mb free disk space
Adaptec SCSI card 2906 for desktop, Adaptec 1460 SlimSCSI PCMCIA for laptop
PCI bus or VL bus graphics card (PCI preferred)
800x600 256 Colour VGA display (1024x768 is recommended)
1.2The WinCue Package
The WinCue package consists of:
Laptop users will receive an I.M.T. box, not the I.M.T. scroll card
WinCue Software (1 CD)
License (1 diskette)
I.M.T. Scroll Card
Scroll Control
User Manual
9 |
AUTOCUE LTD. 2002 |

WINCUE USER GUIDE |
CHAPTER 1 – INSTALLATION OF HARDWARE |
1.3Installing the SCSI card
Before you install the WinCue prompter software you need to install and configure the SCSI card in accordance with the documentation supplied with it. Information on the issues involved with setting up SCSI cards and how to get round problems can be found in Appendix A of this guide.
1.4The I.M.T. Scroll Card
The I.M.T. scroll card allows WinCue to prompt text in any language. Data from the scroll card is sent to the prompter screen via the on-board composite video channel. The I.M.T. card also features an on-board genlock port. In addition, an I.M.T. scroll control can be attached to the I.M.T. card leaving all the ports on your PC free for other peripherals.
1.5Installing the I.M.T. Card
The I.M.T. card will have been configured prior to dispatch for the settings required in your country. Therefore changes to jumpers or dipswitch settings should not be necessary.
Remove the cover from the PC’s case and find a free full length ISA slot. Remove the appropriate blanking plate and carefully insert the I.M.T. card.
Connect the SCSI cable to the I.M.T. card and replace the PC’s cover.
Please refer to Appendix A for more details of the I.M.T. card.
1.6Laptops
Insert the PCMCIA SCSI card in the designated slot in the laptop. Start the laptop and the card should be detected when you boot up. Install the relevant drivers for the SCSI card.
Refer to Appendix A for help in setting up your PCMCIA SCSI card.
10 |
AUTOCUE LTD. 2002 |
WINCUE USER GUIDE |
CHAPTER 2 – INSTALLATION OF SOFTWARE |
Chapter
2
Installing the Software
This chapter covers the installation of the WinCue software.
2Installing the Software
2.1Installing the Software on desktop PCs
Close all programs running on your computer and insert the CD in the CDROM drive.
The Autorun program should load:
Click the Setup button at the top left of the window.
If Autorun does not run automatically click Start and select Run…
11 |
AUTOCUE LTD. 2002 |

WINCUE USER GUIDE |
CHAPTER 2 – INSTALLATION OF SOFTWARE |
And in the Run dialog box type D:\SETUP\SETUP in the Open: text box then click on OK.
The installation program will load:
When the WinCue Setup banner appears click Next >
12 |
AUTOCUE LTD. 2002 |

WINCUE USER GUIDE |
CHAPTER 2 – INSTALLATION OF SOFTWARE |
You will then be asked for the license diskette. Insert the license diskette and click Next > to accept:
13 |
AUTOCUE LTD. 2002 |

WINCUE USER GUIDE |
CHAPTER 2 – INSTALLATION OF SOFTWARE |
 Warning!
The licence disk included with each copy of WinCue is designed to work with the supplied I.M.T. scroll card. It will not work with any other I.M.T. card.
You will then see the WinCue Install dialog box appear.
Click on the Client button. The files will install with a progress dialog box.
When the installation is done it will go back to the WinCue Install window. Click on the Exit button to return to Windows.
14 |
AUTOCUE LTD. 2002 |

WINCUE USER GUIDE |
CHAPTER 2 – INSTALLATION OF SOFTWARE |
2.2Installing the software on Laptops
Follow the Installation process on the laptop as above. After WinCue has been installed shutdown and leave
switched off until you have connected the prompting peripherals.
15 |
AUTOCUE LTD. 2002 |

WINCUE USER GUIDE |
CHAPTER 3 – CONNECTING WINCUE PERIPHERALS |
Chapter
3
Connecting the WinCue peripherals
This chapter covers the connection of the peripherals required to prompt with WinCue.
3Connecting the WinCue peripherals
3.1Desktop PCs
3.1.1Connecting a Scroll Control
The standard scroll control used with WinCue is the I.M.T. scroll control. The I.M.T. scroll control port is the 9 pin analogue port on the back of the I.M.T. card. WinCue expects the scroll control to be connected to this port. The I.M.T. scroll control will not work if it is attached to any other port on your PC.
3.1.2Connecting a Composite Video Feed
The composite video port is the BNC port furthest the scroll control port on the I.M.T. card. This port supplies the composite video feed to the prompter screen(s).
3.1.3Connecting a Genlock Feed
The genlock port is the BNC port nearest from the scroll control port on the I.M.T. card. This port accepts a genlock feed.
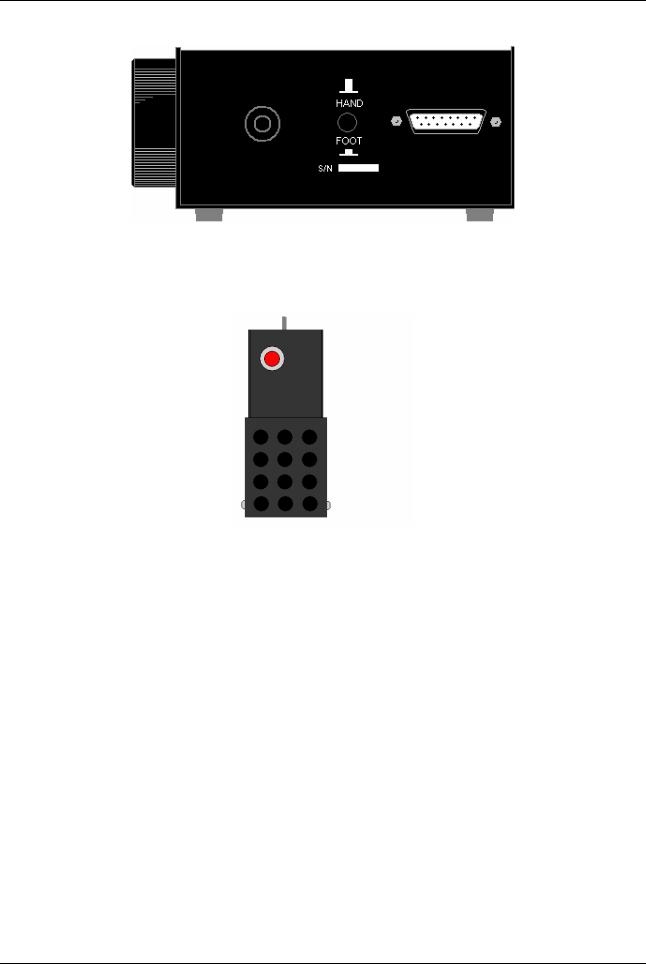
3.1.4Connecting a Foot Control
At the rear of the Multi-button scroll control is a 15 pin D connector for attaching a foot scroll control and a button to select between foot and hand control operation. When this button is pressed in the foot scroll control can be used to prompt the text. Otherwise the Multi-button scroll control is used.
16 |
AUTOCUE LTD. 2002 |
WINCUE USER GUIDE |
CHAPTER 3 – CONNECTING WINCUE PERIPHERALS |
The rear of the
Multibutton Scroll Controller
The foot scroll control is used for controlling the speed and direction of the prompted text only. All other functions such as next marker and reset rundown are available by using the buttons of the Multibutton scroll controller.
The foot control can also be connected direct to the IMT 9 pin connector for stand alone use
The red button is used for changing the direction of the prompted text. The foot pedal controls the speed.
3.2Laptops
When the software has been installed and the PC turned off the laptop can be connected to the I.M.T. box.
Insert the PCMCIA SCSI card into your laptop
Connect one end of the SCSI cable supplied with the SCSI card to the PCMCIA card and the other to the SCSI port on the I.M.T. box
Connect a power cord to the appropriate input of the I.M.T. box (you have a choice of IEC mains or 12V DC)
3.2.1Connecting a Scroll Control
Laptops normally use the I.M.T. scroll control. The I.M.T. scroll control port is the 9 pin analogue port on top of the I.M.T. box. WinCue expects a scroll control to be connected to this port.
17 |
AUTOCUE LTD. 2002 |

WINCUE USER GUIDE |
CHAPTER 3 – CONNECTING WINCUE PERIPHERALS |
The I.M.T. scroll control will not work if it is attached to any other port on your PC.
3.2.2Connecting a Composite Video Feed
The I.M.T. box is made in two versions, one has four BNC composite outputs and the other has one. These ports supply the composite video feed to the prompter screen(s). You can connect your video cable to the BNC output.
See Appendix C3 & C4 for further details.
3.2.3Connecting a Genlock Feed
The genlock port is the BNC port next to the I.M.T. scroll control port on the I.M.T. box. This port accepts a genlock feed.
3.2.4Connecting a Power Supply
The I.M.T. box can be powered from one of three different sources the mains power supply, 12V DC and an optional PAG battery (UK version only). A reset button is provided on the I.M.T. box to reset the I.M.T. scroll card.
18 |
AUTOCUE LTD. 2002 |
WINCUE USER GUIDE |
CHAPTER 4 – CONFIGURING WINCUE |
Chapter
4
Configuring WinCue
This chapter covers the configuration of WinCue for prompt operation.
4Configuring WinCue
4.1Starting WinCue prompter for the first time
Note: users of laptops must switch on the I.M.T. box before switching on the laptop to ensure the PCMCIA
SCSI card successfully detects the I.M.T. scroll card.
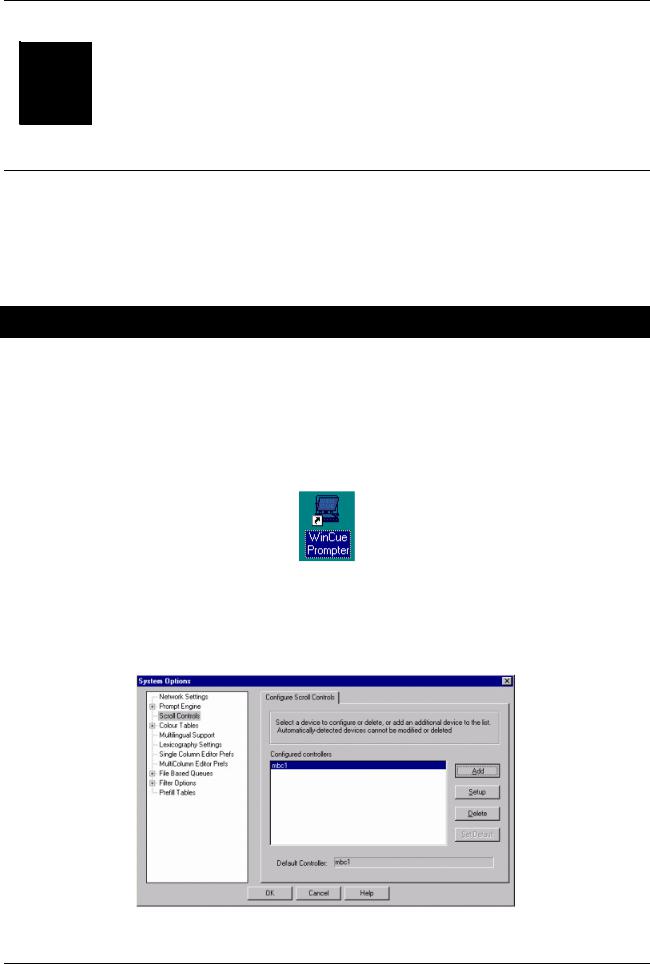
Run WinCue by double-clicking on the WinCue icon:
4.2Configuring the Scroll Controller
Open the Tools menu and select Options. Click on Scroll Controls to open the Configure Scroll Controls window on
the right and click on Add.
19 |
AUTOCUE LTD. 2002 |

WINCUE USER GUIDE |
CHAPTER 4 – CONFIGURING WINCUE |
Enter a name for the new device and click the down arrow to select the type from the drop down list. For the multibutton scroll controller select Hybrid Multibutton.
Click OK and you will see the new device listed. Select it by clicking on it and click the Setup button.
4.2.1Configuring the Controller Mode and Port
Select the serial port you are using by clicking on the down arrow and selecting from the drop down menu.
If the operator wants the prompted text to stop scrolling when the marker on the scroll knob is centred and does not want to use the forward reverse button to change the direction of the prompted text then you can set the Controller mode to Centre Stop by clicking on the radio button next to the option.
4.2.2Configuring the buttons
Click on the Buttons tab. Click on the button you wish to configure. Click the down arrow and select the required button from the drop down list.
20 |
AUTOCUE LTD. 2002 |
WINCUE USER GUIDE |
CHAPTER 4 – CONFIGURING WINCUE |
Configure all the buttons in this way by referring to the table below.
|
Function |
Description |
|
|
|
|
Change Direction |
Changes the direction the text is scrolled |
|
Next Story |
Moves the prompter to the next story in |
Top Row of Buttons |
the rundown |
|
|
Previous Story |
Moves the prompter to the previous story |
|
|
in the rundown |
|
Reset Story |
Moves the prompter to the beginning of |
|
|
the story currently being prompted |
|
|
|
|
Next Marker |
Moves the prompter to the next marker |
|
|
in the story |
|
Previous Marker |
Moves the prompter to the previous |
Middle Row of Buttons |
marker in the story |
|
|
Reset Rundown |
Resets the prompter the top of the |
|
|
rundown |
|
Blank Screen |
Blanks the prompted text from the |
|
|
prompter(s) on the on-camera unit(s) |
|
|
|
|
Caption On/Off |
Switches caption data sent by WinCue |
Bottom Row of Buttons |
on and off |
|
|
Clear Decoder |
Clear the caption output |
|
Stop |
Stop the prompted text scrolling |
|
|
|
21 |
AUTOCUE LTD. 2002 |

WINCUE USER GUIDE |
CHAPTER 4 – CONFIGURING WINCUE |
The blank button is usually configured as the Cue Story button which ensures the cue marker is at the end of the previous prompted story and not inside the next prompted story. This is so that if the next item is dropped the cue marker remains at the correct position in the rundown waiting to cue the actual next story.
4.2.3The End Stop Table
Now click on the End Stop Table window tab. Here you can change the scroll rate. The default incrementation factor settings are usually set for normal operation.
4.2.4The Centre Stop Table
If you have your controller mode set to Centre Stop mode then you can change the settings by clicking on the Centre Stop Table tab.
22 |
AUTOCUE LTD. 2002 |

WINCUE USER GUIDE |
CHAPTER 4 – CONFIGURING WINCUE |
The simple serial scroll control sends serial data in the range 0 to 120 to tell WinCue how fast to prompt the text; 0 is stop and 120 is the fastest scroll rate. This scroll rate is determined by the position of the scroll control knob. If the Stop Point is set to 60, scroll rates of less than 60 will prompt the text backwards, scroll rates greater that over 60 will prompt the text forward, and a scroll rate of exactly 60 will stop the text from scrolling.
The Stop Zone is a range between 0 and 40 over which the prompted text does not scroll. If the Stop Point is set to 60 and the Stop Zone is set to 5, scroll rates between 55 and 65 will mean the prompted text is not scrolled.
 Warning!
Administrators should not attempt to modify either the Configure IMT End Stop Scroll Table or Configure IMT Centre Stop Scroll Table. If modifications are required to either scroll table you should contact your vendor.
Click OK when you are happy with your settings. This will take you back to the Configure Scroll Controls window.
Now you need to configure the prompt engine.
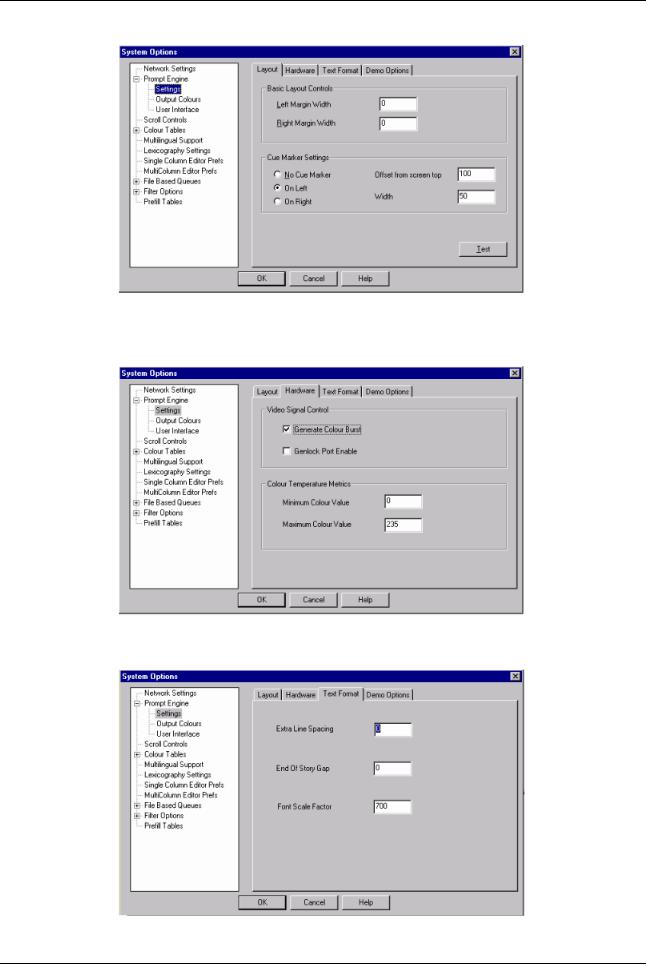
4.3Configuring the Prompt Engine
Click on Prompt engine and then Settings, which will open the Layout window.
23 |
AUTOCUE LTD. 2002 |
WINCUE USER GUIDE |
CHAPTER 4 – CONFIGURING WINCUE |
Enter the required left and right margin width and select where you want the cue marker.
Then click on the hardware window tab.
Here you can enable the Genlock port.
Now click on the Text Format window tab.
24 |
AUTOCUE LTD. 2002 |
WINCUE USER GUIDE |
CHAPTER 4 – CONFIGURING WINCUE |
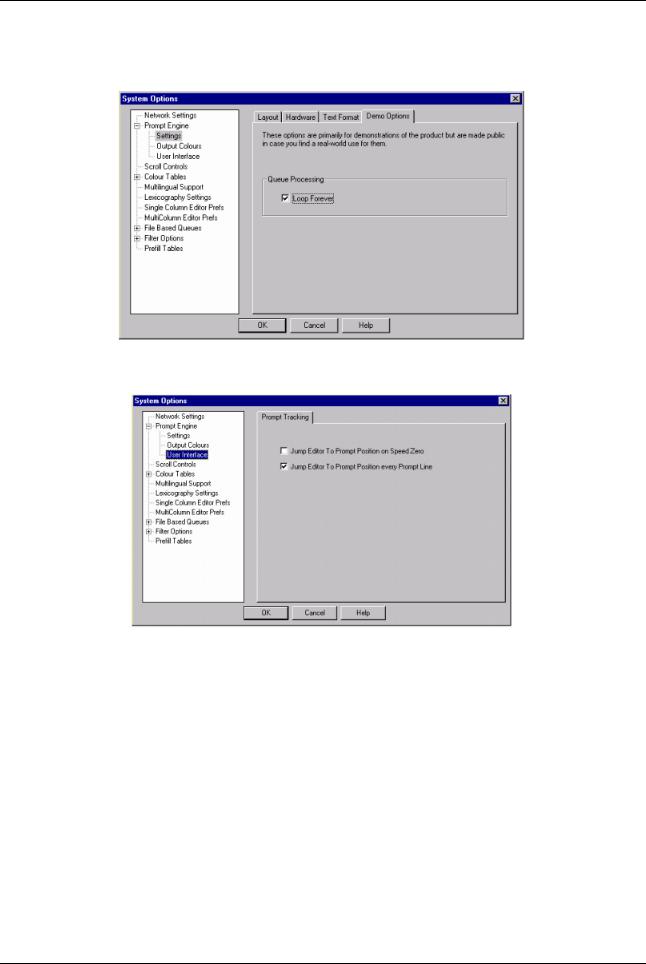
Here you can specify extra line spacing, an end of story gap and the font scale factor. Now click on the demo Options window tab.
Here you can select the loop forever option. When you are happy with these settings click on User Interface on the left to open the Prompt tracking window.
Here you can specify whether you want to jump the editor to prompt position on speed zero or every prompt line by clicking in the relevant checkbox. Click OK to complete the configuration process.
25 |
AUTOCUE LTD. 2002 |

WINCUE USER GUIDE |
CHAPTER 5 - WINCUE BASICS |
Chapter
5
How WinCue Works
This Chapter introduces WinCue and some of its basic features. It covers the use of the menu system and toolbar buttons to navigate around the system. It covers the layout of the screen and how the window panes can be arranged and configured to suit the user.
5Introducing WinCue
There are several ways to navigate around WinCue. You can use the mouse or keyboard to open menus and select options. There are toolbars with buttons that can be clicked with the mouse and there are keyboard shortcuts for most commands. Please note: Refer to Appendix D for a full list of all the toolbar buttons,
keyboard shortcuts and menu commands available.
5.1Using menus
Open menus on the menubar to select commands by clicking on them, and selecting the required option.
To close a menu without choosing a command, click outside the menu or press Escape.
26 |
AUTOCUE LTD. 2002 |

WINCUE USER GUIDE |
CHAPTER 5 - WINCUE BASICS |
5.2WinCue toolbars and tools
Toolbars provide quick access to commonly used commands and tools. When you first start WinCue and open a queue, the Standard and Formatting toolbars are displayed just below the menu bar. You can choose which toolbars you want to display.
A full list of all the toolbar buttons is in Appendix D.
Click buttons on the toolbars to choose commands. The toolbar is divided into separate toolbars, which are all visible here. Buttons that are lit are active; those greyed out are not available in the window you are currently in. You can hide or display individual toolbars by opening the Tools menu, selecting Toolbar and then the toolbar/s you wish to display or hide. Selected toolbars will have a check mark ( ).
5.2.1Standard Toolbar
Most of the buttons on this toolbar are active and available in all panes.
5.2.2Change Layout button
This button is active in all panes and allows you to change the layout displayed on the screen.
5.2.3Favourites button
This button allows you to add queues to a list of favourite queues.
5.2.4Formatting toolbar
This toolbar becomes active and is used in the Script Editor window, which we’ll learn about later.
5.2.5Splitter View toolbar
5.2.6Editor View toolbar
27 |
AUTOCUE LTD. 2002 |
WINCUE USER GUIDE |
CHAPTER 5 - WINCUE BASICS |
5.2.7Prompt toolbar and Prompt (Advanced) toolbar
We will learn more about the prompter toolbars and how to prompt scripts in WinCue later in Section 10.
5.2.8Status bar
This displays information about the language used, and whether you are in Overtype mode, denoted by OVR. On the left of the status bar you have a help description of the options on a menu when they are highlighted.
Toolbars provide quick access to commonly used commands and tools. To display or hide a toolbar, choose Toolbars from the Tools menu, select the toolbar you want to display or hide. The Toolbars selected will have a tick ( ) next to them on the menu.
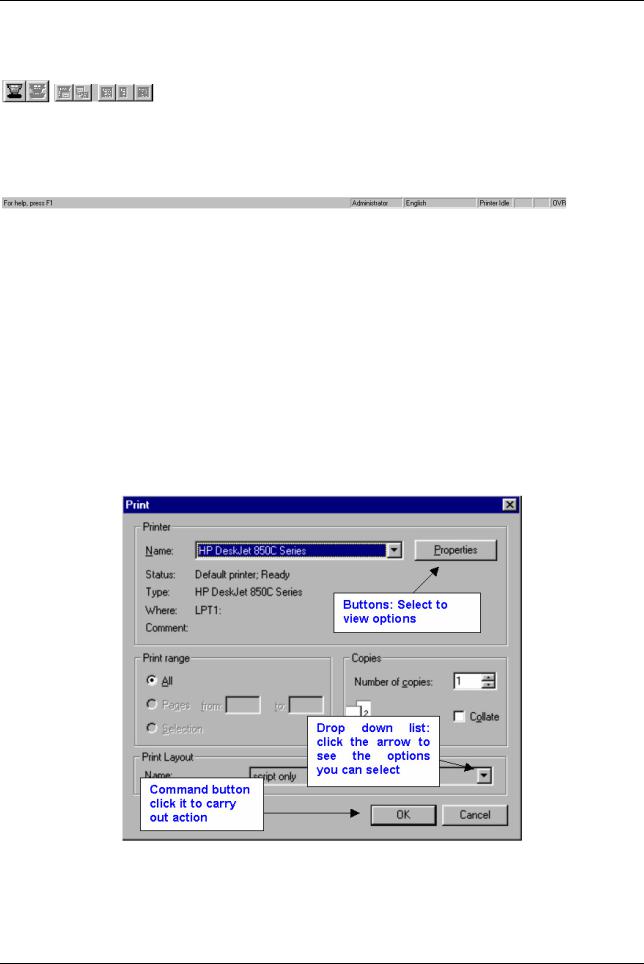
5.3Selecting options in a dialog box
When you choose a menu option that’s followed by three dots, a dialog box appears displaying options to be selected and buttons to click to display further options. Below is an example of the Print dialog box:
28 |
AUTOCUE LTD. 2002 |

WINCUE USER GUIDE |
CHAPTER 5 - WINCUE BASICS |
5.4Using Panes
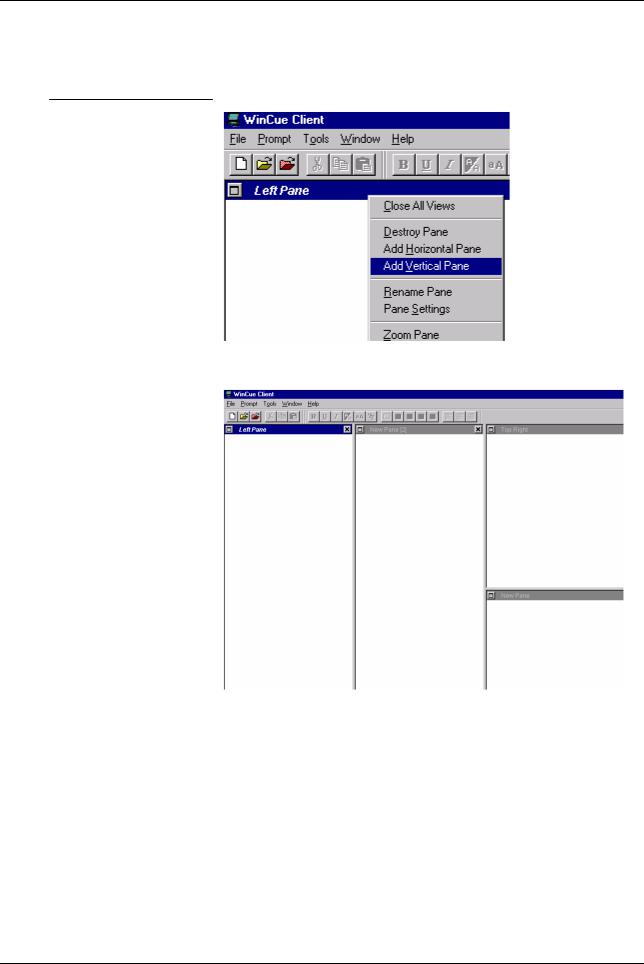
The first thing you’ll notice when you run WinCue is that the screen is divided up into window panes. These panes can be arranged and configured to suit your needs. Each pane is a separate window and you can have as many panes open on the screen as you like, and the user can change this. The active pane has a blue title bar.
5.4.1To add a horizontal pane
What you do |
|
Comments/Prompts |
Right-click in the title bar of the pane you wish to add a horizontal pane to and select Add Horizontal Pane from the pop-up menu.
This adds a horizontal pane to the window:
29 |
AUTOCUE LTD. 2002 |
WINCUE USER GUIDE |
CHAPTER 5 - WINCUE BASICS |
5.4.2To add a vertical pane
What you do |
Comments/Prompts |
|
|
Right-click in the title bar of the window you wish to add a vertical pane to and select Add Vertical Pane from the pop-up menu.
This adds a vertical pane to the window:
30 |
AUTOCUE LTD. 2002 |
 Loading...