

Page 1

Autocue House
WINCUE
WINCUE
WINCUEWINCUE
USER GUIDE
USER GUIDE
USER GUIDEUSER GUIDE
Unit 3 Puma Trade Park
145 Morden Road
Mitcham, Surrey
Tel: +44 (0) 208 665 2992
Fax: +44 (0) 208 687 4869
Email:
info@autocue.co.uk
www.autocue.com
CR4 4DG
Page 2

WINCUE USER GUIDE
Notice
Notice
NoticeNotice
DISCLAIMER
Autocue Ltd. reserves the right to revise this publication and to make
changes in it’s content without obligation of Autocue Ltd. to notify any person
or persons of such revision.
COPYRIGHT
Copyright 1996 - 2007 Autocue Ltd.
All rights reserved.
No part of this publication may be reproduced, stored in a retrieval system,
electronic or otherwise, or revealed to a third party, without prior permission
of Autocue Ltd.
WinCue system version 1.5
2 AUTOCUE LTD. 2002
Page 3

WINCUE USER GUIDE
This manual was updated by Heather Millar of
Autocue Group Ltd. on 21 May 2007
How to use this guide
This user guide provides detailed information on how to setup, configure and operate the WinCue software.
Audience
This guide is intended for use by operators and users whose familiarity with computers and software ranges
from novice to expert. It is also aimed at technical staff who would be responsible for installing, configuring
and supporting WinCue.
Structure of this guide
The user-guide is divided into Chapters, which help the reader to locate information about a particular aspect of the
system quickly and easily.
3 AUTOCUE LTD. 2002
Page 4

WINCUE USER GUIDE
Chapter 1 Installing the Hardware
This chapter covers the hardware
requirements and installation.
Chapter 2 Installing the Software This chapter covers the installation of the
software.
Chapter 3 Connecting the WinCue
peripherals
This chapter covers the connection of the
peripherals required for prompting.
Chapter 4 Configuring WinCue This chapter describes the configuration of
WinCue.
Chapter 5 Introducing WinCue This chapter introduces WinCue, describing
how to use the menu system and toolbars.
Also covers how the window panes can be
arranged and configured to suit the user.
Chapter 6 WinCue Basics This chapter covers how to Start WinCue and
how to create new multi-column rundown
files.
Chapter 7 The Script Editor This chapter covers how to create new
scripts and how to use the Script Editor.
Chapter 8 Presenter Settings and
Profiles
This chapter describes how to change the
default presenter settings, add new
presenters and modify their settings. Also
covers how presenter profiles can be used to
copy presenter settings to other rundowns.
Chapter 9 Working with Rundowns This chapter describes the features of a
multicolumn rundown, editing with the
rundown and modifying the columns in the
Script Editor.
Also covers working with multiple rundowns
and Window Settings.
Chapter 10 Prompting scripts in a
queue
Describes how to prompt scripts in rundowns,
configuring and using the scroll controllers
and the different prompting options available.
Chapter 11 Upgrading WinCue Describes the WinCue upgrade procedure.
4 AUTOCUE LTD. 2002
Page 5

WINCUE USER GUIDE TABLE OF CONTENTS
1 Installing the Hardware _______________________________________________9
1.1 Minimum Hardware Requirements_________________________________________ 9
1.2 The WinCue Package____________________________________________________ 9
1.3 Installing the SCSI card_________________________________________________ 10
1.4 The I.M.T. Scroll Card __________________________________________________ 10
1.5 Installing the I.M.T. Card ________________________________________________ 10
1.6 Laptops______________________________________________________________ 10
2 Installing the Software _______________________________________________11
2.1 Installing the Software on desktop PCs ___________________________________ 11
2.2 Installing the software on Laptops________________________________________ 15
3 Connecting the WinCue peripherals ____________________________________16
3.1 Desktop PCs__________________________________________________________ 16
3.1.1 Connecting a Scroll Control ___________________________________________________ 16
3.1.2 Connecting a Composite Video Feed ____________________________________________ 16
3.1.3 Connecting a Genlock Feed ___________________________________________________ 16
3.1.4 Connecting a Foot Control ____________________________________________________ 16
3.2 Laptops______________________________________________________________ 17
3.2.1 Connecting a Scroll Control ___________________________________________________ 17
3.2.2 Connecting a Composite Video Feed ____________________________________________ 18
3.2.3 Connecting a Genlock Feed ___________________________________________________ 18
3.2.4 Connecting a Power Supply ___________________________________________________ 18
4 Configuring WinCue _________________________________________________19
4.1 Starting WinCue prompter for the first time ________________________________ 19
4.2 Configuring the Scroll Controller_________________________________________ 19
4.2.1 Configuring the Controller Mode and Port ________________________________________ 20
4.2.2 Configuring the buttons_______________________________________________________ 20
4.2.3 The End Stop Table _________________________________________________________ 22
4.2.4 The Centre Stop Table _______________________________________________________ 22
4.3 Configuring the Prompt Engine __________________________________________ 23
5 Introducing WinCue _________________________________________________26
5.1 Using menus _________________________________________________________ 26
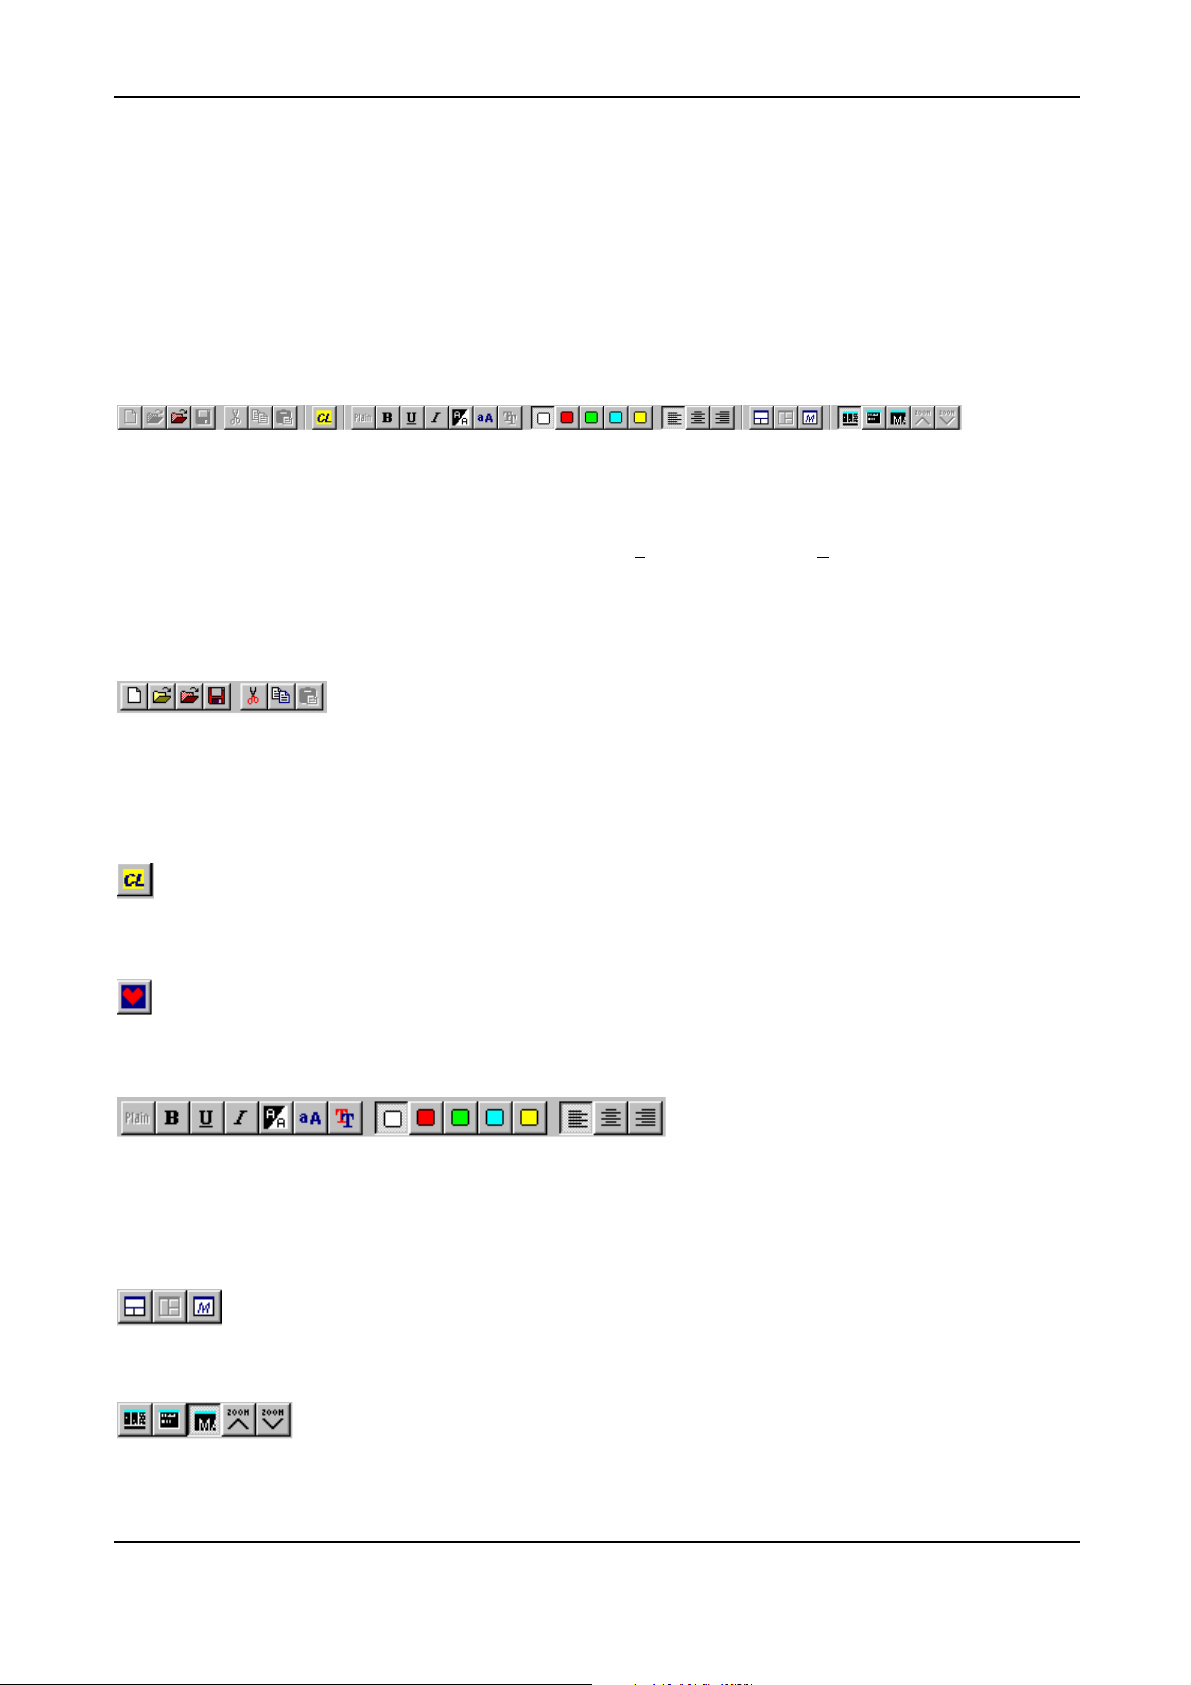
5.2 WinCue toolbars and tools ______________________________________________ 27
5.2.1 Standard Toolbar ___________________________________________________________ 27
5.2.2 Change Layout button________________________________________________________ 27
5.2.3 Favourites button ___________________________________________________________ 27
5.2.4 Formatting toolbar___________________________________________________________ 27
5.2.5 Splitter View toolbar _________________________________________________________ 27
5.2.6 Editor View toolbar __________________________________________________________ 27
5.2.7 Prompt toolbar and Prompt (Advanced) toolbar ____________________________________ 28
5.2.8 Status bar _________________________________________________________________ 28
5.3 Selecting options in a dialog box_________________________________________ 28
5.4 Using Panes __________________________________________________________ 29
5.4.1 To add a horizontal pane _____________________________________________________ 29
5 AUTOCUE LTD. 2002
Page 6

WINCUE USER GUIDE TABLE OF CONTENTS
5.4.2 To add a vertical pane _______________________________________________________ 30
5.4.3 To Zoom a pane ____________________________________________________________ 31
5.4.4 Removing panes ____________________________________________________________ 32
5.4.5 Resizing panes _____________________________________________________________ 32
5.4.6 Pane settings ______________________________________________________________ 33
5.4.7 Renaming panes____________________________________________________________ 34
5.4.8 Moving Panes ______________________________________________________________ 34
5.5 The Principles of Prompting_____________________________________________ 35
5.5.1 Prompters _________________________________________________________________ 35
5.5.2 The Script Editor ____________________________________________________________ 35
5.5.3 Rundowns _________________________________________________________________ 35
5.5.4 The Scroll Controller _________________________________________________________ 35
6 WinCue Basics _____________________________________________________36
6.1 Starting WinCue_______________________________________________________ 36
6.2 The WinCue main window_______________________________________________ 37
6.3 Creating a Multi-column Rundown________________________________________ 37
7 The Script Editor____________________________________________________39
7.1 Creating a new Script in the Rundown ____________________________________ 39
7.1.1 The Script Editor Window _____________________________________________________ 40
7.1.2 The Word Count (Link time) Box _______________________________________________ 42
7.1.3 The Script Duration Box ______________________________________________________ 42
7.1.4 Undo and Redo_____________________________________________________________ 42
7.2 Adding a Presenter Name to a Script______________________________________ 42
7.3 Adding Markers to a Script ______________________________________________ 44
7.4 Saving Your Work _____________________________________________________ 44
7.4.1 Saving a Script _____________________________________________________________ 44
7.4.2 Saving a Rundown __________________________________________________________ 45
7.5 Opening a previously saved rundown_____________________________________ 46
7.6 Changing the Script Characteristics ______________________________________ 47
7.6.1 Highlighting Text in the Editor __________________________________________________ 47
7.6.2 To change the font __________________________________________________________ 47
7.6.3 To change the style and colour of text ___________________________________________ 48
7.6.4 Justifying the Text ___________________________________________________________ 48
7.6.5 Changing the case __________________________________________________________ 48
7.6.6 To invert the background colour and the text ______________________________________ 49
7.6.7 Captions __________________________________________________________________ 49
7.6.8 Format All _________________________________________________________________ 49
7.6.9 Not Prompted Text __________________________________________________________ 49
7.6.10 Finding Words in a Script _____________________________________________________ 49
7.6.11 Replacing Words in a Script ___________________________________________________ 50
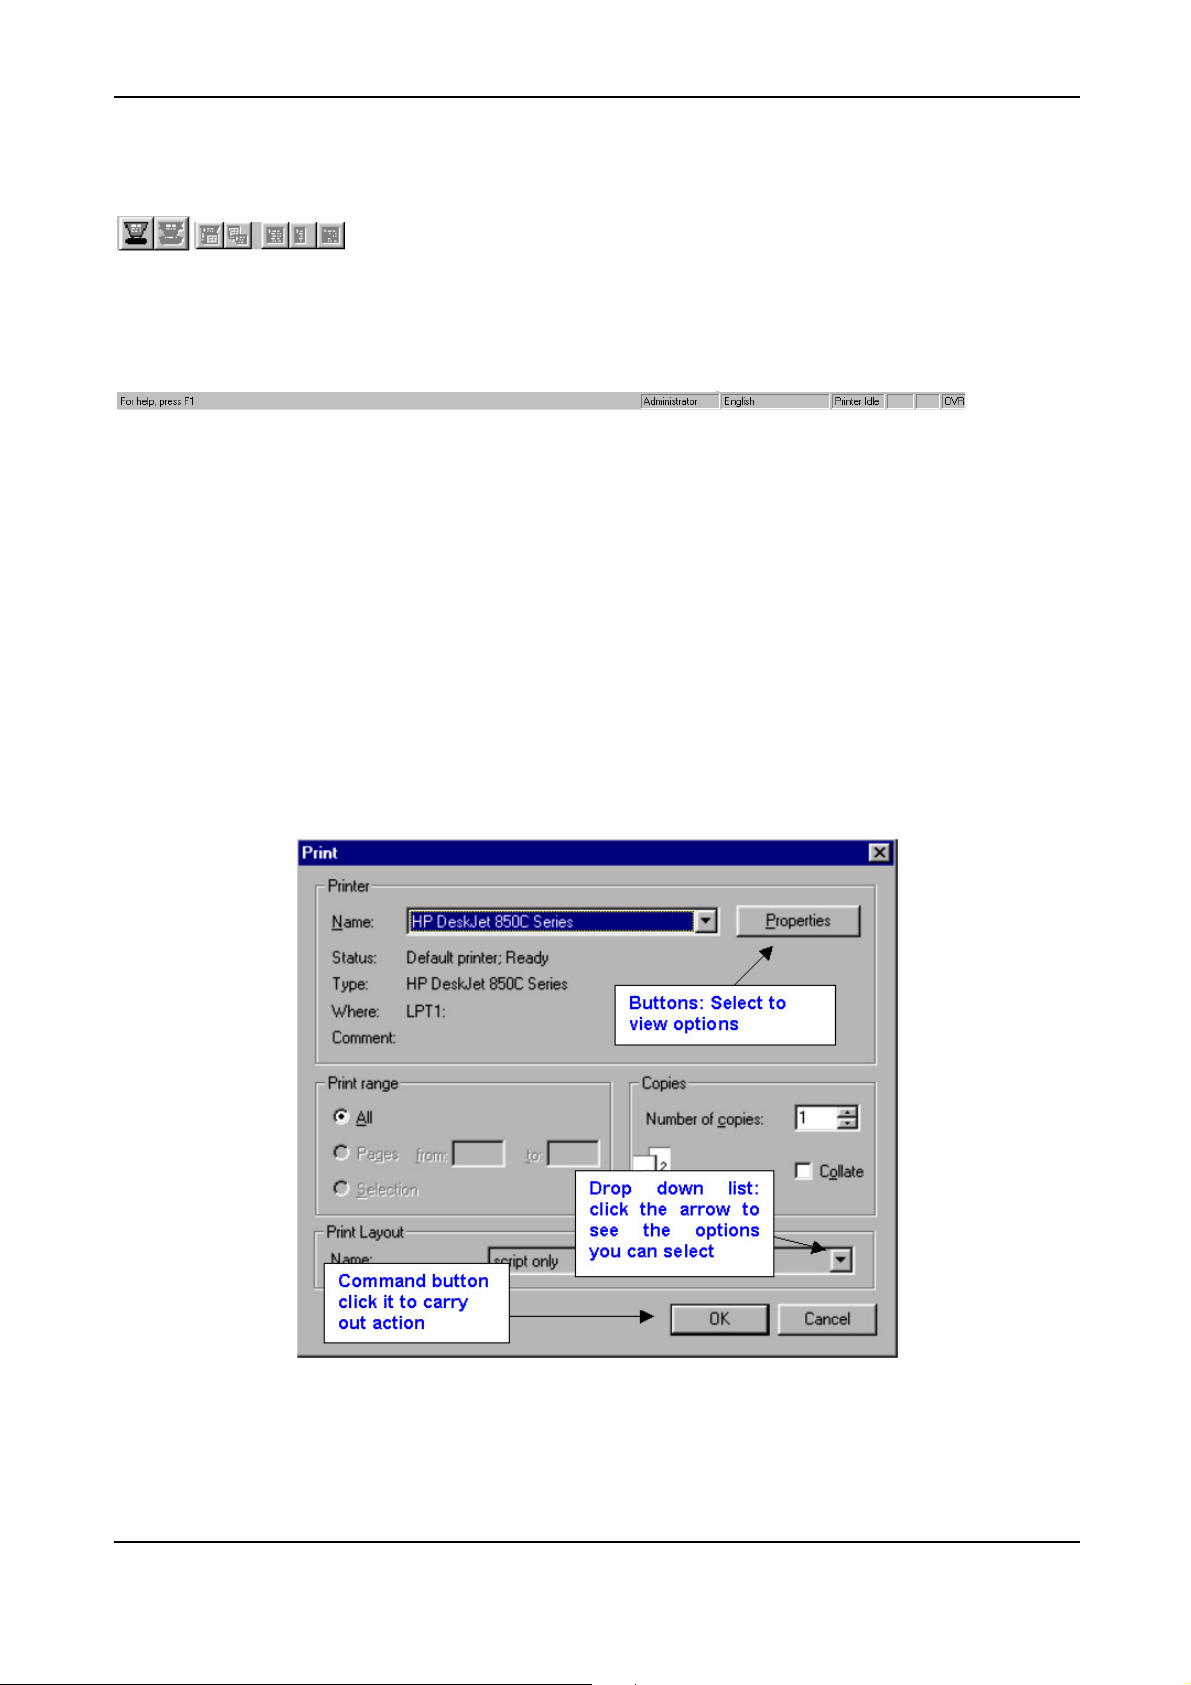
7.7 Printing ______________________________________________________________ 51
7.7.1 Printing Rundowns __________________________________________________________ 51
7.7.2 Printing the Show ___________________________________________________________ 51
8 Presenter Settings and Profiles________________________________________52
8.1 Changing the Default Presenter settings __________________________________ 52
8.1.1 Changing the Default Read Rate _______________________________________________ 52
8.2 Adding a New Presenter ________________________________________________ 55
6 AUTOCUE LTD. 2002
Page 7

WINCUE USER GUIDE TABLE OF CONTENTS
8.3 Changing a Presenter’s Settings _________________________________________ 56
8.4 Deleting a Presenter ___________________________________________________ 56
8.5 Presenter Profiles _____________________________________________________ 57
8.5.1 Saving Presenter Profiles _____________________________________________________ 57
8.5.2 Loading Presenter Profiles ____________________________________________________ 57
9 Working with Rundowns _____________________________________________58
9.1 The WinCue Rundown window___________________________________________ 58
9.1.1 Features of a WinCue Rundown________________________________________________ 59
9.2 Creating a New Rundown _______________________________________________ 59
9.2.1 Adding a New Story to the Rundown ____________________________________________ 59
9.2.2 Adding Break Scripts ________________________________________________________ 59
9.2.3 Saving Scripts and Rundowns _________________________________________________ 59
9.2.4 Moving Stories within the Running Order _________________________________________ 60
9.2.5 Renumbering Stories in the Rundown ___________________________________________ 60
9.3 Editing within the Rundown _____________________________________________ 60
9.3.1 Adding a new script__________________________________________________________ 60
9.3.2 Editing a Script _____________________________________________________________ 60
9.3.3 View Story_________________________________________________________________ 60
9.3.4 Importing files ______________________________________________________________ 61
9.3.5 Deleting Stories_____________________________________________________________ 62
9.3.6 Editing the fields of an item in the rundown _______________________________________ 63
9.3.7 Toggle Hold State ___________________________________________________________ 63
9.3.8 Move to Air Next ____________________________________________________________ 63
9.4 View Settings _________________________________________________________ 63
9.5 Modifying the Columns in the Script Editor ________________________________ 65
9.5.1 Modifying a Script Editor Column _______________________________________________ 65
9.6 Working with Multiple Rundowns ________________________________________ 66
9.6.1 Copying stories between rundowns_____________________________________________ 67
9.7 Window Settings ______________________________________________________ 67
10 Prompting scripts in a queue ________________________________________69
10.1
Opening a Queue
10.2 To start prompting ___________________________________________________ 69
10.3 Scroll Controllers ____________________________________________________ 70
10.3.1 Hybrid multi-button scroll controller _____________________________________________ 70
10.3.2 2-button Hand Scroll Control __________________________________________________ 70
10.4 Prompting options ___________________________________________________ 71
10.4.1 Prompting with the Script Column displayed ______________________________________ 73
10.5 To quit prompting____________________________________________________ 73
_______________________________________________________ 69
11 Upgrading WinCue_________________________________________________74
Appendix A - WinCue Installation Help_____________________________________77
WinCue IMT cards and SCSI cards ____________________________________________ 77
Laptop systems (SlimSCSI 1460d) _____________________________________________________ 77
Desktop systems (2906) _____________________________________________________________ 77
SCSI Cards ________________________________________________________________ 79
7 AUTOCUE LTD. 2002
Page 8

WINCUE USER GUIDE TABLE OF CONTENTS
Appendix B The I.M.T. Card ______________________________________________80
Contents _________________________________________________________________________ 80
Appendix C Wiring Diagrams ____________________________________________88
Appendix D WinCue Tool Buttons and Keyboard Shortcuts ___________________94
Rundowns: Tools and Shortcuts ____________________________________________ 94
Panes ___________________________________________________________________________ 94
On Highlighted items in Rundown ______________________________________________________ 95
Script Editor: Tools and Shortcuts ____________________________________________ 96
Appendix E Wiring____________________________________________________98
E1 WinCue Multibutton Hand Control ________________________________________ 98
E1.1 WinCue IMT card 9 way d connections __________________________________________ 98
E1.2 9 way d Serial port connections ________________________________________________ 98
E1.3 P4 Multibutton Remote Connector 15 Pin D Male __________________________________ 98
E2 2 button Serial Hand Control ____________________________________________ 98
E2.1 9 way d Serial port connections ________________________________________________ 98
E3 2 button IMT Hand Control ______________________________________________ 98
E3.1 IMT Hand control ___________________________________________________________ 98
Technical Support ____________________________________________________100
8 AUTOCUE LTD. 2002
Page 9

WINCUE USER GUIDE CHAPTER 1 – INSTALLATION OF HARDWARE
1
Chapter
Installing the Hardware
This chapter covers the minimum requirements with the recommended specifications and the
installation of the hardware required to run the WinCue software.
1 Installing the Hardware
1.1 Minimum Hardware Requirements
The WinCue prompter will run either on the Windows 2000 or Windows XP Professional operating systems,
Windows XP Home or Windows ME are not supported. The minimum hardware requirements and recommended
specification for your prompter is as follows. Please note that you will require a SCSI card of the type specified
below:
Windows 2000/XP Pro
Pentium II 350 MHz processor (True Pentium chipset is required)
128MB RAM
50Mb free disk space
Adaptec SCSI card 2906 for desktop, Adaptec 1460 SlimSCSI PCMCIA
for laptop
PCI bus or VL bus graphics card (PCI preferred)
800x600 256 Colour VGA display (1024x768 is recommended)
1.2 The WinCue Package
The WinCue package consists of:
Laptop users will receive an
I.M.T. box, not the I.M.T.
scroll card
9 AUTOCUE LTD. 2002
WinCue Software (1 CD)
License (1 diskette)
I.M.T. Scroll Card
Scroll Control
User Manual
Page 10

WINCUE USER GUIDE CHAPTER 1 – INSTALLATION OF HARDWARE
1.3 Installing the SCSI card
Before you install the WinCue prompter software you need to install and configure the SCSI card in accordance
with the documentation supplied with it. Information on the issues involved with setting up SCSI cards and how to
get round problems can be found in Appendix A of this guide.
1.4 The I.M.T. Scroll Card
The I.M.T. scroll card allows WinCue to prompt text in any language. Data from the scroll card is sent to the
prompter screen via the on-board composite video channel. The I.M.T. card also features an on-board genlock
port. In addition, an I.M.T. scroll control can be attached to the I.M.T. card leaving all the ports on your PC free for
other peripherals.
1.5 Installing the I.M.T. Card
The I.M.T. card will have been configured prior to dispatch for the settings required in your country. Therefore
changes to jumpers or dipswitch settings should not be necessary.
Remove the cover from the PC’s case and find a free full length ISA slot. Remove the appropriate blanking plate
and carefully insert the I.M.T. card.
Connect the SCSI cable to the I.M.T. card and replace the PC’s cover.
Please refer to Appendix A for more details of the I.M.T. card.
1.6 Laptops
Insert the PCMCIA SCSI card in the designated slot in the laptop. Start the laptop and the card should be detected
when you boot up. Install the relevant drivers for the SCSI card.
Refer to Appendix A for help in setting up your PCMCIA SCSI card.
10 AUTOCUE LTD. 2002
Page 11
WINCUE USER GUIDE CHAPTER 2 – INSTALLATION OF SOFTWARE
2
Chapter
Installing the Software
This chapter covers the installation of the WinCue software.
2 Installing the Software
2.1 Installing the Software on desktop PCs
Close all programs running on your computer and insert the CD in the CDROM drive.
The Autorun program should load:
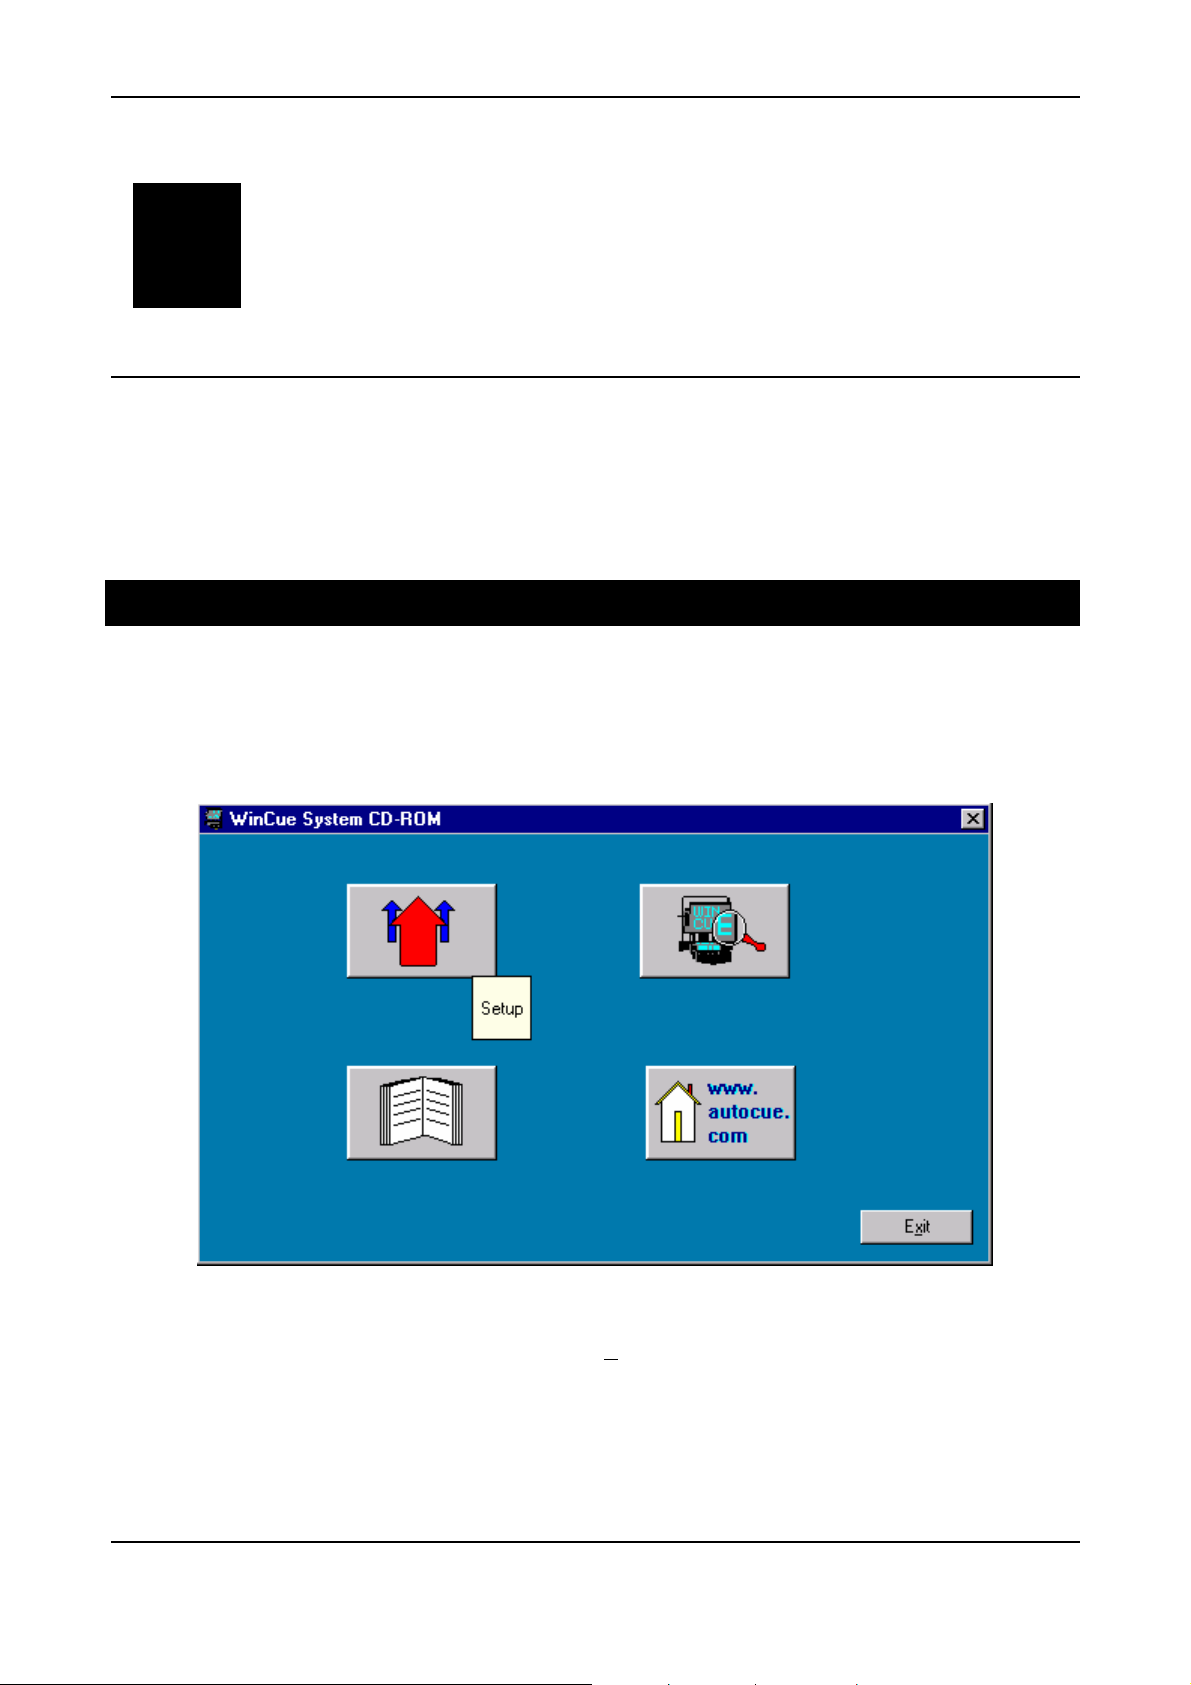
Click the Setup button at the top left of the window.
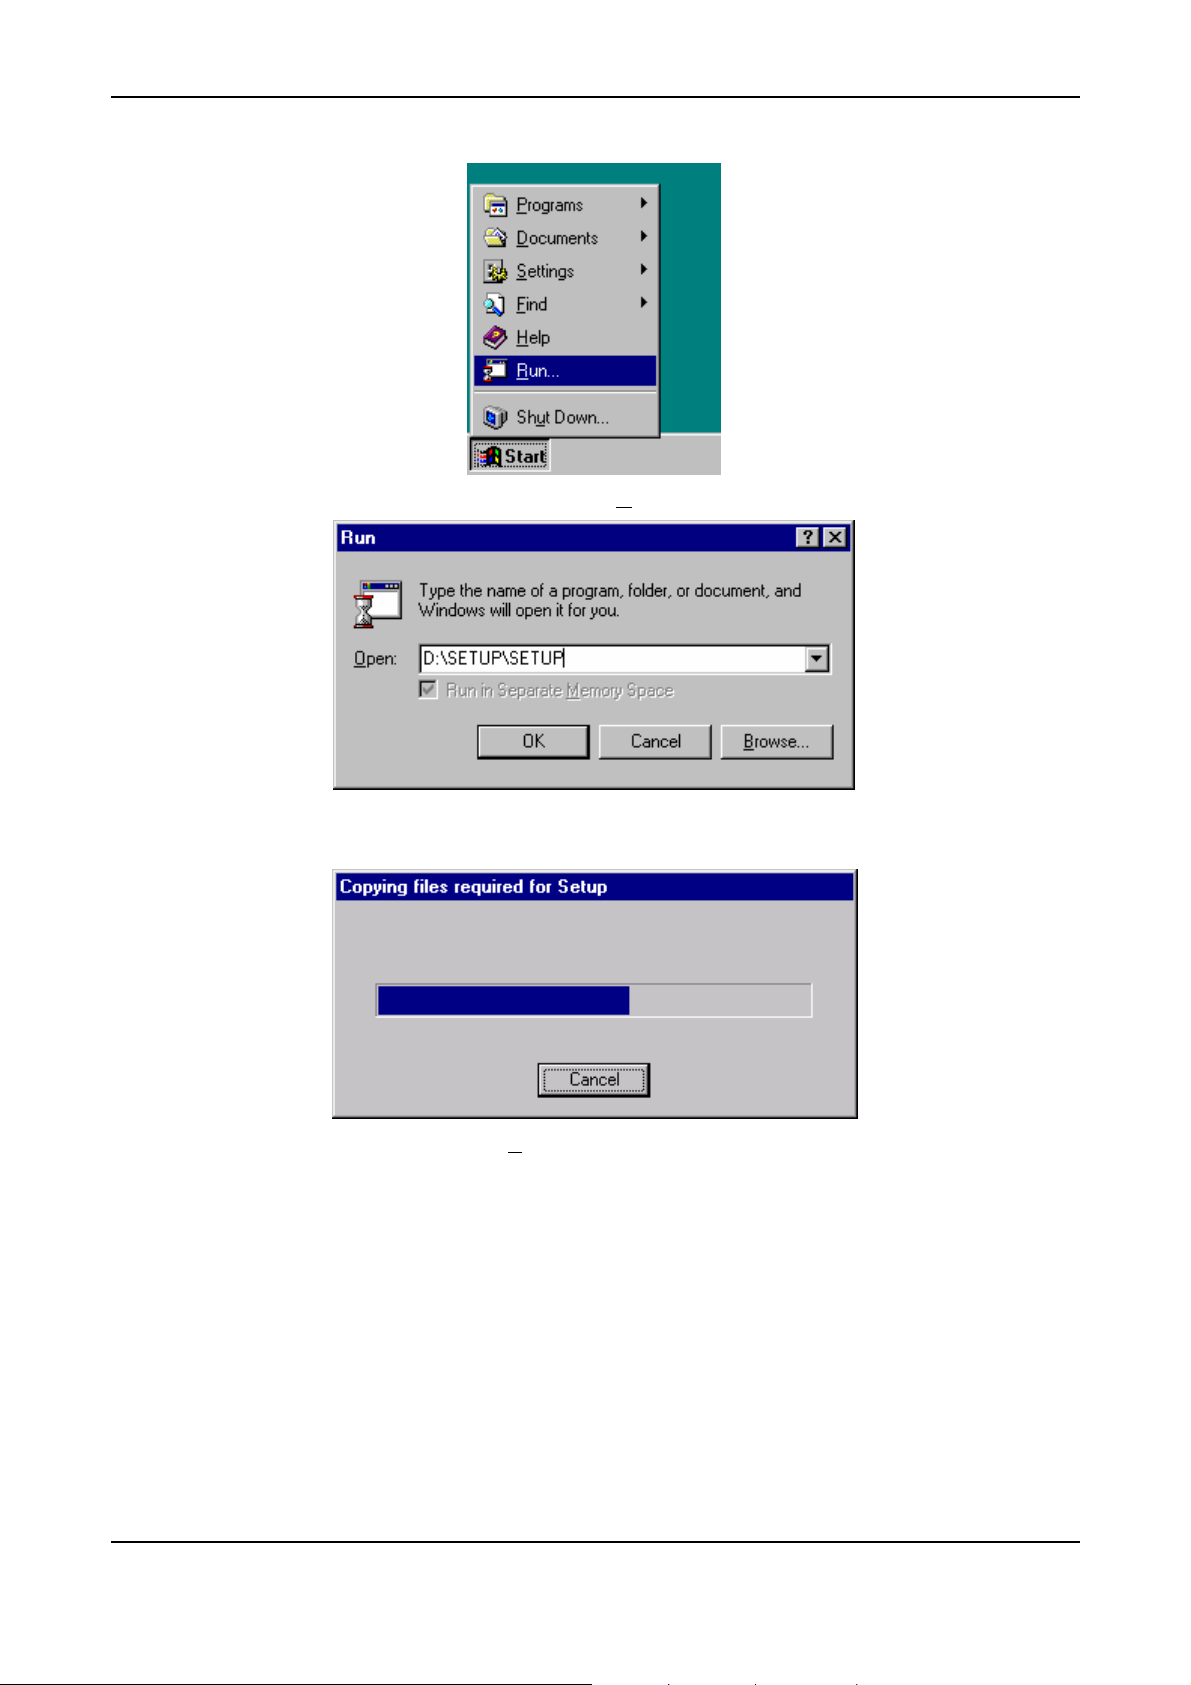
If Autorun does not run automatically click Start and select Run…
11 AUTOCUE LTD. 2002
Page 12
WINCUE USER GUIDE CHAPTER 2 – INSTALLATION OF SOFTWARE
And in the Run dialog box type D:\SETUP\SETUP in the Open: text box then click on OK.
The installation program will load:
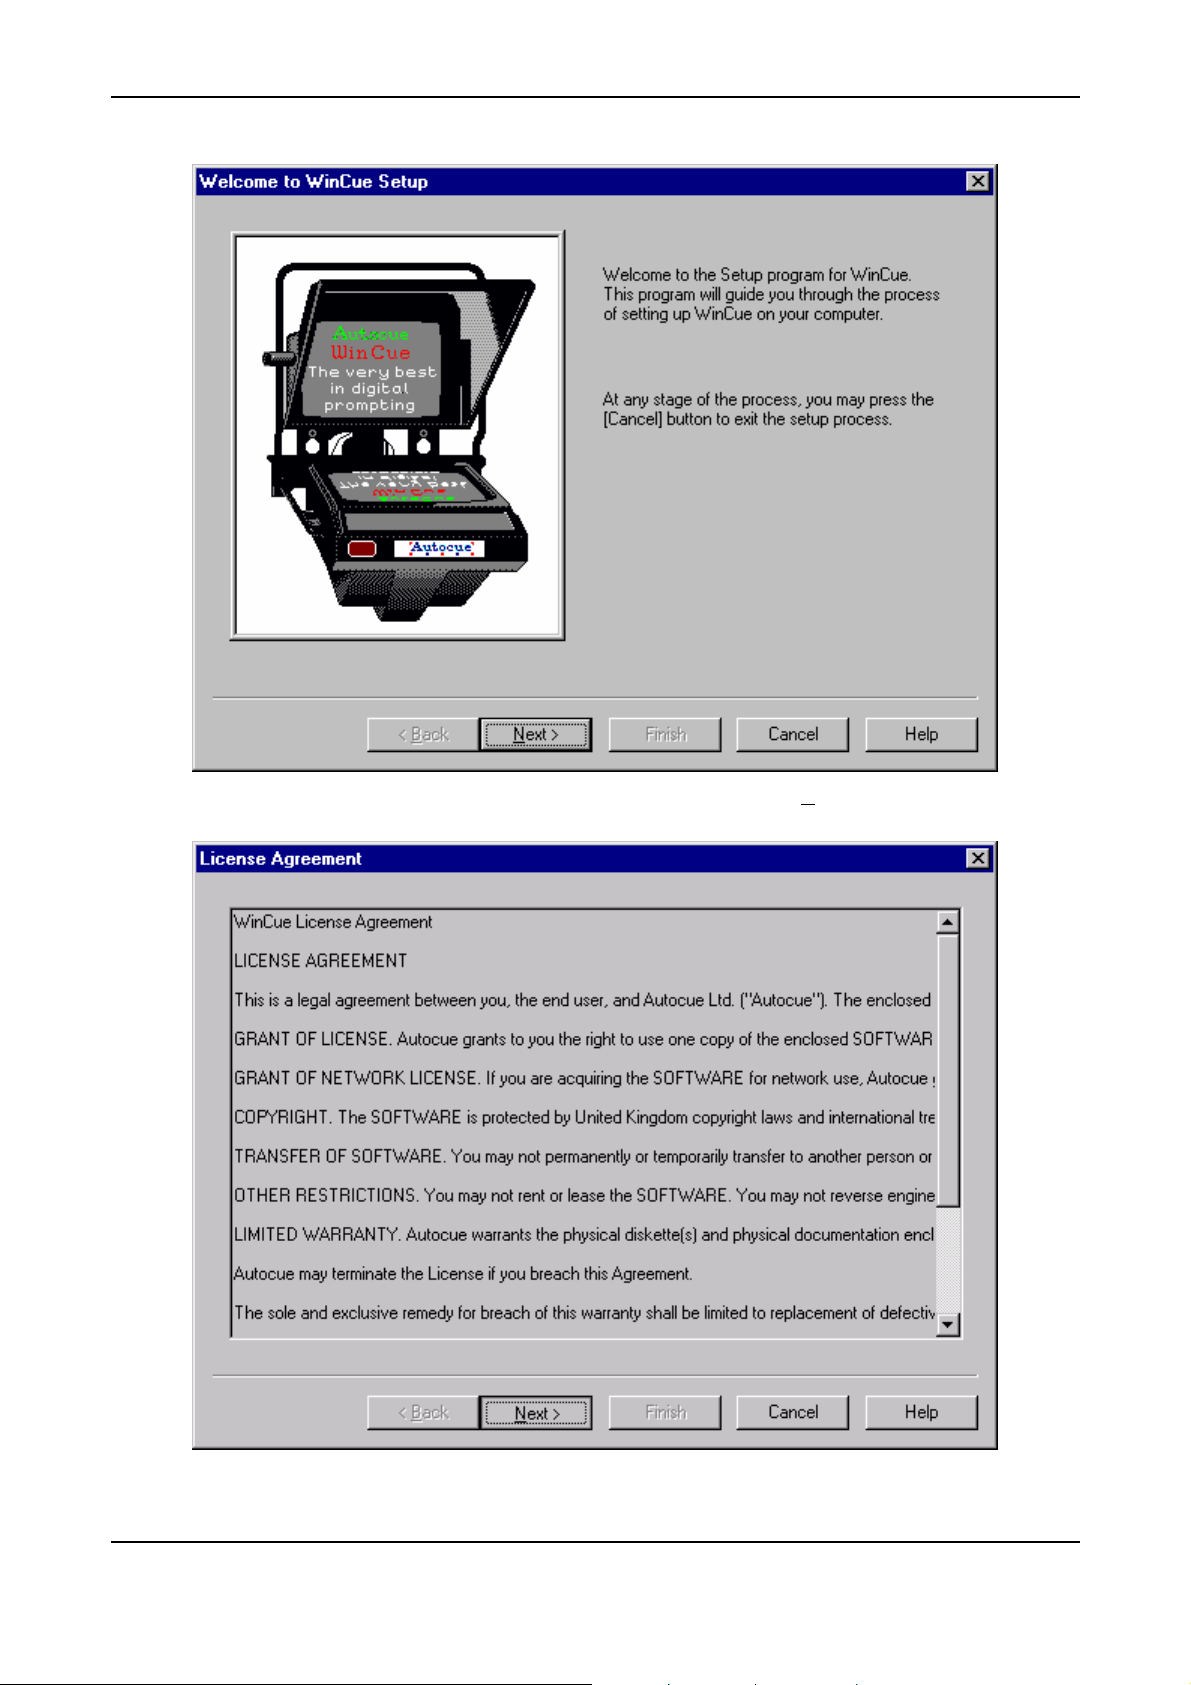
When the WinCue Setup banner appears click Next >
12 AUTOCUE LTD. 2002
Page 13
WINCUE USER GUIDE CHAPTER 2 – INSTALLATION OF SOFTWARE
You will then be asked for the license diskette. Insert the license diskette and click Next > to accept:
13 AUTOCUE LTD. 2002
Page 14

WINCUE USER GUIDE CHAPTER 2 – INSTALLATION OF SOFTWARE
Warning!
The licence disk included with each copy of WinCue
is designed to work with the supplied I.M.T. scroll
card. It will not work with any other I.M.T. card.
You will then see the WinCue Install dialog box appear.
Click on the Client button. The files will install with a progress dialog box.
When the installation is done it will go back to the WinCue Install window. Click on the Exit button to return to
Windows.
14 AUTOCUE LTD. 2002
Page 15

WINCUE USER GUIDE CHAPTER 2 – INSTALLATION OF SOFTWARE
2.2 Installing the software on Laptops
Follow the Installation process on the laptop as above. After WinCue has been installed shutdown and leave
switched off until you have connected the prompting peripherals.
15 AUTOCUE LTD. 2002
Page 16

WINCUE USER GUIDE CHAPTER 3 – CONNECTING WINCUE PERIPHERALS
3
Chapter
Connecting the WinCue peripherals
This chapter covers the connection of the peripherals required to prompt with WinCue.
3 Connecting the WinCue peripherals
3.1 Desktop PCs
3.1.1 Connecting a Scroll Control
The standard scroll control used with WinCue is the I.M.T. scroll control. The I.M.T. scroll control port is the 9 pin
analogue port on the back of the I.M.T. card. WinCue expects the scroll control to be connected to this port. The
I.M.T. scroll control will not work if it is attached to any other port on your PC.
3.1.2 Connecting a Composite Video Feed
The composite video port is the BNC port furthest the scroll control port on the I.M.T. card. This port supplies the
composite video feed to the prompter screen(s).
3.1.3 Connecting a Genlock Feed
The genlock port is the BNC port nearest from the scroll control port on the I.M.T. card. This port accepts a genlock
feed.
3.1.4 Connecting a Foot Control
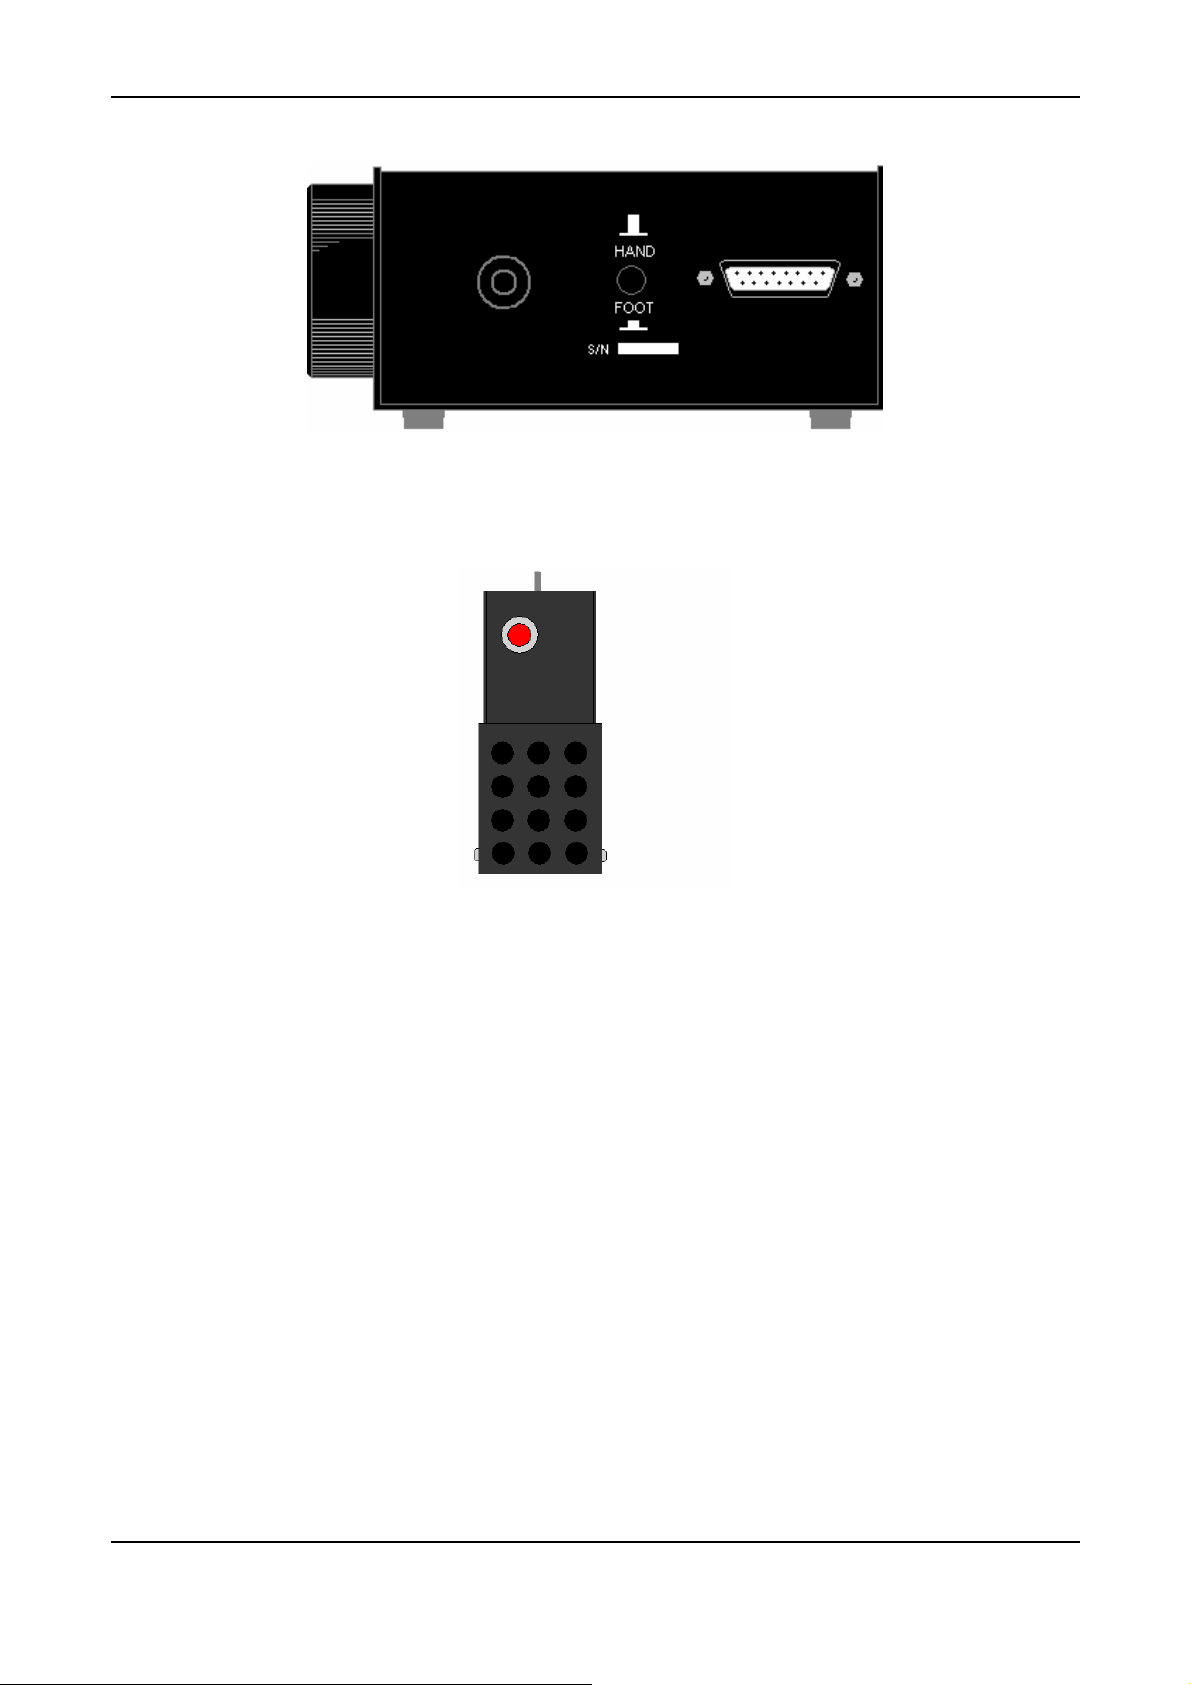
At the rear of the Multi-button scroll control is a 15 pin D connector for attaching a foot scroll control and a button to
select between foot and hand control operation. When this button is pressed in the foot scroll control can be used
to prompt the text. Otherwise the Multi-button scroll control is used.
16 AUTOCUE LTD. 2002
Page 17
WINCUE USER GUIDE CHAPTER 3 – CONNECTING WINCUE PERIPHERALS
The foot control can also
The rear of the
Multibutton Scroll
Controller
The foot scroll control is used for controlling the speed and direction of the prompted text only. All other functions
such as next marker and reset rundown are available by using the buttons of the Multibutton scroll controller.
be connected direct to
the IMT 9 pin connector
for stand alone use
The red button is used for changing the direction of the prompted text. The foot pedal controls the speed.
3.2 Laptops
When the software has been installed and the PC turned off the laptop can be connected to the I.M.T. box.
Insert the PCMCIA SCSI card into your laptop
Connect one end of the SCSI cable supplied with the SCSI card to the PCMCIA card and the other to the SCSI
port on the I.M.T. box
Connect a power cord to the appropriate input of the I.M.T. box (you have a choice of IEC mains or 12V DC)
3.2.1 Connecting a Scroll Control
Laptops normally use the I.M.T. scroll control. The I.M.T. scroll control port is the 9 pin analogue port on top of the
I.M.T. box. WinCue expects a scroll control to be connected to this port.
17 AUTOCUE LTD. 2002
Page 18

WINCUE USER GUIDE CHAPTER 3 – CONNECTING WINCUE PERIPHERALS
The I.M.T. scroll control will not work if it is attached to any other port on your PC.
3.2.2 Connecting a Composite Video Feed
The I.M.T. box is made in two versions, one has four BNC composite outputs and the other has one. These ports
supply the composite video feed to the prompter screen(s). You can connect your video cable to the BNC output.
See Appendix C3 & C4 for further details.
3.2.3 Connecting a Genlock Feed
The genlock port is the BNC port next to the I.M.T. scroll control port on the I.M.T. box. This port accepts a genlock
feed.
3.2.4 Connecting a Power Supply
The I.M.T. box can be powered from one of three different sources the mains power supply, 12V DC and an
optional PAG battery (UK version only). A reset button is provided on the I.M.T. box to reset the I.M.T. scroll card.
18 AUTOCUE LTD. 2002
Page 19

WINCUE USER GUIDE CHAPTER 4 – CONFIGURING WINCUE
4
Chapter
Configuring WinCue
This chapter covers the configuration of WinCue for prompt operation.
4 Configuring WinCue
4.1 Starting WinCue prompter for the first time
Note: users of laptops must switch on the I.M.T. box before switching on the laptop to ensure the PCMCIA
SCSI card successfully detects the I.M.T. scroll card.
Run WinCue by double-clicking on the WinCue icon:
4.2 Configuring the Scroll Controller
Open the Tools menu and select Options. Click on Scroll Controls to open the Configure Scroll Controls window on
the right and click on Add.
19 AUTOCUE LTD. 2002
Page 20

WINCUE USER GUIDE CHAPTER 4 – CONFIGURING WINCUE
Enter a name for the new device and click the down arrow to select the type from the drop down list. For the multi-
button scroll controller select Hybrid Multibutton.
Click OK and you will see the new device listed. Select it by clicking on it and click the Setup button.
4.2.1 Configuring the Controller Mode and Port
Select the serial port you are using by clicking on the down arrow and selecting from the drop down menu.
If the operator wants the prompted text to stop scrolling when the marker on the scroll knob is centred and does not
want to use the forward reverse button to change the direction of the prompted text then you can set the Controller
mode to Centre Stop by clicking on the radio button next to the option.
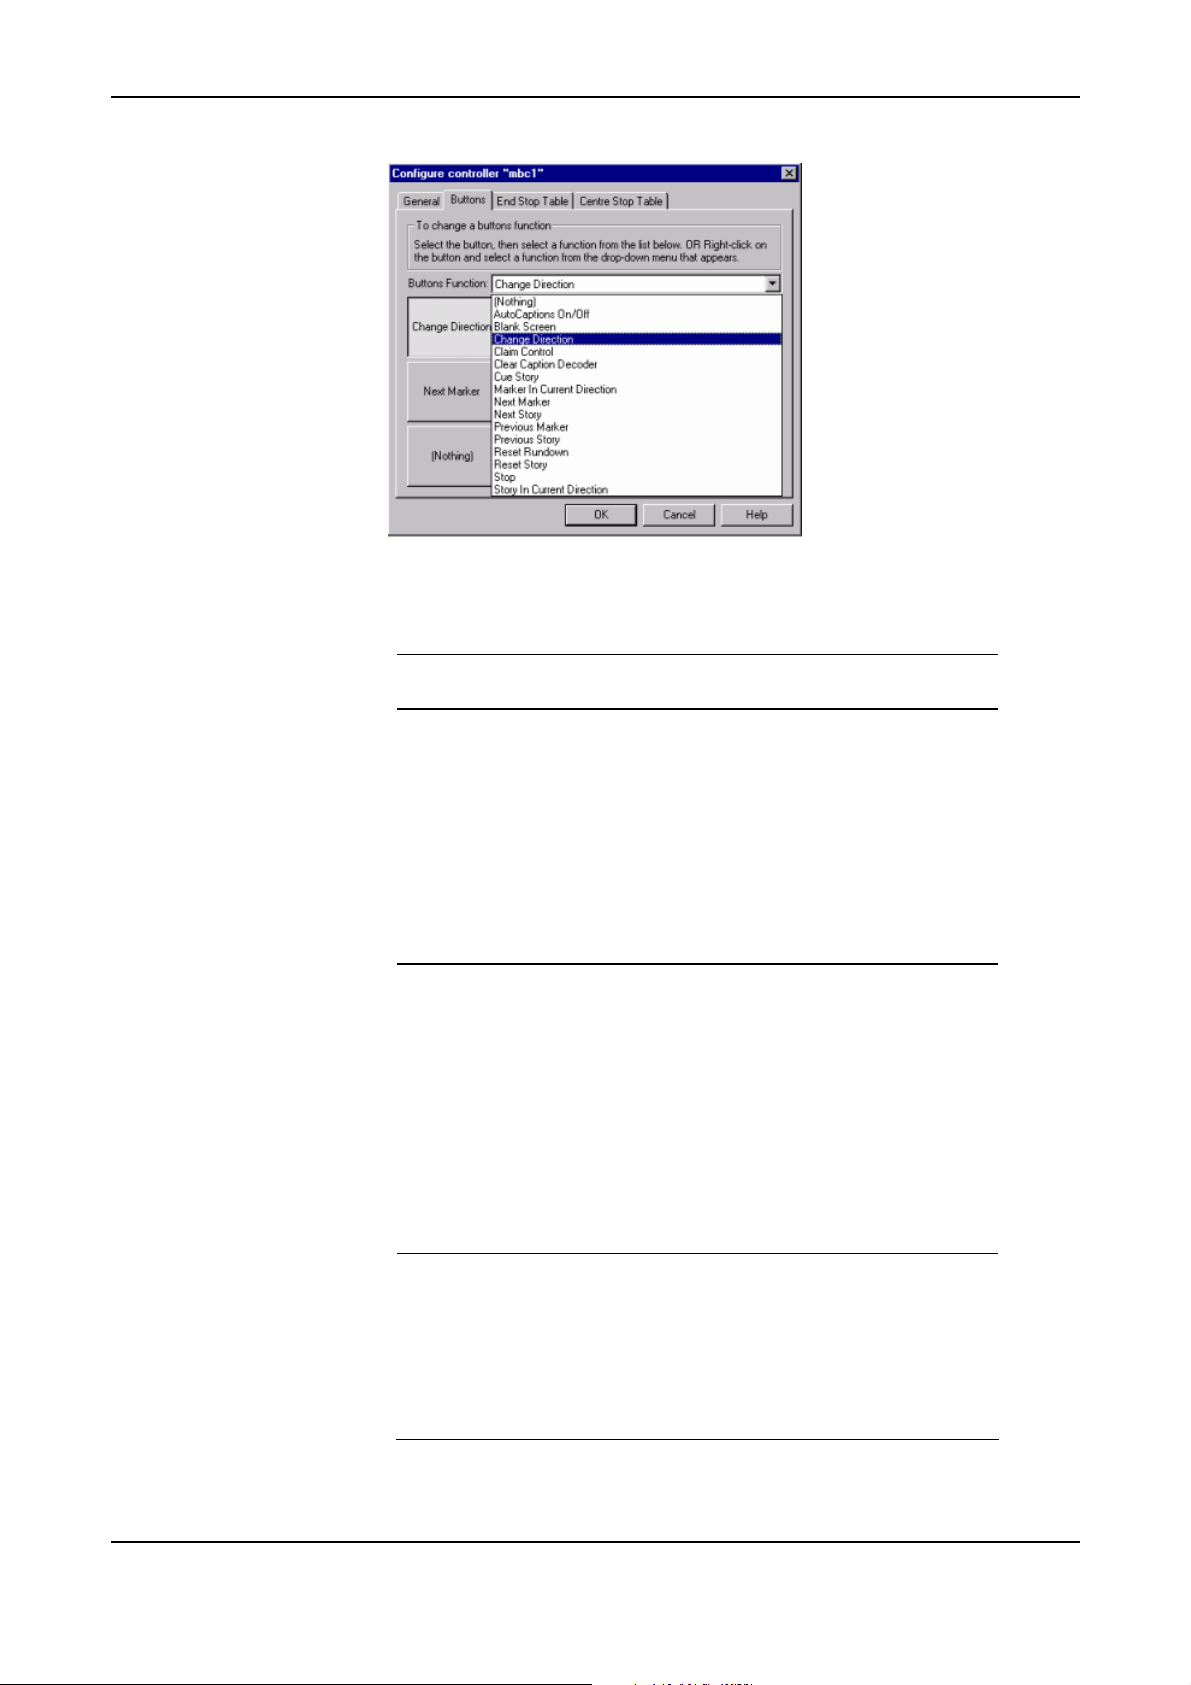
4.2.2 Configuring the buttons
Click on the Buttons tab. Click on the button you wish to configure. Click the down arrow and select the
required button from the drop down list.
20 AUTOCUE LTD. 2002
Page 21
WINCUE USER GUIDE CHAPTER 4 – CONFIGURING WINCUE
Configure all the buttons in this way by referring to the table below.
Function Description
Top Row of Buttons
Middle Row of Buttons
Bottom Row of Buttons
Change Direction
Next Story
Previous Story
Reset Story
Next Marker
Previous Marker
Reset Rundown
Blank Screen
Caption On/Off
Changes the direction the text is scrolled
Moves the prompter to the next story in
the rundown
Moves the prompter to the previous story
in the rundown
Moves the prompter to the beginning of
the story currently being prompted
Moves the prompter to the next marker
in the story
Moves the prompter to the previous
marker in the story
Resets the prompter the top of the
rundown
Blanks the prompted text from the
prompter(s) on the on-camera unit(s)
Switches caption data sent by WinCue
on and off
Clear Decoder
Clear the caption output
Stop Stop the prompted text scrolling
21 AUTOCUE LTD. 2002
Page 22

WINCUE USER GUIDE CHAPTER 4 – CONFIGURING WINCUE
The blank button is usually configured as the Cue Story button which ensures the cue marker is at the end of the
previous prompted story and not inside the next prompted story. This is so that if the next item is dropped the cue
marker remains at the correct position in the rundown waiting to cue the actual next story.
4.2.3 The End Stop Table
Now click on the End Stop Table window tab. Here you can change the scroll rate. The default incrementation
factor settings are usually set for normal operation.
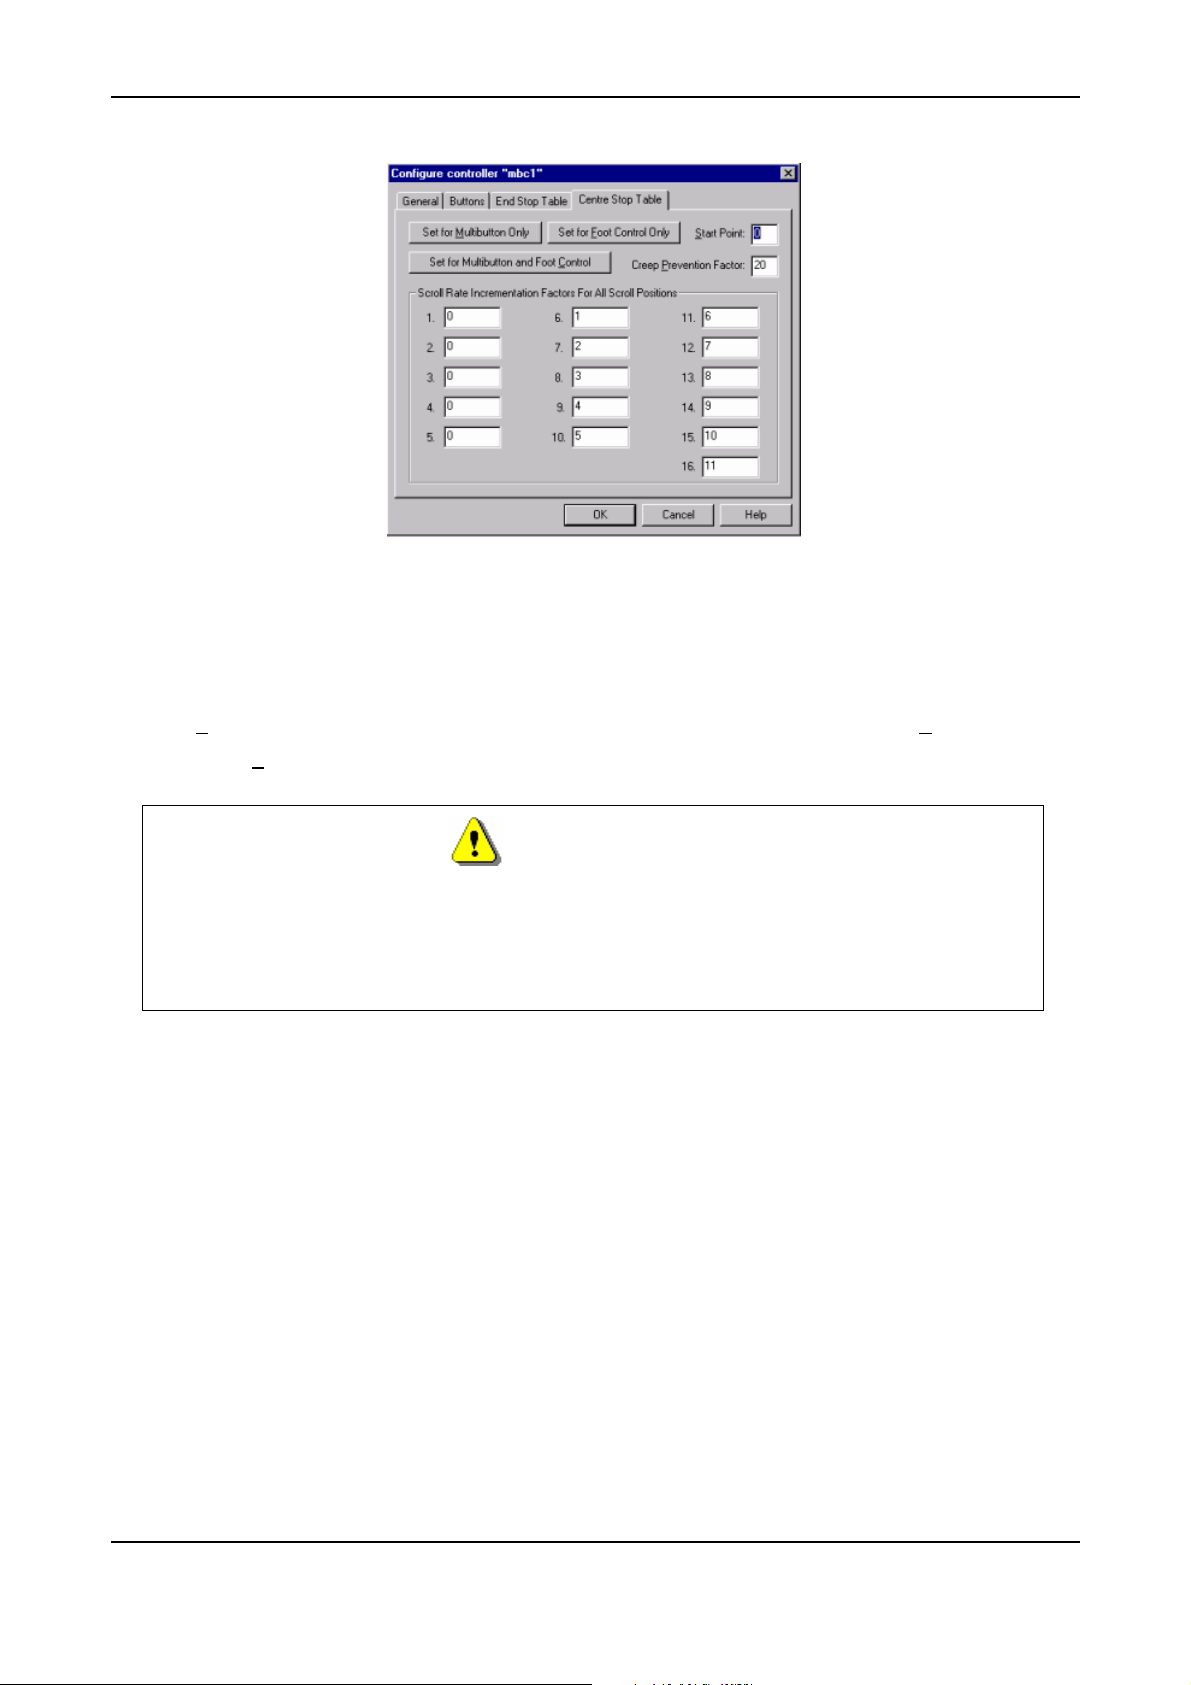
4.2.4 The Centre Stop Table
If you have your controller mode set to Centre Stop mode then you can change the settings by clicking on the
Centre Stop Table tab.
22 AUTOCUE LTD. 2002
Page 23
WINCUE USER GUIDE CHAPTER 4 – CONFIGURING WINCUE
The simple serial scroll control sends serial data in the range 0 to 120 to tell WinCue how fast to prompt the text; 0
is stop and 120 is the fastest scroll rate. This scroll rate is determined by the position of the scroll control knob. If the
Stop Point is set to 60, scroll rates of less than 60 will prompt the text backwards, scroll rates greater that over 60
will prompt the text forward, and a scroll rate of exactly 60 will stop the text from scrolling.
The Stop Zone is a range between 0 and 40 over which the prompted text does not scroll. If the Stop Point is set to
60 and the Stop Zone is set to 5, scroll rates between 55 and 65 will mean the prompted text is not scrolled.
Warning!
Administrators should not attempt to modify either the Configure IMT End Stop Scroll Table or
Configure IMT Centre Stop Scroll Table. If modifications are required to either scroll table you
should contact your vendor.
Click OK when you are happy with your settings. This will take you back to the Configure Scroll Controls window.
Now you need to configure the prompt engine.
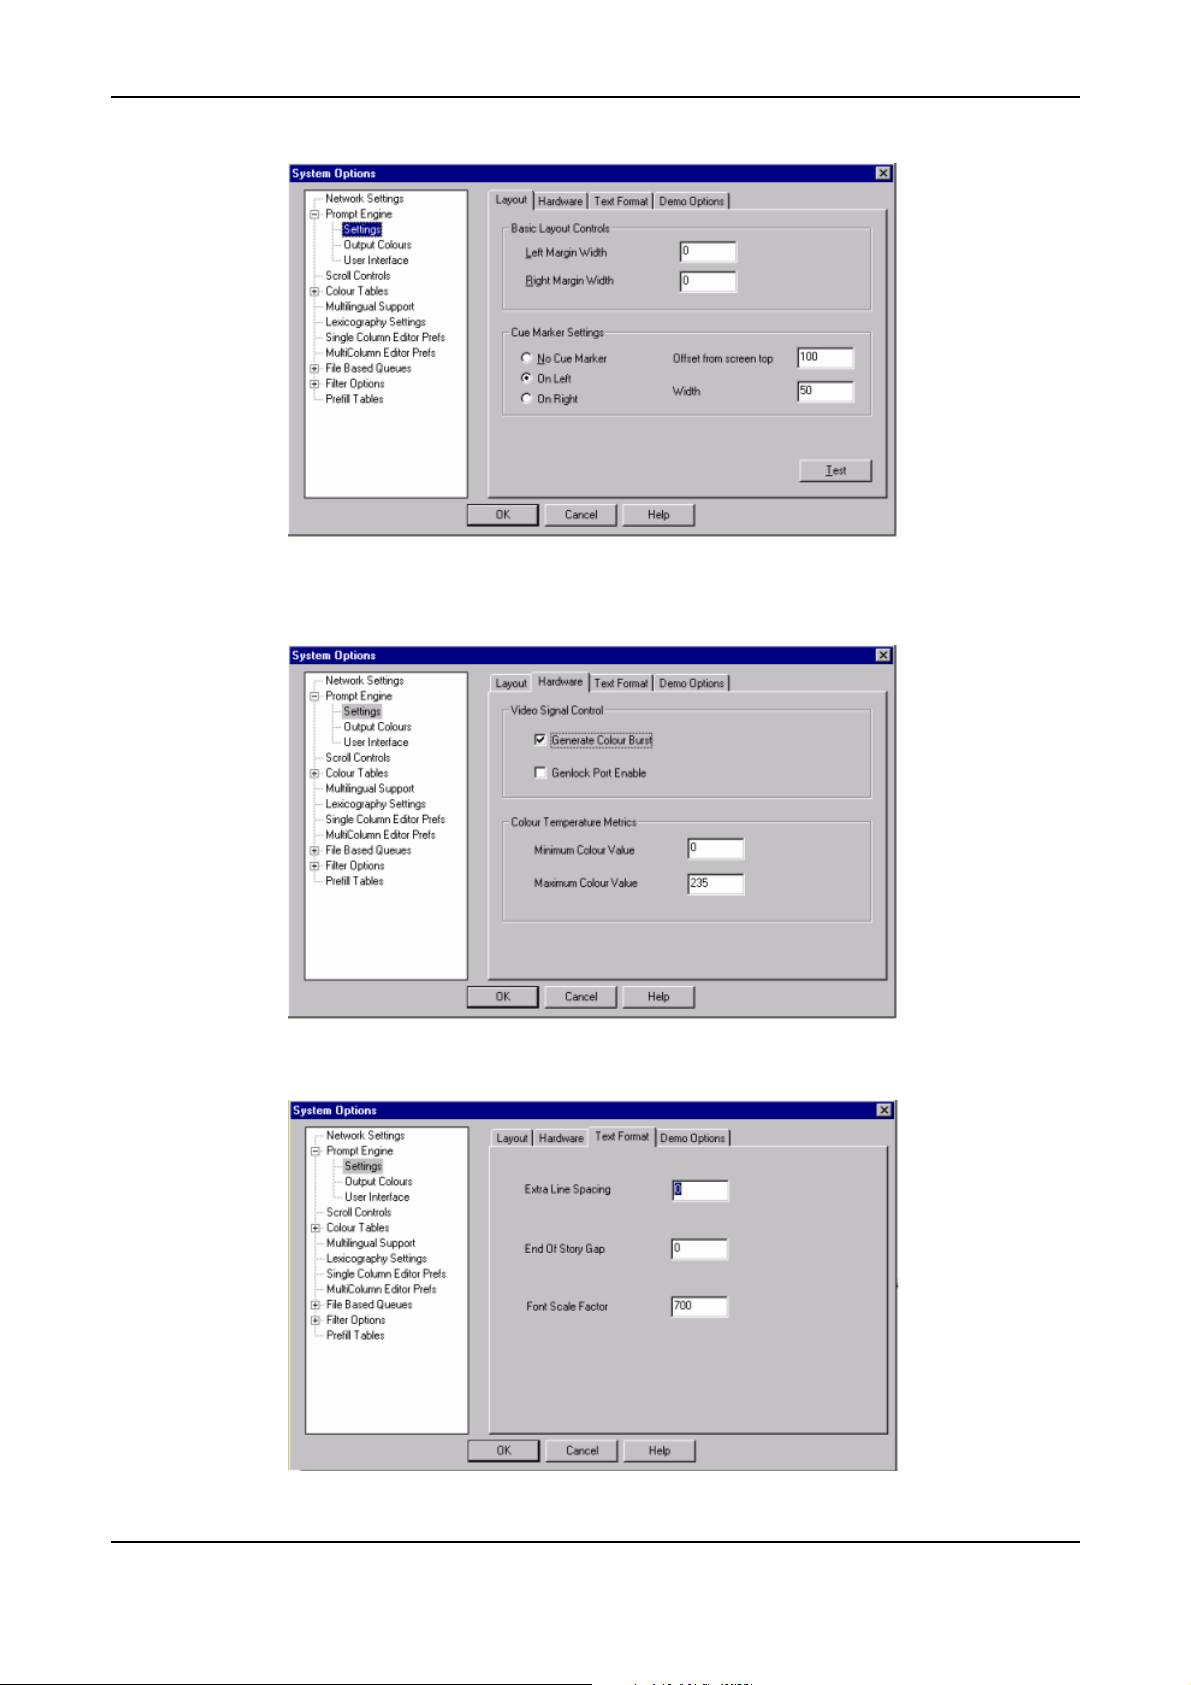
4.3 Configuring the Prompt Engine
Click on Prompt engine and then Settings, which will open the Layout window.
23 AUTOCUE LTD. 2002
Page 24
WINCUE USER GUIDE CHAPTER 4 – CONFIGURING WINCUE
Enter the required left and right margin width and select where you want the cue marker.
Then click on the hardware window tab.
Here you can enable the Genlock port.
Now click on the Text Format window tab.
24 AUTOCUE LTD. 2002
Page 25
WINCUE USER GUIDE CHAPTER 4 – CONFIGURING WINCUE
Here you can specify extra line spacing, an end of story gap and the font scale factor.
Now click on the demo Options window tab.
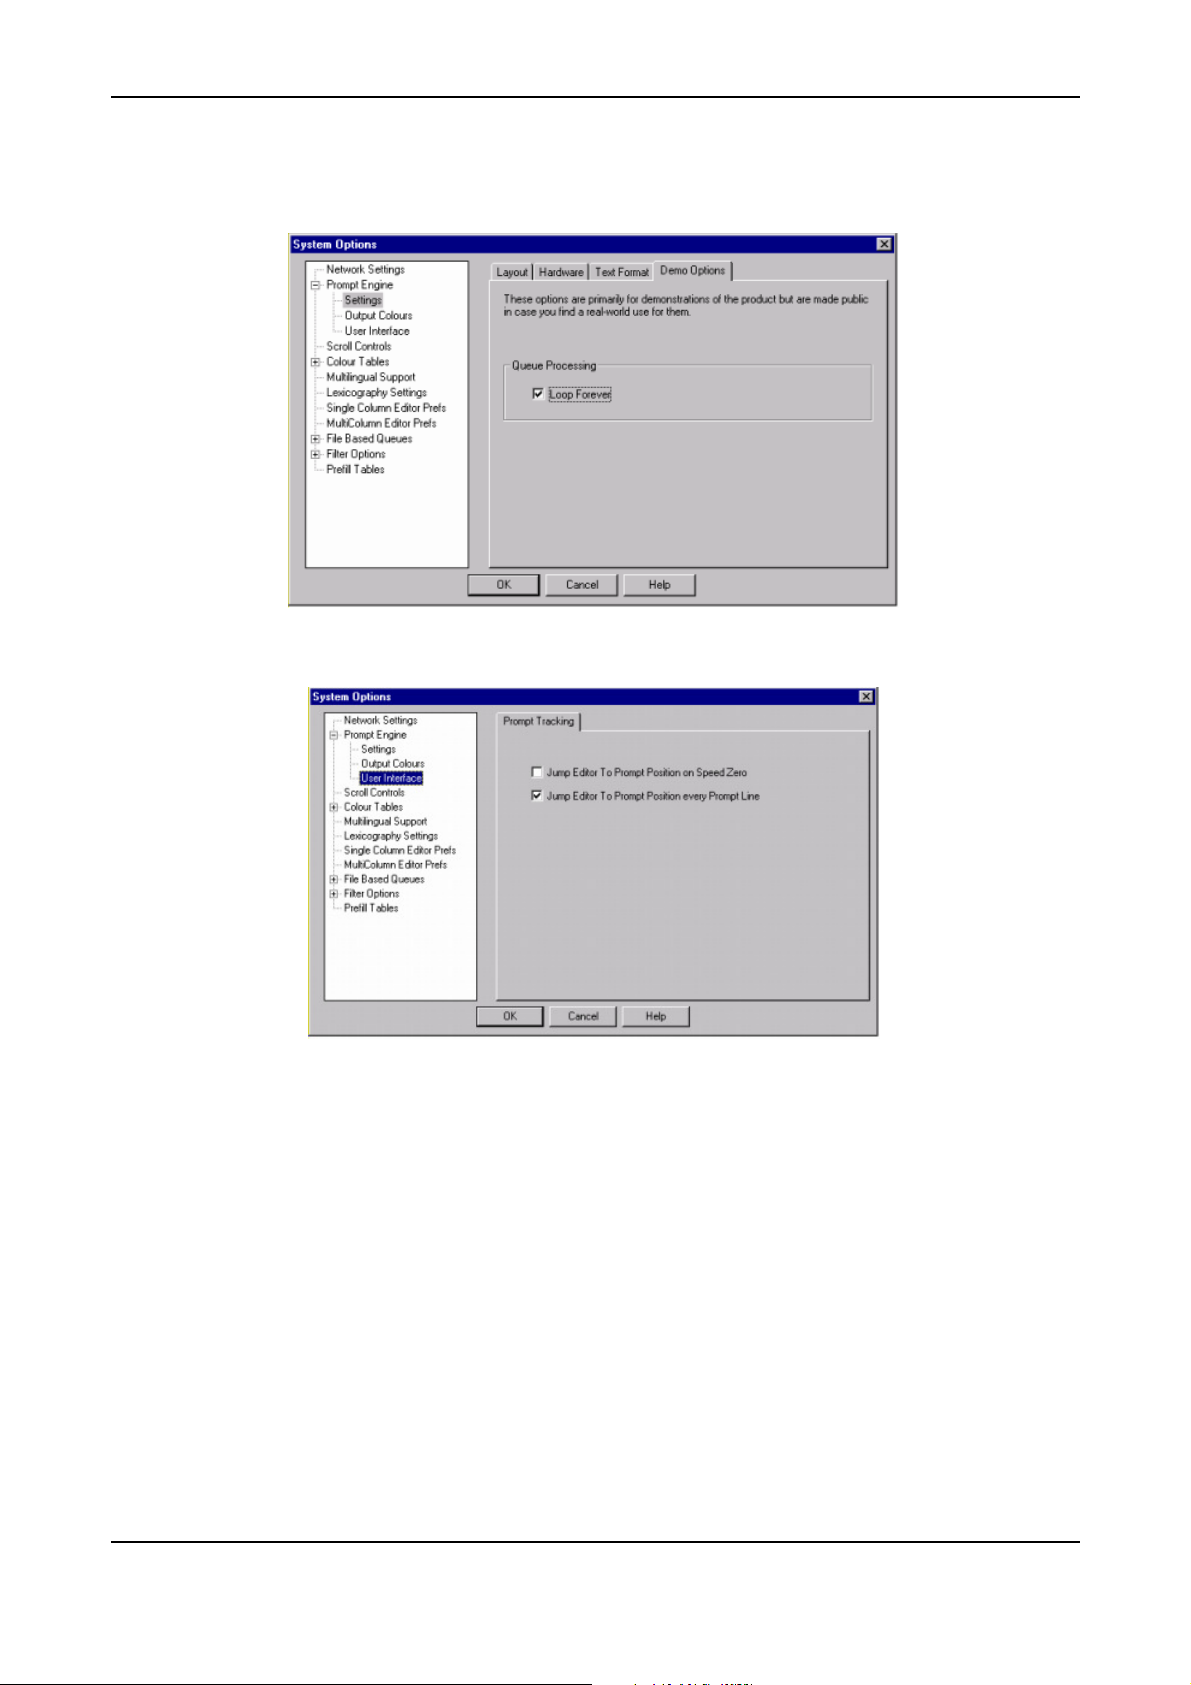
Here you can select the loop forever option. When you are happy with these settings click on User Interface
on the left to open the Prompt tracking window.
Here you can specify whether you want to jump the editor to prompt position on speed zero or every prompt
line by clicking in the relevant checkbox. Click OK to complete the configuration process.
25 AUTOCUE LTD. 2002
Page 26

WINCUE USER GUIDE CHAPTER 5 - WINCUE BASICS
5
Chapter
How WinCue Works
This Chapter introduces WinCue and some of its basic features. It covers the use of the menu
system and toolbar buttons to navigate around the system. It covers the layout of the screen and
how the window panes can be arranged and configured to suit the user.
5 Introducing WinCue
There are several ways to navigate around WinCue. You can use the mouse or keyboard to open menus and
select options. There are toolbars with buttons that can be clicked with the mouse and there are keyboard
shortcuts for most commands. Please note: Refer to Appendix D for a full list of all the toolbar buttons,
keyboard shortcuts and menu commands available.
5.1 Using menus
Open menus on the menubar to select commands by clicking on them, and selecting the required option.
To close a menu without choosing a command, click outside the menu or press Escape.
26
AUTOCUE LTD. 2002
Page 27
WINCUE USER GUIDE CHAPTER 5 - WINCUE BASICS
5.2 WinCue toolbars and tools
Toolbars provide quick access to commonly used commands and tools. When you first start WinCue and open a
queue, the Standard and Formatting toolbars are displayed just below the menu bar. You can choose which
toolbars you want to display.
A full list of all the toolbar buttons is in Appendix D.
Click buttons on the toolbars to choose commands. The toolbar is divided into separate toolbars, which are all
visible here. Buttons that are lit are active; those greyed out are not available in the window you are currently in.
You can hide or display individual toolbars by opening the Tools menu, selecting Toolbar and then the toolbar/s
you wish to display or hide. Selected toolbars will have a check mark ().
5.2.1 Standard Toolbar
Most of the buttons on this toolbar are active and available in all panes.
5.2.2 Change Layout button
This button is active in all panes and allows you to change the layout displayed on the screen.
5.2.3 Favourites button
This button allows you to add queues to a list of favourite queues.
5.2.4 Formatting toolbar
This toolbar becomes active and is used in the Script Editor window, which we’ll learn about later.
5.2.5 Splitter View toolbar
5.2.6 Editor View toolbar
27
AUTOCUE LTD. 2002
Page 28
WINCUE USER GUIDE CHAPTER 5 - WINCUE BASICS
5.2.7 Prompt toolbar and Prompt (Advanced) toolbar
We will learn more about the prompter toolbars and how to prompt scripts in WinCue later in Section 10.
5.2.8 Status bar
This displays information about the language used, and whether you are in Overtype mode, denoted by OVR. On
the left of the status bar you have a help description of the options on a menu when they are highlighted.
Toolbars provide quick access to commonly used commands and tools. To display or hide a toolbar, choose
Toolbars from the Tools menu, select the toolbar you want to display or hide. The Toolbars selected will have a tick
() next to them on the menu.
5.3 Selecting options in a dialog box
When you choose a menu option that’s followed by three dots, a dialog box appears displaying options to be
selected and buttons to click to display further options. Below is an example of the Print dialog box:
28
AUTOCUE LTD. 2002
Page 29
WINCUE USER GUIDE CHAPTER 5 - WINCUE BASICS
5.4 Using Panes
The first thing you’ll notice when you run WinCue is that the screen is divided up into window panes. These panes
can be arranged and configured to suit your needs. Each pane is a separate window and you can have as many
panes open on the screen as you like, and the user can change this. The active pane has a blue title bar.
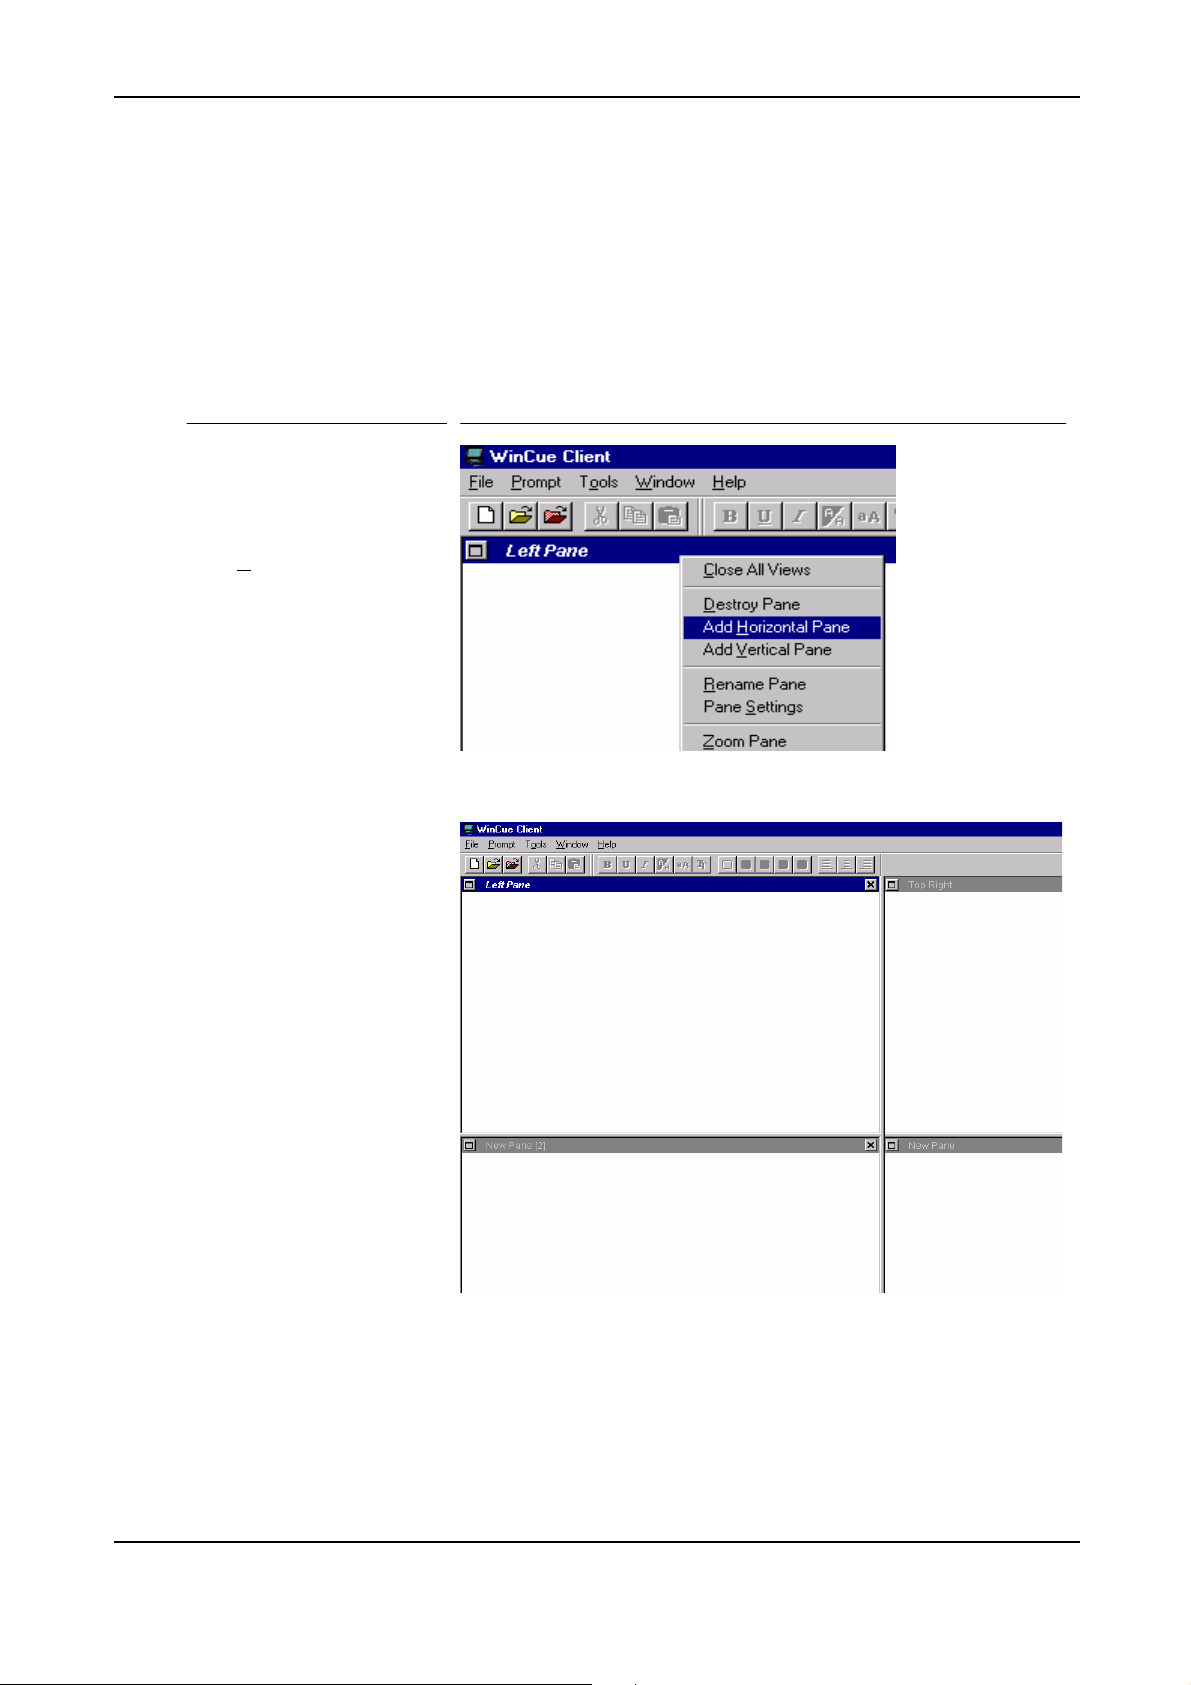
5.4.1 To add a horizontal pane
What you do Comments/Prompts
Right-click in the title bar of
the pane you wish to add a
horizontal pane to and select
Add Horizontal Pane from
the pop-up menu.
This adds a horizontal pane to the window:
29
AUTOCUE LTD. 2002
Page 30
WINCUE USER GUIDE CHAPTER 5 - WINCUE BASICS
5.4.2 To add a vertical pane
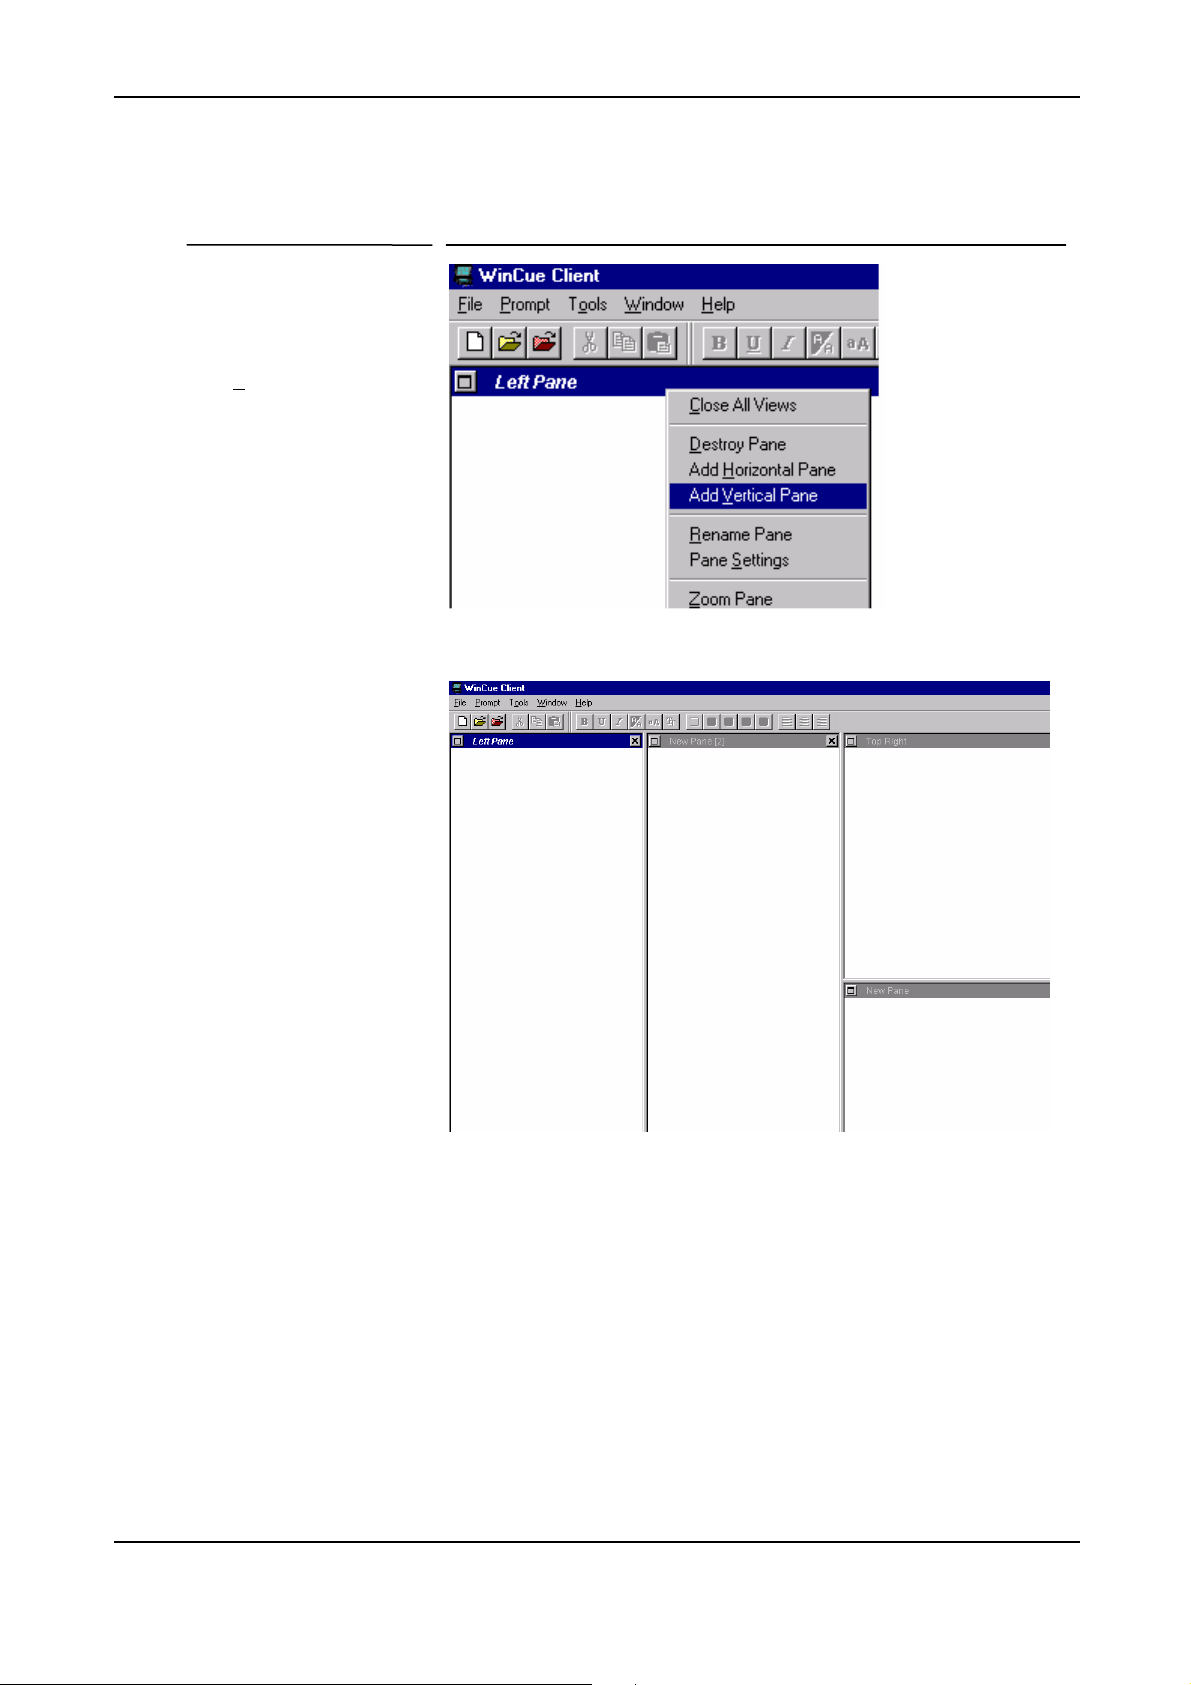
What you do Comments/Prompts
Right-click in the title bar of
the window you wish to add
a vertical pane to and select
Add Vertical Pane from the
pop-up menu.
This adds a vertical pane to the window:
30
AUTOCUE LTD. 2002
Page 31

WINCUE USER GUIDE CHAPTER 5 - WINCUE BASICS
5.4.3 To Zoom a pane
You can zoom any pane to fill the screen.
What you do Comments/Prompts
Click on the zoom button at
the top left hand corner of
the Pane.
OR right-click in the title bar
of the pane and select Zoom
Pane.
Zoom button
The keyboard shortcut for this is CRTL+ALT+Z
To un-zoom pane click on
the UnZoom button
OR right-click on title bar of
pane and select UnZoom
Pane.
When the last zoomed pane is closed the screen goes back to Vertical
Splitter mode.
31
AUTOCUE LTD. 2002
Page 32

WINCUE USER GUIDE CHAPTER 5 - WINCUE BASICS
5.4.4 Removing panes
What you do Comments/Prompts
Right-click on the title bar of
the pane you wish to remove
and select Destroy Pane.
5.4.5 Resizing panes
What you do Comments/Prompts
You can resize any pane by
holding the left mouse button
down on the border of the
pane and dragging the
border to the required
position.
When you close WinCue and logout the last layout of panes you had on the screen will be saved ready for
the next time you use WinCue.
32
AUTOCUE LTD. 2002
Page 33

WINCUE USER GUIDE CHAPTER 5 - WINCUE BASICS
5.4.6 Pane settings
You can control what information can be displayed in the pane in Pane settings
What you do Comments/Prompts
Right-click in the title bar of
the pane and select Pane
Settings.
For each type of queue
select whether you want the
list of items in a queue or the
text of an item or both to be
displayed in this pane.
In the settings for this pane the Item List for Wire Queues and Archive Queues, Story List and Editor for
Multicolumn Rundown Queues options have been selected so only these types of queue or item can be
displayed in this pane. If you open a type of queue or item that none of the panes are set to display then
you will be asked which pane you want to open that queue in.
Note: If you have renamed your panes
then these names will be displayed in
this dialog.
This pane will then change it’s settings to display this type of queue or item in future. If more than one
pane is set to display the same type of queue or item then you will always get this select pane dialog when
you open that type of queue or item in future.
33
AUTOCUE LTD. 2002
Page 34

WINCUE USER GUIDE CHAPTER 5 - WINCUE BASICS
5.4.7 Renaming panes
What you do Comments/Prompts
Right-click in the title bar of
the pane and select Rename
pane.
Enter new name and click
OK.
5.4.8 Moving Panes
You can move the contents of panes to other panes by holding the left mouse button down on the title bar
of the pane and drag and drop the into another pane.
You will get a dialog with options of what you want to do:
If you choose Swap Panes you will move the contents and title of the pane you are dragging, to the new
pane AND swap the pane settings to the new pane. If you choose Move Views the contents and title of
the pane will be moved to the new pane which will then have it’s settings changed to allow this type of
queue or item to be opened in this pane in future. Now when you open that type of queue or item you get
the option of which of the panes you want to display the queue or item in.
34
34 AUTOCUE LTD. 2002
3434
Page 35

WINCUE USER GUIDE CHAPTER 5 - WINCUE BASICS
5.5 The Principles of Prompting
This section aims to provide those who are unfamiliar with prompting systems the basic terms involved.
5.5.1 Prompters
The prompter is normally mounted on the front of the camera and displays the scrolling text created by the
script editor for the presenter to read. The text from the monitor is reflected onto a special sheet of glass.
Thus the presenter can see the text, but the camera looks straight through it.
5.5.2 The Script Editor
The script editor is used to write and modify the stories the presenter is going to read. Each story is
represented as a one-line entry in the rundown.
5.5.3 Rundowns
A rundown is a running order of items representing the stories in the show. The order in which the items
appear in the running order dictates the order in which the stories will be displayed on the prompter.
5.5.4 The Scroll Controller
The scroll controller is used to control the prompted text. The prompter operator controls the speed and
direction the text scrolls to suit the presenter.
35
35 AUTOCUE LTD. 2002
3535
Page 36

WINCUE USER GUIDE CHAPTER 6 – GETTING STARTED WITH WINCUE
6
WinCue icon
Chapter
Getting Started with WinCue
In this chapter we explore the basic commands and functions you will need to know to begin
working with WinCue. We will describe how to use WinCue in four simple steps and start
prompting. By the end of this Chapter you will be able to create scripts and prompt them using
WinCue.
6 WinCue Basics
6.1 Starting WinCue
Double-click on the WinCue icon:
OR use the Start menu:
WinCue can be found in the Programs-WinCue
Applications folder:
The WinCue main window will open.
36 AUTOCUE LTD. 2002
Page 37

WINCUE USER GUIDE CHAPTER 6 – GETTING STARTED WITH WINCUE
6.2 The WinCue main window
The screen is divided into window panes which can be configured and organised in a way that suits the user.
For more information on Panes and how to configure them see Section 5.4 Using Panes.
6.3 Creating a Multi-column Rundown
To create a new multi-column rundown open the File menu and select New File…
OR click on the New File button on the Toolbar: A dialog box “Select New File Type” will appear:
37 AUTOCUE LTD. 2002
Page 38

WINCUE USER GUIDE CHAPTER 6 – GETTING STARTED WITH WINCUE
Select Multicolumn Rundown File and click OK. You will be asked in which pane you would like to open the new
rundown in:
Select Pane One and click OK. A new blank multi-column rundown will then be displayed:
38 AUTOCUE LTD. 2002
Page 39

WINCUE USER GUIDE CHAPTER 7 – THE SCRIPT EDITOR
7
Chapter
WinCue Script Editor
In this Chapter you will learn how to add new scripts to the running order and how to find your way
around the Script Editor. The Script Editor is used to create the prompting text and is similar to
many Windows based editors.
7 The Script Editor
7.1 Creating a new Script in the Rundown
Open the Story menu and select New Script…
The new script will appear as an item in the rundown. To edit the item and add a script double-click on the item.
39 AUTOCUE LTD. 2002
Page 40

WINCUE USER GUIDE CHAPTER 7 – THE SCRIPT EDITOR
This will open the Script Editor. If this is the first time you have used WinCue since installation the Script Editor will
open in the same pane as the Rundown (i.e. Pane One below). If you would like the Script Editor to open in
another pane, as shown below, you need to turn one of the global options off. To do this open the Window menu
and select Settings… Click the Pane Settings 1 tab and deselect the Text In List Pane option by clicking in the
relevant checkbox (). Click OK to save the change.
7.1.1 The Script Editor Window
You can Zoom the Script Editor pane so it fills the screen by clicking on the Zoom button:
OR you can zoom the column to fit the window by clicking on the AutoScale the Column to Window button
on the toolbar:
You can now start typing your script.
40 AUTOCUE LTD. 2002
Page 41

WINCUE USER GUIDE CHAPTER 7 – THE SCRIPT EDITOR
This shows the script being typed whilst the column is scaled to fit the window.
WinCue supports both mouse and keyboard controls. A summary of the shortcut keyboard controls is
shown below. These keystrokes can be used in conjunction with the mouse and will help you to move
around the editor. Text can be deleted using Backspace, the delete key or by highlighting the desired text
and pressing delete.
Key To move
HOME To the beginning of a line
END To the end of a line
Page Up Up one screen
Page down Down one screen
Ctrl + HOME To the beginning of the script
Ctrl + END To the end of the script
41 AUTOCUE LTD. 2002
Page 42

WINCUE USER GUIDE CHAPTER 7 – THE SCRIPT EDITOR
7.1.2 The Word Count (Link time) Box
As you type a script WinCue will keep track of the number of words in the script. The current word count
appears in the Words box and is constantly updated.
7.1.3 The Script Duration Box
The time taken for a person to read a script from the prompter screen will depend on the number of words
in the script and how fast that person reads. WinCue uses the current word count and the presenters read
rate to calculate the duration (Link time)of the script. The script duration in seconds is displayed in the Link
box and is updated as you type. The default presenter’s read rate of 180 words per minute is used unless
you are using a presenter with a modified read rate. See Section 8.3 Changing a Presenter’s Settings.
7.1.4 Undo and Redo
You can undo and redo changes made in the Script Editor in the same way as any other word processor.
To Undo the last changes press CTRL+Z. You can undo each change since the last time you saved the
script. To Redo changes press CTRL+Y.
7.2 Adding a Presenter Name to a Script
To add a presenter name to the script open the Insert menu and select Presenter:
42 AUTOCUE LTD. 2002
Page 43

WINCUE USER GUIDE CHAPTER 7 – THE SCRIPT EDITOR
Select the required presenter and click OK.:
The Presenter will then be inserted into the script and the Link time updated if this presenter does not have the
default read rate set:
43 AUTOCUE LTD. 2002
Page 44

WINCUE USER GUIDE CHAPTER 7 – THE SCRIPT EDITOR
7.3 Adding Markers to a Script
When prompting it is sometimes useful to be able to jump to specific parts of a script without having to scroll to that
point. Markers are placed at points where the operator may need to jump too. To insert a marker move the cursor
to the position in the text where it is required, open the Insert menu and select Marker. A flag marker is then
inserted in the text.
To use the Scroll Controller to jump between markers see Section 9.3 Scroll Controllers.
7.4 Saving Your Work
It is good practice to save your work regularly while writing your script just in case there is a problem with the PC.
7.4.1 Saving a Script
To save a script open the Script menu and select Commit Changes:
44 AUTOCUE LTD. 2002
Page 45

WINCUE USER GUIDE CHAPTER 7 – THE SCRIPT EDITOR
OR use the Save button on the Toolbar:
7.4.2 Saving a Rundown
When you have saved scripts you need to save the rundown. To do this open the File menu and choose
Save to File:
Enter a file name and select the directory to save to and click on Save:
45 AUTOCUE LTD. 2002
Page 46

WINCUE USER GUIDE CHAPTER 7 – THE SCRIPT EDITOR
7.5 Opening a previously saved rundown
To open a previously saved rundown open the File menu and select Open File…
Select the Rundown file you want to open and click Open:
46 AUTOCUE LTD. 2002
Page 47

WINCUE USER GUIDE CHAPTER 7 – THE SCRIPT EDITOR
7.6 Changing the Script Characteristics
You can change sections of text in the scripts by highlighting the section of text and use the toolbars to change the
characteristic. There are various ways of highlighting the text.
7.6.1 Highlighting Text in the Editor
You can highlight text using the mouse or the keyboard. Refer to table below:
Keys you press Function
Shift + One character to the right
Shift + Ctrl + To the end of a word
Shift + Home To the beginning of a line
Shift + End To the end of a line
Shift + Page Up One screen up
Shift + Page Down One screen down
Shift + Ctrl + End To the end of a script
Shift + Ctrl + Home To the beginning of a script
Ctrl + A Highlight all text
7.6.2 To change the font
What you do Comments/Prompts
Highlight the section of text to change and click on
the Font button. Select the required Font and size
and click OK.
47 AUTOCUE LTD. 2002
Page 48

WINCUE USER GUIDE CHAPTER 7 – THE SCRIPT EDITOR
7.6.3 To change the style and colour of text
What you do Comments/Prompts
Highlight the section of text you want to change
with the mouse and click on the required style
Bold
button on the toolbar:
Underline
Italic
Click required colour on the toolbar.
7.6.4 Justifying the Text
What you do Comments/Prompts
Open the Format menu and select Justification.
From the sub-menu appears select Left, Centre or
Right. Once selected it will have a check mark ()
against it. When you begin typing the text will be
justified according to your selection.
OR highlight the text and click on the justify
buttons on the toolbar.
7.6.5 Changing the case
What you do Comments/Prompts
Highlight the text to change and click on the
Change Case button.
48 AUTOCUE LTD. 2002
Page 49

WINCUE USER GUIDE CHAPTER 7 – THE SCRIPT EDITOR
7.6.6 To invert the background colour and the text
The default colours of the text in the editor is white text on a black background, you can invert this to black
text on a white background.
What you do Comments/Prompts
Select the section of text to inverse with
Inverse button
the mouse and click on the Inverse
button.
If the text was blue on a black
background clicking on the inverse
button will change the text to black on a
blue background.
7.6.7 Captions
Those of you running WinCue with a caption generator may want to select particular parts of the script that
won’t be sent to the caption generator. Select the text by highlighting, then choose Format, then Not
Captioned from the menu. The marked text will not be sent to the caption generator.
7.6.8 Format All
For simple formatting of the entire script choose Format then All text… from the menu. The Format All
dialog box will appear. To select Bold, Italic, Underline, Inverse simply press the button. To change the font
press the Font button, a Select Font dialog box will be displayed, choose your font and size. When your
happy with your selection click OK.
7.6.9 Not Prompted Text
There may be text within your script that you don’t need to prompt. Select the text by highlighting, then
choose Format, then Not Prompted from the menu. This text will then not appear on the prompter’s
output.
7.6.10 Finding Words in a Script
To search for a particular word in the current script, choose Edit, then Find, or just press Shift F3. A dialog
box will appear. Type the word you are looking for and click OK. WinCue searches from the current cursor
position to the bottom of the script. If it finds the word you specified, it will highlight it, otherwise it will ask if
you want to continue searching from the top of the script. A warning will be displayed if the word is not
found. You can search for the same word again by choosing Edit, then Find Next, or by pressing F3.
49 AUTOCUE LTD. 2002
Page 50

WINCUE USER GUIDE CHAPTER 7 – THE SCRIPT EDITOR
7.6.11 Replacing Words in a Script
To replace one or more words within the current script, choose Edit, then Replace. The Replace dialog
box will appear. Type the word or phrase you wish to find in the ‘Find what:’ box, and the word or phrase
you want to replace it with in the ‘Replace with:’ box. Then use the Find Next and Replace buttons to
control the replacements manually, or click the Replace All button to automatically make the changes.
50 AUTOCUE LTD. 2002
Page 51

WINCUE USER GUIDE CHAPTER 7 – THE SCRIPT EDITOR
7.7 Printing
7.7.1 Printing Rundowns
What you do Comments/Prompts
Open the Rundown
menu and select Print
Rundown.
Then from the print
dialog box select the
required number of
copies and print layout
and click OK.
7.7.2 Printing the Show
There is an option to print the entire show, with all the scripts.
What you do Comments/Prompts
Open the Rundown
menu and select
Print Show…
Then from the print
dialog box select the
required number of
copies and print
layout and click OK.
51 AUTOCUE LTD. 2002
Page 52

WINCUE USER GUIDE CHAPTER 8 – PRESENTER SETTINGS
8
Chapter
Presenter Settings
In this chapter we learn how to change the default presenter settings, add presenters to the
presenter table, modify their settings and how presenter profiles can be used to copy settings to
other rundowns.
8 Presenter Settings and Profiles
Presenters settings allows you to customise settings for individual presenters. The font, colour, style and read rate
can be allocated for individual presenters. These settings will be automatically applied to the script when the
presenter is selected. You can change the presenter settings for individual queues and then save them as a
presenter profile which can then be loaded into other queues.
8.1 Changing the Default Presenter settings
8.1.1 Changing the Default Read Rate
The default WinCue presenter uses the default read rate of 180. To change the default read rate open the
Rundown menu and select Edit Presenter Table:
52 AUTOCUE LTD. 2002
Page 53

WINCUE USER GUIDE CHAPTER 8 – PRESENTER SETTINGS
The Presenter Table Settings window will open:
Presenter attributes must be enabled here before they can be modified set by clicking in the relevant
checkbox to select it (). Now click on the Presenters tab to display the list of Currently Defined
Presenters. To modify the default presenter select Default and click the Modify button:
The Attributes tab is then displayed:
53 AUTOCUE LTD. 2002
Page 54

WINCUE USER GUIDE CHAPTER 8 – PRESENTER SETTINGS
In the Read Rate text box, type in the new value for the default read rate e.g. 195 and click OK.
8.1.2 Changing the Default Font and Font Size
WinCue can prompt any font installed on your PC. You can change the font used for any new scripts you
create by changing the default. This is done the same way as changing the read rate, in the Presenter
Attributes window as above. Click the Modify Font button and the Select Font dialog box appears:
Select the required font from the list of available Fonts and set the required font size. A preview of your
selection will be displayed. When you are happy with the font settings click on OK.
54 AUTOCUE LTD. 2002
Page 55

WINCUE USER GUIDE CHAPTER 8 – PRESENTER SETTINGS
8.2 Adding a New Presenter
Open the Rundown menu and select Settings to open the Presenter Table Settings window. Click on the
Presenters tab to display the list of Currently Defined Presenters:
Click the Add button to open the Presenter Properties window:
Enter the presenter’s name e.g. James in the Presenter Name text box and click OK. The presenters name you
just added will then be shown in the list of Currently Defined Presenters.
55 AUTOCUE LTD. 2002
Page 56

WINCUE USER GUIDE CHAPTER 8 – PRESENTER SETTINGS
8.3 Changing a Presenter’s Settings
Select the presenter in the list of Currently Defined Presenters and click the Modify button.
8.4 Deleting a Presenter
To delete a presenter select that presenter and click Delete.
Please note if you delete a presenter that is in a script the presenter is removed from the script as are all
their settings. The default presenter settings are then used instead.
56 AUTOCUE LTD. 2002
Page 57

WINCUE USER GUIDE CHAPTER 8 – PRESENTER SETTINGS
8.5 Presenter Profiles
8.5.1 Saving Presenter Profiles
Open the Rundown menu and choose Edit Presenter table. In the Presenter Table window click on Save
As Profile. In the Object Name box and enter a name for the profile and click OK.
8.5.2 Loading Presenter Profiles
Open the rundown queue that you want to copy the presenter profile to. Open the Rundown menu
and select Edit Presenter Table. Click on the Load From Profile button:
Select the presenter profile to load and click OK:
57 AUTOCUE LTD. 2002
Page 58

WINCUE USER GUIDE CHAPTER 9 – WINCUE RUNDOWNS
9
Chapter
WinCue Rundowns
In this chapter we learn more about WinCue rundowns, editing within them, working with multiple
rundowns and copying items between them. Also covers configuring the columns in the Script
Editor and global window settings.
9 Working with Rundowns
9.1 The WinCue Rundown window
58 AUTOCUE LTD. 2002
Page 59

WINCUE USER GUIDE CHAPTER 9 – WINCUE RUNDOWNS
9.1.1 Features of a WinCue Rundown
The Black bar denotes the selected item in the rundown. Break items are in blue. The NO field is the
unique ID number for each item/story in the rundown, the TITLE field is the title of the item, The WORDS
field displays the word count of words in the script and the LINK field is the calculated time it will take for
this script to be presented based on the read-rate set. (The Default read-rate is 180 words per minute).
Each item in the rundown has a Prompt Here button which can be clicked at any time to begin prompting
from that item. The CUMULATIVE field displays the cumulative Link time for the rundown up to the end of
each item. At the END OF RUNDOWN the total number of words and total link time for the rundown is
shown.
9.2 Creating a New Rundown
To create a new Rundown queue open the File menu and select New File… or click the New file button on the
toolbar:
9.2.1 Adding a New Story to the Rundown
Creating a new story adds a new item to the rundown. Open the Story menu and select New Script…
Enter the title of the item and click OK.
9.2.2 Adding Break Scripts
You can insert a Break Script in a rundown to denote a commercial break. Open the Story menu and
select New Break Script… Enter the title of the break and click OK.
9.2.3 Saving Scripts and Rundowns
It is good practice to save the rundown and scripts regularly to ensure no information is lost accidentally.
To save scripts open the Script menu and select Commit Changes or click on the Save button on the
toolbar:
To save a rundown open the File menu and choose Save to File. A Save As dialog box will be displayed.
Enter the required name for the queue and click on Save.
59 AUTOCUE LTD. 2002
Page 60

WINCUE USER GUIDE CHAPTER 9 – WINCUE RUNDOWNS
9.2.4 Moving Stories within the Running Order
The stories within a rundown can be reordered very easily using the drag and drop facility in WinCue.
Drag-and–drop is the easiest way to move a story within a Rundown. Select the story you want to move by
pointing to it and hold down the left-hand mouse button. When the drag and drop pointer appears,
drag the dotted insertion point to the new location. Release the mouse button to drop the story in its new
place in the runorder.
9.2.5 Renumbering Stories in the Rundown
The stories within a rundown can be renumbered at any stage when lines are added or deleted. Open the
Rundown menu, and select Renumber items.
9.3 Editing within the Rundown
It is possible to edit the rundown and the attached stories in the rundown window. This will be quicker and often
more convenient than the pull-down menus. To do this click once with the right mouse button on the story you wish
to edit. A menu appears next to the cursor. This section describes the commands available from this menu.
9.3.1 Adding a new script
Open the Story menu and select New Script or New Break Script,
OR press Insert on the item in the Rundown you want to insert above,
OR you can right-click on the item you want to insert above and select New Script or New Break Script
from the popup menu.
9.3.2 Editing a Script
Select the item you want to edit, open the Story menu and select Edit,
OR press Enter on the selected item,
OR you can right-click on the item to edit and select Edit Script.
9.3.3 View Story
If you don’t want to edit a story you can view it only but right-clicking on that item and selecting View Story
from the pop-up menu.
60 AUTOCUE LTD. 2002
Page 61

WINCUE USER GUIDE CHAPTER 9 – WINCUE RUNDOWNS
9.3.4 Importing files
You can import files saved in other formats such as Word or plain Text into WinCue rundowns. Open the
rundown queue you wish to import to. Open the Story menu and select Import File… Select the file to
import and click Open:
Alternatively you can simply drag and drop the file from Windows Explorer into the required position in the
rundown.
Select from the list of available formats e.g. Plain Text and click OK:
Select the required import settings and click OK:
61 AUTOCUE LTD. 2002
Page 62

WINCUE USER GUIDE CHAPTER 9 – WINCUE RUNDOWNS
Click the Automatically use these settings checkbox if you want to prevent this dialog box appearing again.
The imported file will then appear as a new item in the rundown.
You can also import into an existing script or story in the rundown. Open the story or script by double-
clicking on it. Open the Insert menu and select File… Select the file to import and click Open.
After selecting relevant options where applicable the imported text will be inserted into the opened
story/script.
Alternatively you can drag and drop the file into the required position in the script.
9.3.5 Deleting Stories
To delete a story in the rundown select that item, right-click and choose Delete from the menu or press the
Delete key. A dialog box will appear asking if you’re sure you want to delete this item. Click Yes to delete.
If the item you want to delete is open you will get a message that the story is already open by user… on
computer… And you won’t be able to delete this item until the item is closed.
To delete multiple stories from the rundown, select them by holding the Control key down and clicking
once on each of the stories you wish to delete from the Rundown, to highlight them and press the Delete
key. A dialog box asking if you’re sure you want to delete these scripts will appear. Click on Yes to delete.
62 AUTOCUE LTD. 2002
Page 63

WINCUE USER GUIDE CHAPTER 9 – WINCUE RUNDOWNS
9.3.6 Editing the fields of an item in the rundown
You can change data in fields in the rundown by clicking once to select the field and clicking again to
highlight the field, which can then be edited. Or you can right-click on the field and select Edit Field. You
can then overtype the contents of the field or move the cursor into position to edit. Or press F2 anywhere
on the item line to edit the first field. Press ENTER to save the change or Press the TAB button which
takes you to the next field and saves the change. SHIFT+TAB takes you back a field. Press ESCAPE to
finish the process. To clear a field right-click on it and select Clear Field.
When a field is highlighted, you are in Edit mode and can move up and down the rundown in that
field using the cursor keys or press the TAB key to jump to the next field of the item. You will remain
in edit mode until you finish the process by pressing ENTER to save any changes or by pressing
ESCAPE.
9.3.7 Toggle Hold State
You may wish to put an item in the rundown on hold if it is not ready or you don't want it to be part of the
transmission, so it is not prompted and included in any timing calculations. To put an item on hold, right-
click on that item in the rundown and choose Toggle Hold State from the pop-up menu. That item will then
be in blue. To take off hold repeat the process.
9.3.8 Move to Air Next
The Move To Air Next command allows you to begin prompting from anywhere within the rundown. To do
this right-click on the item you want to prompt from and select Move to Air Next from the popup menu.
OR you can click on the Prompt Here button adjacent to each item in the rundown:
The item selected changes to yellow and you can start scrolling from there.
9.4 View Settings
There are various view settings available in the rundown by opening the View menu and selecting Settings…
63 AUTOCUE LTD. 2002
Page 64

WINCUE USER GUIDE CHAPTER 9 – WINCUE RUNDOWNS
You can select options for deleting and transferring items, editing fields and items and when opening items. Turn
the appropriate option on or off by clicking in the adjacent checkbox (). Click OK to save the changes.
64 AUTOCUE LTD. 2002
Page 65

WINCUE USER GUIDE CHAPTER 9 – WINCUE RUNDOWNS
9.5 Modifying the Columns in the Script Editor
To modify the Columns in the Script Editor such as renaming them, open the Rundown menu and choose Settings:
The Column with the radio button checked is the Script Column and the only column in which the Word count and
Link time boxes will work. You can change the script column to be any one of the 8 Columns.
9.5.1 Modifying a Script Editor Column
To modify the layout of a column click the Modify… button for the Column you want to modify.
65 AUTOCUE LTD. 2002
Page 66

WINCUE USER GUIDE CHAPTER 9 – WINCUE RUNDOWNS
You can rename the column by changing the Title, change the width and specify single, double or triple
line spacing. If you are not modifying the script column you can select Lock Font and Lock Styles to
prevent the font or style being changed in the column. If you want the spell checker enabled for use
select this option here. To change the default font click on the Font button and select the required style
and size.
9.6 Working with Multiple Rundowns
WinCue allows you to have a large number of rundowns and Script Editor windows open at the same time. There
are a number of standard tools to help organise multiple rundown windows.
Open 2 queues using the Open Queue button:
The tabs for the 2 rundowns open are displayed on the window at the bottom left of the window.
You can move one of the rundowns open in the same pane to another pane, by dragging the tab for that queue
and dropping it into another pane. That pane’s settings will then be updated to allow that type of queue or item to
be opened in that pane in future. The same applies for multiple stories open in a pane, dragging the tab for a story
66 AUTOCUE LTD. 2002
Page 67

WINCUE USER GUIDE CHAPTER 9 – WINCUE RUNDOWNS
to another pane moves the story into the new pane and updates it’s settings to allow stories to be opened in that
pane in future as above.
9.6.1 Copying stories between rundowns
You can copy stories from one rundown to another. To do this, open the rundowns in individual panes.
Select the story you want to move by clicking on it to highlight it and holding the left mouse button down
drag the mouse pointer to the new location in the rundown you are copying to, and release the mouse
button.
To copy multiple items hold down the Control key and click once on the items you want to copy and drag
and drop to the required location in the new rundown.
9.7 Window Settings
You can set preferences for windows and panes, by opening the Window menu and select Settings…
On the Window preferences tab there are 2 options:
Restore Frame position – this option restores the position of the main WinCue client window, when closed and
reopened.
Collapse single tabs – this option removes the tab for a queue or item in a pane when only one queue or item is
open in that pane. If you had more than 1 queue or item in a pane, and closed them all except one so that there
should be only 1 tab visible, then this tab is collapsed.
67 AUTOCUE LTD. 2002
Page 68

WINCUE USER GUIDE CHAPTER 9 – WINCUE RUNDOWNS
Use the Pane Settings tabs to set preferences for panes:
For each type of queue you can specify view options, by clicking in the relevant checkbox ().
Text in List Pane – this option is if you want to view text of items in the same pane as the rundown.
Show Search View at Open – this option is only available for Wire Queues and Assignment Desk (in Pane Settings
2 window) if you want the search results window to open when you open a wire queue.
Show Trashcan – this option is only available for multicolumn and prompt rundown queue files and is if you want to
open a trashcan file when you open a multicolumn queue file. If selected a trashcan file is opened behind the
rundown file, so will display 2 tabs in the pane.
Trashcan in Splitter – this option relates to the above and is only available if the Show Trashcan option is selected.
This option allows you to view the trashcan file in a split pane.
68 AUTOCUE LTD. 2002
Page 69

WINCUE USER GUIDE CHAPTER 10 – PROMPTING SCRIPTS
10
Chapter
Prompting Scripts
In this chapter we learn how to prompt scripts in a running order, how to use the scroll controllers
and the various prompting options available.
10 Prompting scripts in a queue
Firstly open the queue file you want to prompt from.
10.1
Opening a Queue
Click the Open File button on the toolbar:
Select the queue you wish to open and click Open.
10.2 To start prompting
To begin prompting click the Begin Prompting button on the toolbar:
69 AUTOCUE LTD. 2002
Page 70

WINCUE USER GUIDE CHAPTER 10 – PROMPTING SCRIPTS
The first item on the rundown list appears yellow indicating that this is the current item prompting. The prompter
operator can now control the text on the prompter using the scroll controller they have. When prompting the Word
Count box and Time box will switch to yellow.
10.3 Scroll Controllers
10.3.1 Hybrid multi-button scroll controller
To start scrolling the text turn the knob at the end of the scroll control clockwise to speed up and anti-
clockwise to slow down. Use the buttons on the scroll controller, which are clearly labeled, as required.
The Multibutton Scroll Controller
To stop scrolling turn the scroll knob fully anti-clockwise or press the Stop button.
10.3.2 2-button Hand Scroll Control
To scroll the text, turn the knob at the end of the scroll control clockwise to speed up and anti clockwise to
slow down. To change the direction of the prompted text press the black button. To jump to the next
marker press the red button
70 AUTOCUE LTD. 2002
Page 71

WINCUE USER GUIDE CHAPTER 10 – PROMPTING SCRIPTS
To stop scrolling turn the scroll knob fully anti-clockwise or press the Stop button.
There are options available whilst prompting which are accessible on the View menu or via keyboard
shortcuts. Refer to the table below for a description of these options and their shortcuts.
A check mark () indicates the command is on.
Option Description Shortcut key Toolbar button
Edit at Prompt Position Allows editing at current prompt
Script Lock Mode Stops prompting and sets
Jump prompt to editor Jumps the prompt output to the
Refresh Prompt Output Skips back a couple of lines
10.4 Prompting options
position
prompter at the beginning of
current item
position the user’s at in the
Script Editor.
and continues prompting
F11
CTRL+F11
SHIFT+F11
F9
There are several options available when tracking rundowns that are being prompted, by opening the View menu
and selecting Settings… You can keep track of the prompt item or the on-air item so that the yellow bar or red bar
respectively is visible on longer rundowns that don’t fit a single page on the screen. You can also keep the on-air
item at the top of the visible portion of the rundown. To set these select the appropriate option/s on the View menu
so that it is ticked:
71 AUTOCUE LTD. 2002
Page 72

WINCUE USER GUIDE CHAPTER 10 – PROMPTING SCRIPTS
You can make these settings permanent by opening the View menu and selecting Save Settings. You will get a
message that your Preferences have been saved.
OR open the View menu, select Settings… and click the Multicolumn Rundown View Tracking tab:
Clicking in the appropriate checkbox to select it () will set that option permanently. Click OK to save the changes.
These settings will be retained next time you start WinCue.
72 AUTOCUE LTD. 2002
Page 73

WINCUE USER GUIDE CHAPTER 10 – PROMPTING SCRIPTS
10.4.1 Prompting with the Script Column displayed
If you have your screen arranged so that the rundown is displayed in one pane and the script being
prompted in another pane, with the AutoScale Column to Window option set (by clicking ), make sure
you open the View menu and select Save View Settings. This ensures that when the next item is
prompted the Script retains the AutoScale Column to Window setting.
If you want to prevent each item opening when prompting in the above manner and just have the item
being prompted open, you need to right-click on the title bar of the pane and select Pane Settings… Then
click the Other tab and select the Restrict to a single text view option by clicking in the relevant checkbox
().
10.5 To quit prompting
To stop prompting click the Stop Prompting button on the toolbar:
73 AUTOCUE LTD. 2002
Page 74

WINCUE USER GUIDE CHAPTER 11 – UPGRADING WINCUE
11
Chapter
Upgrading the Software
In this chapter we cover the procedure involved to upgrade the WinCue software.
11 Upgrading WinCue
When you are ready to upgrade your system you will receive a CDROM with the latest WinCue files on.
Insert the CDROM in the drive and the Autorun program should start:
Click the Setup button at the top left of the window.
If Autorun does not start, click Start and choose Run.
Enter D:\SETUP\SETUP in the dialog box and click OK:
74 AUTOCUE LTD. 2002
Page 75

WINCUE USER GUIDE CHAPTER 11 – UPGRADING WINCUE
The files required for Setup will begin copying:
When the WinCue Setup banner appears click on Next >
When you get the message asking if you are ready to upgrade your system, click on continue.
75 AUTOCUE LTD. 2002
Page 76

WINCUE USER GUIDE CHAPTER 11 – UPGRADING WINCUE
Click Finish to continue with the upgrade. The files will install with a progress dialog box:
If a WinCue Setup dialog box appears asking if you wish to replace a file, check the date and time stamp of the file
in question. If the new file is later click on Replace. If it’s the same or earlier as in this case click on Skip.
When the upgrade has finished you will get a message that Setup has completed successfully. Click OK and the
prompter will shutdown and restart automatically.
76 AUTOCUE LTD. 2002
Page 77

WINCUENEWS PROMPTER GUIDE APPENDIX A
Appendix A - WinCue Installation Help
There are issues to look out for when installing WinCue:
WinCueNews only works on Windows 95, 98 or Windows NT 4.0. It is not recommended to have a SCSI hard disk
or any other SCSI device on the same SCSI bus as the IMT Card. If you have to then see the SCSI
documentation below. We recommend using an Adaptec 2906 SCSI adapter in a desktop PC. Ensure that the
Adaptec SCSI cards ROM BIOS is not a Version 1.3x, if so apply downgrade which can be obtained from Autocue.
Use an Adaptec 1460 SlimSCSI adapter in a laptop PC.
For both desktops and laptops do not use a motherboard that uses an Intel TX chipset. Only use genuine Intel
processors. We recommend you don’t use an Intel Celeron processor.
Ensure that the installed SCSI drivers match those in the following SCSI documentation.
WinCue IMT cards and SCSI cards
Laptop systems (SlimSCSI 1460d)
If WinCue stops on 42% the problem is to do with the version of the Windows SCSI driver ( sparrow.mpd ) which is
located in: C:\WINDOWS\SYSTEM\IOSUBSYS\
the version needed to correct the problem is:
SPARROW.MPD = 17K, 24/08/1996
which can be obtained from Autocue.
Desktop systems (2906)
If you get the message "fatal there are no security providers available sentinel not found" when trying to run
WinCue, check the aic78xx SCSI device driver is enabled in Control Panel-Devices. It should be set to startup
automatically by clicking Startup and selecting Startup Type: Automatic.
Windows 95
If WinCue stops on 10% the problem is to do with the version of the Windows SCSI driver for the Adaptec
'aic78xx.mpd' which is located in: C:\WINDOWS\SYSTEM\IOSUBSYS\.
the version needed to correct the problem is:
AIC78xx.MPD = 31K, 24/08/1996
77 AUTOCUE LTD. 2002
Page 78

WINCUENEWS PROMPTER GUIDE APPENDIX A
which can be obtained from Autocue.
SCSI Hard disks on the same SCSI BUS as IMTCard:
Certain drives do things to the SCSI bus that prevent the IMT from working particularly SCSI drives from Micropolis,
Quantum and Western Digital. Some drives should work providing the SCSI address(ID) of the IMT card is higher
(a lower number) than the SCSI disk E.G. IMT address(ID) is 3 then hard disk is 4 or above. Drives that should
work are Seagate, O'Connor and IBM. It is also important that only one device on the SCSI bus is terminated. The
device located at the end of the cable must be the only one terminated. By default the IMT card is terminated, and
is expected to be connected to the end of the SCSI cable. SCSI termination is set using jumpers or switches on the
SCSI devices, consult the relevant manuals for further details.
The following tables detail hardware devices recommended for use with WinCueNews. If you wish to use devices
not listed here, please contact your vendor.
78 AUTOCUE LTD. 2002
Page 79

WINCUENEWS PROMPTER GUIDE APPENDIX A
SCSI Cards
Autocue has tested a range of SCSI cards. Those listed below have been found suitable for use with
WinCueNews. If you do not find your SCSI card listed below, please contact your vendor.
SCSI Cards for Desktop PCs
Manufacturer Type Bus
Adaptec 2906 PCI
SCSI Cards for Laptops
Manufacturer Type Bus
Adaptec APA 1460A-2 Slim
SCSI
PCMCIA
79 AUTOCUE LTD. 2002
Page 80

WINCUENEWS PROMPTER GUIDE APPENDIX B
Appendix B The I.M.T. Card
In the following appendix we will look at the entire configuration options available for the I.M.T. board.
Contents
Card Layout B2
Termination - J6 B3
Power to Bus for SCSI Termination - J6 B3
SCSI ID – SW2 B4
SCSI/Parallel Select - SW2 B4
Video (PAL or NTSC) - J11 B5
SECAM B5
External Power Supply - J12 B6
Composite Video Features Connector - J10 B6
Other Jumpers B6
The I.M.T. card is configured at the factory to work in your country. It is unlikely that you will need to make
any changes to it. If you do, read the relevant section(s) carefully, or consult your supplier for further help
before changing the configuration of the board.
B2 Card Layout
The following section shows the 3 I.M.T. card layouts that have been produced over the years, most recent of which
being the Issue 3 I.M.T card. You will have been supplied with one of the 3 IMT cards, use the diagrams below to
help you locate all the connectors and jumpers on the card that you have been supplied with.
80
AUTOCUE LTD. 2002
Page 81

WINCUENEWS PROMPTER GUIDE APPENDIX B
IMT Card – Issue 1.
Genlock Port
SCSI Card Connector Parallel Port Connector Reset Button
Even flash ROM chip Odd flash ROM chip I.M.T Scroll
Control Port
Composite Video Port
81
AUTOCUE LTD. 2002
Page 82

WINCUE USER GUIDE APPENDIX B
Composite
IMT Scroll
Port
SCS
I Card
IMT Card – Issue 2. Connector Detail
Genlock
Video
Control
IMT Card – Issue 3. PCI card
Connector
82
AUTOCUE LTD. 2002
Page 83

WINCUE USER GUIDE APPENDIX B
See below to learn about
B3 Termination - J6
By Default the I.M.T. card is terminated, and expects to be connected to the
power to bus SCSI
Termination settings
end of the SCSI cable. Termination can be enabled/disabled by changing a
jumper setting on J6.
To enable termination of the I.M.T. card place a jumper
on leftmost pins of J6
To disable termination of the I.M.T. card remove the
jumper on leftmost pins of J6
B3 Power to Bus for SCSI Termination - J6
J6 is used to determine whether the I.M.T. card is terminated and to
determine the source of termination power.
If you have enabled termination on the SCSI card you will need to set the
source of termination power.
To enable external termination power for the SCSI bus
connect pins 5 and 7 of J6
To enable internal termination power to the SCSI bus connect
pins 7 and 8 of J6
83
AUTOCUE LTD. 2002
Page 84

WINCUE USER GUIDE APPENDIX B
B4 SCSI ID - SW2
By default, SCSI ID is set to 3. It can be changed using dipswitches 1,2 and
3 on SW2.
When a dipswitch is in the top position it is on. When it is in the bottom
position it is off. The dipswitch positions for each SCSI ID is shown in the
table below:
SCSI ID
1 2 3
Dip Switches
0 On On On
1 On On Off
2 On Off On
3 On Off Off
4 Off On On
5 Off On Off
6 Off Off On
7 Off Off Off
B4 SCSI/Parallel Select - SW2
The I.M.T. card can prompt using data sent through either the SCSI port or
parallel port of your PC. By Default it is set up to use SCSI. Dip switches 4
on SW2 controls whether the SCSI or parallel port is used.
84
AUTOCUE LTD. 2002
Page 85

WINCUE USER GUIDE APPENDIX B
When a dipswitch is in the top position it is on. When it is in the bottom
position it is off. The dipswitch positions for SCSI/parallel port selection is
shown in the table below:
Port
4
Dip Switch
SCSI Off
Parallel On
B5 Video (PAL or NTSC) - J11
The I.M.T. card can produce either a PAL or NTSC composite video signal.
The signal available from the composite video port will have been set at the
factory, prior to dispatch. The signal type can be changed by setting a
jumper on J11 (Card Issue 1) or with switch 3 (Card Issue 2).
Issue 1 Issue 2
To enable NTSC place a jumper on leftmost
pins of J11, or turn Switch 1 on.
To enable PAL remove the jumper on
leftmost pins of J11, or turn Switch 1 off.
85
AUTOCUE LTD. 2002
Page 86

WINCUE USER GUIDE APPENDIX B
SECAM
To configure the I.M.T. card for SECAM composite video output use the
same jumper setting as PAL on J11. In the WinCueNews software, from
the Prompt menu choose Configuration then Prompt Engine and ensure
that Colour Burst is disabled. These settings will generate a mono
composite output.
B6 Internal and External Power Supply - J12
If there is not an ISA slot available in your PC for the I.M.T card you will
have to use the J12 External Power Header (as shown in the diagram
below) to connect the IMT card to your PCs power supply. To do this firstly
check to see if you have a free power socket in your PC, then use the
supplied power adapter cable to connect the J12 External Power Header
to a free Power Header on your PCs power supply.
J12 External
Power Header
4 Way Power
Plug
In systems where the I.M.T. card is not fitted inside the PC, it is powered by
an external power supply. This power supply is connected to J12. This
86
AUTOCUE LTD. 2002
Page 87

WINCUE USER GUIDE APPENDIX B
appears as an 8-pin connector on Issue 1 cards, and a 3-pin connector on
Issue 2 cards.
If you need further information about powering the I.M.T. card from an
external power supply please contact your supplier.
B6 Composite Video Features Connector - J10
The Composite Video Features connector allows additional 4 composite
video ports to be added to your PC. To find out more about this product
contact your supplier.
Do not attach anything to any of the pins on J10.
B6 Other Jumpers
J1 and J5
J1 is the debug port. It supplies serial debugging information. Do not attach
anything to any of its pins.
J5 is the flash reset port. Do not attach anything to any of its pins.
87
AUTOCUE LTD. 2002
Page 88

WINCUE USER GUIDE APPENDIX C
Appendix C Wiring Diagrams
The following Appendix contains wiring diagrams to aid you in connecting WinCue in a number of
configurations. You may find that many of the wiring diagrams are not appropriate for your system.
Contents
Standalone Prompter Wiring Diagram C2
Laptop and I.M.T. Box Wiring Diagram (UK) C3
Laptop and IMT Box Wiring Diagram (US) C4
Standalone Edit Station Wiring Diagram C5
Network Prompter Wiring Diagram C6
88
AUTOCUE LTD. 2002
Page 89

WINCUE USER GUIDE APPENDIX C
Video Distribution
C2 Standalone Prompter Wiring Diagram
Power to
Monitor
VGA Port
Genlock
Port
Amplifier
(Optional
Internal)
To Mains
Power
Supply
Key
- Essential cabling
- Optional cabling
89
AUTOCUE LTD. 2002
Page 90

WINCUE USER GUIDE APPENDIX C
SCSI Card
Video
C3 Laptop and I.M.T. Box Wiring Diagram (UK)
On Camera Units
Genlock
Input
I.M.T. Scroll Control
Laptop Computer
PCMCIA
Out
Parallel
Port
SCSI
Port
Powering the I.M.T. Box:-
Choose between mains power supply and 12 volts DC
Page 91

WINCUE USER GUIDE APPENDIX C
SCSI Card
Video
Power
C4 Laptop and I.M.T. Box Wiring Diagram (US)
On Camera Units
Laptop Computer
PCMCIA
Genlock
Input
Out
I.M.T. Scroll Control
Powering the I.M.T. Box: AC or DC Power
AC On/Off Power
SCSI Port
DC Power
DC Fuse
On/Off DC
Page 92

WINCUE USER GUIDE APPENDIX C
C5 Standalone Edit Station Wiring Diagram
Power to
VGA Monitor
Security
Sentinel
VGA Port
To Mains
Power
Supply
92
AUTOCUE LTD. 2002
Page 93

WINCUE USER GUIDE APPENDIX C
Video Distribution
C6 Network Prompter Wiring Diagram
Power to
Monitor
Amplifier
(Optional
Internal)
VGA Port
Genlock
Port
To Mains
Power
Supply
Key
- Essential cabling
- Optional cabling
Ethernet Hub
93
AUTOCUE LTD. 2002
Page 94

WINCUE USER GUIDE APPENDIX D
Appendix D WinCue Tool Buttons and Keyboard Shortcuts
Rundowns: Tools and Shortcuts
Function Toolbar Button Shortcut Menu Command
New File
Open File
Open Queue
Copy
Paste
Change Layout
Favourites
Begin Prompting
Stop Prompting
Edit at Prompt position
Jump Prompt to Editor
CTRL+Q
CTRL+INS
SHIFT+INS
F11
SHIFT+F11
ALT+FN
ALT+FO
ALT+FQ
ALT+EC
ALT+EP
ALT+VL
ALT+FV
ALT+PB
ALT+PS
ALT+PE
ALT+PJ
Panes
Function
Zoom pane
UnZoom pane
Close contents of pane
Toolbar Button
Shortcut
CTRL+ALT+Z
CTRL+ALT+Z
Change Active Pane CTRL+TAB
Horizontal Splitter Mode
Vertical Splitter mode
Mirror Splitter
ALT+WMH
ALT+WMV
ALT+WMM
94
AUTOCUE LTD. 2002
Page 95

WINCUE USER GUIDE APPENDIX D
On Highlighted items in Rundown
Function
Shortcut
Menu Command
Insert New Script INSERT ALT+SN
Insert New Break Script ALT+INSERT ALT+SB
Delete Item DELETE ALT+SD
Edit Script ENTER ALT+SE
View Script CTRL+ENTER ALT+SV
Toggle Hold state ALT+F3 ALT+SH
Toggle Break/Normal state ALT+SC
Lock/Unlock item ALT+SL
Approve Story ALT+SA
95
AUTOCUE LTD. 2002
Page 96

WINCUE USER GUIDE APPENDIX D
Centre / Rig
ht
window
window
script
Script Editor: Tools and Shortcuts
Function Button
Cut
Copy
Paste
Change to plain text
Bold
Underline
Italic
Inverse
Change case of text
Font
Change colour: White
/ Red / Green / Blue /
Shortcut
CTRL+X
CTRL+C
CTRL+V
CTRL+R
CTRL+B
CTRL+U
CTRL+I
CTRL+E
CTRL+L
CTRL+F
Menu Command
ALT+ET
ALT+EC
ALT+EP
ALT+TR
ALT+TB
ALT+TU
ALT+TI
ALT+TV
ALT+TH
ALT+TF
CTRL+1/2/3/4/5
ALT+TC, D/R/G/B/Y
Justify Text: Left /
CTRL+SHIFT+L/C/R
AutoScale script to fit
AutoScale column to fit
Manually scale the
Increase Script size
Decrease Script size
Select all text in
CTRL+ALT+PgUp
CTRL+ALT+PgDown
CTRL+A
Insert Presenter Keypad+, P
Insert Caption Keypad+, G
Undo CTRL+Z
ALT+TJ, L/C/R
ALT+VSS
ALT+VSC
ALT+VSM
ALT+VSI
ALT+VSD
ALT+ES
ALT+IP
ALT+IAC
96
AUTOCUE LTD. 2002
Page 97

WINCUE USER GUIDE APPENDIX D
Captioned
Results
Search Results
Redo CTRL+Y
CTRL+M or
Insert Marker
Keypad+,M
Mark text as Not
Mark text as Not
CTRL+N
CTRL+P
Prompted
Commit changes
F7
Swap columns ALT+ /
Go to Next Script F6
Go to Previous Script SHIFT+F6
Find CTRL+F3
Find Next F3
ALT+IM
ALT+TN
ALT+TP
ALT+SC
ALT+SN
ALT+SV
ALT+EF
ALT+EN
Find Previous SHIFT+F3
Replace CTRL+H
Exit Script
Next Hit in Search
Previous Hit in
SHIFT+F4
ESCAPE
F4
Hard page break CTRL+ENTER
Go to end of script CTRL+END
Go to start of script CTRL+HOME
ALT+EV
ALT+ER
97
AUTOCUE LTD. 2002
Page 98

WINCUE USER GUIDE APPENDIX E
Appendix E Wiring
E1 WinCue Multibutton Hand Control
E1.1 WinCue IMT card 9 way d connections
1 0v
2 0v
3 gnd
4 +5
5 +5
6 pot
7 n/c
8 marker
9 fwd/rev
pot = 10k
E1.2 9 way d Serial port connections
2……..rd……..brown
4……..dtr……..yy
5……..gnd……..ww
e
l
l
o
ww
y
e
l
l
o
e
l
l
o
w
h
i
t
ee
w
h
i
t
h
i
t
e
7……..rts……..purple
dtr and rts are used to generate the supply voltage
E1.3 P4 Multibutton Remote Connector 15 Pin D Male
9……..+ 5v……..Red
10……..0v……..Black
11……..Pot……..Green
12……..Fwd/Rev……..Blue
500k pot for Foot control
E2 2 button Serial Hand Control
E2.1 9 way d Serial port connections
2……..rd……..Red
4……..dtr……..Blue
5……..gnd……..Green
7……..rts……..YY
dtr and rts are used to generate the supply voltage
e
l
l
o
ww
Y
e
l
l
o
e
l
l
o
w
E3 2 button IMT Hand Control
E3.1 IMT Hand control
1……..5v……..Red
98
AUTOCUE LTD. 2002
Page 99

WINCUE USER GUIDE APPENDIX E
5……..0v……..Black
6……..pot……..Green
Y
e
l
l
o
w
Y
e
l
l
o
8……..marker……..Y
w
e
l
l
o
w
9……..fwd/rev……..Blue
99
AUTOCUE LTD. 2002
Page 100

WINCUE USER GUIDE TECHNICAL SUPPORT
Technical Support
For more technical help or advice please contact our
Technical Support Help Line:
+44 (0) 20-8665 2992
Or email
support@autocue.co.uk
100
AUTOCUE LTD. 2002
 Loading...