

Page 1

SSPi
iPhone-based Prompter
Assembly Guide
Page 2

Contents
Latest additions ................................................................................................................................................................... 3
Getting started ..................................................................................................................................................................... 4
Prepare and connect the prompting hardware ....................................................................................................... 4
Use your prompter in different situations ....................................................................................................................... 7
If you need to contact Autocue ..................................................................................................................................... 12
SSP-iUserManual.docx 2011-06-14 2 © 2003-2011 Autocue Group Ltd.
Page 3

Build number
Release date
Changes
Latest additions
This document is a guide for assembling the hardware which enables you to use you iPhone as an oncamera unit.
Any changes since that point have been referenced below. These changes have not been reflected in the
rest of the document.
Revision history
SSP-iUserManual.docx 2011-06-14 3 © 2003-2011 Autocue Group Ltd.
Page 4
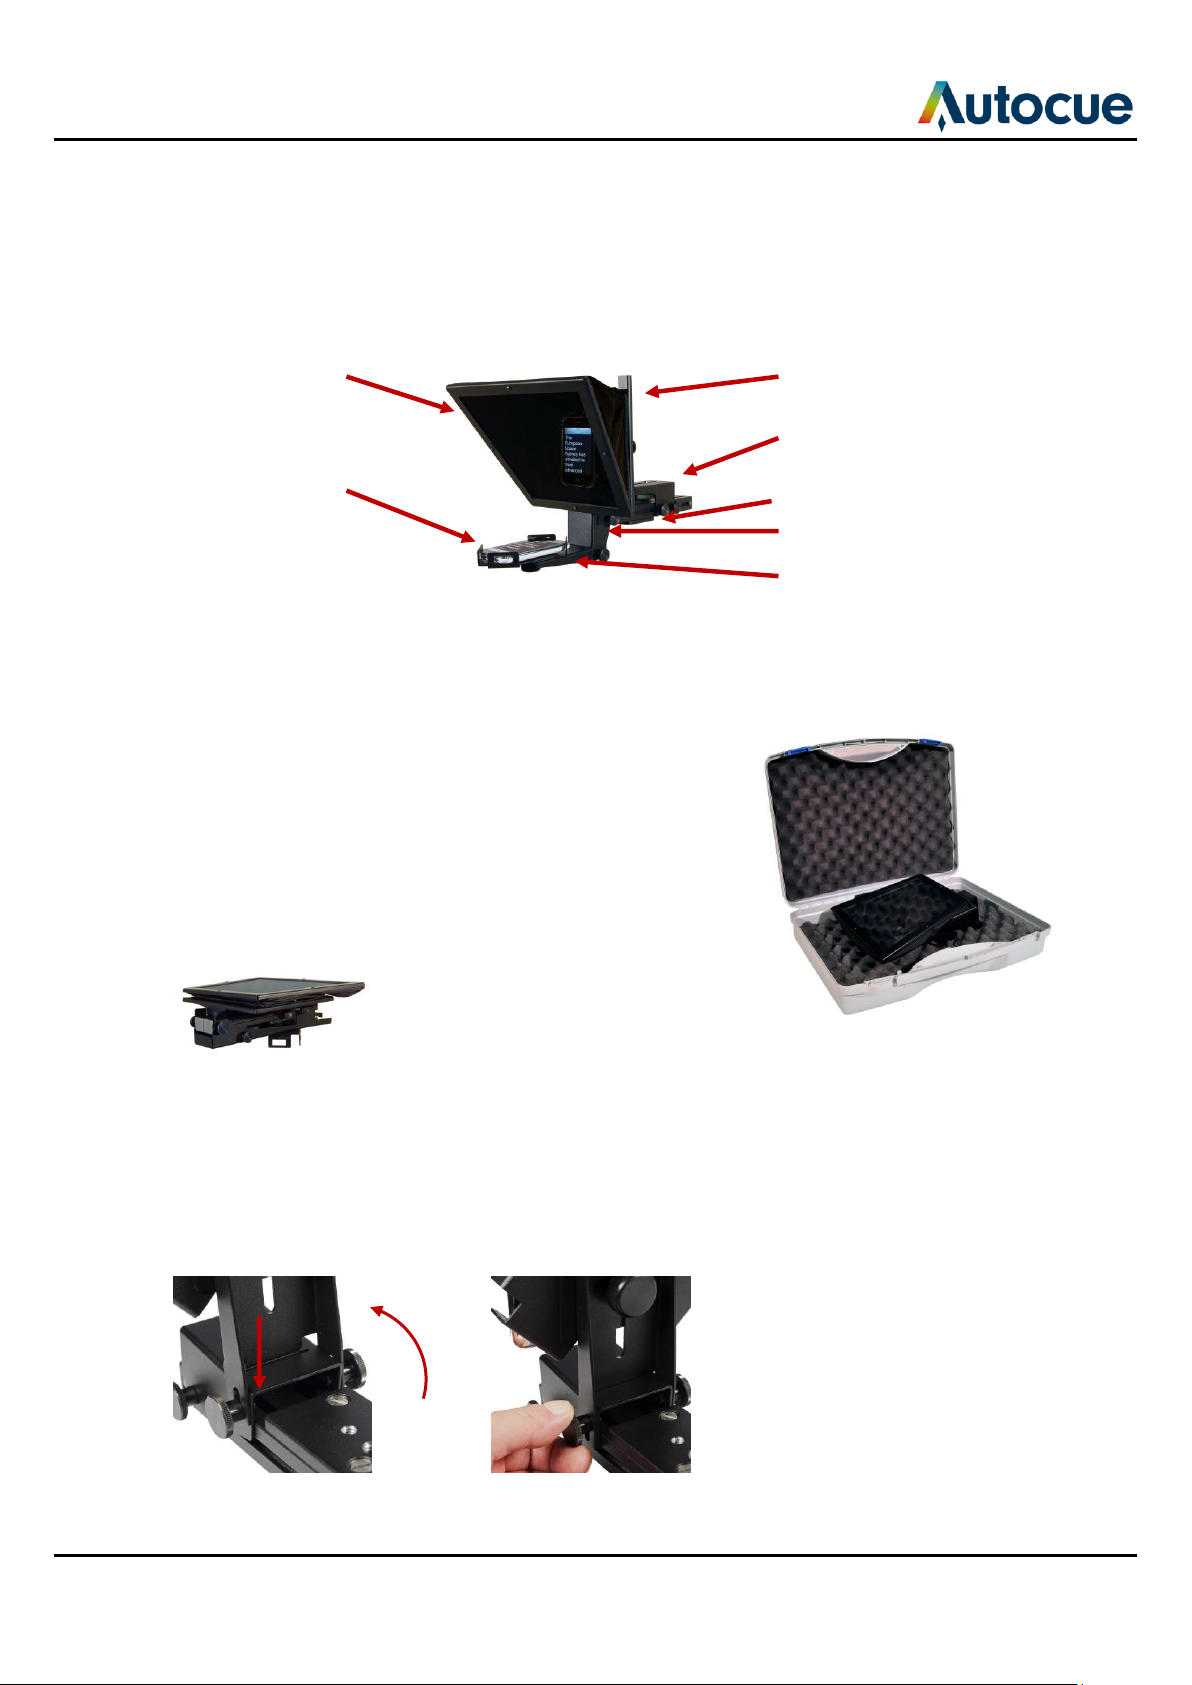
Hood and glass
iPhone Adaptor
(iPhone not supplied)
Hood mounting
bracket
Camera mounting
bracket
Slider plate
Drop bracket
Monitor mounting
plate
Getting started
This section is designed to get your Starter Series Prompter setup as quickly as possible so that you can start
writing and prompting your scripts.
Components of the SSPi
Prepare and connect the prompting hardware
1. Unpack your SSPi and check that the following items
have been received:
a. Starter Series Prompter (SSPi) (one only)
b. Custom carry case
2. Remove unit from its case and carefully place the
glass/hood, face down, onto a smooth clean level
surface.
3. Loosen the thumbscrews holding the monitor assembly and raise the iPhone
Adaptor.
4. Align the metal tongue of the monitor mounting plate with the slot in the drop
bracket and carefully insert the tongue into the slot.
5. Tighten the thumbscrews to secure the monitor assembly.
SSP-iUserManual.docx 2011-06-14 4 © 2003-2011 Autocue Group Ltd.
4 5
Page 5

6. Attach the tripod camera mounting plate to the slider plate on the underside of the
SSPi unit.
7. Slide the on-camera unit onto your tripod.
8. Loosen the two thumbscrews holding the monitor and hood assemblies.
9. Rotate the monitor assembly so that the monitor is horizontal.
10. Raise the hood assembly to the vertical position and tighten the thumbscrews.
Note: The hood mounting bracket should fit over the drop bracket and hold it securely in
position.
11. Loosen the retaining thumbscrews holding the camera mounting bracket.
12. Rotate the camera mounting plate so that it is on the top of the unit and behind the
hood.
13. Slot the bracket over the thumbscrews and tighten all four thumbscrews to secure it.
SSP-iUserManual.docx 2011-06-14 5 © 2003-2011 Autocue Group Ltd.
Page 6

Note: It is likely that the position of the unit will have to be adjusted after you have
mounted your camera so that it is balanced on the tripod. A balanced camera and
prompter assembly will make it easier to perform smooth pan and tilt shots.
SSP-iUserManual.docx 2011-06-14 6 © 2003-2011 Autocue Group Ltd.
Page 7

Use your prompter in different situations
You may not always need to use your prompter with a camera. The Starter Series hardware is designed to
allow you to put your iPhone adaptor in to alternative mounting arrangements depending on how you wish to
use your system.
When altering the position of the different hardware components, always handle
with care to avoid damaging them, especially the mirrored glass.
Straight-read (iPhone on adaptor below the camera with no mirror)
1. Attach the tripod camera mounting plate to the slider plate on the underside of the
SSP07 unit.
2. Slide the on-camera unit onto your tripod.
3. Remove the thumbscrews holding the hood and monitor assemblies in position.
SSP-iUserManual.docx 2011-06-14 7 © 2003-2011 Autocue Group Ltd.
Page 8

4. Remove the hood assembly completely and carefully place it in the SSP07 carry
case.
5. Remove the two thumbscrews attaching the monitor mounting bracket to the drop
bracket.
6. Remove the thumbscrews securing the iPhone Adaptor to the monitor mounting
bracket.
7. Align the hole on the back of the iPhone Adaptor with the hole in the centre of the
drop bracket and secure it position with the thumbscrew.
Portable teleprompter (iPhone on adaptor with hood and glass)
1. Remove unit from its case and carefully place the glass/hood, face down, onto a
smooth clean level surface.
SSP-iUserManual.docx 2011-06-14 8 © 2003-2011 Autocue Group Ltd.
Page 9

2. Loosen the thumbscrews holding the monitor assembly and raise the iPhone
Adaptor.
3. Align the metal tongue of the monitor mounting plate with the slot in the drop
bracket and carefully insert the tongue into the slot.
4. Tighten the thumbscrews to secure the monitor assembly.
4 5
5. Loosen the two thumbscrews holding the monitor and hood assemblies.
6. Rotate the monitor assembly so that the monitor is horizontal.
7. Raise the hood assembly to the vertical position and tighten the thumbscrews.
Note: The hood mounting bracket should fit over the drop bracket and hold it securely in
position.
8. Loosen the retaining thumbscrews holding the camera mounting bracket.
9. Rotate the camera mounting plate so that it is on the top of the unit and behind the
hood.
10. Slot the bracket over the thumbscrews and tighten all four thumbscrews to secure it.
SSP-iUserManual.docx 2011-06-14 9 © 2003-2011 Autocue Group Ltd.
Page 10

11. Attach an optional pistol grip to the slider plate on the underside of the SSPi unit.
Portable straight-read (iPhone on adaptor below the camera with no mirror)
1. Place your SSPi on a smooth, level surface.
2. Remove the thumbscrews holding the hood and monitor assemblies in position.
3. Remove the hood mounting bracket completely and carefully place it in the SSPi
carry case.
4. Remove the two thumbscrews attaching the monitor mounting bracket to the drop
bracket.
SSP-iUserManual.docx 2011-06-14 10 © 2003-2011 Autocue Group Ltd.
Page 11

5. Remove the thumbscrew securing the iPhone Adaptor to the monitor mounting
bracket.
6. Align the hole on the back of the iPhone Adaptor with the hole in the centre of the
drop bracket and secure it to the drop plate with the thumbscrew.
7. Attach an optional pistol grip to the slider plate on the underside of the SSPi unit.
SSP-iUserManual.docx 2011-06-14 11 © 2003-2011 Autocue Group Ltd.
Page 12

If you need to contact Autocue
Support
Our hardware and software support is provided by in-house teams of experienced and dedicated staff.
We provide free telephone support for prompting customers during UK office hours (9am till 6pm GMT) and
US office hours (9am till 5pm EST). When contacting the technical support teams, please provide as much
detail as possible.
Check the FAQ section of the web site to see if the answer you need has already been provided:
http://www.autocue.com/faqs
Information we need
Whenever you make a support enquiry, the minimum information we will need is the name, version and build
number of the software you are using.
Click the About button to display the licence and serial number details for the software you have installed.
If you cannot find the answer on the web site, contact the Technical Support team.
International SoftwareSupport@autocue.com +44 20 8665 2992
HardwareSupport@autocue.com +44 20 8665 2992
Americas SoftwareSupport@autocue.com +1 704 377 1496
HardwareSupport@autocue.com +1 212 929 7755
Sales
If you require additional or replacement equipment, contact the Autocue-QTV sales team.
International sales@autocue.com +44 20 8665 2992
Americas sales@autocue.com +1 212 929 7755
Copyright information
©2003-2010 Autocue Group Ltd. All rights reserved. All information about Autocue software, hardware and
accessories—including company and brand logos—contained in this guide is protected under international
copyright conventions.
No part of this publication may be reproduced, stored in a retrieval system, or transmitted in any recording
or otherwise, without prior permission of Autocue Group Ltd. All third-party software or hardware, including
logos, referenced within this guide is copyright of the respective owners.
Disclaimer
Autocue Group Ltd reserves the right to revise this publication and to make changes in its content without
obligation of Autocue Group Ltd to notify any person or persons of such revision.
SSP-iUserManual.docx 2011-06-14 12 © 2003-2011 Autocue Group Ltd.
 Loading...