

Aukey BR-08 operation manual

2-in-1 Wireless Transmitter and Receiver
User Manual

Contents
English
Deutsch 14 ~ 25
Français
Español
Italiano
01 ~ 13
26 ~ 37
38 ~ 49
50 ~ 61

Thank you for purchasing the AUKEY BR-O8 2-in-1 Wireless Transmitter and Receiver.
Please read this user manual carefully and keep it for future reference. If you need
any assistance, please contact our support team with your product model number
and Amazon order number.
Package Contents
2-in-1WirelessTransmitter and Receiver
Micro-USB Cable
3.5mm Audio Cable
3.5mm to RCA Audio Cable
Toslink Optical Cable
User Manual
Warranty Card
- 01 -

Specifications
Model
Technology
Frequency Range
Input
Operating Range
Dimensions
Weight
BR-O8
BT 5.0, aptX, aptX-LL
2.402GHz – 2.480GHz
DC 5V
Up to 50m / 164ft
113 x 110 x 73mm / 4.45” x 4.33” x 2.87”
300g / 10.58oz
- 02 -
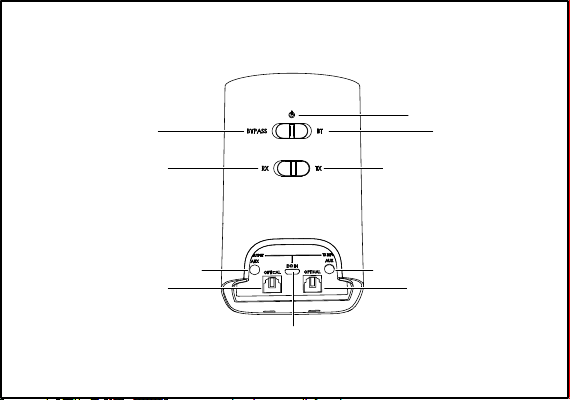
Product Diagram
Bypass Mode
Receiver Mode
3.5mm Audio Output
Optical Output
Powered Off
BT Mode
Transmitter Mode
3.5mm Audio Input
Optical Input
Charging Input
- 03 -

Getting Started
Receiver Mode (RX Mode)
1.
Connect one end of the included 3.5mm audio cable or Toslink optical cable to
the 3.5mm audio output or optical output of BR-O8. Connect the other end to
your wired audio equipment (wired headphones, speaker, or stereo system). You
can also plug your audio equipment cable directly into BR-O8 instead
2.
Connect the BR-O8 to a power source with the micro-USB cable
3.
Slide the RX/TX switch to “RX” position and slide the Power/Mode switch to “BT”
position
4.
Tap and hold for 3 seconds, and the BR-O8 will enter pairing mode with the
square connection status indicator flashing white rapidly
5.
Activate the pairing function of your wireless-compatible audio device (like a
smartphone) and select “AUKEY BR-O8”
6.
Once paired, there will be a solid white “A” indicator on the display
7.
If you want to pair with a second wireless-compatible audio device for dual
device connection, repeat steps 4 & 5 with that device
Once paired, there will be solid white “A” and “B” indicators on the display
8.
- 04 -

Notes for Receiver Mode
●
If your speaker or stereo system has left & right channel RCA inputs (colored white
and red respectively), you can use the included RCA cable to connect instead
When simultaneously connected with two devices, the BR-O8 can only accept
●
audio input from one device at a time
Transmitter Mode (TX Mode)
1.
Connect one end of the included 3.5mm audio cable or Toslink optical cable to
the 3.5mm audio input or optical input of BR-O8. Connect the other end to your
audio source device (TV, computer, DVD player, CD player, or MP3 player) that
doesn’t have wireless function
2.
Connect the BR-O8 to a power source with the micro-USB cable
3.
Slide the RX/TX switch to “TX” position. Then slide the Power/Mode switch to “BT”
position
4.
Tap and hold for 3 seconds, and the BR-O8 will enter pairing mode with the
square connection status indicator flashing green rapidly
5.
Activate the pairing function of your wireless-compatible audio device (like
wireless headphones or speaker). Keep your device close to the BR-O8 and they
will pair automatically
- 05 -

6.
Once paired, there will be a solid white “A” indicator on the display
7.
If you want to pair with a second wireless-compatible audio device for dual
device connection, repeat steps 4 & 5 with that device
Once paired, there will be solid white “A” and “B” indicators on the display
8.
Note for Transmitter Mode
If your TV, DVD player, or CD player has left & right channel RCA outputs (colored white
●
and red respectively), you can use the included RCA cable to connect instead
Notes for Receiver & Transmitter Modes
●
When you turn on the BR-O8, it will automatically reconnect to the last-paired
device
●
The BR-O8 will exit pairing mode after 1 minute
●
To clear the pairing list, tap and hold for 8 seconds in RX or TX Mode
●
The maximum wireless operating range is 50m (164ft). If you exceed this range,
the BR-O8 will disconnect from your paired device. The connection will be
re-established once you re-enter the wireless range within 5 minutes
- 06 -

Bypass Mode
1.
Connect an audio source device (TV, computer, DVD player, CD player, or MP3
player) to the BR-O8 3.5mm audio input or optical input with the included 3.5mm
audio cable or optical cable
2.
Connect your wired audio equipment (wired headphones, speaker, or stereo
system) to BR-O8 3.5mm audio output or optical output with a 3.5mm audio cable
or optical cable
3.
Connect the BR-O8 to a power source with the micro-USB cable
4.
Slide the Power/Mode switch to “BYPASS” position
5.
Tap to select the audio input mode “AUX” or “OPT”
6.
Once connected, you can enjoy boosted sound from your wired audio equipment
Note
●
Only one of each cable type is included, so you will need to use two different
cable types to connect your two devices to BR-O8 (or supply a second cable if
you want to use two the same). If your connected audio equipment has left &
right channel RCA outputs (colored white and red respectively), you can also use
the included RCA cable to connect
- 07 -
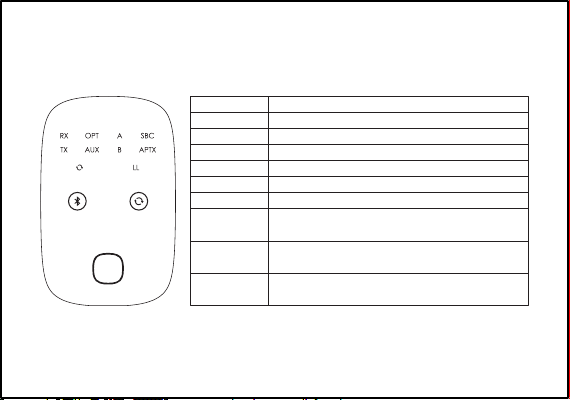
Status Indicators
Indicator
RX
TX
OPT
AUX
A
B
SBC
APTX
LL
Status
Receiver mode
Transmitter mode
Optical audio input mode
3.5mm audio input mode
Device A connected
Device B connected
Connected Bluetooth device supports
Connected Bluetooth device supports
Connected Bluetooth device supports
- 08-
SBC audio codec
aptX audio codec
aptX Low Latency audio codec
Bluetooth Audio Codecs (for Receiver and Transmitter Modes)
Bluetooth audio codecs encode digital audio data for transmission over Bluetooth
connection and decode it at the other end. SBC is a standard codec for Bluetooth
audio streaming. aptX offers lower latency (less audio delay when watching videos or
playing games) and improved audio quality. aptX Low Latency has the best
performance of the three with much lower latency. BR-O8 supports all three codecs, so
the codec used will be the best one your connected Bluetooth device supports.
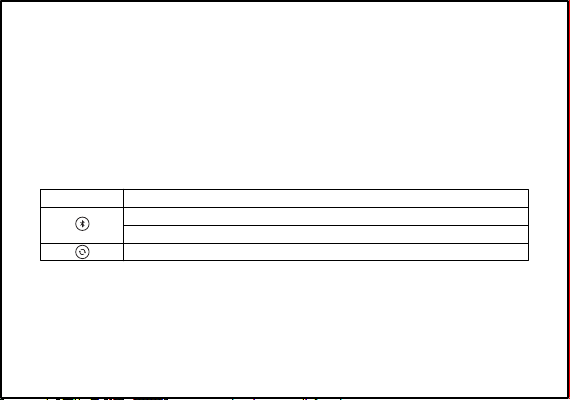
Controls Summary
Note
Button
Tap and hold for 3 seconds to enter pairing mode
Tap to play or pause (receiver mode only)
Tap to switch between 3.5mm and optical audio input modes
Use your device to adjust volume●
Operation
- 09 -

Connections Status Indicators
Indicator
Green flashing slowly
Green flashing rapidly
Green
White flashing slowly
White flashing rapidly
White
Mode Status
Transmitter mode
Receiver mode
Not connected (standby)
Pairing
Connected
Not connected (standby)
Pairing
Connected
Product Care & Use
●
Keep away from liquids and extreme heat
●
Don’t use headphones or speakers at high volume for extended periods, as this
may cause permanent hearing damage or loss
- 10 -

Warranty & Customer Support
For questions, support, or warranty claims, contact us at the address below that
corresponds with your region. Please include your Amazon order number and
product model number.
Amazon US orders: support.us@aukey.com
Amazon EU orders: support.eu@aukey.com
Amazon CA orders: support.ca@aukey.com
*Please note, AUKEY can only provide after sales service for products purchased directly from AUKEY.
If you have purchased from a different seller, please contact them directly for service or warranty
issues.
Notice for the US
Changes or modifications not expressly approved by the party responsible for
compliance could void the user's authority to operate the equipment.
FCC Statement
This device complies with Part 15 of the FCC Rules. Operation is subject to the following
two conditions:
- 11 -

1.
This device may not cause harmful interference.
2.
This device must accept any interference received, including interference that
may cause undesired operation.
NOTE: This equipment has been tested and found to comply with the limits for a Class
B digital device, pursuant to Part 15 of the FCC Rules. These limits are designed to
provide reasonable protection against harmful interference in a residential
installation.
This equipment generates, uses, and can radiate radio frequency energy and, if not
installed and used in accordance with the instructions, may cause harmful
interference to radio communications. However, there is no guarantee that
interference will not occur in a particular installation. If this equipment does cause
harmful interference to radio or television reception, which can be determined by
turning the equipment off and on, the user is encouraged to try to correct the
interference by one or more of the following measures:
- 12 -

●
Reorient or relocate the receiving antenna.
●
Increase the separation between the equipment and receiver.
●
Connect the equipment into an outlet on a circuit different from that to which the
receiver is connected.
Consult the dealer or an experienced radio/TV technician for help.
●
This equipment complies with FCC RF radiation exposure limits set forth for an
uncontrolled environment.
- 13 -

Vielen Dank, dass Sie sich für den BR-O8 2-in-1kabelloserTransmitter und Receiver
von AUKEY entschieden haben. Bitte lesen Sie diese Bedienungsanleitung
aufmerksam durch und bewahren Sie sie für zukünftige Referenz gut auf. Sollten
Sie darüber hinaus Fragen oder Probleme haben, hilft Ihnen unser freundlicher
Kundenservice gerne weiter. Halten Sie Ihre Produktmodell -Nummer und
Amazon-Bestellnummer bereit.
Lieferumfang
2-in-1kabelloserTransmitter und Receiver
Micro-USB-Kabel
3,5-mm-Audiokabel
3,5-mm- zu RCA-Audiokabel
optisches TOSLINK-Kabel
Bedienungsanleitung
Garantiekarte
- 14 -

Technische Daten
Modell
Technologie
Frequenzbereich
Eingang
Reichweite
Abmessungen
Gewicht
BR-O8
BT 5.0, aptX, aptX-LL
2.402GHz – 2.480GHz
DC 5V
50m
113 x 110 x 73mm
300g
- 15 -

Product Diagram
Bypass-Modus
Receiver-Modus
3,5-mm-Audioausgang
Optischer Ausgang
Auschalten
BT-Modus
Transmitter-Modus
3,5-mm-Audioeingang
Optischer Eingang
Ladeeingang
- 16 -

Erste Schritte
Receiver-Modus (RX-Modus)
1.
Verbinden Sie das eine Ende des mitgelieferten 3,5-mm-Audiokabels oder des
optischen TOSLINK-Kabels mit dem 3,5-mm-Audioausgang oder dem optischen
Ausgang des BR-O8. Verbinden Sie das andere Ende mit Ihrem kabelgebundenen
Audiogerät (Kopfhörer, Lautsprecher oder Stereoanlage). Sie können Ihr Audiogerät
alternativ auch direkt per Kabel mit dem BR-O8 verbinden
2.
Verbinden Sie den BR-O8 über das Micro-USB-Kabel mit einer Stromquelle
3.
Schieben Sie den RX/TX-Schalter in die „RX“-Stellung und schieben Sie den
Power/Modus-Schalter in die „BT“-Stellung
4.
Drücken und halten Sie 3 Sekunden lang, damit der Pairing-Modus des BR-O8
aktiviert wird – die viereckige Verbindungsstatusanzeige blinkt schnell weiß
5.
Aktivieren Sie die Pairing-Funktion an Ihrem kabellos-kompatiblen Audiogerät (z.
B. einem Smartphone) und wählen Sie „AUKEY BR-O8“
Nach dem Pairing leuchtet auf dem Display ein weißes „A“
6.
Wenn Sie ein zweites kabellos-kompatibles Audiogerät für eine zweite Verbindung
7.
koppeln wollen, wiederholen Sie die Schritte 4 & 5 mit diesem Gerät
Nach dem Pairing leuchten auf dem Display ein weißes „A“ und „B“
8.
- 17 -

Hinweise für den Receiver-Modus
●
Falls Ihr Lautsprecher oder Ihre Stereoanlage über einen linken und einen rechten
RCA-Eingang verfügt (weiß bzw. rot), können Sie stattdessen über das mitgelieferte
RCA-Kabel eine Verbindung herstellen
Wenn zwei Geräte gleichzeitig verbunden sind, kann der BR-O8 nur das Audiosignal
●
von einem Gerät empfangen
Transmitter-Modus (TX-Modus)
1.
Verbinden Sie das eine Ende des mitgelieferten 3,5-mm-Audiokabels oder des
optischen TOSLINK-Kabels mit dem 3,5-mm-Audioeingang oder dem optischen
Eingang des BR-O8. Verbinden Sie das andere Ende mit Ihrem Audioquellgerät
(Fernseher, Computer, DVD-Player, CD-Player oder MP3-Player), das über keine
kabellose Funktion verfügt
2.
Verbinden Sie den BR-O8 über das Micro-USB-Kabel mit einer Stromquelle
3.
Schieben Sie den RX/TX-Schalter in die „TX“-Stellung. Dann schieben Sie den
Power/Modus-Schalter in die „BT“-Stellung
Drücken und halten Sie 3 Sekunden lang, damit der Pairing-Modus des BR-O8
4.
aktiviert wird – die viereckige Verbindungsstatusanzeige blinkt schnell grün
- 18 -
 Loading...