


KETRON

STYLE COMPILER MANUAL
Audya Style Structure
2 KETRON • AUDYA STYLE COMPILER
Audya Style Structure
Audya Style Structure
The Audya Style structure is compounding by 4 x Main Arranger (A, B, C, D) , 4 Fill ins,
4 Breaks, 3 Intro and 3 Ending.
How to program a Midi file suitable for Audya Style
▀
A Midi file suitable for Audya Style must be programmed as single Midi file ( 0 format) with related Marker for the
following section: (please refer to the file KetronStyleSetUp.mid).
4 Arranger: A , B , C, D. The standard length of an arranger is typically 8 bars but also 2,4,16,24 and 32 bars are
accepted accordingly with different musical needs.
Important: if Audio Drums are used into the Style, on Midi part must have the same length of the Audio Drum file
(See chapter Audio Style Modeling).
For example, if the Audio Drum has a length of 8 bars and a Time signature of 4/4, also the Midi must be 8
measures and Time Sign. 4 / 4.
4 Fill Ins: A, B, C, D. 1 Bar. Each Fill on is related to its Arranger A, B, C and D.
4 Breaks: A, B, C, D. 1 Bar. Each i Break is related to its Arr.A, B, C and D.
Intro 1: Very short Intro only with drum and / or percussion.
End 1: Short Ending with a Corona stop.
The End 1 composing must be done straight on C Major without chord changing or melody lines. Most
of Live Guitar database are already programmed with an END 1 template (See chapter “Audio Style
Modeling”)
Intro 2: Typically a couple of bars programmed straight on C Major and Minor without chord changing or melody
lines.
End 2: Typically 2 or 3 bars plus and stop as Corona.
To be programmed straight on C Major and Minor without chord changing or melody lines. Most of Live
Guitar database are already programmed with END 2 templates (See chapter “Audio Style Modeling”)
Intro 3 – End 3: To be programmed on C Major and Minor with free harmonizations according to the music style.
Markers
Each Midi section must be well identified with some specific Markers properly assigned. Here the names to be
written for to each Marker, according with the Major, Minor or Seventh arrangement programmed:
MAJOR
ARRA_MAJ FILA_MAJ BRKA_MAJ INT1_MAJ END1_MAJ
ARRB_MAJ FILB_MAJ BRKB_MAJ INT2_MAJ END2_MAJ
ARRC_MAJ FILC_MAJ BRKC_MAJ INT3_MAJ END3_MAJ
ARRD_MAJ FILD_MAJ BRKD_MAJ
MINOR
ARRA_MIN FILA_MIN BRKA_MIN INT1_MIN END1_MIN
ARRB_MIN FILB_MIN BRKB_MIN INT2_MIN END2_MIN
ARRC_MIN FILC_MIN BRKC_MIN INT3_MIN END3_MIN
ARRD_MIN FILD_MIN BRKD_MIN
SEVENTH
ARRA_SEV FILA_SEV BRKA_SEV INT1_SEV END1_SEV
ARRB_SEV FILB_SEV BRKB_SEV INT2_SEV END2_SEV
ARRC_SEV FILC_SEV BRKC_SEV INT3_SEV END3_SEV
ARRD_SEV FILD_SEV BRKD_SEV

Audya Style Structure
KETRON • AUDYA STYLE COMPILER 3
The first measure of the Midi file file must have a single Marker on the first tick (step 1) and must be named as:
Audya Style 1.0.
The user will start to program his style events only from the second measure of the file.
The sequence’s order for the Midi parts programmed and for their respective Markers is free, for instance ARRA_
MAJ, INT3_MIN, FILLC_MAJ, etc.....), but all Sections and Markers must be written on following the other to avoid
empty measures.
Style Parts and Midi Channel
These are the parts and Midi Channels to be used for on Style section:
DRUM1 Ch 10 Drum Set 1
DRUM 2 Ch 9 Groove (Drum Set 2)
BASS Ch 5 Bass
CHORD1 Ch. 6 El Piano / Ac.Piano
CHORD2 Ch. 7 Ac Gtr / El Gtr
CHORD3 Ch. 8 Strings / Pad
CHORD4 Ch. 11 Orchestral
CHORD5 Ch. 12 Orchestral
All the Arranger parts must be programmed basically on C Major and C MInor or Seventh if requested. 1.
Audya will convert automatically to all inversions and will recognized the chord changes by internal
algorithms.
On the Midi file the following events and controls are accepted: 2.
Note On/Off, Bend, Modulation, Sustain, Expression, PanPot, Reverb, Chorus, Wha Wha (on:CC 84 value
127 – Off CC 84 value 0, continuous Controllers on CC 85
Value from 0 to 127), Portamento on/Off (on: CC 65 value 127, Off: CC 85 value 0),
Portamento Time CC 5 - continuous value from 0 to 127, Tempo Track (BPM).
The Audya Style Compiler 2009 tool will provide a detailed check for all data contents of the file on order 3.
to get the best music result. Furthermore the Style can be fully edited for sounds, levels, effects also on
the keyboard itself into the Style View menu (except for note informations) .
The Midi file must be saved with 4. 0 (zero) Format with all relative Markers on each sections (Resolution at
48 TPQ)
Please pay attention on Midi tracks do not record twice note or data on style part: this will be recognized 5.
as on error.
All events and Markers of a single track shouldn’t drop on other following sections or Markers.6.
Do not record Control Changes or Pitch Bend events on the same tick (note on /Off).7.
Do not leave twice events with different data on the same note (tick).8.
Here a view for the”KetronStyleSetUp.mid” for the program Cubase SX (R).

Audya Style Structure
4 KETRON • AUDYA STYLE COMPILER
Audya Style Structure
How to program the Live Guitar on the Midi file (Intro 3 - End 3 sections)
▀
User can create on Intro 3 (MAJ / MIN) and on Ending 3 (MAJ /MIN) free harmony sequences using the LIVE
GUITARS. Here the procedure to write Live Guitar informations on the Style:
(See also the Chapter “Audio Style Modeling” and ”Live Guitar on Intro-Ending”).
Kchords: on the first tick of the Channel 12 must be programmed a metaevent by typing the word ”KCHORDS”
(Caps case).
Program Changes: After the txt metaevent “KCHORDS” must be written the Live Guitar Program Change. on
Program Change is related to a single Live Guitar Chord tonality as on the following table:
Major Chords (from 1 to 12)
C Major
C# Major
D Major
D#Major
E Major
F Major
F# Major
G Major
G# Major
A Major
A# Major
B Major
: P. Ch. 1
: P. Ch. 2
: P. Ch. 3
: P. Ch. 4
: P. Ch. 5
: P. Ch. 6
: P. Ch. 7
: P. Ch. 8
: P. Ch. 9
: P. Ch. 10
: P. Ch. 11
: P. Ch. 12
Minor Chords (from 13 to 24)
C Minor
C# Minor
D Minor
D# Minor
E Minor
F Minor
F# Minor
G Minor
G# Minor
A Minor
A# Minor
B Minor
7th Chords (from 25 to 36)
Start1. . The Start Program change for Live Chord is the Progr. Change Number 125.
This must be inserted after the Chord tonality Program Change. 2.
Here on example:
: P. Ch. 13
: P. Ch. 14
: P. Ch. 15
: P. Ch. 16
: P. Ch. 17
: P. Ch. 18
: P. Ch. 19
: P. Ch. 20
: P. Ch. 21
: P. Ch. 22
: P. Ch. 23
: P. Ch. 24
(if exists )
First Tick 1.1.0 KCHORDS1)
Second Tick 1.1.1 1 (C Major)2)
Third Tick 1.1.2 125 (Start)3)
Stop3. . The Stop Program Change is Number 126 and will be used to stop the top the Live Guitar performance
on Intro 3 and End 3.

Audya Style Structure
KETRON • AUDYA STYLE COMPILER 5
Long Chord4. . It is possible also to insert Live Guitar Long Chord Program Changes with 127 (Long Chord
Slow”) or Program Change Number 128 (for Long Chord Fast).
Here on example:5.
7.1.0 Progr. Change 15 : D Minor
7.1.1 Progr. Change 127: D Minor - Fast Long Chord or
7.1.1 Progr. Change 128: D Minor - Slow Long Chord
7.1.2 Progr. Change 125: START
How to compile on Audya Style from the Midi file
▀
Once programmed your own Midi file for the Style, will be necessary to compile it by using the Audya Style
Compiler 2009. Install the Audya Style Compiler .exe program and run it:
Audya Style Compiler 2009 tool (Main View)
Create a Folder having the same name of the Style and copy there your Midi file.1.
On 2. Utility and Setting menu select your device.
Press 3. Compile Midi files and select the folder where your Midi is located.
The file will be compiled automatically. You will find a couple of files into the folder, on with extension 4. .pat
which is the final Pattern to be loaded into Audya and the other with the extension .bin which includes the
Style parameters only (see Edit Style: Working with Audya, Sequencer and Style Compiler for additional
details).
Now, if you want to edit and modify your Style as you like for Sections, Volumes, Program Changes, Pan Pot, 5.
Modes, Drum Mixer & Remap, Lowers, Effect and Audio you can press Audya Style Modify and load you
Pattern file already compiled.
Remember that you can copy the new Pattern directly into Audya –User Style folder , and you can edit the 6.
above Parameters on the Audya itself and then you can save the modified Style into User Style.
Edit Sections
6 KETRON • AUDYA
Volumes/Program Change
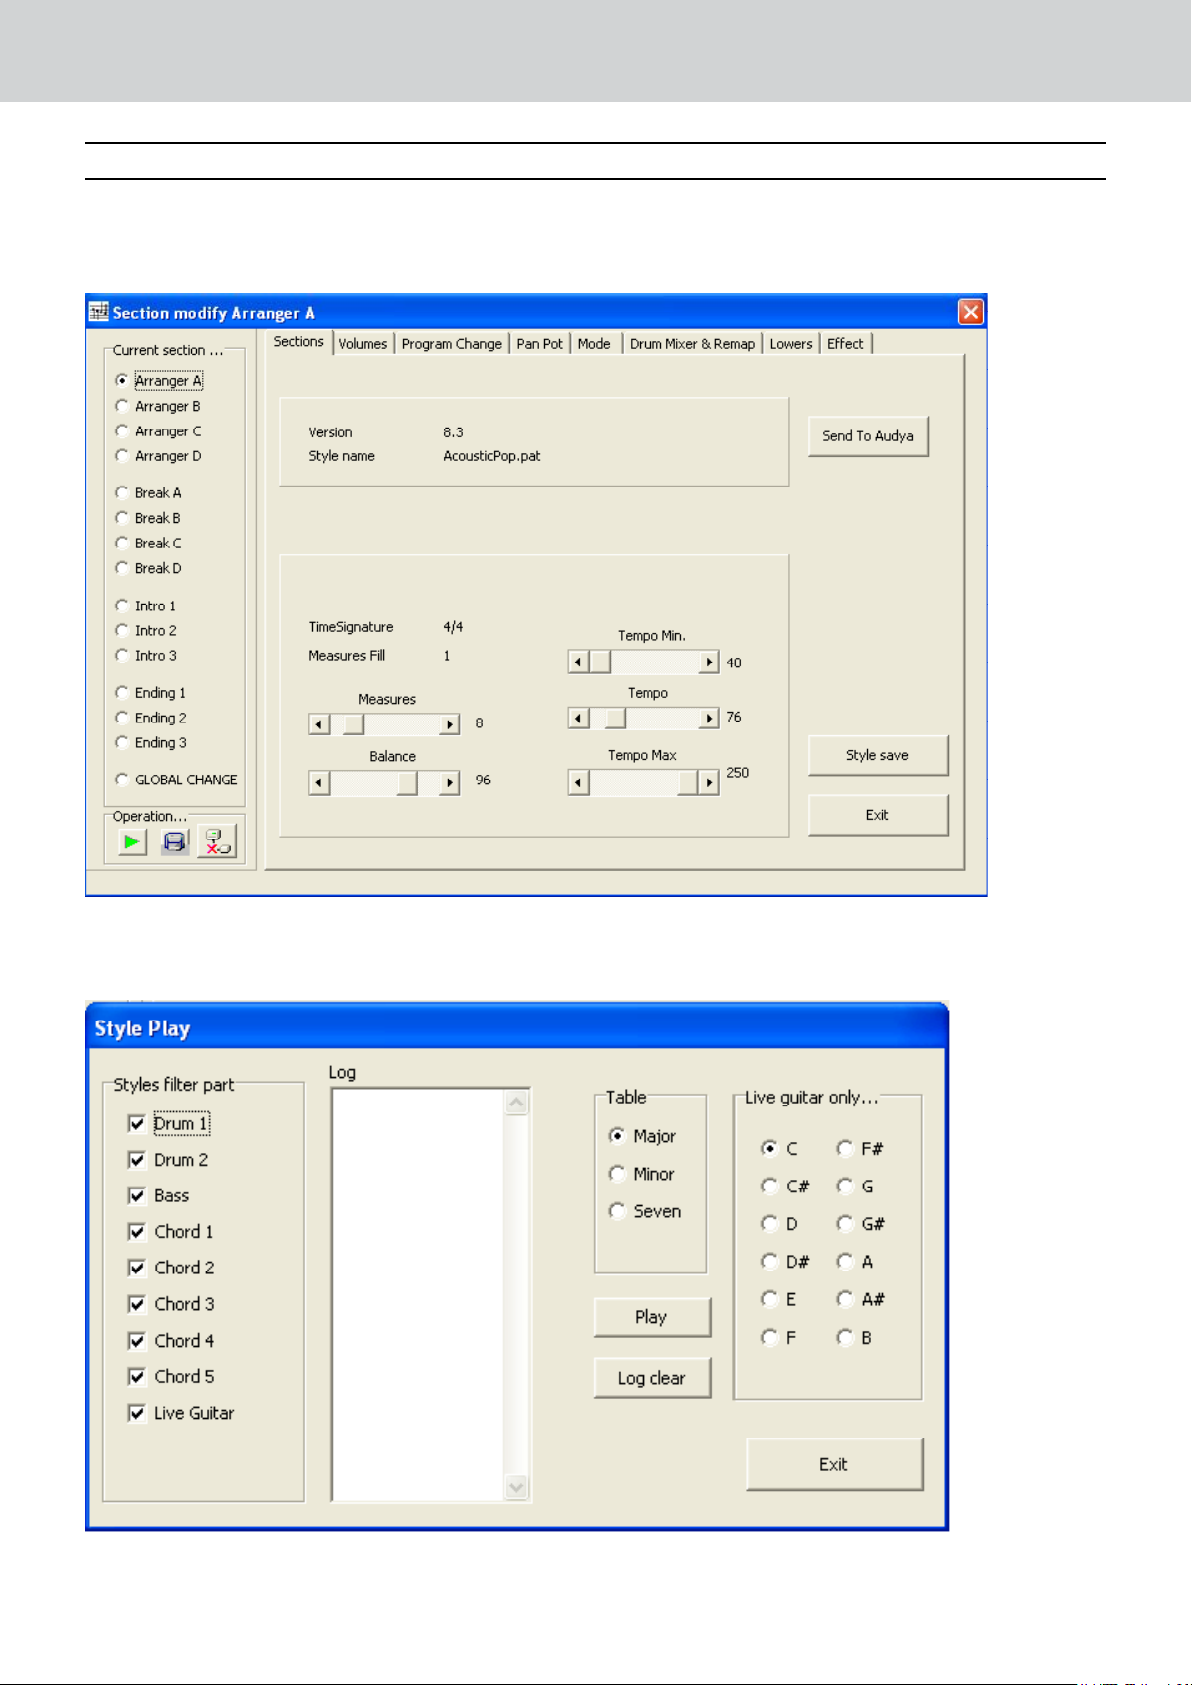
EDIT SECTIONS
On the top left corner of the following view you can select which section is to be modified.
Select a single section as the ARRANGER A (check related box) if you would to modify only Arranger A or select
GLOBAL CHANGE if you want to modify a single parameter for all the Arranger parts. Same procedure can be
used on all other menu of Audya Style Compiler.
Here you can modify the Style Tempo and the Tempo Range value min and max.
On the next view you can locate the Operation > PLAY button which will let you hear the Style parts selected:
 Loading...