

Page 1
APSP G7
INSTALLATION
MANUAL
rev. 1
Page 2

Page 3

INSTALLATION MANUAL
APSP G7 /
Table of Contents
1. PRODUCT DESCRIPTION ....................................................................................................................................................... 5
2. PACKAGING CONTENTS ........................................................................................................................................................6
3. TECHNICAL SPECIFICATIONS .............................................................................................................................................. 7
3.1 Pre-set description ........................................................................................................................................................... 7
4. CONNECTIONS LAYOUT FOR LEFT-HAND DRIVE VEHICLES ...................................................................................... 8
5. CONNECTIONS LAYOUT FOR RIGHT-HAND DRIVE VEHICLES ....................................................................................9
6. REMOVAL OF OEM HEAD UNIT FROM THE GLOVE COMPARTMENT ......................................................................10
6.1 Removal of he OEM Head Unit from the glove compartment ............................................................................... 10
7. DISASSEMBLY OF GLOVE COMPARTMENT ................................................................................................................... 11
7.1 Removing the fastening screws .................................................................................................................................11
8. REMOVAL OF DOOR SILL AND REAR SEATS ..................................................................................................................14
8.1 Removal of the rear seats .............................................................................................................................................14
8.2 Complete removal of the right door sill ...................................................................................................................... 14
8.3 Removal of the lower A-pillar cover ........................................................................................................................... 15
8.4 Removal of the glovebox on driver’s side .................................................................................................................. 15
8.5 Removal of the dashboard left side cover ................................................................................................................. 16
8.6 Removal of the left side cover ...................................................................................................................................... 16
9. DISASSEMBLY OF FRONT A-PILLARS .............................................................................................................................. 17
9.1 Disassembly of the front left and right A-Pillars ...................................................................................................... 17
10. DISASSEMBLY OF FRONT DOOR TRIM PANEL ............................................................................................................... 17
10.1 Removal of door trim panel .......................................................................................................................................... 17
11. APSP G7 HARNESS CABLES ROUTING ............................................................................................................................19
11.1 Instructions for cables routing from the Head Unit to the right side of the dashboard ................................... 19
12. CABLES ROUTING FOR OEM TWEETERS .........................................................................................................................21
12 .1 Cables routing for the right OEM Tweeter ..................................................................................................................21
12.2 Cables routing for the left OEM Tweeter ....................................................................................................................21
13. INSTALLATION OF THE APBX G7 SUBWOOFER ............................................................................................................23
13.1 Securing the mounting kit to the APBX G7 ................................................................................................................23
14.INSTALLATIONOFTHEAP6.5Ω2SPWOOFERS ..........................................................................................................24
14.1 Removal of the OEM Woofers .....................................................................................................................................24
14.2 Connecting the APSP G7 SPEAKER CABLE to the AP 6.5 Ω2 SP Woofer ........................................................... 24
14.3 Mounting the Woofer in its housing ............................................................................................................................25
15. INSTALLATION OF THE AP 8.9 BIT G7 AMPLIFIER .......................................................................................................26
15.1 Securing the ASP module (Automatic Speaker Presence) ...................................................................................26
15.2 Connecting the APSP G7 HARNESS wiring to the AP 8.9 bit G7 .........................................................................26
15.3 Positioning the AP 8.9 bit G7 .......................................................................................................................................26
16. CONNECTION OF OEM TWEETERS ...................................................................................................................................27
16.1 Connecting cables E and F to the OEM Tweeters ....................................................................................................27
17. CONNECTION OF THE APSP G7 HARNESS WIRING TO THE OEM HEAD UNIT .....................................................27
17.1 Connecting the APSP G7 HARNESS wiring .............................................................................................................27
18. CONNECTION OF THE APBX G7 .........................................................................................................................................28
18.1 Connecting cable B to the APBX G7 ..........................................................................................................................28
19. RE-ASSEMBLY OF UNINSTALLED COMPONENTS ........................................................................................................28
19.1 Re-assembly of the vehicle’s components performing inverse operations compared to the ones
described in the disassembly sections ......................................................................................................................28
20. OPTIONAL ACCESSORIES ...................................................................................................................................................29
20.1 APBX G7 Subwoofer .......................................................................................................................................................29
20.2 DRC (Digital Remote Control) ...................................................................................................................................... 29
20.3 DRC-MP (Digital Remote Control) .............................................................................................................................. 29
20.4 Bit Play HD .......................................................................................................................................................................30
20.5 OP 1.5 TOSLINK OPTICAL CABLE 1,5 M / 59.05 IN ................................................................................................30
20.6 OP 4.5 TOSLINK OPTICAL CABLE 4,5 M / 177.16 IN ..............................................................................................30
20.7 STA - F/F SOCKET TOSLINK ADAPTER ....................................................................................................................30
20.8 ECK DRC ..........................................................................................................................................................................30
21. TROUBLESHOOTING .............................................................................................................................................................31
3
Page 4

INSTALLATION MANUAL
APSP G7 /
Introduction
Congratulations for purchasing an Audison product. Yoursatisfaction is the rst requirementthat
ourproductsmustmeet:thesamesatisfactionfeltbythosewholongforexperiencingthecaraudio
emotion.Thismanualwasdrawnuptoprovidethemaininstructionsrequiredtoinstalland usethe
systemproperly.
Before the installation, carefully read all the instructions in this manual and in the manuals included
in the packaging of the individual components. Failure to comply with these instructions may cause
unintentional harm or damage to the system components or to the vehicle.
Warranty
For the warranty conditions please visit our website www.audison.eu or contact your Audison specialized centre.
Safe sound
USE COMMON SENSE AND PRACTICE SAFE SOUND. PLEASE REMEMBER THAT LONG EXPOSURE TO
EXCESSIVELY HIGH SOUND PRESSURE LEVELS MAY DAMAGE YOUR HEARING. SAFETY MUST BE AT
THE FOREFRONT WHILE DRIVING.
4
Page 5

INSTALLATION MANUAL
APSP G7 /
1
1. PRODUCT DESCRIPTION
The APSP G7 was specifically designed for VW Golf 7(*) and comprises:
1. An AP8.9 bit G7 amplifier equipped with bit Drive technology, featuring 7 integrated presets dedicated to the
VW Golf 7(*) designed by the Audison R&D team for “Plug&Sound” performance. The 7 DSP “Drive presets”
preloaded in the AP8.9 bit G7 memory enable the use of the product without PC connection.
The user can select the preset according to his preferences.
The AP8.9 bit G7 is equipped with DCC - Direct Cockpit Current technology and is powered directly by the OEM
source rear connector.
2. A passive reflex sub-box (optional) APBX G7 including the compact speaker APS 250. The box is specifically
designed to be placed in the spare wheel compartment, taking up very limited space and is fixed to the car
without drilling the chassis. The mounting kit and installation manual are included in the packaging.
3. A pair of AP 6.5 Ω2 SP woofers for the front section, adaptors for the speakers OEM set up, connectors and
gaskets for a perfect integration.
4. A complete set of specific cables for the car and the kit, designed according to the Plug&Sound philosophy to
be connected to the original connectors supplied with the car, without needing to change the original wiring.
5. A specific APSP G7 Harness drawing power for the AP8.9 bit G7 directly from the OEM source rear connector.
The kit is designed to be installed on a VW Golf 7(*) in less than 2 hours; this time can vary according to the conditions
and equipment of the vehicle.
WARNING: before starting the installation make sure the kit APSP G7 is compatible with your VW Golf version.
All the information contained in this manual refer to the left-hand drive 5-door version
Remark: • All the kit components have been designed to be secured to the original xing points of the vehicle.
• The removal of the car upholstery may cause damage to the metal clips, making it necessary to replace them
• Pay special care while removing and inserting the speakers’ xing rivets.
• Make sure all the gaskets supplied with the speakers are correctly positioned and working perfectly.
• Connectors are fragile components and must be handled with care.
• After installation and before restarting the system, make sure the equalization of the vehicle’s radio is flat.
• Install the kit components by following the instructions provided to ensure they do not prevent airbags or other safety
devices of the vehicle from working correctly.
• Use suitable quality equipment to simplify, speed up and achieve optimal installation
These installation instructions are updated to revision 01. Additional documents can be downloaded from the website www.audison.eu.
Should a malfunction occur during the kit installation, check the “TROUBLESHOOTING” section at the end of this manual. If you
have consulted the aforesaid section and are still unable to solve the problem, please visit the www.audison.eu website or contact
your Audison authorized specialized centre or the ofcial assistance via email: support@elettromedia.it.
*Golf is a registered Volkswagen trademark.
5
Page 6

INSTALLATION MANUAL
QUICK
START
GUIDE
AP8.9
30 A
2. PACKAGING CONTENTS
APSP G7 /
2
AP 8.9 bit G7
ASP
SETUP CD
AP 6.5 Ω2 SP
APSP G7 HARNESS
2600 mm (102.36 in.)
+ 12 V
USB CABLE
1,8 m / 70.87 in.
AP8.9bit
x 1 x 1
x 1
SCREWS
4,2 mm x 50 mm
0.17 in. x 1.97 in.
HEX KEY
2,5 mm / 0.1 in.
VELCRO TAPE
175 mm x 40 mm
6.89 in. x 1.57 in.
x 1
QSG
CD 1.0A
x 1
AP 6.5 G7 RING
FUSE 30A
x 4 x 1x 1
x 1
APSP G7 SPEAKER CABLE
300 mm (11.81 in.)
AUDISON BADGE
x 2
GND
x 1
x 2
WARRANTY
x 1
QSG APSP G7
AP 6.5 G7 MOUNTING KIT
x 8
APBX G7 (optional)
Front side
x 2x 2
x 1
APBX G7
MOUNTING KIT
x 1
VELCRO TAPE
25 mm x 310 mm (0.98 in. x 12.2 in.)
APBX G7
P&P CABLE
x 1
6
Page 7
INSTALLATION MANUAL
TECHNICAL SPECIFICATIONS
Component
AP 6.5 Ω2 SP
Front Woofer
APBX G7
(optional)
SUBWOOFER
Size mm (in.) Woofer 165 (6.5) 250 (10)
Power Handling
W (peak) 210 900
W (continuos) 70 300
Impedance Ω 2 4
Frequency
Response
Hz 60 ÷ 5k
Crossover type Digital Digital
TECHNICAL SPECIFICATIONS
A
3. TECHNICAL SPECIFICATION
APSP G7 /
3
3.1 Presets description
PRESET
0
1
7
6
3
5
4
(default)
0
1
7
2
6
3
5
4
0
1
7
2
6
3
5
4
0
1
7
2
6
3
5
4
0
1
7
2
6
3
5
4
0
1
7
2
6
3
5
4
0
1
7
2
6
3
5
4
0
1
7
2
6
3
5
4
LISTENING POSITION
WARNING: preset “0” contains the input/output conguration dedicated to this loudspeakers system.
2
The “factory default” function, when selected, causes the loss of the pre-loaded setup in preset “0”.
For this reason restoring the correct input/output conguration via AP Prima PC software will be necessary*.
It is recommended to backup the presets in your PC.
FailuretocomplywiththeserecommendationscancauseirreparabledamagetotheAP8.9bitG7aswellasproductsconnectedto it.
DO NOT CHANGE PRESET WHEN THE PRODUCT IS ON.
Left-hand drive Acoustic
Left-hand drive Live
Left-hand drive Rhythm
Right-hand drive Acoustic
Right-hand drive Live
Right-hand drive Rhythm
Right-hand drive
POWER - 12V
SPEAKER
OUT
30A
1 2 3 4 5
YOUR SOUND
Overall Acoustic
Left-hand drive
Overall
Acoustic
0
1
7
2
6
3
5
4
USB
SUB OUT
OPTICAL IN
1 2 3
INPUTS
4 5 6
OPTICAL SEL.
REM IN
DRC
REM OUT
MASTER ENABLE
ASP
UPGRADEPRESETS
OFF ON
0
1
7
2
6
345
76
8
DESCRIPTION
Detailed mid-high frequencies with perfectly balanced bass. Time
alignments have been calibrated to ensure the best listening
sensation for everybody in the car (left-hand drive cars).
Detailed mid-high frequencies with perfectly balanced bass. Time
alignments have been calibrated to ensure the best listening
sensation for the driver (left-hand drive cars).
Mid-high frequencies more detailed compared to the “Acoustic”
preset. Time alignments have been calibrated to ensure the best
listening sensation for the driver (left-hand drive cars).
Punchier low frequencies compared to the “Acoustic” and “Live”
presets. Time alignments have been calibrated to ensure the best
listening sensation for the driver (left-hand drive cars).
Detailed mid-high frequencies with perfectly balanced bass. Time
alignments have been calibrated to ensure the best listening
sensation for the driver (right-hand drive cars).
Mid-high frequencies more detailed compared to the “Acoustic”
preset. Time alignments have been calibrated to ensure the best
listening sensation for the driver (right-hand drive cars).
Punchier low frequencies compared to the “Acoustic” and “Live”
presets. Time alignments have been calibrated to ensure the best
listening sensation for the driver (right-hand drive cars).
Detailed mid-high frequencies with perfectly balanced bass. Time
alignments have been calibrated to ensure the best listening
sensation for everybody in the car (right-hand drive cars).
Component
Size mm (in.) Woofer 165 (6.5) 250 (10)
Power Handling
Impedance Ω 2 4
Frequency
Response
Crossover type Digital Digital
Remark:
- the AP 8.9 bit G7 is provided with the selector set to preset “0” (Overall - Acoustic).
*
W (peak) 210 900
W (continuos) 70 300
Hz 60 ÷ 5k
Please refer to the users’s manual of the AP8.9 bit for detailed information about the product, its installation and for the use of the “AP Prima PC
Software”. All information is available on the website www.audison.eu.
AP 6.5 Ω2 SP
Front Woofer
APBX G7
(optional)
SUBWOOFER
P8.9 bit OUTPUT CHANNEL MAP
Channel Mode Speaker Power
1-2 Stereo AP 6.5 Ω2 SP 2 x 65W RMS @ 2Ω
3-4 Stereo OEM Rear Speakers
5-6
Stereo 2 x 35W RMS @ 4Ω
7-8
Bridge APBX G7 - Subwoofer 1 x 130W RMS @ 4Ω
OEM Front Tweeter
2 x 35W RMS @ 4Ω
7
Page 8

INSTALLATION MANUAL
4. CONNECTIONS LAYOUT FOR LEFT-HAND DRIVE VEHICLES
The P&P cables can be used
on vehicles with the Head
Unit located in the glove
compartment as well as
behind the display.
APSP G7 /
4
OEM TW
Ch 5
Prima AP 6.5 Ω2 SP
OEM Rear
Ch 1
Ch 4
Ch 3
Prima APBX G7
Ch 7/8
Ch 2
OEM TW
Ch 6
- GND
Prima AP 6.5 Ω2 SP
NO
ASP
OK
ASP
ASP
DRC
REM OUT
MASTER ENABLE
REM IN
OPTICAL SEL.
4 5 6
OEM Rear
OPTICAL IN
USB
OFF ON
UPGRADEPRESETS
1
0
INPUTS
2
3
4
567
SPEAKER
OUT
30A
1 2 3
SUB OUT
8
76
1 2 3 4 5
POWER - 12V
8
Page 9
INSTALLATION MANUAL
5. CONNECTIONS LAYOUT FOR RIGHT-HAND DRIVE VEHICLES
The P&P cables can be used
on vehicles with the Head
Unit located in the glove
compartment as well as
behind the display.
APSP G7 /
5
DRC
OPTICAL IN
USB
OFF ON
UPGRADEPRESETS
1
0
OK
ASP
REM IN
OPTICAL SEL.
INPUTS
2
3
4
567
SPEAKER
OUT
Prima AP 6.5 Ω2 SP
NO
ASP
ASP
REM OUT
MASTER ENABLE
4 5 6
1 2 3
SUB OUT
8
76
1 2 3 4 5
30A
OEM TW
OEM Rear
Ch 1
Ch 6
- GND
Ch 2
OEM TW
Ch 5
Prima AP 6.5 Ω2 SP
Ch 4
Ch 3
OEM Rear
Prima APBX G7
Ch 7/8
POWER - 12V
APBX G7
P&Pcable
9
Page 10
INSTALLATION MANUAL
APSP G7 /
6
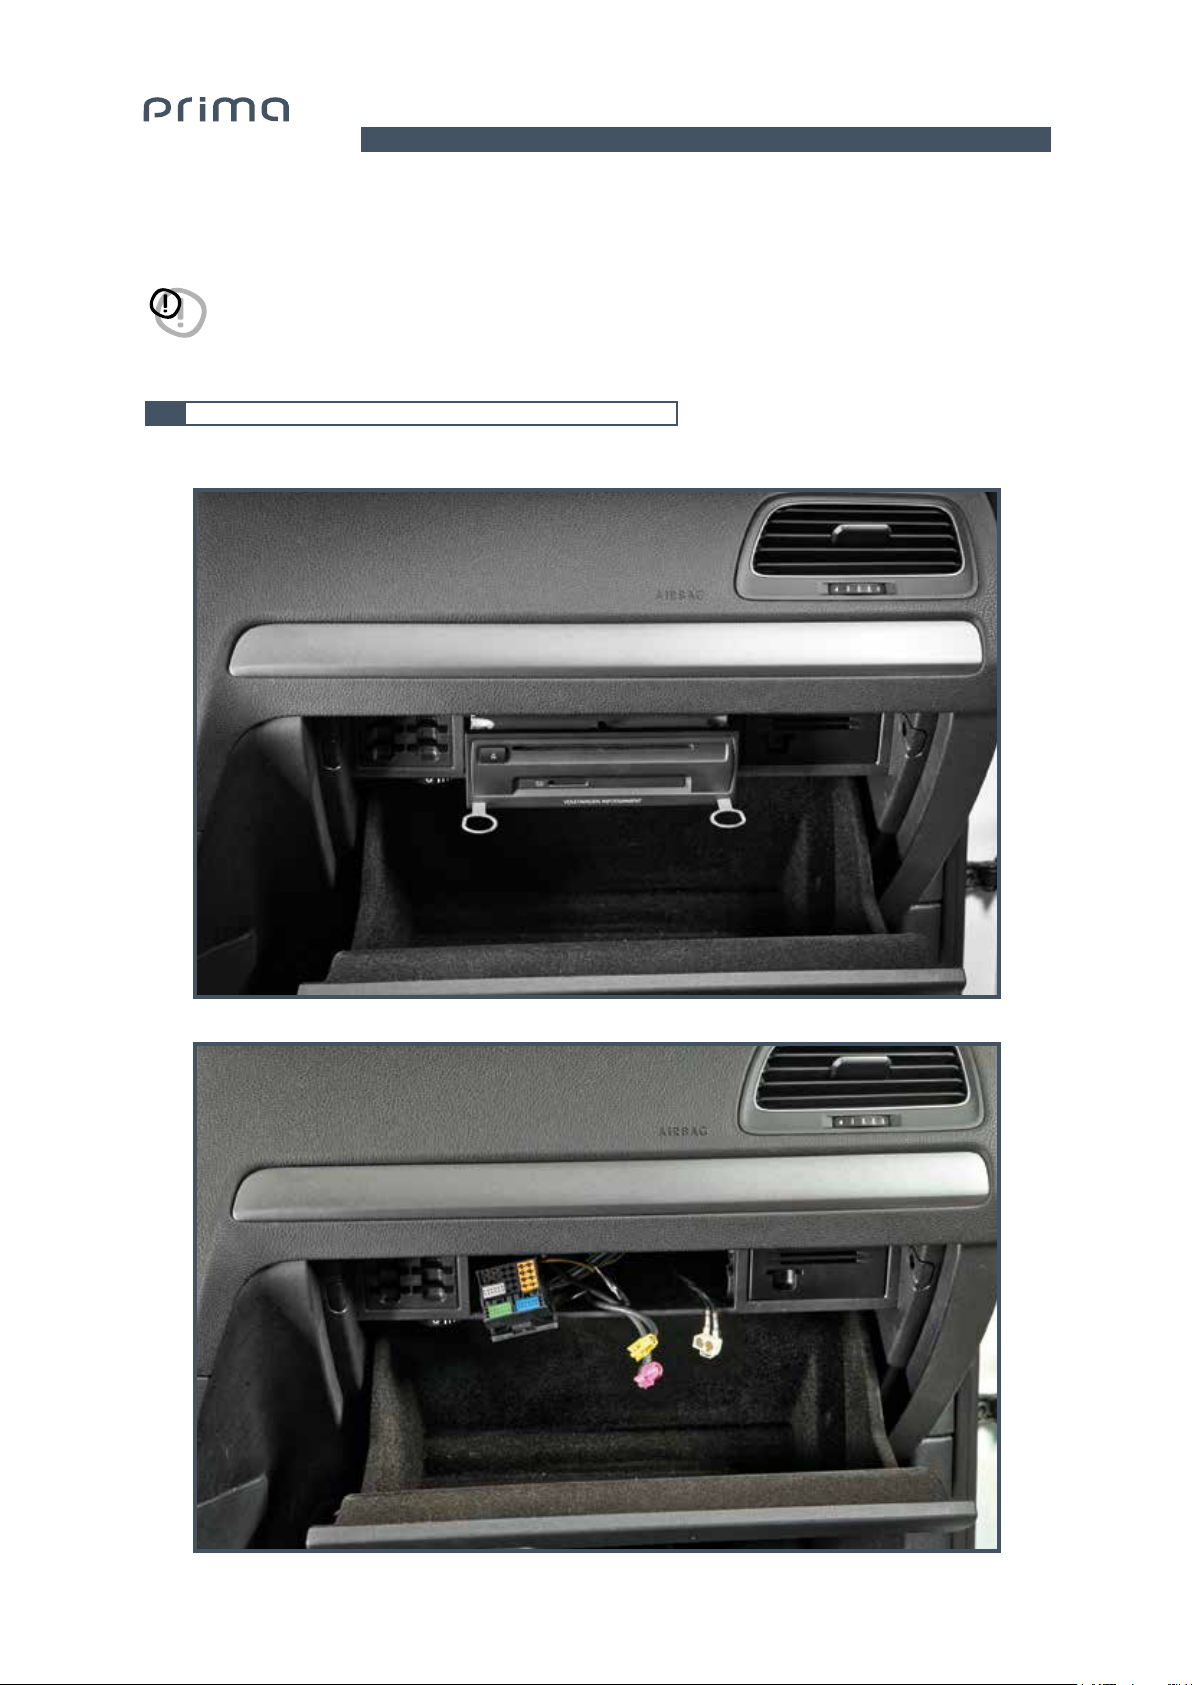
6. REMOVAL OF OEM HEAD UNIT FROM THE GLOVE COMPARTMENT
WARNING: the information below refers to the left-hand drive 5-door version. Remove the key from the car’s
ignition and pull the lever to release the bonnet. Close the doors and wait for 5 minutes, then open the
bonnet and disconnect the negative pole from the vehicle’s battery.
6.1 Removal of the OEM Head unit from the glove compartment
6.1.1 Remove the Head Unit using the dedicated release keys (not included in the kit, to be purchased separately)
to remove it
(g.1).
6.1.2 Remove the Head Unit by disconnecting all the connectors at the back
(g.2).
Fig. 1
Fig. 2
10
Page 11

INSTALLATION MANUAL
7. DISASSEMBLY OF THE GLOVE COMPARTMENT
7.1 Removing the fastening screws
APSP G7 /
7
7.1.1 Remove the screws as indicated below
(Fig.3a 3b).
Fig. 3a
7.1.2 Remove the dashboard right side cover with the help of a plastic
7.1.3 Disconnect the passenger Airbag connector
(g. 4b).
Fig. 3b
(g. 4a).
Fig. 4a
Fig. 4b
11
Page 12

INSTALLATION MANUAL
7.1.4 Remove the screw indicated below (Fig. 5).
Fig. 5
APSP G7 /
7
7.1.5 Remove the cover of the climate control by pulling it towards you
7.1.6 Remove the screw indicated below
(Fig. 7).
(Fig. 6).
Fig. 6
Fig. 7
12
Page 13

INSTALLATION MANUAL
7.1.7 Remove the screws from the right and left panels as indicated in gure 8 and 9.
APSP G7 /
8
Fig. 8
7.1.8 Remove the panels by pulling them downwards.
7.1.9 Remove the highlighted cover by using a plastic lever
Fig. 10
(g.10 and 11).
7.1.10 The glove compartment can now be removed, by pulling it towards you
Fig. 9
Fig. 11
(g.12).
Fig. 12
13
Page 14

INSTALLATION MANUAL
8. REMOVAL OF DOOR SILL AND REAR SEATS
8.1 Removal of the rear seats
8.1.1 Follow the steps shown below (g.13).
APSP G7 /
8
2
3
A
B
A
1
4
8.2 Complete removal of the right door sill
8.2.1 Remove the door sill by using a plastic lever (g.14).
1
2
Fig. 13
3
Fig. 14
14
Page 15

INSTALLATION MANUAL
8.3 Removal of the lower A-pillar cover
APSP G7 /
8
8.3.1 Lift the cover with a lever and pull it out
8.3.2 Lift the cover with a lever and pull it out
(g.15).
Fig. 15
(g.16).
B A
8.4 Removal of the glovebox on driver’s side
(g.17).
8.4.1 Remove the glovebox by releasing the lower side and pulling towards you
Fig. 16
(g.17).
Fig. 17
15
Page 16

INSTALLATION MANUAL
8.5 Removal of the dashboard left side cover
APSP G7 /
8
8.5.1 Remove the dashboard left side cover with the help of a plastic lever
(g.18).
Fig. 18
8.6 Removal of the left side lower A-pillar cover
(g.19).
Fig. 19
16
Page 17

INSTALLATION MANUAL
9. DISASSEMBLY OF FRONT A-PILLARS
9.1 Removal of front left and right A-Pillars
9.1.1 Remove the two A-Pillars with the help of a plastic lever
WARNING: donotcausedamagetotheairbagandxingclips.
(Fig. 20).
Fig. 20
APSP G7 /
9/10
10. DISASSEMBLY OF FRONT DOOR TRIM PANEL
WARNING: the procedure below is valid for the right side of the vehicle. For the left side proceed likewise.
10.1 Removal of the door trim panel
10.1.1 Remove the door handle cover using a plastic lever
by 90 degrees
(Fig. 22).
Fig. 21
10.1.2 Release all the clips of the door trim panel by using a plastic lever
10.1.3 Lift the door trim panel by rmly pulling upwards to release it
(g.21), then loosen screws 1, 2 and rotate screw 3
1
2
3
(Fig. 23).
(Fig. 24).
Fig. 22
Fig. 23
Fig. 24
17
Page 18

INSTALLATION MANUAL
10.1.4 Release the door opening control cable (Fig.25).
APSP G7 /
10
10.1.5 Disconnect all cables from the door door trim panel.
Fig. 25
18
Page 19

INSTALLATION MANUAL
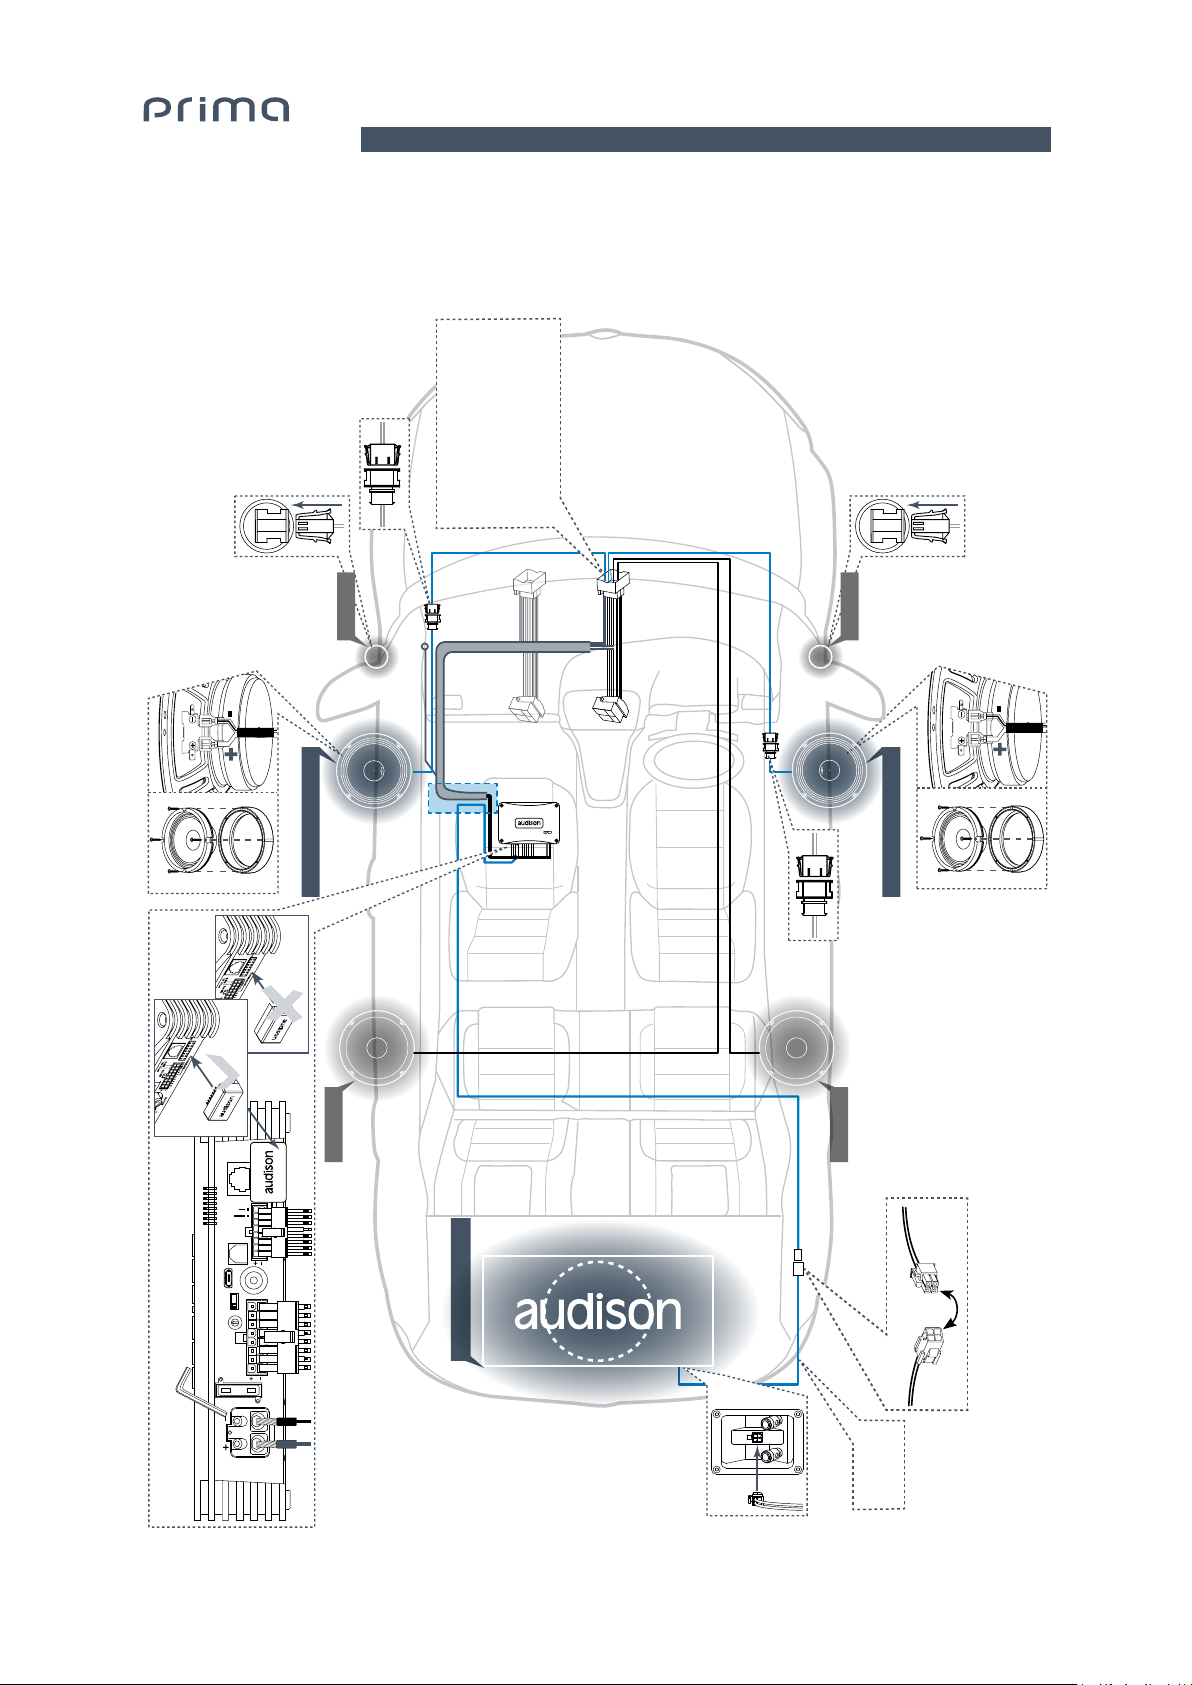
11. APSP G7 HARNESS CABLES ROUTING
11.1 Instructions for cables routing from the Head Unit to the right side of the dashboard
APSP G7 /
11
11.1.1 Direct sections B, C, D, E and F of the APSP G7 HARNESS cable
door sill
APSP G7 HARNESS
(g.27).
(Fig. 26) from the car radio housing to the right
E
F
B
A
D
Remark: the length of the APSP G7 HARNESS wiring enables the installation of the APSP G7 kit on vehicles with the Head
Unit located behind the display as well as in the glove compartment (in this case gather the exceeding cable beside the
glove compartment).
C
Fig. 26
Fig. 27
11.1.2 Slide the cable towards the door sill and connect earth cable D into bolt G (g. 28 and 29).
D
G
Fig. 28
Fig. 29
19
Page 20

INSTALLATION MANUAL
11.1.3 Lift the carpet from the floor as indicated by H (g. 30) and insert cables C (g. 26) under the cover along the
slits available in the carpet. Make sure that both the connectors and power supply cables come out from
the slits located underneath the right front seat.
APSP G7 /
11
H
11.1.4 Route the SUBWOOFER power cable B
the trunk (g.31).
B
B
(g.26) along the door sill, run it along the back seat and continue till
C
Fig. 30
B
Fig. 31
20
Page 21

INSTALLATION MANUAL
APSP G7 /
12
12. CABLES ROUTING FOR OEM TWEETERS
12.1 Cables routing for the right OEM Tweeter
12.1.1 Run cable F (labelled “TW RIGHT”) (g.26) in the right side of the dashboard as shown below (g.32-33).
WARNING: for right-hand side vehicles, run cable E (labelled “TW LEFT”) (g.26) in the left side of the dashboard (g.32-33).
F
12.2 Cables routing for the right OEM Tweeter
12.2.1 Run cable E (labelled “TW LEFT”)
(g.26) in the lower side of the dashboard and secure it with cable ties (g.34).
E
F
Fig. 33Fig. 32
WARNING: for right-hand side vehicles, run cable F (labelled “TW RIGHT”)
and secure it with cable ties
(g.34).
Fig. 34
(g.26) in the lower side of the dashboard
21
Page 22

INSTALLATION MANUAL
12.2.2 Run the cable through the central tunnel (Fig. 35).
E
Fig. 35
APSP G7 /
12
12.2.3 Run the cable underneath the dashboard and secure it with cable ties
12.2.4 Run the cable up the dashboard till the base of the A-Pillar
(Fig. 37).
E
(Fig. 36).
Fig. 36
Fig. 37
22
Page 23

INSTALLATION MANUAL
13. INSTALLATION OF THE APBX G7 SUBWOOFER
13.1 Securing the MOUNTING KIT to the APBX G7
APSP G7 /
13
13.1.1 Secure the APBX G7 MOUNTING KIT as shown below
13.1.2 Position the APBX G7 as shown below
(Fig. 39).
(Fig. 38).
Fig. 38
Fig. 39
WARNING: Remove the highlighted cover on the anchor bolt of the spare wheel applying pressure on “A” (g.40-41).
A
Fig. 41Fig. 40
23
Page 24

INSTALLATION MANUAL
14. INSTALLATION OF THE AP 6.5 Ω2 SP WOOFERS
14.1 Removal of the OEM Woofers
14.1.1 Disconnect the connector from the OEM Woofer (g. 42).
14.1.2 Remove the 4 rivets securing the Woofer
(g. 43).
APSP G7 /
14
Fig. 42
Fig. 43
14.1.3 Place the APSP G7 SPEAKER RING in the allocated slots making sure the APSP G7 SPEAKER CABLE
wiring is set down as shown below
(g.44) and fasten it using the AP6.5 Ω2 SP MOUNTING KIT (g.45).
Fig. 44
Fig. 45
14.2 Connecting the APSP G7 SPEAKER CABLE to the AP6.5 Ω2 SP Woofer
14.2.1 Connect the terminals according to the correct polarity
(Fig. 46).
A
Fig. 46
24
Page 25

INSTALLATION MANUAL
14.3 Mounting the Woofer in its housing
14.3.1 Secure the speaker using the fastening screws provided with the KIT (Fig. 47).
14.3.2 Connect the APSP G7 SPEAKER CABLE to the vehicle’s default connector (Fig. 48).
Fig. 47
APSP G7 /
14
14.3.3 Final result (Fig. 49).
Fig. 48
Fig. 49
25
Page 26

INSTALLATION MANUAL
- GND
Prima APBX G7
Prima AP 6.5 Ω2 SP
OEM Rear
OEM Rear
Ch 1
Ch 2
Ch 7/8
Ch 5
Ch 6
Ch 4
Ch 3
OEM TW
OEM TW
Prima AP 6.5 Ω2 SP
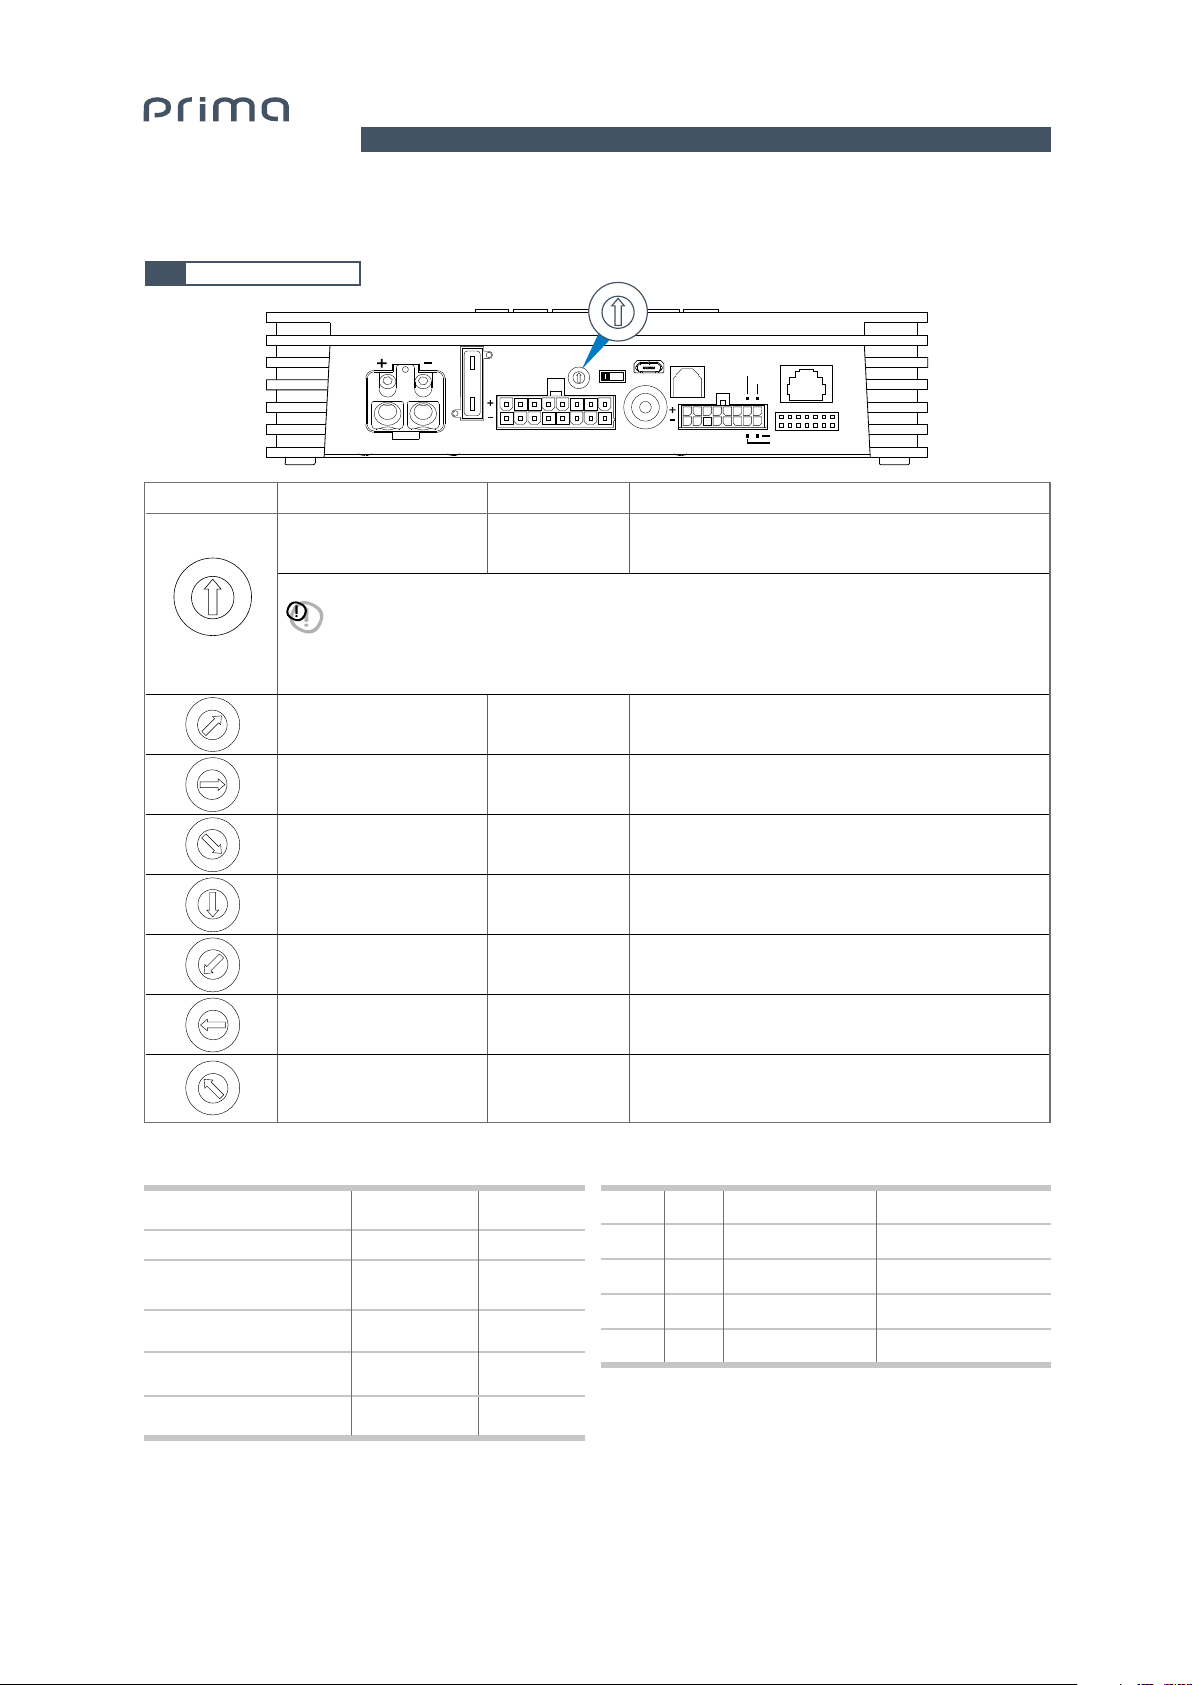
15. INSTALLATION OF THE AP 8.9 BIT G7 AMPLIFIER
15.1 Securing the ASP module (Automatic Speaker Presence)
15.1.1 Install the ASP module in the allocated section
(Fig. 50).
APSP G7 /
15
OPTICAL IN
1 2 3
INPUTS
4 5 6
OPTICAL SEL.
REM IN
REM OUT
MASTER ENABLE
DRC
ASP
ASP
OK
ASP
NO
15.2 Connecting the APSP G7 HARNESS wiring to the AP 8.9 bit G7
15.2.1 Connect in sequence (Fig. 51):
A. Earth cable (black).
B. Power supply cable (red).
C. Output connector.
D. Input connector
15.2.2 Isolate the cables of unused services
POWER - 12V
SPEAKER
OUT
30A
1 2 3 4 5
USB
OPTICAL IN
UPGRADEPRESETS
OFF ON
0
1
7
2
6
345
76
8
SUB OUT
1 2 3
B A C D
15.3 Positioning the AP 8.9 bit G7
INPUTS
4 5 6
OPTICAL SEL.
REM IN
(Fig. 52).
DRC
REM OUT
MASTER ENABLE
OK
ASP
ASP
NO
ASP
Fig. 51 Fig. 52
15.3.1 Position AP8.9 bit under the right seat, fastening it with the VELCRO tape supplied
Remark: the govebox underneath the seat may need to be removed.
Fig. 50
(Fig. 53a -53b).
Fig. 53a
Fig. 53b
26
Page 27

INSTALLATION MANUAL
16. CONNECTION OF OEM TWEETERS
16.1 Connecting cables E and F (g.26) to the OEM Tweeters (g.54a - 54b)
16.1.1 Connect cable E labelled “TW LEFT” with the left Tweeter.
16.1.2 Connect cable F labelled “TW RIGHT” with the right Tweeter.
E F
TW LEFT TW RIGHT
Remark: invert the connections for right-hand drive vehicles.
The available presets for this conguration are 4, 5, 6, e 7
APSP G7 /
16/17
Fig. 54bFig. 54a
17. CONNECTION OF THE APSP G7 HARNESS WIRING TO THE OEM HEAD UNIT
17.1 Connecting the APSP G7 HARNESS wiring
17.1.1 Connect back all cables to the OEM Head Unit.
17.1.2 Connect the APSP G7 HARNESS wiring to the OEM Head Unit
(g.55).
Fig. 55
27
Page 28

INSTALLATION MANUAL
18. CONNECTION OF THE APBX G7
18.1 Connecting cables B to the APBX G7
18.1.1 Connect cables B as shown below (g.56).
APSP G7 /
18/19
B
Fig. 56
19. RE-ASSEMBLY OF UNINSTALLED COMPONENTS
19.1 Re-assembly of the vehicle’s components performing inverse operations compared to the ones
described in the disassembly sections.
28
Page 29

INSTALLATION MANUAL
20. ACCESSORIES
20.1 APBX G7 SUBWOOFER
The Plug&Sound reflex passive subwoofer
system integrates perfectly into the car’s
interior. The Subwoofer is installed in the
spare wheel compartment leaving the loading
dock completely free. The subwoofer itself
has been engineered to mate perfectly with
the available enclosure volume, exploiting
all the power the AP8.9 bit G7 delivers. The
APBX G7 subwoofer is available as separate
component to pair with the APSP G7 kit.
20.2 DRC DIGITAL REMOTE CONTROL
The DRC is a digital interface between the bit processors
and the user. A DRC installed on the dashboard of a vehicle
featuring an APbit processor, ensures:
- option to select between the main and AUX inputs.
- control of general volume, subwoofer volume,
balance and fader.
- The option to select between 2 memory presets set up by
the user for equalizer and crossover alignment settings.
APSP G7 /
20
20.3 DRC-MP DIGITAL REMOTE CONTROL
The new Audison DRC MP (Digital Remote Control Multimedia
Play) is compatible with all the Audison electronics featuring
AC Link bus. Its slim profile along with the holder supplied
with it eases the installation in the best position inside the car.
Thanks to the new Joystick, “Rubber Touch” finished for best
control of the movements along the four direction axes, the
“DRC Settings” menu can be adjusted and navigation is also
possible through the “Navi Command” function if the system
features an Audison bit Play HD with video output connected
to a monitor. The matte black finish and the possibility of
choosing among forty-two different colours for the keyboard
make it easier for the DRC MP to integrate with the car
dashboard. The new display with white characters features
a built-in sensor, for brightness automatic adjustment of the
characters according to the light conditions inside the car,
and remains readable from any viewing angle.
29
Page 30

INSTALLATION MANUAL
20.4 BitPlayHD.
bit Play HD and bit Play HD SSD are high resolution media
players specifically developed for car audio systems. By
connecting the bit Play HD optical output to an Audison
processor or amplifier with digital input, a Full DA system is
created, able to reach a new standard of quality going well
beyond CDs inasmuch as being capable of playing encoded
FLAC audio files up to 24 bit/96 kHz.
To help users who do not wish to have external hard-drives,
the bit Play HD SSD features an internal 240GB SSD 2.5”
unit which is insensitive to the vibration and shaking that
occur while driving thanks to solid state technology and a specially designed damped mechanical housing.
In addition, the SSD is much faster than a traditional hard disk and provides maximum access speed to
multimedia content. If you have a video input, you can connect the bit Play HD and bit Play HD SSD to the
head unit or to an external monitor via the HDMI output or composite video and view the native interface of
the media server in order to directly control the multimedia file navigation functions via remote and access
every setting of the device. Audison R&D department developed an app for Apple and Android devices
providing the ability to connect the smartphone to your bit Play HD and bit Play HD SSD via Wi-Fi network
and use it as a remote control manager of the multimedia library without the need to connect the player
to an external monitor.
APSP G7 /
20
20.5 OP1.5TOSLINKOPTICALCABLE1,5m/59.05in.
OpticalcableendingwithToslinkconnectorsforS/PDIF
digital audio signals.
Cable length 1,5 m/59,05”
20.6 OP4.5TOSLINKOPTICALCABLE4,5m/177.16in.
OpticalcableendingwithToslinkconnectorsforS/PDIF
digital audio signals.
Cable length 4,5 m / 177.16 in.
20.7 STA - F/F SOCKET TOSLINK ADAPTER
Optical adapter to extend optical cables featuring TOSLINK connectors.
20.8 ECK DRC
Additional extension for the cable supplied with the DRC required for
installations on especially long vehicles.
Total length of the supplied cable with the extension is equal to 6,5 m.
30
Page 31

INSTALLATION MANUAL
21. TROUBLESHOOTING
The AP8.9 bit G7 logo is off.
FREQUENTLY ASKED QUESTIONS
Check the power supply fuse. If necessary, replace it
with a new one of the same type and value.
Check that the power supply terminals have a ……
of 12V. Make sure connector C chap. 15 has been
installed correctly (Fig. 51).
APSP G7 /
21
The car radio is
turned on but no
sound can be heard
The sound is not
natural and does not
come from all the
speakers
The AP8.9 bit G7 logo flashes
blue,blue/red, red.
The AP8.9 bit G7 logo is correctly
on.
Incorrect setting of volume /
balance / fader controls.
Connections are not correct or not
well secured.
The “Status Logo” indicates the operating status of
the product and any malfunctions. Refer to the user’s
manual of the AP8.9 bit, sec. 4.12 or sec. 4.13. The
user’s manual is loaded in the CD-ROM provided or
available for download from the website ww.audison.
The Head Unit volume is too low.
Adjust the OEM source controls.
Check the connections and secure them rmly.
eu.
31
Page 32

All the specications herein are subject to change wihout prior notice
PART OF ELETTROMEDIA
62018 Potenza Picena (MC) Italy
T +39 0733 870 870 - F +39 0733 870 880
www.elettromedia.it
 Loading...