

Page 1
160
Watt s Peak
Watt s en Cr ête
Vatio s el Máx imo
40W x 4
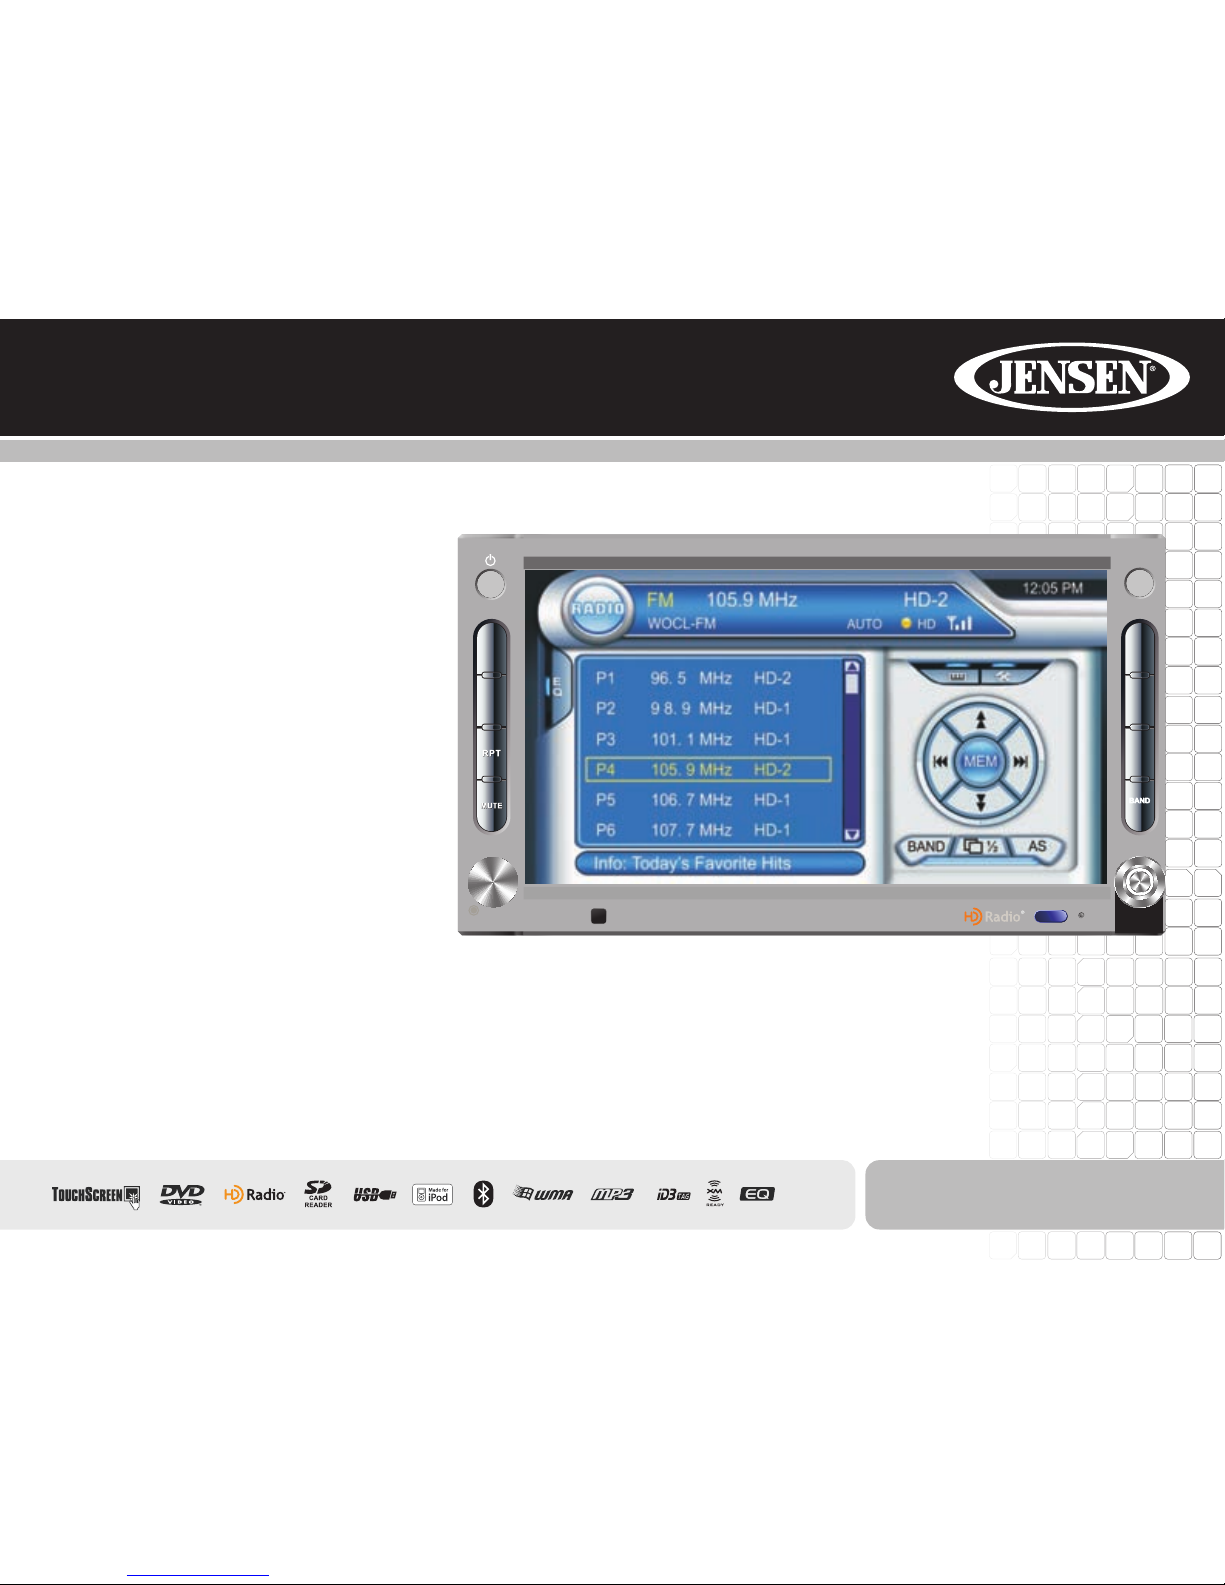
VM9423
Operation Manual
Manual de Operación
Instructions d'opération
Multimedia Receiver
Press Audio
OPEN
Enter
SRC
NAV
INT
DISP
WIDE
PIC
Page 2

Page 3

i
CONTENTS
Thank you for choosing a Jensen product. We hope you will find the instructions in this owner’s
manual clear and easy to follow. If you take a few minutes to look through it, you’ll learn how to
use all the features of your new Jensen VM9423 Mobile Multimedia Receiver for maximum
enjoyment.
Introduction ........................................................................................................................... 1
Anti-Theft Feature ................................................................................................................. 2
Controls and Indicators ......................................................................................................... 3
Remote Control ..................................................................................................................... 5
Using the TFT Monitor .......................................................................................................... 7
Operating Instructions ........................................................................................................... 8
Setup Menu......................................................................................................................... 10
Tuner Operation .................................................................................................................. 12
Satellite Radio Operation .................................................................................................... 15
DVD/VCD Video Operation ................................................................................................. 17
DVD/CD Audio Operation ................................................................................................... 20
Playing MP3/WMA Files...................................................................................................... 21
iPod Operation .................................................................................................................... 24
Bluetooth Operation ............................................................................................................ 26
Troubleshooting .................................................................................................................. 29
Specifications ...................................................................................................................... 32
CONTENIDO
Gracias por elegir los productos Jensen. Esperamos que encuentre en este manual
instrucciones claras y fáciles de seguir. Si se toma unos pocos minutos para leerlo, aprenderá
cómo utilizar todas las funciones de su nuevo radio Jensen VM9423 para su máximo
entretenimiento.
Preparación......................................................................................................................... 33
Dispositivo Anti-robo ........................................................................................................... 35
Controles e Indicadores ...................................................................................................... 36
Control Remoto ................................................................................................................... 38
Cómo Usar el Monitor TFT.................................................................................................. 41
Instrucciones de Funcionamiento ....................................................................................... 43
Menú de Configuración ....................................................................................................... 45
Operación de Sintonizador.................................................................................................. 48
Operación de Radio Satelital .............................................................................................. 51
Operación de Video de DVD/VCD ...................................................................................... 53
Operación de Audio de DVD/CD......................................................................................... 56
Cómo Reproducir Archivos MP3/WMA ............................................................................... 58
Operación de iPod .............................................................................................................. 61
Operación de Bluetooth ...................................................................................................... 63
Resolución de Problemas ................................................................................................... 66
Especificaciones ................................................................................................................. 69
TABLE DES MATIÈRES
Merci d'avoir choisi un produit Jensen. Nous espérons que vous allez trouver les instructions
dans ce guide de propriétaire claires et faciles à suivre. Prenez quelques minutes à le
consulter, vous apprendrez à utiliser toutes les fonctions de votre nouvelle radio Jensen
VM9423 pour en tirer une jouissance maximum.
Preparation......................................................................................................................... 71
Fonctions anti-vol ............................................................................................................... 73
Commandes et indicateurs................................................................................................. 74
Telecommande................................................................................................................... 76
Utilisation du moniteur TFT ................................................................................................ 79
Instructions d’operation ...................................................................................................... 80
Menu configuration (Setup)................................................................................................ 82
Operation tuner .................................................................................................................. 85
Operation radio Satellite..................................................................................................... 88
Operation video DVD/VCD................................................................................................. 90
Operation audio DVD/CD................................................................................................... 93
Jouer des fichiers MP3/WMA............................................................................................. 94
Operation iPod ................................................................................................................... 97
Operation Bluetooth ........................................................................................................... 99
Depannage....................................................................................................................... 102
Specifications ................................................................................................................... 106
Page 4

ii
Page 5

1
VM9423
INTRODUCTION
Congratulations on your purchase of the Jensen VM9423
Mobile Multimedia Receiver.
It’s a good idea to read all of the instructions before beginning
the installation. We recommend having your head unit
installed by a reputable installation shop.
Features
DVD
• Aspect Ratio - Cinema, Normal and OFF (Standby)
• Fast Forward, Fast Reverse - 2X, 4X, 6X and 8X
• Slow Forward, Slow Reverse - 2X, 4X and 8X
• Play, Pause, Stop, Next Chapter and Previous Chapter
• ESP - 2MB Buffer
CD / MP3 / WMA
• ID3 Tag Compatible
• Directory Search (MP3 / WMA Only)
• Direct Track Access via Remote control
• Burn Up To 1500 MP3 and WMA Files onto a DVD+R /
RW
• Audible Forward / Reverse Track Search
• Random, Repeat and Intro
• Play, Pause, Stop, Next Track and Previous Track
• ESP - 2MB Buffer
Tuner
• HDRM-2 HD Radio Module*
• USA / Europe Frequency Spacing
• 24 Station Presets (18 FM / 6 AM)
• Auto Stereo / Mono
• Auto Store
Sat Radio Ready
• Requires XM CNP2000UC and CNPJEN1 (Both Sold
Separately)
• Satellite Channel Name, Artist, Song and Categories
Displayed on TFT Screen
iPod
• High Speed Direct Connect Interface to Access iPod
Playlists, Artists, Albums and Songs. Play music and
view video files from your iPod.
• Power Management Charges iPod while Connected
• Requires jLink
3
iPod Interface Cable (included)
• iTunes
®
Tagging
MediaLink
4
• Under Dash Interface Allows Portable Media Devices to
be Connected
• MediaLink
4
Includes the Following Connectivity:
• USB - Supports Hard Drives and Flash Memory
Drives
• jLinkDirect for iPod
• RCA Audio /Video Input
Chassis
• 2.0 DIN (Import/ISO-DIN Mountable)
• 6.5" Motorized Slide Down TFT Active Matrix LCD with
Anti-Glare Coating
• Screen Tilt/Angle Adjustment
• Heat Management System - Forced-Air Cooling to Keep
the Chip Sets Operating at Nominal Temperatures
General
• Bluetooth ready with hands-free profile for safety /
convenience and A2DP profile for streaming music from
a PDA / PMP
• Navigation Ready (NAV102 Only)
• Infrared Remote Control
• Two Composite Video Outputs for Additional Screens
• Compatible with MZ7TFT Rear Seat Monitors with
Touch Screen Interface
• Two Audio /Video Auxiliary Inputs
• 200-Ohm Preamp Line Output - All Audio Channels
• 4VRMS Line Output - All Channels
• Rotary Encoder Audio Control
• Seven-Band EQ with Eight Preset EQ Curves
• Spectrum Analyzer
• Front, Rear, and Subwoofer Line Output
• Subwoofer Crossover and Phase Control
• Programmable Volume Control
• Rear Camera Input (Normal and Mirror Image View)
• Auto TFT Dimmer
• 5-Way Joystick
• SWC Interface – Compatible with PAC adapter SWI-PS
Steering Wheel Control Interface, sold separately
Optional Equipment
• NAV102
The head unit is "navigation ready." Before accessing
any navigation features, you must purchase and install
the NAV102 module. All installation and operating
instructions will be included with the NAV102 navigation
module.
Once the NAV102 is connected and operating properly,
the NAV source mode will become active. While the
NAV102 is not installed, the NAV option appears gray,
indicating the function is not available.
• Rear Camera
The head unit is "camera ready." Before accessing any
camera features, you must purchase and install a rear
video camera. Once the rear camera is connected and
operating properly, the CAMERA source mode will
become active. While the camera is not installed, the
CAMERA option appears gray, indicating the function is
not available.
• Satellite Radio Tuner
See “Satellite Radio Operation” on page 15.
• iPod
See “Playing MP3/WMA Files” on page 21.
• Bluetooth Phone
See “Bluetooth Operation” on page 26.
WARNING! To reduce the risk of a traffic accident (except
when using for rear view video camera) never use the
video display function while driving the vehicle. This is a
violation of federal law.
WARNING! Never disassemble or adjust the unit.
WARNING! To prevent injury from shock or fire, never
expose this unit to moisture or water.
WARNING! Never use irregular discs.
WARNING! To prevent damage to the mechanism inside
this unit, avoid impact to the TFT monitor.
WARNING! Using an improper fuse may cause damage
to the unit and result in a fire.
*HD Radio™ Technology Manufactured Under License From
iBiquity Digital Corporation. U.S. and Foreign Patents. HD
Radio™ and the HD and HD Radio logos are proprietary
trademarks of iBiquity Digital Corporation.
Page 6
2
VM9423
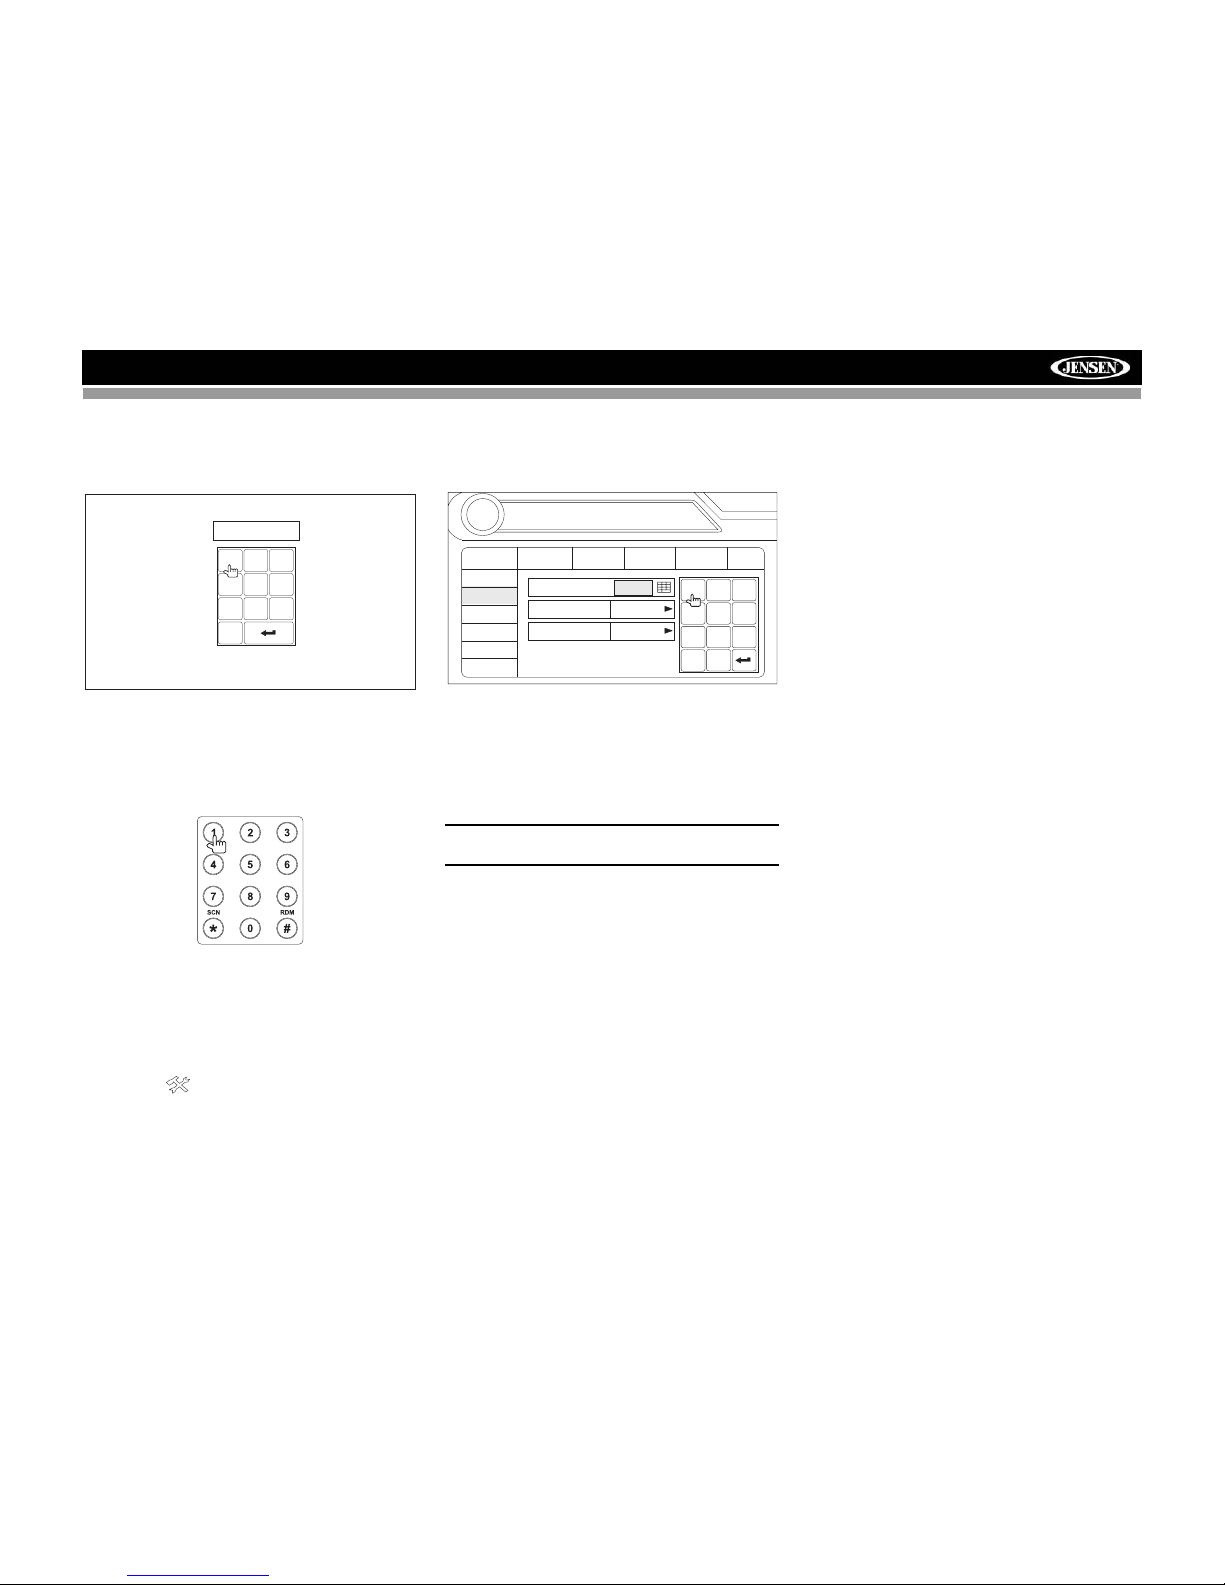
ANTI-THEFT FEATURE
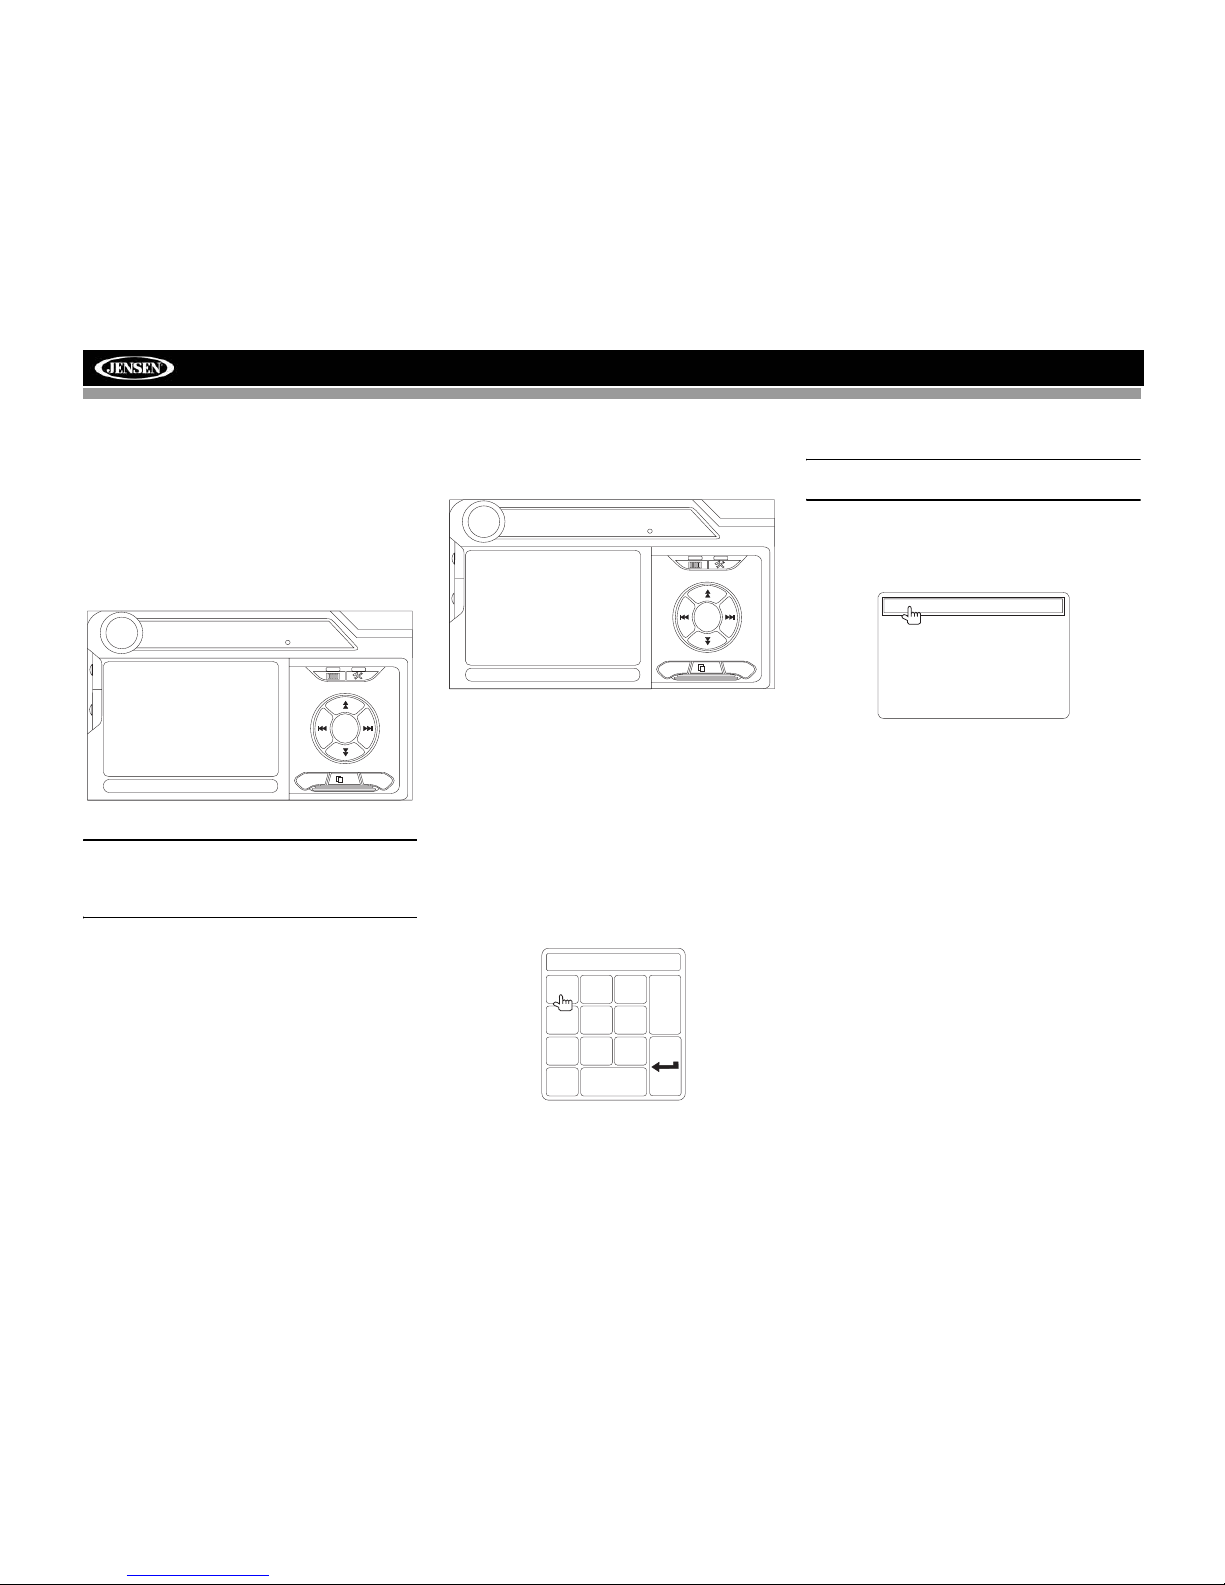
The VM9423 is equipped with an anti-theft feature requiring
the user to enter a password upon initial power on.
Entering the Default Password
The default user password is 012345 (6 digits). Enter the
password using the on-screen keypad and then press the
Enter (arrow) button. You can also use the remote control
keypad to enter the password.
Press the joystick Enter button (18) on the remote control to
confirm.
Changing the Password
To change the anti-theft and RATINGS protection password,
perform the following steps:
1. Press the SETUP button (31) on the remote control or
touch the button on the screen to enter the
“SETUP” menu.
2. Touch RATING to view the “RATING” sub-menu. An
open lock icon to the right of the “Password” field
indicates that a user password had not yet been
entered.
3. Touch the keypad icon next to the blue box in the
“Password” field to open the on-screen keypad.
4. Enter a new 6-digit password and press the Enter
(arrow) button.
The "lock" icon will now appear closed and the new antitheft password will be set, as well as the password for
RATING protection (see “Rating Sub-menu Features”
on page 11).
NOTE: If you forget your password, contact Customer
Service at 1-800-323-4815 for assistance.
1
2
3
4
5
6
7
8
9
0
Enter Password:
RADIO
SETUP
RDS
Rating
Hardware
P.VOL
TS Cal
General
Language
Audio
Back
Password
Rating 8. Adult
Load Factory Reset
Speaker
Demo
Bluetooth
02:40
AM
1
2
3
4
5
6
7
8
9
0
Clear
Page 7
3
VM9423
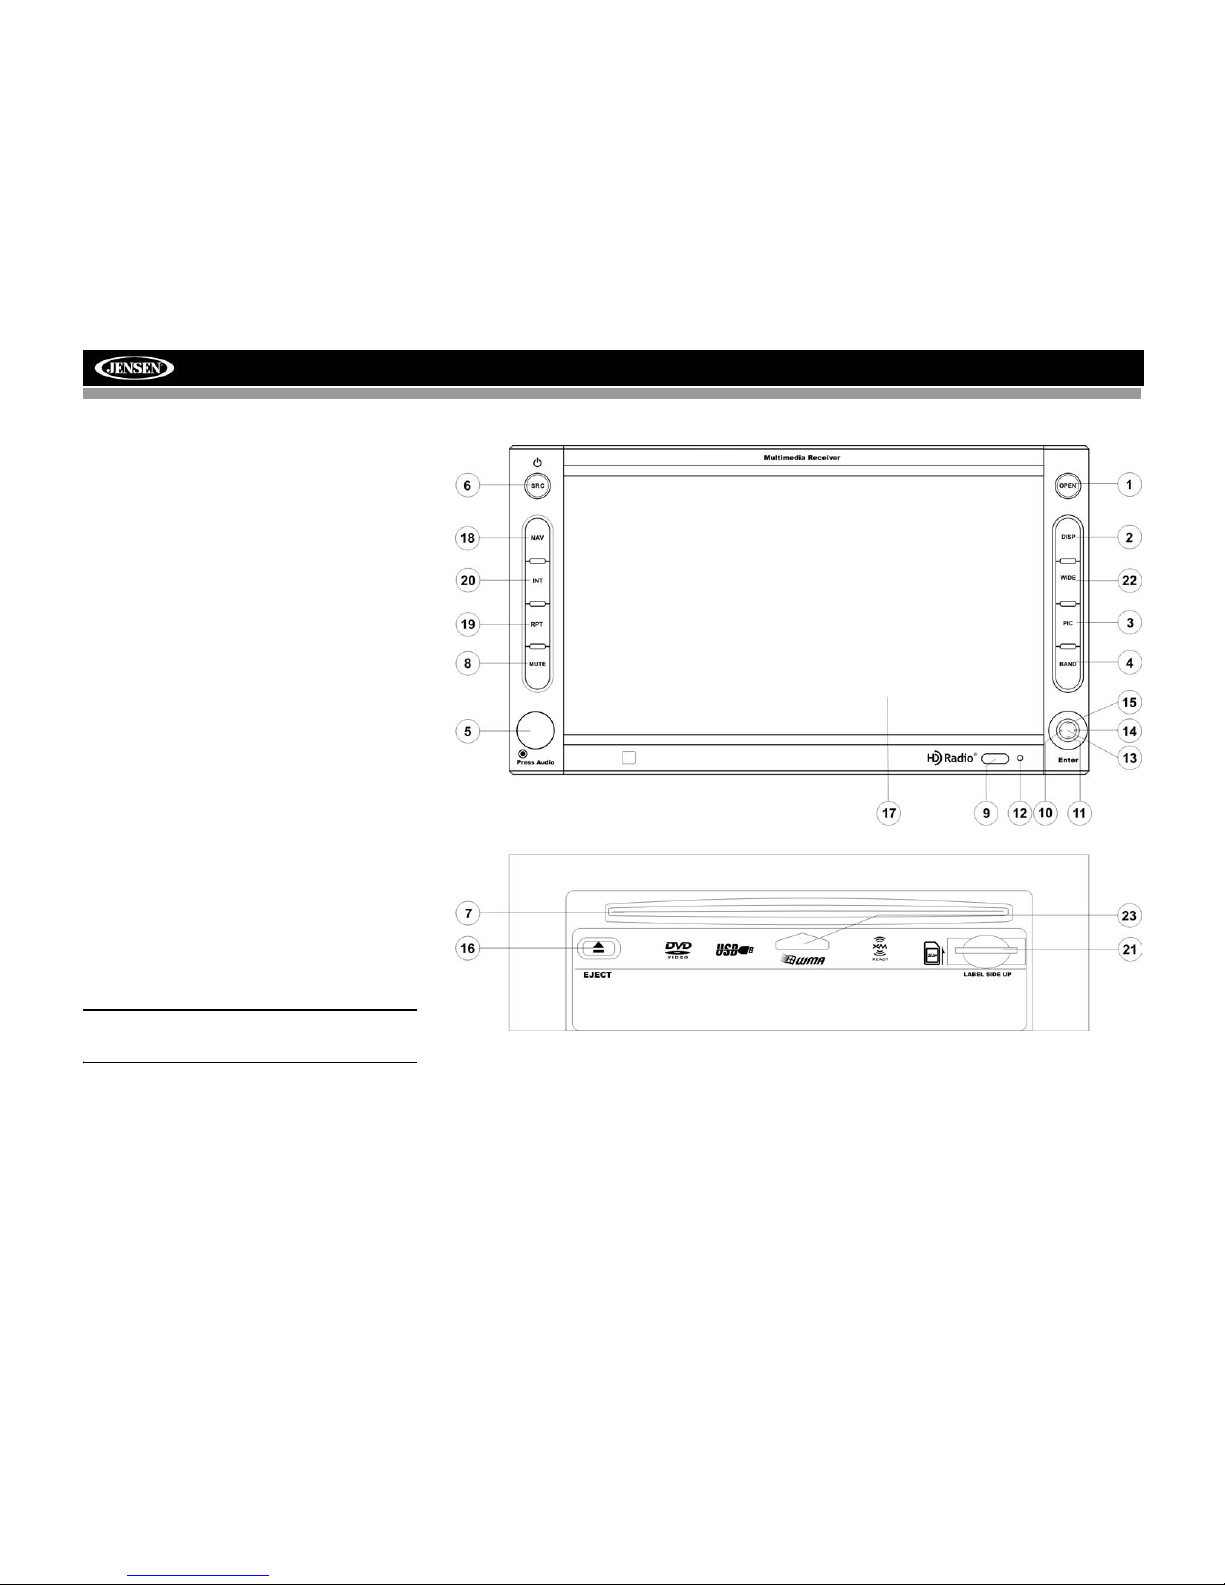
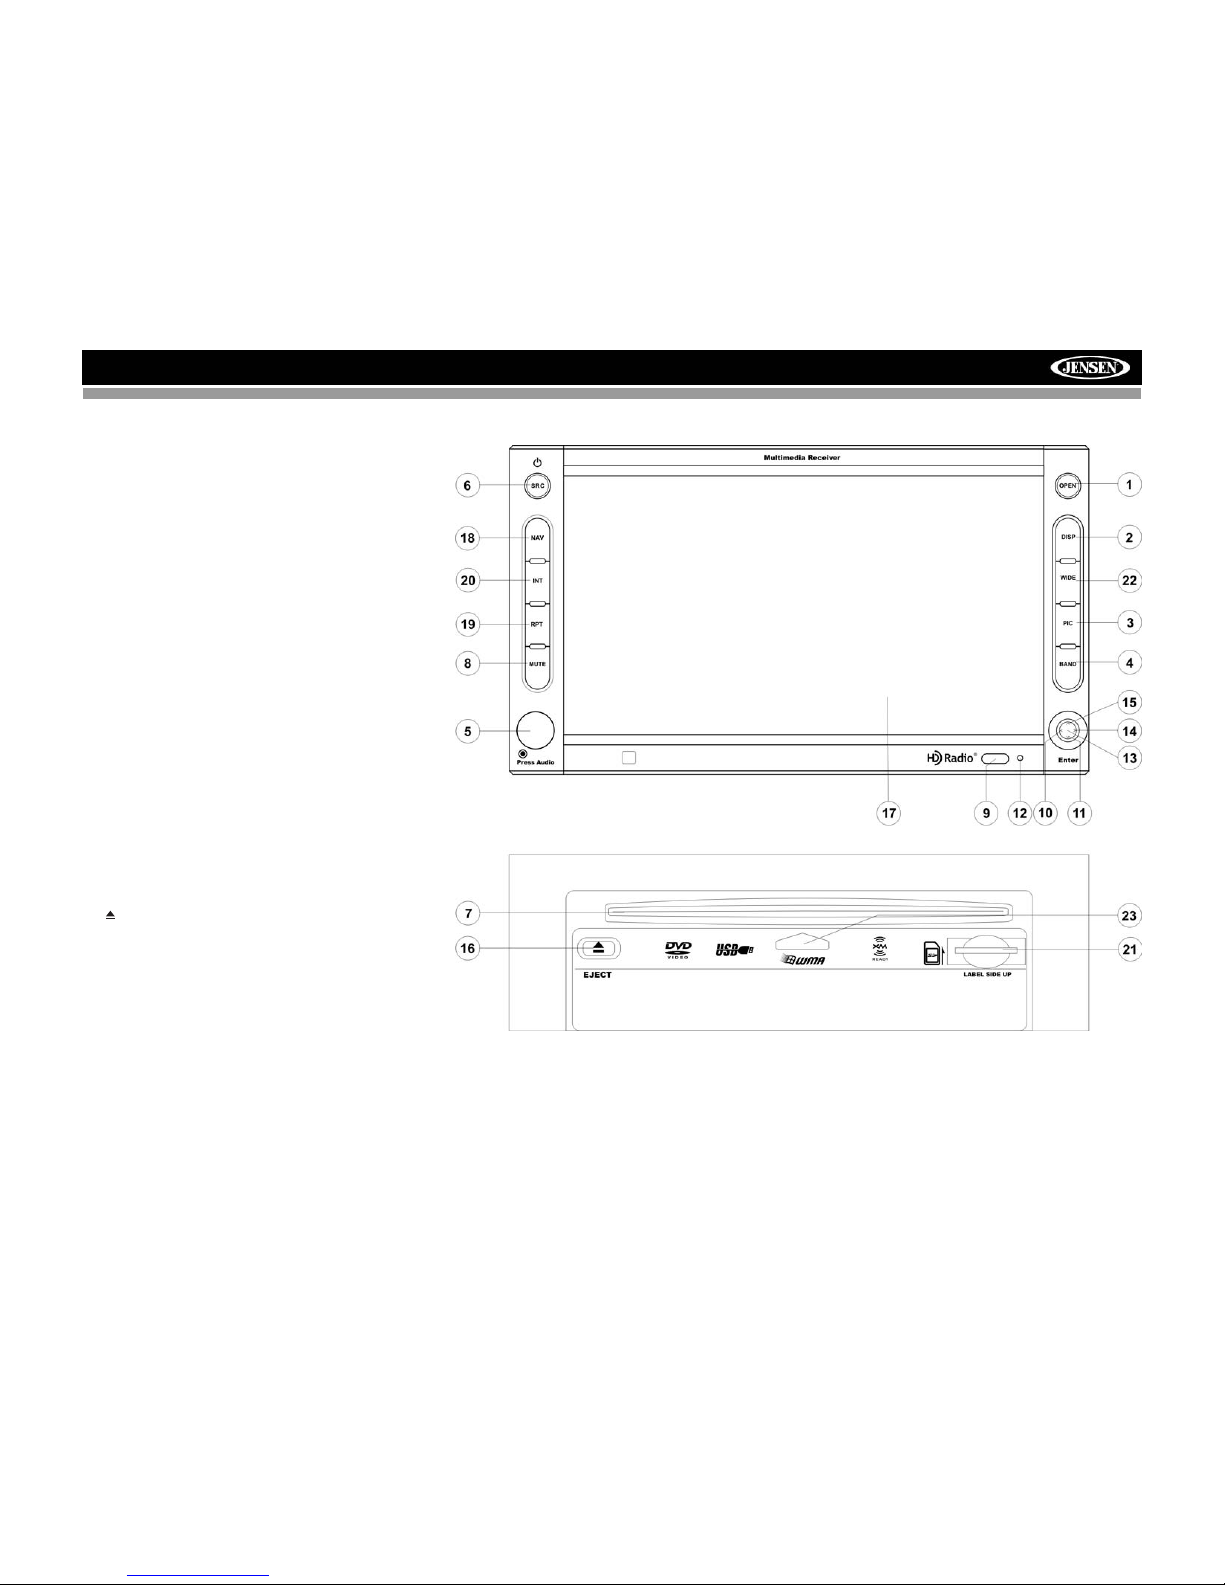
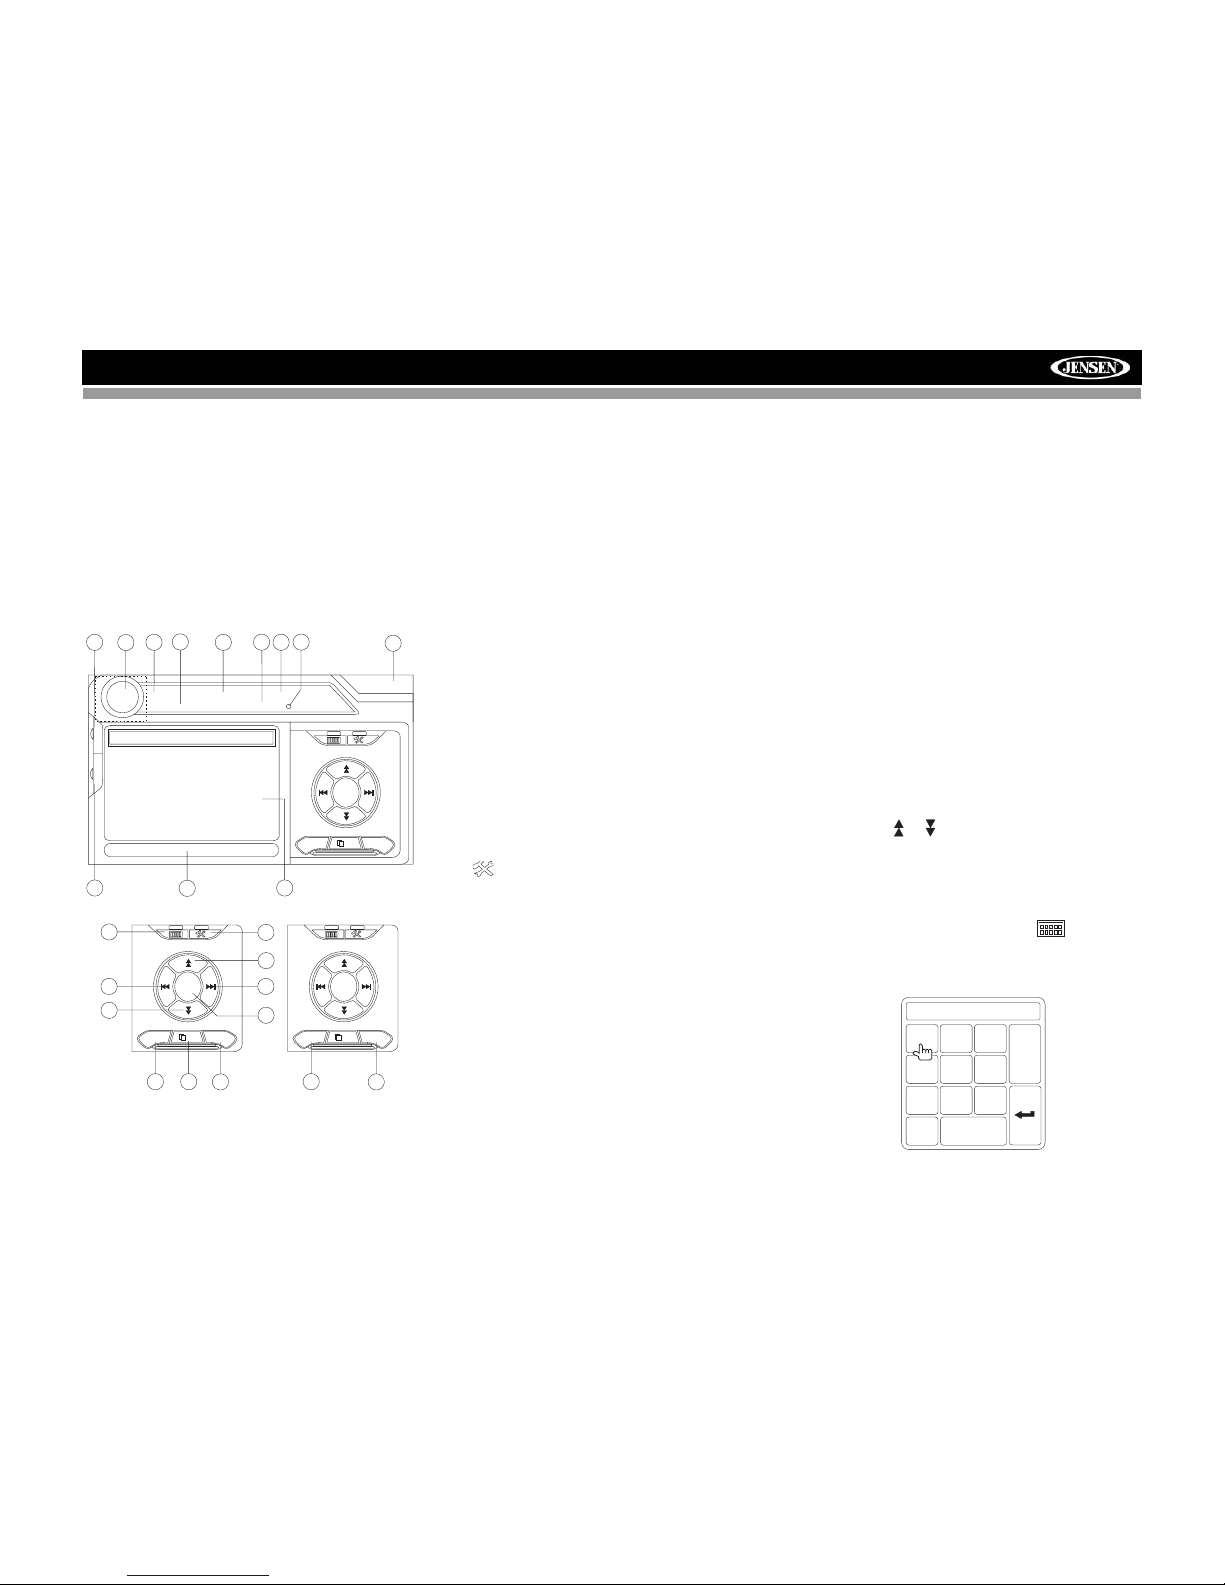
CONTROLS AND INDICATORS
Button Operation
1. OPEN
Press to activate the automatic mechanical system and slide
the TFT monitor down to reveal the disc and SD slots. Press
again to close the TFT.
Press and hold to activate the "Tilt" function. While the Tilt
icon is flashing, use the up/down joystick buttons to move the
TFT into the desired position. Press and hold to exit the
function or wait ten seconds for it to time out.
2. DISP
When viewing files in DVD/disc mode, press to view the top
and bottom information bars. Press again to select "Display
Off".
In DVD Mode, press to view the top and bottom information
bars. Press again to turn “Display Off”.
3. PIC
Press to view and adjust Brightness and Contrast settings.
4. BAND
Press the BAND button to change the AM, FM or SAT band.
5. AUDIO
Rotate to adjust the volume. Press to access audio EQ menu.
6. SRC
Press to select playing mode.
When you change the source during navigation, the voice
prompts will still be heard, although the navigation map
cannot be seen. (The selected source audio will be muted
until the navigation voice prompt command is completed,
after which the source audio will resume.)
7. DISC SLOT
8. MUTE
Press to silence the receiver. Press again to resume previous
volume level.
NOTE: This head unit features Softmute, which will allow
the volume to increase gradually when the MUTE
function is deactivated.
9. IR Remote Control Receiver
Page 8
4
VM9423
CONTROLS AND INDICATORS
10. (left joystick)
DVD/Disc Mode: Press once to play back the previous
chapter/track.
TUNER Mode: Press once to auto-search for the previous
available radio station.
MENU Mode: Press once to move the cursor to the left.
11. (down joystick)
DVD/Disc Mode: Press once for slow forward/slow reverse.
TUNER Mode: Press to go down one frequency step.
MENU Mode: Press once to move the cursor down.
12. Reset
Press to reset system settings to factory default (except the
password and parental lock setting).
13. Pause/Play/Enter
Press to pause or resume playback or to confirm current
selection.
14. (right joystick)
DVD/Disc Mode: Press once to enter the next chapter or
track.
TUNER Mode: Press once to auto-search the next available
radio station.
MENU Mode: Press once to move the cursor to the right.
15. (up joystick)
DVD/Disc Mode: Press once for fast forward/fast reverse.
TUNER Mode: Press to go up one frequency step.
MENU Mode: Press once to move the cursor up.
16. /EJECT
Press once for disc insertion/ejection.
Press and hold to reset core mechanism position.
17. TFT Display
18. NAV
When the NAV102 is connected to the head unit, press to
display the navigation user interface.
19. RPT
Press to control repeat playback function.
20. INT
Press to control intro playback function.
21. SD Card Slot
Insert SD card for playback of audio/video files.
22. WIDE
Press to adjust the display aspect of the picture to one of two
settings: CINEMA, NORMAL or Standby (screen off). NOTE:
Only CINEMA and Standby are available for non-video
sources.
23. Disc Present Indicator
Page 9
5
VM9423
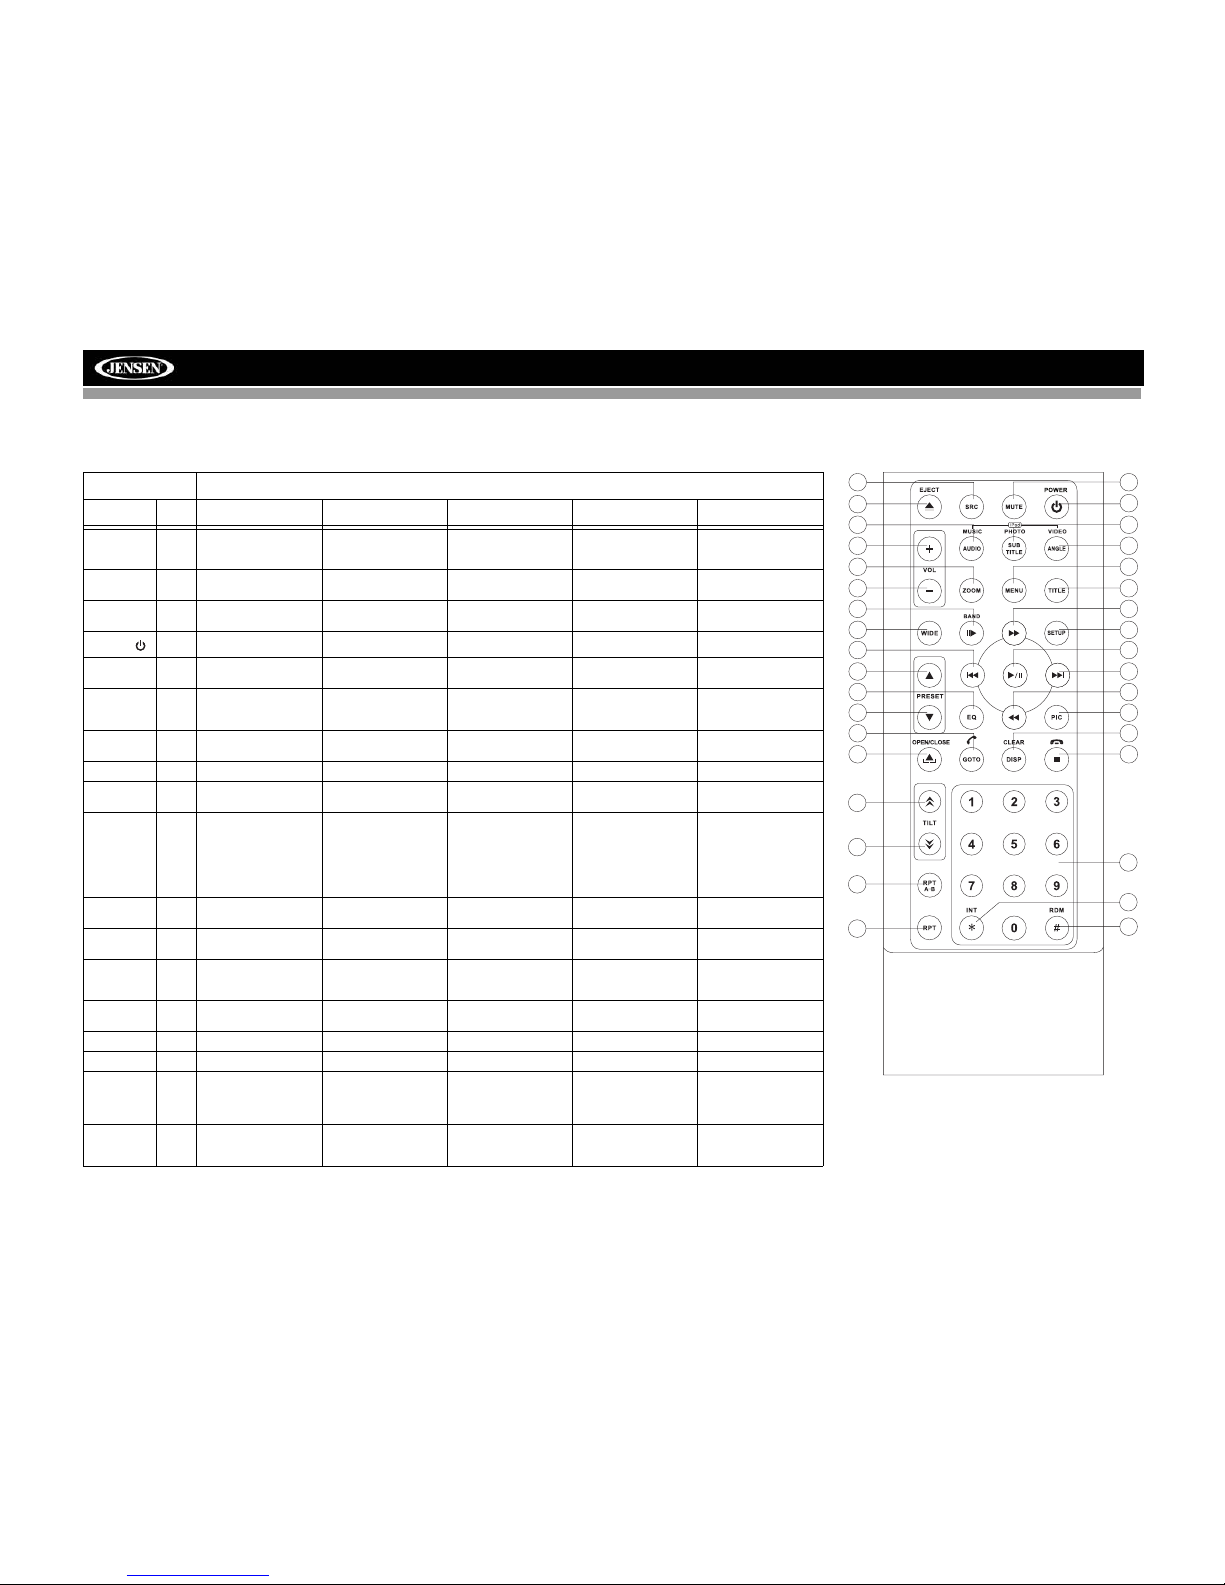
REMOTE CONTROL
Table 1: Remote Control Functions
Button Function
Name Ref# DVD VCD TUNER CD/MP3/USB/SD SATELLITE
MENU 1 Enter the main menu of
the disc
Turn on/off PBC when
playing VCD
TAG HD Radio stations for transfer to an
iPod
Displays diagnostics
screen
TITLE 2 Enter the title menu of
the disc
Play first ten seconds
of each chapter/title
Play first ten seconds
of each file
Category list in CG
mode
MUTE 3 Toggle on/off audio out-
put
Toggle on/off audio output
Toggle on/off audio output
Toggle on/off audio output
Toggles on/off audio
output
POWER/
4 Turn the power on/off Turn the power on/off Turn the power on/off Turn the power on/off Turns the power on/off
AUDIO 5 Change the audio lan-
guage for disc playback
REPT A-B 6 Setup to repeat play-
back from time frame A
to time frame B
Setup to repeat playback from time frame A
to time frame B
REPT 7 Repeat playback of
current chapter
Repeat playback of
current chapter
Repeat playback of
current track
SRC 8 Select playing mode Select playing mode Select playing mode Select playing mode Selects playing source
SUBTITLE 9 Language selection for
subtitle
DISP/
CLEAR
10 Display playback infor-
mation
Delete entry or move
backwards to correct
error in Direct Access
mode
Display playback information
Delete entry or move
backwards to correct
error in Direct Access
mode
Displays audio mode
Delete entry or move
backwards to correct
error in Direct Access
mode
PRESET /\ 11 Navigate the preset
station list
Navigates the preset
station list
PRESET \/ 12 Navigate the preset
station list
Navigates the preset
station list
ANGLE 13 Play back disc in differ-
ent angle for a scene
Play back Picture CD
with different angle of
picture displayed
Switches MEM keypad off
>> 14 Fast forward the disc
content
Fast forward the disc
content
Changes station up
one increment
Fast forward the disc
content
VOL - 15 Decrease volume Decrease volume Decrease volume Decrease volume Decreases volume
VOL + 16 Increase volume Increase volume Increase volume Increase volume Increases volume
|<< 17 Select the previous
chapter for playback
Select the previous
chapter for playback
Search an available
radio station by
decreasing tuning frequency
Select the previous
track for playback
Searches an available
radio station by
decreasing tuning frequency
>/|| 18 Pause playback/start
playback
Pause playback/start
playback
Pause playback/start
playback
ENTER, Toggles the
on-screen menu
between CAT/CH mode
3
4
5
9
6
7
26
27
15
16
34
33
19
32
23
24
31
30
8
35
1
2
10
13
28
25
11
12
14
20
18
17
22
21
29
TAG
Page 10
6
VM9423
>>| 19 Select the next chapter
for playback
Select the next chapter
for playback
Search an available
radio station by
increasing tuning frequency
Select the next track for
playback
Searches an available
radio station by
increasing tuning frequency
/
20 Stop playback/end call Stop playback/end call End call Stop playback/end call
GOTO/
21 Go to specific time
frame and playback/
dial call
Go to specific time
frame and playback/
dial call
Dial call Dial call Enters Direct Access
mode
<< 22 Slow playback/fast
rewind playback
Slow playback/fast
rewind playback
Changes station down
one increment
ZOOM 23 Zoom in/out on an
image
Zoom in/out on an
image
PIC 24 Display set-up parame-
ters
Display set-up parameters
Displays Brightness/
Contrast Controls
OPEN/
CLOSE
25 Open/close the TFT
monitor
Open/close the TFT
monitor
Open/close the TFT
monitor
Open/close the TFT
monitor
Opens/closes the TFT
monitor
TILT
26 Decrease monitor tilt
angle
Decrease monitor tilt
angle
Decrease monitor tilt
angle
Decrease monitor tilt
angle
Decreases monitor tilt
angle
TILT
27 Increase monitor tilt
angle
Increase monitor tilt
angle
Increase monitor tilt
angle
Increase monitor tilt
angle
Increases monitor tilt
angle
WIDE 28 Select display mode:
FULL or NORMAL
Selects display mode:
FULL or NORMAL
Selects display mode:
CINEMA or Standby
1, 2, 3, 4, 5,
6, 7, 8, 9, 0
(Numeric
Keypad)
29 Directly access chapter 1-6 selects preset for
current band
Directly access track 1-6 selects preset for
current band
/BAND
30 Slow motion playback Slow motion playback Change AM/FM band Slow motion playback Selects SAT1, SAT2 or
SAT3 band.
SETUP 31 Display Setup menu Display Setup menu Display Setup menu Display Setup menu Displays Setup menu
EQ 32 Modify equalizer set-
tings
Modify equalizer settings
Modify equalizer settings
Modify equalizer settings
RDM 33 Play all chapters in ran-
dom order
Play all tracks in random order
INT 34 Play the first ten sec-
onds of each track
Preview scan
EJECT 35 Eject disc Eject disc Eject disc Eject disc Ejects disc
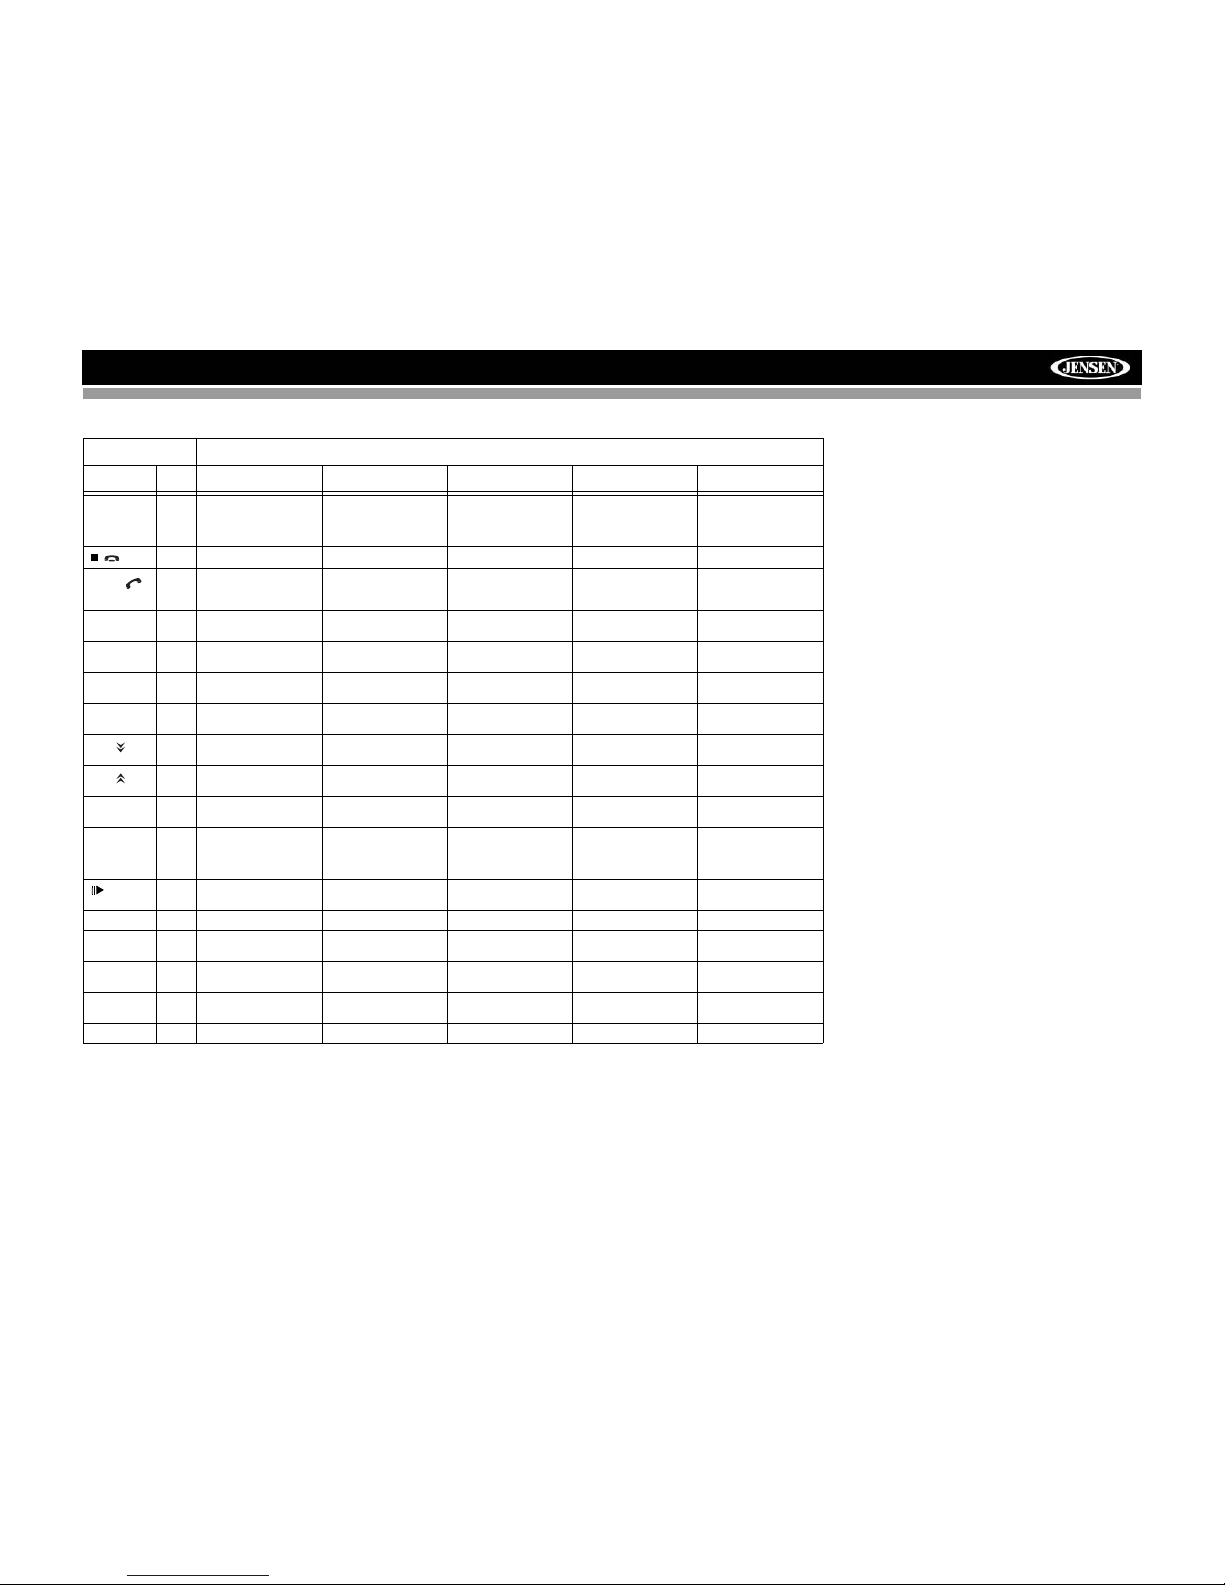
Table 1: Remote Control Functions
Button Function
Name Ref# DVD VCD TUNER CD/MP3/USB/SD SATELLITE
Page 11
7
VM9423
USING THE TFT MONITOR
Open/Close TFT Monitor
Open TFT Monitor
Press the OPEN/CLOSE button (1) on the front panel or
press the ( ) button (25) on the remote control to slide the
monitor down and reveal the disc and SD card slots.
Close TFT Monitor
Press the OPEN/CLOSE button (1) on the front panel or
press the ( ) button (25) on the remote control close the
monitor panel.
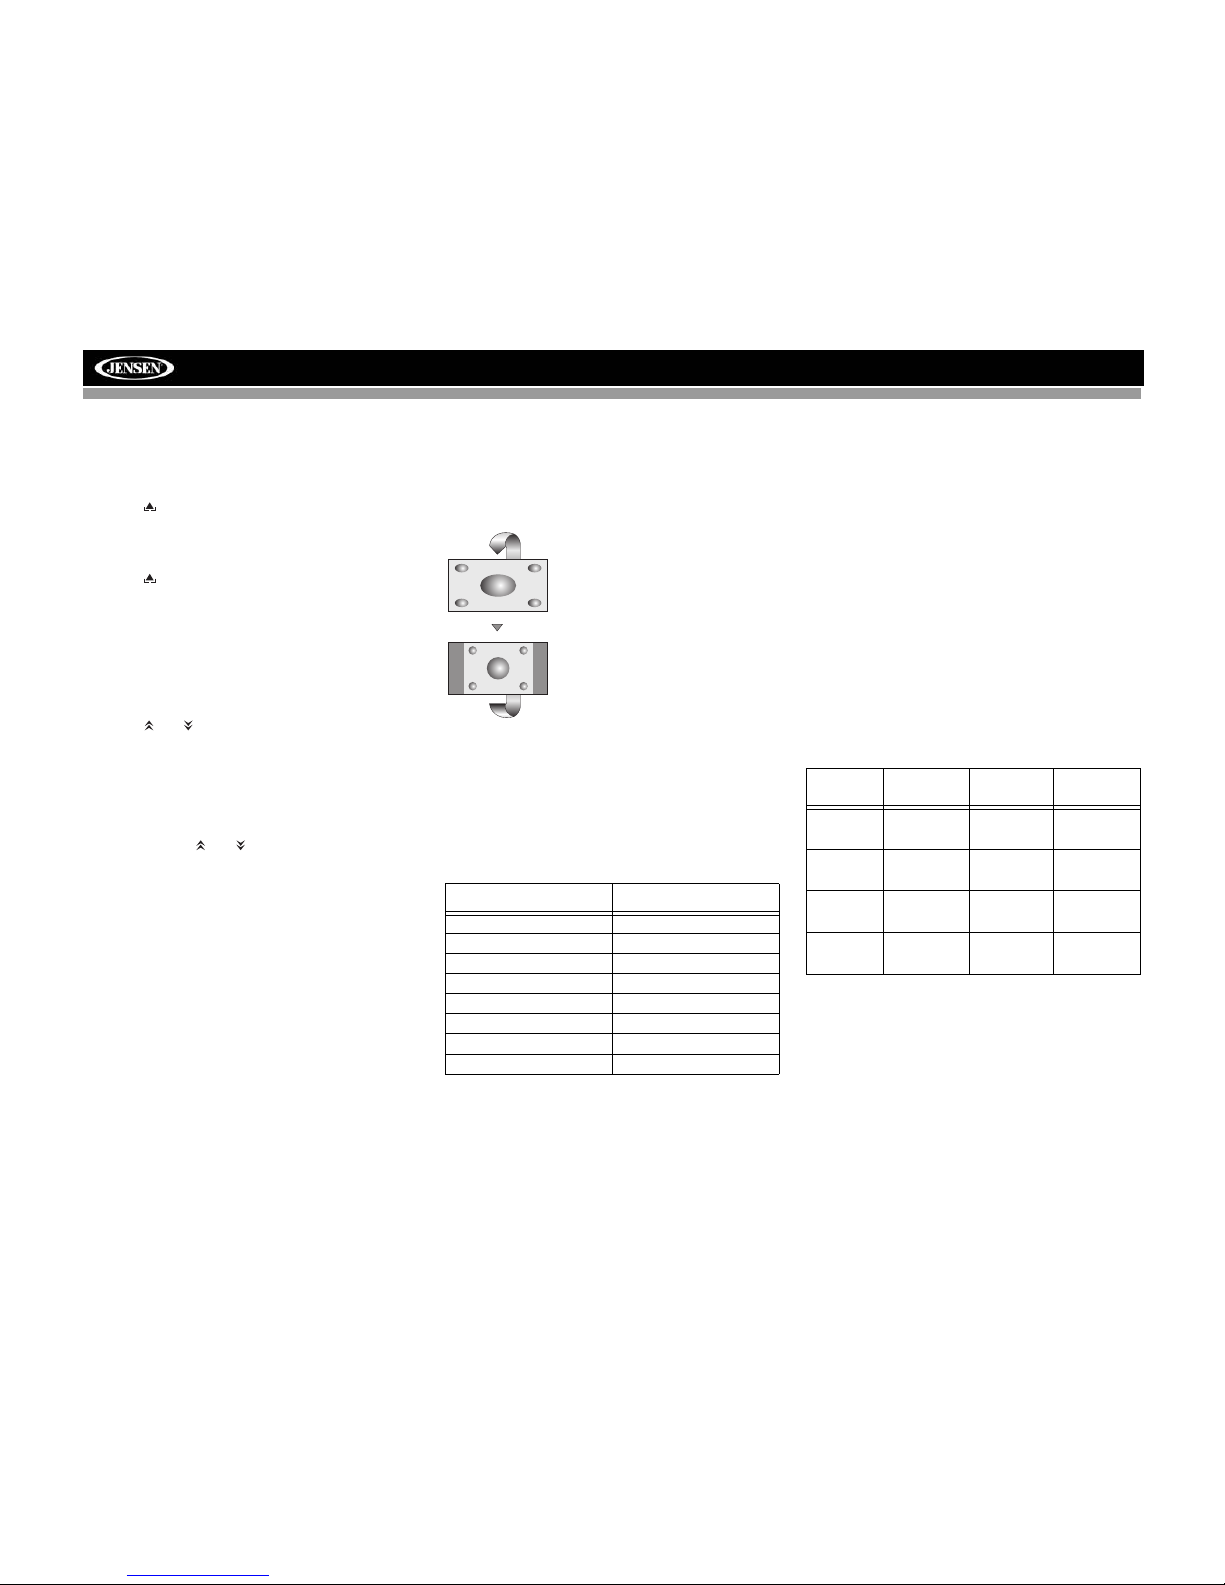
Monitor Tilt Angle Adjustment
A known characteristic of LCD panels is the quality of the
display in relationship to the viewing angle. The monitor
angle can be adjusted for optimum viewing using one of the
following methods.
Step by Step Angle Adjustment
Press the ( ) or ( ) button on the remote control (26, 27) to
adjust the tilt angle of the screen one step at a time.
You can also adjust the tilt by pressing and holding the OPEN
button (1) on the front panel. Use the up/down joystick
buttons to adjust the angle of the screen while the red tilt icon
is flashing.
Continuous Angle Adjustment
Press and hold the ( ) or ( ) button on the remote control
to adjust the tilt angle in a continuous motion.
Reverse Driving Use
If the rear-view video camera is connected, the unit is on, and
the monitor is stationed inside the main compartment of the
unit, the monitor automatically moves into the viewing
position and switches to CAMERA mode upon reverse
driving. When the reverse driving stops, the monitor returns
to the main storage compartment.
If the monitor is in display mode, the monitor automatically
switches to CAMERA mode upon reverse driving. When the
reverse driving stops, the monitor returns to its original input
mode.
Aspect Ratio
Press the WIDE button (28) on the remote control or WIDE
button (22) on the monitor to adjust the aspect ratio as
follows (only active with video source):
Image Setting
Table 2 shows the video output mode for each playing
source.
*CVBS – Composite Video Baseband Signal
Parameter Adjustment Procedure
1. Enter Picture Quality Setting Mode:
Press the PIC button on the remote control or monitor.
2. Select Item to Set:
Use the up/down joystick buttons to select “BRIGHT” or
“CONTRAST”.
3. Set Parameters:
Use the left/right joystick buttons to modify the settings.
4. Exit Picture Quality Setting Mode:
Press the PIC button on the remote control or monitor.
Parking Brake Inhibit
When the pink "Parking" wire is connected to the vehicle
Parking Brake circuit, the front TFT monitor will display video
when the Parking Brake is engaged. (When the pink wire is
grounded via the Parking Brake circuit, video will be
displayed.)
Monitor Movement Mechanism
If an obstruction occurs in the monitor path, the following
protective measurements can be executed to prevent
damage to the mechanism or monitor:
After the protective procedure is executed, normal operation
is resumed by pressing the OPEN button (1) or disconnecting
and reconnecting the power.
Table 2: Video Output Modes
Playing Source Video Output Modes
RADIO RGB Mode
SAT RGB Mode
DISC RGB Mode
BT RGB Mode
AUX 1 CVBS Mode
AUX 2 CVBS Mode
NAV RGB Mode
CAMERA CVBS Mode
CINEMA
The entire screen is extended
horizontally to the aspect ratio of 16 to
9. The extension ratio is the same at
any point.
NORMAL
The conventional display image has a
4 to 3 ratio of horizontal to vertical,
leaving a blank area on the right and
left sides of the display.
STANDBY
Screen becomes black. Touch screen
to resume.
Table 3: Monitor Protective Measures
Obstruction
Self
Protection
OPEN Button
Pressed
Power
Reconnected
Monitor loading out horizontally
Unit stops at
obstruction
point
Monitor fully
extended horizontally
Monitor is automatically
loaded into unit
Monitor loading in horizontally
Unit stops at
obstruction
point
Monitor fully
extended horizontally
Monitor is automatically
loaded into unit
Monitor loading out vertically
Unit stops at
obstruction
point
Monitor swivels back to the
unit
Monitor swivels back to the
unit
Monitor loading in vertically
Unit stops at
obstruction
point
Monitor swivels back to the
unit
Monitor swivels back to the
unit
Page 12
8
VM9423
OPERATING INSTRUCTIONS
Power On / Off
Press the /SRC button (6) on the unit (or the /POWER
button (4) on the remote control) to turn the unit on. The
buttons on the front of the unit light up and the current mode
status appears in the LCD (7).
Press and hold the button to power off the unit.
Audible Beep Confirmation
An audible beep tone confirms each function selection. The
Beep tone can be disabled through the Setup menu.
Volume Adjustment
To increase or decrease the volume level, turn the AUDIO
control (5) on the front panel or press the VOL+/ VOL-
buttons (15, 16) on the remote control. When the volume
level reaches “0” or “40”, a beep sounds, indicating that the
adjustment limit has been reached. The volume ranges from
“0” to “40”. The LCD or TFT screen displays the volume level
for 3 seconds.
Programmable Turn-On Volume
This feature allows the user to select a turn-on volume setting
regardless of the volume setting prior to turning the unit off.
To program a specific turn-on volume level, turn the AUDIO
control (2) to adjust the volume to the desired turn-on volume.
Push and hold the AUDIO button while the yellow speaker
icon and level indication is displayed on the screen. The unit
will beep two times to confirm your turn-on volume setting.
Mute
Press the MUTE button on the front panel (8) or remote
control (3) to mute the volume from the unit. Press the MUTE
button again to restore the volume. “MUTE” is displayed on
the LCD. Adjusting the volume or using any of the audio
setup features cancels the mute function.
Line Mute
If the “MUTE” wire is connected, audio output mutes when a
telephone call is received by the cell phone.
Steering Wheel Control (SWC)
This head unit is compatible with the PAC (Pacific Accessory
Corporation) steering wheel control adapter SWI-PS. A
3.5mm female connector (labeled “SWC Interface”) on the
back of the head unit allows connectivity to the PAC adapter.
Please refer to the instructions included with the PAC adapter
for detailed installation information.
SWC Functions
The following controls are available for most vehicles:
1. Vol Down
2. Vol Up
3. Mute
4. Seek Down / Previous Track / ** Preset Down
5. Seek Up / Next Track / ** Preset Up
6. SRC (Source)
7. ** Select
8. ** Select
9. Band
** If additional steering wheel control buttons are available on
the vehicle, function 7 / 8 may be assigned the "Select"
feature. This feature / function may not be available on some
vehicles.
Select Operation
If "Select" (function 7 or 8) is held down and function 4 is
pressed momentarily, Preset Up will be selected. If "Select"
(function 7 or 8) is held down and function 5 is pressed
momentarily, Preset Down will be selected.
Playing Source Selection
Press the SRC button on the front panel (6) or remote control
(8) to change between available playing sources in the
following order: RADIO, SAT, DISC, NAV, BT, iPod, SD, USB,
AUX1, AUX2 and CAMERA. The playing mode is displayed
on the TFT and LCD screens.
Auxiliary Devices
External peripheral devices can be connected to this unit via
RCA output (AUX IN 2) or the MediaLink
4
.
Select “AUX 1” to play an auxiliary device connected via the
MediaLink
4
RCA or 3.5mm inputs. For example, you can play
music files from a portable music player, video from a video
camera and even view photos stored on a digital camera.
Select “AUX 2” mode to access and control auxiliary devices
connected to the “AUX IN 2” inputs on the back of the radio.
Selecting a Source while Navigating
While navigating, other sources may be selected and listened
to such as AM-FM Tuner, CD, etc. To select a source, press
the /SRC button (6) and then select a source from the
Front Source Menu. Navigation voice prompts will be heard
automatically, although the navigation map cannot be seen.
(The selected source audio will be muted until the navigation
voice prompt command is completed, after which the source
audio will resume.)
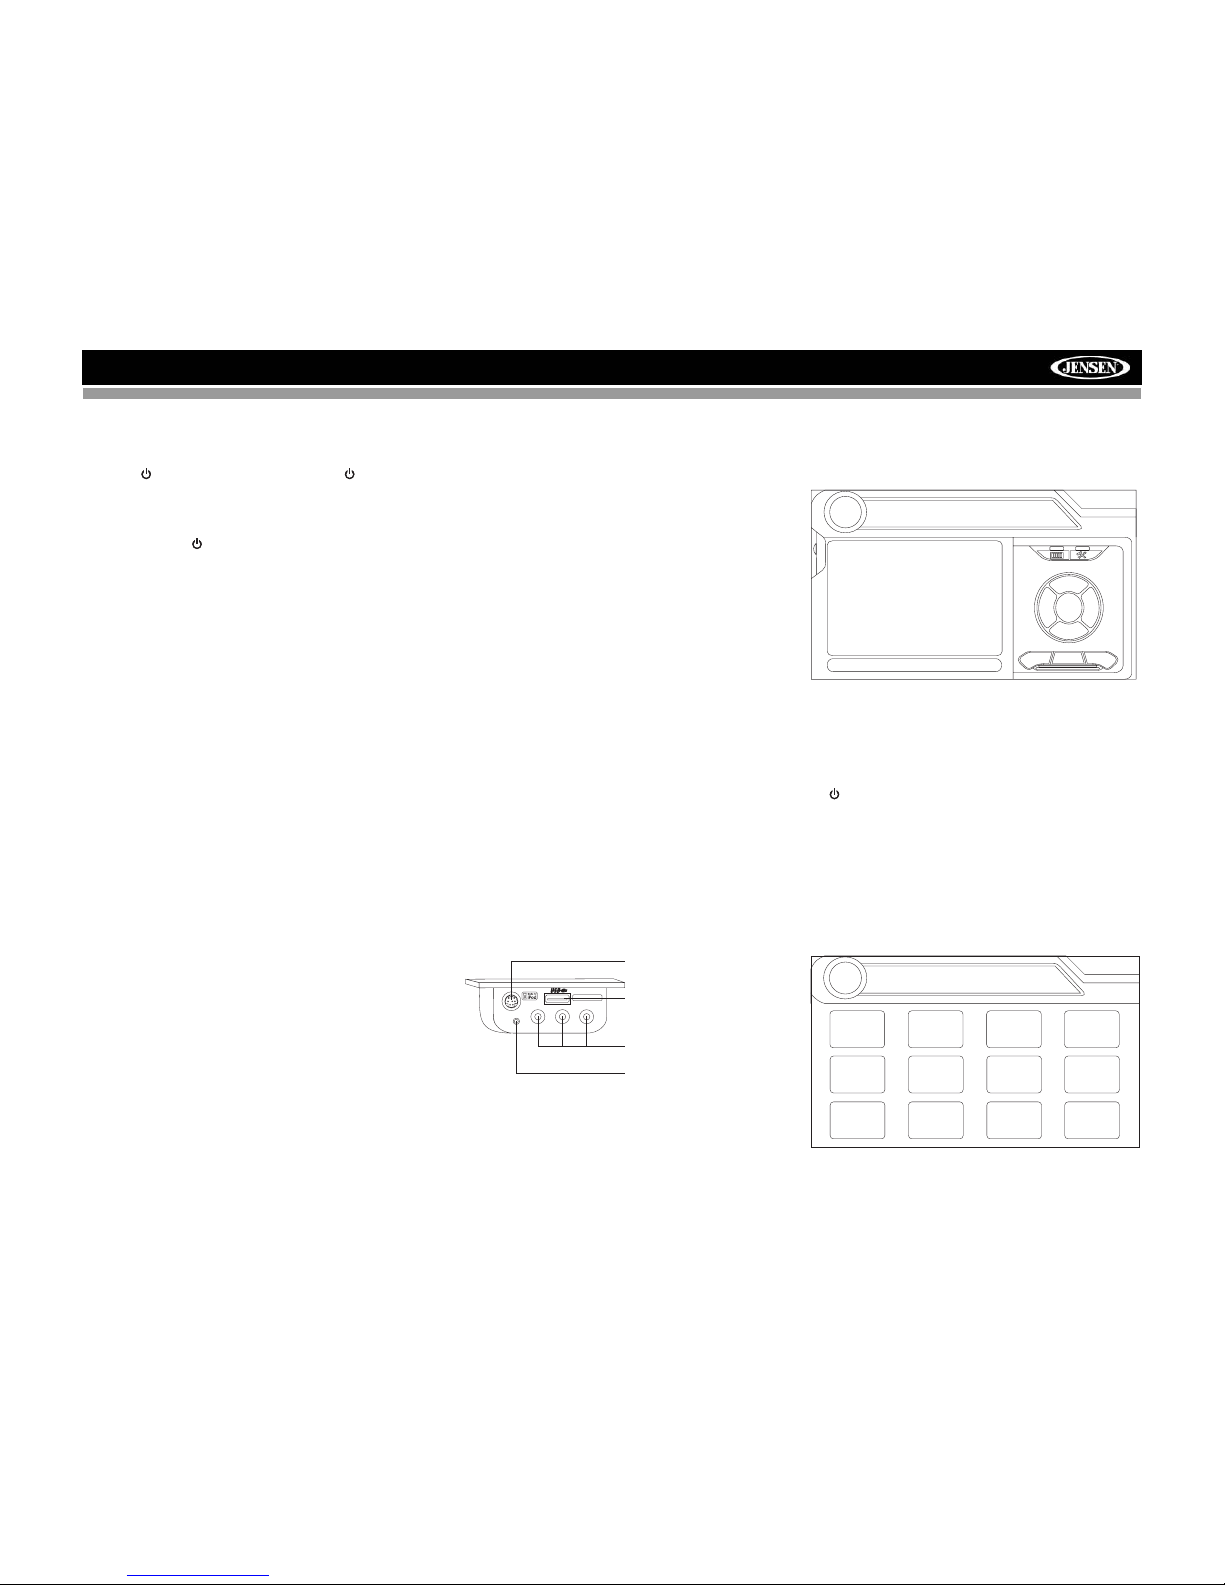
Source Menu
To access the SOURCE MENU, touch the TFT screen in the
top left corner of the screen.
VIDEO LEFT RIGHT
3.5mm- Audio
MediaLink
iPod Connector
USB Connector (Type A)
RCA Inputs (AUX 1)
3.5mm Left & Right
Stereo Inputs (AUX 1)
AUX1
No Video Signal
01:53 PM
E
Q
DISC
SOURCE MENU
DISC
RADIO
SD
iPod
SAT
USB
AUX 1
AUX 2
NAV
CAMERA
BT
Page 13
9
VM9423
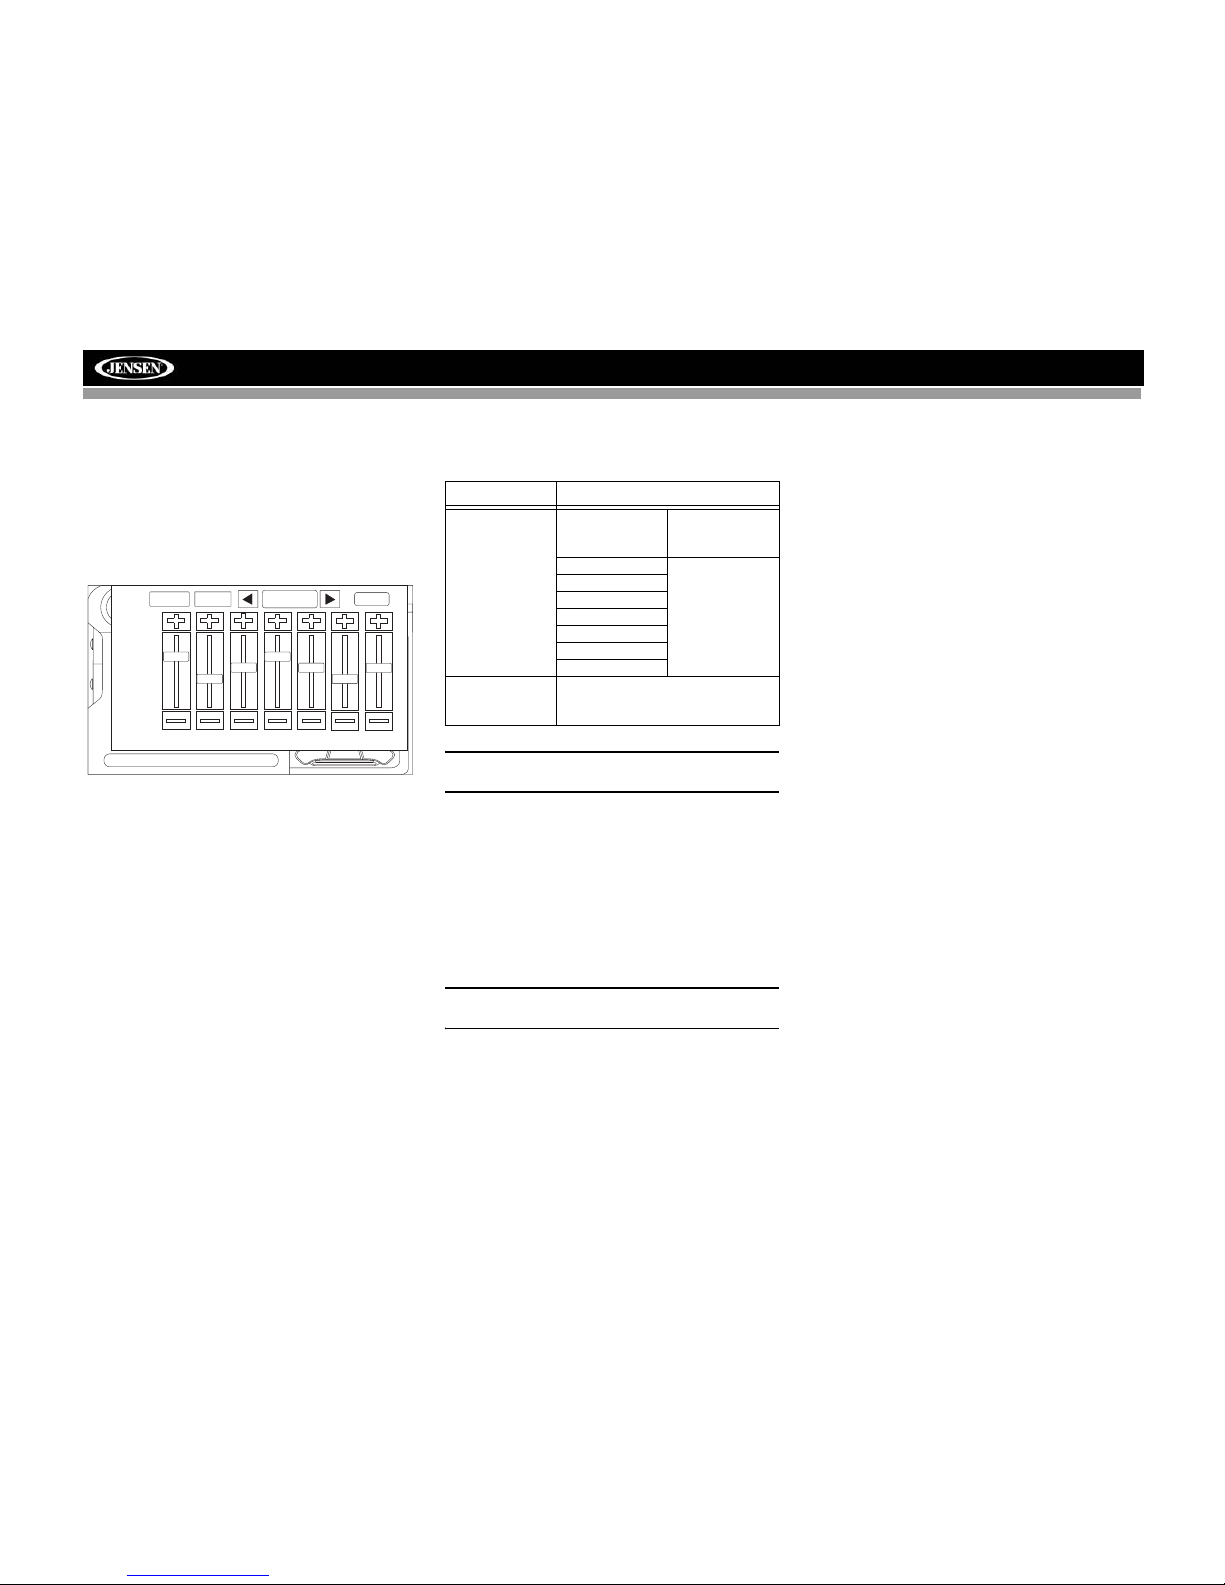
7-Band Graphic Equalizer
The VM9423 features a 7-band graphic equalizer that allows
you to easily adjust your audio system to meet the acoustical
characteristics of your vehicle, which vary depending on the
type of vehicle and its measurements. Proper setting of the
Fader and Balance boosts the effects of the cabin equalizer.
Press the AUDIO button (5) on the front panel or press the
the onscreen EQ button twice to display the following audio
menu.
• Touch the FAD-BAL button to access a second screen
with the Balance/Fader settings.
• Touch the EQ button to return to the Equalizer settings
screen.
• Use the arrows on either side of the box where "User" is
selected, to choose a preset equalizer level.
To adjust an audio feature:
1. Use the left/right joystick buttons to highlight the audio
feature to be adjusted.
2. Press the joystick ENTER button on the control panel
(13) or remote control (18) to select the highlighted
option.
3. Use the joystick to adjust the selected feature to the
desired setting.
NOTE: The EQ mode will automatically change to
“USER” when individual EQ bands are adjusted.
Proper setting of the Fader and Balance complement the
effects of the cabin equalizer.
The Audio menu will automatically exit after a few seconds of
inactivity. To exit quickly, touch the top left corner of the
screen or press and hold the AUDIO button (5).
System Reset
To correct a system halt or other illegal operation, use the tip
of a pen to press the reset button (12) located on the front
bottom-right corner of the unit. After a system reset, the unit
restores all factory default settings.
NOTE: If the unit is reset while a DVD is playing, the DVD
resumes play once the reset is complete.
EQ: User
E
Q
T
A
G
+12 —
0—
–12 —
80 250 600 1k 4k 10k 16k
FAD-BAL EQ
USER
BACK
Table 4: Audio Adjustments
Function Adjustment Options
EQ User In user mode, you
can manually adjust
each of the seven frequency bands.
Acoustic Use the on-screen
arrows to select a
predefined equalization curve.
Urban
Rave
Latin
Dance
Hip Hop
Rock
FAD-BAL Use this screen to adjust the output level for
each speaker in your surround system from 0
to -24dB. You can also adjust the master volume from this screen.
Page 14
10
VM9423
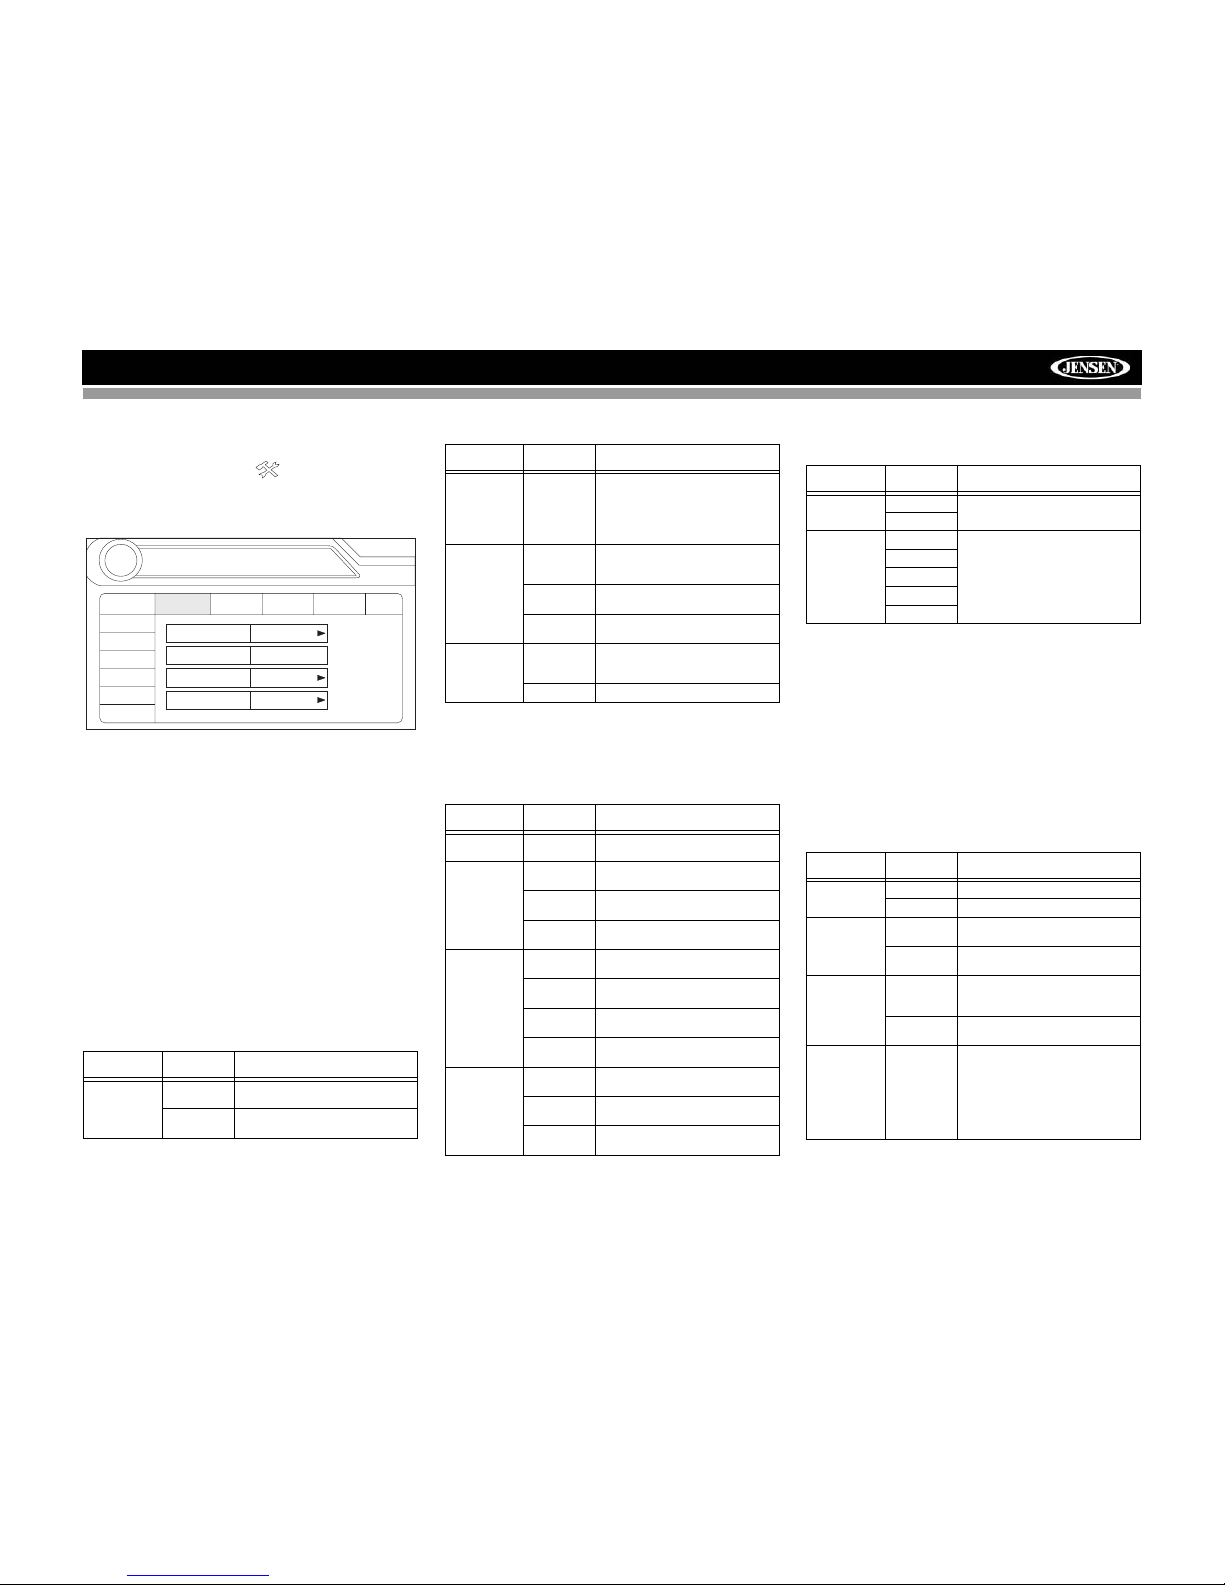
SETUP MENU
To access system settings, press the SETUP button (31) on
the remote control or touch the button on the screen to
enter the “SETUP” menu. The “GENERAL” sub-menu
appears highlighted in blue.
Accessing Menu Items
Touch the sub-menu name or use the joystick to select a submenu (Language, Audio, RDS, etc.).
The features available for adjustment under the highlighted
sub-menu option will appear in the center of the screen.
Adjusting a Feature
1. Use the touchscreen or press the /\ or V buttons on the
joystick to select the feature to be adjusted.
2. Enter the option field for the feature you want to adjust
by using the touchscreen or pressing the ENTER
(joystick) button. A submenu appears in a second row
with the selected option highlighted in blue.
3. Select a new value by using the touchscreen or pressing
the /\ or V buttons on the joystick.
4. Use the touchscreen or press the ENTER (joystick)
button to confirm setup.
General Sub-menu Features
Language Sub-menu Features
If a DVD supports more than 1 Subtitle or Audio language, all
the languages are available for selection during playback. If
the selected language is not supported by the DVD, then the
default language is used.
Audio Sub-menu Features
Speaker Sub-menu Features
• Choose 4 CH or 4.1 CH depending on the speaker
configuration in your vehicle.
• Use the Test Tone feature to verify speaker settings.
Make changes using the EQ/FAD-BAL menu, accessed
by pressing and holding the AUDIO button (volume
control).
• Subwoofer Phase Adjustment: Touch the subw icon to
access the subwoofer polarity controls and reverse the
subwoofer signal polarity from 0° to 180°. Reversing
polarity can improve bass response related to speaker
configuration.
Bluetooth Sub-menu Features
Setting Options Function
Clock Mode 12 Hour Clock displays 12 hour time using
AM and PM.
24 Hour Clock displays 24 hour time up to
23:59.
RADIO
RADIO
SETUP
RDS
Rating
Hardware
P.VOL
TS Cal
General
Language
Audio
Back
Clock Mode 12 Hour
Clock Adjust 04 : 31 AM
Video Input AUTO
Beep On
Speaker
Demo
Bluetooth
02:40
AM
Clock Adjust (HH:MM) The clock appears in the top right
corner of the screen and on the
LCD screen during certain operations. NOTE: The AM/PM indication
will change as you continue to
adjust the hour past 12.
Video Input
(Input circuitry autodetects the
video signal
from the Aux
In source).
Auto The color signal output is switched
automatically based on the current
video input signal - NTSC or PAL.
NTSC The color signals are output in the
standard NTSC format.
PAL The color signals are output in the
standard PAL format.
Beep On When turned on, an audible beep
tone confirms each function selection.
Off No beep sounds.
Setting Options Function
OSD English On Screen Display appears in
English.
DVD Audio English DVD Audio is heard in English
when the option is available.
Spanish DVD Audio is heard in Spanish
when the option is available.
French DVD Audio is heard in French when
the option is available.
DVD Subtitle English DVD subtitles automatically appear
in English when available.
Spanish DVD subtitles automatically appear
in Spanish when available.
French DVD subtitles automatically appear
in French when available.
Off DVD subtitles do not appear auto-
matically.
Disc Menu English DVD menu (if applicable) is dis-
played in English.
Spanish DVD menu (if applicable) is dis-
played in Spanish.
French DVD menu (if applicable) is dis-
played in French.
Setting Options Function
Setting Options Function
DRC Off Employ the Dynamic Range Control
for better playback for low volumes.
On
Sub. W Filter 50Hz Selecting a crossover frequency
sets a cut-off frequency of the subwoofer's LPF (low-pass filter).
80Hz
100Hz
120Hz
150Hz
Setting Options Function
Bluetooth On Enable Bluetooth function.
Off Disable Bluetooth function.
Auto Answer On The unit automatically answers all
incoming calls.
Off Manually answer calls by touching
the “call” button.
Connect Manual Connect the last active mobile
phone by touching the CONNECT
icon when disconnected.
Auto Automatically connect when your
paired phone is in range.
Pairing Code The default code is “1234”. Touch
the keypad icon to open the keypad
and enter the pairing code or pass
key required for Bluetooth connection to your mobile phone. Not all
phones/devices require a pairing
code. The default code is “0000” for
many models.
Page 15
11
VM9423
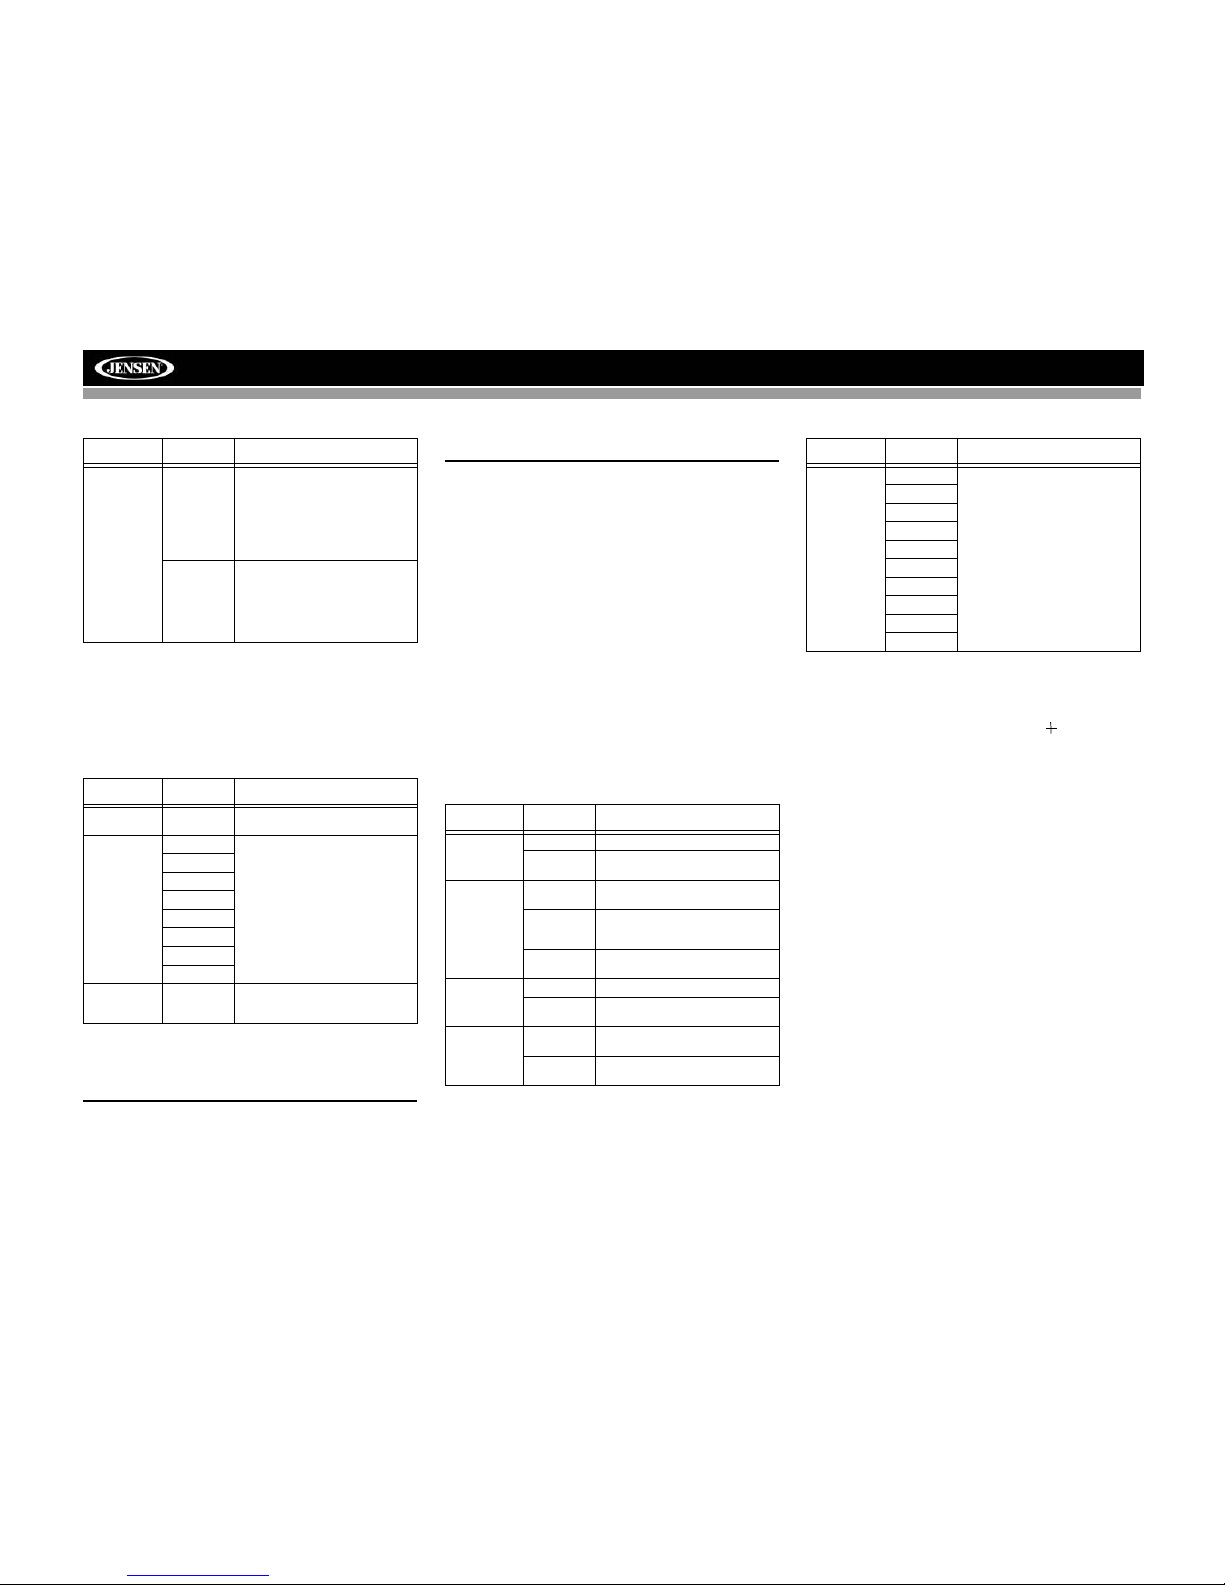
RDS Sub-menu Features
Rating Sub-menu Features
The DVD system has a built-in parental lock feature to
prevent unauthorized persons from viewing restricted disc
content. By default, the rating system is set at the highest
setting (with no restrictions). The parental lock is released
only by entering the correct password. Once the password is
entered, rating is available for setup.
To reset the password, access the “RATING” menu and enter
the current password. Once the correct password is entered,
you can access the “Password” field and enter a new one.
NOTE: Record the password and keep it in a safe place
for future reference. The rating for each disc is marked
on the disc, disc packing, or documentation. If the rating
is not available on the disc, the parental lock feature is
unavailable. Some discs restrict only portions of the disc
and the appropriate content will play. For details, please
refer to the disc description.
Demo Sub-Menu Features
You can stop/run demonstration mode or turn Demo Auto
Run on/off by choosing the “Demo” option from the SETUP
MENU.
When "Demo Auto Run" is Off, you can select "Demo Mode >
Run" to start Demo Mode. Demo Mode scrolls through the
various source screens, simulating activity on the display.
“Demo Mode” is discreetly displayed in yellow text (below the
clock), to indicate the unit is in Demo Mode. To stop Demo
Mode, press the upper-left quadrant of the TFT (Source
select).
When “Demo Auto Run” is On, the unit will automatically
display Demo Mode when powered on.
Hardware Sub-menu Features
If the rear-view video camera is connected, the unit is on, and
the TFT monitor is retracted inside the unit, the TFT monitor
automatically moves into the viewing position and Camera
mode is selected upon shifting into REVERSE gear. When
shifting into DRIVE gear, the TFT monitor is retracted back
inside unit after ten seconds.
If the monitor is in display mode, the monitor automatically
switches to CAMERA mode upon reverse driving. When the
reverse driving stops, the monitor returns to its original input
mode.
P.VOL Sub-menu Features
TS Cal (Screen Calibration)
To access the “Screen Calibration” function from the SETUP
menu, select the “TS CAL” option.
After entering calibration mode, a crosshair appears in a
corner quadrant of the screen. To begin calibration, press and
hold the crosshair for one second until it moves to the next
quadrant. Continue for each quadrant until the calibration is
completed.
To exit without performing calibration, touch the BACK
button.
Exiting the System Setup Menu
To exit setup mode and resume normal playback, press the
SETUP button (31) on the remote control or touch the BACK
button on the screen.
Setting Options Function
Tuner
Region
USA
USA
Canada
Mexico
South
America
FM Band: 87.9MHz -
107.9MHz, channel separation
@ 200kHz
AM Band: 530kHz - 1710kHz,
channel separation @ 10kHz
Europe
UK
Europe
Africa
FM Band: 87.6MHz -
107.9MHz, channel separation
@ 100kHz
AM Band: 531kHz - 1602kHz,
channel separation @ 9kHz
Setting Options Function
Password _ _ _ _ _ _ Enter the default six-digit password
(012345).
Rating 1. Kid Safe Select the appropriate rating level
for the intended audience.
You may override higher ratings by
using your password.
2. G
3. PG
4. PG-13
5. PG-R
6. R
7. NC-17
8. Adult
Load Factory Reset Select “Reset” to restore the factory
default settings for the Rating sys-
tem only.
Setting Options Function
Camera In Normal
Mirror Reverse the camera image as if
looking through a rear-view mirror.
TFT Set
Open
Auto The TFT panel automatically opens
when the unit is turned on.
Manual When the ignition is turned OFF, the
TFT panel DOES NOT retract if it
was previously out
Off You must press the OPEN button
(1) to open the TFT panel.
TFT Set Back Off TFT screen remains fully extended.
On TFT screen moves back slightly
after opening.
Auto Dimmer Off TFT screen brightness remains
constant unless manually adjusted.
On TFT screen will automatically dim
when less light is available.
Setting Options Function
Source DISC
Choose a source for which you
would like to increase the relative volume (LEVEL).
Use the +/- buttons to increase
or decrease relative volume for
specified source up to 6 decibels.
RADIO
SD
SAT
AUX 1
USB
BT
AUX 2
iPod
NAV
Page 16
12
VM9423
TUNER OPERATION
About HD Radio™ Technology
HD Radio technology allows CD-quality digital broadcasting
of your local AM and FM radio stations. HD Radio broadcasts
can include multiple channels on the same frequency, which
is called multicasting. With multicasting, you can receive up
to eight additional multicast channels: HD1~HD8. With your
VM9423 radio, you will receive HD Radio digital broadcasts
automatically when tuned to a station that offers HD Radio
technology.
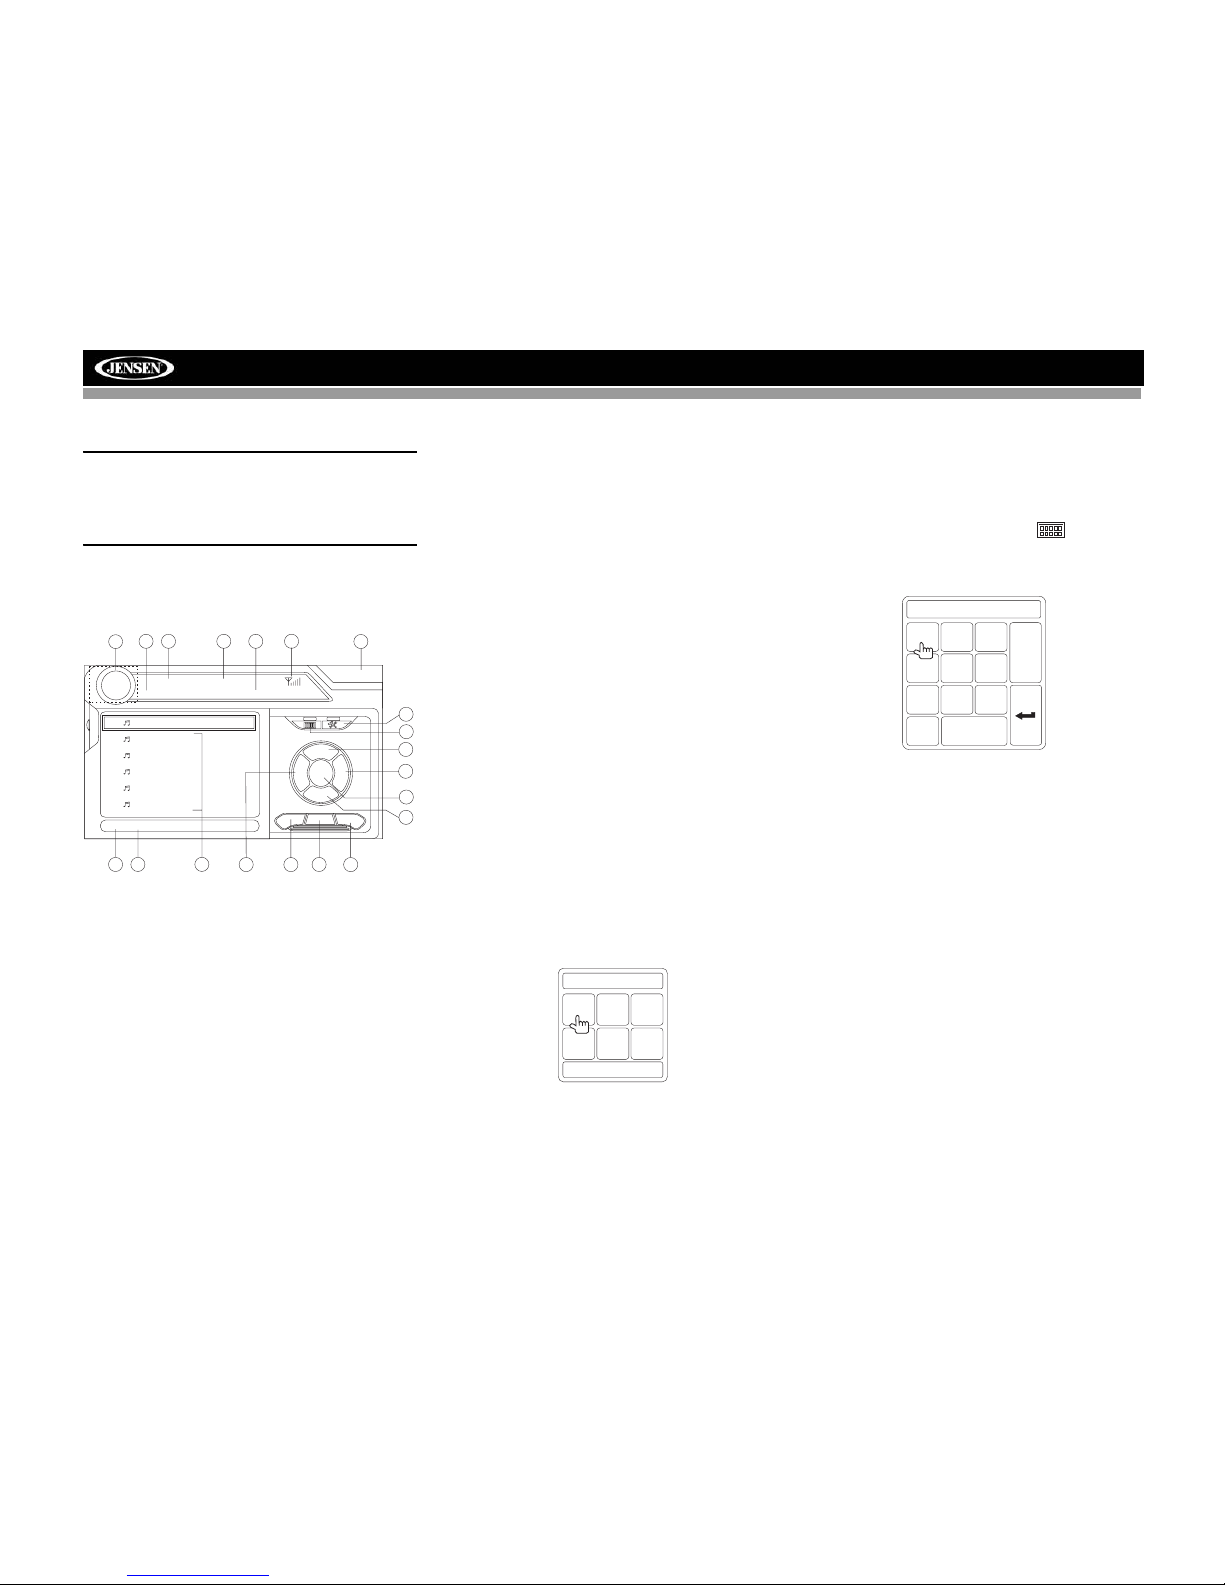
Tuner TFT Display
1. Current radio band indicator
2. Radio frequency indicator
3. Clock
4. Radio station name (call letters)
5. Tuning mode indicator
6. Preset radio stations: Touch to recall preset stations
7. Program Information: Title, Artist, Type
NOTE: The amount of information displayed when
receiving an HD Radio signal is dependent upon what is
being broadcast. Some stations broadcast their call
letters (name), the artist's name, song title, and category
of music.
8. Touch for quick access to Equalizer level settings
9. Touch to access the direct entry screen
10. HD Radio band indicator
11. |<<: Touch to seek backward
12. >>|: Touch to seek forward
13. <<: Touch to tune backward one step, including
multicast channels
14. >>: Touch to tune forward one step, including multicast
channels
15. BAND: Touch to change between AM/FM bands
16. Touch to view the SOURCE MENU and select a new
playback source
17. MEM: View screen used to enter current channel into
preset memory
18. 1/2 or 2/2: Touch this page button to view a second page
of on-screen buttons.
NOTE: In AM mode, there is only one page of on-screen
button options. The PROG button is not visible since
Multicast channels are not available for AM stations.
19. : Touch to view the SETUP menu
20. PROG: Touch to view the HD Radio Multicast channel
display
21. A/D: Touch to select Auto, Analog or Digital tuning
mode.
22. HD Radio station indicator
23. Auto memory scan
24. TAG: Touch to perform iTunes Tagging for current song
Switching to HD Radio Reception
• Touch the top left corner of the screen (the circle) to
view the SOURCE MENU. Touch “Radio”.
• Press the SRC button (6) on the front panel or remote
control (8) to switch to the AM/FM or RADIO source.
Selecting the AM/FM Band
Touch the BAND button (15) on the screen, or press the
BAND button on the unit (4) or remote control (20) to select
the AM or FM band.
Selecting a Tuning Mode
Touch the A/D button (21) to choose from the following
modes:
• Auto: Search for both digital and analog stations.
• Analog: Search and broadcast only analog channels.
• Digital: Search and broadcast only digital stations.
Tuning
Not all FM or AM stations offer HD Radio (digital)
broadcasting. You can receive both analog and digital
stations with the VM9423.
Seek Tuning
To seek the next station:
• Touch the >>| button on screen (13).
• Press the >>| button (19) on remote control.
• Press the > button on the joystick (14).
To seek the previous station:
• Touch the |<< button on screen (12).
• Press the |<< button (17) on the remote control.
• Press the < button on the joystick (10).
Manual Tuning
To increase or decrease the tuning frequency one step:
• Touch the or buttons on screen (14, 15).
• Press the >> or << buttons (14, 22) on the remote
control.
• Press the /\ or V buttons (11, 15) on the joystick.
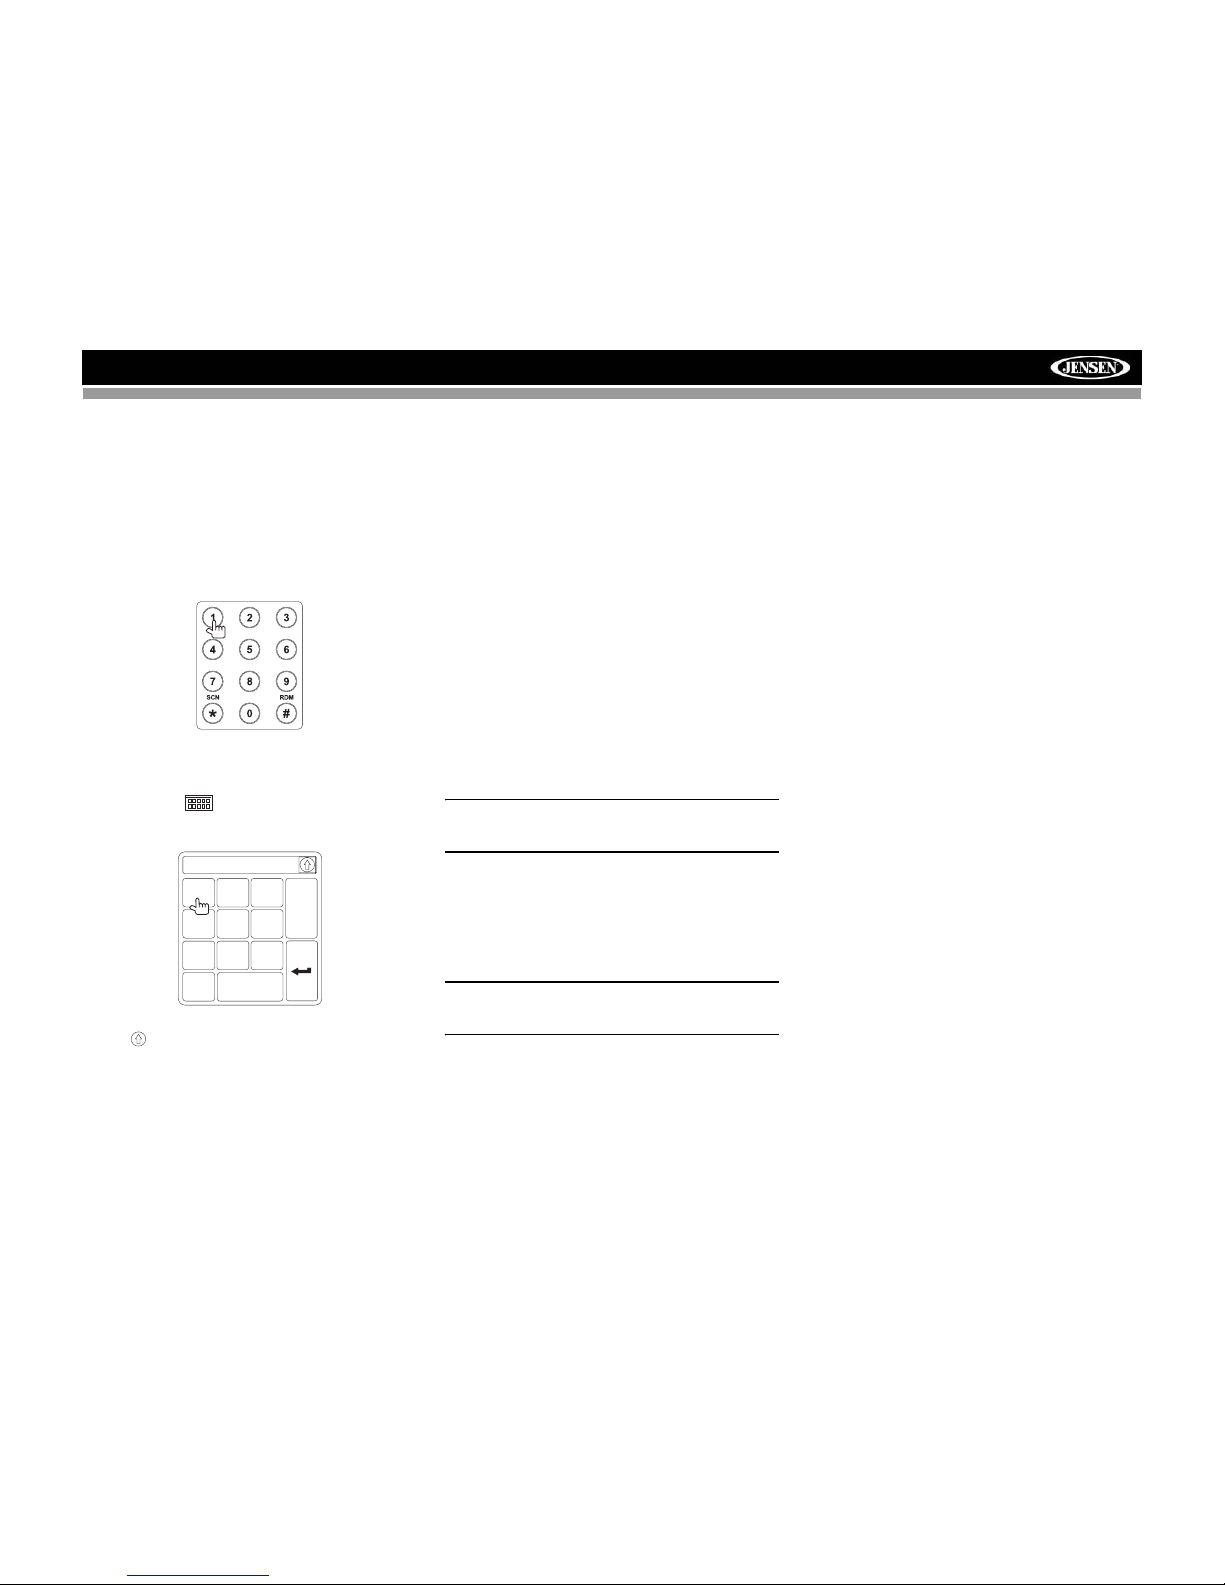
Direct Tuning
To enter a radio station directly, touch the button or
press the GOTO button (21) on the remote control to display
the direct entry menu.
4
1
2
7
8
3
6
16
RADIO
FM 101.9 MHz HD-1
01:02 PM
BAND
1/2
AS
MEM
P1 87.5 MHz
P2 90.1 MHz
P3 98.1 MHz
P4 106.1 MHz
P5 107.9 MHz
P6 102.9 MHz
Info: Sheryl Crow
WJHM-FM
Auto HD
5
10
22
24
E
Q
T
A
G
9
11
12
13
14
15
BAND
1/2
AS
MEM MEM
18
23
17
19
20
PROG
2/2
A/D
21
FM:___._MHz
1
2
3
4
5
6
7
8
9
0
Clear
Exit
Page 17
13
VM9423
Enter the desired radio station using the on-screen number
pad. Press Enter to tune to the selected station. To exit the
screen without changing the station, touch Exit. To clear your
entry and start over, touch Clear.
HD Radio Multicast Channels
To tune to an HD Radio multicast channel, tune to the main
signal and then press the PROG button (20) on page 2/2 . If a
Multicast channel is being broadcast for the current station,
the corresponding multicasting number appears on the left
side of the screen. To view the title and artist, if available,
select HD-1, HD-2, HD3, etc.
NOTE: The amount of information displayed when
receiving an HD Radio signal is dependent upon what is
being broadcast. Some stations broadcast their call
letters (name), the artist's name, song title, and category
of music.
PTY Search
After tuning to an HD Radio channel, the Program Type
categories are listed, allowing listeners to find similar
programming by genre.
If the PTY menu is not displayed, press the PROG button
(20) on page 2/2 to toggle between HD Radio multicast
channels and PTY categories.
When a PTY category is selected from the touch screen
menu, the radio will start scanning for stations broadcasting
in the selected category.
Using Preset Stations
You can store up to 18 presets for FM and 6 presets for AM.
Stored stations appear on the left side of the screen.
Storing a Station
1. Select a band (if needed), then select a station.
2. Touch the on-screen MEM button (17) to open the
preset screen.
3. Enter the preset number for which you would like to
store the current station (or press EXIT to cancel and
close the menu). The preset number and station
appears highlighted on the left side of the screen.
NOTE: Multicast stations can be stored as preset
stations.
Recalling a Station
1. Select a band (if needed).
2. Touch an on-screen preset button (6) to select the
corresponding stored station.
Auto Store (AS)
To select six strong stations and store them in the current
band:
1. Select a band (if needed).
2. Touch the on-screen AS button to activate the Auto
Store function.
The new stations replace stations already stored in that band.
RADIO
FM 106.7 MHz HD-2
02:27 AM
PROG
2/2
A/D
MEM
HD-1
HD-2
HD-3
Title: Lil Love
WXXL-FM
Auto HD
E
Q
T
A
G
RADIO
FM 106.7 MHz HD-1
02:07 AM
PROG
2/2
A/D
MEM
01 Non-specific
02 News
03 Information
04 Sports
05 Talk
06 Rock
Title: DAWSON McALLIST
WXXL-FM
Auto HD
E
Q
T
A
G
Preset: _ _
1
2
3
4
5
6
7
8
9
0
Clear
Exit
P1 87.5 MHz
P2 90.1 MHz
P3 98.1 MHz
P4 106.1 MHz
P5 107.9 MHz
P6 102.9 MHz
Page 18
14
VM9423
iTunes® Tagging
The VM9423 offers iTunes® Tagging, which allows the user
to "Tag" songs playing on HD Radio™ stations for purchase
later through iTunes. When the onscreen TAG button (24) is
touched, the unit stores the title and artist song information
that can then be transferred to your iPod when connected to
the MediaLink
4
. A list titled "Tagged" will appear in iTunes,
allowing you the option to purchase your tagged songs.
iPod Compatibility
Models supported, but not limited to, include the following
• iPod nano 4G
• iPod Classic
• iPod Touch
• iPod 5G
• iPod nano 3G
Tagging Music
To begin tagging music, tune to an HD Radio station. The HD
icon at the top of the display must be illuminated, indicating a
digital station is being received. Touch the onscreen TAG
button or press the MENU/TAG button on the remote control.
“Adding Tag...” will appear in the display. The song
information is saved to the VM9423 memory until an iPod is
connected. When the first tag is successful, the bottom of the
screen displays “Tag Stored 1 of 64”. You can tag up to 64
songs before the tags must be transferred to an iPod or
deleted. When the Tag memory reaches capacity (64 tags)
the bottom of the screen displays “Memory Full, Connect
iPod”.
NOTE: Tags saved to your iPod can be managed using
the iTunes software, available at www.apple.com/itunes.
Downloading Tags to your iPod
To download tags to your iPod, plug an iPod into the iPod
jLink
3
and then into the MediaLink4 iPod connector. All
existing tags are automatically transferred to the iPod and
deleted from the head unit's memory. If an iPod is connected
when a song is tagged, the Tag will be immediately
transferred to the iPod.
NOTE: When transferring Tags to an iPod, the VM9423
must remain in Radio mode until the “## Tag(s) Sent”
message is displayed. To purchase tagged songs, you
must sync your iPod to iTunes and then click the
"Tagged" list on the left side of the iTunes software
screen. Click the "view" button for purchasing
information.
Table 5: TAG Messages
Tag Message Reason
Storing Tag… TAG button is pressed
Tag Stored ## of 64 Successful Storage of Tag
## Tag(s) Sent Tags have been transferred
successfully
Memory full, Connect iPod Tag storage is full
Insufficient Tag Data Tag data is not available
Tag transfer failed Tag transfer failed
iPod full, Tag cannot be stored iPod memory is full
Tagging not supported Unsupported iPod is con-
nected
Page 19
15
VM9423
SATELLITE RADIO OPERATION
Listeners can subscribe to XM® Radio on the Web by
visiting www.xmradio.com, or by calling (800) 967-2346.
Customers should have their Radio ID ready (see
“Displaying the Identification (ID) Code”). Customers can
receive a limited number of free-to-air channels without
activation.
Accessing Satellite Radio Mode
Press the SRC button (6) on the front panel or remote control
(8) to switch to the SAT source.
1. SAT channel name
2. SAT channel number
3. SAT band
4. Time
5. Song title
6. Artist name
7. Song category
8. Signal strength indicator
9. Current preset channels/on-screen preset buttons
10. CH -: Select the previous channel
11. CH +: Select the next channel
12. CAT +: Select next channel in current category only
13. CAT -: Select previous channel in current category only
14. Touch to enter channel directly using keypad on screen
15. CG: Access Channel/Category Guide mode
16. BAND: Change between SAT1, SAT2 and SAT3 bands
17. Touch to view the SETUP menu
18. Touch this area to view the SOURCE MENU and select
a new playback source
19. MEM: View screen used to enter current channel into
preset memory
20. DIAG: This feature is reserved for use by service
professionals for troubleshooting.
Displaying the Identification (ID)
Code
Before you listen to satellite radio, you must subscribe to the
service using your radio’s identification number. To display
the radio ID, press the left/right buttons (16, 17) on the
joystick or the CH - or CH + buttons on the touch screen
repeatedly to tune to channel “000”. The screen displays the
radio ID where the channel name is usually displayed.
Selecting a Station
Use the left/right joystick buttons or the CH - or CH + buttons
on the touch screen to change to another station.
Preset Mode
To enter preset mode, touch the BAND button on the screen,
or press the BAND button on the unit (4) or remote control
(20) to change between the following bands: SAT1, SAT2, or
SAT3 (indicated in the top left corner of the TFT screen).
Six numbered preset buttons store and recall stations for
each band. All six stored stations (P1-P6) for the current
band appear on the TFT screen.
Storing a Station
1. Select a band (if needed), then select a station.
2. Touch the on-screen MEM button (18) to open the
preset screen.
3. Touch the preset number in which you would like to
store the current station (or press EXIT to cancel and
close the menu). The preset number and station
appears highlighted.
Recalling a Station
1. Select a band (if needed).
2. Touch an on-screen preset button to select the
corresponding stored station.
Direct Tuning
To enter a radio station directly, touch the button or
press the GOTO button (21) on the remote control to display
the direct entry menu.
Enter the desired radio station using the on-screen number
pad. Touch the Enter button to tune to the selected station.
To exit the screen without changing the station, touch Exit. To
clear your entry and start over, touch Clear.
Channel/Category Guide Mode
There are two search modes to help navigate through
channels and or categories. To access the Channel/Category
Guide mode, press the ENTER button (18) on the remote
control or the CG button on the touch screen.
Channel Guide is the default search mode. To access
Category Guide, press the TITLE button (2) on the remote
control or touch CAT on the touch screen. To return to
Channel Guide, touch CH on the screen or press the
SUBTITLE button (9) on the remote control.
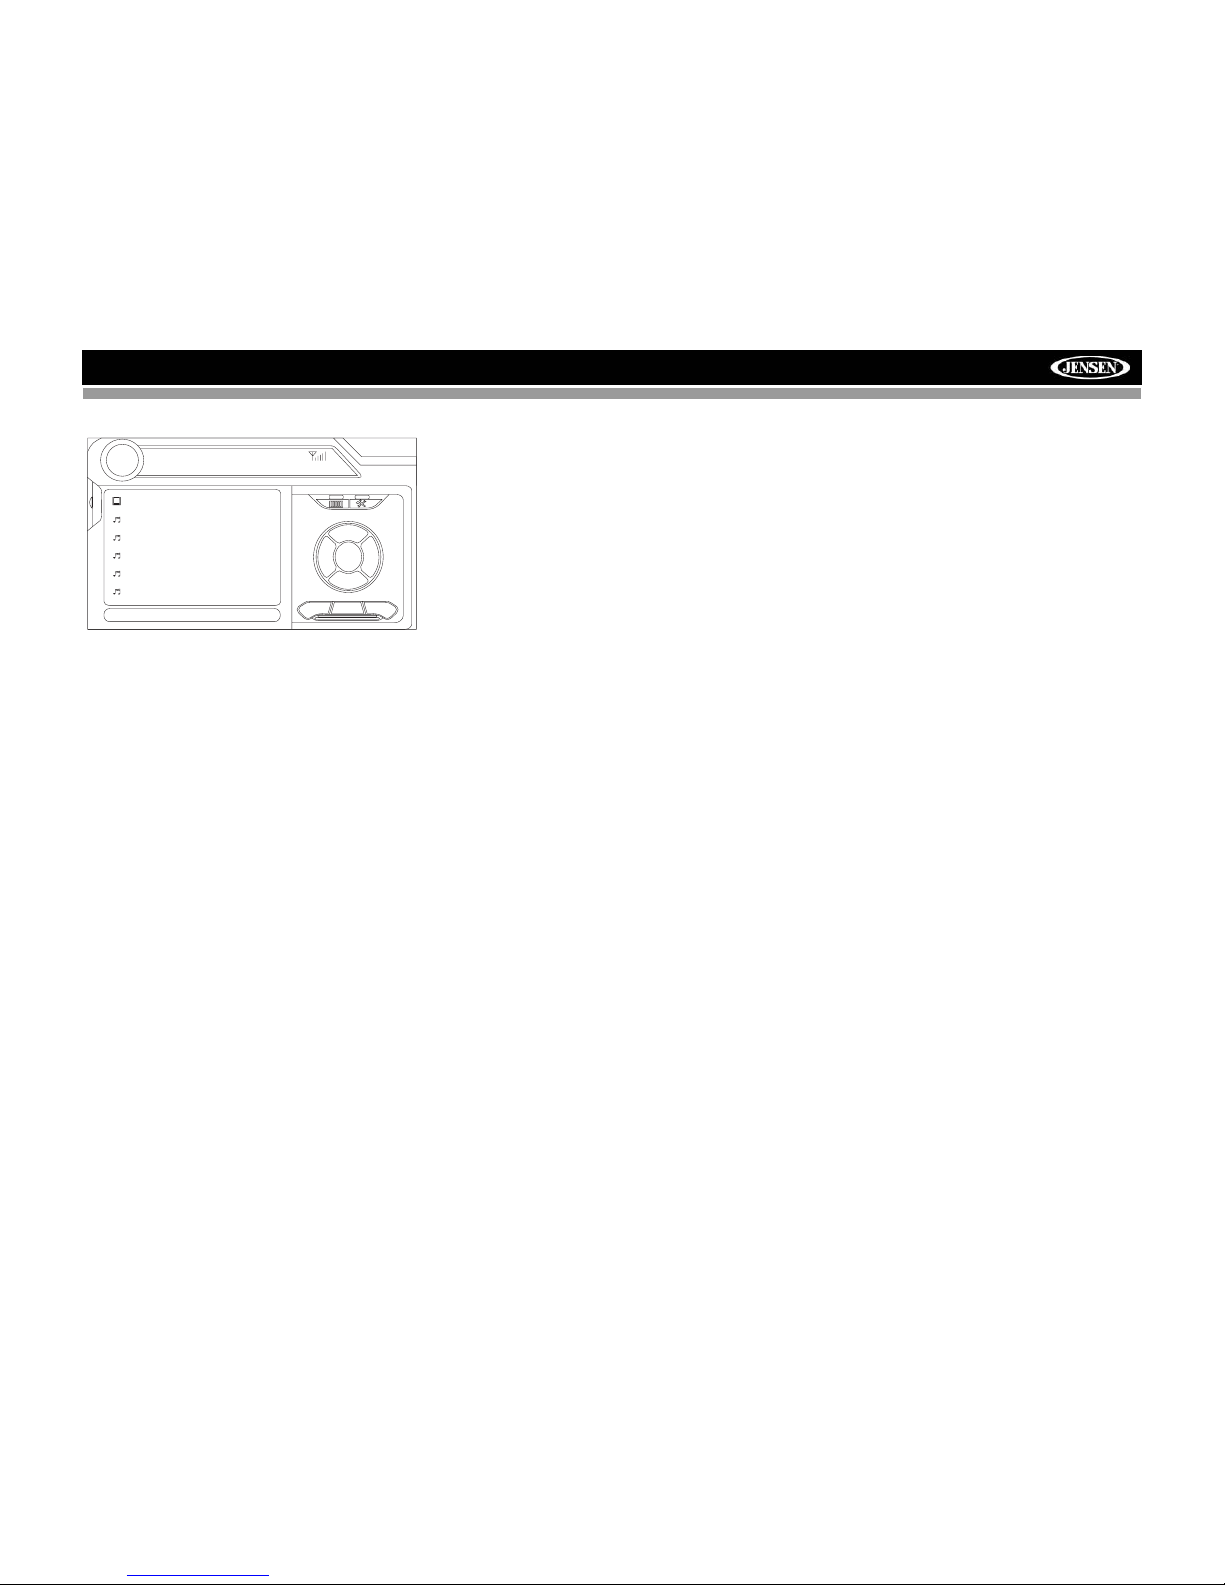
Channel Guide Mode
When Channel Guide mode is selected, the first six satellite
channels are displayed in the boxes in the bottom left of the
TFT screen and the on-screen menu changes to facilitate
search mode.
SAT
SAT1 CH001
01:02
CG
BAND
MEM
DIAG
P1 XM Preview
P2 XM Preview
P3 XM Preview
P4 XM Preview
P5 XM Preview
P6 XM Preview
Title: Fridays XM144!
XM Preview Preview
CAT
+
CAT
-
CHCH
+
-
10
11
12
13
14
15
18
4
3 21
5
16
17
6
7
8
9
19
20
E
Q
Mem:
Exit
P1
P2
P3
P4
P5
P6
CHNO:___/255
1
2
3
4
5
6
7
8
9
0
Clear
Exit
Page 20
16
VM9423
• While in Search Mode, to switch between Channel and
Category search modes, press the CH or CAT buttons
on the touch screen.
• Use the scroll bar and arrows on the touch screen to
view the next/previous page of stations. Each page
contains six channels to select from.
• Press the on-screen SCN button or the INT button (20)
on the control panel to preview each of the 6 channels
displayed for 10 seconds.
• Press the CG button to return to the Preset Mode
screen.
• To select a channel while in Channel Guide mode, touch
the channel name on the screen. The channel will begin
playing and the unit will return to the Preset Mode.
Category Guide Mode
When Category Mode is selected, folder icons appear on the
screen next to category choices.
• While in Search Mode, to switch between Channel and
Category search modes, press the CH or CAT buttons
on the touch screen.
• Use the scroll bar and arrows on the touch screen to
view the next/previous page of categories. Each page
contains six categories to select from.
• To select a category, touch the corresponding category
name or folder icon. The channels in that category will
be displayed on the screen.
• Use the scroll bar and arrows on the touch screen to
view the next/previous six stations in the selected
category.
• Touch the on-screen SCN button to preview each
channel in the selected category for 10 seconds.
• Touch the channel name to play that channel.
• Touch the on-screen CG button to return to the Preset
Mode screen.
SAT
SAT1 CH001
01:02
CG
SCN
MEM
DIAG
########
001 XM Preview
004 The 40s
005 The 50s
006 The 60s
007 The 70s
Title: www.xmradio.com
XM Preview Preview
CH
CAT
E
Q
Page 21
17
VM9423
DVD/VCD VIDEO OPERATION
NOTE: When properly installed, DVD video cannot be
displayed on the main TFT screen unless the parking
brake is applied. If you attempt to play a DVD while the
vehicle is moving, the TFT screen displays “PARKING”
with a blue background. Rear video screens, if
applicable, will operate normally.
Insert/Eject Disc
To insert a disc, you must first press the button (4) to
open the front panel and reveal the disc slot. Upon inserting a
DVD disc, DVD mode is entered and disc play begins. The
disc indicator light (9) illuminates when a disc is inserted.
NOTE: If Parental Lock (Rating) is activated and the disc
inserted is not authorized, the 6-digit code must be
entered and/or the disc must be authorized (see “General
Sub-menu Features” on page10).
You cannot insert a disc if there is already a disc in the unit or
if the power is off.
NOTE: DVD-R and DVD-RW will not play unless the
recording session is finalized and the DVD is closed.
Ejecting a Disc
Press the button (16) on the unit or remote control (35) to
eject the disc. The unit automatically reverts to Tuner mode.
You may eject a disc with the unit powered off. The unit will
remain off after the disc is ejected.
Reset the Loading Mechanism
If the disc loads abnormally or an abnormal core mechanism
operation occurs, press and hold the button (16) on the
unit or remote control (35) to reset the loading mechanism.
Normal operation resumes.
Accessing DVD Mode
To switch to DVD mode when a disc is already inserted,
press the SRC button (6) on the front panel or remote control
(8) until “DISC” appears at the bottom of the screen.
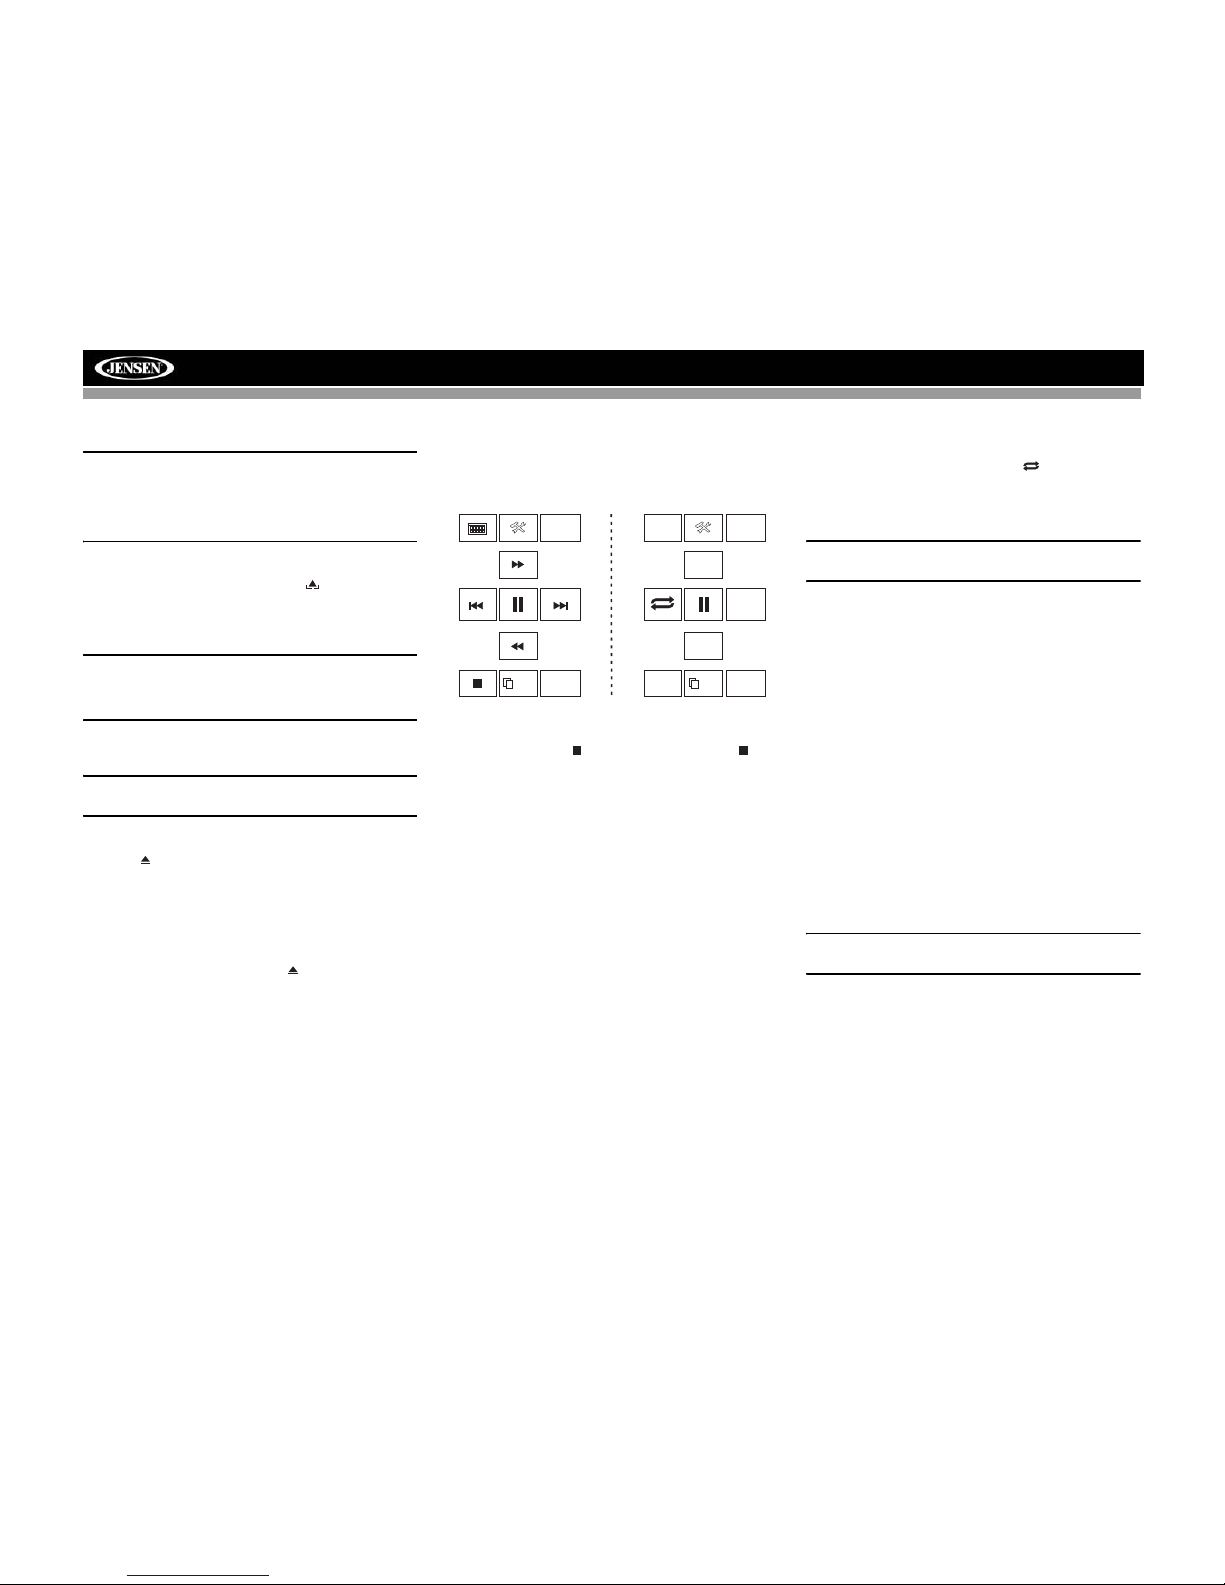
Controlling Playback
To access the on-screen controls, touch the screen. Touch
the 1/2 button to view a second page of controls
Stopping Playback
Touch the stop button ( ) on the screen or press the /
BAND button (20) on the remote control to stop DVD play.
Pausing Playback
Touch the pause button ( || ) on the screen (or press the
>/||
button on the remote control) to suspend disc playback.
Press the > button on the screen to resume disc playback.
Fast Forward Playback
Press the /\ button on the joystick or the >> button on the
screen to fast forward. Keep pressing and releasing the
button to increase the rate from “2X” to “4X”, “6X”, and “8X”.
Press the joystick enter button (18) on the remote control or
touch the play button (>) to resume normal playback.
Fast Reverse Playback
Press the \/ joystick button or touch the << button on the
screen to play the current title in fast reverse. Keep pressing
and releasing the button to increase the rate from “2X” to
“4X”, “6X”, and “8X”.
Press the joystick ENTER button (13) on the unit or touch the
play button (>) to resume normal playback.
Slow Forward/Slow Reverse Playback
Press the ||>/BAND button on the remote control to slow
forward/slow reverse. Keep pressing and releasing the button
to increase the slow forward rate from “2X” to “4X” and “8X”
and then begin slow reverse.
Repeat Playback
Press the RPT button (19) on the control panel, the RPT
button (7) on the remote control, or the button on screen
to alter repeat mode according to the following:
• DVD: Repeat Chapter, Repeat Title, Repeat Off
• VCD (PBC Off): Repeat Single, Repeat Off
NOTE: For VCD play, the repeat function is not available
if PBC is on.
Sectional Repeat Function (A-B)
Use the A-B function to define a specific area of a disc to
repeat.
• Press the RPT A-B button (6) on the remote control (or
the A-B button on screen) to set the start point (A) of the
repeated section.
• Press the RPT A-B button again once you reach the
desired end point (B) of the repeated section. The
selected portion of the DVD will now repeat
continuously.
• Press the RPT A-B button again to cancel the A-B
section setting and stop repeat play.
Random Playback
With a DVD, VCD, or CD playing, press the RDM button on
the remote control (33) to activate random playback and play
all chapters/tracks in random order. “On” appears on the
screen.
Press the > button on the joystick to play the next random
track.
Press the RDM button again to turn random play off.
NOTE: When a VCD is playing with PBC turned “On”,
activating random playback automatically turns PBC off.
Accessing the DVD Menu
Press the MENU button (1) on the remote control to recall the
main DVD menu. Use the joystick to select a title from the
menu or touch the title on screen.
Press the TITLE button (2) on the remote control or on
screen to select a different title for playback.
Press the ENTER (joystick) button to confirm your selection
and begin playback. You can also select a title using the
touch screen.
1/2
BACKBACK
MENU
2/2
DISP
EQ
AUDIO
A-B
TITLE
SUBTITLE
Page 22
18
VM9423
Moving Through Chapters
Press the > button on the joystick or the >>| button on screen
to advance to the next chapter on the DVD.
Press the < button on the joystick or the |<< button on screen
to move to the previous chapter.
Direct Chapter / Track Selection
Remote Control Direct Entry
During DVD, VCD and CD playback, you can use the
numeric keypad on the remote control (29) to access a track
directly.
Touch Screen Direct Entry
To select a title, chapter/track, or specific playback time
directly, touch the button on screen control to display
the direct entry menu.
Use the button to select Title, Chapter, or Time entry.
• Title: _/#
• Chapter: _ _/##
• Time: _ _:_ _:_ _
Enter the desired title, chapter/track, or time using the onscreen number pad and then press the Enter button. To exit
the screen without making a selection, touch Exit. To clear
your entry and start over, touch Clear.
Viewing an Alternate Picture Angle
(DVD Only)
Some DVDs contain scenes that have been shot
simultaneously from different angles. For discs recorded with
multiple angles, press the ANGLE button (13) on the remote
control to toggle available angles of the on-screen image.
Zooming
Press the PRESET /\ and \/ buttons (11, 12) on the remote
control to enlarge and pan through the video image using the
following options: “ZOOM 1.5”, “ZOOM 2”, “ZOOM 3”, and
“OFF”.
Multi-Language Discs (DVD Only)
Changing Audio Language
If you are watching a disc recorded in multiple languages,
press the AUDIO button (5) on the remote control to choose
a language.
Changing Subtitle Language
If you are watching a disc recorded in multiple languages with
subtitles, press the SUBTITLE button (9) on the remote
control to choose the language in which you would like the
subtitles to appear.
NOTE: During VCD playback, press the AUDIO button (5)
on the remote control to choose between Left Channel,
Right Channel, and Stereo.
PBC (Play Back Control - VCD Only)
For VCDs with play back functionality, play back control
(PBC) provides additional controls for VCD playback.
Press the MENU button (1) on the remote control to toggle
the PBC function “On”/”Off”. Once PBC is on, playback starts
from track 1 of the play list.
NOTE: When PBC is activated, fast forward, slow
playback, and previous/next track are available. Repeat
and direct track selection are not available.
When PBC is activated, selecting random, scan, or search
playback automatically deactivates PBC.
Playback Information
During DVD and VCD playback, press the DISP button on the
control panel (2) or remote control (10) to display playback
information on the screen, including the media playing and
current playback time.
DVD Playback Information
The following information is displayed at the top of the screen
during DVD playback:
• Title: 05/08 – “05/08" indicates the fifth of 8 titles on the
DVD is currently playing.
• Chapter: 012/016 – “002/016" indicates that the second
of 16 titles on the DVD is currently playing.
• 00:41:28 – “00:41:28” indicates the playback time of the
current title.
The following information is displayed at the bottom of the
screen:
• Front: Source
• Rear: Source
•CLOCK
VCD Playback Information
The following information is displayed at the top of the screen
during VCD playback:
• VCD 2.0 – Format of current disc.
• Title: 06/18 – “06/18” indicates the sixth of 18 tracks on
the VCD is currently playing.
• 00:02:18 – “00:02:18” indicates the playback time of the
current track.
Chapter: _ _
1
2
3
4
5
6
7
8
9
0
Clear
Exit
Page 23
19
VM9423
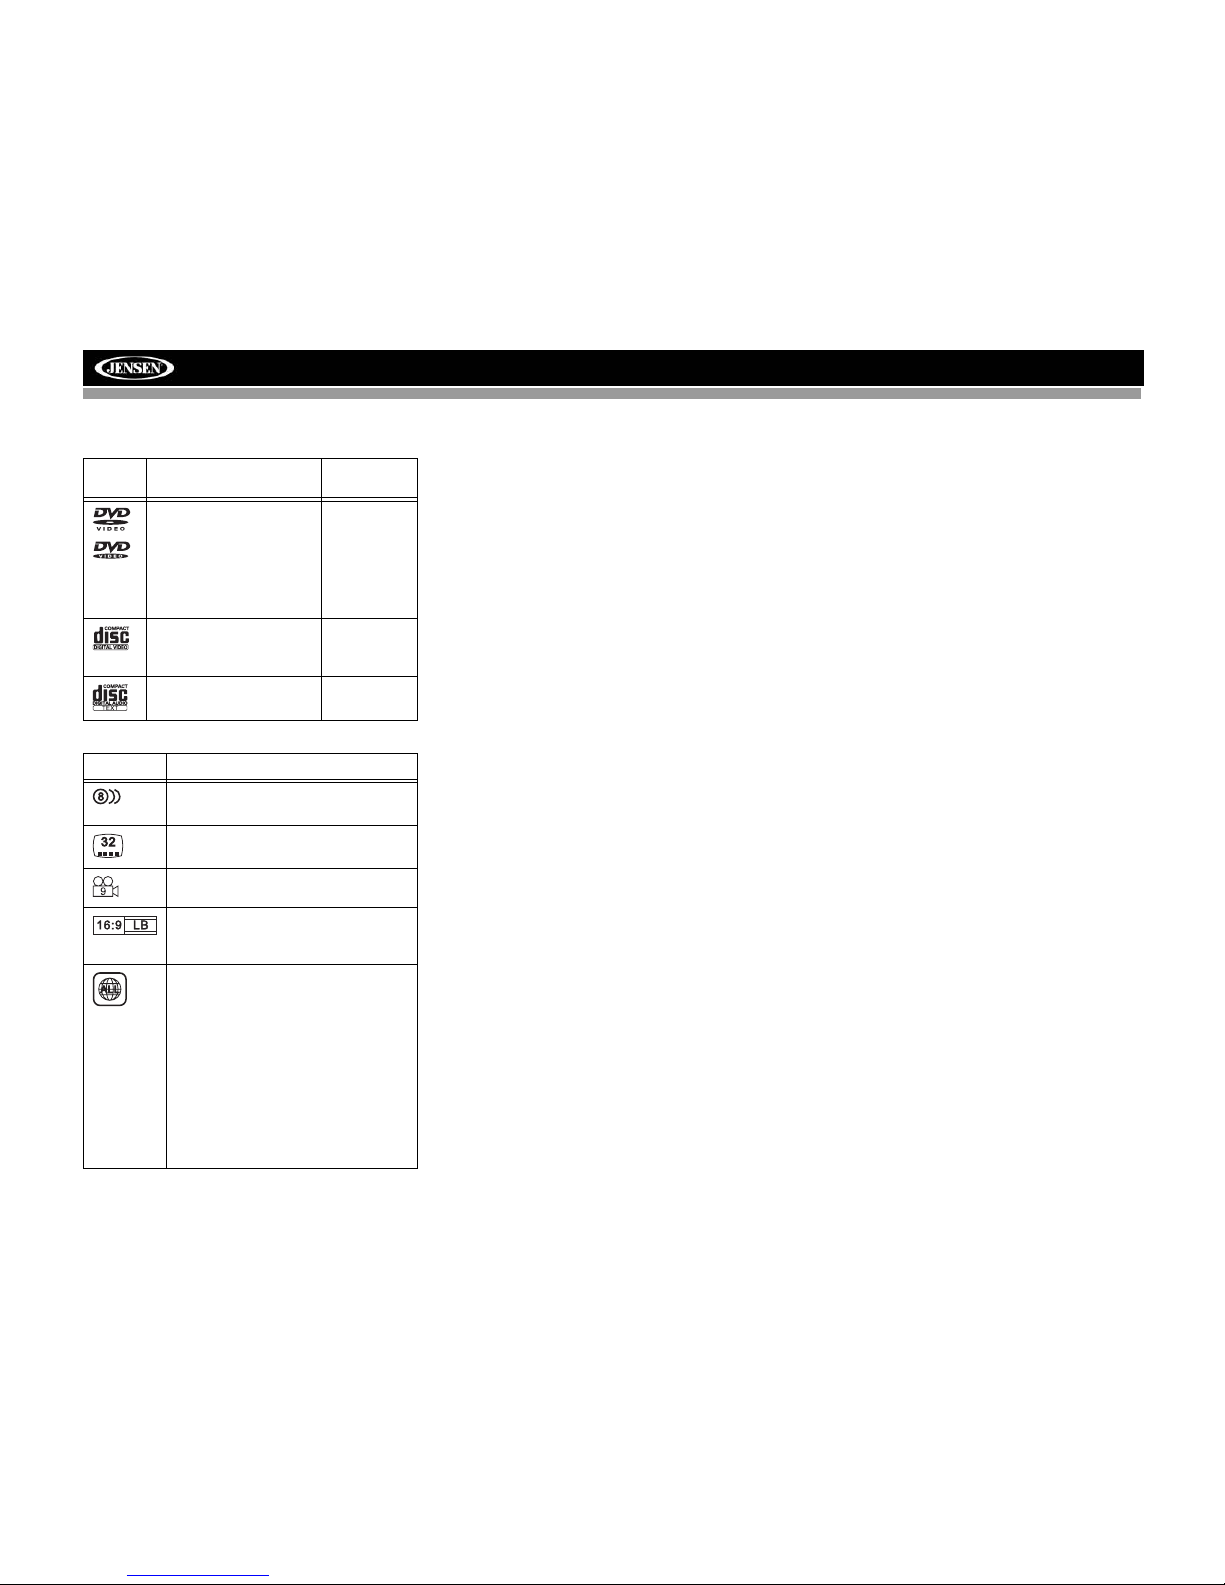
General Disc Information
Table 6: Disc Properties
Symbol 12cm Disc Properties
Max Play
Time
Single side single layer
(DVD-5)
Single side double layer
(DVD-9)
Double side single layer
(DVD-10)
Double side double layer
(DVD-18)
(MPEG 2
Method)
133 minutes
242 minutes
266 minutes
484 minutes
Single side single layer
(VCD)
(MPEG 1
Method)
74 minutes
Single side single layer 74 minutes
Table 7: Disc Symbols
Symbol Meaning
Number of voice languages recorded. The
number inside the icon indicates the number languages on the disc (maximum of 8).
Number of subtitle languages available on
the disc (maximum of 32).
Number of angles provided (maximum of
9).
Aspect ratios available. “LB” stands for Letter Box and “PS” stands for Pan/Scan. In
the example on the left, the 16:9 video can
be converted to Letter Box video.
Indicates the region code where the disc
can be played.
• Region 1: USA, Canada, East Pacific Ocean
Islands
• Region 2: Japan, Western Europe, Northern
Europe, Egypt, South Africa, Middle East
• Region 3: Taiwan, Hong Kong, South Korea,
Thailand, Indonesia, South-East Asia
• Region 4: Australia, New Zealand, Middle and
South America, South Pacific Ocean Islands/
Oceania
• Region 5: Russia, Mongolia, India, Middle
Asia, Eastern Europe, North Korea, North
Africa, North-West Asia
• Region 6: Mainland China
• ALL: All regions
Page 24
20
VM9423
DVD/CD AUDIO OPERATION
Instructions for TFT control and Insert/Eject are the same for
DVD and CD operation. Please see the DVD/Disc Video
Operation section for information about these topics.
The VM9423 will play music or other audio files from the
following disc media/formats:
• CD-DA
• CD-R/RW
•DVD
•DVD+R/RW
•DVD-R/RW
Upon inserting a disc, the disc and track title (if available),
along with the track number and playing time appear on the
screen.
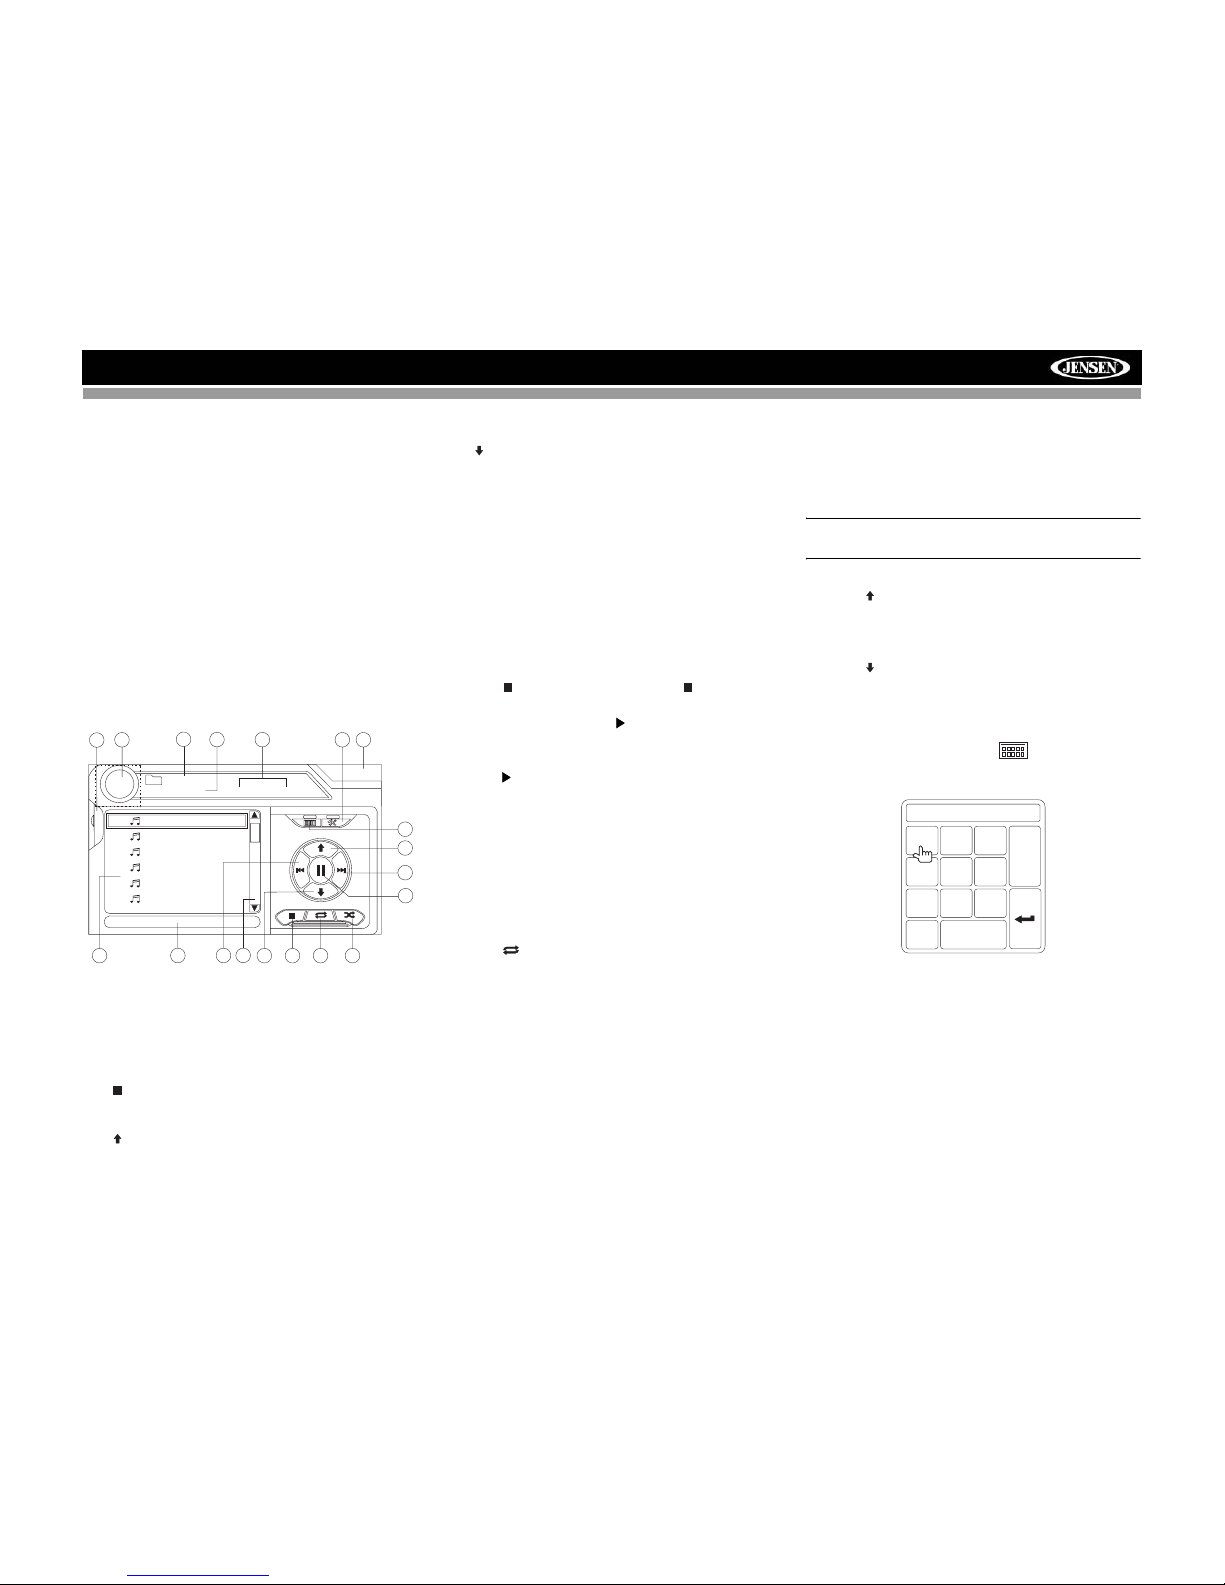
CD Player User Interface
The on-screen indicators and touch key areas for CD
playback are outlined below.
1. Current track and total number of tracks on disc
2. Elapsed playing time/length of track
3. Disc title
4. Available track titles
5. ID3 information
6. ||: Touch to pause/play disc playback
7. : Touch to stop disc playback
8. >>|: Touch to move to next track
9. |<<: Touch to move to previous track
10. />>: Touch to navigate playlist/touch to fast forward
11. /<<: Touch to navigate playlist/touch to fast rewind or
reverse
12. Touch to activate/deactivate Random play mode
13. Touch to activate/deactivate Repeat play mode
14. Touch to access the direct entry screen
15. Touch to view the SETUP menu
16. Touch to view Spectrum Analyzer > Equalizer
17. Touch to view the SOURCE MENU and select a new
playback source
18. Touch the scroll bar and arrows to view the previous/
next page of songs
19. Current time
Controlling Playback
Stopping Playback
Touch the button on screen or press the button (20) on
the remote control to stop disc playback.
To resume playback, touch the button on screen or press
the joystick button.
Pausing Playback
Touch the button on screen or press the joystick button to
suspend or resume disc playback.
Moving Through Tracks
Press the >>| button (19) on the remote control or on screen
or use the > button on the joystick to advance to the next
track on the disc.
Press the |<< button (17) on the remote control or on screen
or use the < button on the joystick to move to the previous
track.
Repeat Playback
Touch the button on screen, press the RPT button on the
remote control (7) or control panel (19) to alter repeat mode
according to the following:
• DVD: Repeat Chapter, Repeat Title, Repeat Off
• CD-DA: Repeat One, Repeat All, Repeat Off
• CD-R/RW: Repeat One, Repeat All, Repeat Off
• DVD-R/RW: Repeat One, Repeat All, Repeat Off
Track Scan Select (CD-DA discs only)
During disc play, press the SCN button on the remote control
(34) or the INT button (20) on the control panel to play the
first 10 seconds of each track. When a desired track is
reached, press the SCN button again to cancel the function
and play the selected track.
Random Play Select
While disc play is stopped, press the RDM button on the
remote control (33) to play the tracks on the disc in a random,
shuffled order. Touch the RDM button again to cancel
Random Play mode.
NOTE: CD-R and CD-RW will not play unless the
recording session is finalized.
Fast Forward
Touch the button on screen or press the /\ button on the
joystick to fast forward. Keep pressing and releasing the
button to increase the rate from “2X” to “4X”, “6X”, and “8X”.
Fast Reverse
Touch the button on screen or press the /\ button on the
joystick to fast reverse. Keep pressing and releasing the
button to increase the rate from “2X” to “4X”, “6X”, and “8X”.
Direct Track Entry
To select a track directly, touch the button on screen to
display the direct entry menu.
Enter the desired track number using the on-screen number
pad, and then press the Enter button. To exit the screen
without making a selection, touch Exit. To clear your entry
and start over, touch Clear.
15
1
7
2
12
5
16
13
3
17
DISC
CD 1/10 01:23 04:31
01:02
1 Track 01
2 Track 02
3 Track 03
4 Track 04
5 Track 05
6 Track 06
14
4
9
11
10
8
6
18
Audio CD
19
E
Q
TRACK:__/##
1
2
3
4
5
6
7
8
9
0
Clear
Exit
Page 25
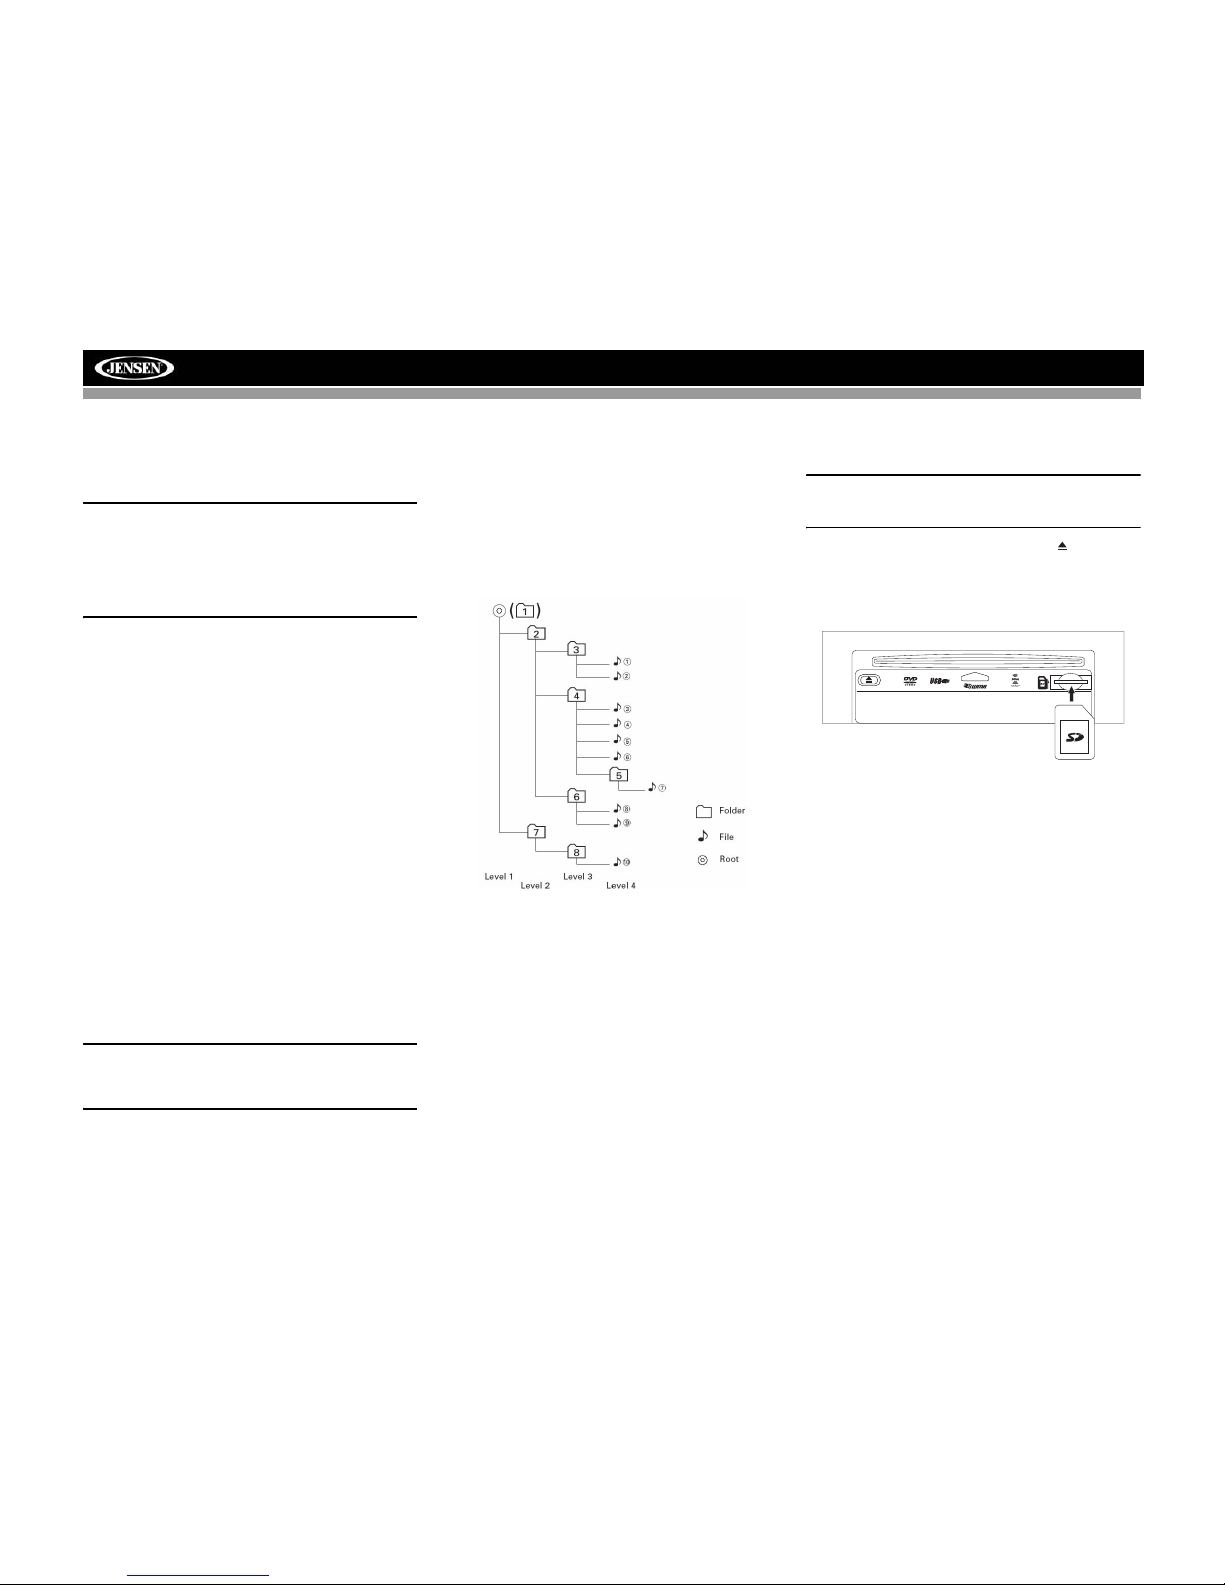
21
VM9423
PLAYING MP3/WMA FILES
Instructions for TFT control and Insert/Eject are the same for
DVD and MP3 operation. Please see the DVD/Disc Video
Operation section for information about these topics.
NOTE: When burning MP3 / WMA files onto a DVD
disc, use the 2X or 4X burning option, if available.
This slower burning speed will help eliminate
buffer errors and increase disc reading reliability.
Also, use folders when burning large numbers of
songs / files to a disc for easy music navigation.
Select the "Disc at Once" option and close your
disc.
MP3/WMA Media and File
Requirements
This player allows you to play back MP3 and WMA files
recorded onto CD-R/RWs, DVD+R/RWs, and DVD-R/RWs.
For CD-RW discs, please make sure it is formatted using the
full method and not the quick method to prevent illegal disc
operation.
Up to 1500 songs/files can be burned onto a disc for a MEGA
DVD music mix. Do not exceed this number of songs/files or
disc readability problems may occur.
MP3 Format Compatibility
The file naming formats listed below are compatible with this
unit:
• ISO 9660 – file name: 12 characters, file extension: 3
characters
• ISO 9660 – file name: 31 characters, file extension: 3
characters
• Joliet – 64 characters
If the file or folder name does not conform to ISO 9660 file
system standards, it may not be displayed or played back
correctly. Use the following settings when compressing audio
data for your MP3 disc:
• Transfer Bit Rate: 128kbps
• Sampling Frequency: 48kHz
NOTE: When recording MP3 up to the maximum
disc capacity, disable additional writing. For
recording on an empty disc up to maximum disc
capacity, use the "Disc at once" setting.
MP3 Playing Order
When selected for play, files and folders (Folder Search, File
Search or Folder Select) are accessed in the order they were
written by the CD writer. As a result, the order in which they
are expected to be played may not match the order in which
they are actually played. You may be able to set the order in
which MP3/WMA files are to be played by writing them onto a
medium such as a CD-R with their file names beginning with
play sequence numbers such as "01" to "99".
For example, a medium with the following folder/file hierarchy
is subject to Folder Search, File Search or Folder Select, as
shown below.
The VM9423 player will only recognize three folder levels and
does not display folders containing only other folders. In the
example above, the unit will display folders 3, 4, 6, and 8, but
not 2 and 7 since they do not contain any tracks directly.
Folder 5 is not recognized at all since it is at the fourth level.
Loading an SD Card
NOTE: The VM9423 will support up to 8GB SD Cards. SD
Cards larger than this (SDHC Cards) will not be
recognized.
To Insert an SD card, you must first press the /EJECT
button on the control panel (5) or remote control (23) to
reveal the SD card slot (14). Insert the SD card into the card
slot and the unit will read the media files on the card
automatically.
To remove the card, first press the SRC button (6) to switch to
another mode and stop SD playback. Push in and release to
pop the card out. Grasp the SD card and pull it straight out.
Most cards have a thin recess that helps with removal.
EJECT
LABELSIDE UP
Page 26
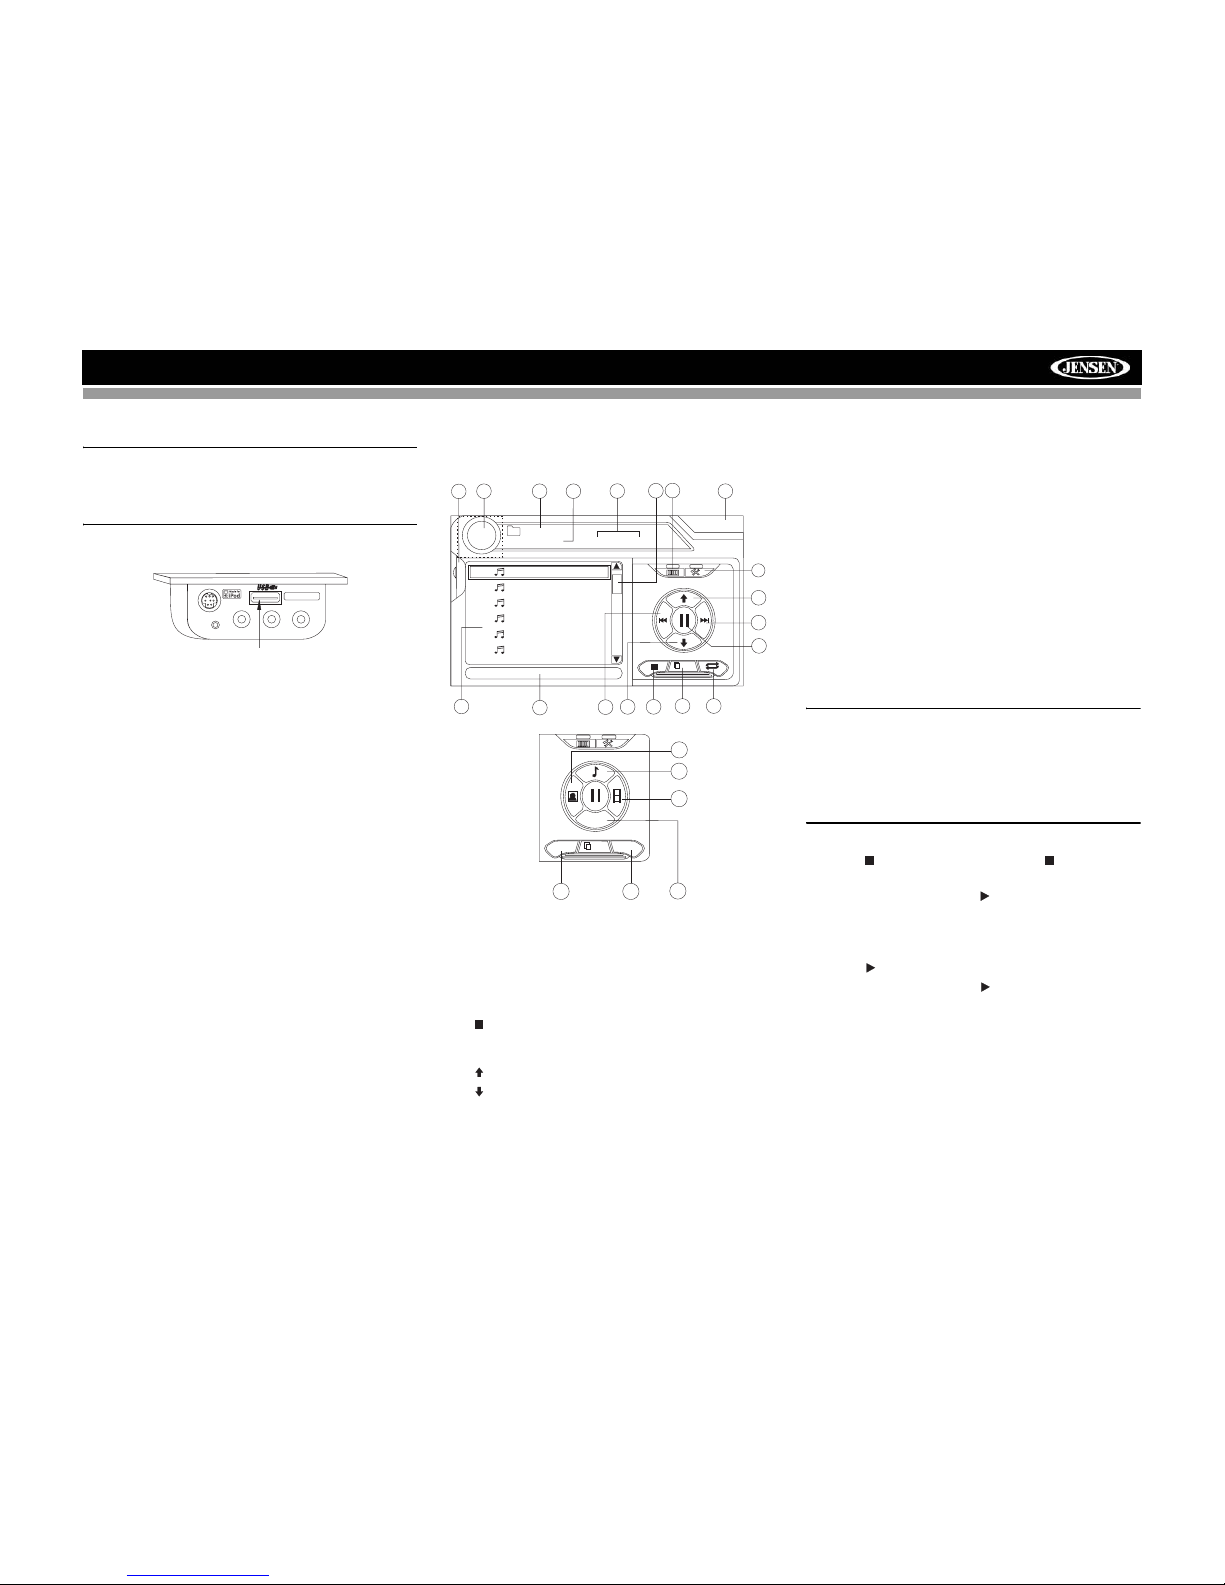
22
VM9423
Loading a USB Device
NOTE: The USB port will recognize most USB flash
memory devices, as well as portable hard drives with
audio / video files. The hard drive must be formatted to
FA T32. The head unit operating system does not support
NTFS file structure.
1. Locate the USB jack on the MediaLink
4
.
2. Insert the USB device into the USB connector. The unit
will read the audio/video media files on the USB device
automatically.
To remove the USB device, press the SRC button (6) to
switch to another mode and then remove the USB device
from the USB connector.
MP3 User Interface
The on-screen indicators and touch key areas for MP3
playback are outlined below.
1. Current track and total number of tracks on root of disc
2. Elapsed playing time, track length
3. Current time
4. Track titles
5. ID3 information
6. || : Touch to play/pause disc playback
7. : Touch to stop disc playback
8. >>|: Touch to move to next track
9. |<<: Touch to move to previous track
10. />>: Touch to navigate playlist/touch to fast forward
11. /<<: Touch to navigate playlist/touch to fast rewind or
reverse
12. DIR -: Touch to view the previous folder
13. DIR +: Touch to view the next folder
14. Touch to access the direct entry screen
15. Touch to view the SETUP menu
16. Touch to view Spectrum Analyzer > Equalizer
17. Touch to view the SOURCE MENU and select a new
playback source
18. Folder name
19. 1/2 or 2/2: Touch this page button to view a second page
of on-screen buttons
20. Touch the scroll bar and arrows to view the previous/
next page of songs
21. Touch to activate/deactivate Repeat play mode
22. Touch to access the Music menu
23. Touch to access the Video menu
24. Touch to access the Photo menu
25. Browse all files
Controlling MP3/WMA Disc Playback
Playing MP3/WMA Files
After inserting a MP3/WMA disc, files will play in the
sequence of the “Root’ directory.
NOTE: When burning MP3 / WMA files onto a DVD
disc, use the 2X or 4X burning option, if available.
This slower burning speed will help eliminate
buffer errors and increase disc reading reliability.
Also, use folders when burning large numbers of
songs / files to a disc for easy music navigation.
Select the "Disc at Once" option and close your
disc.
Stopping Playback
Touch the button on screen or press the /BAND button
(20) on the remote control to stop disc playback.
To resume playback, touch the button on screen, press
the joystick button (13) on the front panel, or press the >/||
button (18) on the remote control.
Pausing Playback
Touch the button on screen, press the joystick button (13)
on the front panel, or press the /|| button (18) on the
remote control to suspend or resume disc playback.
Moving Through Tracks
Press the >>| button (19) on the remote control or on screen
or use the > button on the joystick (14) to advance to the next
track on the disc.
Press the |<< button (17) on the remote control or on screen
or use the < button on the joystick (10) to move to the
previous track.
Repeat Playback
VIDEO LEFT RIGHT
3.5mm- Audio
MediaLink
Type A USB Connector
1
2
5
16
3
17
DISC
MP3 4/84 01:56 00:00:23
01:02 AM
1 Cherry Poppin Da
2 Chris Isaak - Baby
3 Crazy Town - Butt
4 Phish - Birds Of A
5 Phish - Bouncin' R
6 Phish - Freebird (L
4
(Root)
18
1/2
15
7
14
9
11
10
8
6
19 20
20
E
Q
2/2
13
12
DIR -
DIR +
ALL
24
25
22
23
Page 27
23
VM9423
Touch the button on screen, press the RPT button (19)
on the control panel or press the RPT button (7) on the
remote control to alter repeat mode according to the
following: Repeat Single, Folder Repeat, Repeat Off.
Random Play Select
Press the RDM button (33) on the remote control to play the
files on the disc in a random, shuffled order. Press RDM
again to cancel Random Play mode.
NOTE: CD-R and CD-RW will not play unless the
recording session is finalized.
Page 28
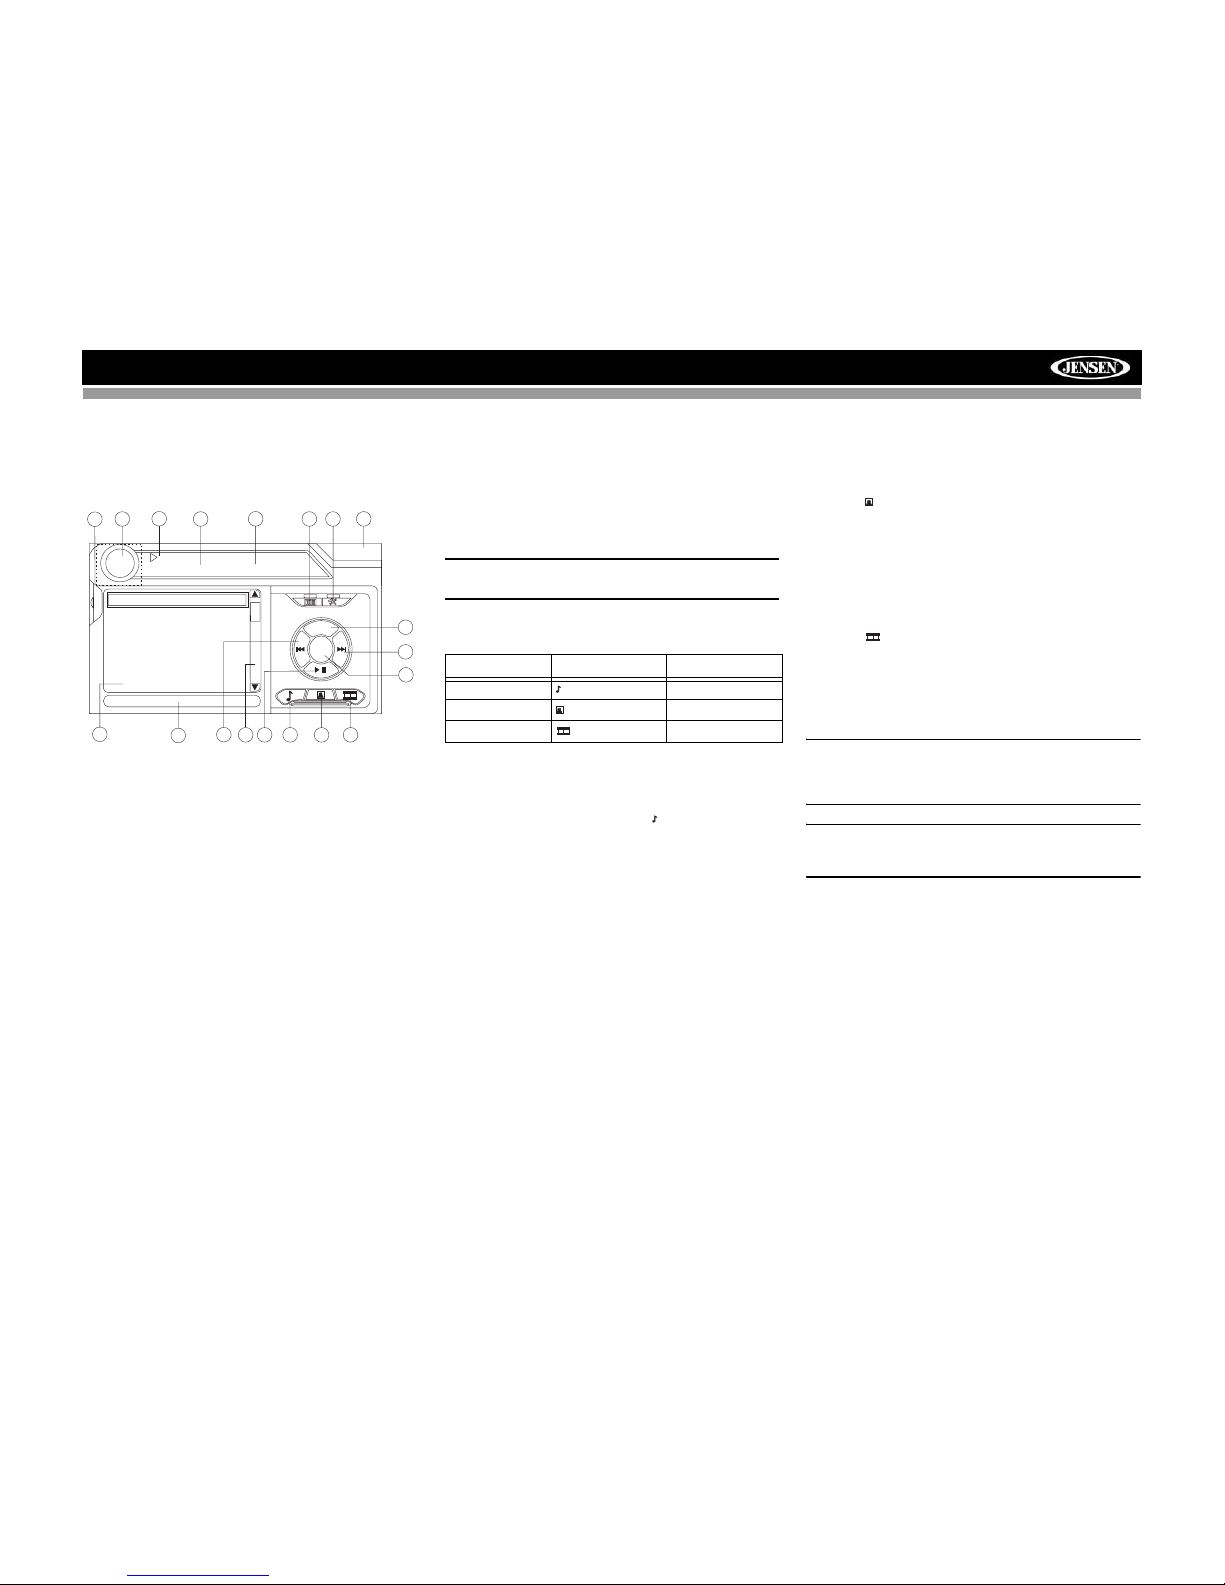
24
VM9423
iPod OPERATION
iPod User Interface
The on-screen indicators and touch key areas for iPod
playback are outlined below.
1. Elapsed playing time
2. Current track and total number of files
3. Current time
4. Media titles/menu information
5. ID3 information
6. Enter
7. Touch to access photos
8. >>|: Touch to move to next track
9. |<<: Touch to move to previous track
10. Touch to access the iPod menu
11. >|| : Touch to play/pause disc playback
12. Touch to access music files
13. Touch to access video files
14. Touch to access the SETUP screen
15. Touch to view Spectrum Analyzer > Equalizer
16. Touch to view the SOURCE MENU and select a new
playback source
17. Song title
18. Touch to view the direct entry menu
19. Touch the scroll bar and arrows to view the previous/
next page of songs
Controlling Your iPod
The unit will automatically switch to iPod mode when an iPod
is plugged into the MediaLink
4
. To return to the iPod menu
from any other source menu, press the SRC button (6) on the
front panel or remote control (8) until the iPod menu appears
on the screen.
NOTE: Be sure your iPod has the latest Apple firmware
installed to avoid connectivity issues.
The following touch screen icons and remote control buttons
are used to access the iPod menus:
Use the touchscreen, the joystick, or the directional keys on
the remote control to navigate the iPod menus.
iPod Music Playback
To access iPod music files, touch the button on screen or
press the AUDIO button (5) on the remote control.
• Touch the > || button on screen to play/pause.
• Touch >>| on screen, press the >>| button (19) on the
remote control, or press the > button on the joystick (17)
to move to the next item on the menu.
• Touch |<< on screen, press the |<< button (17) on the
remote control, or press the < button on the joystick (16)
to move to the previous item on the menu.
• Use the touch screen or press the >/|| button (18) on the
remote control or the joystick ENTER button (20) on the
control panel to select the highlighted menu option.
• Press the >> button (14) on the remote control or the /\
button (18) on the joystick, or touch the MENU button on
screen to return to the previous menu.
Fast Forward/Fast Reverse
Press and hold the |<< or >>| buttons on screen or on the
remote control (17, 19) for 1 second and continue to hold for
fast forward or fast reverse. Release to resume normal
playback.
Photo Playback
While iPod photos can be viewed on the VM9423 screen, you
must use the iPod to control photo playback options.
Touch the icon on screen or press the SUB-TITLE button
(9) on the remote control to access the iPod PHOTO mode.
The VM9423 will release control back to the iPod so you can
select video media to be displayed on the TFT monitor. To
exit PHOTO mode, touch the screen.
Video Playback
While iPod video can be viewed on the VM9423 screen, you
must use the iPod to control video playback options.
Touch the
button on screen or press the ANGLE button
(13) on the remote control to access iPod VIDEO mode. The
VM9423 will release control back to the iPod so you can
select video media to be displayed on the TFT monitor. To
exit VIDEO mode, touch the screen, press the >> button (14)
on the remote control, or press the MENU button on the iPod.
NOTE: To transmit the video from your iPod to the
VM9423 screen, you must set the following options
through the iPod video settings menu: TV Out = On, TV
Signal = NTSC, and Widescreen = On.
NOTE: After disconnecting your iPod, the VM9423 will
always return to the last mode accessed when the iPod
is plugged back into the unit.
14
1
7
2
13
5
15
12
3
16
iPod
1:08 2/124
01:02 AM
0001 A Rush Of Blood to
0002 40
0003 4th of July
0004 A Little Less Conver
0005 A Message
0006 A Sort of Homecomi
4
9
11
10
8
6
17
A Rush of Blood to the Head
MENU
Artist: Coldplay
Enter
18
E
Q
19
Menu Touch Screen Remote Control
Music AUDIO
Photos SUB-TITLE
Videos ANGLE
Page 29
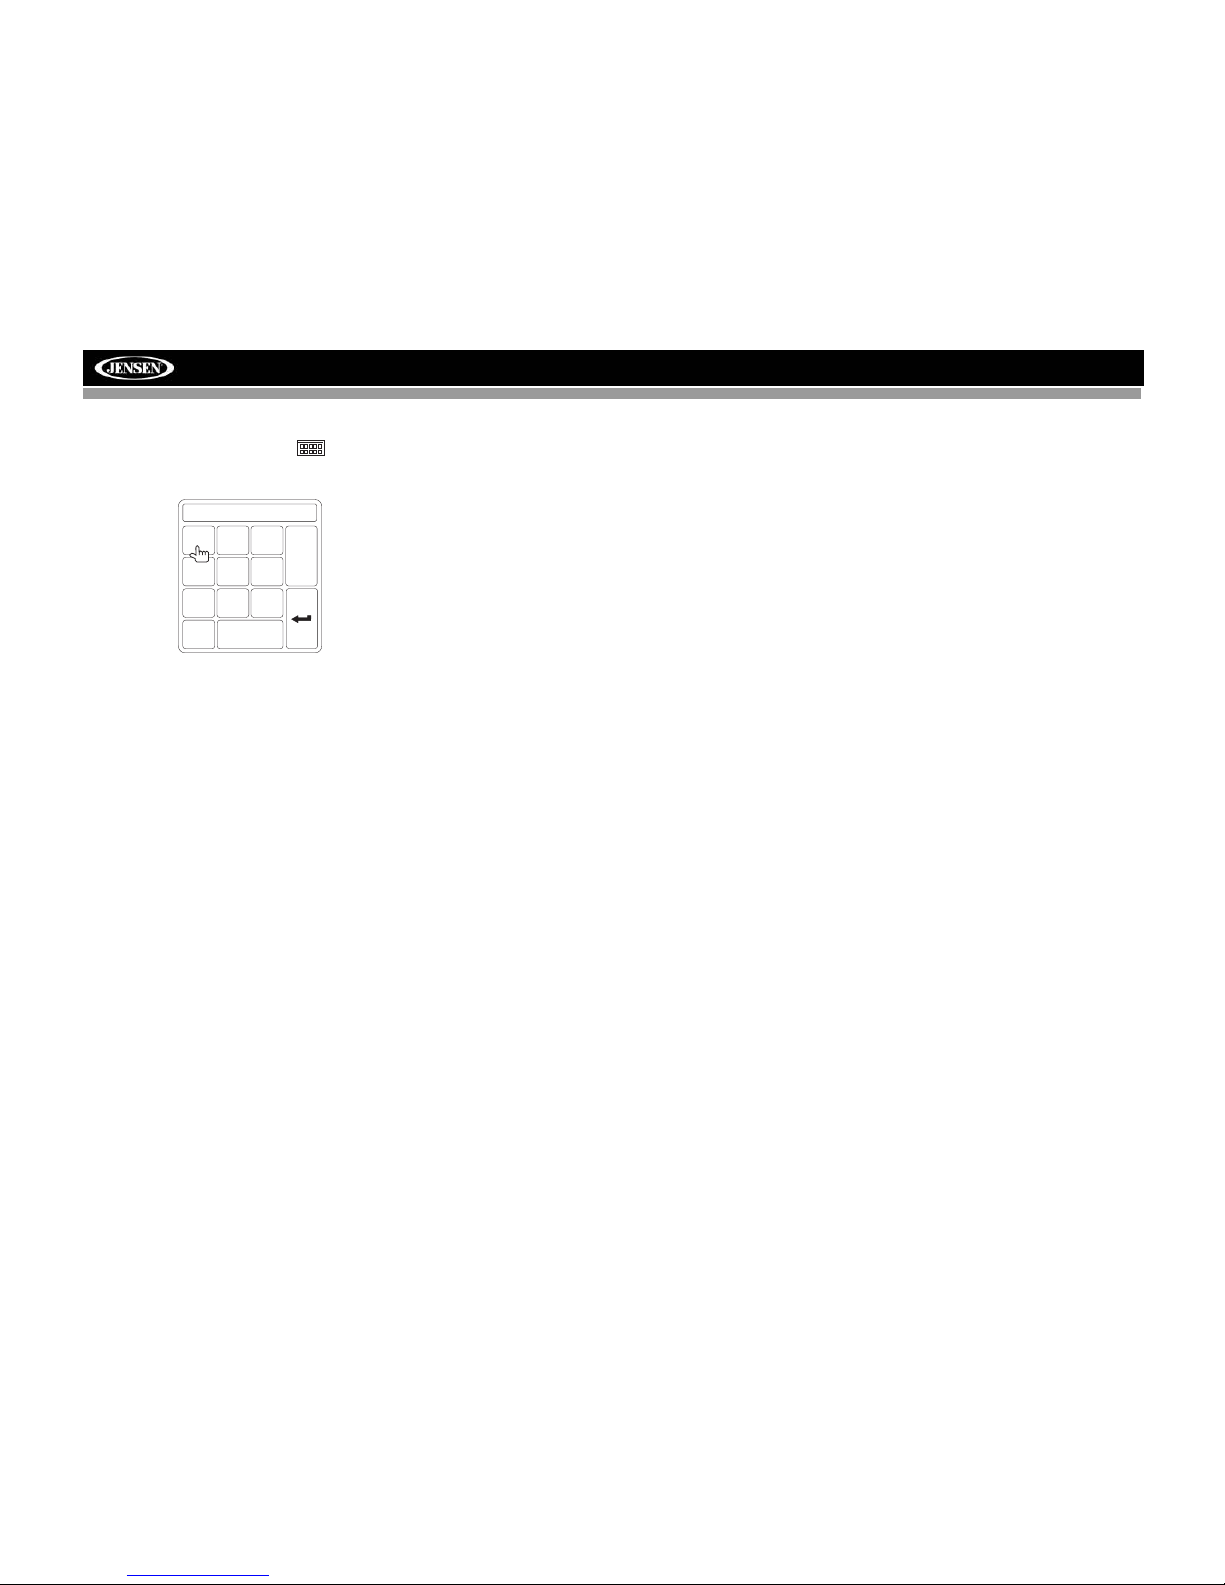
25
VM9423
Direct Track/File Entry
To select a track/file directly, touch the button on
screen control to display the direct entry menu.
Enter the desired track/file using the on-screen number pad.
Press the Enter button to tune to the selected station. To exit
the screen without changing the station, touch Exit. To clear
your entry and start over, touch Clear.
You can also use the numeric keypad (29) on the remote
control to access files directly.
TRACK:__/##
1
2
3
4
5
6
7
8
9
0
Clear
Exit
Page 30
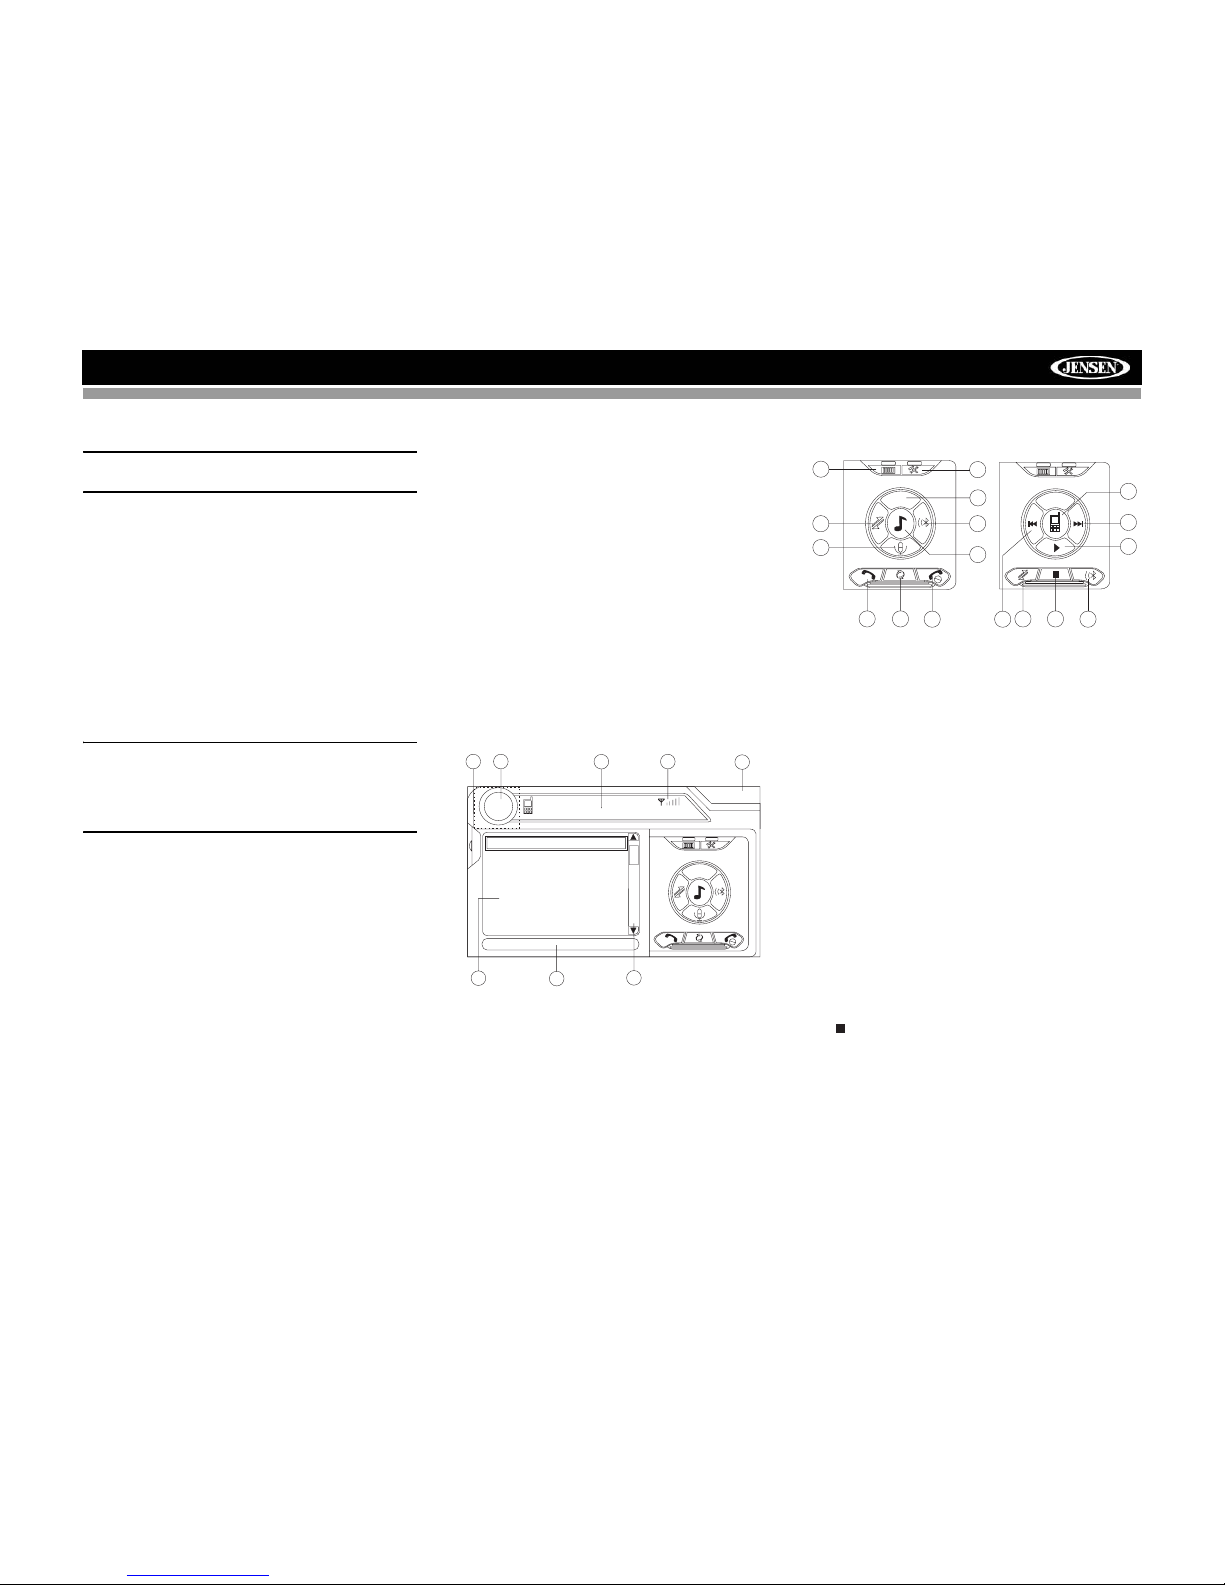
26
VM9423
BLUETOOTH OPERATION
NOTE: Bluetooth operation requires optional BTM10
accessory.
About Bluetooth
Bluetooth is a short-range wireless radio connectivity
technology that is developed as a cable replacement for
mobile phones, handheld PCs and other devices. Bluetooth
operates in 2.4 GHz frequency range and transmits voice and
data at speeds up to 1 megabit per second. Bluetooth was
launched by a special interest group (SIG) comprised of
Ericsson Inc., Intel Corp., Nokia Corp., Toshiba and IBM in
1998, and it is currently developed by nearly 2,000
companies worldwide. The Bluetooth word mark and logos
are owned by the Bluetooth SIG, Inc. and any use of such
marks by Audiovox Corporation is under license. Other
trademarks and trade names are those of their respective
owners.
NOTE: The line-of-sight distance between this unit and
your cellular phone must be 8 meters or less for sending
and receiving voice and data via Bluetooth wireless
technology. However, the transmission distance may
become shorter than the estimated distance, depending
on the environment in use.
Before attempting to use the Bluetooth functions on the
VM9423, please make sure your mobile phone supports
Bluetooth functions (Headset or Handsfree profiles or both).
Adhere to the following guidelines for successful operation.
• Before using Bluetooth functions, you must pair your
mobile phone to the VM9423 head unit (see “Pairing the
Bluetooth System with Your Mobile Phone and Head
Unit”). To ensure the best reception for pairing and
reconnection, please make sure the phone battery is
fully charged before you begin.
• Try to perform pairing within a few minutes of the phone
being turned on.
• Once the unit has been paired with the phone, the unit’s
model number, “VM9423”, will be displayed on the
mobile phone.
• To achieve the best performance, always keep the
mobile phone within 3 meters of the head unit.
• Always keep a clear path between the mobile phone
and the head unit. Never place a metal object or any
other obstacle between the mobile phone and the head
unit.
• Some mobile phones (like Sony Ericsson) may have a
"Power Saving Mode" option. PLEASE DO NOT use the
power saving mode with the VM9423.
• Before accepting or making a call, make sure your
mobile phone's “Bluetooth function” is turned on.
• To ensure the best conversation quality/performance,
stay within one meter of the head unit when talking.
• To “disconnect” the mobile phone from the head unit,
turn the Bluetooth connectivity off on the mobile phone.
• Phone Book direct searching through the head unit
is only available if the mobile phone supports Phone
Book Download. If the feature is not supported, the
head unit will display “Phone book not provided by this
phone” when an attempt is made to download a phone
book.
Bluetooth User Interface
The on-screen indicators and touch key areas for Bluetooth
operation are outlined below.
1. Current connection status/device connected
2. Current time
3. Bluetooth menu
4. Current operation status
5. Toggle Music/Phone menu
6. Transfer active call back to handset
7. Pair your Bluetooth phone (first time use)
8. Connect/disconnect Bluetooth device (phone, PDA,
personal music player, etc.) with hand-free function
9. Exit call listing display
10. Mute/unmute microphone (located on left side of radio)
during active call
11. Answer incoming call/make call
12. Reject incoming call/end call/quit pairing process/quit
reading phone book or call listing
13. Touch to view the SETUP menu
14. Touch to view Spectrum Analyzer > Equalizer
15. Touch to view the SOURCE MENU and select a new
playback source
16. Indicates connection/current operation (--> indicates
incoming call, <-- indicates dialing alert)
17. Touch to access the direct entry screen
18. : Touch to stop playback
19. Touch the scroll bar and arrows to view the previous/
next page of songs
20. Toggle Music/Phone menu/mode
21. Play/Pause selected file
22. |<<: Touch to move to the previous file
23. >>|: Touch to move to the next file
24. Signal strength indicator
1
4
14
2
15
BT
Disconnected
01:02 AM
1 Missed Calls
2 Received Calls
3 Dialed Calls
4 Phone Book
3
MENU
Menu List
19
24
E
Q
MENU
17
8
7
10
9
1156
12
13
8
23
7
MENU
20
21
22
18
PHONE INTERFACE MUSIC INTERFACE
Page 31

27
VM9423
Hands Free Profile (HFP)
To use a phone wirelessly with this unit, it is necessary to first
establish a connection using Bluetooth wireless technology.
Connection is normally established using HFP (Hands Free
Profile), which gives you full control of functions available on
the telephone source. However, depending on your phone,
the connection may be made using HSP (Head Set Profile),
making some functions unavailable. This is a limitation of
your phone, not the VM9423.
Since there are a number of Bluetooth mobile phone
implementations available on the market, operations with
your Bluetooth mobile phone using this unit vary greatly.
Please refer to the instruction manual that came with your
Bluetooth mobile phone along with this manual while
operating your phone with this unit.
Pairing the Bluetooth System with
Your Mobile Phone and Head Unit
1. Press the button (8) to initiate the pairing process.
Keep the mobile phone within 2 meters of the head unit
when pairing. (To terminate the pairing process, press
the button again.)
2. Select the Bluetooth setup option on the mobile phone
to be paired (please refer to the phone’s instruction
manual to learn how to enter Bluetooth setup, turn
Bluetooth on/off, and perform pairing).
NOTE: Some phones require a “pass key” or pairing
code to connect. If your phone requires a pass key or
pairing code, you will need to enter this number in the
Pairing Code field under the Bluetooth SETUP menu. The
default pairing code for many phones is “0000”. The
default code for the VM9423 is “1234”. See “Bluetooth
Sub-menu Features” on page10 for instructions on
entering the pairing code.
3. Select “VM9423” from the pairing list on the mobile
phone.
• If pairing is successful, the TFT will display the
paired mobile phone model number or name (as
specified in your phone’s Bluetooth Setup menu).
• If pairing fails, “Phone Pairing Fail” is displayed at
the bottom of the screen.
Reconnecting
Once the Bluetooth device has been paired, you can touch
the connect button to reconnect.
NOTE: You can only connect to a phone using the
buttons on the on-screen Phone interface.
Each time the button is pressed, the head unit will
automatically reconnect with the mobile phone once (only if
the mobile phone was previously paired with the head unit).
Managing Incoming Calls
When connected to a Bluetooth phone, the unit will mute
audio output, pause CD play, and change to the Bluetooth
screen when a call is received. An incoming phone number
will appear at the top of the screen. If the screen is closed,
the number will scroll across the LCD. If the incoming call has
no caller ID, the TFT or LCD will display “Restricted Number”.
Answering an Incoming Call
To answer the call, touch the button.
For best reception, speak loudly and clearly.
To end the conversation, press the button. The screen will
display the call duration for 3 seconds, and then return to the
previous mode.
Rejecting an Incoming Call
Touch the button to reject an incoming call. The call will
revert to your phone and can be answered directly or left for
voice mail.
Volume Control
To increase or decrease the volume level, turn the AUDIO
control (5) on the front panel or press the VOL+/ VOL-
buttons (15, 16) on the remote control.
Microphone Mute
To mute the microphone, touch the button. Touch again to
resume microphone functionality.
Making an Outgoing Call
NOTE: Press the button from the main Bluetooth
screen to automatically dial the last call received.
1. Touch the button to open the direct dial screen.
2. Use the 0-9, *, and # buttons to input the phone number.
• Touch the CLEAR button to clear the last digit.
• Touch the button to clear the entire number and
start over.
3. After entering the phone number, press the button to
dial the call. The direct dial screen will close once your
call is connected.
To end the conversation, press the button.
Call Transfer
While talking, to transfer audio from the head unit back to the
mobile phone, touch the button (7). The TFT will display
“Transfer”. You can only transfer a call after it has been
answered.
Menu List
The menu list appears on the left side of the screen and can
be accessed from other modes by touching the MENU button
on the right side of the screen.
NOTE: Not all phones allow access to missed, received
or dialed calls and some will not allow uploading of your
phone’s address book.
Missed Calls
The Missed Calls list retrieves the list of Missed numbers
from your phone. The last missed number is the first number
on the list. Touch the Missed Calls menu option to view the
list. To make a call from the Missed Calls list, touch the
number and then touch the button. The TFT will display
“Cannot get missed record” when the feature is not available.
Dialed Calls
Exit
Clear
1
23
4
5 6
7
8
9
0
#
*
Page 32

28
VM9423
The Dialed Calls list retrieves the list of dialed numbers from
your phone. The last dialed number is the first number on the
list. Touch the Dialed Calls menu option to view the list. To
make a call from the Dialed Calls list, touch the number and
then touch the button. The TFT will display “Cannot get
dialed record” when the feature is not available.
Received Calls
Use the Received Calls list to view the last 10 received
numbers stored on your phone. To access the Received list,
touch the Received Calls menu option. The last received
number is the first number on the list. To make a call from the
Received Calls list, touch the number and then touch the
button. The TFT will display “Cannot get received record”
when the feature is not available.
Phone Book
1. Touch the Phone Book menu option to display the
phone book stored on your mobile phone, if compatible.
The screen will display “Ready...” while the phone book
is downloading.
2. Once the download is completed, you can use the arrow
buttons and scroll bar on the right side of the window to
navigate the list. Since the unit downloads one page of
entries at a time, there may be a slight delay while the
next page of numbers is downloaded.
3. Touch to highlight the number you want to dial and then
touch the button.
NOTE: Some mobile phones do not support Phone Book
upload through Bluetooth. This is a limitation of the
phone, not the VM9423.
Bluetooth Setup
Auto Answer
You can choose to have the VM9423 automatically answer
incoming calls to your paired Bluetooth phone. To turn “Auto
answer” on:
1. Touch the button to view the SETUP menu.
2. Select the “Bluetooth” sub-menu.
3. Touch the area to the right of “Auto answer” to select
“On”.
Auto Connect
The auto Connect option will allow the VM9423 to
automatically connect to your previously paired Bluetooth
when it is in range. When the Connect option is set to
“Manual”, you must press the button to re-establish a
connection with your phone. To turn auto “Connect” on:
1. Touch the button to view the SETUP menu.
2. Select the “Bluetooth” sub-menu.
3. Touch the area to the right of “Connect” to select “Auto”.
Advanced Audio Distribution Profile
(A2DP)
The VM9423 allows you to play back audio files from your
phone, PDA or personal music player using a Bluetooth
connection.
Before using an audio player, it may be necessary to enter a
PIN code into the unit. Enter the PIN code referring to
“Bluetooth Sub-menu Features” on page 10.
NOTE: Please quit A2DP mode before attempting to
make a phone call, as unexpected results may occur
depending on your mobile phone model.
The VM9423 can control a Bluetooth audio player via
Advanced Audio Distribution Profile (A2DP) or Audio/Video
Remote Control Profile (AVRCP). Bluetooth audio players (or
Bluetooth adapters) compatible with these profiles can be
connected to this unit. Functionality varies depending on the
profile used:
• A2DP: Stream audio from your Bluetooth compatible
audio player and listen to the music through your
VM9423. Play/pause, song selection, etc. are not
possible.
• AVRCP: Play back, pause, select songs, etc. while
streaming audio from your Bluetooth compatible audio
player to the VM9423.
NOTE: Song information (e.g. elapsed playing time, song
title, song index, etc.) cannot be displayed on this unit.
Since there are a number of Bluetooth audio players
available on the market, operations with your Bluetooth audio
player using this unit vary greatly.
Please refer to the instruction manual that came with your
Bluetooth audio player as well as this manual while operating
your player with the VM9423.
Refer to the MUSIC INTERFACE instructions under
“Bluetooth User Interface” on page 26 for information about
on-screen indicators and touch screen functions that may be
available during audio playback.
Page 33

29
VM9423
TROUBLESHOOTING
Table 8: Troubleshooting
Problem Cause Corrective Action
GENERAL
Unit will not power on Radio Fuse blown Install new fuse with correct rating
Car battery fuse blown Install new fuse with correct rating
Illegal operation Press the RESET button located in the bottom right corner of the front panel
Remote control does not function Battery depleted Replace battery with new one
Battery installed incorrectly Remove battery and install correctly
No/low audio output Improper audio output connection Check wiring and correct
Volume set too low Increase volume level
Improper “MUTE” connection Review wiring diagram and check “MUTE” connection
Speakers damaged Replace speakers
Heavily biased volume balance Adjust the channel balance to the center position
Speaker wiring is in contact with metal part of car Insulate all speaker wiring connections
Poor sound quality or distortion Pirated disc is in use Use original copy
Speaker power rating not compatible with unit Connect proper speakers
Speaker is shorted Check speaker contact
Tel-Mute malfunction “MUTE” wire is grounded Check that the “MUTE” connection is not grounded and that it’s properly insulated
Unit resets itself when engine is off Incorrect connection between ACC and positive battery
wire
Check wiring and correct
TFT MONITOR
No image Incorrect connection to parking brake wire Check wiring and correct
PRK SW is activated and parking brake is not engaged Stop vehicle in safe place and apply parking brake
Flashing image or interference appears on screen DVD is not compatible with current video settings Change setup to accommodate disc
Improper video signal connections Check wiring and correct
Prolonged image or improper height/width ratio dis-
play
Improper aspect ratio setup Use correct aspect ratio setting
Monitor stops at incorrect position Moving path is blocked Press OPEN key to restart monitor movement
TUNER
Weak station searching Auto antenna is not fully extended Connect the auto antenna control cable properly
Auto antenna not properly connected Connect the auto antenna control cable properly
HD Radio broadcast is too far away Switch to Analog tuning mode
CD/DVD
Cannot insert disc Disc already inside unit Eject current disc and insert new one
Page 34

30
VM9423
Error Messages
Disc does not play back Disc is warped or scratched Use disc in good condition
Disc is dirty or wet Clean disc with soft cloth
Laser pickup is dirty Clean laser pickup with cleaning disc
Incompatible disc is used Use compatible disc
Disc rating exceeds Parental Lock rating limit Change Parental Lock settings to lower restriction
Disc region code is not compatible with unit Use disc with proper region code
Disc is inserted upside down Insert disc with label side up
Image blurred, distorted, or dark Disc is illegally copied Use original disc
PBC cannot be used during VCD playback PBC is not available on the disc
No repeat or searching while playing VCD PBC is on Turn PBC off
MP3
Interruption occurred during playback Disc is dirty or scratched Clean disc or replace
File is damaged/bad recording Recreate disc with good files
Incorrect playback message displayed Message is longer than LCD can display
SAT RADIO
No Sound Incorrect cable connections Check RCA cables
Satellite source not available Incorrect cable connections Check Satellite Data cable
IPOD
iPod source not available Incorrect cable connections
Check jLink
3
and MediaLink4 cables
Cannot see video and photo media on TFT screen Wrong iPod Video Settings Change iPod video settings to TV Out = On
Table 8: Troubleshooting
Problem Cause Corrective Action
Table 9: Error Messages
Message Displayed Cause Corrective Action
Loading Disc is being read
No Disc Disc is dirty Clean disc with soft cloth
Disc is upside down Insert disc with label side up
Disc not present in loading compartment Insert disc
Bad Disc Disc is dirty Clean disc with soft cloth
Disc is upside down Insert disc with label side up
Unknown disc Disc format is not compatible with this unit
Region Error DVD is not compatible with region code of unit
Error Illegal mechanism operation Press EJECT key for 5 seconds to reset loading mechanism
Page 35

31
VM9423
Care and Maintenance
1. Use only a clean silicone cloth and neutral detergent to
clean the front panel or monitor. A rough cloth and nonneutral detergent (such as alcohol) may result in
scratching or discoloration.
2. Do not get water or cleaning fluids on the unit.
3. If the temperature inside the player gets too hot, a
protective circuit automatically stops play of the disc. If
this occurs, allow the unit to cool before operating the
player again.
4. Never insert anything other than a 5” (12 cm) disc into
the player as the mechanism can be damaged by
foreign objects.
5. Do not attempt to use a 3” (8 cm) CD-Single disc in this
unit, either with or without an adaptor, as damage to the
player and/or disc may occur. Such damage is not
covered by the Warranty on this product.
6. The CD player may not operate properly in extreme hot
or cold. If such conditions occur, allow the interior of the
vehicle to reach a normal temperature before using
player.
7. When the vehicle warms up during cold weather or
under damp conditions, condensation may appear on
the LCD panel. Should this occur, the screen will not
operate properly until the moisture has evaporated.
8. We suggest you use a cleaning disc in this unit more
frequently than in the unit in your home due to the
environmental conditions of the vehicle.
Page 36

32
VM9423
SPECIFICATIONS
DVD/CD Player
Compatible Disc Media: DVD+
R / RW (Single and Dual
Layer) and CD-R / RW
Compatible Formats: CD-DA, MP3, WMA, VCD, SVCD,
MPEG1 / 2 and Kodak picture CD (JPEG).
Signal to Noise Ratio: >95dBA
Dynamic Range: >95dB
Frequency Response: 20Hz to 20 kHz, -3dB
Channel Separation: > 60dB @ 1 kHz
D/A Converter: High performance 24-bit / 192 kHz sample
rate, Multi-Bit Sigma-Delta Modulator
Video
Format: NTSC, PAL (auto-detection)
Output: 1Vp-p (75-ohm)
Input: 1Vp-p (75-ohm)
FM Analog Tuner
Tuning Range: 87.5MHz - 107.9MHz
Mono Sensitivity (-30dB): 9dBf
Quieting Sensitivity (-50dB): 15dBf
Alternate Channel Selectivity: 70dB
Signal to Noise Ratio @ 1 kHz: 58dB
Image Rejection: 80dB
Stereo Separation @ 1 kHz: >30dB
Frequency Response: 30Hz - 15 kHz, -3dB
HD Radio Tuner
FM: Hybrid -89 dBm, (40 dBf), All Digital -112 dBm (17dBf)
AM: Hybrid -93, dBm, (36 dBf) All Digital -103 dBm (25dBf)
Stereo Separation: 70 dB
Audio THD: .4%
Frequency Response (+/-3dB) 20 Hz - 18 kHz
Signal-to-Noise Ratio (Stereo): 70 dB
AM Tuner
Tuning Range: 530 kHz - 1710 kHz
Sensitivity (-20dB): 12uV
Signal to Noise Ratio @ 1 kHz: 50dB
Image Rejection: 60dB
Frequency Response: 150Hz - 2 kHz, -3dB
Monitor
Screen Size: 6.5" (Measured diagonally), 16:9 Widescreen
• 6.1" (155mm) W X 3.51" (89.2mm) H
Screen Type: TFT Liquid Crystal Display (LCD) active matrix
Response Time: 30mSec rise time, 50mSec fall time
Resolution:
• 280,800 sub pixels, 1200 (W) X 234 (H)
Viewing angle:
• 60 degrees left or right
• 40 degrees up
• 55 degrees down
General
Auxiliary Input Impedance: 10k-ohm
Power Supply: 11 to 16VDC, negative ground
Power Antenna (Blue): 500mA max, current limited protection
Amplifier Remote (Blue/White): 500mA max, current limited
protection
Operating Tempera
ture: -20C ~ 65C
Fuse: 15-amp, mini ATM type
DIN chassis dimensions: 7" X 7"
X 4" (178mm x 178mm x 1
00mm)
CEA Power Ratings
Power Output: 13 Watts RMS x 4 channels into 4-Ohms @ <
1% THD+N
Signal to Noise Ratio: 70dBA below reference (Reference: 1
Watt, 4-Ohms)
Frequency Response: 20 Hz - 20 kHz, -3dB. (Aux Input used
as reference input)
Reference Supply Voltage: 14.4VDC
*Specifications subject to change without notice.
Page 37

33
VM9423
PREPARACIÓN
Felicitaciones por su compra del Jensen VM9423 Mobile
Multimedia Receiver.
Es una buena idea leer todas las instrucciones antes de
comenzar la instalación. Recomendamos hacer instalar su
unidad Jensen principal por un taller de instalación confiable
Características
DVD
• Proporción de aspecto - Cinema, Normal y OFF
(Espera)
• Avance Rápido, Retroceso Rápido - 2X, 4X, 6X y 8X
• Avance Lento, Retroceso Lento - 2X, 4X, 6X y 8X
• Reproducir, Pausar, Detener, Capítulo Próximo y
Capítulo Previo
• ESP - Almacenamiento de 2MB
CD / MP3 / WMA
• Compatible Etiqueta ID3
• Búsqueda de Directorio (Sólo MP3 / WMA)
• Acceso a Pista Directa vía Control Remoto
• Graba hasta 1500 Archivos MP3 y WMA en un DVD+R /
RW
• Búsqueda de Pista Hacia Adelante / Atrás Audible
• Aleatorio, Repetir e Intro
• Reproducir, Pausar, Detener, Capítulo Próximo y
Capítulo Previo
• ESP - Almacenamiento de 2MB
Sintonizador
• Módulo de HD Radio HDRM-2*
• Espaciado de Frecuencia EEUU / Europa
• Prefijado de 24 Estaciones (18 FM / 6 AM)
• Auto Estéreo / Mono
• Almacenamiento Automático
Listo para Radio Satelital
• Requiere XM CNP2000UC y CNPJEN1 (Ambos
Vendidos por Separado)
• Nombre de Canal Satelital, Artista, Canción y
Categorías Mostradas en la Pantalla TFT
iPod
• Interfaz de Conexión Directa de Alta Velocidad para
acceder a las Listas de Canciones del iPod, Artistas,
Albums y Canciones. Reproduce archivos de música y
de video desde su iPod.
• El Administrador de Energía carga el iPod mientras está
conectado
• Requiere cable de interfaz jLink
3
iPod (incluido)
• Etiquetado de iTunes
®
MediaLink
4
• La interfaz bajo Consola Permite que se conecten
Dispositivos Portátiles
• MediaLink
4
Incluye la Siguiente Conectividad:
• USB - Soporta Discos Duros y Dispositivos de
Memoria Flash
• jLinkDirect para iPod
• Entrada RCA de Audio/Video
Chasis
• 2.0 DIN (Import/Montable ISO-DIN)
• 6.5" Motorizada Deslizante hacia Abajo LCD TFT de
Matriz Activa con recubrimiento anti brillo
• Inclinación de Pantalla / Ajuste de Ángulo
• Sistema de Administración de Calor - Aire de
refrigeración forzada para mantener el conjunto de Chip
funcionando a Temperaturas Nominales
General
• Listo para Bluetooth con perfil de manos libres para
seguridad / comodidad y perfil A2DP para reproducción
continua de música de un PDA / PMP
• Listo para Navegación (Sólo NAV102)
• Control remoto infrarrojo
• Dos salidas de Video Compuesto para Pantallas
Adicionales
• Compatible con monitores para asiento trasero MZ7TFT
con Interfaz de Pantalla Táctil
• Dos entradas auxiliares de Audio /Video
• Salida de Línea de Preamplificador de 200-Ohm –
Todos los canales de audio
• Salida de Línea 4VRMS - Todos los Canales
• Codificador Giratorio de Control de Audio
• EQ de siete bandas con ocho curvas de EQ prefijadas
• Analizador de Espectro
• Salida de Línea Frontal, Trasera y Subwoofer
• Separador de Frecuencias y Fase de Subwoofer
• Control de Volumen Programable
• Entrada de Cámara Trasera (Vista de Imagen Normal y
Espejo)
• Oscurecimiento Automático de TFT
• Joystick de 5 vías
• Interfaz SWC – Compatible con adaptador PAC de
Interfaz de Control de Volante SWI-PS, vendido por
separado
Equipo Opcional
• NAV102
La unidad principal está "lista para navegación." Antes
de acceder a cualquier función de navegación, debe
comprar e instalar el módulo de navegación NAV102.
Todas las instrucciones de instalación y uso se incluirán
con el módulo de navegación NAV102.
Una vez que el módulo NAV102 está adecuadamente
conectado y funcionando, se activará el modo de fuente
NAV. Mientras el NAV102 no está instalado, la opción
NAV aparece grisada, indicando que la función no está
disponible.
• Cámara Posterior
La unidad principal está "lista para cámara." Antes de
acceder cualquier función de cámara, debe comprar e
instalar una cámara de video posterior. Una vez que la
cámara está adecuadamente conectada y funcionando,
se activará el modo de fuente CÁMARA. Mientras la
cámara no está instalada, la opción CÁMARA aparece
grisada, indicando que la función no está disponible.
• Sintonizador de Radio Satelital
Vea “Operación de Radio Satelital” en página 50.
• iPod
Vea “Cómo reproducir archivos MP3/WMA” en
página 57.
• Teléfono Bluetooth
Ver “Operación de Bluetooth” en página 62.
*Tecnología HD Radio™ Fabricado bajo licencia de iBiquity
Digital Corp. U.S. y Patentes Extranjeras. Los logos de HD
Radio™ y HD Radio son marcas propietarias de iBiquity
Digital Corporation.
Page 38

34
VM9423
¡ADVERTENCIA! Para reducir el riesgo de accidente de
tránsito (excepto cuando usa la cámara de video de
visión trasera) nunca use la función de mostrar video
mientras conduce el vehículo. Esto es una violación de
la ley federal.
¡ADVERTENCIA! Nunca desarme o ajuste la unidad.
¡ADVERTENCIA! Para evitar lesiones por choque o
incendio, nunca exponga esta unidad al agua o la
humedad.
¡ADVERTENCIA! Nunca use discos irregulares.
¡ADVERTENCIA! Para evitar el daño al mecanismo
dentro de la unidad, evite el impacto del monitor TFT.
¡ADVERTENCIA! El uso de un fusible inadecuado podría
producir un daño a la unidad y llevar a un incendio.
Page 39

35
VM9423
DISPOSITIVO ANTI-ROBO
El VM9423 está equipado con un dispositivo anti-robo que
requiere que el usuario ingrese una contraseño luego del
encendido inicial.
Cómo Ingresar la Contraseña
Predeterminada
La contraseña de usuario predeterminada es 012345 (6
dígitos). Ingrese la contraseña usando el teclado en pantalla
y luego presione el botón Intro (flecha). También puede usar
el teclado del control remoto para ingresar la contraseña.
Presione el botón Intro de joystick (18) en el control remoto
para confirmar.
Cómo Cambiar la Contraseña
Para cambiar las contraseñas de protección anti-robo y
calcificaciones, realizar los siguiente pasos:
1. Presione el botón SETUP (31) en el control remoto o
toque el botón en la pantalla para ingresar al menú
“SETUP”.
2. Toque RATING para ver el sub-menú RATING
"CALIFICACIONES". Un ícono de candado abierto a la
derecha del campo "Contraseña" indica que la
contraseña de usuario todavía no se ha ingresado.
3. Toque el ícono de teclado junto al cuadro azul en el
campo "Contraseña" para abrir el teclado en pantalla.
4. Ingrese una nueva contraseña de 6 dígitos y presione el
botón Intro (flecha).
El ícono de "Candado" ahora aparecerá cerrado y la
nueva contraseña anti-robo se fijará, así como la
contraseña para protección de RATING
“CALIFICACIONES” (ver “Funciones de Sub-menú
Calificación” en página 45).
NOTA: Si olvida su contraseña, contacte a servicio al
cliente al 1-800-323-4815 por asistencia.
1
2
3
4
5
6
7
8
9
0
Enter Password:
RADIO
SETUP
RDS
Rating
Hardware
P.VOL
TS Cal
General
Language
Audio
Back
Password
Rating 8. Adult
Load Factory Reset
Speaker
Demo
Bluetooth
02:40
AM
1
2
3
4
5
6
7
8
9
0
Clear
Page 40

36
VM9423
CONTROLES E INDICADORES
Botón de Operación
1. ABRIR
Presione para activar el sistema mecánico automático y
mover el monitor TFT a una posición de visión. Presione
nuevamente para cerrar el TFT.
Presione y mantenga para activar la función tilt "inclinar".
Mientras el ícono inclinar está parpadeando, use los botones
arriba/abajo del joystick para mover el TFT a la posición
deseada. Presione y mantenga para salir de la función o
espere 10 segundos para que pase a tiempo excedido.
2. DISP
Cuando mira archivos en el modo DVD/disco, presione para
ver las barras de información superior e inferior. Presione
nuevamente para seleccionar "Pantalla Apagada".
En modo DVD, presione para ver las barras de información
superior e inferior. Presione nuevamente para seleccionar
"Pantalla Apagada".
3. PIC
Presione para ver y ajustar las fijaciones de Brillo y
Contraste.
4. BAND
Pulse BAND para cambiar las bandas AM,FM o SAT.
5. AUDIO
Gire para ajustar el volumen. Presione para acceder el menú
EQ de audio.
6. SRC
Presione para seleccionar el modo de reproducción.
Cuando cambia la fuente durante la navegación, los
mensajes de voz se seguirán escuchando, aunque el mapa
de navegación no pueda verse. (La fuente de audio
seleccionada se silenciará hasta que la indicación de
navegación por voz se complete, luego de eso la fuente de
audio continuará.)
7. RANURA DE DISCO
8. MUTE
Presione para silenciar el receptor. Presione nuevamente
para volver al nivel de volumen previo.
NOTA: Esta unidad central posee Softmute, lo que
permitir+a que el volumen suba gradualmente cuando la
función SILENCIAR “MUTE” es desactivada.
9. Receptor IR de Control Remoto
10. (joystick izquierda)
Modo DVD/Disco: Presione una vez para reproducir el
capítulo/pista previo.
Modo TUNER (sintonizador): Presione una vez para
búsqueda automática de la estación de radio previa
disponible.
Modo MENÚ: Presione una vez para mover el cursor a la
izquierda.
Page 41

37
VM9423
CONTROLES E INDICADORES
11. (joystick abajo)
Modo DVD/Disco: Presione una vez para avance lento/
retroceso lento.
Modo TUNER (sintonizador): Presione para bajar un paso de
frecuencia.
Modo MENÚ: Presione una vez para mover el cursor hacia
abajo.
12. Reset(Restaurar)
Presione para restaurar las especificaciones del sistema a
las fijadas de fábrica (excepto la contraseña y el ajuste de
bloqueo parental).
13. Pausar/Reproducir/Intro
Presione para pausar o reiniciar la reproducción o para
confirmar la selección actual.
14. (joystick derecha)
Modo DVD/Disco: Presione una vez para reproducir el
siguiente capítulo o pista.
Modo TUNER (sintonizador): Presione una vez para
búsqueda automática de la estación de radio siguiente
disponible.
Modo MENÚ: Presione una vez para mover el cursor a la
derecha.
15. (joystick arriba)
Modo DVD/Disco: Presione una vez para avance rápido/
retroceso rápido.
Modo TUNER (sintonizador): Presione para ir hacia arriba un
paso de frecuencia.
Modo MENÚ: Presione una vez para mover el cursor hacia
arriba.
16. /EJECT
Presione una vez para inserción/ expulsado del disco.
Presione y mantenga para restaurar la posición central del
mecanismo.
17. Pantalla TFT
18. NAV
Cuando el NAV102 está conectado a la unidad principal,
presione para mostrar la interfaz de usuario de navegación.
19. RPT
Presione para controlar la función de repetir la reproducción.
20. INT
Presione para controlar la función de introducir a
reproducción.
21. Ranura de Tarjeta SD
Insertar la tarjeta SD para reproducción de archivos de audio/
video.
22. WIDE
Presione para ajustar el aspecto de pantalla de la imagen a
uno de estas dos prefijadas: CINEMA, NORMAL o Standby
(pantalla apagada). NOTA: Sólo CINEMA y Standby están
disponible para fuentes que no sean video.
23. Indicador de presencia de Disco
Page 42

38
VM9423
CONTROL REMOTO
Tabla 1: Funciones de Control Remoto
Botón Función
Nombre Ref# DVD VCD SINTONIZADOR CD/MP3/USB/SD SATELITAL
MENÚ 1 Ingresa al menú
principal del disco
Enciende/Apaga PBC
cuando reproduce VCD
MARCAR estaciones
de Radio HD para
transferir a un iPod
Muestra la pantalla de
diagnóstico
TITLE 2 Ingresa al menú Títulos
del disco
Reproduce los
primeros diez
segundos de cada
capítulo/pista
Reproduce los
primeros diez
segundos de cada
archivo
Lista de Categoría en
modo CG
MUTE 3 Alterna la salida de
audio on/off
Alterna la salida de
audio on/off
Alterna la salida de
audio on/off
Alterna la salida de
audio on/off
Alterna la salida de
audio on/off
POWER/
4 Cambia el encendido
on/off
Cambia el encendido
on/off
Cambia el encendido
on/off
Cambia el encendido
on/off
Cambia el encendido
on/off
AUDIO 5 Cambia el idioma de
audio para
reproducción de disco
RPT A-B 6 Fija la repetición de
reproducción desde el
momento A al
momento B
Fija la repetición de
reproducción desde el
momento A al
momento B
RPT 7 Repite la reproducción
del capítulo actual
Repite la reproducción
del capítulo actual
Repite la reproducción
de la pista actual
SRC 8 Selecciona el modo de
reproducción
Selecciona el modo de
reproducción
Selecciona el modo de
reproducción
Selecciona el modo de
reproducción
Selecciona fuente de
reproducción
SUBTITLE 9 Selección de idioma
para subtítulo
DISP/
CLEAR
10 Muestra información de
reproducción
Borra la entrada o
mueva hacia atrás para
corregir errores en
modo de Acceso
Directo
Muestra información de
reproducción
Borra la entrada o
mueva hacia atrás para
corregir errores en
modo de Acceso
Directo
Muestra modo de audio
Borra la entrada o
mueva hacia atrás para
corregir errores en
modo de Acceso
Directo
PRESET /\ 11 Navega la lista de
estaciones prefijadas
Navega la lista de
estaciones prefijadas
PRESET V 12 Navega la lista de
estaciones prefijadas
Navega la lista de
estaciones prefijadas
ANGLE 13 Reproduce el disco en
distinto ángulo para
una escena
Reproduce CD de
imagen con un ángulo
distinto de la imagen
mostrada
Cambia a teclado MEM
a apagado
>> 14 Avance rápido del
contenido del disco
Avance rápido del
contenido del disco
Cambia la estación
hacia arriba un
incremento.
Avance rápido del
contenido del disco
VOL - 15 Desminuye el volumen Desminuye el volumen Desminuye el volumen Desminuye el volumen Disminuye el volumen
VOL + 16 Aumenta el volumen Aumenta el volumen Aumenta el volumen Aumenta el volumen Aumenta el volumen
3
4
5
9
6
7
26
27
15
16
34
33
19
32
23
24
31
30
8
35
1
2
10
13
28
25
11
12
14
20
18
17
22
21
29
TAG
Page 43

39
VM9423
|<< 17 Selecciona el capítulo
anterior para
reproducción
Selecciona el capítulo
anterior para
reproducción
Busca una estación de
radio disponible
disminuyendo la
frecuencia de
sintonización.
Selecciona la pista
anterior para
reproducción
Busca una estación de
radio disponible
disminuyendo la
frecuencia de
sintonización.
>/|| 18 Pausa la reproducción/
inicia la reproducción
Pausa la reproducción/
inicia la reproducción
Pausa la reproducción/
inicia la reproducción
INTRO, Alterna el
menú en pantalla entre
los modos CAT/CH
>>| 19 Selecciona el capítulo
siguiente para
reproducción
Selecciona el capítulo
siguiente para
reproducción
Busca una estación de
radio disponible
aumentando la
frecuencia de
sintonización.
Selecciona la pista
siguiente para
reproducción
Busca una estación de
radio disponible
aumentando la
frecuencia de
sintonización.
/
20 Detiene la
reproducción/finaliza la
llamada
Detiene la
reproducción/finaliza la
llamada
Finaliza llamada Detiene la
reproducción/finaliza la
llamada
GOTO/
21 Va a un momento
específico y reproduce/
disca un llamado
Va a un momento
específico y reproduce/
disca un llamado
Marcar llamado Marcar llamado Ingresa al modo de
Acceso Directo
<< 22 Reproducción lenta/
reproducción rápida
hacia atrás
Reproducción lenta/
reproducción rápida
hacia atrás
Cambia la estación
hacia abajo un
incremento.
ZOOM 23 Acerca/aleja una
imagen
Acerca/aleja una
imagen
PIC 24 Muestra los parámetros
de preparación
Muestra los parámetros
de preparación
Muestra Controles de
Brillo/Contraste
OPEN/
CLOSE
(ABRIR/
CERRAR)
25 Abre/Cierra el Monitor
TFT
Abre/Cierra el Monitor
TFT
Abre/Cierra el Monitor
TFT
Abre/Cierra el Monitor
TFT
Abre/Cierra el Monitor
TFT
TILT
26 Disminuye el ángulo de
inclinación del monitor
Disminuye el ángulo de
inclinación del monitor
Disminuye el ángulo de
inclinación del monitor
Disminuye el ángulo de
inclinación del monitor
Disminuye el ángulo de
inclinación del monitor
TILT
27 Aumenta el ángulo de
inclinación del monitor
Aumenta el ángulo de
inclinación del monitor
Aumenta el ángulo de
inclinación del monitor
Aumenta el ángulo de
inclinación del monitor
Aumenta el ángulo de
inclinación del monitor
WIDE 28 Selecciona el modo de
pantalla: COMPLETO o
NORMAL.
Selecciona el modo de
pantalla COMPLETO o
NORMAL.
Selecciona el modo de
pantalla CINEMA o
Standby
1, 2, 3, 4, 5,
6, 7, 8, 9, 0,
(Teclado
Numérico)
29 Accede Directamente
el capítulo
1-6 selecciona las
estaciones prefijadas
para la banda actual
Accede Directamente
la pista
1-6 selecciona las
estaciones prefijadas
para la banda actual
/BAND
30 Reproducción de
movimiento lento
Reproducción de
movimiento lento
Cambia la Banda AM/FMReproducción de
movimiento lento
Selecciona banda
SAT1, SAT2 o SAT3.
SETUP 31 Muestra el Menú de
Configuración
Muestra el Menú de
Configuración
Muestra el Menú de
Configuración
Muestra el Menú de
Configuración
Muestra el menú de
preferencias
EQ 32 Modifica las
preferencias de
ecualizador
Modifica las
preferencias de
ecualizador
Modifica las
preferencias de
ecualizador
Modifica las
preferencias de
ecualizador
Tabla 1: Funciones de Control Remoto
Botón Función
Nombre Ref# DVD VCD SINTONIZADOR CD/MP3/USB/SD SATELITAL
Page 44

40
VM9423
RDM 33 Reproduce todos los
Capítulos en Orden
Aleatorio
Reproduce todas las
pistas en Orden
Aleatorio
INT 34 Reproduce los
primeros diez
segundos de cada
pista
Búsqueda de
Exploración Previa
EJECT. 35 Expulsa el Disco Expulsa el Disco Expulsa el Disco Expulsa el Disco Expulsa el Disco
Tabla 1: Funciones de Control Remoto
Botón Función
Nombre Ref# DVD VCD SINTONIZADOR CD/MP3/USB/SD SATELITAL
Page 45

41
VM9423
CÓMO USAR EL MONITOR TFT
Abrir/Cerrar el Monitor TFT
Abrir el Monitor TFT
Presione el botón OPEN/CLOSE (1) en el panel frontal o
presione el botón ( ) (25) en el control remoto para deslizar
hacia abajo el panel monitor para revelar las ranuras de
disco y tarjeta SD.
Cerrar el Monitor TFT
Presione el botón OPEN/CLOSE (1) en el panel frontal o
presione el botón ( ) (25) en el control remoto cierra el
panel de monitor.
Ajuste de ángulo de Inclinación de
Monitor
Una característica conocida de los paneles LCD es la calidad
de visión en relación con el ángulo de visión. El ángulo del
monitor puede ajustarse para una visión óptima usando uno
de los siguientes métodos.
Ajuste de Ángulo Paso a Paso
Presione el botón ( ) o ( ) en el control remoto (26, 27)
para ajustar el ángulo de inclinación de la pantalla un paso a
la vez.
También puede ajustar la inclinación presionando y
manteniendo el botón OPEN (1) en el panel frontal Use el
botones de joystick arriba/abajo para ajustar el ángulo de la
pantalla mientras el ícono rojo de inclinación está
parpadeando.
Ajuste Continuo de Ángulo
Presione y mantenga el botón ( ) o ( ) en el en el control
remoto para ajustar el ángulo de inclinación en un
movimiento continuo.
Uso de Conducción en Reversa
Si la cámara de video de visión de vista posterior está
conectada, la unidad está activa, y el monitor está
estacionado dentro del compartimiento principal de la unidad,
el monitor se mueve automáticamente a la posición de visión
y cambia al modo CAMERA cuando conduce en reversa.
Cuando detiene la conducción en reversa, el monitor vuelve
a su compartimiento principal de almacenamiento.
Si el monitor está en modo pantalla, el monitor
automáticamente cambia al modo CÁMARA cuando conduce
en reversa. Cuando detiene la conducción en reversa, el
monitor vuelve a su modo de entrada original.
Proporción de Aspecto
Presione el botón WIDE (28) en el control remoto o el botón
WIDE (22) en el monitor para ajustar la proporción de
aspecto como sigue (sólo activo con fuente de video):
Ajuste de Imagen
La Tabla 2 muestra el modo de salida de video para cada
fuente de reproducción.
*CVBS – Señal de Banda Base de Video Compuesta
Procedimiento de Ajuste de Parámetro
1. Ingresar al Modo de Ajuste de Calidad de Imagen:
Presione el botón PIC en el control remoto o monitor.
2. Seleccionar Ítem a personalizar:
Use los botones arriba/abajo del joystick para
seleccionar “BRIGHT” o “CONTRAST”.
3. Ajustar Parámetros:
Use los botones izquierdo/derecho del joystick para
modificar las preferencias.
4. Salir del Modo de Ajuste de Calidad de Imagen:
Presione el botón PIC en el control remoto o monitor.
Inhibición de Freno de
Estacionamiento
Cuando el cable rosa de "Estacionamiento" está conectado
al interruptor del freno del vehículo, el monitor frontal TFT
mostrará video sólo cuando el freno de estacionamiento está
aplicado. (Cuando el cable rosa está a tierra vía el circuito de
Freno de Estacionamiento, se mostrará el video.)
Mecanismo de Movimiento de Monitor
Si se produce una obstrucción en el paso del monitor, las
siguientes medidas de protección pueden realizarse para
evitar daños al mecanismo o el monitor:
Después de ejecutarse el procedimiento protector, la
operación normal se retoma presionando el botón OPEN (1)
o desconectando y volviendo a conectar la energía.
Tabla 2: Modos de Salida de Video
Fuente de
Reproducción
Modos de Salida de
Video
RADIO Modo RGB
SAT Modo RGB
DISC Modo RGB
BT Modo RGB
AUX 1 Modo CVBS
AUX 2 Modo CVBS
NAV Modo RGB
CÁMARA Modo CVBS
CINEMA
Toda la pantalla se extiende
horizontalmente a la proporción de
aspecto de 16 a 9. La proporción de
extensión es la misma en cualquier
punto.
NORMAL
La imagen de pantalla convencional
tiene una proporción de 4 a 3 de
horizontal a vertical, dejando un área
negra en los lados derechos e
izquierdo de la pantalla.
STANDBY
La pantalla se pone negra. Toque la
pantalla para volver.
Tabla 3: Medidas de Protección del Monitor
Obstrucción
Auto
Protección
Botón OPEN
Presionado
Energía
Reconectada:
Monitor
cargando
afuera
horizontalmen
te
La unidad se
detiene en el
punto de
obstrucción
Monitor
extendido
completament
e en forma
horizontal
El monitor está
cargado
automáticame
nte dentro de
la unidad
Monitor
cargando
adentro
horizontalmen
te
La unidad se
detiene en el
punto de
obstrucción
Monitor
extendido
completament
e en forma
horizontal
El monitor está
cargado
automáticame
nte dentro de
la unidad
Monitor
cargando
afuera
Verticalmente
La unidad se
detiene en el
punto de
obstrucción
El monitor
vuelve a la
unidad
El monitor
vuelve a la
unidad
Monitor
cargando
adentro
verticalmente
La unidad se
detiene en el
punto de
obstrucción
El monitor
vuelve a la
unidad
El monitor
vuelve a la
unidad
Page 46

42
VM9423
INSTRUCCIONES DE FUNCIONAMIENTO
Encendido / Apagado
Presione el botón /SRC (6) en la unidad (o el botón /
POWER (4) en el control remoto) para encender la unidad.
Los botones en el frente de la unidad se iluminan y el estado
del modo actual aparece en el LCD (7). .
Presione y mantenga el botón para apagar la unidad.
Bip Audible de Confirmación
Un tono bip audible confirma cada selección de función. El
tono bip puede desactivarse a través del menú de
Configuración.
Ajuste de Volumen
Para aumentar o disminuir el nivel de volumen, gire el control
AUDIO (5) en el panel frontal o presione los botones VOL+/
VOL- (15, 16) en el control remoto. Cuando el nivel de
volumen alcanza “0” o “40”, suena un bip, indicando que se
ha alcanzado los límites del ajuste. El volumen varía de “0” a
“40”. La pantalla LCD o TFT muestra el nivel de volumen por
3 segundos.
Volumen de encendido Programable
Esta función le permite al usuario seleccionar el ajuste del
volumen de encendido sin importar el ajuste de volumen
anterior al apagado de la unidad. Para programar un nivel
específico de encendido, gire el control AUDIO (2) para
ajustar el volumen al volumen de encendido deseado.
Presione y mantenga el botón AUDIO mientras el icono
amarillo de parlante y la indicación de nivel se muestra en la
pantalla. La unidad tocará un bip para confirmar su
preferencia de volumen de encendido.
Silenciar
Presione el botón MUTE en el panel frontal (8) o el control
remoto (3) para reproducir el próximo archivo. Presione el
botón MUTE nuevamente para restaurar el volumen. Se
muestra MUTE” en el LCD. El ajustar el volumen o usando
cualquier de las funciones de configuración de audio cancela
la función de silenciar.
Silenciar Línea
Si el cable “MUTE” está conectado, la salida de audio se
silencia cuando se recibe un llamado telefónico en el teléfono
celular.
Control de Volante (SWC)
La unidad principal es compatible con el adaptador SWI-PS
de volante de PAC (Pacific Accessory Corporation). Un
conector hembra de 3.5mm (marcado “SWC Interface”) en la
parte trasera de la unidad principal permite conectividad al
adaptador PAC. Por favor refiérase a las instrucciones
incluidas en el adaptador PAC para información detallada de
instalación.
Funciones SWC
Los siguiente controles están disponibles en la mayoría de
los vehículos
1. Bajar Volumen
2. Subir Volumen
3. Silenciar
4. Buscar Hacia Abajo / Pista Previa/**Prefijada Hacia
Abajo
5. Buscar Hacia Arriba / Pista Próxima/**Prefijada Hacia
Arriba
6. SRC (Fuente)
7. ** Seleccionar
8. ** Seleccionar
9. Banda
** Si hay botones adicionales de control de volante en el
vehículo, podrían asignarse las funciones 7 / 8 a la función
"Seleccionar". Esta función/ característica podría no estar
disponible en algunos vehículos.
Seleccionar operación
Si "Seleccionar" (función 7 u 8) se mantiene presionada y
función 4 se presiona momentáneamente. se seleccionará
Prefijadas Hacia Arriba. Si "Seleccionar" (función 7 u 8) se
mantiene presionada y función 5 se presiona
momentáneamente. se seleccionará Prefijadas Hacia Abajo.
Selección de Fuente de Reproducción
Presione el botón SRC en el panel de frontal (6) o el control
remoto (8) para cambiar entre las fuentes de reproducción
disponibles en el siguiente orden: RADIO, SAT, DISC, NAV,
BT, iPod, SD, USB, AUX1, AUX2 y CAMERA. El modo de
reproducción es mostrado en las pantallas TFT y LCD.
Dispositivos Auxiliares
Pueden conectarse dispositivos periféricos externos a esta
unidad vía una salida RCA (AUX IN 2) o el MediaLink
4
.
Seleccione “AUX 1” para reproducir un dispositivo auxiliar
conectado vía las entradas MediaLink
4
RCA o 3.5mm. Por
ejemplo, puede reproducir archivos de música de un
reproductor de música portátil, video desde una cámara de
video e incluso ver fotos almacenadas en una cámara digital.
Seleccionar el modo “AUX 2” para acceder y controlar
dispositivos auxiliares conectados a las entradas “AUX IN 2”
en la parte posterior de la radio.
Cómo seleccionar una Fuente mientras Navega
Mientras navega, otras fuentes podrían seleccionarse y
escucharse tales como el Sintonizador AM-FM, CD, etc. Para
seleccione una fuente, presione el botón /SRC (6) y luego
seleccione una fuente desde el Menú de Fuente Frontal. Las
indicaciones de navegación por voz se oirán
automáticamente, a pesar que el mapa de navegación no se
va poder ver. (La fuente de audio seleccionada se silenciará
VIDEO LEFT RIGHT
3.5mm- Audio
MediaLink
iPod Connector
USB Connector (Type A)
RCA Inputs (AUX 1)
3.5mm Left & Right
Stereo Inputs (AUX 1)
AUX1
No Video Signal
01:53 PM
E
Q
Page 47

43
VM9423
hasta que la indicación de navegación por voz se complete,
luego de eso la fuente de audio continuará.)
Menú Fuente
Para acceder al MENÚ SOURCE, toque la esquina superior
izquierda de la pantalla TFT.
Ecualizador Gráfico de 7-Bandas
El VM9423 posee un ecualizador gráfico de 7-bandas que le
permite ajustar su sistema de audio para cubrir las
características acústicas de su vehículo, la cual variará
dependiendo del tipo de vehículo y sus dimensiones. El
ajuste adecuado del Fader y Balance refuerza los efectos del
ecualizador de cabina.
Presione el botón AUDIO (5) en el panel frontal o presione el
botón en pantalla EQ dos veces para mostrar el siguiente
menú de audio.
• Toque el botón de FAD-BAL para tener acceso a una
segunda pantalla con los ajustes del balance/del
atenuador.
• Toque el botón de EQ para volver a la pantalla de los
ajustes del equalizador.
• Utilice las flechas de cualquier lado de la caja donde
"User" se selecciona, para elegir un nivel del
equalizador de la precolocación.
Para ajustar una función de audio:
1. Use los botones izquierdo/derecho del joystick para
resaltar las características de audio a ser ajustadas.
2. Presione el botón de joystick INTRO en el panel frontal
(13) o control remoto (18) para seleccionar una opción
resaltada de menú.
3. Use el joystick para ajustar la característica
seleccionada al valor deseado.
NOTA: El modo EQ cambiará automáticamente a “USER”
cuando son ajustadas bandas EQ individuales.
El valor adecuado del Fader y Balance refuerza los efectos
del ecualizador de cabina.
El menú de audio saldrá automáticamente después de unos
segundos de inactividad. Para salir rápidamente, toque la
esquina superior izquierda de la pantalla o presione y
mantenga el botón AUDIO (5).
Restauración del Sistema
Para corregir una falla de sistema u otra operación impropia,
use la punta de una pluma para presionar el botón de
restaurar (12) ubicado en la esquina inferior derecha frontal
de la unidad. Después de restaurar el sistema, la unidad
restablece todas las características especificadas de fábrica.
NOTA: Si la unidad es restaurada mientras se reproduce
un DVD, el DVD vuelve a reproducción una vez que la
restauración se completa.
DISC
SOURCE MENU
DISC
RADIO
SD
iPod
SAT
USB
AUX 1
AUX 2
NAV
CAMERA
BT
EQ: User
E
Q
T
A
G
+12 —
0—
–12 —
80 250 600 1k 4k 10k 16k
FAD-BAL EQ
USER
BACK
Tabla 4: Ajustes de Audio
Función Opciones de Ajuste
EQ User
(Usuario)
En modo usuario,
puede ajustar
manualmente cada
una de las siete
bandas de
frecuencia.
Acoustic Use las flechas en
pantalla para
seleccionar una curva
de ecualización
predefinida.
Urban
Rave
Latin
Dance
Hip Hop
Rock
FAD-BAL Use esta pantalla para ajustar el nivelo de
salida de cada parlante en su sistema
envolvente de 0 a -24dB. También puede
ajustar el volumen maestro desde esta
pantalla.
Page 48

44
VM9423
MENÚ DE CONFIGURACIÓN
Para acceder a las preferencias del sistema, presione el
botón SETUP (31) en el control remoto o toque el botón
en la pantalla para ingresar al menú “SETUP”. El sub-menú
“GENERAL” aparece resaltado en azul.
Cómo acceder Ítems de menú
Toque el nombre de sub-menú o use el joystick para
seleccionar un sub-menú (Idioma, Audio, RDS, etc.).
Los dispositivos disponibles para ajustes bajo la opción de
sub-menú resaltada aparecerán en el centro de la pantalla.
Cómo ajustar una función
1. Use la pantalla táctil o presione los botones /\ o V en el
joystick para seleccionar la función para ajustar.
2. Ingrese el campo de opción para la función que desea
ajustar usando la pantalla táctil o presionando el botón
INTRO (joystick). Aparece un submenú en una segunda
línea con la opción seleccionada resaltada en azul.
3. Seleccione un nuevo valor usando la pantalla táctil o
presionando los botones/\ o V en el joystick.
4. Use la pantalla táctil o presione el botón INTRO
(joystick) para confirmar el valor.
Funciones de Sub-menú General
Funciones de Sub-menú Idioma
Si un DVD soporta más de 1 Subtítulo o Idioma de Audio,
todos los idiomas que se encontrarán disponibles para la
selección durante la reproducción. Si el idioma seleccionado
no está soportado por el DVD, entonces es usado el idioma
predeterminado.
Funciones de Sub-menú de Audio
Funciones de Sub-menú de Parlantes
• Elija 4 CH o 4.1 CH dependiendo de la configuración de
parlantes en su vehículo.
• Use la función Tono de Prueba para verificar las
preferencias de parlantes. Haga cambios usando el
menú EQ/FAD-BAL, accedida presionando y
manteniendo el botón AUDIO (control de volumen).
• Ajuste de Fase de Subwoofer: Toque el ícono subw
para acceder los controles de polaridad de subwoofer e
invertir la polaridad de señal de subwoofer de 0° a 180°.
Preferenc
ias
Opciones Función
Clock Mode
(Modo Reloj):
12 Hour
(12 Horas)
El reloj muestra 12 horas usando
AM y PM.
24 Hour
(24 Horas)
El reloj muestra 24 horas hasta
las 23:59.
RADIO
RADIO
SETUP
RDS
Rating
Hardware
P.VOL
TS Cal
General
Language
Audio
Back
Clock Mode 12 Hour
Clock Adjust 04 : 31 AM
Video Input AUTO
Beep On
Speaker
Demo
Bluetooth
02:40
AM
Clock Adjust
(Ajuste de
Reloj)
(HH:MM) El reloj aparece en la esquina
superior derecha de la pantalla y
en la pantalla LCD durante
determinadas operaciones.
NOTA: La indicación AM/PM
cambiará a medida que continúa
ajustando la hora pasadas las
12.
Video Input
“Entrada de
Video”
El circuito de
entrada
detecta
automáticam
ente la señal
de video de
la fuente de
entrada
Auxiliar).
Auto La señal de color cambia
automáticamente basada en la
señal de entrada de video actual
- NTSC o PAL.
NTSC Las señales de color están en el
formato de la norma NTSC.
PAL Las señales de color están en el
formato de la norma PAL.
Beep On
“Activado”
Cuando está activado, Un tono
bip audible confirma cada
selección de función.
Off
“Desactivado”
Sin sonido bip
Preferenc
ias
Opciones Función
OSD English
“Inglés”
La pantalla se muestra en Inglés.
DVD Audio English
“Inglés”
El Audio del DVD se escucha en
Inglés cuando la opción está
disponible.
Spanish
“Español”
El Audio del DVD se escucha en
Español cuando la opción está
disponible.
French
“Francés”
El Audio del DVD se escucha en
Frances cuando la opción está
disponible.
Preferenc
ias
Opciones Función
DVD Subtitle
“Subtítulo de
DVD”
English
“Inglés”
Los subtítulos de DVD aparecen
automáticamente en Inglés
cuando está disponible.
Spanish
“Español”
Los subtítulos de DVD aparecen
automáticamente en Español
cuando está disponible.
French
“Francés”
Los subtítulos de DVD aparecen
automáticamente en Frances
cuando está disponible.
Off
“Desactivado
”
Los subtítulos de DVD no
aparecen automáticamente.
Disc Menu
“Menú de
Disco”
English
“Inglés”
El Menú de DVD (si corresponde)
se muestra en Inglés.
Spanish
“Español”
El Menú de DVD (si corresponde)
se muestra en Español.
French
“Francés”
El Menú de DVD (si corresponde)
se muestra en Frances.
Preferenc
ias
Opciones Función
DRC Off
“Desactivado
”
Emplee el Control Dinámico de
Rango para mejor reproducción
en bajos volúmenes.
On
“Activado”
Sub W. Filter
Filtro de Sub.
W
50Hz Seleccionando una frecuencia de
fusión fija una frecuencia de corte
para los LPF del subwoofer (Filtro
de graves).
80Hz
100Hz
120Hz
150Hz
Preferenc
ias
Opciones Función
Page 49

45
VM9423
El invertir la polaridad puede mejorar la respuesta de
graves relativa a la configuración de parlantes.
Funciones de Sub-menú de Bluetooth
Funciones de Sub-menú RDS
Funciones de Sub-menú Calificación
El sistema de DVD tiene incorporado una función de bloqueo
parental para evitar que personas no autorizadas vean un
disco con contenido restringido. Como predeterminado, el
sistema de calificación está fijado en la mayor calificación
(sin restricciones). El bloqueo parental es liberado sólo al
ingresar la contraseña correcta. Una vez ingresada la
contraseña, la calificación está disponible para ser fijada.
Para restaurar la contraseña, acceda al menú “RATING” e
ingrese la contraseña actual. Una vez ingresada la
contraseña correcta, puede acceder al campo “Password
(contraseña)” e ingresar una nueva.
NOTA: Registre la contraseña y guárdela en un lugar
seguro para referencias futuras. La calificación para
cada disco está marcada en cada disco, empaque del
disco o documentación. Si la calificación no está
disponible en el disco, la función de bloqueo parental no
está disponible. Algunos discos sólo restringen
porciones del disco y el contenido adecuado se
reproducirá. Para detalles, por favor refiérase a la
descripción del disco.
Funciones de Sub-menú Demo
Puede detener/correr el modo demostración o encender
apagar el Modo Demo eligiendo la opción "Demo" desde el
MENÚ SETUP (CONFIGURACIÓN).
Cuando "Auto Run" (Auto Ejecución) está Desactivado,
puede seleccionar "Modo Demo > Run", “Modo Demo >
Ejecutar” para iniciar el Modo Demo. El Modo Demo navega
por distintas pantallas de fuente, simulando actividad en la
pantalla. El “Modo Demo” es directamente mostrado en texto
amarillo (debajo del reloj), para indicar que la unidad está en
Modo Demo. Para detener el Modo Demo, presione el
cuadrante superior izquierdo del TFT (seleccionar Fuente).
Cuando “Demo Auto Run” está en On, la unidad
automáticamente mostrará Modo Demo cuando se enciende.
Preferenc
ias
Opciones Función
Bluetooth On
“Activado”
Activar función Bluetooth.
Off
“Desactivado
”
Desactivar función Bluetooth.
Auto Answer
(Respuesta
Automática)
On
“Activado”
La unidad responde
automáticamente todas las
llamadas entrantes.
Off
“Desactivado
”
Responder manualmente
llamadas tocando el botón
"llamada"
Connect
“Conectar”
Manual Conectar el último teléfono móvil
activo tocando el icono
CONECTAR cuando se
desconecta.
Auto Conectar Automáticamente
cuando el teléfono apareado está
en rango.
Pairing Code
“Código de
Apareamient
o”
El código predeterminado es
“1234”. Toque el icono de teclado
para abrir un teclado e ingresar un
código de apareamiento o clave
de acceso requerido para la
conexión Bluetooth a su teléfono
móvil. No todos los teléfonos/
dispositivos requieren un código
de apareamiento. El código
predeterminado es “0000” para
muchos modelos.
Preferenc
ias
Opciones Función
Tuner
Region
“Región de
Sintonizado
r”
USA
EEUU
Canadá
México
Sud
América
Banda FM: 87.9MHz -
107.9MHz, separación de
canal cada @ 200kHz
Banda AM: 530kHz -
1.710kHz, separación de
canal cada @ 10kHz
Europe
RU
Europa
África
Banda FM: 87,6MHz -
107.9MHz, separación de
canal cada @ 100kHz
Banda AM: 531kHz -
1.602kHz, separación de
canal cada @ 9kHz
Preferenc
ias
Opciones Función
Password
“Contraseña”
_ _ _ _ _ _ Ingrese la contraseña
predeterminada de seis dígitos
(012345).
Rating
“Calificación”
1. Kid Safe
“Niño seguro”
Seleccione el nivel de calificación
adecuado para la audiencia
deseada.
Podría pasar por encima de
calificaciones mayores usando su
contraseña.
2. G
3. PG
4. PG-13
5. PG-R
6. R
7. NC-17
8. Adult
“Adulto”
Load Factory
“Carga de
Fábrica”
Reset
“Restaurar”
Seleccione “Reset” para restaurar
la configuración predeterminada
de fábrica sólo para el sistema de
calificación.
Page 50

46
VM9423
Funciones de Sub-menú de Dispositivos
Si la cámara de video de visión trasera está conectada, la
unidad está encendida, y el monitor TFT está retraído dentro
de la unidad, el monitor TFT se mueve automáticamente a la
posición de visión y se selecciona el modo Cámara cuando el
auto se coloca en REVERSA. Cuando se coloca el cambio
en DRIVE, el monitor TFT se vuelve a retraer dentro de la
unidad después de diez segundos.
Si el monitor está en modo de muestra, el monitor
automáticamente cambia al modo CÁMARA cuando conduce
en reversa. Cuando detiene la conducción en reversa, el
monitor vuelve a su modo de entrada original.
Funciones de Sub-menú P.VOL
TS Cal (Calibración de pantalla)
Para acceder la función de "Calibración de Pantalla" desde el
menú SETUP, seleccione la opción “TS CAL”.
Después de ingresar al modo de calibración, aparece un cruz
en una esquina de cuadrante de la pantalla. Para
comenzar la calibración, presione y mantenga a cruz por un
segundo hasta que se mueva al cuadrante siguiente.
Continúe con cada cuadrante hasta completar la calibración.
Para salir sin realizar la calibración, toque el botón BACK.
Cómo salir del Menú de Configuración
del Sistema
Para salir del modo preferencias y volver a la reproducción
normal presione el botón SETUP (31) en el control remoto o
toque el botón BACK en la pantalla.
Preferenc
ias
Opcione
s
Función
Camera In
“Cámara In”
Normal
Mirror
“Espejo”
Invierte la imagen de la cámara
como si mirara por el espejo retrovisor.
TFT Set
Open
“TFT fijado
abierto”
Auto El panel TFT abre automáticamente
cuando la unidad se enciende.
Manual Cuando se apaga el encendido, el
panel TFT NO se retrae si
previamente estaba afuera
Off
“Desactivad
o”
Debe presionar el botón OPEN (1)
para abrir el panel TFT.
TFT Set Back
“Volver
Fijación de
TFT”
Off
“Desactivad
o”
La pantalla TFT permanece
totalmente extendida.
On
“Activado”
La pantalla TFT se mueve hacia
atrás levemente después de abrir.
Auto Dimmer
“Oscurecimie
nto
Automático”
Off
“Desactivad
o”
El brillo de la pantalla TFT
permanece constante a menos que
se ajuste manualmente.
On
“Activado”
La pantalla TFT se oscurecerá
automáticamente cuando hay
disponible menos luz.
Preferenc
ias
Opcione
s
Función
Source
“Fuente”
DISC
Elija una fuente para la cual
desea aumentar el volumen
relativo (NIVEL).
Use los botones +/- para
aumentar o disminuir el
volumen relativo para la fuente
especificada hasta 6 decibeles.
RADIO
SD
SAT
AUX 1
USB
BT
AUX 2
iPod
NAV
Page 51

47
VM9423
OPERACIÓN DE SINTONIZADOR
Acerca de la Tecnología HD Radio™
La tecnología HD Radio permite la transmisión digital de
calidad CD de sus estaciones locales de radio AM y FM. La
transmisión de HD Radio puede incluir canales múltiples en
la misma frecuencia, lo cual se llama multidifusión. Con
multidifusión, puede recibir hasta ocho canales adicionales
de multidifusión: HD1~HD8. Con su radio VM9423 recibirá
transmisiones digitales de HD Radio automáticamente
cuando sintoniza una estación que ofrece tecnología de HD
Radio.
Pantalla TFT de Sintonizador
1. Indicador de banda actual de radio
2. Indicador de frecuencia de Radio
3. Reloj
4. Nombre de la estación de radio (letras de identificación)
5. Indicador de Modo de Sintonía
6. Estaciones de radio prefijadas: Toque para activar las
estaciones prefijadas
7. Información de Programa: Artista, Título, Tipo
NOTA: La cantidad de información mostrada cuando
recibe una señal de HD Radio depende de lo que se
está transmitiendo. Algunas estaciones transmiten sus
letras de identificación (nombre), el nombre del artista,
el título de la canción, y la categoría de la música.
8. Toque para acceso rápido a fijaciones de nivel de
ecualizador
9. Toque para acceder el ingreso directo a pantalla.
10. Indicador de Banda de HD Radio
11. |<<: Toque para buscar hacia atrás
12. >>|: Toque para buscar hacia adelante
13. <<: Toque para sintonizar un paso hacia atrás,
incluyendo canales múltiples
14. >>: Toque para sintonizar un paso hacia adelante,
incluyendo canales múltiples
15. BAND: Toque para cambiar entre las bandas AM/FM
16. Toque para ver el MENÚ SOURCE y seleccione una
nueva fuente de reproducción
17. MEM: Ver pantalla usada para ingresar el canal actual
dentro de una memoria prefijada
18. 1/2 o 2/2: Toque el botón de esta página para ver la
segunda página de botones en pantalla.
NOTA: En modo AM, sólo hay una página de opciones
de botones en pantalla. El botón PROG no se encuentra
visible dado que los canales multidifusión no se
encuentran disponibles en estaciones AM.
19. : Toque para ver el menú SETUP
20. PROG: Toque para mostrar el canal de multidifusión de
HD Radio
21. A/D: Toque para seleccionar el modo del sintonizador
Auto, Analógico o Digital.
22. Indicador de Estación Radio HD
23. Exploración automática de memoria
24. TAG: Toque para realizar el Etiquetado de iTunes para
la canción actual
Cambio de Recepción de HD Radio
• Toque la esquina superior izquierda de la pantalla
(círculo) para ver el MENÚ SOURCE. Toque “Radio”.
• Presione el botón (6) SRC en el panel frontal o el control
remoto (8) para cambiar a la fuente AM/FM o RADIO.
Cómo Seleccionar la Banda AM/FM
Toque el botón BAND (15) en la pantalla, o presione el botón
BAND en la unidad (4) o control remoto (20) para cambiar
entre las bandas AM o FM:
NOTA: El botón BAND en la unidad sólo funciona cuando
el TFT está cerrado.
Selección del Modo de Sintonización
Toque el botón A/D (21) para elegir uno de los siguientes
modos:
• Auto: Buscar estaciones analógicas y digitales.
• Analógica: Buscar solamente canales analógicos.
• Digital: Buscar y reproducir solamente estaciones
digitales.
Sintonizador
No todas las estaciones FM o AM ofrecen transmisión de HD
Radio (digital). Puede recibir estaciones analógicas y
digitales con el VM9423.
Buscar Sintonización
Para buscar la siguiente estación:
• Toque el botón >>| en pantalla (13).
• Presione el botón >>| (19) en el control remoto.
• Presione el botón > en el joystick (14).
Para buscar la estación previa:
• Toque el botón |<< en pantalla (12).
• Presione el botón |<< (17) en el control remoto.
• Presione el botón < en el joystick (10).
Sintonizado Manual
Para aumentar o disminuir un paso la frecuencia de
sintonización:
• Toque los botones o en pantalla (14, 15).
• Presione los botones >> o << (14, 22) en el control
remoto.
• Presione los botones /\ o V (11, 15) en el joystick.
4
1
2
7
8
3
6
16
RADIO
FM 101.9 MHz HD-1
01:02 PM
BAND
1/2
AS
MEM
P1 87.5 MHz
P2 90.1 MHz
P3 98.1 MHz
P4 106.1 MHz
P5 107.9 MHz
P6 102.9 MHz
Info: Sheryl Crow
WJHM-FM
Auto HD
5
10
22
24
E
Q
T
A
G
9
11
12
13
14
15
BAND
1/2
AS
MEM MEM
18
23
17
19
20
PROG
2/2
A/D
21
Page 52

48
VM9423
Sintonía Directa
Para ingresar directamente una estación de radio, toque el
botón o presione el botón GOTO (21) en el control
remoto para mostrar el menú de ingreso directo.
Ingrese la estación de radio deseada usando el teclado
numérico en pantalla. Presione Intro para sintonizar la
estación seleccionada. Para salir de la pantalla sin cambiar
de estación, toque Exit(Salir). Para limpiar su ingreso y
comenzar de nuevo, toque Clear (Limpiar).
Canales de HD Radio Multidifusión
Para sintonizar un canal de HD Radio Multidifusión, sintonice
la señal principal y luego presione el botón PROG (20) en
página 2/2 . Si un canal multidifusión se está transmitiendo
para la estación actual, el número correspondiente de
multidifusión aparece en el lado izquierdo de la pantalla. Para
ver el título y el artista, si se encuentra disponible, seleccione
HD-1, HD-2, HD3, etc.
NOTA: La cantidad de información mostrada cuando
recibe una señal de HD Radio depende de lo que se está
transmitiendo. Algunas estaciones transmiten sus letras
de identificación (nombre), el nombre del artista, el título
de la canción, y la categoría de la música.
Búsqueda PTY
Después de seleccionar un canal de HD Radio, se enumeran
las categorías de Tipo de Programa, permitiendo a los
oyentes encontrar programas similares por genero.
Si el menú PTY no es mostrado, pulse el botón PROG (20)
en la página 2/2 para cambiar entre los canales de
multidifusión de HD Radio y las categorías de PTY.
Cuando se selecciona una categoría PTY del menú de la
pantalla táctil, la radio comenzará a buscar estaciones que
transmiten en la categoría seleccionada.
Cómo usar Estaciones Prefijadas
Puede guardar hasta 18 memorias para FM y 6 memorias
para AM. Las estaciones almacenadas aparecen en el lado
izquierdo de la pantalla.
Cómo almacenar una Estación
1. Seleccione una banda (si es necesario), luego
seleccione una estación.
2. Toque el botón en pantalla MEM (17) para abrir la
pantalla de prefijados.
3. Toque el número de prefijado donde desea almacenar
la estación actual (o presione EXIT (SALIR) para
cancelar y cerrar el menú). El número predefinido y la
estación aparece resaltada en el lado izquierdo de la
pantalla.
NOTA: Las estaciones de multidifusión pueden ser
guardadas como estaciones predefinidas.
Cómo activar una Estación
1. Seleccione una banda (si es necesario).
2. Toque un botón (6) de prefijado en pantalla para
seleccionar la estación almacenada correspondiente.
Almacenamiento Automático (AS)
Para seleccionar seis estaciones fuertes y almacenarlas en
la banda actual:
1. Seleccione una banda (si es necesario).
2. Toque el botón en pantalla AS para activar la función
de Almacenamiento Automático.
Las nuevas estaciones reemplazan las estaciones ya
almacenadas en esa banda.
FM:___._MHz
1
2
3
4
5
6
7
8
9
0
Clear
Exit
RADIO
FM 106.7 MHz HD-2
02:27 AM
PROG
2/2
A/D
MEM
HD-1
HD-2
HD-3
Title: Lil Love
WXXL-FM
Auto HD
E
Q
T
A
G
RADIO
FM 106.7 MHz HD-1
02:07 AM
PROG
2/2
A/D
MEM
01 Non-specific
02 News
03 Information
04 Sports
05 Talk
06 Rock
Title: DAWSON McALLIST
WXXL-FM
Auto HD
E
Q
T
A
G
Preset: _ _
1
2
3
4
5
6
7
8
9
0
Clear
Exit
P1 87.5 MHz
P2 90.1 MHz
P3 98.1 MHz
P4 106.1 MHz
P5 107.9 MHz
P6 102.9 MHz
Page 53

49
VM9423
Etiquetado de iTunes
®
El VM9423 ofrece Etiquetado iTunes
®
, lo cual permite al
usuario "Etiquetar" canciones que se reproducen en
estaciones HD Radio™ para su compra posterior a través de
iTunes. Cuando el botón en pantalla TAG (24) es tocado, la
unidad almacena información de título y artista de canción
que luego pueden ser transferidas a su iPod cuando se
conecta al MediaLink
4
. Una lista titulada "Etiquetada"
aparecerá en iTunes, permitiéndole la opción de comprar sus
canciones etiquetadas.
Compatibilidad iPod
Los modelos apoyados, pero no limitados a, incluyen el
siguiente:
• iPod nano 4G
• iPod Classic
• iPod Touch
• iPod 5G
• iPod nano 3G
Cómo Etiquetar Música
Para comenzar a etiquetar música, sintonice una estación de
HD Radio. El ícono HD en la parte superior de la pantalla
debe estar iluminado, indicando que se está recibiendo una
estación digital. Toque el botón en pantalla TAG o presione el
botón MENU/TAG en el control remoto. Aparecerá en la
pantalla “Adding Tag...” (agregando etiqueta...). La
información de canción es guardada en la memoria del
VM9423 hasta que se conecte un iPod. Cuando la primera
etiqueta es satisfactoria, la parte inferior de la pantalla
muestra "Etiqueta almacenada 1 de 64". Puede etiquetar
hasta 64 canciones antes que las etiquetas deban ser
transferidas a un iPod o borrarse. Cuando la memoria de
Etiquetas alcanza la capacidad (64 etiquetas) la parte inferior
de la pantalla muestra "Memoria Llena, Conecte un iPod".
NOTA: Las etiquetas guardadas en su iPod pueden ser
administradas usando el software iTunes, disponible en
www.apple.com/itunes.
Descarga de Etiquetas a su iPod
Para descargar etiquetas a su iPod, enchufe un iPod dentro
del iPod jLink
3
y luego dentro del conector MediaLink4 iPod.
Todas las etiquetas existentes son transferidas
automáticamente al iPod y borradas de la memoria de la
Unidad principal. Si se conecta un iPod cuando una canción
está etiquetada, la etiqueta será transferida inmediatamente
al iPod.
NOTA: Cuando transfiere Etiquetas a un iPod, el VM9423
debe permanecer en modo Radio hasta que el mensaje
“## Etiqueta(s) Enviada” se muestre. Para comprar
canciones etiquetadas, debe sincronizar su iPod a
iTunes ay luego pulsar la lista "Etiquetada" en el lado
izquierdo de la pantalla de software iTunes. Pulse el
botón "view" ver para información de compra.
Tabla 5: Mensajes de Etiquetado
Mensaje de Etiquetado Motivo
Almacenando Etiqueta... El botón Etiqueta está
presionado
Etiqueta Almacenada ## de 64 Almacenamiento Satisfactorio
de Etiquetas
## Etiqueta(s) Enviado Las etiquetas fueron
transferidas satisfactoriamente
Memoria llena, Conecte un iPod Almacenamiento de Etiquetas
lleno
Datos de Etiqueta insuficientes Datos de Etiqueta no
disponible
Transferencia de Etiqueta fallida Transferencia de Etiqueta
fallido
iPod lleno, no puede
almacenarse Etiqueta
Memoria de iPod llena
Etiquetado no soportado iPod no soportado conectado
Tabla 5: Mensajes de Etiquetado
Mensaje de Etiquetado Motivo
Page 54

50
VM9423
OPERACIÓN DE RADIO SATELITAL
Los oyentes pueden suscribirse a XM® Radio en la Web
visitando www.xmradio.com, o llamando al (800) 967-
2346. Los clientes deberían tener preparada su ID de
Radio (ver “Cómo mostrar el código de identificación
(ID)”). Los clientes pueden recibir un número limitado de
canales libres al aire sin la activación.
Cómo Acceder al Modo de Radio
Satelital
Presione el botón SRC (6) en el panel frontal o el control
remoto (8) para cambiar a fuente SAT.
1. Nombre del Canal SAT
2. Número de Canal SAT
3. Banda SAT
4. Hora
5. Título de Canción
6. Nombre de Artista
7. Categoría de la canción
8. Indicador de fuerza de señal
9. Canales actualmente pre-definidos/botones predefinidos en la pantalla
10. CH -: Selecciona el canal previo
11. CH +: Selecciona el siguiente canal
12. CAT +: Selecciona el próximo canal solamente en la
actual categoría
13. CAT -: Selecciona el canal previo solamente en la
actual categoría
14. Toque para ingresar directamente el canal usando el
teclado en pantalla
15. CG: Modo de Canal de Acceso/Guía de Categoría
16. BANDA: Cambio entre las bandas SAT1, SAT2 y SAT3
17. Toque para ver el menú SETUP
18. Toque para ver el MENÚ SOURCE y seleccione una
nueva fuente de reproducción
19. MEM: Ver pantalla usada para ingresar el canal actual
dentro de una memoria prefijada
20. DIAG: Esta función está reservada para ser usada sólo
por el profesional de servicio para determinación de
problemas.
Cómo mostrar el código de
identificación (ID)
Antes que pueda escuchar la radio satelital, debe suscribirse
al servicio usando su número de identificación de radio. Para
mostrar la ID de radio, presione los botones izquierdo/
derecho (16, 17) en el joystick o los botones CH - o CH + en
la pantalla táctil repetidamente para sintonizar al canal el
“000”. La pantalla muestra la ID de radio donde el nombre del
canal es generalmente mostrado.
Cómo Seleccionar una Estación
Use los botones izquierdo/derecho del joystick o los botones
CH - o CH + en la pantalla táctil para cambiar a otra estación.
Modo Prefijado
Para ingresar al modo prefijado, Toque el botón BAND en la
pantalla, o presione el botón BAND en la unidad (4) o control
remoto (20) para cambiar entre las siguientes bandas: SAT1,
SAT2, o SAT3 (indicadas en la esquina superior de la
pantalla TFT).
Seis botones numerados de prefijado almacenan y activan
estaciones para cada banda. Las seis estaciones
almacenadas (P1-P6) para la banda actual aparecen en la
pantalla TFT.
Cómo almacenar una Estación
1. Seleccione una banda (si es necesario), luego
seleccione una estación.
2. Toque el botón en pantalla MEM (18) para abrir la
pantalla de prefijados.
3. Toque el número de prefijado donde desea almacenar
la estación actual (o presione EXIT (SALIR) para
cancelar y cerrar el menú). El número prefijado y la
estación aparecen resaltados.
Cómo activar una Estación
1. Seleccione una banda (si es necesario).
2. Toque un botón de prefijado en la pantalla táctil para
seleccionar la estación almacenada correspondiente.
Sintonía Directa
Para ingresar directamente una estación de radio, toque el
botón o presione el botón GOTO (21) en el control
remoto para mostrar el menú de ingreso directo.
Ingrese la estación de radio deseada usando el teclado
numérico en pantalla. Presione el botón Intro para sintonizar
la estación seleccionada. Para salir de la pantalla sin cambiar
de estación, toque Exit (SALIR). Para limpiar su ingreso y
comenzar de nuevo, toque Clear (Limpiar).
SAT
SAT1 CH001
01:02
CG
BAND
MEM
DIAG
P1 XM Preview
P2 XM Preview
P3 XM Preview
P4 XM Preview
P5 XM Preview
P6 XM Preview
Title: Fridays XM144!
XM Preview Preview
CAT
+
CAT
-
CHCH
+
-
10
11
12
13
14
15
18
4
3 21
5
16
17
6
7
8
9
19
20
E
Q
Mem:
Exit
P1
P2
P3
P4
P5
P6
CHNO:___/255
1
2
3
4
5
6
7
8
9
0
Clear
Exit
Page 55

51
VM9423
Modo de Canal de Acceso/Guía de
Categoría
Hay dos modos de acceso para ayudarlo a navegar a través
de los canales y o categorías. Para acceder al modo Guía de
Canal/Categoría, presione el botón INTRO (18) en el control
remoto o en el botón CG en la pantalla táctil.
Guía de Canal es el modo de búsqueda predeterminado.
Para acceder a la Guía de Categoría, pulse el botón TITLE
(2) en el control remoto o toque CAT en la pantalla táctil.
Para regresar, a la Guía de Canal, toque CH sobre la pantalla
o pulse el botón SUBTITLE (9) en el control remoto.
Modo Guía de Canal
Cuando el Modo de Guía de Canal es seleccionado, los
primeros seis canales satelitales son mostrados en las
casillas en la parte inferior izquierda de la pantalla TFT y el
menú en pantalla cambia para facilitar el modo de búsqueda.
• Mientras está en Modo Búsqueda, para cambiar entre
los modos de búsqueda de Canal y Categoría, presione
los botones CH o CAT en la pantalla táctil.
• Utilice la barra deslizante y las flechas en la pantalla
táctil para ver la página previa/siguiente de las
estaciones. Cada página contiene seis canales entre los
cuales seleccionar.
• Presione el botón en pantalla SCN o los botones INT
(20) en el panel de control para vista previa de cada uno
de los 6 canales mostrados por 10 segundos.
• Presione el botón CG para regresar la pantalla al Modo
Preset.
• Para seleccionar un canal mientras se encuentra en el
modo Guía de canal, toque el nombre del canal en la
pantalla. El canal comenzará a reproducirse y la unidad
regresará al modo Prefijado.
Modo de Guía de Categoría
Cuando el Modo de Guía de Categoría es seleccionado,
aparecen en pantalla iconos de carpeta al lado de las
opciones de categorías.
• Mientras está en Modo Búsqueda, para cambiar entre
los modos de búsqueda de Canal y Categoría, presione
los botones CH o CAT en la pantalla táctil.
• Utilice la barra deslizante y las flechas en la pantalla
táctil para ver la página previa/siguiente de las
categorías. Cada página contiene seis categorías entre
las cuales seleccionar.
• Para seleccionar una categoría, toque el nombre de la
correspondiente categoría o icono de carpeta. Los
canales en la categoría serán mostrados en la pantalla.
• Utilice la barra deslizante y las flechas en la pantalla
táctil para ver las seis estaciones previas/siguientes en
la categoría seleccionada.
• Pulse el botón SCN en pantalla para escuchar por 10
segundos cada canal.
• Toque el nombre del canal para reproducirlo.
• Presione el botón en pantalla CG para regresar la
pantalla al Modo Preset.
SAT
SAT1 CH001
01:02
CG
SCN
MEM
DIAG
########
001 XM Preview
004 The 40s
005 The 50s
006 The 60s
007 The 70s
Title: www.xmradio.com
XM Preview Preview
CH
CAT
E
Q
Page 56

52
VM9423
OPERACIÓN DE VIDEO DE DVD/VCD
NOTA: Cuando está instalado correctamente, no puede
mostrarse video de DVD en la pantalla principal TFT
salvo que esté aplicado el freno de estacionamiento. Si
intenta reproducir un DVD mientras el vehículo está en
movimiento, la pantalla TFT muestra "PARKING" sobre
un fondo azul. Las pantallas de video traseras, si las hay,
funcionarán normalmente.
Insertar/Expulsar Disco
Para insertar un disco, primero debe presionar el botón
(4) para abrir el panel frontal y mostrar la ranura del disco.
Luego de insertar un disco DVD, se ingresa al modo DVD y
comienza la reproducción del disco. La luz indicadora de
disco (9) se ilumina cuando se inserta un disco.
NOTA: Si el Bloqueo de Padres (calificación) está
activado y el disco insertado no está autorizado, debe
ingresarse el código de 6 dígitos y/o el disco debe
autorizarse (ver “Funciones de Sub-menú General” en
página 44).
No puede insertar un disco si ya hay un disco en la unidad o
si está apagada.
NOTA: Los DVD-R y DVD-RW no se reproducirán a
menos que la sesión de grabación esté finalizada y el
DVD esté cerrado.
Cómo Expulsar un Disco
Presione el botón (16) en la unidad o el control remoto
(35) para expulsar el disco. La unidad vuelve
automáticamente al modo Sintonizador. Puede expulsar un
disco con la unidad apagada. La unidad permanecerá
apagada luego de expulsar el disco.
Restaurar el Mecanismo de Carga
Si el disco carga anormalmente o se produce un
funcionamiento anormal del mecanismo principal, presione y
mantenga el botón (16) en la unidad o el control remoto
(35) para restaurar el mecanismo de carga. Se vuelve a la
operación normal.
Cómo Acceder el Modo DVD
Para cambiar al modo DVD cuando el disco ya está
insertado, presione el botón (6) SRC en el panel frontal o el
control remoto (8) hasta que aparezca “DISC” en la parte
inferior de la pantalla.
Cómo Controlar la Reproducción
Para acceder los controles en pantalla, toque la pantalla.
Toque el botón 1/2 para ver una segunda página de los
controles
Cómo Detener la Reproducción
Toque el botón ( ) en la pantalla o presione el botón /
BAND (20) en el control remoto para detener la reproducción
del DVD.
Cómo Pausar la Reproducción
Presione el botón ( || ) en la pantalla (o presione el botón
>/||
en el control remoto) para suspender la reproducción del
disco. Presione el botón > en pantalla para volver a la
reproducción del disco.
Reproducción Avance Rápido
Presione el botón /\ en el control remoto o el botón >> en la
pantalla para avance rápido. Mantenga presionando y
liberando el botón para aumentar la velocidad de “2X” a “4X”,
“8X”, y “20X”.
Presione el botón ENTER (18) en el control remoto o toque el
botón reproducir (>) para volver a la reproducción normal.
Reproducción en retroceso rápido
Presione el botón \/ del joystick o toque el botón << en la
pantalla para reproducir el título actual en retroceso rápido.
Mantenga presionando y liberando el botón para aumentar la
velocidad de “2X” a “4X”, “8X”, y “20X”.
Presione el botón de joystick ENTER (13) en la unidad o
toque el botón reproducir (>) para volver a la reproducción
normal.
Reproducción en Avance Lento/Retroceso Lento:
Presione el botón ||>/BAND en el control remoto para
reproducción de avance lento/retroceso lento. Mantenga
presionando y liberando el botón para aumentar la velocidad
de avance lento de “2X” a “4X” y “8X”, y luego comenzar el
retroceso lento.
Repetir Reproducción
Presione el botón RPT (19) en el panel de control, el botón
RPT (7) en el control remoto, o el botón en pantalla para
alternar el modo repetir de acuerdo a lo siguiente:
• DVD: Repetir Capítulo, Repetir Título, Repetición
Desactivada
• VCD (PBC Off): Repetir una, Repetición desactivada
NOTA: Para reproducir VCD, la función repetir no está
disponible si PBC está activado.
Función de Repetir Sección (A-B)
Use la función A-B para definir un área específica de un
disco a repetir.
• Presione el botón RPT A-B (6) en el control remoto (o el
botón A-B en pantalla) para fijar el punto de inicio (A) de
la sección repetida.
• Presione nuevamente el botón RPT A-B una vez que
alcanza el punto final (B) deseado de la sección
repetida. La porción seleccionada del DVD se repetirá
ahora continuamente.
• Presione nuevamente el botón RPT A-B para cancelar
el ajuste de la sección A-B y detener la repetición de
reproducción.
Reproducción Aleatoria
Con un DVD, VCD, o CD reproduciéndose, presione el botón
RDM (33) en el control remoto para activar la reproducción
aleatoria y reproducir todos los capítulos/pistas en forma
aleatoria. Aparece “On” (Activado) en la pantalla.
Presione el botón > en el joystick para reproducir la próxima
pista aleatoria.
Presione el botón RDM nuevamente para desactivar la
reproducción aleatoria.
1/2
BACKBACK
MENU
2/2
DISP
EQ
AUDIO
A-B
TITLE
SUBTITLE
Page 57

53
VM9423
NOTA: Cuando un VCD está reproduciendo con PBC
activado, el activar la reproducción aleatoria
automáticamente desactiva el PBC.
Cómo acceder el Menú DVD
Presione el botón MENÚ (1) en el control remoto para llamar
al menú DVD principal. Use el joystick para seleccionar un
título desde el menú o toque el título en pantalla.
Presione el botón TITLE (TÍTULO) (2) en el control remoto o
en la pantalla para seleccionar un título distinto para
reproducción.
Presione el botón INTRO (joystick) para confirmar su
selección y comenzar la reproducción. También puede
seleccionar un título usando la pantalla táctil.
Cómo moverse por los capítulos
Presione el botón > en el joystick o el botón >>| en pantalla
para avanzar al siguiente capítulo en el DVD.
Presione el botón < en el joystick o el botón |<< en pantalla
para moverse al capítulo anterior.
Selección Directa de Capítulo / Pista
Ingreso Directo en Control Remoto
Durante la reproducción de DVD, VCD y CD, puede usar el
teclado numérico en el control remoto (29) para acceder
directamente una pista.
Ingreso Directo en Pantalla Táctil
Para seleccionar directamente un capítulo/pista, toque el
botón en la pantalla de control para mostrar el menú
de ingreso directo.
Use el botón para seleccionar entrada de Título,
Capítulo, o Tiempo.
• Título: _/#
• Capítulo: _ _/##
• Hora: _ _:_ _:_ _
Ingrese el título, capítulo/pista, o tiempo deseado usando el
teclado numérico en pantalla y luego presione el botón Intro.
Para salir de la pantalla sin cambiar de estación, toque Exit
(SALIR). Para limpiar su ingreso y comenzar de nuevo,
toque Clear (Limpiar).
Cómo ver un Ángulo de Visión
Alternativo (Sólo DVD)
Algunos DVDs contienen escenas que se han grabado
simultáneamente desde distintos ángulos. Para discos
grabados con ángulos múltiples, presione el botón ANGLE
(13) en el control remoto para cambiar entre los ángulos
disponibles de la imagen en pantalla.
Acercamiento
Presione los botones PRESET /\ y \/ (11, 12) en el control
remoto para agrandar y tener una vista panorámica de la
imagen de video usando las siguientes opciones: “ZOOM
1.5”, “ZOOM 2”, “ZOOM 3”, y “OFF”.
Discos Multi-Idioma (Sólo DVD)
Cómo cambiar el idioma de Audio
Si está mirando un disco grabado con idiomas múltiples,
presione el botón AUDIO (5) en el control remoto para elegir
un idioma.
Cómo cambiar el idioma de Subtítulos
Si está mirando un disco grabado con idiomas múltiples con
subtítulos, presione el botón SUBTITLE (9) en el control
remoto para elegir el idioma en el cual desea que aparezcan
los subtítulos.
NOTA: Durante la reproducción de VCD, presione el
botón AUDIO (5) en el control remoto para elegir entre
Canal Izquierdo, Canal Derecho, y Estéreo.
PBC (Control de Reproducción - Sólo
VCD)
Para VCDs con funcionalidad de reproducción, el control de
reproducción (PBC) provee controles adicionales para
reproducción de VCD.
Presione el botón MENU (1) en el control remoto para
cambiar la función PBC "On"/"Off". Cuando PBC está
activado, comienza la reproducción desde la pista 1 de la
lista de reproducción.
NOTA: Cuando PBC está activado, están disponible el
avance rápido, reproducción lenta, y pista previa/
siguiente. No están disponibles Repetición y selección
directa de pista.
Cuando PBC está activada, el seleccionar aleatorio,
búsqueda, o búsqueda de reproducción desactiva
automáticamente el PBC.
Información de Reproducción
Durante una reproducción de DVD y VCD, presione el botón
DISP (2) en el panel de control o en el control remoto (10)
para mostrar información de reproducción en la pantalla,
incluyendo el medio de reproducción y el tiempo actual de
reproducción.
Información de Reproducción de DVD
La siguiente información es mostrada en la parte superior de
la pantalla durante la reproducción de DVD:
• Título: 05/08 – “05/08" indica que el quinto de 8 títulos
en el DVD se está reproduciendo actualmente.
• Capítulo: 002/016 – “002/016" indica que el segundo de
16 títulos en el DVD se está reproduciendo
actualmente.
• 00:41:28 – “00:41:28” indica el tiempo de reproducción
del título actual.
La siguiente información es mostrada en la parte inferior de
la pantalla:
Chapter: _ _
1
2
3
4
5
6
7
8
9
0
Clear
Exit
Page 58

54
VM9423
• Frente: Fuente
• Trasero: Fuente
• Reloj
Información de Reproducción de VCD
La siguiente información es mostrada en la parte superior de
la pantalla durante la reproducción de VCD:
• VCD 2.0 – Formato del disco actual.
• Título: 06/18 – “06/ 18" indica que el sexto de 18 títulos
en el VCD se está reproduciendo actualmente.
• 00:02:18 – “00:02:18” indica el tiempo de reproducción
de la pista actual.
Información General de Disco
Tabla 6: Propiedades del Disco
SímboloPropiedades de Disco
de 12cm
Tiempo
Máximo de
Reproducci
ón
Un lado una capa (DVD-5)
Un lado capa doble (DVD-9)
Dos lados una capa (DVD-
10)
Dos lados capa doble (DVD-
18)
(Método
MPEG 2)
133 minutos
242 minutos
266 minutos
484 minutos
Un lado una capa (VCD)
(Método
MPEG 1)
74 minutos
Un lado una capa 74 minutos
Tabla 7: Símbolos de Disco
Símbolo Significado
Número de idiomas de voces grabadas. El
número dentro del icono indica el número
de idiomas en el disco (máximo de 8).
Número de idiomas de subtítulos disponible
en el disco (máximo de 32).
Números de ángulos provistos (máximo de
9).
Proporciones de Aspecto disponibles. “LB”
proviene de Letter Box y “PS” proviene de
Pan/Scan. En el ejemplo de la izquierda; el
video 16:9 puede convertirse a video Letter
Box.
Indica el código de región donde el disco
puede reproducirse.
• Región 1: EE.UU, Canadá, Islas del Pacífico
Este
• Región 2: Japón, Europa Occidental, Europa
del Norte, Egipto, Sud África, Oriente medio
• Región 3: Taiwán, Hong Kong, Corea del Sur,
Tailandia, Indonesia, Asia Sud-oriental
• Región 4: Australia, Nueva Zelanda, América
central y Sud América, Islas del Pacífico Sur/
Oceanía
• Región 5: Rusia, Mongolia, India, Asia
Central, Europa Oriental, Corea del Norte,
África del norte, Asia nor-occidental
• Región 6: China Continental
• ALL: Todas las regiones
Tabla 7: Símbolos de Disco
Símbolo Significado
Page 59

55
VM9423
OPERACIÓN DE AUDIO DE DVD/CD
Las instrucciones para control de TFT e insertar/expulsar son
las mismas para la operación de DVD y CD. Por favor vea la
sección Operación de Video DVD/Disco para información
sobre estos tópicos.
El VM9423 reproducirá música u otros archivos de audio de
los siguientes medios de disco:
• CD-DA
• CD-R/RW
•DVD
•DVD+R/RW
•DVD-R/RW
Luego de insertar un disco , el disco y el título de pista (si
está disponible), junto con el número de pista y el tiempo de
reproducción aparecen en la pantalla.
Interfaz de Usuario del Reproductor
de CD
Los indicadores en pantalla y las áreas táctiles clave para la
reproducción de CD se indican a continuación.
1. Pista actual y número total de pistas en el disco
2. Tiempo transcurrido de reproducción/duración de la
pista
3. Titulo de Disco
4. Títulos de pista disponible
5. Información de ID3
6. ||: Toque para reproducir/pausar reproducción de disco
7. : Toque para detener reproducción de disco
8. >>|: Toque para moverse a la pista siguiente
9. |<<: Toque para moverse a la pista previa.
10. />>: Toque para navegar la lista de reproducción/
toque para avance rápido
11. /<<: Toque para navegar la lista de reproducción/
toque para retroceso rápido
12. Toque para activar/desactivar el modo de reproducción
Aleatorio
13. Toque para activar/desactivar el modo de reproducción
Repetir
14. Toque para acceder el ingreso directo a pantalla.
15. Toque para ver el menú SETUP
16. Toque para ver el Spectrum Analyzer > Equalizer
“Analizador de Espectro > Ecualizador”
17. Toque para ver el MENÚ SOURCE y seleccione una
nueva fuente de reproducción
18. Toque la barra deslizante y flechas para ver la página
previa/siguiente de canciones
19. Tiempo Actual
Cómo Controlar la Reproducción
Cómo Detener la Reproducción
Toque el botón en pantalla o presione el botón (20) en
el control remoto para detener la reproducción del disco.
Para volver a la reproducción, toque el botón en pantalla o
presione el botón en el joystick.
Cómo Pausar la Reproducción
Toque el botón en pantalla o presione el botón en el
joystick para suspender o volver a la reproducción de disco.
Cómo moverse por las pistas
Presione el botón >>| (19) en el control remoto o en la
pantalla o use el botón > en el joystick para avanzar a la
próxima pista en el disco.
Presione el botón |<< (17) en el control remoto o en la
pantalla o use el botón < en el joystick para moverse a la
pista previa.
Repetir Reproducción
Toque el botón en la pantalla o presione el botón RPT (7)
en el control remoto o panel de control (19) para alternar el
modo repetición de acuerdo a lo siguiente:
• DVD: Repetir Capítulo, Repetir Título, Repetición
Desactivada
• CD-DA: Repetir Uno, Repetir Todo, Repetición
Desactivada
• CD-R/RW: Repetir Uno, Repetir Todo, Repetición
Desactivad
• DVD-R/RW: Repetir Uno, Repetir Todo, Repetición
Desactivada
Seleccionar exploración de Pista (sólo discos CD-DA)
Durante la reproducción de disco, presione el botón SCN en
el control remoto (34) o el botón INT (20) en el panel de
control para reproducir los primeros 10 segundos de cada
pista. Cuando se alcanza la pista deseada, presione
nuevamente el botón SCN para cancelar la función y
reproducir la pista seleccionada.
Seleccionar Reproducción Aleatoria
Mientras esta detenida la reproducción de disco, presione el
botón RDM (33) en el control remoto para reproducir las
pistas en el disco en forma aleatoria. Toque el botón RDM
nuevamente para cancelar el modo de Reproducción
Aleatorio.
NOTA: CD-R y CD-RW no se reproducirán salvo que la
sesión de grabación esté finalizada.
Avance Rápido
Toque el botón en pantalla o presione el botón /\ en el
joystick para avance rápido. Mantenga presionando y
liberando el botón para aumentar la velocidad de “2X” a “4X”,
“8X”, y “20X”.
Retroceso rápido
Toque el botón en pantalla o presione el botón /\ en el
joystick para retroceso rápido. Mantenga presionando y
liberando el botón para aumentar la velocidad de “2X” a “4X”,
“8X”, y “20X”.
15
1
7
2
12
5
16
13
3
17
DISC
CD 1/10 01:23 04:31
01:02
1 Track 01
2 Track 02
3 Track 03
4 Track 04
5 Track 05
6 Track 06
14
4
9
11
10
8
6
18
Audio CD
19
E
Q
Page 60

56
VM9423
Ingreso Directo de Pista
Para seleccionar una pista directamente, toque el botón
en el control de pantalla para mostrar el menú de
ingreso directo.
Ingrese el número de pista deseado usando el teclado
numérico en pantalla y luego presione el botón Intro. Para
salir de la pantalla sin cambiar de estación, toque Exit
(SALIR). Para limpiar su ingreso y comenzar de nuevo,
toque Clear (Limpiar).
TRACK:__/##
1
2
3
4
5
6
7
8
9
0
Clear
Exit
Page 61

57
VM9423
CÓMO REPRODUCIR ARCHIVOS MP3/WMA
Las instrucciones para control de TFT e insertar/expulsar son
las mismas para la operación de DVD y MP3. Por favor vea
la sección Operación de Video DVD/Disco para información
sobre estos tópicos.
NOTA: Cuando graba archivos MP3 / WMA dentro
de un disco DVD, use la opción de grabación 2X o
4X, si está disponible. Esta baja velocidad de
grabación ayudará a eliminar errores de buffer y
aumentará la capacidad de legibilidad del disco.
También, use carpetas cuando graba un gran
número de canciones / archivos a un disco para
una fácil navegación de la música. Seleccio ne la
opción "Disc at Once" (Todo el Disco a la Vez) y
cierre su disco.
Requisitos de Medio y Archivos MP3/
WMA
Este reproductor le permite reproducir archivos MP3 y WMA
grabados en CD-R/RWs, DVD+R/RWs, y DVD-R/RWs. Para
discos CD-RW, por favor asegúrese que se le da formato
usando el método completo y no el método rápido para evitar
operación ilegal del disco.
Hasta 1500 canciones/archivos pueden grabarse dentro de
un disco para una mezcla de música de MEGA DVD. No
exceda este número de canciones/archivos dado que se
podrían producir problemas de legibilidad.
Compatibilidad de Formato MP3
Los formatos de nomenclatura de archivo listados a
continuación son compatibles con esta unidad:
• Nombre de archivo - ISO 9660: 12 caracteres,
extensión de archivo: 3 caracteres
• Nombre de archivo - ISO 9660: 31 caracteres,
extensión de archivo: 3 caracteres
• Joliet – 64 caracteres
Si el nombre de archivo o carpeta no cumple con las normas
de sistema de archivos ISO 9660, podría no ser mostrado o
reproducido correctamente. Use las siguientes preferencias
cuando comprime datos de audio para su disco MP3:
• Tasa de Transferencia de Bit: 128kbps
• Frecuencia de la Muestra: 48kHz
NOTA: Cuando graba MP3 hasta la máxima
capacidad del disco, desactive escritura
adicional. Para grabar un disco vacío hasta la
capacidad máxima del disco, use la opción "Disc
at once" (Todo el Disco a la Vez).
Orden de Reproducción MP3
Cuando se seleccionan para reproducción los archivos y
carpetas (Búsqueda de Carpeta, Búsqueda de Archivo o
Selección de Carpeta) son accedidos en el orden que fueron
grabados por el grabador de CD. Como resultado, el orden
en cual se espera que sean reproducidos podría no coincidir
con el orden en que son realmente reproducidos. Podría fijar
el orden en el cual los archivos MP3/WMA serán
reproducidos grabándolos en el medio de forma tal de
escribir los nombres de archivos en el CD comenzando con
los números de secuencia de reproducción como "01" a "99".
Por ejemplo, un medio con la siguiente organización de
carpeta/archivo está sujeto a Búsqueda de Carpeta,
Búsqueda de Archivo o Selección de Carpeta, como se
muestra a continuación.
El reproductor VM9423 sólo reconocerá tres niveles de
carpeta y no muestra carpetas que contienen sólo otras
carpetas. En el ejemplo de arriba, la unidad mostrará las
carpetas 3, 4, 6, y 8, pero no 2 y 7 dado que no contienen
ninguna pista directamente. La carpeta 5 no es reconocida
para nada dado que está en el cuarto nivel.
Page 62

58
VM9423
Cómo Cargar una Tarjeta SD
NOTA: El VM9423 soportará Tarjetas SD de hasta 8GB.
Las tarjetas SD mayores a estas (Tarjetas SDHC) no
serán reconocidas.
Para insertar un tarjeta SD, primero debe presionar el botón
/EJECT (EXPULSAR) en el panel de control (5) o el
control remoto (23) para revelar la ranura de tarjeta SD (14)
Inserte la tarjeta SD dentro de la ranura de tarjeta, la unidad
leerá los archivos de audio/video en la tarjeta
automáticamente.
Para quitar la tarjeta, primero presione el botón SRC (6) para
cambiar a otro modo y detener la reproducción SD. Presione
y suelte para sacar la tarjeta. Agarre la tarjeta SD y quítela en
forma recta. La mayoría de las tarjetas tienen un fino
descanso que ayuda a removerla.
Cómo cargar un Dispositivo USB
NOTA: El puerto USB reconocerá la mayoría de los
dispositivos de memoria flash USB, así como discos
duros portátiles con archivos de audio / video. El disco
duro debe estar formateado en FAT32. El sistema
operativo de la unidad central no soporta estructuras de
archivo NTFS.
1. Ubique un conector USB localizado en el MediaLink
4
.
2. Inserte el dispositivo USB en el conector USB. La
unidad leerá automáticamente los archivos de audio/
video en el dispositivo USB.
Para quitar el dispositivo USB, presione el botón (6) SRC
para cambiar a otro modo y luego de quitar el dispositivo
USB del Conector USB.
Interfaz de usuario MP3
Los indicadores en pantalla y las áreas táctiles clave para la
reproducción de MP3 se indican a continuación.
1. Pista actual y número total de pistas en la raíz del disco
2. Tiempo transcurrido de reproducción, duración de la
pista
3. Tiempo actual
4. Títulos de Pistas
5. Información de ID3
6. || : Toque para reproducir/pausar reproducción de disco
7. : Toque para detener reproducción de disco
8. >>|: Toque para moverse a la pista siguiente
9. |<<: Toque para moverse a la pista previa.
10. />>: Toque para navegar la lista de reproducción/
toque para avance rápido
11. /<<: Toque para navegar la lista de reproducción/
toque para retroceso rápido
12. DIR -: Toque para ver la carpeta previa
13. DIR +: Toque para ver la carpeta siguiente
14. Toque para acceder al ingreso directo a pantalla.
15. Toque para ver el menú SETUP
16. Toque para ver el Spectrum Analyzer > Equalizer
“Analizador de Espectro > Ecualizador”
17. Toque para ver el MENÚ SOURCE y seleccione una
nueva fuente de reproducción
18. Nombre de Carpeta
19. 1/2 o 2/2: Toque el botón de esta página para ver la
segunda página de botones en pantalla.
20. Toque la barra deslizante y flechas para ver la página
previa/siguiente de canciones
21. Toque para activar/desactivar el modo de reproducción
Repetir
22. Toque para acceder al menú Música
23. Toque para acceder al menú Vídeo
24. Toque para acceder al menú Photo
25. Navegar todos los archivos
Cómo controlar la Reproducción de
MP3/WMA
Cómo Reproducir Archivos MP3/WMA
Después de insertar un disco MP3/WMA, los archivos se
reproducirán en secuencia del directorio "Raíz".
NOTA: Cuando graba archivos MP3 / WMA dentro
de un disco DVD, use la opción de grabación 2X o
4X, si está disponible. Esta baja velocidad de
grabación ayudará a eliminar errores de buffer y
aumentará la capacidad de legibilidad del disco.
También, use carpetas cuando graba un gran
número de canciones / archivos a un disco para
una fácil navegación de la música. Seleccione la
opción "Disc at Once" (Todo el Disco a la Vez) y
cierre su disco.
Cómo Detener la Reproducción
Toque el botón en pantalla o presione el botón /BAND
(20) en el control remoto para detener la reproducción del
disco.
Para volver a la reproducción, toque el botón en la
pantalla, presione el botón del joystick (13) en el panel
frontal, o presione el botón >/|| (18) en el control remoto.
EJECT
LABELSIDE UP
VIDEO LEFT RIGHT
3.5mm- Audio
MediaLink
Conector USB Tipo A
1
2
5
16
3
17
DISC
MP3 4/84 01:56 00:00:23
01:02 AM
1 Cherry Poppin Da
2 Chris Isaak - Baby
3 Crazy Town - Butt
4 Phish - Birds Of A
5 Phish - Bouncin' R
6 Phish - Freebird (L
4
(Root)
18
1/2
15
7
14
9
11
10
8
6
19 20
20
E
Q
2/2
13
12
DIR -
DIR +
ALL
24
25
22
23
Page 63

59
VM9423
Cómo Pausar la Reproducción
Toque el botón en la pantalla, presione el botón del
joystick (13) en el panel frontal, o presione el botón /|| (18)
on el control remoto para suspender o reanudar la
reproducción del disco.
Cómo moverse por las pistas
Presione el botón >>| (19) en el control remoto o en la
pantalla o use el botón > en el joystick (14) para avanzar a la
próxima pista en el disco.
Presione el botón |<< (17) en el control remoto o en la
pantalla o use el botón < en el joystick (10) para moverse a la
pista previa.
Repetir Reproducción
Toque el botón en pantalla, presione el botón RPT (19)
en el panel de control o presione el botón RPT (7) en el
control remoto para alternar el modo de acuerdo a lo
siguiente: Repetir una, Repetir Carpeta, Repetición
desactivada.
Seleccionar Reproducción Aleatoria
Presione el botón RDM (33) en el control remoto para
reproducir los archivos en el disco en forma aleatoria.
Presione RDM nuevamente para cancelar el modo de
Reproducción Aleatorio.
NOTA: CD-R y CD-RW no se reproducirán salvo que la
sesión de grabación esté finalizada.
Page 64

60
VM9423
OPERACIÓN DE iPod
Interfaz de Usuario iPod
Los indicadores en pantalla y las áreas táctiles clave para la
reproducción del iPod se indican a continuación.
1. Tiempo transcurrido de reproducción
2. Pista actual y número total de archivos
3. Tiempo Actual
4. Información de títulos/menú de Medio
5. Información de ID3
6. Intro
7. Toque para acceder fotos
8. >>|: Toque para moverse a la pista siguiente
9. |<<: Toque para moverse a la pista previa.
10. Toque para acceder al menú iPod
11. >|| : Toque para reproducir/pausar reproducción de
disco
12. Toque para acceder archivos de música
13. Toque para acceder archivos de video
14. Toque para acceder a la pantalla SETUP
15. Toque para ver el Spectrum Analyzer > Equalizer
“Analizador de Espectro > Ecualizador”
16. Toque para ver el MENÚ SOURCE y seleccione una
nueva fuente de reproducción
17. Título de Canción
18. Toque para ver el menú de ingreso directo.
19. Toque la barra deslizante y flechas para ver la página
previa/siguiente de canciones
Cómo controlar su iPod
La unidad cambiará automáticamente a modo iPod cuando
un iPod es enchufado al MediaLink
4
. Para volver al menú
iPod desde cualquier otro menú de fuente, presione el botón
(6) SRC en el panel frontal o el control remoto (8) hasta que
aparezca el menú iPod en la pantalla.
NOTA: Asegúrese que su iPod tiene instalado el último
firmware de Apple para evitar problemas de
conectividad.
Los siguientes iconos de la pantalla táctil y botones del
control remoto se usan para acceder a menús del iPod:
Use la pantalla táctil, el joystick, o las teclas direccionales en
el control remoto para navegar los menús de iPod.
Reproducción de Música del iPod
Para acceder archivos de música iPod, toque el botón en
pantalla o presione el botón AUDIO (5) en el control remoto.
• Toque el botón > || en la pantalla para reproducir/
pausar.
• Toque >>| en pantalla, presione el botón >>| (19) en el
control remoto, o presione el botón > en el joystick (17)
para mover al siguiente ítem en el menú.
• Toque |<< en pantalla, presione el botón |<< (17) en el
control remoto, o presione el botón < en el joystick (16)
para moverse al ítem anterior en el menú.
• Use la pantalla táctil o presione el botón >/|| (18) en el
control remoto o el botón de joystick INTRO (20) en el
panel de control para seleccionar la opción de menú
resaltada.
• Presione el botón >> (14) en el control remoto o el botón
/\ (18) en el joystick, o toque el botón MENU en pantalla
para volver al menú previo.
Avance Rápido/Retroceso Rápido
Presione y mantenga los botones |<< o >>| en el control
remoto (17, 19) por 1 segundo y continúe manteniendo
pulsado para avance rápido o retroceso rápido. Suelte para
volver a la reproducción normal.
Reproducción de Fotos
Mientras que las fotos y videos iPod pueden ser vistos en la
pantalla VM9423 debe usar el iPod para controlar las
opciones de reproducción de fotos y videos.
Toque el ícono en pantalla o presione el botón SUB-TITLE
(9) en el control remoto para acceder el modo iPod FOTO. El
VM9423 liberará el control de nuevo al iPod de forma tal que
puede seleccionar el medio de video a ser mostrado en el
monitor TFT. Para salir del modo FOTO, toque la pantalla.
Reproducción de Video
Mientras que los videos iPod pueden ser vistos en la pantalla
VM9423 debe usar el iPod para controlar las opciones de
reproducción de videos.
Presione el botón
en pantalla o presione el botón ANGLE
(13) en el control remoto para acceder al modo iPod VIDEO.
El VM9423 liberará el control de nuevo al iPod de forma tal
que puede seleccionar el medio de video a ser mostrado en
el monitor TFT. Para salir del modo de VIDEO, toque la
pantalla, pulse el botón >> (14) en el control remoto, o pulse
el botón MENU en el iPod.
NOTA: Para transmitir el video desde su iPod a la
pantalla del VM9423, debe fijar las siguientes opciones a
través del menú preferencias de video iPod: TV Out (Sal.
de TV) = On, TV Signal (Señal de TV) = NTSC, y
Widescreen (Pantalla Ancha)= On.
NOTA: Después de desconectar su iPod, el VM9423
siempre retornará al último modo accedido cuando el
iPod es conectado nuevamente a la unidad.
14
1
7
2
13
5
15
12
3
16
iPod
1:08 2/124
01:02 AM
0001 A Rush Of Blood to
0002 40
0003 4th of July
0004 A Little Less Conver
0005 A Message
0006 A Sort of Homecomi
4
9
11
10
8
6
17
A Rush of Blood to the Head
MENU
Artist: Coldplay
Enter
18
E
Q
19
Menú Pantalla Táctil Control Remoto
Música AUDIO
Fotos SUB-TITLE
Videos ANGLE
Page 65

61
VM9423
Ingreso Directo de Pista/Archivo
Para seleccionar directamente un pista/archivo, toque el
botón en la pantalla de control para mostrar el menú
de ingreso directo.
Ingrese la pista/archivo deseada usando el teclado numérico
en pantalla. Presione el botón Intro para sintonizar la
estación seleccionada. Para salir de la pantalla sin cambiar
de estación, toque Exit (SALIR). Para limpiar su ingreso y
comenzar de nuevo, toque Clear (Limpiar).
También puede usar el teclado numérico (29) en el control
remoto para acceder archivos directamente.
TRACK:__/##
1
2
3
4
5
6
7
8
9
0
Clear
Exit
Page 66

62
VM9423
OPERACIÓN DE BLUETOOTH
NOTA: La operación de Bluetooth requiere el accesorio
opcional BTM10.
Acerca de Bluetooth
Bluetooth es una tecnología de conectividad de radio
inalámbrica de corto alcance que está desarrollada como un
reemplazo de cables para teléfonos móviles, PCs de mano y
otros dispositivos. Bluetooth funciona en el rango de
frecuencia de 2.4 GHz y transmite voz y datos hasta 1
megabits por segundo. Bluetooth fue presentado por un
grupo especial de interés (SIG) compuesto por Ericsson Inc.,
Intel Corp., Nokia Corp., Toshiba e IBM en 1998, y
actualmente es desarrollado por cerca de 2,000 compañías
en el mundo. La palabra, marca y logos Bluetooth son
propiedad de Bluetooth SIG, Inc. y cualquier uso de tales
marcas por Audiovox Corporation es bajo licencia. Otras
marcas y nombres de marcas son aquellos de sus
respectivos propietarios.
NOTA: La distancia de línea de señal entre esta unidad y
su teléfono celular debe ser de 8 metros o menos para
enviar y recibir voz y datos vía la tecnología inalámbrica
Bluetooth. Sin embargo, la distancia de transmisión
podría acortarse más que la distancia estimada,
dependiendo del ambiente en uso.
Antes de intentar usar las funciones Bluetooth en el VM9423,
por favor asegúrese que su teléfono móvil soporta funciones
Bluetooth (perfiles de auriculares o manos libres o ambos).
Siga las siguientes guías para una operación satisfactoria.
• Antes de usar las funciones Bluetooth, debe aparear su
teléfono móvil con la unidad central VM9423 (ver “Cómo
aparear el Sistema Bluetooth con su Teléfono Móvil y la
Unidad Central”). Para asegurar la mejor recepción para
aparear y reconexión, por favor asegúrese que la
batería de su teléfono está completamente cargada
antes de comenzar.
• Trate de realizar el apareado a los pocos minutos de
haber encendido su teléfono.
• Una vez que la unidad se ha apareado con el teléfono,
el número de modelo de la unidad, “VM9423”, se
mostrará en el teléfono móvil.
• Para lograr el mejor rendimiento, siempre mantenga el
teléfono móvil dentro de los 3 metros de la unidad
central.
• Siempre mantenga un paso despejado entre el teléfono
móvil y la unidad central. Nunca coloque un objeto
metálico o cualquier otro obstáculo entre el teléfono
móvil y la unidad central.
• Algunos teléfonos móviles (como el Sony Ericsson)
podrían tener una opción de "Modo de Ahorro de
Energía". POR FAVOR NO use el modo de ahorro de
energía con el VM9423.
• Antes de aceptar o hacer un llamado, asegúrese que la
función “Bluetooth” de su teléfono móvil está activada.
• Para asegurar la mejor calidad/rendimiento de
conversación, permanezca a menos de un metro de la
unidad principal cuando habla.
• Para “desconectar” el teléfono móvil de la unidad
central, desactive la conectividad Bluetooth del teléfono
móvil.
• La búsqueda directa en la Libreta de Teléfonos a
través de la unidad central sólo está disponible si el
teléfono móvil soporta Descarga de Libreta de
Teléfonos. Si la función no está soportada, la unidad
central mostrará “Phone book not provided by this
phone” - "Libreta de teléfonos no provista para este
teléfono" cuando se hace un intento de descargar una
libreta de teléfonos.
Interfaz de Usuario Bluetooth
Los indicadores en pantalla y las áreas táctiles clave para la
operación de Bluetooth se indican a continuación.
1. Estado de Conexión Actual/dispositivo conectado
2. Tiempo Actual
3. Menú de Bluetooth
4. Estado Actual de Operación
5. Alterna entre menú de Música/Teléfono
6. Transferir llamada activa de nuevo al microteléfono
7. Aparear su teléfono Bluetooth (uso por primera vez)
8. Conectar/desconectar dispositivos Bluetooth (teléfono,
PDA,reproductor personal de música, etc.) con función
manos libres
9. Salir de pantalla de listado de llamados
10. Silenciar/activar el micrófono (ubicado en el lado
izquierdo de la radio) durante una llamada activa
11. Responder llamadas entrantes/hacer llamadas
12. Rechazar llamadas entrantes/finalizar llamada/salir de
proceso de apareado/salir de lectura de libreta de
teléfonos o lista de llamadas
13. Toque para ver el menú SETUP
14. Toque para ver el Spectrum Analyzer > Equalizer
“Analizador de Espectro > Ecualizador”
15. Toque para ver el MENÚ SOURCE y seleccione una
nueva fuente de reproducción
16. Indica conexión/operación actual (--> indica llamada
entrante, <-- indica alerta de discado)
17. Toque para acceder el ingreso directo a pantalla.
18. : Toque para detener reproducción
19. Toque la barra deslizante y flechas para ver la página
previa/siguiente de canciones
20. Alterna entre menú/modo de Música/Teléfono
21. Reproduce/Pausa archivo seleccionado
22. |<<: Toque para moverse al archivo previo
23. >>|: Toque para moverse al archivo siguiente
1
4
14
2
15
BT
Disconnected
01:02 AM
1 Missed Calls
2 Received Calls
3 Dialed Calls
4 Phone Book
3
MENU
Menu List
19
24
E
Q
MENU
17
8
7
10
9
1156
12
13
8
23
7
MENU
20
21
22
18
INTERFAZ DE TELÉFONO INTERFAZ DE
MÚSICA
Page 67

63
VM9423
24. Indicador de fuerza de señal
Perfil de Manos Libres (HFP)
Para usar un teléfono en forma inalámbrica con esta unidad,
es necesario primero establecer una conexión usando
tecnología inalámbrica Bluetooth. La conexión normalmente
se establece usando HFP (Perfil de Manos Libres), el cual le
brinda control de funciones completas disponibles en el
teléfono fuente. Sin embargo, dependiendo de su teléfono, la
conexión puede hacerse usando HSP (Perfil de Auricular), lo
que hace a algunas funciones no disponibles. Esta es una
limitación de su teléfono, no del VM9423.
Dado que hay una gran cantidad de implementaciones de
teléfono móvil Bluetooth disponibles en el mercado, las
operaciones con su teléfono móvil Bluetooth usando esta
unidad varía ampliamente.
Por favor refiérase al manual de instrucciones que viene con
su teléfono móvil Bluetooth junto con este manual mientras
opera su teléfono con esta unidad.
Cómo aparear el Sistema Bluetooth
con su Teléfono Móvil y la Unidad
Central
1. Presione el botón (8) para iniciar el proceso de
apareamiento. Mantenga el teléfono móvil a menos de 2
metros de la unidad central cuando aparea. (Para
terminar el proceso de apareado, presione el botón
nuevamente.)
2. Seleccione la opción de configuración de Bluetooth en
el teléfono móvil ha ser apareado (por favor refiérase al
manual de instrucciones del teléfono para conocer
como ingresar a la configuración Bluetooth, activar/
desactivar Bluetooth, y realizar el apareado).
NOTA: Algunos teléfonos requieren “clave de paso” o
código de apareado para conectar. Si su teléfono
requiere la clave de paso o código de apareo, deberá
ingresar el número en el campo Código de Apareado
bajo el menú de CONFIGURACIÓN Bluetooth. El código
de apareamiento es “0000” para muchos teléfonos. El
código predeterminado para el VM9423 es “1234”. Ver
“Funciones de Sub-menú de Bluetooth” en página 45
para instrucciones para ingresar el código de apareado.
3. Seleccione “VM9423” de la lista de apareado en el
teléfono móvil.
• Si el apareado es satisfactorio, el TFT mostrará el
número o nombre de modelo de teléfono móvil
apareado (como se especifica en el menú de
configuración Bluetooth del teléfono).
• Si el apareado falla, se muestra "Phone Pairing
Fail" (falla de apareado de teléfono) en la parte
inferior de la pantalla:
Cómo Reconectar
Una vez que el dispositivo Bluetooth se ha apareado, puede
tocar el botón conectar para reconectar.
NOTA: Sólo puede conectar un teléfono usando los
botones en pantalla de Interfaz de Teléfono.
Cada vez que se presiona el botón , la unidad central
reconectará automáticamente con el teléfono móvil una vez
(sólo si el teléfono móvil fue apareado previamente con la
unidad central).
Cómo administrar Llamadas Entrantes
Cuando está conectado a un teléfono Bluetooth, la unidad
silenciará la salida de audio, pausará la reproducción de CD,
y cambiará a la pantalla Bluetooth cuando es recibida la
llamada. El número telefónico entrante aparecerá en la parte
superior de la pantalla. Si la pantalla está cerrada, el número
se desplazará por el LCD. Si la llamada entrante no tiene ID
de llamada, el TFT o LCD mostrará “Restricted Number”.
Cómo responder a una Llamada Entrante
Para responder el llamado, toque el botón .
Para una mejor recepción, hable fuerte y claramente.
Para finalizar la conversación, presione el botón . La
pantalla mostrará la duración de llamada por 3 segundos, y
luego vuelve al modo previo.
Cómo rechazar a una Llamada Entrante
Toque el botón para rechazar una llamada entrante. El
llamado revertirá a su teléfono y puede ser respondido
directamente o dejado para su correo de voz.
Control de Volumen
Para aumentar o disminuir el nivel de volumen, gire el control
AUDIO (5) en el panel frontal o presione los botones VOL+/
VOL- (15, 16) en el control remoto.
Silenciar Micrófono
Para silenciar el micrófono, toque el botón . Toque
nuevamente para volver a la funcionalidad de micrófono.
Cómo Hacer una Llamada Saliente
NOTA: Presione el botón de la pantalla principal
Bluetooth para marcar automáticamente el último
llamado recibido.
1. Toque el botón para abrir la pantalla de discado
directo.
2. Use los botones 0-9, *, y # para ingresar el número
telefónico.
• Toque el botón CLEAR (LIMPIAR) para borrar el
último dígito.
• Toque el botón para borrar todo el número y
comenzar de nuevo.
3. Después de ingresar el número de teléfono, presione el
botón para discar el llamado. La pantalla de discado
directo se cerrará una vez que su llamado se conecte.
Para finalizar la conversación, presione el botón .
Transferencia de Llamada
Mientras habla, para transferir audio desde la unidad central
de nuevo al teléfono móvil, toque el botón (7). El TFT
mostrará “Transfer” (transferir). Sólo puede transferir
después de haber respondido.
Lista de Menú
La lista de menú aparece en el lado izquierdo de la pantalla y
puede accederse desde otros modos tocando el botón
MENÚ en el lado derecho de la pantalla.
Exit
Clear
1
23
4
5 6
7
8
9
0
#
*
Page 68

64
VM9423
NOTA: No todos los teléfonos permiten acceso a
llamadas perdidas, recibidas o realizadas y algunos no
permitirán descargar la libreta de direcciones de su
teléfono.
Llamadas Perdidas
La lista de llamadas perdidas obtiene la lista de números
Perdidos de su teléfono. El último número perdido es el
primer número de la lista. Toque la opción de menú de
Llamados Perdidos para ver la lista. Para hacer un llamado
desde la lista de Llamados Perdidos, toque el número y
luego toque el botón . El TFT mostrará “Cannot get
missed record” (no puede obtenerse el registro perdido)
cuando esta función no está disponible.
Llamadas Realizadas
La lista de llamadas realizadas recupera la lista de números
llamados desde su teléfono. El último número marcado es el
primer número de la lista. Toque la opción de menú de
Llamados Realizados para ver la lista. Para hacer un llamado
desde la lista de Llamados Realizados, toque el número y
luego toque el botón . El TFT mostrará “Cannot get dialed
record” (no puede obtenerse el registro marcado) cuando
esta función no está disponible.
Llamadas Recibidas
Use la lista de Llamadas Recibidas para ver los 10 últimos
números almacenados en su teléfono. Para acceder a la lista
de Recibidas, toque la opción de menú Llamadas Recibidas.
El último número recibido es el primer número de la lista.
Para hacer un llamado desde la lista de Llamadas Recibidas,
toque el número y luego toque el botón . El TFT mostrará
“Cannot get received record” (no puede obtenerse el registro
recibido) cuando esta función no está disponible.
Libreta de Teléfonos
1. Toque la opción Phone Book (libreta de teléfonos) para
mostrar la libreta de teléfonos almacenada en su
teléfono móvil, si es compatible. La pantalla mostrará
“Ready...” (Listo...) mientras se está descargando la
libreta de teléfonos.
2. Una vez que se completa la descarga, puede usar los
botones flecha y la barra de desplazamiento en el lado
derecho de la ventana para navegar la lista. Dado que
la unidad descarga una página de entradas por vez,
podría haber una pequeña demora mientras los
números de la siguiente página se descargan.
3. Toque el número resaltado que desea marcar y luego
toque el botón .
NOTA: Algunos teléfonos móviles no soportan descarga
de Libreta de Teléfonos a través de Bluetooth. Esta es
una limitación de su teléfono, no del VM9423.
Configuración Bluetooth
Respuesta Automática
Puede elegir hacer que el VM9423 responda
automáticamente llamadas entrantes a su teléfono Bluetooth
apareado. Para activar "Auto answer" (responder
automáticamente):
1. Toque el botón para ver el menú SETUP
(configuración).
2. Seleccione el Sub-menú "Bluetooth".
3. Toque el área de la derecha de “Auto answer” para
seleccionar “On”.
Conexión Automática
La opción de Conexión Automática le permitirá al VM9423
conectar automáticamente a su Bluetooth previamente
apareado cuando está en rango. Cuando la opción Conexión
se fija en “Manual”, debe presionar el botón para reestablecer conexión con su teléfono. Para activar "Auto
connect" (conectar automáticamente):
1. Toque el botón para ver el menú SETUP
(configuración).
2. Seleccione el Sub-menú "Bluetooth".
3. Toque el área de la derecha de “Conectar” para
seleccionar “Auto”.
Perfil Avanzado de Distribución de
Audio (A2DP)
El VM9423 le permite reproducir archivos de audio de su
teléfono, PDA o reproductor personal de música usando la
conexión Bluetooth.
Antes de usar un reproductor de audio, podría ser necesario
ingresar un código PIN en la unidad. Ingrese el código PIN
referente a “Funciones de Sub-menú de Bluetooth” en
página 45.
NOTA: Por favor salga del modo A2DP antes de intentar
hacer un llamado telefónico, dado que podrían
producirse resultados inesperados dependiendo del
modelo de su teléfono móvil.
El VM9423 puede controlar el reproductor de audio Bluetooth
vía Advanced Audio Distribution Profile (A2DP) o Audio/
Video Remote Control Profile (AVRCP). Los reproductores
de audio Bluetooth (o adaptadores Bluetooth) compatibles
con estos perfiles pueden conectarse a esta unidad. La
funcionalidad varía dependiendo del perfil usado
• A2DP: Reproduzca música en forma continua desde su
reproductor de audio Bluetooth compatible y escuche la
música a través de su VM9423. Reproducción/pausa,
selección de canción, etc. no son posibles.
• AVRCP: Reproduzca, pause, seleccione canciones, etc.
mientras pasa audio continuo desde su reproductor de
audio Bluetooth compatible al VM9423.
NOTA: Información de canción (por ejemplo tiempo
transcurrido de reproducción, título de canción, índice
de canción, etc.) no pueden ser mostrados en esta
unidad.
Dado que hay una gran número de reproductores de audio
Bluetooth disponibles en el mercado, las operaciones con su
reproductor de audio Bluetooth usando esta unidad varía
ampliamente.
Por favor refiérase al manual de instrucciones que viene con
su reproductor de audio Bluetooth así como este manual
mientras opera su reproductor con el VM9423.
Refiérase a las instrucciones INTERFAZ DE MÚSICA bajo
“Interfaz de Usuario Bluetooth” en página 62 para
información relativa a indicadores en pantalla y las funciones
de pantalla táctil que podrían estar disponibles durante la
reproducción de audio.
Page 69

65
VM9423
RESOLUCIÓN DE PROBLEMAS
Tabla 8: Resolución de Problemas
Problema Causa Acción Correctiva
GENERAL
La unidad no enciende Fusible de Radio quemado Instale un nuevo fusible con la especificación correcta
Fusible de batería de automóvil quemado Instale un nuevo fusible con la especificación correcta
Operación Ilegal Presione el botón RESET ubicado en la esquina inferior derecha del panel frontal
Control Remoto no funciona Batería agotada Reemplace la batería con una nueva
Batería instalada incorrectamente Quite la batería e instálela correctamente
Sin/baja salida de audio Conexión de salida de audio inadecuada Verifique cableado y corrija
Volumen fijado demasiado bajo Aumente el nivel de volumen
Conexión de "MUTE" inadecuada Revise el diagrama de cableado y verifique la conexión de “MUTE”
Parlantes dañados Reemplace parlantes
Balance de volumen fuertemente desviado Ajuste el balance del canal a la posición central
Cableado de parlantes en contacto con partes
metálicas del automóvil
Aísle todas las conexiones de cableado de parlantes
Mala calidad de sonido o distorsión Disco pirata en uso Use copia original
Especificación de potencia de los parlantes no
compatible con la unidad
Conecte parlantes adecuados
Parlante en corto circuito Verifique contacto de parlantes
Falla de Silenciar-Teléfono el cable "MUTE" está a tierra Verifique que la conexión de "MUTE" no está a tierra y está correctamente aislada
La unidad se restaura a si misma cuando se apaga
el motor.
Conexión incorrecta entre ACC y cable positivo de
batería
Verifique cableado y corrija
PANTALLA TFT
Sin imagen Conexión incorrecta al cable de freno de
estacionamiento
Verifique cableado y corrija
El interruptor de Estacionamiento está conectado pero
el Freno de Estacionamiento no está aplicado
Detenga el vehículo en lugar seguro y aplique el freno de estacionamiento
Imagen intermitente o interferencia aparece en la
pantalla
el DVD no es compatible con las preferencias actuales
de Video
Cambie la configuración para acomodar el disco
Conexiones de señal de video inadecuadas Verifique cableado y corrija
Imagen alargada o inadecuada muestra de
relación alto/ancho
Inadecuada configuración de proporción de aspecto Use la configuración de proporción de aspecto correcta
El monitor se detiene en una posición incorrecta El camino del movimiento está bloqueado Presione la tecla OPEN para restaurar el movimiento del monitor
SINTONIZADOR
Búsqueda de estación débil Antena del automóvil no está completamente extendida Conecte el cable de control de antena de automóvil adecuadamente
Antena del automóvil no conectada adecuadamente Conecte el cable de control de antena de automóvil adecuadamente
La transmisión de HD Radio está demasiado lejos Cambie al modo de sintonía Analógica
CD/DVD
No se puede insertar disco Ya hay un disco en la unidad Expulse el disco actual e inserte uno nuevo
Page 70

66
VM9423
Mensajes de Error
No reproduce el disco Disco doblado o roto Use discos en buenas condiciones
Disco sucio o mojado Limpie el disco con un paño suave
Lector láser sucio Limpie el lector láser con un disco de limpieza
Se está usando un disco incompatible Use disco compatible
Calificación del disco excede el límite de calificación de
Bloqueo Parental
Cambie la configuración de Bloqueo Parental a una restricción más baja
Código de región no es compatible con la unidad Use disco con el adecuado código de región
El disco está insertado con la cara superior hacia abajo Inserte el disco con la etiqueta hacia arriba
Imagen borrosa, distorsionada, u oscura Disco copiado ilegalmente Use copia original
PBC no puede usarse durante la reproducción de
VCD
PBC no está disponible en el disco
Sin repetición o búsqueda durante la reproducción
de VCD
PBC está activado Desactive el PBC
MP3
Se produce una interrupción durante la
reproducción
Disco sucio o roto Limpie o reemplace el disco
Archivo está dañado/mal grabado Vuelva a crear el disco con archivos buenos
Mensaje de reproducción mostrado
incorrectamente
El mensaje es más largo de lo que el LCD puede
mostrar
RADIO SAT
Sin Sonido Conexiones incorrectas de cableado Verifique los cables RCA
Fuente satelital no disponible Conexiones incorrectas de cableado Verifique el cable de datos del satélite
IPOD
Fuente iPod no disponible Conexiones incorrectas de cableado
Verifique cables jLink
3
y MediaLink4 cables
No se pueden ver videos o fotos en la pantalla TFT Preferencia de Vídeo del iPod incorrectas Cambiar las preferencias de Vídeo del iPod a TV Out = On
Tabla 8: Resolución de Problemas
Problema Causa Acción Correctiva
Tabla 9: Mensajes de Error
Mensaje Mostrado Causa Acción Correctiva
Cargando Se está leyendo el disco
Sin Disco Disco sucio Limpie el disco con un paño suave
El disco está insertado con la cara superior hacia abajo Inserte el disco con la etiqueta hacia arriba
Sin disco en el compartimiento de carga Inserte Disco
Disco Malo Disco sucio Limpie el disco con un paño suave
El disco está insertado con la cara superior hacia abajo Inserte el disco con la etiqueta hacia arriba
Disco Desconocido Formato del disco no es compatible con la unidad
Error de Región DVD no es compatible con el código de región de la
unidad
Error Operación Ilegal del mecanismo Presione la tecla EJECT por 5 segundos para restaurar el mecanismo de carga
Page 71

67
VM9423
Cuidado y Mantenimiento
1. Use sólo un paño con siliconas limpio y detergente
neutro para limpiar el panel frontal o el monitor. Un paño
áspero y detergente no neutro (tal como alcohol) podría
llevar a raspaduras o decoloración.
2. No aplique agua o fluidos de limpieza en la unidad.
3. Si la temperatura dentro del reproductor está muy
caliente, un circuito protector detiene automáticamente
la reproducción del disco. Si esto se produce, permita
que la unidad se enfríe antes de operar nuevamente el
reproductor.
4. Nunca inserte nada distinto a discos compactos de 5”
(12 cm) dentro del reproductor dado que el mecanismo
puede ser dañado por objetos extraños.
5. No intente usar CD simples de 3” (8 cm.) en esta
unidad, con o sin adaptador, dado que se podría
producir el daño del reproductor y/o disco. Tales daños
no están cubiertos por la garantía de este producto.
6. El reproductor de CD podría no funcionar
adecuadamente en calor o frío extremo. Si se produce
tal condición, permita que el interior del vehículo
alcance la temperatura normal antes de usar el
reproductor.
7. Cuando el vehículo se calienta durante clima frío o bajo
condiciones de humedad, puede aparecer
condensación en el panel LCD. Si esto se produce, la
pantalla no funcionará adecuadamente hasta que se
evapore la humedad.
8. Sugerimos que use un disco de limpieza en esta unidad
más frecuentemente que en la unidad en su casa
debido a las condiciones ambientales del vehículo.
Page 72

68
VM9423
ESPECIFICACIONES
Reproductor de DVD/CD
Medios Compatibles de Disco: DVD +
R / RW (Capa simple y
doble) y CD-R / RW
Formatos compatibles: CD-DA, MP3, WMA, VCD, SVCD,
MPEG1 / 2, XviD, y Kodak picture CD (JPEG).
Relación Señal Ruido: > 95dBA
Rango Dinámico >95dB
Respuesta a Frecuencias: 20Hz a 20 kHz, -3dB
Separación de Canales: > 60dB @ 1 kHz
Convertidor D/A: Tasa de transferencia de 24-bit / 192 kHz de
alto rendimiento, Modulador Multi-Bit Sigma-Delta
Video
Formato: NTSC, PAL (detección automática)
Salida: 1Vp-p (75-ohm)
Entrada: 1Vp-p (75-ohm)
Sintonizador Analógico de FM
Rango de Sintonización: 87.5MHz - 107.9MHz
Sensibilidad Mono (-30dB): 9dBf
Sensibilidad Acallado (-50dB): 15dBf
Selectividad de Canal Alternativo 70dB
Relación Señal Ruido @ 1 KHz: 58dB
Rechazo de Imagen 80dB
Separación Estéreo @ 1 kHz: >30dB
Respuesta a Frecuencias: 30Hz - 15 kHz, -3dB
Sintonizador de Radio HD
FM: Híbrido -89 dbm, (40 dBf), Todo Digital -112 dBm (17dBf)
AM: Híbrido -93 dbm, (36 dBf), Todo Digital -103 dBm (17dBf)
Separación Estéreo: 70 dB
Audio THD: .4%
Respuesta de frecuencia (+/-3dB)20 Hz - 18 kHz
Relación Señal Ruido (Estéreo): 70 dB
Sintonizador AM
Rango de Sintonización: 530 kHz - 1710 kHz
Sensibilidad (-20dB): 12uV
Relación Señal Ruido @ 1 KHz: 50dB
Rechazo de Imagen 60dB
Respuesta a Frecuencias: 150Hz - 2 kHz, -3dB
Monitor
Tamaño de pantalla: 6,5" (Medido diagonalmente), 16:9
Widescreen
• 6,1" (155mm) D X 3,51" (89,2mm) A
Tipo de Pantalla: Pantalla de Cristal Líquido (LCD) TFT
matriz activa
Tiempo de Respuesta: 30mSec tiempo de subida, 50mSec
tiempo de bajada
Resolución:
• 336,960 sub píxeles, 1200 (W) X 234 (H)
Ángulo de visión:
• 60 grados izquierda o derecha
• 40 grados hacia arriba
• 55 grados hacia abajo
General
Impedancia de Entrada Auxiliar 10k-ohm
Fuente de Alimentación: 11 a 16VCC, negativo a tierra
Alimentación de Antena (Azul): 500mA máx., protección
limitada de corriente
Amplificador Remoto (Azul/Blanco): 500mA máx., protección
limitada de corriente
Temperatura de Funcionamiento -20C ~ 65C
Fusible: 15-amp, Tipo ATM mini
Dimensiones de chasis DIN: 7" X 7" X 2" (178mm x 178mm x
1
00mm)
Calificaciones de Potencia CEA
Potencia de Salida: 13 Watts RMS x 4 canales dentro de 4Ohms @ < 1% THD+N
Relación Señal Ruido: 70dBA bajo referencia (Referencia: 1
Watt, 4-Ohms)
Respuesta a Frecuencias: 20Hz - 20 kHz, -3dB Entrada Aux.
usada como referencia de entrada)
Voltaje de Alimentación de Referencia: 14.4VDC
*Especificaciones sujetas a cambio sin aviso.
Page 73

71
VM9423
PREPARATION
Félicitations d’avoir acheté un Récepteur Multimédia Portatif
Jensen VM9423.
C’est une bonne idée de lire toutes les instructions avant de
commencer l’installation. Nous recommandons que vous
fassiez installer votre installation de tête par une boutique
d’installation de bonne réputation.
Caractéristiques
DVD
• Rapport largeur/longueur - Cinéma, Normal and OFF
(En attente)
• Avance rapide ; Recul rapide - 2X, 4X, 6X et 8X
• Avance en ralenti, Recul en ralenti - 2X, 4X et 8X
• Jouer ; Suspendre, Arrêt, Chapitre prochain et Chapitre
précédent
• ESP - 2MB Tampon
CD / MP3 / WMA
• Compatible avec ID3 Tag
• Recherche répertoire (MP3 / WMA uniquement)
• Accès direct à la piste par la télécommande
• Enregistrez jusqu’à 1500 fichiers MP3 et WMA sur un
DVD+R / RW
• Recherche audible de piste en avant/en arrière
• Hasard, répétition et Intro
• Jouer ; suspendre ; arrêt ; piste prochaine et piste
précédente
• ESP - 2MB tampon
Tuner
• Module HD Radio HDRM-2 *
• Espacement de fréquence Etats-Unis/Europe
• 24 Stations préréglées (18 FM / 6 AM)
• Stéréo/Mono automatique
• Mise en mémoire automatique
Prêt pour la radio satellite
• EXige XM CNP2000UC et CNPJEN1 (Vendu ; tous les
deux ; séparément)
• Nom de canal satellite, artiste, chanson et catégories
affichés sur l’écran TFT.
iPod
• Interface de branchement direct à haut vitesse pour
accéder aux listes d’écoute iPod, des artistes ; des
albums et des chansons. Jouer des fichiers musique et
vidéo depuis votre iPod.
• Gestion de puissance charge iPod lorsqu’il est branché.
• Exige un câble d’interface iPod jLink
3
(fourni)
• Repérage iTunes
®
MediaLink
4
• Inteface sous le tableau de bord permet aux dispositifs
média portatifs d’être branchés
• MediaLink
4
comprend les types de branchements
suivants :
• USB - Soutient des disques durs et des des à
mémoire flash
• jLinkDirect pour iPod
• Entrée Audio/Vidéo RCA
Châssis
• 2.0 DIN (Importer/Montable ISO-DIN)
• TFT matrice active affichage aux cristaux liquides et
enrobement anti-reflet, Motorisé 6.5" Slide Down
• Inclinaison d’écran/angle d’ajustement
• Système de gestion de chaleur - air conditionnement
forcé pour garder le jeu de puces opérant à une
température nominale
Général
• Prêt pour Bluetooth avec profil mains libres pour la
sécurité/commodité et profil A2DP pour la lecture en
transit de la musique d’un PDA/PMP
• Prêt pour la navigation (Uniquement NAV102)
• Télécommande Infrarouge
• Deux sorties vidéo composites pour des écrans
supplémentaires
• Compatible avec des moniteurs MZ7TFT pour siège
arrière avec interface Ecran Tactile
• Deux entrées auxiliaires audio/vidéo
• Sortie de ligne préamplification à 200-Ohm - Tous les
canaux audio
• Sortie de ligne 4VRMS - Tous les canaux
• Commande audio à l’enchiffreur à rotation
• Egaliseur à sept bandes avec huit courbes EQ
préréglées
• Analyseur de spectre
• Sortie de ligne Avant, Arrière et Caisson de basse
• Aire de recouvrement caisson de basse et commande
de phase
• Commande de volume programmable
• Entrée de caméra à l’arrière (Visionnement de l’image
normale et en miroir)
• Gradateur automatique TFT
• Manette de jeu à 5-Voies
• Interface SWC – Compatible avec l’adaptateur PAC
Interface commande de volant SWI-PS (vendu
séparément
Equipement facultatif
• NAV102
L’installation de tête est prête pour la navigation. Avant
d’accéder aux fonctions de navigation vous devez
acheter et installer le module NAV102. Toutes les
instructions d’opération et d’installation sont fournies
avec le module de navigation NAV102.
Lorsque le NAV102 est branché et fonctionne
correctement, le mode de source NAV deviendra actif.
Lorsque le NAV102 n’est pas installé, la choix NAV se
colore en gris indiquant que la fonction n’est pas
disponible.
• Caméra en arrière
L’installation de tête est « prête pour la caméra ». Avant
d’accéder à des fonctions caméra vous devez acheter
installer une caméra vidéo en arrière. Lorsque la
caméra en arrière est branchée et fonctionne
normalement, le mode de source CAMERA deviendra
actif. Lorsque la CAMERA n’est pas installée, la choix
CAMERA se colore en gris indiquant que la fonction
n’est pas disponible.
• Satellite Radio Tuner
Voir « Operation radio Satellite » á la page 88.
• iPod
Voir « Operation iPod » á la page 97.
• Bluetooth Phone
Voir « Operation Bluetooth » á la page 99.
*Technologie HD Radio™ Fabriquée sous licence d’iBiquity
Digital Corporation. Des Brevets Américains et étrangers. HD
Radio™ et les logos HD et HD Radio sont les marqués
déposées d’iBiquity Digital Corporation.
Page 74

72
VM9423
AVERTISSEMENT! Pour réduire le risque d’un accident
de la circulation (excepté lorsque vous l’utilisez pour la
caméra vidéo à vue arrière) n’utilisez jamais la fonction
d’affichage vidéo lorsque vous conduisez le véhicule.
C’est une violation de la loi fédérale.
AVERTISSEMENT! Ne démontez ni n’ajustez jamais cet
appareil.
AVERTISSEMENT! Pour empêcher l’endommagement
par un choc ou une incendie n’exposez jamais cet
appareil à l’eau ou à l’humidité.
AVERTISSEMENT! N’utilisez jamais de disques
irréguliers.
AVERTISSEMENT! Pour empêcher l’endommagement au
mécanisme à l’intérieur de cet appareil, évitez d’impacter
le moniteur TFT.
AVERTISSEMENT! Utilisation d’un fusible incorrect peut
endommager l’appareil et causer une incendie.
Page 75

73
VM9423
FONCTIONS ANTI-VOL
Le VM9423 est équipé d’une fonction anti-vol qui exige de
l’utilisateur un mot de passe après la mise en marche de
l’appareil.
Entrer le mot de passe par défaut
Le mot de passe par défaut est 012345 (6 chiffres). Entrez
le mot de passe en utilisant le clavier sur écran et puis
pressez le bouton Enter (flèche). Vous pouvez aussi utilisez
le claiver sur la télécommande pour entrer le mot de passe.
Pressez le bouton Enter de la manette (18) sur la
télécommande pour confirmer.
Changer le mot de passe
Pour changer le mot de passe anti-vol ou de la protection de
RATINGS performez les étapes suivantes :
1. Pressez le bouton SETUP (31) sur la télécommande ou
bien touchez le bouton sur l’écran pour entrer dans
le menu « SETUP ».
2. Touchez RATING pour voir le sous-menu RATING. Un
icône de verrou ouvert à la droite du champ de mot de
passe indique qu’un mot de passe d’utilisateur n’a
toujours pas été entré.
3. Touchez l’icône clavier à côté de la boîte bleue dans le
champ « Mot de Pass » pour ouvrir un clavier sur écran.
4. Entrez un nouveau mot de passe à 6 chiffres et pressez
Enter (flèche).
L’icône « verrou » apparaîtra fermé et le nouveau mot
de passe anti-vol sera réglé, aussi bien que le mot de
passe pour RATING (voir « Fonctions du sous-menu
Rating » á la page 83.
A NOTER : Si vous avez oublié votre mot de passe
contactez Customer Service à 1-800-323-4815 pour aide.
1
2
3
4
5
6
7
8
9
0
Enter Password:
RADIO
SETUP
RDS
Rating
Hardware
P.VOL
TS Cal
General
Language
Audio
Back
Password
Rating 8. Adult
Load Factory Reset
Speaker
Demo
Bluetooth
02:40
AM
1
2
3
4
5
6
7
8
9
0
Clear
Page 76

74
VM9423
COMMANDES ET INDICATEURS
Opération Bouton
1. OPEN
Pressez pour activer le système mécanique automatique et
ramené le moniteur TFT à une position de visionnement.
Pressez encore une fois pour fermer le TFT.
Pressez et maintenez pour activer la fonction « Inclinaison »
(Tilt). Alors que l’icône Tilt clignote, utilisez les boutons vers
le haut/vers le bas de la manette pour mouvoir le TFT à une
position désirée. Pressez et maintenez pour quitter la
fonction ou bien attendez dix secondes pour que le
mécanisme fasse temps mort.
2. DISP
En visionnant des fichiers en mode DVD/disque, pressez
pour visionner les barres d’information en haut et en bas.
Pressez de nouveau pour sélectionner « Display Off »
(Affichage éteint).
En mode DVD, pressez pour voir les barres d’information en
haut et en bas. Pressez de nouveau pour éteindre « Display
Off ».
3. PIC
Pressez pour visionner et ajuster les réglages Luminosité et
Contraste.
4. BAND
Pressez le bouton BAND pour changer entre les bandes AM,
FM ou SAT.
5. AUDIO
Tournez pour ajuster le volume. Pressez pour accéder au
menu audio EQ.
6. SRC
Pressez pour sélectionner le mode de reproduction.
Lorsque vous changez de source pendant la navigation, les
soufflets vocaux seront toujours entendus bien que le plan de
navigation ne soit pas visible. (La source audio sélectionnée
sera mise en sourdine jusqu’à ce que la commande de
soufflet vocal de navigation ne soit terminée, après quoi la
source audio reprendra).
7. DISC SLOT
8. MUTE
Pressez pour mettre le récepteur en sourdine. Pressez de
nouveau pour reprendre le niveau de volume précédent.
A NOTER : L’in stallation de tête a Softmut e ce qui permet
au volume d’augmenter par grades lorsque la fonction
MUTE est désactivée.
Page 77

75
VM9423
COMMANDES ET INDICATEURS
9. IR Remote Control Receiver
10. (manette de gauche)
DVD/Disc Mode : Pressez une fois pour reproduire le
chapitre/piste précédent.
TUNER Mode : Pressez une fois pour rechercher
automatiquement la station de radio précédente disponible.
MENU Mode : Pressez une fois pour déplacer le curseur à
gauche.
11. (manette vers le bas)
DVD/Disc Mode : Pressez une fois pour avance ralentie/recu
ralenti.
TUNER Mode : Pressez pour désendre une étape de
fréquence.
MENU Mode : Pressez une fois pour déplacer le curseur vers
le bas.
12. Reset
Pressez pour réinitiliaser le système aux réglages d’usine par
défaut (sauf le mot de passe et le verrouillage parental).
13. Pause/Play/Enter
Pressez pour suspendre ou reprendre la reproduction ou
pour confirmer la sélection actuelle.
14. (manette à droite)
DVD/Disc Mode : Pressez une fois pour entrer le prochain
chapitre ou piste.
TUNER Mode : Pressez une fois pour chercher
automatiquement la prochaine station de radio disponible.
MENU Mode : Pressez une fois pour déplacer le curseur à
droite.
15. (manette vers le haut)
DVD/Disc Mode : Pressez une fois pour avance/recul rapide.
TUNER Mode : Pressez pour monter d’une étape de
fréquence.
MENU Mode : Pressez une fois pour déplacer le curseur vers
le haut.
16. /EJECT
Pressez une fois pour insertion/éjection du disque.
Pressez et maintenez pour réinitialiser la position du
mécanisme de coeur.
17. TFT Display
18. NAV
Lorsque le NAV102 est branché à l’installation de tête,
pressez pour afficher l’interface d’utilisateur de navigation.
19. RPT
Pressez pour commander la fonction à reproduction répétée.
20. INT
Pressez pour commander la reproduction d’intro.
21. SD Card Slot
Insérez carte SD pour reproduction des fichiers audio/video.
22. WIDE
Pressez pour ajuster l’aspect d’affichage de l’image à l’un
des réglages suivants : CINEMA, NORMAL ou En attente
(écran éteint). A NOTER : Seulement CINEMA et En attente
sont disponibles pour des sources non-vidéo.
23. Illumine quand un disque est présent
Page 78

76
VM9423
TELECOMMANDE
Table 1: Fonctions Télécommande
Bouton Fonction
Nom Ref# DVD VCD TUNER CD/MP3/USB/SD SATELLITE
MENU 1 Entrez le menu princi-
pal du disque
Mettre le PBC en
marche/ en arrêt en
jouant le VCD
TAG HD Radio stations pour transfert à un
iPod
Affiche l’écran des
diagnostiques
TITLE 2 Entrez le menu titre du
disque
Jouez les dix premières
secondes de chaque
chapitre/titre
Jouer les dix premières
secondes de chaque
fichier
Liste des catégories en
mode CG
MUTE 3 Bascule en marche/en
arrêt la sortie audio
Bascule en marche/en
arrêt la sortie audio
Bascule en marche/en
arrêt la sortie audio
Bascule en marche/en
arrêt la sortie audio
Bascule en marche/en
arrêt la sortie audio
POWER/
4 Allumer/Eteindre Allumer/Eteindre Allumer/Eteindre Allumer/Eteindre Allumer/Eteindre
AUDIO 5 Changer la langue
audio pour la reproduction du disque
REPT A-B 6 Réglage pour répéter la
reproduction du cadre
temporel A au cadre
temporel B
Réglage pour répéter la
reproduction du cadre
temporel A au cadre
temporel B
REPT 7 Répéter la reproduction
des chapitres actuels
Répéter la reproduction
du chapitre actuel
Répéter la reproduction
des pistes actuelles
SRC 8 Sélectionner des
modes de reproduction
Sélectionner des
modes de reproduction
Sélectionner des
modes de reproduction
Sélectionner des
modes de reproduction
Sélectionner des
modes de reproduction
SUBTITLE 9 Sélectionner des
langues pour soustitrage
DISP/
CLEAR
10 Afficher l’information de
reproduction
Effacer l’entrée ou bien
faites marche arrière
pour corriger l’erreur en
mode d’accès direct.
Afficher l’information de
reproduction
Effacer l’entrée ou bien
faites marche arrière
pour corriger l’erreur en
mode d’accès direct.
Afficher le mode audio
Efface l’entrée et faites
marche arrière pour
corriger l’erreur en
mode d’accès direct
PRESET /\ 11 Naviguer la liste des
stations préréglées
Naviguez la liste des
stations préréglées
PRESET \/ 12 Naviguer la liste des
stations préréglées
Naviguer la liste des
stations préréglées
ANGLE 13 Reproduire le disque
depuis un angle différent pour une scène
Reproduire le CD Picture avec un angle différent de l’image
affichée
Eteindre le claiver
MEM
>> 14 Avance rapide du con-
tenu du disque
Avance rapide du contenu du disque
Change la station par
une étape vers le haut
Avance rapide du contenu du disque
VOL - 15 Diminue le volume Diminue le volume Diminue le volume Diminue le volume Diminue le volume
VOL + 16 Augmente le volume Augmente le volume Augmente le volume Augmente le volume Augmente le volume
3
4
5
9
6
7
26
27
15
16
34
33
19
32
23
24
31
30
8
35
1
2
10
13
28
25
11
12
14
20
18
17
22
21
29
TAG
Page 79

77
VM9423
|<< 17 Sélectionne le chapitre
précédent pour reproduction
Sélectionne le chapitre
précédent pour reproduction
Cherche une station de
radio disponible en
diminuant la fréquence
de syntonisation
Sélectionne la piste
précédente pour reproduction
Cherche une station de
radio disponible en
diminuant la fréquence
de syntonisation
>/|| 18 Suspend la reproduc-
tion/démarre la reproduction
Suspend la reproduction/démarre la reproduction
Suspend la reproduction/démarre la reproduction
ENTER, Bascule le
menu sur écran entre
les modes CAT/CH
>>| 19 Sélectionne le chapitre
prochain pour reproduction
Sélectionne le chapitre
prochain pour reproduction
Cherche une station de
radio disponible en
augmentant la
fréquence de syntonisation
Sélectionne la piste
prochaine pour reproduction
Cherche une station de
radio disponible en
augmentant la
fréquence de syntonisation
/
20 Arrête la reproduction/
termine l’appel
Arrête la reproduction/
termine l’appel
Termine l’appel Arrête la reproduction/
termine l’appel
GOTO/
21 Allez à un cadre tempo-
rel spécifique et reproduisez/composez
l’appel
Allez à un cadre temporel spécifique et reproduisez/composez
l’appel
Composez le numéro Composez le numéro Entre dans le mode
d’Accès Direct
<< 22 Reproduction en ral-
enti/rembobinage
rapide reproduction
Reproduction en ralenti/rembobinage
rapide reproduction
Change de station une
étape à la fois
ZOOM 23 Zoom sur/ arrière une
image
Zoom sur/ arrière une
image
PIC 24 Paramètres de configu-
ration d’affichage
Paramètres de configuration d’affichage
Affiche des commandes de Luminosité/
Contraste
OPEN/
CLOSE
25 Ouvrir/fermer le moni-
teur TFT
Ouvrir/fermer le moniteur TFT
Ouvrir/fermer le moniteur TFT
Ouvrir/fermer le moniteur TFT
Ouvrir/fermer le moniteur TFT
TILT
26 Diminue l’angle d’incli-
naison du moniteur
Diminue l’angle d’inclinaison du moniteur
Diminue l’angle d’inclinaison du moniteur
Diminue l’angle d’inclinaison du moniteur
Diminue l’angle d’inclinaison du moniteur
TILT
27 Augmente l’angle
d’inclinaison du moniteur
Augmente l’angle
d’inclinaison du moniteur
Augmente l’angle
d’inclinaison du moniteur
Augmente l’angle
d’inclinaison du moniteur
Augmente l’angle
d’inclinaison du moniteur
WIDE 28 Sélectionne mode
d’affichage : PLEIN ou
NORMAL
Sélectionne mode
d’affichage : PLEIN ou
NORMAL
Sélectionne le mode
d’affichage : CINEMA
ou En Attente
1, 2, 3, 4, 5,
6, 7, 8, 9, 0
(Numeric
Keypad)
29 Accéder directement
aux chapitres
1-6 sélectionnent des
préréglés pour la
bande actuelle
Accéder directement
aux pistes
1-6 sélectionne des
préréglés pour la
bande actuelle
/BAND
30 Reproduction en ralenti Reproduction en ralenti Changer la bande AM/FMReproduction en ralenti Sélectionne la bande
SAT1, SAT2 ou SAT3
SETUP 31 Affiche le menu SETUP Affiche le menu SETUP Affiche le menu SETUP Affiche le menu SETUP Affiche le menu SETUP
EQ 32 Modifier les réglages
d’égaliseur
Modifier les réglages
d’égaliseur
Modifier les réglages
d’égaliseur
Modifier les réglages
d’égaliseur
RDM 33 Jouer tous les chapi-
tres dans un ordre
mélangé
Jouer toutes les pistes
dans un ordre mélangé
Table 1: Fonctions Télécommande
Bouton Fonction
Nom Ref# DVD VCD TUNER CD/MP3/USB/SD SATELLITE
Page 80

78
VM9423
INT 34 Jouer les dix premières
secondes de chaque
piste
Scannage de prévisionnement
EJECT 35 Ejecter le disque Ejecter le disque Ejecter le disque Ejecter le disque Ejecter le disque
Table 1: Fonctions Télécommande
Bouton Fonction
Nom Ref# DVD VCD TUNER CD/MP3/USB/SD SATELLITE
Page 81

79
VM9423
UTILISATION DU MONITEUR TFT
Ouvrir/Fermer le moniteur TFT
Ouvrir le moniteur TFT
Pressez le bouton OPEN/CLOSE (1) sur le panneau avant
ou pressez le bouton ( ) (25) sur la télécommande.pour
glisser le moniteur vers le bas et révéler les fentes de carte
SD et du disque.
Fermer le Moniteur TFT
Pressez le bouton OPEN/CLOSE (1) sur le panneau avant
ou bien pressez le bouton ( ) (25) sur la télécommande
.fermer le panneau du moniteur.
Ajustement de l’angle d’inclinaison du
moniteur
UN caractéristique connu des panneaux d’affichage aux
cristaux liquides est la qualité de l’affichage par rapport à
l’angle de visionnement. L’angle du moniteur peut être ajusté
pour un visionnement optimal en utilisant les méthodes
suivantes.
Ajustement d’angle étape par étape
Pressez le bouton ( ) ou le bouton ( ) sur le sur la
télécommande (26, 27) pour ajuster l’angle d’inclinaison de
l’écran une étape à la fois.
Vous pouvez aussi ajuster l’incilnaison en pressant et
maintenant le bouton OPEN (1) sur le panneau avant.
Utilisez les boutons de la manette vers le haut/vers le bas
pour ajuster l’angle de l’écran lorsque l’icône d’inclinaison
rouge clignote.
Ajustement d’angle continuel
Pressez et maintenez les boutons () ou () sur le la
télécommande pour ajuster l’angle d’inclinaision en une
motion continuelle.
Marche arrière
Si la caméra vidéo à vue arrière est branchée, l’appareil est
en marche et le moniteur est stationné à l’intérieur du
compartiment principal de l’appareil, le moniteur se meut
automatiquement à une position de visionnement et change
au mode CAMERA lorsque le véhicule fait marche arrière.
Lorsque la marche arrière s’arrête, le moniteur revient au
compartiement de stockage principal.
Si le moniteur est en mode d’affichage, le moniteur change
automatiquement au mode CAMERA lorsque le véhicule fait
marche arrière. Lorsque la marche arrière s’arrête, le
moniteur revient à sont mode d’entrée original.
Rapport largeur/longueur
Pressez le bouton WIDE (28) sur la télécommande ou le
bouton WIDE (22) sur le moniteur pour ajuster le rapport
largeur/longueur comme suit (n’est actif qu’avec une source
vidéo).
Réglage d’image
Table 2 montre le mode de sortie vidéo pour chaque source
de reproduction.
*CVBS – Composite Video Baseband Signal
Procédure d’ajustement des paramètres
1. Entrer le mode de réglage de la qualité de l’image :
Pressez le bouton PIC sur la télécommande ou bien
moniteur.
2. Sélectionnez l’article à régler :
Utilisez les boutons de la manette pour sélectionner «
BRIGHT » ou « CONTRAST ».
3. Réglez les paramètres :
Utilisez les boutons de la manette gauche/droite pour
modifier les réglages.
4. Quitter le mode de réglage de la qualité de l’image :
Pressez le bouton PIC sur la télécommande ou monitor.
Inhibition du frein de stationnement
Lorsque le fil rose de « Stationnement » est branché au
circuit du frein de stationnement du véhicule, le moniteur TFT
avant affichera de la vidéo lorsque le frein de
stationnementest engagé. (Lorsque le fil rose est terré par le
circuit du frein de stationnement, la vidéo s’affichera).
Mécanisme du mouvement du
moniteur
S’il y a un obstacle dans le chemin du moniteur, les mesures
de protection suivantes peuvent êre exécutées pour
empêcher que le mécanisme ou le moteur ne soit
endommagés.
Après l’exécution de la procédure de protection l’opération
normale se reprend en pressant le bouton OPEN (1) ou en
débranchant et rebranchant la puissance.
Table 2: Mode de sortie vidéo
Source de
reproduction
Mode de sortie vidéo
RADIO RGB Mode
SAT RGB Mode
DISC RGB Mode
BT RGB Mode
AUX 1 CVBS Mode
AUX 2 CVBS Mode
NAV RGB Mode
CAMERA CVBS Mode
CINEMA
L’écran tout entier est étendu
horizontalement à un rapport largeur/
longueur de 16 à 9. Le rapport
d’extension est le même à n’importe
quel point.
NORMAL
L’image d’affichage conventionnel a un
rapport de 4 à 3 horizontal au vertical,
laissant une zone blanche à droite et à
gauche de l’affichage.
STANDBY
L’écran devient noir. Touchez l'écran
pour reprendre.
Table 3: Mesures de Protection du Moniteur
Obstacle
Protection de
soi
Bouton OPEN
pressé
Puissance
rebranchée
Moniteur se
charge horizontalement
L’ap parei l
s’arrête au
point d’obstacle
Moniteur
étendu
jusqu’au bout
horizontalement
Moniteur se
charge
automatiquement dans
l’appareil
Moniteur se
charge horizontalement
L’ap parei l
s’arrête au
point d’obstacle
Moniteur
étrendu
jusqu’au bout
horizontalement
Moniteur se
charge automaitquement
dans l’appareil
Moniteur se
charge
dehors verticalement
L’ap parei l
s’arrête au
point d’obstacle
Moniteur se
pivote de
retour dans
l’appareil
Moniteur se
pivote de retour
dans l’appareil
Moniteur se
charge
dedans verticalement
L’ap parei l
s’arrête au
point d’obstacle
Moniteur se
pivote de
retour vers
l’appareil
Moniteur se
pivote de retour
vers l’appareil
Page 82

80
VM9423
INSTRUCTIONS D’OPERATION
Puissance en marche/en arrêt
Pressez le bouton /SRC (6) sur l’appareil (ou le bouton /
POWER (4) sur la télécommande) pour allumer l’appareil.
Les boutons sur l’avant de l’appareil s’illuminent et le statut
du mode actuel apparaît dans l’affichage aux cristaux
liquides (7).
Pressez et maintenez le bouton pour éteindre l’appareil.
Confirmation au bip audible
Une tonaltié bip audible confirmer chanque sélection de
fonction. La tonalité BIP peut être désactivée par le menu
Setup (Configuration).
Ajustement du volume
Pour augmenter ou diminuer le niveau de volume, tournez la
commande AUDIO (5) sur le panneau avant ou bien presser
les boutons VOL+/ VOL- (15, 16) sur la télécommande.
Lorsque le niveau de volume atteint « 0 » ou « 40 », un bip se
fait entendre indiquant qu’une limite d’ajustement a été
atteinte. Le volume va de « 0 » à « 40 ». L’affichage aux
cristaux liquides ou l’écran TFT afficher le niveau de volume
pendant 3 secondes.
Volume d’allumage programmable
Cette fonction permet à l’utilisateur de sélectionner un
volume d’allumage peu importe le réglage de volume avant
que l’appareil n’ait été éteint. Pour programmer un niveau de
volume d’allumage spécifique, tournez la commande AUDIO
(2) pour ajuster le volume au volume d’allumage désiré.
Pressez et maintenez le bouton AUDIO alors que l’icône
jaune du haut parleur et l’indication du niveau sont affichés
sur l’écran. L’appareil va faire bip deux fois pour confirmer
votre réglage du volume d’allumage.
Mute
Pressez le bouton MUTE sur le panneau avant (8) ou sur la
télécommande (3) pour mettre le volume en sourdine depuis
l’appareil. Pressez le bouton MUTE de nouveau pour rétablir
le volume. « MUTE » est affiché sur l’affichage aux cristaux
liquides. Ajuster le volume ou utiliser les fonctions de
configuration audio annulent la fonction de mise en sourdine.
Line Mute
Si le fil « MUTE » est branché, la sortie audio se met en
sourdine lorsqu’un appel téléphonique est reçu par le
téléphone cellulaire.
Commande du Volant (SWC)
Cette installation de tête est compatible avec l’adaptateur de
commande du volant SWI-PS du PAC (Pacific Accessory
Corporation). Un connecteur femelle à 3.5mm (étiqueté «
SWC Interface ») sur le dos de l’installation de tête permet la
connexion à l’adaptateur PAC. Veuillez vous référer aux
instructions fournies avec l’adaptateur PAC pour des
informations d’installation détaillées.
Fonctions SWC
Les commandes suivantes sont disponibles pour la plupart
des véhicules :
1. Vol Diminution
2. Vol Augmentation
3. Mise en sourdine
4. Cherche vers le bas/Piste précédente/Préréglé vers le
bas
5. Cherche vers le haut / Piste prochaine/ ** Préréglé vers
le haut
6. SRC (Source)
7. ** Sélectionnez
8. ** Sélectionnez
9. Bande
** Si des boutons de commande du volant supplémentaires
sont disponibles sur le véhicule, les fonctions 7/8 peuvent
être attribuées à la fonction « Sélectionner ». Cette fonction/
caractéristique peut ne pas être disponible sur certains
véhicules.
Sélectionnez l’opération
Si « Sélectionner » (fonction 7 ou 8) est pressé et la fonction
4 est pressée momentanément, le préréglé vers le haut sera
sélectionné. Si « Sélectionner » (Fonction 7 ou 8) est pressé
et la fonction 5 est pressée momentanément, préréglé vers le
bas sera sélectionné.
Sélection de source de reproduction
Pressez le bouton SRC sur le panneau avant (6) ou sur la
télécommande (8) pour changer entre les sources de
reproduction dans l’ordre suivant : RADIO, SAT, DISC, NAV,
BT, iPod, SD, USB, AUX1, AUX2 et CAMERA. Le mode de
de reproduction est affiché sur les écrans TFT et LCD.
Dispositifs auxiliaires
Des dispositifs périphériques externes peuvent être branché
à l’appareil par la sortie RCA (AUX IN 2) ou MediaLink
4
.
Sélectionnez « AUX 1 » pour jouer un dispositif auxiliaire
branché par le RCA MediaLink
4
ou les entrées 3.5mm. Par
exemple, vous pouvez jouer des fichiers musiques depuis un
lecteur de musique portatif, de la vidéo depuis une caméra
vidéo et vous pouvez même visionner des photos stockées
sur un appareil photographique numérique.
Sélectionnez « AUX 2 » pour accéder aux et commander ds
dispositifs auxiliaires branchés à AUX IN 2 sur le dos de la
radio.
Sélectionner une source en naviguant
D’autres sources, telles que AM-FM Tuner, CD, etc. peuvent
être sélectionnés et écoutés tout en naviguant. Pour
sélectionner une source pressez le bouton /SRC (6) et
puis sélectionnez une source depuis le Menu Source Avant.
Des soufflets vocaux de navigation seront entendus
automatiquement, bien que le plan de navigation ne peut pas
VIDEO LEFT RIGHT
3.5mm- Audio
MediaLink
iPod Connector
USB Connector (Type A)
RCA Inputs (AUX 1)
3.5mm Left & Right
Stereo Inputs (AUX 1)
AUX1
No Video Signal
01:53 PM
E
Q
Page 83

81
VM9423
être vu. (La source audio sélectionnée sera mise en sourdine
jusqu’à ce que la commande de soufflet vocal de navigation
ne soit terminée, après quoi la source audio va reprendre).
Menu Source
Pour accéder au MENU SOURCE, touchez l’écran TFT au
coin gauche supérieur de l’écran.
Egaliseur Graphique à 7-Bande
Le VM9423 a un égaliseur graphique à 7-bandes qui vous
permet d’ajuster facilement votre système audio pour
satisfaire aux caractéristiques acoustiques de votre véhicule
qui varie selon le type du véhicule et ses dimensions. Un
réglage bon de l’égaliseur et la balance augmente les effets
de l’égaliseur de cabine.
Pressez le bouton AUDIO (5) sur le panneau avant ou bien
pressez le bouton sur écran EQ deux fois pour afficher le
menu audio suivant :
• Touchez le bouton de FAD-BAL pour accéder à un
deuxième écran avec les arrangements d'équilibre/
affaiblisseur.
• Touchez le bouton d'EQ pour retourner à l'écran
d'arrangements d'égaliseur.
• Employez les flèches de chaque côté de la boîte où
« User » est choisi, pour choisir un niveau d'égaliseur de
préréglage.
Pour ajuster une fonction audio :
1. Utilisez les boutons manette gauche/droite pour surligner la fonction audio à ajuster.
2. Pressez le bouton manette ENTER sur le panneau de
commande (13) ou sur la télécommande (18) pour
sélectionner la choix surlignée.
3. Utilisez la manette pour ajuster la fonction sélectionnée
au réglage désiré.
A NOTER : Le mode EQ se changera automatiquement à
« USER » lorsque les bandes EQ individuelles sont
ajustées.
Un réglage bon de l’Egaliseur et la Balance suppléent aux
effets d’égaliseur de cabine.
Le menu AUDIO va automatiquement quitter au bout de
quelques secondes d’inaction. Pour quitter rapidement,
touchez le coin gauche supérieur de l’écran ou bien pressez
et maintenez le bouton AUDIO (5).
Réinitialisation du système
Pour corriger un arrêt du système ou d’autres opérations
illégales, utilisez le bout d’un stylo pour presser le bouton de
réinitialisation (12) situé sur le coin droite avant en bas de
l’appareil. Après une réinitialisation du système l’appareil
rétablit tous les réglages par défaut d’usine.
A NOTER : Si l’appareil est réinitialiser alors qu’un DVD
est en train d’être joué, le DVD reprend la reproduction
dès que la réinitialisation est terminée.
DISC
SOURCE MENU
DISC
RADIO
SD
iPod
SAT
USB
AUX 1
AUX 2
NAV
CAMERA
BT
EQ: User
E
Q
T
A
G
+12 —
0—
–12 —
80 250 600 1k 4k 10k 16k
FAD-BAL EQ
USER
BACK
Table 4: Ajustements Audio
Fonction Choix d’ajustements
EQ Utilisateur En mode utilisateur,
vous pouvez ajuster à
la main chacune des
sept bands de
fréquence
Acoustique Utilisez les flèches
sur écran pour sélectionner une courbe
d’égalisation
prédéfinie
Urban
Rave
Latin
Dance
Hip Hop
Rock
FAD-BAL Utilisez cet écran pour ajuster le niveau de
sortie pour chaque haut parleur dans votre
système quadriphonique de 0 à 24dB. Vous
pouvez aussi ajuster le volume maître depuis
cet écran.
Page 84

82
VM9423
MENU CONFIGURATION (SETUP)
Pour accéder aux réglages du système, pressez le bouton
SETUP (31) sur la télécommande ou bien touchez le bouton
sur écran pour entrer dans le menu « SETUP ». Le
sous-menu « GENERAL » apparaît surligné en bleu.
Accéder aux articles du menu
Touchez le nom du sous-menu ou bien utilisez la manette du
jeu pour sélectionner un sous-menu (Langue, Audio, RDS ;
etc.).
Les fonctions disponibles pour ajustement sous la choix du
sous-menu surligné apparaîtront au centre de l’écran.
Ajustement d’une fonction
1. Utilisez l’écran tactile ou bien pressez les boutons /\ ou
V sur la manette pour sélectionner la fonction à ajuster.
2. Entrez le champ de choix pour la fonction que vous
voulez ajuster en utilisant l’écran tactile ou bien en
pressant le bouton ENTER (manette). Un sous-menu
apparaît dans le deuxième rang avec la choix
sélectionnée surlignée en bleu.
3. Sélectionnez une nouvelle valeur en utilisant l’écran
tactile ou bien en pressant les boutons /\ ou V sur la
manette.
4. Utilisez l’écran tactile ou bien pressez le bouton ENTER
(manette) pour confirmer la configuration.
Fonctions du sous-menu Général
Fonctions du sous-menu Langue
Si un DVD soutient plus d’une langue de sous-titrage ou
d’audio, toutes les langues sont disponibles pour sélection
pendant la reproduction. Si la langue sélectionnée n’est pas
soutenue par le DVD une langue par défaut est utilisée.
Fonctions du sous-menu Audio
Fonction du sous-menu haut parleur
• Choisissez 4 CH ou 4.1 CH en fonction de la
configuration des hauts parleurs dans votre véhicule.
• Utilisez la fonction Test Tone pour vérifier les réglages
haut parleur. Faites des changements en utilisant le
menu EQ/FAD-BAL, accédé en pressant et maintenant
le bouton AUDIO (commande du volume).
• Ajustement de phase de caisson de basse : Touchez
l’icône subw pour accéder au x commandes de polarité
des caissons de basse et inversez la polarité du signal
du caisson de basse de 0° à 180°. Inverser la polarité
peut améliorer la réponse basse liée à la configuration
des hauts parleurs.
RADIO
RADIO
SETUP
RDS
Rating
Hardware
P.VOL
TS Cal
General
Language
Audio
Back
Clock Mode 12 Hour
Clock Adjust 04 : 31 AM
Video Input AUTO
Beep On
Speaker
Demo
Bluetooth
02:40
AM
Réglage Choix Fonction
Mode horloge 12 Heures L’horloge affiche l’heure à 12 heu-
res en utilisant AM et PM.
24 Heures L’horloge affiche l’heure à 24heures
jusqu’à 23:59.
Ajustement
de l’horloge
(HH:MM) L’horloge apparaît au coin droite
supérieur de l’écran et sur l’écran
d’affichage aux cristaux liquides
pendant certaines opérations. A
NOTER : L’indication AM/PM
changera au fu et à mesure que
vous continuez à ajuster l’heure au
delà de 12 heures.
Entrée vidéo
(la circuiterie
d’entrée
détecte
automatiquement le signal
vidéo de la
source AUX
IN)
Auto La sortie du signal couleur se
change automatiquement basé sur
le signal d’entrée vidéo actuel NTSC ou PAL
NTSC Les signaux couleur sont sortis
dans le format NTSC standardisé
PAL Les signaux couleurs sont sortis
dans le format PAL standardisé
Bip On Allumé, une tonalité bip audible
confirmer chaque sélection de fonction.
Off Pas de tonalité bip
Réglage Choix Fonction
OSD English L’affichage sur écran apparaît en
anglais
DVD Audio English L’audio DVD est entendu en anglais
lorsque la choix est disponible
Spanish L’audio DVD est entendu en espag-
nol lorsque la choix est disponible
French L’audio DVD est entendu en
français lorsque la choix est disponible
DVD Soustitrage
English Les sous-titres DVD apparaissent
automatiquement en anglais lorsque disponible.
Spanish Les sous-titres DVD apparaissent
automatiquement en espagnol lorsque disponible.
French Les sous-titres DVD apparaissent
automatiquement en français lors
disponible
Off Les sous-titres DVD n’apparaissent
pas automatiquement
Disc Menu English Le menu DVD (où applicable) est
affiché en anglais
Spanish Le menu DVD (où applicable) est
affiché en espagnol
French Le menu DVD (où applicable) est
affiché en français
Setting Options Function
DRC Eteint Employez le Dynamic Range Con-
trol pour une meilleure reproduction
à des volumes bas
Allumé
Filtres caisson de basse
50Hz Sélectionner une fréquence d’aire
de recouvrement règle une
fréquence de coupure du filtre
passe bas (LPF) du cassion de
basse.
80Hz
100Hz
120Hz
150Hz
Réglage Choix Fonction
Page 85

83
VM9423
Fonctions du sous-menu Bluetooth
Fonctions du sous-menu RDS
Fonctions du sous-menu Rating
Le système DVD a un verrrou parental encastré qui empêche
des personnes non-autorisées de visionner un disque
restreint. Par défaut, le système de rating est réglé au
réglage le plus haut (sans restrictions). Le verrou parental
n’est relâché qu’en entrant le mot de passe correct. Lorsque
le mot de passe est entré, le rating est disponible pour
configuration.
Pour régler le mot de passe de nouveau, accéder au menu «
RATING » et entrez le mot de passe actuel. Lorsque le mot
de passe correct est entré vous pouvez accéder au champ «
Password » et en entrer un nouveau.
A NOTER : Enregistrez le mot de passe et gardez-le dans
un endroit sûr pour référence à l’avenir. Le rating pour
chaque disque est marqué sur le disque, sur l’emballage
du disque ou dans la documentation. Si le rating n’est
pas disponible sur le disque, la fonction de verrouillage
parental n’est pas disponible. Certains disques ne
restreignent que des parties de disque et le contenu
approprié va jouer. Pour des détails veuillez vous référer
à la description du disque.
Fonctions du sous-menu Démo
Vous pouvez arrêter et faire marcher le mode de
démonstration ou allumer/éteindre le Demo Auto Run en ch
oisissant la choix « Demo » depuis le MENU SETUP
(Configuration).
Lorsque le "Demo Auto Run" est éteint, vous pouvez
sélectionner "Demo Mode > Run" pour démarrer le Mode
Démo. Le Mode Démo se défile à travers les écrans de
source divers, simulant l’activité sur l’affichage. « Demo
Mode » est affiché discrètement en texte jaune (sous
l’horloge) pour indiquer que l’appareil est en mode démo.
Pour arrêter le Mode démo, pressez le quadrant à gauche
supérieur du TFT (Sélection de source).
Lorsque « Demo Auto Run » est Allumé, l’appareil va
automatiquement afficher le Mode Démo lorsqu’il est mis en
marche.
Réglage Choix Fonction
Bluetooth Allumé Active la fonction Bluetooth
Eteint Désactive la fonction Bluetooth
Autorépondeur
Allumé L’appareil répond automatique-
ment à tous les appels entrants
Eteint Répondez aux appels en touchant
le bouton « call ».
Connect Manual Connectez le dernier téléphone
portatif actif en touchant l’icône
CONNECT lorsque celui-ci est
débranché.
Auto Branchez automatiquement lorsque
votre téléphone apparié est à
portée.
Code d’appariment
Le code par défaut est « 1234 ».
Touchez l’icône clavier et entrez le
code d’appariment ou la clé de
passe exigés pour la connexion
Bluetooth pour votre téléphone portatif. Tous les téléphones/dispostifs
n’exigent pas un code d’appariment. Le code par défaut est «
0000 » pour plusieurs modèles.
Réglage Choix Fonction
Région
Tuner
USA
USA
Canada
Mexico
South
America
FM Band : 87.9MHz -
107.9MHz, channel separation
@ 200kHz
AM Band : 530kHz - 1710kHz,
channel separation @ 10kHz
Europe
UK
Europe
Africa
FM Band : 87.6MHz -
107.9MHz, channel separation
@ 100kHz
AM Band : 531kHz - 1602kHz,
channel separation @ 9kHz
Réglage Choix Fonction
Mot de passe _ _ _ _ _ _ Entrez le mot de passe à 6 chiffres
par défaut (012345)
Rating 1. Kid Safe Sélectionnez le niveau de rating
approprié pour le public voulu.
Vous pouvez surpasser des ratings
plus hauts en utilisant votre mot de
passe
2. G
3. PG
4. PG-13
5. PG-R
6. R
7. NC-17
8. Adult
Load Factory Reset Sélectionnez « Reset » pour rétablir
les réglages par défaut d’usine pour
le système Rating uniquement.
Page 86

84
VM9423
Fonctions du sous-menu matériel
Si la caméra vidéo à vue arrière est branchée, l’appareil est
en marche et le moniteur TFT est retiré à l’intérieur de
l’appareil, le moniteur TFT se meut automatiquement à une
position de visionnement et le mode Caméra est sélectionné
lorsque le véhicule fait marche arrière. Lorsque la vitesse se
remet à « conduire », le moniteur TFT se retire dans
l’appareil au bout de dix secondes.
Si le moniteur est en mode d’affichage , le moniteur change
automatiquement au mode CAMERA lors de la marche
arrière. Lorsque la marceh arrière s’arrête le moniteur revient
à son mode d’entrée original.
Fonctions du sous-menu P.VOL
TS Cal (Calibration d’écran)
Pour accéder la fonction « Calibration d’écran » depuis le
menu SETUP (configuration), sélectionnez la choix
« TS CAL ».
Après être entré dans le mode de calibration, un réticule
apparaîtra dans un quandrant du coin de l’écran. Pour
commencer la calibration, pressez et maintenez le réticule
pour une seconde jusqu’à ce qu’il se metu au prochain
quadrant. Continuez pour chaque quadrant jusqu’à ce que la
calibration soit terminée.
Pour sortir sans calibrer, touchez le bouton BACK.
Sortir du menu de la configuration du
système
Pour quitter le mode de configuration et reprendre la
reproduction normale, pressez le bouton SETUP (31) sur la
télécommande ou touchez le bouton BACK sur l’écran.
Réglage Choix Fonction
Camera In Normal
Miroir Renverse l’image de la caméra
comme si l’on regardait un miroir à
vue arrière.
TFT Set
Open
Auto Le panneau TFT s’ouvre automa-
tiquement lorsque l’appareil se met
en marche.
Manual Lorsque le commutateur d’allumage
est éteint ; le panneau TFT NE SE
RETIRE PAS s’il était auparavant
dehors.
Eteint Vous devez presser le bouton
OPEN (1) pour ouvrir le panneau
TFT.
TFT Set Back Eteint L’écran TFT reste étendu jusqu’au
bout
Allumé L’écran TFT se meut en arrière un
peu après l’ouverture
Auto Gradateur
Eteint La luminosité de l’écran TFTreste
constante à moins qu’ajusté à la
main.
Allumé L’écran TFT va automatiquement
s’estomper lorsque moins de
lumière est disponible.
Setting Options Function
Source DISC
Choisissez une source pour
laquelle vous voudriez augmenter le volume relatif
(NIVEAU).
Utilisez les boutons +/- pour
augmenter ou diminuer le volume relatif pour une source
spécifiée jusqu’à 6 décibels.
RADIO
SD
SAT
AUX 1
USB
BT
AUX 2
iPod
NAV
Page 87

85
VM9423
OPERATION TUNER
A propos de la technologie HD Radio™
La technologie HD Radio permet une émission de qualité CD
numérique de vos stations AM et FM. Les émissions HD
Radio peuvent inclure des canaux multiples sur la même
fréquence, ce qui s’appelle le mutliplexage des programmes.
Avec le multiplexage, vous pouvez recevoir jusqu’à huit
canaux multiplexage supplémentaires : HD1~HD8. Avec
votre radio VM9423, vous recevrez des émissions
numériques HD Radio automatiquement lorsque vous
syntoniser à une station qui offre la technologie HD Radio.
Affichage Tuner TFT
1. Indicateur de bande radio actuelle
2. Indicateur de fréquence radio
3. Horloge
4. Nom de la station de radio (indicatif)
5. Indicateur de mode de syntonisation
6. Des stations de radio préréglées. Touchez pour rappeler
des stations préréglées.
7. Information de programme : Titre, Artiste, Type
A NOTER : La quantité de l’information affichée lorsque
vous recevez un signal HD Radio dépend de ce qui est
en train d’être émis. Certaines stations émettent leur
indicatif (nom), le nom de l’artiste, le titre de la chanson ;
et la catégorie de musique.
8. Touchez pour accès rapide aux réglages du niveau
d’Egaliseur
9. Touchez pour accéder à l’écran d’accès direct
10. Indicateur de la bande HD Radio
11. |<< : Touchez pour chercher en arrière
12. >>| : Touchez pour chercher en avant
13. << : Touchez pour syntoniser une étape en arrière, y
compris des canaux multiplexage
14. >> : Touchez pour syntoniser une étape en avant, y
compris des canaux multiplexage
15. BAND : Touchez pour changer entre les bandes AM/FM
16. Touchez pour voir la SOURCEMENU et sélectionner
une nouvelle source de reproduction.
17. MEM : Voir l’écran utilisé pour entrer le canal actuel
dans la mémoire préréglée
18. 1/2 ou 2/2 : Touchez ce bouton page pour voir une
deuxième page des boutons sur écran.
A NOTER : En mode AM, il n’y a qu’une page de
boutons sur écran. Le bouton PROG n’est pas visible
puisque les canaux multiplexage ne sont pas
disponibles pour des stations AM.
19. : Touchez pour voir le menu SETUP.
20. PROG : Touchez pour voir l’affichage des canaux
multiplexage HD Radio.
21. A/D : Touchez pour sélectionner le mode de
syntonisation Auto, Analogue ou Numérique.
22. Indicateur de station HD Radio
23. Scanner la mémoire automatique
24. TAG : Touchez pour faire un Repérage iTunes pour la
ch anson actuelle.
Changer à la réception HD Radio
• Touchez le coin gauche supérieur de l’écran ( le cercle)
pour voir le MENU SOURCE. Touchez « Radio ».
• Pressez le bouton SRC (6) sur le panneau avant ou sur
la télécommande (8) pour changer à la source AM/FM
ou RADIO.
Sélectionner la bande AM/FM
Touchez le bouton BAND (15) sur l’écran ou bien pressez le
bouton BAND sur l’appareil (4) ou sur la télécommande (20)
pour sélectionner la bande AM ou FM.
A NOTER : Le bouton BAND sur l’appareil ne fonctionne
que lorsque le TFT est fermé.
Sélectionner un mode de
syntonisation
Touchez le bouton A/D (21) pour choisir entre les modes
suivants :
• Auto : Cherchez des stations analogues et numériques.
• Analog : Cherchez et émettre des canaux analogues
uniquement.
• Digital : Cherchez et émettre des canaux numériques
uniquement.
Syntonisation
Toutes les stations FM ou AM n’offrent pas d’émission
(numérique) HD Radio. Vous pouvez recevoir des stations
analogue et numériques avec le VM9423.
Syntonisation à recherche
Pour chercher la prochaine station :
• Touchez le bouton >>| sur écran (13).
• Pressez le bouton >>| (19) sur la télécommande.
• Pressez le bouton > sur la manette (14).
Pour chercher la station précédente :
• Touchez le bouton |<< sur écran (12).
• Pressez le bouton |<< (17) sur la télécommande.
• Pressez le bouton < sur la manette (10).
Syntonisation à la main
Pour augmenter ou diminuer la fréquence de syntonisation
par une étape :
• Touchez le bouton ou sur écran (14, 15).
• Pressez le bouton >> ou << (14, 22) sur la
télécommande.
• Pressez le bouton /\ ou V (11, 15) sur la manette.
4
1
2
7
8
3
6
16
RADIO
FM 101.9 MHz HD-1
01:02 PM
BAND
1/2
AS
MEM
P1 87.5 MHz
P2 90.1 MHz
P3 98.1 MHz
P4 106.1 MHz
P5 107.9 MHz
P6 102.9 MHz
Info: Sheryl Crow
WJHM-FM
Auto HD
5
10
22
24
E
Q
T
A
G
9
11
12
13
14
15
BAND
1/2
AS
MEM MEM
18
23
17
19
20
PROG
2/2
A/D
21
Page 88

86
VM9423
Syntonisation directe
Pour entrer une station de radio directement , touchez le
bouton ou bien pressez le bouton GOTO (21) sur la
télécommande pour afficher le menu d’entrée directe.
Entrez la station de radio désirée en utilisant le pavé
numérique sur écran. Pressez Enter pour syntoniser à la
station sélectionnée. Pour quitter l’écran sans faire de
changements, touchez Exit. Pour effacer votre entrée et
recommencer touchez Clear.
Des canaux multiplexage HD Radio
Pour syntoniser à un canal multiplexage HD Radio,
syntoniser au signal principal et puis pressez le bouton
PROG (20) à la page 2/2 . Si un canal multiplexage est en
train d’être émis pour la station actuelle, le numéro de
multiplexage correspondant apparaît au côté gauche de
l’écran. Pour voir le titre et l’artiste, si disponible, sélectionnez
HD-1, HD-2, HD3, etc.
A NOTER : La quantité de l’information affichée lorsque
vous recevez un signal HD Radio dépend de ce qui est
émis. Certaines stations émettent leur indicatif (nom), le
nom de l’artiste, le titre de la chanson et la catégorie de
musique.
Recherche PTY
Après avoir syntonisé à un canal HD Radio , les catégories
du Type de Programme sont listées permettant aux
écouteurs de trouver de la programmation semblable par
genre.
Si le menu PTY n’est pas affiché, pressez le bouton PROG
(20) à la page 2/2 pour basculer entre les canaux
multiplexage HD Radio et les catégories PTY.
Lorsqu’une catégorie PTY est sélectionnée depuis un menu
d’écran tactile, la radio se mettra à scanner pour des stations
émettantes dans la catégorie sélectionnée.
Utiliser les stations préréglées
Vous pouvez mettre en mémoire jusqu’à 18 préréglés pour
FM et 6 préréglés pour AM. Les stations mises en mémoire
apparaîtront au côté gauche de l’écran.
Mettre une station en mémoire
1. Sélectionnez une bande (si nécessaire) et puis sélectionner une station.
2. Touchez le bouton sur écran MEM (17) pour ouvrir
l’écran préréglé.
3. Entrez le numéro préréglé pour lequel vous voudriez
mettre la station actuelle en mémoire (ou bien pressez
Exit pour annuler et fermer le menu). Le numéro
préréglé et la station apparaissent surlignés au côté
gauche de l’écran.
A NOTER : Des stations multiplexage peuvent être mises
en mémoire comme des stations préréglées.
Rappeler une station
1. Sélectionnez une bande (si nécessaire).
2. Touchez un bouton préréglé sur écran (6) pour
sélectionner la station mise en mémoire
correspondante.
Mise en mémoire automatique (AS)
Pour sélectionner six stations fortes et les mettre en mémoire
dans la bande actuelle :
1. Sélectionnez une bande (si nécessaire).
2. Touchez le bouton sur écran AS pour activer la fonction
Mise en mémoire automatique.
Les nouvelles stations remplacent les stations déjà mises en
mémoire dans cette bande.
FM:___._MHz
1
2
3
4
5
6
7
8
9
0
Clear
Exit
RADIO
FM 106.7 MHz HD-2
02:27 AM
PROG
2/2
A/D
MEM
HD-1
HD-2
HD-3
Title: Lil Love
WXXL-FM
Auto HD
E
Q
T
A
G
RADIO
FM 106.7 MHz HD-1
02:07 AM
PROG
2/2
A/D
MEM
01 Non-specific
02 News
03 Information
04 Sports
05 Talk
06 Rock
Title: DAWSON McALLIST
WXXL-FM
Auto HD
E
Q
T
A
G
Preset: _ _
1
2
3
4
5
6
7
8
9
0
Clear
Exit
P1 87.5 MHz
P2 90.1 MHz
P3 98.1 MHz
P4 106.1 MHz
P5 107.9 MHz
P6 102.9 MHz
Page 89

87
VM9423
Repérage iTunes®
Le VM9423 offre iTunes® Tagging, qui permet à l’utilisateur
de repérer des chansons jouant sur des stations HD Radio
pour un achat ultérieur par iTunes. Lorsque le bouton TAG
(24) est touché, l’appareil met le titre et l’information sur
l’artiste de la chanson en mémoire ce qui peut alors être
transféré à votre iPod lorsque celui-ci est branché au
MediaLink
4
. Une liste intitulé "Tagged" apparaîtra dans
iTunes ; vous permettant la choix d’acheter vos chansons
repérées.
Compatibilité iPod
Les modèles soutenus, mais non limités à, incluent ce qui
suit :
• iPod nano 4G
• iPod Classic
• iPod Touch
• iPod 5G
• iPod nano 3G
Repérer la musique
Pour commencer à reprérer la musique, syntonisez à une
station HD Radio. L’icône HD en haut de l’affichage doit être
illuminé, indiquant que l’on reçoit la station numérique.
Touchez le bouton sur écran TAG ou bien pressez le bouton
MENU/TAG sur la télécommande. « Adding Tag... »
apparaîtra sur l’affichage. L’information sur la chanson est
enregistrée dans la mémoire du VM9423 jusqu’à ce qu’un
iPod est branché. Lorsque la première repère a réussi, le bas
de l’écran affiche « Tag Stored 1 of 64 ». Vous pouvez
repérer jusqu’à 64 chansons avant que les repères ne soient
transférées à un iPod ou effacées. Lorsque la mémoire Tag
atteint sa capacité maximale (64 repères) le bas de l’écran
affiche « Memory Full, Connect iPod ».
A NOTER : Des repères sauvées à votre iPod peuvent
être gérées en utilisant le logiciel iTunes, disponible sur
www.apple.com/itunes.
Télédéchargez vos repères sur votre iPod
Pour télédécharger des repères sur votre iPod, branchez un
iPod à votre iPod jLink
3
et puis au connecteur iPod
MediaLink
4
. Toutes les repères existantes seront
automaitquement transférées à l’iPod et effacées de la
mémoire de l’installation de tête. Si un iPod est branché
lorsqu’une chanson est repérée, la repère sera
immédiatement transférée à l’iPod.
A NOTER : Lorsque vous transférez les repères à un
iPod, le VM9423 doit rester en mode Radio jusqu’à ce
que le message « ## Tag(s) Sent » est affiché. Pour
acheter les chansons reprérées vous devez
synchronisez votre iPod à iTunes et puis cliquez sur la
liste « Tagged » au côté droite de l’écran du logiciel
iTunes. Cliquez le bouton « view » pour information sur
l’achat.
Table 5: Messages TAG
Message Tag Raison
Storing Tag… Le bouton Tag est pressé
Tag Stored ## of 64 Mise en mémoire des reprères
réussie
## Tag(s) Sent Les repères ont été trans-
férées
Memory full, Connect iPod La mémoire Tag est pleine
Insufficient Tag Data Les données Tag ne sont pas
disponibles
Tag transfer failed Transfert de repères n’a pas
réussi
iPod full, Tag cannot be stored Mémoire iPod est pleine
Tagging not supported Un iPod non-soutenu est
branché
Table 5: Messages TAG
Message Tag Raison
Page 90

88
VM9423
OPERATION RADIO SATELLITE
Des écouteurs peuvent s’abonner à XM® Radio sur le
Web en visitant www.xmradio.com, ou en appelant (800)
967-2346. Des clients doivent avoir leur identification
Radio prête (voir « Affichage du code d’identification ID
»). Des clients peuvent recevoir un nombre limité de
canaux gratuits sans activation.
Accéder au mode Radio Satellite
Pressez le bouton SRC (6) sur le panneau avant ou sur la
télécommande (8) pour changer à la source SAT.
1. Nom de canal SAT
2. Numéro du canal SAT
3. Bande SAT
4. L’heure
5. Titre de chanson
6. Nom de l’artiste
7. Catégorie de chanson
8. Indicateur de la force du signal
9. Canaux préréglés actuels/boutons des préréglés sur
écran
10. CH - : Sélectionnez le canal précédent
11. CH + : Sélectionnez le canal prochain
12. CAT + : Sélectionnez le canal prochain dans la
catégorie actuelle uniquement
13. CAT - : Sélectionnez le canal précédent dans la
catégorie actuelle uniquement
14. Touchez pour entrer le canal directement en utilisant le
clavier sur écran.
15. CG : Accéder au mode du Guide Canal/Catégorie
16. BAND : Changez entre les bandes SAT1, SAT2 et SAT3
17. Touchez pour voir le menu SETUP
18. Touchez cette zone pour voir le MENU SOURCE et
sélectionner une nouvelle source de reproduction
19. MEM : Voir l’écran utilisé pour entrer le canal actuel
dans la mémoire préréglée
20. DIAG : Cette fonction est réservée pour des
professionnels du service pour le dépannage.
Afficher le code d’identification (ID)
Avant d’écouter votre radio satellite, vous devez vous
abonner au service en utilisant le numéro d’identification de
votre radio. Pour afficher l’identification radio, pressez les
boutons gauche/droite (16, 17) sur la manette ou les boutons
CH - ou CH + sur l’écran tactile plusieurs fois de suite pour
syntoniser au canal « 000 ». L’écran afficher l’identification
radio où le nom du canal est normalement affiché.
Sélectionner une station
Utilisez les boutons gauche/droite de la manette ou les
boutons CH - ou CH + sur l’écran tactile pour changer à une
autre station.
Mode préréglé
Pour entrer dans le mode préréglé, touchez le bouton BAND
sur l’écran, ou bien pressez le bouton BAND sur l’appareil (4)
ou sur la télécommande (20) pour changer entre les bandes
suivantes : SAT1, SAT2, ou SAT3 (indiqué au coin gauche
supérieur de l’écran TFT).
Six boutons préréglés numérotés mettent en mémoire et
rappellent des stations pour chaque bande. Toutes les six
stations mises en mémoire (P1-P6) pour la bande actuelle
apparaissent sur l’écran TFT.
Mettre une station en mémoire
1. Sélectionnez une bande (s’il le faut), et puis sélectionnez une station.
2. Touchez le bouton MEM sur écran (18) pour ouvrir
l’écran des préréglés.
3. Touchez le numéro préréglé dans lequel vous voudriez
mettre en mémoire la station actuelle (ou bien pressez
EXIT pour annuler et fermer le menu). Le numéro
préréglé et la station apparaissent surlignés.
Rappeler une station
1. Sélectionnez une bande (s’il le faut).
2. Touchez un bouton préréglé sur écran pour sélectionner
la station mise en mémoire correspondante.
Syntonisation Directe
Pour entrer une station de radio directement, touchez le
bouton ou bien pressez le bouton GOTO (21) sur la
télécommande pour afficher le menu d’entrée directe.
Entrez la station de radio désirée en utilisant le pavé
numérique sur écran. Touchez le bouton Enter pour
syntoniser à la station sélectionnée. Pour quitter l’écran sans
changer de station, touchez Exit. Pour effacer votre entrée et
recommencer, touchez Clear.
SAT
SAT1 CH001
01:02
CG
BAND
MEM
DIAG
P1 XM Preview
P2 XM Preview
P3 XM Preview
P4 XM Preview
P5 XM Preview
P6 XM Preview
Title: Fridays XM144!
XM Preview Preview
CAT
+
CAT
-
CHCH
+
-
10
11
12
13
14
15
18
4
3 21
5
16
17
6
7
8
9
19
20
E
Q
Mem:
Exit
P1
P2
P3
P4
P5
P6
CHNO:___/255
1
2
3
4
5
6
7
8
9
0
Clear
Exit
Page 91

89
VM9423
Mode du Guide Canal/Catégorie
Il y a deux modes de recherche pour aider à naviguer les
canaux et/ou les catégories. Pour accéder au mode du guide
Canal/Catégorie, pressez le bouton ENTER (18) sur la
télécommande ou le bouton CG sur l’écran.
Guide des canaux est le mode de recherche par défaut. Pour
accéder au Guide Catégorie, pressez le bouton TITLE (2) sur
la télécommande ou touchez CAT sur l’écran tactile. Pour
revenir au guide des canaux touchez CH sur écran ou
pressez le bouton SUBTITLE (9) sur la télécommande.
Mode du guide canal
Lorsque le mode du Guide des Canaux est sélectionné, les
six premiers canaux satellites sont affichés dans des boîtes
en bas à gauche de l’lécran TFT et le menu sur écran change
pour faciliter le mode de recherche.
• Lorsque vous êtes en mode recherche, pour changer
entre les modes de rechercher Canal et Catégorie,
pressez le bouton CH ou CAT sur l’écran tactile.
• Utilisez la barre de défilement et les flèches sur l’écran
tactile pour voir la page prochaine/précédente des
stations. Chaque page contient six canaux à
sélectionner.
• Pressez le bouton SCN sur écran ou le bouton INT (20)
sur le panneau de commande pour prévisionner chacun
des six canaux affichés pour 10 secondes à la fois.
• Pressez le bouton CG pour revenir à l’écran du mode
des préréglés.
• Pour sélectionner un canal alors que vous êtes en mode
du Guide des Canaux, touchez le nom du canal sur
l’écran. Le canal se mettre à jouer et l’appareil reviendra
au mode des préréglés.
Mode du Guide Catégorie
Lorsque le MOde Catégorie est sélectionné, des icônes des
dossiers apparaissent sur l’écran à côté des choix de
catégories.
• Alors que vous êtes en mode rechercher, pout changer
entre les modes de rechercher par Canal et par
CAtégorie, pressez le bouton CH ou CAT sur l’écran
tactile.
• Utilisez la barre de défilement et les flèches sur l’écran
tactile pour voir la page prochaine/précédente des
catégories. Chaque page contient six catégories à
sélectionner.
• Pour sélectionner une catégorie touchez le nom de
catégorie correspondante ou l’icône du dossier. Les
canaux dans cette catégorie seront affichés sur l’écran.
• Utilisez la barre de défilement et les flèches sur l’écran
tactile pour voir les six stations prochaines/précédentes
dans la catégorie sélectionnée.
• Touchez le bouton SCN sur écran pour passer en revue
chaque canal dans la catégorie sélectionnée pour 10
secondes à la fois.
• Touchez le nom du canal pour jouer ce canal-là.
• Touchez le bouton CG sur écran pour revenir à l’écran
du mode des préréglés.
SAT
SAT1 CH001
01:02
CG
SCN
MEM
DIAG
########
001 XM Preview
004 The 40s
005 The 50s
006 The 60s
007 The 70s
Title: www.xmradio.com
XM Preview Preview
CH
CAT
E
Q
Page 92

90
VM9423
OPERATION VIDEO DVD/VCD
A NOTER : Lorsqu’il est bien installé la vidéo DVD ne
peut pas être affichée sur l’écran TFT principal à moins
que le frein de stationnement ne soit appliqué. Si vous
tentez de jouer un DVD alors que véhicule se meut,
l’écran TFT affiche « PARKING » avec arrière-fond en
bleu. Les écrans vidéo en arrière fonctionneront
normalement où applicable.
Insérez/Ejecter un Disque
Pour insérer un disque vous devez d’abord presser le bouton
(4) pour ouvrir le panneau avant et révéler la fente du
disque. Après avoir inséré un disque DVD, le mode DVD est
entré et la reproduction du disque commence. La lumière
d’indication du disque (9) s’illumine lorsqu’un disque est
inséré.
A NOTER : Si le Verrouillage Parental est activé et le
disque inséré n’est pas autorisé, il faut entrer le code à 6
chiffres et/ou le disque doit être autorisé (voir «
Fonctions du sous-menu Général » á la page 82).
Vous ne pouvez insérer un disque s’il y a déjà un disque dans
l’appareil ou si la puissance est éteinte.
A NOTER : DVD-R et DVD-RW ne joueront pas à moins
que la séance d’enregistrement ait été finalisée et le DVD
soit fermé.
Ejecter un disque
Pressez le bouton (16) sur l’appareil ou sur la
télécommande (35) pour éjecter le disque. L’appareil revient
automatiquement au mode Tuner. Vous pouvez éjecter un
disque lorsque la puissance est éteinte. L’appareil restera
éteint après l’ejection du disque.
Réinitialiser le mécanisme de
chargement
Si le disque se charge d’une manière anormale ou une
opération du mécanisme de coeur anormale advient, pressez
et maintenez le bouton (16) sur l’appareil ou sur la
télécommande pour réinitialiser le mécanisme de
chargement. L’opération normale se reprend.
Accéder au mode DVD
Pour changer au mode DVD lorsqu’un disque est déjà inséré,
pressez le bouton SRC (6) sur le panneau avant ou sur la
télécommande (8) jusqu’à ce que « DISC » apparaisse en
bas de l’écran.
Commander la reproduction
Pour accéder aux commandes sur écran, touchez l’écran.
Touchez le bouton 1/2 pour voir la deuxième page des
commandes.
Arrêter la reproduction
Touchez le bouton d’arrêt ( ) sur l’écran ou bien pressez le
bouton /BAND (20) sur la télécommande pour arrêter la
reproduction du DVD.
Suspendre la reproduction
Touchez le bouton de suspension ( || ) sur l’écran (ou bien
pressez le bouton
>/|| sur la télécommande) pour suspendre
la reproduction du disque. Pressez le bouton > sur l’écran
pour reprendre la reproduction du disque.
Reproduction avance rapide
Pressez le bouton /\ sur la manette ou le bouton >> sur
l’écran pour faire avance rapide. Pressez et relâchez
plusieurs fois de suite pour augmenter la vitesse de « 2X » à
« 4X », « 6X », et « 8X ».
Pressez le bouton enter de la manette (18) sur la
télécommande ou touchez le bouton jouez (>) pour reprendre
la reproduction normale.
Reproduction recul rapide
Pressez le bouton de la manette \/ ou bien touchez le bouton
<< sur l’écran pour jouer le titre actuel en recul rapide.
Pressez et relâchez plusieurs fois de suite pour augmenter la
vitesse de « 2X » à « 4X », « 6X », et « 8X ».
Pressez le bouton de la manette ENTER (13) sur l’appareil
ou bien touchez le bouton jouez (>) pour reprendre la
reproduction normale.
Reproduction avance ralentie/recul en ralenti
Pressez le bouton ||>/BAND sur la télécommande pour faire
avance ralentie/ recul en ralenti. Pressez et relâchez
plusieurs fois de suite pour augmenter la vitesse du ralenti de
« 2X » à « 4X » et « 8X » et puis commencer le recul en
ralenti.
Reproduction répétée
Pressez le bouton RPT (19) sur le panneau de commande, le
bouton RPT (7) sur la télécommande ou bien le bouton
sur l’écran pour modifier le mode de répétition selon le
suivant :
• DVD : Répéter Chapitre, Répéter Titre, Répéter Eteint
• VCD (PBC Off) : Répéter Simple, Répéter Eteint
A NOTER : Pour le VCD, la fonction de répétition n’est
pas disponible si le PBC est allumé.
Fonction de répétition par segment (A-B)
Utilisez la fonction A-B pour définir une zone spécifique du
disque à répéter.
• Pressez le bouton RPT A-B (6) sur la télécommande
(ou le bouton A-B sur écran) pour régler le point de
démarrage (A) du segment à répéter.
• Pressez le bouton RPT A-B de nouveau lorsque vous
êtes arrivé au point final (B) du segment à répéter. La
partie sélectionnée du DVD va se répéter
continuellement.
• Pressez le bouton RPT A-B de nouveau pour annuler la
section A-B et arrêter la reproduction répétée.
• Reproduction au hasard
Avec un DVD, VCD ou un CD en train de jouer, pressez le
bouton RDM sur la télécommande (33) pour activer la
reproduction au hasard et jouer tous les chapitres/pistes
dans un ordre mélangé. « On » apparaît sur l’écran.
Pressez le bouton > sur la manette pour jouer la prochaine
piste au hasard.
Pressez le bouton RDM de nouveau pour éteindre la
reproduction au hasard.
1/2
BACKBACK
MENU
2/2
DISP
EQ
AUDIO
A-B
TITLE
SUBTITLE
Page 93

91
VM9423
A NOTER : Lorsqu’un VCD est en train de jouer avec le
PBC allumé, activer la reproduction au hasard va
automatiquement éteindre le PBC.
Accéder au menu DVD
Pressez le bouton MENU (1) sur la télécommande pour
rappeler le menu DVD principal. Utilisez la manette pour
sélectionner un titre du menu ou touchez le titre sur l’écran.
Pressez le bouton TITLE (2) sur la télécommande ou sur
l’écran pour sélectionner un titre différent pour la
reproduction.
Pressez le bouton ENTER (manette) pour confirmer votre
sélection et commencer la reproduction. Vous pouvez aussi
sélectionner un titre utilisant l’écran tactile.
Se mouvoir à travers les chapitres
Pressez le bouton > sur la manette ou le bouton >>| sur
écran pour avancer jusqu’au prochain chapitre sur le DVD.
Pressez le bouton < sur la manette ou le bouton |<< sur
l’écran pour aller au chapitre précédent.
Sélection directe du chapitre/de la
piste
Entrée directe par télécommande
Pendant la reproduction du DVD, VCD et CD, vous pouvez
utiliser le pavé numérique sur la télécommande (29) pour
accéder directement à une piste.
Entrée directe par écran tactile
Pour sélectionner un titre, chapitre/piste ou un temps de
reproduction spécifiée directement, touchez le bouton
sur l’écran pour afficher le menu d’entrée directe.
Utilisez le bouton pour sélectionner le Titre ; Chapitre, ou
l’entrée Heure.
• Titre : _/#
• Chapitre : _ _/##
• Heure : _ _:_ _:_ _
Entrez le titre, chapitre/piste désiré ou l’heure désirée en
utilisant le pavé numéirque sur écran et puis pressez le
bouton Enter. Pour quitter l’écran sans faire une sélection,
touchez Exit. Pour effacer votre entrée et recommencer
touchez Clear.
Visionner un angle de l’image
alternatif (Uniquement DVD)
Certains DVDs contiennent des scènes qui ont été filmées
des angles différents simultanément. Pour des disques
enregistrés avec des angles multiples, pressez le bouton
ANGLE (13) sur la télécommande pour basculer entre les
angles disponibles de l’image sur écran.
Zooming
Pressez les boutons PRESET /\ et \/ buttons (11, 12) sur la
télécommande pour élargir et faire panoramique par une
image vidéo en utilisant les choix suivantes : « ZOOM 1.5 »,
« ZOOM 2 », « ZOOM 3 », and « OFF ».
Des disques à langues multiples (DVD
uniquement)
Changer la langue audio
Si vous regardez un disque enregistré dans des langues
multiples, pressez le bouton AUDIO (5) sur la télécommande
pour choisir une langue.
Changer la langue de sous-titrage
Si vous regardez un disque enregistré dans des langues
multiples avec des sous-titres, pressez le bouton SUBTITLE
(9) sur la télécommande pour choisir la langue dans laquelle
vous voudriez que les sous-titres apparaissent.
A NOTER : Pendant la reproduction d’un VCD, pressez le
bouton AUDIO (5) sur la télécommande pour choisir
entre le canal Gauche, Canal Droite et Stéréo.
PBC (Commande de reproduction VCD uniquement)
Pour des VCDs avec la fonctionnalité de reproduction, la
commande de reproduction (PBC) fournit des commandes
supplémentaires pour la reproduction VCD.
Pressez le bouton MENU (1) sur la télécommande pour
basculer entre les fonctions PBC « Allumé/Eteint ». Lorsque
le PBC est allumé, la reproduction commencer à partir de
piste 1 de la liste d’écoute.
A NOTER : Lorsque le PBC est activé, avance rapide,
reproduction en ralenti, piste prochaine/précédente sont
disponible. La reproduction répétée et la sélection
directe de piste ne sont pas disponibles.
Lorsque le PBC est activé, sélectionner la reproduction au
hasard, scannage ou la reproduction à rechercher désactive
automatiquement le PBC.
Information sur la reproduction
Pendant la reproduction DVD et VCD, pressez le bouton
DISP sur le panneau de commande (2) ou sur la
télécommande (10) pour afficher l’information sur la
reproduction sur l’écran y comprise la média qui joue et le
temps de reproduction actuel.
Information sur la reproduction DVD
L’information suivante est affichée en haut de l’écran pendant
la reproduction DVD :
• Titre : 05/08 – « 05/08" indique que le cinquième des 8
titres sur le DVD est actuellement reproduit.
• Chapitre : 012/016 – « 002/016" indique que le deuxième des 16 titres sur le DVD est actuellement reproduit.
Chapter: _ _
1
2
3
4
5
6
7
8
9
0
Clear
Exit
Page 94

92
VM9423
• 00:41:28 – « 00:41:28 » indique le temps de
reproduction du titre actuel
L’information suivante est affichée en bas de l’écran :
• Avant : Source
• Arrière : Source
•HORLOGE
Information sur la reproduction du VCD
L’information suivante est affichée en haut de l’écran pendant
la reproduction VCD :
• VCD 2.0 – Format du disque actuel.
• Titre : 06/18 – « 06/18 » indique que le sixième des 18
pistes sur le VCD est actuellement reproduit
• 00:02:18 – « 00:02:18 » indique le temps de
reproduction de la piste actuelle.
Information général sur le disque
Table 6: Propriétés du disqueDisc Properties
SymbolePropriétés du disque à
12cm
Temps de
reproductio
n maximal
Simple face simple couche
(DVD-5)
Simple face double couche
(DVD-9)
Double face simple couche
(DVD-10)
Double face double couche
(DVD-18)
(MPEG 2
Méthode)
133 minutes
242 minutes
266 minutes
484 minutes
Simple face simple couche
(VCD)
(MPEG 1
Méthode)
74 minutes
Simple face simple couche 74 minutes
Table 7: Symbôles du disque
Symbôle Signification
Le nombre des langues vocales enregistrées. Le numéro à l’intérieur de l’icône
indique le nombre de langues sur le disque
(maximum 8)
Nombre de langue de sous-titrages disponibles sur le disque (maximum 32)
Nombre d’angles fourni (maximum 9)
Rapport largeur/longueur disponibles. « LB
» signifie Boîtes à Lettres et PS signifie
Panoramique/Scannage. Dans l’exemple à
gauche la vidéo 16:9 peut être converti en
vidéo Boîtes à Lettres.
Indique le code régional où le disque peut
être joué.
• Region 1 : USA, Canada, East Pacific Ocean
Islands
• Region 2 : Japan, Western Europe, Northern
Europe, Egypt, South Africa, Middle East
• Region 3 : Taiwan, Hong Kong, South Korea,
Thailand, Indonesia, South-East Asia
• Region 4 : Australia, New Zealand, Middle and
South America, South Pacific Ocean Islands/
Oceania
• Region 5 : Russia, Mongolia, India, Middle
Asia, Eastern Europe, North Korea, North
Africa, North-West Asia
• Region 6 : Mainland China
• TOUT : Toutes les régions
Table 7: Symbôles du disque
Symbôle Signification
Page 95

93
VM9423
OPERATION AUDIO DVD/CD
Des instructions pour la commande TFT et Insérer/Ejecter
sont les mêmes pour opération DVD et CD. Veuillez voir la
section sur Opération Vidéo DVD/Disque pour des
informations sur ces sujets.
Le VM9423 jouera de la musique ou d’autres fichiers audio
depuis les formats/média disque suivants :
• CD-DA
• CD-R/RW
•DVD
•DVD+R/RW
•DVD-R/RW
Après l’insertions du disque , le disque et le titre de la piste (si
disponible) avec le numéro de la piste et le temps de
reproduction apparaissent sur l’écran.
Interface d’utilisateur lecteur CD
Les indicateurs sur écran et les zones de clé tactile pour la
reproduction CD sont donnés ci-dessous.
1. Piste actuelle et le nombre total des pistes sur le disque
2. Temps de reproduction écoulé/longueur de la piste
3. Titre du disque
4. Titres de piste disponibles
5. Information ID3
6. || : Touchez pour suspendre/ jouer la reproduction du
disque
7. : Touchez pour arrêter la reproduction du disque
8. >>| : Touchez pour aller à la piste prochaine
9. |<< : Touchez pour aller à la piste précédente
10. />> : Touchez pour naviguer la liste d’écoute/touchez
pour faire avance rapide
11. /<< : Touchez pour naviguer la liste d’écoute/touchez
pour faire recul ou rembobinage rapide
12. Touchez pour activer/ désactiver mode de reproduction
au hasard
13. Touchez pour activer/désactiver le mode de
reproduction répétée
14. Touchez pour accéder à l’écran d’entrée directe
15. Touchez pour voir le menu SETUP
16. Touchez pour voir Analyseur de Spectre > Egaliseur
17. Touchez pour voir le MENU SOURCE et sélectionner
une nouvelle source de reproduction
18. Touchez la barre de défilement et des flèches pour voir
la page précédente/prochaine des chansons
19. Temps actuel
Commander la reproduction
Arrêter la reproduction
Touchez le bouton sur écran ou pressez le bouton (20)
sur la télécommande pour arrêter la reproduction du disque.
Pour reprendre la reproduction, touchez le bouton sur
l’écran ou bien pressez le bouton de la manette.
Suspendre la reproduction
Touchez le bouton sur écran ou bien pressez le bouton de
la manete pour suspendre ou reprendre la reproduction du
disque.
Se mouvoir à travers les pistes
Pressez le bouton >>| (19) sur la télécommande ou sur
l’écran ou utiliser le bouton > sur la manette pour avancer
jusqu’à la piste prochaine sur le disque.
Pressez le bouton |<< (17) sur la télécommande ou sur
l’écran ou utilisez le bouton < sur la manette pour aller à la
piste précédente.
Reproduction répétée
Touchez le bouton sur l’écran, pressez le bouton RPT
sur la télécommande (7) ou sur le panneau de commande
(19) pour modifier le mode de reproduction répétée selon le
suivant :
• DVD : Répéter Chapitre, Répéter Titre, Répéter Eteint
• CD-DA : Répéter Un, Répéter Tout, Répéter Eteint
• CD-R/RW : Répéter UN, Répéter Tout, Répéter Eteint
• DVD-R/RW : Répéter Un, Répéter Tout, Répéter Eteint
Sélection de scannage des pistes (CD-DA disques
uniquement)
Pendant la reproduction du disque, pressez le bouton SCN
sur la télécommande (34) ou le bouton INT (20) sur le
panneau de commande pour jouer les dix premières
secondes de chaque piste. Lorsqu’une piste désirée est
atteinte, pressez le bouton SCN de nouveau pour annuler la
fonction et jouer la piste sélectionnée.
Sélection de reproduction au hasard
Lorsque la reproduction du disque est arrêtée, pressez le
bouton RDM sur la télécommande (33) pour jouer les pistes
sur le disque dans un ordre mélangé au hasard. Touchez le
bouton RDM de nouveau pour annuler le mode de
reproduction au hasard.
A NOTER : CD-R et CD-RW ne joueront pas à moins que
la séance d’enregistrement n’ait été finalisée.
Avance Rapide
Touchez le bouton sur l’écran ou bien pressez le bouton /\
sur la manette pour faire avance rapide. Pressez et relâchez
le bouton plusieurs fois de suite pour augmenter la vitesse de
« 2X » à « 4X », « 6X », et « 8X ».
Recul rapide
Touchez le bouton sur l’écran ou bien pressez le bouton /\
sur la manette pour faire recul rapide. Pressez et relâchez le
bouton pour augmenter la vitesse de « 2X » à « 4X », « 6X »,
et « 8X ».
Entrée directe de piste
Pour sélectionner une piste
directement, touchez le bouton
sur l’écran pour afficher
le menu d’entrée directe.
Entrez le numéro de piste
désiré en utilisant le pavé
numérique sur écran et puis
pressez le bouton Enter. Pour
quitter l’écran sans faire de
sélection, touchez Exit. Pour
effacer votre entrée et
recommencer, touchez Clear.
15
1
7
2
12
5
16
13
3
17
DISC
CD 1/10 01:23 04:31
01:02
1 Track 01
2 Track 02
3 Track 03
4 Track 04
5 Track 05
6 Track 06
14
4
9
11
10
8
6
18
Audio CD
19
E
Q
TRACK:__/##
1
2
3
4
5
6
7
8
9
0
Clear
Exit
Page 96

94
VM9423
JOUER DES FICHIERS MP3/WMA
Instructions pour la commande TFT et Insérer/Ejecter sont
les même pour opération DVD et MP3. Veuillez voir la section
sur l’opération vidéo DVD/Disque pour des informations sur
ces sujets.
A NOTER : Lorsque vous enregistrez des fichiers
MP3/WMA sur un disque DVD, utiliser la choix
d’enregistrement 2x ou 4x si disponible. Cette
vitesse d’enregistrement plus lente aidera à
éliminer des erreurs tampons et augmenter la
fiabilité de la lecture du disque. Aussi, utilisez
des dossiers lorsque vous enregistrez un nombre
important de chansons/fichiers sur un disque
pour une navigation de la musique facile.
Sélectionnez la choix « Disc at Once » et fermez
votre disque.
Exigence fichiers et média MP3/WMA
Ce lecteur vous permet de reproduire des fichiers MP3 et
WMA enregistrés sur des CD-R/RWs, DVD+R/RWs, and
DVD-R/RWs. Pour des disques CD-RW veuillez vous
rassurer qu’ils soient formatés en utilisant la méthode pleine
et non pas la méthode rapide pour empêcher des opérations
de disque illégales.
Vous pouvez enregistrez jusqu’à 1500 chansons/fichiers sur
un disque pour un mélange de musique MEGA DVD.
N’excédez pas ce nombre de chansons/fichiers sinon il peut
y avoir des problèmes de lisibilité.
Compatibilité avec format MP3
Les formats de nomination des fichiers donnés ci-dessous
sont compatibles avec cet appareil :
• ISO 9660 – nom du fichiers : 12 caractères, extension
du fichier : 3 caractères
• ISO 9660 – nom du fichier : 31 caractères, extension du
fichier : 3 caractères
• Joliet – 64 caractères
Si le nom du fichier ou du dossier ne se conforme pas au
standards du système de fichier ISO 9660, il peut ne pas être
affiché ou reproduit correctement. Utilisez les réglages
suivants lorsque vous comprimez des données audio pour
votre disque MP3 :
• Taux de transfert de bits : 128kbps
• Fréquence d’échantillonnage : 48kHz
A NOTER : Lorsque vous enreigstrez des fichiers
MP3 jusqu’à la capacité maximum du disque,
désactivez l’écriture supplémentaire. Pour
enregistrement sur un disque vide jusqu’à sa
capacité maximum, utilisez le réglage « Disc at
Once ».
L’ordre de reproduction MP3
Lorsqu’ils sont sélectionnés pour reproduction, des fichiers et
des dossiers (Recherche Dossier ; Recherche Fichier, ou
Sélectionnez Dossier) sont accédés dans l’ordre dans lequel
ils avaiient été écrits par l’écrivain CD. Par conséquent,
l’ordre dans lequel on s’attend à les écouter peut ne pas
s’accorder avec l’ordre dans lequel ils sont actuellement
joués. Vous pouvez régler l’ordre dans lequel des fichiers
MP3/WMA sont joués en les écrivant sur un médium tel que
CD-R avec les noms de fichier commençant avec les
numéros de séquence de reproduction tels que « 01 » à
« 99 ».
Par exemple, un médium avec la hiérarchie dossier/fichier
suivant est soumis à la Recherche Dossier, Recherche
Fichier ou Sélectionner dossier, comme montré ci-dessous.
Le lecteur VM9423 ne reconnaîtra que trois niveaux de
dossiers et n’affiche pas de dossiers qui ne contiennent que
d’autres dossiers. Dans l’exemple ci-dessus, l’appareil
afficher des dossiers 3, 4, 6 et 8, mais non pas 2 et 7
puisqu’ils ne contiennent pas de pistes directement. Dossier
5 n’est pas reconnu du tout puisqu’il est au quatrième niveau.
Page 97

95
VM9423
Charger une carte SD
A NOTER : Le VM9423 soutiendra des cartes SD jusqu’à
8GB. Des cartes SD plus grandes que celles-ci (Cartes
SDHC) ne seront pas reconnues.
Pour insérer une Carte SD, vous devez d’abord presser le
bouton /EJECT sur le panneau de commande (5) ou sur la
télécommande (23) pour révéler la fente de la carte SD (14).
Insérez la carte SD dans la fente destinée à la carte et
l’appareil lira les fichiers audio/vidéo sur la carte
automatiquement.
Pour enlever la carte, pressez d’abord le bouton SRC (6)
pour changer à un autre mode et arrêter la reproduction SD.
Poussez et relâchez pour faire sauter la carte vers le dehors.
Tenez la carte SD et tirez-la tout droit. La plupart des cartes
ont un recoin mince qui aident à l’enlèvement.
Charger un dispositif USB
A NOTER : Le port USB reconnaîtra la plupart des
dispositifs USB à mémoire flash aussi bien que des
disques durs portatifs avec des fichiers vidéo/audio. Ce
disque dur doit être formaté à FAT32. L’installation de
tête du système d’opération ne soutient pas de structure
de fichier NTFS.
1. Trouvez le jack USB situé sur le MediaLink
4
.
2. Insérez le dispositif USB dans le connecteur USB.
L’appareil lira les fichiers de média audio/video sur le
dispositif USB automatiquement.
Pour enlever le dispositif USB, pressez le bouton SRC (6)
pour changer à un autre mode et puis enlevez le dispositif
USB du connecteur USB.
Interface d’utilisateur MP3
Les indicateurs sur écran et les zones de clés tactiles pour la
reproduction Mp3 sont donnés ci-dessous.
1. Piste actuelle et le nombre total de piste sur la racine du
disque
2. Temps de reproduction écoulé, longueur de piste
3. Temps actuel
4. Titres de piste
5. Information ID3
6. || : Touchez pour jouer/suspendre la reproduction du
disque
7. : Touchez pour arrêter la reproduction du disque
8. >>| : Touchez pour aller à la piste prochaine
9. |<< : Touchez pour aller à la piste précédente
10. />> : Touchez pour naviguer la liste d’écoute/touchez
pour faire avance rapide
11. /<< : Touchez pour naviguer la liste d’écoute/ touchez
pour faire recul ou rembobinage rapides
12. DIR - : Touchez pour voir le dossier précédent
13. DIR + : Touchez pour voir le dossier prochain
14. Touchez pour accéder à l’écran d’entrée directe
15. Touchez pour voir le menu SETUP
16. Touchez pour voir l’Analyseur de Spectre > Egaliseur
17. Touchez pour voir le MENU SOURCE et sélectionner
une nouvelle source de reproduction
18. Nom du dossier
19. 1/2 ou 2/2 : Touchez ce bouton page pour voir une
deuxième page de boutons sur écran.
20. Touchez la barre de défilement et les flèches pour voir la
page prochaine/précédente de chansons
21. Touchez pour activer/désactiver le mode de
reproduction à répétition
22. Touchez pour accéder au menu Musique
23. Touchez pour accéder au menu Vidéo
24. Touchez pour accéder au menu Photo
25. Naviguez tous les fichiers
Commander la reproduction du disque
MP3/WMA
Jouer des fichiers MP3/WMA
Après l’insertion d’un disque MP3/WMA, les fichiers joueront
dans la séquence établie par le répertoire « Racine ».
A NOTER : Lorsque vousenregistrez des fichiers
MP3/WMA sur un disque DVD, utilisez la choix
d’enregistrement 2x ou 4X si disponible. Cette
vitesse d’enregistrement plus lente aidera à
éliminer des erreurs tamons et augmentera la
fiabilité de la lecture du disque. Aussi, utilisez
des dossiers lorsque vous enregistrez une
quantité importante de chansons/fichiers pou
une navigation facile de la musique. Sélectionnez
« Disc at Once » et fermez votre disque.
Arrêter la reproduction
Touchez le bouton sur écran ou bien pressez le bouton /
BAND (20) sur la télécommande pour arrêter la reproduction
du disque.
Pour reprendre la reproduction, touchez le bouton sur
écran, pressez le bouton de la manette (13) sur le panneau
EJECT
LABELSIDE UP
VIDEO LEFT RIGHT
3.5mm- Audio
MediaLink
Connecteur USB du Type A
1
2
5
16
3
17
DISC
MP3 4/84 01:56 00:00:23
01:02 AM
1 Cherry Poppin Da
2 Chris Isaak - Baby
3 Crazy Town - Butt
4 Phish - Birds Of A
5 Phish - Bouncin' R
6 Phish - Freebird (L
4
(Root)
18
1/2
15
7
14
9
11
10
8
6
19 20
20
E
Q
2/2
13
12
DIR -
DIR +
ALL
24
25
22
23
Page 98

96
VM9423
avant, ou bien pressez le bouton >/|| (18) sur la
télécommande.
Suspendre la reproduction
Touchez le bouton sur écran, pressez le bouton manette
(13) sur le panneau avant, ou bien pressez le bouton /||
(18) sur la télécommande pour suspendre ou reprendre la
reproduction du disque.
Se mouvoir à travers les pistes
Pressez le bouton >>| (19) sur la télécommande ou sur écran
ou bien utilisez le bouton > sur la manette (14) pour avancer
jusqu’à la piste prochaine sur le disque.
Pressez le bouton |<< (17) sur la télécommande ou sur écran
ou bien utilisez le bouton < sur la manette (10) pour aller à la
piste précédente.
Reproduction répétée
Touchez le bouton sur écran, pressez le bouton RPT (19)
sur la télécommande pour modifier le mode de répétition
selon le suivant : Répéter Simple, Répéter Dossier, Répéter
Eteint.
Sélectionner la reproduction au hasard
Pressez le bouton RDM (33) sur la télécommande pour jouer
les fichiers sur un disque au hasard dans un ordre mélangé.
Pressez RDM de nouveau pour annuler le mode de
Reproduction au Hasard.
A NOTER : CD-R et CD-RW ne joueront pas à moins que
la séance d’enregistrement n’ait été finalisée.
Page 99

97
VM9423
OPERATION iPod
Interface d’utilisateur iPod
Les indicateurs sur écran et les zones de clés tactiles pour la
reproduction iPod sont donnés ci-dessous.
1. Temps de reproduction écoulé
2. Piste actuelle et le nombre total des fichiers
3. Temps actuel
4. Information menu/titres média
5. Information ID3
6. Entrez
7. Touchez pour accéder aux photos
8. >>| : Touchez pour aller à la piste prochaine
9. |<< : Touchez pour aller à la piste précédente
10. Touchez pour accéder au menu iPod
11. >|| : Touchez pour suspendre/jouer la reproduction du
disque
12. Touchez pour accéder aux fichiers musiques
13. Touchez tpour accéder aux fichiers vidéo
14. Touchez pour accéder à l’écran SETUP
15. Touchez pour voir l’Analyseur de Spectre > Egaliseur
16. Touchez pour voir le SOURCE MENU et sélectionner
une nouvelle source de reproduction
17. Titre de chanson
18. Touchez pour voir le menu d’entrée directe
19. Touchez la barre de défilement et les flèches pour voir la
page prochaine/précédente des chansons
Commander votre iPod
L’appareil changera automatiquement au mode iPod
lorsqu’un iPod est branché dans le MediaLink
4
. Pour revenir
au menu iPod de n’importe quelle source , pressez le bouton
SRC (6) sur le panneau avant ou la télécommande (8)
jusqu’à ce que le menu iPod apparaisse sur l’écran.
A NOTER : Soyez sûr que votre iPod a le dernier logiciel
Apple installé pour éviter des questions de connectivité.
Les icônes d’écran tactile suivants et les boutons de
télécommande sont utilisés pour accéder aux menus iPod.
Utilisez l’écran tactile, la manette ou les clés directionnels sur
la télécommande pour naviguer les menus iPod.
Reproduction de musique iPod
Pour accéder aux fichiers musiques iPod, touchez le bouton
sur écran ou bien pressez le bouton AUDIO (5) sur la
télécommande.
• Touchez le bouton > || sur l’écran pour jouer/ suspendre.
• Touchez >>| SUR ÉCRAN, PRESSEZ LE BOUTON >>|
(19) sur la télécommande ou bien pressez le bouton >
sur la manette (17) pour aller à l’article prochain sur le
menu.
• Touchez |<< sur écran ; pressez le bouton |<< (17) sur
la télécommande, ou bien pressez le bouton < sur la
manette (16) pour aller à l’article précédent sur le menu.
• Utilisez l’écran tactile ou bien pressez le bouton >/|| (18)
sur la télécommande ou le bouton ENTER sur la
manette (20) sur le panneau de commande pour
sélectionner la choix menu surlignée.
• Pressez le bouton >> (14) sur la télécommande ou le
bouton /\ (18) sur la manette, touchez le bouton MENU
sur écran pour revenir au menu précédent.
Avance rapide/Recul rapide
Pressez et maintenez les boutons |<< ou >>| sur l’écran ou
sur la télécommande (17, 19) pour une seconde et continuer
à faire avance rapide ou recul rapide. Relâchez pour
reprendre la reproduction normale.
Reproduction des photos
Alors que des photos iPod peuvent être visionnées sur
l’écran du VM9423 vous devez utiliser les commandes de
choix de reproduction photos iPod.
Touchez l’icône sur écran ou bien pressez le bouton SUB-
TITLE (9) sur la télécommande pour accéder au mode
PHOTO iPod. Le VM9423 relâchera la commande vers l’iPod
pour que vous puissiez sélectionner de la média vidéo pour
aêtre affichée sur le moniteur TFT. Pour quitter le mode
PHOTO, touchez l’écran.
Reproduction Vidéo
Alors que de la vidéo iPod peut être visionnée sur l’écran
VM9423 vousdevez utiliser l’iPod pour commander des choix
de reproduction vidéo.
Touchez le bouton
sur l’écran ou bien pressez le bouton
ANGLE (13) sur la télécommande pour accéder au mode
iPod VIDEO. Le VM9423 relâchera la commande à l’iPod
pour que vous puissiez sélectionner la média vidéo pour être
affichée sur le moniteur TFT. Pour quitter le mode VIDEO,
touchez l’écran, pressez le bouton >> (14) sur la
télécommande, ou bien pressez le bouton MENU sur l’iPod.
A NOTER : Pour transmettre de la vidéo depuis votre
iPod à l’écran du VM9423 vous devez d’abord régler les
choix suivantes à travers le menu des réglages vidéo
iPod : TV Out = On, TV Signal = NTSC, et Widescreen =
On.
A NOTER : Après le débranchement de votre iPod, le
VM9423 reviendra toujours au dernier mode accédé
lorsque l’iPod est branché dans l’appareil.
14
1
7
2
13
5
15
12
3
16
iPod
1:08 2/124
01:02 AM
0001 A Rush Of Blood to
0002 40
0003 4th of July
0004 A Little Less Conver
0005 A Message
0006 A Sort of Homecomi
4
9
11
10
8
6
17
A Rush of Blood to the Head
MENU
Artist: Coldplay
Enter
18
E
Q
19
Menu Ecran Tactile Télécommande
Musique AUDIO
Photos SUB-TITLE
Videos ANGLE
Page 100

98
VM9423
Entrée directe Piste/Fichier
Pour sélectionner une piste/un fichier directement, touchez le
bouton sur la commande sur écran pour afficher le
menu d’entrée directe.
Entrez la piste/le fichier désiré en utilisant le pavé numérique
sur écran. Pressez le bouton Enter pour syntoniser à la
station sélectionnée. Pour quitter l’écran sans changer de
station, touchez Exit. Pour effacer votre entrée et
recommencer, touchez Clear.
Vous pouvez aussi utiliser le pavé numérique (29) sur la
télécommande pour accéder directement aux fichiers.
TRACK:__/##
1
2
3
4
5
6
7
8
9
0
Clear
Exit
 Loading...