

Page 1
VM9223 Quick
Reference Guide
VM9223
Multimedia Receiver
A / V
Input
SRC
VOL - VOL + MUTE
PIC
DVD, CD, MP3, WMA, USB and
SD Playback
Touch Screen Interface
RCA and Front Panel A/V Input
USB Connector
Composite Video Out
Remote Control
Navigation Ready (NAV102 Only)
Bluetooth Ready (Requires
BTM10)
Featuring:
Page 2

Page 3

Navigation operation requires NAV102
installation
Bluetooth operation requires BTM10
installation
Rear Camera operation requires rear camera
installation
Page 4
VM9223
Multimedia Receiver
A / V
Input
SRC
VOL - VOL +
MUTE PIC
316
5
4 10
128
7
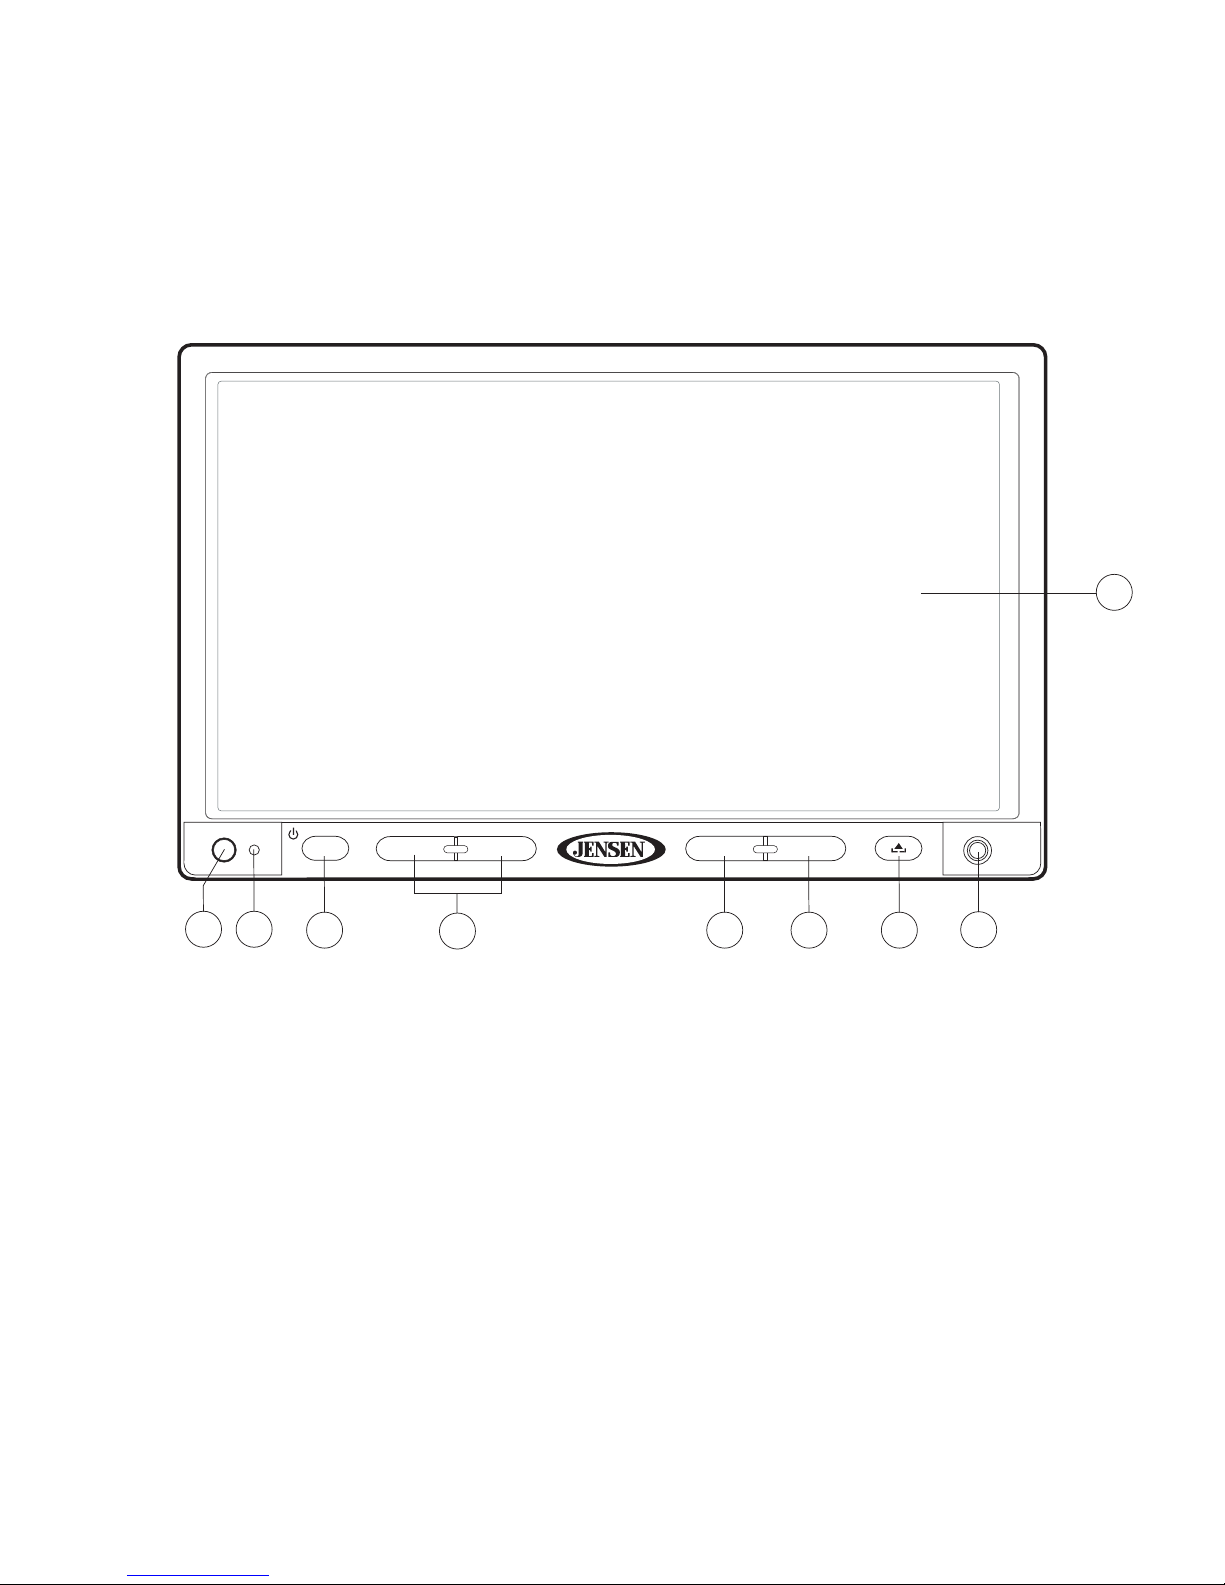
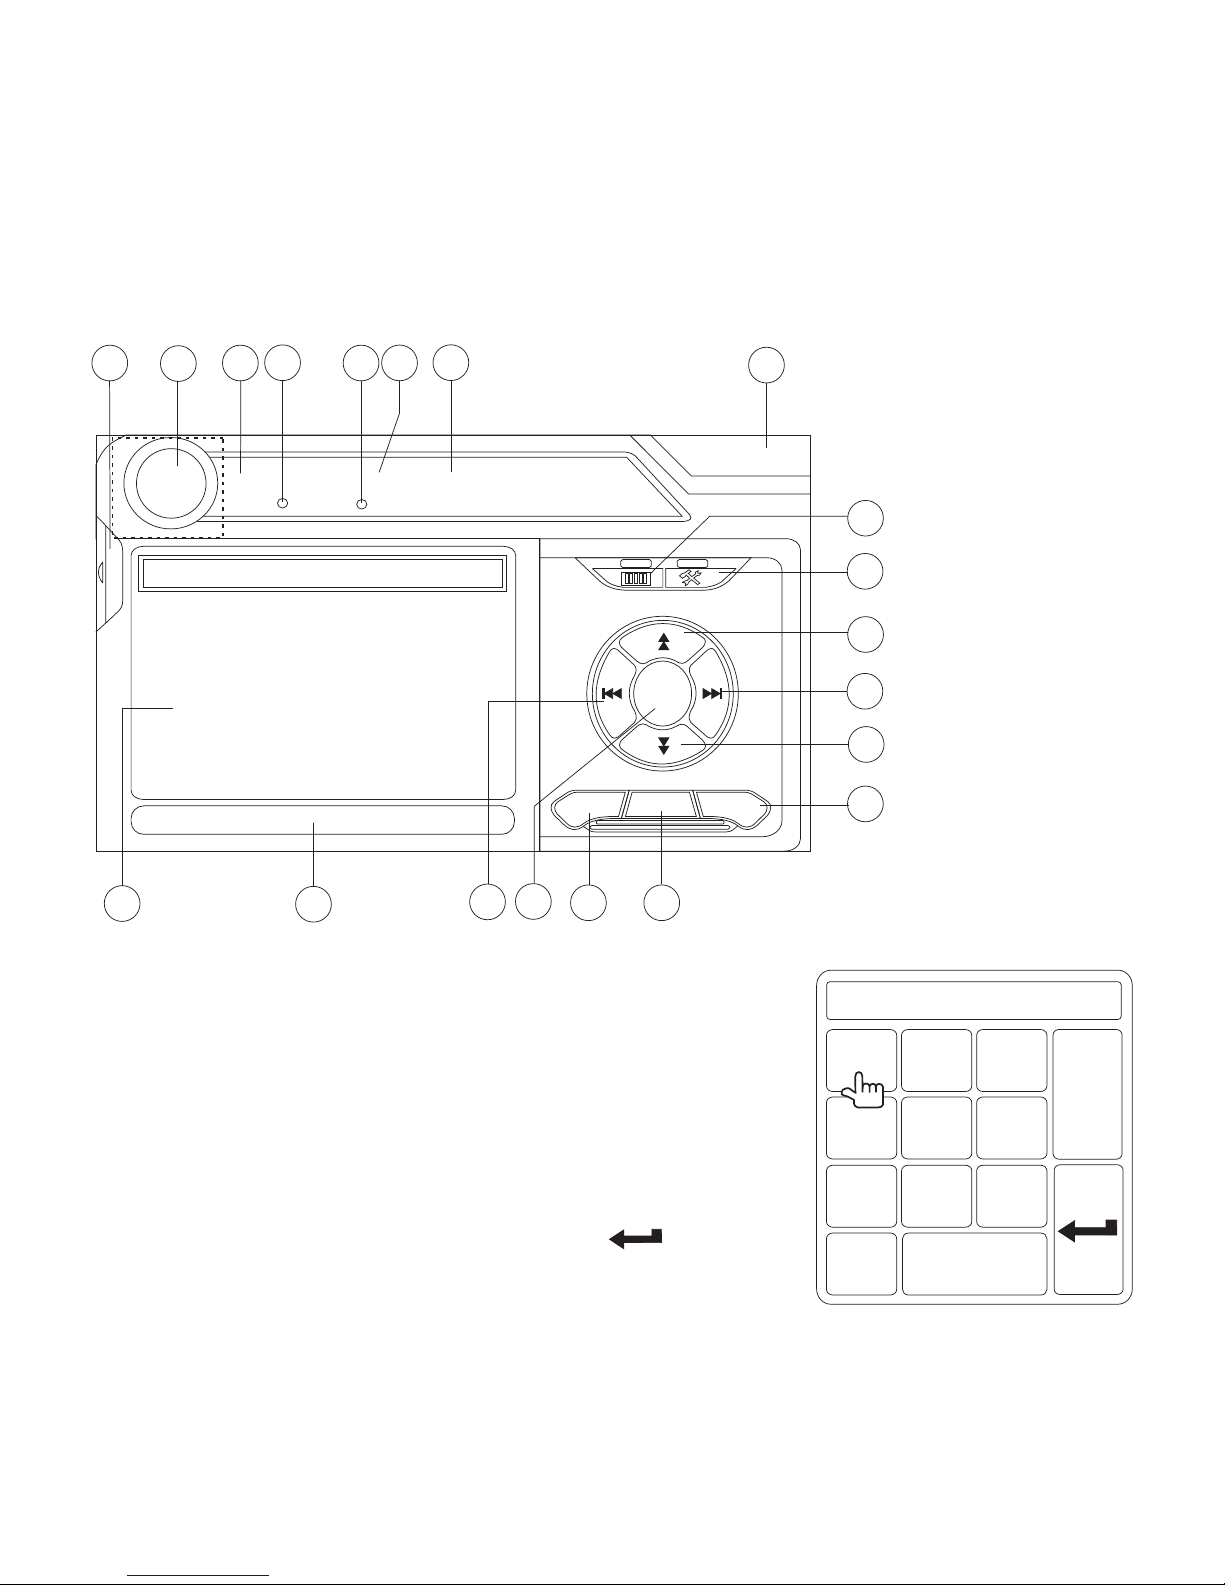
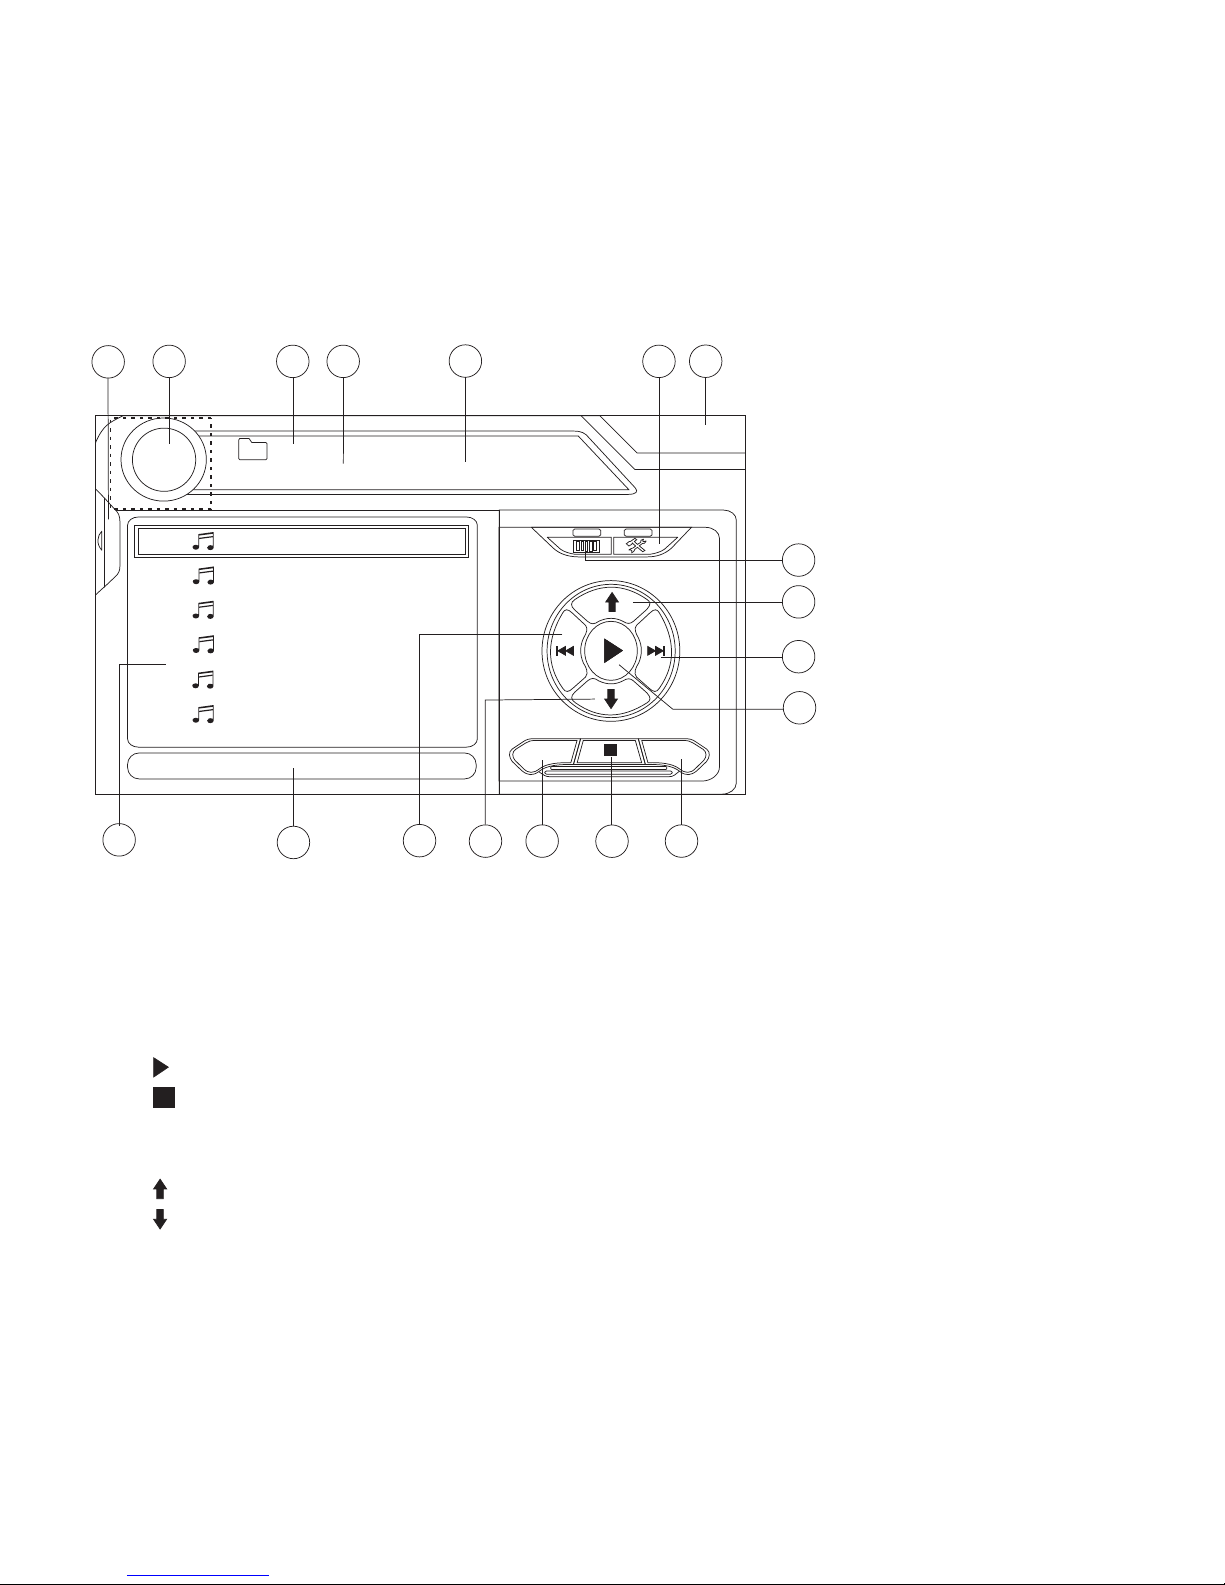
Controls and Indicators
1. Press to silence the audio. Press again to resume the previous volume level. In
radio mode, press and hold to set the LOC/DX function. In all other modes, press
and hold while the volume icon is showing to set the turn-on volume.
2. Insert SD card for playback of compatible multimedia files.
3. Press to adjust the Brightness and Contrast. Press the PIC button again to move
between Brightness and Contrast. Press the VOL-/VOL+ buttons to adjust the
setting for the selected option.
When the NAV102 is connected, press and hold to display the navigation user
interface.
Page 5
LABEL SIDE UP
DISC IN
EJECT
9
13
11
2
4. Press to activate the automatic mechanical system and slide the TFT monitor
down to reveal the disc and SD slots. Press again to close the TFT.
Press and hold to activate the tilt function. Use the VOL -/VOL+ buttons to adjust
the angle of the screen while the yellow tilt icon is flashing. You can also adjust
the tilt using the and buttons on the remote control. Press once to adjust the
downward tilt angle of the screen one step at a time or press and hold to adjust
the angle in a continuous motion.
5. Press VOL - to decrease the volume. Press VOL+ to increase the volume.
6. Press the SRC/ button to turn the unit on. Press and hold to turn the unit off.
Press to access the SOURCE MENU.
7. TFT Monitor
8. IR Remote Control Receiver
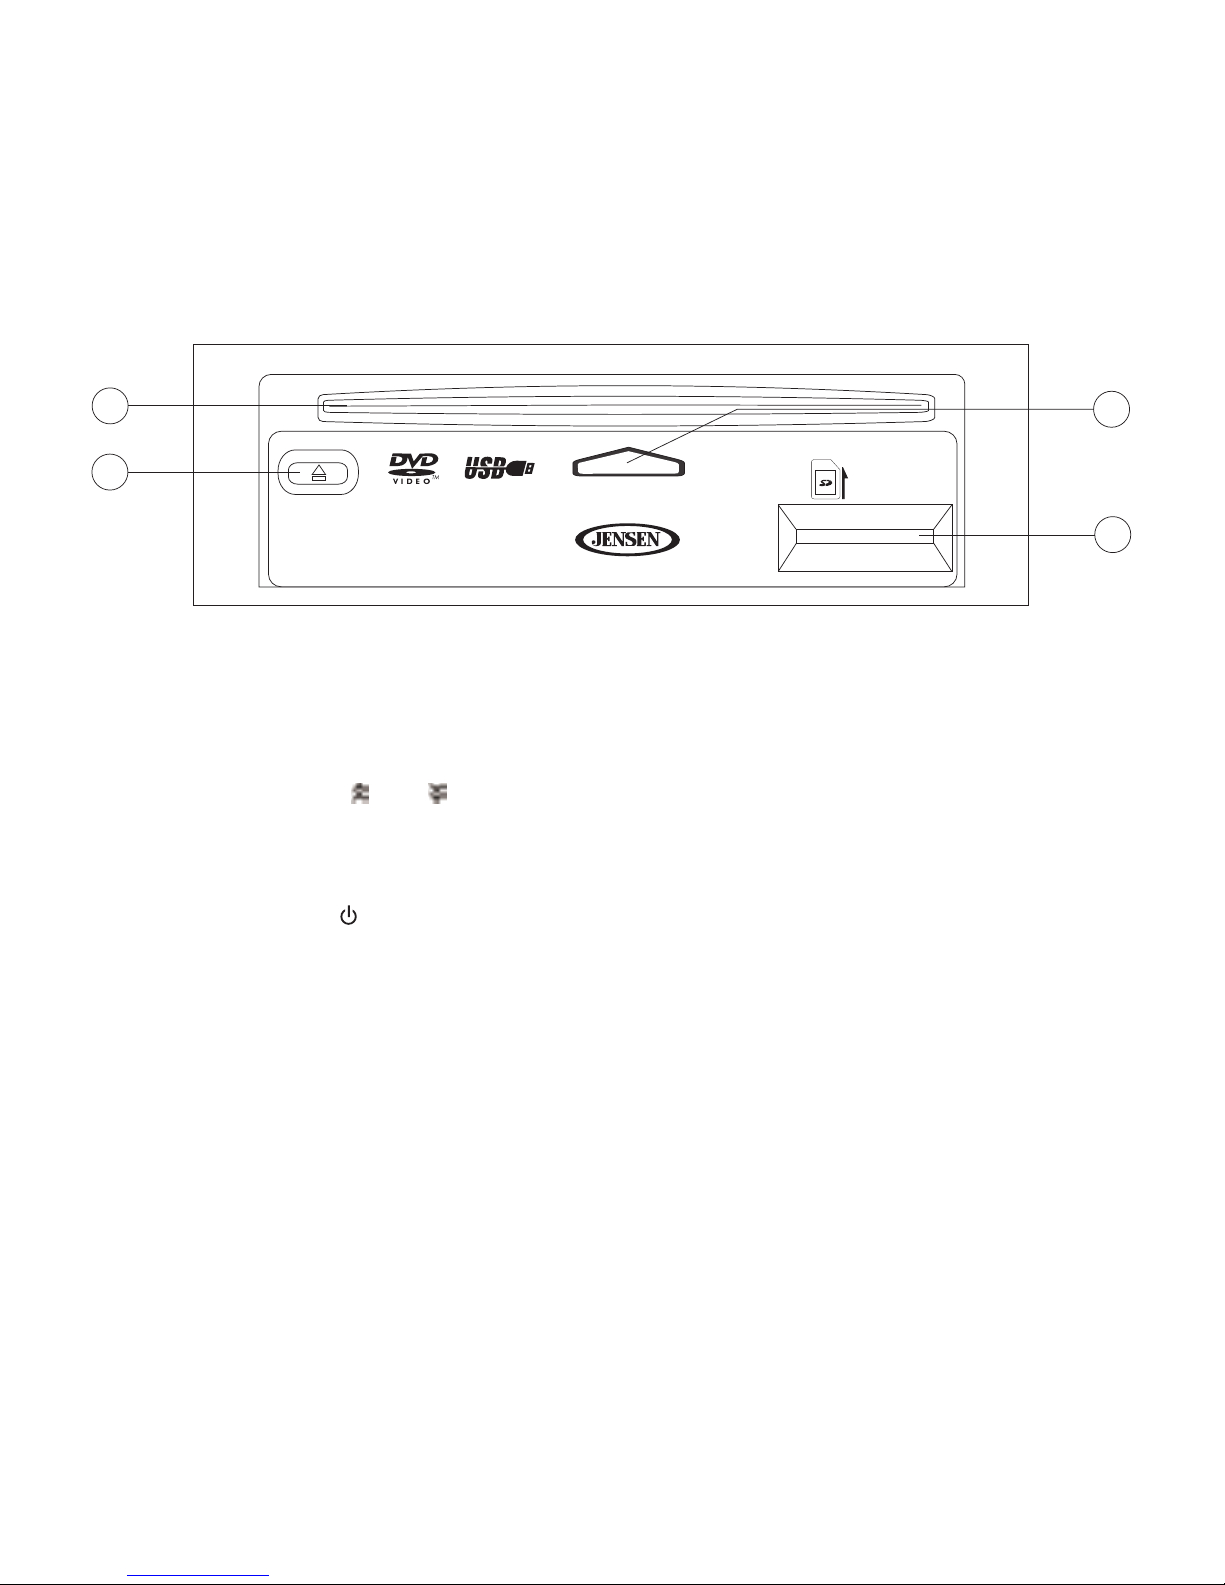
9. Disc Indicator Light
10. Audio/Video Input
11. Press to eject disc. Press and hold to reset core mechanism position.
12. Press to reset system settings to factory default (except the password and
parental lock setting).
13. Disc Slot
Page 6

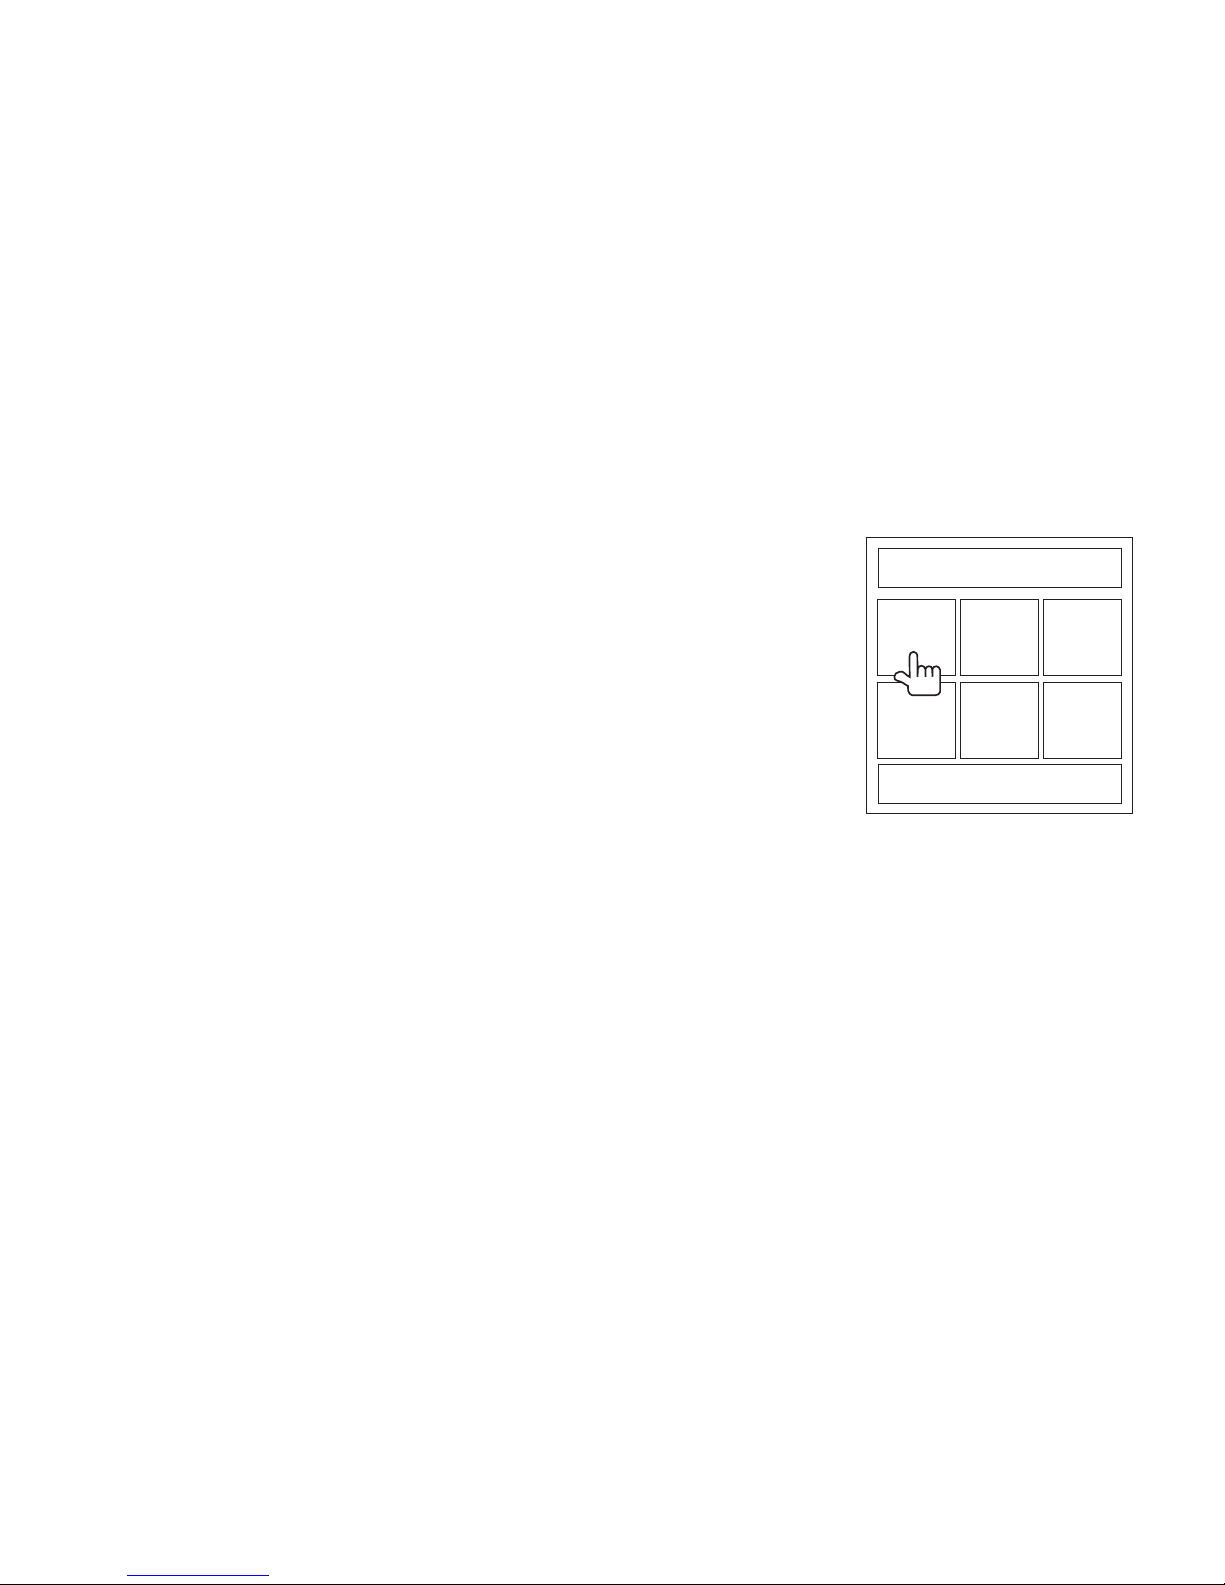
Common User Settings
Audio Control Menu
Touch the EQ button on the left side of the screen to access the Audio Control Menu,
shown below.
1. Use the touchscreen, or press the (>>|)/(|<<) buttons on the remote control to
highlight the audio feature to be adjusted.
2. Touch the screen to select the highlighted option.
3. Touch the +/– buttons on the screen or press the |<<, >>|, >>, or << buttons on
the remote control to adjust the selected feature to the desired setting.
+14 — 0 —
0 — —
–14 — –14 —
EQ
User
FAD BAL
BASS MID TREB SUB
User
F
R
R
L
The "FAD-BAL"
portion of the
screen uses a
grid control.
Touch inside the
box to move the
cursor and
adjust the Fader
and Balance
level from Front
to Rear and Left
to Right.
NOTE
The EQ mode will automatically change to “USER” when individual
audio functions are adjusted.
Page 7
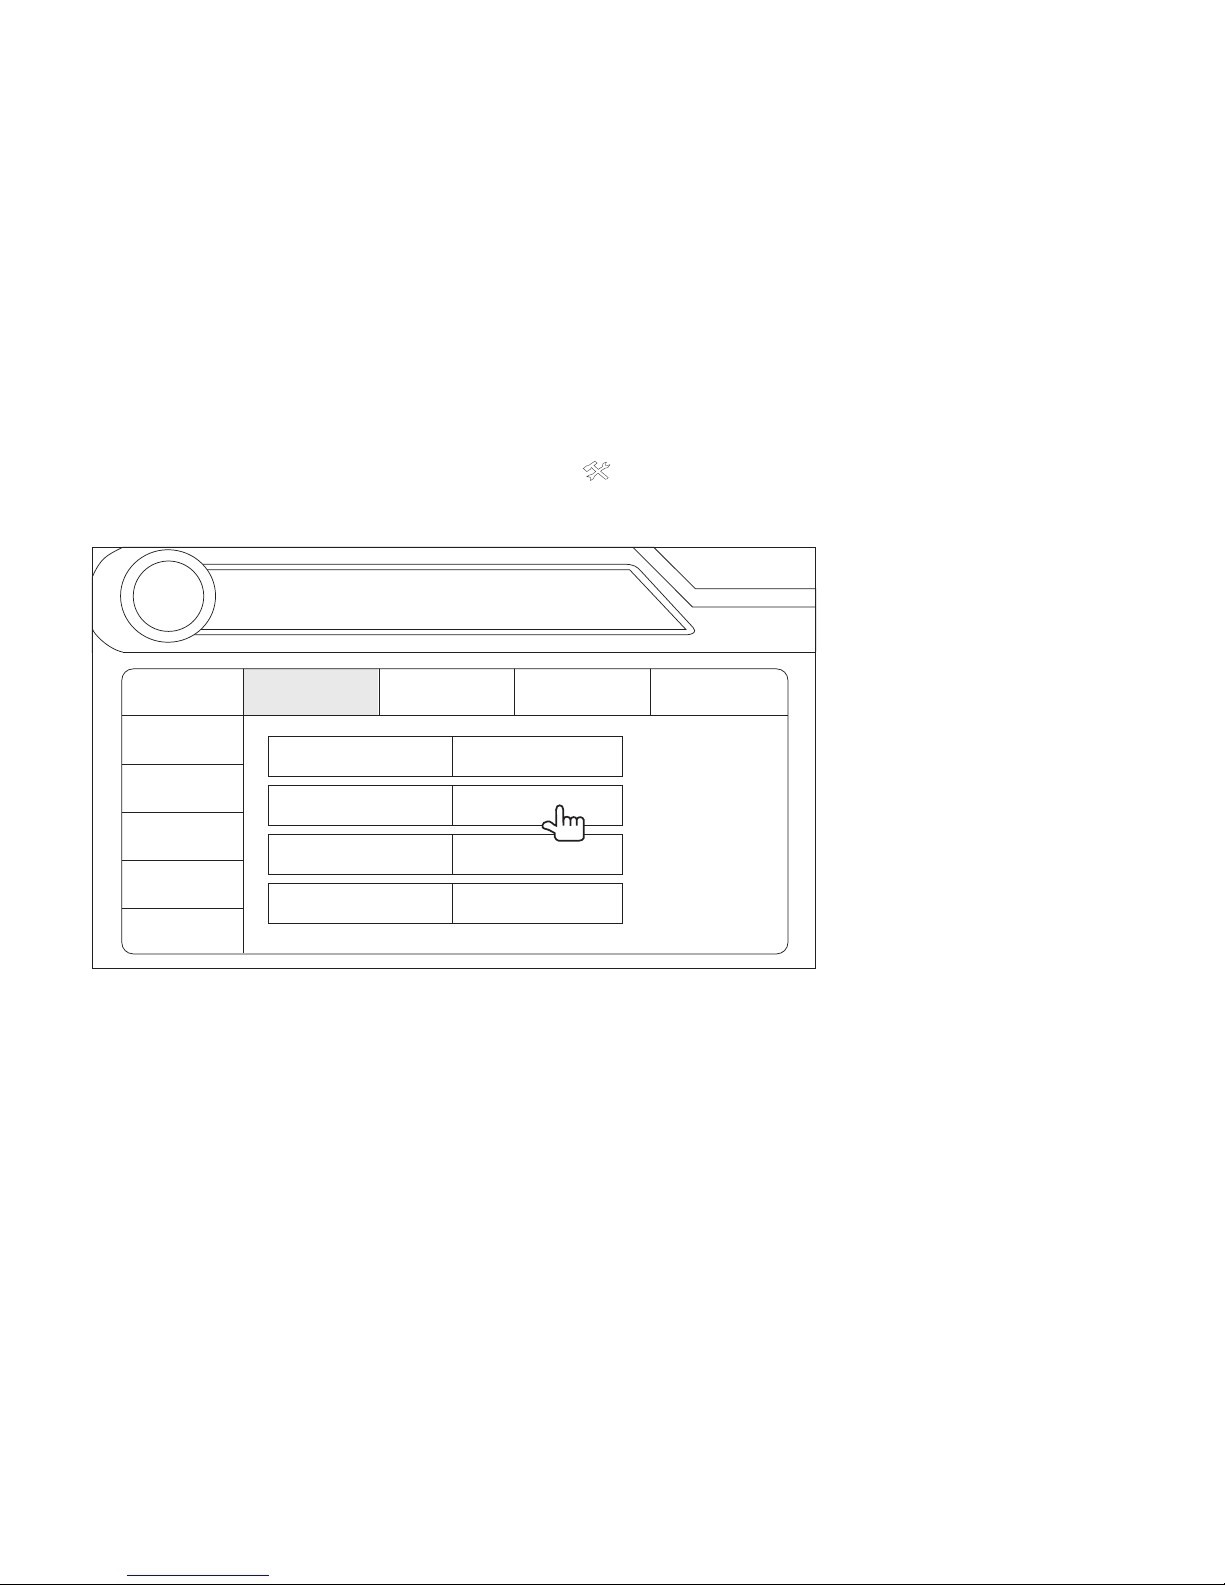
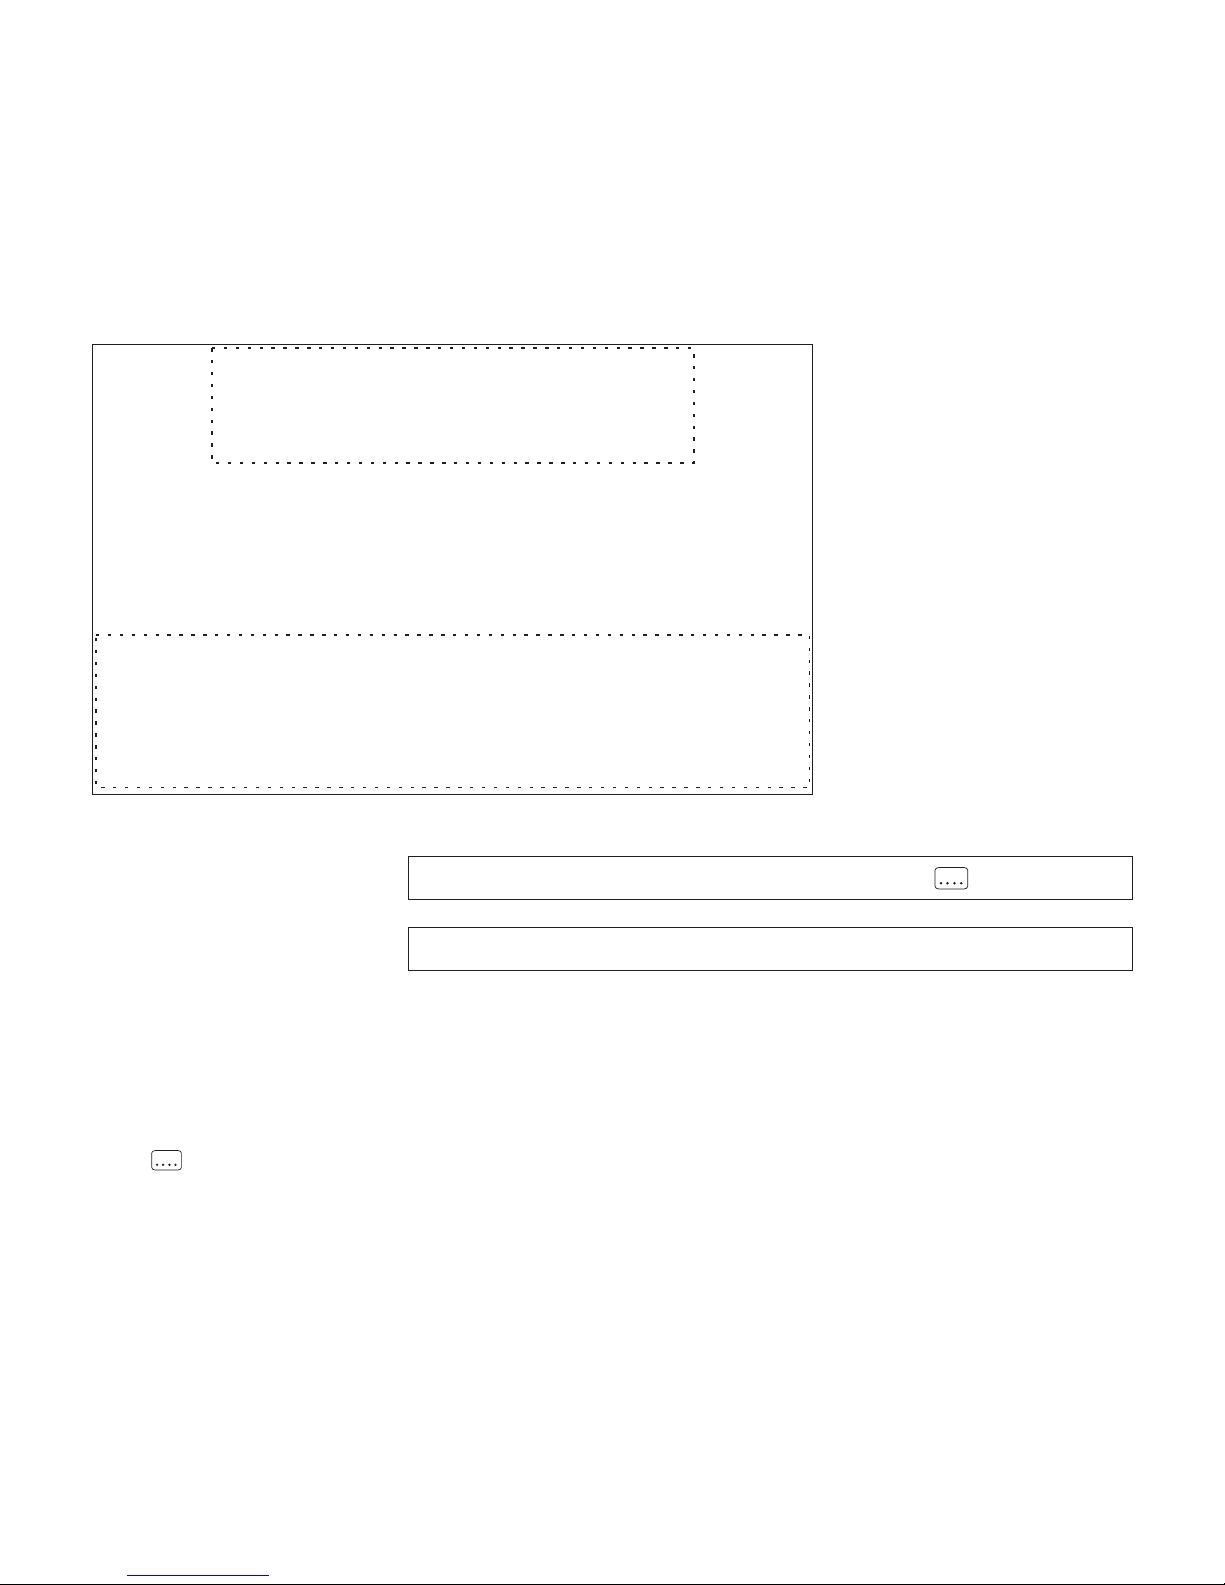
Set Clock
The clock appears in the top right corner of the screen and on the LCD screen during
certain operations.
To set the clock, you must first press the button on the screen to access the SETUP
menu.
1. Use the touch screen or directional buttons on the remote control to select the
Clock option.
2. Use the touch screen or press the >/|| button on the remote control to enter the
adjustment field.
3. Select a new value using the touch screen or >> and << buttons on the remote
control. The AM/PM indication will change as you continue to adjust the hour past
12.
4. Use the touch screen or press >/|| to confirm and exit the SETUP menu.
RADIO
SETUP
Rating
Bluetooth
Hardware
DEMO
P.VOL
TS Cal
General Language
Audio Back
Clock Mode 12Hr
Clock 04 : 31 AM
Tuner Region USA
Beep On
Touch the menu titles
across the left and
top of the menu to
see highlighted submenu options in the
center of the screen.
Touch the menu
option you want to
adjust and use the
touch screen to
adjust the setting.
Page 8
1. Current radio band indicator
2. Radio frequency indicator
3. Clock display
4. Stereo reception indicator
5. Tuning mode indicator (local/distant)
6. Touch to recall preset stations.
7. No function in tuner mode.
8. Touch for quick access to Equalizer level settings.
9. Touch to access the Direct Entry Screen. Enter the
desired frequency and then touch the button.
You can also press GOTO on the remote control to
access the Direct Entry Screen.
Tuner User Interface
4
1
10
2
5
7
8
3
6
17
RADIO
FM-1 P1 87.5 MHz
01:02 PM
E
Q
PS
BAND
AS
MEM
P1 87.5 MHz
P2 90.1 MHz
P3 98.1 MHz
P4 106.1 MHz
P5 107.9 MHz
P6 102.9 MHz
ST
LOC
9
11
12
19
14
15
13
16
18
20
FM: _ _ _ . _ MHz
1
2
3
4
5
6
7
8
9
0
Clear
Exit
Direct Entry Screen
Page 9
10. Preset station indicator
11. |<<: Touch to seek backward.
12. >>|: Touch to seek forward.
13. <<: Touch to tune backward one step.
14. >>: Touch to tune forward one step.
15. BAND: Touch to change bands (FM1, FM2, FM3, AM1,
and AM2).
16. AS: Touch to automatically store stations for the current
band.
17. Touch to view the SOURCE MENU and select a new
playback source. You can also change the source by
pressing the SRC button on the control panel or remote
control.
18. MEM: View screen used to enter current channel into
preset memory. Touch P1 - P6 to store or Exit to leave
the screen.
19. PS (Preview Scan): Touch to scan all stations available,
stopping for 5 seconds at each and continuing until a station is selected.
20. View SETUP menu.
Preset: _
E x i t
P1
P2
P3
P4
P5
P6
Page 10

CD/DVD Audio Operation
1. Current track and total number of tracks on disc
2. Elapsed playing time
3. Current time
4. Track titles (if available on disc)
5. Touch to view the SOURCE MENU and select a new playback source
6. /||: Touch to play/pause disc playback
7. : Touch to stop disc playback
8. >>|: Touch to move to next track
9. |<<: Touch to move to previous track
10. >>: Touch to fast forward current track
11. <<: Touch to rewind current track
12. Touch to activate/deactivate Repeat play mode
15
1
7
2
13
16
12
3
5
DISC
CDDA 1/10 00:00:23
01:02
E
Q
Track 1
Track 2
Track 3
Track 4
Track 5
Track 6
14
4
9
11
10
8
6
The VM9223 will play
music or other audio
files from the following
disc media:
CD-DA
CD-R/RW
DVD
DVD+R/RW
DVD-R/RW
CD-R and CD-RW will
not play unless the
recording session is
finalized.
Page 11

13. Touch to activate/deactivate Random mode
14. Touch to access the direct entry screen
15. : Touch to view the SETUP menu
16. Touch for quick access to Equalizer level settings
NOTE
During disc play, press the INT button on the remote control to play
the first 10 seconds of each track. When a desired track is reached,
press the INT button again to play the selected track.
Page 12
CD/DVD Video Operation
A
B
A – Displays
playback
information
B – Displays
on-screen
control menu
TOUCH SCREEN CONTROL AREAS
Touch inside the outlined areas (A and B)
for playback information and controls.
DVD T : 5/8 C : 2/16 00:41:28 2/6 Eng
VCD 2.0 T : 6/18 00:41:28
DVD Display Info "
VCD Display Info "
T : 5/8 – “5/8" indicates the fifth of 8 titles on the DVD is currently playing.
C : 2/16 – “2/16" indicates that the second of 16 chapters/tracks on the disc is
currently playing.
00:41:28 – “00:41:28” indicates the playback time of the current title/track.
2/6 Eng – The language display information indicates the second language
out of 6 (English) is currently being used.
VCD 2.0 – Format of current disc.
Page 13
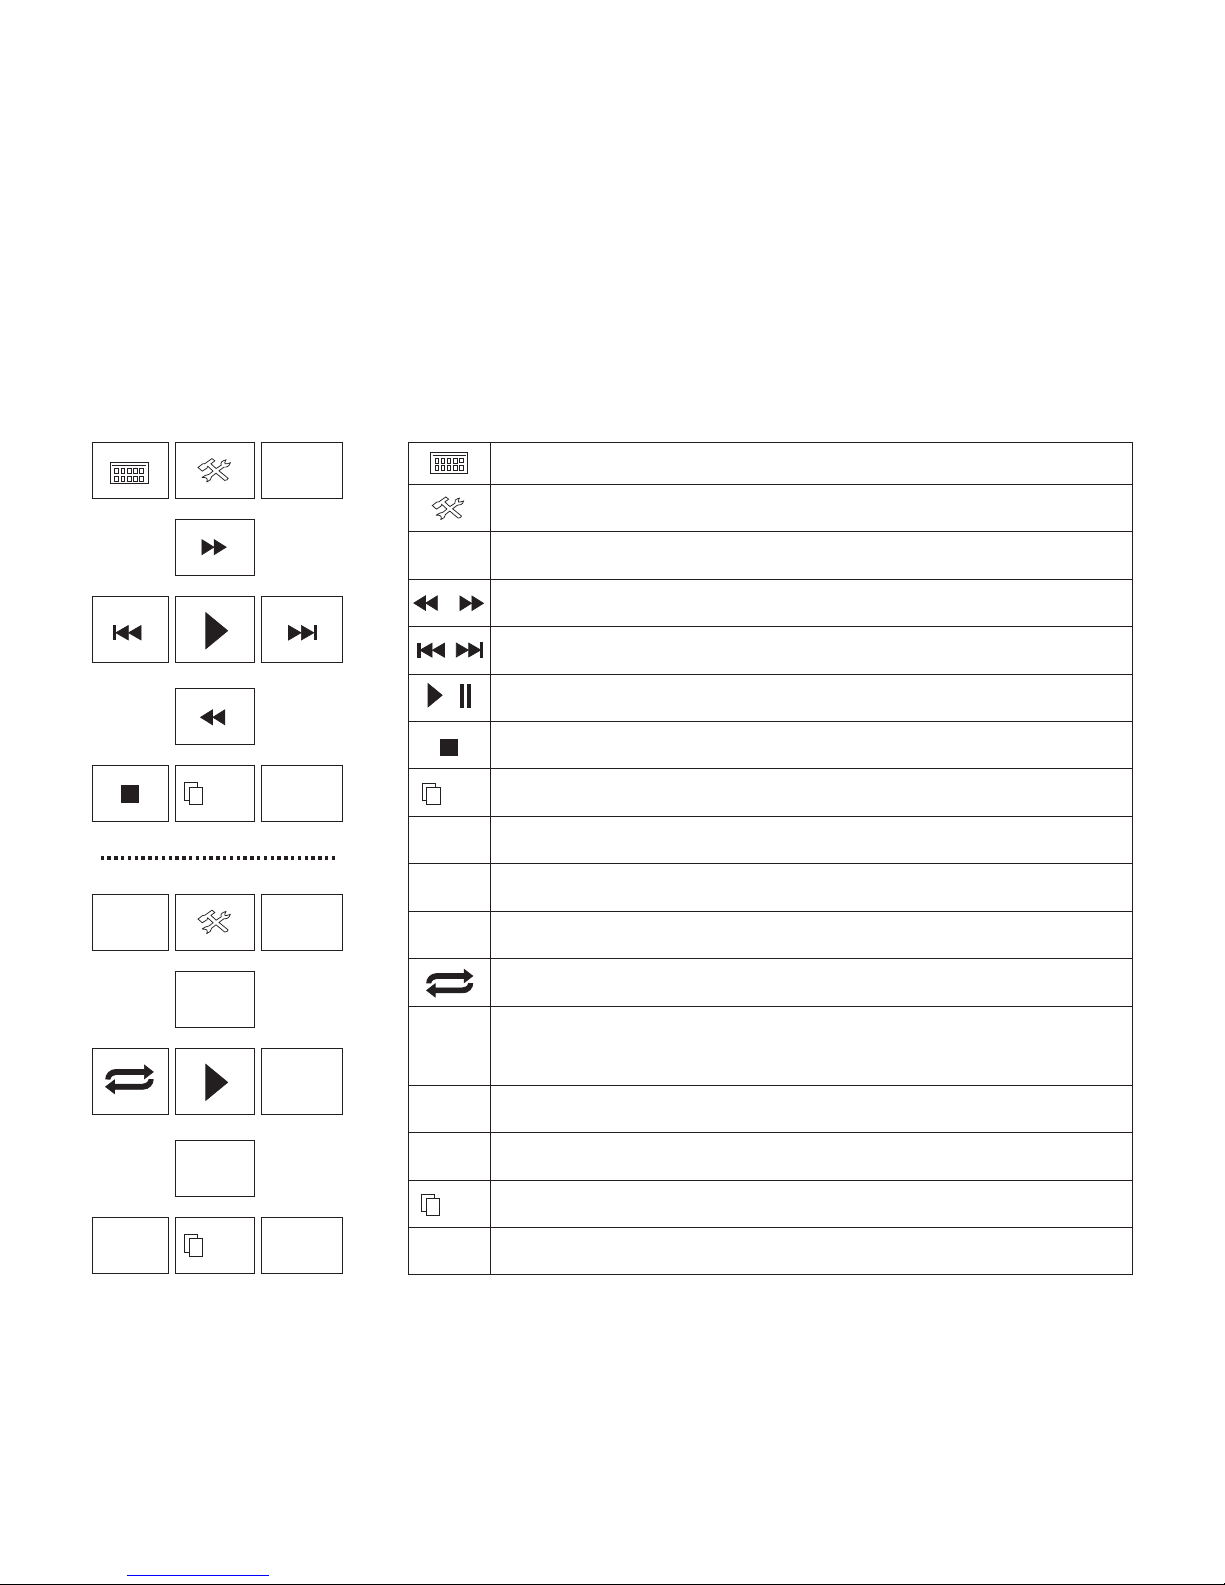
To access the on-screen controls, touch the bottom 1/3 of the screen (section B).
Touch the 1/2 button to view a second page of controls.
1/2
1/2
BACK
BACK
MENU
MENU
2/2
2/2
BACK
DISP
DISP
EQ
EQ
AUDIO
AUDIO
A-B
A-B
TITLE
TITLE
SUBTITLE
SUBTITLE
Access the direct entry screen
Access the SETUP menu
Exit on-screen control menu
Rewind/Fast Forward
Previous/Next track or title
Play/Pause
Stop playback
View second page of on-screen controls
Access DVD Main Menu
Adjust Equalizer settings
Change audio language for disc playback
Repeat play current track/chapter
Press to select beginning repeat point. Press again
to select end repeat point. Press again to stop.
Select language for subtitles
Select different title for playback
View first page of on-screen controls
Display playback information
Page 14
1. Current file and total number of files on your media device
2. Elapsed playing time
3. Current time
4. Track titles
5. ID3 information
6. /||: Touch to play/pause disc playback
7. : Touch to stop disc playback
8. >>|: Touch to move to next track
9. |<<: Touch to move to previous track
10. : Touch to view the next page of songs
11. : Touch to view the previous page of songs
12. DIR -: Touch to view the previous folder
MP3/WMA Operation
15
1
7
2
13
5
16
12
3
17
DISC
MP3 4/84 00:00:23
01:02 AM
E
Q
1 Cherry Poppin Dad
2 Chris Isaak - Baby
3 Crazy Town - Butt
4 Phish - Birds Of A
5 Phish - Bouncin' R
6 Phish - Freebird (L
14
4
9
11
10
8
6
DIR - DIR +
(Root)
18
Page 15

13. DIR +: Touch to view the next folder
14. Touch to access the direct entry screen
15. : Touch to view the SETUP menu
16. Touch for quick access to Equalizer level settings
17. Touch to view the SOURCE MENU and select a new playback source
18. Folder name
Inserting an SD Card
To Insert an SD card, you must first press the EJECT button on the control panel or
remote control to reveal the SD card slot. Insert the SD card into the card slot and the
unit will read the media files on the card automatically.
To remove the card, first press the SRC button to switch to another mode and stop SD
playback. Push in and release to pop the card out. Grasp the SD card and pull it
straight out. Most cards have a thin recess that helps with removal.
LABEL SIDE UP
DISC IN
EJECT
Page 16

Bluetooth Operation
The line-of-sight distance between this unit and your cellular phone
must be 8 meters or less, depending on the environment.
Bluetooth is a short-range wireless radio connectivity technology that is developed as
a cable replacement for mobile phones, handheld PCs and other devices. Bluetooth
operates in 2.4 GHz frequency range and transmits voice and data at speeds up to 1
megabit per second.
The BTM10 (purchased separately) is required for Bluetooth operation.
Pairing your Phone
1. Press the button to initiate the pairing process. Keep the mobile phone within 2
meters of the head unit when pairing.
2. Select the Bluetooth setup option on the mobile phone to be paired (please refer
to the phone’s instruction manual).
3. If prompted, enter the “pass key” or pairing code. The dafault code for many
phones is “0000”. The default code for the VM9223 is “1234”.
4. Select “VM9223” from the pairing list on the mobile phone.
Hands Free Profile (HFP)
To use a phone wirelessly with this unit, it is necessary to first establish a connection
using Bluetooth wireless technology. Connection is normally established using HFP
(Hands Free Profile), which gives you full control of functions available on the
telephone source. However, depending on your phone, the connection may be made
using HSP (Head Set Profile), making some functions unavailable. This is a limitation
of your phone, not the VM9223.
Page 17

Menu List
The menu list appears on the left side of the screen and can be accessed from other
modes by touching the MENU button on the right side of the screen.
To make a call from a list, touch the number and then touch the button.
Missed Calls: The Missed Calls list retrieves the list of Missed numbers from your
phone. The last missed number is the first number on the list. Touch the Missed
Calls menu option to view the list.
Dialed Calls: The Dialed Calls list retrieves the list of dialed numbers from your
phone. The last dialed number is the first number on the list. Touch the Dialed
Calls menu option to view the list.
Received Calls: Use the Received Calls list to view the last 10 received numbers
stored on your phone. To access the Received list, touch the Received Calls menu
option. The last received number is the first number on the list.
Phone Book: Touch the Phone Book menu option to display the phone book
stored on your mobile phone, if compatible. The screen will display “Ready...”
while the phone book is downloading. Once the download is completed, you can
use the arrow buttons and scroll bar on the right side of the window to navigate the
list. Since the unit downloads one page of entries at a time, there may be a slight
delay while the next page of numbers is downloaded.
Not all phones allow access to missed, received or dialed calls and
some will not allow uploading of your phone’s address book.
Page 18

1
4
14
2
15
BT
Disconnected
01:02 AM
1 Missed Calls
2 Received Calls
3 Dialed Calls
4 Phone Book
3
16
MENU
Menu List
E
Q
19
Bluetooth Operation (continued)
1. Current connection status/device connected
2. Current time
3. Bluetooth menu
4. Current operation status
5. Toggle Music/Phone menu
6. Transfer active call back to handset
7. Pair your Bluetooth phone (first time use)
8. Exit call listing display
9. Connect/disconnect Bluetooth device (phone, PDA, personal music player, etc.)
with hands-free function
Page 19

MENU
17
9
7
10
8
11
5
6
12
13
9
23
7
MENU
20
21
22
18
10. Mute/un-mute microphone during active call
11. Answer incoming call/make call
12. Reject incoming call/end call/quit pairing process/quit reading phone book or call
listing
13. Touch to view the SETUP menu
14. Touch to view the equalizer
15. Touch to view the SOURCE MENU and select a new playback source
16. Status indicators (phone mode, music mode, mic mute)
17. Touch to access the direct entry screen
18. : Touch to stop A2DP playback
19. Touch the scroll bar and arrows to view the previous/ next page of choices (only
visible when needed)
20. Toggle Music/Phone menu/mode
21. Play/Pause selected file
22. |<<: Touch to move to the previous file
23. >>|: Touch to move to the next file
Touch the
music/phone icon
in the middle of the
circle to switch
between phone
interface (left) and
music interface
(right).
Page 20

Page 21

instalación del NAV102
La operación de Bluetooth requiere la
instalación del BTM10
La operación de la Cámara Trasera requiere
la instalación de la cámara trasera
La operación de navegación requiere la
Destacando:
Reproducción de DVD, CD, MP3, WMA,
USB y SD
Interfaz Pantalla Táctil
Entrada RCA y del USB del Panel de Delante
Conectador USB
Salida de Video Compuesto
Control Remoto Infrarrojo
Listo para Navegacíon (Sólo NAV102)
Listo para Bluetooth (Requiren BTM10)
VM9223 Guía de Referencia Rápida
Page 22

Controles e Indicadores
VM9223
Multimedia Receiver
A / V
Input
SRC
VOL - VOL +
MUTE PIC
316
5
4 10
128
7
1. Presione para silenciar el receptor. Presione nuevamente para volver al nivel de
volumen previo. En el modo de radio, presione y mantenga para fijar la función
de LOC/DX. En el resto de los modos, presione y mantenga mientras que el
icono del volumen está demostrando para fijar el volumen de abertura.
2. Inserte la tarjeta SD para repr. de archivos compatibles.
3. Presione para ajustar el Brillo y Contraste. Presione el botón PIC nuevamente
para cambiar entre Brillo y Contraste. Presione los botones VOL-/VOL+ para
ajustar la opción seleccionada.
Cuando el NAV102 está conectado, presione y mantenga para mostrar la interfaz
de usuario de navegación.
Page 23

4. Presione para activar el sistema mecánico automático y mover el monitor TFT
hacia abajo para mostrar las ranuras de CD y tarjeta SD. Presione nuevamente
para cerrar el TFT. Presione y mantenga para activar la función inclinar. Use los
botones VOL -/VOL+ para ajustar el ángulo de la pantalla mientras el ícono
amarillo de inclinación está parpadeando. También puede ajustar la inclinación
usando los botones y en el control remoto. Presione una vez para ajustar
hacia abajo el ángulo de inclinación de la pantalla un paso a la vez o presione y
mantenga para ajustar el ángulo en movimiento continuo.
5. Presione VOL - para disminuir el volumen. Presione VOL + para aumentar el
volumen.
6. Presione para encender la unidad. Presione y mantenga para apagar la unidad.
Presione para acceder el MENÚ FUENTE.
7. Monitor TFT
8. Receptor IR de Control Remoto
9. Luz indicadora de Disco
10. Entrada de Audio/Video
11. Presione para expulsar el disco. Presione y mantenga pulsado para restaurar la
posición central del mecanismo.
12. Presione para restaurar las especificaciones del sistema a las fijadas de fábrica
(excepto la contraseña y la fijación de bloqueo parental).
13. Ranura de Disco
LABEL SIDE UP
DISC IN
EJECT
9
13
11
2
Page 24

Funciones Comunes para el Usuario
Menú de Control de Audio
Presione el botón EQ en la pantalla táctil para acceder al Menú de Control de Audio
que se muestra debajo.
1. Utilice la pantalla táctil, o presione los botones (>>|)/(|<<) en el control remoto
para resaltar la característica de audio que será ajustada.
2. Toque la pantalla para seleccionar la opción resaltada.
3. Toque los botones +/– en la pantalla o presione los botones |<<, >>|, >>, o << en
el control remoto para ajustar la característica seleccionada al escenario
deseado.
La sección "FADBAL" de la pantalla
utiliza una
cuadrícula de
control. Toque
dentro de la caja
para mover el cursor
y ajustar el nivel de
Fader y Balance de
Adelante hacia Atrás
y de Izquierda a
Derecha.
NOTA
El modo cambiará automáticamente a "USER" (USUARIO) cuando
las funciones individuales de audio sean ajustadas.
+14 — 0 —
0 — —
–14 — –14 —
EQ
User
FAD BAL
BASS MID TREB SUB
User
F
R
R
L
Page 25

Ajuste de la Hora
El reloj aparece en la esquina derecha superior de la pantalla y en la pantalla LCD
durante ciertas operaciones.
Para fijar la hora del reloj, deberá primero presionar el botón en la pantalla para
acceder al menú SETUP.
1. Use la pantalla táctil o los botones direccionales en el control remoto para
seleccionar la opción del reloj.
2. Use la pantalla táctil o presione el botón >/|| en el control remoto para ingresar al
campo de ajuste.
3. Seleccione un Nuevo valor utilizando la pantalla táctil o los botones >> y << en el
control remoto. La indicación AM/PM cambiará a medida que siga ajustando la
hora pasadas las 12.
4. Use la pantalla táctil o presione >/|| para confirmar la salida del menú SETUP.
RADIO
SETUP
Rating
Bluetooth
Hardware
DEMO
P.VOL
TS Cal
General Language
Audio Back
Clock Mode 12Hr
Clock 04 : 31 AM
Tuner Region USA
Beep On
Toque los títulos del
menú a lo largo de la
izquierda y la parte
superior del menú
para ver las opciones
resaltadas del sub
menú en el centro de
la pantalla.
Toque la opción del
menú que desee
ajustar y utilice la
pantalla al tacto para
ajustar la opción.
Page 26

1. Indicador de la banda de radio actual
2. Indicador de frecuencia de radio
3. Pantalla del reloj
4. Indicador de recepción estéreo
5. Indicador de modo de sintonía (local / distante)
6. Toque para acceder a las estaciones
preestablecidas.
7. Sin función en el modo tuner (sintonizador).
8. Toque para un acceso rápido a los parámetros de
niveles del Ecualizador.
9. Toque para acceder a la pantalla de Ingreso Directo.
Ingrese la frecuencia deseada y luego presione el
Interfaz de Ingreso Directo
4
1
10
2
5
7
8
3
6
17
RADIO
FM-1 P1 87.5 MHz
01:02 PM
E
Q
PS
BAND
AS
MEM
P1 87.5 MHz
P2 90.1 MHz
P3 98.1 MHz
P4 106.1 MHz
P5 107.9 MHz
P6 102.9 MHz
ST
LOC
9
11
12
19
14
15
13
16
18
20
FM: _ _ _ . _ MHz
1
2
3
4
5
6
7
8
9
0
Clear
Exit
Pantalla de Ingreso
Directo
Page 27

botón .También puede presionar GOTO en el control remoto para acceder a
la pantalla de Ingreso Directo.
10. Memorice el indicador de estación.
11. |<<: Presione para buscar hacia atrás.
12. >>|: Presione para buscar hacia adelante.
13. <<: Presione para sintonizar un paso hacia atrás.
14. >>: Presione para sintonizar un paso hacia adelante.
15. BAND: Toque para cambiar la banda (FM1, FM2, FM3, AM1, y AM2).
16. AS: Tóquelo para almacenar automáticamente
estaciones en la banda actual.
17. Tóquelo para ver el MENU SOURCE (MENÚ DE
FUENTE) y seleccionar una nueva fuente de
reproducción. También podrá cambiar la fuente
presionando el botón SRC en el panel de control o en el
control remoto.
18. MEM: Observe la pantalla utilizada para ingresar el
canal actual en la memoria prefijada. Toque P1 - P6 para
almacenar o Exit (Salir) para dejar la pantalla.
19. PS: Toque para explorar todas las estaciones
disponibles, deteniéndose por cinco segundos en cada una y continuando hasta
que una estación sea seleccionada.
20. Observe el menú SETUP.
Preset: _
E x i t
P1
P2
P3
P4
P5
P6
Page 28

Operación CD/DVD Audio
1. Pista actual y número total de pistas en disco.
2. Tiempo de reproducción transcurrido
3. Hora actual
4. Título de la pista (si esta disponible en disco)
5. Tocar para observar el MENU SOURCE y seleccionar una nueva fuente de
reproducción
6. /||: Tocar para reproducir/pausar la reproducción
7. : Tocar para detener la reproducción del disco
8. >>|: Tocar para pasar a la próxima pista
9. |<<: Tocar para pasar a la pista anterior
10. >>: Tocar para adelantar rápido la pista actual
11. <<: Tocar para volver al inicio de la pista actual
15
1
7
2
13
16
12
3
5
DISC
CDDA 1/10 00:00:23
01:02
E
Q
Track 1
Track 2
Track 3
Track 4
Track 5
Track 6
14
4
9
11
10
8
6
El VM9223
reproducirá música u
otros archivos de los
siguientes discos:
• CD-DA
• CD-R/RW
• DVD
• DVD+R/RW
• DVD-R/RW
CD-R y CD-RW no se
ejecutarán salvo que
la sesión de
grabación se
encuentre finalizada.
Page 29

12. Tocar para activar/desactivar el modo de repetir la reproducción
13. Tocar para activar/desactivar el modo Random (Aleatorio)
14. Toque para acceder a la pantalla de ingreso directo
15. : Toque para ver el menú SETUP
16. Toque para un acceso rápido a los parámetros de niveles del Ecualizador
NOTA
Durante la reproducción del disco, presione el botón INT en el
control remoto para reproducir los primeros 10 segundos de cada
pista. Cuando llegue a una pista deseada, presione el botón INT
nuevamente para reproducir la pista seleccionada.
Page 30

Operación CD/DVD Video
A
B
A – Muestra
información de
reproducción
B – Muestra el
menú de
control en
pantalla
ÁREAS DE CONTROL DE LA PANTALLA
TÁCTIL.
Toque dentro de
las áreas delineadas (A y B) por
información de reproducción y controles.
DVD T : 5/8 C : 2/16 00:41:28 2/6 Eng
VCD 2.0 T : 6/18 00:41:28
Pantalla de
Información de DVD
Pantalla de
Información de VCD
"
"
T : 5/8 – “5/8" indica que el quinto de 8 títulos en el DVD está siendo
reproducido.
C : 2/16 – “2/16" indica que el Segundo de 16 capítulos/pistas en el disco está
siendo reproducido en este momento.
00:41:28 – “00:41:28” indica el tiempo de reproducción del título/písta actual.
2/6 Eng – La información de pantalla de idioma indica que es el segundo
idioma de un total de 6 (Inglés) idiomas se encuentra en la actualidad en uso.
VCD 2.0 – Formato del disco actual.
Page 31

Para acceder a los controles en pantalla, toque el tercio inferior de la pantalla (sección
B). Toque el botón 1/2 para observar la segunda página de controles.
1/2
1/2
BACK
BACK
MENU
MENU
2/2
2/2
BACK
DISP
DISP
EQ
EQ
AUDIO
AUDIO
A-B
A-B
TITLE
TITLE
SUBTITLE
SUBTITLE
Acceso a la pantalla de ingreso directo
Acceso al menú SETUP
Salida del menú de control en pantalla
Retroceder / Avanzar rápido
Pista/capítulo previo o próximo
Reproducción/Pausa
Detener reproducción
Ver la segunda página de controles en pantalla
Acceso al Menú Principal del DVD
Ajuste de los parámetros del Ecualizador
Cambiar el idioma de audio para repr. de disco
Repetir reproducción de pista/capítulo actual
Pulse para sel- el inicio del punto de rep. Pulse
para sel. punto de final. Pulse para detener.
Seleccionar idioma para subtítulos
Seleccionar título diferente para reproducción
Ver primera página de controles en pantalla
Mostrar información de reproducción
Page 32

1. Archivo actual y número total de archivos en su dispositivo de medios
2. Tiempo transcurrido de reproducción
3. Hora actual
4. Títulos de las pistas
5. Información ID3
6. /||: Tocar para reproducir / pausar reproducción
7. : Tocar para detener reproducción del disco
8. >>|: Tocar para ir a la próxima pista
9. |<<: Tocar para ir a la pista previa
10. : Tocar para ver la próxima página de canciones
11. : Tocar para ver la página previa de canciones
12. DIR -: Tocar para ver la carpeta anterior
Operación MP3/WMA
15
1
7
2
13
5
16
12
3
17
DISC
MP3 4/84 00:00:23
01:02 AM
E
Q
1 Cherry Poppin Dad
2 Chris Isaak - Baby
3 Crazy Town - Butt
4 Phish - Birds Of A
5 Phish - Bouncin' R
6 Phish - Freebird (L
14
4
9
11
10
8
6
DIR - DIR +
(Root)
18
Page 33

13. DIR +: Tocar para ver la carpeta siguiente
14. Tocar para acceder a la pantalla de ingreso directo
15. : Tocar para ver el menú SETUP
16. Tocar para un acceso rápido a los parámetros de nivel del Ecualizador
17. Tocar para ver el MENU SOURCE y seleccionar una nueva fuente de
reproducción
18. Nombre de la carpeta
Usando un Tarjeta SD
Para insertar un tarjeta SD, primero debe presionar el botón EJECT en el panel de
control o el control remoto para revelar la ranura de tarjeta SD. Inserte la tarjeta SD
dentro de la ranura de tarjeta, la unidad leerá los archivos media en la tarjeta
automáticamente.
Para quitar la tarjeta, primero presione el botón SRC para
cambiar a otro modo y detener la reproducción SD. Presione y
suelte para sacar la tarjeta. Agarre la tarjeta SD y quítela en forma
recta. La mayoría de las tarjetas tienen un fino descanso que
ayuda a removerla.
LABEL SIDE UP
DISC IN
EJECT
Page 34

Operación de Bluetooth
La distancia de la línea de visión entre esta unidad y su teléfono
móvil deberá ser de 8 metros o menos, dependiendo del entorno.
Bluetooth es una tecnología de conectividad de corto alcance que está desarrollada
como un reemplazo de los cables para teléfonos móviles, PC portátiles y otros
dispositivos. Bluetooth opera en un rango de frecuencia de 2.4 GHz y transmite voz y
datos a una velocidad de hasta 1 megabyte por segundo.
Para la operación de Bluetooth se requiere del BTM10 (vendido separadamente).
Conexión de su Teléfono
1. Presione el botón para iniciar el proceso de conexión. Mantenga el teléfono a
menos de 2 metros de la unidad central en el transcurso de la operación.
2. Seleccione la opción de “Bluettooth Setup” – Configuración de Bluetooth en el
teléfono móvil a ser conectado (por favor lea el manual de instrucciones del
teléfono).
3. Si se lo solicita, ingrese lal ”clave de contraseña” o código de apareamiento. El
código por omisión de gran cantidad de teléfonos es "0000". El código por
omisión del VM9223 es "1234".
4. Seleccione "VM9223" de la lista de apareamiento del teléfono móvil.
Perfil de Manos Libres (HFP)
Para utilizar un teléfono sin cables en esta unidad, es necesario establecer primero
una conexión utilizando la tecnología sin cables de Bluetooth. La conexión se
establece normalmente utilizando HFP (Perfil de Manos Libres), que le brinda un
control total de las funciones disponibles en el teléfono fuente. De todas maneras,
dependiendo de su teléfono, la conexión puede ser hecha utilizando HSP (Perfil de
Auricular), lo que hace que algunas funciones no estén disponibles. Esta es una
limitación de su teléfono, no del VM9223.
NOTA
Page 35

Lista del Menú
La lista del menú aparece en la parte izquierda de la pantalla y puede ser accedida
desde otros modos tocando el botón MENU en la parte derecha de la pantalla.
Para realizar una llamada desde una lista, toque el número y luego presione el
botón.
Missed Calls: La lista de llamadas perdidas busca la lista de números perdidos
de su teléfono. El último número perdido es el primer número de la lista. Toque la
opción Llamadas Perdidas para observar la lista.
Dialed Calls: La lista de llamadas marcadas busca la lista de números marcados
de su teléfono. El último número marcado es el primer número de la lista. Toque
la opción Llamadas Marcadas en el menú de opciones para ver la lista.
Received Calls : Use la lista de Llamadas Recibidas para ver los últimos 10
números desde donde lo llamaron almacenados en su teléfono. Para acceder a la
lista de Recibidos, toque Llamadas Recibidas en el menú de opciones. El último
número recibido es el primer número de la lista.
Phone Book: Toque Phone Book en el menú de opciones para que le muestre la
agenda telefónica almacenada en su teléfono móvil, si es compatible. La pantalla
le mostrará "Ready... " mientras se carga la agenda. Una vez que la carga se
haya completado, puede utilizar los botones con flechas y la barra desplazadora
en el lado derecho de la ventana para navegar a lo largo de la lista. Debido a que
la unidad carga una página de entradas a la vez, puede existir una pequeña
demora mientras se carga la próxima página de números telefónicos.
No todos los teléfonos le permitirán el acceso a las llamadas
pérdidas, recibidas o marcadas y algunos no le permitirán la carga
de su agenda telefónica.
NOTA
Page 36

1
4
14
2
15
BT
Disconnected
01:02 AM
1 Missed Calls
2 Received Calls
3 Dialed Calls
4 Phone Book
3
16
MENU
Menu List
E
Q
19
Operación de Bluetooth (continuación)
1. Estado actual de la conexión/dispositivo conectado
2. Hora actual
3. Menú de Bluetooth
4. Estado de operación actual
5. Cambiar entre Menú de Música/Teléfono
6. Transfiere la llamada activa nuevamente al equipo de manos
7. Aparea su teléfono Bluetooth (uso por primera vez)
8. Pantalla de llamadas salientes
9. Dispositivo de conexión/desconexión de Bluetooth (teléfono, PDA, reproductor
de música personal, etc.) con función manos libres
Page 37

MENU
17
9
7
10
8
11
5
6
12
13
9
23
7
MENU
20
21
22
18
10. Silenciar/Des-silenciar el micrófono durante la llamada activa
11. Contestar llamada entrante /realizar llamada
12. Rechazar llamada entrante /finalizar llamada /salir del proceso de apareamiento
/salir de la lectura de la agenda telefónica o listado de llamadas
13. Tocar para ver el menú SETUP
14. Tocar para ver el ecualizador
15. Tocar para ver el MENÚ SOURCE y seleccionar una nueva fuente de
reproducción
16. Indicadores de Estado (modo teléfono, modo música, micrófono silenciado)
17. Tocar para acceder a la pantalla de ingreso directo
18. : Tocar para detener la reproducción A2DP
19. Tocar la barra desplazadora y las flechas para observar la página previa /
siguiente de alternativas (sólo visible cuando es la necesita)
20. Cambiar entre Menú de Música/Teléfono
21. Archivo seleccionado Reproducir/Pausar
22. |<<: Tocar para moverse al archivo anterior
23. >>|: Tocar para moverse al próximo archivo
Toque el icono
música/teléfono en
el medio del
círculo para
cambiar entre la
interfaz del
teléfono
(izquierda) a la
interfaz de música
(derecha).
Page 38

Page 39

Opération navigation exige l’installation de
NAV102
Opération Bluetooth exige l’installation de
BTM 10
Opération caméra arrière exige l’installation
d’une caméra à l’arrière
Comprenant:
Reproduction DVD, CD, MP3, WMA, USB et SD
Interface d'Écran Tactile
Entrée d'A/V de RCA et de Panneau Avant
Connecteur USB
Sortie Vidéo Composite
Télécommande á Infra-rouge
Prête pour la Navigation (NAV102 Uniquement)
Bluetooth Ready (Requires BTM10)
VM9223 Guide de référence rapide
Page 40

Commandes et indicateurs
VM9223
Multimedia Receiver
A / V
Input
SRC
VOL - VOL +
MUTE PIC
316
5
4 10
128
7
1. Pressez pour assourdir l’audio. Pressez de nouveau pour reprendre le niveau de
volume précédent. En mode par radio, pressez et maintenez pour placer la
fonction de LOC/DX. En tous autres modes, pressez et maintenez tandis que
l'icône de volume montre pour placer le volume d'ouverture.
2. Insérez la carte SD pour une reproduction des fichiers multimédia compatible.
3. Pressez pour ajuster la luminosité et le contraste. Pressez le bouton PIC de
nouveau pour aller entre la luminosité et le contraste. Pressez les boutons VOL-
/VOL+ pour ajuster le réglage d’une option sélectionnée.
Lorsque le NAV102 est branché, pressez et maintenez pour afficher l’interface
d’utilisateur de navigation.
Page 41

4. Pressez pour activer le système mécanique automatique et glisser le moniteur
TFT vers le bas pour révéler les fentes du disque et de SD. Pressez encore une
fois pour fermer le TFT.
Pressez et maintenez pour activer la fonction d'inclinaison. Utilisez les boutons
VOL -/ VOL+ pour ajuster l'angle de l'écran alors que l'icône jaune d'inclinaison
clignote. Vous pouvez aussi ajuster l'inclinaison en utilisant les boutons et
sur la télécommande. Pressez une fois pour ajuster l'angle d'inclinaison vers le
bas de l'écran une étape à la fois ou bien pressez et maintenez pour ajuster
l'angle dans un mouvement continuel.
5. Pressez VOL - pour diminuer le volume. Pressez VOL+ pour augmenter le
volume.
6. Pressez pour allumer l'appareil. Pressez et maintenez pour éteindre l'appareil.
Pressez pour accéder au SOURCE MENU.
7. Moniteur TFT
8. Récepteur Télécommande IR
9. Lumière d’indicateur Disque
10. Entrée Audio/Vidéo
11. Pressez pour éjecter le disque. Pressez et maintenez pour réinitialiser la position
du mécanisme de coeur.
12. Pressez pour réinitialiser les réglages du système aux défauts d’usine (exception
faite du mot de passe et le régalge de verrouillage parental).
13. Fente du disque
LABEL SIDE UP
DISC IN
EJECT
9
13
11
2
Page 42

Réglages d’utilisateur communs
Menu contrôle audio
Pressez le bouton EQ sur l’écran tactile pour accéder au menu contrôle audio montré
ci-dessous.
1. Utilisez l’écran tactile ou bien pressez les boutons (>>|)/(|<<) sur la
télécommande pour surligner la fonction audio à ajuster.
2. Touchez l’écran pour sélectionner la choix surlignée.
3. Touchez les boutons +/– sur l’écran ou bien pressez les boutons |<<, >>|, >>, ou
<< sur la télécommande pour ajuster la fonction sélectionnée au réglage désiré.
+14 — 0 —
0 — —
–14 — –14 —
EQ
User
FAD BAL
BASS MID TREB SUB
User
F
R
R
L
NOTE
La partie "FAD-BAL"
de l’écran utilise une
commande par
quadrillage. Touchez
dans la boîte pour
bouger le curseur et
ajuster l’égaliseur et
la balance d’avant
en arrière, et
degauche à droite.
droite.
Le mode EQ changera automatiquement à “USER” lorsque les
fonctions audio individuelles sont ajustées.
Page 43

Régler l'horlage
L’horloge apparaît au coin droite supérieur de l’écran et sur l’affichage aux cristaux
liquides pendant certaines opérations.
Pour régler l’horloge, vous devez d’abord pressez le bouton sur l’écran pour
accéder au menu SETUP.
1. Utilisez l'écran tactile ou les boutons de directions sur la télécommande pour
sélectionner l'option Horloge.
2. Utilisez l'écran tactile ou pressez le bouton >/|| sur la télécommande pour entrer
dans le champ d'ajustement.
3. Sélectionnez une nouvelle valeur en utilisant l'écran tactile ou les boutons >> et
<< sur la télécommande. L'indication AM/PM changera au fur et à mesure que
vous continuez à ajuster l'heure au-delà de 12 heures.
4. Utilisez l'écran tactile ou pressez >/|| pour confirmer et sortir du menu SETUP.
RADIO
SETUP
Rating
Bluetooth
Hardware
DEMO
P.VOL
TS Cal
General Language
Audio Back
Clock Mode 12Hr
Clock 04 : 31 AM
Tuner Region USA
Beep On
Touchez les titres
menu sur la partie
gauche et supérieure
du menu pour voir les
choix de sous-menu
surlignées au centre
de l'écran.
Touchez la choix
menu que vous
voudriez ajuster et
utilisez l'écran tactile
pour ajuster le
réglage.
Page 44

1. Indicateur de la bande radio actuelle
2. Indicateur de fréquence de la radio
3. L’affichage d’horloge
4. Indicateur de réception stéréo
5. L’indicateur du mode de syntonisation (local/distant)
6. Touchez pour rappeler des stations préréglées.
7. Pas de fonction en mode tuner.
8. Touchez pour accès rapide aux réglages de niveau
d’Egaliseur.
9. Touchez pour accéder à l’écran d’entrée directe.
Entre une fréquence désirée et puis touchez le
bouton .
Interface d’utilisateur du tuner
4
1
10
2
5
7
8
3
6
17
RADIO
FM-1 P1 87.5 MHz
01:02 PM
E
Q
PS
BAND
AS
MEM
P1 87.5 MHz
P2 90.1 MHz
P3 98.1 MHz
P4 106.1 MHz
P5 107.9 MHz
P6 102.9 MHz
ST
LOC
9
11
12
19
14
15
13
16
18
20
FM: _ _ _ . _ MHz
1
2
3
4
5
6
7
8
9
0
Clear
Exit
Ecran d'entrée directe
Page 45

Vous pouvez aussi presser GOTO sur la télécommande pour accéder à l’écran
d’entrée directe.
10. Indicateur de station préréglée
11. |<<: Touchez pour chercher à l’arrière.
12. >>|: Touchez pour chercher à l’avant.
13. <<: Touchez pour syntoniser une étape en arrière.
14. >>: Touchez pour syntoniser une étape en avant.
15. BAND: Touchez pour changer les bandes (FM1, FM2, FM3, AM1, et AM2).
16. AS: Touchez pour mettre automatiquement en mémoire des stations dans la
bande actuelle.
17. Touchez pour voir le MENU SOURCE et sélectionner
une nouvelle source de reproduction. Vous pouvez aussi
changer la source en pressant le bouton SRC sur le
panneau de commande ou sur la télécommande.
18. MEM: Voir l’écran utilisé pour entrer la canal actuel dans
la mémoire préréglée. Touchez P1 - P6 pour mettre en
mémoire ou Exit pour sortir l’écran.
19. PS (Scanner la présentation): Touchez pour scanner
toutes les stations disponibles; s’arrêtant à chaque
station pendant 5 secondes et continuant jusqu’à ce
qu’une station ne soit sélectionnée.
20. Voir menu SETUP.
Preset: _
E x i t
P1
P2
P3
P4
P5
P6
Page 46

Opération audio CD/DVD
1. Piste actuelle et le nombre total des pistes sur le disque.
2. Temps de reproduction écoulé
3. Temps actuel
4. Titres de pistes (si disponible sur le disque)
5. Touchez pour voir le SOURCE MENU et sélectionner une nouvelle source de
reproduction.
6. /||: Touchez pour suspendre/jouer la reproduction du disque.
7. : Touchez pour arrêter la reproduction du disque.
8. >>|: Touchez pour aller à la piste prochaine.
9. |<<: Touchez pour aller à la piste précédente.
10. >>: Touchez pour faire avance rapide sur la piste actuelle.
11. <<: Touchez pour rembobiner la piste actuelle.
12. Touchez pour activer/désactiver le mode de reprodution à répétition.
13. Touchez pour activer/désactiver le mode au Hasard.
15
1
7
2
13
16
12
3
5
DISC
CDDA 1/10 00:00:23
01:02
E
Q
Track 1
Track 2
Track 3
Track 4
Track 5
Track 6
14
4
9
11
10
8
6
Le VM9223 jouera la
musique ou d’autres
fichiers audio des
média disque
suivants:
CD-DA
CD-R/RW
DVD
DVD+R/RW
DVD-R/RW
CD-R et CD-RW ne
joueront pas à moins
que la séance
d’enregistrement ne
soit finalisée.
Page 47

14. Touch to access the direct entry screen.
15. : Touch to view the SETUP menu.
16. Touchez pour accès rapide aux réglages du niveau Egaliseur.
NOTE
Pendant la reproduction du disque, pressez le bouton INT sur la
télécommande pour jouer les 10 premières seconde de chaque
piste. Lorsque vous arrivez à une piste désirée pressez sur INT
Page 48

Opération vidéo CD/DVD
A
B
A – Affiche
information sur
la reproduction
B – Affiche le
menu de
commande sur
écran
ZONES TACTILES D’ECRAN
Touchez dans les zones délignées (A et B)
pour information sur la reproduction et commandes
DVD T : 5/8 C : 2/16 00:41:28 2/6 Eng
VCD 2.0 T : 6/18 00:41:28
DVD Information
d'affichage "
VCD Information "
d'affichage
T : 5/8 – “5/8" indique que le cinquième des 8 titres sur le DVD est en train de
jouer.
C : 2/16 – “2/16" indique que le deuxième des 16 chapitres/pistes sur le disque
est en train de jouer.
00:41:28 – “00:41:28”indique que le temps de reproduction pour le titre/piste
actuelle.
2/6 Eng – L’information d’affichage de langue indique que la deuxième langue
des 6 (Anglais) est actuellement utilisée.
VCD 2.0 – Format du disque actuel.
Page 49

Pour accéder aux commandes sur écran, touchez le tiers en bas de l’écran (section
B). Touchez le bouton ½ voir une deuxième page de commandes.
1/2
1/2
BACK
BACK
MENU
MENU
2/2
2/2
BACK
DISP
DISP
EQ
EQ
AUDIO
AUDIO
A-B
A-B
TITLE
TITLE
SUBTITLE
SUBTITLE
Accéder à l’écran d’entrée directe
Accéder au menu SETUP
Sortir du menu de commande sur écran
Rembobinage/Avance rapide
Piste ou titre précédent/prochain
Jouer/Suspendre
Arrête la reproduction
Voir une deuxième page de commandes sur écran
Accéder au menu principal DVD
Ajuster les réglages d’Egaliseur
Changer la langue audio pour reproduction disque
Répéter le chapitre/la piste actuels
Pressez pour sélectionner le début de répétition. Pressez de
nouveau pour sélectionner la fin de répétition. Pressez encore pour
vous arrêter.
Sélectionnez langue pour sous-titres
Sélectionnez titre différent pour reproduction
Voir première page des commandes sur écrans
Afficher l’information de reproduction
Page 50

1. Fichier actuel et le nombre total de fichiers sur votre dispositif média
2. Temps de reproduction écoulé
3. Temps actuel
4. Titres de piste
5. Information ID3
6. /||: Touchez pour jouer/suspendre la reproduction du disque.
7. : Touchez pour arrêter la reproduction du disque.
8. >>|: Touchez pour aller à la piste prochaine.
9. |<<: Touchez pour aller à la piste précédente.
10. : Touchez pour voir la deuxième page de chansons.
11. : Touchez pour voir la page précédente de chansons.
12. DIR -: Touchez pour voir le dossier précédent.
13. DIR +: Touchez pour voir le dossier prochain.
14. Touchez pour accéder à l’écran d’entrée directe.
Opération MP3/WMA
15
1
7
2
13
5
16
12
3
17
DISC
MP3 4/84 00:00:23
01:02 AM
E
Q
1 Cherry Poppin Dad
2 Chris Isaak - Baby
3 Crazy Town - Butt
4 Phish - Birds Of A
5 Phish - Bouncin' R
6 Phish - Freebird (L
14
4
9
11
10
8
6
DIR - DIR +
(Root)
18
Page 51

15. : Touchez pour voir le menu SETUP.
16. Touchez pour accès rapide aux réglages de niveau Egaliseur.
17. Touchew pour voir le SOURCE MENU et sélectionner une nouvelle source de
reproduction.
18. Nom du dossier
Charger un Carte SD
Pour insérer une carte SD, vous devez d’abord presser le bouton EJECT sur la
panneau de commande ou sur la télécommande pour révéler la fente de la carte SD.
Insérez une carte SD dans la fente de la carte et l’appareil lira les média sur la carte
automatiquement.
Pour enlever la carte, pressez d’abord le bouton SRC pour
changer à un autre mode et arrêter la reproduction SD. Poussez
et relâchez pour faire sortir la carte. Tenez la carte SD et la tirer
tout droit. La plupart des cartes ont un recoin mince qui aide dans
l’enlèvement.
LABEL SIDE UP
DISC IN
EJECT
Page 52

Opération Bluetooth
La distance ligne de vue entre cet appareil et votre téléphone
portatif doit être 8mètres ou moins, en fonction de l’environnement.
Bluetooth est une technologie de connexion radio sans fil à portée limitée qui s’est
développée comme un remplacement de câble pour des téléphons portatifs, des
ordinateurs de poche et d’autres dispositifs. Bluetooth opère dans la gamme de
fréquence 2.4GHz et transmet des données et de la voix à des vitesses remontant
jusqu’à 1 mégabit par seconde.
Le BTM10 (acheté séparément) est exigé pour l’opération Bluetooth.
Apparier votre téléphone
1. Pressez le bouton pour initier le processus d’appariment. Gardez le téléphone
portatif à l’intérieur de 2 mètres de l’installation de tête lorsque vous appariez.
2. Sélectionnez la choix de configuration Bluetooth sur le téléphone portatif à
apparier (veuillez vous référer au mode d’emploi du téléphone).
3. Si soufflé, entrez la clé de passe ou le code d’appariment. Le code par défaut
pour plusieurs téléphones est “0000”. Le code par défaut pour le VM9223 est
“1234”.
4. Sélectionnez “VM9223” depuis la liste d’appariment sur le téléphone portatif.
Profil mains libres (HFP)
Pour utiliser un téléphone sans fil avec cet appareil, il est nécessaire d’abord d’établir
une connexion en utilisant la technologie sans fil Bluetooth. La connexion est
normalement établie en utilisant le HFP (Profil mains libres) ce qui vous donne un
contrôle total des fonctions disponibles sur la téléphone source. Tout de même,
dépendant de votre téléphone, la connexion peut être faite en utilisant le HSP (Profil
casque) rendant certaines fonctions non-disponibles. Ceci est une limitation de votre
téléphone et non pas du VM9223.
Page 53

Liste Menu
La liste menu apparaît au côté gauche de l’écran et peut être accédée des autres
modes en touchant le bouton MENU au côté droite de l’écran.
Pour faire un appel de cette liste, touchez le numéro et puis le touchez le bouton .
Appels manqués: La liste des appels manqués récupère la liste des appels
manqués de votre téléphone. Le dernier numéro manqué est le premier sur la
liste. Touchez la choix menu Appels Manqués pour voir la liste.
Appels composés: La liste des appels composés récupère la liste des appels
composés de votre téléphone. Le dernier numéro composé est le premier sur la
liste. Touchez le menu Appels Composés pour voir la liste.
Appels reçus: Utillisez la liste des Appels Reçus pour voir les dernier dix numéros
reçus mis en mémoire sur votre téléphone. Pour accéder à la liste des Reçus,
touchez la choix menu Appels Reçus. Le dernier numéro reçu et le premier sur la
liste.
L’Annuaire: Touchez la choix menu Phone Book pour afficher l’annuaire mis en
mémoire sur votre téléphone portatif, si compatible. L’écran va afficher “Ready...”
Lorsque votre annuair est en train de télédécharger. Dès que le télédéchargement
est terminé, vous pouvez utiliser les boutons flèches et la barre de défilement au
côté droite de l’écran pour naviguer la liste. Puisque l’appareil télédécharge une
page d’entrées à la fois, il peut y avoir un léger retard lorsque la prochaine page
des numéros se télédécharge.
Toutes les téléphones ne permettent pas d’accès à des appels
manqués; reçus ou composés et certains ne permettront pas le
téléchargement du carnet d’adresse de votre téléphone.
Page 54

1
4
14
2
15
BT
Disconnected
01:02 AM
1 Missed Calls
2 Received Calls
3 Dialed Calls
4 Phone Book
3
16
MENU
Menu List
E
Q
19
Opération Bluetooth (continué)
1. Statut de connextion actuel/dispositif branché
2. Temps actuel
3. Menu Bluetooth
4. Statut d’opération actuelle
5. Menu bascule Musique/Téléphone
6. Transférer appel actif au combiné
7. Apparier votre téléphone Bluetooth (utilisation pour la première fois)
8. Sortir de l’affichage de listing d’appels
9. Brancher/Débrancher dispositif Bluetooth (téléphone; PDA, lecteur de musique
personnel) avec la fonction mains libres.
10. Mise en sourdine/remise de volume microphone pendant un appel actif.
11. Répondre à l’appel entrant/ faire un appel
Page 55

MENU
17
9
7
10
8
11
5
6
12
13
9
23
7
MENU
20
21
22
18
12. Rejeter l’appel entrant/terminer l’appel/quitter le processus d’appariment/s’arrêter
de lire l’annuaire ou le listing d’appel.
13. Touchez pour voir le menu SETUP.
14. Touchez pour voir l’égaliseur.
15. Touchez pour voir le SOURCE MENU et sélectionnez une nouvelle source de
reproduction.
16. Indicateurs de statut (mode téléphone, mode musique, mise en sourdine du
microphone).
17. Touchez pour accéder à l’écran d’entrée directe.
18. : Touchez pour arrêter la reproduction A2DP.
19. Touchez la barre de défilement et des flèches pour voir la page
précédente/prochaine des choix (visible seulement lorsque nécessaire).
20. Bascule Musique/Téléphone menu/mode
21. Jouer/Suspendre le fichier sélectionné
22. |<<: Touchez pour aller au fichier précédent.
23. >>|: Touchez pour aller au fichier prochain.
Touchez l’icône
musique/téléphone
au milieu du cercle
pour basculer
entre l’interface
téléphone
(gauche) et
l’interface musique
(droite).
Page 56

Audiovox Electronics Corporation
Hauppauge, NY 11788
www.jensen.com
© 2009 Audiovox
v. 032409
Printed in China/Impreso en China/Imprimé en Chine
 Loading...