

Page 1

R}>IUDIOrOX-
^Ce/Zu/ar te/ephones
150 Marcus Blvd. hauppauge, NY 11788
PRINTED IN JAPAN 2-92
Page 2

TABLE OF CONTENTS
FEATURES AND OPTIONS....................................6
GENERAL SPECIFICATIONS
TELEPHONE UNIT FUNCTIONS
BASIC OPERATION
Turning the Unit On
To Store a Number in Memory
To Recall a Number from Memory
To Review the Prefix
Last Number Review
Display Own Telephone Number
Repertory Memory Scroll
Automatic Storing into a Vacant Memory Address
To Lock tbe Unit
Automatic Lock (NAM Option)
To Unlock the Unit
Backlighting On/Off Control
Volume Control
PLACING TELEPHONE CALLS
To Place a Call
If the Call Fails to Go Through
Automatic Redial (NAM Option)
Terminating a Call (Hanging Up)
To Receive Calls
To Place a Call with a Number in the Memory
911 Emergency Call (NAM Option)
Automatic Answering
To Mute a Phone Conversation
Call in Progress Protection
CALL RESTRICTIONS (NAM OPTION)
To Set Call Restricted Mode
To Exit Call Restriction Programming Mode
HANDS-FREE OPERATION (NAM OPTION) ■■■16
END-TO-END SIGNALING
Touch Tone^'’ from Memory
Link Dialing
SCRATCH PAD DIALING
SCRATCH PAD DIALING
WITHOUT KEYING TONES
CALL TIME DISPLAY
To Display the Talk Time of the Last Call
To Display the Cumulative Talk Time
To Display the Number of Calls
To Clear the Timer
One Minute Beep (NAM Option)
A/B SYSTEM SELECTION
SYSTEM INHIBIT (NAM OPTION)
MULTIPLE CITY REGISTRATION
.............................................
..........................................
...............................
..........................
...........................
..............
..................................
...................................
.............................
...................................
....................
.....................
7
8
10
13
15
16
18
18
18
19
20
21
Page 3

RADIO FREQUENCY (RE)
CHANNEL INDICATOR ...................................21
HORN ALERT (NAM OPTION)
CALLS IN ABSENCE INDICATOR
FUNCTION REVIEW ............................................23
IMPORTANT SAPETY INFORMATION
WARNING...............................................................24
Touch Tone’^" is a registered trade mark of AT&T.
..........................
.....................
............
22
22
24
AUDIOVOX CELLULAR
CAR TELEPHONE
Congratulations... By choosing the Audiovox SBC
Series cellular telephone, you have joined the thou
sands of satisfied customers who are enjoying the
benefits and quality performance that only an
Audiovox cellular telephone can provide.
Audiovox is a leader in the cellular telephone indus
try and your Audiovox SBC Series cellular telephone
has been designed to meet the same standards of
quality that has made Audiovox the leading supplier
of cellular telephones in the United States.
This fifth generation cellular telephone combines the
most advanced technology with the latest high tech
design to offer you even more enhanced features than
ever before.
The styling of the SBC Series is sleek and trim and
features a new mini transceiver. In addition, the SBC
Series cellular telephone offers an outstanding array
of enhanced features such as push button on-hook
dialing, that enables you to dial while the handset is
in the cradle ; repertory dialing that let you store and
recall up to 50 numbers ; and last number redial that
permits you to redial the last number you called at
the touch of a single button (a great help when calling
frequently busy phones).
Your SBC Series also includes an auto answer fea
ture which will automatically answer the phone after
the second ring allowing you to talk to the calling
party without touching the handset (in hands-free
mode) ; and automatic storage of numbers which
searches for the first vacant memory location, and
eliminates the problem of accidentally writing over a
previously stored number.
The SBC Series also has multi-city registration,
which will permit you to register your phone in
multiple cities and save on costly roaming charges,
and 911 emergency calling, even if your phone is in
the locked or restricted modes.
For all its high tech sophistication, the Audiovox
SBC Series Cellular Telephone is surprisingly easy to
use ; with its built-in function review menu, you can
review at the touch of a button, which keys to use the
order to access the many different features.
And the Audiovox cellular car telephone is a no
nonsense, high quality instrument, rugged enough for
Page 4

off-road use, as well as high speed freeway vibration.
The following pages, which describe the unit’s func
tions and many of its components, will help you to
make the easiest and most efficient use of the
Audiovox SBC Series cellular car telephone.
FEATURES AND OPTIONS
• Push Button Dialing
• Backlit Keypad and Display with ON/OFF Control
• Large Size Dot-matrix LCD Display
Status/Function Indicator
15-Digit Dial Number
Receiving Signal Strength Indicator
• Pre-set Dialing up to 16 Digits (32 Digits : NAM
Option)
• Extended Readability
• Last Digit Clear
• Digit Display Clear
• On-Hook Dialing
• 911 Emergency Call in all modes
• Repertory Dialing : 16 Digits 50 Memories
• Repertory Memory Scroll
• Automatic Storing into a Vacant Memory Address
• Link Pre-set Dialing from Memory
• Last Number Redial
• Automatic Redial (NAM Option)
• Last Number Review
• Mute or Hold
• Call Restrictions (NAM Option)
• Scratch Pad Dialing (with/without keying Tones)
• End-to-End Signaling
• Touch Tone'''” from Memory
• Continuous DTME from Keypad
• Call in Progress Protection
• Automatic Answering
• Call Time Display (Five Functions)
• Hands-free Operation (NAM Option)
• Horn Alert (NAM Option)
• Calls in Absence Indicator
• Safety Timer
• Display Own Telephone Number
• Multiple A/B System Selection
• System Inhibit (NAM Option)
• Multiple City Registration
• RF Channel Indicator
• Electronic Lock
• Automatic Lock (NAM Option)
• Function Review
• Rear Seat Extension (Option)
• Flexible Mounting
GENERAL SPECIFICATIONS
(subject to change without notice)
Frequency Range:
Number of RF Channels:
Channel Spacing:
Duplex Spacing:
Frequency Stability:
Operating Temperature:
Supply Voltage: 13.7 V DC±20%, Negative Ground
Current Drain: approx. 1.5 A in use, 0.2A standby
Size:
Transceiver : ЗОН x 210'W x 90 D (mm)
Telephone Unit : 58.5HX62WX211D (mm)
Weight :
Transceiver :
Telephone unit :
RF Power Output :
824 to 849 MHz Transmit
869 to 894 MHz Receive
832 Full Duplex
30 kHz
45 MHz
±2.5 PPM
-30”C to ± 60”C
L18HX8.27WX3.54D (inches)
2.30HX2.44WX8.31D (inches)
approx. 0.7kg (1.541bs)
approx. 0.4kg (0.881bs)
3 watts (50 ohms)
Page 5
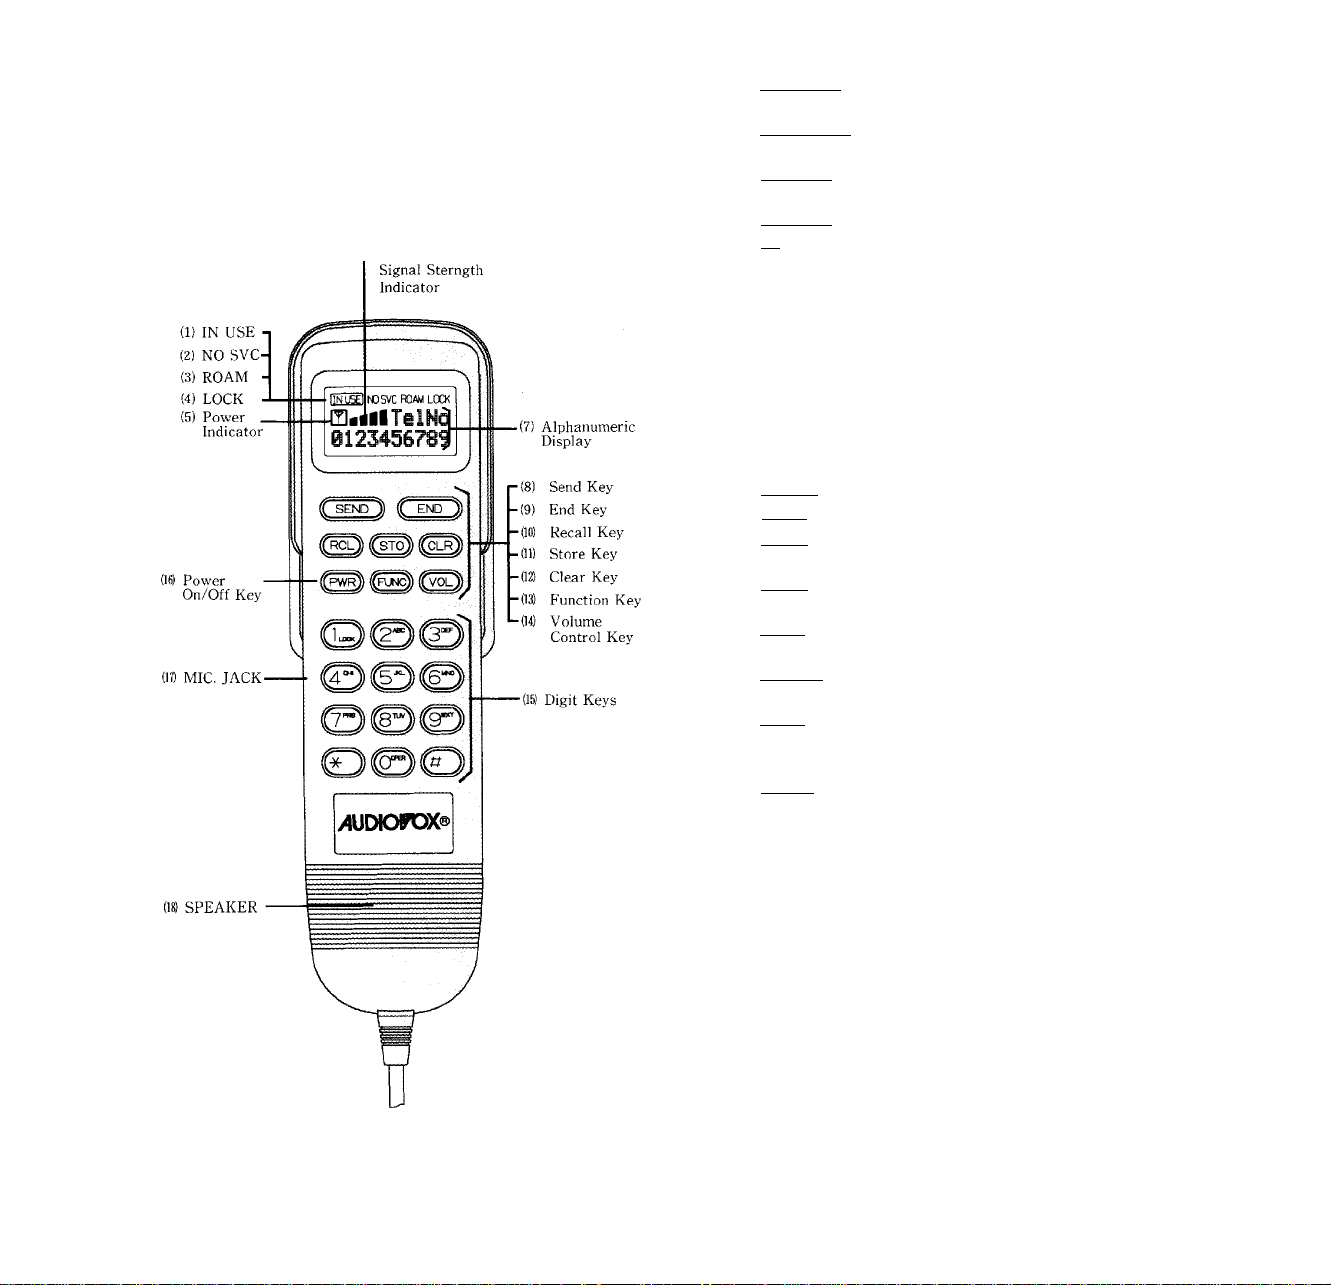
TELEPHONE UNIT
FUNCTIONS
(6) Receiving
I IN USE I indicator lights when a call is in prog
(1)
ress.
(2)
I NO SVC I (no service) indicator lights when the
unit is in a non-coverage area.
(3)
I
ROAM I indicator lights when the unit is out of
the home area.
(4)
I LOCK I indicator lights when the unit is locked.
(5)
[t] is used as a POWER ON indicator which
lights when the unit is on.
(6)
RECEIVING SIGNAL STRENGTH INDICA
TOR : The number of shaded blocks indicates
the Received Signal Strength.
(7)
15-CHARACTER FUNCTIONAL ALPHA
NUMERIC DISPLAY:
The first 5 characters indicate current function
and status conditions.
The remaining 10 characters show the last 10
digits of the dialed number.
(8)
I send] (send key) for placing or receiving a call.
(9)
|END| (end key) terminates a call.
iRCLl (recall key) recalls phone numbers from
repertory memory.
ISTOl (store key) stores phone numbers in reper
(11)
tory memory.
(12)
ICLRi (clear key) clears the diglt(s) from the
display.
(13)
IFUNCI (function key) shifts the digit keys to the
functional keys.
(14)
|VOL| (volume control key) control Loudspeaker
and Earpiece audio level as well as Alert tone.
(15)
DIGIT KEYS to enter a phone number.
(16)
IPWRI (power on/off key) is used to turn the unit
on/off.
(17)
MICROPHONE JACK for HANDS-FREE.
Built in Loudspeaker.
Page 6

BASIC OPERATION
Turning the Unit On
With the ignition switch at “ON” or “ACCESSORY”,
press IPWRI . The indicator [5 will light (all indicators
will light momentarily ; display will show your phone
number, and a tone will be heard).
• Receiving Signal Strength Indicator
The number of the shaded blocks indicates the Signal
Strength in your area. Four blocks show the maxi
mum level. The display will vary as your car moves.
If the signal is not strong enough to place a call, the
jNO SVC] indicator will appear on the readout.
To Store a Number in Memory
1. Press |CLR|
2. Press [ST^ ,
through 50).
Example: Press |STO|, key [T] then [§ , the displayed
number will be stored into memory address 15.
To Recall a Number from Memory
Press |RCL| , then enter the memory address (01
through 50).
Example: Press |RCL , key [T] then , the number
stored in memory address 15 will be displayed
on the readout.
To Review the Prefix
(Number Longer than 10 digits)
After pressing |RCL| , hold down the second digit of
the memory address.
Note; When a set of linked numbers is recalled, you
can review only the last linked number with
this feature. To review Link 1 to Link 5, use
[FUNCl , |RCL| then key [XI (X is 1 to 5). See
“Link Dialing”.
Last Number Review
Press |RCL| , key [§ then [^ again, the last number
used will be displayed.
Display Own Telephone Number
You can see your own phone number on the readout.
Press |RCL| , key jX! then |X1 again.
then enter the phone number,
then enter the memory address (01
Repertory Memory Scroll
This feature is useful in finding a certain phone
number by scrolling the repertory memory from one
of the designated starting addresses.
1. Press |RCL] , key [X] then [f] .
[X] is the digit used to assign the starting address
as follows.
X Starting address
0 01
1 11
2 21
3
4
2.
Press [U or g .
[#1: Scroll upward (with roll back to 01)
(XI: Scroll downward (with roll up to 50)
Memory address and the last 7 digits of the stored
number will be displayed on the readout as fol
lows.
Example: | 3 | 1 | - | 1 | 2 | 3 | 4 | 5 | 6 | 7 |
Address-No. Tel. No.
Note: In this scroll feature, any vacant memory
address(es) will be skipped.
31
41
___________
/
Automatic Storing into a Vacant Memory Address
This feature allows automatic storing into a vacant
repertory memory address. This ends the possible
problem of writing over a previously stored number.
1. Enter the phone number.
2. Press ISTOl.
3. Enter a memory address group number in which
you want to store a number.
[0]: From 01 to 10
[T] : From 11 to 20
: From 21 to 30
i3]: From 31 to 40
[4]; From 41 to 50
r#1: From 01 to 50
4. Press [#].
The memory address and the last 7 digits of the
stored phone number will be displayed on the
readout as follows.
Example: |3| 1 |-| 1 | 2 | 3 | 4 | 5 | 6 | 7 |
Note: If there is no vacant address in the assigned
area, the phone number will not be stored in
the memory.
10
11
Page 7

To Lock the Unit
Press IFUNCI, then key [T] (LOCK).
The ILOCKI indicator lights. The unit will remain
locked until unlocked, even if the power is turned off.
Automatic Lock (NAM Option)
If you request the feature of Automatic Lock, your
NAM can be programmed so that your unit will
automatically go into the lock mode when the power
of the unit is turned “off”. When IPWRI is turned “on”,
the unlock code is required to operate the unit.
To Unlock the Unit
Enter the three-digit unlock code. The ILOCKI indica
tor will go out when the three-digit code is the same
as the code registered in the NAM.
Backlighting On/Off Control
LCD display and the keypad are backlit automati
cally after the Power-On. If needed, backlighting can
be turned off by pressing iRCLl, key |3 then .
Even if the unit is in the backlighting “Off” mode, the
backlighting will be turned on again automatically
for 10 seconds when any key operation is performed
or a call is received.
To return to the backlighting “On” mode, press |RCL|,
key 13 then again.
Volume Control
The audio level of the loudspeaker, earpiece and the
alert tone can be adjusted by the Volume Control
key IVOLl.
• Loudspeaker: Leave the handset on the cradle :
Keep pressing I VOL I until you get the desired sound
level.
Sound level will be displayed on the readout digitally
during the level adjustment and the sample tone will
indicate the sound level when you are not engaged in
a telephone conversation. The display format is as
follows:
SPK □□ (1 to 10)
• Handset: Lift the handset and perform the same
procedures as above.
In this case, the display format is as follows:
H.S □□ (1 to 10)
• Alert Tone: Press |RCL|, key then [§ .
Then adjust the alert tone level in the same manner
as above. Your telephone will ring at the new level.
In this case, the display format is as follows:
ALT □□ (1 to 10)
PLACING TELEPHONE
CALLS
To Place a Call
1. Enter the phone number with the handset on or off
the cradle. The last 15 digits of the dialed number
are displayed on the readout.
Note: After 120 sec., display will return to the
10-digit display mode.
2. If a dialing error is made, press |CLR|, then enter
the phone number again. Pressing |CLR| momen
tarily (less than approx. 0.5 sec.) clears only the
last digit.
3. Press
Note: If assigned in NAM, the phone number can be
If the Call Fails to Go Through
1. If you hear the “reorder” signal, press |END|, then
2. If the “intercept” signal is heard, press |END| or
Automatic Redial (NAM Option)
If the feature of Automatic Redial (NAM Option) is
selected, your unit will automatically make five
attempts to reach the cell site if the first try is not
successful. The |
the speaker will be muted for twenty seconds.
This is done so that you do not hear the reorder
signals from the loudspeaker. If you need to termi
nate the automatic redial, press fEFjPl.
Terminating a Call (Hanging Up)
Press [END I, or replace the handset on the cradle.
The I IN USE] indicator will go out.
I
SEND
I
. The I IN USE I indicator will light.
You may lift the handset either before or after the
called party answers to proceed with your conver
sation.
pre-set up to 32 digits. However, in this case
it is necessary to confirm with system opera
tor whether such service is available or not.
if there were no dialing errors, press I SEND I for
redial. (Redialing with digit keys is not necessary.)
hang up, then redial the correct number.
IN USE] indicator will stay on, but
12
13
Page 8

If Hands-free is activated in NAM, you have to press
I END I to terminate a call.
To Receive Calls
1. When the telephone rings, lift the handset or press
I
SEND
I
to answer the call. The
will light.
2. If the handset is off the cradle when ringing starts,
press ISENDl to answer a call.
I
IN USE] indicator
To Place a Call with a Number in the
Memory
1. Press |RCL|, then enter the memory address ( 01
through 50). The last 10 digits of the number will
appear on the readout. If the number is longer
than 10 digits, hold down the second digit of the
memory address (after pressing |RCL| )to see the
prefix.
Note: Refer to “To Recall a Number from Memory”
and “To Review the Prefix” for more
details.
2.
Press
I
as the call is placed.
SEND
____________
I .
The I IN USE j indicator will light
911 Emergency Call (NAM Option)
This feature permits you to place an emergency call
(911) even if your telephone unit has been set to the
Lock Mode or Call Restricted Mode.
Operation in Lock Mode
1. Enter the emergency call number (911); [^[Tirn
(“911” is not indicated, but the
will light.)
2. Press
3. To terminate the call, press |END|. (The | IN USE j
Operation in Call Restriction Mode
The operation and display are the same as in the
normal mode.
I
SEND
I
, the
I
indicator will go out.)
IN USE] indicator will light.
I
LOCK j indicator
Automatic Answering
With this feature, the incoming call will be automati
cally connected for operation after two alert tones,
and the
Then the unit is ready for Hands-free operation.
1. To activate this mode, press IFUNCI and then
2. This mode is deactivated when iFUNCi and then
3. This feature will not function if the unit is in the
i
IN USE"| indicator will light on the readout.
key [§ .
key are pressed again.
following modes or the handset is off the cradle.
I
A.Ans j will appear on the readout.
Lock, Horn Alert, and Calls in Absence Indicator.
To Mute a Phone Conversation
1. Press iFUNCj , then key . | Mute | will appear
on the readout. Then the transmit audio will be
muted and the receive audio will be heard from
the loudspeaker. You may converse privately
with a passenger during a call with the handset on
or off the cradle.
2. To return to normal conversation, press | FUNC |.
then key again or lift the handset.
3. Mute is reset when call is terminated.
Call in Progress Protection
Phone conversation will continue until call is ter
minated, even after ignition switch is turned off.
CALL RESTRICTIONS
(NAM OPTION)
This feature permits you to impose various kinds of
restrictions on Outgoing Calls.
To Set Call Restricted Mode
Enter the three-digit security code, then press I FUNC |
, key U] then [7].
The following key operation is needed to activate
one of the restricted modes;
rn: Only phone numbers having 11 digits or less are
accepted. Operator assisted dialing is prohibited.
: Only phone numbers having 7 digits or less are
accepted. Operator assisted dialing is prohibited.
[3l: Operator assisted dialing (0 Origination) is pro
hibited.
[4]' No phone calls can be placed except for re
pertory dialing from memory address 01 to 09.
However, emergency call with “911” are availa
ble.
151 ■ No restriction.
To Exit Call Restriction Programming Mode
Press IFUNCI, then |CLR|.
Noted): When in restricted mode 4, number storage
into the memory will not be permitted.
Note(2); In the restricted mode, a short beep tone
14
15
Page 9

will be heard to inform you of the improper
operation, and the word [Restrict^ will be
shown on the readout.
HANDS-FREE OPERATION
(NAM OPTION)
This feature permits you to engage in a conversation
without lifting the handset.
1. After receiving a call (press I SEND I to answer),
conduct the conversation via the hands-free
microphone with the handset on the cradle. To
converse more naturally:
a Speak in a normal tone,
b. Turn off the radio or stereo and close the
car windows.
2. To place a call, enter the phone number, then press
I
SEND
I
. The microphone will be turned on, ready
for conversation when your party answers.
3. After a call is completed, press |END| to terminate
the call.
Note: If you hear feedback on a bad RF Channel,
adjust the hands-free loop attenuation as fol
lows.
1) Press
2) To return to the normal condition, press
I
FUND I, key 0 then [2]. Hands-free
loop attenuation will be increased.
I FUND I, key then Q] .
Note: Continuous DTMF from keypad can be manu
ally dialed as well to access answering
machines when engaged in a telephone call.
Link Dialing
This feature permits you to pre-set from repertory
memory or the keypad up to five numbers before
placing a call. With this feature, the first number is
sent in digital form to the cell site. Then up to four
other numbers can be sent with DTMF signaling by
simply pressing I SEND I for each additional number.
Noted): Each number to be linked may be recalled
from memory or entered by keypad.
Note(2): Each number to be linked should be within
16 digits including linking mark “ = ” at the
end.
Note(3): Linked number can be stored in the mem
ory. However, the total number of digits
must be less than 16 digits.
Example: To access the alternate long distance ser
vice you should call your long distance service
office first, and enter your ID number, then
the phone number to be placed.
1. Recall the phone number of the long distance
service office.
Press |RCL| , then enter the memory address (01
through 50).
7 4
END-TO-END SIGNALING
This feature permits you to utilize additional phone
services, such as accessing an alternate long distance
network, signaling a pager, or banking by phone etc..
For these services the signaling should be in DTMF
(Touch Tone’^”). The following two features will
make it easier to send in DTMF codes.
Touch Tone^*^ from Memory
DTMF signaling by repertory dialing is available
while engaged in a telephone conversation.
1. Press [RCL] |RCL| , then enter the repertory memory
address (01 through 50). The last 10 digits of the
number will appear on the readout.
2. Press I SEND I . Then DTMF signaling will be
placed and the DTMF tone can be monitored
through the loudspeaker.
16
Press I FUNGI , then key .
Linking Mark “ = ” will be added at the end of the
number and I Link 1 | will appear.
L i n k 1
4 7
1 1 1 7 1 4 1 6
3
Recall your ID number. Press IRGLI
then [T].
1
1 1 1 1 6 1 7
4 8 5 2
Press 1 FUNGI, then key .
L i n
1 1 1 6 1 7 1 1
4
5
8
5. Recall or dial the phone number to be called.
Press [RCLl , then enter the memory address (01
through 50) to recall the phone number to be
called.
17
9
key 15
k
2
=
2
Page 10

1 1 1 2 1 3 1 4 1 5
6. Press
7. After you received an answer from the long dis
8. If your ID number is accepted, the long distance
I
SEND
I
. The
I
IN USE
as the call is placed. I Link 1 I will appear on the
readout.
i 1 1 7 1 4 1 6
tance service office, press
DTMF signal will be placed and the DTMF tone
of your ID number can be monitored through the
loudspeaker. I Link 2 I will appear on the readout.
service office will answer again, so press I SEND
Then the long distance call will be placed and the
DTMF tone can be monitored through the
loudspeaker.
I Link 3
1
will appear on the readout.
6 7 8 9
I
indicator will light
L 1
3 4 7 9
I
SEND
n
I
again. The
O
k
1
I .
SCRATCH-PAD DIALING
This feature permits you to enter a number to be
redialed (or store a number in memory ) while
engaged in a conversation.
SCRATCH-PAD DIALING
WITHOUT KEYING TONES
This feature permits you to activate scratch pad
memory without annoying key tones over the circuit.
1. Press I FUNGI , then key , then enter a phone
number. | Tone | will be displayed for 5 seconds.
The microphone circuit will remain active, but
the tones will not be heard.
2. If necessary, press [STOl , then enter the memory
address.
3. To exit the Scratch pad Mode, press |FUNGI ,then
key [§ again or turn the unit off.
The timers can also be cleared if necessary.
With beep tones you can be notified of the approxi
mate talk time (NAM Option) in approximately 60
second increments.
To Display the Talk Time of the Last Call
1. Press |RGL| , key then [T].
The talk time of the last call will be displayed on
the readout for 5 seconds.
While in a conversation, the talk time of a call in
progress will be displayed, and updated each sec
ond. The display format is as follows.
fO 1 m25| •••1 min. and 25 sec.
To Display the Cumulative Talk Time
1. Press |RGL| , key then .
The cumulative talk time will be displayed on the
readout in minute format for 5 seconds.
I 1 8ml “TSmin.
To Display the Number of Calls
1. Press |RGL| , key then .
The number of calls will be displayed on the
readout for 5 seconds. The display format is as
follows.
I 86c] •••Received or placed 86 calls
To Clear the Timer
GLR
Press
code.
2. Press |STO|, key then [Tj.
The timers will be cleared, and the count for the
cumulative talk time and the number of calls will
start from zero.
then enter the three-digit security1.
One Minute Beep (NAM Option)
During conversation, you can be notified of the
approximate talk time by tones for the first five
minutes (a short monotone signal will sound every
minute and a double beep tone will be heard after
approximately 5 minutes.)
CALL TIME DISPLAY
This feature automatically records the elapsed time
per conversation. The talk time of the last call,
cumulative talk time, and the number of calls can be
displayed on the readout.
18
A/B SYSTEM SELECTION
This feature permits you to select the system you
need to use. The system that you are registered with
is the preferred system, and your home system.
19
Page 11

Standard Mode
When you turn the unit on, the unit remembers the
last position of the A/B system selected, and will
start to scan the radio frequency channels of that
selection.
If you want to confirm the current mode, press
IFUNCI, key [O] then [4]. Status indicator shows
the current mode. To return the unit to the stan
dard mode, press [FUNCI, key then again.
Status indicator shows |STD|. The unit will scan
the preferred system channels.
If unable to find an acceptable preferred channel,
the unit switches to scan the non-preferred chan
nels.
2
.
Preferred System Only Mode
Press IFUNC | , key [O] then [T] . Status indicator
shows |PRF| . The unit will scan the preferred
system only and prevents switching over to the
non-preferred system.
3.
Non-preferred System Only Mode
Press IFUNCI , key [O] then . Status indicator
shows
preferred system only.
4.
Home Only Mode
Press I FUNC | , key [O] then [2] • Status indicator
shows I Home |. You can place or receive calls only
within your home area.
Noted): The |ROAM| indicator lights as follows.
Lights continuously;
Flashes;
Note(2): The |NO SVCl indicator flashes when the
unit is requesting service but not in the
requested service area.
key
N-PRF
1 . The unit will scan the non
When the unit is in the preferred system
in another city.
When the unit is in the non-preferred
system.
SYSTEM INHIBIT
(NAM OPTION)
This feature permits you to inhibit (by NAM Option)
cellular systems, or Roam Systems you do not want
to use, even when in that service area.
The |NO SVC1 indicator flashes, if your A/B switch is
selected to any system that is inhibited.
MULTIPLE CITY
REGISTRATION
Some cellular users find it beneficial to register their
phone in multiple cities, rather than rely on “roam”.
The multiple city registration feature permits you to
reprogram from the handset, the different phone
numbers for the cities in which you are registered.
Each programmed phone number will be designated
as your home system.
Press |CLR|, then enter the new system ID number (5
digits) followed by the corresponding phone number
(10 digits). Please include your area code.
You must register your unit with the carrier in order
to get both the system ID number and your phone
number.
Press I FUNC I,then key . Your new phone number
will be displayed on the readout. (Holding down [§ ,
to display your new system ID number.)
Note(l): System ID number and phone number can
not be programmed during a call.
Note(2): Calls are placed or received using only the
programmed phone number, in use at the
time of call.
RADIO FREQUENCY (RE)
CHANNEL INDICATOR
If necessary, you can see the RF channel status in
which your unit is operating.
1. Press iRCLl, key @ then SI •
The RF channel number, RSSI, SAT color code,
and transmitting power level will be displayed on
the readout. The display format is as follows:
1 2 3
c
lRhl8|7|
C123....
R187....
SO
P2
......
The display will remain on the readout until you
manually reset it by pressing any key.
RF channel number
RSSI value
.....
SAT color code
Transmitting power level
s 0
p
2
20
21
Page 12

AUTOMATIC
HORN ALERT
(NAM OPTION)
This feature, when wired to the vehicle, indicates the
incoming call by sounding the horn or by flashing the
lights. When on, the Automatic Horn Alert will
automatically set each time that the car ignition is
turned off.
1. Press IFUNCI. then key . I HORN
the display and the Automatic Horn Alert mode
will he on. Each time the ignition is turned off, this
feature will he set automatically.
2. When a call is received, the unit will either sound
the horn or flash the lights five times, depending
on how the horn alert wire has been connected to
the car.
3. This mode wilt be off in the following cases :
1) When iFUNCj and then key are pressed
again.
2) When the Automatic Calls In Absence Indica
tor mode is set.
4. This feature is deactivated in the following cases :
1) By turning the ignition to on or accessory
position.
2) When the safety timer (8 hours) expires.
Note(l); Deactivate this mode if it is not being used
as this feature remains activated even if
the power source is turned off.
Note(2): The power source is automatically turned
off to prevent the discharge of the car
battery after 8 hours.
I
will appear on
AUTOMATIC
CALLS IN ABSENCE
INDICATOR
This feature indicates the number of incoming calls
while you are out of the car. When automatic
Call-in-Absence is on, it will be activated when the
ignition is turned off.
1. Press I FUNC
the display. However, this mode is not activated
unless the ignition switch is turned off.
2. Turn the ignition switch off and leave the tele
phone switch on. If necessary, lock the unit.
I
. then key .
22
I
Call
I
will appear in
3. When calls are received, the unit will indicate
them by flashing [ CALL I and IXXj (XX being the
number of calls) alternately in the display.
4. This mode will be off in the following cases :
1) When iFUNCi and then key are pressed
again.
2) When the Automatic Horn Alert is set.
5. This feature is deactivated in the following cases :
1) By turning the ignition to on or accessory
position.
2) When the safety timer (8 hours) expires.
6. The
Note(l): Deactivate this mode if it is not being used
Note(2): The power source is automatically turned
I
CALL
I
and |XX| will continue flashing until
any key is pressed or the handset is lifted.
as this feature remains activated even if
the power source is turned off.
off to prevent the discharge of the car
battery after 8 hours.
FUNCTION REVIEW
This feature shows you which numbered keys to use
for different FUNC/RCL key functions.
To review the function menu:
Press
I
FUNC
I
for about one second.
Scroll the menu up or down, using the [#1 or
key respectively.
The display information will appear as follows.
DISPLAY
[Lock ]
[Horn ]
[Call ]
[A.Ans]
[HF ]
[Mute ]
[Tone ]
[ABsys]
[Timer ]
[RF CH]
[Light]
[Alert]
[Restr]
[ID 1
Note (1) : XYZ = Three-digit Security Code
Note (2) : <ID> = System ID number-F Own
[FUNC 1
[FUNC 2
[FUNC 3
[FUNC
[FUNC
[FUNC
[FUNC
[FUNC
[RCL ^1-3
[RCL ^ 4
[RCL ^ 5
[RCL ^ 6
[XYZ FUNC#
[<1D>FUNC
1-2
0
4 ] A/B System Selection
7 jCall Restricted Mode
6] Multiple City Registration
Phone Number
FUNCTION
]Lock
]Horn
iNumber of Calls in Absence
Indication
] Automatic Answerirg
] Hands-free Adjustment
]Mute
]DTMF Tone Mute
]Call Timer
]RF Channel Indication
] Backlighting Control
] Alert Volume Control
23
Page 13

IMPORTANT SAFETY
INFORMATION
Please read and follow these cautions carefully:
TURN OFF your unit in an explosive atmosphere
(near a fuel pump, blasting area, etc.).
DO NOT operate your unit when someone is within
two feet (0.6 meters)of your antenna.
DO NOT dial when your vehicle is moving in states
where this action is illegal (this is not a prudent
practice, even where it is legal).
DO NOT permit untrained personnel to operate the
unit.
¿S//Í//ÜÍ te/sp/ionss
36 MONTH LIMITED
WARRANTY
WARNING
The following offenses can be punished by fine,
imprisonment, or both;
• Using obscene, indecent or profane language.
• Using the unit to give off false distress calls.
• Wiretapping or otherwise intercepting a telephone
call unless that person has first obtained the con
sent of the parties participating in the call.
• Making anonymous calls to annoy, harass or
molest other people.
• Charging to an account without authorization to
avoid payment for service.
• Refusing to yield a party line when informed that it
is needed for an emergency call (It is also unlawful
to take over a party line by stating falsely that it is
needed for an emergency).
AUDIOVOX CORPORATION (the Company^
warrants to the original retail purchaser of this
Audiovox Cellular Telephone, that should this
product or any part thereof (except the items listed
below), under normal use and conditions, be proven
defective in material or workmanship within the first
thirty-six (36) month period from the date of
purchase, such defect(s) will be repaired or replaced
(with new or rebuilt parts) at the Company's option,
without charge for parts or labor directly related to
the defect(s).
The following items, if supplied, are similarly
warranted from the date of purchase only for the
periods indicated.
12 Months ; Keypad, handset cord, display panel,
hands-free-microphone, interconnect cable,
battery cable.
90 Days ; Retractable antenna, transportable
antenna, rechargeable battery pack, desk-top
charger, AC / DC adaptor, cigarette lighter
adaptor, carrying bag and bag hardware, wrist
strap.
To obtain repairs or replacement within the terms of
this warranty, the product should be delivered with
proof of warranty coverage, specification of defect(s),
transportation prepaid, to the Company at the
address shown below or an approved warranty
station.
For the nearest warranty station, please use the
exclusive TRAVELERS WARRANTY SERVICE.
Call toll free to (800) 645-4994 (in N. Y. State, (516)
231-6051) for reference to an Authorized Warranty
Station in your area.
24
Page 14

This Warranty does not apply to fuses, or costs
incurred tor removal, reinstallation, testing,
evaluation, or to any product or part there of which
has suffered through alteration, serial number
defacement, inproper installation, excessive
temperature or humidity, environmental conditions,
mishandling, misuse, neglect or accident. This
Warranty is not assignable or transferable.
THE EXTENT OF THE COMPANY'S LIABILITY
UNDER THIS WARRANTY IS LIMITED TO THE
REPAIR OR REPLACEMENT PROVIDED ABOVE
AND, IN NO EVENT, SHALL THE COMPANY'S
LIABILITY EXCEED THE PURCHASE PRICE PAID
BY PURCHASER FOR THE PRODUCT.
The Company disclaims liability for geographic
coverage, inadequate signal to the antenna or
antenna connector, communications range or
operation of the Cellular System as a whole.
ANY IMPLIED WARRANTIES, INCLUDING ANY
IMPLIED WARRANTY OF MERCHANTABILITY
SHALL BE LIMITED TO THE DURATION OF THIS
WRITTEN WARRANTY. ANY ACTION FOR
BREACH OF ANY WARRANTY HEREUNDER
INCLUDING ANY IMPLIED WARRANTY OF
MERCHANTABILITY, MUST BE BROUGHT WITHIN
A PERIOD OF 48 MONTHS FROM DATE OF
ORIGINAL PURCHASE.
IN NO CASE SHALL THE COMPANY BE LIABLE
FOR ANY CONSEQUENTIAL OR INCIDENTAL
DAMAGES FOR BREACH OF THIS OR ANY
OTHER WARRANTY, EXPRESS OR IMPLIED,
WHATSOEVER.
No person or representative is authorized to assume
for the company any liability other than expressed
herein in connection with the sale of this product.
Some states do not allow limitations on how long an
implied warranty lasts or the exclusion or limitation of
incidental or consequential damage so the above
limitation or exclusions may not apply to you. This
Warranty gives you specific legal rights, and you may
also have other rights which vary from state to state.
IN U. S. A : AUDIOVOX CORPORATION 150
Marcus Boulevard Hauppauge, New York 11788
(516) 231-7750
IN CANADA : AUDIOVOX CANADA LTD.
1070 Kamato Road, Unit 15
Mississauga, Ontario L4W2W5
(416) 629-1400
 Loading...